IBEX. User Guide. IBEX Wireless Binocular Indirect Ophthalmoscope
|
|
|
- Osborn Hood
- 6 years ago
- Views:
Transcription


1 User Guide Wireles


2 Wireless Introduction Congratulations on your new purchase and welcome to! We appreciate your patronage and the opportunity to exceed your expectations with outstanding products and services. As a valued customer, your experience with is our top priority, and we strive for a 100% customerr satisfaction rate. Your new Wireles arrives with a comprehensive 3-Year Warranty, should you have any questions or concerns, please do not hesitate to contact us. Product Registration If you purchased your product directly through, your product is already registered. If you purchased your product from one of our many Business Partners, please registerr your products. As part of our ongoing efforts to provide you with the best possible customer support and user experience, wee urge you to register your new product at It s fast & easy. Wireless LED Binocular Indirect s are serialized in order to track product versions and revision changes. The serial number may be required to complete any necessary services and or repairs. Registering your product serial number simply allows our support team to better understand the productt revisions in order to expedite your service. Before you begin using your new Wirelesss LED Binocular Indirect, please read, understandd and follow all safety instructions. This will insure safe operation, optimum performance and a longer service life for your instrument. Be sure to retain this manual for future reference. Warning and Information Symbols General Warning General Mandatory Action Hot Surface Read Operator s Manual Voltage Hazard Type B Applied Part Optical Radiation Notes European Certificate of Conformity Page 1
3 Wireles Table of Contents Introduction... 1 Product Registration... 1 Warning and Information Symbols... 1 Table of Contents... 2 Product Overview... 3 Indications for use... 3 Major Components... 3 Accessories... 4 Usage Getting Started... 5 Knowing the BIO... 5 Headband Adjustment... 5 Optical Tower Position Adjustment... 6 Pupillary Adjustment... 6 Illumination Control... 6 Small Pupil Convergence Control Lever... 7 Light Beam Angle Adjustment... 7 Filter Selector... 7 Aperture Selector... 8 Basic Instrument Operation... 8 Battery and Battery Charger... 8 Battery Charging Procedure... 9 Maintenance & Cleaning Routine maintenance General cleaning Tips for taking care of your optical parts Recommended Lens Cleaning Procedure Technical Specifications General Classifications Basic Troubleshooting Removing and replacing the battery Block Diagram Storage, Transportation & Environment Warranty Quality Systems Safety Instructions Safety Standards Standards Compliance Contact Information Page 2


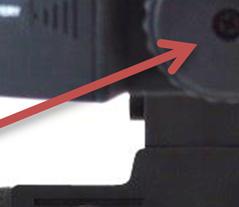


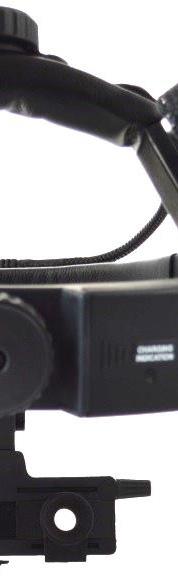


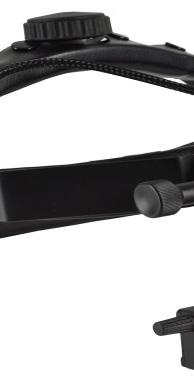


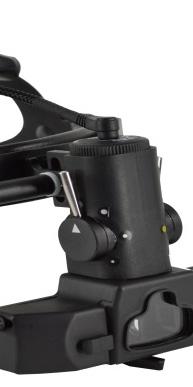


4 Wireless Product Overview Indications for use The Wireless LED Binocular Indirect is a special microscope that provides stereoscopic, wide-illuminationn options allow for visualization of the fundus regardless of high ametropia, hazy ocular media or central opacities. angled, high resolution views of the entire fundus and overlyingg vitreous. Its optical principles and Major Components Headband Sizing Knob (1) 2. On/Off + Light control knob 3. Illumination Tower 4. Convergencee control level 5. Mirror Adjustment 6. Color Filter Selector 7. Headbandd 8. Battery Charger Input 9. Illumination Tower Angle Knob 10. Apertures Selector 11. Headband Sizing Knob (2) 12. Battery Status Indication light 13. Mirror Angle Adjustment Bar 14. P.D. Control Slide Page 3


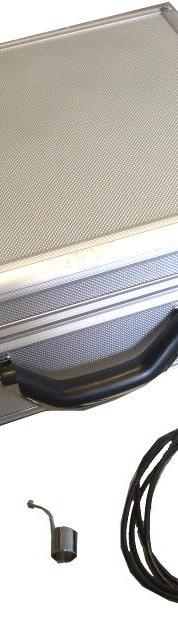


5 Wireless Accessories Carrying case USB Wall plug battery Charger 3. Scleral Depressor 4. Teaching mirror Page 4


6 Wireless Usage Getting Started Before use, the slit lamp should be allowed to adjust to the ambient room temperature for several hours. This is especially important when the unitt has been stored or transported in a cold environment. For best battery performance, remove the charging adapter from the unit after the charging period has completed. Do not store the unit with the charging adapter attached and plugged in. Each eyepiece and the PD must be individually adjusted for each examiner. Never attempt to connect or disconnect this instrument with wet or damp hands. Do not disconnect this instrument from the charger by pulling on the power cord. Grip and hold the connector firmly when disconnectin ng from the power source. LED fixtures can reach high temperatures during use allow ample time to cool before handling any potentially hot surface. Knowing the BIO Your BIO is fully charge from the factory. It is readyy to use Headband Adjustment Adjust the headband sizing knob (1) and (2), so thatt the instrument is supported comfortably around and on top of the head. Headband Sizing Knob (1) Headband Sizing Knob (2) Page 5


7 Wireless Optical Tower Position Adjustment For vertical angle alignment of the optical tower with respect too the eyepiece, adjust the angle by loosen the tension of the knob. Tighten the knob when in position. Illumination Tower Angle Knob Pupillary Adjustment Because the eyes are dissociated, particular care must be takenn to ensure the optics (eyepieces) are set properly in front of each eye. Always set the aperture selection to the large light patch for this exercise. Place an object, perhaps the thumb, approximately 40cm from the face and center it horizontally in the light patch. Then, close one eye. Using the thumb and forefinger of the opposite hand, slide the P.D. Control sliding knob of the open eye (located directly under each eyepiece) so that your object moves into the center of the field, keeping the object in the center of the light patch. Repeat for the other eye. Eye Piece P.D. Control Sliding Knob Illumination Control Illumination control knob is located at the side of the headband. This knob is also served as a unit On/Off switch. Illumination Control Knob Page 6


8 Wireless Small Pupil Convergence Control Lever With the adjustment of the control level, the optimize image depth perception and illumination can be achieved by one single movement. In general, for dilated pupil, move the control level underneath the instrument the instrument to the large circle. For small pupil, move the control level to the small circle. Convergence control level Light Beam Angle Adjustment The angle of the light beam can be adjusted by rotating the mirror angle adjustment bar clockwise or counterclockwise. Image location when turns the knob counterclockwise Center reference line Image location when turns the knob clockwise Mirror angle adjustment bar Filter Selector Various filters are available for the operator to choose during operation. It can be changed by moving the lever up and down. 1. Open 2. Red Free 3. Yellow 4. Cobalt Blue Page 7


9 Wireless Aperture Selector Various sizes of apertures are available for the operator to choose during operation. It can be changed byy moving the lever up and down. Aperture size Image working distance mm 3.2mm 2.2mm 1.2mm 75.0mm 55.0mm 40.0mm 22.0mm Basic Instrument Operation For the best result, observe with dilatedd pupils. Place the headset in place comfortably on the forehead and set the light intensity in the mid-range. With the +20D condensing lens, position the lens about 18 to 20 inchess in front of the patient s eye. Direct the light beam into the pupil, producing a completee red pupillary reflex. Then pull backward on the lens, maintaining the central position of the pupil reflex, until the entiree lens is filled with the fundus image. Fine tune the adjustment to createe a distortion-free image by tilting and changingg the vertex distance of the lens. Battery and Battery Charger Before using the charger, read all instructions and cautionary markings on the battery charger, batteries, and device. Always make sure that the unit is turned off. Rechargeable batteries can be recycled free of charge at any Rechargeable Recycling Corporation (RBRC) participating location. When battery status indication light turns red, the unit runs low on battery. It has less than 5 minutes of battery life remaining. Page 8


10 Wireless Battery Chargingg indicator light Micro USB charger and plug Battery Charging Procedure Never attempt to connect or disconnect this instrument with wet or damp hands. Do not disconnect this instrument from thee charger by pulling on the power cord. Grip and hold the connector firmly when disconnecting from the power source. To reduce the risk of injury, charge only manufacturer s specified batteries. Other type of batteries might burst, causing personal injury or damage to your charger. Although many adapters look similar, it s important to use only the adapter that came with your unit. Step 1: Insert the mini USB charger plug into the hole on thee right hand side of the unit. Plug the charger into a wall outlet. A RED light will illuminate when the unit is charging. Step 2: Let the battery recharge for 6 hours. Step 3: When the RED light turns Green, charging completed. For Best battery performance, remove the charging adapter from the unit after the charging period has completed. Step 4: The fully charged battery will last up to 18 hours under normal operation. Page 9


11 Wireless Maintenance & Cleaning Routine maintenance Never attempt to connect or disconnect this instrument with wet or damp hands. Do not disconnect this instrument by pulling on the power cord. Grip and hold the connector firmly when disconnecting from the power source. Before performing any maintenance or cleaning procedure, ensuree the dial knob switch iss set to the off position. LEDs have a life expectancy of 10,000+ hours and should not require changing by the user. We recommend turning off the device after each use to conserve energy and LED life. In the unlikely event of failure of the LED, please contact your representative for guidance. General cleaning Before any cleaning of the instrument or the base unit insure that the power cord is disconnected from the power source. To keep your BIO in optimumm condition, the BIO should be cleaned with a lightly damp lint free cloth whenever dust or dirt is detected. Do not use any form of chemical liquids and/or corrosive agents to clean the slit lamp. Tips for taking care of your optical parts Since oil and debris from your hands or from used lens tissue can stain or damage optical coatings, you should not touch any trans-missive or reflective surface of your optical system and never reuse a lens tissue. If it s not dirty, don t clean it! Handling optics increases their chances of getting dirty or damaged, so you should clean optics only when necessary. Inspect the eyepieces for dust and stains by holding it near a bright visible-light source. Viewing the optic at different angles allows you to see any scattering of dust and stains. Page 100
12 Wireles Recommended Lens Cleaning Technique and Procedure Step 1 - Remove dust Dusting is always the first step in cleaning your optics. Wiping a dusty optic is like cleaning it with sandpaper. So always dust with a canned air duster, soft optical brush or air blower before wiping any optic. If the dusted optic has no visible stains after you dust it, remember: If it s not dirty, don t clean it. If it s still not clean, proper use of solvents and lens tissue can often do the trick. Step 2 - Wiping the optic Remember always wipe slowly and clean the edges first. Blow off the dust before attempting to clean any optics. Place the brush on the optic surface, apply slight pressure and slowly wipe straight across, from one edge of the optic surface to the other. If the optic still appears dirty proceed to step 3. Step 3 - Use of solvents and lens tissue Glass-cleaning solvents will streak, and tissue paper or a t-shirt can scratch, so always clean optics with optical cleaning solution and a low-lint tissue manufactured for cleaning optics. Always use lens tissue with a solvent, because dry lens tissue may scratch optical surfaces. Cleaning the optic s edges before cleaning its faces prevents dirt from being drawn up onto the face. Wiping slowly allows the solvent to evaporate without streaking. Remember, slow and steady cleans the optic. Technical Specifications Optical System Power Supply Li-Polymer Battery Light Source Pupillary Distance Net Weight Aperture size Smallest pupil size Filters Battery Charging time Battery Usage time Stereoscopic I/P: 100V 240V AC 50Hz 60Hz, 180mA O/P: 5.7V DC / 700mA, Rechargeable. 3.7V DC, 1360mAh LED, 3.6V DC, 1W mm adjustable 500g 4.2mm, 3.2mm, 2.2mm, 1.2mm 2mm Red Free, Yellow, Cobalt Blue 4.5hrs. continuous maximum setting Page 11
13 Wireless General Classifications Mode of operation: Degree of mobility: Type of protection against: Degree of protection against: Protection against harmful ingress of water: Power of Requirements: Battery: Intermediate Portable Electrical Shock - Class I Electrical Shock - Type B IPX-0 Battery Charger: I/P: AC 110V AC / 220V AC, 50Hz / 60Hz; O/P: 12V DC, 500mAhh Rechargeable Li-Polymer, 3.7V 1360mAh Basic Troubleshooting If your does not function at all, check your battery level To help prevent the possibility of electrical shock always unplug the Battery charger before removing or placing the battery case. If the main illumination lamp does not light, check the followings: 1. Check the ON/OFF switch located on the front of the unit 2. Turn the intensity knob clockwise for brightness. 3. Check your status of the battery level. Due to the complicity design of the LED model. In the event of changing new LED fixture is necessary; an authorized Trevi Technology technician must perform the procedure. Please contact your dealer for further instruction. Page 122


14 Wireless Removing and replacing the battery Sliding Battery Cover Step 1: Slide the battery cover to the left. 2 Pin Battery Wire Step 2: Carefully lift out the battery pack and disconnect thee old battery wire terminal by pulling apart the wire terminal connectors. Then remove the battery pack. Step 3: Connect the new battery pack wire terminal connector to the unit. Step 4: Insert the cover into the battery pack grooves and slide the cover to the right. Block Diagram Main LED Intensity light controller with on/off switch Left side back pack Lithium Ion Battery Right side back pack Main PCB Wall plug power supply A/ /C power Page 133
15 Wireles Storage, Transportation & Environment Storage: Temperature -5 C to +50 C Air Pressure 35% to 95% Relative Humidity 700kPa to 1060kPa Transport: Temperature -40 C to +70 C Air Pressure 35% to 95% Relative Humidity 700kPa to 1060kPa Environment Condition of Use: Temperature 0 C to + 50 C Air Pressure 35% to 95% Relative Humidity 700kPa to 1060k Warranty Three-Year Comprehensive Warranty Wireless LED Binocular Indirect s are guaranteed for thirty-six months against faulty workmanship, materials or factory assembly. The Warranty is a Return-To-Base (RTB) Basis at the cost of the customer. All parts and services rendered are included at no additional cost to the customer and in most cases the work is completed within 2-3 working days. The LED illumination system is designed to operate with consistency for 10,000+ hours of continuous use and therefore is considered as a non-consumable item. In the unlikely event of an LED failure within or after the warranty period, please contact Trevi Technology, Inc. for a replacement. In case of any defect during warranty period, the concerned person / hospital / institution, shall immediately contact Trevi Technology. Trevi Technology will rectify the problem and replace any parts if necessary with no cost. The following terms and conditions apply during the warranty period. Page 14


 or flammable anesthetics are in use. Connect the equipment to properly powered outlets.")
16 Wireless Quality Systems Safety Instructions Read and follow the instructions, cautions and warnings before installing or using this instrument. The repair/service of this instrument will only be performed by a qualified technician authorized by Trevi Technology. Trevi Technology is responsible for the safety and performance of the equipment only if it is used in accordance with its intended use and the instructions given in the user guide. This instrument is designed to perform as per the declared indications for safe and reliablee service. Do not modify and/ /or repair this equipment without authorization of the manufacturer. The manufacturer declines any and all responsibility for loss and/or damages resulting from unauthorized repairs. Any repairs must only be performed by trained and authorized specialists. Check your Wireless LED Binocular Indirect periodically for any signs of damage or misuse. This device is intended to be used only by suitably trained and authorized healthcare professionals. Federal law restricts this device to sale by or on the order of a licensed physician. Never use this device in a potentially explosive environment where volatile solvents (alcohol, petrol, etc.) or flammable anesthetics are in use. Connect the equipment to properly powered outlets. The entire electrical system in the room or building where your slit lamp is located should conform to IEC and/or local government regulations. Disconnect the equipment from AC power before servicing and/or cleaning. Never touch the cable and main power supply system with wet or damp hands. Before any cleaning of the instrument or the base unit insure that the power lead is disconnected. LED fixtures can reach high temperatures during use allow ample time to cool before handling any potentially hot surface. Page 155


17 Wireless Safety Standards The FDA and CE marks on the Wireless LED Binocular Indirect indicates that it has beenn tested to meet and/or exceed the U.S. Department of Health and Human Services, Food and Drug Administration Guidance for Slit Lamp Optical Equivalency and Radiation Safety, International Standards within the 93/42/EEC Medical Device Directive and Electrical Safety. The optical radiation emissions from the slitt lamp do not exceed the Threshold Limit Values (TLVs) for optical radiation, as established by the American Conference of Governmental Industrial Hygienists (ACGIH)) under worst case clinical exposure conditions and times for ultraviolet and infrared radiation, and visible and near infrared radiation including blue light and aphakic hazards. It is recommended that the intensity of the light directed into the patient s eye be limited to the minimum levell necessary for diagnosis. Wireless LED Binocular Indirect s are equipped with protective filters that eliminate UV radiation and short wavelength blue light. Children, infants, aphakes and any person with diseased eyes may be at greater risk. The risk may also be increased if the person being examined has had any exposure with the same instrument or any other ophthalmic instrument using a visible light source during the previous 24 hours. This will apply particularly if the eye has been exposed to retinal photography. The Wireless LED Binocular Indirect is manufactured under strict quality manufacturing systems and certifications as established by ISO 9001:2008 and ISO 13485:2012. These systemss encompass materials, processes, assembly and packaging. Standards Compliance Wireless LED Binocular Indirect development, production, testing, set-up, maintenance and repair is compatible with IEC (electrical safety), IEC (electromagnetic compatibility), EN ISO (optical radiation safety). In addition, Wireless LED Binocular Indirect s are compliant with the Directive 93/42/EEC as confirmed by the CE marking. This device meets all the requirements for electromagnetic compatibility according to IEC This device is built so that the generation and emission of electromagnetic interference is limited to the extent thatt other devices are not disturbed in their use in accordance with the regulation and so that the slit lamp itself has appropriate immunity to electromagnetic interference. This device is designed to comply with the following safety aspects. Leakage current is less than 0.5mA in normal condition. Leakage current is less than 1.0mA in a single fault condition. Isolation voltage between ground and main wires is greater than 1500V. Page 166
18 Wireles Contact Information If for some reason your, Wireless LED Binocular Indirect does not perform properly or you incur a problem with the instrument: a. Consult the applicable section of this manual. b. Check: c. info@ibexeye.com Attn: Engineering Department d. Call: Ask for the Engineering Department Trevi Technology, Inc Dublin Rd. Columbus, OH Page 17
Cleaning Instructions for Symbol IP54 Devices
 Cleaning Instructions for Symbol IP54 Devices Purpose: The purpose of this document is to demonstrate the proper methods and solutions to clean Symbol mobile computer IP54 devices as well as their respective
Table of Contents. English
 OM-E0799E 000 English Thank you for purchasing VIVA ace Motor Kit. Please read this Operation Manual and the VIVA ace Basic Set Operation Manual carefully before use for operating instructions and care
Operating Microscope Adapter. Operator Manual
 Operating Microscope Adapter Operator Manual Operating Microscope Adapter Operator Manual 13106-EN Rev D 2013-05 2013 by IRIDEX Corporation. All rights reserved. IRIDEX, the IRIDEX logo, IRIS Medical,
OWNERS MANUAL OPERATION GUIDE
 OWNERS MANUAL OPERATION GUIDE Built in Redmond Oregon USA www.laserlinemfg.com P/N 1700-0041 REV. 7.24.17 PRODUCT OVERVIEW The GL1700 Laser Guide was designed from the ground up to provide precise start-stop
SYNRAD Laser Safety 101
 SYNRAD Laser Safety 101 Version 2.1 Released June 2018 SYNRAD is a registered trademark of Novanta Corporation. Novanta Corporation 2018. All Rights Reserved. No reproduction without written authorization.
HXL. Operating instructions
 HXL Operating instructions EN SCOPE OF DELIVERY FOR HXL: 1. HXL line laser 2. Battery adapter BA 3. AA batteries 4. Case 5. Magnetic holder MAH 6. Quick start guide 4 HXL 1. Laser beam output aperture
FATG OM 0604 OWNERS MANUAL. Anywhere. Everywhere. Fresh Air... To Go.
 62-000110-001 FATG OM 0604 Anywhere. Everywhere. Fresh Air... To Go. OWNERS MANUAL Contents Specifications...............................................2 Control Pad Layout..........................................2
Dahua HD Mini IR Waterproof Bullet Network Camera. Quick Start Guide
 Dahua HD Mini IR Waterproof Bullet Network Camera Quick Start Guide Version 1.0.0 Zhejiang Dahua Vision Technology Co., LTD Welcome Thank you for purchasing our Network camera! This user s manual is designed
5580 S. Nogales Highway Tucson, AZ Phone: (800) Fax: (520) ANAPOD Instructions For Use
 Fax: (520) ANAPOD Instructions For Use") 5580 S. Nogales Highway Tucson, AZ 85706 Phone: (800) 975-7987 Fax: (520) 294-6061 www.westmedinc.com TM ANAPOD Instructions For Use PN 75054, Rev 02 ii TABLE OF CONTENTS Servicing: Beyond the replacement
5580 S. Nogales Highway Tucson, AZ 85706 Phone: (800) 975-7987 Fax: (520) 294-6061 www.westmedinc.com TM ANAPOD Instructions For Use PN 75054, Rev 02 ii TABLE OF CONTENTS Servicing: Beyond the replacement
Instruction Manual. Self-Leveling Rotary Laser Level Model No &
 3180H_Manuals 2/12/10 11:12 AM Page 1 Self-Leveling Rotary Laser Level Model No. 40-6527 & 40-6532 Instruction Manual Congratulations on your choice of this Self-Leveling Rotary Laser Level. We suggest
MaxiCompressor. Limited Warranty. High Performance 50 PSI Compressor 501-S
 Limited Warranty Global Medical Holdings (GMH) warrants the MaxiCompressor for 1 year from the date of purchase due to faulty parts or workmanship. This warranty is limited to the original purchaser of
User Guide. Luxxor. 35 LED Light Source Fax: Tremont Street, Rochester, New York gradientlens.
 User Guide Luxxor 35 LED Light Source 207 Tremont Street, Rochester, New York 14608 800.536.0790 Fax: 585.235.6645 REV. 0116 gradientlens.com warnings & cautions Warnings & Cautions PORTABLE CAMERA Luxxor
CONGRATULATIONS. on your purchase of a Viridian Reactor, the most advanced sighting device available. Technology on your new Reactor
 REACTOR MANUAL CONGRATULATIONS on your purchase of a Viridian Reactor, the most advanced sighting device available. DO NOT RETURN THIS PRODUCT TO THE STORE! If you experience any problems with your product
Instruction Manual. Self-Leveling Laser Level Model No
 Self-Leveling Laser Level Model No. 40-0912 Instruction Manual Congratulations on your choice of this Self-Leveling Laser Level. We suggest you read this instruction manual thoroughly before using the
Bar Fridge USER MANUAL MB46W
 Bar Fridge USER MANUAL MB46W CONTENTS Safety information... 2-3 Identifying parts of the fridge... 4 Transporting... 5 Installation... 5 Reversing the door... 6 Operating instructions... 7 Cleaning &
Infrared Thermometer
 572-2 Infrared Thermometer PN 4307046 March 2013, Rev. 1, 08/13 2013 Fluke Corporation. All rights reserved. Specifications are subject to change without notice. All product names are trademarks of their
SAD Light Pad. Product Code: DL Unit Description
 SAD Light Pad Product Code: DL08127 Unit Description 1. Light screen 2. On/off button 3. Stand hole 4. Stand 5. Socket for appliance plug 6. Stand storage cavity Technical specification Dimensions (WHD)
User Manual. Non-contact Infrared Thermometer.
 User Manual Non-contact Infrared Thermometer www.paryvara.com info@paryvara.com Introduction Thank you for purchasing this Non-contact Infrared Thermometer. Please read the User Manual carefully to ensure
Tower Fan NSTF-06MI IMPORTANT! KEEP FOR FUTURE REFERENCE. Instruction Manual. Please register your product on-line at
 Instruction Manual Tower Fan NSTF-06MI Please register your product on-line at www.nscessity.co.uk www.nscessity.co.uk IMPORTANT! KEEP FOR FUTURE REFERENCE NSTF-06MI Instruction 8pp 23.5.indd 2 24/5/10
Instruction Manual. Head & Eye Massager with Acupressure and Heat Compression.
 Instruction Manual Head & Eye Massager with Acupressure and Heat Compression www.pure-therapy.com 1 WARNING: To reduce the risk of burns, fire, electric shock or injury to persons: Read the entire manual
OWNERS MANUAL. Installation. Operation. Specifications. Features. Maintenance. Warranty REV 0905 FAOM15_0905
 OWNERS MANUAL Installation Operation Specifications Features Maintenance Warranty 65-00087-008 REV 0905 FAOM15_0905 INTRODUCTION CONTENTS INSPECTION & INSTALLATION OPERATION Congratulations, you have purchased
MT4 MAX/MT4 MAX + Infrared Thermometer
 MT4 MAX/MT4 MAX + Infrared Thermometer Users Manual PN 4326561 August 2013 2013 Fluke Corporation. All rights reserved. Specifications are subject to change without notice. All product names are trademarks
HEDMAN The HEDMAN Company 189 Gordon St. Elk Grove Village, IL
 HEDMAN The HEDMAN Company 189 Gordon St. Elk Grove Village, IL 60007 800-872-2788 NOTICE Proprietary Information - this material is not to be reproduced by any means or disclosed in any way without prior
Design Manual Installation Operation Maintenance
 Design Manual Installation Operation Maintenance Model FT194 UV/IR Portable Flame Detector Test Lamp 23282 Mill Creek Drive, Suite 215 Laguna Hills, CA 92653 USA +1.949.583.1857 Phone +1.949.340.3343 Fax
KB 5. OPERATOR MANUAL Cordless Sweeper...2 MANUAL DE USUARIO Barredora inalámbrica...12 MANUEL D UTILISATION Balayeuse sans fil
 KB 5 OPERATOR MANUAL Cordless Sweeper..............2 MANUAL DE USUARIO Barredora inalámbrica.........12 MANUEL D UTILISATION Balayeuse sans fil............24 59682240 2018.07 CORDLESS SWEEPER OPERATOR
Instruction Manual. Self-Leveling Rotary Laser Level Model Nos and
 Self-Leveling Rotary Laser Level Model Nos. 40-6515 and 40-6516 Instruction Manual Congratulations on your choice of this Self-Leveling Rotary Laser Level. We suggest you read this instruction manual thoroughly
Instruction Manual. Self-Leveling Combination Cross-Line Laser and Five-Beam Laser Dot Model No &
 6339H_Manuals 10/24/12 12:56 PM Page 1 Self-Leveling Combination Cross-Line Laser and Five-Beam Laser Dot Model No. 40-6685 & 40-6687 Instruction Manual Congratulations on your choice of this Self-Leveling
CLETEF-786. Infrared Thermometer Instruction Manual
 CLETEF-786 0482 Infrared Thermometer Instruction Manual Introduction Thank you for choosing the Clever Choice Duo TM Ear & Forehead Thermometer, by Simple Diagnostics. The infrared thermometer CLETEF-786
ULTRASONIC HUMIDIFIER
 To Buy: Visit www.sylvane.com or call (800) 934-9194 For Product Support: Contact Sunpentown at 1-800-330-0388 ULTRASONIC HUMIDIFIER [ADORABLE MONKEY] To prolong the life of this humidifier, using distilled
HDAVS ICR IR Water proof Dome Camera User s Manual
 HDAVS ICR IR Water proof Dome Camera User s Manual Version 1.0.0 Table of Contents 1 General Introduction... 1 1.1 Overview... 1 1.2 Features... 1 2 Device Framework... 2 3 Installation... 3 4 Menu...
Parts and Service Manual BURNISHER MODEL: MR , MR , MR , MR
 Parts and Service Manual BURNISHER MODEL: MR2000-115, MR1500-115, MR2000-220, MR1500-220 TABLE OF CONTENTS RECEIVING YOUR EQUIPMENT... 3 WARNINGS AND SAFETY... 3 ELECTRICAL INFORMATION... 4 GROUNDING INSTRUCTIONS...
MODEL 7000 SUCTION UNIT
 MODEL 7000 SUCTION UNIT OPERATOR S MANUAL Caution Federal law restricts this device to sale by or on order of a physician, or any other practitioner licensed by the law of the State in which he practices
Infrared Thermometer. Getting Started
 572-2 Infrared Thermometer Getting Started PN 4307046 March 2013 2013 Fluke Corporation. All rights reserved. Specifications are subject to change without notice. All product names are trademarks of their
SAD Day Light. Product Code: DL Unit Description
 SAD Day Light Product Code: DL08128 Unit Description 1. Switch 2. Cover 3. Plug 4. Mounting hole 5. Fold-out Stand 6. Lamp tube clip 7. 45W lamp tube NOTE: Plug power lead into mains. Technical specification
Koolbreeze. Portable Air-conditioner User s Manual. For Model : CLIMATEASY 14 P14HCP. Downloaded from manuals search engine
 Koolbreeze Portable Air-conditioner User s Manual For Model : CLIMATEASY 14 P14HCP Table of Contents 1. Installation.. 2 2. General Safety Reqirements.. 4 3. Product safety.... 5 4. Safety Awareness....
AlcoBlow. User Handbook
 AlcoBlow User Handbook RM42053 Revision 2.3 June 2013 Unit and Controls 1 ON/OFF Switch 2 STATUS Light 3 Sample Cone 4 PASSIVE Switch 5 DISPLAY Light 6 Battery Cap 2 Contents 1 SAFETY INFORMATION 5 2 USEFUL
User Manual. 40 Tower Fan MODEL: WFTR40W
 User Manual 40 Tower Fan MODEL: WFTR40W 1. READ these instructions carefully before installing and operating the appliance. Keep them for further reference. 2. Record in the space below the SERIAL/MODEL
D-TEK Select. Refrigerant Leak Detector
 O P E R A T I N G M A N U A L D-TEK Select Refrigerant Leak Detector DECLARATION OF CONFORMITY This is to certify that this equipment, designed and manufactured by INFICON Inc., Two Technology Place, East
Color Mark Sensor. Sensing gdsa distance Spot diameter e. Possible to switch between vertical or horizontal connection using the M12 rotary connector.
 Color Mark Sensor Detects laminated or light-dispersing objects in stable operation without being influenced by mirror reflection. Double indication of the detection level and threshold level allows easy
650/1000 Antihalo 650/1000 Fresnel 650/1000 PC 300/500 Antihalo 300/500 Fresnel. User manual. theatre spotlight
 650/1000 Antihalo 650/1000 Fresnel 650/1000 PC 300/500 Antihalo 300/500 Fresnel User manual Musikhaus Thomann Thomann GmbH Hans-Thomann-Straße 1 96138 Burgebrach Germany Telephone: +49 (0) 9546 9223-0
G-10s. Instruction Manual. G-Series Cooler UPRIGHT COOLER. Part No.11IPA
 G-Series Cooler UPRIGHT COOLER Part No.11IPA-062800 Instruction Manual FOR YOUR FUTURE REFERENCE Thank you for using our product. This manual will guide you in getting the best use of your cooler. Remember
PURPOSE OF THE PROCEDURE
 Title: Non-Ionizing Radiation Procedure Effective Date: November 2005 Revision Date: January 13, 2017 Issuing Authority: Responsible Officer: VP, Facilities and Construction Management Director Environmental
LED Colour Flood 10W / 30W RGB LED floodlight. user manual
 LED Colour Flood 10W / 30W RGB LED floodlight user manual Musikhaus Thomann Thomann GmbH Hans-Thomann-Straße 1 96138 Burgebrach Germany Telephone: +49 (0) 9546 9223-0 E-mail: info@thomann.de Internet:
OPERATIONS MANUAL. Hotplate Stirrer/Hotplate/Magnetic Stirrer Model HTS-1003/HTP-1002/MGS Certified
 OPERATIONS MANUAL Hotplate Stirrer/Hotplate/Magnetic Stirrer Model HTS-1003/HTP-1002/MGS-1001 Certified Contents 1. Safety 3 2. Introduction 7 3. Package Contents 7 4. Specifications 7 5. Features 8 6.
G-7s. Instruction Manual. G-Series Cooler COUNTERTOP COOLER. Part No.11IPA
 G-Series Cooler COUNTERTOP COOLER Part No.11IPA-061000 Instruction Manual FOR YOUR FUTURE REFERENCE This easy-to-use manual will guide you in getting the best use of your cooler. Remember to record the
BOLT ION 2-IN-1 CORDLESS VACUUM USER GUIDE REMANUFACTURED 1312R. For How-To videos, go to
 For How-To videos, go to Sections marked with this video icon have more information online. BOLT ION 2-IN-1 CORDLESS VACUUM USER GUIDE REMANUFACTURED 1312R IMPORTANT SAFETY INSTRUCTIONS READ ALL INSTRUCTIONS
Local Air Conditioner
 Local Air Conditioner Thank you for selecting this air-conditioner. Please keep this User s Manual for future reference. Read the User s Manual carefully before operating this unit. IMPORTANT SAFEGUARDS
RLD-H10P Refrigerant Leak Detector
 FANs 125, 121 Product/Technical Bulletin RLD-H10P Issue Date 0396 RLD-H10P Refrigerant Leak Detector The RLD-H10P is a professional grade leak detector for use by refrigeration and air conditioning technicians.
Kinsa Smart Ear ThermometerTM Instructions For Use
 ENGLISH Kinsa Smart Ear ThermometerTM Instructions For Use Thank you for purchasing the Kinsa Smart Ear Thermometer, a professionally accurate instrument for fast and easy temperature taking in the ear.
62 MAX/62 MAX + Infrared Thermometer
 62 MAX/62 MAX + Infrared Thermometer Users Manual Test Equipment Depot - 800.517.8431-99 Washington Street Melrose, MA 02176 TestEquipmentDepot.com PN 4060712 April 2012 2012 Fluke Corporation. All rights
PLX. Operating instructions
 PLX Operating instructions EN 2.. PXL 5 4 2 2 3 4 0. SCOPE OF DELIVERY PXL BASIC. Line/Point Laser PXL 2. Battery adapter BA 3. Mignon batteries (AA) 4. Drywall adapter TBA 5. Case 6. Quick start guide
ASPIRE Laboratory Aspirator
 ASPIRE Laboratory Aspirator USER MANUAL Rev 2/14/18 Accuris Instruments / Benchmark Scientific Ph: (908) 769-5555 E-mail: info@accuris-usa.com (C) Benchmark Scientific, 2018 THE ACCURIS ASPIRE LABORATORY
Ionizer (Static Remover) STABLO-EX Instruction Manual
 STABLO-EX Instruction Manual") 321-56879-21E Jan. 2009 For Electronic Balances Ionizer (Static Remover) STABLO-EX Instruction Manual Read the instruction manual thoroughly before you use the product. Retain this instruction manual for
321-56879-21E Jan. 2009 For Electronic Balances Ionizer (Static Remover) STABLO-EX Instruction Manual Read the instruction manual thoroughly before you use the product. Retain this instruction manual for
3KW ELECTRIC FAN HEATER
 3KW ELECTRIC FAN HEATER MODEL NO: DEVIL 7003 PART NO: 6935452 OPERATION & MAINTENANCE INSTRUCTIONS LS0615 INTRODUCTION Thank you for purchasing this CLARKE product. Before attempting to use this product,
150 Watt Explosion Proof LED Light - 5' Tall Base Stand Mount - 24 Inch Stand - Class I Div 1 C&D
 150 Watt Explosion Proof LED Light - 5' Tall Base Stand Mount - 24 Inch Stand - Class I Div 1 C&D Part #: EPL-24BS-5FT-1X150LED-100 Page: 1 Made in Texas The EPL-24BS-5FT-1X150LED-100 Explosion Proof LED
PRELUDE. User Manual. PA3500 Mattress Overlay System. Guarantees and Warranty. 1.1 General Information 1.2 Intended Use. 3.1 Unpacking 3.
 1. Introduction 4 1.1 General Information 1.2 Intended Use PRELUDE 2. Product Description 4 3. Installation 4 3.1 Unpacking 3.2 Setting Up PA3500 Mattress Overlay System 4. Operation 5 4.1 Function Description
Class 1 laser beam sensor safe for your eyes
 113 Sensor SERIES Related Information General terms and conditions... F-7 About laser beam... P.199~ Sensor selection guide... P.1~ General precautions... P.11 PHOTO PHOTO PARTICUR MEASURE ITY panasonic.net/id/pidsx/global
MODEL MR-720 FUNCTIONS AND CONTROLS SELF-POWERED AM/FM WEATHER BAND CLOCK RADIO
 FUNCTIONS AND CONTROLS MODEL MR-720 SELF-POWERED AM/FM WEATHER BAND CLOCK RADIO Please read this Instruction Manual carefully before using the unit and retain it for future reference 1. BAND SELECT SWITCH
RECHARGEABLE CLIPPER LI ION RECHARGEABLE CLIPPER INSTRUCTIONS
 LI ION RECHARGEABLE CLIPPER INSTRUCTIONS 1 Please read all instructions carefully to familiarise yourself with your new clipper before using. Save these instructions for further reference. For any further
HDCVI PIR Camera User s Manual
 HDCVI PIR Camera User s Manual Version 1.0.1 Table of Contents 1 General Introduction... 1 1.1 Overview... 1 1.2 Features... 1 2 Device Framework... 2 3 Detection Range... 4 4 Device Installation... 5
Operator's Manual. LIGHTNING 2 Laser Detector
 Operator's Manual LIGHTNING 2 Laser Detector Thank you for purchasing an Apache Technologies, Inc. product. Your LIGHTNING 2 Laser Detector is a premium quality tool that has been designed and manufactured
User Guide. Portable banknote counter AB300
 User Guide Portable banknote counter AB300 Thank you for purchasing this AccuBANKER product. We recommend reading all information in the user guide to become familiar with this product. AccuBANKER and
Black Body Calibration Source User Manual
 Black Body Calibration Source Surface Plate Type with External Controller Model CBB18GC- 2 WD1069 Rev B 10/23/17 Wahl Instruments Inc. 234 Old Weaverville Road Asheville, NC 28804 Toll Free: 800-421-2853
Suits all KPF849 models
 Kambrook - Australia Ground Floor, Suite 2, 170-180 Bourke Rd Alexandria NSW 2015, Australia Locked Bag 2000 Botany NSW 1455 Customer Service Line 1300 139 798 Customer Service Fax 1800 621 337 www.kambrook.com.au
ACTIV8 ONE OFF. 1 Tips USER S GUIDE COMBINED RADAR OPENING AND ACTIVE INFRARED SAFETY SENSOR. 1 Description. 2 Symbols.
 ACTIV8 ONE OFF USER S GUIDE COMBINED RADAR OPENING AND ACTIVE INFRARED SAFETY SENSOR 1 Description Cover 2 nd Radar Antenna Radar motion sensor Push-Buttons IR-Presence sensor Radar Antenna clip IR-Prism
E3M-V. Mark Sensor. Applications
 Mark Sensor Detects laminated or light-dispersing objects in stable operation without being influenced by mirror reflection. Double indication of the detection level and threshold level allows easy grasp
Please Keep This Manual For Future Reference REV.01
 ELCG347 ELCG240 1-855-571-1044 Please Keep This Manual For Future Reference REV.01 IMPORTANT INFORMATION When using electrical appliances, basic precautions should always be followed to reduce the risk
AirFloss Ultra. 5_020_4312_1_DFU-Luxury_A6_v5.indd 1 01/12/15 14:17
 AirFloss Ultra 5_020_4312_1_DFU-Luxury_A6_v5.indd 1 01/12/15 14:17 5_020_4312_1_DFU-Luxury_A6_v5.indd 2 01/12/15 14:17 1 1 ENGLISH 4 Philips Sonicare AirFloss Ultra 5_020_4312_1_DFU-Luxury_A6_v5.indd 3
2 IN 1 CORDLESS VACUUM
 2 IN 1 CORDLESS VACUUM MODEL: PLA1452 Instruction Manual Due to ongoing product improvements, specifications and accessories may change without notice. Actual product may differ slightly to that depicted.
ENGLISH Par W COB UV
 MANUAL ENGLISH Par 64 100W COB UV V1 Highlite International B.V. Vestastraat 2 6468 EX Kerkrade the Netherlands Table of contents Warning... 2 Safety Instructions... 2 Operating Determinations... 4 Rigging...
TAW H1 D. Instruction manual. /Model. Electric air washer.
 Instruction manual Electric air washer wwwtimberkcom wwwtimberkru Model TAW H D Outlook of devices aslo colour scores can be revised without any special advance notices ENGLISH DEAR CUSTOMER Thank you
Owner s Manual & Safety Instructions
 Owner s Manual & Safety Instructions Save This Manual Keep this manual for the safety warnings and precautions, assembly, operating, inspection, maintenance and cleaning procedures. Write the product s
T R A N S F O R M I N G T E C H N O L O G I E S, L L C O U T S T A N D I N G A L T E R N A T I V E S I N S T A T I C C O N T R O L
 T R A N S F O R M I N G T E C H N O L O G I E S, L L C O U T S T A N D I N G A L T E R N A T I V E S I N S T A T I C C O N T R O L BFN 801 Ionizing Blowers Instruction Manual Contents BFN 801 Description
Read through the instructions carefully before using the appliance for the first time. Safeguard them for future reference.
 Table of Contents Important Safeguards... 2 Additional Caution for Blower... 2 Parts... 3 Installing Charger Base... 4 Charging the Battery... 4 Important Note for Charging... 5 Indication Lights... 5
WARNING: Warns of health hazards and identifies possible risks of injury. CAUTION: Indicates possible dangers to the machine or other objects.
 VBT3ASV USER GUIDE SAFETY INFORMATION About this user guide Read this user guide completely before using the machine. Keep this user guide for reference. If you pass your machine on to third parties, it
DV7215EL DV1015EL DV1415EL DV1815EL.
 www.blackanddecker.co.uk DV7215EL DV1015EL DV1415EL DV1815EL A B E C D E 2 F G H I J 3 ENGLISH (Original instructions) Intended use Your Black & Decker Dustbuster handheld vacuum cleaner has been designed
Dual Channels - TENS Electronic Pulse Massager Unit Model No.: MT-5180
 Please carefully read through this manual before first use, and store it in safe place. If you pass the product to another person, hand over this manual along with it! EXPLANATION SYMBOLS DANGER: Warning
IMPORTANT INSTRUCTIONS OPERATING MANUAL
 IMPORTANT INSTRUCTIONS OPERATING MANUAL ESP AIR PURIFIER with UV GERMICIDAL LAMP and NEGATIVE ION Model No.: 9079E READ AND SAVE THESE IMPORTANT INSTRUCTIONS When using electrical appliances, basic precautions
ST E /ST E / ST E / ST E ST E / ST E / ST E
 ST-5-3-E /ST-5-4-E / ST-53-3-E / ST-53-4-E ST-533-40-E / ST-55-40-E / ST-59-40-E Turbo Electric Heater 800083-4 ENGLISH...-0 Read The Instruction manual: When this symbol is marked on a product, it means
40cm Pedestal Fan with Remote Control
 Instruction Manual 40cm Pedestal Fan with Remote Control Model: HF40BRG READ AND SAVE THESE INSTRUCTIONS Please read and follow the instructions in this user manual even if you feel you are familiar with
Mobile Air Conditioner Instruction Manual Model TC-N9KM
 Mobile Air Conditioner Instruction Manual Model TC-N9KM Please read and retain these instructions for future reference SPECIFICATION Model no. Cooling capacity Power/Ampere consumption for cooling* Air
CORDLESS HAND VACUUM USER GUIDE BOLT 1316 SERIES
 BOLT CORDLESS HAND VACUUM USER GUIDE 1316 SERIES IMPORTANT SAFETY INSTRUCTIONS READ ALL INSTRUCTIONS BEFORE USING YOUR HAND VACUUM. Always connect to a polarized outlet (one slot is wider than the other)
Juicer User Manual BKK 2144 BKK 2144 Y
 Juicer User Manual BKK 2144 BKK 2144 Y Please read this user manual first! Dear Customer, Thank you for prefering a Beko product. We hope that you get the best results from your product which has been
9780 SW Freeman Dr. Wilsonville, OR USA Tel: Fax: crimsontrace.com Rev002 12/15
 9780 SW Freeman Dr. Wilsonville, OR 97070 USA Tel: 800-442-2406 Fax: 503-783-5334 crimsontrace.com 27-1499 Rev002 12/15 MVF-515 MODULAR VERTICAL FOREGRIP INTEGRATED LASER/LIGHT USER S MANUAL FOR RED &
Class 1 laser beam sensor safe for your eyes
 13 Sensor SERIES Related Information General terms and conditions... F-17 About laser beam... P.13~ Sensor selection guide... P.967~ General precautions... P.1 PHOTO PHOTO Conforming to EMC Directive Conforming
62 MAX/62 MAX + Infrared Thermometer. Users Manual
 Infrared Thermometer Introduction The Fluke 62 MAX and 62 MAX + Infrared Thermometers (the Product) can determine the surface temperature by measuring the amount of infrared energy radiated by the target
FD 430 Envelope Sealer
 FD 430 Envelope Sealer 1/2018 OPERATOR, MAINTENANCE, & PARTS MANUAL REV. 1 2 CONTENTS 1 SAFETY INSTRUCTIONS... 5 1.1 Symbols and reference key... 5 1.2 Basic safety precautions... 6 1.3 Safety advice...
USER MANUAL. PEDESTAL FAN (16 Inch)
") USER MANUAL PEDESTAL FAN (16 Inch) ACFP1016 Hydrofarm.com TABLE OF CONTENTS OVERVIEW 2 PARTS LIST - (WHAT S IN THE BOX) 3 IMPORTANT SAFEGUARDS 4 ASSEMBLY INSTRUCTIONS 4 ASSEMBLY 4 ELECTRIC SCHEMATIC DIAGRAM
USER MANUAL PEDESTAL FAN (16 Inch) ACFP1016 Hydrofarm.com TABLE OF CONTENTS OVERVIEW 2 PARTS LIST - (WHAT S IN THE BOX) 3 IMPORTANT SAFEGUARDS 4 ASSEMBLY INSTRUCTIONS 4 ASSEMBLY 4 ELECTRIC SCHEMATIC DIAGRAM
16 Stand Fan with Remote Control Model No: FS3-40R-30
 16 Stand Fan with Remote Control Model No: FS3-40R-30 FEATURES Remote Control 3 Speed Settings 4 Hour Auto-off Timer Oscillation LED Display Panel Adjustable Height Adjustable Tilt Head Whisper Quiet Operation
LED CEILING LIGHT WITH MOTION SENSOR AND REMOTE. ITM. / ART Model: LM56123 CARE & USE INSTRUCTIONS
 LED CEILING LIGHT WITH MOTION SENSOR AND REMOTE ITM. / ART. 1165831 Model: LM56123 CARE & USE INSTRUCTIONS IMPORTANT, RETAIN FOR FUTURE REFERENCE: READ CAREFULLY For assistance with assembly or installation,
TOWER AIR PURIFIER FOR THE FOLLOWING MODEL : EE-5068
 TOWER AIR PURIFIER FOR THE FOLLOWING MODEL : EE-5068 If you have any questions about the operation of your purifier, please contact Crane Customer Care. Toll Free: 888-599-0992 Email: customer-service@crane-usa.com
WET/DRY VACUUM. QUEST for Continuous Improvement Windsor s Quality Management System is Certified ISO MODEL: T1. Operating Instructions (ENG)
") WET/DRY VACUUM Operating Instructions (ENG) MODEL: T1 y QUEST for Continuous Improvement Windsor s Quality Management System is Certified ISO 9001. Read these instructions before operating the machine.
WET/DRY VACUUM Operating Instructions (ENG) MODEL: T1 y QUEST for Continuous Improvement Windsor s Quality Management System is Certified ISO 9001. Read these instructions before operating the machine.
A3G Green Rotary Laser SPECIAL EDITION INSTRUCTION MANUAL
 A3G Green Rotary Laser SPECIAL EDITION INSTRUCTION MANUAL SAFETY Please read this instruction manual before operating this product. Please store this instruction manual in the carry case for future reference.
Document No A3 Revised February Atlantic Ultraviolet Corporation
 375 Marcus Boulevard Hauppauge, NY 11788 USA 631.273.0500 Fax: 631.273.0771 e-mail: info@ultraviolet.com Extensive Product Information Available at: ultraviolet.com Document No. 98-1179A3 Revised February
REFRACTION TABLE HRT-7000
 1 User Manual REFRACTION TABLE HRT-7000 HUVITZ REFRACTION TABLE HRT-7000 2 Notice This product might cause a malfunction due to the electromagnetic waves of the cell phones, walkie-talkie, and wireless
Electronic Self-Leveling Horizontal Rotary Laser Level Model No Instruction Manual
 1467H-English 8/6/08 10:07 AM Page 1 Electronic Self-Leveling Horizontal Rotary Laser Level Model No. 40-6537 Instruction Manual Congratulations on your choice of this Electronic Self-Leveling Horizontal
INSTALLATION AND OPERATION MANUAL
 ECONOMY OVENS SMO1E SMO3E MODELS OBSOLETED AFTER MAY 31ST SMO1E-2, SMO3E-2, SMO5E, SOM5E-2 INSTALLATION AND OPERATION MANUAL Revised June 13, 2017 861659 Sheldon Manufacturing Inc. P.O. Box 627 Cornelius,
Prizmatix UV Torch. User Manual
 UV Torch User Manual Version: 2.0 Main Office Phone:+972-72-2500097 Fax: +972-72-2500096 sales@prizmatix.com European Sales Office Phone: +44 (0)77 9172 9592 Fax: +44 (0)20 7681 2977 sales.europe@prizmatix.com
OPERATING MANUAL. Model number: AR29
 OPERATING MANUAL Model number: AR29 IMPORTANT SAFEGUARDS: IMPORTANT: READ ALL INSTRUCTIONS BEFORE USE. RETAIN INSTRUCTIONS FOR FUTURE REFERENCE. Do not use in rain or leave outdoors whilst raining. WARNING:
62 MAX/62 MAX + Infrared Thermometer
 62 MAX/62 MAX + Infrared Thermometer Users Manual PN 4060712 April 2012 Rev. 1, 11/12 2012 Fluke Corporation. All rights reserved. Printed in China. Specifications are subject to change without notice.