Operation and Installation Manual
|
|
|
- Agatha Miles
- 5 years ago
- Views:
Transcription
 Tel: 610-265-3610 Fax: 610-265-8327 info@fmna.com")
1 Fogmaker Operation and Installation Manual Water Based Fire Suppression for Enclosed Spaces Fogmaker North America Post Address: 150 Gordon Dr Exton, PA Delivery Address: 150 Gordon Dr Exton, PA Installation manual 65 Bar Rev F 1 (67) Tel: Fax: info@fmna.com
2 Installation manual 65 Bar Rev F 2 (67)

3 Fogmaker is a registered trademark for an automatic fire suppression unit intended to suppress fires for Class A surface burning and Class B fires within an enclosed volume. The suppressant creates a cold water fog that not only cools down the temperature very rapidly and effectively, but also forces out the air so that the oxygen content is reduced. The effectiveness of the suppressant increases when the fluid is vaporized from exposure to heated surfaces as a result of the fire. Fogmaker operates and releases the suppressing fluid completely regardless of the installation position of the piston accumulator. This is based on a patented solution that makes the function more secure than the traditional fire suppression canister or cylinder type where a rising pipe is used which reduces or completely eliminates the function when suppressing if the piston accumulator is hung or held nearly horizontally or upside down. The piston accumulator is designed of aluminium alloy which is anodized to about 20 μm, which makes it very resistant to corrosion, even in demanding environments such as salt sea air. The suppressing fluid is water-based and has frost-protection additives and film-forming chemicals that impede re-ignition in leaking fuel. How does it operate? The Fogmaker high-pressure agent in the piston accumulators suppresses fires with the help of three basic mechanisms. All three operating modes depend on the size of the drops. The high pressure, 940 psi (65 bar), and special nozzles break the water down into very small drops. The average size of the drops is approximately 80 μm. As a simple comparison, 2,000 of these small drops equal the volume of one drop with a 1 mm diameter! One liter of water requires 335 kj in order to be heated up from +20 to +100 C and a further 2,257 kj in order to turn from water into steam. Water is a well-known fire suppressant. Upon vaporization, 1 liter of water expands to 1,700 liters of steam. The oxygen content is reduced very effectively and smothers the fire from its center, where the oxygen content is at its lowest, and prevents new oxygen from being added. Besides water, the suppressing agent also contains antifreeze and AFFF, a foam maker which is a very effective suppressing agent for fire in petrol, diesel, or oils. Test fire in a 2.5 m3 engine room. The source of the fire consists of four troughs, 20x40 cm, filled with diesel as well as a diesel spray, 1 lit/min 5 bar, which sprays the engine. The heat effect is approximately 600 kwh. Pictures are taken at approximately 4-second intervals. The temperature drops during this time from slightly more than +400 C to +40 C. During these 12 seconds, approximately 7.5 L suppression fluid is used Installation manual 65 Bar Rev F 3 (67)

4 The fire is suppressed and the temperature falls Diesel spray (50 Bar, 0.15kg/min) may burn for 30 sec. In a test room of 5m³. The temperature in the smoke gauges reaches 275 C. Suppression takes place in approx 5 sec. Note that only components from Fogmaker may be used. If other components are used, Fogmaker will not guarantee the unit function. Components in this manual marked with an asterisk (*) are not UL listed Installation manual 65 Bar Rev F 4 (67)
5 List of contents Page PART ONE: SYSTEM OVERVIEW Section 1 Piston Accumulator General Description Suppression Fluid... 9 Section 2 Release Valve & Microswitch... 9 Section 3 Activation Mechanical Activation Hydro Pneumatic Activation Electrical Activation Section 4 Alarm Panels...14 Section 5 Nozzles...15 Section 6 Hydraulic Hoses PART TWO: INSTALLATION Section 7 Installation of Piston Accumulator Installation Dimensions Section 8 Installation of Safety Screw Microswitch Section 9 Installation of Mechanical Activation Cables Section 10 Installation of Electrical Activation Switch Section 11 Installation of Hydro Pneumatic Detection System Installation of Detection Tube Pressurizing of the Detection Tube Detection Cylinder Signal Processing from the Pressure Switch Connection of the Detection Tube to the Connectors Section 12 Installation of Nozzles Section 13 Installation of Pipe Systems Section 14 Installation of Hydraulic Hose Section 15 Unit Limitations for UL-Listed Components Detection Tubing Pipe System Nozzles Section 16 Arm/Disarm Instructions Standard Valve Valve for Electrical Activation Section 17 Functional Check After Installation Section 18 Action in Case of Fire Section 19 Actions After Suppressing Section 20 Control Plan for the Suppression System Section 21 Effect of Suppressing Section 22 Function Reset After a Fire Section 23 Winter Storage Section 24 Technical Data Section 25 Material Safety Data Sheets (MSDS) Section 26 Performed Functional Tests and Technical Approvals Warranty Policy Inspection/Service/Installation Checklist Installation manual 65 Bar Rev F 5 (67)
6 Installation manual 65 Bar Rev F 6 (67)

.")
7 Section 1 The Piston Accumulator 1.1 General Description PART ONE: SYSTEM OVERVIEW The suppression fluid container is available in different versions depending on the volume of the piston accumulator. Fogmaker 3.3 L*, 4 L, 6.5 L* and 7.5 L consist of one container. The 6 L*, 8 L*, 13 L* and 14 L* consist of two containers linked by a hose connection. 8 L*, 13 L*, and 14 L* systems are used primarily in larger machines and vehicles. They have sufficient capacity to be connected to a pipe system with up to approximately nozzles. As a comparison, a 4 L piston accumulator manages up to 6-8 nozzles (3-6 nozzles in units with UL-listed components). The piston accumulator is pressurized with nitrogen to approximately 940 psi (65 bar), which is the rated operating pressure of the system at 70 F/21 C. Warning: Never lift the piston accumulator by the gauge. Dimensioning of the system: Allocate 2 liter suppressant for every cubic meter volume (gross) of the enclosed volume. Desired discharge time should always be between seconds. The choice for the number of nozzles depends on the criteria above. * Fig. 1.1 Double piston accumulator*. Fig. 1.2 Single piston accumulator Installation manual 65 Bar Rev F 7 (67)
, refilling connection for suppression fluid (6), bracket (7), brace (8), manometer (gauge) (9), pressure switch* (optional) (10) safety screw (11), bracket, double piston")

8 The suppression system consists of: piston accumulator (1), release valve (2), connector for detection tube (3), safety valve (optional per DOT requirements) (4), outlet for suppression fluid with protective plug (5), refilling connection for suppression fluid (6), bracket (7), brace (8), manometer (gauge) (9), pressure switch* (optional) (10) safety screw (11), bracket, double piston accumulator* (12), cylinder 2* (13), brace, double piston accumulator* (14), interconnection hose* (15). The bottom of the container has a refilling connection for the propellant. Fig 1.3 Construction of double piston accumulator*. Fig. 1.4 Construction of single piston accumulator. The protection plug (5) must always be in position during installation, service, and transport of the piston accumulator. The safety screw (11) prevents unintentional activation and must always be in position during assembly, disassembly or service, and during transport if the accumulator is pressurized. The safety screw may not be removed until the whole pipe system is installed and the piston accumulator system is made active. Let the safety screw hang on the cable when it is not screwed in. Installation fittings (7) and braces (8) for single cylinder, installation fittings* (12) and braces* (14) for double cylinders* are included. Screws are not included. The type of screw to be used depends on the method and location for the installation. The double cylinder has the installation fittings attached on delivery. These must not be removed in connection with the installation since there would be a risk that the connections between the hose and the top of the container could leak as a result. Multiple suppression units should not be interconnected. Fogmaker can supply dual- and triple-piston accumulator units* to cover a wide variety of fire suppression needs. Multiple-piston accumulator units are not UL-listed Installation manual 65 Bar Rev F 8 (67)
9 WARNING Do not tamper with the release valve or the top of the piston accumulator when the system is pressurized. The pressure in the system may be released resulting in personal injury. Do not loosen or remove the safety screw (11) before the installation of the system is complete. 1.2 Suppression Fluid The suppression fluid is based on frost-protected water with additives of a film-forming chemical that impedes the re-ignition of leaking fuel and improves the suppressing characteristics. The standard suppression fluid is available in three versions for protection to - 30 C*, -15 C*, and 0 C. See Section 23 for additional information. Section 2 Release Valve Fogmaker s patented release valve is available in three different versions: 1) a fully mechanical valve that is activated manually with one to four cables*; 2) a fully automatic electric valve* that is activated either by a detector cable, heat sensors, or smoke sensors; or 3) a hydro pneumatic, fully automatic valve that is activated by a detection tube pressurized by a detection fluid container. Electrical activation* can be combined with mechanical cable activation*. The release valve is designed with an outlet opening for the discharge of the suppression fluid into the piping of the system. For safety reasons the outlet opening is provided with a protection plug that shall always be in position during service and transport of the pressurized piston container. A stainless steel pipe should be used to connect the outlet opening (which has a 1/4 BSPT thread) and the pipe system with nozzles. See Section 13 for further details on installing the pipe system. The release valve is secured against unintentional activation by a safety screw that must always be in position during service or assembly/disassembly of the piston accumulator. The safety screw should be removed when the container is installed and the system is activated. The safety screw is retained by a hanging wire to the valve for future use Installation manual 65 Bar Rev F 9 (67)
 is used to alert the operator when the Fogmaker system is armed or disarmed.")

10 Safety Screw Microswitch* The safety screw microswitch (part no. FMWH ) is used to alert the operator when the Fogmaker system is armed or disarmed. When the screw is inserted in the micro switch, the control panel display will indicate system ready. When the safety screw is inserted into the release valve assembly, the systemdisarmed service light will become illuminated Installation manual 65 Bar Rev F 10 (67)
11 Section 3 Activation 3.1 Mechanical Activation Cables* Two to four activation cables can be connected to the mechanical valve (see fig. 3.1, below). The cables are fastened with steel-rubber braces (p-clamps) and screws on a wall or equivalent. Braces for the fixture of the cable should be located approximately 300mm apart from each other along the casing of the wire. It is important that the cable is installed in such a way that it is not exposed to breakage or acute bends that would prevent or impede activation. The end of the cable is equipped with a pull handle assembly that should be fixed/mounted in an easily accessible position outside the space that the Fogmaker system shall protect in case of fire. For installation in vehicles one of the pull handles is to be located in the operator/driver location and the other on the outside of the vehicle. The pull handles are equipped with shackle locks that can be sealed. The external handle should be located where it will not be damaged by branches or other obstacles. 3.2 Hydro Pneumatic Activation The hydro pneumatic detection system is fully automatic and operates without the need for electricity or other types of external energy Installation manual 65 Bar Rev F 11 (67)
 is established during the design of the system. See Section 11 for additional information.")
12 The system consists of: The cylindrical 1 L detection container that is filled with 500 ml detection fluid and nitrogen gas. The pressure of the container on delivery (24 bar or 31 bar) is established during the design of the system. See Section 11 for additional information. The sensor that consists of a detection tube designed of a polymer material, with an external diameter of 6 mm that connects the detection container to the piston accumulator release valve. Various installation material, special 6 mm connectors, protection tube, protection spiral, labels, etc. (See figs and 11.2.) Note that only components from Fogmaker may be used. If other components are used, Fogmaker will not guarantee the system function. and agent N₂ N₂ Fig 3.2 Hydro pneumatic activation. The detection tube is vulnerable and must be installed with care. Damage to the surface of the detection tube can lead to cracks that may create leakage in the system resulting in the release of the suppression fluid. During a fire event, the polymer material around the detection tube is perforated, allowing the pressure in the detection system to drop and the piston accumulator valve to open, releasing the suppressing fluid. The detection cylinder has a pressure switch normally open (NO)* as standard and can have another NO pressure switch* as an option. The standard pressure switch gives a warning signal at less than14 bar which means the system pressure is too low. The optional pressure switch gives a signal at less than 5 bar which means the system has activated. As an option there is also a manual punch* that can be installed on the detector tube. This allows an operator to manually activate the system by cutting the detection tube Installation manual 65 Bar Rev F 12 (67)

13 Fig. 3.4 part no. FM Fig. 3.5 part no. FM-1656* Fig part no. FM-1657* double pressure switches 14 pressure switch 14 bar and pressure switch 14 bar and and 5 bar. T-connector. L-connector. 3.3 Electrical Activation* As an alternative or complement to the manual activation with cables, the release valve can be actuated electrically. Fogmaker has several different central units that can activate the electrical release. The release can be push button, semi-automatic, or fully automatic. The release is triggered by applying an electric voltage between 5-24 volts DC to the actuator. At the moment of activation the current is 3A (15W) during 1 millisecond. For a hydro pneumatic system there is also an electrically or manually activated punch * that cuts the tube. Contact Fogmaker or your retailer for further information Installation manual 65 Bar Rev F 13 (67)

")
14 Section 4 Alarm Panels* There are different alarm panels for fire and methane detection with optical or acoustical signals as well as special functions for automatic engine stop, release delay, fuel and main power cut-off. See figs and the Fogmaker Fire and Methane Panel Manuals for more details. Fig. 4.1 Alarm panel FM *. Fig. 4.2 Alarm panel fire only FM-US * (surface mount) FM-US * (in dash mount) Installation manual 65 Bar Rev F 14 (67)
 or FM-1503-010 (1.2 L flow per minute) consist of a body with built-in vortex generator and sintered filter. There is a hole in the end from which the water mist is sprayed.")

15 Fig 4.3 Alarm panel Fire & Methane detection FM-US * (in dash mount). Section 5 Nozzles Fig. 4.4 Methane Detection Only Alarm Panel FM-US *. The nozzles FM (0.8 L flow per minute) or FM (1.2 L flow per minute) consist of a body with built-in vortex generator and sintered filter. There is a hole in the end from which the water mist is sprayed. In order that the hole shall not become obstructed by contamination over time, disposable caps (part nos. FM and FM ) are supplied that are to remain in place after the installation. Upon activation of the unit, the nozzle cap will be expelled by the pressure. The nozzle spreads the water mist in a column-shaped mist with a diameter of approximately mm and has a range of approximately 2000 mm. The nozzle cap is intended for single use and may not be reused. Replace with new caps as required Installation manual 65 Bar Rev F 15 (67)


16 Fig. 5.1 FM Nozzle with nozzle cap. Red cap is included with nozzle; replacement part number is FM Yellow cap is included with nozzle; replacement part number is FM Fig. 5.2 FM Nozzle with nozzle cap. Fig. 5.3 Spreading of water mist. Section 6 Hydraulic Hose Between the piston accumulator and the pipe system or the bulkhead fitting, a hydraulic hose is connected that is intended to absorb vibrations and prevent vibration damage to the pipe lines. The hydraulic hose is available in any length with a straight-straight, straight-45, or straight-90 connection nipple. Only hydraulic hoses supplied by Fogmaker shall be used. Only Fogmaker hydraulic hoses of 5 feet in length and shorter are UL-listed. Fig. 6.1 Hydraulic hose, straight-90 connection nipple Installation manual 65 Bar Rev F 16 (67)

17 PART TWO: INSTALLATION IMPORTANT SAFETY NOTES Installation should only be done or reviewed by Fogmaker authorized personnel. For the systems with electrical* or mechanical actuation*, the testing of the activation function should be conducted on a completely assembled system. See Sections 9 and 10. The final step to arm/activate the system is to remove the safety screw from the Release Valve. See Section 16 for details. For the system with the hydro-pneumatic actuation the entire system should be fully installed, followed by the pressurizing of the detection system. See Section 11 for details. After all checkups have been completed, the final step to arm/activate the system is to remove the safety screw from the Release Valve. See Section 16 for details. Note that only components from Fogmaker may be used. If other components are used, Fogmaker will not guarantee the system function. Use protective goggles for work with the Fogmaker system. Section 7 Installation of the Piston Accumulator Install the container within no more than 26 ft/8 m of the space to be protected (no more than 26 ft/8 m from piston accumulator release valve to the first nozzle). The surroundings in the installation location should be clean and have a temperature of between -22 F to 149 F (-30 C to + 65 C), the same as the suppression unit. Do not locate the piston accumulator in the engine bay. Protection boxes are available in powder paint coated steel plate both for the single and double* piston accumulator. These are primarily used with external installations on vehicles/machines that operate in demanding environments. The protection boxes are also available in powder paint coated stainless versions Installation manual 65 Bar Rev F 17 (67)

18 Fig 7.1 Protection box* for single PA. Fig 7.2 Protection box* for double PA*. Mount the installation fittings in a suitable position on a sufficiently stable frame in order to withstand the weight of the cylinder/s. Use M8 x 25 mm bolts in the same number as there are attachment points on the single cylinder/double cylinder protecting boxes. Install the cylinder/s and protecting boxes so that there is a minimum of 6 in clearance at the end of the container where the release valve is located, and so that the space is sufficiently large to allow the connection of hydraulic hoses, pipes, detection hose, or release wires for mechanical activation or electric activation devices*. See Section 24 for weights of the cylinders and the protection boxes. The container can be installed in any position. However, make sure to install the piston accumulator so that the gauge can be clearly read. (If the container cannot be installed with the gauge visible, it is recommended that a suppression unit with a pressure switch be used instead.) Do not use the pressure gauge attached to the fire suppression unit to determine when the intended charging pressure has been reached. Use a pressure regulator when the pressure source is a tank of high pressure gas; that is, gas at higher than the charging pressure of the unit Installation manual 65 Bar Rev F 18 (67)


19 7.1 Installation Dimensions (dimensions shown in millimeters) Fig 7.3 Installation dimensions 3.3 L*, 4 L and 6.5 L* single suppression unit. Fig 7.4 Installation dimensions 7.5 L single suppression unit Installation manual 65 Bar Rev F 19 (67)


20 Fig 7.5 Installation dimensions 6 L* and 8 L* double suppression unit. Fig 7.6 Installation dimensions 13 L* double suppression unit Installation manual 65 Bar Rev F 20 (67)


21 Fig 7.7 Installation dimensions 14 L* double suppression unit. Fig 7.8 Installation dimensions 12 L* triple suppression unit Installation manual 65 Bar Rev F 21 (67)


22 Fig 7.9 Installation dimensions 3.3 L* and 4 L single suppression unit in protection box*. Fig 7.10 Installation dimensions 6.5 L* single suppression unit in protection box* Installation manual 65 Bar Rev F 22 (67)


23 Fig 7.11 Installation dimensions 7.5 L single suppression unit with protection box*. Fig 7.12 Installation dimensions 6 L* and 8 L* double suppression unit in protection box* Installation manual 65 Bar Rev F 23 (67)


24 Fig 7.13 Installation dimensions 13L* double suppression unit in protection box*. Fig 7.14 Installation dimensions 16 L* double suppression unit with protection box* Installation manual 65 Bar Rev F 24 (67)
 Install safety screw in the disarmed location in the release valve before any work is done. 2) Remove and discard cover plate using a 4 mm hex key on the standard release valve (fig. 8.1). The screw will be reused with the microswitch assembly*.")
 Plug in the amp super seal connectors* between the wire harness and the 14 bar pressure switch on the detector bottle.")
 Follow the arming instructions that are used after installation of the Fogmaker system is complete (see Section 16).")
25 Section 8 Installation of the Safety Screw Microswitch* Screw Disarmed Cover plate Fig. 8.1 Standard Release Valve. 1) Install safety screw in the disarmed location in the release valve before any work is done. 2) Remove and discard cover plate using a 4 mm hex key on the standard release valve (fig. 8.1). The screw will be reused with the microswitch assembly*. 3) Install the new microswitch assembly* (part no. FMWH ) onto the standard release valve with a 4 mm hex key (reuse the screw from step 1). See figs 8.2 and 8.3. Fig. 8.2 FMWH Fig ) Plug in the amp super seal connectors* between the wire harness and the 14 bar pressure switch on the detector bottle. Turn on the vehicle and check that the alarm panel* has the service light on when the safety screw is in the disarmed position. 5) Follow the arming instructions that are used after installation of the Fogmaker system is complete (see Section 16). Only move the safety screw from the disarmed position to the armed position after the ball valve is opened on the detector bottle. See fig. 8.4 for the armed and disarmed locations Installation manual 65 Bar Rev F 25 (67)
 are removed, Fogmaker can be released unintentionally with only light pressure on the release catch under the protection")
 can be emitted and cause serious")
26 Disarmed location Armed location Fig. 8.4 WARNING The safety screw must always be installed during transport, installation, and service. When the safety screw and protection plate(s) are removed, Fogmaker can be released unintentionally with only light pressure on the release catch under the protection plate. The release valve must not be removed when the container is pressurized. If the valve or any of its nipples or connectors are removed when the container is pressurized, a powerful fluid spray 943 psi (65 bar) can be emitted and cause serious personal injury. Section 9 Installation of Mechanical Activation Cables* Installation manual 65 Bar Rev F 26 (67)

27 In order to ensure a satisfactory cable function in the installation, proceed as follows: Drill an 8 mm hole where the handle will be located. Screw off the outer of the two M8 nuts and insert the cable fixture from the back. Put on the safety lock, if one is to be installed, and then screw on the outer M8 nut again and tighten. Then tighten the M8 nut on the backside. Install the supplied M5 nut and the T-handle on the cable. Lock the T-handle with the M5 nut in a suitable position. (It is particularly important, if the safety lock is used, to make sure that this can be opened/closed with suitable slackness.) Clamp the outer casing to the vehicle apart from the last half meter before the valve. The smallest bend radius for the cable is 150 mm. Remove the protection plate for the valve by loosening its screw (fig 9.2 no. 1). Pull out the inner cable from the casing with the help of the T-handle to about mm and cut the outer casing to a suitable length. Pull out the cable again and install the terminals/tensioners (fig 9.2 no. 2) on the casing. Cut the inner wire to 26 and 31 mm respectively (fig 9.1) and thread the cable through the M6 hole in the valve housing and screw in the cable tensioner (fig 9.2 no. 2). Install the cable stops (fig 9.3 no. 5). Thread the cable stops in the cut tracks in the release catch (fig 9.4 no. 6). Attach the lid (fig 9.2 no. 4). The cable stops are kept in position by the lid. Install the last clamp as close to the valve housing as possible in order to ensure that the cable casing is properly fixed without any movement. Braces for the fixture of the cable should be located approximately 300 mm apart along the casing of the cable. Install the cable where it will not be exposed to breakage or acute bends that would prevent or impede activation. Fix or mount the pull handle on the end of the cable in an easily accessible position outside the space that the Fogmaker unit is intended to protect in case of fire. For installation in vehicles, one of the handles is to be located in the operator/driver location and the other on the outside of the vehicle, in a place where it will not sustain physical damage from branches or other obstacles. Fig. 9.1 Fig Installation manual 65 Bar Rev F 27 (67)


28 Fig. 9.3 Fig. 9.4 Fig. 9.5 Fig. 9.6 In tight spaces a 90 angle bend can be used. Assemble the cable split approximately mm from the output on the valve. Check that the cable can stretch and is sufficient in order to trigger the valve. Mounting position mm Pull length Fig. 9.7 If more than two cables are needed, a one to two cable split can be used. Function testing of cable system after install is required. (Reference Service Manual section 2.1.) Installation manual 65 Bar Rev F 28 (67)

29 Section 10 Installation of Electrical Activation Switch* Fig Push button switch kit*. Mount the electrical activation switch* with the safety clip ring up. The safety clip should have the lanyard and tamper proof tie attached. To test the switch: NOTE: Do NOT check the switch function with the wire harness attached to the actuator. It will cause the actuator to function. 1. Disconnect the switch at the plug from the harness. 2. Remove the safety clip. 3. Check continuity accross the pins in the plug. It should be open. When the switch is pressed in, the continuity will be closed. 4. Reassemble the switch, putting the safety clip back in and securing with tamper proof tie. Be sure there is no continuity across the pins in the plug. 5. Attach the wire back to the harness at the plug Installation manual 65 Bar Rev F 29 (67)
30 Section 11 Installation of Hydro Pneumatic Detection System The desired pressure in the detection system at 70 F/21 C after pressurization from the detection container is bar. In order to obtain the desired pressure for different lengths of detection tubes, there are detection cylinders pressurized to 24 bar or 31 bar (see instructions below). In addition, the detection tube must be prefilled with a hand pump if the tube length exceeds 14m*. Instruction for pre-filling is also shown below. Under 8m detection tube: 24bar detection container, no pre-filling. 8m-14m detection tube: 31bar detection container, no pre-filling. Over 14m detection tube: 24bar detection container with pre-filling. See Section 15 for detection tubing limitations in UL-listed units Installation of Detection Tube Heat rises, thus the detection tube must be installed in the upper part of the protected space. See figs and 11.2 for possible system designs. Fogmaker hydro pneumatic detection tubing is part no. FM Installation manual 65 Bar Rev F 30 (67)
31 * * * Fig Example of Detection System Design Installation manual 65 Bar Rev F 31 (67)
32 * * * * Fig Example of Detection System Design Installation manual 65 Bar Rev F 32 (67)
.")

33 Item #1 Locate the detection tube end plug (fused) in a cool area and fasten it with a 12 mm steel-rubber brace. Item # 2 Refer to fig for preferred method to transition from protection conduit* to coil. Item # 3 Refer to figs and 11.7 for suggested methods to mount the detection tube. Fig End of Protective Coil (Example A). Fig End of Protective coil (Example B). ALWAYS bend the cut coil ends as shown above. Instruction for fastening of detection tube onto pipe Fig Incorrect positioning. Avoid the above situation by mounting correctly in order to eliminate the risk of changes in position by vibrations, heat, etc Installation manual 65 Bar Rev F 33 (67)
. Avoid a location close to heat sources such as turbochargers, etc.")
.")
34 Fig Example of fastening detection tube onto pipe. Fig Example of ideal method of fastening detection tube onto pipe. Avoid locating the detection tube near sharp edges and do not bend it less than a radius of 3.15 in (80 mm). Avoid a location close to heat sources such as turbochargers, etc. High temperatures affect the material structure of the detection tube and can degrade the tube and cause faulty detection. The minimum distance between the detection tube and a turbo, manifold, silencer, catalyzer, or other hot part is 20 in (500 mm). The detection tube should be easy to remove and visually inspect for service. The detection tube is provided with labels (see fig. 11.8, item 7) that indicate the purpose of the tube. On the entire detective length of the detection tube (i.e., in the protected area), a stainless protection coil must be used. Protection coils are available in four lengths: 4.5m, 5m, 6m and 7m. Avoid cutting the protection coil. If the coil must be cut, the end of it must be bent into a ring ( shape) away from the tube to avoid scoring (see figs and 11.4). Use 8 mm steel-rubber braces when installing the detection tube in the protected space. If wire ties must be used, they should be at least 10 mm wide. The wire ties must not be applied directly on the detection tube. Use a minimum 50 mm layer of protection conduit (part no. FM-47132*) in between. Outside the protected space, use conduit (protection) tube* in order to protect the detection tube over its entire length. Fasten with 10 mm steel-rubber braces or, in exceptional cases, use the aforementioned wire ties Installation manual 65 Bar Rev F 34 (67)

")
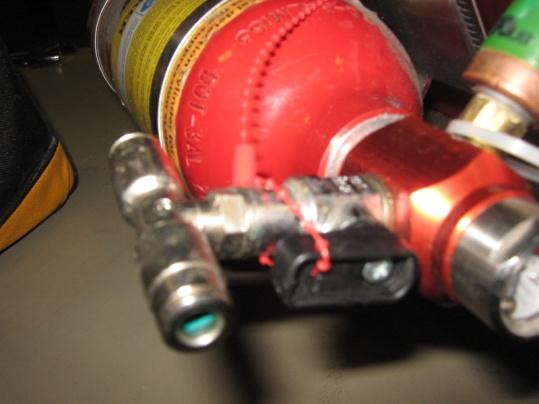
35 Fig Installation of detection tube Pressurizing of the Detection Tube For detection tube less than 14 meters: Fig Ball valve Pressurize the detection tube by slowly opening the ball valve on the detection bottle. The detection fluid will fill the detector tube. The fluid is colored to make it visible in the tube. There will be an air bubble in the end of the tube. This air bubble will disappear slowly over several weeks and pressure will drop about 0.5 bar. Final pressure in the fire detection system should be between 20 and 24 bar on the gauge Installation manual 65 Bar Rev F 35 (67)


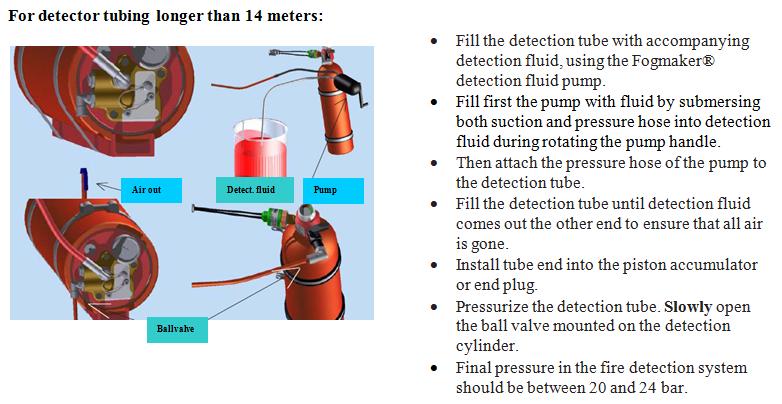
36 For detection tubing longer than 14 meters*: Fig Air out Detect. fluid Pump Ballvalve Fill the detection tube with accompanying detection fluid, using the Fogmaker detector fluid pump. Fill first the pump with fluid by submersing both suction and pressure hose into detection fluid during rotating the pump handle. Then attach the pressure hose of the pump to the detection tube. Fill the detection tube until detection fluid comes out the other end to ensure that all air is gone. Install tube end into the piston accumulator or end plug. Pressurize the detection tube. Slowly open the ball valve mounted on the detection cylinder. Final pressure in the fire detection system should be between 20 and 24 bar Detection Cylinder Enclosed with the detection cylinder on delivery are two braces, four to six labels, and fitting contacting parts for the AMP-contact on the pressure switch. Use an Elpress DRB 115 or similar crimping tool. Fig Parts for the AMP super seal contact. Fig Tong Elpress DRB Installation manual 65 Bar Rev F 36 (67)

37 The detection container must be installed in one of the approved positions shown in fig Inside all detection containers is a flexible siphon tube that will not operate properly if installation deviates from the ideal or OK positions shown below. Ideal positioning Incorrect Incorrect OK Fig Detection cylinder mounting positions Signal Processing from the Pressure Switch* If pressure switches are connected to one of Fogmaker s alarm panels, the handling is managed automatically. Refer to Alarm Panel Manuals for connections. If the pressure switch is connected to an existing system, CAN bus multiplexer, the signals shall be interpreted as in the tables below. System with 2 pressure switches* on the detection container and without a pressure switch on the piston accumulator. Standard Optional Evaluation of signal pressure switch 14 bar pressure switch* 5 bar On the detection container On the detection container 0 1 Pressure loss in detection system 1 0 Pressure switch 5 bar faulty, or wire disruption 0 0 FIRE 1 1 System OK Installation manual 65 Bar Rev F 37 (67)
38 System with 2 pressure switches* on the detection container and with a pressure switch on the piston accumulator. Standard pressure switch 14 bar On the detection container Optional pressure switch 5 bar* On the detection Optional Pressure switch 50 bar* On the piston accumulator Evaluation of signal Container Pressure loss in detection system Pressure switch 5 bar faulty, or wire disruption Pressure loss in the piston accumulator or released FIRE FIRE FIRE System OK Systems with 1 pressure switch* on the detection container and with a pressure switch* on the piston accumulator. Standard pressure switch Optional Pressure switch Evaluation of signal 14 bar 50 bar* On the detection container On the piston accumulator 0 1 Pressure loss in detection system 1 0 Pressure loss in the piston accumulator or released 0 0 FIRE 1 1 System OK Fig Attachment of the Detection Tube to the Connectors The connectors are specially produced to cope with the tough system requirements. These are equipped with 3 O-rings and withstand high pressures and temperatures. A cut end on the detection tube must be clean, undamaged, round, and free from scoring. In order to ensure that the detection tube is in contact with the bottom of the connector, mark a control line at 22 mm from the cut end with a black felt-tip pen or tape. The insertion depth must be a minimum of 20 mm. When installing the detection tube in the connector, hold the connector firmly and wiggle the tube at the same time as you push it in Installation manual 65 Bar Rev F 38 (67)


39 Insertion depth min 20 mm Control line at 22 mm Fig Positioning of control line. Fig Insertion of detection tube. The tightness of the detection system must be checked for fluid leakage after the ball valve on the detection container has been opened. Inspect every connection and follow the whole path of the detection tube. Note the gauge value and check again after approximately 15 minutes to ensure it is still in the green swept area. Section 12 Installation of Nozzles The nozzles are installed with a T-connection, part no. FM-4401, straight connector, part no. FM-4402, or 90-degree elbow, part no. FM-4409 without a cutting ring. See section 15 for details on nozzle limitations for UL-listed units. FM-4401 FM-4409 FM-4402 Fig Fittings/Connectors Installation manual 65 Bar Rev F 39 (67)


40 Mounting Nozzles Before installation, make sure that the nozzles are clean and that they have no visible defects. It is preferred to use a premounting tool for connections; if not available, a vise can be used to hold the connection in place. Remove the nut and cutting ring. The cutting ring will not be used. Place the nozzle in the nut and screw the nut back on the connection as far as possible by hand. Tighten with spanner ½-1 turns, approximately 20 Nm, then loosen the nut and tighten ½ turn after the noticeable increase in torque. Nozzle Quantities and Placement for UL-Listed Units Fig Mounting nozzles. The 4L piston accumulator is UL listed for use with 3 to 4 1.2L flow per minute nozzles or 4 to 6 0.8L flow per minute nozzles. The 7.5L piston accumulator is UL listed for use with 6 to 9 1.2L flow per minute nozzles or 8 to L flow per minute nozzles. Nozzles must be placed in a manner that complies with the minimum and maximum nozzle spacing, as well as the minimum and maximum perpendicular distance to the side wall as shown in the table below. * For units with more than 3 nozzles, the minimum and maximum nozzle spacing applies to the closest 2 nozzles. ** For units with more than 4 nozzles, where centrally placed nozzles are anticipated, the maximum perpendicular distance requirement only applies to the nozzles closest to the side walls Installation manual 65 Bar Rev F 40 (67)
41 Section 13 Installation of Pipe Systems Stainless steel pipes 8x1mm, part no. FM , are the only pipes that may be used in a Fogmaker fire suppression unit. Only pipes supplied by Fogmaker may be used. The stainless pipes are 45 in (1150 mm) in length, so keep this in mind when engineering a system. The pipes should be bent using a 24 mm radius on a CNC bender, table top bender, or hand bender. NEVER bend pipe freehand, as this can cause kinks and duplication issues. Keep a minimum straight length between bends of.75 in (19 mm). Keep a.75 in (19 mm) straight on tube ends to ensure cone sealing when inserted into fittings. If the pipe system for a certain application must be movable, or if piping is very difficult to install, hydraulic hoses can be used instead (see Section 14). Try to minimize the use of hydraulic hose. See Section 15 for details on the pipe system limitations for UL-listed units. Install the pipe system with the nozzles in the roof of the space to be protected. Make sure that it is possible to install the pipe system so that it is located firmly. The nozzles shall be inclined slightly inwards and downwards, mm from the engine and with mm distance between the nozzles in order to achieve the best possible spreading of the flow. See fig The suppressing effect is improved when the nozzles are directed towards the parts of the space where fire can be expected to arise or some hot area that speeds up the steam formation. Examples of such hot parts are spray pipes, turbo, manifolds, compressors, and additional heaters. The spray from different nozzles should be adjusted so that it does not disrupt the spray from other nozzles and then disrupt the mist formation. Fig Example of a complete system. (1) piston accumulator, (2) hydraulic hose, (3) bulkhead lead-through, (4) pipe system with nozzles, (5) engine, (6) partition Installation manual 65 Bar Rev F 41 (67)
42 The most common connectors used in the set-up of the pipe system are T-connector part no. FM-4401, straight connector part no. FM-4402 and 90 elbow part no. FM Only connectors supplied by Fogmaker may be used. These parts adhere to the standard DIN 2353-EN ISO Cut the tubing at 90 degree angles. Remove all burrs. 2. Use mineral oil to lubricate the cone and thread on the fitting body, the cutting ring, and the thread on the nut. 3. Fit the nut and the cutting ring on the tube as shown in fig The large diameter of the cutting ring must face the nut. 4. Insert the tube into the cone until it comes into contact with the stop on the fitting body. Tighten the nut by hand until the cutting ring rests firmly on the nut. Then tighten the nut with a wrench until the cutting edge of the ring is in contact with the tube and prevents rotation of the tube. 5. Hold the tube against the fitting body, stop and make sure it does not rotate, and then tighten the nut by ¾ of a turn. This way the cutting ring cuts into the outer part of the tube for the necessary depth and raises an edge in front of its cutting edge while the second cutting edge clinches the tube at the same time. 6. Loosen the nut and check that there is a clearly raised edge all around the tube. The edge must cover 80% of the front of the cutting ring. This check is for the safety of all concerned! If the raised edge is not satisfactory, pre-assembly in step 5 must be repeated. The cutting ring can rotate on the tube. 7. Reassemble the nut on the fitting until it contacts the cutting ring, and then tighten for a further ¼ turn more. Cutting ring Fig Assembly of pipes on connectors. Note It is the responsibility of the installation contractor to ensure that the pipe system is tight and that all connections are tightened according to instructions. If a hydraulic hose will be used between the piston accumulator and the pipe system, see Section 14. If there is a partition between the space where the piston accumulator is installed and the engine bay, use a bulkhead fitting, part no. FM Then connect the pipe system in the protected area to the bulkhead grommet with the hydraulic hose (see fig. 13.1). Alternatively, the pipe system can be connected directly to the bulkhead grommet with the connector part no. FM Clamp the pipe system in the vehicle every 300 mm with steel-rubber clamps, part no. FM-5308, so that vibrations and sagging are prevented (see fig. 7.3). The maximum distance from an end nozzle to a brace is 100 mm Installation manual 65 Bar Rev F 42 (67)


43 Fig Clamping of the pipe system Connectors should be suitably clamped with steel-rubber clamps, part no. FM-5318 (see fig. 13.4). It is recommended that T-connectors are clamped on both sides to avoid rotation of unit. Fig. 7.4 Clamping of a T-connector. Section 14 Installation of Hydraulic Hose When installing the hydraulic hose on the piston accumulator, first remove the protection plug on the outlet hole on the valve (see fig. 14.1). Install steel-rubber washer part no. FM-5006 and nipple part no. FM-4307 in the outlet hole and then the valve hose. Protection plug Steel-rubber washer FM-5006 Nipple FM-4307 Fig.14.1 Removal of protection plug Installation manual 65 Bar Rev F 43 (67) Fig.14.2 Installation of hydraulic hose.


44 Then mount the hydraulic hose on the bulkhead fitting or on the pipe system with the end-connector or T- connector. Fix the hydraulic hose every 300 mm with steel-rubber braces, part no. FM-5314, or with wire ties with a width of at least 7 mm. Section 15 Unit Limitations for UL-Listed Components The following unit limitations apply only to Fogmaker units containing UL-listed components. For a complete listing of UL-approved Fogmaker parts, see the Fogmaker Parts Catalog Detection Tubing The detection tubing may have a total length of no more than 11.5 m. The detection tubing should be installed with no more than one each of the following fittings: Detection tube fitting SR L6-1/8 Detection tube T-fitting T6-1/8-6 Detection tube end plug Part no. FM-4254 Part no. FM-4253 Part no. FM-4258 Do not splice detector tubing under any circumstances Pipe System For UL listed units, the following maximum piping and fitting limitations apply to the overall distribution system. Installation and fabrication techniques are the same as described in Sections 13 (tubing) and 14 (hose). The stainless steel distribution piping may have a total length of no more than 14 m, which includes any hydraulic hose the unit may contain. Hydraulic hose may not exceed 1.5 m or 5 ft in length. The total length of tubing and hose may not exceed 17.5 m. The distribution piping may have no more than 24 fittings. These can include no more than 13 T-fittings, 2 straight fittings, or elbow fittings for a total number of fittings not to exceed 24. The distribution piping is to have no more than bends at the minimum bend radius of 24 mm Installation manual 65 Bar Rev F 44 (67)

 of that 8 m length may consist of hydraulic hose. The maximum length between the first nozzle and the last nozzle is 6 m.")
45 Equal T-fitting 8x8x8 Straight fitting 8x8 Equal 90 degree elbow 8x8 Part no. FM-4401 Part no. FM-4402 Part no. FM Nozzles A Fogmaker unit with a 4.0 L piston accumulator may use at least 3 and no more than 6 nozzles, depending on the liter flow per minute of the nozzles. A unit with a 7.5 L piston accumulator may use at least 6 and no more than 14 nozzles, depending on liter flow per minute. The maximum length between the piston accumulator and the first nozzle is 8 m. No more than 5 ft (1.524 m) of that 8 m length may consist of hydraulic hose. The maximum length between the first nozzle and the last nozzle is 6 m. For more details on nozzle placement and limitations in UL-listed units, see Section 12. Section 16 Arm/Disarm Instructions WARNING Do not perform the steps in this section until the Fogmaker fire suppression unit is 100% installed and inspected. The following steps will arm the unit Standard Valve Note: Make sure all fittings and clamps are tight and the end plug is installed on the detection tube before pressurizing Installation manual 65 Bar Rev F 45 (67)


46 Ball valve open (pressurized) Ball valve locked open with wire tie Installation manual 65 Bar Rev F 46 (67)


47 Arm the extinguisher by removing the safety screw as shown (yellow label). The safety screw should always be attached to the wire to avoid loss. To disarm the system, simply insert the safety screw and close the ball valve on the detector bottle Valve for Electrical Activation* Refer to the following pictures for instructions on arming a valve for electrical activation. WARNING: DO NOT PERFORM THE NEXT STEPS UNTIL THE FOGMAKER SYSTEM IS 100% INSTALLED AND INSPECTED. THE FOLLOWING STEPS WILL ARM THE SYSTEM. SLOWLY TURN THE BALL VALVE OPEN ON THE DETECTION BOTTLE. RED FLUID WILL FILL AND PRESSURIZE THE TUBE. GAUGES SHOULD BE IN GREEN BEFORE AND AFTER ARMING Installation manual 65 Bar Rev F 47 (67)


48 INSPECT DETECTION TUBE FOR ANY LEAKS BEFORE PROCEEDING. END OF LINE WILL HAVE AN AIR BUBBLE. THE AIR BUBBLE WILL DISSIPATE OVER TIME. WARNING: DO NOT REMOVE SAFETY SCREW UNTIL THE DETECTION UNIT IS FULLY ARMED. REMOVE THE SAFETY SCREW ON THE PISTON ACCUMULATOR TO ARM THE SYSTEM Installation manual 65 Bar Rev F 48 (67)

49 To disarm the system, simply insert the safety screw and close the ball valve on the detection bottle. Section 17 Functional Check After Installation 1. The Fogmaker piston accumulator is tested for leakage for at least 3 days after production prior to delivery, so testing by the customer is not necessary. 2. A test of the tightness of the pipe system must be carried out by connecting compressed air to one end of the piston accumulator connection, after which all connections and joints are sprayed with leakage spray and are observed. (Nozzles are to be temporarily replaced with plugs during this test.) Make sure that all nuts for the pipe and nozzle connectors have been tightened in correctly. Mark all nuts after check with paint marker. Draw a line over every nut and connector body. This will indicate and remind that each nut has been checked. 3. A hydro pneumatic detection system is checked after the ball valve on the detection container has been opened, after which all the joints and connections are tested for leakage with leakage spray. Any possible leaks are rectified. The gauge on the hydro pneumatic system should thereafter be observed for a minimum of one week. The pressure shall be between bar. 4. For electrical systems*, check that all wires are correct and that there are no faulty connections. Check the alarm panel function per the appropriate Alarm Panel Manual. 5. This fire suppression unit is to be maintained and inspected according to the Standard for Extinguishing Agent Extinguishing Systems, NFPA Installation manual 65 Bar Rev F 49 (67)
50 Section 18 Action In Case of Fire The following shall be observed in the event of fire in the protected area: 1. Stop engines, cooling and HVAC System. 2. Turn off the main power switch. 3. If possible, close doors/lids to the protected area. 4. Activate Fogmaker. If the system is not fully automatic or is in the manual position, pull the wire handle or press the release button. 5. Close the fuel supply to the engine. 6. If possible, keep doors/lids to the protected area closed for five minutes after suppressing. Have a hand fire extinguisher on standby if the fire should flame up again. Section 19 Actions After Suppressing The suppression fluid contains frost protection, rust inhibitor, and film-forming liquids that are broken down by natural organisms. When the fluid dries, the corrosion protection loses its effect. In order to avoid corrosion on metal parts, these parts must be cleaned as soon as possible. This is done by flushing with fresh water, preferably under high pressure. Also use some form of alkaline washing detergent that facilitates the removal of film formation. Otherwise a coating can remain which collects impurities. The nozzles should be removed and the tube set flushed with fresh water. After flushing with fresh water, the tube set should be blown dry with compressed air. Refer to system function reset instructions in section 22. IMPORTANT In order to protect engines, electrical installations, and other metal parts against corrosion, flush the remains of dried or moist suppression fluid as soon as possible after the release of the piston accumulator (use a high pressure washer if possible), irrespective of whether the piston accumulator has been released in connection with a fire or for other reasons. Section 20 Control Plan for the Suppression System The Fogmaker system should be inspected per the instructions listed in the Service Manual, number Installation manual 65 Bar Rev F 50 (67)
51 Section 21 Effect of Suppressing Fogmaker does not normally harm the function of an engine. If the suppression fluid is sucked into the air intake on the engine, it will not significantly change the function of the engine. However, starting difficulties can occur with diesel engines since the incoming suppression fluid contains water. Note that the suppression fluid can cause corrosion damage if the engine is not cleaned within a short time after the fire. For safety s sake, the engine should be protected by filling it with a little oil and turning over the start motor for a few revolutions. The function of the electrical system can be affected by the suppression fluid and give undesirable short-circuits if the cleaning protocol described in Section 18 is not performed quickly. The protected equipment can be used again once it has been cleaned and the cause of the fire has been eliminated, assuming that the fire itself has not caused damage that must first be repaired. Section 22 Function Reset after a Fire After Fogmaker has been released, the piston accumulator must be refilled. For a hydro pneumatic system, the detection cylinder must be replaced. This must be carried out by authorized personnel. For parts, see the Fogmaker Parts Catalog. Take the following actions if the piston accumulator is to be removed and delivered to an authorized repair facility: 1. Install the safety screw in the release valve. See Section 8 for instructions. 2. Remove the hydraulic hose from the release valve on the piston accumulator and inspect and replace when indications of mechanical damage or corrosion are observed. 3. Loosen the wire from the release valve on the piston accumulator for a mechanical system or the electric wire on an electric system*. Remove and replace the detection tube on a hydro pneumatic system. 4. Remove the piston accumulator and the detection cylinder and return them to an authorized service facility for inspection and refilling. 5. Remove the nozzles and flush the pipe system with water. (Rinsing tools can be ordered from Fogmaker.) Then blow out the pipe lines with psi of compressed air. 6. Install new nozzles. 7. When the piston accumulator and the detection cylinder have been refilled, they are to be installed again as in a new installation. 8. Activate the system per the Arm-Disarm Instructions in Section Installation manual 65 Bar Rev F 51 (67)
52 Section 23 Winter Storage The suppression fluid in Fogmaker is, as standard, frost protected to withstand temperatures down to approximately -30 C (-22 F) unless otherwise ordered. If Fogmaker Universal is installed in places where the temperature during the winter can be lower than the frost protection limit, the piston accumulator must be removed. Refer to Arm-Disarm Instructions in Section 16 before removal. Section 24 Technical Data Single Piston Accumulator Product name Universal 3.3 l Universal 4 l Universal 6.5 l Universal 7.5 l Filled Piston Accumulator weight (lb) Volume suppressant fluid approx Double Piston Accumulators Product name Universal 6 l Universal 8 l Universal 13 l Universal 14 l Filled Piston Accumulator weight (lb) Volume suppressant fluid approx Triple Piston Accumulators Product name Universal 12 l Universal 11 l Universal 19 l Universal 21 l Filled Piston Accumulator weight (lb) Volume suppressant fluid approx Common technical data: Material Container Mounting brackets Valve Anodizing Extruded high resistant aluminum AA 6061 T6 Aluminum, straps of stainless steel Brass, pertaining components of stainless steel Min 20 μm, all aluminum parts Other specifications Ambient temperature container Min. -30 C (-22 F) Max. 65 (149 F) Suppressant fluid Water, frost protection, film-former Frost protection temperature Standard to -30 C (if not other ordered) Propellant Nitrogen Test pressure cylinder 190 bars Charging pressure (approx.) 65 bars at 22 C Installation manual 65 Bar Rev F 52 (67)
53 Section 25 Material Safety Data Sheets (MSDS) 17.1 Extinguishant -35 Safety Data Sheet Version: 7 Version Date: 12/02/ Identification of the substance/preparation and of the company/undertaking Trade name: Extinguishant -35 Supplier: Fogmaker International AB Box 8005 Sandvägen Växjö Tel: +46 (0) , Fax: +46 (0) info@fmna.com Internet: VAT no.: Tel. with emergency situation: +46(0) (Kemiindustrins ERC) 2. Hazards identification The product is not restricted by any hazards identification. 3. Composition/information on ingredients Chemical Characterization: High pressure water mist fire extinguishing liquid based water. Amount is based at freezing point 35 o C Component Amount % CAS Einecs nr Symbol R- phrase Brine of carboxylic acids AFFF Xi R36/38 1,2-Ethandiol < 0, Xn R22 Synthetic Surfactant < 0,2 Trade Secret Xi R Installation manual 65 Bar Rev F 53 (67)
54 Fluorosurfactant Composition < 0,7 Trade Secret Xi R36-52/53 Corrosion inhibitors < 1,5 Aliphatic acid, Sodium salt < 0,5 Xn R63 Tolytriazol < 0, Xn R22 Water First-aid measures Eye Contact: Skin Contact: Inhalation: Ingestion: Wash eye thoroughly with water. If irritation persists, obtain medical advice. Wash with water and soap. In case of excessive exposure, get fresh air. Drink much water, seek medical attention. 5. Fire Fighting Measures 6. Accidental Release Measures Not flammable, non-burning liquid. Possesses extinguishing properties. Steps to be Taken if Material is Released or Spilled: Flush with much water, accidental release can be flushed in sink with excess hygiene. 7. Handling and Storage General Handling: Sink and water should be available close to working place. 8. Exposure Controls / Personal Protection Personal Protection Normal ventilation, wear plastic gloves. Protect eyes with goggles when contact may occur 9. Physical and Chemical Properties Physical State Colorless liquid Density (kg/m3): Boiling point ( C): Ca 109 Melting point ( C): Installation manual 65 Bar Rev F 54 (67)
55 PH Ca 8-9 Solubility (% of the weight): Flash point ( C): 10. Stability and Reactivity Unlimited in water, glycol, alcohol and glycerine. Not flammable Stability: Condition to avoid: Stable at normal conditions, does not react with other water-based heat transfer fluids. Not suitable materials galvanized steel, zinc and soft solder. 11. Toxicological Information Skin contact: Eye contact: Ingestion: LD50 oral rat: A prolonged contact with the skin may give redness or skin chaps. Unlikely to cause other than temporary redness on accidental contact. The product has a bitter taste, which gives a warning if the product is digested by mistake. The product is not toxic. LD50, oral rat: > mg/kg. 12. Ecological Information Persistence/Degradability: Bio-accumulation: Ecotoxicity: Corrosion inhibitors Biodegradation: Aquatic toxicity: Bio-accumulation: The product is not regarded as being toxic to the environment. components are easily biodegradable, DOC (OECD 301A): 99% days. Not bioaccumulating. Most of the components act as fertilizers and enter in to the biological circulation and do not accumulate in any micro organisms, plants or other living species. LC50 96h, OECD TG203 (Rainbow Trout, Oncorhynchus mykiss) mg/l and is not classified as acute aquatic toxic. 92 % after 18 days. Readily biodegradable. The product is not regarded as being toxic to the environment. The product is regarded to have low potential for bioaccumulation. Fire extinguishing foam Information on elimination The product is very well bio-degradable. Approximately 96% Installation manual 65 Bar Rev F 55 (67)
56 in 28 days (DIN EN ISO 9888). COD: appr mg O2/liter (concentrate; DIN EN H41-1) appr mg O2/liter (3% solution; DIN EN H41-1) BOD5: appr mg O2/liter (concentrate; DIN EN ) appr mg O2/liter (3% solution; DIN EN ) Influence on sewage systems Influence unlikely if induced at concentrations lower than the following(ttc Test, DIN L3):Concentrate: < mg/l(> 265 times diluted)solution 3%: < mg/l(> 8 times diluted) Fish Toxicity LC50: appr mg/liter (96h, OECD 203) Algae Toxicity ErC50: appr. 95 mg/liter (72 h, OECD 201) Daphnia Toxicity EC50:appr mg/liter (48h, OECD 202) 13. Disposal Considerations Product disposal: Dispose in accordance with local regulations 14. Transport Information 15. Regulatory Information Not regulated. ADR/RID, IMDG or DGR. The product does not fall under any EC labeling regulation. The safety data sheet is prepared according EC-directive. 16. Other Information Installation manual 65 Bar Rev F 56 (67)
57 Revision Fogmaker International AB urges each customer or recipient of this (M)SDS to study it carefully and consult appropriate expertise, as necessary or appropriate, to become aware of and understand the data contained in this (M)SDS and any hazards associated with the product. The information herein is provided in good faith and believed to be accurate as of the effective date shown above. However, no warranty, express or implied, is given. Regulatory requirements are subject to change and may differ between various locations. It is the buyer's/user's responsibility to ensure that his activities comply with all federal, state, provincial or local laws. The information presented here pertains only to the product as shipped. The product is solely designed for use as extinguishant in Fogmaker fire suppression system. For all other usage the buyers/users must determine the conditions necessary for the safe use of this product. Due to the proliferation of sources for information such as manufacturer-specific (M)SDSs, we are not and cannot be responsible for (M)SDSs obtained from any source other than ourselves. If you have obtained an (M)SDS from another source or if you are not sure that the (M)SDS you have is correct, please contact us for the most recent version Fogmaker Detector Fluid Safety Data Sheet Revision A Version Date: 2/29/ Identification of the substance/preparation and of the company/undertaking Trade name: Fogmaker Detection fluid Supplier: Fogmaker International NA 150 Gordon Drive Exton PA, Tel: Fax: info@fmna.com Internet: Tel. with emergency situation: Hazards identification Red liquid. Avoid temperatures above 450F, 232C. 14. Composition/information on ingredients Installation manual 65 Bar Rev F 57 (67)
58 Chemical Characterization: High pressure water mist fire suppression Loss Of Pressure Detector fluid. Amount is based at freezing point 35 o C Component Amount % CAS Product code MSD Dowfrost See below for Dowfrost (MSDS) Mixture Water First-aid measures Eye Contact: Skin Contact: Inhalation: Flush eyes thoroughly with water. If irritation persists, obtain medical advice. Wash in flowing water or shower. Remove to fresh air if effects occur. Consult a physician Ingestion: Material Safety Data Sheet Dowfrost : Installation manual 65 Bar Rev F 58 (67) No adverse effects anticipated by this route of exposure incidental to proper industrial handling. Section 1: Chemical Product and Company Identification Product Name: Dowfrost Catalog Codes: SLD2902 CAS#: Mixture. RTECS: Not applicable. TSCA: TSCA 8(b) inventory: Propylene glycol; Potassium phosphate dibasic; Water CI#: Not applicable. Synonym: Dowfrost; Chemical Name: Dowfrost Chemical Formula: Not applicable. Contact Information: Sciencelab.com, Inc Smith Rd. Houston, Texas US Sales: International Sales: Order Online: ScienceLab.com CHEMTREC (24HR Emergency Telephone), call: International CHEMTREC, call: For non-emergency assistance, call: Section 2: Composition and Information on Ingredients Composition:
59 Name CAS # % by Weight Propylene glycol Potassium phosphate dibasic Water Toxicological Data on Ingredients: Propylene glycol: ORAL (LD50): Acute: mg/kg [Rat] mg/kg [Mouse]. DERMAL (LD50): Acute: mg/kg [Rabbit]. Potassium phosphate dibasic LD50: Not available. LC50: Not available. Section 3: Hazards Identification Potential Acute Health Effects: Hazardous in case of inhalation. Slightly hazardous in case of skin contact (permeator), of eye contact (irritant), of ingestion. Non-corrosive for skin. Non-irritant for skin. Potential Chronic Health Effects: Slightly hazardous in case of skin contact (irritant), of eye contact (irritant), of ingestion, of inhalation. Non-corrosive for skin. Non-sensitizer for skin. Non-permeator by skin. CARCINOGENIC EFFECTS: Not available. MUTAGENIC EFFECTS: Not available. TERATOGENIC EFFECTS: Not available. DEVELOPMENTAL TOXICITY: Not available. The substance is toxic to mucous membranes. Repeated or prolonged exposure to the substance can produce target organs damage. Section 4: First Aid Measures Eye Contact: Check for and remove any contact lenses. Immediately flush eyes with running water for at least 15 minutes, keeping eyelids open. Cold water may be used. Get medical attention. Skin Contact: In case of contact, immediately flush skin with plenty of water. Remove contaminated clothing and shoes. Cold water may be used. Wash clothing before reuse. Thoroughly clean shoes before reuse. Get medical attention. Serious Skin Contact: Not available. Inhalation: If inhaled, remove to fresh air. If not breathing, give artificial respiration. If breathing is difficult, give oxygen. Get medical attention. Serious Inhalation: Not available. Ingestion: Do NOT induce vomiting unless directed to do so by medical personnel. Never give anything by mouth to an unconscious person. Loosen tight clothing such as a collar, tie, belt or waistband. Get medical attention if symptoms appear. Serious Ingestion: Not available. Section 5: Fire and Explosion Data Flammability of the Product: May be combustible at high temperature. Auto-Ignition Temperature: The lowest known value is 410 C (770 F) (Propylene glycol). Flash Points: OPEN CUP: 102 C (215.6 F). Flammable Limits: LOWER: 2.6% UPPER: 12.5% Products of Combustion: These products are carbon oxides (CO, CO2). Some metallic oxides Installation manual 65 Bar Rev F 59 (67)
60 Fire Hazards in Presence of Various Substances: Flammable in presence of oxidizing materials. Slightly flammable to flammable in presence of open flames and sparks, of heat. Non-flammable in presence of shocks, of reducing materials, of combustible materials, of organic materials, of metals, of acids, of alkalis, of moisture. Explosion Hazards in Presence of Various Substances: Risks of explosion of the product in presence of mechanical impact: Not available. Risks of explosion of the product in presence of static discharge: Not available. Fire Fighting Media and Instructions: SMALL FIRE: Use DRY chemical powder. LARGE FIRE: Use water spray, fog or foam. Do not use water jet. Special Remarks on Fire Hazards: When heated to decomposition it emits acrid smoke and irritating fumes. (Propylene glycol) Special Remarks on Explosion Hazards: Not available. Section 6: Accidental Release Measures Small Spill: Dilute with water and mop up, or absorb with an inert dry material and place in an appropriate waste disposal container. If necessary: Neutralize the residue with a dilute solution of acetic acid. Finish cleaning by spreading water on the contaminated surface and dispose of according to local and regional authority requirements. Large Spill: Absorb with an inert material and put the spilled material in an appropriate waste disposal. Neutralize the residue with a dilute solution of acetic acid. Finish cleaning by spreading water on the contaminated surface and allow to evacuate through the sanitary system. Section 7: Handling and Storage Precautions: Keep away from heat. Keep away from sources of ignition. Empty containers pose a fire risk, evaporate the residue under a fume hood. Ground all equipment containing material. Do not ingest. Do not breathe gas/fumes/ vapor/spray. Wear suitable protective clothing. In case of insufficient ventilation, wear suitable respiratory equipment. If ingested, seek medical advice immediately and show the container or the label. Keep away from incompatibles such as oxidizing agents. Storage: Keep container tightly closed. Keep container in a cool, well-ventilated area. Do not store above 121 C (249.8 F). Section 8: Exposure Controls/Personal Protection Engineering Controls: Provide exhaust ventilation or other engineering controls to keep the airborne concentrations of vapors below their respective threshold limit value. Ensure that eyewash stations and safety showers are proximal to the work-station location. Personal Protection: Safety glasses. Lab coat. Vapor respirator. Be sure to use an approved/certified respirator or equivalent. Gloves (impervious). Personal Protection in Case of a Large Spill: Splash goggles. Full suit. Vapor respirator. Boots. Gloves. A self contained breathing apparatus should be used to avoid inhalation of the product. Suggested protective clothing might not be sufficient; consult a specialist BEFORE handling this product. Exposure Limits: Not available Installation manual 65 Bar Rev F 60 (67)
61 Section 9: Physical and Chemical Properties Physical state and appearance: Liquid. Odor: Odorless. Taste: Not available. Molecular Weight: Not applicable. Color: Colorless. ph (1% soln/water): Basic. Boiling Point: 188 C (370.4 F) Melting Point: May start to solidify at -59 C (-74.2 F) based on data for: Propylene glycol. Critical Temperature: Not available. Specific Gravity: 1.05 (Water = 1) Vapor Pressure: 0 kpa (@ 20 C) Vapor Density: 2.62 (Air = 1) Volatility: Not available. Odor Threshold: Not available. Water/Oil Dist. Coeff.: Not available. Ionicity (in Water): Not available. Dispersion Properties: See solubility in water, methanol. Solubility: Easily soluble in cold water, hot water, methanol. Section 10: Stability and Reactivity Data Stability: The product is stable. Instability Temperature: Not available. Conditions of Instability: Not available. Incompatibility with various substances: Reactive with oxidizing agents. Slightly reactive to reactive with acids. Corrosivity: Non-corrosive in presence of glass. Special Remarks on Reactivity: Hygroscopic; keep container tightly closed. Incompatible with chloroformates. (Propylene glycol) Special Remarks on Corrosivity: Not available. Polymerization: Will not occur. Section 11: Toxicological Information Routes of Entry: Absorbed through skin. Eye contact. Inhalation. Ingestion. Toxicity to Animals: Acute oral toxicity (LD50): mg/kg [Rat]. (Propylene glycol). Acute dermal toxicity (LD50): mg/kg [Rabbit]. Chronic Effects on Humans: Not available. Other Toxic Effects on Humans: Hazardous in case of inhalation. Slightly hazardous in case of skin contact (permeator), of ingestion. Non-irritant for skin. Special Remarks on Toxicity to Animals: Not available. Special Remarks on Chronic Effects on Humans: Can cause gastrointestinal disturbances. (Propylene glycol) Special Remarks on other Toxic Effects on Humans: Not available. Section 12: Ecological Information Ecotoxicity: Not available. BOD5 and COD: Not available. Products of Biodegradation: Installation manual 65 Bar Rev F 61 (67)
62 Possibly hazardous short term degradation products are not likely. However, long term degradation products may arise. Toxicity of the Products of Biodegradation: The product itself and its products of degradation are not toxic. Special Remarks on the Products of Biodegradation: Not available. Section 13: Disposal Considerations Waste Disposal: Section 14: Transport Information DOT Classification: Not a DOT controlled material (United States). Identification: Not applicable. Special Provisions for Transport: Not applicable. Section 15: Other Regulatory Information Federal and State Regulations: Pennsylvania RTK: Propylene glycol TSCA 8(b) inventory: Propylene glycol; Potassium phosphate dibasic; Water Other Regulations: OSHA: Hazardous by definition of Hazard Communication Standard (29 CFR ). Other Classifications: WHMIS (Canada): CLASS D-2B: Material causing other toxic effects (TOXIC). DSCL (EEC): R36/38- Irritating to eyes and skin. HMIS (U.S.A.): Health Hazard: 1 Fire Hazard: 0 Reactivity: 0 Personal Protection: g National Fire Protection Association (U.S.A.): Health: 0 Flammability: 1 Reactivity: 0 Specific hazard: Protective Equipment: Gloves (impervious). Lab coat. Vapor respirator. Be sure to use an approved/certified respirator or equivalent. Wear appropriate respirator when ventilation is inadequate. Safety glasses. Section 16: Other Information References: This is a Trademark product of the Dow Chemical Company Other Special Considerations: Not available. Created: 10/10/ :04 AM Last Updated: 11/01/ :00 PM The information above is believed to be accurate and represents the best information currently available to us. However, we make no warranty of merchantability or any other warranty, express or implied, with respect to such information, and we assumeno liability resulting from its use. Users should make their own investigations to determine the suitability of the information for their particular purposes. In no event shall ScienceLab.com be liable for any claims, losses, or damages of any third party or for lost profits or any special, indirect, incidental, consequential or exemplary damages, howsoever arising, even Installation manual 65 Bar Rev F 62 (67)
63 if ScienceLab.com has been advised of the possibility of such damages. Note: Fogmaker NA urges each customer or recipient of this (M)SDS to study it carefully and consult appropriate expertise, as necessary or appropriate, to become aware of and understand the data contained in this (M)SDS and any hazards associated with the product. The information herein is provided in good faith and believed to be accurate as of the effective date shown above. However, no warranty, express or implied, is given. Regulatory requirements are subject to change and may differ between various locations. It is the buyer's/user's responsibility to ensure that his activities comply with all federal, state, provincial or local laws. The information presented here pertains only to the product as shipped. The product is solely designed for use as detector fluid in Fogmaker fire suppression system. For all other usage the buyers/users must determine the conditions necessary for the safe use of this product. Due to the proliferation of sources for information such as manufacturer-specific (M)SDSs, we are not and cannot be responsible for (M)SDSs obtained from any source other than ourselves. If you have obtained an (M)SDS from another source or if you are not sure that the (M)SDS you have is correct, please contact us for the most recent version. Section 26 Performed Functional Tests and Technical Approvals Testing authority Standard Date ÅF-Kontroll AB PED 97/23/EC Pressure vessel approval (-40/+65 C) Swedac AFS 1994:39, LA Design Reviev Certificate The International Automobilist Art. 253, Safety equipment Federation (FIA) Homologating no. Ex , Techno. List No 16 (Groups N, A, B) The Swedish Testing and Research SBF 128 for Busses Institute (SP) F The Swedish Administration Rep: no. 96 R30737b of Shipping and Navigation regulations from Extinguishing test in 5 m3 The Swedish Administration Type approval of Shipping and Navigation regulations File: for engine bays < 5 m3 for pleasure boats Installation manual 65 Bar Rev F 63 (67)
64 The Swedish Fire SBF Protection Association Approved extingui- Dnr. NF shing test in loaders for the peat industry 04:127 S01 Certificate for full scale test SBF SBF for homologation of needed water quantity Approved extinguishing test at 2,0 lit/m3 The Swedish Fire SBF Protection Association. Dnr. NF Approved for extinguishing in buses 04:S 02 RINA of Italy Approval of fixed ISO : aerosol fire extinguishing systems in ISO :2002 machinery spaces. Cert no. FPE CS Bureau Veritas of France Cert no /A0 BV MARINE DIVISION Certificate for machinery spaces up to 96 m 3. File number : ACI 2000/054/001Product code : 5561D Fogmaker North America Limited Warranty 2013 WARRANTY: Fogmaker North America LLC (FMNA) warrants to the original buyer that its Automatic Fire Suppression Systems (AFSS) are free from defects in material and workmanship for a period of two (2) year. FMNA also warrants to the original buyer that its Methane Detection Systems are free from defects in material and workmanship for a period of two (2) years with exception of the Methane Sensors which are covered with a one (1) year warranty. Warranty period begins at time of installation NON-PRORATED REPLACEMENT: In the event that a warranty-covered failure should occur within the warranty period, FMNA will repair or replace the system without charge and without prorating, at FMNA s option. This is the sole and exclusive remedy for breech of any warranty. Any replacement system or part is only covered by this warranty for the remainder of warranty period applicable to the original system. EXCLUSIONS: This warranty specifically excludes any items exposed to normal wear and tear such as metal finish and paint and does not apply to any system that is damaged as result of accident, derailment, improper installation, structural defects, intentional damage, abuse, vandalism, negligence, misuse, improper operating conditions, or extreme natural phenomena. Systems exposed to toxic or corrosive materials are excluded from this warranty. This warranty is provided directly to the purchaser only and does not extend to any subsequent party and is solely for the FMNA product as it is originally manufactured. INCIDENTAL, CONSEQUENTIAL DAMAGES, & LIMITATIONS: This warranty shall be in lieu of any other warranty, expressed warranty, expressed or implied, including but not limited to any implied warranty of merchantability or fitness for a particular purpose. The purchaser s sole and exclusive remedy against FMNA shall be for the repair and replacement of the defective product as provided herein. No other remedy; including but not limited to incidental or consequential damages for lost profits, lost sales, injury to person or property, shipping, freight, installation, removal, or any other incidental or consequential loss shall be available to the purchaser. NOTIFICATION: All reports, claims, or notices required by the warranty to be provided to FMNA must be in writing and delivered to: Attention FMNA Warranty Claim Department, 150 Gordon Drive, Exton, PA Repairs being claimed for warranty must be sent to Installation manual 65 Bar Rev F 64 (67)
65 FMNA for prior approval and warranty acceptance before any warranty claims can be made. Parts being claimed for warranty must be sent to FMNA for prior approval and warranty acceptance before any warranty claims can be made. INSPECTION AND VERIFICATION: The owner must provide access to the failed system so that FMNA's authorized representative can perform an on-site inspection. Within 30 days of the inspection, FMNA will render an opinion as to whether or not the claimed failure is covered by the warranty. This inspection will be executed utilizing the FMNA Certification Report ensuring the execution matches the original certified installation. GENERAL MAINTENANCE: FMNA provides the proper maintenance instructions, as well as recommended service intervals with each system. Warranty is contingent upon documented performance of recommended maintenance and service. All replacement parts should be recommended or authorized FMNA components. Failure to purchase proper components will null and void the warranty. DESIGN: FMNA reserves the right to modify parts and design specifications without notice as long as the systems meet general specifications, unless otherwise committed per contract. In case further non-conforming changes have to be incorporated, FMNA will submit such changes to customer for prior approval. Warranty FogmakerNA Nov10.doc Installation manual 65 Bar Rev F 65 (67)

66 FMNA Fire Suppression System Inspection Report Installation Report Service Report Service Technician Order # Date Work Site Customer # of Nozzles ** Piston Accumulator Address Serial # PA Gauge City, State, Zip Reading Contact Name Detector Serial # Detector Gauge Contact Phone End User Vehicle # Vehicle Mfg. Reading Vehicle Year/Model ** Contact FMNA Engineering or OEM for correct number & placement of nozzles 1 Piston Accumulator (PA) YES NO NA 1.1 Control Fixture/ Vibration Damage Are all mounting locations of the PA intact with no signs of wear or breakage? 1.2 Control Protection Box / Labels Is the protection box intact with no signs of wear or breakage? Are all labels visible and legible? 1.3 Control Leakage / Corrosion Is there any indication of leakage or corrosion around the PA couplings/valve/connections? 1.4 Change of Service Interval Label / Control of Gauge Pressure Is the service interval date label changed for next inspection? For annual inspections only, is the annual inspection label replaced as required for warranty? Is the pressure gauge indicating in the green area on the PA and pressure reading recorded on this form? Is the safety screw for the release valve located on the PA removed and is the system active? 2 Cable Activation / Electric Activation* BEFORE PERFORMING ANY WORK ON ACTIVATION, RE-INSERT THE SAFETY SCREW! YES NO NA 2.1 Checking the Cable or Electric Activation* Is the manual or electric punch* properly installed and properly connected? For cable activation, inspect the handle lever for proper sealing and/or damage. Lubricate cables and handle assembly, if applicable. Check cables and harness connections on electrical punch*, if applicable. Confirm the pull pin can be removed on the manual button. 3 Sprinkler System / Hydraulic Hose (Distribution System) YES NO NA 3.1 Control for Vibration Damage / Wear Are there any indications of damage/wear on any hoses or pipes in the system? Are the stainless pressure lines free of kinks and nicks? 3.2 Control for Braces (Clamps), Tightness Are all braces or clamps secure per the installation instructions and in good condition? Are all connections tightened per the requirements in the installation instructions? 3.3 Control for Protective Covers / Proper Positioning of Nozzles Are the proper number of nozzles installed? Are all nozzles properly positioned per First Article Inspection and free of obstructions? Are the protective covers for the nozzles in position and clean? If not, replace with new ones. 3.4 Control for Breakages / Cracks on Hydraulic Hoses Are all hoses secure and in good condition? Are all hoses & tubing connections tight with no possibility for leaks? Installation manual 65 Bar Rev F 66 (67)
67 4 Detection System YES NO NA 4.1 Control for Detection Gas Cylinder / Detection Fluid Cylinder Are all mounting locations of the detection bottle intact with no signs of wear or damage? Is the pressure gauge indicating in the green area on the detection bottle and the pressure reading recorded on this form? 4.2 Control for Detection Tube / Clamps Is the routing and fixture of the detection tube free from wear or other damage? Is there any area of the detection tubing unprotected? Is the detection tube free of abrasions and secured, and does nothing contact the tube through the protective coil, etc.? Are all tubing connections tight with no possibility for leaks? 4.3 Control for Damage to Protective Tube / Protective Coil (Spiral) Is there any wear, pinching, or other damage to the protective tube or protective coil? Is the protective coil secure and are the ends properly bent according to the Installation Manual? 4.4 Control for Labels on the Detection Tube Are the Red FIRE DETECTOR labels clearly visible on the detection tube? Replace as needed. 5 Alarm Panel* / Alarm Device* / Cables* YES NO NA 5.1 Check for Slackness / Breakage / Cracks Is there any slack in the cables and are all joints/cables undamaged? 5.2 Function Test/Fire Simulation Is the green light illuminated on the control panel and does there appear to be no evidence of tampering? Has the control panel been tested per the instructions on the panel? 6 Other YES NO NA Is all electrical wiring intact and showing no sign of wear or damage? Are all control labels up to date and visible? Check if customer would like the system manuals sent electronically and notifiy customer service. Additional Comments: Service Tech (Printed) Signature Customer Name (Printed) Customer Signature Company Date Date Note: It is the customer's responsibility to ensure that all service checks are performed in accordance to Fogmaker North America's guidelines as indicated in the Installation Manual. Services and/or maintenance must be performed by a Fogmaker trained, certified technician. It is the responsibility of the customer to correct any problems as indicated by this document to ensure the proper function of the system Installation manual 65 Bar Rev F 67 (67)
68 Fogmaker Service manual Fire-suppressing with water mist for Enclosed spaces Fogmaker North America Post address: 150 Gordon Dr Exton, PA Delivery address: 150 Gordon Dr Exton, PA Tel: Fax: Service Manual Rev B
69 WARNING The safety screw shall always be installed during transport, installation and service. When the safety screw and protection plates are removed, Fogmaker can be released with light pressure on the release catch under the protection plate by mistake. The release valve must not be removed when the container is pressurized. If the valve or any of its nipples or connectors are removed when the container is pressurized, a powerful fluid spray 940 psi (65 bar) can be emitted and cause serious personal injury. Control plan for the suppression system The suppression system shall be serviced once a year by authorized personnel according to the control plan below. Every sixth year the piston accumulator (PA) shall be serviced and the suppression fluid shall be changed. The service may only be carried out by authorized personnel. Control plan for weekly inspection A visual inspection of the system components should be carried out every week to ensure that the system has not received any damage. Repairs should be completed by authorized personnel. Control plan for daily inspection Check that the pressure in the piston accumulator is correct by the gauge being in the green swept area. The pressure in the detector fluid bottle shall be in the green swept area. The pressures do not need to be checked if PA & Detector has electronic monitoring with pressure switches. Control plan for annual service 1. Piston Accumulator / cylinder 1.1 Control for mounting / vibration damage to the piston accumulator Check all mountings for any damage to the piston accumulator or other components or the suppression peripheral equipment. Also check that there is no vibration damage. 1.2 Control for protecting box / labels Check the condition of the protecting box so that it protects the piston accumulator satisfactorily and that the mounting is intact. Check labels and markings so that they are readable and easily visible. Replace with new ones if required. Check that the date is less than 6 years from manufacture date. Perform 6 year service if required. 1.3 Control for leakage / corrosion Check that there is no leakage / corrosion around the piston accumulator couplings / connections and valves Service Manual Rev B
70 1.4 Change of service interval label / Control of gauge pressure Change the service interval label and attach the new one with the correct month towards the arrow. Check the gauge pressure and note it on the inspection report. Note! The pressure should be in the green swept area. If deviations occur, contact Fogmaker or authorized service provider 2. Cable activation 2.1 Start by screwing in the safety screw in the valve. Check that all the releases are sealed and that all the wires run easily without damage to the wires or the releases that can affect their function. Remove the protective cover on the valve and free the wire so that it is possible to test its function. Spray with lubricating oil CRC 5-56 or the equivalent on the valve mechanism. Restore the wires and valve as well as sealing the releaser again. 3. Sprinkler system / hydraulic hose (distribution system) 3.1 Control for vibration damage / wear Check that there is no damage/wear on any hoses or pipes in the system. 3.2 Control for braces (clamps), tightness Check that braces for wear and that the pipe system is tightened in the correct way according to the installation manual. Check that all connections are tightened so that there is no risk for leakage. If a leakage is suspected, the system must be test pressurized according to the installation manual. 3.3 Control for Red protective covers for nozzles Visually check that the Red protective covers are in position and clean. If not, replace with new ones. 3.4 Control for breakages / cracks on hydraulic hoses Check hydraulic hoses for possible cracks or breakages that can cause faults or leakage when the system is released. 4. Detector system 4.1 Control for detector gas cylinder / detector fluid cylinder Check the condition and the fixture of the cylinder. The gauge pressure shall be in the green segment. If not, contact Fogmaker for consultation Service Manual Rev B
71 4.2 Control for detector tube/clamps Check the routing and fixture of the detector tube so that no wear or other damage can occur. Check that nothing is rubbing the detector tubing through the protective coil. 4.3 Control for damage to protective tube / protective coil (spiral) Check that there is no wear, pinching or other damage to the protective tube or protective coil and that it is secure according to the installation manual. Check clamps for wear and tightness. 4.4 Control for labels on the detector tube Check that the Red FIRE DETECTOR labels (part # FM-8206) are clearly visible on the detector tube so that it cannot be misinterpreted that it is a detector tube. Replace if damaged or missing. 5. Alarm panel / Alarm device / Cables 5.1 Check for slackness, breakage and cracks Check that is no slackness in the cables and that all joints / cables are undamaged. 5.2 Function test/fire Simulation Check that the Green indicator light is on. Simulate a fire by taking apart the contact to the pressure switch on the detector cylinder or and the piston accumulator. Refer to the Alarm Panel Manual for function test. 6.1 User manual 6. Other items Check that there is a user manual in the vehicle. Add if required. (Missing) 6.2 Activation labels/control Labels Check that there are activation/control labels according to the instructions in the installation manual. 6.3 Control if safety screw is out!!! Check that the detector system is activated and that the safety screw is removed from the PA valve. Refer to the Arm/Disarm Instructions Service Manual Rev B
72 FMNA Fire Suppression System Inspection Report Installation Report Service Report Service Technician Order # Date Work Site Customer # of Nozzles ** Piston Accumulator Address Serial # PA Gauge City, State, Zip Reading Contact Name Detector Serial # Contact Phone End User Vehicle # Vehicle Mfg. Detector Gauge Reading Vehicle Year/Model ** Contact FMNA Engineering or OEM for correct number & placement of nozzles 1 Piston Accumulator (P.A.) YES NO NA 1.1 Control Fixture/ Vibration Damage Are all mounting locations of the P.A. intact with no signs of wear or breakage? 1.2 Control Protection Box / Labels Is the protection box intact with no signs of wear or breakage? Are all labels visible and readable? 1.3 Control Leakage / corrosion Is there any indication of leakage or corrosion around the P.A. couplings/valve/connections? 1.4 Change of service interval label / Control of gauge pressure Is the service interval date label changed for next inspection? For annual inspections only, is the annual inspection label replaced as required for warranty? Is the pressure gauge indicating in the green area on the P.A. & pressure recorded on this form? Is the safety screw on the P.A. removed? 2 Cable activation / Electric Activation BEFORE PERFORMING ANY WORK ON ACTIVATION, RE-INSERT THE SAFETY SCREW! YES NO NA 2.1 Checking the cable or electric activation Is the manual or electric punch properly installed and properly connected? For cable activation, check handle lever for sealing or damage Lubricate wires & handle, if applicable. Check wires and harness connections on electrical punch, if applicable. Can the pull pin be removed on the manual button? 3 Sprinkler system / hydraulic hose (distribution system) YES NO NA 3.1 Control for vibration damage / wear Is there any damage/wear on any hoses or pipes in the system? Is the Stainless free of kinks and nicks? 3.2 Control for braces (clamps), tightness Are all braces or clamps secure per the installation instructions and in good condition? Are all connections tightened so that there is no risk for leakage? 3.3 Control for Red protective covers & Proper positioning of nozzles Are the proper number of nozzles installed? Are all nozzles properly placed per customer or FMNA drawing and free of obstructions? Are the Red protective covers position and clean? If not, replace with new ones. 3.4 Control for breakages / cracks on hydraulic hoses Are all hoses secure and in good condition? Are all hoses & tubing connections tight with no possibility for leaks? Service Manual Rev B
73 4 Detector System YES NO NA 4.1 Control for detector gas cylinder / detector fluid cylinder Are all mounting locations of the detector bottle intact with no signs of wear or breakage? Is the pressure gauge indicating in the green area on the detector bottle & pressure reading recorded on this form? 4.2 Control for Detector Tube/Clamps Is the routing and fixture of the detector tube free from wear or other damage? Is there any area of the detector tubing unprotected? Is the detection tube free of abrasions, secured, & nothing contacting tube through coil, etc.? Are all tubing connections tight with no possibility for leaks? 4.3 Control for damage to protective tube / protective coil (spiral) Is there any wear, pinching, or other damage to the protective tube or protective coil? Is the protective coil secure according and the ends properly bent according to the installation manual? 4.4 Control for labels on the detector tube Are the Red FIRE DETECTOR labels are clearly visible on the detector tube? Replace as needed 5 Alarm panel / Alarm device / Cables YES NO NA 5.1 Check for slackness, breakage and cracks Is there any slack in the cables and are all joints / cables are undamaged? 5.2 Function test/fire Simulation Is the green light illuminated on the control panel and no evidence of tampering? Did you test the control panel per instructions on the panel? 6 Other YES NO NA Is all wiring intact and shows no sign of wear or melting? Are all control labels up to date and easily shown? Check if customer would like a manual sent electronically and notify customer service Additional Comments: Service Tech (Printed) Customer Name (Printed) Signature Company Customer Signature Date Date Note: It is the customer's responsibility to ensure that all service checks are performed in accordance to Fogmaker North America's guidelines as indicated in the Installation Manual. Services and/or maintenance must be performed by a Fogmaker trained, certified technician. It is the responsibility of the customer to correct any problems as indicated by this document to ensure the proper function of the system Service Manual Rev B

74 MShield GD2 Methane Fume Detector Installation and Operation Manual MADE IN THE USA. Sold separately or in conjunction with Fogmaker North America s Fire Suppression System Contact: Fogmaker NA 150 Gordon Dr Exton, PA Ph READ THIS MANUAL CAREFULLY AND SAVE FOR FUTURE REFERENCE. KEEP THIS MANUAL WITH THE MShield. Introduction The vapor-monitoring system utilizes advanced technology for detection of methane fumes. The MShield allows the connection of four (4) sensors (with optional splitter FM-US ) and has both visual and audible alarms that trigger at 20% and 50% LEL of methane respectively. Test switches are provided for full checking of all operations. System operation and correct sensor operation are continually monitored and indicators are provided for fault detection. The MShield P/N: FM-US Page 1 Rev. C
75 has an internal relay for automatic control of an external device up to 1 amp. Read this owner s manual completely before installation. Failure to read and follow these instructions can result in damage to the unit voiding the warranty. Components This Kit Includes 1 MSHIELD Display PART NUMBER FM-US MS-3 Sensors part number FM-US S2B CABLE part number FM-US Horn Optional Components: MS-3 Cable 5 Extension Cable for MS-3 Sensor Part number FMWH MS-3 Cable 10 Extension Cable for MS-3 Sensor Part number FMWH MS-3 Cable 15 Extension Cable for MS-3 Sensor Part number FMWH MS-3 Cable 20 Extension Cable for MS-3 Sensor Part number FMWH MS-3 Cable 25 Extension Cable for MS-3 Sensor Part number FMWH Splitter Splitter for 1 Additional Sensor Part number FM-US CAUTION: NO POWER ON/OFF SWITCH IS PROVIDED FOR THIS UNIT. TO FUNCTION AS INTENDED, THE MSHIELDMUST BE CONNECTED TO A CORRECT POWER SOURCE, AND FOR MAXIMUM EFFECTIVENESS, BE POWERED AT ALL TIMES A DANGER MAY BE PRESENT. IF POWER IS ON AND LEFT UNATTENDED FOR AN EXTENDED PERIOD OF TIME, BATTERY POWER MAY BE DIMINISHED. P/N: FM-US Page 2 Rev. C
76 Manual Display Controls / Indicator 1 Zone 1 Sensor OK LED (Green when sensor is detected and sending OK signal) 2 Zone 1 Sensor Warning LED (Orange when sensor detects 20% LEL) 3 Zone 1 Sensor Danger LED (Red when sensor detects 50% LEL) 4 Power/Fault (Green display is functioning properly) 5 Zone 2 Sensor OK LED (Green when sensor is detected and sending OK signal) 6 Zone 2 Sensor Warning LED (Orange when sensor detects 20% LEL) 7 Zone 2 Sensor Danger LED (Red when sensor detects 50% LEL) 8 Fault (Yellow system has fault) Display Installation The MShield should be mounted in a convenient location, preferably at the source of methane usage where the visual indicators may be readily seen. To install the display, you must first remove the screw on bezel. Next, drill a 2-1 /16 diameter hole into the panel. Slip the instrument through the hole and secure with the threaded bezel. For surface mount installation there are 4 locations at the corner s of the display recessed for drilling. By drilling these out with a 3/16 drill bit from the back of the housing. The holes are spaced 2.18 inches from each other in each corner. Sensor Installation Install sensor in a location that will be high enough to detect the methane fumes but also out of the path of any kind of constant external air flow or sources of contamination. Methane is lighter than air and will rise. Therefore, it is important that a location be selected with this in mind. Wiring the MShield Wire the power connector to the systems 12V battery. Connect the black wire to the Gnd from the battery. Connect the red wire to the positive side of the battery. If auxiliary devices are used that require 12V the orange or purple wire can be used to supply the 12V as they are connected internally to the red wire. To switch an auxiliary device connect the blue or green wire to the ground of the device to be switched. When 50% of the LEL of methane is detected the internal relay will close connecting Gnd to the blue and green wires. Plug the appropriate connectors into the display. Cables are available in various lengths to allow remote mounting of the sensors. (See Optional Components) P/N: FM-US Page 3 Rev. C


77 System Diagram with Splitter P/N: FM-US Page 4 Rev. C
78 System Diagram for Remote Panel P/N: FM-US Page 5 Rev. C
79 Operation When first turned on the display will sequence through each of the LEDs to confirm operation. It will also cycle the output relay. After startup the LEDs will illuminate as described in the Manual Displays section. If methane is detected the warning or danger LED will turn on depending on concentration. If methane is detected at 50% of the LEL or greater then the LED indicator will remain on in addition the relay will activate. (generally connected to an external horn) Testing Display Mode Internal operation of the display mode may be tested using the corresponding TEST switch. Pressing the test buttons will test the LEDs and relay function. Sensor Fault Detection Should the unit determine that either of the sensors is faulty or disconnected, the Service Required LED will turn on. Nuisance Alarms The sensor used for the MShield is sensitive to hydrocarbons- an alarm may be triggered by the use of other chemicals such as cleaners, paint, polish, etc The sensors will also detect hydrogen fumes from an overcharged battery. If no gasoline fumes are present, check for recent use of cleaners, fiberglass repairs, strong adhesives, etc If none of these are present, the sensor may have been damaged and will need replacement. WARNING The MShield has been designed to alarm visually at 20% of the LEL (Lower Explosive Limit) of Methane and alarm visually and audibly at 50% of the LEL. Implement immediately the following procedures in the event of an alarm. Manually shut off the source of Methane if possible. Turn off all electrical circuits EXCEPT circuits, which operate blowers and/or exhaust fans. Remove all personnel from the area. Ventilate the area. Carefully check all fuel lines, tanks and fittings to locate the leak. Have the problem repaired by qualified personnel. Maintenance The MShield requires very little maintenance. Periodically examine the sensors for contamination or damage. Check that sensor wires are not frayed, pinched, or cut. Test the operation of both sensors and display frequently. Do NOT expose sensors to liquids or chemicals. When cleaning, seal off the sensor(s) with a plastic covering. Harsh chemicals may damage the sensor. Keep sensor(s) sealed until the compartment has been completely ventilated. The sensors need to be tested three times per year (NFPA 52, section ) and after any incidental contact with a harsh chemical/environment. P/N: FM-US Page 6 Rev. C
80 Specifications Voltage +12VDC Nominal (10VDC min to 18VDC max) Alarm 20% of LEL 50% of LEL Relay... 1 amp max Display Current ma Sensor Current 75 ma Splitter01 current. 40 ma MRL(X)-00X Current.. 30 ma WARNING The MShield is a Methane detector ONLY. This device is meant to serve as a supplement warning only. It is NOT intended to replace standard safety practices which should be carried out around explosive gases (i.e. inspect all compartments, check all gas fittings and connections, smell for methane gas fumes, etc ) To function properly the MShield must be powered at all times. Before installing in applications which may appear different than those outlined in this manual, contact the manufacturer. This device is not intended for use in aircraft. There are no user or field serviceable parts in this product. The MShield must be returned to the manufacturer for any repair or trouble shooting beyond what is recommended in this manual. Installation shall be done by qualified personnel authorized to do so by the authorities having jurisdiction for the particular application in which the product is being used. Electrical wiring shall be in accordance with applicable codes. Improper wiring, including all wire connections, may render the unit inoperable, damage components, or cause a fire, and will void all warranties P/N: FM-US Page 7 Rev. C
81 Manual for Fire Suppression & Methane Detection System Fogmaker North America Post address: 150 Gordon Dr Exton, PA Delivery address: 150 Gordon Dr Exton, PA Tel: Fax: Page 1 Rev. L
82 Methane Fume Detector/Fire Detection System Installation and Operation Manual MADE IN THE USA READ THIS MANUAL CAREFULLY AND SAVE FOR FUTURE REFERENCE. KEEP THIS MANUAL WITH THE FM-US (in-dash mount) OR FM-US (surface mount). Introduction The FM-US /FM-US vapor-monitoring system utilizes advanced technology for detection of methane fumes. The FM-US /FM-US allows the connection of (2-4) sensors and has both visual and audible alarms that trigger at 20% and 50% LEL (Lower Explosive Level) of methane respectively. Test switches are provided for full testing of all operations. System operation and correct sensor operation are continually monitored and indicators are provided for fault detection. The FM-US /FM-US has an internal relay for automatic control of an external device up to 1 amp. The FM-US /FM-US also has a fire detection system built in. It has the ability to monitor pressure switches, IR-Thermal switches, and other contact type inputs. These inputs will control the indicators on the display to alert a user of service needed or in case of a fire. They also control the engine shutdown relay and one input has its own separate output. This output switches system voltage or ground out if a condition occurs. Read this owner s manual completely before installation. Failure to read and follow these instructions can result in damage to the unit voiding the warranty. DANGER! NO POWER ON/OFF SWITCH IS PROVIDED FOR THIS UNIT. TO FUNCTION AS INTENDED, THE FM-US /FM-US MUST BE CONNECTED TO A SUITABLE POWER SOURCE AND BE POWERED CONTINUOUSLY. DANGER! UNLIKE CNG, LNG HAS NO IDENTIFIABLE ODOR. IF AN LNG LEAK IS DETECTED BY THE METHANE SYSTEM TAKE EXTREME CAUTION! CAUTION: IF POWER IS ON AND LEFT UNATTENDED FOR AN EXTENDED PERIOD OF TIME, BATTERY POWER MAY BE DIMINISHED. Manual Display Controls / Indicator Fire Detection OK - Green when there is no fire detected or service required Service Required Orange when pressure has dropped in detector bottle or piston accumulator. Fire Red when pressure lost or fire detected/occurred. Methane Detection OK Green when there is no service required and no gas detected Service Required Orange when sensor is disconnected or malfunction detected Trace Gas Orange when methane is detected between 20% and 50% LEL Significant Gas Red when methane is detected over 50% LEL Display Installation The FM-US /FM-US should be mounted in a convenient location, preferably where the visual indicators may be readily seen. To install the display, you must first cut a rectangular opening 4 1/8 x 2 1/4. Secure the display at the four corners with #6 screws. Sensor Installation The sensor can be mounted horizontally or vertically on a flat surface. It is important for the surface to be flat to prevent bowing of the housing. Page 2 Rev. L
83 CNG (Compressed Natural Gas) is lighter than air and will rise. Therefore, it is important that a location be selected that is within nine (9 ) inches (22.86cm) of the ceiling height. Do not locate sensor directly in the path of any kind of constant external air flow or sources of contamination. Keep sensor dry. Once the location has been selected peel the backing paper off of the sensor and stick in its desired location. Place a #8 washer on a #8 pan head screw and insert through the hole in the sensor ear to secure. Repeat on the other ear. Do not use Loctite as it can cause the sensor housing to crack. Use a lock washer or locknut instead. Tighten the screws to 20 in-lbs, do not over tighten. Wiring the FM-US /FM-US The display has five connectors for external connections and one pink wire for battery back-up. See diagram below for connections. See the table for connector pin outs. FM-US /FM-US has an in line fuse on the positive cable. Optional Equipment FM-US Methane Sensor FM-US Allows for additional MS-3 or MS-4 sensor to be connected to a system FM-US Methane Sensor with built in LED FM-US Methane Sensor 90 degree mounting bracket FM-US Rechargeable battery backup unit for Vdc FM-US Aluminum Methane Sensor with built in LED FMWH XX Extension Cable for MS-3/MS-4 Sensor (0XX = length in 5 increments) Page 3 Rev. L
84 Connector Pin Function Color Gauge Primary Fire Connector A Gnd from display W 18 B 50 Bar in switch (if 50 Bar is open & 14 Bar is closed then service lights. If 50 Bar & 14 Bar are open then fire lights, siren sounds, relay activation) Y 18 C 5 Bar in switch (if 5 Bar is open & 14 Bar is closed then service lights. If 5 Bar & 14 Bar are open then fire lights, siren sounds, relay activation) Blk 18 D Relay Option (if disconnected no relay delay, if connected to system voltage 15 second delay on relay) Grn 18 E 14 Bar in switch (if 14 Bar is open & 50 or 5 Bar is closed then service lights. If 14 Bar & 50 or 5 Bar are open then fire lights, siren sounds, relay activation) Br 18 F NC output for Engine relay O 18 G NO output for Engine relay R 18 H Common input for the Engine relay. Relay is triggered by 50Bar, 5Bar, IR Thermal or Methane in Danger. Bl 18 IR Thermal Connector A B IR Thermal switch input. (if closed fire lights, siren sounds, 15sec delayed relay activation) Switched system voltage on closed IR Thermal switch Bl R Power Connector Sensor 1 Sensor 2 A Power (10V 54V) R 18 B Ground input for display Blk V to sensor (regulated by display do not by pass) R 22 2 Methane signal out from sensor Grn 22 3 Ground to sensor (can be by passed and grounded remotely) Blk V to sensor (regulated by display do not by pass) R 22 2 Methane signal out from sensor Grn 22 3 Ground to sensor (can be by passed and grounded remotely) Blk 22 Testing Display Mode If no alarm conditions are present, holding either SILENCE/RESET button down for 4 seconds will initiate a self test sequence. During this sequence all LEDs will cycle along with the engine relay and siren. Sensor Fault Detection Should the unit determine that either of the methane sensors are faulty or disconnected, the Service Required LED will illuminate. In the case of service required, the vehicle should be stopped and pulled from service until the sensor / system is serviced and the Service Required LED is cleared. FM-US and FM-US sensors are also equipped with an LED to indicate each state of operation. Solid On - Everything is ok no methane present LED off - Sensor is in fault or is not plugged in Slow Flash - Sensor is detecting trace gas (20% LEL) Fast Flash - Sensor is detecting significant gas (50% LEL) Page 4 Rev. L
85 Engine Relay The engine relay is controlled by both the fire and methane detection systems and has (C, NO, NC) dry contacts for multiple wiring options. If the Fire or Significant Gas lights come on the relay will turn on immediately. If the green wire is connected to system voltage the relay will turn on after 15 seconds. (See connector table.) IR-Thermal Relay This relay has the common tied to system voltage and is normally open. When a ground is present at the IR- Thermal input the relay closes sending out system voltage. Button Operation Either SILENCE/RESET button can be used for each system. When there are no alarm conditions, holding either button for 4 seconds will initiate a self test sequence. If the siren is sounding, holding either button in for 1 second will mute the siren for 15 seconds. Engine Relay If the engine relay is activated, holding either SILENCE/RESET button will reset the relay for 250mS to signal the bus s monitoring system. If the green wire is connected to system voltage and the engine relay is activated, holding either button for 5 seconds will cause the relay to reset for 15 seconds allowing the vehicle to start. (See connector table.) DANGER! CHOOSING TO OVERRIDE THE METHANE SYSTEM DURING A 50% LEL ALARM CAN RESULT IN AN EXPLOSION. EXTREME CAUTION SHOULD BE TAKEN BEFORE OVERRIDING THE SYSTEM. Nuisance Alarms The sensors used for the FM-US /FM-US are sensitive to hydrocarbons but an alarm may be triggered by the use of other chemicals such as cleaners, paint, polish, etc. The sensors will also detect hydrogen fumes from an overcharged battery. If no hydrocarbon fumes are present, check for recent use of cleaners, fiberglass repairs, strong adhesives, etc. If none of these are present, the sensor may have been damaged and will need replacement. WARNING: The FM-US /FM-US has been designed to alarm visually at 20% of the LEL (Lower Explosive Limit) of methane and alarm visually and audibly at 50% of the LEL. Implement immediately the following procedures in the event of an alarm. Manually shut off the source of methane if possible. Turn off all electrical circuits EXCEPT circuits which operate blowers and/or exhaust fans. Remove all personnel from the area. Ventilate the area. Carefully check all fuel lines, tanks and fittings to locate the leak. Have the problem repaired by qualified personnel. Page 5 Rev. L

86 Panel Logic: Testing the operation of the fire suppression system: 1. Connect all wires and arm the fire suppression system. Turn on the bus. After the automatic system test runs if everything is connected and the bottles charged to the correct pressure the green SYSTEM OK light should be illuminated. 2. Disconnect the connection between the 50 bar pressure switch and the wire harness. This is labeled EXT PR SW. The SERVICE REQUIRED light will be illuminated. Reconnect after this is verified. 3. Disconnect the connection between the 14 bar pressure switch and the wire harness. This is labeled DET CYL PR SW. The SERVICE REQUIRED light will be illuminated. Reconnect after this is verified. 4. Disconnect the connections between the 14 bar pressure switch and the 50 bar pressure switch. The FIRE light will be illuminated. The siren will sound. The relay will activate (unless the green wire is connected to system voltage. See connector table.). Press Silence reset button for 1 second to silence the alarm. To restart the bus hold the Silence reset button for 4 seconds to reset the 15 second timer. If system is equipped with the optional 5 bar pressure switch: 1. Disconnect the connection between the 5 bar pressure switch and the wire harness. This is labeled 5 BAR SW. The SERVICE REQUIRED light will be illuminated. Reconnect after this is verified. 2. Disconnect the connections between the 5 bar pressure switch and the 14 bar switch. The FIRE light will be illuminated. The siren will sound. The relay will activate (unless the green wire is connected to system voltage. See connector table.). 3. Disconnect the connections between the 14 bar pressure switch, the 50 bar pressure switch and the 5 bar pressure switch. The FIRE light will be illuminated. The siren will sound. The relay will activate (unless the green wire is connected to system voltage. See connector table.). Maintenance The FM-US /FM-US requires very little maintenance. Periodically examine the sensors for contamination or damage. Check that sensor wires are not frayed, pinched, or cut. Test the operation of both sensors and display frequently. Do NOT expose sensors to liquids or chemicals. When cleaning, seal off the sensor(s) with a plastic covering. Harsh chemicals may damage the sensor. Keep sensor(s) sealed until the compartment has been completely ventilated. Page 6 Rev. L
87 Specifications 3A Fuse Voltage +12VDC Nominal (10VDC to 48VDC) Temperature. -40F to 158F operating (-40F to 170F storage) Alarm 20% of LEL 50% of LEL Relay... 1 amp max Display Current.. 50 ma Sensor Current 75 ma Splitter01 current. 40 ma WARNING The FM-US /FM-US is for fire and methane detection. This device is meant to serve as a supplemental warning only. It is NOT intended to replace standard safety practices which should be carried out around explosive gases (i.e., inspect all compartments, check all gas fittings and connections, smell for methane gas fumes, etc.) To function properly the FM-US /FM-US must be powered at all times. Before installing in applications which may appear different than those outlined in this manual, contact the manufacturer. This device is not intended for use in aircraft. There are no user or field serviceable parts in this product. The FM-US /FM-US must be returned to the manufacturer for any repair or trouble shooting beyond what is recommended in this manual. Installation shall be done by qualified personnel authorized to do so by the authorities having jurisdiction for the particular application in which the product is being used. Electrical wiring shall be in accordance with applicable codes. Improper wiring, including all wire connections, may render the unit inoperable, damage components, or cause a fire, and will void all warranties Page 7 Rev. L
88 Methane Detector Test Procedure (for Aluminum-housing sensors) FMNA Post address: 150 Gordon Dr Exton, PA Delivery address: 150 Gordon Dr Exton, PA Tel: Fax: Page 1 Rev. A

 b.")
89 Methane Fume Detector/Fire Detection System Methane Sensor Test Procedure MADE IN THE USA 1. Start Engine to Vehicle and wait for Methane Detection System OK light to illuminate on Fogmaker Control Panel 2. Open and assemble Calibration Kit as shown in the image below, by: a. Screwing regulator/valve onto desired test bottle and ensure that gauge reads 100 psi or greater (if not, replace bottle) b. Assembling clear tube to output of regulator/valve 3. Begin the flow of test gas by turning thumb screw on regulator/valve counterclockwise until it stops. 4. Hold opening free end of clear tubing against one of two slots in cap of detector to be tested, as shown in the image below: Page 2 Rev. A
User manual Contractor s machinery / vehicles, tooling machines and special machines
 Fire extinguisher system for engine compartments User manual Contractor s machinery / vehicles, tooling machines and special machines Hydro pneumatic activation Mechanical activation Electrical activation
JOHN DEERE GATOR HPX/XUV 2 PASSENGER HEATER INSTALLATION INSTRUCTIONS (p/n: 9PH20S30)
") P. 1 of 12 JOHN DEERE GATOR HPX/XUV 2 PASSENGER HEATER INSTALLATION INSTRUCTIONS (p/n: 9PH20S30) Item: Qty: Description: 1 2 1 x 1 x 5/8 Tee Fitting 2 2 Plastic Snap-in Hose Grommet 3 4 1-1/2" Hose Clamps
P. 1 of 12 JOHN DEERE GATOR HPX/XUV 2 PASSENGER HEATER INSTALLATION INSTRUCTIONS (p/n: 9PH20S30) Item: Qty: Description: 1 2 1 x 1 x 5/8 Tee Fitting 2 2 Plastic Snap-in Hose Grommet 3 4 1-1/2" Hose Clamps
INVERTER SPLIT - TYPE
 INVERTER SPLIT - TYPE ISSUE No 2 DATE 04/09/08 P/No 2020323A2868 CONTENTS SAFETY PRECAUTIONS Warning 2 Operating temperature 2 BEFORE INSTALLATION Tools needed for installation 3 Items required for installing
INSTALLATION AND COMMISSIONING MANUAL. Neos 100S Integra 20X, 30S, 35X, 40X, 50X
 Installation Truck Refrigeration & Commissioning Manual: INSTALLATION AND COMMISSIONING MANUAL for Neos 100S Integra 20X, 30S, 35X, 40X, 50X Direct Drive Refrigeration Units 2017 Carrier Corporation Printed
Installation Instructions. For the 18 Built-In Dishwasher and Front Color Panels
 Installation Instructions For the 18 Built-In Dishwasher and Front Color Panels Printed in USA 154232102 Before You Begin DO NOT INSTALL DISHWASHER UNTIL YOU HAVE READ ALL INSTRUCTIONS. FOR YOUR SAFETY,
Basic Vehicle Fire Protection Manual
 Basic Vehicle Fire Protection Manual Basic Vehicle Fire Protection Manual TABLE OF CONTENTS Introduction... 3 System Operation...... 5 Component Overview.... 7 Operator Controls Control Panel.........
Ductless Split Air Conditioner
 Ductless Split Air Conditioner Installation Manual Indoor HSU09VHG(DB)-W HSU12VHG(DB)-W HSU18VHH(DB)-W HSU24VHG(DB)-W Outdoor HSU09VHG(DB)-G HSU12VHG(DB)-G HSU18VHH(DB)-G HSU24VHG(DB)-G Table of Contents
DLCSRA. INSTALLATION INSTRUCTIONS Outdoor Unit Ductless Split System Sizes 09 to 36 TABLE OF CONTENTS
 DLCSRA INSTALLATION INSTRUCTIONS Outdoor Unit Ductless Split System Sizes 09 to 36 NOTES: Read the entire instruction manual before starting the installation. Images are for illustration purposes only.
BlueHeat AirTop 2000 Heater
 BlueHeat AirTop 000 Heater Air Heater Installation Manual Ford E-Series 6.0L Diesel Beginning Model Year: 006 Special instructions for these models Part locations may differ slightly dependent on the vehicle
DLCLRA. INSTALLATION INSTRUCTIONS Outdoor Unit Single Zone Ductless System Sizes 36 to 58 TABLE OF CONTENTS
 DLCLRA INSTALLATION INSTRUCTIONS Outdoor Unit Single Zone Ductless System Sizes 36 to 58 Fig. 1 - Size 36 TABLE OF CONTENTS PAGE SAFETY CONSIDERATIONS... 2 PARTS LIST... 3 SYSTEM REQUIREMENTS... 4 WIRING...
SuperKlean Washdown Products
 DURAREEL DR8 & DR8S INSTALLATION AND MAINTENANCE INSTRUCTIONS **DO NOT THROW AWAY AFTER INSTALLATION** **SAVE AND DISPLAY PROMINENTLY WHERE THIS EQUIPMENT IS USED** GENERAL WARNINGS High pressure and hot
Installation Instructions
 38MHR Outdoor Unit Single Zone Ductless System Sizes 09 to 24 Installation Instructions NOTE: Read the entire instruction manual before starting the installation. NOTE: Images are for illustration purposes
INSTALLATION MANUAL. Split-type Air Conditioner (Cooling and Heating) Outdoor Unit UQB09JJWC UQB12JJWC. Indoor Unit AQB09JJWC AQB12JJWC
 Outdoor Unit UQB09JJWC UQB12JJWC. Indoor Unit AQB09JJWC AQB12JJWC") AQB09JJ6WC_IM_E_2585 2006.4.17 4:26 PM Page 17 INSTALLATION MANUAL Indoor Unit AQB09JJWC AQB12JJWC Outdoor Unit UQB09JJWC UQB12JJWC ENGLISH FRANÇAIS ESPAÑOL Split-type Air Conditioner (Cooling and Heating)
AQB09JJ6WC_IM_E_2585 2006.4.17 4:26 PM Page 17 INSTALLATION MANUAL Indoor Unit AQB09JJWC AQB12JJWC Outdoor Unit UQB09JJWC UQB12JJWC ENGLISH FRANÇAIS ESPAÑOL Split-type Air Conditioner (Cooling and Heating)
Installation Instructions
 PAGE 1 Installation Instructions Important information about your new a/c system. Please read the following directions prior to installing this a/c system. PN: CK6772-1CHPU 1967-1972 Chevy PU A/C Kit Contact
INSTALLATION AND SERVICE MANUAL FOR THE SERIES 2000 & SERIES 3000 FAN SERIES GEN 2
 INSTALLATION AND SERVICE MANUAL FOR THE SERIES 2000 & SERIES 3000 FAN SERIES GEN 2 (PNEUMATIC CONTROL AND HYDRAULIC CONTROL) PUBLICATION No. 01900 Revision 2 Printed in Canada 1.1 INTRODUCTION Thank you
INSTALLATION MANUAL. Split-type Air Conditioner (Cooling and Heating) Indoor Unit AQB18J6WC AQB24J2WC. Outdoor Unit UQB18J6WC UQB24J2WC
 Indoor Unit AQB18J6WC AQB24J2WC. Outdoor Unit UQB18J6WC UQB24J2WC") AQB8J6WC_IM_E_25864 2006.4.4 3:29 PM Page 7 INSTALLATION MANUAL Indoor Unit AQB8J6WC AQB24J2WC Outdoor Unit UQB8J6WC UQB24J2WC ENGLISH FRANÇAIS ESPAÑOL Split-type Air Conditioner (Cooling and Heating)
AQB8J6WC_IM_E_25864 2006.4.4 3:29 PM Page 7 INSTALLATION MANUAL Indoor Unit AQB8J6WC AQB24J2WC Outdoor Unit UQB8J6WC UQB24J2WC ENGLISH FRANÇAIS ESPAÑOL Split-type Air Conditioner (Cooling and Heating)
Air Conditioner. user installation & manual manual. imagine the possibilities
 ARFSSSBWK Series ARFSSSCUR AJ JNADCH Series Air Conditioner user installation & manual manual This manual is made with 100% recycled paper. imagine the possibilities Thank you for purchasing this Samsung
INSTALLATION AND SERVICE MANUAL FOR THE SERIES 2000 & SERIES 3000 FAN SERIES GEN 1
 INSTALLATION AND SERVICE MANUAL FOR THE SERIES 2000 & SERIES 3000 FAN SERIES GEN 1 (PNEUMATIC CONTROL AND HYDRAULIC CONTROL) PUBLICATION No. 01524 Revision 15 Printed in Canada 1.1 INTRODUCTION Thank
INSTALLATION INSTRUCTIONS TXV Coils for Manufactured Housing EMA
 TXV Coils for Manufactured Housing EMA NOTE: Read the entire instruction manual before starting the installation. SAFETY CONSIDERATIONS Improper installation, adjustment, alteration, service, maintenance,
Installation Manual PS-225 & PS-275
 Installation Manual PS-225 & PS-275 Table of Contents Pre-Uncrating Checklist... 1 Verifying System Requirements... 2 Verifying System Direction... 2 Verifying the Electrical Requirements... 2 Removal
R32. Installation Manual Split Type Wall Mounted Air Conditioner. This appliance shall be installed in accordance with: REFRIGERANT
 SWING LRSWING Installation Manual Split Type Wall Mounted Air Conditioner COOL RUN C SPEED TURBO ON/OFF FAN COOL HEAT SWING SWING Rinnai Systems Models System Indoor Outdoor HSNRQ25B HINRQ25B HONRQ25B
SAFE DRINKING WATER AND TOXIC ENFORCEMENT ACT
 Installation instructions for your new Spacemaker Laundry WSM2780 Gas Before you begin Read these instructions completely and carefully. IMPORTANT OBSERVE ALL GOVERNING CODES AND ORDINANCES. Note to Installer
CEILING FAN OWNER S MANUAL
 Style that revolves around you. CEILING FAN OWNER S MANUAL Total fan weight *53 lbs. WEXFORD 11/05 WARNING: Read and follow these instructions carefully and be mindful of all warnings shown throughout.
ENGINEERING SPECIFICATIONS FOR FM-200 CLEAN AGENT INDIRECT PRE-ENGINEERED FIRE SUPPRESSION SYSTEMS
 ENGINEERING SPECIFICATIONS FOR FM-200 CLEAN AGENT INDIRECT PRE-ENGINEERED FIRE SUPPRESSION SYSTEMS SECTION 1 GENERAL SPECIFICATIONS I. SCOPE This specification outlines the requirements for a pre-engineered
Installation Manual PS-200 & PS-201
 Installation Manual PS-200 & PS-201 Table of Contents Pre-Uncrating Checklist... 1 Verifying System Requirements... 2 Verifying System Direction... 2 Verifying the Electrical Requirements... 2 Removal
Installation Instructions
 38MPRA Outdoor Unit Single Zone Ductless System Sizes 09 to 12 Installation Instructions NOTES: Read the entire instruction manual before starting the installation. Images are for illustration purposes
CENTRAL AIR CONDITIONER SPLIT SYSTEM
 CENTRAL AIR CONDITIONER SPLIT SYSTEM WITH ELECTRONIC CONTROL SERIES: DS INSTALLATION INSTRUCTIONS INDEX GENERAL... 2 UNIT LOCATION CRITERIA... 2 DIMENSIONAL DRAWINGS... 3 INDOOR UNIT INSTALLATION... 5
DISHWASHER. Models DW2432 and DW2432SS. Installation Manual. Write Serial Number (on inner door of unit) here:
 here:") DISHWASHER Models DW2432 and DW2432SS Installation Manual Write Serial Number (on inner door of unit) here: Felix Storch, Inc. Summit Appliance Division 770 Garrison Avenue Bronx, New York 10474 www.summitappliance.com
DISHWASHER Models DW2432 and DW2432SS Installation Manual Write Serial Number (on inner door of unit) here: Felix Storch, Inc. Summit Appliance Division 770 Garrison Avenue Bronx, New York 10474 www.summitappliance.com
PRELIMINARY INSTALLATION. Operation & Service Manual. Carrier Transicold Europe 03/09/07 Viento - Installation/Rev- #1/56
 INSTALLATION Carrier Transicold Europe 03/09/07 Viento - Installation/Rev- #1/56 INSTALLATION Table of content Introduction...4 Preparation before installation...5 Vehicle partition... 6 Box preparation...7
Heavy Duty Heater / Air Conditioner Model R-8545
 Heavy Duty Heater / Air Conditioner Model R-8545 INSTALLATION INSTRUCTIONS NOTE 1. Please read instructions all the way through, making sure you have all the parts and tools 2. While working on or around
INSTALLATION GUIDE Dual Fuel Ranges
 INSTALLATION GUIDE Dual Fuel Ranges Contents Wolf Dual Fuel Ranges......................... 3 Safety Instructions............................ 4 Dual Fuel Range Specifications.................. 5 Dual Fuel
Model Series ELECTRIC WATER SYSTEM PUMP. PumpAgents.com - buy pumps and parts online. Model Series. Automatic Multi-Outlet FEATURES
 PumpAgents.com - Click here for Pricing/Ordering Model 36950-2 Series ELECTRIC WATER SYSTEM PUMP Automatic Multi-Outlet FEATURES Self-Priming Diaphragm Design Allows Dry Running Built-in Discharge Check
WHEELED STORED PRESSURE
 OWNERS SERVICE MANUAL NO. 19795 INSTALLATION, OPERATING & SERVICING INSTRUCTIONS All fire extinguishers should be installed, inspected and maintained in accordance with the National Fire Protection Association
specializing in AIR CONDITIONING, PARTS AND SYSTEMS for your classic hi l PERFECT FIT SERIES IN-DASH HEAT/ COOL/ DEFROST FORD TRUCK
 specializing in AIR CONDITIONING, PARTS AND SYSTEMS for your classic hi l PERFECT FIT SERIES IN-DASH HEAT/ COOL/ DEFROST 1967-72 FORD TRUCK CONTROL & OPERATING INSTRUCTIONS The controls on your new Perfect
HydroCycle Vertical Aeroponic Systems
 HydroCycle Vertical Aeroponic Systems 2018 Growers Supply All Rights Reserved. Reproduction is prohibited without permission. *Actual system may differ from system shown. 113593 8' Vertical System (44
HEATING AND AIR CONDITIONING
 XJ HEATING AND AIR CONDITIONING 24-1 HEATING AND AIR CONDITIONING TABLE OF CONTENTS page DESCRIPTION AND OPERATION SERVICE WARNINGS AND PRECAUTIONS...1 COMPRESSOR - 2.5L VM DIESEL....3 COMPRESSOR CLUTCH
GETZ EQUIPMENT INNOVATORS PART NO.: 9G58619 MODEL: SV1 150 PR VACUFILL SYSTEM (Revised 2/25/14)
") GETZ EQUIPMENT INNOVATORS PART NO.: 9G58619 MODEL: SV1 150 PR VACUFILL SYSTEM (Revised 2/25/14) !!WARNING!! SEVERE DAMAGE AND/OR INJURY MAY RESULT DO NOT DISCHARGE ANY EXTINGUISHER CYLINDER EXCEEDING 195
GETZ EQUIPMENT INNOVATORS PART NO.: 9G58619 MODEL: SV1 150 PR VACUFILL SYSTEM (Revised 2/25/14) !!WARNING!! SEVERE DAMAGE AND/OR INJURY MAY RESULT DO NOT DISCHARGE ANY EXTINGUISHER CYLINDER EXCEEDING 195
Electrical cable Water supply tube Fittings for tube Coupler Teflon tape. Hole saw min. 2½" bit
 Installation Parts and Tools Parts not Provided Electrical cable Water supply tube Fittings for tube Coupler Teflon tape Air gap Wire nuts for 6-gauge wiring Hose clamp ⅞" UL approved strain relief Electrical
AOYG18LFC OUTDOOR UNIT INSTALLATION MANUAL INSTALLATION MANUAL. For authorized service personnel only. PART NO
 AOYG8LFC OUTDOOR UNIT INSTALLATION MANUAL INSTALLATION MANUAL For authorized service personnel only. English PART NO. 93778639 93778639_IM.indb /20/20 6:07:25 PM AIR CONDITIONER OUTDOOR UNIT INSTALLATION
Installation and Operation Manual For Hunter Ceiling Fans
 Installation and Operation Manual For Hunter Ceiling Fans 1 2 CONGRATULATIONS! Your new Hunter ceiling fan is an addition to your home or office that will provide comfort and performance for many years.
INSTALLATION INSTRUCTIONS FOR 6532 SERIES PACKAGE HEAT PUMP
 INSTALLATION INSTRUCTIONS FOR 6532 SERIES PACKAGE HEAT PUMP RV Products A Division of Airxcel, Inc. P.O. Box 4020 Wichita, KS 67204 1976-360 (1-02) PP TABLE OF CONTENTS 1. Warnings......................................................
I-VICFLEX.AB4. Victaulic VicFlex Style AB4 Sprinkler Fitting for Hat Furring Channel Ceiling Systems WARNING INSTALLATION INSTRUCTIONS
 INSTALLATION INSTRUCTIONS I-VICFLEX.AB Victaulic VicFlex Style AB Sprinkler Fitting for Hat Furring Channel Ceiling Systems Read and understand all instructions before attempting to install any Victaulic
Page 1 of 18. Part# /5/2013
 Part# 1002655-06 8/5/2013 This manual contains important information concerning the installation and operation of the gun washers listed above. Read manual thoroughly and keep for future reference INSTRUCTIONS
SD Bendix AD-1 and AD-2 Air Dryers
 SD-08-2403 Bendix AD-1 and AD-2 Air Dryers AD-1 AIR DRYER AD-2 AIR DRYER FIGURE 1 The air dryer collects and removes moisture and contaminants before the air reaches the first reservoir. It is distinctly
PURPLE K POWDER EXTINGUISHERS INSTALLATION, OPERATION, MAINTENANCE AND RECHARGE MANUAL
 PURPLE K POWDER EXTINGUISHERS INSTALLATION, OPERATION, MAINTENANCE AND RECHARGE MANUAL NO. 05602 FOR AMEREX STORED PRESSURE, HAND PORTABLE DRY CHEMICAL FIRE EXTINGUISHERS. ABC (Ammonium Phosphate Base)
OWNER'S SERVICE MANUAL NO INSPECTION, MAINTENANCE AND RECHARGE
 FOAM FIRE EXTINGUISHERS MODEL 254-6 LITER AFFF FOAM WITH SPRAY NOZZLE Model 250 2 ½ GAL.LON AFFF FOAM WITH ASPIRATED NOZZLE MODEL 252 2 ½ GAL.LON FFFP (ALCOHOL RESISTANT) FOAM WITH ASPIRATED NOZZLE OWNER'S
BlueHeat Coolant Heater
 BlueHeat Coolant Heater Dodge Ram 500 / 3500 003 / 004-5. Liter Gasoline 003 / 006-5.9 Liter Diesel 00 6. Liter Diesel Installation Instructions DOC P/N 500068B KIT P/N 5000498C PRELIMINARY INFORMATION
Models: GW/R-T GW/R-2-T GW/R-3-T
 Part# GW/R-T-OM 1/12/04 TN Models: GW/R-T GW/R-2-T GW/R-3-T This manual contains important information concerning the installation and operation of the gun washers listed above. Read manual thoroughly
HEATING AND AIR CONDITIONING
 WJ HEATING AND AIR CONDITIONING 24-1 HEATING AND AIR CONDITIONING TABLE OF CONTENTS page SERVICE PROCEDURES REFRIGERANT OIL LEVEL...1 REFRIGERANT RECOVERY....1 REFRIGERANT SYSTEM CHARGE...1 REFRIGERANT
1. SAFETY RULES. 8. Avoid placing objects in the path of the blades.
 1 1. SAFETY RULES 1. To reduce the risk of electric shock, insure electricity has been turned off at the circuit breaker or fuse box before beginning. 2. All wiring must be in accordance with the National
A HEATER KIT With Diesel Engine Connection Fittings
 A-12142 HEATER KIT With Diesel Engine Connection Fittings Figure 1 (General Layout and Parts I.D.) Page 1 of 6 Read these instructions and identify all components. Please retain these instructions for
Installation & Service Manual. Models ALF 20, 30, 40, 50, 60, 80
 Installation & Service Manual Models ALF 20, 30, 40, 50, 60, 80 IMPORTANT! Read all safety instructions before installing, using, or servicing the heater. Installation & servicing should only be carried
SECTION air supply system + WARNING: + NOTE: GENERAL DESCRIPTION COMPRESSED AIR RESERVOIRS / 1.
 08-000.02/ 1 2011JA14 SECTION 08-000.02 GENERAL DESCRIPTION See Figure 1 for a schematic diagram of the. See the Nova LFS parts manual for a detailed schematic of the. The function of the vehicle s is
TECHNICAL DATA OBSOLETE
 October 10, 2008 Deluge Devices 281a 1. PRODUCT DESCRIPTION The Viking Model C-1 is a rate-of-rise releasing device for use on hydraulic and pneumatic release systems controlling operation of Viking deluge
Patio Heater Model No. GM and GM
 Patio Heater Model No. GM124-003 and GM124-004 FEATURES: The ideal solution for extending the season for outdoor entertaining Maximum output 39.6 MJ/hr Direct ignition Adjustable heat output Safety tip-over
HX Field Replacement Kit
 Quantity Kit Part Number Description PE 110 Natural Gas Stainless Steel Condensate Pan PT 110 Natural Gas Polypropylene Condensate Pan Model PE 110 LP Stainless Steel Condensate Pan PT 110 LP Polypropylene
Glass and Dishwashers AMX / AUX Series
 Glass and Dishwashers AMX / AUX Series INSTALLATION OPERATION VERSION 24.02.04 Important Notes Use in Accordance with Regulations This machine is exclusively to be used to wash ware such as plates, cups,
Overpressure Leak Detector
 Overpressure Leak Detector Installation and User Manual Model LD-UPP-3 Franklin Fueling Systems 3760 Marsh Rd. Madison, WI 53718 USA Tel: +1 608 838 8786 800 225 9787 Fax: +1 608 838 6433 www.franklinfueling.com
CLe-series Dishwashers
 CLe-series Dishwashers Blower-dryer electric (CLe SERIES) ML-138211 ML-138212 ML-138213 ML-138214 electric (CLeR SERIES) ML-138325 ML-138326 ML-138327 ML-138328 STEAM (CLe SERIES) ML-138226 ML-138227 ML-138228
GENERAL 2004 HVAC SYSTEMS. Manual HVAC System - Sorento SPECIFICATIONS. Fig. 1: Air Conditioner Specifications Courtesy of KIA MOTORS AMERICA, INC.
 Fig. 2: Blower & Evaporator Unit Specifications 2004 HVAC SYSTEMS Manual HVAC System - Sorento GENERAL SPECIFICATIONS AIR CONDITIONER Fig. 1: Air Conditioner Specifications BLOWER AND EVAPORATOR UNIT HEATER
5COM52XXD Series Fan. Owner s Guide and Installation Manual. UL Model NO. : 5COM52XXD
 Owner s Guide and Installation Manual 5COM52XXD Series Fan UL Model NO. : 5COM52XXD Attach sales receipt to this card and retain as your proof of purchase DATE OF PURCHASE: MODEL NUMBER: RETAILER NAME:
COMPRESSED AIR DRYER. SAFETY... Page 2 MAINTENANCE... Page 5. INSTALLATION... Page 3 PARTS AND KITS... Page 6
 OWNERS MANUAL BOSS COMPRESSED AIR DRYER Distributed by Air & Vacuum Process, Inc. Phone: 281-866-9700 Fax: 281-866-9717 Email: sales@airvacuumprocess.com SAFETY... Page 2 MAINTENANCE... Page 5 INSTALLATION...
Isco 3700ZR Sampler. Manual Set
 Isco 3700ZR Sampler Manual Set Assembly #60-2744-045 Copyright 2001. All rights reserved, Teledyne Isco Revision D, December 14, 2012 This set of manuals supports the Isco 3700ZR Refrigerated Sampler.
OPERATING MANUAL MODEL AIR 1500TM AIR DRYER
 OPERATING MANUAL MODEL AIR 500TM AIR DRYER Puregas, LLC 226-A Commerce St. Tel: 800-52-535 Broomfield, Colorado Fax: 303-657-2205 P/N P0255 REV A, 02/9/4 TABLE OF CONTENTS.0 GENERAL... 3 2.0 SPECIFICATIONS...
Installation Instructions
 Installation Instructions KFN 9855 ide en - CA Installation, repair and maintenance work should be performed by a Miele authorized service technician in accordance with national and local safety regulations
HEATING AND VENTILATION
 SECTION 14-102.04 14-102.04/ 1 2007OC19 DESCRIPTION The heating, ventilation and air conditioning (HVAC) system is designed to optimize passenger comfort. The system regulates interior vehicle atmosphere,
TABLE OF CONTENTS. NOTE: Read the entire instruction manual before starting the installation. TROUBLESHOOTING... 13
 R 410A Duct Free Split System Air Conditioner and Heat Pump Product Family: DFS4(A/H) System, DFC4(A/H)3 Outdoor, DFF4(A/H)H Indoor NOTE: Read the entire instruction manual before starting the installation.
Truck Edition V-520 RT Series Models 10, 20, 30 and 50 Single Temperature Systems TK IM (Rev. 8, 1/16)
") Installation Manual Truck Edition V-520 RT Series Models 10, 20, 30 and 50 Single Temperature Systems TK 54987-18-IM (Rev. 8, 1/16) Installation Manual Truck Edition V-520 RT Series Models 10, 20, 30
Installation Manual Truck Edition V-520 RT Series Models 10, 20, 30 and 50 Single Temperature Systems TK 54987-18-IM (Rev. 8, 1/16) Installation Manual Truck Edition V-520 RT Series Models 10, 20, 30
Hodge Clemco Ltd. MJC Mini Cartridge Filters Owners Manual. TSOM 556 Date of issue 13/07/04. Hodge Clemco Ltd
 1 MJC Mini Cartridge Filters Owners Manual TSOM 556 Date of Issue: 13.07.04 Orgreave Drive, Sheffield South Yorkshire. S13 9NR Tel:0114 254 0600 Fax: 0114 2540250 Email:sales@hodgeclemco.co.uk www.hodgeclemco.co.uk
Owner s Guide and Installation Manual
 For Your Records and Warranty Assistance For reference, also attach your receipt or a copy of your receipt to the manual. Model Name Type 2A Models Owner s Guide and Installation Manual Model No. Date
Section 4-3. Service - Air Dryer
 Section 4-3 Service - Air Dryer UPPER UPPER OUTER SHELL OUTER SHELL LOWER LOWER END COVER END COVER CONTROL CONTROL SUPPLY SUPPLY DELIVERY WIRING HARNESS CONNECTION DELIVERY WIRING HARNESS CONNECTION EXTENDED
Installation Instructions
 Installation Instructions For the 18" Built-In Dishwasher Sears, Roebuck and Co. Sears Canada, Inc. Hoffman Estates, IL 60179 U.S.A. Toronto, Ontario, Canada M5B 2B8 154435201 Before You Begin DO NOT INSTALL
Owner s Guide and Installation Manual
 For Your Records and Warranty Assistance For reference, also attach your receipt or a copy of your receipt to the manual. Model Name Type 2A Models Owner s Guide and Installation Manual Model No. Date
AVANI Grinding Booth
 AVANI Grinding Booth GB-6066-DD Customer: Kelly Walsh Customer PO#: 11305 AVANI SO#: Serial #: 153920-153921 Ship Date / Install Date: Tested By: Please read and save these instructions. Read carefully
Installation Instructions Part No , Part No Part No
 Torsion-Flex Motor mount for PSC motors and Rigid-Mount for ECM motors Replacement Kit Cancels: New Installation Instructions Part No. 327752-401, Part No. 327753-401 Part No. 327754-401 IIK-310A-45-11
OP44-1 REV 2: Removed depiction of air intake hole in the CB-907A Right Aft Case Baffle.
 REVISION DESCRIPTION: OP44-1 REV 2: Removed depiction of air intake hole in the CB-907A Right Aft Case Baffle. OP44-4 REV 1: Steps rewritten to describe the air intake hole on the CB-907A Right Aft Case
Camaro A/C Install Instructions
 1967-1968 Camaro A/C Install Instructions This kit is designed for the 1967-1968 non A/C equipped Camaro. This kit can be used with or without Astro vents Step One Remove the following factory components:
INSTALLATION, OPERATION, AND MAINTENANCE MANUAL
 INSTALLATION, OPERATION, AND MAINTENANCE MANUAL TUBE AXIAL FANS BTA, WTA, HTA, DDA The purpose of this manual is to aid in the proper installation and operation of the fans. These instructions are intended
Installation Instructions
 GE Consumer & Industrial Appliances Installation Instructions Junction Box Cover Within this user bag, you will find a junction box cover and a #10 hex head screw used to attach the junction box cover
Heater for BRP Commander. Caution: Before using this product, read this manual and follow all safety instructions. Owner s Manual
 Owner s Manual Model: Can Am Commander Heater for BRP Commander Caution: Before using this product, read this manual and follow all safety instructions. Safety Instructions Kit Contents Tool Requirement
Teflon Rotary Drum Pump
 Operating Instructions & Parts Manual 6005 Please read and save these instructions. Read carefully before attempting to assemble, install, operate or maintain the product described. Protect yourself and
Datasheet Automatic Protection System for Vehicle Engine Rooms Model: BPS
 Applications: The VID FIRE-KILL Model BPS is suitable for protection of engine rooms in busses, trucks, etc. System description: The VID Fire-Kill Model BPS system is a little local application fire extinguishing
READ AND SAVE THESE INSTRUCTIONS
 READ AND SAVE THESE INSTRUCTIONS CEILING FAN INSTALLATION AND OPERATION INSTRUCTION FAN RATING AC 120V. 60Hz UL LISTED MODEL: AC-552OD WEIGHT OF FAN: 6.82 KGS 1. TOOLS AND MATERIALS REQUIRED Philips screw
Propane Flame Projector Safety instructions and operating manual
 Bigflame Propane Flame Projector Safety instructions and operating manual 1 Flame projector Bigflame Safety instructions Caution The directions in this manual must be followed strictly. It is imperative
SINGLE - ZONE Ductless Split System Heat Pumps Installation, Operation & Maintenance Manual
 Presents SINGLE - ZONE Ductless Split System Heat Pumps Installation, Operation & Maintenance Manual 9k,12k 18k 24k, 30k, 36k ECR International, Inc. 2201 Dwyer Avenue, Utica NY 13501 Phone: 800.325.5479
GAS COOKTOP INSTALLATION INSTRUCTIONS
 INSTALLATION AND SERVICE MUST BE PERFORMED BY A QUALIFIED INSTALLER. IMPORTANT: SAVE FOR LOCAL ELECTRICAL INSPECTOR'S USE. READ AND SAVE THESE INSTRUCTIONS FOR FUTURE REFERENCE. WARNING If the information
Installation Instructions Dual Fuel Ranges
 Installation Instructions Dual Fuel Ranges E30DF74EPS E36DF76EPS E48DF76EPS 5995447082 2 Safety IMPORTANT SAFETY INSTRUCTIONS Safety Precautions Do not attempt to install or operate your unit until you
AIR OPERATED CLUTCH & BRAKE BLEEDING KIT. MODEL NO: CHT637 Part No: OPERATING & MAINTENANCE INSTRUCTIONS GC01/12
 AIR OPERATED CLUTCH & BRAKE BLEEDING KIT MODEL NO: CHT637 Part No: 1801637 OPERATING & MAINTENANCE INSTRUCTIONS GC01/12 INTRODUCTION Thank you for purchasing this CLARKE Clutch & Brake Bleeding Kit. Before
Product Support Bulletin
 MODEL: SUBJECT: CONVENTIONAL, W/ C7 CAT ENGINE WEBASTO TSL-17 HEATER Body DATE: APRIL 13, 2004 INDEX: 6 PAGE: 1 OF 16 Before you start this procedure, perform Freightliner Service Bulletin #20-7 first.
PERFECT FIT SERIES IN-DASH HEAT/ COOL/ DEFROST CHEVROLET NOVA
 specializing in AIR CONDITIONING, PARTS AND SYSTEMS for your classic PERFECT FIT SERIES IN-DASH HEAT/ COOL/ DEFROST 1966-67 CHEVROLET NOVA CONTROL & OPERATING INSTRUCTIONS The controls on your new Perfect
SWP. (Models SWP08 through SWP20) IMPORTANT! Read before proceeding! OPERATION & MAINTENANCE MANUAL
 IMPORTANT! Read before proceeding! OPERATION & MAINTENANCE MANUAL") SWP (Models SWP08 through SWP20) OPERATION & MAINTENANCE MANUAL IMPORTANT! Read before proceeding! Read carefully before attempting to assemble, install, operate or maintain the product described. Protect
SWP (Models SWP08 through SWP20) OPERATION & MAINTENANCE MANUAL IMPORTANT! Read before proceeding! Read carefully before attempting to assemble, install, operate or maintain the product described. Protect
Glass and Dishwashers AMX / AUX Series
 Glass and Dishwashers AMX / AUX Series INSTALLATION OPERATION REV. 8.xx 04.07.2005 Installation and Operation Instructions for Models of AMX / AUX Series Content Page 1 Installation... 3 2 Connections...
Lifetime Limited Warranty
 Hampton Bay Lifetime Limited Warranty The retailer warrants the fan motor to be free from defects in workmanship and material present at time of shipment from the factory for a lifetime after the date
Select. Sutter PlaceTM. Instruction Manual. A Kichler Select ceiling fan
 Sutter PlaceTM A Kichler ceiling fan Kichler Lighting 7711 East Pleasant Valley Road P.O. Box 318010 Cleveland, Ohio 44131-8010 Customer Service 866.558.5706 8:30 AM to 5:00 PM EST, Monday - Friday Instruction
GETZ MANUFACTURING PART NO.: MODEL: SV1 100 PR VACUFILL SYSTEM (Revised 6/7/05)
") GETZ MANUFACTURING PART NO.: 58616 MODEL: SV1 100 PR VACUFILL SYSTEM (Revised 6/7/05) GETZ SV1-100-PR VACU-FILL SYSTEM TABLE OF CONTENTS PAGE # 1... GETZ SV1-100-PR VACU-FILL SYSTEM 2... PARTS LIST 3...
GETZ MANUFACTURING PART NO.: 58616 MODEL: SV1 100 PR VACUFILL SYSTEM (Revised 6/7/05) GETZ SV1-100-PR VACU-FILL SYSTEM TABLE OF CONTENTS PAGE # 1... GETZ SV1-100-PR VACU-FILL SYSTEM 2... PARTS LIST 3...
PIPE DREAMS 96. Aeroponic Garden IMPORTANT:
 1 WARNING: BEFORE PUTTING WATER PUMP INTO OPERATION FILL UP NUTRIENT TANK TO TOP OF PUMP. THE PUMP MUST NEVER RUN DRY OTHERWISE, WARRANTY WILL BE DECLINED. READ FILLING INSTRUCTIONS BEFORE USE. Welcome
52 CEILING FAN READ AND SAVE THESE INSTRUCTIONS FAN RATING AC 120V.
 Irene 52 CEILING FAN READ AND SAVE THESE INSTRUCTIONS FAN RATING AC 120V. 60Hz TABLE OF CONTENTS Tools and Materials Required... 1 Package Contents... 1 Safety Rules... 2 Mounting Options... 3 Hanging
Installation and Operation Manual For Hunter Ceiling Fans /16/2004
 Installation and Operation Manual For Hunter Ceiling Fans 1 2 CONGRATULATIONS! Your new Hunter ceiling fan is an addition to your home or office that will provide comfort and performance for many years.
Safety. Rinse Kit for Multi-Pro 1200 and 1250 Turf Sprayers Model No Safety and Instructional Decals. Installation Instructions
 Rinse Kit for Multi-Pro 1200 and 1250 Turf Sprayers Model No. 106-4842 Form No. 3353-529 Rev B Installation Instructions Note: Determine the left and right sides of the machine from the normal operating
Installation manual for room air conditioner
 Installation manual for room air conditioner HSU-26HEK03/R2(D)/I HSU-35HEK03/R2(D)/I HSU-53HEK03/R2(D)/I HSU-71HEK03/R2(D)/I HSU-26HEK03/R2(D)/O HSU-35HEK03/R2(D)/O HSU-53HEK03/R2(D)/O HSU-71HEK03/R2(D)/O