VERTICAL WALL BED INSTRUCTIONS - FULL & QUEEN
|
|
|
- Kristopher Weaver
- 5 years ago
- Views:
Transcription


1 VERTICAL WALL BED INSTRUCTIONS - FULL & QUEEN
 I Tube (for attaching legs) x1 x1 J Slats x40 x42 K Slat caps x80 x84 L Wrench x1 x1 M1 Allen key #4 x1 x1 M2 Allen key #5 x1 x1 N Threaded inserts x16 x16 O")
2 Hardware F Q A Flat Bars B Pistons (non locking) Full: 90kg, Queen: 110kg C Mattress Supports D Mounting Plates (left and right) E Saddle locking plates F Brackets to attach wall bed to wall G Door brackets x12 x12 H Legs (left and right) I Tube (for attaching legs) x1 x1 J Slats x40 x42 K Slat caps x80 x84 L Wrench x1 x1 M1 Allen key #4 x1 x1 M2 Allen key #5 x1 x1 N Threaded inserts x16 x16 O M8 x 16mm Screws x16 x16 P #10 x 55mm Screws x8 x8 2
 x4 x4 Z M5 Nuts (for saddle locks) AA M8 Locking nuts x6 x6 BB Temporary stoppers Note: Pro Value offers a 5 year")

3 Hardware - Continued F Q Q #8 x 15mm Screws x44 x44 R #10 x 15mm Screws x4 x4 S #10 x 30mm Screws x4 x4 T M5 x 15mm Screws U M6 x 30mm Bolts x4 x4 V M8 x 50mm Bolts x8 x8 W M8 x 70mm Bolts x3 x3 X Washers x8 x8 Y Nylon Washers (for pivoting legs) x4 x4 Z M5 Nuts (for saddle locks) AA M8 Locking nuts x6 x6 BB Temporary stoppers Note: Pro Value offers a 5 year limited warranty on slat bases used in the wall bed as well as the mechanisms. The warranty covers the replacement of parts with manufacturing defects and/or breakage caused by regular use. It does not cover damages caused by poor installation or misuse of the product. Professional installation suggested. The bed must be secured to the wall into wood or metal studs. 3
 board.")

4 Conversion Table Inside Measurements Width Depth Height Full 1454mm / 57-1/4 368mm / 14-1/2 2006mm 79 Queen 1606mm / 63-1/4 368mm / 14-1/2 2137mm 84-1/8 Outside Measurements Width Depth Height Full 1492mm / 58-3/4 406mm / mm 80-1/2 Queen 1644mm / 64-3/4 406mm / mm 85-5/8 *All measurements are for 19mm (3/4 ) board. E E Full E E Queen A = Exterior B - C - D - E = Inset Full Wall Bed Qty Width Length Thickness A 2 406mm / mm / 80-1/2 19mm 3/4 B 2 406mm / mm / 57-1/4 19mm 3/4 C 1 330mm / mm / 57-1/4 19mm 3/4 D 1 660mm / mm / 57-1/4 19mm 3/4 E 2 724mm / 28-1/2 1999mm / 78-11/16 19mm 3/4 F 1 76mm / 3 457mm / 18 16mm 5/8 Queen Wall Bed Qty Width Length Thickness A 2 406mm / mm / 85-5/8 19mm 3/4 B 2 406mm / mm / 63-1/4 19mm 3/4 C 1 330mm / mm / 63-1/4 19mm 3/4 D 1 660mm / mm / 63-1/4 19mm 3/4 E 2 800mm / 31-1/2 2129mm / 83-13/16 19mm 3/4 F 1 76mm / 3 457mm / 18 16mm 5/8 *Suggested dimensions. 4
5 Drilling Guide The holes should be 3/8 (9mm) in diameter and 1/2 (13mm) deep for the threaded inserts. Back 156mm 64mm 64mm 197mm " " " " 176mm " Front 79mm " 240mm " 290mm " 353mm " 450mm " 290mm " Bottom *All measurements are for 19mm (3/4 ) board. 5


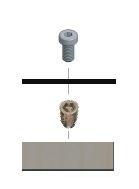


6 1 Installing The Mounting Brackets 0 x16 Right side D N x16 Left side Front Wood O + N D Front Bottom 2 Assembling The Cabinet See conversion guide for suggested cabinet dimensions. 6


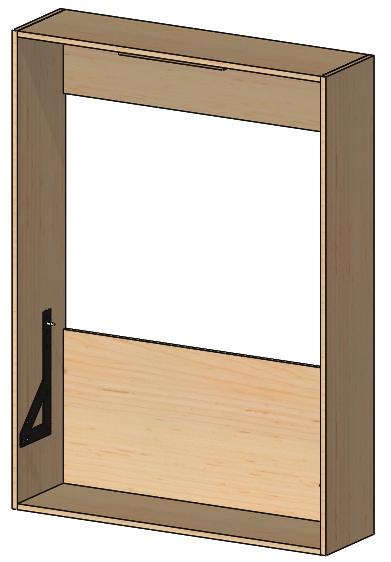
7 3 Securing To The Wall R Q *Needs to be secured into atleast two wood or metal studs. Q= x4 X= x8 R= x4 F= Nylon wall anchors are NOT recommended. *Professional installation recommended. W= 4 Assembling The Frame x Attach the two half frames with W Attach the flat bar A to the frame with V. A= V= x8 A 7


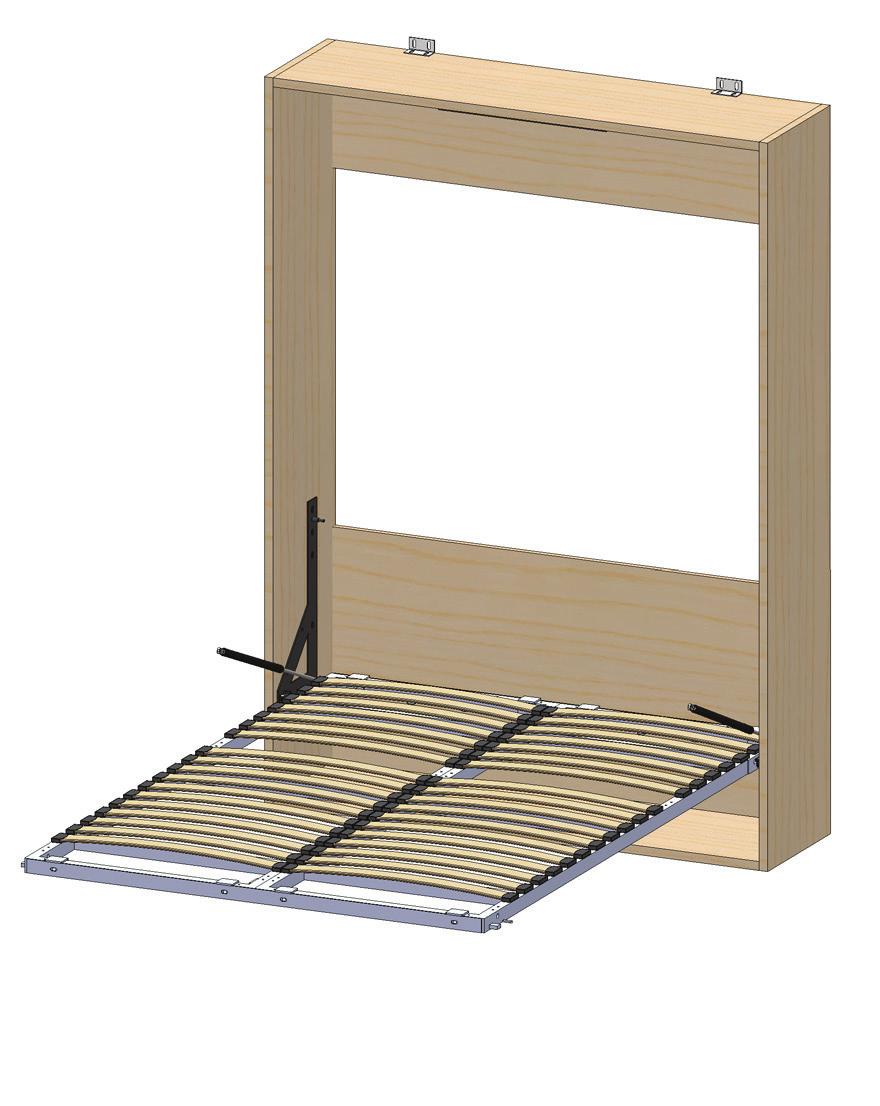

8 5 AA = Attaching The Pistons To The Frame B= Secure the longer metal ends of the pistons to the frame. This end 6 Installing The Frame Onto The Mounting Brackets T= E= Z= 8


9 7 Installing The Pistons To The Cabinet Tilt the frame inside past the cabinet edge to mount the pistons on the mounting brackets through the opening between the slats. AA = 8 Installing The Legs 8.1 Install the temporary stoppers BB onton the top corners of the bed cabinet. BB = 8.2 Secure the legs to the bed frame. Do not overtighten. AA = Y= x4 U 8.3 Install tube to both legs. U= M1 = x4 H U H I 9

 are for the placement of this hole along the doors.")


10 9 102mm Installing The Door Brackets 102mm 4 4 Top The door brackets must point downward. Install the door brackets in alignment with the support bars on the bed frame. Measurements (right) are for the placement of this hole along the doors. Q= G= 714mm 28-1/8 x 24 x12 714mm 28-1/8 Bottom Install the handle (not included) on the other side of the door during this step. Handle should be mounted at a height to comfortably allow the user to pull the bed down (approximately 1/3 of the way down from the top of the door.) 10 Installing The Doors 10.1 Hook the door brackets onto the frame and push down until they are firmly in place. Center the doors on the frame mm 10-1/16


 on the inside")

11 10 Installing The Doors 10.2 Attach the doors to the frame while putting weight on the frame to keep the bed open. We recommend to have someone else sit on the frame during this step. Q P For this step Q = x 20 P = x8 11 Installing The Permanent Stopper Permanent Stopper Install the stopper (not included) on the inside top of the cabinet where it will allow for the door to close flush to the front of the cabinet. 11


12 12 Installing The Slats K= K J J= K Place a cap on both ends of the slats. Insert the slats into their designated holes along the frame. 13 Installing The Mattress Supports Insert the mattress supports into the designated holes on the bed frame. C= 12 C x8 x4


 Full 1372 x 1905mm (54 x 75 ) Queen 1524")
13 Using The Wall Bed 1 2 Pivot the leg towards the inside of the unit. Make sure leg is fully retracted. The wall bed is assembled and shown in lowered position. 3 Pull up gently to close. The leg serves as a mattress retaining system. The pistons insure that the door closes properly and remains closed. Bed model may vary. Note: The bed will not stay open on its own without the weight of a mattress. Load Rating Bed Size Mattress Size (Mattress not included) Full 1372 x 1905mm (54 x 75 ) Queen 1524 x 2032mm (60 x 80 ) Thickness 25mm (10 ) Dynamic 154kg (340 lbs) 181 kg (400 lbs) Static 454 kg (1000 lbs) 13
14 VERTICAL WALL BED INSTRUCTIONS 909 Forest Edge Drive Vernon Hills, IL T: F: Other locations: West Haven, CT Elk Grove Village, IL Indianapolis, IN Versailles, KY Livonia, MI Eagan, MN Fenton, MO Kansas City, MO Londonderry, NH Edison, NJ Pennsauken, NJ Syracuse, NY Guilderland Center, NY Brooklyn Heights, OH Columbus, OH Middletown, OH Bethlehem, PA Harrisburg, PA Rumford, RI Pewaukee, WI
INSTALLATION INSTRUCTIONS: VERTICAL WALL BED HARDWARE KIT WITH FRAME
 INSTALLATION INSTRUCTIONS: VERTICAL WALL BED HARDWARE KIT WITH FRAME MODEL CODES: 54877 (Single vertical wall bed) 55991 (Double vertical wall bed) 54386 (Queen vertical wall bed) *Our more compact model
2 ADULTS REQUIRED FOR ASSEMBLING
 2 ADULTS REQUIRED FOR ASSEMBLING If you have any questions regarding assembly or if you are missing parts, do not return this item to Retailer Store Please call our customer service number and have your
Installation Instructions
 Installation Instructions Outdoor Installation Kit Models AD250 & AW250 Part No. 24097 Qualifications for installation of the kit: You must be able to read and understand all instructions provided with
PRO 48 INSTALLATION INSTRUCTIONS
 PRO 48 INSTALLATION INSTRUCTIONS CONTENTS PRO 48 Installation Recommendations 3 PRO 48 Overall Dimensions 4 PRO 48 Installation Specifications 5 PRO 48 Installation Instructions 6 PRO 48 Installation Checklist
Wall Bed Assembly Instructions
 Wall Bed Assembly Instructions Pardo European Adjustable Fold Away Bed Systems For Casework The SM Series Bed Mechanisms Vertical Descending Horizontal Descending Concealed Hardware Exposed Hardware End
Wall Bed Assembly Instructions
 Wall Bed Assembly Instructions Pardo European Adjustable Fold Away Bed Systems For Casework The SM Series Bed Mechanisms Vertical Descending Horizontal Descending Concealed Hardware Exposed Hardware End
Installation Manual Universal Top-of-Pole Mount UNI-TP/02
 Installation Manual Universal Top-of-Pole Mount UNI-TP/02 Solar Mounting Solutions UNI-TP/02 April 2008 www.ironridge.com 2008 IronRidge, Inc. All Rights Reserved Version 1.0 2 Universal Top-of-Pole Mount
Pole Mounting System Installation & Certification Manual
 Pole Mounting System Installation & Certification Manual IronRidge Pole Mount Installation Guide... 2 IronRidge Certification Letter... 17 IronRidge Wet Stamped Drawing... 18 IronRidge Foundation Addendum...
STONE TROUGH CONSOLE SINK
 STONE TROUGH CONSOLE SINK INSTRUCTIONS CONTENTS Console Installation Sink Support 2 2 Backsplash 2 Undermount Sink Semi-Recessed Sink 3 4 Vessel Sink 5 Drain Installation 6 1 CONSOLE SINK Read entire Console
Flat-Screen TV Ceiling Mount - For 32in to 70in LCD, LED or Plasma TVs
 Flat-Screen TV Ceiling Mount - For 32in to 70in LCD, LED or Plasma TVs Product ID: FLATPNLCEIL Save space and mount your flat-screen television in the ideal viewing location, by suspending it from the
Modular Drawer Cabinets Installation Instructions
 Modular Drawer Cabinets Installation Instructions IMPORTANT PRODUCT LIABILITY INFORMATION Read all instructions before proceeding with installation or drawer loading. Vital product information pertaining
User s Manual and Operating Instructions
 User s Manual and Operating Instructions Model Numbers: PT-18W-DDF-A, PT-20F-DDF-A, PT-20S-DDF, PT-24O-DDF, PT-24-DDF, PT-24-DDF-F, PT-30-DDF, PT-30P-DDF-A, PT-30P-DDF-AF READ AND SAVE THESE INSTRUCTIONS
Griddle Stands REFRIGERATORS & FREEZERS. Call us toll free at (800) INNOVATIVE DESIGNS FOR YOUR FOODSERVICE NEEDS
 INNOVATIVE DESIGNS FOR YOUR FOODSERVICE NEEDS") Griddle Stands REFRIGERATORS & FREEZERS Call us toll free at (800) 523-7138 INNOVATIVE DESIGNS FOR YOUR FOODSERVICE NEEDS Griddle Stands Refrigerator & Freezer Griddle Stands are available in 7 sizes for
Griddle Stands REFRIGERATORS & FREEZERS Call us toll free at (800) 523-7138 INNOVATIVE DESIGNS FOR YOUR FOODSERVICE NEEDS Griddle Stands Refrigerator & Freezer Griddle Stands are available in 7 sizes for
STEP BY STEP INSTALLATION INSTRUCTIONS. Durawood Blinds. Easy Lift Cordless
 STEP BY STEP INSTALLATION INSTRUCTIONS Durawood Blinds Easy Lift Cordless Table of Contents Everything You Need A Smooth Set-Up We want you to love your new blinds and that includes having a smooth installation
Installation and Care Instructions
 Installation and Care Instructions 2" Horizontal Aluminum Blinds MagnaView Tilt Feature CONTENTS Getting Started................................................ 1 Mount the Installation s....................................
ASSEMBLY and INSTALLATION INSTRUCTIONS. Pipe wrench Ratchet 3/8 socket 9/16 socket 11/16 socket 3/16 Allen key 3/32 Allen key 9/64 Allen key
 ASSEMBLY and INSTALLATION INSTRUCTIONS Gas Conversion Kit Tube Heaters View these instructions online at www.lbwhite.com Kit Contents: DESCRIPTION QTY. Instructions 1 Burner orifi ce 1 Manifold pipe 1
Oahu Showerspa Model #1035 Owner's Manual
 O A H U Oahu Showerspa Model #1035 Owner's Manual Oahu ShowerSpa Model #1034 Please Read The Following Instructions COMPLETELY Before Beginning! Our goal is to ensure your installation goes smoothly and
Integrated Refrigeration
 INSTALLATION GUIDE Integrated Refrigeration Contents Integrated Refrigeration....................... 3 Model Specifications.......................... 4 Site Preparation.............................. 6
USER MANUAL PLEASE READ AND UNDERSTAND THIS MANUAL COMPLETELY BEFORE USING & INSTALLING THE FIXED SOLAR PANEL KIT.
 Fixed Solar Panel Kit USER MANUAL PLEASE READ AND UNDERSTAND THIS MANUAL COMPLETELY BEFORE USING & INSTALLING THE FIXED SOLAR PANEL KIT. Warnings Ensure all the bolts are firm and will not vibrate loose.
Installation Instructions
 Installation Instructions For Fully Integrated NoFrost Combined Refrigerator-Freezers HCB 1560/1561 7084 429-00 Important Please read and follow these instructions These instructions contain Danger, Warning
Installation and Care Instructions
 Installation and Care Instructions 2" Horizontal Aluminum Blinds MagnaView Tilt Feature Thank you for your purchase. Your new blinds have been custom built for you from the highest quality materials. Properly
BULK PURCHASE DISCOUNTS Valid for purchases any time of year
 2018 FISH FOOD PRICE LIST P: 800-334-5257 F: 336-784-4306 staff@blueridgekoi.com FORMULA PELLET SIZE 2 LB BAG 5 LB BAG 14 LB BUCKET 25 LB BAG 50 LB BAG 12 PER CASE 6 PER CASE 2 PER CASE 1 PER CASE 1 PER
PX Dual Sliding Doors, Installation Guide
 s, 01 102.25 Bumper location inside header Header & Valance Legs (C-Channels, Width 3 ) Door Handles Bumper location inside header Floor Brackets 54" Installation Instructions: Step #1 Attach legs to valance
Installation Instructions
 Installation Instructions For Fully Integrated NoFrost Combined Refrigerator-Freezers HC 2062 HCB 2062 HC/HCB 20 7082 373-00 Important PLEASE READ AND FOLLOW THESE INSTRUCTIONS These instructions contain
Pole Mounting System Installation & Certification Manual
 Pole Mounting System Installation & Certification Manual IronRidge Pole Mount Installation Guide... 2 IronRidge Certification Letter... 14 IronRidge Wet Stamped Drawing... 15 IronRidge Foundation Addendum...
Ebb & Flow System
 113501 Ebb & Flow System Actual system may differ from what is shown. System requires a timer to control the main pump and to set watering cycles. Additional purchase required. 2016 FarmTek All Rights
Installation. Built-in Full Height Wine Cellar VCWB301
 Installation Built-in Full Height Wine Cellar VCWB301 Table of Contents Warnings & Important Information _ 3 Dimensions _ 5 Specifications _ 6 Cutout Dimensions 7 Cabinet Information _ 8 Cabinet Information
Product Name: Villa Park 3pc Bistro Set - Golden Wheat
 Please refer to part numbers when reordering For questions or comments about product: Email: sears@sunjoygroup.com or Call toll-free: 1-866-578-6569 Made in / Hecho en CHINA Distributed by Sears, Roebuck
Installation Manual Universal Top-of-Pole Mount UNI-TP/08LL
 Installation Manual Universal Top-of-Pole Mount UNI-TP/08LL Solar Mounting Solutions UNI-TP/08LL April 2010 www.ironridge.com 2010 IronRidge, Inc. All Rights Reserved Version 2.0 2 Universal Top-of-Pole
Canterbury Bathroom Vanity
 TM anterbury athroom Vanity 60-IN Vanity ase and Top ( 60-IN W x -IN x 35-IN H) ITEM# WHITE ITEM# LA IRH 86479 White Finish ase, White Engineered Top 86486 lack irch Finish ase, White Engineered Top 8648
Wood. Blind owner's handbook
 Wood owner's handbook 2 WARNING Cords and bead chains can loop around a child s neck and strangle. Always keep cords and bead chains out of children s reach. Move furniture away from cords and bead chains.
Installation Instructions
 Instructions For Fully Integrated NoFrost Combined Refrigerator-Freezers HC 1540/1541 7084 433-00 Important Please read and follow these instructions These instructions contain Danger, Warning and Caution
Undercounter Refrigeration
 INSTALLATION GUIDE Undercounter Refrigeration Contents Undercounter Refrigeration..................... 3 Undercounter Specifications.................... 4 Site Preparation..............................
INSTALLATION INSTRUCTIONS
 INSTALLATION INSTRUCTIONS BUILT-IN BOTTOM MOUNT REFRIGERATOR/FREEZER Retain for Future Reference VIKING RANGE CORPORATION 111 Front Street Greenwood, Mississippi 38930 USA (662) 455-1200 IMPORTANT - PLEASE
Installation. Leveling
 Your refrigerator was packed carefully for shipment. Remove and discard shelf packaging and tape. Do not remove the serial plate. Location Do not install refrigerator near oven, radiator or other heat
Handshower, Hose & Handshower Accessories
 P24443, P24445, P24446, P24452, P24453, P24456 1 of 6 INSTALLATION INSTRUCTIONS Thank You For Choosing KALLISTA We appreciate your commitment to KALLISTA quality products. Please take a moment to review
Viking Installation Guide
 Viking Installation Guide Viking Range, LLC 111 Front Street Greenwood, Mississippi 38930 USA (662) 455-1200 For product information, call 1-888-(845-4641) or visit the Viking Web site at vikingrange.com
CEILING FAN OWNER S MANUAL
 Style that revolves around you. CEILING FAN OWNER S MANUAL Total fan weight *53 lbs. WEXFORD 11/05 WARNING: Read and follow these instructions carefully and be mindful of all warnings shown throughout.
SAN RAPHAEL PRESSURE LITE VITREOUS CHINA SIPHON JET TOILET
 SAN RAPHAEL PRESSURE LITE VITREOUS CHINA SIPHON JET TOILET BEFORE YOU BEGIN HOW TO USE THESE INSTRUCTIONS Please read these instructions carefully to familiarize yourself with the required tools, materials,
Threaded Faucet Installation
 Threaded Faucet Installation !"#$%&'"()'*&+(%',%--%.'*/(0'1--%23.4 M$-"3773"'#$&P'3,93Q )*+'$,-!"#$%&!'$(.CCD&EFGF&!'7'5#$% J#=*K= @347(&8%"B%%$ J#=*K=&3$L&!'$( A""35;&!'$(&B'";.CCD&EFGF&!'7'5#$%../01&2345%"&6#7%.H/I1&6#7%.1
MAYFIELD CEILING FAN LISTED E ITEM # MODEL #BTH44ABZC5C BTH44BNK5C Español p. 20 ATTACH YOUR RECEIPT HERE.
 Harbor Breeze is a registered trademark of LF, LLC. All Rights Reserved. ITEM #0331094 0331096 MAYFIELD CEILING FAN MODEL #BTH44ABZC5C BTH44BNK5C Español p. 20 ATTACH YOUR RECEIPT HERE Serial Number Purchase
Speaker Wall Mount (MSP-DCCSPM)
") INSTALLATION INSTRUCTIONS Speaker Wall Mount () The speaker wall mount is a convenient mounting solution for speakers that are compatible with flat panel displays. The speaker wall bracket is equipped
INSTALLATION INSTRUCTIONS Speaker Wall Mount () The speaker wall mount is a convenient mounting solution for speakers that are compatible with flat panel displays. The speaker wall bracket is equipped
Single-Control Lavatory Faucet
 P22740 P23201 P24407 1 of 5 Thank You For Choosing KALLISTA We appreciate your commitment to KALLISTA quality products. Please take a moment to review this manual before you install your KALLISTA product.
Bed Frames Roll Slats Trundles
 Bed Frames Roll Slats Trundles Twin/Full Bolt-On Bed Frame B100-21 Sturdy metal bed frame supports a twin or full mattress and foundation/box spring. Designed to bolt onto the headboard. Mattress and foundation/box
ASSEMBLY INSTRUCTIONS
 ITEM NO.: 2695&2696-03&04 DRESSER & MIRROR-HAMPTON THANK YOU OR PURCHASING THIS QUALITY PRODUCT. BE SURE TO CHECK ALL PACKING MATERIALS CAREULLY OR SMALL PARTS THAT MAY HAVE COME LOOSE INSIDE THE CARTON
Please read the following installation instructions first after purchasing this product or transporting it to another location.
 9 Installation Overview Please read the following installation instructions first after purchasing this product or transporting it to another location. 1 Unpacking your refrigerator 2 Choosing the proper
Floor Standing Bath Shower Mixer. Fitting instructions. Please keep these instructions for future reference and request of replacement parts.
 Floor Standing Bath Shower Mixer Fitting instructions Please keep these instructions for future reference and request of replacement parts. We have taken great care to ensure that this product reaches
Bed Frames Roll Slats Trundles
 Bed Frames Roll Slats Trundles Twin/Full Bed Frame B100-11 Sturdy metal bed frame supports a twin or full mattress and foundation/box spring. Designed to bolt onto the headboard. Mattress and foundation/box
Instructions CH Chrome SS Stainless Steel Certifications. Single Handle, Pull-Down, Kitchen Faucet. Tools Required.
 Instructions *Image may vary slightly from actual product Tools Required Adjustable Wrench Groove Joint Pliers Pipe Wrench Phillips Screwdriver Pipe Tape or pipe thread compound Safety Tips If you solder
Single-Control Bathroom Sink Faucet
 P24407 1 of 5 THANK YOU FOR CHOOSING KALLISTA We appreciate your commitment to KALLISTA quality products. Please take a moment to review this manual before you install your KALLISTA product. If you encounter
Pole Mounting System Installation & Certification Manual
 Pole Mounting System Installation & Certification Manual IronRidge Pole Mount Installation Guide... 2 IronRidge Certification Letter... 14 IronRidge Wet Stamped Drawing... 15 IronRidge Foundation Addendum...
INSTALLATION INSTRUCTIONS
 INSTALLATION INSTRUCTIONS BUILT-IN FULL HEIGHT WINE CELLAR Retain for Future Reference VIKING RANGE CORPORATION 111 Front Street Greenwood, Mississippi 38930 USA (662) 455-1200 IMPORTANT - PLEASE READ
CEILING FAN OWNER'S MANUAL
 CEILING FAN OWNER'S MANUAL READ AND SAVE THESE INSTRUCTIONS MODEL: 52-854-5RV-234 52-854-5RV-CH 52-854-5RV- FAN RATING AC 120V. 60Hz CUL LISTED MODEL : AG-962MC 1. TOOLS AND MATERIALS REQUIRED Philips
Aluminum Horizontal Blinds BOX BRACKET INSTALLATION
 Aluminum Horizontal Blinds BOX BRACKET INSTALLATION MOUNT THE INSTALLATION BRACKETS Mounting Options The installation brackets may be inside mounted, outside mounted or ceiling mounted. In all cases, level
EW25 EW30 EW35 USER & INSTALLATION MANUAL. Model. Model. Model
 ON-WALL SPEAKERS Model EW25 Model EW30 Model EW35 USER & INSTALLATION MANUAL Introduction Congratulations on your purchase of an EMP Tek EW25, 30 or 35 on-wall Speaker! Your speaker is the result of many
REFRIGERATOR INSTALLATION INSTRUCTIONS / \ / \
 _0m_o_,_ /kl,_lle.r_lg 240EdwardsStreet,SE C_eveJa_o. Tennessee 373_1 Tel:423472-3333 Fax:423-478-6710 REFRIGERATOR INSTALLATION INSTRUCTIONS / \ / \ / LEAVE THESE INSTRUCTIONS WITH THE OWNER Important
Installation Manual Universal Single-Arm Side-of-Pole Mount UNI-SA/21.5
 Installation Manual Universal Single-Arm Side-of-Pole Mount UNI-SA/21.5 Solar Mounting Solutions UNI-SA/21.5 March 2009 www.ironridge.com 2009 IronRidge, Inc. All Rights Reserved Version 2.0 2 Universal
CBT 50LA-1 & CBT 100LA-1
 CBT 50LA-1 & CBT 100LA-1 Bracket Installation Guide Rev B For Swivel (Pan) / Tilt Wall Bracket Included: SPEAKER BRACKET SWIVEL-TILT WALL BRACKET M6-34L M6-15L SS Flat washers M6 nuts SS Lock washers switch
Gfp 400 Series August Gfp 463 TH. Please read this manual carefully before operating!
 OPERATING MANUAL Gfp 455 TH Gfp 463 TH Please read this manual carefully before operating! 1 Table of Contents Gfp 400 Series August 2015 Contents Page 1. Introduction 3 2. Important Safety Instructions..
Pole Mounting System Installation & Certification Manual
 Pole Mounting System Installation & Certification Manual IronRidge Pole Mount Installation Guide... 2 IronRidge Certification Letter... 11 IronRidge Wet Stamped Drawing... 12 www.ironridge.com 800-227-9523
INSTALLATION INSTRUCTIONS
 INSTALLATION INSTRUCTIONS BUILT-IN BOTTOM MOUNT REFRIGERATOR/FREEZER DBRTGK72SS-GRILLE KIT (FOR designer SERIES ONLY) VIKING RANGE CORPORATION 111 Front Street Greenwood, Mississippi (MS) 38930 USA (662)
GETTING STARTED OPTIONAL HARDWARE A
 ROLLER SHADES Continuous Cord Loop and Link System without Cassette Double Roller GETTING STARTED OPTIONAL HARDWARE A few simple tools are required: Hold Down Brackets Spacer Block Spacers Steel Tape Measure
Installation Instructions
 Installation Instructions Above the Cooktop Microwave Oven JVM60 and JVM65 Questions? Call -800-56- or Visit our Website at: GEAppliances.ca BEFORE YOU BEGIN Read these instructions completely and carefully.
INSTALLATION INSTRUCTIONS. Aluminum Blinds - Standard - - Lift & Lock -
 1 INSTALLATION INSTRUCTIONS Aluminum Blinds - Standard - - Lift & Lock - 1 Deluxe 1 Traditional 1 Value & 1 Basic 2 Macro Thank you for your purchase. This blind has been custom built for you from the
Operator and Parts Manual Nu-1600 Burnisher, Belt Drive Nu-2000 Burnisher, Belt Drive
 Operator and Parts Manual Nu-1600 Burnisher, Belt Drive Nu-2000 Burnisher, Belt Drive NuSource Enterprises, LLC; A 4699 61 st St. Suite C; Holland, MI 49423 Length 33.75 in. Width 21 in. Height 50 in.
Flat-Screen TV Ceiling Mount - Short Pole - Full Motion
 Flat-Screen TV Ceiling Mount - Short Pole - Full Motion Product ID: FPCEILPTBSP Save space and create the ultimate viewing environment for your flat-screen television, by suspending it from the ceiling.
Instructions for Installation and Use
 Clinically Proven Allergy Relief Comfortable & Convenient Instructions for Installation and Use www.purezone.com Contents Introduction Introduction................................................... 3
ModulAir Air Dryer with External Purge Tank - Changeover from Bendix AD-IS for Peterbilt Installation. Air Dryer Mounting Bracket (Item 1)
") Instruction Guide L31259 11/10 ModulAir Air Dryer with External Purge Tank - Changeover from Bendix AD-IS for Peterbilt Installation Air Dryer Mounting Bracket (Item 1) Tank Mounting Bracket (Item 19)
Instruction Guide L31259 11/10 ModulAir Air Dryer with External Purge Tank - Changeover from Bendix AD-IS for Peterbilt Installation Air Dryer Mounting Bracket (Item 1) Tank Mounting Bracket (Item 19)
Graber Lake Forest Faux Wood and Premium Faux Wood Blind
 2 3 5 6 8 7 1 2" (5.1cm) Blind shown 1. Blind (cord tilt shown) 2. Mounting Brackets 3. Center support bracket (if required). Mounting screws (2 per bracket) 5. Projection brackets (optional, one per mounting
Instructions. 110-KVD-CYSCH-AD-Z Chrome 110-KVD-CYSSS-AD-Z Stainless Steel Certifications. Single Handle, Pull-Down, Kitchen Faucet
 Instructions *Image may vary slightly from actual product Tools Required Adjustable Wrench Groove Joint Pliers Pipe Wrench Phillips Screwdriver Pipe Tape or pipe thread compound Safety Tips If you solder
INSTALLATION INSTRUCTIONS
 INSTALLATION INSTRUCTIONS BUILT-IN BOTTOM MOUNT REFRIGERATOR/FREEZER BRTGK72SS-GRILLE KIT (FOR PROFESSIONAL SERIES ONLY) VIKING RANGE CORPORATION 111 Front Street Greenwood, Mississippi (MS) 38930 USA
Installation & Service Guide
 Reverse Osmosis Ontario Soft Water.ca Kitchener, Canada 519-579-0500 Installation & Service Guide Pentair 75 gpd Encapsulated Membrane System Standard System 75gpd Membrane Your New Reverse Osmosis System
Inventory Management Guide
 SOUTH/SOUTHEAST Inventory Management Guide Honeywell Residential Combustion is the industry leader in combustion controls for applications including warm air furnaces, boilers, commercial water heaters,
CEILING FAN OWNER'S MANUAL
 CEILING FAN OWNER'S MANUAL READ AND SAVE THESE INSTRUCTIONS MODELS: 52-ECM-5RV-13 52-ECM-5RV- 52-ECM-5RV-SN FAN RATING AC 120V. 60Hz CUL LISTED MODEL : AC-552 1. TOOLS AND MATERIALS REQUIRED Philips screwdriver
AQUARITE DELUXE Model: HW Installation Manual
 AQUARITE DELUXE Model: HW205930 Installation Manual Table of Contents Diagrams. 1 Tools Needed for Installation. 1 Notice to Installers. 2 Packing List. 2 Hinge Assembly. 2 Drain assembly Information.
GE Monogram. Installation. Instructions. Stainless Steel Bottom Mount Built-In Refrigerators. Models ZICS36N RH ZICS36N LH
 GE Monogram Installation Instructions Stainless Steel Bottom Mount Built-In Refrigerators Models ZICS36N RH ZICS36N LH Before you begin - Read these instructions completely and carefully. IMPORTANT - Save
Installation Instructions
 Dear customer! Thank you for choosing this quality product from ASKO. We hope it will meet your expectations and fulfil your needs for many years to come. Scandinavian design combines clean lines, everyday
MNEFDD54 & MNBCDD54 GALVANIZED WALL FANS Installation, Operation, and Maintenance Instructions
 FARM PRODUCTS DIVISION MEMBER OF AMCA AMERICAN COOLAIR CORPORATION P.O. BOX 2300 JACKSONVILLE, FLORIDA 32203 PHONE (904) 389-3646 FAX (904) 387-3449 E-MAIL - fans@coolair.com MNEFDD54 & MNBCDD54 GALVANIZED
Closomat Lima Vita installation & user guide
 Closomat Lima Vita installation & user guide design manufacture supply install service recycle Technical data The Closomat toilet MUST be installed by a competent or qualified person. Explanation of symbols
Step 1: Identify the parts of your shade (parts shown are not to scale)
") Motor Operated Solar Shade with Valance Installation and Care Instructions Read carefully and retain for future use. Installation video is available online. Tools required: Philips head screwdriver (not
Motor Operated Solar Shade with Valance Installation and Care Instructions Read carefully and retain for future use. Installation video is available online. Tools required: Philips head screwdriver (not
Featured Fish-Week ofmay 29th
 Featured Fish-Week ofmay 29th 4.5 HiFinBandedSharksin stocknow 26.50each Orderinanyquantity! 5-6 Premium GradeKoi Buy1FulCount Geta2ndFulCount50% OFF! Staf@BlueRidgeKoi.com P:800-334-5257F:336-784-4306
Installation Instructions
 Installation Instructions For Fully Integrated NoFrost Combined Refrigerator-Freezers HC 2060/2061 7082 485-00 Important PLEASE READ AND FOLLOW THESE INSTRUCTIONS These instructions contain Warning and
EF36, IF36 PLANNING GUIDE. 36 Wide Built-In Refrigerator. (1.3 cm) 1/8. Opening Dimensions
 1/8. Opening Dimensions") 1/8 Opening Dimensions To avoid tipping during use, the solid soffit must be within 1 (2.5 cm) maximum above the refrigerator. If the solid soffit is higher than 1 (2.5 cm) or one is not available, then
1/8 Opening Dimensions To avoid tipping during use, the solid soffit must be within 1 (2.5 cm) maximum above the refrigerator. If the solid soffit is higher than 1 (2.5 cm) or one is not available, then
Models , Equinox, and Sirens Clutch Replacement Service Manual
 Models 2001-130, Equinox, and 508-128 Sirens Clutch Replacement Service Manual 25500297 Rev. A0 1115 Printed in U.S.A. Copyright 2015 Federal Signal Corporation Contents Safety Messages... 3 General Description...
HONEYCOMB AND PLEATED SHADES
 HONEYCOMB AND PLEATED SHADES GETTING STARTED BRACkET INFORMATION A few simple tools are required: The brackets you received with your product are REQUIRED for proper installation. Brackets should be installed
Installation Instructions
 Installation Instructions For Fully Integrated NoFrost Combined Refrigerator-Freezers HC 2060/2061 HCB 2060/2061 7084 349-00 Important Please Read and Follow these Instructions These instructions contain
PARKSIDE RESIN WICKER SWING. Product Code: D71 M1228 KSN: UPC Code: Date of Purchase: / /
 PARKSIDE RESIN WICKER SWIN Product Code: D71 M18 KSN: 0-0880361-0 UPC Code: 095457158008 Date of Purchase: / / Thank you for your purchase Thank you for your purchase! We are pleased that you have chosen
ARIN THERMOSTATIC SHOWER SYSTEM
 ARIN THERMOSTATIC SHOWER SYSTEM INSTALLATION INSTRUCTIONS Before installing, read entire shower system installation instructions. Observe all local building and safety codes. For the following installation
High Ceiling TV Mount - 8.2' to 9.8' Long Pole - For 32" to 75" TVs - Full Motion
 High Ceiling TV Mount - 8.2' to 9.8' Long Pole - For 32" to 75" TVs - Full Motion Product ID: FPCEILPTBLP Now, you can suspend your flat-screen television in an area with a high ceiling, for optimal viewing.
nordica 36 ceiling fan
 09/15 nordica 36 ceiling fan model no. 052-1191-4! INSTRUTIONS PERTAINING TO RISK OF FIRE OR INJURY TO PERSONS. READ ALL INSTRUTIONS IMPORTANT SAFETY INSTRUTIONS SAVE THESE INSTRUTIONS INSTALLATION AND
Nut & Bolt Faucet Installation
 Nut & Bolt Faucet Installation Nut & Bolt Faucet Installation STEP 1 Layout all faucet components that will be installed. STEP 2 Turn faucet head to expose water supply attachment plugs holes. Attach water
FES - Series Portable Electric Heaters. YES - Series Suspended Electric Heaters CONTENTS
 FOSTORIA INDUSTRIES, INC. A DIVISION OF FES - Series Portable Electric Heaters YES - Series Suspended Electric Heaters (FES-1524-3E shown) IMPORTANT SAFETY INFORMATION INSIDE Serious injury or death possible.
Installation Instructions
 Installation Instructions For Fully Integrated NoFrost Combined Refrigerator-Freezers HCB 1560/1561 HC 1550 7084 327-00 Important Please Read and Follow these Instructions These instructions contain Danger,
Installation and Care Instructions. Wood Blinds and Alternative Wood Blinds. LiteRise Touch System. Getting Started
 Installation and Care Instructions Wood Blinds and THANK YOU for purchasing a Hunter Douglas product. Your new blind has been custom built for you from the highest quality materials. Once in your window,
wholesalesolar.com Table of Contents 1. Racking Layout Options (page 2-3) 2. IronRidge Roof Mounting System (page 4-12)
 2. IronRidge Roof Mounting System (page 4-12)") wholesalesolar.com Table of Contents 1. Racking Layout Options (page 2-3) 2. IronRidge Roof Mounting System (page 4-12) 3. WEEB Installation Instructions (page 13-24) Page 1 RACKING LAYOUT OPTIONS MID
wholesalesolar.com Table of Contents 1. Racking Layout Options (page 2-3) 2. IronRidge Roof Mounting System (page 4-12) 3. WEEB Installation Instructions (page 13-24) Page 1 RACKING LAYOUT OPTIONS MID
Instructions. Certifications CH Chrome SS Stainless Steel. Single Handle, Industrial Style, Pull-Down Kitchen Faucet.
 Instructions *Image may vary slightly from actual product Tools Required Adjustable Wrench Groove Joint Pliers Pipe Wrench Phillips Screwdriver Pipe Tape or pipe thread compound Safety Tips If you solder
Vertical Blinds. Step by Step Installation Instructions
 Vertical Blinds Step by Step Installation Instructions Everything You Need A Smooth Set-Up We want you to love your new window coverings and that includes having a smooth installation experience. We recommend
Installation Instructions
 Installation Instructions For Fully Integrated NoFrost Combined Refrigerator-Freezers HC 2062 HCB 2062 HC/HCB 2062 7084 445-00 Important Please read and follow these instructions These instructions contain
IB 835. Installation Manual. Integrated Bidet Toilet TABLE OF CONTENTS
 IB 835 Installation Manual Integrated Bidet Toilet Cautions before installation Water supply should have a minimum water pressure of 10 psi For smooth drainage, water pressure must stay at its required
WATERSHIELIJrM REVERSE OSMOSIS INSTALLA TION MANUAL ~ ~ ~ ~ ~ l ~ TO INSURE THIS PRODUCT AND THE INSTALLATION THEREOF. ~ ~ ~ ~ ~
 WATERSHIELIJrM REVERSE OSMOSIS SYSTEM INSTALLA TION MANUAL p 1 ~ -~ I IMPORTANT I ITHIS REVERSE OSMOSIS SYSTEM WAS SOLD IN KIT FORM. IT HAS ~ INOT BEEN PRESSURE TESTED IN ANY WAY. UPON INSTALLATION IT