PX Dual Sliding Doors, Installation Guide
|
|
|
- Theresa Robertson
- 5 years ago
- Views:
Transcription

1 s, 01
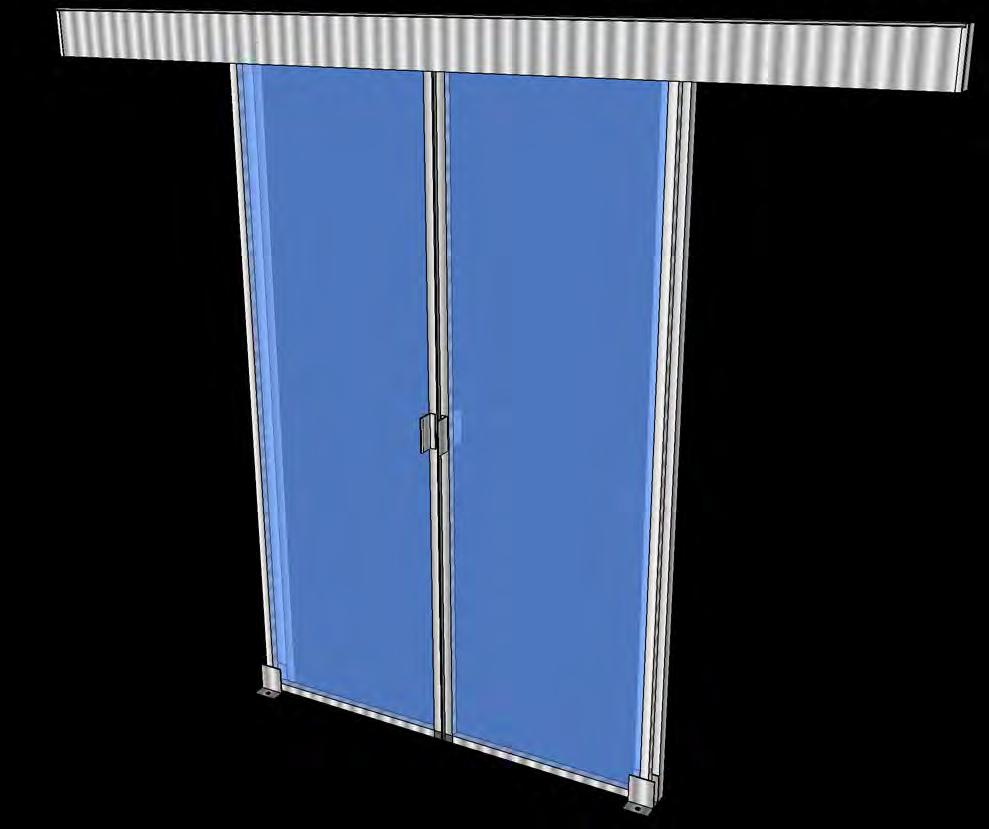
2 Bumper location inside header Header & Valance Legs (C-Channels, Width 3 ) Door Handles Bumper location inside header Floor Brackets 54" Installation Instructions: Step #1 Attach legs to valance header with hardware provided. Step #2 Bring door frame to the vertical position with temporary/supplemental support Step #3 Create temporary anchoring to the racks. Ensure door frame is leveled. Step #4 Install doors w/o handles. Ensure doors slide freely. Step #5 Attach floor brackets. Make sure doors slide freely through floor brackets. Step #6 Attach header to the racks using L-brackets provided. Step #7 Install front and back handles on each door. Step #8 Install bumpers on the headers. Step #9 Install end-caps. Step #10 Check to make sure there is no gap where doors meet. Adjust if necessary. Note: Valance is removable if adjustments to the door are necessary after installation. 02


3 Step #1 Attach each leg to the header with two 1/4-20 hex bolts. Header Step #2 Bring frame to the vertical position with temporary/ supplemental support. Step #3 Create temporary anchoring to the racks. Ensure structure is leveled. Note: Temporary and or supplemental methods are not shown. Legs Step #4 Slide doors into the track from sides of header. Make sure lower height rollers slide in first. Do not install handles yet. Feed one door into track from this side. Feed other door into track from this side. NOTE SHORTER ROLLERS Both doors come with preinstalled P-gaskets on inside side of the doors. 03


4 Step #5 The floor brackets, which come attached to the legs, need to be fastened to the floor. Note: Ensure doors slide freely through brackets. Adjust legs forward or backward as needed to allow smooth sliding. Diameter 9/16 Step #6 Attach header to the racks using L-brackets provided. A hole needs to be drilled in the desired location on the back of the header for the L-bracket. It is recommended to place the L-bracket no more than 12 from the outside edge of the header. Note: If not attaching to racks, then place L-bracket as needed to attach to unistrut or other support system. Brackets Location. 4 L-Bracket 04


5 Step #7 Install two handles on on each door. Handles, outside Handles, inside Step #8 Install bumpers on the header track to prevent doors from coming out. The holes for the bumpers are pre-drilled. Use #8 self-taping screws to attach bumpers. Step #9 Install end caps by pressing them on. Step #10 Optional. After doors are installed, check to make sure there is no gap where doors meet. Adjust the levelness of the doors if necessary. If adjustment is needed, remove valance, which is attached to header with screws. Make adjustments to the roller stem with thin nose pliers while the doors are in place. Note: There are spacers pre-installed to adjust and align doors before shipment from factory. 05

6 Kit of Parts BRACKETS, NUTS/BOLTS FOR HEADER, HARDWARE FOR ATTACHMENT TO RACKS NOT PROVIDED NUTS/BOLTS FOR LEGS TO HEADER END CAPS PRESSURE FIT ONTO HEADER FACE END BUMPERS, INSTALL INTO ENDS OF ROLLER TRACK INSIDE HEADER. INSTALL AFTER PUTTING DOORS ONTO HEADER TRACK DOOR HANDELS, INSTALL AFTER PUTTING DOORS ONTO HEADER TRACK 06
Horizontal Blinds Installation Instructions
 Horizontal Blinds Installation Instructions Mounting Options Inside mount: Blind is mounted inside the window frame, either to the top of the frame or to the sides. Outside mount: Blind is mounted either
Graber Lake Forest Faux Wood and Premium Faux Wood Blind
 2 3 5 6 8 7 1 2" (5.1cm) Blind shown 1. Blind (cord tilt shown) 2. Mounting Brackets 3. Center support bracket (if required). Mounting screws (2 per bracket) 5. Projection brackets (optional, one per mounting
GETTING STARTED OPTIONAL HARDWARE A
 ROLLER SHADES Continuous Cord Loop and Link System without Cassette Double Roller GETTING STARTED OPTIONAL HARDWARE A few simple tools are required: Hold Down Brackets Spacer Block Spacers Steel Tape Measure
kk21 installation Kk21-WF21 Things you might need for the installation: vessel sink,
 Kk21-WF21 Things you might need for the installation: vessel sink, plumber's putty(home depot), liquid nails(home depot), Bucket silicone caulk(home depot), Putty knife Plumber's putty Pipe wrench Channel-lock
HONEYCOMB AND PLEATED SHADES
 HONEYCOMB AND PLEATED SHADES GETTING STARTED BRACKET INFORMATION A few simple tools are required: The brackets you received with your product are required for proper installation. Brackets should be installed
STEP BY STEP INSTALLATION INSTRUCTIONS. Wood Blinds. Cordless Control
 STEP BY STEP INSTALLATION INSTRUCTIONS Wood Blinds Cordless Control Everything You Need Table of Contents Step 1 - Getting Started....3 Overview - Standard Control Wood Blinds....4 Step 2 - Mounting the
MINI BLINDS Classic GETTING STARTED STANDARD HARDWARE. A few simple tools are required: OPTIONAL HARDWARE
 MINI BLINDS Classic GETTING STARTED STANDARD HARDWARE A few simple tools are required: Steel Tape Measure Pencil Level End Brackets (Open Position LH & RH) Top Brackets Power Drill and Drill Bits Flathead
Vertical Blinds. Step by Step Installation Instructions
 Vertical Blinds Step by Step Installation Instructions Everything You Need A Smooth Set-Up We want you to love your new window coverings and that includes having a smooth installation experience. We recommend
STEP BY STEP INSTALLATION INSTRUCTIONS. Wood Blinds. Standard Control
 STEP BY STEP INSTALLATION INSTRUCTIONS Wood Blinds Standard Control Everything You Need Table of Contents Step 1 - Getting Started...3 Overview - Standard Control Wood Blinds...4 Step 2 - Mounting the
STEP BY STEP INSTALLATION INSTRUCTIONS. Vertical Honeycomb Shades
 STEP BY STEP INSTALLATION INSTRUCTIONS Vertical Honeycomb Shades Everything You Need A Smooth Set-Up We want you to love your new window coverings and that includes having a smooth installation experience.
Before you begin the installation process, gather the following tools and keep them handy:
 Vertical Blind Installation Instructions ucontact@udoblinds.com 1-855-205-8442 Congratulations on purchasing vertical blinds from Follow these instructions to properly install your blinds. Tools You Need
STEP BY STEP INSTALLATION INSTRUCTIONS. Durawood Blinds. Standard Lift
 STEP BY STEP INSTALLATION INSTRUCTIONS Durawood Blinds Standard Lift Everything You Need A Smooth Set-Up We want you to love your new blinds and that includes having a smooth installation experience. If
HONEYCOMB AND PLEATED SHADES
 HONEYCOMB AND PLEATED SHADES GETTING STARTED BRACkET INFORMATION A few simple tools are required: The brackets you received with your product are REQUIRED for proper installation. Brackets should be installed
McDONALD S 30 ROOF ELEMENT
 29-10 7/16 PRE-DRILLED HOLES IN LEGS 4-8 15/16 1-7 1/4 MCDO BRACKET 1-7 1/4 RIVNUT NALDS BRACKET 10-8 2 1-7 1/4 = DISTANCE FROM BOTTOM OF BASE PLATE TO CENTER OF TIE-BACK ASSEMBLY C L 22 1/16" FROM WALL
Step by Step Installation Instructions. Rod Mounted Valance. Wall Mount
 Step by Step Installation Instructions Rod Mounted Valance Wall Mount Everything You Need Table of Contents Step 1 - Getting Started (Parts & Tools).... 3 Overview -... 4 Step 2 - Attaching the Brackets....
Dimensions: 39 1/2" w x 22" D x 35.5 H. kk25 installation. Things you might need for the installation: vessel sink,
 Things you might need for the installation: vessel sink, plumber's putty(home depot), liquid nails(home depot), Bucket silicone caulk(home depot), Putty knife Plumber's putty Pipe wrench Channel-lock pliers
DOOR AND PANEL PARTS
 DOOR AND PANEL PARTS UNDERCOUNTER DISHWASHER 1 Literature Parts W10158012 Instructions, Installation W10184366 Energy Guide Y6920183 Guide, Use & Care 2 99002693 Insulation, Door 3 99003048 Barrier, Foam
IB 835. Installation Manual. Integrated Bidet Toilet TABLE OF CONTENTS
 IB 835 Installation Manual Integrated Bidet Toilet Cautions before installation Water supply should have a minimum water pressure of 10 psi For smooth drainage, water pressure must stay at its required
Soft Sheer Vertical. Installation and Care Guide
 Soft Sheer Vertical Installation and Care Guide Soft Sheer Vertical Blinds represent a design breakthrough in style, efficiency and function. The unique fabric structure and hardware system are designed
Handshower, Hose & Handshower Accessories
 P24443, P24445, P24446, P24452, P24453, P24456 1 of 6 INSTALLATION INSTRUCTIONS Thank You For Choosing KALLISTA We appreciate your commitment to KALLISTA quality products. Please take a moment to review
STEP BY STEP INSTALLATION INSTRUCTIONS. Durawood Blinds. Easy Lift Cordless
 STEP BY STEP INSTALLATION INSTRUCTIONS Durawood Blinds Easy Lift Cordless Table of Contents Everything You Need A Smooth Set-Up We want you to love your new blinds and that includes having a smooth installation
Retrofit Instructions CLEARVIEW DAY COVER CAUTION: Please read this manual completely before attempting to install, operate or service this equipment
 Retrofit Instructions CLEARVIEW DAY COVER CAUTION: Please read this manual completely before attempting to install, operate or service this equipment This manual is Copyright 2019 Duke Manufacturing Co.
Installation Instructions
 Installation Instructions For Free Standing NoFrost Combined Refrigerator-Freezers CS 1660 7082 653-00 PLEASE READ AND FOLLOW THESE INSTRUCTIONS These instructions contain Warning and Caution statements.
Instructions Apply For Model PHTT-6P-KFC. Panel Shelf Is Removed to install warming drawers
 Installation Tips and Procedure For OTR-KFC Table Assembly And Auto-Fill Connection Instructions Apply For Model PHTT-6P-KFC TO DETERMINE TABLE PLACEMENT: Faces Front: Control Side of the units. APPROVED
2" and 2 1/2" Wood Horizontal Blinds 2", 2 1/4" and 2 1/2" Faux Wood Horizontal Blinds. Installation & Operating Instructions
 2" and 2 1/2" Wood Horizontal Blinds 2", 2 1/4" and 2 1/2" Faux Wood Horizontal Blinds Installation & Operating Instructions TC07-08.2011 TABLE OF CONTENTS Product View...3 GETTING STARTED...4 Tools Required:...4
Installation Guide. Model: IC15- MF Model: IC15- MFSilent Model: IC30- MF Model: IC30- MFSilent
 Installation Guide Model: IC15- MF Model: IC15- MFSilent Model: IC30- MF Model: IC30- MFSilent IMPORTANT SAFETY INFORMATION READ AND SAVE THESE INSTRUCTIONS WARNING TO REDUCE THE RISK OF FIRE, ELECTRIC
GV Series 4 Section Assembly
 GV Series 4 Section Assembly 192 Current Service Parts GV Series 4 Section Assembly Fig. No. Part No. Description Size Notes 1 322-200-280 Section Assembly, GV-3 (Repair Kit Required) 3 1 322-200-281 Section
WIRE GUIDE BLIND OUTDOOR DELUXE ROLLER. 5YR Warranty ASSEMBLY GUIDE
 WIRE GUIDE BLIND OUTDOOR DELUXE ROLLER 5YR Warranty 5 YEAR FABRIC WARRANTY AGAINST UV DEGRADATION ASSEMBLY GUIDE 2 You will need: Pelmet cap Pelmet Pelmet cap Idle end plug Aluminium tube Clutch plug Clutch
Installation and Care Instructions
 Installation and Care Instructions 2" Horizontal Aluminum Blinds MagnaView Tilt Feature CONTENTS Getting Started................................................ 1 Mount the Installation s....................................
GRAIN DRYER. 800 Bu. Form S Printed in U.S.A. Operators Manual & Parts Book SUPPLEMENT
 R 800 Bu. GRAIN DRYER Operators Manual & Parts Book SUPPLEMENT Form S-3084-14 Printed in U.S.A. R P.O. Box 525 Clay Center, KS 67432, U.S.A. (785) 632-2151 (800) 423-9428 FAX (785) 632-3308 Email: info@gtmfg.com
High-Density Industrial
 Installation Instructions 1 High-Density Industrial Drawers in Shelving BORROUGHS CORPORATION 3002 N. BURDICK STREET * KALAMAZOO, MI 49004-3483 800-748-0227 * FAX: 269-342-4161 Industrial Drawer Installation
INSTALLATION INSTRUCTIONS: VERTICAL WALL BED HARDWARE KIT WITH FRAME
 INSTALLATION INSTRUCTIONS: VERTICAL WALL BED HARDWARE KIT WITH FRAME MODEL CODES: 54877 (Single vertical wall bed) 55991 (Double vertical wall bed) 54386 (Queen vertical wall bed) *Our more compact model
Things you might need for the installation: vessel sink, plumber's putty(home depot), liquid nails(home depot), Bucket silicone caulk(home depot),
, liquid nails(home depot), Bucket silicone caulk(home depot),") Things you might need for the installation: vessel sink, plumber's putty(home depot), liquid nails(home depot), Bucket silicone caulk(home depot), Putty knife Plumber's putty Pipe wrench Channel-lock pliers
Things you might need for the installation: vessel sink, plumber's putty(home depot), liquid nails(home depot), Bucket silicone caulk(home depot), Putty knife Plumber's putty Pipe wrench Channel-lock pliers
Installation Instructions
 Installation Instructions For Free Standing NoFrost Combined Refrigerator-Freezers CS 1640, CS 1400 7083 229-00 Important PLEASE READ AND FOLLOW THESE INSTRUCTIONS These instructions contain Warning and
Installation Instructions
 Wood Blinds Installation Instructions Heartland Woods Heartland Woods w/ Continuum *Click on any page to return to the Table of Contents* Heartland Woods Wood Blinds Mounting Inside or Outside Window Frame
Wood. Blind owner's handbook
 Wood owner's handbook 2 WARNING Cords and bead chains can loop around a child s neck and strangle. Always keep cords and bead chains out of children s reach. Move furniture away from cords and bead chains.
WU701 BLOWER/AIR INLET & WATER LEVEL FLOAT
 WU701 BLOWER/AIR INLET & WATER LEVEL FLOAT WU701 BLOWER/AIR INLET & WATER LEVEL FLOAT 2 310217 NO LONGER AVAILABLE (S/P) 3 900882 SWITCH, WATER LEVEL (S/P) 4 900911 FLOAT SWITCH & BRACKET ASSM (S/P) 5
Modular Drawer Cabinets Installation Instructions
 Modular Drawer Cabinets Installation Instructions IMPORTANT PRODUCT LIABILITY INFORMATION Read all instructions before proceeding with installation or drawer loading. Vital product information pertaining
Installation and Care Instructions
 Installation and Care Instructions 2" Horizontal Aluminum Blinds MagnaView Tilt Feature Thank you for your purchase. Your new blinds have been custom built for you from the highest quality materials. Properly
DOOR AND PANEL PARTS
 DOOR AND PANEL PARTS UNDERCOUNTER DISHWASHER 1 Literature Parts W10158012 Instructions, Installation W10208029 Energy Guide Y6920186 Guide, Use & Care 2 Bracket, Hinge W10202226 Left W10202227 Right 3
ARIN THERMOSTATIC SHOWER SYSTEM
 ARIN THERMOSTATIC SHOWER SYSTEM INSTALLATION INSTRUCTIONS Before installing, read entire shower system installation instructions. Observe all local building and safety codes. For the following installation
STEP BY STEP INSTALLATION INSTRUCTIONS. Natural Woven Shades. Standard Top Down/Bottom Up Slim Headrail Operable Lining
 STEP BY STEP INSTALLATION INSTRUCTIONS Natural Woven Shades Standard Top Down/Bottom Up Slim Headrail Operable Lining Table of Contents Everything You Need A Smooth Set-Up We want you to love your new
Installation and Care Instructions
 Installation and Care Instructions THANK YOU for purchasing a Hunter Douglas product. Your new blind has been custom built for you from the highest quality materials. Once in your window, it will provide
CME1856W Service Parts
 This parts list contains the part numbers and description of the replacement parts available for this model. To avoid costly and time consuming errors, double check the model and voltage before ordering
Table of Contents. What to Expect with. Mounting Options. Tools Needed. Preparation. Wiring. Downrod.
 Table of Contents www.casablancafanco.com What to Expect with Your Installation Congratulations on purchasing your new Casablanca ceiling fan! It will provide comfort and performance in your home or office
FAUX WOOD BLINDS 2 & 2-1/2 SLAT SIZES
 INSTALLATION INSTRUCTIONS FAUX WOOD BLINDS 2 & 2-1/2 SLAT SIZES STANDARD RECTANGULAR Thank you for your purchase. This blind has been custom built for you from the highest quality materials. To avoid errors
Table of Contents What to Expect with Your Installation. Tools Needed. Motor Housing.
 Table of Contents Congratulations on purchasing your new Casablanca ceiling fan! It will provide comfort and performance in your home or office for many years. This installation and operation manual contains
Installation and Operation Manual CLEARVIEW DAY COVER CAUTION: To view a video scan the QR code above
 Installation and Operation Manual CLEARVIEW DAY COVER To view a video scan the QR code above CAUTION: Please read this manual completely before attempting to install, operate or service this equipment
Things you might need for the installation: vessel sink, plumber's putty(home depot), liquid nails(home depot), Bucket silicone caulk(home depot),
, liquid nails(home depot), Bucket silicone caulk(home depot),") Things you might need for the installation: vessel sink, plumber's putty(home depot), liquid nails(home depot), Bucket silicone caulk(home depot), Putty knife Plumber's putty Pipe wrench Channel-lock pliers
Things you might need for the installation: vessel sink, plumber's putty(home depot), liquid nails(home depot), Bucket silicone caulk(home depot), Putty knife Plumber's putty Pipe wrench Channel-lock pliers
STONE TROUGH CONSOLE SINK
 STONE TROUGH CONSOLE SINK INSTRUCTIONS CONTENTS Console Installation Sink Support 2 2 Backsplash 2 Undermount Sink Semi-Recessed Sink 3 4 Vessel Sink 5 Drain Installation 6 1 CONSOLE SINK Read entire Console
Handshower, Hose & Handshower Accessories
 INSTALLATION INSTRUCTIONS P21650, P21660, P24452, P24453, P24454, P24456, P24743, P24745, P24746, P24761, P24843 1188577-2-F 2014 KALLISTA 1 of 5 THANK YOU FOR CHOOSING KALLISTA We appreciate your commitment
Installation Operation Care
 Installation Operation Care Duette and Applause Honeycomb Shades Vertiglide Side Stack Design CONTENTS Getting Started: Product View... 1 Tools and Fasteners Needed... 2 Installation: Installation Overview...
Repair Parts List DISHWASHER MODEL NUMBER DU471. When requesting service or ordering parts, always provide the following information:
 Repair Parts List DISHWASHER MODEL NUMBER DU471 When requesting service or ordering parts, always provide the following information: - Product Type - Part Number - Model Number - Part Description 2005
Installation Operation Care
 Installation Operation Care Roman Shades EasyRise and UltraGlide Lifting Systems CONTENTS Getting Started: Product View... 1 Tools and Fasteners Needed... 2 Mounting Types and Window Terminology... 2 Installation:
CONTENTS BEFORE YOU BEGIN
 Owner s Guide Wood Blinds Alternative Wood Blinds 2" Aluminum Horizontal Blinds Intelligence Interface Motor Clip Receiver Eye Battery Holder Battery Cover Remote PowerTilt Motorized Tilt System CONTENTS
Viking Installation Guide
 Viking Installation Guide Viking Range, LLC 111 Front Street Greenwood, Mississippi 38930 USA (662) 455-1200 For product information, call 1-888-(845-4641) or visit the Viking Web site at vikingrange.com
CHALLENGER 1 COOLING UNITS
 COOLING UNITS PART NO. 284463200 2844632000 284464200 2844642000 284465200 2844652000 46343000 463430000 of 6 Control Code A ªIMI Cornelius Co., 972-2000 COOLING UNIT 6 2 7 0 26 2 3 22 34 8 9 3 9 2 4 5
Installation Operation Care
 Installation Operation Care Duette and Applause Honeycomb Shades Vertiglide System CONTENTS Getting Started: Product View... 1 Tools and Fasteners Needed... 2 Installation: Installation Overview... 3 Outside
FRAME AND CONSOLE PARTS
 FRAME AND CONSOLE PARTS UNDERCOUNTER DISHWASHER 1 3375275 Console (Includes Item 2) 2 3376026 Insert, Console 3 3376029 Switch, 5 Pushbutton 4 3369529 Follower, Cam 5 3373626 Timer 6 3369415 Cam 7 304231
Table of Contents What to Expect with Your Installation. Tools Needed. Wall Control
 Table of Contents Congratulations on purchasing your new Casablanca ceiling fan! It will provide comfort and performance in your home or office for many years. This installation and operation manual contains
Arctica Solar 1500 Series Heater Installation Manual
 Arctica Solar 1500 Series Heater Installation Manual A wall mounted Arctica Solar 1500 series solar heater + PV panel demonstration wall The 1500 Series Solar Air Heater from Arctica Solar is designed
UltraGroove and UltraGroove Metal
 UltraGroove and UltraGroove Metal Retractable Tonneau Covers INSTALLATION INSTRUCTIONS NISSAN FRONTIER TABLE OF CONTENTS Tools Required for Assembly... 1 Before You Start... 1 Drain Hole Locations... 1
DOOR AND PANEL PARTS For Models: DU1300XTVB0, DU1300XTVQ0, DU1300XTVT0, DU1300XTVS0 (Black) (White) (Biscuit) (Stainless)
 (White) (Biscuit) (Stainless)") DOOR AND PANEL PARTS UNDERCOUNTER DISHWASHER 1 Literature Parts W10142914 Instructions, Installation W10219596 Energy Guide Guide, Use & Care W10130986 English/French Guide, Use & Care W10130990 Spanish
DOOR AND PANEL PARTS UNDERCOUNTER DISHWASHER 1 Literature Parts W10142914 Instructions, Installation W10219596 Energy Guide Guide, Use & Care W10130986 English/French Guide, Use & Care W10130990 Spanish
INSTALLATION GLYDEA MOTORIZED TRACK PRODUCT OVERVIEW. 1. Glydea Motor 2. Motorized Drapery Track. 3. Wall Brackets 4. One Touch Ceiling Bracket
 PRODUCT OVERVIEW 1. Glydea Motor 2. Motorized Drapery Track 2 3. Wall Brackets 4. One Touch Ceiling Bracket 7 6 6 7 5. Return Hooks 6. Master Carrier/Carrier Arms 1 7. Carriers 8. Swivel/Ceiling Bracket
Technical Bulletin. 1405F/DF Switching Valve Maintenance NEW DESIGN Bulletin # TS0062 Rev 05/2016
 Technical Bulletin 1405F/DF Switching Valve Maintenance NEW DESIGN 56-011934 Bulletin # TS0062 Rev 05/2016 The purpose of this Technical Bulletin is to inform our customers when & why they should service
CME1856W Service Parts
 This parts list contains the part numbers and description of the replacement parts available for this model. To avoid costly and time consuming errors, double check the model and voltage before ordering
Installation Operation Care
 Installation Operation Care Duette and Applause Honeycomb Shades Vertiglide System CONTENTS Getting Started: Product View... 1 Tools and Fasteners Needed... 2 Installation: Installation Overview... 3 Outside
Table of Contents. What to Expect with. Mounting Options. Tools Needed. Wall Control
 Table of Contents www.casablancafanco.com What to Expect with Your Installation Congratulations on purchasing your new Casablanca ceiling fan! It will provide comfort and performance in your home or office
Installation Instructions
 Installation Instructions For Free Standing NoFrost Combined Refrigerator-Freezers CS 1660 7084 203-00 Important Please Read and Follow these Instructions These instructions contain Danger, Warning and
COOKTOP, BURNER AND GRATE PARTS For Model: JGRP548WP00 (Stainless)
") COOKTOP, BURNER AND GRATE PARTS 48" Stainless Commercial Style Range 8 10 Litho in U.S.A. (amd) (psw) 1 Part No. Rev. B COOKTOP, BURNER AND GRATE PARTS 1 Literature Parts Tech Sheet W10323236 English W10323237
COOKTOP, BURNER AND GRATE PARTS 48" Stainless Commercial Style Range 8 10 Litho in U.S.A. (amd) (psw) 1 Part No. Rev. B COOKTOP, BURNER AND GRATE PARTS 1 Literature Parts Tech Sheet W10323236 English W10323237
Installation Instructions
 Aluminum Blinds Installation Instructions Echelon, Traditions & Integra Aluminum Blinds 2 Metro Aluminum Blinds *Click on any page to return to the Table of Contents* Echelon, Traditions & Integra Aluminum
INSTALLATION INSTRUCTIONS. WOOD BLINDS 1-3/8, 2 and 2-3/8 SLAT SIZES. COMPOSITE FAUX WOOD BLINDS 2 and 2-1/2 SLAT SIZES
 INSTALLATION INSTRUCTIONS WOOD BLINDS 1-3/8, 2 and 2-3/8 SLAT SIZES COMPOSITE FAUX WOOD BLINDS 2 and 2-1/2 SLAT SIZES POLYMER FAUX WOOD BLINDS 2 and 2-1/2 SLAT SIZES STANDARD CORDLESS LIFT Thank you for
Installation and Care Instructions. Wood Blinds and Alternative Wood Blinds. LiteRise Touch System. Getting Started
 Installation and Care Instructions Wood Blinds and THANK YOU for purchasing a Hunter Douglas product. Your new blind has been custom built for you from the highest quality materials. Once in your window,
PVC BLINDS PVC READY-MADE STANDARD FEATURES
 READY-MADE PVC BLINDS STANDARD FEATURES Available with: 1.0" (25mm), and 2.0" (50mm) slats. Wand tilters, with zinc stems, for durability and strength. Cord locks with solid brass rollers in a clear polycarbonate
CU1526, CU2026, CU3030 Service Parts
 This is the illustrated list of service parts for all models of the CU, CU0 and CU00 self contained ice machines. These machines were manufactured in several voltages, which is designated by a numeric
LED Flex Tube Assembly Guide
 LED Flex Tube Assembly Guide WARNING: NEVER APPLY POWER TO FLEX TUBE WHILE COILED!!! Please read entire guide before beginning assembly or installation. Licensed electricians should provide all electrical
KD-27A SERIES DISHWASHERS
 KD-27A SERIES DISHWASHERS INSTALLATION INSTRUCTIONS FORM 4171083 (153138) 3-86 THIS PAGE INTENTIONALLY LEFT BLANK BEFORE STARTING: Please read these installation instructions COMPLETELY AND CAREFULLY.
Installation Instructions
 Installation Instructions For Fully Integrated NoFrost Combined Refrigerator-Freezers HC 2060/2061 7082 485-00 Important PLEASE READ AND FOLLOW THESE INSTRUCTIONS These instructions contain Warning and
CABINET PARTS. For Models: KBLC36FMS00 (Stainless Steel) 9 05 Litho In U.S.A. (kdj) Part No " BOTTOM MOUNT BUILT IN REFRIGERATOR
 9 05 Litho In U.S.A. (kdj) Part No BOTTOM MOUNT BUILT IN REFRIGERATOR") CABINET PARTS 36" BOTTOM MOUNT BUILT IN REFRIGERATOR 9 05 Litho In U.S.A. (kdj) 1 Part No. 1 Literature Parts LIT2266810 Use & Care Guide LIT2266819 Energy Label LIT2266830 Service & Wiring Sheet LIT628370
CABINET PARTS 36" BOTTOM MOUNT BUILT IN REFRIGERATOR 9 05 Litho In U.S.A. (kdj) 1 Part No. 1 Literature Parts LIT2266810 Use & Care Guide LIT2266819 Energy Label LIT2266830 Service & Wiring Sheet LIT628370
Table of Contents What to Expect with Your Installation. Tools Needed. Wall Control
 Table of Contents Congratulations on purchasing your new Casablanca ceiling fan! It will provide comfort and performance in your home or office for many years. This installation and operation manual contains
GE Monogram. Installation. Instructions. Professional Ranges. 48" Natural Gas Models ZDP48N4GWSS ZDP48N6RWSS ZDP48N6DWSS
 GE Monogram Installation Instructions Professional Ranges 48" Natural Gas Models ZDP48N4GWSS ZDP48N6RWSS ZDP48N6DWSS 48" LP Gas Models ZDP48L4GWSS ZDP48L6RWSS ZDP48L6DWSS 36" Natural Gas Models ZDP36N6WSS
Rotary XL (558 Series) and Classic (548 Series)
 and Classic (548 Series)") INSTALLATION and OPERATING INSTRUCTIONS ROOF MOUNT AIR CONDITIONER Rotary XL (558 Series) and Classic (548 Series) QUICK START SHUR START MODELS MODELS 54812.041 54812.042 55812.041 55812.042 54815.041
INSTALLATION and OPERATING INSTRUCTIONS ROOF MOUNT AIR CONDITIONER Rotary XL (558 Series) and Classic (548 Series) QUICK START SHUR START MODELS MODELS 54812.041 54812.042 55812.041 55812.042 54815.041
PAVIA INSTALLATION GUIDE
 FSP800 PAVIA INSTALLATION GUIDE Parts List Please unpack and inspect all packages and components carefully, make sure they are complete. Examine for shipping damage. If some parts are damaged or missing,
INSTALLATION INSTRUCTIONS. Aluminum Blinds - Standard - - Lift & Lock -
 1 INSTALLATION INSTRUCTIONS Aluminum Blinds - Standard - - Lift & Lock - 1 Deluxe 1 Traditional 1 Value & 1 Basic 2 Macro Thank you for your purchase. This blind has been custom built for you from the
CME1056 Service Parts. Table of Contents
 This is the parts list for the CME0 ice machine. The CME0 was manufactured in A, D, E and F series, as well as single phase 0 Hz, single phase 0 Hz, and three phase. The E series change was to side panels
Installation Instructions Built-In Dishwasher
 Installation Instructions Built-In Dishwasher If you have questions, call 800.GE.CARES (800.432.2737) or visit our Website at: GEAppliances.com. In Canada, please call 1.800.561.3344 or visit www.geappliances.ca
INSTALLATION MANUAL FOR MODELS: TERAZZA, TRACCIO, MILANO, CERRATO
 INSTALLATION MANUAL FOR MODELS: TERAZZA, TRACCIO, MILANO, CERRATO TABLE OF CONTENTS ROOM SPECIFICATIONS ELECTRICAL SPECIFICATIONS PLUMBING SPECIFICATIONS TECHNICAL SPECIFICATIONS INTRODUCTION ASSEMBLY
ET14JKXAW01, ET14JKXAN01, ET14JKYAW01, ET14JKYAN01
 DOOR PARTS REFRIGERATOR 9 97 Litho In U.S.A. 1 Part No. Rev.A DOOR PARTS 1 Refrigerator Door Panel (Also Order Item 11) 9790362 White 9791629 Almond 2 End Cap 9791773 White 9791774 Almond 3 Hole Plug (2)
I-VICFLEX.AB4. Victaulic VicFlex Style AB4 Sprinkler Fitting for Hat Furring Channel Ceiling Systems WARNING INSTALLATION INSTRUCTIONS
 INSTALLATION INSTRUCTIONS I-VICFLEX.AB Victaulic VicFlex Style AB Sprinkler Fitting for Hat Furring Channel Ceiling Systems Read and understand all instructions before attempting to install any Victaulic
Installation Operation Care
 Installation Operation Care EasyRise UltraGlide LiteRise Vignette Modern Roman Shades Traditional Style EasyRise, LiteRise, and UltraGlide Operating Systems CONTENTS Getting Started: Product View Traditional
Installation Instructions
 7' 6 1 /4" 7' 9" Internet access port 8' 8 1 /2" Monogram Wine Vault Installation Instructions TABLE OF CONTENTS Important Safety Information...................2, 3 Before You Begin...............................4,
Illus. Part No. No. DESCRIPTION
 DOOR AND PANEL PARTS UNDERCOUNTER DISHWASHER 1 Literature Parts W10284980 Instructions, Installation W10398585 Energy Guide W10255114 Guide, Use & Care W10142800 Tech Sheet 2 Arm, Hinge 8534854 Left 8534853
Standard Downrod for ceilings 8-10 feet high. Longer Downrod for ceilings 10 feet or higher
 Table of Contents www.casablancafanco.com To register your fan, please visit: www.casablancafanco.com/register What to Expect with Your Installation Save your receipt for proof of purchase. Ceiling Bracket??
TruTrainer. Premium Bicycle Rollers Assembly Instructions. Shaft Anti Rotation on Drive Side Rollers Purchased post 2008
 TruTrainer Premium Bicycle Rollers Assembly Instructions Shaft Anti Rotation on Drive Side Rollers Purchased post 2008 CAUTION: To prevent damage, familiarize yourself with the parts list and assembly
A. Section includes Factory Packaged, Modular units, providing cooling and heating for air distribution systems.
 15855 AIR HANDLING UNITS SPECIFIER: CSI MasterFormat 2004 number: 237313 PART 1 GENERAL 1.1 SUMMARY A. Section includes Factory Packaged, Modular units, providing cooling and heating for air distribution
Acrylic Claw Foot Tub
 Acrylic Claw Foot Tub Wrench or socket Drill & Bits Parts Recommended 2-2 x12 boards 4 Lag Bolts 4 Flat Washers Be sure to re-inforce the floor before securing tub. We recommend 2-2 x12 s securely fastened
INSTALLATION INSTRUCTIONS
 INSTALLATION INSTRUCTIONS BUILT-IN FULL HEIGHT WINE CELLAR Retain for Future Reference VIKING RANGE CORPORATION 111 Front Street Greenwood, Mississippi 38930 USA (662) 455-1200 IMPORTANT - PLEASE READ
Installation Operation Care
 Installation Operation Care 2" Horizontal Aluminum Blinds MagnaView Tilt Feature 5102014000F 4/14 CONTENTS Getting Started: Product View Reveal with MagnaView... 1 Product View Natural Elements with MagnaView...
Undercounter Refrigeration
 INSTALLATION GUIDE Undercounter Refrigeration Contents Undercounter Refrigeration..................... 3 Undercounter Specifications.................... 4 Site Preparation..............................
Acrylic Claw Foot Tub
 Acrylic Claw Foot Tub Wrench or socket Drill & Bits Parts Recommended 2-2 x12 boards 4 Lag Bolts 4 Flat Washers Be sure to re-inforce the floor before securing tub. We recommend 2-2 x12 s securely fastened