Closing procedures for in-ground pools
|
|
|
- Christian Copeland
- 6 years ago
- Views:
Transcription
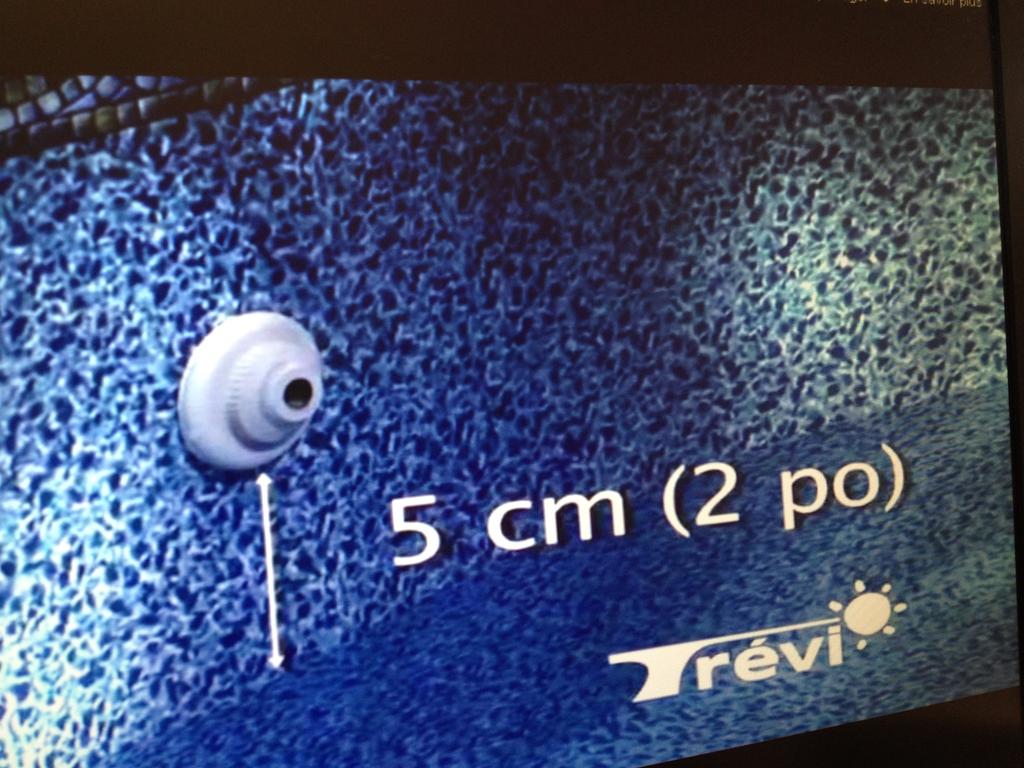
1 Closing procedures for in-ground pools Note: Carefully read this entire document before proceeding with the closure of your pool. In order to avoid unpleasant surprises, please check with your insurance company to make sure that your pool is insured. For easier opening in spring, Trevi recommends that you close your pool as late as possible, ideally once the water temperature drops to about 10 C (50 F). We recommend that you have a complete test of your water done in one of our 4 superstores. Adjust alkalinity to between 100 and 120 ppm and ph to between 7.2 and 7.4 in order to maintain neutral water. Maintaining the water and the bottom clean longer will help prevent the accumulation of dirt and minimize the formation of bacteria and algae. Closing your pool late also ensures that the vinyl liner is exposed to the sun s rays for a shorter period of time and therefore less likely to dry up and fade. Make a drawing or take a photograph of your filtering system to facilitate reassembly come spring. Be sure to monitor the water level in your pool in order to detect leaks. Any necessary repair work must be carried out prior to winterizing, as ice will begin to form on the surface of the water once temperatures drop below freezing. In the event of a leak, the water level gradually drops and the ice falls to the bottom of the pool, exerting pressure on the pool walls and stress on the vinyl liner, which may result in serious damage. To protect equipment against freezing and maintain clear water, do not turn off the filter system prior to winterizing your pool. 1) PROCEDURE Check that there is little or no water in the dry well (less than 12 inches) Add half a container of TREVI STOP (optional) in the water of your pool and wait 12 hours. Vacuum and clean liner if necessary using TREVI VINYL NET or CLEAN AND PERFECT. Only if you are using a sand filter: - Set filter on BACKWASH. Pour 2 litres of TREVI FILTRE (optional) into the skimmer and close the bottom drain. Run the pump for 4 minutes. Lower water level to 5 cm (2 inches) below the water returns. If there are jets in your steps, you will need to bring the water level below the lowest jet. There are three ways to proceed: See illustration A. - Bottom drain connected to the skimmer Leave both holes open, place vacuum plate on basket and block hole using plug. Hold the vacuum plate down with a heavy object (e.g., a gallon of antifreeze). Insert the garden hose into the skimmer and turn the water on low. If you are using a sand filter, place filter handle on DRAIN or WASTE. If you are using a cartridge filter, open the backwash (valve on top of the pump) or unscrew the cap located at the bottom of the filter and install backwash hose. Bottom drain connected directly to the pump: Close the skimmer valve and leave the drain valve open. Place garden hose in the skimmer and allow a trickle of water to run out. If you are using a sand filter, place filter handle on DRAIN or WASTE. If you are using a cartridge filter, backwash (valve on top of the pump) or unscrew the cap located at the bottom of the filter and install backwash hose. 1
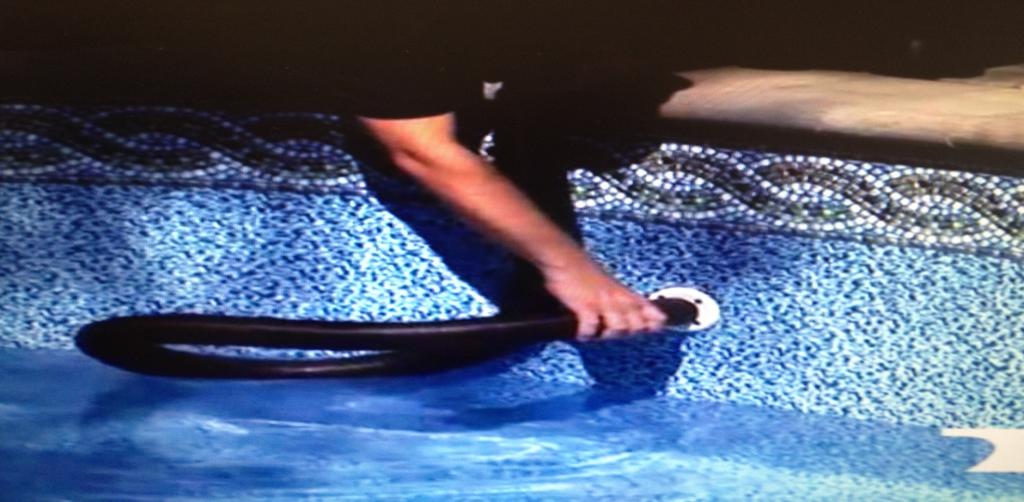
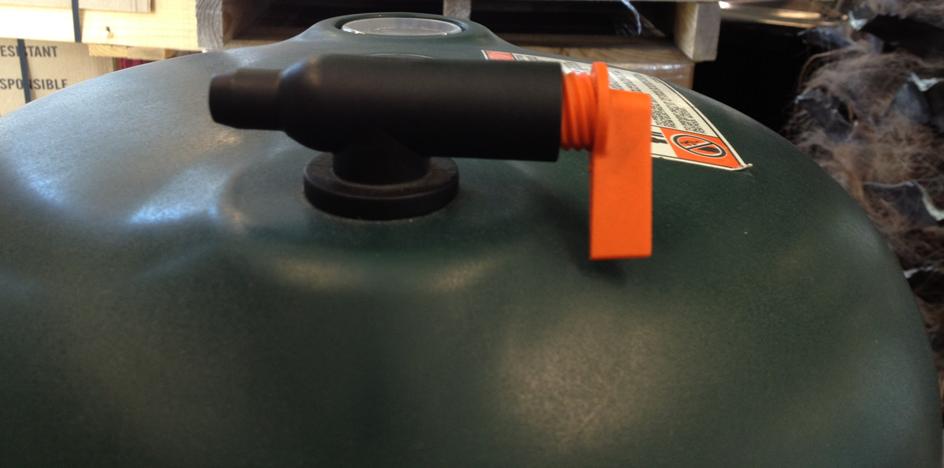
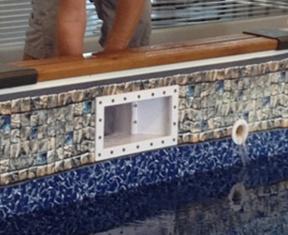
2 - No bottom drain Prepare as if for vacuuming. Place the garden hose in the skimmer and allow a trickle of water to run out. If you are using a sand filter, place filter handle on DRAIN or WASTE. If you are using a cartridge filter, open the backwash (valve on top of the pump) or unscrew the cap located at the bottom of the filter and install backwash hose. While the water level is going down, remove solar blanket, rinse, let dry and store for winter. Remove all accessories, e.g., thermometer, baskets, solar blanket winder, robot cleaner, cable and floats. Remove ladder, taking care not to remove rubber pads. Remove diving board. Never remove base. Remove return holes rings, eyeballs and all spa jets located in the step (if applicable). It is important to never remove the plates that are attached by 4 screws. 2) DRAINING THE PIPES You will need to drain the pipes completely, except for the bottom drain pipe, to avoid damages during winter. Choose one of the following methods: If you are using a Shop-Vac type vacuum: See illustrationr B If you are using a sand filter, place filter handle on WINTERIZE or CLOSE and remove the gauge. If you are using a cartridge filter, open the air valve (purge) and remove cartridge. Make sure the bottom drain is closed. Vacuum the skimmer line by connecting the vacuum hose directly to the bottom of the skimmer. Vacuum the farthest water line by connecting the vacuum hose to the water return inside the pool and by blocking the other water return holes with plugs. Repeat this operation for all the holes, working your way to the hole closest to the filter. Do not forget the discharge line. If you are using a blower: See illustration C If you are using a sand filter, set the filter handle to WHIRLPOOL or to RECIRCULATE. Leave the pressure gauge in place. If you are using a cartridge filter, remove cartridge and leave the air valve («purge») on top of the filter closed. Make sure the bottom drain is closed. Activate the filter pump for one minute. Connect the blower to the bottom of the skimmer. If you have more than one water return line, you will need to blow each one separately. Close all lines except for the water return line. Plug all water returns except the one located farthest from your filtration system, then start the blower. When no more water comes out, plug this hole, and repeat the operation immediately for the second furthermost hole. Repeat this operation for all the holes, working your way to the hole closest to the filter. Do not forget to blow the additional lines (water cascade or slide hole, for example) by opening and blowing them one at a time. If you have an underground backwash line, set the filter handle to DRAIN or WASTE while activating the blower. Stop blowing when no more water comes out. 2
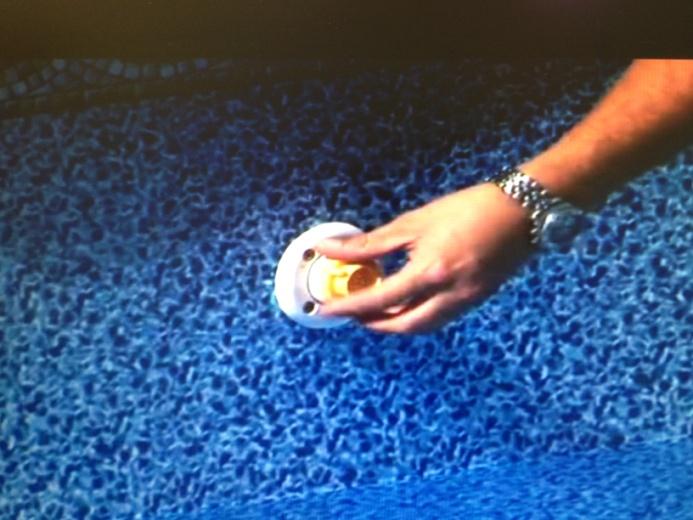
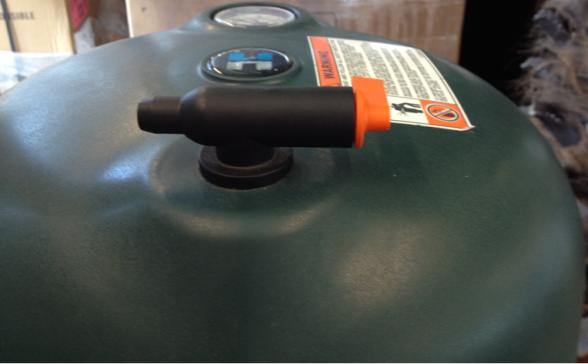
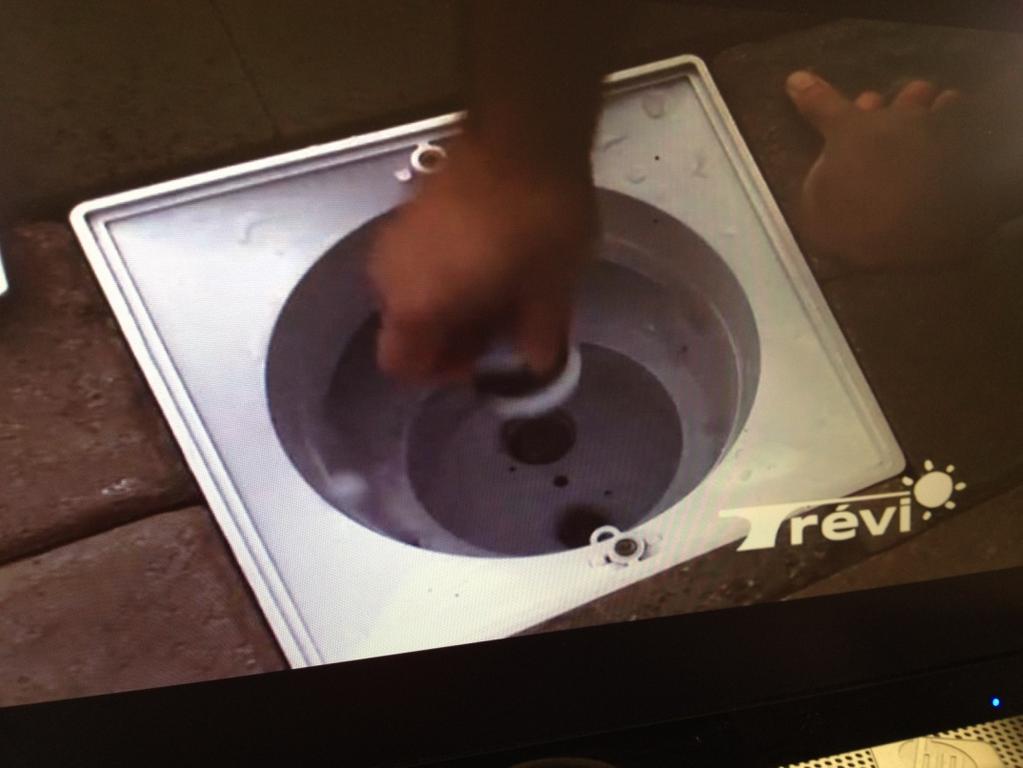
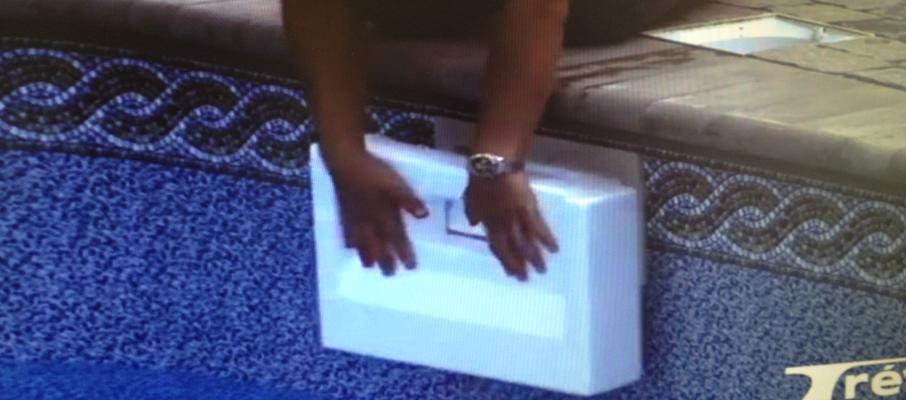
3 3) WINTERIZING WATER LINES Pour 1/2 gallon of non-toxic antifreeze* per return line, as well as into the skimmer. See illustration D Add 1 gallon of non-toxic antifreeze* for the bottom drain line. Insert foam cylinder into the skimmer hole closest to the water (if applicable) so that it fits into the hose leading to the bottom drain. Cover all 1 1/2» caps with Teflon tape and screw them in place onto the water return holes and in the bottom of the skimmer. If your Trevi pool was installed in 2008 or later, you will need to use a 2» screw cap for the bottom of the skimmer. See illustration E If you have jets in your steps, place an expanding cap into each of the cavities, then raise water level to 2 inches below the pool s water returns. Place the specially designed Styrofoam cube inside the skimmer to protect against freezing damage. See illustration F. Empty the pump by removing drainage caps. Replace caps after pump is empty. Pour a gallon of non-toxic antifreeze* into the pool s pump in order to avoid damage to mechanical seals and bearings. Flush any chemicals and water from the chlorinator to avoid damage. Rinse properly to avoid damage. Remove drainage cap for the winter. Add Jack s lubricating gel (no Vaseline) to all apparent o-rings and to all anchor blocks (ladder and steps) and bolts. 4) WINTERIZING YOUR EQUIPMENT Note: To avoid unnecessary breakage, make sure the power is off (breaker in OFF position) during winter. Put tape on the breaker to prevent anyone from reactivating it. HEAT PUMP: Turn the heat pump to OFF and deactivate the corresponding breaker. Disconnect the gas valve and blow out and/or vacuum water lines. This will prevent ice from forming and expanding inside the fittings during the winter. Rinse out the heat exchanger in order to eliminate any chlorine deposits which could corrode the zinc and copper alloy. We also suggest that you add non-toxic antifreeze* to both exchanger pipes. In both cases, disconnect the fittings and blow out and (or) vacuum the water lines. GAS (PROPANE OR NATURAL): To close your gas heater, you must first close the valve near the water heater and then close the valve on the tank. This leaves some gas in the line for faster and easier opening in the spring. We suggest you add non-toxic antifreeze* to the two exchanger hoses. SAND FILTERS: Empty the filter by unscrewing the drainage cap located below the tank. Make sure it is completely empty. Do not replace drain plug for winter. Position the filter handle on WINTERIZE or on CLOSE and remove pressure gauge and bottle CARTRIDGE SYSTEM: Drain the reservoir by removing the filter drain plug. Remove the cartridge(s) and rinse with clear water. Rinse reservoir interior as well. Clean the cartridge(s) with Trévinergie CARTRIDGE CLEANER. Soak in a bucket for 12 hours, rinse and let dry. Trevi recommends that you store the system indoors to protect it from frost. 3
4 HAYWARD LIGHTS: i. HALOGEN : Firmly pull the light towards the swimming pool. A slit on the edge will help you remove it. Do not use tools. When you remove the bulb from its housing, you will have about 36 inches of cable to bring it up to the pool deck and secure it to a peg. Insert a chunk of Styrofoam into the housing. ii. LED lights : Remove the front screw. Pull the light firmly toward the pool. Do not use tools. Do not use tools. When you remove the bulb from its housing, you will have about 36 inches of cable to bring it up to the pool deck and secure it to a peg. Insert a chunk of Styrofoam into the housing. LUMI-O LIGHTS: First unplug the breaker, then remove bulb and leave shell inside the casing. Lower the water level as recommended, regardless of the light. OPTIC FIBRE: Turn breaker off. SALT SYSTEM: Disconnect power supply by switching OFF main circuit breaker. Disconnect white cable from electrolysis cell. Turn filter pump off or open bypass valve (if there is one). Ensure that no water flows onto cell. Unscrew the unions in order to dismount cell. Set the cell on its cleaning stand, with cable at bottom. Fill the cell with 1 litre of phosphoric acid LECTRA CLEAN in order to decalcify it. (Take all necessary precautions and read the instructions on the container.) Allow 15 minutes of contact time. Pour product back into its container. Check if all scaling has dissolved. If necessary, repeat procedure if necessary to perfectly clean the cell. Remove the cell from its base. Rinse with clean water and reinstall. If the box is outdoors and not sheltered, be sure to cover it for protection from wind, snow and rain. OZONE SYSTEM : Turn off power to the ozone system. Disconnect the see-through hose from the control panel as well as the hose attached to the pool. Cover with adhesive tape on the control panel. Blow the by-pass thoroughly. If the power supply is connected to a 220V input, cover it to protect it from the elements. SPILL-OVER SPA: Drain the spa and remove the jets and drains by removing the screws. Blow out or vacuum water lines. Place rubber plugs in all spa openings and fill halfway. 5) POOL CLOSING KIT Note: To find out which PERMA POLAR kit to use for your in-ground pool, refer to the directions on the packaging or ask your TRÉVI representative. If you are using a chlorine or ozone system - Place the PERMA POLAR in the Styrofoam ring, punch two of the four holes and leave it to float in the pool. - Dilute PERMA 180 in a bucket of warm water and pour directly into the water, on all sides of the pool. Wait 4 hours. - Pour PERMACIDE directly into the water. Wait 4 hours. - Pour the other half of the TREVI STOP container (optional) directly into the water all around the pool in order to make the ring around the pool easier to clean in the spring. If you are using a salt system - Pour PERMACIDE directly into the water. Wait 15 minutes. - Dilute the 3 bags of TREVI-OXYDANT in a bucket of warm water and pour directly into the water, on all sides of the pool. Wait 1 hour. - Pour METALOC directly into the pool water. Wait one hour. 4
5 - Pour the other half of the TREVI STOP container (optional) directly into the water all around the pool in order to make the ring around the pool easier to clean in the spring. Reminder: Before the first frost (October), pour TREVI ANTIFREEZE (Permafrost) into the bottom drain line. Make sure there is little or no water (less than 12 inches) inthe drainage well before frost sets in. 6) INSTALLING THE WINTER COVER TREVI recommends the use of a winter cover because it protects the vinyl liner against the sun s rays and shields the water from debris, dirt and leaves. It also prevents chemicals from evaporating, which helps keep the water clear until it freezes. For mesh fabrics, use ball under the canvas is essential. Trevi offers a variety of products, and the installation technique may vary from one product to the other. An in-store representative will be glad to help you make the appropriate choice. IMPORTANT: AFTER NOVEMBER 1st, once the pool is closed, heavy rains may raise the water level in the pool. If so, you will need to lower the water level to 2 inches below the below the water jets. A high water level combined with freezing action may otherwise damage the wall near the skimmer, as well as the skimmer and the structure. You will need to use a submersible pump to lower the water level because everything has already been wintered. In such an event, your pool warranty could be rendered void. For steel-sided pools, always keep a uniform quantity of snow around the sides of the pool. 5

6 Make sure you have less than 12 inches of water in your sink draining before emptying your pool.
7 Illustra=on A

8 Illustra=on B


9 Illustra=on C
10 You will need to add ½ gallon of an=freeze water per each return line. We recommend that you use a funnel to put an6freeze in each of backflow in the pool. You will also need to add ½ gallon of an=freeze in the line of the skimmer and 1 gallon at the line of the bodom drain. Illustra=on D


11 Illustra=on E
12 Illustra=on F
Closing procedures for in-ground pools
 Closing procedures for in-ground pools Note: Carefully read this entire document before closing your pool. The following procedures are also available in video format under the «Videos» tab at www.trevi.com.
Closing procedures for above-ground pools
 Closing procedures for above-ground pools Note: Carefully read this entire document before closing your pool. The following procedures are also available in video format under the «Videos» tab at www.trevi.com.
POOL WINTERIZING INSTRUCTIONS
 TASK CHECKLIST 1. Clean the Filter 2. Remove the Deck Equipment 3. Clean the Pool 4. Lower the Water Level 5. Apply Chemicals 6. Freeze Proof Equipment & Plumbing Lines 7. Put on the Winter Cover Note:
WINTERIZATION INDUSTRY BEST PRACTICE
 WINTERIZATION INDUSTRY BEST PRACTICE Zodiac Pool Systems, Inc. 1-800-822-7933 Regional Extension www.zodiacpoolsystems.com Zodiac Academy zodiac.academy@zodiac.com www.zodiacacademy.com Instructor: Email:
Section 1. Information before installation
 2 3 Section 1. Information before installation 1.1 General delivery conditions All equipment, even carriage and packaging paid, is shipped at the recipient s risk. If damaged caused during transport is
Pool Setup & Maintenance Guide. Supplement to Pool Owners Manual. (Includes optional Salt System Information)
") Pool Setup & Maintenance Guide Supplement to Pool Owners Manual (Includes optional Salt System Information) - 1 - Table of Contents Overview... 3 Ball Valve... 4 Pump... 7 Cartridge Filter... 8 Sand Filter...
Pool Setup & Maintenance Guide Supplement to Pool Owners Manual (Includes optional Salt System Information) - 1 - Table of Contents Overview... 3 Ball Valve... 4 Pump... 7 Cartridge Filter... 8 Sand Filter...
INSTRUCTION MANUAL. Blue Whale Spa Ltd, 11 Glaisdale Drive East Nottingham, NG8 4GU
 INSTRUCTION MANUAL Balboa 500DZ-Series Operation Guide Initial Start-up Your spa will enter Priming Mode ( ) when it is energized. During Priming Mode, press Jets button(s) repeatedly and be sure all pumps
Jacuzzi J-D300 Pool Cleaning System
 Jacuzzi J-D300 Pool Cleaning System Limited Warranty Terms & Conditions 1 year warranty coverage, exclusions apply J-D300 Before using the cleaner, review the owner s manual completely. Failure to read
Step-by-Step Guide To Clean Your Own Pool
 Step-by-Step Guide To Clean Your Own Pool Every pool owner wishes to see sparkling blue water in his pool. But he might want to save some bucks by cleaning the pool himself. It does require a bit of work
HARMSCO INSTALLATION AND OPERATION MANUAL UPFLOW SWIMMING POOL CARTRIDGE FILTER CARTRIDGE CLEANING INSTRUCTIONS HARMSCO CARTRIDGES
 HARMSCO INSTALLATION AND OPERATION MANUAL UPFLOW SWIMMING POOL CARTRIDGE FILTER CARTRIDGE CLEANING INSTRUCTIONS HARMSCO CARTRIDGES May be cleaned and reused before replacement is necessary. Cartridge cleaning
OWNER S MANUAL. Vintage Signature Series models: AC750, AC1050, AC1100, AC1250, AC1500, AC1750. Proudly Made in the USA.
 OWNER S MANUAL Vintage Signature Series models: AC750, AC1050, AC1100, AC1250, AC1500, AC1750 Proudly Made in the USA support@aquacomfort.com 888-475-7443 Manufacturing High Quality, High Efficiency Heat
INSTALLATION INSTRUCTIONS
 INSTALLATION INSTRUCTIONS VARIABLE SPEED BOOSTER PUMP IMPORTANT SAFETY INSTRUCTIONS READ AND FOLLOW ALL INSTRUCTIONS SAVE THESE INSTRUCTIONS IMPORTANT SAFETY INFORMATION WARNING: RISK OF ELECTRICAL SHOCK
OWNER S MANUAL. Vintage Classic HEAT COOL models. Proudly Made in the USA
 OWNER S MANUAL Vintage Classic HEAT COOL models Proudly Made in the USA support@aquacomfort.com www.aquacomfort.com/service-and-support 888-475-7443 Manufacturing High Quality, High Efficiency Heat Pump
INSTALLATION AND OPERATION. -, 3. -is INSTRUCTIONS FOR COOLAIR S EVAP-PAD COOLING SYSTEM. Coo/ah AMERICAN COOLAIR CORPORATION
 I -, 3. -is INSTALLATION AND OPERATION INSTRUCTIONS FOR COOLAIR S EVAP-PAD COOLING SYSTEM e Coo/ah AMERICAN COOLAIR CORPORATION TABLE OF CONTENTS PAGE I. CONCEPT OF EVAPORATIVE COOLING....2 II. RECOMMENDEDTOOLS......3
ACROBAT GT OPERATING AND TROUBLESHOOTING GUIDE. Automatic Pool Cleaner. We hope you enjoy your ACROBAT GT automatic pool cleaner!
 ACROBAT GT Automatic Pool Cleaner OPERATING AND TROUBLESHOOTING GUIDE 36 fin disc and flexible foot constructed of quality polyurethane Proven technology: Diaphragm driven strength & quietness Unique hose
SPIKA NG ICE MAKER MAINTENANCE
 1. AIR CONDENSER CLEANING: 2. Clean condenser using a vacuum cleaner, soft brush or low pressure air. Clean from top to bottom, not side to side. Be careful not to bend the condenser fins. 3. Connect the
OWNER S MANUAL. Models: AC110, AC125, AC150 made from 2003 through Proudly Made in the USA
 OWNER S MANUAL Models: AC110, AC125, AC150 made from 2003 through 2010 Proudly Made in the USA support@aquacomfort.com www.aquacomfort.com/service-and-support/ (888) 475-7443 Manufacturing High Quality,
Robotic Pool Cleaner BASIC 2 Operating Instructions
 Robotic Pool Cleaner BASIC 2 Operating Instructions Contents 1. INTRODUCTION...2 2. SPECIFICATIONS...2 3. WARNINGS AND CAUTIONS...2 3.1. Warnings...2 3.2. Cautions...2 4. POOL CLEANER PARTS...3 5. USING
SELF-CONTAINED CRESCENT CUBER
 Reliability is a beautiful thing TM SELF-CONTAINED CRESCENT CUBER KM-250BAF KM-250BWF INSTRUCTION MANUAL ISSUED: March 14, 2000 REVISED: December 22, 2004 IMPORTANT Only qualified service technicians should
HAYWARD POOL PRODUCTS, INC. 620 Division Street Elizabeth, NJ Tel:
 IS270T-05 Rev. B OWNER S MANUAL INSTALLATION, OPERATION & PARTS MODEL S270T PRO SERIES HIGH-RATE SAND FILTER Basic safety precautions should always be followed, including the following: Failure to follow
Fleck 5600 Carbon Filter Installation & Start Up Guide
 Clean Water Made Easy www.cleanwaterstore.com Fleck 5600 Carbon Filter Installation & Start Up Guide Thank you for purchasing a Clean Water System! With proper installation and a little routine maintenance
Robotic Pool Cleaner REVOLUTION I. Operating Instructions Robotic Pool Cleaner REVOLUTION I... p. 1-8
 EN Operating Instructions... p. 1-8 8151626 Operating Instructions Contents 1. INTRODUCTION...2 2. SPECIFICATIONS...2 3. WARNINGS AND CAUTIONS...2 3.1. Warnings...2 3.2. Cautions...2 4. POOL CLEANER PARTS...3
HAYWARD POOL PRODUCTS, INC. 620 Division Street Elizabeth, NJ Tel:
 IS310S Rev B OWNER S MANUAL INSTALLATION, OPERATION & PARTS MODELS S310S PRO SERIES HIGH RATE SAND FILTERS Basic safety precautions should always be followed, including the following: Failure to follow
Clean Water Made Easy. Fleck 7000 Tannin Filter Installation & Startup Guide. Questions?
 Clean Water Made Easy www.cleanwaterstore.com Fleck 7000 Tannin Filter Installation & Startup Guide For Tannin Filters with Vortech Distributor Screen Thank you for purchasing a Clean Water System! With
Iron Air Charge MangOx 2510 SXT Installation & Start Up Guide
 Iron Air Charge MangOx 2510 SXT Installation & Start Up Guide Thank you for purchasing a Clean Water System! With proper installation and a little routine maintenance your system will be providing iron
CHAMPION PUMP OWNER S MANUAL
 CHAMPION PUMP OWNER S MANUAL IMPORTANT SAFETY INSTRUCTIONS READ AND FOLLOW ALL INSTRUCTIONS SAVE THESE INSTRUCTIONS WARNING: Before installing this product, read and follow all warning notices and instructions
INSTALLATION & OPERATION MANUAL
 INSTALLATION & OPERATION MANUAL Important Read all the instructions before installing your solar heating system. How does a solar heating system work? 1. Connect your existing pool pump to the solar panel.
CWS Plus Sediment Filter Installation & Start Up Guide
 Clean Water Made Easy www.cleanwaterstore.com CWS Plus Sediment Filter Installation & Start Up Guide Thank you for purchasing a Clean Water System! With proper installation and a little routine maintenance
Clean Water Made Easy. CWS Time Clock Softener Installation & Start Up Guide. Questions?
 Clean Water Made Easy www.cleanwaterstore.com CWS Time Clock Softener Installation & Start Up Guide Thank you for purchasing a Clean Water System! With proper installation and a little routine maintenance
AUTOMATIC ICE-CUBE MAKER - INSTRUCTIONS AND WARNINGS
 AUTOMATIC ICE-CUBE MAKER - INSTRUCTIONS AND WARNINGS Dear Customer, Congratulations on having chosen a quality product which will certainly fully meet your expectations. Thank you for having purchased
INSTRUCTION MANUAL. Blue Whale Spa Ltd, 11 Glaisdale Drive East Nottingham, NG8 4GU
 INSTRUCTION MANUAL Balboa 500Z-Series Operation Guide Initial Start-up Your spa will enter Priming Mode ( ) when it is energized. During Priming Mode, press Jets button(s) repeatedly and be sure all pumps
7 Steps to Building the Dream Water Garden
 7 Steps to Building the Dream Water Garden The perfect water garden can be achieved as long as you follow the right steps. Here are 7 tips to help build that dream water garden. Step 1 in Building the
Clean Water Made Easy
 Clean Water Made Easy http://www.cleanwaterstore.com Pro-OX 2510 Iron Filter Installation & Start- Up Guide Thank you for purchasing a Clean Water System! With proper installation and a little routine
Ultraviolet Systems UV-C 50 INSTALLATION INSTRUCTIONS & PRODUCT MANUAL
 Ultraviolet Systems Inc. UV-C 50 INSTALLATION INSTRUCTIONS & PRODUCT MANUAL TABLE OF CONTENTS SECTION 1 General Information 1A. Description...1 1B. Specifications...1 SECTION 2 Installation 2A. Pool Preparation...
INSTALLATION INSTRUCTIONS GEO PRIME TANK. (Patent Pending) GPC
 GPC") INSTALLATION INSTRUCTIONS GEO PRIME TANK (Patent Pending) GPC Table of Contents General Description 2 Installation 3 Flushing and Purging 5 Initial Start up 7 Adding or Checking Fluid 8 Replacing a Pump
INSTALLATION INSTRUCTIONS GEO PRIME TANK (Patent Pending) GPC Table of Contents General Description 2 Installation 3 Flushing and Purging 5 Initial Start up 7 Adding or Checking Fluid 8 Replacing a Pump
PZ2 Series Manual. PROZONE INTERNATIONAL, Inc. Ozone Water Purification Systems. INSTALLATION GUIDE and OPERATION MANUAL. Prozone PZ2 Series
 PZ2 Series Manual PROZONE INTERNATIONAL, Inc. Ozone Water Purification Systems INSTALLATION GUIDE and OPERATION MANUAL Prozone PZ2 Series Ozone Generator Systems SAFETY READ AND FOLLOW ALL INSTRUCTIONS.
CAUTION: DO NOT OPERATE MACHINE UNTIL YOU HAVE READ ALL SECTIONS OF THIS INSTRUCTION MANUAL
 KING COBRA 310 120V INFORMATION & OPERATING INSTRUCTIONS U. S. PRODUCTS CAUTION: DO NOT OPERATE MACHINE UNTIL YOU HAVE READ ALL SECTIONS OF THIS INSTRUCTION MANUAL 56041963 IMPROPER USE OF THE MACHINE
MODEL: NSD10020 PACKING DIAGRAM \ _\ CARDBOARD (2) CORD COVERS AND PART--+- i----1 :ASTING POLYFOAM UMP. c=j-transformer AND L_J LIGHT
 CORD COVERS AND PART--+- i----1 :ASTING POLYFOAM UMP. c=j-transformer AND L_J LIGHT") MODEL: NSD10020 PACKING DIAGRAM \ _\ CARDBOARD I CJ (2) CORD COVERS AND PART--+- i----1 :ASTING POLYFOAM UMP c=j-transformer AND L_J LIGHT You should have received the following parts in the package. Please
MODEL: NSD10020 PACKING DIAGRAM \ _\ CARDBOARD I CJ (2) CORD COVERS AND PART--+- i----1 :ASTING POLYFOAM UMP c=j-transformer AND L_J LIGHT You should have received the following parts in the package. Please
7800 Neutralizer Installation & Start-Up Guide
 Clean Water Made Easy www.cleanwaterstore.com 7800 Neutralizer Installation & Start-Up Guide Thank you for purchasing a Clean Water System! With proper installation and a little routine maintenance your
AGITATOR V DO NOT OPERATE THE MACHINE UNTIL YOU HAVE READ ALL SECTIONS OF THESE INSTRUCTIONS IMPROPER USE OF THE MACHINE WILL VOID THE WARRANTY
 AGITATOR 20 120V INFORMATION & OPERATING INSTRUCTIONS DO NOT OPERATE THE MACHINE UNTIL YOU HAVE READ ALL SECTIONS OF THESE INSTRUCTIONS IMPROPER USE OF THE MACHINE WILL VOID THE WARRANTY 1. Always use
ASSEMBLY INSTRUCTIONS
 ABOVE-GROUND POOL CLEANER ASSEMBLY INSTRUCTIONS Congratulations on purchasing a Nemo Automatic Pool Cleaner! MODEL NE4380 NE4380 PARTS LIST Re f. # 1 2 3 4 5 6 7 8 9 10 11 Orde r # NEP2276 NEP2277 NEP2278
MODULAR AUTOMATIC GRANULAR ICE FLAKER
 MODULAR AUTOMATIC GRANULAR ICE FLAKER INSTRUCTIONS AND WARNINGS 24479 rev. 03 It is strictly forbidden to reproduce this instruction manual or any part thereof. Dear Customer, Congratulations on having
2 SPEED PUMP INSTRUCTION MANUAL READ THIS MANUAL CAREFULLY BEFORE USING YOUR 2 SPEED PUMP
 2 SPEED PUMP INSTRUCTION MANUAL READ THIS MANUAL CAREFULLY BEFORE USING YOUR 2 SPEED PUMP 8308 PUMP PARTS BREAKDOWN Ref # Part # Manf. # Descrip on 1 NEP2134 AC 81361 PUMP LID 2 NEP2135 AC 81396 PUMP LID
AUTOMATIC GRANULAR ICE FLAKER
 AUTOMATIC GRANULAR ICE FLAKER INSTRUCTIONS AND WARNINGS 24480 rev. 01 It is strictly forbidden to reproduce this instruction manual or any part thereof. Dear Customer, Congratulations on choosing a
INSTRUCTION MANUAL. Blue Whale Spa Ltd, 11 Glaisdale Drive East Nottingham, NG8 4GU
 INSTRUCTION MANUAL MVP260 Control Reference Card Non-Circ Operation Initial Start-up When your spa is first actuated, it will go into Priming mode, indicated by Please see the M-7 Installation Instruction
Robotic Pool Cleaner REVOLUTION II & REVOLUTION III. Operating Instructions...p. 1-7 REVOLUTION II REVOLUTION III
 Robotic Pool Cleaner REVOLUTION II & REVOLUTION III EN Operating Instructions...p. 1-7 REVOLUTION II REVOLUTION III 8151704 EN Robot Pool Cleaner REVOLUTION II & REVOLUTION III Operating Instructions
EZ CLEAN IMPORTANT SAFETY INSTRUCTIONS READ AND FOLLOW ALL SAFETY INSTRUCTIONS SAVE THESE INSTRUCTIONS. External Aquarium Filter
 EZ CLEAN External Aquarium Filter Model 01105 TM The Supreme EZ CLEAN FILTER is a multifunction aquarium appliance. It provides water filtration with dual cartridges to filter water mechanically removing
FLECK 5600 WATER SOFTENER INSTALLATION
 FLECK 5600 WATER SOFTENER INSTALLATION Discount Water Softeners recommends using a licensed plumber to install your water softener. The following installation instructions are for use with the water softener
Clean Water Made Easy
 Clean Water Made Easy www.cleanwaterstore.com CWS Plus Neutralizer/Birm Blend Installation & Start-Up Guide Thank you for purchasing a Clean Water System! With proper installation and a little routine
Hoshizaki America, Inc.
 Hoshizaki America, Inc. Self-Contained Flaker Model F-330BAH(-C) A Superior Degree of Reliability INSTRUCTION MANUAL www.hoshizaki.com Issued: 5-4-2007 Revised: 1-15-2013 WARNING Only qualified service
Fleck 2510 SXT Catalox Installation & Start Up Guide
 Fleck 2510 SXT Catalox Installation & Start Up Guide For Catalox Filters with PotPerm Bleach Solution Tank Thank you for purchasing a Clean Water System! With proper installation and a little routine maintenance
COMMERCIAL STRENGTH POLYMER MEDIA FILTER OWNERS MANUAL
 COMMERCIAL STRENGTH POLYMER MEDIA FILTER OWNERS MANUAL INTRODUCTION Congratulations on choosing the Poolrite S6000 mk2, S5000 mk2, S8000 mk1 or S9000 mk4 High Rate Media Filter fitted with the exclusive
Hoshizaki America, Inc.
 Hoshizaki America, Inc. Self-Contained Crescent Cuber Models KM-255BAH KM-255BWH A Superior Degree of Reliability INSTRUCTION MANUAL www.hoshizaki.com Issued: 10-4-2006 IMPORTANT Only qualified service
KREEPY KRAULY PROWLER 910 ROBOTIC ABOVEGROUND POOL CLEANER
 KREEPY KRAULY PROWLER 910 ROBOTIC ABOVEGROUND POOL CLEANER INSTALLATION AND USER S GUIDE IMPORTANT SAFETY INSTRUCTIONS READ AND FOLLOW ALL INSTRUCTIONS SAVE THESE INSTRUCTIONS CUSTOMER SERVICE / TECHNICAL
AUTOMATIC MODULAR ICE-CUBE MAKER
 AUTOMATIC MODULAR ICE-CUBE MAKER INSTRUCTIONS AND WARNINGS 24851 ed. 06-2012 It is strictly forbidden to reproduce this instruction manual or any part thereof. Dear Customer, Congratulations on having
Pool Weasel Vacuum Users Guide
 Pool Weasel Vacuum Users Guide Welcome to best way to keep your swimming pool or fountain clean. WE have done everything to insure that the Pool Weasel is the safest pool vacuum system available, You have
AUTOMATIC MODULAR ICE-CUBE MAKER WITH VERTICAL EVAPORATOR SYSTEM
 AUTOMATIC MODULAR ICE-CUBE MAKER WITH VERTICAL EVAPORATOR SYSTEM INSTRUCTIONS AND WARNINGS 24481 ed. 11-2007 It is strictly forbidden to reproduce this instruction manual or any part thereof. Dear
Kinetico 2060f OD Sulfur Guard Installation Instructions
 SAFETY GUIDELINES Read all steps, guides, and rules carefully before installing and using the Kinetico 2060f OD Sulfur Guard. Check your local building and sanitation codes for installation compliance.
Explorer CleaningPartsDirect.com Carpet Extractor. Operator and Parts Manual. Home Find... Go To.. Model No.: Can.
 Explorer 1500 Carpet Extractor Model No.: 608808 609231 Can. Operator and Parts Manual CleaningPartsDirect.com 662-393-3045 NOBLES 12875 RANSOM STREET HOLLAND MI 49424 U.S.A. CUSTOMER SERVICE: 1-800-365-6625
SELF-CONTAINED FLAKER
 Reliability is a beautiful thing TM SELF-CONTAINED FLAKER F-500BAF(-C) INSTRUCTION MANUAL ISSUED: April 13, 1998 REVISED: December 30, 2004 IMPORTANT Only qualified service technicians should attempt to
ECONO FLO 2.7HP VARIABLE SPEED PUMP OWNER S MANUAL
 ECONO FLO 2.7HP VARIABLE SPEED PUMP OWNER S MANUAL IMPORTANT SAFETY INSTRUCTIONS READ AND FOLLOW ALL INSTRUCTIONS SAVE THESE INSTRUCTIONS WARNING: Before installing this product, read and follow all warning
SMF PUMP OWNER S MANUAL
 SMF PUMP OWNER S MANUAL IMPORTANT SAFETY INSTRUCTIONS READ AND FOLLOW ALL INSTRUCTIONS SAVE THESE INSTRUCTIONS WARNING: Before installing this product, read and follow all warning notices and instructions
Maintenance page 14 Guarantees page 15 BIO-UV Range DESCRIPTION UV10 UV20 UV30 UV40
 C O N T E N T S BIO-UV RANGE page 3 Reminders & Advice page 4 Warnings and safety page 5 Blown up view and Nomenclature pages 6 to 8 Clearance diagrams page 9 Installation model page10 Connections page11
FOR THE RECORD. You should record the model and serial numbers, which can be found on the back of the unit, for future reference.
 FOR THE RECORD You should record the model and serial numbers, which can be found on the back of the unit, for future reference. Warranty: 18 mo. on unit and 1 year on check valve assembly Model: The Ozone
QUIETFLO OWNER S MANUAL
 QUIETFLO OWNER S MANUAL INSTALLATION, OPERATION & PARTS To prevent potential injury and to avoid unnecessary service calls, read this manual carefully and completley. CAUTION - We highly recommend a qualified
Fleck 2510 Sediment Filter Installation & Start-Up Guide
 Clean Water Made Easy www.cleanwaterstore.com Fleck 2510 Sediment Filter Installation & Start-Up Guide Thank you for purchasing a Clean Water System! With proper installation and a little routine maintenance
5700-E Sediment Filter Installation & Start-Up Guide
 Clean Water Made Easy www.cleanwaterstore.com 5700-E Sediment Filter Installation & Start-Up Guide Thank you for purchasing a Clean Water System! With proper installation and a little routine maintenance
Clean Water Made Easy
 Clean Water Made Easy www.cleanwaterstore.com CWS F5 Manual Carbon Filter Installation & Start Up Guide Thank you for purchasing a Clean Water System! With proper installation and a little routine maintenance
Ozone Generator Systems
 PZ2-1 & PZ2-2 - Commercial and Residential Pools & Spas Ozone Generator Systems INSTALLATION GUIDE and OPERATION MANUAL T. O3 NATURAL TECHNOLOGY Reduces Chemical Usage, Improves Sanitation Produces Crystal
Owner s Manual Guide du propriétaire Manual de Usuario. H Rev -
 H0343700 Rev - Owner s Manual Guide du propriétaire Manual de Usuario Important Information WARNING RISK OF SUCTION ENTRAPMENT HAZARD, WHICH, IF NOT AVOIDED CAN RESULT IN SERIOUS INJURY OR DEATH. Ensure
SwimPro by HAYWARD 620 Division Street Elizabeth, NJ Tel:
 OWNER S MANUAL INSTALLATION, OPERATION & PARTS ISSW256T Rev. B SW96T75XS SERIES SW236TX5S SERIES SW256TX5DS SERIES SW256TX5S SERIS HIGH-RATE SAND FILTER SYSTEMS SW96T SW236T SW256T HIGH RATE SAND FILTERS
Operating and Maintenance Manual
 Models: FX-88 FX-88HP Operating and Maintenance Manual Congratulations and thank you for buying a FX-88 portable extractor. The FX-88 is designed to give you truckmount performance in a portable machine
Next Generation Corona Discharge Installation & Operation Manual
 Next Generation Corona Discharge Installation & Operation Manual 4-2319-01 Rev.A IMPORTANT SAFETY INSTRUCTIONS READ & FOLLOW ALL INSTRUCTIONS Read this manual completely before attempting installation.
Vacuum-ultraviolet Ozone Systems. Installation & Operation Manual. Model OZ-SPA
 OzoneAX 3 T Vacuum-ultraviolet Ozone Systems Installation & Operation anual odel OZ-SPA A. Important Safety Instructions IPORTANT SAFETY INSTRUCTIONS When using this electrical equipment, basic safety
Hoshizaki America, Inc.
 Hoshizaki America, Inc. Modular Flaker Models F-1500MAH(-C) F-1500MWH(-C) F-1500MRH(-C) A Superior Degree of Reliability INSTRUCTION MANUAL www.hoshizaki.com Issued: 10-9-2003 Revised: 12-30-2004 IMPORTANT
OWNER S MANUAL. The following parts are included with your Ranger (Model# W01698): (1) Wheel Deflector & Adapter. (1) FlowKeeper Valve
: (1) Wheel Deflector & Adapter. (1) FlowKeeper Valve") OWNER S MANUAL The following parts are included with your Ranger (Model# W01698): (1) FlowKeeper Valve (1) Slotted Disc (1) Wheel Deflector & Adapter (1) Cleaner Head (10) Hose Lengths (1) 4 1 /2" Connector
OWNER S MANUAL The following parts are included with your Ranger (Model# W01698): (1) FlowKeeper Valve (1) Slotted Disc (1) Wheel Deflector & Adapter (1) Cleaner Head (10) Hose Lengths (1) 4 1 /2" Connector
General System Layout Sketch
 General System Layout Sketch EZ-37 Solar Panels PV panel Glycol Fill Valve Expansion Tank ` 1 Introduction This document describes how to install a Heliatos GH type solar water heating system. These systems
Hoshizaki America, Inc.
 Hoshizaki America, Inc. Modular Crescent Cuber Models KM-900MAH50 KM-900MRH50 A Superior Degree of Reliability INSTRUCTION MANUAL www.hoshizaki.com Issued: 6-25-2008 IMPORTANT Only qualified service technicians
WS1 Greensand Installation & Start Up Guide
 WS1 Greensand Installation & Start Up Guide Thank you for purchasing a WS1 Water System for the removal of iron, manganese and hydrogen sulphide gas. With proper installation and a little routine maintenance
Elite Primer Baldor Series External Pond Pump
 Elite Primer Baldor Series External Pond Pump ( 5250PPB21, 6440PPB23, 7550PPB26, 9600PPB28) Installation and User s Guide IMPORTANT SAFETY INSTRUCTIONS, READ AND FOLLOW ALL INSTRUCTIONS. SAVE THESE INSTRUCTIONS
HEATING AND VENTILATION
 SECTION 14-102.04 14-102.04/ 1 2007OC19 DESCRIPTION The heating, ventilation and air conditioning (HVAC) system is designed to optimize passenger comfort. The system regulates interior vehicle atmosphere,
Robotic Pool Cleaner Classic 4 / Top 4 - UNI
 Robotic Pool Cleaner Classic 4 / Top 4 - UNI EN User Instructions...p. 1-11 Classic 4 - UNI FR Mode d emploi...p. 12-22 IT Istruzioni per l uso...p. 23-33 ES Instrucciones de Uso...p. 34-44 DE Gebrauchsanweisung...s.
Hybrid - Robotic Suction Pool Cleaner. Operating Instructions
 Hybrid - Robotic Suction Pool Cleaner Operating Instructions by 8151170 Contents The Hybrid Suction Cleaner...2 Parts...2 Warnings...3 Specifications...3 Water conditions...3 Pool Preparation...3 Setup...3
Pool Protector OPERATING INSTRUCTIONS MANUAL
 Pool Protector OPERATING INSTRUCTIONS MANUAL MEETS NF90-307 CE R&TTE This product has been designed to aid in the detection of unwanted intrusions into unsupervised pools. POOL PROTECTOR IS A SAFETY ALARM
WINTERIZATION DRIP IRRIGATION SYSTEM
 WINTERIZATION DRIP IRRIGATION SYSTEM CHECK LIST Erick Smith, Dario Chavez, Tim Coolong, and Lenny Wells, UGA Department of Horticulture Wesley Porter, UGA Department of Crop and Soil Sciences As the season
WELCOME TO ZODIAC. PRIVATE BAG X127 HALFWAY HOUSE 1685 CUSTOMER CARE HELPLINE 0860 ZODIAC ( )
") WELCOME TO ZODIAC ZODIAC: YOUR PARTNER IN POOL CARE Renowned worldwide for the quality and reliability of our products in the swimming pool industry, Zodiac is proud to be the market leader here in South
WELCOME TO ZODIAC ZODIAC: YOUR PARTNER IN POOL CARE Renowned worldwide for the quality and reliability of our products in the swimming pool industry, Zodiac is proud to be the market leader here in South
Reliability is a beautiful thing TM MODULAR FLAKER F-800MAH(-C) F-800MWH(-C) INSTRUCTION MANUAL
 F-800MWH(-C) INSTRUCTION MANUAL") Reliability is a beautiful thing TM MODULAR FLAKER F-800MAH(-C) F-800MWH(-C) INSTRUCTION MANUAL ISSUED: FEB. 28, 2001 REVISED: DEC. 11, 2003 IMPORTANT Only qualified service technicians should attempt
Reliability is a beautiful thing TM MODULAR FLAKER F-800MAH(-C) F-800MWH(-C) INSTRUCTION MANUAL ISSUED: FEB. 28, 2001 REVISED: DEC. 11, 2003 IMPORTANT Only qualified service technicians should attempt
Clean Water Made Easy
 Clean Water Made Easy http://www.cleanwaterstore.com Pro-OX 1650 Iron Filter Installation & Start-Up Guide Thank you for purchasing a Clean Water System! With proper installation and a little routine maintenance
MAXI PUMP INSTRUCTION MANUAL NE6151B /NE6171B READ THIS MANUAL CAREFULLY BEFORE USING YOUR MAXI PUMP
 MAXI PUMP INSTRUCTION MANUAL NE6151B /NE6171B READ THIS MANUAL CAREFULLY BEFORE USING YOUR MAXI PUMP 8104 MAXI-PUMP PARTS BREAKDOWN Re f # 1 2 3 4 5 6 7a 7b 8 9 10 11 12 13 14 15 16 2 Part # NEP2134 NEP2135
Robot Pool Cleaner by Maytronics. User Instructions. Guide d utilisation. Istruzioni per l uso. Instrucciones para el Usuario DEU
 1 English Robot Pool Cleaner by Maytronics EN FR IT SP DEU User Instructions Guide d utilisation Istruzioni per l uso Instrucciones para el Usuario Bedienungsanweisungen by MCC8-UNI 8151247, 1/2011 1
WARRANTY TABLE OF CONTENTS TECHNICAL SPECIFICATIONS. Product Warranty Always keep your receipt as proof of purchase. Technical specifications...
 4 TABLE OF CONTENTS Technical specifications... 1 Warranty... 2 Important precautions Read first!... 3 Safety features and electrical power information... 5 Parts and diagram list... 6 Assembly and operation
EcoMaster - Residential Pools up to 40,000 Gallons
 - Residential Pools up to 40,000 Gallons INSTALLATION/ OPERATION GUIDE Reduces Chemical Usage, Improves Sanitation Produces Crystal Clear Water Copyright 2013 Prozone Water Products: 3004 11 th Ave. -
Scale Stopper Plus Installation & Start-Up Guide
 Clean Water Made Easy www.cleanwaterstore.com Scale Stopper Plus Installation & Start-Up Guide Thank you for purchasing a Clean Water System! With proper installation and a little routine maintenance your
HAYWARD POOL PRODUCTS POMONA, CA CLEMMONS, NC NASHVILLE, TN
 IS210T90 Rev. D OWNER S MANUAL INSTALLATION, OPERATION & PARTS MODEL S210T, S210T93 PRO SERIES HIGH-RATE SAND FILTRATION SYSTEM Basic safety precautions should always be followed, including the following:
ECONO FLO VSA 165 VARIABLE SPEED PUMP OWNER S MANUAL
 ECONO FLO VSA 165 VARIABLE SPEED PUMP OWNER S MANUAL IMPORTANT SAFETY INSTRUCTIONS READ AND FOLLOW ALL INSTRUCTIONS SAVE THESE INSTRUCTIONS WARNING: Before installing this product, read and follow all
c=) MODEL: NSD10037 PACKING DIAGRAM UMP AND (3) SHIMS ' IGHTS AND TRANSFORMER. LOWER COLUMN ESERVOIR BASE CASTING POLYFOA
 MODEL: NSD10037 PACKING DIAGRAM UMP AND (3) SHIMS ' IGHTS AND TRANSFORMER. LOWER COLUMN ESERVOIR BASE CASTING POLYFOA") MODEL: NSD10037 PACKING DIAGRAM UMP AND (3) SHIMS LI I l------+--1 '---...--+-----1IGHTS AND TRANSFORMER. LOWER COLUMN A ESERVOIR BASE 0 CASTING POLYFOA c=) a You should have received the following parts
MODEL: NSD10037 PACKING DIAGRAM UMP AND (3) SHIMS LI I l------+--1 '---...--+-----1IGHTS AND TRANSFORMER. LOWER COLUMN A ESERVOIR BASE 0 CASTING POLYFOA c=) a You should have received the following parts
Robotic Pool Cleaner Dolphin X40 PLUS
 Robotic Pool Cleaner Dolphin X40 PLUS 8151662-AU Ver. 01 09/2017 Dolphin X 40 PLUS User Instructions Contents 1. INTRODUCTION... 2 2. SPECIFICATIONS... 2 3. WARNINGS AND CAUTIONS... 2 3.1 Warnings...
IMPORTANT SAFETY INSTRUCTIONS READ AND FOLLOW ALL INSTRUCTIONS SAVE THESE INSTRUCTIONS. Table of Contents WARNING.
 Eagle Pump Owners Manual IMPORTANT SAFETY INSTRUCTIONS READ AND FOLLOW ALL INSTRUCTIONS SAVE THESE INSTRUCTIONS Table of Contents SECTION I. INSTALLATION... 2 SECTION II. OPERATION & MAINTENANCE... 2 SECTION
EXTREME 1 Reverse Osmosis System
 EXTREME 1 Reverse Osmosis System Leader Evaporator Co., Inc. 49 Jonergin Drive Swanton, VT 05488 Tel: 802-868-5444 www.leaderevaporator.com TABLE OF CONTENTS INTRODUCTION... 4 THEORY OF OPERATION... 4
INSTALLATION AND USER'S GUIDE
 INSTALLATION AND USER'S GUIDE FILTRATION BLOCKS Infinity (U) 25 m 3 /hour and 20/50 m 3 /hour Equipment of high-alloy steel for cleaning and filtering water in the pool 2 TABLE OF CONTENTS Page APPLICATION.