Operator s Manual READY RACK EXTRACTOR. Installation/Operation/Maintenance/Parts DIMENSIONS OF THE WASHER: HEIGHT (AT BACK): 42
|
|
|
- Grant Watson
- 5 years ago
- Views:
Transcription

1 READY RACK EXTRACTOR DIMENSIONS OF THE WASHER: HEIGHT (AT BACK): 42 HEIGHT (W/ LID RAISED): 56 WIDTH: 27 DEPTH: 26 DEPTH (W/ REAR HOSE): 30 WEIGHT: 190 lbs. SHIP WEIGHT: 255 lbs. Operator s Manual Installation/Operation/Maintenance/Parts Part Number: PPE-EW HXW2505 Model Number: MADE IN THE USA
2 FORWARD We are pleased that you have selected the Ready Rack Extractor as one of your appliances. Your gear will be washed using a tumble action inner tub. Please register your new Extractor by contacting support@groves.com. An average of sixteen gallons of water per cycle moves through your gear to clean them, therefore less water and detergent is used than in agitator washers. Your gear spin at approximately RPMS / G-Force during the spin cycle, removing most of the water to reduce drying time. You will receive many years of service with the durable stainless steel inner and outer tubs. You will enjoy economic, environmental, and energy savings. To get the best performance from this Extractor, operate and maintain it according to the instructions in this manual. Note the importance of safety. You and anyone else using or maintaining this Extractor are strongly urged to read this manual, especially all the safety instructions. WARNING and CAUTION, used with the triangular safety alert symbol, highlight safety messages. Always read and understand these messages because they relate to personal injury and your safety. IMPORTANT messages refer to mechanical information and the possibility of damaging a part or parts of the clothes washer. NOTE identifies general information worthy of special attention. CONTENTS 3 Important Safety Instructions 4 Warranty 5 Installation Instructions 6 Benefits and Washing Instructions for the Extractor 8 Operation 9 Maintenance 13 Troubleshooting Guide 15 Parts 2
3 PRODUCT IDENTIFICATION Model, Series and Serial numbers are used to identify your new Extractor. These numbers should always be referred to when consulting the Customer Assistance Center concerning service, parts, or other information you may require. For your convenience and ready reference, enter Model, Series, and Serial numbers below. Please register your new Extractor by contacting Model number: Series number: Serial number: IMPORTANT SAFETY INSTRUCTIONS This safety alert symbol means CAUTION or WARNING personal safety instruction. Read and understand the instruction because it has to do with safety. Failure to comply with the instruction may result in personal injury. Improper use or maintenance of Extractor can result in injury. To reduce potential for injury, comply with the following safety instructions. WARNING To reduce the risk of fire, electric shock, or injury to persons when using this appliance, follow basic precautions, including the following: 1. Read all instructions before using the appliance. 2. Do not wash articles that have been previously cleaned in, washed in, soaked in, or spotted with gasoline, dry-cleaning solvents, or other flammable or explosive substances as they give off vapors that could ignite or explode. 3. Do not add gasoline, dry cleaning solvents, or other flammable or explosive substances to the wash water. These substances give off vapors that could ignite or explode. 4. Under certain conditions, hydrogen gas may be produced in a hot water system that has not been used for two weeks or more. HYDROGEN GAS IS EXPLOSIVE If the hot water system has not been used for such a period, before using this washing machine, turn on all hot water faucets and let the water flow from each for several minutes. This will release any accumulated hydrogen gas. Since the gas is flammable, do not smoke or use an open flame during this time. 5. Do not let children play on or around the appliance. Close supervision is necessary when the appliance is used near children. 6. Before the appliance is removed from service or discarded, remove the top lid assembly. 7. Do not reach into the appliance if the clothes basket is moving. 8. Do not install or store this appliance where it will be exposed to the weather. 9. Do not tamper with any controls. 10. Do not repair or replace any part of the appliance or attempt any servicing until contacting customer service, unless specifically recommended in the user-maintenance instructions or in published user-repair instructions that you understand and have the skills to carry out. 3
4 IMPORTANT GROUNDING INSTRUCTIONS This appliance must be grounded. In the event of malfunction or breakdown, grounding will reduce the risk of electric shock by providing a path of least resistance for electric current. This appliance is equipped with a cord having an equipment grounding conductor and a grounding plug. The plug must be plugged into an appropriate outlet that is properly installed and grounded in accordance with all local codes and ordinances. WARNING Improper connection of the equipment grounding conductor can result in the risk of electric shock. Check with a qualified electrician or service person if you are in doubt as to whether the appliance is properly grounded. Do not modify the plug provided with the appliance. If it will not fit the outlet, have a proper outlet installed by a qualified electrician. WARRANTY Length of warranty Manufacturer will pay for: Manufacturer will not pay for: ONE YEAR FULL WARRANTY FROM DATE OF PURCHASE THREE YEAR LIMITED WARRANTY ONE YEAR FULL PLUS SECOND AND THIRD YEAR LIMITED FROM DATE OF PURCHASE TWENTY-FIVE YEAR LIMITED WARRANTY FROM DATE OF PURCHASE Replacement parts with prior written authorization to correct defects in materials or workmanship. Replacement parts for the Bearing Assembly & Suspension System if defective in materials or workmanship. Replacement parts for the outer tub module if the tub develops a water leak caused by rust through as a result of defective materials or workmanship. A. Service calls to: 1. Correct the installation of the washer. 2. Instruct you how to use the washer. 3. Correct wiring, correct plumbing or replace house fuses. B. Damage resulting from accident, alteration, misuse, abuse, improper installation or installation not in accordance with local electrical and plumbing codes. C. Shipping charges for warranty parts or labor for units operated outside the Continental United States. D. Pickup and delivery. This product is designed to be repaired in the department. E. Repairs to parts or systems caused by unauthorized modifications made to the appliance. MANUFACTURER DOES NOT ASSUME ANY RESPONSIBILITY FOR INCIDENTAL OR CONSEQUENTIAL DAMAGES. Some states do not allow the exclusion or limitation of incidental or consequential damages, so this exclusion may not apply to you. This warranty gives you specific legal rights and you may have other rights which may vary from state to state. If you need service, first see the Troubleshooting Guide section of the Operator s manual. After checking the Troubleshooting Guide, additional help can be found by calling our Customer Service Team at All warranty 4 parts must be returned to the factory freight prepaid.

5 INSTALLATION CAUTION: Use great care when loading, unloading or working around clothes basket with top lid raised. DO NOT allow any items to fall between inner and outer tubs. If this should occur DO NOT START EXTRACTOR. The item must be removed from the tub or damage to the clothes basket or water system may occur. If the item cannot be removed by rotating the clothes basket, we recommend removing the item though the sump hose. Refer to maintenance procedures for details. Uncrate Extractor using care not to scratch or damage surface of washer. IMPORTANT: When lifting or moving Extractor, always do so from left and/or right side of washer. Lifting or moving from the front or back may damage clothes washer. Lift Extractor straight up off bottom of shipping container and remove Styrofoam shipping block. Unpack clothes basket and accessories. NOTE: We recommend that all shipping materials be either retained for later use in moving the Extractor or recycled through a local solid waste management agency. Place Extractor in position taking care to move Extractor by moving only from either side. Level Extractor side-to-side and front-to-back. DO NOT level washer with front higher than back, damage to internal parts can result. Place a bubble level on top of Extractor with lid open. Loosen Locknut s on leveling legs and level washer. Keep leveling legs as close to washer frame as possible. There should be an equal amount of weight on all four legs. After washer is level, secure legs by rotating locknut s up against washer frame. Locate the four foot pads and install one on each leveling leg. Recheck level of Extractor and adjust as necessary. Remove all but the lowest drain hose shipping ties from back of washer. Form a goose-neck in free end of hose, place end in standpipe and secure. Attach free end of each fill hose to appropriate water supply, top hose to hot water supply and bottom hose to cold water supply. Turn water on and check for leaks. Plug power supply cord into grounded 120V60Hz electrical receptacle only. DO NOT plug power supply cord into a GFI outlet. Variations in electrical voltage may impact G-Force. Consult an electrician to ensure electrical receptacle meets proper requirements. WARNING: Do not use adapter plug, extension cord, or remove grounding prong from power supply cord. Do not modify plug provided with this Extractor. If it will not fit a properly grounded outlet, have a properly grounded outlet installed by a qualified electrician. Electrical current can cause fire and serious bodily harm. 5
6 BENEFITS OF EXTRACTOR 1. Washes more per load than a traditional agitator washer and saves on drying time with superior moisture extraction. 2. Gentle wash action ensures less wear and tear on gear (last longer). 3. Conserves water, energy, and money spent on laundry products. TO WASH CLOTHES, FOLLOW THESE SIMPLE INSTRUCTIONS STEP 1: After raising top outer lid, open access doors to clothes basket. Using both hands, one on each door, firmly depress safety latch on left door to release latching hook; slowly allow the doors to spring open. STEP 2: Load tub with clothes-tub can be lightly packed without affecting wash performance. STEP 3: Add measured amount of detergent as follows: IMPORTANT: Use an average of only one ounce of detergent. Using more detergent than recommended decreases the cleaning effectiveness, can cause suds or water to overflow and may damage the washer. If using a water softener, less detergent may be required. PRE-WASH CYCLE Pour 1/2 ounce each, of low sudsing detergent into designated reservoirs, adding up to 1/2 additional ounce of detergent to the reservoir marked pre-wash. NORMAL WASH CYCLE Pour 1 ounce each, of low sudsing detergent into designated reservoirs. If using powdered detergent, pour NO MORE THAN 1 OUNCES over clothes. STEP 4: Using both hands, close inner access doors ensuring that left door latching hook securely engages right side louver. Close top lid. STEP 5: Set temperature, water usage, and wash cycle selection switches. Push timer knob in, rotate to desired start position, pull timer knob out. The red light will come on to indicate power to the Extractor and tumbling will start. The green lid locked light only lights during spin portions of the cycle. To gain access to clothes after Extractor has started to agitate, wait for Extractor to stop agitating, then open lid. If the lid is opened while Extractor is agitating the loading doors may not be at the top. CAUTION DO NOT attempt to raise the top lid when the lid locked lamp is lit. To gain access to clothes tub after Extractor has started to spin, push timer knob in. Lid locked lamp will go out within two minutes and top lid may then be opened. 6

7 FOUR THINGS THAT AFFECT THE CLEANLINESS OF YOUR CLOTHES 1. The amount of tumbling: Equipped with a patented inner and outer tub, the Extractor is designed to increase the tumbling rate allowing for minimal use of chemicals, heat and time per wash load. 2. The amount of Detergent used: The increased performance eliminates the need for excess detergent, leaving your gear smelling less like perfume and more like natural woven fabrics. NOTE: Using too much detergent will cause over sudsing and create a whiteout condition. This prevents all tumbling and will cause poor wash performance. Using more detergent does not mean cleaner gear! 3. The amount of Heat used: Use hot water for white loads and use warm or cold water for other colors. The wash temperature can be increased to allow for more energy to break down the unwanted particles on your clothes. NOTE: Hot temperature can not exceed 105 degrees Fahrenheit per NFPA Requirements. 4. The amount of Time washed: By using the pre-wash cycle with detergent, the Extractor allows for more time to break down unwanted dirt particles, getting your clothes cleaner in one wash load. The Extractor is designed to eliminate the need to increase the above mentioned items while ensuring the maximum cleaning per wash cycle. 7

. Delicate settings has a slower spin speed (525 RPM/85.9 G-Force).")
8 OPERATION CONTROLS Temperature Controls temperature of wash water only. Extractor is designed to use cold water for rinses. Hot temperature can not exceed 105 degrees Fahrenheit per NFPA Requirements. Water Usage Controls amount of water entering Extractor during each fill. Use High setting for all normal loads containing a fully or loosely packed tub. Use Low setting for loads containing only a few garments. Wash Cycle Controls tumbling speed, tumbling duty cycle and spin speed. Use Normal setting for most fabrics; it has the fastest spin speed (560 RPM/97.8 G-Force). Delicate settings has a slower spin speed (525 RPM/85.9 G-Force). Use Delicate setting for delicate and knitted items. Timer Controls selection of pre-wash cycle and length of wash cycle. Power Lamp ON indicates that power is being applied to electronics to start Extractor. Lid Locked Lamp ON indicates that lid lock has locked and spin cycle can begin. OFF indicates that lid lock has released and top lid may be safely opened. DO NOT attempt to open lid while this lamp is ON. LIQUID DISPENSING SYSTEM All holding reservoirs will retain a maximum of 2 ounces of liquid solution. Flow through reservoir serves as a funnel to dispense a per-measured amount of low sudsing liquid detergent into wash tub without pouring solution directly onto clothes in tub (Bleach and fabric softener is not recommended to wash PPE gear). Recommended amount of low sudsing liquid detergent to use for normal wash loads is 1 ounce. For Low water level setting, use 1/2 ounce. If using the pre-wash setting use 1/2 ounce or less of detergent in pre-wash & 1/2 ounce or less in heavy, medium or light cycle. Do not overfill detergent. 8
9 MAINTENANCE PROCEDURES DESIGNED TO BE END-USER REPAIRABLE REMOVE FRONT PANEL 1. Disconnect the appliance from the power source. 2. Remove the four 5/16 headed screws located at the bottom of the front panel. 3. After the screws have been removed, grasp the panel on both sides and pull forward. Allow the panel to drop free of the top assembly and set aside. INSTALL FRONT PANEL 1. Locate left and right side of front panel over guide pins on cabinet. 2. While applying upward pressure, use a 5/16 nut driver and screw the four 5/16 headed screws back in the bottom of the front panel. HOW TO RAISE TOP ASSEMBLY 1. Remove the two 5/16-headed screws located at the upper left and right corner of the edge of the cabinet. These two screws will allow access to the interior of the machine. Set these two screws aside separate from the other four screws because they may be different on your machine. 2. Lift up on the front of the top until the two front clips have cleared the edge of the cabinet. NOTE: Secure the lid to the top panel with a piece of tape or some other means. Once the top raised vertically, the lid might open and fall backwards. This could damage the lid or cause it to become detached from the top. 3. Pull the plastic top assembly towards you an inch to free up the hinges on the back. Then lift the top until you can gain access to the rear wall of the cabinet. Note: Again, secure the top so it will remain open while you are working in this area. If the top is not secured, it could fall closed while you are working in this area. ACCESSING THE MOTOR CONTROL BOARD 1. First unplug the machine from its power source. 2. Raise top assembly 3. The motor control board is now accessible. The location of the board is on the rear upper right corner of the cabinet. REPLACE DRIVE BELT 1. Remove the front panel as directed under REMOVE FRONT PANEL. 2. Remove belt and inspect pulleys for wear and tightness. 3. Install new belt on pulleys, check belt tension and adjust as necessary. Install front panel on Extractor as directed under INSTALL FRONT PANEL and plug power cord into electrical receptacle. 9


10 REPLACE PUMP 1. Remove the front panel as directed under REMOVE FRONT PANEL. 2. Remove sump and drain hoses from pump (with pliers) using a pan to catch any trapped water. 3. Remove wires from pump. 4. Remove two bolts from pump and remove pump from Extractor. 5. Install wires on new pump, install pump on Extractor, reconnect sump and drain hoses on pump and reinstall front panel as directed under INSTALL FRONT PANEL. Plug power cord into electrical receptacle. REPLACE DRIVE BELT 1. Remove the front panel as directed under REMOVE FRONT PANEL. 2. Remove belt and inspect pulleys for wear and tightness. 3. Install new belt on pulleys, check belt tension and adjust as necessary. Install front panel on the Extractor as directed under INSTALL FRONT PANEL and plug power cord into electrical receptacle. REPLACE PUMP 1. Remove the front panel as directed under REMOVE FRONT PANEL. 2. Remove sump and drain hoses from pump (with pliers) using a pan to catch any trapped water. 3. Remove wires from pump. 4. Remove two bolts from pump and remove pump from Extractor. 5. Install wires on new pump, install pump on Extractor, reconnect sump and drain hoses on pump and reinstall front panel as directed under INSTALL FRONT PANEL. Plug power cord into electrical receptacle. REPLACE DRIVE MOTOR 1. Remove the front panel as directed under REMOVE FRONT PANEL. 2. Remove belt adjustment bolt and drive belt from motor. 3. Remove clip and washer from pivot shaft. Slide shaft to rear far enough to allow motor to come off shaft. 4. Note position of wiring plugs on motor and remove plugs from motor. 5. Install wiring plugs on new motor as noted, position motor on shaft, slide shaft into position and secure with washer and clip. Install drive belt adjustment bolt on motor. Install drive belt, adjust belt tension and tighten adjustment bolt. Install front panel on clothes washer as directed under INSTALL FRONT PANEL and plug power cord into electrical receptacle. 10

11 REPLACE TIMER 1. Disconnect the Extractor from the power source. 2. Remove the six screws that hold the control panel to the top. 3. Allow the control panel to slide down, pull the top of the control panel out and lift up. 4. Lay the control panel face down on the top while removing the timer. 5. To release the setting knob pull out on the black shaft extending through the timer. Pull off indicator dial. 6. Remove the timer wire harness connection. Lift up locking tap and pull out on the harness until the connector is free from the timer. 7. Note the position of the timer. The replacement will be reinstalled in the same position. 8. Remove the 5/16 headed screw that holds the timer to the control panel. 9. Lift up on timer locking tap labeled 1 and slide the complete timer to the left and remove. Install the new timer in reverse sequence. 10. Install timer mounting screw. 11. Reinstall the wire connection. Once the timer connection is fully seated, you will hear a slight click. This indicates that the locking tab is locked. 12. Replace the timer indicator dial. There is a flat on the inside of the indicator that will match the flat on the timer plastic shaft. This will align the indicator dial on the timer. 13. Install knob on timer and push black shaft extending through timer until flush with rear of timer housing. 14. Reinstall control panel to housing. Insert bottom of control panel into housing first. Then slide the panel into place and secure with six Phillips head screws. NOTE: Do not over tighten the screws or you will strip the holes and the screws will not hold. 15. Plug machine into the 120 vac power supply. REPLACE TEMPERATURE, WATER LEVEL AND WASH CYCLE SWITCHES 1. Disconnect the Extractor from the power source. 2. Remove the six screws that hold the control panel to the top. 3. Allow the control panel to slide down, pull the top of the control panel out and lift up. 4. Lay the control panel face down on the top. 5. Pull knob off switch to be replaced. Unscrew attaching nut from switch and remove switch from front control panel. Note on a piece of paper, position and color of electrical wires on switch. Remove wires from switch. 6. Install wires on new switch as noted. Install switch on control panel using nut. Reinstall control panel by reversing procedures above. Install knob on switch and plug in power cord. 11

12 REPLACE PRESSURE SWITCH 1. Disconnect the Extractor from the power source. 2. Remove the six Phillips head screws that hold the control panel to the top. 3. Allow the control panel to slide down, pull the top of the control panel out and lift up. 4. Lay the control panel face down on the top. 5. Pull up on the pressure switch that is fastened to the bottom of the control housing. 6. Remove the connectors from the switch. 7. To install a new switch, reverse the above procedures. 8. Plug power cord into electrical receptacle. REPLACE WATER VALVE 1. Disconnect the Extractor from the power source. 2. Shut off the hot and cold water supply. 3. Remove the six screws that hold the control panel to the top. 4. Allow the control panel to slide down, pull the top of the control panel out and lift up. 5. Lay the control panel face down on the top. 6. Using a 5/16 nut driver, remove the water valve hold down nut located between the two electrical coils on the valve. Lift the water valve from the control panel. 7. Note on a piece of paper, position and color of electrical wires on the water valve. Remove the wires from the valve. 8. Remove the two inlet hoses from the water valve. 9. Remove the outlet hose from the water valve. 10. Install a the new water valve on the clothes washer by reversing the above procedures. 11. Turn on both water supplies. Check for water leaks. 12. Plug the power cord into electrical receptacle. REPLACE LID LOCK SWITCH 1. Remove the front panel as directed under REMOVE FRONT PANEL. 2. Remove two screws from lid lock switch bracket and remove switch from clothes washer. 3. Note on a piece of paper, position of wiring plug on switch. Remove plug from switch. 4. Install plug on new switch as noted and install switch on Extractor. Reinstall front cover as directed under INSTALL FRONT PANEL and plug power cord into electrical receptacle. 12
13 TROUBLESHOOTING PROBLEM CAUSE CORRECTIVE ACTION Power on light does not illuminate when timer knob is pulled out. Extractor not plugged in. Electrical outlet does not have AC power. Light is burned out. Plug power cord into properly grounded receptacle. Check fuse or circuit breaker. Replace light. Lid locked light does not illuminate during spin cycle. Water does not enter the Extractor. Water flows continuously. Lid is not fully closed. Microprocessor did not properly boot up. Lid lock assembly has failed. Water on circuit board. Polarity is incorrect at receptacle. Low voltage on inverter system Light has burned out Water supply turned off. Screens in water inlet valve are plugged. Water valve has failed. Pressure switch has failed. Water level switch has failed. Water level switch hung up between high and low. Drain hose is not in stand pipe. Pressure switch has failed. Water level switch has failed. Pressure switch tube is disconnected from pressure switch. Plugged pressure switch tube. Close lid completely. Reset microprocessor, unplug machine for a minimum of 30 seconds and plug back in. Replace lid lock assembly. Dry board. Call electrician and correct. Take inverter out of sleep mode and reset microprocessor, unplug machine for a minimum of 30 seconds and plug back in. Replace light. Turn water on. Clean screens. Replace water valve. Replace pressure switch. Replace water level switch. Move switch to correct position. Place hose in stand pipe and secure. Replace pressure switch. Replace water level switch. Connect pressure tube. Remove obstruction. Extractor does not agitate. Motor control board has failed. Motor has failed. Drive belt has broken or come off the pulley. J1 connector on motor control board is not making contact. Washer plugged into Green Plug. Poor connection on timer plug. Check fuse on circuit board. Replace motor. Replace belt or reinstall drive belt. Reset connector on board. Do not use. Remove from circuit. Do not use. Remove from circuit. Reset connector. 13
14 TROUBLESHOOTING PROBLEM CAUSE CORRECTIVE ACTION Water does not drain from Extractor. Obstruction in sump area of outer tub. Obstruction in sump hose. Obstruction in pump. Obstruction in drain hose or stand pipe. Pump has failed. Stand pipe higher than seven feet. Poor connection on timer plug. Remove obstruction. Remove obstruction. Remove pump and clear obstruction. Remove obstruction. Replace pump. Shorten stand pipe. Reset connector. Extractor does not spin Motor control circuit has failed. Pressure switch has failed. Drive belt has broken or come off the pulley. Wash a larger load. Out of balance switch has tripped. Remove obstruction from pump Pump did not pump out water Check circuit breaker on back of machine. If showing white it has tripped and can be reset by pushing gently- do not force. Replace pressure switch. Replace belt or reinstall drive belt. Replace motor. Motor has failed Replace program selector switch. Program selector switch has failed. Replace lid lock. Lid lock not on/locked Extractor walks across floor. Extractor spins with a full tub of water. Remove shipping block. Level washer. Weight of washer not evenly distributed on all four leveling legs. Out of balance switch out of adjustment. Defective control board. Reverse polarity at receptacle. Defective pressure switch. Shipping block under motor not removed. Washer not leveled. Adjust leveling legs properly Adjust out of balance switch. Replace control board. Call electrician and correct. Change pressure switch. Water leaks from Extractor. Over sudsing of wash load. Rubber skirt not in correct position. Defective hose from water valve to soap dispenser. Defective drain hose. Sump hose hanger not on. Reduce amount of detergent. Do not use Ultra products. Reseat skirt into outer bezel. Replace hose. Replace drain hose and install in correct position. Reinstall sump hose hanger. Timer does not advance in prewash, wash or rinse cycles. Not enough water. Check water supply. Check inlet screens at water valve. Replace water valve. 14
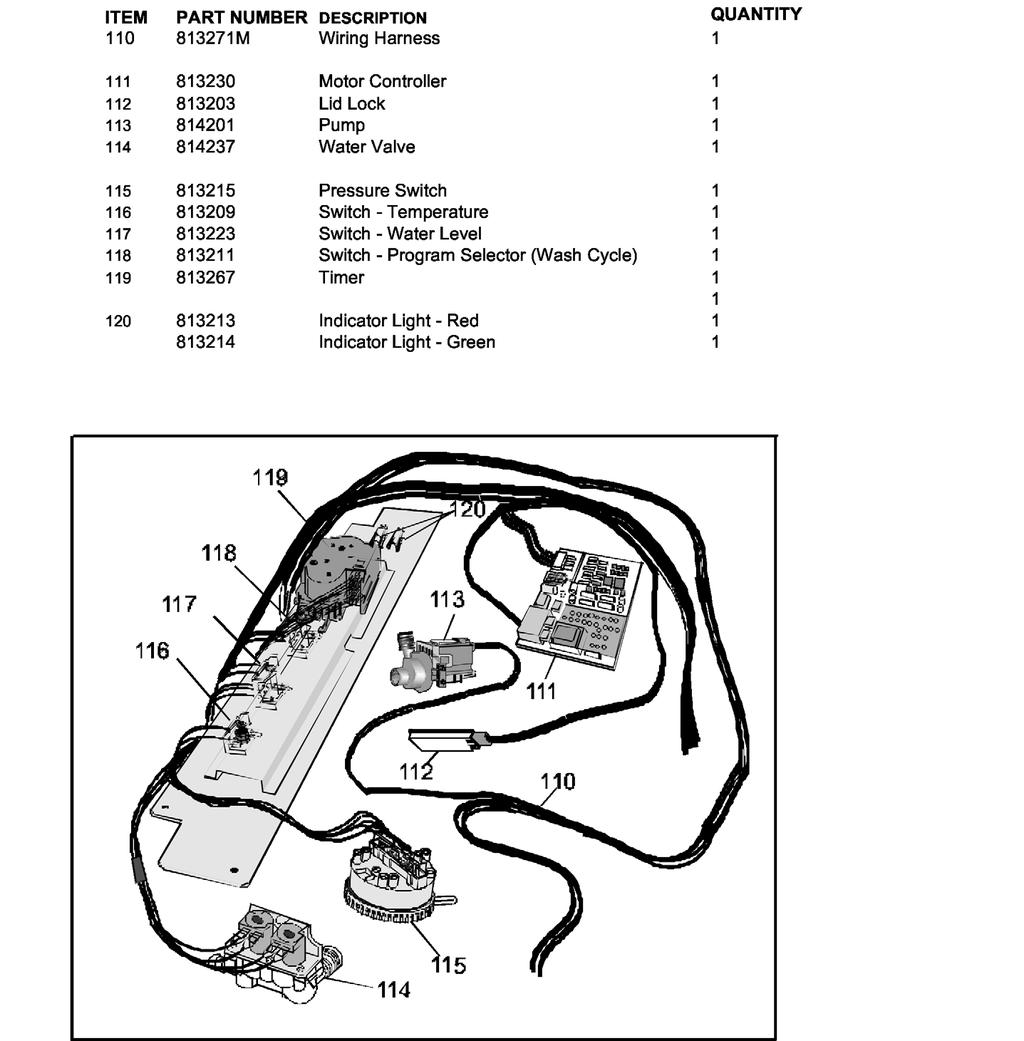
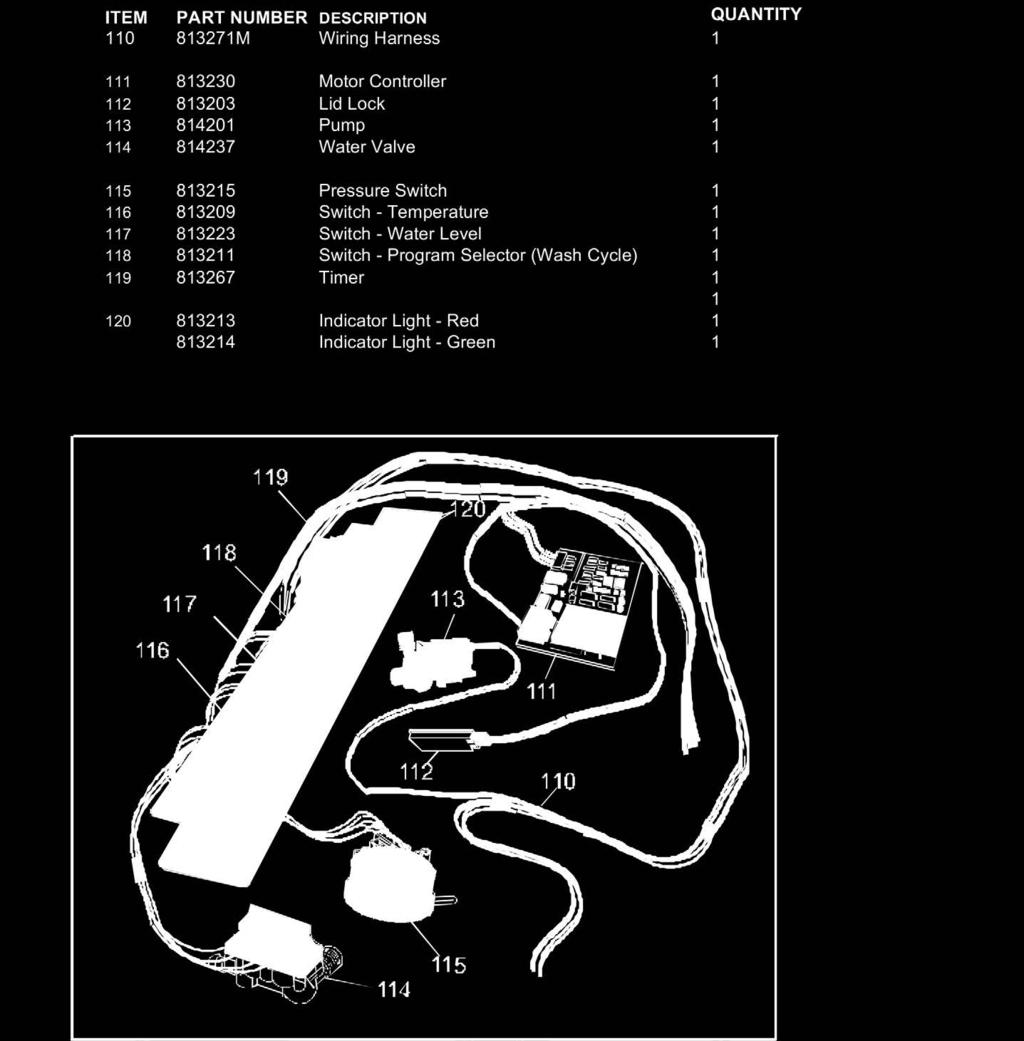
15 PARTS 15
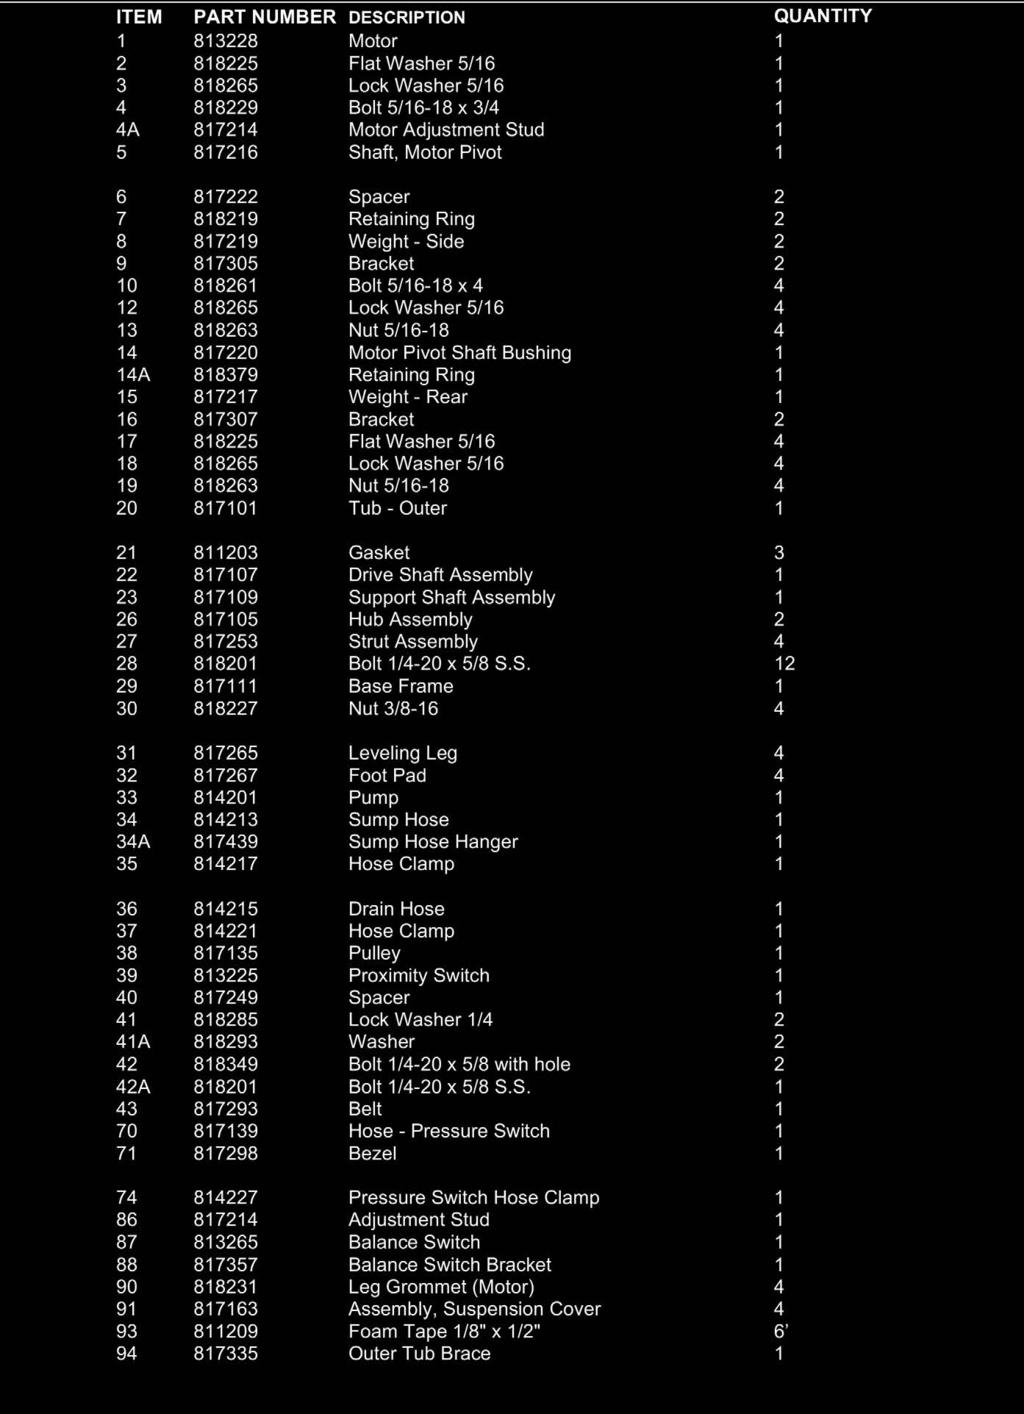
16 PARTS 16
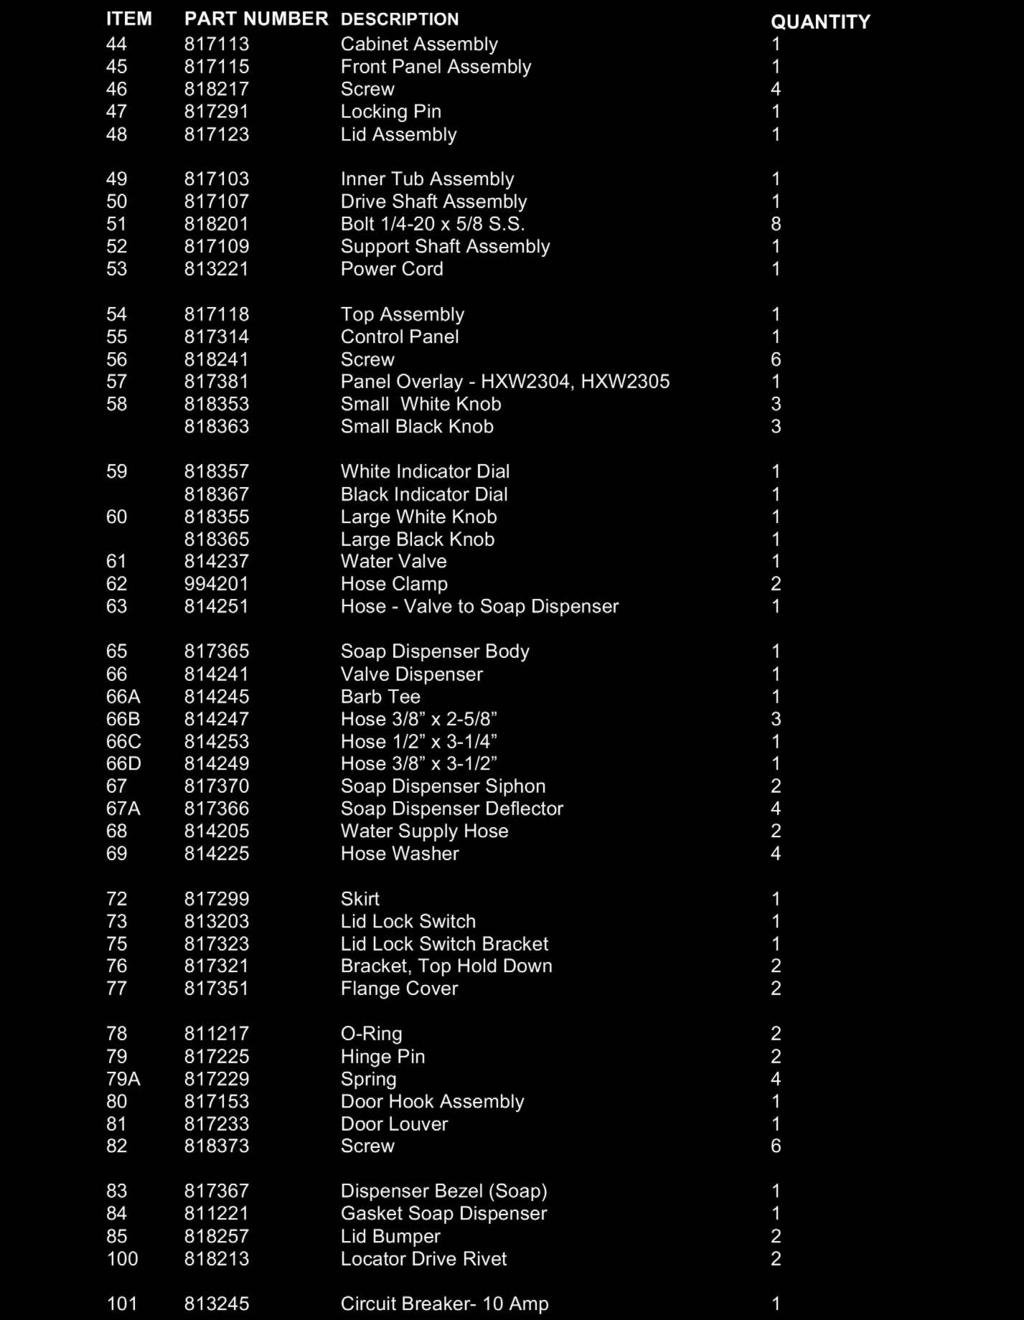
17 PARTS 17
18 PARTS 18
19 PARTS 19

20 GROVES INCORPORATED Manufacturer of Fire Fighter Racking & Storage Systems Trakk Ln. Woodstock, IL Phone: // Fax:
THE READY RACK 2 GEAR PPE DRYING CABINET. Operator s Manual & Installation Guide. Installation/Operation/Maintenance/Part Number I
 THE READY RACK 2 GEAR PPE DRYING CABINET Operator s Manual & Installation Guide Installation/Operation/Maintenance/Part Number 820220I Copy right 2016 Forward We are pleased that you have selected a Ready
Operator s Manual READY RACK PPE & HOSE DRYER. Installation/Operation/Maintenance/Parts DIMENSIONS OF THE DRYER: HEIGHT 80 WIDTH: 55 DEPTH: 31
 READY RACK PPE & HOSE DRYER DIMENSIONS OF THE DRYER: HEIGHT 80 WIDTH: 55 DEPTH: 31 WEIGHT: 520 lbs. SHIP WEIGHT: 630 lbs. Operator s Manual Installation/Operation/Maintenance/Parts Part Number: PPEHD IDC
WASHER USER INSTRUCTIONS
 WASHER USER INSTRUCTIONS Before calling for assistance or service, please check Troubleshooting. It may save you the cost of a service call. If you still need help, contact the dealer from whom you purchased
16 OUTDOOR MISTING FAN
 16 OUTDOOR MISTING FAN Model: SF-1670M READ AND SAVE THESE SAFETY INSTRUCTIONS BEFORE USE IMPORTANT SAFETY INSTRUCTIONS When using electrical appliances, basic precautions should always be followed to
Ultra Lightweight Household & Commercial Vacuums
 Owner s Manual Ultra Lightweight Household & Commercial Vacuums Save These Instructions Index Important Safety Instructions............................................................. 2 Polarization Instructions................................................................
G-7s. Instruction Manual. G-Series Cooler COUNTERTOP COOLER. Part No.11IPA
 G-Series Cooler COUNTERTOP COOLER Part No.11IPA-061000 Instruction Manual FOR YOUR FUTURE REFERENCE This easy-to-use manual will guide you in getting the best use of your cooler. Remember to record the
(The chances are you re never going to read me) Owner s Manual HEAVY DUTY SHD-1T.
 Owner s Manual HEAVY DUTY SHD-1T.") (The chances are you re never going to read me) Owner s Manual HEAVY DUTY SHD-1T www.simplicityvac.com Index Important Safety Instructions............................................................ 2
(The chances are you re never going to read me) Owner s Manual HEAVY DUTY SHD-1T www.simplicityvac.com Index Important Safety Instructions............................................................ 2
Owner s Manual CPU-1QD CPU-1 CPU-1T CPU-2 CPU-2T HEAVY DUTY UPRIGHT VACUUMS. Save These Instructions
 Owner s Manual HEAVY DUTY UPRIGHT VACUUMS CPU-1QD CPU-1 CPU-1T CPU-2 CPU-2T Save These Instructions Index Important Safety Instructions.... 2 Polarization Instructions....3 Grounding Instructions.....
Use & Care Guide COMPACTWO SPEED AUTOMATIC WASHER LPR6244A LPR4231A. Model and serial -number plate (under lid) instructions
 instructions") Use & Care Guide Model and serial -number plate (under lid) -Lid instructions Load size selector (model LPR6244A) Basket Agitator Tub COMPACTWO SPEED AUTOMATIC ER LPR6244A LPR4231A Contents Page Important
Use & Care Guide Model and serial -number plate (under lid) -Lid instructions Load size selector (model LPR6244A) Basket Agitator Tub COMPACTWO SPEED AUTOMATIC ER LPR6244A LPR4231A Contents Page Important
User s Manual and Operating Instructions
 User s Manual and Operating Instructions Model Numbers: PT-18W-DDF-A, PT-20F-DDF-A, PT-20S-DDF, PT-24O-DDF, PT-24-DDF, PT-24-DDF-F, PT-30-DDF, PT-30P-DDF-A, PT-30P-DDF-AF READ AND SAVE THESE INSTRUCTIONS
READ AND SAVE THESE INSTRUCTIONS READ CAREFULLY BEFORE ATTEMPTING TO ASSEMBLE, INSTALL, OPERATE OR MAINTAIN THE PRODUCT DESCRIBED. PROTECT YOURSELF AN
 READ AND SAVE THESE INSTRUCTIONS READ CAREFULLY BEFORE ATTEMPTING TO ASSEMBLE, INSTALL, OPERATE OR MAINTAIN THE PRODUCT DESCRIBED. PROTECT YOURSELF AND OTHERS BY OBSERVING ALL SAFETY INFORMATION. FAILURE
User s Manual and Operating Instructions
 User s Manual and Operating Instructions Model Numbers: CL-30P-DDF, CL-20F-DDF, CL-24O-DDF, CL-30-DDF READ AND SAVE THESE INSTRUCTIONS IMPORTANT: Read and understand all of the directions in this manual
π H-2268 SANITAIRE UPRIGHT VACUUM SAFETY uline.com
 π H-2268 SANITAIRE UPRIGHT VACUUM 1-800-295-5510 uline.com SAFETY PAGE 1 OF 7 NOTE: When using an electrical appliance, basic precautions should always be followed, including the following: READ ALL INSTRUCTIONS
8 lb Lightweight Vacuum Model CK LW 13/1
 TORNADO INDUSTRIES 7401 W. LAWRENCE AVENUE CHICAGO, IL 60706 (708) 867-5100 FAX (708) 867-6968 www.tornadovac.com Operations & Maintenance Manual For Commercial Use Only 8 lb Lightweight Vacuum Model CK
READY RACK HOSE WASHER
 READY RACK HOSE WASHER DIMENSIONS OF THE HOSE WASHER: HEIGHT: 40 WIDTH: 24 LENGTH: 46 WEIGHT: 510 lbs. SHIP WEIGHT: 620 lbs. SHIP SIZE: 60 x 36 x 54 Operator s Manual Installation/Operation/Maintenance/Parts
e Bath Fan with Light User s Guide
 e Bath Fan with Light User s Guide abfl100rnl, BFL125RNL Item Stock Number(s): BFL100RNL, BFL125RNL IMPORTANT INSTRUCTIONS - OPERATING MANUAL READ AND SAVE THESE INSTRUCTIONS READ CAREFULLY BEFORE ATTEMPTING
CONSUMER SERVICES TECHNICAL EDUCATION GROUP PRESENTS
 CONSUMER SERVICES TECHNICAL EDUCATION GROUP PRESENTS L-71 SinkSpa JETTED SINK Model LJD1306L JOB AID Part No. 8178201 FORWARD This Whirlpool Job Aid, SinkSpa Jetted Sink, (Part No. 8178201), provides the
e Bath Fan with Light User s Guide
 e Bath Fan with Light User s Guide abfl50uq, BFL60UQ, BFL70, BFL85 Item Stock Number(s): BFL50UQ, BFL60UQ, BFL70, BFL85 IMPORTANT INSTRUCTIONS - OPERATING MANUAL READ AND SAVE THESE INSTRUCTIONS READ CAREFULLY
G-10s. Instruction Manual. G-Series Cooler UPRIGHT COOLER. Part No.11IPA
 G-Series Cooler UPRIGHT COOLER Part No.11IPA-062800 Instruction Manual FOR YOUR FUTURE REFERENCE Thank you for using our product. This manual will guide you in getting the best use of your cooler. Remember
Owner s Guide. Powerhead Canister Vacuum Cleaner
 Owner s Guide Powerhead Canister Vacuum Cleaner INDEX 1. Important Safety Instructions 2. Components & Accessories 3. Assembly 4. How to Operate a. On/Off Switch b. Check bag indicator c. Variable suction
WASHER USER INSTRUCTIONS
 If you need assistance or service, first see the Troubleshooting section. Additional help is available by calling our Customer experience Center at 1-800-253-1301 from anywhere in the U.S.A., or write:
OPERATING INSTRUCTIONS
 OPERATING INSTRUCTIONS FOR CARPET PRO UPRIGHT VACUUMS MODELS : CPU-75, CPU-75T, CPU-85, CPU-85T Before operating the vacuum, please read these instructions completely. Index Important Safety Instructions.............................................................2
e Bath Fan with Light User s Guide
 e Bath Fan with Light User s Guide abfl125rok Item Stock Number(s): BFL125ROK IMPORTANT INSTRUCTIONS - OPERATING MANUAL READ AND SAVE THESE INSTRUCTIONS READ CAREFULLY BEFORE ATTEMPTING TO ASSEMBLE, INSTALL,
(The chances are you re never going to read me) Owner s Manual. Model S10E.
 Owner s Manual. Model S10E.") (The chances are you re never going to read me) Owner s Manual Model S10E www.simplicityvac.com 1 Contents Getting Started Important Safety Instructions 2 Polarization Instructions 3 State of California
(The chances are you re never going to read me) Owner s Manual Model S10E www.simplicityvac.com 1 Contents Getting Started Important Safety Instructions 2 Polarization Instructions 3 State of California
ULTRASONIC HUMIDIFIER With Night Light and Fragrance Diffuser
 To Buy: Visit sylvane.com or call (800) 934-9194 For Product Support: Contact Sunpentown 1-800-330-0388 ULTRASONIC HUMIDIFIER With Night Light and Fragrance Diffuser SU-2550B (Blue) SU-2550P (Pink) SU-2550V
Unpacking and removing shipping bolts. Connecting the drain line Leveling the washer Connecting to the power supply
 11 INSTALLATION Installation Overview Choosing the proper location Unpacking and removing shipping bolts Connecting the water line Connecting the drain line Leveling the washer Connecting to the power
Compact Two Speed Automatic Washers
 Compact Two Speed Automatic Washers A Note to You...2 Washer Safety...3 Parts and Features...4 Washer Installation...5 Using Your Washer...7 Starting your washer...7 Loading...8 Selecting a cycle and time...9
SERVICE MANUAL SPARE PARTS CATALOG AND EQUATOR COMBINATION WASHER-DRYER. First Edition - October Advanced Appliances.
 EQUATOR SERVICE MANUAL AND SPARE PARTS CATALOG First Edition - October 2003 COMBINATION WASHER-DRYER MODELS: EZ 1500 EZ 2500 C EZ 3600 C/CEE www.washerdryer.com Advanced Appliances Table Of Contents WARRANTY
Easy-To-Use Automatic Washers
 Easy-To-Use Automatic Washers A Note to You... 2 Washer Safety... 3 Parts and Features... 4 Operating Your Washer... 5 Caring for Your Washer... 11 Troubleshooting... 12 Requesting Assistance or Service...
þ Îñ ÊÖ Super capacity that can wash more clothes Features Full automatic washing machine GWT900AW
 Full automatic washing machine þ Îñ ÊÖ Service Manual GWT900AW Features blanket washing ea Dual drive technology and sav Pulsator type for wash efficien Super capacity that can wash Shift washing, shift
DR-180 Through the Wall Exhaust Fan PRODUCT MANUAL & INSTALLATION GUIDE
 DR-180 Through the Exhaust Fan PRODUCT MANUAL & INSTALLATION GUIDE READ AND SAVE THESE INSTRUCTIONS READ CAREFULLY BEFORE ATTEMPTING TO ASSEMBLE, INSTALL, OPERATE OR MAINTAIN THE PRODUCT DESCRIBED. PROTECT
IMPORTANT INSTRUCTIONS - OPERATING MANUAL
 IMPORTANT INSTRUCTIONS - OPERATING MANUAL Models: AK80LSL, AK100LSL Exhaust Fan READ AND SAVE THESE INSTRUCTIONS READ CAREFULLY BEFORE ATTEMPTING TO ASSEMBLE, INSTALL, OPERATE OR MAINTAIN THE PRODUCT DESCRIBED.
Installation Instructions
 Installation Instructions Before you begin... 2 Location... 2 Recommended grounding instructions... 2 Electrical requirements... 2 Exhaust requirements... 3 Water supply and drain requirements... 3 Please
Washer-Extractor. Troubleshooting. Cabinet Hardmount Mechanical Timer Refer to Page 8 for Model Numbers.
 Washer-Extractor Cabinet Hardmount Mechanical Timer Refer to Page 8 for Model Numbers Troubleshooting CHM1624C www.comlaundry.com Part No. F232202R3 November 2011 Table of Contents Safety Information...3
Summer Breeze Heater Service Manual
 Summer Breeze Heater Service Manual RSBH RSBH-SB RSBHP Revision: 1.0 Issued: 12-18-2012 Table of Contents I. Basic Assembly and Operation A. Safety Instructions... 2 B. Grounding Instructions... 3 C.
PORTABLE DEHUMIDIFIER
 PORTABLE DEHUMIDIFIER User s Manual For information or assistance, please contact: Soleus International 9451 Telstar Ave. El Monte, CA 91731 Tel: 1-888-876-5387 www.soleusair.com POWERED BY: KEEP THESE
WASHER USER INSTRUCTIONS WASHER SAFETY
 WASHER USER INSTRUCTIONS If you need assistance or service, first see the Troubleshooting section. Additional help is available by calling our Costco Support Line for KIRKLAND SIGNATURE appliances by Whirlpool
EASY-TO-USE AUTOMATIC WASHER Use & Care Guide
 EASY-TO-USE AUTOMATIC WASHER Use & Care Guide Table of Contents... 2 Model 3RLSQ8000 8316482 WASHER SAFETY...2 WASHER DISPOSAL...3 PARTS AND FEATURES...4 WASHER USE...5 Understanding Washer Cycles...5
AGITATOR V DO NOT OPERATE THE MACHINE UNTIL YOU HAVE READ ALL SECTIONS OF THESE INSTRUCTIONS IMPROPER USE OF THE MACHINE WILL VOID THE WARRANTY
 AGITATOR 20 120V INFORMATION & OPERATING INSTRUCTIONS DO NOT OPERATE THE MACHINE UNTIL YOU HAVE READ ALL SECTIONS OF THESE INSTRUCTIONS IMPROPER USE OF THE MACHINE WILL VOID THE WARRANTY 1. Always use
Installation & Operating Guide
 5-036 HOT WATER TANK Installation & Operating Guide Read all instructions thoroughly. Keep this guide for future reference. Proof of purchase is required for Warranty. Staple receipt or proof of purchase
Installation Electric Dryers Instructions 01
 Installation Electric Dryers Instructions 01 Questions? Call 800.GE.CARES (800.432.2737) or visit our Web site at: GEAppliances.com This is the safety alert symbol. This symbol alerts you to potential
Get Cleaning... What s your Vax s model number? User Guide. Carpet Washer Vax Careline: AU: NZ:
 User Guide Vax Careline: AU: 1300 361 505 NZ: 0800 800 900 Carpet Washer Get Cleaning... What s your Vax s model number? W8 W8 W0 W0 W0 W W W W W What s your serial number? (Located on the base of the
TWO SPEED AUTOMATIC WASHERS Use & Care Guide
 TWO SPEED AUTOMATIC WASHERS Use & Care Guide Table of Contents...2 3950327 www.whirlpool.com TABLE OF CONTENTS WASHER SAFETY... 3 PARTS AND FEATURES... 4 USING YOUR WASHER... 5 Understanding Washer Cycles...
RCM-77. Instruction Manual. G-Series Cooler. U.S. Patent No. 8,215,125 RECHARGE COLD MERCHANDISER
 G-Series Cooler RECHARGE COLD MERCHANDISER U.S. Patent No. 8,215,125 Instruction Manual FOR YOUR FUTURE REFERENCE This easy-to-use manual will guide you in getting the best use of your cooler. Remember
Operator s Manual SAVE THESE INSTRUCTIONS. Light Weight Upright Vacuum. Model PF60EC, PF60VC, PF61EC and PF61VC
 Operator s Manual Light Weight Upright Vacuum Model PF60EC, PF60VC, PF61EC and PF61VC READ ALL INSTRUCTIONS BEFORE USING THIS APPLIANCE SAVE THESE INSTRUCTIONS 3101 Wichita Court Fort Worth, Texas 76140-1710
User s Manual and Operating Instructions
 User s Manual and Operating Instructions Model Numbers: MAC-12F, MAC-20F-DDF, MAC-20FO-DDF, MAC-20S-DDF, MAC-24-DDF, MAC-24P, MAC-24POSC, MAC-24W, MAC-24WOSC, MAC-30W, MAC-30WOSC, MAC-30-DDF, MAC-30P-DDF,
Dual Suction System Pro-Lite
 Dual Suction System Pro-Lite INSTRUCTION MANUAL Model CFR51EC CFR LIMITED WARRANTY CFR will repair or exchange parts for your vacuum in the event of a manufacturing defect as follows: PARTS: New or comparable
CAUTION All safety information must be followed as provided in this Technical Sheet and in Service Manual RS
 Domestic Washer Technical Information 120 V, 60 Hz Models SAV2555AW* Due to possibility of personal injury or property damage, always contact an authorized technician for servicing or repair of this unit.
USER S GUIDE LAW2400. Automatic Washer W-19
 LAW2400 Automatic Washer W-19 USER S GUIDE Congratulations on your purchase of a Maytag Performa clothes washer! Your satisfaction is very important to us. Read this manual for best results. It contains
DryAire DRYING CABINET
 CONSUMER SERVICES TECHNICAL EDUCATION GROUP PRESENTS L-72 DryAire DRYING CABINET Model LMA1053L JOB AID Part No. 8178202 FORWARD This Whirlpool Job Aid, DryAire Drying Cabinet, (Part No. 8178202), provides
WASHER USER INSTRUCTIONS
 WASHER USER INSTRUCTIONS Table of Contents ASSISTANCE OR SERVICE... 1 WASHER SAFETY... 2 WASHER USE... 3 WASHER CARE... 5 TROUBLESHOOTING... 6 WARRANTY... 8 If you need assistance or service, first see
Owner s Manual READ AND SAVE THESE INSTRUCTIONS
 16 Outdoor Misting / Oscillating Fan Model Number: AMMF16R-1 Owner s Manual READ AND SAVE THESE INSTRUCTIONS CAUTION: Before using this product, read this manual and follow all safety rules and operating
COMPACT ELECTRIC DRYER
 COMPACT ELECTRIC DRYER Model SPD1205 Use & Care Guide Before using this machine, please read and follow all safety rules and operating instructions. Felix Storch, Inc. Summit Appliance Division 770 Garrison
High-Velocity Floor Fan
 High-Velocity Floor Fan Owner s Manual WARNING: Read carefully and understand all ASSEMBLY AND OPERATION INSTRUCTIONS before operating. Failure to follow the safety rules and other basic safety precautions
RCM-77. Instruction Manual. G-Series Cooler. Manual is for the following model: RCM-77-N23EB. U.S. Patent No. 8,215,125 RECHARGEABLE COLD MERCHANDISER
 G-Series Cooler RCM-77 RECHARGEABLE COLD MERCHANDISER Manual is for the following model: RCM-77-N23EB U.S. Patent No. 8,215,125 Instruction Manual Manual is for the following model: RCM-77-N23EB Instruction
WASHING MACHINE SERVICE MANUAL CAUTION READ THIS MANUAL CAREFULLY TO DIAGNOSE PROBLEMS CORRECTLY BEFORE SERVICING THE UNIT.
 WASHING MACHINE SERVICE MANUAL CAUTION READ THIS MANUAL CAREFULLY TO DIAGSE PROBLEMS CORRECTLY BEFORE SERVICING THE UNIT. MODEL : WM2240C* Jul. 2010 PRINTED IN KOREA P/No. : MFL30599179 CONTENTS 1.SPECIFICATIONS...
Stand Fan. English. Owner s Guide. Model F R
 Digital Oscillating Stand Fan Owner s Guide English Model F-7508 61302-01 R20151201 CONTENTS Safety Precautions... 3 Fused Plug... 4 Fan Assembly... 5 Operating Instructions... 6 Care and Maintenance...
Operator s Manual. Wet/Dry Vacuum with Detachable Blower 12 Gallon Model No. VBV1210 FOR YOUR SAFETY
 Wet/Dry Vacuums Operator s Manual Wet/Dry Vacuum with Detachable Blower 12 Gallon Model No. VBV1210 FOR YOUR SAFETY Read and understand this manual before use Keep this manual for future reference www.vacmaster.com
GCG-9. Instruction Manual. G-Series Cooler. Manual is for the following models: GCG-9-N13EB G-9-N13EB GCG-9-B13EB UPRIGHT COOLER
 G-Series Cooler UPRIGHT COOLER Manual is for the following models: -N13EB G-9-N13EB -B13EB Instruction Manual FOR YOUR FUTURE REFERENCE This easy-to-use manual will guide you in getting the best use of
ULTRASONIC HUMIDIFIER
 To Buy: Visit www.sylvane.com or call (800) 934-9194 For Product Support: Contact Sunpentown at 1-800-330-0388 ULTRASONIC HUMIDIFIER [ADORABLE MONKEY] To prolong the life of this humidifier, using distilled
CATALINA FIRE TABLE ASSEMBLY INSTRUCTIONS
 CATALINA FIRE TABLE ASSEMBLY INSTRUCTIONS CSA Model 98300 DRF01000 Installer: Leave these instructions with consumer. Consumer: Keep these instructions for future reference. DANGER If you smell gas: 1.
HAIER WASHING MACHINE. Service Manual PART # WD HAIER AMERICA TRADING, LLC
 HAIER WASHING MACHINE Service Manual PART # WD-8888-83 HAIER AMERICA TRADING, LLC www.haieramerica.com 1 XQJ100-96 Full automatic agitating washer Service Manual HLT20E(United States) LAH1212(Mexico) LAH1214(Mexico)
WASHER USER INSTRUCTIONS
 If you need assistance or service, first see the Troubleshooting section. Additional help is available by calling our Customer Interaction Center at 1-800-253-1301 from anywhere in the U.S.A., or write:
GCG-10. Instruction Manual. G-Series Cooler. Manual is for the following models: GCG-10-N33EB G-10-N33EB UPRIGHT COOLER
 G-Series Cooler GCG-10 UPRIGHT COOLER Manual is for the following models: GCG-10-N33EB G-10-N33EB Instruction Manual Manual is for the following models: GCG-10-N33EB G-10-N33EB Instruction Manual GCG-10
SERVICE MANUAL WASHING MACHINE
 Website:http://www.LGEservice.com E-mail:http://www.LGEservice.com/techsup.html WASHING MACHINE SERVICE MANUAL! CAUTION READ THIS MANUAL CAREFULLY TO DIAGSE PROBLEMS CORRECTLY BEFORE SERVICING THE UNIT.
ImPress IRONING STATION
 CONSUMER SERVICES TECHNICAL EDUCATION GROUP PRESENTS L-73 ImPress IRONING STATION Model LFB2611L JOB AID Part No. 8178203 FORWARD This Whirlpool Job Aid, ImPress Ironing Station, (Part No. 8178203), provides
OPERATING INSTRUCTIONS
 CLEANMAX OPERATING INSTRUCTIONS FOR CLEANMAX STANDARD SERIES UPRIGHT VACUUMS MODELS : CMS-1T CMS-1N Before operating the vacuum, please read these instructions completely. Index Important Safety Instructions............................................................
OPERATING INSTRUCTIONS
 CLEANMAX OPERATING INSTRUCTIONS FOR CLEANMAX PRO SERIES UPRIGHT VACUUMS MODELS : CMPS-1T CMPS-1N CMPS-QD CMPS-QDZ Before operating the vacuum, please read these instructions completely. Index Important
User s Manual & Operating Instructions
 User s Manual & Operating Instructions Model Numbers REM-03-240-GH / REM-05-240-GH CONSUMER: READ AND SAVE THESE INSTRUCTIONS Use this heater only as described in this manual. Any other use not recommended
- website: Vax Ltd., Kingswood Road, Hampton Lovett, Droitwich, Worcestershire WR9 0QH, UK
 V-026PT User Guide.qxd 7/9/06 15:13 Page 12 EEC STATEMENT OF COMPLIANCE Manufacturer/EEC importer: Vax Limited, hereby on our own responsibility, declare that the product V-026PT is manufactured in compliance
ROTARY CONTROL AIR CONDITIONER
 USE & CARE MANUAL NOTE: This USE & CARE MANUAL provides specific operating instructions for your model. Use the room air conditioner only as instructed in this USE & CARE MANUAL. These instructions are
FM740 INSTRUCTION MANUAL VACUUM CLEANER. Contents HOUSEHOLD USE ONLY
 INSTRUCTION MANUAL VACUUM CLEANER FM70 Contents IMPORTANT SAFETY INSTRUCTIONS NAMES OF EACH PART PREPARATIONS BEFORE USE USING THE VACUUM CLEANER USING THE ATTACHMENTS EMPTYING THE DUST COMPARTMENT CLEANING
Operations and Parts Manual
 Canister Vacuums Hospital Vac Operations and Parts Manual Models: S9HOSPITAL 2 IMPORTANT SAFETY INSTRUCTIONS When using an electrical appliance, basic precaution must always be followed, including the
Installation Instructions
 Instructions for Topload Washers Original Instructions Keep These Instructions for Future Reference. CAUTION: Read the instructions before using the machine. (If this machine changes ownership, this manual
HW-17 Record Cleaning Machine Setup and Instruction Manual
 HW-17 Record Cleaning Machine Setup and Instruction Manual VPI Industries, Inc., 77 Cliffwood Ave. #3B, Cliffwood, NJ 07721 Phone: 732-583-6895, Email: Sales@vpiindustries.com http://www.vpiindustries.com
Installation. Leveling
 Your refrigerator was packed carefully for shipment. Remove and discard shelf packaging and tape. Do not remove the serial plate. Location Do not install refrigerator near oven, radiator or other heat
20-GALLON MOBILE PARTS WASHER OWNER S MANUAL
 20-GALLON MOBILE PARTS WASHER OWNER S MANUAL WARNING: Read carefully and understand all INSTRUCTIONS before operating. Failure to follow the safety rules and other basic safety precautions may result in
60In. Ceiling Fan. Owner s Manual
 60In. Ceiling Fan Owner s Manual WARNING: Read carefully and understand all ASSEMBLY AND OPERATION INSTRUCTIONS before operating. Failure to follow the safety rules and other basic safety precautions may
30 Professional Cooling Unit. Model Number: XC3000. Owner s Manual READ AND SAVE THESE INSTRUCTIONS
 30 Professional Cooling Unit Model Number: XC3000 Owner s Manual READ AND SAVE THESE INSTRUCTIONS CAUTION: Before using this product, read this manual and follow all safety rules and operating instructions.
PUREPOWER SERIES CENTRAL VACUUM POWER UNITS PP500, PP600 & PP650
 USER GUIDE PUREPOWER SERIES CENTRAL VACUUM POWER UNITS PP500, PP600 & PP650 AB0039 FOR RESIDENTIAL USE ONLY!! MODELS SFDB-DQ, SFDB-DR AND SFDB-DS 30042509E IMPORTANT SAFETY INSTRUCTIONS SAVE THESE INSTRUCTIONS
PUREPOWER SERIES CENTRAL VACUUM POWER UNITS PP500, PP600 & PP650
 USER GUIDE PUREPOWER SERIES CENTRAL VACUUM POWER UNITS PP500, PP600 & PP650 AB0039 FOR RESIDENTIAL USE ONLY!! BROAN-NUTONE LLC; HARTFORD, WISCONSIN WWW.NUTONE.COM 1-888-336-3948 REGISTER YOUR PRODUCT ONLINE
User Manual Box Exhaust Fan Series (Belt Drive)
") User Manual Box Exhaust Fan Series (Belt Drive) 36" Box Exhaust Fan with Three Wing Blade Box with Aluminum Shutter 54" Box with Cone 800-779-3267 sales@schaeferfan.com www.schaeferfan.com 2013 Schaefer
User Manual Box Exhaust Fan Series (Belt Drive) 36" Box Exhaust Fan with Three Wing Blade Box with Aluminum Shutter 54" Box with Cone 800-779-3267 sales@schaeferfan.com www.schaeferfan.com 2013 Schaefer
Upright Freezer Congélateur vertical Congelador vertical
 Installation and User Manual Manuel d installation et d utilisation Manual de instalación y del usuario HFU0100ACW Upright Freezer Congélateur vertical Congelador vertical Part # 0570000002 TABLE OF CONTENTS
Installation Instructions Dual Fuel Ranges
 Installation Instructions Dual Fuel Ranges E30DF74EPS E36DF76EPS E48DF76EPS 5995447082 2 Safety IMPORTANT SAFETY INSTRUCTIONS Safety Precautions Do not attempt to install or operate your unit until you
WHYNTER Compressor Cooling Beverage Refrigerator - Stainless Steel
 WHYNTER Compressor Cooling Beverage Refrigerator - Stainless Steel Model Number: JC-88 MODEL# : BR-125SD Instruction Manual Thank you for your purchase of this WHYNTER product. Please read this Instruction
Attached is Supplement three for service manual We suggest you file this with your Manual for reference.
 INTRODUCTION Attached is Supplement three for service manual 16008203. We suggest you file this with your 16008203 Manual for reference. Models covered in this manual: MAH21PD MAH21PN MAH21PR MAH21PS CONTENTS
TWO SPEED AUTOMATIC WASHERS Use & Care Guide
 TWO SPEED AUTOMATIC WASHERS Use & Care Guide Table of Contents... 2 W10096744 WASHER SAFETY...3 PARTS AND FEATURES...4 WASHER USE...5 Understanding Washer Cycles...5 Loading...5 Normal Sounds...5 Starting
Model PF 2030 Wide Area Vacuum Cleaner
 Model PF 2030 Wide Area Vacuum Cleaner OPERATING INSTRUCTIONS COMMERCIAL WIDE AREA SWEEPER VACUUM CONGRATULATIONS YOU HAVE JUST ACQUIRED A HIGH QUALITY VACUUM CLEANER. PLEASE READ THIS MANUAL CAREFULLY,
Owner s Manual Window Air Conditioner
 Owner s Manual Window Air Conditioner G17-5MCVWAC1 G16-5MCVWAC Write the model and serial numbers below for your records: Model # Serial # Date Purchased Please read the entire manual carefully to ensure
WASHER USER INSTRUCTIONS
 WASHER USER INSTRUCTIONS If you need assistance or service, first see the Troubleshooting section. Additional help is available by calling: Whirlpool Customer Interaction Centre 1-300-363-344 (Australia)
Pet. Easy Guide. VAX Ltd., Kingswood Road, Hampton Lovett, Droitwich, Worcestershire, WR9 OQH, UK - website:
 V-027P Rapide Pet User Guide 10/7/07 10:05 Page 14 EEC STATEMENT OF COMPLIANCE Manufacturer/EEC importer: VAX Limited, hereby on our own responsibility declare that the products V-027/V-027PT/V-027P/CCW-701
WHEATGRASS JUICER C O M M E R C I A L. INSTRUCTION MANUAL Model No
 COMMERCIAL PRODUCTS ATTENTION If any components of this unit are broken, do not operate properly, or for product returns, please contact Pragotrade at 1-800-814-4895 Outside the U.S. call 440-638-3131.
R20SC, R20E & R20ENT. Owner s Manual
 R20SC, R20E & R20ENT Owner s Manual Contents Getting Started Important Safety Instructions... 2 Polarization Instructions... 3 State of California Proposition 65 Warnings... 3 Description of the Vacuum...
Canister Vacuums S6EVO. Operations and Parts Manual. Models: S6EVO
 Canister Vacuums S6EVO Operations and Parts Manual Models: S6EVO 2 IMPORTANT SAFETY INSTRUCTIONS When using an electrical appliance, basic precaution must always be followed, including the following: READ
Installation Guide. 15 W./24 W. Undercounter Refrigeration
 Installation Guide 15 W./24 W. Undercounter Refrigeration Table of Contents Warnings & Important Information 3 Proper Disposal 4 Dimensions (15 W. Professional) 5 Dimensions (24 W. Professional) 6 Dimensions
Automatic Washer A
 Automatic Washer A Note to You...2 Washer Safety...3 Parts and Features...4 Using Your Washer...5 Starting Your Washer...5 Loading...6 Selecting a Cycle, Time and Temperature...7 Adding Liquid Chlorine
Authorized Replacement Parts Form EdenPURE
 QUANTITY Authorized Replacement Parts Form EdenPURE UV Vacuum Cleaner Bio SpeedCLEAN 12.1 Qt. Hepa Filter 6-pac Replacement Bags (BSCRB6)...Only $19.95 $ Bio SpeedCLEAN UV 12.1 Qt. Hepa Filter 3-pac Replacement
Navigator Upright Vacuum NV70 Series
 Navigator Upright Vacuum NV70 Series OWNER S GUIDE IMPORTANT SAFETY INSTRUCTIONS FOR HOUSEHOLD USE ONLY PLEASE READ CAREFULLY BEFORE USE If the plug does not fit fully into the outlet, reverse the plug.
Because you re not like everyone else. MISTING FAN MF18W OWNER S MANUAL
 Because you re not like everyone else. MISTING FAN MF18W OWNER S MANUAL 2 BECAUSE YOU RE NOT LIKE EVERYONE ELSE. And neither are we. Always at the forefront of our industry, our goal is to offer the best
Description of the vacuum. (The chances are you re never going to read me) Owner s Manual. models X9 & G9.
 Owner s Manual. models X9 & G9.") Description of the vacuum (The chances are you re never going to read me) Owner s Manual models X9 & G9 www.simplicityvac.com Contents IMPORTANT SAFETY INSTRUCTIONS 2 Polarization instructions 3 Description
Description of the vacuum (The chances are you re never going to read me) Owner s Manual models X9 & G9 www.simplicityvac.com Contents IMPORTANT SAFETY INSTRUCTIONS 2 Polarization instructions 3 Description