Designer Bathroom Cabinets 60cm - 120cm This very clever patented designer bathroom cabinet extractor fan is totally unique, not only in design but
|
|
|
- Poppy Blair
- 5 years ago
- Views:
Transcription

1 Instruction manual
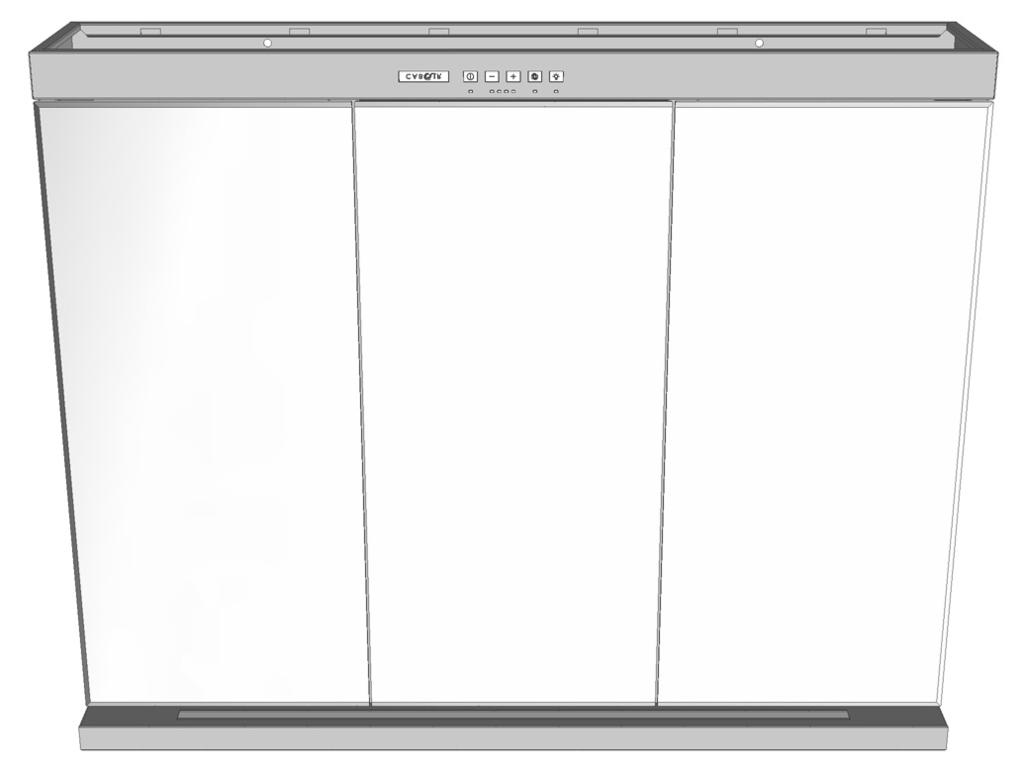
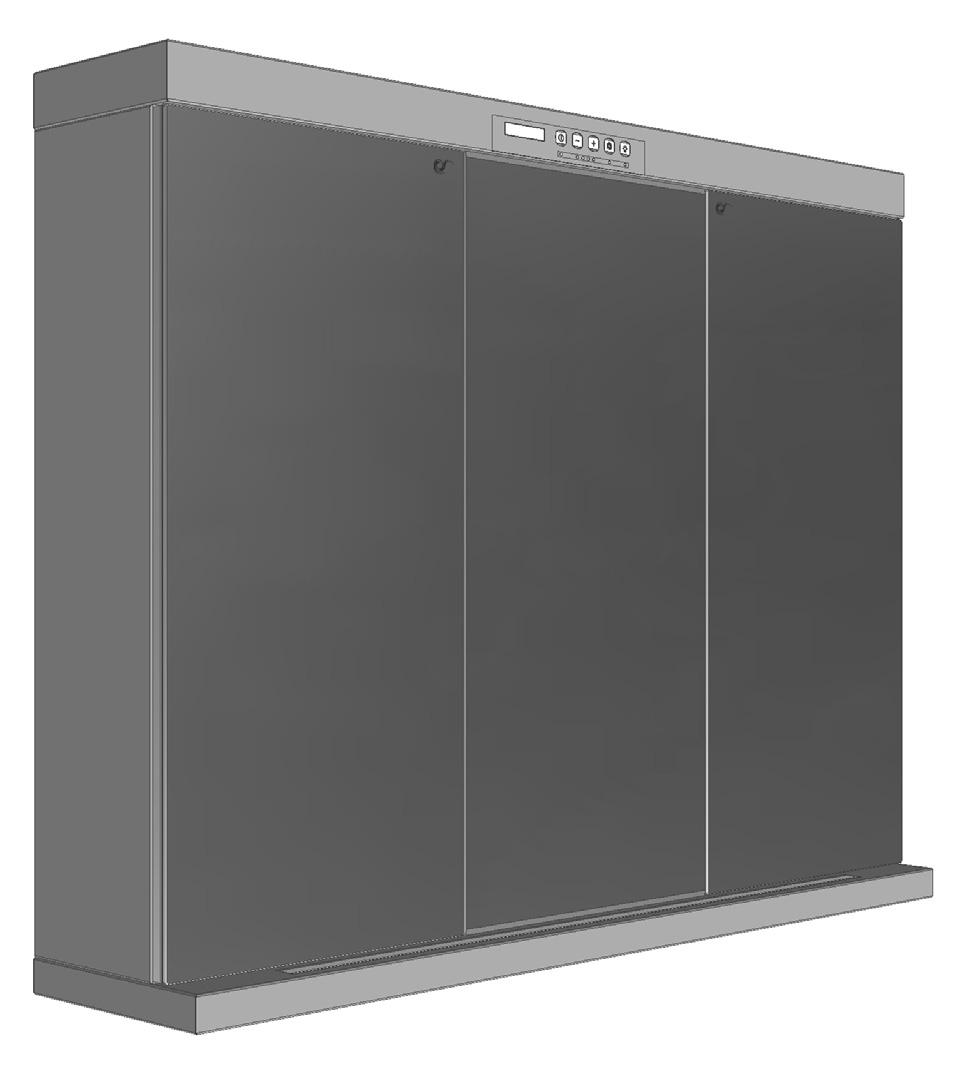
2 Designer Bathroom Cabinets 60cm - 120cm This very clever patented designer bathroom cabinet extractor fan is totally unique, not only in design but functionality. We have designed this bathroom fan to be concealed in the bathroom cabinet! we use the very best quality stainless steel on all our products. Ideally suited to be situated on an outside wall and ducted directly behind the fan thus hiding the ducting system completely. 240v motor 480 m³/hr The Cabair features LED lighting, glass shelving, touch sensitive controls and a UK plug toothbrush or shaver socket inside the cabinet. Available in three size options 600mm, 900mm and 1200mm, this bathroom cabinet has three colour choices, white black or stainless steel. The cabinet can also be used in re-circulation mode if external ducting is not possible. 2
3 INSTRUCTIONS FOR USE and PRECAUTIONS Before the fist use pay attention to what has been written in the attached manual. This appliance should not be operated by minors, children under the age of eight years old or people with learning difficulties, Children above eight years old must be supervised and given clear instruction as to the operation of this appliance. Children shall not play with the appliance. Cleaning and maintenance should only be carried out by a competent person under the strict supervision of an adult. Never use abrasive cleaning materials on the appliance. Before any cleaning or maintenance operation, disconnect the appliance from the main supply, by means of the main switch or the bipolar switch or by removing the plug. If other gas equipment or equipment which consumes oxygen from the environment is used, ventilation must be sufficient. For safe ventilation, maximum depression in the room should not exceed 4 Pa (0,04 mbar) and there must be a hole on the outside facing wall (suitably positioned and dimensioned). If in doubt, national and international standards precisely indicate the rules for the state of art installation of gas systems and for environment air change, to avoid the possibility of incomplete combustions with the risk of poisonous fumes being emitted. Keep the grease filters clean, taking into account the recommended cleaning suggestions. Replace the carbon filters (if the appliance is used as a filtering), as indicated. Do not use the appliance to suction gas, fumes, vapours or other substances different from the normal fumes from the inside environment. GENERAL In the SUCTION use extracts air, fumes and vapours from the inside environment and then expels them outside. It is not necessary to use carbon filters for purifying. In the FILTERING use extracts air, fumes and vapours from the inside environment, purifies them by means of carbon filters and then emits the purified air into the same environment. In this case the use of carbon filters is absolutely necessary. Carbon filters are available separately and can be purchased as optional accessories (see OPTIONAL ACCESSORIES). 3
4 BEFORE MOUNTING The instruction manual apply to several versions of the appliance. Accordingly you may find descriptions of individual features that do not apply to your specific appliance. Arrange for a socket outlet or standard connection to the electric mains; if the appliance is used as a suction use, it is necessary to make a hole towards the outside (i.e in the open air) for the scavenging of the fumes. It is absolutely forbidden for the user to connect the air discharge of the appliance, when used a suction use, to boiler chimneys, gas, fume or vapour scavenging chimneys or any other duct, even only ventilation ducts, which have been used or will be used for other devices. Moreover it is not permitted to connect the scavenging pipe for fumes in other adjacent rooms or wellholes, or pipes for fire-fighting devices. In any case it is necessary to respect all norms concerning scavenging of the air. Any user who does not adhere to these instructions is risking his own life and the lives of others. In this case, the manufacturer declines any responsibility. If the appliance is used as a suction use, it is necessary for qualified personnel to make a hole for ventilation on the outside wall. If the appliance is to be used as a filtering use, it is necessary to purchase carbon filters (see OPTIONAL ACCESSORIES). MOUNTING INSTRUCTIONS Mount the appliance as shown in the pictures of the M series if is used for suction use, or C series if is used for filtering use. The appliance is equipped with standard fixing material. The person who is mounting the hood should make sure that the fixing elements are right and suitable for the walls and ceilings he finds. The manufacturer declines any responsibility for damages caused by incorrect mounting. The appliance is heavy and in order to move it 2 persons are needed. The packaging material is dangerous for childen. Never allow the children to play with the packaging material. During the installation of the appliance, always wear protective handgloves to prevent injuries. DISMANTLING AND REPOSITIONING OF THE GREASE FILTERS Switch the light off and wait untill the bulbs are completely cooled down. Follow the steps as shown in the pictures. To dismantle the metal filters, press the handles, overturn the filters and remove them. To remount the metal filters, put the rear part of the metal filter into its seat, press the handle, insert the front part of the filter and release the handles. FITTING AND REMOVAL OF EVENTUAL CARBON FILTERS If you want to use the appliance as filtering it is necessary to mount the carbon filters as it is shown in the pictures of the C series. The carbon filters are OPTIONAL and they have to be bought in a separate way. 4
5 There are carbon filters that need replacement after use and carbon filters that can be regenerated. In case of use of carbon filters which can be regenerated follow the instructions enclosed to the filters. GENERAL WARNING The pipe must be heat, flame and corrosionproof. The manufacturer strongly advises against the use of reducers or pipes with different diameter to the appliance outlet pipe, and pipes made of flexible aluminium because performance is diminished and noise level increased. The end part of the pipe, on the outside of the hole on the wall, must be of such a shape to avoid rain, gusts of wind or other foreign bodies getting into the pipe. Should there be any doubt, contact anyone specialising in the installation of gas or ventilation system. ELECTRICAL CONNECTION WARNING The electrical connection can only be carried out by qualified professional personnel, using standard material and state of the art installation methods. The manufacturer declines any responsibility for installations carried out by unskilled persons and for installations which are not in conformity with the standard norms concerning electrical safety (both concerning methods and materials). ELECTRICAL TECHNICAL DATA The electrical technical data are visible inside the appliance after the removal of the filters. CONNECTION TO THE POWER SUPPLY The flexible feed cable supplied is already connected internally and emerges from the appliance near the air outlet duct. It is possible to effect two types of electric installation: fixed installation; installation by means of plug on a socket. BEFORE ELECTRICAL INSTALLATION Before connection you must: the appliance can be used only in the areas/places as shown in the mounting pictures. Please follow current regulations to identify the installation areas. check that the electrical data indicated are in conformity with the main voltage and frequency values of the building where the hood is to be installed; check that the building is fitted with electric safety systems to protect against short circuits and electric shock systems, according to the laws in force; install an electric socket (or connection point) with a bipolar switch, which has contacts with an opening of at least 3 mms; if it is wished to install the appliance with a plug, it is necessary that you have access to the plug; always turn off the main voltage supply by means of the bipolar switch before connecting and switch on again only when connections have been completed, tested and are safe. 5

6 If the light of the lamps is weak when the appliance is in stand by, then invert the phase of the plug/socket. PRECAUTIONS TO BE TAKEN IF REPAIRS ARE TO BE CARRIED OUT Repairs, including the replacement of the feed cable if necessary, are to be carried out only by qualified personnel, using standard methods, instruments and materials. Any repairs carried out by others could prove to be dangerous and could be a fire risk. FUNCTION AND USE The led points above the push buttons the motor. are showing the 4 different speeds of It turns on and off the lights. It increases the speeds of the motor. The highest speed is shown with the led flashing and after 10 minutes the motor goes automatically to speed 2. It decreases the speed of the motor. It stops the motor. INTERVAL FUNCTION: and,, and A specific function of this appliance is the Interval Function which consists in activating the motor in automatic way 10 minutes each hour at the flashing shown speed. How to activate: Keep pressing at the same time the push button and : the led point of the first speed will switch on, press again the push button, the light indicator will show the following for the speeds of the motor ; 6
7 Keep pressing within 5 seconds the push button and to confirm the speed for the motor you wish for the interval function. By pressing any push button, light excluded, the interval function is excluded. SATURATION INDICATORS OF GREASE FILTERS AND CARBON FILTERS The appliance is delivered standard in suction use: if you wish to use in filtering version it is necessary to set this function. When the metal filters need to be cleaned, you have a saturation indicator for the filters and, if the appliance is set for filtering use, when the carbon filters need to be replaced/regenerated you have a saturation indicator for the carbon filters. Saturation indicator alarm for the metal filter: acoustic signal with working motor and the point of the led of the push button is flashing. Clearing the saturation indicator alarm for the metal filter: with the motor off press twice the push button. Saturation indicator alarm for the carbon filters: acoustic signal with working motor and led of the push button is flashing. Clearing of the saturation indicator alarm of the carbon filter: press twice the push button. Setting of the filtering use: if the suction function is set up (standard delivery), with motor and lights off keep pressing for 5 seconds the push button / ; the led point of the push button will switch on for 5 seconds. Setting of the suction use: if the appliance is set for filtering use, with motor and lights off keep pressing for 5 seconds the push button / ; the led point of the push button will switch on for 5 seconds. MAINTENANCE METAL FILTERS The metal filters are used to retain the particles in suspension. For washing by hand, use hot water and soap; this can be done by hand brushing vigorously several times and then rinsing under the tap. After washing, the metal filters should be dried and re-fitted correctly. It is possible that after washing the filter will have slight change in the colour. It is advised to wash the metal filters after circa 100 hours of use of the appliance. If the metal filters are very dirty, the motor can only take in a small quantity of air, and performance is reduced; CARBON FILTERS The carbon filters at the suction outlet of the motor, are used to retain the odours. It is not necessary to use carbon filters. The use of carbon filters is necessary if you use the appliance as filtering. We advise to replace the carbon filters after circa hours of use of the appliance. The carbon filters cannot be either washed nor regenerated but need to be replaced when expired. Carbon filters do not guarantee the interchange of oxygen in the air. 7

8 CLEANING To preserve the apliance in good condition, clean this periodically following the advice given as follows. Make sure that power has been completely turned off. The detergent solution recommended is a combination of WATER and NEUTRAL LIQUID SOAP. It is of vital importance that the liquid soap should not contain any grains which could scratch the surface. The solution should be applied first onto a soft cloth which is then rubbed over the shell. It is important to follow the pattern of the satin finish with the cloth. It is absolutely forbidden to pour liquids directly onto the appliance. The cloth used should not have any buttons, zips, fasteners or anything else which could scratch the surface. The use harsh abrasive or granular products, petrol, spirits or similar products which could damage the surface of the materiall, is severely forbidden. The manufacturer will not be responsible for any damages either functional or to the appearance of the hood, caused by cleaning operations carried out using unsuitable products or unsuitable methods. ACCESSORIES The following optional accesories are available and are sold separately: ONE USE CARBON FILTERS; FILTERING KIT; CARTER TO COVER THE PIPES. IF YOU ENCOUNTER A PROBLEM Disconnect the appliance from the mains electricity supply and keep it disconnected for ca 1 minute, then reconnect. If the behaviour of the hood seems strange, read the procedure for resetting carbon and grease filters concerning the kind of control in your hood. (see FUNCTION AND USE). If the lights of the lamps is weak when the hood is in stand-by, then invert the plug. EUROPEAN DIRECTIVE MARK This appliance is marked according to the European directive 2002/96/EC on Waste Electrical and Electronic Equipment (WEEE). This norm is the frame of a European-wide validity of return and recycling of Waste Electrical and Electronic Equipment. The symbol on the product or on its packaging indicates that this product may not be treated as household waste. Instead it shall be handed over to the applicable collection point for the recycling of electrical and electronic equipment. By ensuring this product is disposed of correctly, you will help prevent potential negative consequences for the environment and human health, which could otherwise be caused 8
9 by inappropriate waste handling of this product, please contact your local city office, your household waste disposal service or the shop where you purchased the product. 9
10 WARNING! This model is equipped with standard fixing material. The person who is mounting should make sure that the fixing elements are right and suitable for the walls and ceilings he finds. The manufacturer declines any responsibility for damages caused by incorrect mounting. Do not place any objects on the top of the cabinet!

 M1 C1 Ducting")

11 Ducting from above version (fig. M series) Recirculation version (fig. C series) M1 C1 Ducting from behind version (fig. M series) M2

12 1 M3/C M4/C3

13 4 3 M5/C4 5 5 M6/C5


14 M7/C6 BACK OUTLET TOP OUTLET KNOCK OUT KNOCK OUT M8
15 Vac OK! NO! A 2,25 m 0,6 m 0,6 m 2,25 m 0,6 m <0,15 m >0,15 m M9/C7
16 B 2,25 m 2,25 m 0,6 m 0,6 m 0,6 m <0,15 m >0,15 m Please ensure that this unit is installed away from any direct water sources, showers and bath tubs. This cabinet can be installed above a sink with a minimum height clearance of 300mm.


17 13 12 M10/C M11/C9


18 FILTERING KIT A B C10 3 M12/C11
19 B A PUSH OPEN/CLOSED
20 Warranty Registration
Use and maintenance manual LA-78-ARCUS
 Use and maintenance manual LA-78-ARCUS MIN 50 mm ~2 mm 20 mm 1 2 NO Induction YES 3 5A 5B 6 4 The total power of the hob is 7.4 W. The rings will operate at full power as indicated in brackets below until
Island Hood KCH110ST/KCH900IS. User and Installation Instruction
 Island Hood KCH110ST/KCH900IS User and Installation Instruction Fig.1 Fig.2 2 Fig.3 Fig.4 3 Fig.5 Fig.6 4 Fig.7 Fig.8 5 Fig.9 Fig.10 6 Fig.11 Fig.12 7 Fig.13 Fig. 14 Fig. 15 8 Fig.16 Fig. 17 9 Fig. 18
Instructions Manual CTB CTB 9407
 Instructions Manual CTB 6407 - CTB 9407 INDEX EN RECOMMENDATIONS AND SUGGESTIONS... 3 CHARACTERISTICS... 4 INSTALLATION... 5 USE... 7 MAINTENANCE... 8 2 RECOMMENDATIONS AND SUGGESTIONS The Instructions
Instructions Manual SHC520X - SHC700X
 Instructions Manual SHC520X - SHC700X INDEX EN RECOMMENDATIONS AND SUGGESTIONS... 3 CHARACTERISTICS... 4 INSTALLATION... 5 USE... 7 MAINTENANCE... 8 2 RECOMMENDATIONS AND SUGGESTIONS The Instructions for
installation and operating instructions K224 rangehood
 installation and operating instructions K224 rangehood Fig. 1 Fig. 2 Fig. 3 Fig. 4 Fig. 5 Fig. 6 Fig. 7 Fig. 8 Fig. 9 GENERAL Carefully read the following important information regarding installation safety
INDEX RECOMMENDATIONS AND SUGGESTIONS... 4 CHARACTERISTICS... 5 INSTALLATION... 6 USE... 9 MAINTENANCE... 11
 INDEX EN RECOMMENDATIONS AND SUGGESTIONS... 4 CHARACTERISTICS... 5 INSTALLATION... 6 USE... 9 MAINTENANCE... 11 2 RECOMMENDATIONS AND SUGGESTIONS The Instructions for Use apply to several versions of this
ZEST HOOD. Instructions Manual.
 ZEST HOOD Instructions Manual www.rangemaster.co.uk INDEX EN RECOMMENDATIONS AND SUGGESTIONS... 3 CHARACTERISTICS... 4 INSTALLATION... 6 USE... 14 MAINTENANCE... 16 2 RECOMMENDATIONS AND SUGGESTIONS The
Installation and Operating Instructions. Models: T4-12LOW-9IS
 Installation and Operating Instructions Models: T4-12LOW-9IS Dear Valued Customer, Thank you and congratulations on purchasing your new Parmco appliance. All Parmco products are made to the highest quality
VH60SS 60CM VISOR HOOD STAINLESS STEEL
 VH60SS 60CM VISOR HOOD STAINLESS STEEL INSTRUCTION MANUAL Thank you for purchasing our product. We hope you enjoy using the many features and benefits it provides. Before using this product please study
EN Instruction on mounting and use
 EN Instruction on mounting and use EN - Instruction on mounting and use Closely follow the instructions set out in this manual. All responsibility, for any eventual inconveniences, damages or fires
Glass Chimney Hood. Installation & User Instructions Please keep for future reference
 Glass Chimney Hood Installation & User Instructions Please keep for future reference 4897549 4897556 Important Please read these instructions fully before installing or using These instructions contain
User and maintenance manual
 GB User and maintenance manual IMPORTANT SAFETY INSTRUCTIONS These instructions shall also be available on website: docs.whirlpool.eu. YOUR SAFETY AND THAT OF OTHERS IS HIGHLY IMPORTANT. This manual and
Stainless Steel and Glass Angled Extractor
 Stainless Steel and Glass Angled Extractor HJA2600 User & Installation Guide CONTENTS Environmental Note 3 Product information 4 4 Parts List 4 Method of Extraction 5 Installation 6 Hanging Your Extractor
Instructions for use PHPC 6.4F AM X
 EN English, 7 Instructions for use PHPC 6.4F AM X 2 3 4 5 6 English GENERAL SAFETY Before any cleaning or maintenance operation, disconnect hood from the mains by removing the plug or disconnecting the
GEH9026G Cooker Hood
 User Manual for your GEH9026G Cooker Hood 90 cm Chimney Hood in Stainless Steel NOTE: This User Instruction Manual contains important information, including safety & installation points, which will enable
Instruction manual for downdraft hood
 Instruction manual for downdraft hood Model code: BODY / DD600BK - BODY / DD900BK BODY / DD600SS - BODY / DD900SS Contact Caple on 0844 800 3830 or for spare parts www.4caple.co.uk The symbol on the product
Instructions for use
 Instructions for use These instructions are also available on the website: www.kitchenaid.eu Important instructions for safety 4 Installation 6 Safeguarding the environment 6 Troubleshooting guide 7 After-sales
Cooker Hood User Manual CCB 6254 S
 Cooker Hood User Manual CCB 6254 S Please read this user manual first! Dear Customer, Thank you for purchasing this Beko product. We hope that you get the best results from your product which has been
SL51 fresco SL35 fresco 1200 SL53 excel SL SL SL SL SLCR 83 - SL_EM41 - SLTC SLTC-EM53 90
 COMMERCIAL INFORMATION FOR THE CONSUMER GB INSTALLATION, USE AND MAINTENANCE INSTRUCTION SL51 fresco 1200 - SL35 fresco 1200 SL53 excel 900 - SL7 900 - SL7 1200 - SL19 900 SL22 900 - SLCR 83 - SL_EM41
SIL EM SIL 24 - SIL 25
 INFORMAZIONI COMMERCIALI PER I CONSUMATORI COMMERCIAL INFORMATION FOR THE CONSUMER INFORMATIONS COMMERCIALES POUR LE CLIENT INFORMACIONES COMERCIALES PARA EL CLIENTE HANDELSINFORMATIONEN FÜR DEN KUNDEN
ART cm Island Curved Glass
 ART28101 90cm Island Curved Glass [01] x 1 [02] x 1 [03] x 1 [04] x 1 [05] x 4 [06] x 1 [07] x 1 [08] x 1 [09] x 4 [10] x 4 [11] x 1 [12] x 4 (6x70mm) [13] x 4 (6.3x17x2mm) [14] x 8 (4x12x1mm) [15] x 4
Operating Instructions COOKER HOOD Contents
 HDF6.5SAB HDA6.5SAB HDF7.5SAB HDF9.5SAB HDA9.5SAB HDA7.5SAB English Operating Instructions COOKER HOOD Contents Operating Instructions,1 Warnings,7 Installation,9 GLASS controls,10 Maintenance and care,11
IN 900 BIC UK INSTRUCTION MANUAL - KITCHEN EXTRACTOR HOOD
 IN 900 BIC UK INSTRUCTION MANUAL - KITCHEN EXTRACTOR HOOD EN Before using the appliance, please carefully read this manual! 2 3 min 450mm Electrical cookers min 650mm Gas cookers min 650mm Gas cookers
Cooker Hood User Manual
 Cooker Hood User Manual HCB93042X EN 01M-8850803200-0116-02 Please read this manual first! Dear Customers! Thank you for preferring a Beko product. We hope that you get the best results from your product
USER MANUAL. Cooker Hood ZHG51250GA
 EN USER MANUAL Cooker Hood 2 ZHG51250GA EN 2 Recommendations and Suggestions The Instructions for Use apply to several versions of this appliance. Accordingly, you may find descriptions of individual features
OSC... INSTRUCTION MANUAL - KITCHEN EXTRACTOR HOOD
 OSC... INSTRUCTION MANUAL - KITCHEN EXTRACTOR HOOD EN min 450mm Electrical cookers min 650mm Gas cookers min 650mm Gas cookers 1a 1b 1c 2a 2b ELECTRICAL / GAS - 650mm 3a 3b 2 2 x 8 3c 3d 3e 3 0 1 2 3 L
"Let's provide you with a superior User Experience delivering Ease-of-Mind."
 "Let's provide you with a superior User Experience delivering Ease-of-Mind." contents 2 Safety warnings...3 For the installer...3 For the user...3 Installation...4 Unpacking...4 Location...4 Electrical
Instructions for use
 Instructions for use These instructions are also available on the website: www.kitchenaid.eu Important instructions for safety 4 Installation 6 Safeguarding the environment 6 Troubleshooting guide 7 After-sales
GB User and maintenance manual
 GB User and maintenance manual IMPORTANT SAFETY INSTRUCTIONS These instructions shall also be available on website: docs.whirlpool.eu. YOUR SAFETY AND THAT OF OTHERS IS VERY IMPORTANT This manual and
INSTRUCTIONS FOR USE. To make the most of your new oven, read the user's instructions carefully and keep them on hand for consultation in the future.
 INSTRUCTIONS FOR USE INSTALLATION...4 SAFEGUARDING THE ENVIRONMENT... 7 IMPORTANT NOTES... 7 BEFORE USING THE OVEN... 8 OVEN ACCESSORIES... 9 CARE AND MAINTENANCE... 10 TROUBLESHOOTING GUIDE... 12 AFTER
100cm Chimney Hood GB IE
 100cm Chimney Hood GB IE [01] x 1 [02] x 2 [03] x 2 [04] x 2 [05] x 3 [06] x 1 [07] x 1 1 : 1 [09] x 8 (3.9 x 32mm) [08] x 8 [10] x 4 (4 x 12mm) 100cm Chimney Hood GB IE Cooker Hood 04 FR Hotte Aspirante
LEIHDC70SC - LEIHDC70BB LEIHDC70BC. Instructions Manual.
 LEIHDC70SC - LEIHDC70BB LEIHDC70BC Instructions Manual www.rangemaster.co.uk INDEX EN RECOMMENDATIONS AND SUGGESTIONS...3 CHARACTERISTICS...4 INSTALLATION...5 USE...8 MAINTENANCE...9 2 RECOMMENDATIONS
User manual. Cooker hood GHC601 GHC901
 User manual Cooker hood GHC601 GHC901 2 ³ 50cm ³ 65cm 5x Ø 8x40 1x 1x 1x 5x Ø 5x45 1x 2x M6x20 2x Ø 2,9x6,5 2x Ø 3,5x9,5 2x Ø 14x9 1x Ø 125 mm Ø 120 mm 1X Ø 150 mm 2x 1x 1x Type 20 LONG LIFE Type 15 1X
CG60/ 70/ 80/ 90/ 100 SS/BK
 CG60/ 70/ 80/ 90/ 100 SS/BK GB IE [01] x 1 [02] x 1 [03] x 1 [04] x 2 [05] x 1 [06] x 1 [07] x 1 [08] x 4 [09] x 4 [10] x 1 [11] x 6 1 : 1 [12] x 4 [13] x 6 (3.9 x 32mm) [14] x 4 (3.4 x 10mm) CG60/ 70/
BT16.4SS-HK BT19.4SS-HK Cooker Hood
 BT16.4SS-HK BT19.4SS-HK Cooker Hood User Manual for your Baumatic User Manual for your Baumatic BT16.4SS-HK 60 cm Chimney Hood BT19.4SS-HK 90 cm Chimney Hood NOTE: This User Instruction Manual contains
Instructions for use and installation Cooker Hood. Istruzioni per l uso e l installazione Cappa. Mode d emploi et installation Hotte de Cuisine
 GB IT FR DE TR Instructions for use and installation Cooker Hood Istruzioni per l uso e l installazione Cappa Mode d emploi et installation Hotte de Cuisine Bedienungsanleitung und Einrichtung Dunstabzugshaube
User manual. Cooker hood CMH601SS CMH901SS
 User manual Cooker hood CMH601SS CMH901SS 2 50cm 65cm 1x 1x Ø3x9 5x Ø8x40 5x Ø5x45 1x 1x Ø2,9x13 Type 47 Ø 150 mm 3 1 50cm 65cm 2 3 4 5 4 1x 1x 10 6 7 8 9 1x Ø 2,9x13 Ø150 10 5 11 Ø 3x9 12 13 14 6 EN -
USER MANUAL. ICON60H Version 00. Vertical Glass Hood
 USER MANUAL ICON60H Version 00 Vertical Glass Hood [02] x 1 [01] x 1 [03] x 1 [04] x 1 [07] x 1 [05] x 1 [08] x 9 [06] x 1 [09] x 9 (4 x 30mm) [10] x 2 (3 x 10mm) Cooker hood Let's get started... These
ENGLISH INSTALLATION AND USER S MANUAL FRENCH NOTICE D INSTALLATION ET D UTILISATION ITALIAN MANUALE D ISTRUZIONE
 ENGLISH INSTALLATION AND USER S MANUAL FRENCH NOTICE D INSTALLATION ET D UTILISATION ITALIAN MANUALE D ISTRUZIONE 1 INSTALLATION AND USER S MANUAL CONTENT INTRODUCTION 03 SAFETY PRECAUTION 03 SPECIFICATION
Hamlet 60 & 80 Wall Hood
 Hamlet 60 & 80 Wall Hood Installation & User Instructions Please read these instructions carefully before installing and operating this appliance 1 Contents 1. Introduction 3 2. Health and Safety 3-4 3.
60cm Chimney Extractor
 60cm Chimney Extractor LAM2401 HJA2480 User & Installation Guide Contents Page Environmental note 3 IMPORTANT SAFETY INFORMATION 4 6 Specifications of your extractor 7 8 Dimensions 7 Specifications 7-8
USE AND CARE GUIDE WALL MOUNTED HOOD
 USE AND CARE GUIDE WALL MOUNTED HOOD MODELS: HEE92(900MM) HEE22(600MM) HEE96(600MM) HEM52(A-900MM) HEE22(F-1100MM) HEE91(A-600MM) HEE22(900MM) HEE65(900MM) HEM52(A-600MM) HEM52(A-600MM) Fig.1 Fig.2 Fig.3
Instructions for use
 Instructions for use These instruction shall be available on website docs.kitchenaid.eu Important instructions for safety 4 Installation 6 Safeguarding the environment 6 Troubleshooting guide 7 After-Sales
ISCG90SS _03 ISCG90SS
 ISCG90SS 60900355_03 ISCG90SS GB IE [01] x 1 [02] x 1 [03] x 1 [04] x 8 [05] x 1 [06] x 4 [07] x 1 [08] x 1 [09] x 1 [10] x 4 [11] x 4 [12] x 1 [13] x 4 (6x70mm) [14] x 8 (6.3x17x2mm) 1 : 1 [15] x 4 (3.9x18mm)
JLBIHD624 60cm Cooker Hood
 JLBIHD624 60cm Cooker Hood User guide 2 Cooker hood user guide Contents Contents 3 Introduction 4 Safety is important 4 In the box 4 Safety information 5 Important safety information 5 Warnings 5 Cautions
IMPORTANT SAFETY INSTRUCTIONS DANGER: WARNING:
 IMPORTANT SAFETY INSTRUCTIONS YOUR SAFETY AND THAT OF OTHERS IS PARAMOUNT This manual and the appliance itself provide important safety warnings, to be read and observed at all times. This is the attention
Operating Instructions COOKER HOOD Contents
 HXQB9.8LTI English Operating Instructions COOKER HOOD Contents Operating Instructions,1 Warnings,8 Installation,10 TBOX-GLASS controls,11 Maintenance and care,13 Troubleshooting,14 After Sales Service,16
ORT6WXA ORT9WXA Slide-out Rangehoods
 Instructions for the Use and Care and Installation of ORT6WXA ORT9WXA Slide-out Rangehoods CONTENT 1. GENERAL 2. SAFETY PRECAUTION 3.. WARNING!! 4.. INSTALLATION INSTRUCTIONS 5.. ATTENTION 6.OPERATION
SAFEGUARDING THE ENVIRONMENT IMPORTANT NOTES BEFORE USING THE OVEN OVEN ACCESSORIES CARE AND MAINTENANCE TROUBLESHOOTING GUIDE AFTER SALES SERVICE
 INSTRUCTIONS FOR USE SAFEGUARDING THE ENVIRONMENT IMPORTANT NOTES BEFORE USING THE OVEN OVEN ACCESSORIES CARE AND MAINTENANCE TROUBLESHOOTING GUIDE AFTER SALES SERVICE To make the most of your new oven,
Leonardo 90 Wall Hood
 Leonardo 90 Wall Hood Installation & User Instructions Please read these instructions carefully before installing and operating this appliance 1 Contents 1. Introduction 3 2. Health and Safety 3-4 3. Installation
Chmney Hood - Model: H91PK H91PX H101PK H101PX. COOKER HOOD - User instructions
 Chmney Hood - Model: H91PK H91PX H101PK H101PX GB COOKER HOOD - User instructions A B C Fig.1 Fig.2 Fig.3 Fig.4 Fig.5-3 - Fig.6 Fig.7 Fig.8-4 - GENERAL ENGLISH GB Carefully read the following important
TYPE: FSLA - FSLB GB INSTALLATION, USE AND MAINTENANCE INSTRUCTION
 INFORMAZIONI COMMERCIALI PER I CONSUMATORI COMMERCIAL INFORMATION FOR THE CONSUMER INFORMATIONS COMMERCIALES POUR LE CLIENT INFORMACIONES COMERCIALES PARA EL CLIENTE HANDELSINFORMATIONEN FÜR DEN KUNDEN
THE BEAUTY OF SIMPLICITY USER MANUAL
 DESIGNER HOOD MODEL: CK-SPECCHIO THE BEAUTY OF SIMPLICITY USER MANUAL Fig.1 Fig.2 Fig.3 Fig.4 Fig.5 2 Fig.6 A B Fig.7 Fig.8 Fig.9 Fig.10 Fig.11 Fig.12 Fig.13 Fig.14 3 Fig.15 Fig.16 Fig.17 Fig.18 GENERAL
Instruction Manual JLHDA cm Cooker hood
 Contents 3 Introduction 3 Safety is important 3 In the box 4 Safety information 4 Important safety information 4 Warnings 5 Cautions 5 Electrical information 6 Remote control 6 Programming the remote control
Nabucco Island Hood. Installation & User Instructions. Please read these instructions carefully before installing and operating this appliance
 Nabucco Island Hood Installation & User Instructions Please read these instructions carefully before installing and operating this appliance 1 Contents 1. Introduction 3 2. Health and Safety 3-4 3. Installation
Stainless Steel Chimney Extractor
 Stainless Steel Chimney Extractor HJA2450-2 User & Installation Guide LAMONA Appliances Dear Customer, Congratulations on your choice of a LAMONA domestic appliance which has been designed to give you
Instructions for use and installation Cooker Hood. Istruzioni per l uso e l installazione Cappa. Mode d emploi et installation Hotte de Cuisine
 GB IT FR DE TR Instructions for use and installation Cooker Hood Istruzioni per l uso e l installazione Cappa Mode d emploi et installation Hotte de Cuisine Bedienungsanleitung und Einrichtung Dunstabzugshaube
SAFEGUARDING THE ENVIRONMENT IMPORTANT NOTES BEFORE USING THE OVEN OVEN ACCESSORIES CARE AND MAINTENANCE TROUBLESHOOTING GUIDE AFTER SALES SERVICE
 31002018GB.fm Page 11 Tuesday, December 2, 2008 10:29 PM INSTRUCTIONS FOR USE SAFEGUARDING THE ENVIRONMENT IMPORTANT NOTES BEFORE USING THE OVEN OVEN ACCESSORIES CARE AND MAINTENANCE TROUBLESHOOTING GUIDE
USER MANUAL EFC60001 EFC70001 EFC90001
 USER MANUAL EFC60001 EFC70001 EFC90001 We were thinking of you when we made this product electrolux 3 RECOMMDATIONS AND SUGGESTIONS 5 CHARACTERISTICS 6 INSTALLATION 8 USE 11 MAINTANCE 12 Welcome to the
Operating Instructions COOKER HOOD Contents
 HXB9.8LT HXB6.8LT English Operating Instructions COOKER HOOD Contents Operating Instructions,1 Warnings,9 Installation,11 TBOX-LUCE controls,12 Maintenance and care,14 Troubleshooting,16 After Sales Service,18
Rigoletto 60,90 & 120 Built-In Cupboard Hood
 Rigoletto 60,90 & 120 Built-In Cupboard Hood Installation & User Instructions Please read these instructions carefully before installing and operating this appliance 1 Contents 1. Introduction 3 2. Health
CANOPY RANGEHOOD. instruction manual V3FC60SS & V3FC90SS 12 MONTH WARRANTY
 CANOPY RANGEHOOD instruction manual V3FC60SS & V3FC90SS 12 MONTH WARRANTY Contents Guide to the Appliance 2 Caring for the Environment 3 Safety Information and Warnings 4 Installation Instructions 6 Operation
Verdi 90 & 120 Ceiling Hood Re-Circulating and Ducted Installation & User Instructions
 Verdi 90 & 120 Ceiling Hood Re-Circulating and Ducted Installation & User Instructions Please read these instructions carefully before installing and operating this appliance 1 Contents 1. Introduction
UNDERMOUNT RANGEHOOD. instruction manual VPP52S & VPP90S 12 MONTH WARRANTY
 UNDERMOUNT RANGEHOOD instruction manual VPP52S & VPP90S 12 MONTH WARRANTY Contents Guide to the Appliance 2 Caring for the Environment 3 Safety Information and Warnings 4 Installation Instructions 6 Operation
Rigoletto 60,90 & 120 Built-In Cupboard Hood
 Rigoletto 60,90 & 120 Built-In Cupboard Hood Installation & User Instructions Please read these instructions carefully before installing and operating this appliance 1 Contents 1. Introduction 3 2. Health
V-ZUG Ltd. Range hood. Levante. Operating instructions
 V-ZUG Ltd Range hood Levante Operating instructions Thank you for choosing to buy one of our products. Your appliance is made to high standards and is easy to use. Nevertheless, please take the time to
ENGLISH. Contents. Technical data 10 Environment concerns 11 IKEA GUARANTEE 12
 BEJUBLAD 4 Please refer to the last page of this manual for the full list of IKEA appointed Authorized Service Centre and relative national phone number 4 Contents Safety information 4 Product description
BWT6.3GL Cooker Hood 60 cm Glass chimney hood
 User Manual for your BWT6.3GL Cooker Hood 60 cm Glass chimney hood NOTE: This User Instruction Manual contains important information, including safety & installation points, which will enable you to get
V-ZUG Ltd. Range hood DW-SE/DI-SE. Operating instructions
 V-ZUG Ltd Range hood DW-SE/DI-SE Operating instructions Thank you for choosing to buy one of our products. Your appliance is made to high standards and is easy to use. Nevertheless, please take the time
SLTC919 UNDERMOUNT RANGEHOOD INSTALLATION INSTRUCTIONS
 Congratulations on your purchase! Thank you for choosing a Sirius product. SLTC919 UNDERMOUNT RANGEHOOD INSTALLATION INSTRUCTIONS SLTC919 520 EAN # 9351116002244 SLTC919 580 EAN # 9351116002251 www.siriusbrand.com
Instruction Manual JLCHDD601/JLCHDD901 60cm/90cm Cooker hood
 Contents 3 Introduction 3 Safety is important 3 In the box 4 Safety information 4 Important safety information 4 Warnings 5 Cautions 5 Electrical information 6 Operation 6 Automatic shut-down 7 Care and
60cm Glass Chimney Cooker Hood User Manual HBG 60 X
 60cm Glass Chimney Cooker Hood User Manual HBG 60 X Please read this user manual first! Dear Customer, Thank you for purchasing this Beko product. We hope that you get the best results from your product
User Manual for your GEH6017 & GEH9017 Cooker Hood
 User Manual for your GEH6017 & GEH9017 Cooker Hood NOTE: This User Instruction Manual contains important information, including safety & installation points, which will enable you to get the most out of
90cm Chimney Extractor
 90cm Chimney Extractor LAM2412 Stainless Steel LAM2413 Black Instructions and Installation www.howdens.com/appliance-registration See back page for product serial number LAMONA Appliances Dear Customer,
EZT90BL Extractor. Installation, Use and Maintenance.
 EZT90BL Extractor Installation, Use and Maintenance Customer Care Department The Group Ltd. Harby Road Langar Nottinghamshire NG13 9HY T : 01949 862 012 F : 01949 862 003 E : customer.care@cda.eu W : www.cda.eu
INSTALLATION AND USER S MANUAL COOKER HOOD RS-600/A-S
 INSTALLATION AND USER S MANUAL COOKER HOOD RS-600/A-S RS-600 (CHS60SS)-GB-05.indd 1 6/8/2010 9:30:59 AM TABLE OF CONTENTS 1. Introduction 2 2. Safety precaution 2 3. Intended use 3 4. Parts supplied 3
VALUE SERIES SLIMLINE MULTIDECKS
 VALUE SERIES SLIMLINE MULTIDECKS GB OPERATING INSTRUCTIONS NO CFC - HCFC Code. 26.23.247 25-01-2008 Rev. 00 ENGLISH Thank you for having chosen one of our products. You certainly have made a good investment
Cooker Hood Instruction Manual
 Cooker Hood Instruction Manual Model number(s): RHGCH702B IMPORTANT: RETAIN FOR FUTURE REFERENCE Contents Safety Instructions. 3-6 Product Overview. 7 Positioning. 8 Operating modes. 9 Installation. 10-15
Ecostrad Amalfi. Wall-mounted Infrared Heater INSTALLATION & OPERATING INSTRUCTIONS. 3kg 2 Years (excludes lamp & remote control) IP65
 IP65") Ecostrad Amalfi Wall-mounted Infrared Heater INSTALLATION & OPERATING INSTRUCTIONS TECHNICAL INFORMATION: Rated Power: Heating Element: Reflector: Dimensions: Remote control: Mounting position: Warm-up
Ecostrad Amalfi Wall-mounted Infrared Heater INSTALLATION & OPERATING INSTRUCTIONS TECHNICAL INFORMATION: Rated Power: Heating Element: Reflector: Dimensions: Remote control: Mounting position: Warm-up
LA-Omaggio Operating and Maintenance guide
 LA-Omaggio Operating and Maintenance guide INSTALLATION, OPERATING AND MAINTENANCE INSTRUCTIONS FOR OMAGGIO COOKER HOOD Exhausting cooker hood. The equipment is constructed in accordance with European
CAN60 / CAN60SV _01 CAN60_CAN60SV. WARNING: Read the instructions before using the appliance.
 CAN60 / CAN60SV 60901870_01 CAN60_CAN60SV GB IE WARNING: Read the instructions before using the appliance. [01] x 1 [02] x 1 [03] x 2 [04] x 1 1 : 1 [05] x 4 (4x 32mm) [6] x 2 (3x 12mm) Cooker hood GB
UPUTE ZA UGRADNJU I UPORABU
 CROATIAN CZECH ENGLISH FRENCH GERMAN GREEK ITALIAN POLISH PORTOGUESE ROMANIAN SLOVENIAN SPANISH DUTCH UPUTE ZA UGRADNJU I UPORABU NÁVOD K POUŽITÍ A INSTALACI INSTALLATION AND USER S MANUAL NOTICE D INSTALLATION
Instructions for Use and Warranty Details. RH17-900mm Island Canopy Rangehood
 Cooking c o l l e c t i o n Instructions for Use and Warranty Details RH17-900mm Island Canopy Rangehood C ongratulations on the purchase of your new appliance. This appliance has been designed and manufactured
JLBIHD920 90cm Chimney Hood
 JLBIHD920 90cm Chimney Hood User guide 2 Cooker hood user guide Contents Contents 3 Introduction 4 Safety is important 4 In the box 4 Safety information 5 Important safety information 5 Warnings 5 Cautions
Instructions for the Use and Care and Installation of BRU5G BRU7G. Under Cupboard Rangehood.
 Instructions for the Use and Care and Installation of BRU5G BRU7G Under Cupboard Rangehood. Dear Customer You will find that the modern look of your Blanco rangehood blends in perfectly with your kitchen
Cooker Hood Instruction Manual
 Cooker Hood Instruction Manual Model number(s): RHSCH601SS/B & RHSCH901SS/B IMPORTANT: RETAIN FOR FUTURE REFERENCE Contents Safety Instructions. 3-6 Product Overview. 7 Positioning. 8 Operational modes.
EVG Extractors. Manual for Installation, Use and Maintenance
 EVG Extractors Manual for Installation, Use and Maintenance Customer Care Department The Group Ltd. Harby Road Langar Nottinghamshire NG13 9HY T : 01949 862 012 F : 01949 862 003 E : service@cda.eu W :
Cooker Hood LA-72-CAN.
 Cooker Hood LA-72-CAN EN www.luxairhoods.com WARNINGS Safety This equipment can be used by children aged 8 or more, people with physical, mental and sensory disabilities or inexperienced users it they
BWTC6510GL Cooker Hood 60 cm Glass cooker hood in stainless steel. BWTC9510GL Cooker Hood 90 cm Glass cooker hood in stainless steel
 User Manual for your BWTC6510GL Cooker Hood 60 cm Glass cooker hood in stainless steel BWTC9510GL Cooker Hood 90 cm Glass cooker hood in stainless steel NOTE: This User Instruction Manual contains important
Instructions for use and installation Cooker Hood. Istruzioni per l uso e l installazione Cappa. Mode d emploi et installation Hotte de Cuisine
 GB IT FR DE TR SE Instructions for use and installation Cooker Hood Istruzioni per l uso e l installazione Cappa Mode d emploi et installation Hotte de Cuisine Bedienungsanleitung und Einrichtung Dunstabzugshaube
Stainless Steel Chimney Extractor
 Stainless Steel Chimney Extractor User & Installation Guide LAM2404 LAMONA Appliances Dear Customer, Congratulations on your choice of a LAMONA domestic appliance which has been designed to give you excellent
EZA60BL & EZA90BL Extractors
 EZA60BL & EZA90BL Extractors Installation, Use and Maintenance Customer Care Department The Group Ltd. Harby Road Langar Nottinghamshire NG13 9HY T : 01949 862 012 F : 01949 862 003 E : customer.care@cda.eu
CSH COMBINED STORAGE HEATERS INSTALLATION INSTRUCTIONS AND USER GUIDE
 INSTALLATION INSTRUCTIONS AND USER GUIDE CSH COMBINED STORAGE HEATERS CSH12 CSH18 CSH24 CSH12A CSH18A CSH24A Please read these instructionscarefullybefore installing or using this appliance for the first
Box60/ 70/ 90. Box60_70_90 v8
 Box60/ 70/ 90 Box60_70_90 v8 GB IE [01] x 1 [02] x 2 [03] x 1 [04] x 2 [05] 60cm, 70cm x 2 90cm x 3 [06] x 1 [07] x 1 1 : 1 [09] x 6 (3.9 x 32mm) [08] x 6 [10] x 4 (3.4 x 10mm) Box60/ 70/ 90 GB IE Cooker
SAFETY INSTRUCTIONS IMPORTANT TO BE READ
 SAFETY INSTRUCTIONS EN IMPORTANT TO BE READ AND OBSERVED Before using the appliance read these safety instructions. Keep them nearby for future reference. These instructions are valid if the country symbol
66 Contents Safety warnings For the user For the installer Description of the Appliance Description of the Appliance - For DK
 DK 9160-9190 DK 9360-9390 DK 9660-9690 DK 9960-9990 DK 9090-9060 HC 5690-3360 Dunstabzugshaube Afzuigkap Hotte Cooker Hood Montage- und Gebrauchsanweisung Installatie- en gebruiksaanwijzing Notice d utilisation
FMH Range Hoods. Installation, Operation & Maintenance Instructions
 Installation, Operation & Maintenance Instructions Fourneaux de France Ltd Unit 3 Albion Close, Newtown Business Park, Poole Dorset, BH12 3LL Tel 01202-733011 Email info@fdef.co.uk www.fdef.co.uk W1103
Island Extractor. Instructions & Installation LAM
 Island Extractor LAM2850 Instructions & Installation www.howdens.com/appliance-registration See back page for product serial number Dear Customer, Congratulations on your choice of domestic appliance.
Cooker Hood CHIM60 CHIM70 CHIM90 CHIM101 CHIM110. Installation & User s instructions
 Cooker Hood CHIM60 CHIM70 CHIM90 CHIM101 CHIM110 Installation & User s instructions 2 250 20.5 167.5 A 590 : 960 260 330 Max 370 E F 304 278 42 206 167 Z B C D 230 230 Fig.1 Fig.3 G E A Z Z F B Y C D 490
READ CAREFULLY AND KEEP FOR FUTURE REFERENCE
 product safety READ CAREFULLY AND KEEP FOR FUTURE REFERENCE This product can be used by children aged 8 years and above, and persons who require supervision, provided: they are familiar with the hazards