Crestline Dampening System
|
|
|
- Barrie May
- 5 years ago
- Views:
Transcription

1 Crestline Dampening System Installation Instructions Hamada 500, 600, 700, E-47, SU47 Series Parent Press X /2001 Rev-C 2593
2 GENERAL INFORMATION ATTENTION CRESTLINE DAMPENER OWNER! Accel Graphic Systems provides parts and service through its authorized distributors and dealers. Therefore, all requests for parts and service should be directed to your local dealer. The philosophy of Accel Graphic Systems is to continually improve all of its products. Written notices of changes and improvements are sent to Accel Graphic Systems' Dealers. If the operating characteristics or the appearance of your product differs from those described in this manual, please contact your local Accel Graphic Systems Dealer for updated information and assistance. Always update your dampener when improvements are made available, especially those related to safety. YOUR AUTHORIZED CRESTLINE DEALER IS: THE SERIAL NUMBER OF YOUR CRESTLINE DAMPENER(S) IS: SAFETY INFORMATION FOR YOUR SAFETY, DO NOT DISENGAGE OR REMOVE ANY GUARDS FROM THE CRESTLINE DAMPENER. THE DAMP- ENER CONTAINS SOME INWARD ROTATING ROLLER NIPS THAT CAN CAUSE INJURY IF LEFT UNGUARDED. 2
3 BASIC CONFIGURATION OF CRESTLINE AND ROLLER PRESSURES a. 3/16" (5mm) P GENERAL INFORMATION b. 1/8" (3mm) - 5/32" (4mm) M I O F c. 5/32"(4mm) Plate Cylinder Adjustments a. Pan to Metering b. Metering to Intermediate c. Form to Plate Roller Description P = Pan M = Metering I = Intermediate O = Oscillator F = Form TERMINOLOGY OPS = Operator's Side NOPS = Non Operator's Side TECHNICAL ASSISTANCE For technical assistance during the installation, please contact: ACCEL GRAPHIC SYSTEMS Indian Trail Dallas, TX (972) Fax (800) accel@dallas.net WEB SITE Crestline is covered by U.S. Patents and Patents Pending 3
4 GENERAL INFORMATION REQUIRED TOOLS 1. Phillips Screwdriver 2. Standard Screwdriver 3. 3/32" Allen Wrench 4. 1/8" Allen Wrench 5. 5/32" Allen Wrench 6. 7/16" Open End Wrench 7. Hammer mm Allen Wrench 9. 3 mm Allen Wrench 10. Punches mm Open End Wrench 12. Spring Hook Tool 13. Saw or Snips 4
5 GENERAL INFORMATION PRE-INSTALLATION PROCEDURES AND CHECKING THE DAMPENER FOR PARALLEL. 1. Cut the ties holding the rollers and examine rollers for gouges, scratches, or nicks. 2. Check box and parts board to make sure all pieces are present and nothing has broken in shipping. 3. Check the dampener's alignment by setting the pan roller end on a flat surface as shown. (Cutter bed works best.) If dampener rocks, it needs to be realigned. Loosen tie bar bolts at OPS and align the frames to the flat surface. Retighten bolts. 5
6 6
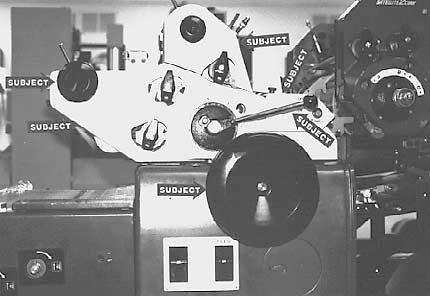
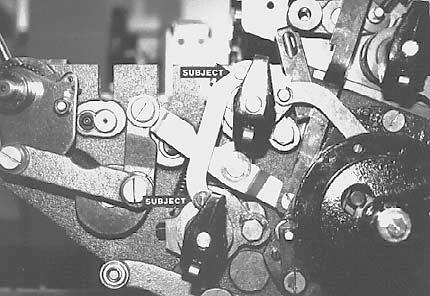
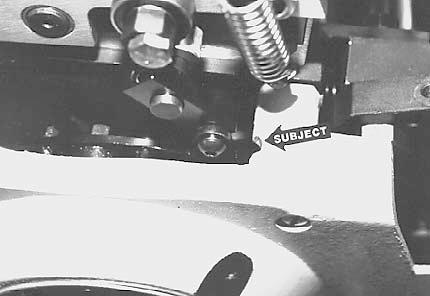
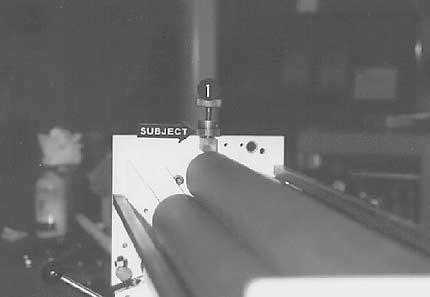
7 DISASSEMBLY 1 NOTE: For Hamada SU47 with Kompac Dampening see separate disassembly instructions. At OPS remove hand wheel, single lever handle, ink and water fountain roller knobs and side covers as indicated by subject arrow. 2 At NOPS remove ink fountain control knob and side covers indicated by subject arrows. 3 At OPS remove "E" clip (subject arrow) from water fountain linkage. 7

8 8
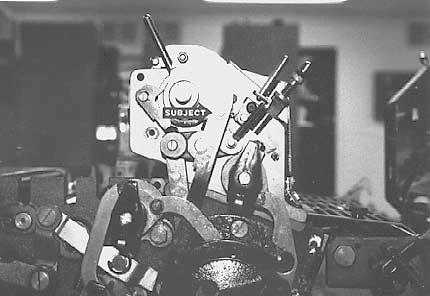
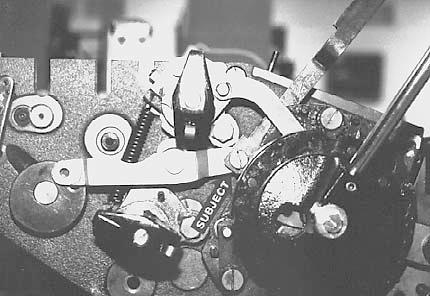
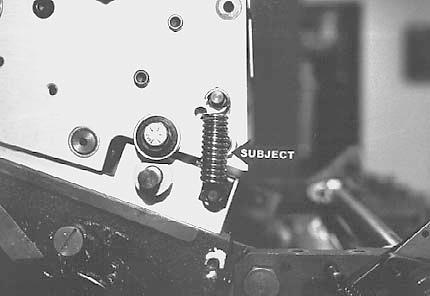
9 DISASSEMBLY 4 Remove set screw, (subject arrow) from water ductor linkage and pull out slotted head pin. 5 Remove spring (subject arrow) from water ductor mechanism. 6 Remove "E" clip (subject arrow) from water ductor mechanism and then remove stud and nut (subject arrow). The linkage will hang loosely on press side frame. 9

10 10
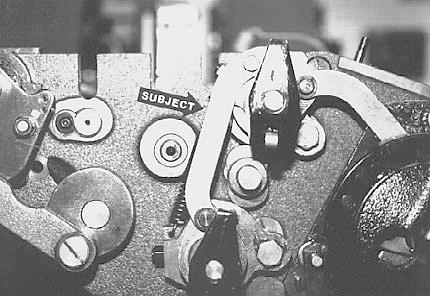
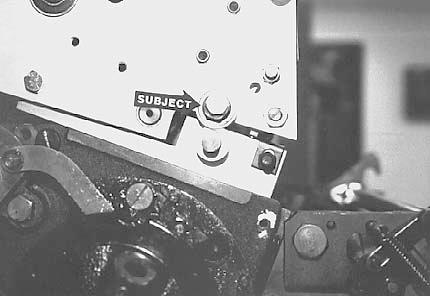
11 DISASSEMBLY 7 Remove 2 "E" clips from linkage that connects the 2 ink forms to one another and remove link. Save for reinstallation. 8 Remove slotted head stud, lock washer and nut (subject arrow). The ink fountain linkage will drop down and hang loosely on the press. Save parts for reinstallation. 9 Remove "E" clip (subject arrow) from water fountain linkage. 11

12 12
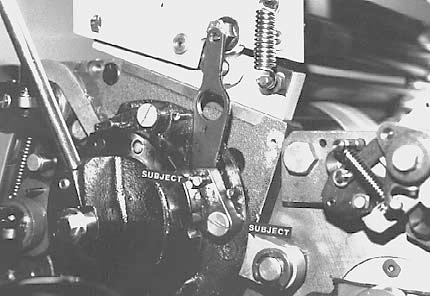
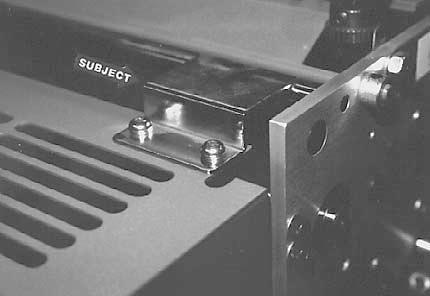
13 DISASSEMBLY 10 Drop down water ductor linkage to access "E" clip (subject arrow) and remove. Linkage will still hang loosely on press frame. 11 Temporarily replace single lever handle and place it in the "INK" position. Remove "E" clip from top of water form roller linkage (upper subject arrow). Remove slotted stud, lock washer and nut (lower subject arrow). The tumbler can then be removed and water form roller linkage can then be pulled off. Save slotted stud, lock washer, nut and tumbler for reinstallation. 12 At OPS & NOPS, remove button head bolts (subject arrow) which secure the dampener frames to the press frame. 13


14 14
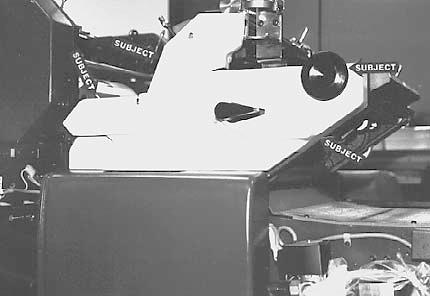
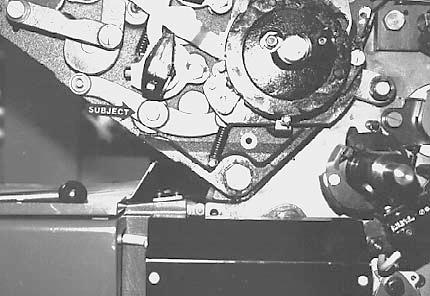
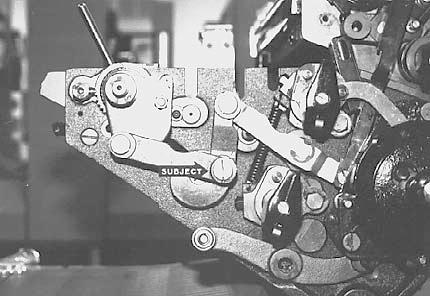
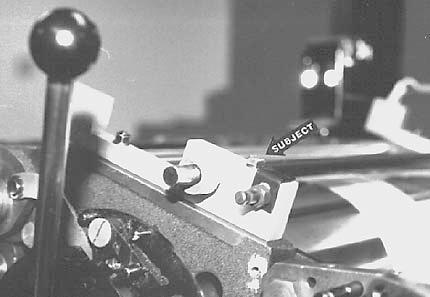
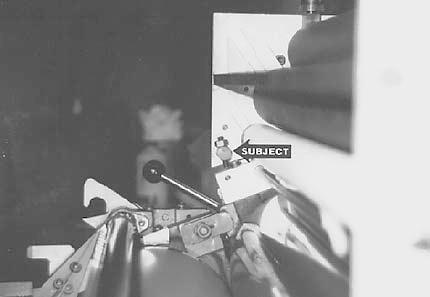
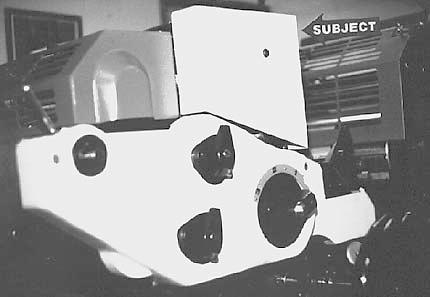
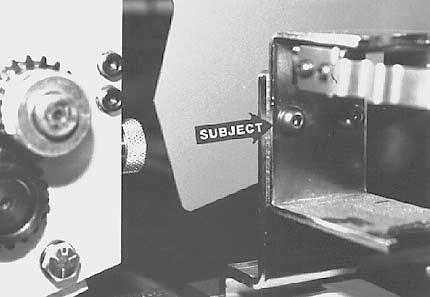
15 DISASSEMBLY 13 At NOPS remove cap screw (subject arrow) which secures water form drive gear to the dampener. After bolt is removed, push the stud through the dampener frame and remove drive gear. 14 At OPS & NOPS on inside of dampener frame locate the nut indicated by the subject arrow and remove. Save nut and lockwasher for reinstallation. 15 Unplug microswitch at NOPS and remove dampener from press. It should look like photo. 15
16 16
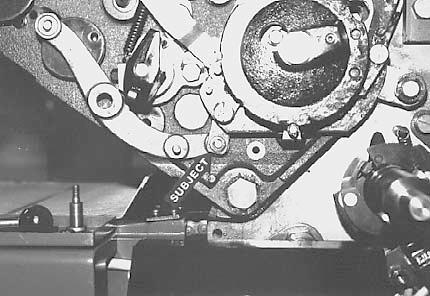
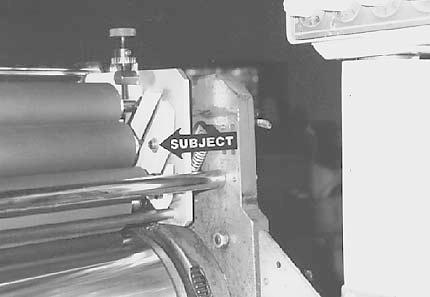
17 DISASSEMBLY 16 With dampener removed, water ductor linkage can now be pulled off the press. To remove remaining water fountain linkage, position linkage so that slotted head stud (subject arrow) clears the large black plate and remove stud, lockwasher and nut. The remaining linkage can now be pulled off the press. YOU ARE NOW READY TO INSTALL CRESTLINE. 17
18 18
19 INSTALLATION 1 NOTE: For Hamada SU47 presses skip to step 3. Reinstall ink fountain linkage as shown using spacer provided (subject arrow), to take the place of the dampener linkage removed earlier. 2 Reinstall connecting link (subject arrow) between ink form rollers. 3 The mounting base is shipped attached to the Crestline Dampener. Remove the 2 springs and bolts and pull mounting base away from dampener. Place mounting base onto press as shown. The threaded studs in the press frame will protrude through slots in the bracket. Using long hex head bolts provided (subject arrow) and lock washers and nuts saved from disassembly step 14, secure the mounting base to the press frame. Turn lift shaft by hand as you tighten base to press frame making sure it does not bind. The insides of the brackets will be approximately flush with the inside of the press frames. NOTE: For Hamada SU47 presses use the provided M5x16mm socket cap screw, lock washer, and flat washer for the upper mounting point since the threaded stud does not exit. 19

20 20
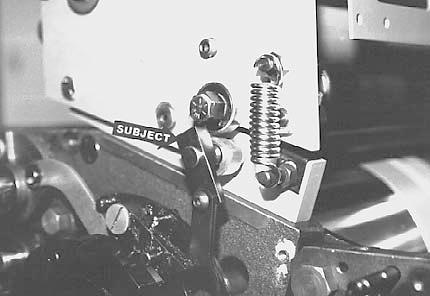
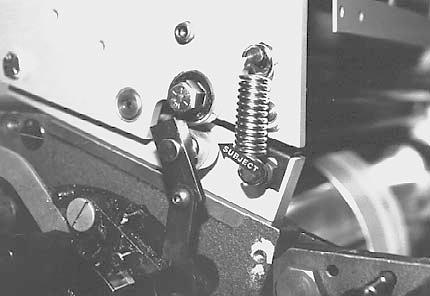
21 INSTALLATION 4 Place dampener onto press as shown. Secure to the mounting base with provided hex head bolts. Make sure mounting spool with flange goes to the NOPS. The flange will be on outside of dampener frame. After bolts are secure, move dampener up and down by hand to make sure it is moving freely. 5 At OPS & NOPS install provided extension spring (subject arrow) on studs on dampener and mounting base. 6 Make sure single lever is still in the "INK" position (2nd detent). Reinstall tumbler block (lower subject arrow) removed in disassembly step 11(or saved from SU47 disassembly). The original dampener activation link will be replaced with the new one provided. Be sure the letter "F" stamped on the link is facing outward and is right reading. Pay careful attention to the position of the tumbler before securing nut. Note that the guide pin (upper subject arrow) on the tumbler block is on outside of the detent disk. 21
22 22
23 INSTALLATION 7 Place single lever back to OFF position (fully clockwise). Slip control block (subject arrow) over end of lift shaft as shown. The milled notch will face inward. Do not tighten set screw in block at this time. Line up the hole in connecting link with threaded hole in control block and using button head bolt/spool provided, join the control block to the connecting link. 8 Place the single lever into the WATER ON position (1st detent, counterclockwise). Turn dampener lift shaft by hand until flats on lift cams (subject arrow) are parallel to tops of dampener mounting blocks. In this position tighten set screw in control block against lift shaft. Return single lever to OFF position after set screw is secure. NOTE: Photo shows single lever in OFF position to get a better view of the flats of the lift cams. 9 Take the OPS main side cover and, using a file, cut a small notch (subject arrow) to allow new dampener linkage to clear. Replace this cover on press as well as all other press side covers, knobs and levers. Move single lever from OFF to WATER and check that the linkage clears cover. Leave off dampener side covers and inker guard for now. NOTE: If this press is a model E-47, refer to Appendix A for special cover modifications. If the press is a model SU47, refer to Appendix B for special cover modifications. 23
24 24
25 INSTALLATION 10 If the press is also equipped with a satellite head: Remove the hinges from the original guard and attach the provided blanket cylinder guard to the Crestline Dampener guard as shown in the left diagram. If the press is not equipped with a satellite unit: Using the provided hardware attach the provided blanket cylinder guard to the Crestline Dampener guard as shown in the right diagram. YOU ARE NOW READY TO MAKE FINAL ADJUSTMENTS. 25
26 26
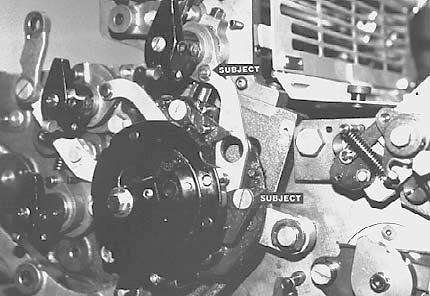
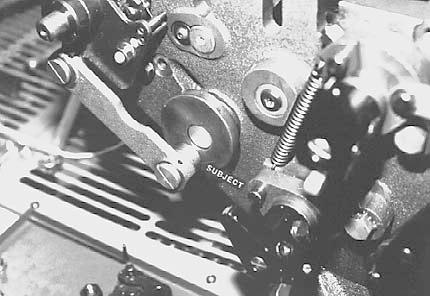
27 FINAL ADJUSTMENTS 1 Mount a metal plate to the press. Place single lever in OFF position. The lift cams will rotate so that the round side moves under the ball bearings on the dampener, lifting it off the plate. The clearance between the dampener form roller and the plate should be.030" -.040" (1mm) and parallel. To adjust, loosen lock bolt in ball bearing eccentric and turn eccentric (subject arrow). Note that the high side of the eccentric points toward delivery end of the press so that turning the OPS eccentric counterclockwise increases the dampener lift and vice-versa. At NOPS, turning the eccentric clockwise increases lift and vice versa. Retighten lock bolt when finished. NOTE: PHOTO SHOWN WITHOUT LINKAGE FOR CLARITY. P M I 2 Dab some ink on the dampener oscillator and turn on the press to distribute the ink on the dampener. Lower the dampener to the plate then move back to OFF and check the stripe. The proper setting is an even 5/32" (4mm) across the plate. Adjust the stripe by turning the screws (subject arrow) in the blocks. Turning the screws down and makes a thinner stripe and vice versa. Adjust to 5/32" (4mm) and lock the screws in place with the lock nuts. F O Plate Cylinder 5/32" (4mm) P M I 3 1/8" - 5/32" (3mm - 4mm) Adjust metering to intermediate roller pressure by loosening the hanger bolt (subject arrow) and pivoting the entire assembly towards the metering roller. (Bolts located at OPS & NOPS). Check the stripe between the metering and intermediate rollers and adjust until it is between 1/8" (3mm) and 5/32" (4mm). (The best way to check the stripe is to drop the water form to the plate and rotate the press backwards by hand). F O Plate Cylinder 27
28 28
29 FINAL ADJUSTMENTS 3/16" (4mm) P Plate Cylinder M I F O 4 Spin the ratchet gears down (subject arrow) until they stop against the cross bar (they are not yet locked to the knurled knobs). Adjust the knurled knobs (#1) to obtain an even 3/16" (5mm) stripe between the pan & metering rollers. Turning the knobs down makes a wider stripe and vice versa. To check the stripe, turn on press and run seconds then shut off and allow to sit still seconds. Quickly jogging the press forward will reveal the stripe. Once this pressure has been set, lock the ratchet gear to the knurled knob with the set screws. 5 Using the original hardware attach inker guard to hinge on dampener as shown. In some cases it will be necessary to notch inker guard at NOPS to clear Crestline water pan knob. 6 Connect wiring harness to microswitch at NOPS, making sure it clears all moving parts. Check for proper switch activation by opening and closing both dampener and inker guards. Adjust trip cams as needed. When finished, attach Crestline side covers as shown. 29
30 30
31 FINAL ADJUSTMENTS 7 Connect original water bottle cup hose to Crestline water pan. Fill bottle with water and place in cup. The water level should be approximately 1/2 way up in water pan. To adjust, loosen button head screws in cup holder (subject arrow) and move holder down to lower water level and vice versa. For Hamada SU47 presses originally equipped with Kompac Dampeners the cup holder is provided by Hamada. See the parts list included with the SU47 disassembly instructions. 31
32 BASIC OPERATION START OF DAY A. Make sure the oscillator, lower intermediate and metering rollers are in place. B. Spin knurled knobs until the shoulder on the ratchet stops against the stud bar. C. Mount plate to cylinder. Wipe down all plates before running. Pre-ink the Crestline dampener before running the plates with an extremely light coverage of ink. Dab the ink on the oscillator only. D. Place water bottle in bracket. NOTE: Accel recommends using the proper fountain solution for the plate material being run on the press. A good acid/gum etch should be used with metal plates. RUNNING DURING THE DAY A. In general, the Crestline Dampener should not have to be adjusted from job to job. The form roller setting should never be changed unless it has deviated from the factory specification of 5/32" to the plate. B. Adjustments to the amount of water fed to the plate are made by the knurled knobs that apply pressure to the metering roller. The dampener has been set up for minimum water. To increase the water to the plate, turn the knurled knobs counterclockwise 1 or 2 clicks at a time. This opens the gap between the metering and pan rollers and allows more water to the plate. C. In general, more water will only be required when going from a metal plate to an electrostatic or Silvermaster type plate. 32
33 CLEANING & MAINTENANCE WASH UPS DURING THE DAY 1. Remove bottle and drain the excess water from the pan. 2. Mount a metal plate to the press. 3. Turn on the press and squirt a small amount of press wash on the ink rollers. 4. Drop both the dampener and ink forms to the plate. In general, the dampener will pick up enough roller wash off the plate to clean itself. Apply wash directly to the dampener only when necessary. 5. Use wash up attachment as normal. The plate cylinder is being used as a bridge between the dampener and inker. Solution transfers from the dampener to the plate, plate to inker, and inker to wash up attachment. 6. Remove water pan and clean any solution left in it. 7. Be sure to wipe excess clean up solution from the ends of the dampener metering and pan rollers. END OF THE DAY 1. Wash up dampener. Pay close attention to cleaning the ends of the pan and metering rollers that extend past the form rollers. 2. Spin the knurled knobs up until the metering roller can be removed. 3. Remove metering roller and wipe down thoroughly to remove any excess wash that may be on the roller. 33
34 CLEANING & MAINTENANCE DEGLAZING THE DAMPENER Periodic deglazing of water-soluble contaminants will be necessary with the Crestline. Typically, once every 2-3 weeks will be sufficient, unless you are running electrostatic plates on a daily basis whereas deglazing should be performed weekly. A 50/50 solution of household ammonia and hot water can be used for deglazing purposes. If you prefer a commercially available deglazer, avoid those containing pumice or gritty substances. Always follow deglazing with straight water and then roller wash. Accel offers a product called COMPOUND X that we recommend for deglazing our system. Contact your dealer or Accel for more information. OILING AND GREASING THE DAMPENER A. Place a small amount of grease on the gears once a month. B. Inject grease into the oscillator grease fitting once a month. 34
35 CLEANING & MAINTENANCE CRESTLINE CLEANING & MAINTENANCE CHART Daily Weekly Bi-Weekly Monthly Wash Rollers Deglaze Rollers Metal Plate Users Silvermaster Plate Users Electrostatic Plate Users Grease Gears Inspect Ball Bearings Check Roller Pressures Check Roller Surfaces 35
36 APPENDIX A Side cover and inker guard modifications for model E
37 EXISTING EDGE REMOVE SHADED AREA FLUSH WITH EXISTING EDGE COVER MODIFICATION DIAGRAM OPERATOR SIDE HAMADA E-47 37

38 OPS MODIFICATION AFTER BEFORE 38
39 39 COVER MODIFICATION DIAGRAM NON-OPERATOR SIDE HAMADA E-47

40 NOPS MODIFICATION AFTER BEFORE 40
41 41 INKER GUARD MODIFICATION DIAGRAM HAMADA E-47
42 APPENDIX B SIDE COVER AND INKER GUARD MODIFICATIONS FOR MODEL SU47 42
43 43 COVER MODIFICATION DIAGRAM OPERATOR SIDE HAMADA SU47
44 44 COVER MODIFICATION DIAGRAM NON-OPERATOR SIDE HAMADA SU47
45 45 INKER GUARD MODIFICATION DIAGRAM HAMADA SU47
46 APPENDIX C PARTS DIAGRAMS HAMADA 500CDA HAMADA HAMADA HAMADA E HAMADA SU
47 47
48 48
49 49
50 50
51 51
52 52
53 53
54 54
55 55
56 56
57 57
58 58
59 59
60 60
61 61
62 62
63 63
64 64
65 65
66 66
67 67
68 68
69 69
70 70
71 71
72 72
73 73
74 74
75 75
76 76
77 77
78 78
79 79
80 80
81 81
82 82
83 83
84 84
85 85
86 86
87 87
88 88
89 89
90 90
91 91
92 92
93 93
94 94
95 95
96 96
97 97
98 98
99 99
100 100
101 101
102 102
103 103
104 104
105 105
106 106
107 107
108 108
109 109
110 110
111 111
112 112
113 113
114 114
115 115
116 116
117 117
118 118
119 119
120 120
121 121
122 122
123
124 11103 Indian Trail,Dallas,TX Phone , Fax Web Site
Altra Series Dampener
 Crestline TM Altra Series Dampener Installation Instructions Heidelberg MO X88-66 10/97 Rev-A GENERAL INFORMATION ATTENTION CRESTLINE ALTRA SERIES TM DAMPENER OWNER! Accel Graphic Systems provides parts
Tempest Hot Air Drying System. Installation Instructions. Ryobi X /98 Rev-C
 Tempest Hot Air Drying System Installation Instructions Ryobi 3304 X88-99 5/98 Rev-C GENERAL INFORMATION ATTENTION TEMPEST DRYER OWNER! Accel Graphic Systems provides parts and service through its authorized
Tempest Hot Air Drying System. Installation Instructions. Ryobi 522/522HX/524/524HX/582/662. X /98 Rev-B
 Tempest Hot Air Drying System Installation Instructions Ryobi 522/522HX/524/524HX/582/662 X88-60 7/98 Rev-B GENERAL INFORMATION ATTENTION TEMPEST DRYER OWNER! Accel Graphic Systems provides parts and service
Tempest Hot Air Drying System. Installation Instructions. Hamada RS/VS34II X /98
 Tempest Hot Air Drying System Installation Instructions Hamada RS/VS34II X88-120 1/98 GENERAL INFORMATION ATTENTION TEMPEST DRYER OWNER! Accel Graphic Systems provides parts and service through its authorized
Tempest /PowderPro. Installation Instructions. Heidelberg QM46DI X /98
 Tempest /PowderPro Installation Instructions Heidelberg QM46DI X88-126 8/98 POWDERPRO GENERAL INFORMATION ATTENTION POWDERPRO OWNER! Accel Graphic Systems provides parts and service through its authorized
Tempest Hot Air Drying System. Installation Instructions. Sakurai 258II. X / Rev-B
 Tempest Hot Air Drying System Installation Instructions Sakurai 258II X88-57 10/98 2656 Rev-B GENERAL INFORMATION ATTENTION TEMPEST DRYER OWNER! Accel Graphic Systems provides parts and service through
Technical Data. Name: ERIKA Automat fully automatic machine to divide and to round dough pieces of the same size
 AUTOMAT MANUAL 1 Technical Data Name: ERIKA Automat fully automatic machine to divide and to round dough pieces of the same size Type Divisions Dough Portions (in ounces) Plate Nos. 3 30 1.0 3.5 #35 4/40A
M5 BLUE BOY FIVE GALLON PAINT MIXER Owner s Manual
 M5 BLUE BOY FIVE GALLON PAINT MIXER Owner s Manual Introduction..3 Safety Precautions 4 Installation Instructions 5 Electrical Connections..7 Operating Instructions..8 Maintenance Procedures...8 Parts
MAINTENANCE MANUAL TAIYO SEIKI CO., LTD.
 MAINTENANCE MANUAL TAIYO SEIKI CO., LTD. Introduction This Maintenance Manual explains how to replace and adjust the major components of the Automatic Taping Machine when required in daily operation.
Installation. Leveling
 Your refrigerator was packed carefully for shipment. Remove and discard shelf packaging and tape. Do not remove the serial plate. Location Do not install refrigerator near oven, radiator or other heat
Standard Downrod for ceilings 8-10 feet high. Longer Downrod for ceilings 10 feet or higher
 Table of Contents www.casablancafanco.com To register your fan, please visit: www.casablancafanco.com/register What to Expect with Your Installation Save your receipt for proof of purchase. Ceiling Bracket??
OWNERS MANUAL FOR MEC 300E ATA
 OWNERS MANUAL FOR MEC 300E ATA PLEASE READ AND FULLY UNDERSTAND THE INSTRUCTIONS PRIOR TO SETTING OR TUNING THE MACHINE. CAUTION: ANY MEC CLAY TARGET MACHINE MUST BE IN THE DISARMED STATE WITH THE BATTERY
Table of Contents What to Expect with Your Installation. Tools Needed. Wall Control
 Table of Contents Congratulations on purchasing your new Casablanca ceiling fan! It will provide comfort and performance in your home or office for many years. This installation and operation manual contains
User s Manual and Operating Instructions
 User s Manual and Operating Instructions Model Numbers: PT-18W-DDF-A, PT-20F-DDF-A, PT-20S-DDF, PT-24O-DDF, PT-24-DDF, PT-24-DDF-F, PT-30-DDF, PT-30P-DDF-A, PT-30P-DDF-AF READ AND SAVE THESE INSTRUCTIONS
ENGINEER S MANUAL No.01
 1-NEEDLE, UNISON FEED, LOCKSTITCH MACHINE (AUTOMATIC LUBRICATION) LU-1510 1-NEEDLE, UNISON FEED, LOCKSTITCH MACHINE WITH AUTOMATIC THREAD TRIMMER (AUTOMATIC LUBRICATION) LU-1510-7 1-NEEDLE, UNISON FEED,
SuperKlean Washdown Products
 DURAREEL DR8 & DR8S INSTALLATION AND MAINTENANCE INSTRUCTIONS **DO NOT THROW AWAY AFTER INSTALLATION** **SAVE AND DISPLAY PROMINENTLY WHERE THIS EQUIPMENT IS USED** GENERAL WARNINGS High pressure and hot
JOHN DEERE GATOR HPX/XUV 2 PASSENGER HEATER INSTALLATION INSTRUCTIONS (p/n: 9PH20S30)
") P. 1 of 12 JOHN DEERE GATOR HPX/XUV 2 PASSENGER HEATER INSTALLATION INSTRUCTIONS (p/n: 9PH20S30) Item: Qty: Description: 1 2 1 x 1 x 5/8 Tee Fitting 2 2 Plastic Snap-in Hose Grommet 3 4 1-1/2" Hose Clamps
P. 1 of 12 JOHN DEERE GATOR HPX/XUV 2 PASSENGER HEATER INSTALLATION INSTRUCTIONS (p/n: 9PH20S30) Item: Qty: Description: 1 2 1 x 1 x 5/8 Tee Fitting 2 2 Plastic Snap-in Hose Grommet 3 4 1-1/2" Hose Clamps
Installation Instructions
 Aluminum Blinds Installation Instructions Echelon, Traditions & Integra Aluminum Blinds 2 Metro Aluminum Blinds *Click on any page to return to the Table of Contents* Echelon, Traditions & Integra Aluminum
C-IV 60 CEILING FAN READ AND SAVE THESE INSTRUCTIONS. FAN RATING AC 120V. 60Hz
 C-IV 60 CEILING FAN READ AND SAVE THESE INSTRUCTIONS FAN RATING AC 120V. 60Hz Please do not use any electric or battery powered tools in the assembly and installation of this or any Matthews Fan Company
TECHNICAL INFORMATION B 890 and B 990 Rotary Irons (US Models)
") TECHNICAL INFORMATION B 890 and B 990 Rotary Irons (US Models) 2011 Miele USA Table of Contents A B C D 010 Warning and Safety Instructions... 5 1 General... 5 2 Touch Current Measurement... 6 3 Risk of
TECHNICAL INFORMATION B 890 and B 990 Rotary Irons (US Models) 2011 Miele USA Table of Contents A B C D 010 Warning and Safety Instructions... 5 1 General... 5 2 Touch Current Measurement... 6 3 Risk of
Bentley II 13 in Ceiling Fan Owner s Manual. Bentley II Ventilador de Techo de 33 cm Manual del Propietario
 Bentley II 13 in Ceiling Fan Owner s Manual Bentley II Ventilador de Techo de 33 cm Manual del Propietario 326 960 Bentley II by Hampton Bay 13 Bentley II Ceiling Fan by Hampton Bay Thank you for purchasing
Part 3: Service manual, class
 Contents Page: Part : Service manual, class 7-75. General.................................................. Gauges................................................. 4. Description and adjustment of the
ASTRO ENVELOPE FEEDER AMC FOR HEIDELBERG PRINTMASTER INSTALLATION AND OPERATING INSTRUCTIONS
 ASTRO ENVELOPE FEEDER AMC-2000-17 FOR HEIDELBERG PRINTMASTER INSTALLATION AND OPERATING INSTRUCTIONS INTRODUCTION Thank you for purchasing the Astro Envelope Feeder. It is fast, efficient, reliable, and
Bliss Box Former Troubleshooting. 6.1 Troubleshooting Chart. Troubleshooting INTRODUCTION SAFETY PROCEDURES
 6.0 Bliss Box Former 1.0 INTRODUCTION Table 6-1 provides a logical sequence of tests that are designed to isolate problems with the Bliss Box Former machines. This table includes a list of probable causes
MNEFDD54 & MNBCDD54 GALVANIZED WALL FANS Installation, Operation, and Maintenance Instructions
 FARM PRODUCTS DIVISION MEMBER OF AMCA AMERICAN COOLAIR CORPORATION P.O. BOX 2300 JACKSONVILLE, FLORIDA 32203 PHONE (904) 389-3646 FAX (904) 387-3449 E-MAIL - fans@coolair.com MNEFDD54 & MNBCDD54 GALVANIZED
Tommy Bahama INDOOR/OUTDOOR 52 in. / 132 cm. CABRILLO COVE CEILING FAN
 IMPORTANT, RETAIN FOR FUTURE REFERENCE: READ CAREFULLY Cabrillo Cove Ceiling Fan with Tropical Blades Cabrillo Cove Ceiling Fan with Paddle Blades Tommy Bahama INDOOR/OUTDOOR 52 in. / 132 cm. CABRILLO
Table of Contents What to Expect with Your Installation. Tools Needed. Wall Control
 Table of Contents Congratulations on purchasing your new Casablanca ceiling fan! It will provide comfort and performance in your home or office for many years. This installation and operation manual contains
 www.whitakerbrothers.com The Challenge Machinery Company provides owner's manuals on its products solely as a courtesy to its customers. See the information below before using this manual. These manuals
Service Manual Q MODEL DISPENSER Q160/290/300
 Q MODEL DISPENSER Q160/290/300 Service Manual Thank you for selecting a Manitowoc Dispenser, the dependability leader in ice making equipment and related products. With proper care and maintenance, your
Installation Instructions
 Dear customer! Thank you for choosing this quality product from ASKO. We hope it will meet your expectations and fulfil your needs for many years to come. Scandinavian design combines clean lines, everyday
Table of Contents. What to Expect with. Mounting Options. Tools Needed. Wall Control
 Table of Contents www.casablancafanco.com What to Expect with Your Installation Congratulations on purchasing your new Casablanca ceiling fan! It will provide comfort and performance in your home or office
CBT LW MAINTENANCE GUIDE
 CBT LW MAINTENANCE GUIDE PICTOGRAMS Each Signifier displayed here is specific to this User Manual. Menu Previous Advance Note Tip Example Powder Feeder Mixing Bowl Weigh Scale CBP Tanks Control Panel PSD
READ AND SAVE THESE INSTRUCTIONS
 TM READ AND SAVE THESE INSTRUCTIONS CF2000AB02 CF2000AW02 CF2000BC02 CF2000ORB02 Model No. CF2000PW02 CF2000WB02 CF2000WW02 DATE CODE: The date code of this fan may be found on the box, stamped in ink
Industrial Sewing Machine TECHNICAL MANUAL SEWING MACHINE HEAD. Electronic Pattern Sewing Machine. Model PLK-G1010 A180E593P03
 Industrial Sewing Machine TECHNICAL MANUAL SEWING MACHINE HEAD Electronic Pattern Sewing Machine Model PLK-G1010 A180E593P03 FOR SAFE USE Before the installation, operation, and inspection for this product,
Ceiling Fan Installation Instructions
 OWNER S MANUAL Ceiling Fan Installation Instructions Total fan weight For 3TF24XX Series Fans READ AND SAVE THESE INSTRUCTIONS QUALITY CEILING FANS Installation 1. 2. 3. 4. 5. 6. 7. 8. 9. 10. 11. 12. 13.
User s Manual and Operating Instructions
 User s Manual and Operating Instructions Model Numbers: CL-30P-DDF, CL-20F-DDF, CL-24O-DDF, CL-30-DDF READ AND SAVE THESE INSTRUCTIONS IMPORTANT: Read and understand all of the directions in this manual
Installation and Care Instructions
 Installation and Care Instructions THANK YOU for purchasing a Hunter Douglas product. Your new blind has been custom built for you from the highest quality materials. Once in your window, it will provide
PERFECT FIT IN-DASH HEAT/ COOL/ DEFROST FORD PICKUP
 specializing in AIR CONDITIONING, PARTS AND SYSTEMS for your classic vehicle PERFECT FIT IN-DASH HEAT/ COOL/ DEFROST 1960-66 FORD PICKUP CONTROL & OPERATING INSTRUCTIONS The controls on your new Perfect
CEILING FAN OWNER S MANUAL
 CEILING FAN OWNER S MANUAL VERA CRUZ 5/04 GENERAL INSTALLATION & OPERATION INSTRUCTIONS IMPORTANT SAFEGUARDS: 1. To ensure the success of the installation, be sure to read the instructions and review the
Installation Manual PS-200 & PS-201
 Installation Manual PS-200 & PS-201 Table of Contents Pre-Uncrating Checklist... 1 Verifying System Requirements... 2 Verifying System Direction... 2 Verifying the Electrical Requirements... 2 Removal
Table of Contents. What to Expect with. Mounting Options. Tools Needed. Preparation. Wiring. Downrod.
 Table of Contents www.casablancafanco.com What to Expect with Your Installation Congratulations on purchasing your new Casablanca ceiling fan! It will provide comfort and performance in your home or office
Table of Contents What to Expect with Your Installation. Ceiling Plate. Tools Needed.
 Table of Contents Congratulations on purchasing your new Casablanca ceiling fan! It will provide comfort and performance in your home or office for many years. This installation and operation manual contains
Industrial Sewing Machine TECHNICAL MANUAL SEWING MACHINE HEAD. Electronic Pattern Sewing Machine. Model PLK-G2516 A180E621P01
 Industrial Sewing Machine TECHNICAL MANUAL SEWING MACHINE HEAD Electronic Pattern Sewing Machine Model PLK-G2516 A180E621P01 FOR SAFE USE Before the installation, operation, and inspection for this product,
installation and operation manual for Hunter Ceiling Fans
 For Your Records and Warranty Assistance Model Name: Catalog/Model No.: Serial No.: Date Purchased: Where Purchased: For reference also attach your receipt or a copy of your receipt to the manual. installation
Industrial Sewing Machine TECHICAL MANUAL SEWING MACHINE HEAD. Electronic Pattern Sewing Machine. Model PLK-G1010 A180E593P02
 Industrial Sewing Machine TECHICAL MANUAL SEWING MACHINE HEAD Electronic Pattern Sewing Machine Model PLK-G1010 A180E593P02 FOR SAFE USE Before the installation, operation, and inspection for this product,
READ AND SAVE THESE INSTRUCTIONS
 READ AND SAVE THESE INSTRUCTIONS CEILING FAN INSTALLATION AND OPERATION INSTRUCTION FAN RATING AC 120V. 60Hz UL LISTED MODEL: AC-552OD WEIGHT OF FAN: 6.82 KGS 1. TOOLS AND MATERIALS REQUIRED Philips screw
INSTRUCTION MANUAL FOR DUTCHESS MODEL 260 BAGEL & BUN SLICER
 INSTRUCTION MANUAL FOR DUTCHESS MODEL 260 BAGEL & BUN SLICER Table of Contents Safety Information I thru VII Uncrating Instructions 1 Introduction 2 Adjustment Instructions 3 Operating Instructions, Cleaning,
Installation Manual PS-225 & PS-275
 Installation Manual PS-225 & PS-275 Table of Contents Pre-Uncrating Checklist... 1 Verifying System Requirements... 2 Verifying System Direction... 2 Verifying the Electrical Requirements... 2 Removal
Retrofit Instructions CLEARVIEW DAY COVER CAUTION: Please read this manual completely before attempting to install, operate or service this equipment
 Retrofit Instructions CLEARVIEW DAY COVER CAUTION: Please read this manual completely before attempting to install, operate or service this equipment This manual is Copyright 2019 Duke Manufacturing Co.
CEILING FAN OWNER'S MANUAL
 CEILING FAN OWNER'S MANUAL READ AND SAVE THESE INSTRUCTIONS MODELS: 52-ECM-5RV-13 52-ECM-5RV- 52-ECM-5RV-SN FAN RATING AC 120V. 60Hz CUL LISTED MODEL : AC-552 1. TOOLS AND MATERIALS REQUIRED Philips screwdriver
Nilfisk Inc Winnetka Avenue North Minneapolis, MN REV.03( ) VF80189
 VF80189") Nilfisk Inc. 9435 Winnetka Avenue North Minneapolis, MN 55445 www.usviper.com REV.03(05-) VF8089 SAFETY PRECAUTIONS This machine is intended for commercial use. It is constructed for use in an indoor
Nilfisk Inc. 9435 Winnetka Avenue North Minneapolis, MN 55445 www.usviper.com REV.03(05-) VF8089 SAFETY PRECAUTIONS This machine is intended for commercial use. It is constructed for use in an indoor
CBT Bowl & wrap replacement
 CBT bowl & wrap replacement 2 CBT BOWL & WRAP REPLACEMENT Revision History rev. level 01_03.14.2012 rev. level 02_03.19.2012 rev. level 03_03.23.2012 rev. level 04_05.30.2013 NOTE: due to the fact that
PARTS LIST. CoverPro 900CP & 1000CP
 PARTS LIST CoverPro 900CP & 00CP 1 5 2 7 9 3 6 11 20 23 12 13 1 19 21 2 26 17 16 1 22 15 25 1 No. Part number Description 1 79560300 Face cover unit 2 79501600 Face cover 3 0602006 Thread cutter unit 000115700
600 Floor Stripper Applicator
 600 Floor Stripper Applicator Operator and Parts Manual Model Part No.: 60763 www.tennantco.com 607624 Rev. 0 (08-2007) *607624* OPERATION This manual is furnished with each new model. It provides necessary
52 CEILING FAN READ AND SAVE THESE INSTRUCTIONS FAN RATING AC 120V.
 Irene 52 CEILING FAN READ AND SAVE THESE INSTRUCTIONS FAN RATING AC 120V. 60Hz TABLE OF CONTENTS Tools and Materials Required... 1 Package Contents... 1 Safety Rules... 2 Mounting Options... 3 Hanging
Hakki Pilke Raven spare parts manual
 1 ENGLISH Hakki Pilke Raven spare parts manual Valimotie 1, FI-85800 Haapajärvi, FINLAND Tel. +358 8 772 7300, Fax +358 8 772 732 info@maaselankone.fi, www.maaselankone.fi 2 Table of contents 1 Upper section
TruTrainer. Premium Bicycle Rollers Assembly Instructions. Shaft Anti Rotation on Drive Side Rollers Purchased post 2008
 TruTrainer Premium Bicycle Rollers Assembly Instructions Shaft Anti Rotation on Drive Side Rollers Purchased post 2008 CAUTION: To prevent damage, familiarize yourself with the parts list and assembly
Installation and Care Instructions
 Installation and Care Instructions 2" Horizontal Aluminum Blinds MagnaView Tilt Feature Thank you for your purchase. Your new blinds have been custom built for you from the highest quality materials. Properly
PACER 30 VACUUM IMPORTANT SAFETY INSTRUCTIONS READ AND UNDERSTAND ALL INSTRUCTIONS BEFORE OPERATING OR SERVICING MACHINE
 DANGER! PACER 30 VACUUM IMPORTANT SAFETY INSTRUCTIONS READ AND UNDERSTAND ALL INSTRUCTIONS BEFORE OPERATING OR SERVICING MACHINE Failure to Observe These Instructions Can Cause Fire, Electrical Burn, Shock
1. SAFETY RULES. 1. To reduce the risk of electric shock, insure electricity has been turned off at the circuit breaker or fuse box before beginning.
 Kichler Basics 403 1 1. SAFETY RULES 1. To reduce the risk of electric shock, insure electricity has been turned off at the circuit breaker or fuse box before beginning. 2. All wiring must be in accordance
Step 1: Identify the parts of your shade (parts shown are not to scale)
") Motor Operated Solar Shade with Valance Installation and Care Instructions Read carefully and retain for future use. Installation video is available online. Tools required: Philips head screwdriver (not
Motor Operated Solar Shade with Valance Installation and Care Instructions Read carefully and retain for future use. Installation video is available online. Tools required: Philips head screwdriver (not
Section - A Vacuum Feed Attachment
 Tray Box Former 1.0 Section - A Vacuum Feed Attachment A-1 Table of Contents SECTION NO. PAGE SECTION NO. PAGE A.0 INTRODUCTION PURPOSE... A-3 A.1 SET-UP AND ADJUSTMENTS FIGURE A-1 VACUUM FEED MOUNTING
INSTALLATION. Glass Panel Doors (select models) CAUTION
 CAUTION") Location Do not install refrigerator near oven, radiator or other heat source. If not possible, shield refrigerator with cabinet material. Do not install where temperature falls below 55 F (13 C) or rises
Location Do not install refrigerator near oven, radiator or other heat source. If not possible, shield refrigerator with cabinet material. Do not install where temperature falls below 55 F (13 C) or rises
Ultimate Flip Lever Astragal Cut Down Instructions
 Ultimate Flip Lever Astragal Cut Down Instructions 8817 West Market Street Colfax, NC 27235 800.334.2006 www.enduraproducts.com Tools Required: Pencil/Marker Tape Measure Chop Saw Flathead Screwdriver
2 Installation Instructions For Vari-Fan Ceiling Fans Installation Instructions For Vari-Fan Ceiling Fans 11
 Installation Instructions For Installation Instructions For Vari-Fan Ceiling Fans Vari-Fan Ceiling Fans Installation Instructions For Vari-Fan Ceiling Fans Vari-Fan Ceiling Fans DC powered fans designed
DAGNY LK. Ceiling Mounted Rotational Fan READ AND SAVE THESE INSTRUCTIONS. FAN RATING AC 110V~60Hz
 DAGNY LK Ceiling Mounted Rotational Fan READ AND SAVE THESE INSTRUCTIONS FAN RATING AC 110V~60Hz Please do not use any electric or battery powered tools in the assembly and installation of this or any
Part Nos.: Laminators
 Part Nos.: 22-22813 -1 18 22-22812 -1 24 Laminators Mega Electronics Limited Mega House, Grip Industrial Estate, Linton, Cambridge. England. CB21 4XN Tel: +44 (0) 1223 893900 Fax: +44 (0) 1223 893894 Email:
5CO52XX Series Fan UL Model No. : 5CO52. Owner s Guide and Installation Manual. Attach sales receipt to this card and retain as your proof of purchase
 Owner s Guide and Installation Manual 5CO52XX Series Fan UL Model No. : 5CO52 Attach sales receipt to this card and retain as your proof of purchase DATE OF PURCHASE: RETAILER NAME: MODEL NUMBER: RETAILER
FitchTM. Instruction Manual. Includes our Basic Function CoolTouch TM Control System Looks permanent, but goes wherever you go!
 Includes our Basic Function CoolTouch TM Control System Looks permanent, but goes wherever you go! FitchTM A Kichler Décor ceiling fan U.S. Patent Pending Kichler Lighting 7711 East Pleasant Valley Road
MODEL SK2750. COMPRESSOR SERVICE KIT For use on 2750 Series Compressors
 MODEL SK2750 COMPRESSOR SERVICE KIT For use on 2750 Series Compressors WARNING: Unplug the compressor before beginning disassembly. CAUTION: Improper assembly or use of damaged parts may lead to premature
Operating Instructions & Parts Manual Models 99533, 99532
 Operating Instructions & Parts Manual Models 99533, 99532 2 Please read and save these instructions. Read carefully before attempting to assemble, install, operate or maintain the product described. Protect
5COM52XXD Series Fan. Owner s Guide and Installation Manual. UL Model NO. : 5COM52XXD
 Owner s Guide and Installation Manual 5COM52XXD Series Fan UL Model NO. : 5COM52XXD Attach sales receipt to this card and retain as your proof of purchase DATE OF PURCHASE: MODEL NUMBER: RETAILER NAME:
CEILING FAN OWNER'S MANUAL
 CEILING FAN OWNER'S MANUAL READ AND SAVE THESE INSTRUCTIONS MODEL: 52-854-5RV-234 52-854-5RV-CH 52-854-5RV- FAN RATING AC 120V. 60Hz CUL LISTED MODEL : AG-962MC 1. TOOLS AND MATERIALS REQUIRED Philips
WAILEA OWNER S MANUAL
 WAILEA OWNER S MANUAL The blades in each pack are matched for equal weight to assure smooth fan operation. If more than one fan is being installed, be careful not to mix blades from different cartons.
ValkyrieTM. Instruction Manual. Includes our new CoolTouch TM 6 Speed DC Control System Looks permanent, but goes wherever you go! U.S.
 ValkyrieTM A Kichler Décor ceiling fan Designed to coordinate with a popular Kichler Lighting collection. Includes our new CoolTouch TM 6 Speed DC Control System Looks permanent, but goes wherever you
Installation and Care Instructions. Wood Blinds and Alternative Wood Blinds. LiteRise Touch System. Getting Started
 Installation and Care Instructions Wood Blinds and THANK YOU for purchasing a Hunter Douglas product. Your new blind has been custom built for you from the highest quality materials. Once in your window,
TS-49 PART # DPEC DATE: REVISED:
 36-6022 COMPACT PORTABLE TABLE SAW - w/mobile STAND 38 73 325 176 x2 x4 x2 324 326 323 x2 P1 36-6022 COMPACT PORTABLE TABLE SAW - w/mobile STAND 116 191 P2 36-6022 COMPACT PORTABLE TABLE SAW - w/mobile
Hanson LED C e i l i n g F a n
 Hanson LED C e i l i n g F a n model no. 052-8398-2 Toll-free 1-866-827-4985 IMPORTANT: For your safety please read and understand this manual before installing or operating this product. OWNER S MANUAL
ALUMA INSTRUCTION MANUAL WARRANTY CERTIFICATE
 ALUMA BY INSTRUCTION MANUAL WARRANTY CERTIFICATE Manual design and all elements of manual design are protected by U.S. Federal and/or State Law, including Patent, Trademark and/or Copyright laws. The Minka-Aire
HEDMAN DI-50. Endorser Instructions. Hedman DI-50 Operators Guide
 HEDMAN DI-50 Endorser Instructions Hedman DI-50 Operators Guide 25-0132-20 TABLE OF CONTENTS 1. INTRODUCTION...1 1.1 DI-50 Description...1 1.2 Items Included...1 1.3 Safety Terms...2 1.4 Safety Precautions...3
1. SAFETY RULES. 8. Avoid placing objects in the path of the blades.
 1 1. SAFETY RULES 1. To reduce the risk of electric shock, insure electricity has been turned off at the circuit breaker or fuse box before beginning. 2. All wiring must be in accordance with the National
OPERATING MANUAL Gfp 800 Series
 OPERATING MANUAL Gfp 800 Series Please read this manual carefully before operating! 1 Contents Table of Contents Page 1. Introduction 3 2. Important Safety Instructions.. 3 3. Installation Safeguards..
Installation Instructions
 GE Consumer & Industrial Appliances Installation Instructions Junction Box Cover Within this user bag, you will find a junction box cover and a #10 hex head screw used to attach the junction box cover
TECHNICAL INSTRUCTIONS
 TID-0137_0A TECHNICAL INSTRUCTIONS AM Series Boiler Heat Exchanger Maintenance & Replacement For all models of AM Series Boilers, Including: Boilers: AM 399B AM 500B AM 750B AM 1000B Water Heaters: AM
Orrin. Instruction Manual. Includes our new CoolTouch TM Control System Looks permanent, but goes wherever you go! U.S.
 Includes our new CoolTouch TM Control System Looks permanent, but goes wherever you go! U.S. Patent Pending Orrin A Kichler Select ceiling fan Kichler Lighting 7711 East Pleasant Valley Road P.O. Box 318010
Heat Exchanger Block Replacement Instructions
 Series 1-4 Gas-fired water boiler Heat Exchanger Block Replacement Instructions Ultra-80 S1-4 Heat Exchanger Block Replacement Kit, Part No. 383-500-773 Ultra-105 S1-4 Heat Exchanger Block Replacement
LaceyTM. Instruction Manual. Includes our new CoolTouch TM 6 Speed DC Control System Looks permanent, but goes wherever you go! U.S.
 LaceyTM A Kichler Décor ceiling fan Designed to coordinate with a popular Kichler Lighting collection. Includes our new CoolTouch TM 6 Speed DC Control System Looks permanent, but goes wherever you go!
CEILING FAN OWNER S MANUAL
 CEILING FAN OWNER S MANUAL LX SERIES 5/04 WARNING: Read and follow these instructions carefully and be mindful of all warnings shown throughout. GENERAL INSTALLATION & OPERATION INSTRUCTIONS IMPORTANT
PERFECT FIT SERIES IN-DASH HEAT/ COOL/ DEFROST CHEVROLET CHEVELLE/ EL CAMINO NOTE: INSTRUCTIONS DEPICT CHEVELLE
 specializing in AIR CONDITIONING, PARTS AND SYSTEMS for your classic vehicle PERFECT FIT SERIES IN-DASH HEAT/ COOL/ DEFROST 1964-65 CHEVROLET CHEVELLE/ EL CAMINO NOTE: INSTRUCTIONS DEPICT CHEVELLE CONTROL
52 DorsetTM. Instruction Manual. Basic Function Wall Control System Included. A Kichler Decor ceiling fan
 Basic Function Wall Control System Included 52 DorsetTM II A Kichler Decor ceiling fan Kichler Lighting 7711 East Pleasant Valley Road P.O. Box 318010 Cleveland, Ohio 44131-8010 Customer Service 866.558.5706
MK-100 JCS Tile Saw TILE SAW OWNER S MANUAL & OPERATING INSTRUCTIONS SERIAL NUMBER:
 MK-00 JCS Tile Saw TILE SAW OWNER S MANUAL & OPERATING INSTRUCTIONS CAUTION: Read all safety and operating instructions before using this equipment Enter the Serial Number of your new saw in the space
Table of Contents What to Expect with Your Installation. Tools Needed. Motor Housing.
 Table of Contents Congratulations on purchasing your new Casablanca ceiling fan! It will provide comfort and performance in your home or office for many years. This installation and operation manual contains
PAVIA INSTALLATION GUIDE
 FSP800 PAVIA INSTALLATION GUIDE Parts List Please unpack and inspect all packages and components carefully, make sure they are complete. Examine for shipping damage. If some parts are damaged or missing,
Refrigerator. Installation Guide. Free Standing Appliance
 Refrigerator Guide Free Standing Appliance Untitled-3 1 2018-04-10 12:31:22 Follow these instructions carefully to prevent accidents and to ensure the proper installation of this refrigerator. WARNING
DATE OF PURCHASE: RETAILER NAME: MODEL NUMBER: RETAILER ADDRESS:
 Owner s Guide and Installation Manual 3TF24XX Series Fan UL Model No. : AC-536 Attach sales receipt to this card and retain as your proof of purchase DATE OF PURCHASE: RETAILER NAME: MODEL NUMBER: RETAILER
Lifetime Limited Warranty
 Hampton Bay Lifetime Limited Warranty The retailer warrants the fan motor to be free from defects in workmanship and material present at time of shipment from the factory for a lifetime after the date
Installation Instructions
 Wood Blinds Installation Instructions Heartland Woods Heartland Woods w/ Continuum *Click on any page to return to the Table of Contents* Heartland Woods Wood Blinds Mounting Inside or Outside Window Frame
User s Manual and Operating Instructions
 User s Manual and Operating Instructions Model Numbers: MAC-12F, MAC-20F-DDF, MAC-20FO-DDF, MAC-20S-DDF, MAC-24-DDF, MAC-24P, MAC-24POSC, MAC-24W, MAC-24WOSC, MAC-30W, MAC-30WOSC, MAC-30-DDF, MAC-30P-DDF,
Built-In Dishwasher. Installation Instructions. BEFORE YOU BEGIN Read these instructions completely and carefully. IMPORTANT The dishwasher MUST be
 Installation Instructions Built-In Dishwasher If you have questions, call 800.GE.CARES (800.432.2737) or visit our website at: www.ge.com BEFORE YOU BEGIN Read these instructions completely and carefully.
ChicagoTM. Instruction Manual. Includes our new CoolTouch TM Control System Looks permanent, but goes wherever you go! U.S.
 Includes our new CoolTouch TM Control System Looks permanent, but goes wherever you go! U.S. Patent Pending ChicagoTM A Kichler Decor ceiling fan Kichler Lighting 7711 East Pleasant Valley Road P.O. Box