900mm Island Canopy Manual
|
|
|
- Eustacia Cannon
- 5 years ago
- Views:
Transcription
1 900mm Island Canopy Manual MODEL ICF9BLS Installation and Operation
2 CANOPY INSTALLATION AND OPERATION MANUAL
3 Dear Customer, We thank you for choosing this quality appliance and hope you enjoy many years of reliable service. Please ensure this manual is read carefully before installation and use. Keep this manual in a safe and accessible location should future reference be required. Regards Home Appliances CONTENT 2.Notice 3.Feature 4..Installation 6..Notice of installation 6..Safety Warning 7 Use 8 Maintenance 9 Abnormity and Solution 1
4 NOTICE 1. Thank you for choosing our cooker hood. Please read the instruction manual carefully before use. 2. The installation work must be undertaken by a qualified and competent fitter. 3. The manufacturer disclaims all liability for any damage or injury caused as a result of not following instructions for installation contained in the following text. The cooker hood is used on 220/240v, 50Hz. 2
5 (2)FEATURE 1. The cooker hood uses high quality materials, and is made with a streamlined design. 2. Equipped with a large power low noise electric motor and centrifugal leaf, it produces strong suction, low noise, non stick grease filter and easy to clean. 3. Special wind tunnel construction and oil collector design, free dirt will be absorbed in a second. 3

6 (3) INSTALLATION 1. The ceiling must can bear at least 40kgs weight, and the thickness of the ceiling must be 30MM, see pic 2, drill 1*170mm round hole in the ceiling. 2. According to the hanging board, drill 12 holes in the ceiling, see pic 2, 12pcs of ST6*40mm big flat screws will be used to fix the hanging board on the ceiling, and then 8pcs of M4*10 screws and M4 nut with gasket will be used to connect the angle iron into the hanging board, see pic 1, calculated the length of the angle iron, and 16pcs M4*10 big flat screws and M4 nut with gasket will be used to connect the angle iron and another angle iron ( the overlap length of angle iron can not less 100MM) 3. Let the one side of the extensible pipe go outside through the hole of 170MM, see pic pcs ST4*8 big flat screws will be used to connect the internal chimney into the hanging board, then put one the external chimney, two hooks will be used to put up the external chimney in order to the next installation, see pic pcs ST4*8 big flat screws will be used to install the outlet, see pic Hold up the hood, 16pcs M4*10 big flat screws will be used to connect the hood body into angle iron, see pic Put the extensible pipe on the outlet; after ensure all the things ok, put down the hook, take from the external chimney, all the installation is finished, see pic7& 8. Warning: Failure to install the screws or fixing device in accordance with these instructions may result in electrical hazards 4
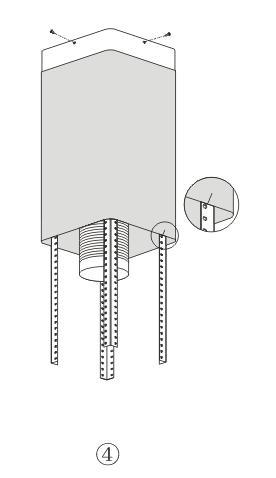
7 5 5
8 (4) NOTICE OF INSTALLATION 1. Before installation, please ensure the area is clean to avoid suction of the remaining bits of broken wood and dust. 2. It cannot share the same air ventilation tube with other appliance such as gas tube, warmer tube, and hot wind tube. 3. The bending of ventilation tube should be 120, parallel or above the start point and should be connected to the external wall. 4. After installation, make sure that the extractor is level to avoid grease collection at one end. (5) SAFETY WARNING Never let the children operate the machine The cooker hood is for home use only, not suitable for barbecue, Roast shop and other commercial purpose. Please ask the technical person to do the assembling. The cooker hood and its filter mesh should be clean regularly in order to keep in good working order. Before cleaning, please switch the power off at the main supply. Clean the cooker hood according to the instruction manual and keep the cooker hood from the danger of burning. If there is any fault with the appliance, please call the service department to arrange a service engineer. CAUTION: Accessible parts may become hot when used with cooking appliances. 6
9 (6) USE Electronic Button 1. Turn on the power; the buzzer will buzz five times. The sound shows that the appliance is powered. 2. Push the low button, the indicating light 1 on, the buzzer will buzz once, and the motor runs at low speed. Push it again and the motor will stop. 3. Push the middle button, the indicating light 2 on, the buzzer will buzz once, and the motor runs at mid speed. Push it again and the motor will stop 4. Push the high button, the indicating light 3 on, the buzzer will buzz once, and motor runs on high speed. Push it again and the motor will stop 5. Push the light button; the indicating light 4 on, and the two lighting lamps will come on. Push it again and the lamps will turn off, with every push the buzzer will buzz one time.
10 Push button 1. Push stop button, and the motor will stop. 2. Push the Low button, the buzzer will buzz once, and the motor runs at low speed. 3. Push the Mid button, the buzzer will buzz once, and the motor runs at mid speed. 4. Push the High button, the buzzer will buzz once, and the motor runs at high speed. 5. Push the light button and the two lights will come on. Push it again and the light will turn off. Stop Low Mid pic6c High Light
11 LCD Electronic button Pic 7 1. Plug the hood; LCD will display 24-hour system with blue backlight. Backlight will be extinguished after 30 seconds without any operation. 2. Press button once; lights will be on and LCD will show. Press button again; lights will be off and on LCD will disappear. 3. Press button once; the hood works at LOW speed and LCD will show and button will be on. Press button again; the hood works at MEDIUM speed. Press works at HIGH speed. Press button one more time; the hood button again; the hood works at LOW speed again and it repeat. While pressing button; the button is always on. If you want to stop the hood now; press the button once. 4. When the hood is not working; press button once. The hood will work at the speed it works last time and LCD will show. Press button again; the hood stop working and will disappear from LCD. 5. When both button and button don t work; button is used for time-setting. Press button for 2 to 3 seconds; will be shown on LCD and flashes; which represents hour. Press button once the number adds by 01. Continue pressing button; it will display from 13;14 until 23. When LCD shows 23; it doesn t work by


12 pressing button. Press button once; the number reduces by 01. When LCD shows 00; it doesn t work by pressing button. After setting hour; you can start setting minute by pressing button again. on LCD flashes; which represents minutes. Press button once the number adds by 01. Continue pressing button; it will display from 01;02 until 59. When LCD shows 59; it doesn t work by pressing button. Press button once; the number reduces by 01. When LCD shows 00; it doesn t work by pressing minute; press to confirm. button. After setting hour and When button doesn t work; button is used for delay timer function. Delay timer function allows you to set the hoods automatically power off according to the delay timer you set from 1 minute to 60 minutes. Press button once; it enters for delay timer setting and LCD shows. Press button once the number adds by 01. Continue pressing button; it will display from ; ; until Press button once; the number reduces by 01. After setting delay timer you want; press button to confirm. If you set delay timer as 05:00; the LCD display will show from 05:00; 04:59 until 00:01 00:00. When LCD shows 00:00; the hood will automatically power off and LCD display will only show 24-hour system with blue backlight. After 30 seconds without operation; blue backlight will disappear. But please note the Lamp is not under control of delay timer. Next time; if you want to use delay timer function and you press button without any change on time. The hood will automatically count time down from your previous setting after 5 seconds.
13 LCD Touch control Pic 8 1. Power on: Switch on the power supply, and the backlight is lit, displaying 24-hour system. The output is then blocked up,and the soot machine enters standby status. The backlight disappear automatically 30 seconds later under the condition of none operation. 2. Press Indicator key: Press the indicator key once, the indicator is lit, and on the LCD screen is lit. Press it for a second time, of the indicator and the LCD screen will distinguish and it will be repeated again and again. 3. Power on position and increase key, the motor is provided with three positions, i.e. low, medium and high. 1. Press key once, the is displayed on the display screen, and the motor starts operation. The is the low position (power on position.) 2. Press key once more at the low position, the is displayed on the display screen, and the is the medium position. 3. Press key once more at the medium position, the is displayed on the display screen, and the is the high position. 4. Go on pressing key at the high position, the is still displayed on the display screen, and the motor works normally. It is still at high position at this time. 4. Power on position and decrease key 1. Press key once, the motor is adjusted to a lower position, and the LCD screen displays that position in the meantime; If it is decreased continuously to none position, then, it is the power off position (namely, the motor stops operation.) 5. Timer key : 1. The timer key is the timer setting key if the timer key doesn t work at both the position and indicator.
14 Long press timer key for 2-3 seconds, time segment, and the first two hour bit segment flash, use key for the digit increase, and use key for the digit decrease. Namely: The variable is 01 each time it is pressed; the hour segment is with the largest digit of 23. If it exceeds 23, key is null and void. If it is equal to 00, then, the key is null and void. Press the timer key for the 2 nd time, time segment, and the last two minute bit segment flash, use key for the digit increase, and use key for the digit decrease. Namely: The variable is 01 each time it is pressed; the minute segment is with the largest digit of 59. If it exceeds 59, key is null and void. If it is equal to 00, then, the key is null and void. Press the timer key and confirm key. for the 3 rd time, and it is the time setting exit Long press timer key for 2-3 seconds under this operation mode, and it is for the hour setting; Press it for the 2 nd time: Setting for the minute; Press it for the 3 rd time: For the time setting exit and confirm, and it will be repeated again and again (if the 1 st time pressing doesn't exceed 2 seconds, then it can't run this operating procedure.) 2. The timer key is the timer if the timer key works at either the position or the indicator. It is provided with three kinds of time segment, and they are 5min/15min/30min/timer cancel in sequence, and the 1 st time is 5min, the 2 nd time is 15min, the 3 rd time is 30min, the 4 th time is timer cancel, the 5 th time is 5min, and the 6 th time is 15min., and it will be repeated again and again. Example: Let the setting time be 15min, the display is 00:15, 00:14, 00:1, with 0:00 displays per minute, and once 00: 00 appears, the motor position and the indicator power supply will be cut off automatically, (the display screen displays 24-hour system, the output is blocked up, and the soot machine enters standby status, and the backlight will be put out automatically 30 seconds later.) Time segment change over, 5 seconds later, it starts to decrease gradually (example: 15min is changed over to 30min, with a delay of 5 seconds, and 00: 30 on the display screen starts to decrease gradually).
15 (7) MAINTENANCE 7.1 The cleaning of the carbon grease filter mesh The filter mesh is made of high-density stainless steel. Please do not use the corrosive detergent on it. Keeping this filter clean will keep the appliance running correctly. Please strictly follow the guidelines below. Method 1: Put the mesh into c clean water, pour on detergent, and soak for 2-3 mins. Wear gloves and clean with a soft brush. Please do not apply too much pressure, as the mesh is delicate and will damage easy. Method 2: If instructed to do so, it can be put into a dishwasher, set the temperature at around 60 degrees. 7.2 Notice of cleaning cooker hood A. To protect the main body from corrosion over a long period of time, the cooker hood should be cleaned with hot water plus non corrosive detergent every one month. B. Please do not use abrasive detergent for it will damage the body. C. Keep the motor and other spare parts free from water, as this will cause damage to the appliance. D. Before cleaning the appliance please remember to cut off power E. The carbon filter shouldn t be exposed to heat. F. Please don t tear open the fixed bar around the carbon filter
16 G. If the supply cord is damaged, it must be replaced by the manufacturer, its service agent or similarly qualified persons in order to avoid a hazard. (8) ABNORMITY AND SOLUTION 8.1 LED light replacing Remove the filters, and push the light downwards, and unplug the wiring connector.
17 8.2 Some solution Fault Cause Solution The leaf blocked Get rid of the blocking Light on, but motor does not work Light does not work, motor does not work Oil leakage Shake of the body Insufficient suction The capacitor damaged Replace capacitor The motor jammed bearing Replace motor damaged The internal with of motor off or Replace motor a bad smell from the motor Beside the above mentioned, check the following: Light damaged Power cord looses One way valve and the air ventilation entrance are not tightly sealed Leakage from the connection of U-shaped section and cover The leaf damaged and causes shaking The motor is not tightly hanged The body is not tightly hanged The distance between the body and the gas top too long Too much ventilation from open doors or windows Replace lights Connect the wires as per the electric diagram Take down the one way valve and seal with glue Take U-shaped section down and seal with soap or paint Replace the leaf Lock the motor tightly Fixed the body tightly Readjust the distance Choose a new place and resemble the machine The machine inclines The fixing screw not tight enough Tighten the hanging screw and make it horizontal
18 The hanging screw not tight enough Tighten the hanging screw and make it horizontal
INSTRUCTION MANUAL Wall mounted Cooker hood Nebel INOX 90
 INSTRUCTION MANUAL Wall mounted Cooker hood Nebel INOX 90 1 Hafele Article Number (533.87.214) CONTENT 1.Notice 2.Feature 3..Installation 4..Notice of installation 5..Safety Warning 6 Speed adjustment
Instructions for the Use and Care and Installation of ORW6XA ORW9XA. Wall Canopy Rangehoods
 Instructions for the Use and Care and Installation of ORW6XA ORW9XA Wall Canopy Rangehoods CONTENTS 1 Notice 2 Features 3 Installation 4 Notice of installation 5 Safety Warning 6 Use Instructions 7 Maintenance
Instructions for the Use and Care and Installation of ORC97G ORC98G. Glass Canopy Rangehoods
 Instructions for the Use and Care and Installation of ORC97G ORC98G Glass Canopy Rangehoods CONTENTS 1 Notice 2 Features 3 Installation 4 Notice of installation 5 Safety Warning 6 Use Instructions 7 Maintenance
ORC93XA ORC94XBA. Wall Canopy Rangehoods
 Instructions for the Use and Care and Installation of ORC93XA ORC94XBA Wall Canopy Rangehoods CONTENTS 1 Warning 2 Features 3 Installation 4 Notice of installation 5 Safety Warning 6 Use Instructions 7
Installation and Operating Instructions. Models: T4-12LOW-9IS-1
 Installation and Operating Instructions Models: T4-12LOW-9IS-1 727626032017 p: 09 573 5678 f: 09 573 5699 e: sales@parmco.co.nz w: www.parmco.co.nz Parmco Appliances extended 7 year warranty 7 New Zealand
KKKKKKKCOOKER HOOD INSTRUCTION MANUAL
 KKKKKKKCOOKER HOOD INSTRUCTION MANUAL Read this manual carefully before operation Pictures in this manual are for reference only, the product in kind prevail. E60MEW2M19 Contents 01 02 03 04 05 06 07 08
INSTALLATION, OPERATION & MAINTENANCE INSTRUCTIONS
 INSTALLATION, OPERATION & MAINTENANCE INSTRUCTIONS FOR EVERDURE RANGE HOOD Models Included: RBES63 RBES91 RBES92 IMBERLEY INSTALLATION, OPERATION AND MAINTENANCE INSTRUCTIONS FOR EVERDURE RANGE HOOD RBES63,
CANOPY RANGEHOOD. instruction manual V3FC60SS & V3FC90SS 12 MONTH WARRANTY
 CANOPY RANGEHOOD instruction manual V3FC60SS & V3FC90SS 12 MONTH WARRANTY Contents Guide to the Appliance 2 Caring for the Environment 3 Safety Information and Warnings 4 Installation Instructions 6 Operation
Installation and Operating Instructions
 Installation and Operating Instructions Models: RBOX-6S-1000 RBOX-9S-1000 RCAN-6S-1000 RCAN-6S-500 RCAN-6W-1000 RCAN-6W-500 RCAN-9S-1000 RCAN-9S-500 RCAN-9W-1000 RCAN-9W-500 RLCD-9G-1000 RLOW-9S-1000 T4-11GLA
ENGLISH INSTALLATION AND USER S MANUAL FRENCH NOTICE D INSTALLATION ET D UTILISATION ITALIAN MANUALE D ISTRUZIONE
 ENGLISH INSTALLATION AND USER S MANUAL FRENCH NOTICE D INSTALLATION ET D UTILISATION ITALIAN MANUALE D ISTRUZIONE 1 INSTALLATION AND USER S MANUAL CONTENT INTRODUCTION 03 SAFETY PRECAUTION 03 SPECIFICATION
User Manual\ Canopy Rangehood\ RH92G\RH92GB\RH62GB
 User Manual\ Canopy Rangehood\ RH92G\RH92GB\RH62GB Dear Customer, Congratulations on purchasing your new rangehood. The Residentia brand is proudly distributed within Australia by Residentia Group Pty
Integrated Rangehood SERVICE TOLL FREE NUMBER. SERVICE WEBSITE INSTALLATION AND OPERATION MANUAL
 SERVICE TOLL FREE NUMBER 1800 805 300 Integrated Rangehood MODEL: IRI9WE3-865mm IRI6WE3-565mm SERVICE WEBSITE www.customersupport.hapl.com.au distributors of distributors of HAPL_MC_IRI*WE3_Sept 2012 INSTALLATION
Cleaning & Maintenance
 Cleaning & Maintenance Warning: Before cleaning, please ensure that the power is switched off by detaching the plug from the wall socket. 10.1 Clean the surface of hood every week with mild soap or detergent.
COOKER HOOD. AFTER-SALES SERVICE (Including Spare Part Request)
") TM AFTER-SALES SERVICE (Including Spare Part Request) 1800-282-093 603-6286 9000 www.rubine.com.my WARRANTY: Standard 1-year warranty on manufacturing defects. 5-year warranty on cooking hood motor. PRODUCT
TM AFTER-SALES SERVICE (Including Spare Part Request) 1800-282-093 603-6286 9000 www.rubine.com.my WARRANTY: Standard 1-year warranty on manufacturing defects. 5-year warranty on cooking hood motor. PRODUCT
COOKER HOOD. RCH-GEMELLO-RS90. AFTER-SALES SERVICE (Including Spare Part Request)
") TM AFTER-SALES SERVICE (Including Spare Part Request) 1800-282-093 603-6286 9000 www.rubine.com.my RCH-GEMELLO-RS90 COOKER HOOD FIAMMA TRADING SDN BHD(330476-P) 9-2, Wisma Fiamma No. 20 Jalan 7A/62A, Bandar
TM AFTER-SALES SERVICE (Including Spare Part Request) 1800-282-093 603-6286 9000 www.rubine.com.my RCH-GEMELLO-RS90 COOKER HOOD FIAMMA TRADING SDN BHD(330476-P) 9-2, Wisma Fiamma No. 20 Jalan 7A/62A, Bandar
VH60SS 60CM VISOR HOOD STAINLESS STEEL
 VH60SS 60CM VISOR HOOD STAINLESS STEEL INSTRUCTION MANUAL Thank you for purchasing our product. We hope you enjoy using the many features and benefits it provides. Before using this product please study
Instructions for the Use and Care and Installation of ORU52X ORU70X. Undermount Rangehoods CONTENTS
 Instructions for the Use and Care and Installation of ORU52X ORU70X Undermount Rangehoods CONTENTS CONTENTS 1) WARNING 2) INSTALLATION INSTRUCTIONS 3) OPERATION 4) LIGHT REPLACEMENT 5) CLEANING 6) ATTENTION
UNDERMOUNT RANGEHOOD. instruction manual VPP52S & VPP90S 12 MONTH WARRANTY
 UNDERMOUNT RANGEHOOD instruction manual VPP52S & VPP90S 12 MONTH WARRANTY Contents Guide to the Appliance 2 Caring for the Environment 3 Safety Information and Warnings 4 Installation Instructions 6 Operation
Cooker Hood User Manual
 Cooker Hood User Manual HCB93042X EN 01M-8850803200-0116-02 Please read this manual first! Dear Customers! Thank you for preferring a Beko product. We hope that you get the best results from your product
UPUTE ZA UGRADNJU I UPORABU
 CROATIAN CZECH ENGLISH FRENCH GERMAN GREEK ITALIAN POLISH PORTOGUESE ROMANIAN SLOVENIAN SPANISH DUTCH UPUTE ZA UGRADNJU I UPORABU NÁVOD K POUŽITÍ A INSTALACI INSTALLATION AND USER S MANUAL NOTICE D INSTALLATION
Cooker Hood BAH61&BAH91 BAH60&BAH90 BAH93CG&BAH93CGIS BAH94FG&BAH94FGIS. User Manual for your
 User Manual for your BAH61&BAH91 BAH60&BAH90 BAH93CG&BAH93CGIS BAH94FG&BAH94FGIS Cooker Hood NOTE: This User Instruction Manual contains important information, including safety & installation points, which
Kind Regards, The Residentia Team
 RUM52 RUM75 RUM90 Dear Customer, Congratulations on purchasing your new rangehood. The Residentia brand is proudly distributed within Australia by Residentia Group Pty Ltd. Please refer to the warranty
COOKER HOOD USER MANUAL
 COOKER HOOD USER MANUAL TROUBLE SHOOTINGS CAUTION: Disconnect the power supply before servicing. STATUS The power supply is damaged CAUSE AND METHOD OF REPAIRING If the power supply is damaged,please call
Range Hoods. General Manual. For Models: IVN900X, IVN900N, IVCC900X, IVCG900, IVSG900
 Range Hoods General Manual For Models: IVN900X, IVN900N, IVCC900X, IVCG900, IVSG900 IMPORTANT SAFETY INFORMATION **Read the complete manual carefully before installation** Intended for Domestic Kitchen
INSTALLATION AND USER S MANUAL COOKER HOOD RS-600/A-S
 INSTALLATION AND USER S MANUAL COOKER HOOD RS-600/A-S RS-600 (CHS60SS)-GB-05.indd 1 6/8/2010 9:30:59 AM TABLE OF CONTENTS 1. Introduction 2 2. Safety precaution 2 3. Intended use 3 4. Parts supplied 3
ART cm Island Curved Glass
 ART28101 90cm Island Curved Glass [01] x 1 [02] x 1 [03] x 1 [04] x 1 [05] x 4 [06] x 1 [07] x 1 [08] x 1 [09] x 4 [10] x 4 [11] x 1 [12] x 4 (6x70mm) [13] x 4 (6.3x17x2mm) [14] x 8 (4x12x1mm) [15] x 4
100cm Chimney Hood GB IE
 100cm Chimney Hood GB IE [01] x 1 [02] x 2 [03] x 2 [04] x 2 [05] x 3 [06] x 1 [07] x 1 1 : 1 [09] x 8 (3.9 x 32mm) [08] x 8 [10] x 4 (4 x 12mm) 100cm Chimney Hood GB IE Cooker Hood 04 FR Hotte Aspirante
User Manual PRISMA TOUCH 90
 PRISMA TOUCH 90 Voltage 110V-120V 1. FOR YOUR SECURITY... 3 2. EXTRACTOR DESIGN... 3 3. WHEN CLEANING THE EXTRACTOR... 6 4. CHANGING THE BULBS... 7 5. INSTALATION... 8 6. CIRCUIT DIAGRAM... 10 7. TECHNICAL
COOKER HOOD USER MANUAL
 COOKER HOOD USER MANUAL READ AND SAVE THESE INSTRUCTIONS MANUAL CONTENTS TECHNICAL CHARACTERISTICS... 2 BODY SIZE...2 MAIN PARTS NAME...3 INSTALLATION REQUIREMENT...4 INSTALLATION PROCEDURES...5-7 OPERATING
USER MANUAL. ICON60H Version 00. Vertical Glass Hood
 USER MANUAL ICON60H Version 00 Vertical Glass Hood [02] x 1 [01] x 1 [03] x 1 [04] x 1 [07] x 1 [05] x 1 [08] x 9 [06] x 1 [09] x 9 (4 x 30mm) [10] x 2 (3 x 10mm) Cooker hood Let's get started... These
RWC Issue: F. Description: ARISTON WALL CANOPY Model Numbers: ARCH90BIX. Model may vary slightly from images pictured. All measurements are in mm.
 RWC Issue: F Description: ARISTON WALL CANOPY Model Numbers: ARCH90BIX Model may vary slightly from images pictured. All measurements are in mm. 1 Overview Pre-installation Thank you for purchasing a quality
Manual de Instrucciones Campanas Extractoras ND.3. Bedienungsanleitung Dunstabzugshauben ND.3. Instructions Manual Kitchen Hoods ND.
 Manual ND.qxd 12/01/2005 17:10 Page 1 Manual de Instrucciones Campanas Extractoras ND.3 Bedienungsanleitung Dunstabzugshauben ND.3 Instructions Manual Kitchen Hoods ND.3 Manuel d instructions Hottes aspirantes
Installation and Operating Instructions. Models: T4-13DM-SLI-1 T4-14DM-LOW-1 T4-15DM-CUR-1 T4-18GBOX
 Installation and Operating Instructions Models: T4-13DM-SLI-1 T4-14DM-LOW-1 T4-15DM-CUR-1 T4-18GBOX As part of Parmco Appliances commitment to improving and upda ng product ranges, we reserve the right
Glass Chimney Hood. Installation & User Instructions Please keep for future reference
 Glass Chimney Hood Installation & User Instructions Please keep for future reference 4897549 4897556 Important Please read these instructions fully before installing or using These instructions contain
GEH9026G Cooker Hood
 User Manual for your GEH9026G Cooker Hood 90 cm Chimney Hood in Stainless Steel NOTE: This User Instruction Manual contains important information, including safety & installation points, which will enable
INSTALLATION MANUAL. Decoration Panel Provided with Filter Auto Cleaning Function Self Cleaning decoration panel BYCQ140D7GW1 BYCQ140D7GFW1
 INSTALLATION MANUAL Decoration Provided with Filter Auto Cleaning Function Self Cleaning decoration panel BYCQ0D7GW BYCQ0D7GFW BYCQ0D7GW BYCQ0D7GFW Installation manual Contents. SAFETY PRECAUTIONS....
LI117A Ed. 01/03 Menhir by David Lewis
 Menhir by David Lewis LI11A Ed. 01/03 i 1 3 1 5 g g j h A g g 3 3 3 3 1,5 190 5 1 9 8 8 5 G F 13a 13b 13a 10F 13b 10A 13a 1a 1b 1a 1b 1 1 11 11 18-1 18-5 18-18- 1 1b 1b 18-3 18-18- 1 18-8 1a 1 1 3 5 8
JLBIHD624 60cm Cooker Hood
 JLBIHD624 60cm Cooker Hood User guide 2 Cooker hood user guide Contents Contents 3 Introduction 4 Safety is important 4 In the box 4 Safety information 5 Important safety information 5 Warnings 5 Cautions
Instructions for Use and Warranty Details. RH17-900mm Island Canopy Rangehood
 Cooking c o l l e c t i o n Instructions for Use and Warranty Details RH17-900mm Island Canopy Rangehood C ongratulations on the purchase of your new appliance. This appliance has been designed and manufactured
ISLAND MOUNT RANGE HOOD. This manual is made with 100 % recycled paper. Electronic version of this manual is available at:
 ISLAND MOUNT RANGE HOOD This manual is made with 100 % recycled paper. Electronic version of this manual is available at: www.cosmoappliances.com Thank You Thank you for your purchase. We know that you
Issue 1 ROBINHOOD ISLAND CANOPY 90CM. Product may vary slightly from the picture
 Issue 1 Description: Model Numbers: ROBINHOOD ISLAND CANOPY 90CM RIE3CL9SS Product may vary slightly from the picture Pre-installation Thank you for purchasing a quality Robinhood rangehood. Robinhood
90cm Slimline Rangehood
 90cm Slimline Rangehood Model Number SRH91B INSTRUCTION MANUAL IM Version No.: V1.3 Issue Date: 08/2016 MODEL: SRH91B PRODUCT CODE: 54296 08/2016 Welcome Congratulations on choosing to buy a STIRLING product.
WALL MOUNT RANGE HOOD. This manual is made with 100 % recycled paper. Electronic version of this manual is available at:
 WALL MOUNT RANGE HOOD This manual is made with 100 % recycled paper. Electronic version of this manual is available at: www.cosmoappliances.com Thank You Thank you for your purchase. We know that you have
Angled Glass Chimney Extractor
 Angled Glass Chimney Extractor LAM2701 LAM2702 User & Installation Guide Dear Customer, Congratulations on your choice of a LAMONA domestic appliance which has been designed to give you excellent service.
Instruction Manual JLCHDD601/JLCHDD901 60cm/90cm Cooker hood
 Contents 3 Introduction 3 Safety is important 3 In the box 4 Safety information 4 Important safety information 4 Warnings 5 Cautions 5 Electrical information 6 Operation 6 Automatic shut-down 7 Care and
GUH90 90 cm Canopy Hood
 User Manual for your GUH90 90 cm Canopy Hood NOTE: This User Instruction Manual contains important information, including safety & installation points, which will enable you to get the most out of your
Operating and Installation Manual for Cooker Hoods
 Operating and Installation Manual for Cooker Hoods en LC65S953.. Preface Thank you for choosing Siemens cooking appliance. Before using your appliance for the first time, please read these instructions
INSTRUCTION MANUAL EPH-121 CONTENTS
 INSTRUCTION MANUAL EPH-121 CONTENTS SAFETY PRECAUTIONS 1 NAME OF COMPONENT PARTS 5 HOW TO ASSEMBLE THE FRAME 6 OPEN AND CLOSE THE PANELS 7 OPERATION 9 TIMER OPERATION 10 SHUTDOWN 11 ROUTINE MAINTENANCE
BT16.4SS-HK BT19.4SS-HK Cooker Hood
 BT16.4SS-HK BT19.4SS-HK Cooker Hood User Manual for your Baumatic User Manual for your Baumatic BT16.4SS-HK 60 cm Chimney Hood BT19.4SS-HK 90 cm Chimney Hood NOTE: This User Instruction Manual contains
DESIGNER HOOD MODEL: EH-E9122ST(BK) Owner s Manual. Please read this manual carefully before operating your set. Retain it for future reference.
 Owner s Manual. Please read this manual carefully before operating your set. Retain it for future reference.") DESIGNER HOOD MODEL: EH-E9122ST(BK) Owner s Manual Please read this manual carefully before operating your set. Retain it for future reference. Record model number and serial number of the set. See the
DESIGNER HOOD MODEL: EH-E9122ST(BK) Owner s Manual Please read this manual carefully before operating your set. Retain it for future reference. Record model number and serial number of the set. See the
Código de Erros Split Piso Teto
 Código de Erros Split Piso Teto No. Type Description Flash Blink Code Note 1 Failure Indoor temp. sensor testing port warning Timer led blinks on 1Hz frequency E2 2 Failure 3 Failure 4 Failure Evap. temp.
WALL MOUNT RANGE HOOD. This manual is made with 100 % recycled paper. Electronic version of this manual is available at:
 WALL MOUNT RANGE HOOD This manual is made with 100 % recycled paper. Electronic version of this manual is available at: www.cosmoappliances.com Thank You Thank you for your purchase. We know that you have
BWT6.3GL Cooker Hood 60 cm Glass chimney hood
 User Manual for your BWT6.3GL Cooker Hood 60 cm Glass chimney hood NOTE: This User Instruction Manual contains important information, including safety & installation points, which will enable you to get
ISCG90SS _03 ISCG90SS
 ISCG90SS 60900355_03 ISCG90SS GB IE [01] x 1 [02] x 1 [03] x 1 [04] x 8 [05] x 1 [06] x 4 [07] x 1 [08] x 1 [09] x 1 [10] x 4 [11] x 4 [12] x 1 [13] x 4 (6x70mm) [14] x 8 (6.3x17x2mm) 1 : 1 [15] x 4 (3.9x18mm)
GB User and maintenance manual
 GB User and maintenance manual IMPORTANT SAFETY INSTRUCTIONS These instructions shall also be available on website: docs.whirlpool.eu. YOUR SAFETY AND THAT OF OTHERS IS VERY IMPORTANT This manual and
ORT6WXA ORT9WXA Slide-out Rangehoods
 Instructions for the Use and Care and Installation of ORT6WXA ORT9WXA Slide-out Rangehoods CONTENT 1. GENERAL 2. SAFETY PRECAUTION 3.. WARNING!! 4.. INSTALLATION INSTRUCTIONS 5.. ATTENTION 6.OPERATION
60cm Chimney Extractor
 60cm Chimney Extractor LAM2401 HJA2480 User & Installation Guide Contents Page Environmental note 3 IMPORTANT SAFETY INFORMATION 4 6 Specifications of your extractor 7 8 Dimensions 7 Specifications 7-8
User and maintenance manual
 GB User and maintenance manual IMPORTANT SAFETY INSTRUCTIONS These instructions shall also be available on website: docs.whirlpool.eu. YOUR SAFETY AND THAT OF OTHERS IS HIGHLY IMPORTANT. This manual and
SL51 fresco SL35 fresco 1200 SL53 excel SL SL SL SL SLCR 83 - SL_EM41 - SLTC SLTC-EM53 90
 COMMERCIAL INFORMATION FOR THE CONSUMER GB INSTALLATION, USE AND MAINTENANCE INSTRUCTION SL51 fresco 1200 - SL35 fresco 1200 SL53 excel 900 - SL7 900 - SL7 1200 - SL19 900 SL22 900 - SLCR 83 - SL_EM41
ISLAND MOUNT RANGE HOOD. This manual is made with 100 % recycled paper. Electronic version of this manual is available at:
 ISLAND MOUNT RANGE HOOD This manual is made with 100 % recycled paper. Electronic version of this manual is available at: www.cosmoappliances.com Thank You Thank you for your purchase. We know that you
THE BEAUTY OF SIMPLICITY USER MANUAL
 DESIGNER HOOD MODEL: CK-SPECCHIO THE BEAUTY OF SIMPLICITY USER MANUAL Fig.1 Fig.2 Fig.3 Fig.4 Fig.5 2 Fig.6 A B Fig.7 Fig.8 Fig.9 Fig.10 Fig.11 Fig.12 Fig.13 Fig.14 3 Fig.15 Fig.16 Fig.17 Fig.18 GENERAL
WINDOW TYPE ROOM AIR CONDITIONER OPERATION AND INSTALLATION MANUAL
 MODEL RA-0LDF RA-3LDF WINDOW TYPE ROOM AIR CONDITIONER OPERATION AND INSTALLATION MANUAL AIR DEFLECTORS VERTICAL DEFLECTORS Vertical de ectors at both sides of outlets can be set to either auto-swing or
IMPORTANT SAFETY INSTRUCTIONS DANGER: WARNING:
 IMPORTANT SAFETY INSTRUCTIONS YOUR SAFETY AND THAT OF OTHERS IS PARAMOUNT This manual and the appliance itself provide important safety warnings, to be read and observed at all times. This is the attention
Instructions for use and installation Cooker Hood. Istruzioni per l uso e l installazione Cappa. Mode d emploi et installation Hotte de Cuisine
 GB IT FR DE TR Instructions for use and installation Cooker Hood Istruzioni per l uso e l installazione Cappa Mode d emploi et installation Hotte de Cuisine Bedienungsanleitung und Einrichtung Dunstabzugshaube
ZEST HOOD. Instructions Manual.
 ZEST HOOD Instructions Manual www.rangemaster.co.uk INDEX EN RECOMMENDATIONS AND SUGGESTIONS... 3 CHARACTERISTICS... 4 INSTALLATION... 6 USE... 14 MAINTENANCE... 16 2 RECOMMENDATIONS AND SUGGESTIONS The
BWTC6510GL Cooker Hood 60 cm Glass cooker hood in stainless steel. BWTC9510GL Cooker Hood 90 cm Glass cooker hood in stainless steel
 User Manual for your BWTC6510GL Cooker Hood 60 cm Glass cooker hood in stainless steel BWTC9510GL Cooker Hood 90 cm Glass cooker hood in stainless steel NOTE: This User Instruction Manual contains important
Range hood Instruction Manual
 Range hood Instruction Manual ESL6002S and ESL6002WH EURO APPLIANCES BY EUROSTYLE GROUP - 1 - 第 1 页共 6 页 1. GENERAL A) Carefully read the following important information regarding installation safety and
TLA-1245 EFFICIENT HEAT CYCLE SHRINK TUNNEL OPERATION MANUAL
 TLA-1245 EFFICIENT HEAT CYCLE SHRINK TUNNEL OPERATION MANUAL Contents 1. Introduction... 3 1.1 Features... 3 1.2 Specifications... 3 2. Installation... 3 3. Machine explosion drawing... 4 4. Equipment
INFORMATION ONLY READ AND SAVE THESE INSTRUCTIONS SAFETY FIRST
 This information guide will help you with converting the electronics on the Comfort- Touch to Advan-Touch technology. Within this guide you will find step by step instruction on how to convert the fan,
Instructions Manual SHC520X - SHC700X
 Instructions Manual SHC520X - SHC700X INDEX EN RECOMMENDATIONS AND SUGGESTIONS... 3 CHARACTERISTICS... 4 INSTALLATION... 5 USE... 7 MAINTENANCE... 8 2 RECOMMENDATIONS AND SUGGESTIONS The Instructions for
Ultrasonic Humidifier DROP. Product Manual
 1 Ultrasonic Humidifier DROP Product Manual 2 Contents 04 05 06 10 11 12 Part Description Features & Specifications Instructions Use Set the Mist Volume Set the Timer The Aroma Diffusion Function Cleaning
OPERATING AND INSTALLATION INSTRUCTIONS FOR WHISPAIR RANGEHOODS UTILISING ON BOARD FAN MOTOR UNITS
 A I R E N G I N E E R E D OPERATING AND INSTALLATION INSTRUCTIONS FOR WHISPAIR RANGEHOODS UTILISING ON BOARD FAN MOTOR UNITS CONGRATULATIONS Congratulations and thank you for choosing a Whispair rangehood.
Owner s Manual STAINLESS CONICAL CHIMNEY HOOD CONTENTS
 Owner s Manual CONICAL CHIMNEY HOOD CONTENTS STAINLESS 2 Installation 3 Electrical Installation 3 The Controls 4 Operation 4 Maintenance 4 The controls 5 Cleaning and maintaining stainless steel 6 Problem
Installation and Operating Instructions
 Installation and Operating Instructions TILTA MODELS: T1-6-2 T1-6HT T1-9HT As part of Parmco Appliances Ltd commitment to improving and updating product ranges, we reserve the right to alter, change and
K-Star International Group Inc. K-Star Electronic Appliance Inc. Toll Free:(800)
") READ AND SAVE THIS INSTRUCTIONS FOR DOMESTIC COOKING ONLY Installer: Leave this manual with the homeowner. Homeowner: Cleaning, Maintenance and Operating instructions on the coming pages. RANGE HOOD ITEM
READ AND SAVE THIS INSTRUCTIONS FOR DOMESTIC COOKING ONLY Installer: Leave this manual with the homeowner. Homeowner: Cleaning, Maintenance and Operating instructions on the coming pages. RANGE HOOD ITEM
Cooking c o l l e c t i o n
 Cooking c o l l e c t i o n Instructions for Use and Warranty Details RH60-600mm Fixed Rangehood RH90-900mm Fixed Rangehood ongratulations on the purchase of your new C appliance. This appliance has been
SIL EM SIL 24 - SIL 25
 INFORMAZIONI COMMERCIALI PER I CONSUMATORI COMMERCIAL INFORMATION FOR THE CONSUMER INFORMATIONS COMMERCIALES POUR LE CLIENT INFORMACIONES COMERCIALES PARA EL CLIENTE HANDELSINFORMATIONEN FÜR DEN KUNDEN
CG60/ 70/ 80/ 90/ 100 SS/BK
 CG60/ 70/ 80/ 90/ 100 SS/BK GB IE [01] x 1 [02] x 1 [03] x 1 [04] x 2 [05] x 1 [06] x 1 [07] x 1 [08] x 4 [09] x 4 [10] x 1 [11] x 6 1 : 1 [12] x 4 [13] x 6 (3.9 x 32mm) [14] x 4 (3.4 x 10mm) CG60/ 70/
Black Fascia & Auto Slide-Out Canopy Range Hood
 啊哈 Black Fascia & Auto Slide-Out Canopy Range Hood 20100610 issue 3 Installation and User manual Content Safety instructions---------------------------------- 1 Product description---------------------------------
USER S MANUAL DIGITAL AIR FRYER DAF-530D-2
 USER S MANUAL DIGITAL AIR FRYER DAF-530D-2 Introduction Thank you for purchasing Kitchen Couture Air Fryer. The Kitchen Couture Air Fryer evenly circulates hot air rapidly around food. The Kitchen Couture
Briza Line. Digital Display Unit (Room Thermostat) Model BLC 13-RS Wall Mounting Cat Model BLC 33-RS Semi Flush Mounting Cat.
 Model BLC 13-RS Wall Mounting Cat Model BLC 33-RS Semi Flush Mounting Cat.") Briza Line Digital Display Unit (Room Thermostat) Model BLC 13-RS Wall Mounting Cat. 1099482 Model BLC 33-RS Semi Flush Mounting Cat. 1099483 Operation and Applications Manual MADE IN ISRAEL Page 1 of
Briza Line Digital Display Unit (Room Thermostat) Model BLC 13-RS Wall Mounting Cat. 1099482 Model BLC 33-RS Semi Flush Mounting Cat. 1099483 Operation and Applications Manual MADE IN ISRAEL Page 1 of
INSTALLATION INSTRUCTIONS USER GUIDE
 INSTALLATION INSTRUCTIONS USER GUIDE Tilted wall cooker hood HT90GHB2 model GB IE CONTENTS Introduction 3 Safety and warnings 4 Installation instructions 8 About your cooker hood Energy efficiency 18
Verdi 90 & 120 Ceiling Hood Re-Circulating and Ducted Installation & User Instructions
 Verdi 90 & 120 Ceiling Hood Re-Circulating and Ducted Installation & User Instructions Please read these instructions carefully before installing and operating this appliance 1 Contents 1. Introduction
Safety and Instruction Manual
 T14002 Safety and Instruction Manual PLEASE READ CAREFULLY 30cm Ceramic Coated Electric Sauté Pan T14002 30cm Ceramic Coated Electric Sauté Pan TECHNICAL DATA Description: Model: Rated Voltage: Input power:
UNDER CABINET RANGE HOOD
 UNDER CABINET RANGE HOOD MANUAL IMPORTANT SAFETY INSTRUCTIONS READ AND SAVE THESE INSTRUCTIONS FOR DOMESTIC COOKING ONLY 1. Read all instructions before using the appliance 2. Install or locate this appliance
USE AND CARE GUIDE WALL MOUNTED HOOD
 USE AND CARE GUIDE WALL MOUNTED HOOD MODELS: HEE92(900MM) HEE22(600MM) HEE96(600MM) HEM52(A-900MM) HEE22(F-1100MM) HEE91(A-600MM) HEE22(900MM) HEE65(900MM) HEM52(A-600MM) HEM52(A-600MM) Fig.1 Fig.2 Fig.3
DESIGNER WALL CANOPY
 DESIGNER WALL CANOPY HC60DCXB1, HC90DCXB1 & HC120DCXB1 Models INSTALLATION GUIDE / USER GUIDE CN Made in Spain Contents Safety and warnings 1 Preparing to install 3 Installation instructions 4 Operating
READ AND SAVE THESE INSTRUCTIONS
 READ AND SAVE THESE INSTRUCTIONS CEILING FAN INSTALLATION AND OPERATION INSTRUCTION FAN RATING AC 120V. 60Hz UL LISTED MODEL: AC-552OD WEIGHT OF FAN: 6.82 KGS 1. TOOLS AND MATERIALS REQUIRED Philips screw
Stainless Steel and Glass Angled Extractor
 Stainless Steel and Glass Angled Extractor HJA2600 User & Installation Guide CONTENTS Environmental Note 3 Product information 4 4 Parts List 4 Method of Extraction 5 Installation 6 Hanging Your Extractor
Stainless Steel Chimney Extractor
 Stainless Steel Chimney Extractor User & Installation Guide LAM2404 LAMONA Appliances Dear Customer, Congratulations on your choice of a LAMONA domestic appliance which has been designed to give you excellent
TYPE: FSLA - FSLB GB INSTALLATION, USE AND MAINTENANCE INSTRUCTION
 INFORMAZIONI COMMERCIALI PER I CONSUMATORI COMMERCIAL INFORMATION FOR THE CONSUMER INFORMATIONS COMMERCIALES POUR LE CLIENT INFORMACIONES COMERCIALES PARA EL CLIENTE HANDELSINFORMATIONEN FÜR DEN KUNDEN
BFR6 / BFR9 Rangehood
 BFR6 / BFR9 Rangehood User Manual for your Baumatic BFR6, 60 cm Rangehood BFR9, 90 cm Rangehood NOTE: This User Instruction Manual contains important information, including safety & installation points,
Barcelona Collection. Use and handling instructions Mode d emploi et d entretien Instrucciones de uso y mantenimiento
 Barcelona Collection Use and handling instructions Mode d emploi et d entretien Instrucciones de uso y mantenimiento GBENGLISH INSTALLATION INSTRUCTIONS. READ & SAVE THESE INSTRUCTIONS! INSTALLATION INSTRUCTIONS:
BX600. CLASSIC ColleCtion. Specifications. Model Colour Venting Size. Air Flow Volume: Electrical Consumption:
 BX600 Innovation by Design - Since 1991 CLASSIC ColleCtion Insert Cyclone s newest insert is discreet and quiet yet bold and powerful enough to leave a distinct impression. Powered at 600 CFM and fitted
Section 1 - Safety Information Section 2 - Installation: Wall Mount Hoods Section 3 - Installation: Island Mount Hoods
 Range Hoods Owner s Manual Section 1 - Safety Information Section 2 - Installation: Wall Mount Hoods Section 3 - Installation: Island Mount Hoods Section 4 - Use & Care Instructions Section 5 - Control
ADVAN TOUCH W-62 BRACKET/HOLSTER REMOVAL
 ADVAN-TOUCH (W-62) and (W-63) Controls Casablanca s Advan Touch is a wall-mounted or hand-held remote control system. Advan Touch combines a user-friendly design with a large LCD display and intuitive
COOKER HOOD INSTRUCTIONS MANUAL MODEL
 390 3300 COOKER HOOD INSTRUCTIONS MANUAL MODEL INTRODUCTION OF DEVICE 3 4 5 390 390 0 3 Min 80/Max 060 6 5 3300 ) Chimney ) Body 3) Control Panel 4)Aluminum Cassette Filter 5) Lighting 6) Split Extraction
COFFEE ROASTER VENTILATION HOOD INSTALLATION AND OPERATING INSTRUCTIONS
 COFFEE ROASTER VENTILATION HOOD INSTALLATION AND OPERATING INSTRUCTIONS sonofresco 1365 Pacific Drive Burlington, WA 98233 360-757-2800 1 4046061-E Coffee Roaster and Vent Hood Installation Figure 1 2
ELECTRIC BLANKET INSTRUCTIONS
 ELECTRIC BLANKET INSTRUCTIONS FITTED FLEECY Adjustable Timer 3, 6, 9 & 12 Hour Model Number CEFG60DAB - Queen Size Note: The specifications and/or components of this product are subject to change without