BUILT-IN GAS HOBS OPERATION AND INSTALLATION INSTRUCTION
|
|
|
- Laura Bryan
- 5 years ago
- Views:
Transcription


1 BUILT-IN GAS HOBS EN OPERATION AND INSTALLATION INSTRUCTION ER76K230Mx ER76K251Mx ER76K231Mx ER76K252Mx
2 Thanks for your choosing Siemens cooking appliances. Please read this instruction carefully before you use the product. Any failure and loss derived from the improper use or installation different from that which is stipulated in this user's manual is not covered by our product's warranty. Please keep all documents properly for future reference. If you have any question, please contact our local service center or Siemens dealer. If you need an English instruction, please download it from Siemens website. Or you can send an to or call the service department to get it for free. Thanks! Siemens Appliance Chinese Website: Hotline: Free Hotline: Retailer: Address: BSH Electrical Appliances (China) Co., Ltd. 20F-21F, Zhongnan International Building, 129 Zhongshan Road, Nanjing, Jiangsu Post Code: Manufacturer: Address: BSH Electrical Appliances (Jiangsu) Co., Ltd. No. 208, Yaoxin Avenue, Economic and Technical Development Zone, Nanjing Post Code:
3 Packaging of new hob..2 Disposal of old hob 2 Before using the new hob 2 Product specification 3 Product standards Product features...3 Placement location...4 Safety precautions 5 Countertop tapping..6 Connecting the gas pipeline.7 Gas leak detection 8 Connecting power supply 8 Installing the supports, caps and burners.9 Getting familiar with your new hob Safety precautions..12 Operation method...14 Interlink instruction...15 Control panel and button instruction...16 Flame power adjustment 18 Cleaning and maintaining your hob 19 Faults analysis and troubleshooting...20 Tips with good intention 21 Warranty statement 22 Service commitment..22 Warranty Card Attention: BSH Electrical Appliances (Jiangsu) Co., Ltd. reserves the final interpretation rights for the Operation and Installation Instruction. Any change of it will not be further notified..
4 All the packing materials are environmental-friendly and recyclable. When you are disposing of these materials, please do so in such a way that protects the environment and minimizes waste. Do not allow children to play with the thin film or packing case to avoid suffocation or accidents. The old hob should be taken to a recycling center where it can be disposed of in a way which protects the environment. Old hobs contain useful materials that can be recycled. They can be disposed of in a way which protects the environment. Discarded batteries can be hazardous to the environment. Please throw them to special recycling bins to protect the environment. The gas hob is specially designed for the purpose of home cooking, so that it should be installed in the kitchen for personal use. If you find the gas hob is visibly damaged, do not connect it to the gas. Please contact our local service center or dealer immediately. Please check the nameplate on your gas hob carefully, and make sure that the gas type you intend to use is consistent with the gas hob specified on the nameplate (which is located at the back shell of the gas hob). If you have any question, please contact our local service center. Only technicians who have received professional training and have the proper qualifications for gas hob maintenance can perform the installation and maintenance of the gas hob. As the end-user, you shall maintain and use the gas hob correctly. To use the gas hob correctly and safely, please read the operation and installation instruction carefully.
5 "X" in the product cod e (E-Nu mb er) indicates the gas source in one area. Please refer to the nameplate for corresponding product mod el and applicable gas type. Th e product meets th e following n ational standards: GB Home Gas Hob Safety Design Each burner of the gas hob is equipped with a safety device for quick cut-off of the gas. For gas hobs with timer function, in case of a flameout while cooking, the safety device will start automatically to cut off gas supply. This can avoid accidents. User-centered Design This product inherits and carries forward precise processing and manufacturing technologies and user-centered design of German. New burner The burner is new and high-efficiency. Its main body is processed by over 10 technologies, which ensures the perfection of the structure and appearance. The exquisite surface treatment technology is adopted. The surface of cap adopts non-organic black high-temperature resistant painting meeting the European test standards. The surface is high-temperature and erosion resistant and has good adhesion.
6 The gas hob can be installed only in the home kitchen. Do not use it in other rooms. Do not place the gas hob in the bathroom, bedroom, basement, or place flammable, explosive or corrosive substances in close proximity. Do not place flammable or explosive objects on or around the gas hob, e.g. curtains. If there are flammable materials around the gas hob, e.g. wooden walls, low ceilings, etc., the gas hob should be installed at a distance of at least 150mm from the wooden wall, and at least 1m from the kitchen ceiling. Fireproof materials around the gas hob are not limited by this distance. The use of the gas hob will result in temperature rising and humidity increasing in the room where the hob is installed. Therefore, please ensure there is a good ventilation in the kitchen. Do not cover natural ventilation openings. If the gas hob operates at a high flame for a long time, good ventilation will be required. To achieve good ventilation, you may open windows, doors or use an efficient range hood. Installation of sterilizer cabinets, baking ovens, microwave ovens and other appliances shall be performed according to the method specified in the instruction.. Drawers set under the gas hob must be made of fireproof materials. Do not put any heat-sensitive or flammable objects into the drawers under the gas hob, e.g. spraying agents or shoe polishing, etc. If the gas hob is installed in a cupboard, the plastic coating and plywood in it shall be subjected to the treatment of fire resistant glue (heat resistant glue); otherwise, they are likely to deform or the surface layers are likely to scale, especially on the sides of the cupboard. The gas hob should be installed on a solid and flat countertop. The minimum thickness of the countertop should be more than 16mm. The minimum width of the countertop should be more than 550mm; however, 600mm is recommended. See the attached tapping template for the size of the countertop tapping. The cupboard should have a tapping whose size meets the ventilation requirements and which is open to the air. The area of the ventilation opening should be no less than 100cm 2. Otherwise, it is likely to cause an explosion resulting from gas leakage. 4
7 Only the technicians with the proper qualifications for gas hob maintenance can perform the installation, commissioning and gas replacement for the gas hob. Install a special gas valve between the indoor gas connecting hose and the gas hob to daily connect and cut off the gas. The valve can also be used to cut off the gas immediately if an accident occurs during operation. Please make sure the valve is accessible at all times. Please install the range hood with an exhaust pipe in accordance with the local gas hob installation regulations and guides. The distance between this type of range hood and the gas hob should be no less than 750mm. The gas hob has received a strict gas leakage performance test before leaving the factory. Do not dismantle the faceplate or inner parts when installing the gas hob to avoid later gas poisoning and fires resulting from gas leakage during operation. Please make sure the gas hose connected to the gas hob does not touch any movable part in the cupboard, e.g. drawer, roller, etc. when the installation is completed. Please make sure there is safe grounding power supply. If you find your power wires are damaged, you must purchase the special powers lines from the local customer service center. Replacement must be performed by technicians from the manufacturer or their maintenance department. If you move house and intend to reinstall the gas hob to your new house, please check whether the gas supplied for your new house is consistent with the gas specified on the nameplate. If it is not consistent, contact our local service center. We will make proper adjustments to your gas hob as soon as possible. 5
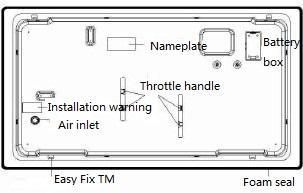
8 As shown in the attached tapping template (the installation size of all products is the same), perform the tapping on the countertop. To ensure the proper connection of the gas hose, a height of 100mm below the gas hob should be kept available. To ensure the stable placement of the gas hob, please make sure the vertical surfaces of the installation site are smooth. According to the method shown in the left figure, clamp the four spring sheets attached to the product to the corresponding four installation positions on the back shell. After installing the spring sheets, push the entire gas hob firmly into the cutout openings on the countertop, until the outside rim of the gas hob is seated closely to the countertop. 6
9 Connection of the gas hob should be performed by the technicians with professional qualifications for gas hob maintenance. Make sure that the connection meets the legal provisions and requirements of local gas hob administration departments. The indoor gas hose behind the gas meter and the air inlet at the bottom of the gas hob can be connected with a metal bellow or a special rubber hose whose length should not exceed 1.5m. (Please refer to the requirements issued by the local gas management departments. You can also consult and purchase the special hose and hose clip at gas product counters in supermarkets). Attention! We recommend that you use the metal bellows to connect the gas. Especially when the other appliances (such as disinfecting cabinets, backing ovens, microwave oven, etc.) are installed under the hob, it is forbidden to connect the gas with a gas rubber hose. Connecting the gas with a rubber hose -The two ends of the gas hose are respectively connected to the gas hob and the indoor gas valve (the inside diameter of the gas hose is 9.5mm). -When connecting the gas hose, you must insert the gas hose until it reaches the red line on the multi-directional air inlet, and then fix it firmly with a hose clip. -After the connection is completed, please make sure that the gas hose is not flattened, twisted or bent by any other objects. Then smear soap suds all over the connection parts; and check whether there is any leakage in each connection part. -We recommend that you conduct an airtight test for the gas hob you use, or replace the gas hose annually. -Do not leave the gas hose in a high temperature area or make it touch any high temperature section of the gas hob. Connecting the gas with metal bellows -The metal bellows we adopt should meet the following requirements: Safety and Environmental Protection Requirements for Gas Hobs (DB31/ ) Metal Bellows Connected to Gas Hobs (CJ/T ) -The installation method, procedures and notes of metal bellows must strictly follow the instruction of the "Stainless Steel Soft Special -Connecting Pipes" (performed by the technicians with qualifications for gas hob maintenance) 7.Attention! After the gas pipeline connection has been completed, check all connection parts with suds to make sure there is no gas leakage.


10 Connecting the power supply Suds detection: Attention! After the gas pipeline connection has been completed, the leak detection test must be performed. Smear the suds on each connection part with a soft brush, and then pen the gas valve to check carefully whether bubbles appear. If there are bubbles, close the gas valve immediately, and adjust the gas inlet connection until no bubbles appear. The power supply is fixed in the middle of bottom. When you use it, please make sure it is safe and grounded. Please make sure the hob wires are grounded. The gas hob has a three-pin plug. The plug must be connected to the grounded socket. Grounding can prevent human from getting electric shocks. It is suggested that the socket be fixed on the bottom right of the gas hob and be far away from the gas source and air inlets. 8
11 As shown in the below figure, please make sure that the knobs, burner heads, caps and supports have been installed correctly. Incorrect installation will seriously affect the normal use of the product and shorten its service life. When installing the burner, the user should align the installation hole on the burner with the ignition electrode and thermocouple on the hybrid pipelines. If you place the components randomly or rotate them for hob placement, it is probable to break the electrode. Any loss caused by this is not covered by our warranty.
12 10

13 Specification E-Number ER76K230Mx ER76K251Mx ER76K252Mx ER76K231Mx "X" in the product code E-Number indicates the gas source in one area. Please refer to the nameplate for corresponding product model and applicable gas type. Product appearance Product Model JZT-T52S1 JZY-T52S1(X) JZT-T52S2 JZY-T52S2(X) JZT-T52G1 JZT-T52G2 JZT-T52G1(X) JZT-T52G2(X) Applicable gas NG NG special for Shanghai NG NG special for Shanghai NG NG special for Shanghai Gas pressure (kpa) Designed heat input for burner (left/right) (KW) Rating heat input (left/right) (KW) Dimension (W x D x H) (mm) 760 x 450 x x 450 x x 450 x 150 Height above installation table (mm) 75 Size of tapping (W X D) (mm) 700 x 400 Fillet 4 x R20 Minimum thickness of installation cable (mm) >16 Installation method Easy Fix TM Spring clip type Specification of external air inlet pipe ID Φ 9.5mm corrosion-proof rubber hose or metal bellows (special for Shanghai) Net Weight (Kg) Gross weight (Kg) Faceplate High-quality 240 brushed metal faceplate Explosion-proof toughened glass Supports Flat steel black enamel Cast iron black enamel Ignition method and power supply Spinning high-voltage pulse ignition, Rated voltage (V) 220 Output power (W) 3 11
14 Before first use: Please clean the hob and its accessories thoroughly. This will remove the "new" smell of the hob. Before using, make sure the gas pipelines, knobs, burner heads and caps, and supports have been installed correctly. Then open the indoor gas valve. Since there is residual air in the gas pipelines, the first ignition (or ignition after it has been left unused for a long time) may be difficult. This is a normal phenomenon. Please repeat the igniting operations, until the hob is ignited normally. When in use: Do not leave the gas hob unattended during cooking. Gas Poisoning Warning! When using the hob, you must keep good ventilation, such as opening windows or starting the range hood. The gas hob may cause carbon monoxide poisoning if you are using the gas hob in a closed kitchen without ventilation for an extended time. Explosion Warning! If you find a gas leakage while using the gas hob, you should turn off the main indoor gas valve immediately, and then open windows and doors for ventilation. Do not use open fire or turn on or off appliances at this time to avoid igniting the residual gas in the room and causing an explosion. In case of a leakage, please contact our local service center. Fire Warning! Do not ignite the gas hob for heating when no pan is placed on it or there is no food in the pan. This may cause damages of the range hood over the gas hob for overheating, or cause a fire for the residual grease in the range hood is ignited. Scald Warning! Do not let unattended children use or stand close to the gas hob while it is in use. Once the gas hob is turned off, do not touch the hot burners, supports and the faceplate around the burners with your hands or other part of your body to avoid scald. 12

15 13 When using the gas hob, please protect it from strong wind, which may cause uneven heating or even extinguish the flame. When cooking food with vegetable oil and animal fats, you should be careful to avoid fires caused by overheating oil in the pan. When cooking food with this kind of oil, do not leave the food unattended in the pan. In case of a fire caused by overheated oil, immediately use an iron pot lid or other large metal objects to cover the fire to cut off the air needed for burning, and then turn off the indoor gas valve. Never use water to extinguish a fire to avoid accidents. When the gas hob is in use, do not touch it. Do not put metallic objects, e.g. knives, forks, scoops, lids on the countertop to avoid being heated. Whenever the burners are extinguished for any reason, turn it off and wait for at least 1 minute before re-igniting it. Please do not plug or pull out the plug when your hands are wet. Please do not draw the wire with strength to pull out the plug. The gas hob has a timer with electronic control and can provide automatic fire extinction. However, it s rather difficult for users to calculate and evaluate the potential effects which may be brought to cooking under the influence of different combination of cooking time and flame power; furthermore, when the Timer is in operation, the user or someone else may reset the cooking time and the flame power. Therefore, to ensure the absolute safe use of the gas hob, do not leave the kitchen with the timer in operation, nor leave the gas hob unattended whenever with burning flames. Besides, after the timer stops working and the flame goes out, the gas hob will automatically stop working and provide automatic fire extinction. However, the knob of the gas hob cannot turn back automatically. Users are hereby reminded to turn the gas knob back manually once the timer stops working, to avoid unsatisfied cooking result or occurrence of any other accident due to the users' improper operation of the timer. The timer function of the gas hob, which is designed for the convenience of users, does not indicate that the manufacturer and distributor have provided safety protection more than a standard gas hob without such a timer. To ensure safe use of the gas hob and its corresponding functions, users are required to carefully read this INSTALLATION AND OPERATION INSTRUCTION, especially the safety precautions for operation whereof, and use the gas hob in strict compliance with the requirements hereof.
16 Normal operation of the gas hob has no unusual noises. If you have any question, please contact our local service center. After use: Clean the glass faceplate and the display screen to avoid button failure for accumulation of foreign matter such as oil and water. Remember to turn off the valve on the indoor pipelines when you finish using the gas hob, go out or go to bed. A pan with a thick base can improve heat distribution, especially for small flames when the gas is on a low setting. The bigger size the pan has, the higher efficiency the gas hob achieves. This can save more energy. Turn the burner to the small-flame position when you move the pan away for a short time. In this way, when you approach the gas hob for other operations, you can reduce the risk of burning, save gas, and reduce pollution. When you use a big stove, make sure that there is a distance of at least 25mm between the stove and the surrounding combustible materials. In addition, the distance between the knob and the stove should be no less than 50mm.

17 Interlink instruction 3 status of the interlink button 15 First activating the "interlink" mode Notes: At first, ensure the power supply of the range hood receiving signals from corresponding hobs is connected, and the interlink function is not activated. 1. When the gas hob is plugged in the socket for the first time, the interlink button displays blue and flashes for three times. After 0.5 second, it goes out and goes back to "OFF" status. 2. First activating and establishing one-to-one mode Power on the range hood and the hob. Press for 3 seconds. The LED on the range hood flashes, waiting for coding with hob. Press the left knob and for 8 seconds on the hob. Notes: After the hood buzzer beeps, this indicates the link is finished. LED on the hood flashes for 2 seconds. The interlink function is activated. If you do not press the symbol within 10 seconds, the symbol changes to 1/3 brightness. Attention: When the link function is running, in case of powering off or cutoff, after the power supply is connected again, the link function is in non-working status, while the link code remains. Attention: This instruction is just an example for range hoods of the same kind and brand. For different brands or models, the interlink function differs. (Refer to corresponding range hood instructions for specific information.) How to use "interlink" button (Codes of the hob and the range hood have been matched, and the hob and the range hood enter into the interlink mode.) Notes: Refer to corresponding instruction for the reflections of the range hood. 1. When "interlink" button is opened, i.e. the button displays blue : Turn the knob. The gas hob is ignited and works normally. The hob sends a signal to the corresponding hood (consider all burners as one: only the first burner flame on send out "fan on" command, only the last burner flame off send "fan off" command.) Symbol changes from 1/3 brightness to full brightness During cooking, if the hob is working, the interlink symbol remains no change, i.e. full brightness. When all knobs are turned to 0 degree, the hob is extinguished. After about 5-8 seconds, the gas hob sends a signal to the hood. The interlink symbol changes to 1/3 brightness. The range hood stops working after 3 minutes. 2. When the knob is at 0 degree, i.e. there is no flame: Press or button for about 3 seconds. The interlink symbol will be OFF and the interlink function is deactivated. Press button for about 3 seconds. The interlink symbol will be ON and the symbol displays blue. If you do not press the button within 10 seconds, the brightness will change to 1/3. 3. When the interlink symbol is OFF, i.e. white: The interlink function is deactivated. The gas hob will not send a signal to the corresponding range hood. The hob and the hood will be turned on or off by hand.

18 Notes: Timer operation must be performed after the burner is ignited. ID code Touch ID code for 3 seconds to active the timer. A code will be shown in the screen. Select different burners. When you first touch, the right burner becomes active; when you second touch, the left burner becomes active. ID code : If you touch this code, the time you set will decrease. ID code : If you touch this code, the time you set will increase. After you activate the timer, press or, enter the time you want. If you press, the time will increase from 1min. If you press, the time will decrease from 99min. After the timer is activated, if you press or, the time will increase or decrease quickly. If you press, the time will decrease from 99min to 1min. If you press once again, the time will be 0. If you press, the time will increase from 1min to 99min, If you press once again, the time will be 0. After 5 seconds when you finished setting the time, and will be locked. The time you set begin to countdown. ID code: Show which burner is working and the time left. ID code: Show which burner is working. ID code: The working time left of the working burner. ID code: Show which burner is flaming. For example: The working time set for the right burner is 10min and the working time set for the left burner is 80min. Setting steps: 1. Touch for 3 seconds to activate the timer. The right code begins to flash. 2. Press to set the working time of the right burner, until the figure on the screen increases from to. 3. Touch again to select the left burner. The left code begin to flash. 4. Touch again to set the working time of the left burner, until the figure on the screen decreases from to. 5. When you finish the setting, the buttons and will be locked 5 seconds later. The time will be shown on the screen, and the time begin to countdown. 16
19 Change the setting time You need activate the timer by touching for 3 seconds when you want, and change the working time by touching and. After 5 seconds when the changing is finished, the buttons and are locked, and the time begin to countdown. For example : Change the working time of the left burner from 20min to 10min; change the working time of the right burner from 20min to 30min. Setting steps: 1. Touch for 3 seconds to activate the timer. The left code begin to flash. 2. Press to set the working time of the right burner, until the figure on the screen decreases from to. 3. Touch again to select the right burner. The right burner begins to flash. 4. Touch to set the working time of the left burner, until the figure on the screen increases from to. 5. When you finish the setting, the buttons and will be locked 5 seconds later. The time will be shown on the screen, and the time begins to countdown. Time up When the time is up, the burner will extinguish. After the burner extinguishes, the code on the screen begins to flash. If there are other working burners, there have DI DI alarm signal every 2 seconds within 60 seconds. After the alarm, the time set for other burners will display on the screen. You may stop the alarm signal by touching any button. Stopping the timer in advance by hand Touch the code for 5 seconds to stop all working burners. Checking the time left When several burners working with timer, the code and flash alternately at regular intervals. When the code, flashes, the time shown on the screen is the time left. 17
20 According to the following five-stage flame power indication chart and function descriptions, choose the flame you want. When the knob is turned OFF (0 degree), press it down and then turn it to the ignition position (30-40 degrees counterclockwise). At this time, the flame of the internal ring is ignited while the flame of the external ring is not yet ignited. Press the knob down. Keep the movement for 3-5 seconds and then release your hands. If the flame goes out after your releasing, repeat the above operations. Special instructions: -The 40-degree ignition position is to prevent sudden gas release upon igniting, which may cause deflagration, especial for artificial gas. When the burner head is ignited, release the knob first, and then turn the knob counterclockwise to the maximum flame position (90 degrees). The flame will be transferred from the internal ring to the external ring rapidly. When you turn the knob counterclockwise from the maximum flame position (90 degrees) to the medium flame position (170 degrees), the small flame of the internal ring will remain unchanged, while the flame of the external ring will gradually be extinguished. When you turn the knob counterclockwise from the medium flame position to the minimum flame position (230 degrees), the small flame of the internal ring will be reduced to the minimum. Special instructions: -The wide-range of (230-degree) flame power adjustment ensures the flame can be adjusted conveniently and accurately, which can meet all your needs. After using the gas hob, turn the knob clockwise to the OFF (0 degree). The flame will be extinguished. For gas hobs with timer, you may extinguish the flame by setting the timer. But after the flame extinguishes, please turn the knob clockwise to OFF (0 degree). For the sake of your safety, do turn off the gas valve on the indoor pipelines after using the gas hob. 18
 to clean enamel surfaces (e.g. supports, etc.")
21 19 Before cleaning the gas hob, you must turn off the indoor gas valve, and wait until the gas hob is cooled. When cleaning, do not dismantle the safety device or sealed parts of the hob. Cleaning the pan supports of the gas hob Clean the pan supports with soft gauze, cleanser and hot water. Do not use acid substances (e.g. lemonade, vinegar, etc.) to clean enamel surfaces (e.g. supports, etc.) Cleaning the burners of the gas hob (at least once a month) Clean the dirt on the surfaces of the burner base, ignition electrodes and thermal couples with a soft brush. (Do not touch the ignition electrodes when cleaning) Do not use a granular cleanser (decontamination powder), sharp objects, steel wool or knives to clean the stubborn stains on the burner. Otherwise, the safety device of the gas hob will go wrong or the surface of some parts will be abraded. This will directly shorten the service life of the product. Cleaning the faceplate of the gas hob Please clean and maintain the hob faceplate with soft gauze and soap suds (or special cleansers). If you want to remove the fingerprints left on the stainless steel surface, you should use a 3M cleanser. You had better not use a chloride-based cleanser to clean the glass. Do not use a granular cleanser (decontamination powder) or steel wool to clean the faceplate. This may cause scratches on the surface of the hob. Cleaning the caps of the gas hob (at least once a month) When you are using the hob, you may find the flame is not uniform or some burner openings have no flame. In such cases, after the hob has cooled, take down the cap and use a steel needle to remove the dirt and carbon blocked in the burner openings. As shown in the figure, install the cap correctly. Do not wash the cap directly with water (as the bubbles may temporarily block the fire holes).do not use a hard object to wipe the inorganic water-based and temperature-resistant coating on the burner surface, which will result in permanent damage to the black surface. If there is water or oil entering the center hole and this causes ignition failure, clean the liquid with soft cloth to make the gas pipeline unblocked. Then install the cap correctly according to the figure and ignite again. After cleaning, please re-install the support, burner heads and caps in accordance with the correct method (as shown in Page 9). Any permanent scratch on the faceplate surface or deformation of caps caused by incorrect installation is not covered by the warranty.
22 Symptom Cause Solution Ignition electrode does not spark Power supply The power supply is not connected or has a poor contact. Re-connect Burner Not installed properly Re-install correctly Ignition electrode and ignition position are not aligned. Adjust discharge distance to 3-4mm Ignition electrode The ignition is wet, especially in the rainy season; or due to food overflows Use a dry, soft cloth to dry the ignition electrode. Flame goes out when the ignition knob is released Safety valve The pressing and holding time was too short for the safety solenoid valve to work properly. Ignite again and hold the knob down for 3 to 5 seconds after the flame is ignited. When you are using the pulse ignition, the hob is not ignited or is difficult to be ignited. A loud noise when igniting/burning Deriving from the flame or flame blowoff Flame out when using Short and weak flame Long and yellow flames Gas valve Not open or not completely open. Ensure the gas valve is fully open. Gas pipeline There is air in the gas pipeline. Ignite repeatedly until the flame is ignited. Burner Caps or other components are not installed correctly. Re-install these components correctly. Burner The burner holes on the cap are blocked so that the gas cannot flow out normally. Clean the dirt out of the burner holes. Ignition electrode It is wet, or dirty due to the overflowing food. Dry the ignition electrode and remove all dirt. Gas connecting hose The gas hose is flattened or blocked. Adjust or replace the gas connecting hose. Power supply Power supply is cut off. Re-connect. Cap Not installed properly. Re-install correctly. Throttle Air inlet is too big. Re-adjust the throttle and flame. The protection sensor is dirty Clean thermal couple. Thermal couple The fitting position deviates from the small flame range. Adjust the position of thermal couple properly. Gas in gas cylinder is used up; the opening angle of Gas source the pressure-reducing valve is too small; otherwise Replace the gas cylinder; clean the gas there is a problem with the gas pressure in the connecting hose or adjust the decompression. pipeline. Throttle Air inlet is too small. Re-adjust the throttle and flame. Cap Some flame holes are blocked. Clean out the dirt in the flame holes. Unstable burning Cap Not installed properly. Re-install correctly. The gas rubber hose is aging, cracked, fractured or Replace the gas connecting hose. Smell Leakage falling off. The main burner is not ignited. Re-ignite the burner after the smell disappears. The flame goes out suddenly. The voltage is too low. Turn the knob to 0 degree. After checking the power supply, the voltage is normal. Turn the knob to 0 degree. Operate after the The flame goes out suddenly and Temperature during work is too high. temperature becomes normal and "H" does not "H" flashes. flash. The screen displays ignition failure. Set the timer to 0 for hobs with timer, and press Mistaken There are foreign matters such as water etc. on the operation zone, "+" and "-" for 5 seconds to exit the mode. Clean The indicator lights up upon and mistaken operation leads to display mode. the operation buttons. touching, but flame is not ignited. The button does not work or abnormal interlink. 17 Ignition fails and alarm Foreign matters on the surface for a long time or electromagnetic wave Interlink code address changes. The knob does not spring. Clean the surface or re-operate. 18 Re-activate the interlink mode according to requirement "2" on Page 15. Adjust the knob position. 20
23 Danger!!! Only technicians who have received professional training and obtained a qualification for gas hob maintenance can maintain the gas hob. To avoid serious consequences, no other persons should maintain the gas hob without permission. When your gas hob is malfunctioning, before contacting our service center, please refer to the Faults Analysis and Troubleshooting first. If the technicians go to your house and find there is nothing wrong with your gas hob, you will have to pay the relevant expenses, even if it is within the warranty period. If you cannot find a solution to the fault, turn off the gas valve and contact our local service center. When you contact our customer service center, please state the product code (E-Number), the applicable gas (Gas Type), the product model (Model), the manufacturing date (FD) and the serial number (Serial. No.). These information will help us to offer better service, and save your unnecessary cost. You will find these information on the nameplate of your gas hob. 21
24 In accordance with the Regulations on Maintaining, Changing and Returning of Some Commodities of the People's Republic of China, we provide a three-year warranty period for main components of this product and a one-year warranty period for the whole product since the purchasing date. For an appliance purchased for the purposes of production, operation, commercial use or collective use, we provide a three-month warranty period for the whole product and its main components, except it is stipulated otherwise in purchasing contracts. In case laws and regulations have different stipulations, it shall be subject to the later. The discounted commodities sold by the factory or commercial units have the same warranty as the above. However, we do not offer warranty on those components sold at a price less than the retail price. During the warranty period, in case of repairs, users must hold the valid purchase invoice and the warranty card required d by the factory. The warranty period shall be calculated from the date of issuing the invoice. Users shall keep the warranty card and the purchase invoice properly, both of which must be shown for repairs. In accordance with national regulations, the following items are not covered by the free warranty, and will be charged for repair: - There are damages caused by the user's improper transportation, installation, use, maintenance and keeping; - The product is disassembled and repaired by the user or in a non-factory-specified repair station; - The product has no warranty card or valid purchase invoice; - The serial number on the warranty card is altered or is not consistent with the product to be repaired; - The product is damaged by force majeure; - The frees warranty period has expired; - All damages and losses caused by the usage conditions, such as the power supply, water, temperature and humidity, which cannot be controlled by our company, are not covered by free warranty. Round-the-clock hotline Maintenance within 24 hours in the same city Free installation and debug (except material cost) Hotline consultancy service Service through the service life 22
25 Warranty Card of Siemens Customer Name Tel Address Purchase Date E-Number Maintenance Point Invoice Number Phone of Maintenance Point Customer Name Purchase Date E-Number Maintenance Date Address Invoice No. Date of leaving factory Serial No. (Case No.) Settlement Sheet V Customer Name Purchase Date E-Number Maintenance Date Address Invoice No. Date of leaving factory Serial No. (Case No.) Settlement Sheet IV Customer Name Purchase Date E-Number Maintenance Date Address Invoice No. Date of leaving factory Serial No. (Case No.) Settlement Sheet III Customer Name Purchase Date E-Number Maintenance Date Address Invoice No. Date of leaving factory Serial No. (Case No.) Settlement Sheet II Customer Name Purchase Date E-Number Maintenance Date Address Invoice No. Date of leaving factory Serial No. (Case No.) Settlement Sheet I
26 Material No.: Version: 02 Production License Code: XK Siemens Appliance Chinese Website: Hotline: Customer Service
Built-in Gas Hobs Operation and Installation Instruction
 Material Number: 9000353880 Version: 01 Production License Code: XK00-005-00419 Quality Safety Built-in Gas Hobs Operation and Installation Instruction PED7250Ax PED7230Ax Preface Thank you for choosing
BUILT-IN GAS HOBS INSTALLATION AND OPERATION INSTRUCTION
 BUILT-IN GAS HOBS INSTALLATION AND OPERATION INSTRUCTION en ER74357HK ER74253HK ER74333HK ER74232HK Preface Dear customer, Congratulations on your choice and thank you for purchasing one of our appliances.
USER MANUAL. 80 cm 2 burners, glass hob AKC 820C/BLM
 USER MANUAL 80 cm 2 burners, glass hob AKC 820C/BLM For your safety These instructions have been drawn up for your safety and that of others. You are therefore requested to read them carefully before installing
USER MANUAL. 60cm, 3 burners, Hob AKC 630
 USER MANUAL 60cm, 3 burners, Hob AKC 630 For your safety These instructions have been drawn up for your safety and that of others. You are therefore requested to read them carefully before installing
5. Wok setting (wok burner) 6. Roasting setting (wok burner)
 6. Roasting setting (wok burner)") OPERATION Description 6 5 7 8 9 0 Ignition and adjustment. zone indication. 0 position. High setting. Low setting 5. Wok setting (wok burner) 6. Roasting setting (wok burner). rapid burner. standard burner.
OPERATION Description 6 5 7 8 9 0 Ignition and adjustment. zone indication. 0 position. High setting. Low setting 5. Wok setting (wok burner) 6. Roasting setting (wok burner). rapid burner. standard burner.
Installation and Operating Instructions
 Installation and Operating Instructions Models: Verso 4G Hob As part of Parmco Appliances commitment to improving and updating product ranges, we reserve the right to alter, change and update technical
HG 675 CX 60 HG 675 CN 60 HG 675 CW 60
 HG 675 X 60 HG 675 CX 60 HG 675 CN 60 HG 675 CW 60 1 2 1. : 93/68: 90/396: 2006/95/CE: 2004/108/CE: - 1935/2004:. 2002/95/CE: RoHS 2.,.,,,,...,. (,..)..,,.,. ( ),,, ;,,.,.....,.,,,,,,...,. (..),,.,..,.,,,,
BUILT-IN GLASS HOB MODEL: EGH-G8592G(BK) EGH-G8593G(BK) Owner s Manual Please read this manual carefully before operating your set.
 EGH-G8593G(BK) Owner s Manual Please read this manual carefully before operating your set.") BUILT-IN GLASS HOB MODEL: EGH-G8592G(BK) EGH-G8593G(BK) Owner s Manual Please read this manual carefully before operating your set. Retain it for future reference. Record model number and serial number
BUILT-IN GLASS HOB MODEL: EGH-G8592G(BK) EGH-G8593G(BK) Owner s Manual Please read this manual carefully before operating your set. Retain it for future reference. Record model number and serial number
Hong Kong Town Gas. Gas Hobs. for installation in worktops GD LUX 30 1G GD LUX 30 2G
 Hong Kong Town Gas Gas Hobs for installation in worktops GD LUX 30 1G GD LUX 30 2G Welcome 2 Welcome Dear customer, We thank you for your confidence in our product. We are supplying you with a high-quality
Built-in Gas Hob. Important - Please read these instructions fully before using. Operating Instructions -Please keep for future reference
 Built-in Gas Hob Operating Instructions -Please keep for future reference A70GCIS Important - Please read these instructions fully before using These instructions contain important information which will
User Manual. Hob PH601SS
 EN User Manual Hob PH601SS Contents Safety information 2 Safety instructions 3 Product description 5 Daily use 5 Hints and tips 6 Care and cleaning 6 Safety information Troubleshooting 6 Installation 7
Pro6 Duo. Stampa Novaprint - Tel cod USER MANUAL
 Pro6 Duo Stampa Novaprint - Tel.0424-539449 - www.novaprint.it cod.10161031310 USER MANUAL 9. Troubleshooting PROBLEM CAUSE SOLUTION Boiler fails to heat up. Device not plugged in. Button 3 and/or 4 not
Fully-automatic Gas tankless Water Heater USER'S MANUAL FOR MODEL EZ-101 ISO9001 certified
 Fully-automatic Gas tankless Water Heater USER'S MANUAL FOR MODEL EZ-101 ISO9001 certified Thank you for purchasing our fully-automatic gas-fired tankless water heater. Please completely read this Manual
USER MANUAL AKC cm 4 Burners, Stainless Steel Hob
 USER MANUAL AKC 641 60 cm 4 Burners, Stainless Steel Hob For your safety These instructions have been drawn up for your safety and that of others. You are therefore requested to read them carefully before
GAS COOKER GAS OVEN SERIES. Owner s Manual Please read this manual carefully before operating your set. Retain it for future reference.
 GAS COOKER GAS OVEN SERIES Owner s Manual Please read this manual carefully before operating your set. Retain it for future reference. Record model number and serial number of the set. See the label attached
BUILT-IN OVEN MODEL: EBO-D7080D(SS) Owner s Manual Please read this manual carefully before operating your set. Retain it for future reference.
 Owner s Manual Please read this manual carefully before operating your set. Retain it for future reference.") BUILT-IN OVEN MODEL: EBO-D7080D(SS) Owner s Manual Please read this manual carefully before operating your set. Retain it for future reference. Record model number and serial number of the set. See the
BUILT-IN OVEN MODEL: EBO-D7080D(SS) Owner s Manual Please read this manual carefully before operating your set. Retain it for future reference. Record model number and serial number of the set. See the
GAS STAINLESS COOKTOPS
 GAS STAINLESS COOKTOPS CG604D & CG905D models CG604DCG905D USER GUIDE HK SG Contents 1 EN Safety and warnings 2 Introduction 5 Using your cooktop 6 Cooking guidelines and cookware 8 Care and cleaning
NON-DUCTED TYPE SMOKELESS BBQ ROASTER MODEL NJG-C
 OPERATION MANUAL NON-DUCTED TYPE SMOKELESS BBQ ROASTER MODEL NJG-C * Before operating this roaster unit, please read and understand the instructions specified in this manual for proper and safety use.
PROF. RANGE COOKER MODEL: EPRC-9850FE/SS EPRC-9860E/SS. Owner s Manual Please read this manual carefully before operating your set.
 PROF. RANGE COOKER MODEL: EPRC-9850FE/SS EPRC-9860E/SS Owner s Manual Please read this manual carefully before operating your set. Retain it for future reference. Record model number and serial number
Instructions for use. Gas hobs for installation in worktops GKS GWS GKS GKS
 Instructions for use Gas hobs for installation in worktops GKS 3920.0 GWS 3911.0 GKS 6940.0 GKS 9951.0 For use in: Hong Kong Issue: 2014-01-14 Version: 1.3_EN Identity no.: 073587_HK Welcome 2 Welcome
Index. page 8. 1 Description of appliance. Description of accessories. page 4. 3 Precautions for use. page 5. 4 Getting started
 Index 1 Description of appliance page 2 2 Description of accessories page 3 3 Precautions for use 4 Getting started page 4 page 5 5 Practical use of the accessories page 5 6 Continuous refilling page 6
Setup instructions. Honeywell GAS DETECTOR. Overview. Accessories The instruction x1 Plug dowel x2 Screw x2 Double-sided adhesive tape x2
 Setup instructions 1. Connection terminal, output signal and device connection Honeywell GAS DETECTOR Overview The autonomous gas sensor (hereinafter referred to as the sensor) is a home device for detecting
Contents authorised persons
 Contents 1. INSTRUCTIONS FOR SAFE AND PROPER USE 4 2. POSITIONING OF THE HOB 6 3. GAS CONNECTION 10 4. ELECTRICAL CONNECTION 11 5. ADAPTATION TO DIFFERENT TYPES OF GAS 12 6. FINAL OPERATIONS 14 7. USING
Washing Machine OWNER S MANUAL TRWTL-70. Before using your washing machine, please read this manual carefully and keep it for future reference.
 Before using your washing machine, please read this manual carefully and keep it for future reference. Washing Machine OWNER S MANUAL TRWTL-70 Read This Manual Inside you will find many helpful hints on
6L PRESSURE COOKER. Instruction Manual. Model: PLA1424
 6L PRESSURE COOKER Instruction Manual Model: PLA1424 Due to ongoing product improvements, specifications and accessories may change without notice. Actual product may differ slightly to that depicted.
User Manual. Hob CH601FL
 EN User Manual Hob CH601FL Contents Safety information 2 Safety instructions 3 Product description 5 Daily use 5 Hints and tips 5 Care and cleaning 6 Safety information Troubleshooting 7 Installation 7
Belling. Gas Hob GHU573 - GHU573T GHU70GE - GHU70TGE - GHU70GC GHU70TGC - GHU60GC INSTALLATION AND USER INSTRUCTIONS
 Belling Gas Hob GHU573 - GHU573T GHU70GE - GHU70TGE - GHU70GC GHU70TGC - GHU60GC INSTALLATION AND USER INSTRUCTIONS Note: This appliance is supplied for use with Natural Gas and can be converted to LPG
HR 601 C A AUS. ENGLISH Instructions for use Page 2
 HR 61 C A AUS ENGLISH Instructions for use Page 2 1 INSTRUCTION FOR USE IMPORTANT SAFETY INSTRUCTIONS BEFORE USING THE GLASS CERAMIC HOB INSTALLATION ELECTRICAL CONNECTIONS ENERGY SAVING TIPS SAFEGUARDING
USER S INFORMATION MANUAL (2,4)SG13B
SG13B") USER S INFORMATION MANUAL (2,4)SG13B Series Gas Heating/Electric Cooling Package Unit Congratulations......your outdoor heating/cooling package unit is a valuable piece of equipment, designed and manufactured
USER S INFORMATION MANUAL (2,4)SG13B Series Gas Heating/Electric Cooling Package Unit Congratulations......your outdoor heating/cooling package unit is a valuable piece of equipment, designed and manufactured
INSTRUCTION MANUAL BUILT-IN HOBS CIR900X
 INSTRUCTION MANUAL BUILT-IN HOBS CIR900X ENGLISH 3-19 Thank you for choosing our product. We advise you to read this manual carefully. It contains all necessary instructions for maintaining unaltered the
PDG PDG4.1...A PDG5.0...A INSTRUCTION MANUAL IO 00450/2 ( )
") PDG4.0... PDG4.1...A PDG5.0...A INSTRUCTION MANUAL IO 00450/2 (11.2010) DEAR CUSTOMER, Outstanding user-friendliness and excellent efficiency make cooktops a perfect choice. Please read this manual thoroughly
PDG4.0... PDG4.1...A PDG5.0...A INSTRUCTION MANUAL IO 00450/2 (11.2010) DEAR CUSTOMER, Outstanding user-friendliness and excellent efficiency make cooktops a perfect choice. Please read this manual thoroughly
Installation and Operating Instructions
 Installation and Operating Instructions Model: HOB6S-4E-4 HOB6W-4E-4 For your convenience, we recommend to attach the serial number label HERE. As part of Parmco Appliances commitment to improving and
USER MANUAL Model DWP-55/DWP-66
 USER MANUAL Model DWP-55/DWP-66 ELECTRIC THERMO POT BY D A E W O O E L E C T R O N I C S S AL E S & SERVICES ( M ) S DN BH D CONTENTS TITLES PAGE NO General Safety Precautions 1 Parts Introduction 3 Technical
INSTALLATION & USER MANUAL
 INSTALLATION & USER MANUAL Scholtès Gas Domino Built-in Hob Index Important Safety Instruction, 1-2 Instructions for Use, 3 Usage Maintenance Instructions for Installer, 4-5 Installation Positioning Gas
GAS WATER HEATER HT351G12
 GAS WATER HEATER HT351G12 Note: Before operating or installing this gas water heater read this manual and follow all safety rules and operating instructions. 2,800 Pa 1/2"- 1/2" NPT 12 L 2xAA BATTERIES
BUILT-IN OVEN MODEL: EBO-E7081D(SS) Owner s Manual Please read this manual carefully before operating your set. Retain it for future reference.
 Owner s Manual Please read this manual carefully before operating your set. Retain it for future reference.") BUILT-IN OVEN MODEL: EBO-E7081D(SS) Owner s Manual Please read this manual carefully before operating your set. Retain it for future reference. Record model number and serial number of the set. See the
BUILT-IN OVEN MODEL: EBO-E7081D(SS) Owner s Manual Please read this manual carefully before operating your set. Retain it for future reference. Record model number and serial number of the set. See the
Washing Machine. User manual WW9*K5*****/WW8*K5*****/WW7*K5***** Untitled :17:40
 Washing Machine User manual WW9*K5*****/WW8*K5*****/WW7*K5***** Untitled-6 1 2017-12-12 3:17:40 Contents Contents 4 What you need to know about the safety instructions 4 Important safety symbols 4 Important
User Manual. Ceramic Cooktop Model : CRSF745
 User Manual Ceramic Cooktop Model : CRSF745 Please read this instruction manual carefully before using your new ceramic cooktop and keep the manual in a safe place for future reference. Dear customer,
PC 640 GB. Built-in cooking tables 60 Instructions for installation and use
 PC 640 GB Built-in cooking tables 60 Instructions for installation and use Congratualtions on choosing an Ariston appliance, which you will find is dependable and easy to use. We recommend that you read
EGG9363NOX EN HOB USER MANUAL
 EGG9363NOX...... EN HOB USER MANUAL 2 www.electrolux.com CONTENTS 1. SAFETY INFORMATION................................................... 3 2. SAFETY INSTRUCTIONS..................................................
TABLE OF CONTENTS DEAR CUSTOMERS,
 MODEL : P619.1SS DEAR CUSTOMERS, First of all, thank you for buying our product. Please read all the instructions and warnings in this manual carefully. The manual includes important information about
HEA-900 EDENPURE INDOOR/OUTDOOR ALL SEASON INFRARED HEATER
 HEA-900 EDENPURE INDOOR/OUTDOOR ALL SEASON INFRARED HEATER USER MANUAL 01mf_Manuel_EdenPure_ChaufHEA-900_12025.indd 1 ALL SEASON INFRARED HEATER 01mf_Manuel_EdenPure_ChaufHEA-900_12025.indd 2 INSTRUCTION
UBGHFF60W 60cm Gas on Glass Gas Hob
 UBGHFF60W 60cm Gas on Glass Gas Hob GB [02] x 1 [03] x 2 [04] x 1 [01] x 1 [08] x 4 [05] x 2 [09] x 1 [06] x 1 [07] x 4 [10] x 4 [11] x 1 TEMPLATE TEMPLATE UBGHFF60W GB Built-in 60cm Gas on Glass Gas Hob
60cm Built In Induction Cooktop
 20100618 issue 2 啊哈 60cm Built In Induction Cooktop Installation and User manual Content Safety instructions---------------------------------- 1 Product description--------------------------------- 3 Installation---------------------------------------------
Built-in Gas Hob CZ55554 CZ55571
 Built-in Gas Hob CZ55554 CZ55571 INSTALLATION AND OPERATING INSTRUCTIONS The product may differ from the one illustrated but the installation and operation procedure remains the same The product may differ
USER GUIDE NZ AU GB IE
 GAS COOKTOP CG604DX & CG905DX models USER GUIDE NZ AU GB IE CONTENTS Safety and warnings 2 Introduction 7 Using your cooktop 8 Cooking guidelines and cookware 10 Care and cleaning 11 Troubleshooting 15
Gas Cooktop Installation, User and Service Instructions GMS 955.1
 Gas Cooktop Installation, User and Service Instructions GMS 955.1 IMPORTANT: SAVE FOR LOCAL ELECTRICAL INSPECTOR S USE. READ AND SAVE THESE INSTRUCTIONS FOR FUTURE REFERENCE. OBSERVE ALL FEDERAL, STATE
SAVE THESE INSTRUCTIONS
 2 IMPORTANT SAFEGUARDS When using electrical appliances especially when children are present, basic safety precautions should always be followed to reduce the risk of fire, electric shock, and/or injury
OPERATION MANUAL. System Inverter Air Conditioners FXNQ20A2VEB FXNQ25A2VEB FXNQ32A2VEB FXNQ40A2VEB FXNQ50A2VEB FXNQ63A2VEB
 OPERATION MANUAL System Inverter Air Conditioners FXNQ20A2VEB FXNQ25A2VEB FXNQ32A2VEB FXNQ40A2VEB FXNQ50A2VEB FXNQ63A2VEB CONTENTS Read before operation Part name and functions...2 Safety precautions...2
User manual Installation instruction Conversion instruction. BG6xA BG6xB BG6xC BG6xD BG6xE BG6xF
 User manual Installation instruction Conversion instruction BG6xA BG6xB BG6xC BG6xD BG6xE BG6xF Pictograms used: Important information Tip Gas connection Electrical connection Right Wrong Safety regulations
Operating instructions
 en Operating instructions Neff GmbH Carl-Wery-Straße 34 81739 München Cod. 9000413914 G www.neff-international.com Table of contents Safety precautions................... 5 Your new appliance.................
SYSTEM Inverter Air Conditioners
 OPERATION MANUAL SYSTEM Inverter Air Conditioners MODEL Ceiling-mounted duct type low static pressure unit FXDQ07MVJU FXDQ09MVJU FXDQ12MVJU FXDQ18MVJU FXDQ24MVJU Read these instructions carefully before
INSTRUCTIONS AND WARRANTY
 INSTRUCTIONS AND WARRANTY MODEL NO: STS80 SALTON HOT TRAY WITH TEMPERATURE CONTROL Congratulations on purchasing our Salton Hot Tray with Temperature Control. Each unit is manufactured to ensure safety
NOTE: THIS APPLIANCE MUST BE INSTALLED SOLELY AND EXCLUSIVELY BY A QUALIFIED TECHNICIAN.
 Table of Contents 1. IMPORTANT SAFETY INSTRUCTIONS... 4 2. DESCRIPTION OF CONTROLS... 6 3. USING THE COOKTOP... 7 3.1 Ignition with safety device... 7 3.2 Practical advices to use the burners... 8 3.3
Contents. 1. Instructions for safety and use 20
 Contents 1. Instructions for safety and use 20 2. Positioning in the counter top 21 2.1 Fixing to the supporting structure 21 2.2 Positioning the adhesive sponge 22 2.3 Positioning the fastening clips
Porter & Charles OPERATION MANUAL. Gas Cooktop CG60S, CG76S, CG90S, CG60W, CG90W
 Porter & Charles OPERATION MANUAL Gas Cooktop CG60S, CG76S, CG90S, CG60W, CG90W Congratulations on the purchase of your Porter & Charles appliance. We are sure it will provide many years of great cooking
Operating and Installation Manual for Cooker Hoods
 Operating and Installation Manual for Cooker Hoods en LC65S953.. Preface Thank you for choosing Siemens cooking appliance. Before using your appliance for the first time, please read these instructions
USER MANUAL. FairWind FWPC6L Pressure Cooker. Contact Us:
 USER MANUAL FairWind FWPC6L Pressure Cooker Contact Us: 1-844-528-2566 Read and Save These Instructions TABLE OF CONTENTS SPECIFICATIONS... 2 Parts List... 3 Important Safety Instructions... 4 Installation
Proline GAS HOB Model TCG40IX Instruction Book
 Proline GAS HOB Model TCG40IX Instruction Book GB Operating and Installation Instructions Index Technical data and specifications...... 3 Installation...................... 3-6 Ventilation........................
Bar Fridge USER MANUAL MB46W
 Bar Fridge USER MANUAL MB46W CONTENTS Safety information... 2-3 Identifying parts of the fridge... 4 Transporting... 5 Installation... 5 Reversing the door... 6 Operating instructions... 7 Cleaning &
INSTRUCTION MANUAL GAS COOKTOPS IL**604, IL**775, IL**905 (** = BV, WV and SS models)
") INSTRUCTION MANUAL GAS COOKTOPS IL**604, IL**775, IL**905 (** = BV, WV and SS models) OPEN 24/7 ILVE ACCESSORIES ONLINE SHOP Dear customer, We thank you and congratulate you on your choice. This new carefully
INSTRUCTION MANUAL GAS COOKTOPS IL**604, IL**775, IL**905 (** = BV, WV and SS models) OPEN 24/7 ILVE ACCESSORIES ONLINE SHOP Dear customer, We thank you and congratulate you on your choice. This new carefully
Intelligent Swing Gate Turnstile Operating Manual CPW-322CS
 Intelligent Swing Gate Turnstile Operating Manual CPW-322CS C O N T E N T S 1. General Descriptions...1 2. Definitions... 1 2.1 Swing Gate Turnstile... 1 2.2 Passing Modes... 2 3. Safety Precautions...3
EHF6140FOK EN HOB USER MANUAL
 EHF6140FOK...... EN HOB USER MANUAL 2 www.electrolux.com CONTENTS 1. SAFETY INFORMATION................................................... 3 2. SAFETY INSTRUCTIONS..................................................
User Manual. 600mm, 700mm & 900mm Gas Cooktops Model No. CF6GS, CF6GW, CF7GS, CF9GS
 User Manual 600mm, 700mm & 900mm Gas Cooktops Model No. CF6GS, CF6GW, CF7GS, CF9GS For all product enquires, including warranty support, please contact our Customer Care team 1800 444 357 or email customercare@hapl.com.au
GUH90 90 cm Canopy Hood
 User Manual for your GUH90 90 cm Canopy Hood NOTE: This User Instruction Manual contains important information, including safety & installation points, which will enable you to get the most out of your
Built-in ceramic-glass cooktop
 Built-in ceramic-glass cooktop The built-in ceramic-glass cooktop is manufactured for household use only. Our appliances are packed in environmentally friendly materials which may be recycled, deposited
INDUCTION COOKER MODEL: EIC-G1810(BK) Owner s Manual. Please read this manual carefully before operating your set. Retain it for future reference.
 Owner s Manual. Please read this manual carefully before operating your set. Retain it for future reference.") INDUCTION COOKER MODEL: EIC-G1810(BK) Owner s Manual Please read this manual carefully before operating your set. Retain it for future reference. Record model number and serial number of the set. See the
INDUCTION COOKER MODEL: EIC-G1810(BK) Owner s Manual Please read this manual carefully before operating your set. Retain it for future reference. Record model number and serial number of the set. See the
User Manual. 110 Cup (55 Cup Raw) Gas Rice Cooker. Model: 177GRCLP, 177GRCNAT 12/2018. Please read and keep these instructions. Indoor use only.
 Gas Rice Cooker. Model: 177GRCLP, 177GRCNAT 12/2018. Please read and keep these instructions. Indoor use only.") 110 Cup (55 Cup Raw) Gas Rice Cooker Intertek 5010781 Conforms to ANSI STD Z83.11-2016 Model: 177GRCLP, 177GRCNAT 12/2018 FOR YOUR SAFETY Do not store or use gasoline or other flammable vapors or liquids
110 Cup (55 Cup Raw) Gas Rice Cooker Intertek 5010781 Conforms to ANSI STD Z83.11-2016 Model: 177GRCLP, 177GRCNAT 12/2018 FOR YOUR SAFETY Do not store or use gasoline or other flammable vapors or liquids
GLASS CERAMIC COOKTOP
 PHS 3216C GLASS CERAMIC COOKTOP USER'S MANUAL Dear customer, Thank you for buying a PHILCO brand product. So that your appliance serves you well, please read all the instructions in this user's manual.
EGT7828CK EGT7838CK EGT9229CK EGT9239CK EGT9239CKB. User Manual. EN Gas Cooktop. Fj oms113"01u. TH 1cnL.ls:nou01rns. VI Bếp gas âm
 EGT7828CK EGT7838CK EGT9229CK EGT9239CK EGT9239CKB EN Gas Cooktop TH 1cnL.ls:nou01rns VI Bếp gas âm User Manual Fj oms113"01u Hướng dẫn sử dụng Contents 2 Safety instructions... 3 Parts identification...
INSTRUCTIONS AND WARRANTY
 INSTRUCTIONS AND WARRANTY MODEL: SB400E SALTON 450W STAINLESS STEEL GLASS JUG BLENDER Congratulations on purchasing our Salton 450W Stainless Steel Glass Jug Blender. Each unit is manufactured to ensure
User manual. Hob CHT601FL
 User manual Hob CHT601FL Contents Safety information 2 Safety instructions 3 Product description 5 Daily use _ 6 Helpful hints and tips _ 8 Safety information Care and cleaning 8 Troubleshooting 9 Installation
OPERATION MANUAL. SYSTEM Inverter Air Conditioners FXSQ36MVJU FXMQ36MVJU FXSQ48MVJU. MODELS Ceiling-mounted Duct type. Ceiling-mounted Built-in type
 OPERATION MANUAL SYSTEM Inverter Air Conditioners MODELS Ceiling-mounted Duct type FXMQ30MVJU FXMQ36MVJU FXMQ48MVJU Ceiling-mounted Built-in type FXSQ12MVJU FXSQ18MVJU FXSQ24MVJU FXSQ30MVJU FXSQ36MVJU
Kyung Dong Oil Boiler. Contents. 1. General Warnings Safety Warnings
 Contents 1. General Warnings --------------------- 1 2. Safety Warnings ----------------------- 2 3. Parts and structure --------------------- 7 4. Safety Device ------------------------- 9 5. Checkups
User Manual. Hob ZGX65414BA
 EN User Manual Hob ZGX65414BA GB Contents Safety information 2 Safety Instructions 3 Product description 6 Daily use 6 Hints and tips 7 Care and cleaning 8 Troubleshooting 9 Installation 10 Technical information
EGG6343NOR EGG6343NOX EGG6343NOW EGG6343NDX...
 EGG6343NOR EGG6343NOX EGG6343NOW EGG6343NDX...... EN HOB USER MANUAL 2 www.electrolux.com CONTENTS 1. SAFETY INFORMATION................................................... 3 2. SAFETY INSTRUCTIONS..................................................
Electric Cooker. Important Please read these instructions fully before installing or using
 Electric Cooker Installation & User Instructions - Please keep for future reference Cat no Model 2679556 BUSH BET50W WHITE 2441935 BUSH BET50B BLACK 3596669 BUSH BET50S SILVER Cooker serial number place
Installation and Operating Instructions
 Installation and Operating Instructions Models: HO-1 HO-2 HO-6 HO-7 As part of Parmco Appliances commitment to improving and updating product ranges, we reserve the right to alter, change and update technical
USERS MANUAL FOR GAS BOILERS
 USERS MANUAL FOR GAS BOILERS PLEASE READ THE MANUAL CAREFULLY: IT CONTAINS IMPORTANT INFORMATION REGARDING SAFETY, INSTALLATION, USE AND MAINTENANCE OF THE APPLIANCE MODELS: NOVADENS 24 NOVADENS 24C NOVADENS
TECHNOLOGY MANUAL INSTANTANEOUS GAS WATER HEATER MODEL: 5L/6L CF EDITION: 01 / MAY, 2007 ISSUED BY MTS (CHINA)
") TECHNOLOGY MANUAL INSTANTANEOUS GAS WATER HEATER MODEL: 5L/6L CF EDITION: 01 / MAY, 2007 ISSUED BY MTS (CHINA) INDEX Characteristic & Function..2 - - 4 Outlook & summary.2 General technology data 3 Function.4
TECHNOLOGY MANUAL INSTANTANEOUS GAS WATER HEATER MODEL: 5L/6L CF EDITION: 01 / MAY, 2007 ISSUED BY MTS (CHINA) INDEX Characteristic & Function..2 - - 4 Outlook & summary.2 General technology data 3 Function.4
OWNERS MANUAL ELECTRIC STOVES
 OWNERS MANUAL ELECTRIC STOVES Electrolux Home Products 1. READ these instructions carefully before installing and operating the oven. Keep them for further reference. 2. Record in the space below the MODEL
DAIKIN ROOM AIR CONDITIONER. Operation Manual
 DAIKIN ROOM AIR CONDITIONER Operation Manual FDXM25F2V1B FDXM50F2V1B FDXM35F2V1B FDXM60F2V1B CONTENTS READ BEFORE OPERATION Safety precautions... 2 Names of parts... 4 CARE Care and Cleaning... 6 TROUBLE
User s Manual WS-69TB30 / WS-69TB36 (22 ) WS-69TB42 / WS-69TB48 (22 ) WS-69TS30 / WS-69TS36 (18 ) WS-69TS42 / WS-69TS48 (18 )
 WS-69TB42 / WS-69TB48 (22 ) WS-69TS30 / WS-69TS36 (18 ) WS-69TS42 / WS-69TS48 (18 )") www.windsterhood.com User s Manual LINER SERIES WS-69TB30 / WS-69TB36 (22 ) WS-69TB42 / WS-69TB48 (22 ) WS-69TS30 / WS-69TS36 (18 ) WS-69TS42 / WS-69TS48 (18 ) NOTE: PLEASE INSPECT HOOD IMMEDIATELY UPON
www.windsterhood.com User s Manual LINER SERIES WS-69TB30 / WS-69TB36 (22 ) WS-69TB42 / WS-69TB48 (22 ) WS-69TS30 / WS-69TS36 (18 ) WS-69TS42 / WS-69TS48 (18 ) NOTE: PLEASE INSPECT HOOD IMMEDIATELY UPON
Pizza Oven with Stand
 Pizza Oven with Stand Cooks up to 3 pizzas at a time Use to cook a variety of food Easy clean vitreous enamel interior Model No. P0104 Powerful 22MJ/h stainless steel burner Viewing window and temperature
OWNER'S MANUAL WARNING WARNING WARNING WARNING WARNING. Factory No.: HYFP Style No.: WARNING WARNING READ BEFORE USE!
 OWNER'S MANUAL READ BEFORE USE! Factory No.: HYFP30205-19 Style No.: 65209 For Outdoor Use Only! Use Propane Gas Only! - USE PROPANE GAS ONLY! Do not store or use gasoline or other flammable vapors and
Wok Cookers Instruction Manual
 Wok Cookers Instruction Manual Part No. DC100-09 Single Burner Wok Cooker Part No. DC200-09 Double Burner Wok Cooker IMPORTANT It is IMPORTANT that you read these instructions carefully and understand
F900 SERIES GAS CHARGRILL G9440, G9460, G9490, G User, installation and servicing instructions T Read these instructions before use
 F900 SERIES User, installation and servicing instructions GAS CHARGRILL G9440, G9460, G9490, G94120 Read these instructions before use DATE PURCHASED: MODEL NUMBER: SERIAL NUMBER: DEALER: SERVICE PROVIDER:
Cordless Ice Slicer DOSICE17
 Cordless Ice SlicerDOSICE17 Instruction Manual Thank you for purchasing Otona- Cordless Ice Slicer. To ensure proper use and for your safety, please read this instruction manual thoroughly before operating
STAR-MAX GAS GRIDDLES MODELS 615MA 624MA 636MA 648MA 615TA 624TA 636TA 648TA 624TSPA 636TSPA 648TSPA
 Star Manufacturing International Inc. 10 Sunnen Drive St. Louis, MO 63143 Phone: (314) 781-2777 Fax: (314) 781-3636 Installation and Operating Instructions 2M-Z1351 Rev. B 4/23/04 STAR-MAX GAS GRIDDLES
INFRARED ZONE HEATING SYSTEM
 TIMER UV. MODE INFRARED ZONE HEATING SYSTEM OWNER S MANUAL Model No. ATI-HF-X www.advancedtechinfrared.com PLEASE SAVE THESE INSTRUCTIONS WARNING: READ THIS OWNER S MANUAL CAREFULLY BEFORE USE. Thank you
User s Manual WALL MOUNT SERIES TABLE OF CONTENTS RA7730SS/RA77B30SS RA7736SS/RA77B36SS RA7742SS/RA77B42SS RA7748SS/RA77B48SS.
 TABLE OF CONTENTS 1 Table of Contents www.windsterhood.com Safety Information... 2 3 WALL MOUNT SERIES User s Manual RA7730SS/RA77B30SS RA7736SS/RA77B36SS RA7742SS/RA77B42SS RA7748SS/RA77B48SS NOTE: PLEASE
SR42G/52G Series Gas Fryers
 SR42G/52G Series Gas Fryers Installation & Operation Manual PRINTED IN THE UNITED STATES For Service, Call (318) 865-1711 Dean, 8700 Line Avenue, PO Box 51000, Shreveport, Louisiana 71135-1000 Shipping
Installation and Operating Instructions Models: HO-4-6S-CER-T HO-4-6NF-CER-T
 Installation and Operating Instructions Models: HO-4-6S-CER-T HO-4-6NF-CER-T For your convenience, we recommend to attach the serial number label HERE. 727626032017 p: 09 573 5678 f: 09 573 5699 e: sales@parmco.co.nz
Electric Cooker. Important Please read these instructions fully before installing or using
 Electric Cooker Installation & User Instructions - Please keep for future reference Cat no Model 2455426 BUSH BEDC60W WHITE 2329150 BUSH BEDC60B BLACK 3318816 BUSH BEDC60S SILVER 2745105 BUSH BEDC50W WHITE
PHCZ6511 / KMG13169C / PHCG4.1ZpZtC
 PHCZ6511 / KMG13169C / PHCG4.1ZpZtC INSTRUCTION MANUAL EN DEAR CUSTOMER, Outstanding user-friendliness and excellent efficiency make cooktops a perfect choice. Please read this manual thoroughly before
HCC663 Ceramic Hob. Manual for Installation, Use and Maintenance
 HCC663 Ceramic Hob Manual for Installation, Use and Maintenance 1 Customer Care Department The Group Ltd. Harby Road Langar Nottinghamshire NG13 9HY T : 01949 862 012 F : 01949 862 003 E : service@cda.eu
ECH60DC 60CM CERAMIC HOB DIAL CONTROL. Instruction Manual. Please read these instructions carefully before use and retain for future reference
 ECH60DC 60CM CERAMIC HOB DIAL CONTROL Instruction Manual Please read these instructions carefully before use and retain for future reference Safety Warnings Your safety is important to us. Please read
Built-in Electric Ceramic Hob
 Instruction Manual Built-in Electric Ceramic Hob LCHOBTC14 Image for indication only. GB Contents Safety Warnings... 3 Unpacking... 5 Product Overview... 6 Top View...6 Control Panel...6 Before Using Your
Instructions 1 This appliance is intended for non-professional use within the home. 2 Before using the appliance, carefully read the
 Instructions This appliance is intended for non-professional use within the home. 2 Before using the appliance, carefully read the instructions contained in this manual, as they provide important information
Operating Instructions
 Operating Instructions Air Conditioner Model No. Indoor Unit CS-PC9QKH CS-PC12QKH CS-PC18QKH CS-PC24QKH CS-PC28QKH Outdoor Unit CU-PC9QKH CU-PC12QKH CU-PC18QKH CU-PC24QKH CU-PC28QKH Operating Instructions