Service. Manual. Built-In Dishwasher. Preferred Service FDB301 RDDB201 RDDB301 VDB301
|
|
|
- Victoria Marshall
- 5 years ago
- Views:
Transcription

1 Service Preferred Service Manual This manual is to be used by qualified appliance technicians only. Viking does not assume any responsibility for property damage or personal injury for improper service procedures done by an unqualified person. Built-In Dishwasher This Base Manual covers general and specific information including, but not limited to the following models: FDB301 RDDB201 RDDB301 VDB301 SMK-0006 APR 2012
2 Table of Contents Safety Information... 3 Important Information... 3 General Information... 4 Warnings... 4 Water... 4 DRAIN... 4 Electrical... 4 Model Serial Number Matrix... 6 Settings and Functions... 7 Control Operation... 7 Wash Cycles... 7 POTS / PANS... 7 NORMAL WASH... 7 LIGHT/CHINA... 7 RINSE/HOLD... 7 Options... 7 HI TEMP WASH... 7 SANITIZED 155 F RINSE... 7 DELAY START... 7 AUDIBLE SOUND SIGNAL... 7 ILLUMINATION OF BUTTONS... 8 Cycle Data... 8 Preparing Dishes... 9 Before Operation... 9 Option Restrictions... 9 Changing a Program After the Unit has Started Opening door after cycle st.arts Entering Diagnostic Mode Fail Codes Parts Location Door Door Disassembly Outer Door Removal Control Panel Removal User Interface Removal Start Switch Removal Door Latch Interlock Removal Detergent Dispenser Door Spring and Cable Assembly Door Hinge Disassembly Parts Location - Interior Lower Spray Arm Removal Coarse Strainer Removal Fine Strainer Removal Upper Rack Removal Base Pan Front View Base Cover Disassembly Parts Location - Base Unit Drain Motor Disassembly Wash Diverter Disassembly Circulation Motor Disassembly Capacitor Disassembly Water Heater Disassembly Water Temperature Sensor Removal Fill Valve Disassembly Control Board Disassembly Control Board (cont.) Control Board Test Points Control Board Diagnosis Door Switch Detergent Dispenser Circulation Motor Fill Valve Drain Motor Moisture Sensor Wash Diverter Water Temperature Sensor User Interface Port User Interface Board Water Heater Timing Charts Pots/Pans HI Temp Pots/Pans Normal HI Temp Normal Economy Light China Rinse Hold Pots/Pans HI Temp Option Charts HI Temp Option o F Sanitized Rinse Option Troubleshooting Guide Main Control Board and User Interface Wiring Connections /301 Schematic diagram B 2012 Viking Preferred Service
3 Safety Information We have provided many important safety messages in this manual and on the appliance. Always read and obey all safety messages. This is the safety alert symbol.! This symbol alerts you to hazards that can kill or hurt you and others. All safety messages will be preceded by the safety alert symbol and the word DANGER, WARNING, or CAUTION. These words mean: SAVE THESE INSTRUCTIONS Important Information REVIEW ALL SERVICE INFORMATION IN THE APPROPRIATE SERVICE MANUAL AND TECHNICAL SHEETS BEFORE BEGINNING REPAIRS. Pride and workmanship go into every product to provide our customers with quality products. It is possible, however, that during its lifetime, a product may require service. Products should be serviced only by a qualified service technician that is familiar with the safety procedures required in the repair and who is equipped with the proper tools, parts, testing instruments, and the appropriate service manual.! WARNING To avoid risk of serious injury or death, repairs should not be attempted by unauthorized personnel.! CAUTION VIKING will not be responsible for any injury or property damage from improper service procedures. If performing service on your own product, you must assume responsibility for any personal injury or property damage which may result. Technical support for authorized servicers:!! DANGER IMMEDIATE HAZARDS WHICH WILL RESULT IN SEVERE PERSONAL INJURY OR DEATH. WARNING Hazards or unsafe practices which COULD result in severe personal injury or death Address your written correspondence to: Viking Preferred Service 1803 HWY 82 West Greenwood, MS 38930! CAUTION Hazards or unsafe practices which COULD result in minor personal injury or product or property damage. All safety messages will identify the hazard, tell you how to reduce the chance of injury, and tell you what can happen if the instructions are not followed Viking Preferred Service C
4 General Information Warnings Read and follow all instructions before using this appliance to prevent the potential risk of fire, electric shock, personal injury, or damage to the appliance as a result of improper usage of the appliance. Use appliance only for its intended purpose as described in this manual. To ensure proper and safe operation: Appliance must be properly installed and grounded by a qualified technician. DO NOT attempt to adjust, repair, service, or replace any part of your appliance unless it is specifically recommended in this manual. All other servicing should be referred to a qualified servicer. Water WARNING Plumbing connections must comply with applicable sanitary, safety, and plumbing codes. Water pressure for the water supply should be a minimum of 10 to 125 psi. The dishwasher is supplied with a 5 (1.5 m) braided stainless steel water line with 3/8 (0.95 cm) compression fitting connected to dishwasher. After determining where the water supply line will connect to the dishwasher, provide a 2 (5.1 cm) access hole and run the water supply line to the approximate fill valve location. For service convenience, a shut-off valve (not supplied) should be installed in the supply line in a readily accessible location (such as beneath the sink). It is recommended that the dishwasher be connected to a hot water supply. If a cold water supply is used, cycle times will vary. It is important that the water supply line and the shut-off valve have a sufficient flow volume. Flush the supply line prior to connecting it to the intake line of the dishwasher. DRAIN and as near to the back wall as possible. Do not use any fittings anywhere in the drain line that are less than 1/2 (1.3 cm) ID. If the drain line is going to be connected to a food waste disposer, be sure to remove the knockout or plug from the fitting before connecting drain line. Drain connection should be a minimum of 20 (51.0 cm) from the floor. If connection is lower, siphoning during cycle can occur. WARNING The dishwasher has a factory installed backflow preventer. Do Not add an additional check valve. Electrical This appliance must be grounded. In the event of a malfunction or breakdown, grounding will reduce the risk of electric shock by providing a path of least resistance for electric current. Note: For this model, a power cord will have to be purchased separately. The plug must be plugged into an appropriate outlet that is installed and grounded in accordance with all local codes and ordinances. WARNING Be sure electrical power is turned off at circuit breaker or fuse box before servicing unit. Do not use an extension cord for this appliance WARNING Improper connection of the equipment grounding conductor can result in a risk of electric shock. Check with a qualified electrician or serviceman if you are in doubt as to whether the appliance is properly grounded. Do not modify the plug if it will not fit the outlet, have a proper outlet installed by a qualified electrician The access hole for the drain line should be 2 square (5.1 cm). Locate as low Viking Preferred Service
5 General Information WARNING ELECTRICAL SHOCK HAZARD Electrically ground dishwasher. Connect ground wire to green ground connector in terminal box. DO NOT use an extension cord. Failure to follow these instructions, can result in death, fire or electrical shock. WARNING EXCESSIVE WEIGHT HAZARD Use two or more people to move dishwasher. Failure to do so can result in back or other injury. WARNING TIP OVER HAZARD DO NOT push down on open door. Doing so can result in serious injury or cuts 2012 Viking Preferred Service 5


6 General Information Model Serial Number Matrix The serial number and model number for your appliance are located on the identification plate mounted on the inside of the unit. Model Numbers V D B S S V= Viking D = Dishwasher B= Built-In Version SS= Stainless Serial Numbers D Month Day Serial number digits Year of manufacture Made in the USA HOUSEHOLD DISHWASHER VIKING RANGE CORPORATION GREENWOOD, MISSISSIPPI MODEL VDB201SS 120V 60Hz OPER 12.2A 2.5A OTHER 15.5A CSA LISTED USA SERIAL NO D U L E C US Viking Preferred Service
7 Operation Settings and Functions Control Operation The following is the basic layout of the control panel and how it is referenced below. Start Resume viking Multi-Level Power Wash Quiet Clean System POTS PANS NORMAL WASH LIGHT CHINA RINSE HOLD SANITIZED HI TEMP WASH SANITIZED 155 F RINSE 2 DELAY 4 START CYCLES OPTIONS Wash Cycles POTS / PANS Heavily soiled pots, pans and casserole dishes. Long heated prewash loosens up encrusted food. High temperature main wash and final rinse. NORMAL WASH Normally soiled plates, glasses, bowls, and lightly soiled pots and pans. Energy-usage label is based on this cycle. LIGHT/CHINA Lightly soiled items, china and crystal. Lower temperatures for cleaning delicate items. RINSE/HOLD All dishware. Short rinse with no heat. Options HI TEMP WASH Increases the temperature, adding heat, time and water for improved cleaning performance. Available only with POTS/ PANS and NORMAL WASH. Note: Periods of soaking will occur to aid in removal of baked on soils SANITIZED 155 F RINSE Raises water temperature to 155 F in the final rinse. Adds heat and time to the cycle. This high temperature rinse sanitizes your dishes and glassware in accordance with NSF/ANSI STANDARD 184 for Residential Dishwashers. Certified for residential dishwashers and not intended for licensed food establishments. Available only with POTS/PANS and NORMAL WASH. DELAY START Lets you delay running the dishwasher for up to 4 hours. To set DELAY START, select the desired wash cycle and option(s). Press the DELAY START button once and the number 2 will light, indicating a two hour delay. If you desire a longer delay, continue pressing the DELAY START button to a 4 hour delay. The corresponding number on the button will light. Once you have set the desired delay time, press the START button and close the door. DELAY START is not available with the Rinse/Hold cycle. AUDIBLE SOUND SIGNAL A single beep will occur when you select cycles, options and press the START key. If the START button is not pressed or if the door is not closed within 4 seconds of pressing the START button, 3 short beeps will occur. The end-of-cycle signal consists of 2 long beeps and activates 30 minutes after the last drain, when the condensate dry portion of the cycle is completed. For all other error messages and to deselect the audible sound signal, see the Troubleshooting/ Fault Codes section Viking Preferred Service 7

8 Operation Options (continued) ILLUMINATION OF BUTTONS Option, Cycle and Start buttons will only illuminate after they are selected. The "SANITIZED" indicator will illuminate when the cycle has been completed. If your dishwasher did not properly sanitize your dishes, the indicator light will not illuminate. This can happen if the cycle is interrupted or the water could not be heated to the required temperatures. The "SANITIZED" indicator light goes off after you have opened and closed the door or if you press and hold the START/RESUME button. Cycle Data Note: All wash times, temperatures and fills are approximate and are dependent on installation and environmental conditions. Note: Heating delays to meet set temperatures may extend the cycle times. Note: Wash time does not include the 30 minute condensate dry time Viking Preferred Service
9 Operation Preparing Dishes It is not necessary to rinse normal food soils off the dishes before putting them in the dishwasher, although larger solid particles, such as bones, seeds, skins, pits, and toothpicks should be removed. Note: All wash times, temperatures and fills are approximate and are dependent on installation and environmental conditions. Note: Heating delays to meet set temperatures may extend the cycle times. Note: Wash time does not include the 30 minute condensate dry time. If you are not going to run the dishwasher immediately after loading, it is best to rinse salty and highly acidic foods off stainless steel, silver, and silverplate flatware. Prolonged contact of foods including lemon juice, salt, vinegar, mustard, mayonnaise, and salad dressings with stainless steel can cause corrosion (pitting). Before Operation 1. Load the dishes per recommended loading. See section on Loading Dishwasher. 2. Make sure there is rinse agent in the dispenser. Add rinse agent if needed. See section on Rinse Agent. 3. Add proper amount of detergent and pre-wash. See section on Dishwasher Detergent. 4. Push both top and bottom racks in. 5. Select the desired cycle and option(s). 6. Press START. The START symbol will illuminate to indicate the unit is ready. 7. Close the door tightly until you hear a click. Otherwise, the dishwasher will not start. Option Restrictions All options are not available for all cycles. Please note the following: The option HI TEMP WASH is not available with the LIGHT/CHINA cycle. No options are available in the RINSE/HOLD cycle. The option SANITIZED 155 F RINSE is not available with the LIGHT/CHINA cycle. After selecting the wash cycle and options, depress START button. The start symbol will illuminate. This merely means the machine is ready. Close the door securely within 4 seconds of pressing the START button Viking Preferred Service 9
10 Operation Changing a Program After the Unit has Started The dishwasher is programmed to stop operating if the door is opened during a cycle. To change a program or option after starting the machine, open the door slightly to let the spray arms stop rotating and avoid getting sprayed with water. Press and hold START for four seconds to cancel the current selection, then press the touchpad(s) for your desired selection. Press START again and close the door. The drain pump will run to remove any dirty water from the dishwasher before starting the newly selected cycle. Check to make sure there is still detergent in the detergent dispenser. Opening door after cycle starts If the door is opened after the cycle has started, the START button will flash to indicate that the dishwasher is in Standby Mode. Press the START button and close the door securely within 4 seconds to restart the cycle If a cycle is canceled, the dishwasher will drain any remaining water in the unit out Viking Preferred Service
11 System Diagnosis Entering Diagnostic Mode To enter the Diagnostic mode, press the left most program button five times and then immediately press the START button, within 6 seconds. The unit will beep, and flash all LED's three times. Close door to begin the Service cycle. To exit this mode before completion, hold "START" key for three seconds. Start Resume viking Multi-Level Power Wash Quiet Clean System POTS PANS NORMAL WASH LIGHT CHINA RINSE HOLD SANITIZED HI TEMP WASH SANITIZED 155 F RINSE 2 DELAY 4 START CYCLES OPTIONS The test cycle will run approximately 6-1/2 minutes and will run each component individually. Be sure to close the soap dispenser cup as this function will also be energized opening up the cup. 1. Drains for 85 Seconds 5 Seconds On 5 Seconds Off 30 Seconds On 5 Seconds Off 40 Seconds On. 2. Fills for 75 seconds. 3. Activates soap dispenser and wash arm diverter sets (duration varies). 4. Circulates top wash arm with heat for 40 seconds. Note: Heater does not activate until the motor check is complete (16 seconds after motor starts). 5. Water level check and wash arm diverter sets (duration varies). 6. Circulate lower wash arm with heat for 10 seconds. 7. Water level check and wash arm diverter sets (duration varies). 8. Circulate (filter clean) for 10 seconds. 9. Drains for 85 Seconds. 5 Seconds On 5 Seconds Off 30 Seconds On 5 Seconds Off 40 Seconds On 10. When complete, you will hear two long beeps approximately ten seconds after the drain cycle stops. This is the indication that the test cycle has completed. Note: During this test cycle, if the control board senses a failure that it is programmed to monitor, it will display an error code Viking Preferred Service 11
12 System Diagnosis Fail Codes LED 1 Pots Pans LED 2 Normal Wash Service Cycle Only Error Code Cause Action / Possible Root Cause(s) Moisture sensor disconnect Motor Control Status Error (Variable Speed Motor) Diverter Timeout Drain Error (NON pressure sensor models) Moisture sensor reads out of normal range Motor current sense is out of range Main control activates the diverter, but never sees feedback from the diverter that the correct position is reached 1. Wires disconnected to moisture sensor in base pan 2. Defective moisture sensor 3. Defective control board 1. Wires disconnected between control board and motor 2. Wires disconnected between motor and start capacitor 3. Defective motor 4. Defective main control 5. Defective start capacitor 1. Wires disconnected between control board and diverter 2. Defective diverter 3. Defective control board The water detection 1. Verify that dishwasher drain hose is not clogged or algorithm determines water kinked is left in the tub after a 2. Verify that plug has been removed from disposal (if drain. so connected) 3. Verify that hose has a high loop per installation guide 4. Verify that dishwasher is level front to back and side to side 5. Verify that filters are not clogged 6. Defective drain pump 7. Defective wash pump 8. Defective control board X 3 3 Fill Error (NON pressure sensor models) User Interface - Main Control Communication Error Pump Flow Error Drain Pump Error Insufficient temperature change during fill attempts User interface is unable to successfully communicate with the main control Control detects insufficient/inconsistent water flow through the wash system and will not allow the flow through heater to activate Drain pump current sense is out of range 1. Verify water is turned on to dishwasher 2. Verify that fill line is not kinked 3. Verfiy there has not been a decrease in water pressure 4. Defective thermistor 5. Defective control 1. Wires disconnected between main control and user interface 2. Defective cable between main control and user interface 3. Defective main control 4. Defective user interface 1. Verify water is fully turned on to dishwasher 2. Verify that fill line is not kinked 3. Verify that dishwasher is level front to back and side to side 4. Verify that filters are not clogged 5. Verify that there has not been a decrease in water pressure 6. Verify that the drain has the proper high loop 7. Verify proper fill level 8. Enable extended fill service mode (press and hold Normal Wash for 10 seconds) 9. Defective wash motor 10. Defective water inlet valve 11. Defective main control 1. Wires disconnected between main control and drain pump 2. Defective drain pump 3. Defective main control Viking Preferred Service
13 System Diagnosis Fail Codes (cont'd) LED 1 Pots Pans LED 2 Normal Wash Service Cycle Only Error Code Cause Action / Possible Root Cause(s) X 4 3 X 4 4 X Temperature Sensor Error Wash Heater Error Dispenser Error Inlet Valve Error Temperature sensor reads out of range Wash heater current sense is out of range Dispenser current sense is out of range Inlet valve current sense is out of range 1. Wires disconnected to temperature sensor 2. Defective temperature sensor 3. Defective control board 1. Wires disconnected between main control and wash heater 2. Defective wash heater 3. Defective main control 4. Defective temperature sensor 1. Wires disconnected between main control and dispenser 2. Defective dispenser 3. Defective main control 1. Wires disconnected between main control and inlet valve 2. Defective inlet valve 3. Defective main control 5 4 X Current Sense Error Main control reads current draw when no loads are active 1. Defective main control 2. Defective wire harness Flash both LED1 and LED2 continuously Flash all LEDs but start and run continuously Moisture Sensor - water detection AC Power Loss Moisture sensor output is equivalent to water in the pan Power loss occurred during a running cycle 1. Water in base pan from overflow / leak 2. Defective moisture sensor 1. Power lost during a cycle 2. Reset by pressing and holding start for 3 seconds 2012 Viking Preferred Service 13
14 Disassembly Parts Location Door Door Latch Interlock Control Panel Outer Door Door Spring Assembly Detergent Dispenser Hinge Inside View Side View Viking Preferred Service

15 Disassembly Door Disassembly In order to gain access to the internal components of the door, which includes the detergent dispenser, start switch, door interlock, and the user interface, you will need to remove the front door panel and the control panel. Remove the four T20 TORX screws along the top of the door indicated below by red arrows. Then remove the two inner phillips head screws (latch screws), indictaed below with blue arrows! CAUTION Make sure that the outer door is held in place while removing the screw so that the door does not fall and become dented or scratched. The inner door assembly is sharp and could result in minor personal injury. Outer Door Removal In order to gain access to the inner door assembly and detergent dispenser, you must first remove the outer stainless steel or wood door panel. Open the door to a complete 90 angle to expose the securing screws. Using a T15 TORX screwdriver, remove the ten screws, five on each side. Carefully ease door to close position, do not latch. Pull outer door panel out towards you a few inches to expose electrical connections to control panel (Control panel is still mounted to outer door panel at this point.) Remove wires going to the door latch and the three connectors going to the control pad as shown above Viking Preferred Service 15


16 Disassembly Remove outer door assembly and place in a location to prevent damage to panel and household items, preferably on a padded surface. Control Panel Removal In order to gain access to control panel, remove outer door panel, see outer door removal procedure, Page 15. With outer door panel removed put on padded surface to remove the control panel which is mounted on the outer door panel. Remove the two T20 Torx screws, circled in red above to remove control assy from outer door panel. User Interface Removal In order to gain access to control panel, remove outer door panel, see outer door removal procedure, Page 15. Remove control panel, see Control Panel Removal. Remove the four T10 Torx screws as indicated by arrows in photo above, remove user interface board from control panel assembly Viking Preferred Service


17 Disassembly When user interface is re-installed care must be taken to face the four plastic keepers into the control panel the correct way. The screw goes into the recessed side of the keeper, see photo below. Start Button Removal Using a very thin object such as the razor blade shown below, slip under the button collar and gently lift up until prongs release collar and button. Recessed side of keeper The plastic keepers have two feet on each keeper. These feet fit into matching slots on the control panel to ensure that User Interface Board doesn't move and is firmly anchored. Start Switch Removal keeper feet Remove outer door panel, see Outer Door Removal procedure, Page 15. Remove the two T10 TORX screws that mount Start switch to console, see red arrows below, remove switch. Keeper feet are inserted into small rectangular holes in the console Viking Preferred Service 17


18 Disassembly Door Latch Interlock Removal Remove outer door panel, see Outer Door Removal procedure, Page 15. Install these two screws snuggly Remove control panel assy, see Control Panel Removal procedure, Page 16. The door latch mechanism is secured to the outer door panel by one T20 TORX screw. With the control panel removed, remove the screw. Remove the two upper screws at this time, they will be installed during the outer door panel assembly to the inner door assembly. Reassemble door by reversing procedures in previous column. If door latch has been removed the following procedure should be used to install it for proper alignment. With control panel mounted to outer door place door latch in it's proper position, then install T20 TORX into bottom of latch as shown above in previous step. DO NOT TIGHTEN this screw at this time. Install the two latch screws into the upper latch mounts shown in photo in next column. Snug these two screws down all the way, don't overtighten. At this time tighten the T20 TORX screw at bottom of latch. These actions should ensure proper latch alignment Viking Preferred Service


19 Disassembly Detergent Dispenser Remove outer door panel, see Outer Door Removal procedure, Page 15. Remove connector going to detergent dispenser. To remove detergent dispenser bend tabs up to clear and release plastic dispenser assembly while pushing in on dispenser, this will allow the dispenser to release and come out of the inner door liner. See arrows below, there are metal tabs on all four sides of detergent dispenser.! CAUTION When replacing soap dispenser, a rubber lubricant is required to install the new dispenser, part # (P80 emulsion), this should come with the new dispenser and should be applied to seal before installation. Failure to use this lubricant could result in water leaks Viking Preferred Service 19


20 Disassembly Door Spring and Cable Assembly The image below shows the right side door hinge cable, spring, and pulley. The left side is the same. Below is a close-up view of the cable wrapped around the pulley. As the door opens or closes, the cable will ride along the roller creating a smooth movement in the door operation. The image below shows the spring and the channel it rides in. The connection is secured in mounting holes in the channel frame.! CAUTION Make sure that when removing or adjusting the door spring tension that you are wearing protective gloves and eye wear. Injury can occur should the spring or cable come loose or slip during assembly. The image below shows the spring in its default location (sixth hole from the top) Viking Preferred Service


21 Disassembly Door Hinge Disassembly To access door hinge, slide unit out of the installation. Next remove the outer door panel (see Outer Door Removal section, Page 15.). Disconnect tension cable from hinge. Remove two screws that hold each hinge to the inner door. Repair or replace the hinge as necessary. Reverse the procedure to reinstall the hinge. Remove C-Clip securing hinge. Note: Remove C-Clip slowly (clip has spring and can dislodge) Viking Preferred Service 21


22 Disassembly Parts Location - Interior Lower Spray Arm Fine Filter Coarse Filter Viking Preferred Service


.")


23 Troubleshooting Lower Spray Arm Removal To access lower spray arm, open the door and remove lower rack. Next, unsnap lower spray arm (shown below). Spray arm Fine Strainer Removal To access fine strainer, open door and remove lower rack. Next, remove coarse strainer (see Coarse Strainer Removal procedure, lower left). Slide fine strainer counter-clockwise to disengage. Fine Strainer Repair or replace as necessary. Reverse the procedure to reinstall the spray arm. Coarse Strainer Removal To access coarse strainer, open door and remove lower rack. Next, remove lower spray arm (see Lower Spray Arm Removal procedure, above). Squeeze tabs on coarse strainer to release (shown below). Lift fine strainer out and repair or replace as necessary. Reverse the procedure to reinstall the fine strainer. Upper Rack Removal Slide upper rack out to full extension, release left and right clips by swinging out, see photos below. Lift rollers out of slide rails pull forward and remove rear rollers from slides. Coarse Strainer Lift coarse strainer out and repair or replace as necessary. Reverse the procedure to reinstall the coarse strainer Viking Preferred Service 23


24 Disassembly Base Pan Front View The base front panel is pictured below, note that front levelling legs are manual adjustment on the 201 series model. The rear leg is adjustable from the front with a flat blade screwdriver in center of panel.! CAUTION After the four screws that secure the pan to the frame are removed, be careful because the moisture sensor is mounted to the pan and the wiring could be damaged. Front legs adjustable on 301 from front The image below shows the moisture sensor secured to base pan. The sensor is secured in place by one T15 TORX screw. 301 series model Remove two T20 Torx screws shown in photo above, top with arrows. Remove panel and place in safe location. Base Cover Disassembly Remove the four T20 TORX screws that hold the bottom base to the dishwasher superstructure. The image in next column shows the location of these screws. With the panel removed, locate the moisture sensor and unplug, leaving the moisture sensor attached to the base pan. Unplug Sensor here Note: Place base pan in a secured area. Take care not to damage the sensor. With the base pan removed, you now have access to locate, diagnose, and service all the components Viking Preferred Service

25 Disassembly Parts Location - Base Unit Front Levelling Legs Drain Motor Control Board Circulation Motor Wash Temp Sensor Wash Diverter Water Heater Capacitor Rear Levelling Leg Fill Valve 2012 Viking Preferred Service 25
 wire on")


 shows the hose connected and below right shows the hose")
 shows sump area with pump removed.")

.")
26 Disassembly Drain Motor Disassembly The image below shows the drain motor. When required, the main control sends 120-volts from terminal P6-4 (brown) wire on the control board and Neutral. Unplug the wires to the motor. When tab is released rotate clockwise to remove pump When reinstalling pump, make sure to bend the tab back in place to lock the pump in the sump housing. P10-1 P6-4 Locate the drain hose on the rear of the pump. Using a pair of pliers, disconnect the hose. Image below (left) shows the hose connected and below right shows the hose disconnected. The image below (left) shows the pump removed. The image below (right) shows sump area with pump removed. Note the location of the O-ring gasket in the sump. Make sure the gasket is in place when reinstalling the pump or the unit will leak water into the base pan. Next, release the drain motor from the sump assembly. Locate the release tab (indicated by the yellow dotted line, below left). Using a flat blade screwdriver, bend the tap in the direction shown by the arrow (below right) to release the pump from the main housing. Grasp the pump and rotate clockwise and the pump can be removed Viking Preferred Service


 and tells the controller the position of the diverter.")
 shows the rear of the diverter and below right shows the sump area with the")

27 Wash Diverter Disassembly Disassembly The wash diverter is designed to direct the water flow to the upper arm, lower arm or both. When required, the main control sends 120-volts AC from terminal P6-2 (gray) wire on the control board and neutral to activate the motor. The yellow wire on the diverter sends line voltage back to the control board to P6-5 (line in-yellow wire) and tells the controller the position of the diverter. P6-5 T20 Remove the diverter from the sump assembly. The image below (left) shows the rear of the diverter and below right shows the sump area with the diverter removed. P6-2 J10-2 Disconnect the hose clamp connection from the diverter inlet as shown.! CAUTION It is recommended that the diverter be taken out before removing the circulation motor. It makes it easier to handle the motor assembly. Clamp, Diverter inlet The wash diverter is attached to the sump by the use of three T20 TORX screws. Remove all three screws Viking Preferred Service 27


28 Disassembly Circulation Motor Disassembly The Dishwasher use a single speed, capacitor assist wash motor. Voltage between P5-1 and P5-2 should be 120 VAC. If voltage is not present, verify wiring. If voltage is present and the motor is not running, check the capacitor and motor windings for proper readings. The image below shows the filter inlet hose to the sump disconnected. The arrow points to the Filter Clean inlet in the sump. Regardless of the position of the diverter, water is directed to this tube. Filter Clean Inlet Remove clamp and hose The image below (with diverter removed) shows the hose connections to the circulation motor inlet, output, and the filter clean sump inlet. Disconnect the green hose clamp from the heater tube to pump inlet as well as the red hose clamp from the filter inlet tube on the pump assembly. Disconnect the pump inlet hose from the pump assembly. The image below shows the hose disconnected from the pump. Notice that there is a white motor grommet over the pump opening. Make sure it is back in place and bottom edge is facing base pan before reassembly. (The previous image on this page shows proper position of grommet). Output Inlet Filter Clamp Pump Inlet Clamp Motor Grommet Bottom Edge The motor assembly can now be removed for service Viking Preferred Service


29 Disassembly Capacitor Disassembly The capacitor is a start capacitor. The start capacitor provides an electrical push to help get the motor rotation started. This is accomplished by creating a current to voltage lag in the start windings of the motor. The slow build up of current allows the motor armature time to react and begin to rotate. Once the motor is very close to its rated speed, the start capacitor and start windings drop out of the circuit. If the capacitor is defective, when voltage is applied the motor will just sit and hum. Capacitor To test the capacitor, place the volt ohmmeter to the 1K Ω ohm scale. Place the meter leads across the terminals of the capacitor and take a reading. Then reverse the meter leads on the capacitor terminals. A reading should be seen momentarily in one direction and an open circuit detected in the other. If this occurs the capacitor is good. The readings can also be made at the blue and yellow wire connection at the circulation motor Water Heater Disassembly The dishwasher uses a flow-through heater that will heat the water as it passes though the center of the heater. In order to remove, unplug the 2-wire connector that supplies power to the heating element and the ground wire which connects to a spade Neutral Control Board P12 Ground Wire terminal on the heater housing. This image shows the connections. Next, disconnect the two clamps that hold the heater assembly to both the sump outlet (Arrow 1) and circulation pump Arrow 1 inlet (Arrow 2) shown here. The heater can now be removed for service. You will need to transfer the two 1-1/2 OD hoses to the new heater assembly. The element is a Arrow volt,12 ohm, 10 amp, 1200 watt draw. It is controlled from P12 (gray) to Neutral on the main terminal block Viking Preferred Service 29
 sensor which reads approximately 47k Ω ohms at 77 ambient.")


30 Disassembly Water Temperature Sensor Removal The water temperature sensor will sense the temperature of the water throughout the wash cycle. It is an N.T.C (Negative Temperature Control) sensor which reads approximately 47k Ω ohms at 77 ambient. As the water temperature rises, the resistance drops. In order to remove, unplug the 2-wire connector and then twist the sensor counterclockwise to release from the sump assembly. The image below shows the temp sensor in the locked position. Grasp the sensor tabs and twist counterclockwise to release. Fill Valve Disassembly In order to access the fill valve, you will need to lay the unit on its back. Remove the base pan and moisture sensor. The valve is secured to the rear frame with two TORX screws as shown. To Unlock Screws To Control Board The image below shows the temp sensor in the unlocked position. Unlocked Remove the two screws shown above and remove the fill valve from the base. Unplug the white and blue wires from the coil, and then disconnect the fill tube from the valve outlet. The fill valve is a 120-volt valve. The coil is a 1.1K Ω ohm coil and is controlled from P6-3 (line voltage-blue) and Neutral on the main terminal block. While grasping the tabs, pull the sensor out of the sump assembly as shown Viking Preferred Service


31 Disassembly Control Board Disassembly The control board is secured to the inner left support structure of the dishwasher. Please exercise caution when removing in order to avoid any damage to the board and its components The image below shows the locking tabs that hold the control board support (indicated by red dotted lines) to the dishwasher frame. Release these tabs in the directions shown by the arrows.! CAUTION In order to protect the electronic circuits on the board and avoid any damage caused by static discharge, Viking Range Corporation recommends the use of a ground strap. Remove the sheet from the tabs and place aside. The image below (right) shows the protective sheet removed. P4 P9 Wiring Harness Disconnect P4/P9 wiring harness. Now carefully pull the board down and release from front. Control Board P4 P9 Wiring Harness Plastic Protector 2012 Viking Preferred Service 31
 P6 P5 P10 P12 P9 P4 P8 32 2012 Viking")
32 Disassembly Control Board (cont.) P6 P5 P10 P12 P9 P4 P Viking Preferred Service
, the following can be measured: P8 Moisture sensor / Temperature sensor P9 User Interface Port P12 Water Heater P6")
33 Troubleshooting Control Board Test Points The unit has a control board that controls the functions of the dishwasher. Components can be diagnosed via the control board. With the control board accessed (see Control Board Disassembly procedure, Page 30), the following can be measured: P8 Moisture sensor / Temperature sensor P9 User Interface Port P12 Water Heater P6 Water valve, Drain pump, Diverter P4 Door switch, Dispenser P10 Water valve, Drain pump P5 Circulation Motor Component Control Board Test Point Readings (Typical) Door Switch P4-1 (Yellow) P4-2 (RD/WH) 0 Ω door closed Ω door open Dispenser P4-1 P Ω Wash Motor P5-1 (Red) P5-2 (White) 6.3 Ω Water Valve P6-3 (Blue) P10-1 (White) 1.1K Ω Drain Pump P6-4 (Brown) P10-1 (White) 15.1 Ω Diverter P6-2 (Gray) P10-1 (White) 2.7K Ω Moisture Sensor P8-1 (Red/White) P8-2 (Purple) 175K Ω Temperature Sensor P8-3 (Black/White) P8-4 (Blue) 47K 77 (varies based on temp) Water Heater P12 (Gray) P10-1 (White) Ω 2012 Viking Preferred Service 33
 With the control board removed (see Control Board Disassembly procedure, Page 30), the following components can be diagnosed without removal of the components: Door Switch The door interlock switch")
 and P4-2 (yellow). With the door closed, the reading should be 0 Ω ohms.")
34 Troubleshooting Control Board Diagnosis (Some measurements require power and others require the unit not to be powered.) With the control board removed (see Control Board Disassembly procedure, Page 30), the following components can be diagnosed without removal of the components: Door Switch The door interlock switch controls 12 VDC to the control board. When the door is open, the contact opens and the board stops the operation. To check the switch, unplug the molex connector and check for continuity between P4-1 (red/white) and P4-2 (yellow). With the door closed, the reading should be 0 Ω ohms. Open the door and the reading should be infinity ( ). If the readings are incorrect, check the wiring to the door switch and inspect the door switch. P-4 Detergent Dispenser The dishwasher uses a detergent dispenser to release detergent into the tub. As voltage is applied, the latch mechanism releases the dispenser door allowing detergent to enter the tub. Voltage between P4-1 and P4-4 should be 12 VDC when the dispenser is activated. If no voltage is measured, verify wiring. P-4 P-4 Note: Testing the soap dispenser can be achieved in the diagnostic mode. P Viking Preferred Service
 Circulation Motor The 200 Series Dishwasher uses a single speed, capacitor assist wash motor.")


35 Troubleshooting (Some measurements require power and others require the unit not to be powered.) Circulation Motor The 200 Series Dishwasher uses a single speed, capacitor assist wash motor. Voltage between P5-1 and P5-2 should be 120 VAC when the motor is activated. If voltage is not present, verify wiring. If voltage is present and the motor is not running, check the capacitor and motor windings for proper readings. P-5 Fill Valve The dishwasher uses a fill valve to fill the machine with water. Verify as the valve is energized 120 VAC is present between P6-3 and P10-1. If voltage is present and no water enters, check the water supply and shut off valve to make sure water is being supplied to the unit. If water is present, unplug the wires to the fill valve and using an ohmmeter, check for approximately 1.1k Ω ohms at the coil. If 0 Ω ohms are read, replace the fill valve (see Fill Valve Disassembly procedure, page 33). P-5 P-6 P-6 Note: Testing the circulation motor can be achieved in the diagnostic mode. P-10 P-10 Note: Testing the fill valve can be achieved in the diagnostic mode Viking Preferred Service 35
 Drain Motor The dishwasher uses a drain motor to remove water from the tub at timed intervals during the wash cycle. In the drain mode, voltage between P6-4 and neutral should be 120 VAC.")
.")
36 Troubleshooting (Some measurements require power and others require the unit not to be powered.) Drain Motor The dishwasher uses a drain motor to remove water from the tub at timed intervals during the wash cycle. In the drain mode, voltage between P6-4 and neutral should be 120 VAC. If voltage is measured, unplug the wires to the drain motor and using an ohmmeter, check for approximately 15.1 Ω ohms at the valve. If 0 Ω ohms are read, replace the drain pump. If readings are correct, remove pump and check for obstructions in the drain pump (see Drain Motor Disassembly procedure, page 24). Moisture Sensor The dishwasher uses a moisture sensor that is mounted in the base pan of the dishwasher. Any moisture that comes in contact with the sensor will cause the unit to stop filling, operate the drain pump, and signal an error code. If the sensor is open, an open fail code will signal (see Fail Codes, page 12). Resistance between P8-1 and P8-2 should be 175K Ω ohms. P-6 P-6 P-8 P-8 P-10 P-10 Note: Testing the drain motor can be achieved in the diagnostic mode Viking Preferred Service
 Wash Diverter The dishwasher uses a wash diverter to divert water to either the upper arm or lower arm during the wash cycle.")

.")
37 Troubleshooting (Some measurements require power and others require the unit not to be powered.) Wash Diverter The dishwasher uses a wash diverter to divert water to either the upper arm or lower arm during the wash cycle. This allows for low water consumption and a better wash to both upper and lower racks. At the beginning of each wash cycle, the control board positions the wash diverter to its proper starting position. It is monitored by a built in monitoring switch that sends 120 VAC back to P6-5. Depending on how long the switch is closed determines what position it is in. To check the wash diverter, check the motor with an ohmmeter between P6-2 and Neutral. It should read approximately 2.7k Ω ohms. If readings are incorrect, verify wiring connections to the diverter. If the wiring is proper, replace the wash diverter (see Wash Diverter Disassembly procedure, page 30). Note: If the diverter does not position itself, a Diverter time out error will display (see Fail Codes, page 12). Water Temperature Sensor The dishwasher uses a water temperature sensor that is mounted in the sump of the dishwasher. It is an N.T.C (Negative Temperature Coefficient). As the temp of the water rises, the resistance drops (and viceversa). In the 200 Series dishwasher, it also serves as a water input sensor as well. During a fill cycle, an increase or decrease in water temperature is monitored by the control board. This temperate change due to incoming water temperature fluctuations is realized by the board as water entering the machine. If no change in temperature is recorded, a FILL error code will be displayed. If the senor is open, an OPEN fail code will signal (Refer to page 12 for fail codes). The control board monitors P8-3 P8-4. Resistance should be 47K 77. If no resistance is found, check wiring. If wiring is OK, replacement of the sensor is necessary. P-6 P-8 P-8 P-6 P-10 P Viking Preferred Service 37


38 Troubleshooting (Some measurements require power and others require the unit not to be powered.) User Interface Port User Interface Board The user interface allows the end consumer to make cycle selections. As the selection is made, the signal is sent to the control board via a ribbon connection. Voltage between P9-1 and P9-2 should be 12 VDC. If no voltage is found, check ribbon connector. If connector is OK, replacement of the user interface is necessary (see Control Panel Removal procedure, page 22). P-9 P Viking Preferred Service
 The unit uses a 120-volt, 1200 watt heater to heat the water during the wash cycle.")

39 Troubleshooting Water Heater (Some measurements require power and others require the unit not to be powered.) The unit uses a 120-volt, 1200 watt heater to heat the water during the wash cycle. To check the heater, unplug the gray wire on P12 and using an ohmmeter, check for 12 Ω ohms between the gray wire and Neutral. If 0 Ω ohms are read, check the wiring to the heater. If the wiring is correct, replace the heater. The heater can also be tested in the Diagnostic mode (see page 12). P-12 P-10 P-12 P Viking Preferred Service 39


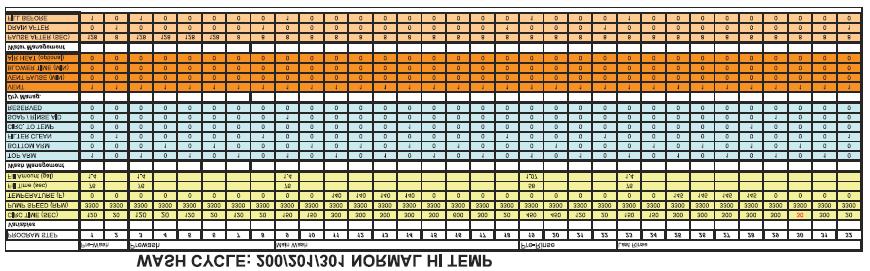
40 Troubleshooting Timing Charts Viking Preferred Service


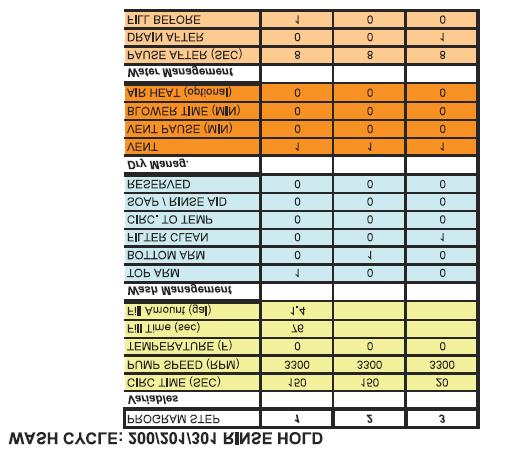
41 Troubleshooting 2012 Viking Preferred Service 41


42 Troubleshooting Option Charts Viking Preferred Service
43 Troubleshooting Troubleshooting Guide Below are some general guides should a problem be detected. Please refer to the test procedures in this manual to determine the defective component. Problem Probable Cause Correction The dishwasher does not start Door is open Make sure door is closed and check door switch Delay Start option is ON Water supply is disconnected Power cord is disconnected Fuse is blown Spotting and filming Hard water Filter block No rinse aid Dishwasher detergent Turn option OFF Verify supply and check water valve Verify power supply and connection Check breaker Check water hardness Check filters for obstructions Add rinse aid and check dispenser Check amount of detergent and verify it is not old and caked Wash arms not rotating freely Obstruction Low water pressure Remove obstruction Check water pressure Strainer blocked Obstruction Remove obstruction Excessive foam in machine Small particles deposited on items Detergent left in detergent compartment Dishes not dry Dishwasher will not fill Water backs up in sink when dishwasher drains Water left in bottom near filters Dishwasher will not drain Improper detergent Detergent Improper loading Filter clogged Compartment blocked Old detergent Dispenser Rinse aid Improper loading Water temperature Heater Door open Water valve Water supply Food waste disposer Normal Drain hose Drain pump Use only dishwasher detergent Use fresh detergent Make sure wash arm turns freely Verify filters are free of obstructions Verify no obstructions Use new detergent Verify dispenser is opening properly Verify rinse aid in dispenser Verify proper loading Verify proper water temperature Verify heater is working Verify door is closed and check door switch (must press start and shut door within four seconds) Check water valve and check for obstructions Verify water supply and check supply line Verify no obstructions in trap at sink Some water in bottom is normal Verify hose is not obstructed or kinked Verify no obstructions in pump 2012 Viking Preferred Service 43


44 Wiring Diagrams User Interface Red/White White Blue Start Switch RDDB301 / VDB301 Schematic Red/White Black/White Temperature Sensor Black/White Red/White Blue Com Soap Dispenser Red/White Yellow Flood Sensor Violet Door Switch P P8 P7... Orange P4... Violet Black/White Blue Black/White Control Board 1 Ω Resistor, part of harness P2... White P12 Grey Red P5 P P6 Pump/Motor White Brown Green/Yellow Flow Through Heater Blue Grey Red White Yellow White L1 Grnd N Diverter Valve Terminal Block Water Valve Drain Pump White Green/Yellow Viking Preferred Service
45 Wiring Diagrams 201/301 Schematic diagram 2012 Viking Preferred Service 45
Service. Manual. Built-in Dishwasher. Preferred Service. VDB450 DFB450 (Before 5/26/2010)
") Service Preferred Service Manual This manual is to be used by qualified appliance technicians only. Viking does not assume any responsibility for property damage or personal injury for improper service
Service Preferred Service Manual This manual is to be used by qualified appliance technicians only. Viking does not assume any responsibility for property damage or personal injury for improper service
Viking Installation Guide
 Viking Installation Guide Viking Range Corporation 111 Front Street Greenwood, Mississippi 38930 USA (662) 455-1200 For product information, call 1-888-VIKING1 (845-4641) or visit the Viking Web site at
Installation. 324 Series Built-In Dishwashers U L. Viking Range, LLC 111 Front Street Greenwood, Mississippi USA (662)
") Installation Viking Range, LLC Front Street Greenwood, Mississippi 890 USA (66) 455-00 For product information, call -888-845-464 or visit the Viking Website at vikingrange.com U L C U L 4 Series Built-In
Installation Viking Range, LLC Front Street Greenwood, Mississippi 890 USA (66) 455-00 For product information, call -888-845-464 or visit the Viking Website at vikingrange.com U L C U L 4 Series Built-In
INSTALLATION INSTRUCTIONS UNDERCOUNTER DISHWASHERS
 INSTALLATION INSTRUCTIONS UNDERCOUNTER DISHWASHERS VIKING 111 Front Street Greenwood, Mississippi 38930 USA (662) 455-1200 IMPORTANT - PLEASE READ AND FOLLOW Before beginning - please read these instructions
ImPress IRONING STATION
 CONSUMER SERVICES TECHNICAL EDUCATION GROUP PRESENTS L-73 ImPress IRONING STATION Model LFB2611L JOB AID Part No. 8178203 FORWARD This Whirlpool Job Aid, ImPress Ironing Station, (Part No. 8178203), provides
OUTDOOR DISHWASHER INSTALLATION INSTRUCTIONS
 OUTDOOR DISHWASHER INSTALLATION INSTRUCTIONS IMPORTANT! Read all of these instructions before installing the dishwasher. AUTOMATIC HIGH LOOP The drain hose is fastened to the back of the machine at the
DOUBLE DISHDRAWER TM DISHWASHER
 DOUBLE DISHDRAWER TM DISHWASHER DD4DDFT & DD4DVT models INSTALLATION GUIDE US CA 5985 A 08.7 SAFETY AND WARNINGS! WARNING! Electrical Shock Hazard Before installing the dishwasher, remove the house fuse
Installation Instructions. For the 18 Built-In Dishwasher and Front Color Panels
 Installation Instructions For the 18 Built-In Dishwasher and Front Color Panels Printed in USA 154232102 Before You Begin DO NOT INSTALL DISHWASHER UNTIL YOU HAVE READ ALL INSTRUCTIONS. FOR YOUR SAFETY,
DryAire DRYING CABINET
 CONSUMER SERVICES TECHNICAL EDUCATION GROUP PRESENTS L-72 DryAire DRYING CABINET Model LMA1053L JOB AID Part No. 8178202 FORWARD This Whirlpool Job Aid, DryAire Drying Cabinet, (Part No. 8178202), provides
WARNING. Electrical Shock Hazard FOR SERVICE TECHNICIAN ONLY DO NOT REMOVE OR DESTROY L WASHER. Pub # /18/10 GE
 L WASHER WARNING Electrical Shock Hazard Disconnect power before servicing. Replace all parts and panels before operating. Failure to do so can result in injury or death. IMPORTANT Electric Discharge (ESD)
INSTALLATION INSTRUCTIONS
 INSTALLATION INSTRUCTIONS BUILT-IN BOTTOM MOUNT REFRIGERATOR/FREEZER DBRTGK72SS-GRILLE KIT (FOR designer SERIES ONLY) VIKING RANGE CORPORATION 111 Front Street Greenwood, Mississippi (MS) 38930 USA (662)
Installation. Built-in Full Height Wine Cellar VCWB301
 Installation Built-in Full Height Wine Cellar VCWB301 Table of Contents Warnings & Important Information _ 3 Dimensions _ 5 Specifications _ 6 Cutout Dimensions 7 Cabinet Information _ 8 Cabinet Information
Installation & Operating Guide
 5-036 HOT WATER TANK Installation & Operating Guide Read all instructions thoroughly. Keep this guide for future reference. Proof of purchase is required for Warranty. Staple receipt or proof of purchase
User Manual. Dishwasher ZDM17301SA ZDM17301WA
 EN User Manual Dishwasher ZDM17301SA ZDM17301WA Contents Safety information 2 Safety instructions 3 Product description 4 Control panel 5 Programmes 6 Daily Use 7 Hints and tips 10 Care and cleaning 11
DISHWASHER INSTALLATION GUIDE SPECIFICATIONS, INSTALLATION, AND MORE
 DISHWASHER INSTALLATION GUIDE SPECIFICATIONS, INSTALLATION, AND MORE COVE DISHWASHER Contents 3 Cove Dishwasher 4 Specifications 7 Door Panel 9 Installation 15 Troubleshooting Features and specifications
Dishwasher. Use & Care Manual HDW2401ST. Table of Contents. Important Safety Instructions Features of your new dishwasher...
 Dishwasher Use & Care Manual HDW2401ST Table of Contents Important Safety Instructions... 1 Features of your new dishwasher.... 2-4 Operating Instructions... 5-10 Preparing and loading dishes... 11-13
INSTANT HOT WATER DISPENSER
 INSTANT HOT WATER DISPENSER Tank Installation Materials required (not provided) 2 mounting bracket screws (and 2 plastic anchors if attaching to drywall) Shut-Off valve and T fitting Components When you
W C. Table of Contents... 2 Table des matières... 25
 INSTALLATION INSTRUCTIONS UNDERCOUNTER DISHWASHER PLASTIC GIANT TUB MODELS INSTRUCTIONS D'INSTALLATION LAVE-VAISSELLE SOUS COMPTOIR MODÈLES À TRÈS GRANDE CUVE EN PLASTIQUE Table of Contents... 2 Table
SKY Stainless Steel Compact Dishwasher. Instructions
 SKY4313 - Stainless Steel Compact Dishwasher Instructions Please retain these instructions for future reference. Notice: Do not allow children to operate this appliance. Keep appliance out of reach of
1998 DISHWASHERS Servicing and Troubleshooting
 CONSUMER SERVICES TECHNICAL EDUCATION GROUP PRESENTS KD-10 1998 DISHWASHERS Servicing and Troubleshooting MODELS DU800DWG DU801DWG DU805DWG DU810DWG DP840DWG DU840DWG DU850DWG DU890DWG DU910PFG DP920PFG
Service. Manual. Trash Compactor. Preferred Service FCU150
 Service Preferred Service Manual Trash Compactor This Base Manual covers general and specific information including, but not limited to the following models: FCU150 SMK-0004 FEB 2012 2 Table of Contents
Food Waste Disposer Instruction Manual
 Food Waste Disposer Instruction Manual See insert for specific information about your new disposer NOTE: IMPORTANT: CAUTION: This Food Waste Disposer has been designed to operate on 110-120 Volt, 60 Hz
Installation GUIDE VDWU524SS VDWU524WSSS FDWU524WS FDWU524 VDWU324SS FDWU324
 Installation GUIDE VDWU524SS VDWU524WSSS FDWU524WS FDWU524 VDWU324SS FDWU324 To prevent accidents, which could cause serious injury or death, as well as machine damage read these instructions before installation
Viking Installation Guide
 Viking Installation Guide Viking Range, LLC 111 Front Street Greenwood, Mississippi 38930 USA (662) 455-1200 For product information, call 1-888-(845-4641) or visit the Viking Web site at vikingrange.com
FOR SERVICE TECHNICIAN ONLY DO NOT REMOVE OR DESTROY
 L WASHER WARNING Electrical Shock Hazard Disconnect power before servicing. Replace all parts and panels before operating. Failure to do so can result in injury or death. IMPORTANT Electric Discharge (ESD)
SINGLE DISHDRAWER TM DISHWASHER
 SINGLE DISHDRAWER TM DISHWASHER DD4SA & DD4SCT models INSTALLATION GUIDE US CA 595B 08.7 SAFETY AND WARNINGS! WARNING! Electrical Shock Hazard Before installing the dishwasher, remove the house fuse or
DISHWASHER. Models DW2432 and DW2432SS. Installation Manual. Write Serial Number (on inner door of unit) here:
 here:") DISHWASHER Models DW2432 and DW2432SS Installation Manual Write Serial Number (on inner door of unit) here: Felix Storch, Inc. Summit Appliance Division 770 Garrison Avenue Bronx, New York 10474 www.summitappliance.com
DISHWASHER Models DW2432 and DW2432SS Installation Manual Write Serial Number (on inner door of unit) here: Felix Storch, Inc. Summit Appliance Division 770 Garrison Avenue Bronx, New York 10474 www.summitappliance.com
INSTALLATION. Glass Panel Doors (select models) CAUTION
 CAUTION") Location Do not install refrigerator near oven, radiator or other heat source. If not possible, shield refrigerator with cabinet material. Do not install where temperature falls below 55 F (13 C) or rises
Location Do not install refrigerator near oven, radiator or other heat source. If not possible, shield refrigerator with cabinet material. Do not install where temperature falls below 55 F (13 C) or rises
SERVICE MANUAL Undercounter Refrigerator Drawer Units
 SERVICE MANUAL Undercounter Refrigerator Drawer Units Models VURD140 DURD140 DFRD140 VIKING Preferred Service 1803 Hwy 82 West, Greenwood, Mississippi (MS) 38930 USA 662-455-1200 Important Information
INSTALLATION INSTRUCTIONS
 INSTALLATION INSTRUCTIONS BUILT-IN BOTTOM MOUNT REFRIGERATOR/FREEZER BRTGK72SS-GRILLE KIT (FOR PROFESSIONAL SERIES ONLY) VIKING RANGE CORPORATION 111 Front Street Greenwood, Mississippi (MS) 38930 USA
FOR SERVICE TECHNICIAN ONLY DO NOT REMOVE OR DESTROY WARNING
 WARNING Electrical Shock Hazard Disconnect power before servicing. Replace all parts and panels before operating. Failure to do so can result in injury or death. IMPORTANT Electric Discharge (ESD) Sensitive
Installation Instructions
 GE Consumer & Industrial Appliances Installation Instructions Junction Box Cover Within this user bag, you will find a junction box cover and a #10 hex head screw used to attach the junction box cover
NOTICE . SAFE SERVICING PRACTICES. Electric Wall Oven with Electronic Oven Control
 SERVICE DATA SHEET 318047418 (0504) Rev. A Electric Wall Oven with Electronic Oven Control NOTICE This service data sheet is intended for use by persons having electrical and mechanical training and a
Installation. Leveling
 Your refrigerator was packed carefully for shipment. Remove and discard shelf packaging and tape. Do not remove the serial plate. Location Do not install refrigerator near oven, radiator or other heat
CONSUMER SERVICES TECHNICAL EDUCATION GROUP PRESENTS
 CONSUMER SERVICES TECHNICAL EDUCATION GROUP PRESENTS L-71 SinkSpa JETTED SINK Model LJD1306L JOB AID Part No. 8178201 FORWARD This Whirlpool Job Aid, SinkSpa Jetted Sink, (Part No. 8178201), provides the
Installation Instructions
 Installation Instructions Built-In Dishwasher If you have questions, call 800-944-9400(US),800-245-8352(Canada)or visit our website at: www.frigidaire.com BEFORE YOU BEGIN Read these instructions completely
INSTALLATION INSTRUCTIONS
 INSTALLATION INSTRUCTIONS BUILT-IN FULL HEIGHT WINE CELLAR (VCWB300 PROFESSIONAL MODEL) Retain for Future Reference VIKING RANGE CORPORATION 111 Front Street Greenwood, Mississippi 38930 USA (662) 455-1200
BUILT-IN DISHWASHER INSTALLATION INSTRUCTIONS
 BUILT-IN DISHWASHER INSTALLATION INSTRUCTIONS PLEASE READ COMPLETE INSTRUCTIONS BEFORE YOU BEGIN LEAVE INSTALLATION INSTRUCTIONS AND USER'S GUIDE WITH OWNER ALL ELECTRIC WIRING AND PLUMBING MUST BE DONE
Installation Instructions
 Installation Instructions Built-In Dishwasher If you have questions, call 800-GECARES or visit our website at: www.geappliances.com BEFORE YOU BEGIN Read these instructions completely and carefully. IMPORTANT
Installation Instructions 36 Inch Refrigerator
 Installation Instructions 36 Inch Refrigerator For Use With Models: EF36BNNF, IF36BNNF, PF36BNNF Francis - Voir Page 9 Part No. 106177 Rev. B/13036906 Refrigerator Safety...1 Proper Disposal of Your Refrigerator...1
Installation Instructions
 Installation Instructions Before you begin... 2 Location... 2 Recommended grounding instructions... 2 Electrical requirements... 2 Exhaust requirements... 3 Water supply and drain requirements... 3 Please
Viking Installation Guide
 Viking Installation Guide Viking Range Corporation 111 Front Street Greenwood, Mississippi 38930 USA (66) 455-100 For product information, call 1-888-VIKING1 (845-4641) or visit the Viking Web site at
Attached is Supplement three for service manual We suggest you file this with your Manual for reference.
 INTRODUCTION Attached is Supplement three for service manual 16008203. We suggest you file this with your 16008203 Manual for reference. Models covered in this manual: MAH21PD MAH21PN MAH21PR MAH21PS CONTENTS
Top Control Dishwasher
 INSTALLATION GUIDE Top Control Dishwasher NS-DWH2BS8/NS-DWH2SS8/NS-DWR2BS8/NS-DWR2WH8/NS-DWR2SS8 Before using your new product, please read these instructions to prevent any damage. Contents Introduction......................................................................................................
Installation GUIDE 6 SERIES. Built-in Electric Single and Double Wall Ovens MVSOE630 / CMVSOE630 MVDOE630 / CMVDOE630
 Installation GUIDE 6 SERIES Built-in Electric Single and Double Wall Ovens MVSOE630 / CMVSOE630 MVDOE630 / CMVDOE630 1 Table of Contents Warnings & Important Safety Information 2 Dimensions 4 Specifications
INSTALLATION INSTRUCTIONS
 INSTALLATION INSTRUCTIONS INSTALLATION REQUIREMENTS Tools and Parts Gather required tools and parts before starting installation. Tools needed: Optional tools: Flashlight Options: Bucket Pedestal: You
Q: What can be done if my dishes have a cloudy, white film on them after a wash?
 TROUBLESHOOTING 45 TROUBLESHOOTING FAQs: Frequently Asked Questions Q: Does this dishwasher require a rinse aid to be used? A: Rinse aid is strongly recommended to enhance the drying performance of the
Viking Installation Guide
 Viking Installation Guide Viking Range Corporation 111 Front Street Greenwood, Mississippi 38930 USA (662) 455-1200 For product information, call 1-888-VIKING1 (845-4641) or visit the Viking Web site at
Built-In Dishwasher. Installation Instructions. BEFORE YOU BEGIN Read these instructions completely and carefully. IMPORTANT The dishwasher MUST be
 Installation Instructions Built-In Dishwasher If you have questions, call 800.GE.CARES (800.432.2737) or visit our website at: www.ge.com BEFORE YOU BEGIN Read these instructions completely and carefully.
PUREPOWER SERIES CENTRAL VACUUM POWER UNITS PP500, PP600 & PP650
 USER GUIDE PUREPOWER SERIES CENTRAL VACUUM POWER UNITS PP500, PP600 & PP650 AB0039 FOR RESIDENTIAL USE ONLY!! MODELS SFDB-DQ, SFDB-DR AND SFDB-DS 30042509E IMPORTANT SAFETY INSTRUCTIONS SAVE THESE INSTRUCTIONS
IMPORTANT INFORMATION. Revised Dishwasher Installation Instructions
 IMPORTANT INFORMATION Revised Dishwasher Installation Instructions To obtain a revised copy of the entire Dishwasher User s Manual, go to www.eurotechappliances.com. SPECIAL EDITION 11-20-02 SAVE THESE
Electrical cable Water supply tube Fittings for tube Coupler Teflon tape. Hole saw min. 2½" bit
 Installation Parts and Tools Parts not Provided Electrical cable Water supply tube Fittings for tube Coupler Teflon tape Air gap Wire nuts for 6-gauge wiring Hose clamp ⅞" UL approved strain relief Electrical
Installation Instructions
 GE Consumer & Industrial Appliances Installation Instructions Junction Box Cover Within this user bag, you will find a junction box cover and a #10 hex head screw used to attach the junction box cover
INSTALLATION INSTRUCTIONS
 INSTALLATION INSTRUCTIONS TM DishDrawer dishwasher DD4D 7 & DD4DT 7 models US CA 59004D 04.3 FOLLOW THE INSTALLATION SEQUENCE RELEVANT TO YOUR MODEL STANDARD HEIGHT DOUBLE MODELS TALL HEIGHT DOUBLE MODELS
DOUBLE DISHDRAWER TM DISHWASHER
 DOUBLE DISHDRAWER TM DISHWASHER DD60DA & DD60DC models INSTALLATION GUIDE NZ AU GB IE 591151C 08.17 WARNING! Electrical shock hazard Before installing the dishwasher, remove the house fuse or open the
Installation Instructions Built-In Dishwasher
 Installation Instructions Built-In Dishwasher If you have questions, call 800.GE.CARES (800.432.2737) or visit our Website at: GEAppliances.com. In Canada, please call 1.800.561.3344 or visit www.geappliances.ca
DISHWASHER INSTALLATION INSTRUCTIONS
 DISHWASHER INSTALLATION INSTRUCTIONS IMPORTANT! Read all of these instructions before installing the dishwasher. AUTOMATIC HIGH LOOP The drain hose is fastened to the back of the machine at the best height.
One-Touch Dispense. Multi-temp selections. 208 F For tea, coffee, instant noodle. 194 F Keep warm around 194 F. 176 F Keep warm around 176 F.
 Instruction Manual Automatic Dispensing Hot Water Pot with Multi-temperature Function Automatic Dispensing One-Touch Dispense FEATURES Reboil Function 5 Temperature Settings Image Of SP-5016 208 F For
TECH SHEET DO NOT DISCARD PAGE 1. If unsuccessful entry into diagnostic mode, actions can be taken for specific indications:
 TECH SHEET DO NOT DISCARD PAGE 1 WARNING Electrical Shock Hazard Disconnect power before servicing. Replace all parts and panels before operating. Failure to do so can result in death or electrical shock.
Installation Electric Dryers Instructions 01
 Installation Electric Dryers Instructions 01 Questions? Call 800.GE.CARES (800.432.2737) or visit our Web site at: GEAppliances.com This is the safety alert symbol. This symbol alerts you to potential
Operator s Manual READY RACK EXTRACTOR. Installation/Operation/Maintenance/Parts DIMENSIONS OF THE WASHER: HEIGHT (AT BACK): 42
: 42") READY RACK EXTRACTOR DIMENSIONS OF THE WASHER: HEIGHT (AT BACK): 42 HEIGHT (W/ LID RAISED): 56 WIDTH: 27 DEPTH: 26 DEPTH (W/ REAR HOSE): 30 WEIGHT: 190 lbs. SHIP WEIGHT: 255 lbs. Operator s Manual Installation/Operation/Maintenance/Parts
READY RACK EXTRACTOR DIMENSIONS OF THE WASHER: HEIGHT (AT BACK): 42 HEIGHT (W/ LID RAISED): 56 WIDTH: 27 DEPTH: 26 DEPTH (W/ REAR HOSE): 30 WEIGHT: 190 lbs. SHIP WEIGHT: 255 lbs. Operator s Manual Installation/Operation/Maintenance/Parts
INSTALLATION INSTRUCTIONS
 INSTALLATION INSTRUCTIONS DishDrawer TM dishwasher DD24SUT7 and DD24SVT7 models US CA 590225B 04.4 SAFETY AND WARNINGS Electrical hazard WARNING! Before installing the dishwasher, remove the house fuse
Installation Instructions Built-In Dishwasher
 RINSE CHINA CRYSTAL SPEED CYCLE NORMAL WASH COOK WARE SELECTIONS ANTI BACTERIA START RESET ENHANCEMENTS DELAY HOURS ADDED HEAT PRE WASH HEATED DRY TO LOCK CONTROLS PRESS HEATED DRY FOR 3 SECONDS GE Consumer
INSTALLATION INSTRUCTIONS INSTRUCTIONS D INSTALLATION INSTRUCCIONES DE INSTALACIÓN
 EN FRONT LOAD DRYER FR SÉCHEUSE Á CHARGEMENT FRONTAL ES SECADORA DE CARGA FRONTAL INSTALLATION INSTRUCTIONS INSTRUCTIONS D INSTALLATION INSTRUCCIONES DE INSTALACIÓN 2 IMPORTANT SAFETY INSTRUCTIONS For
2008 DOUBLE DRAWER UNDER COUNTER REFRIGERATOR / FREEZER PRODUCTS
 TECHNICAL EDUCATION R-107 2008 DOUBLE DRAWER UNDER COUNTER REFRIGERATOR / FREEZER PRODUCTS KDDC24RVS KDDO24RVX KDDC24CVS KDDO24CVX KDDC24FVS KDDO24FVX JUD248RCRS JUD248RCCX JUD248CCRS JUD248CCCR JUD248FCRS
10,000 BTU PORTABLE ROOM AIR CONDITIONER
 CONSUMER SERVICES TECHNICAL EDUCATION GROUP PRESENTS R-100 10,000 BTU PORTABLE ROOM AIR CONDITIONER Model ACP102PR JOB AID Part No. 8178485 FORWARD This Whirlpool Job Aid, 10,000 BTU Portable Room Air
Installation. All Refrigerator / All Freezer VCRB5303 / VCRB5363 / CVCRB5303 / CVCRB5363 VCFB5303 / VCFB5363 /CVCFB5303 / CVCFB5363
 Installation All Refrigerator / All Freezer VCRB5303 / VCRB5363 / CVCRB5303 / CVCRB5363 VCFB5303 / VCFB5363 /CVCFB5303 / CVCFB5363 Table of Contents Warnings & Important Information _ 2 Professional Dimensions
1998 WHIRLPOOL POWER CLEAN FILTER DISHWASHERS
 CONSUMER SERVICES TECHNICAL EDUCATION GROUP PRESENTS KD-11 1998 WHIRLPOOL POWER CLEAN FILTER DISHWASHERS JOB AID Part No. 4322451L I INTRODUCTION This Job Aid, 1998 WHIRLPOOL POWER CLEAN FILTER DISHWASHERS,
Dishwasher Installation Instructions DW 24XT/DW 24XV
 Dishwasher Installation Instructions DW 24XT/DW 24XV Installation Instructions Dishwasher BEFORE YOU BEGIN Read these instructions completely and carefully. IMPORTANT Observe all governing codes and ordinances.
! WARNING To avoid risk of electrical shock, personal injury, or death, disconnect power to dishwasher before servicing.
 Dishwasher Technical Information JDB1080AW*, JDB1090AW*, JDB1270AW*, JDB2100AW*, MDB9750AW*, NDB8630AW*, RJDW2480B*, RJDW2481B*, DB5710D* Due to possibility of personal injury or property damage, always
Viking Installation Guide
 Viking Installation Guide Viking Range Corporation 111 Front Street Greenwood, Mississippi 38930 USA (662) 455-1200 For product information, call 1-888-VIKING1 (845-4641) or visit the Viking Web site at
Installation Instructions
 Installation Instructions For the 18" Built-In Dishwasher Sears, Roebuck and Co. Sears Canada, Inc. Hoffman Estates, IL 60179 U.S.A. Toronto, Ontario, Canada M5B 2B8 154435201 Before You Begin DO NOT INSTALL
Washer. 120~volt 60-Hz. IhilPORTANT: Read and save these instructions. Parts supplied:
 Bi Installation Instructions 120~volt 60-Hz Washer Your safety and the safety of others is very important. We have provided many important safety messages in this manual and on your appliance. Always read
Dryer. User manual DV22K6800** DV22K A-00_EN (US)_ indd :15:41
_ indd :15:41") Dryer User manual DV22K6800** DV22K6800-03650A-00_EN (US)_151211.indd 1 2015-12-11 7:15:41 Before installation Read through the following instructions before installing the dryer, and keep this manual
Dryer User manual DV22K6800** DV22K6800-03650A-00_EN (US)_151211.indd 1 2015-12-11 7:15:41 Before installation Read through the following instructions before installing the dryer, and keep this manual
INSTALLATION INSTRUCTIONS UNDERCOUNTER DISHWASHER STAINLESS STEEL TUB LAVAVAJILLAS EMPOTRADA CON TINA DE ACERO INOXIDABLE
 INSTALLATION INSTRUCTIONS UNDERCOUNTER DISHWASHER STAINLESS STEEL TUB LAVAVAJILLAS EMPOTRADA CON TINA DE ACERO INOXIDABLE INSTRUCTIONS D INSTALLATION LAVE-VAISSELLE ENCASTRÉ AVEC CUVE EN ACIER INOXYDABLE
29 IN. (73.7 CM) ELECTRIC DRYER INSTALLATION INSTRUCTIONS DRYER SAFETY
 ELECTRIC DRYER INSTALLATION INSTRUCTIONS DRYER SAFETY") 9 IN. (7.7 CM) ELECTRIC DRYER INSTALLATION INSTRUCTIONS DRYER SAFETY... INSTALLATION INSTRUCTIONS... Tools and Parts... Location Requirements... Electrical Requirements... Electrical Connection...4 Venting
9 IN. (7.7 CM) ELECTRIC DRYER INSTALLATION INSTRUCTIONS DRYER SAFETY... INSTALLATION INSTRUCTIONS... Tools and Parts... Location Requirements... Electrical Requirements... Electrical Connection...4 Venting
INSTALLATION INSTRUCTIONS
 INSTALLATION INSTRUCTIONS TM DishDrawer dishwasher DD36SDFTX (Designer) & DD36STI (Integrated) models US CA 59008D 04.3 a SAFETY AND WARNINGS Electrical hazard WARNING! Before installing the dishwasher,
! WARNING To avoid risk of electrical shock, personal injury or death; disconnect power to washer before servicing, unless testing requires power.
 24 Front Load Washer Technical Information MAH2400A* Due to possibility of personal injury or property damage, always contact an authorized technician for servicing or repair of this unit. Refer to Service
TECHNICAL INFORMATION Touchtronic Clothes Dryers
 TECHNICAL INFORMATION Touchtronic Clothes Dryers Includes: T1302, T1303, T1322, T1329ci T1403 & T1405 2004 Miele This page intentionally left blank. Table of Contents GENERAL INFORMATION A. Warning and
Installation. Professional Built-In Electric Warming Drawers (Indoor and Outdoor Models)
") Installation Professional Built-In Electric Warming Drawers (Indoor and Outdoor Models) VEWD527 / CVEWD527 / VEWD530 / CVEWD530 VEWDO530 / CVEWDO530 / VEWDO536 / CVEWDO536 Table of Contents Warnings &
Installation Professional Built-In Electric Warming Drawers (Indoor and Outdoor Models) VEWD527 / CVEWD527 / VEWD530 / CVEWD530 VEWDO530 / CVEWDO530 / VEWDO536 / CVEWDO536 Table of Contents Warnings &
FAVORIT34502VIO. EN User Manual
 FAVORIT34502VIO EN User Manual 2 www.aeg.com CONTENTS 1. SAFETY INFORMATION...3 2. SAFETY INSTRUCTIONS... 4 3. PRODUCT DESCRIPTION... 6 4. CONTROL PANEL...6 5. PROGRAMMES... 7 6. SETTINGS... 8 7. BEFORE
TECH SHEET - DO NOT DISCARD PAGE
 TECH SHEET - DO NOT DISCARD PAGE 1 3. If this test mode has been entered successfully, all indicators on the console are illuminated for 5 seconds with 8:88 showing in the Estimated Time Remaining three-digit
INSTALLATION INSTRUCTIONS
 INSTALLATION INSTRUCTIONS TM DishDrawer dishwasher DD4S 7 & DD4ST 7 models US CA 59004D 04.3 FOLLOW THE INSTALLATION SEQUENCE RELEVANT TO YOUR MODEL STANDARD HEIGHT SINGLE MODELS TALL HEIGHT SINGLE MODELS
Installation Instructions Built-In Dishwasher
 GE Consumer & Industrial Appliances Installation Instructions Built-In Dishwasher If you have questions, call 800.GE.CARES (800.432.2737) or visit our website at: www.ge.com BEFORE YOU BEGIN Read these
Installation. Guide. 7 SERIES Professional TurboChef Speedcook Double Oven VDOT730
 Installation Guide 7 SERIES Professional TurboChef Speedcook Double Oven VDOT730 Table of Contents Warnings and Important Information 3 Dimensions 6 Specifications 7 Cutout Dimensions 8 General Information
Dishwasher Cycle Chart Condensation Dry System
 Models: DMR57LFB/XAA DMR57LFS/XAA DMR57LFW/XAA DMR77LHB/XAA DMR77LHS/XAA DMR77LHW/XAA DMR78AHB/XAA DMR78AHS/XAA DMR78AHW/XAA Program Drain Pre-wash 1 Fast Track Troubleshooting IMPORTANT SAFETY NOTICE
Service Manual Model 3163
 Service Manual Model 3163 Contents Important Safety Information.......... 1 Specifications.................. 2 General Information.............. 2 Direct Vent Requirements........... 2 Propane System................
INSTALLATION INSTRUCTIONS
 INSTALLATION INSTRUCTIONS BUILT-IN FULL HEIGHT WINE CELLAR Retain for Future Reference VIKING RANGE CORPORATION 111 Front Street Greenwood, Mississippi 38930 USA (662) 455-1200 IMPORTANT - PLEASE READ
P MODEL AIR CONDITIONER
 CONSUMER SERVICES TECHNICAL EDUCATION GROUP PRESENTS R-94 P MODEL AIR CONDITIONER JOB AID Part No. 8178039 FORWARD This Whirlpool Job Aid, P Model Air Conditioner (Part No. 8178039), provides the technician
User manual. Dishwasher ZDT15010FA
 EN User manual Dishwasher ZDT15010FA Contents Safety instructions 2 Control panel 3 Programmes _ 4 Options _ 5 Before first use _ 6 Daily use _ 7 Hints and tips 9 Care and cleaning _ 10 Troubleshooting
DOUBLE DISHDRAWER TM DISHWASHER
 DOUBLE DISHDRAWER TM DISHWASHER DD4DI, DD4DTI & DD4DHTI models INSTALLATION GUIDE US CA 5986 A 08.7 !! WARNING! Electrical Shock Hazard Before installing the dishwasher, remove the house fuse or open the
FAVORIT W0P. EN User manual
 FAVORIT 88419 W0P EN User manual 2 www.aeg.com CONTENTS 1. SAFETY INSTRUCTIONS...................................................... 3 2. PRODUCT DESCRIPTION.....................................................
Dishwasher. Use & Care Manual DW24PR
 Dishwasher Use & Care Manual DW24PR CONTENTS Please carefully read this manual before using the dishwasher, it will help you use and maintain the dishwasher properly. 01 1 IMPORTANT SAFETY INSTRUCTIONS
INSTALLATION INSTRUCTIONS UNDERCOUNTER DISHWASHER PLASTIC TUB INSTRUCCIONES DE INSTALACIÓN LAVAVAJILLAS EMPOTRADA CON TINA PLÁSTICA
 INSTALLATION INSTRUCTIONS UNDERCOUNTER DISHWASHER PLASTIC TUB INSTRUCCIONES DE INSTALACIÓN LAVAVAJILLAS EMPOTRADA CON TINA PLÁSTICA INSTRUCTIONS D INSTALLATION LAVE-VAISSELLE ENCASTRÉ CUVE EN PLASTIQUE
Viking Installation Guide
 Viking Installation Guide Viking Range Corporation 111 Front Street Greenwood, Mississippi 38930 USA (662) 455-1200 For product information, call 1-888-VIKING1 (845-4641) or visit the Viking Web site at
FAVORIT 34502VI0. EN User manual
 FAVORIT 34502VI0 EN User manual 2 www.aeg.com CONTENTS 1. SAFETY INSTRUCTIONS...................................................... 3 2. PRODUCT DESCRIPTION.....................................................
Viking Installation Guide
 Viking Installation Guide Viking Range Corporation 111 Front Street Greenwood, Mississippi 38930 USA (662) 455-1200 For product information, call 1-888-VIKING1 (845-4641) or visit the Viking Web site at
Installation Instructions
 Installation Instructions KFN 9855 ide en - CA Installation, repair and maintenance work should be performed by a Miele authorized service technician in accordance with national and local safety regulations
INSTALLATION MANUAL CT-200
 INSTALLATION MANUAL CT-200 1 CHILLER SAFETY Your safety and the safety of others are very important. We have provided many important safety messages in this manual and on your appliance. Always read and
1 SAFETY INSTALLATION REPAIR OPERATION COMPONENTS FAULT DIAGNOSTICS... 34
 ASCENTTA DW REPAIR INSTTRUCTTI I ION 1 SAFETY... 3 1.1 General hazards...3 1.2 Electrical shock / fire hazards...3 1.3 Plumbing / scalding hazards...3 2 INSTALLATION... 4 2.1 Pre-Install checklist...4