INSTRUCTION MANUAL A REVISION A. Series e 3-4/e 3-6 Instant Hot Water Recirculating Systems
|
|
|
- Lee Hardy
- 5 years ago
- Views:
Transcription

1 INSTRUCTION MANUAL A REVISION A Series e 3-4/e 3-6 Instant Hot Water Recirculating Systems
2
3


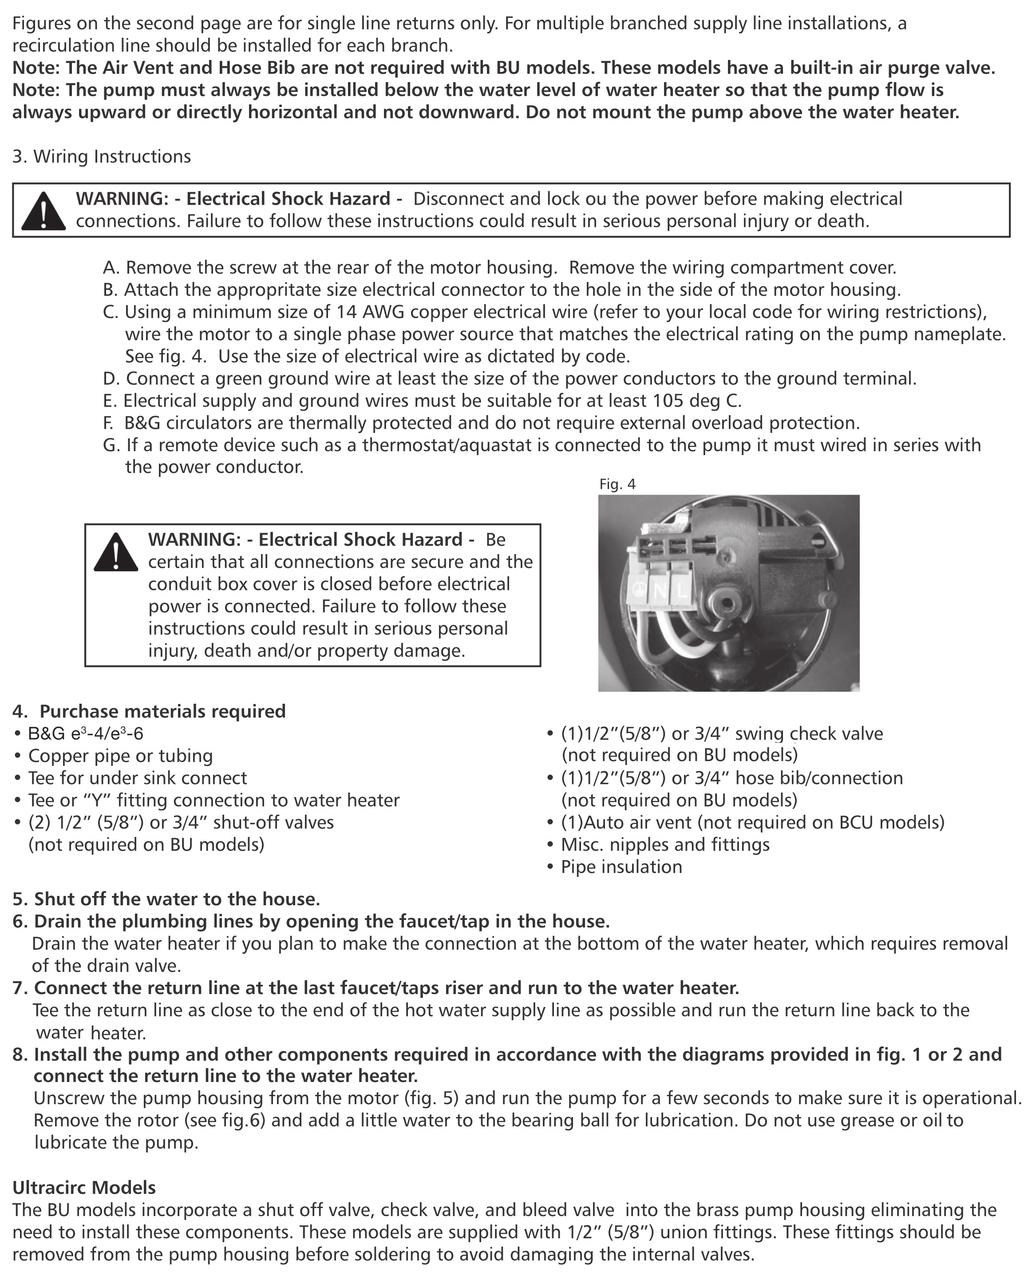
4 Fig. 5 Remove the motor unit and o-ring from the pump housing into the plumbing line. Do not sweat the housing into the plumbing line with the motor or o-ring attached. Arrows on the pump housing indicate the direction of water flow. Fig. 6 e 3-4 and e 3-6 Models - Rotor/Impeller Installation: To remove the rotor unit, grasp the top of the unit and gently pull straight up. Do not pull up on one side only or push the rotor sideways. If the rotor sits too tightly, carefully lever it off with a screwdriver on each side of the rotor. When re-installing the rotor, use enough force to hear the rotor click on to the ceramic bearing and spin the rotor with your fingers to insure that it turns freely. Caution: Only hand tighten the screw ring. Do not over tighten! Do not use plumbers putty on the screw ring. Remove the Rotor/Impeller by using forefinger and thumb and pulling upward. Or, if the Rotor/Impeller cannot be removed using forefinger and thumb, carefully lever off evenly with two screwdrivers. 8. Close the shut-off valve on the inlet side of the pump and turn the water supply to the house back on. 9. Flush system of debris. Before reattaching the pump motor, open the shut-off valve on the inlet side of the pump housing and let water flow through the housing. Use a bucket to catch the water. Let the water run long enough to clear all sand, solder pellets, plumbers tape flakes, etc. from the lines. Close the inlet shut-off valve when finished. 10. Connect the pump motor to the housing. Make sure the rubber o-ring is in place in the housing and the screw ring is securely hand tightened. Reopen the shut-off valve or valves and let the water flood the pump housing. 11. Purge air from the supply line. Correct Installation Turn on the faucet/taps or shower farthest from the water heater. Open the line until you get a good, steady stream of water without sputter or evidence of air. 12. Purge air from the return line. Connect the pump to the electrical supply. With the pump running, open the hose bib/connection and let water run until the pump is running quietly and there is no sputtering or other evidence of air coming from the hose bib. Close the hose bib. Your system is now in operation. Allow a few minutes for instant hot water to recirculate to all of your faucet/taps. Do s and Do Not s Do: Install an air vent mounted in a vertical position (if provided). Use 1/2 (5/8 ) recirculation line tubing. Check to be sure there are no crimps or sharp bends in the recirculation line that would restrict the flow. Be sure the check valve is installed in the proper direction of the flow. Be sure all air is purged from the system prior to starting the pump. Use a water conditioner if you have hard water. Be sure the gate valves are open before turning on the pump. Install the pump pumping in upward direction only. Do Not Use grease or oil to lubricate the pump (it is self-lubricating). Over tighten the screw ring. Install the pump with the motor above the pump housing. Install the pump pumping away from the water heater nor pumping downward. Start the pump before the system is full of water and purged of air. Allow the water heater temperature above 140ºF (60ºC). (only in the US) Install the pump in the supply line to faucet/taps. Use any pipe size other than 1/2 (5/8 ) for all models. Position the pump at the top of the water heater. Improper Installation - Do NOT mount in these orientations Note: Keep The Hot Water Temperature Below 140ºF (60ºC). Higher temperatures can cause calcium and magnesium elements to come out of solution and create solids which could not only cause damage to the pump but also reduce water heater efficiency and premature failure of the water heater. Hard Water Conditions Use a water conditioner. Hard water can cause scale build-up and eventually reduce the life of the pump and other system components. Protected by one or more of the following Patents: , , , , , , , ,
5 System Maintenance Do not attempt to lubricate the pump. The pump is self-lubricating. Prevent the pump from running dry. Flush the system of any debris and re-purge all air from the system in the event of any water supply interruptions in plumbing line. Prevent heavy scale build-up by keeping the hot water temperature 140ºF (60ºC) or less. (only in US) Don t over salt your water conditioner. U.L. Caution This pump has been tested using water only. Its suitability for use with liquids other than water is the end user s responsibility. Australia This pump must be installed in accordance with AS3500 Trouble Shooting Noise in the System The pump should be virtually noiseless during operation. The rotor may make a brief but hardly perceptible fluttering noise immediately after the pump is turned off. During normal operation, an occasional air bubble may pass through the pump housing causing a momentary gurgling noise. However, if noise at the pump persists for any prolonged period, correct the problem. The check valve/non-return valve is mistakenly installed on the inlet side of pump or in the wrong direction. The inlet side shut-off valve is closed or clogged. There is air trapped in the pump housing (turn the pump on and off several times to see if the air pocket can be bumped out of the pump and if not, then open the hose bib for manual venting). There is debris blocking the rotor. The rotor bearing has worn due to dry running causing the rotor to wobble during operation. If the return line connects to the cold water supply at the top of water heater, the warm water may be creating back pressure in the cold supply line. If so, add a check valve/non-return valve on the cold supply line above the return line tee connector. Pump Operating Intermittently or Not at All No power to the pump. There is debris or foreign matter in the pump. The thermostat is not functioning properly. If wanted, the thermostat may be easily disconnected. Contact the B&G factory or local representative for details. Water Taking Too Long to Get to Faucet/Tap The hot water supply from the water heater is exhausted. The faucet/tap involved may be on a branch line off the main hot water supply line in which case there may be a slightly longer wait for hot water to arrive than at faucet/tap directly off the main supply line. The check valve/non-return valve is installed backwards. The pump is not operating. The timer is not operating properly. Signs of Dry Run Dry run results from inadequate water supply to the pump, which prevents lubrication of the bearing ball. It may be caused by operating the pump without water in the plumbing lines, which may occur with frozen pipes, or by failing to turn the pump off when the system is drained for servicing. It can also occur as the result of large air bubbles collecting in the pump housing and preventing the flow of water over the bearing ball. If the problem is air in the system, check that the air vent is functioning, that the system is properly purged of air and that the pump and various system components are installed. Safety Requirements Mechanical Safety WARNING: - Excessive System Pressure Hazard - The maximum working pressure of the pump is listed on the nameplate - Do Not Exceed This Pressure. Failure to follow these instructions could result in serious personal injury, death and/or property damage.

6 Xylem Inc N. Austin Avenue Morton Grove, Illinois Phone: (847) Fax: (847) Bell & Gossett is a trademark of Xylem Inc. or one of its subsidiaries Xylem, Inc. A A July 2012
Seal-less Centrifugal Canned Motor Pumps For Instant Hot Water Recirculating Systems
 Installation & Operating Manual Please read this manual carefully before attempting to install, operate or maintain the product described. Failure to comply with the information provided in this manual
Laing Thermotech. Autocirc The Instant Hot Water Pump Models E1-BCANCT1W-06 and E1-BCANRT1W. Installation & Operating Manual
 Installation & Operating Manual Please read this manual carefully before attempting to install, operate or maintain the product described. Failure to comply with the information provided in this manual
LS Condensate Removal Pump INSTRUCTION MANUAL REVISION A
 LS Condensate Removal Pump INSTRUCTION MANUAL 6-71-075-115 REVISION A CAUTION: Combustible liquids may not be pumped! The condensate pump may not be run dry, as this can destroy the bearings in a very
Autocirc Instant Hot Water Pump Model: ACT E10 INSTRUCTION MANUAL REVISION A
 Autocirc Instant Hot Water Pump Model: ACT E10 INSTRUCTION MANUAL 6-71-075-109 REVISION A Preparation for Installation: Assemble the parts and tools required: 1. Open and inspect Autocirc pump package.
ASTRO EXPRESS 2 HOT WATER DELIVERY SYSTEM
 ASTRO EXPRESS 2 HOT WATER DELIVERY SYSTEM INSTALLATION AND OPERATING INSTRUCTIONS File No: 10.817 Date: july 23, 2015 Supersedes: 10.817 Date: june 3, 2015 1.0 Typical installations 1 2.0 How it works
ASTRO 2 SERIES HOT WATER RE-CIRCULATION SYSTEM INSTALLATION AND OPERATING INSTRUCTIONS
 ASTRO 2 SERIES HOT WATER RE-CIRCULATION SYSTEM INSTALLATION AND OPERATING INSTRUCTIONS File No: 10.812 Date: february 24, 2017 Supersedes: 10.812 Date: july 23, 2015 1.0 Typical application 1 2.0 How it
Instruction Manual. Bell & Gossett ecocirc wireless Potable Hot Water Recirculation Kit
 Instruction Bell & Gossett ecocirc wireless Potable Hot Water Recirculation Kit Table of Contents Table of Contents Introduction and Safety... 2 Introduction... 2 Safety... 2 Safety terminology and symbols...2
ASTRO 2 SERIES HOT WATER RE-CIRCULATION SYSTEM INSTALLATION AND OPERATING INSTRUCTIONS
 ASTRO SERIES HOT WATER RE-CIRCULATION SYSTEM INSTALLATION AND OPERATING INSTRUCTIONS File No: 10.81 Date: july 11, 018 Supersedes: 10.81 Date: february 4, 017 1.0 Typical application 1.0 How it works 1
INSTRUCTION MANUAL DN0136 REVISION D
 INSTRUCTION MANUAL DN0136 REVISION D PIPING (Returns) Gravity return lines from system must be properly pitched down to unit inlet. Returns must also be trapped to prevent steam entry into the unit. An
Threaded. Flanged. Model PSH. Primary Secondary Header A-451
 Threaded Flanged Model PSH Primary Secondary Header A-451 The History of Primary-Secondary Pumping Did you know that Bell & Gossett invented Primary-Secondary Pumping? This widely popular pumping arrangement
INSTRUCTIONS FOR USE PORTABLE VACUUM SYSTEM LEI Part # s / , , , IMPORTANT INFORMATION
 INSTRUCTIONS FOR USE PORTABLE VACUUM SYSTEM LEI Part # s / 27-009, 27-010, 27-015, 27-020 IMPORTANT INFORMATION UNATHORIZED CHANGES OR ALTERATIONS TO ANY LINCOLN PORTABLE VACUUM SYSTEM WILL AUTOMATICALLY
Astro Express 2 - Hot Water Delivery System
 FILE NO.: 10.817 DATE: Apr. 4, 2011 SUPERSEDES: 10.817 DATE: Feb. 24, 2010 INSTALLATION AND OPERATING INSTRUCTIONS Astro Express 2 - Hot Water Delivery System TYPICAL APPLICATIONS The Armstrong Astro Express
SM-909/SM /2" Sweat 3/4" Sweat 3 3/8" F.L. Max. Max. Line Weight Model No. HP Inlet/Outlet Volts Amps Fluid Temp. Pressure (Lbs.
 Installation & Operating Manual Please read this manual carefully before attempting to install, operate or maintain the product described. Failure to comply with the information provided in this manual
Installation & Operating Guide
 5-036 HOT WATER TANK Installation & Operating Guide Read all instructions thoroughly. Keep this guide for future reference. Proof of purchase is required for Warranty. Staple receipt or proof of purchase
ONE PIECE TOILET LT3. Model: MPN: B0940 INSTALLATION INSTRUCTIONS. Version: 1.0
 Model: MPN: B0940 INSTALLATION INSTRUCTIONS Version: 1.0 READ ALL INSTRUCTIONS BEFORE UNPACKING THE PRODUCT INSTRUCTIONS THAT, IF IGNORED COULD RESULT IN DEATH OR SERIOUS INJURY CAUSED BY INCORRECT HANDLING
7 1/4" 3 3/8" Pump Max. Max. Line Weight Model No. HP Housing Inlet/Outlet Fluid Temp. Pressure (Lbs.)
") Installation & Operating Manual Please read this manual carefully before attempting to install, operate or maintain the product described. Failure to comply with the information provided in this manual
Installation & Operating Manual Please read this manual carefully before attempting to install, operate or maintain the product described. Failure to comply with the information provided in this manual
Plastic Housing Plastic Housing Stainless Housing SM /8" 3 3/8"
 Installation & Operating Manual Please read this manual carefully before attempting to install, operate or maintain the product described. Failure to comply with the information provided in this manual
Installation Instructions. For the 18 Built-In Dishwasher and Front Color Panels
 Installation Instructions For the 18 Built-In Dishwasher and Front Color Panels Printed in USA 154232102 Before You Begin DO NOT INSTALL DISHWASHER UNTIL YOU HAVE READ ALL INSTRUCTIONS. FOR YOUR SAFETY,
Technical Data TYPE T14 & T14D TEMPERATURE PILOT SPENCE ENGINEERING COMPANY, INC. 150 COLDENHAM ROAD, WALDEN, NY SD 4511A T14 PILOT
 Technical Data SD 4511A SPENCE ENGINEERING COMPANY, INC. 150 COLDENHAM ROAD, WALDEN, NY 12586-2035 TYPE T14 & T14D TEMPERATURE PILOT PRINTED IN U.S.A. SD 4511A/9811 5 13 /16 D 4 7 /8 1 13 /16 T14 PILOT
SAAB 99 Series H Type Engine. Installation Guide Silicone Cooling System Hoses. Classic Silicone Hoses
 SAAB 99 Series 1981 1984 H Type Engine Installation Guide Silicone Cooling System Hoses Classic Silicone Hoses http://www.classicsiliconehoses.com/ Disclaimer This document is for reference purposes only.
INSTALLATION INSTRUCTIONS GEO PRIME TANK. (Patent Pending) GPC
 GPC") INSTALLATION INSTRUCTIONS GEO PRIME TANK (Patent Pending) GPC Table of Contents General Description 2 Installation 3 Flushing and Purging 5 Initial Start up 7 Adding or Checking Fluid 8 Replacing a Pump
INSTALLATION INSTRUCTIONS GEO PRIME TANK (Patent Pending) GPC Table of Contents General Description 2 Installation 3 Flushing and Purging 5 Initial Start up 7 Adding or Checking Fluid 8 Replacing a Pump
INSTALLATION INSTRUCTIONS
 INSTALLATION INSTRUCTIONS Thermostatic Three Tap Hole tap, with pop up (excluding tap heads & base) - T26 Option 1: urlington has 3 different style handle for your selection. Claremont Anglesey irkenhead
E.2 series high efficiency circulator. Installation and operating instructions
 E.2 series high efficiency circulator Installation and operating instructions File No: 10.84 Date: august 16, 2012 Supersedes: 10.84 Date: july 20, 2010 contents 1.0 Operating limits 4 2.0 Electrical
Installation & Operating Guide
 HOT WATER DISPENSER Installation & Operating Guide Read all instructions thoroughly. Keep this guide for future reference. Proof of purchase is required for Warranty. Staple receipt or proof of purchase
MAXI PUMP INSTRUCTION MANUAL NE6151B /NE6171B READ THIS MANUAL CAREFULLY BEFORE USING YOUR MAXI PUMP
 MAXI PUMP INSTRUCTION MANUAL NE6151B /NE6171B READ THIS MANUAL CAREFULLY BEFORE USING YOUR MAXI PUMP 8104 MAXI-PUMP PARTS BREAKDOWN Re f # 1 2 3 4 5 6 7a 7b 8 9 10 11 12 13 14 15 16 2 Part # NEP2134 NEP2135
Domestic Pump Vacuum and Boiler Feed Units Series VCMD TM INSTRUCTION MANUAL DN0137 REVISION F
 Domestic Pump Vacuum and Boiler Feed Units Series VCMD TM INSTRUCTION MANUAL DN0137 REVISION F DESCRIPTION The Series VCMD family of units consists of various combinations of boiler feed units combined
ELECTRIC WATER HEATER HT382E55
 ELECTRIC WATER HEATER HT382E55 Note: Before operating or installing this electric water heater read this manual and follow all safety rules and operating instructions. 220v 240v 60Hz 30~55 C 6.8 Kw 1.8
DISHWASHER. Models DW2432 and DW2432SS. Installation Manual. Write Serial Number (on inner door of unit) here:
 here:") DISHWASHER Models DW2432 and DW2432SS Installation Manual Write Serial Number (on inner door of unit) here: Felix Storch, Inc. Summit Appliance Division 770 Garrison Avenue Bronx, New York 10474 www.summitappliance.com
DISHWASHER Models DW2432 and DW2432SS Installation Manual Write Serial Number (on inner door of unit) here: Felix Storch, Inc. Summit Appliance Division 770 Garrison Avenue Bronx, New York 10474 www.summitappliance.com
2 SPEED PUMP INSTRUCTION MANUAL READ THIS MANUAL CAREFULLY BEFORE USING YOUR 2 SPEED PUMP
 2 SPEED PUMP INSTRUCTION MANUAL READ THIS MANUAL CAREFULLY BEFORE USING YOUR 2 SPEED PUMP 8308 PUMP PARTS BREAKDOWN Ref # Part # Manf. # Descrip on 1 NEP2134 AC 81361 PUMP LID 2 NEP2135 AC 81396 PUMP LID
Hoffman Specialty Watchman Series WC & WCS Condensate Units Replacement Parts PART LISTS DN0436C
 Hoffman Specialty Watchman Series WC & WCS Condensate Units Replacement Parts PART LISTS DN06C PARTS LIST DN06 Index How To Use This Parts List.............................. Identifying Your Watchman Unit..........................-
568X, 587X, 588X Series
 Please read and save this Repair Parts Manual. Read this manual and the General Operating Instructions carefully before attempting to assemble, install, operate or maintain the product described. Protect
Series 47 and 247 Mechanical Water Feeders. Series 47-2 and Combination Mechanical Water Feeder/Low Water Cut-Off ! WARNING
 Series 47 and 247 Mechanical Water Feeders McDonnell & Miller Installation & Maintenance Instructions MM-316(C) Series 47-2 and 247-2 Combination Mechanical Water Feeder/Low Water Cut-Off Series 47 Water
LC Series - Light Commercial Pump Station Installation and Operation Manual
 LC Series - Light Commercial Pump Station Installation and Operation Manual Please keep this manual with the pump station Content Rain Bird LC Series Overview... Safety Instruction... Operation... 3 Pump
Series 1140 and 1141 Temperature Regulators
 Hoffman Specialty Installation & Maintenance Instructions HS-504(E) Series 1140 and 1141 Temperature Regulators! CAUTION FOLLOW ALL INSTALLATION AND OPERATING INSTRUCTIONS. TURN OFF WATER OR STEAM BEFORE
Clean Water Made Easy. CWS Time Clock Softener Installation & Start Up Guide. Questions?
 Clean Water Made Easy www.cleanwaterstore.com CWS Time Clock Softener Installation & Start Up Guide Thank you for purchasing a Clean Water System! With proper installation and a little routine maintenance
Nichole Ernst CEO Powerhouse International
 Dear Valued Customer, Thank you so much for your order. We are a family-owned business in Lincoln, NE and customer service is our priority. If you have any questions about your product, please feel free
SAVE THESE INSTRUCTIONS
 Built-In Dishwasher Dishwashers Write the model and serial numbers here: Model # Serial # You can find them on the tub wall just inside the door or. the lower part of back. Installation Instructions DDW1802W
SELF-PRIMING CENTRIFUGAL PUMPS BMLS-M & BMLS-H
 SELF-PRIMING CENTRIFUGAL PUMPS BMLS-M & BMLS-H INSTALLATION, OPERATION & MAINTENANCE INSTRUCTIONS HP Phase Medium Head High Head 3 1 BMLS 300 M BMLS 300 H 3 3 BMLS 300 M3 BMLS 300 H3 5 1 BMLS 500 M BMLS
Entertainment Faucet with Remote Valve
 P25205 1 of 7 Thank You For Choosing Kallista We appreciate your commitment to Kallista quality products. Please take a moment to review this manual before you install your Kallista product. If you encounter
Installation Instructions
 Installation Instructions For the 18" Built-In Dishwasher Sears, Roebuck and Co. Sears Canada, Inc. Hoffman Estates, IL 60179 U.S.A. Toronto, Ontario, Canada M5B 2B8 154435201 Before You Begin DO NOT INSTALL
Installation and operating instructions. E.2 Series high efficiency circulator
 Installation and operating instructions E.2 Series high efficiency circulator File No: 10.84 Date: august 16, 2012 Supersedes: 10.84 Date: july 20, 2010 contents 1.0 Operating limits 4 2.0 Electrical
CAUTION CAUTION HCWB2 & HCWP2 SERIES IAQ HUMIDIFIERS USER S MANUAL FOR HCWB2 AND HCWP2 HUMIDIFIERS. Table Of Contents
 IAQ HUMIDIFIERS Litho U.S.A. 2007 Dallas, Texas, USA 505,289M 08/2007 Supersedes 02/2007 KAZ # C.6046 HCWB2 & HCWP2 SERIES USER S MANUAL FOR HCWB2 AND HCWP2 HUMIDIFIERS Table Of Contents Introduction....................................
INSTALLER: PLEASE LEAVE THIS MANUAL FOR THE OWNER S USE. Condensate Return Systems General Installation, Operation, & Service Instructions !
 Condensate Return Systems General Installation, Operation, & Service Instructions INSTALLER: PLEASE LEAVE THIS MANUAL FOR THE OWNER S USE. SAFETY INSTRUCTIONS This safety alert symbol will be used in this
Hot-1 Hot Water Dispenser
 The Installation, Care and Use of Your New Hot-1 Hot Water Dispenser Valve lever design may vary How your hot water dispenser works Water is electrically heated to a brewing/cooking hot 190 F (88 C)* by
INSTALLATION INSTRUCTIONS Cased N Coil, Horizontal ENH4X
 INSTALLATION INSTRUCTIONS Cased N Coil, Horizontal ENH4X NOTE: Read the entire instruction manual before starting the installation. TABLE OF CONTENTS PAGE SAFETY CONSIDERATIONS... 1 INTRODUCTION... 1 INSTALLATION...
OWNERS GUIDE TO INSTALLATION AND OPERATION
 OWNERS GUIDE TO INSTALLATION AND OPERATION SPM SERIES HIGH POWER CENTRIFUGALS READ THESE INSTRUCTIONS CAREFULLY Read these installation instructions in detail before installing your pump. Be sure to check
Chanson Water USA, INC. Installation Guide for SCF-3000/SCF-6000
 Chanson Water USA, INC. Installation Guide for SCF-3000/SCF-6000 Water Dove Systems will not be ready for full use for 48-72 hours after install. Please plan you installation accordingly. Product Spec
STERI-VAC CENTRAL SUCTION SYSTEM
 STERI-VAC CENTRAL SUCTION SYSTEM INSTALLATION MANUAL This is a general installation manual for Steri-Vac Central Suction Systems. For detailed information see specific technical sheet. These are high-volume
CFF-500 CHILLER. Operator s & Installation Manual. Release Date: November 3, 1996 Publication Number: Revision Date: March 25, 2014 Revision: F
 CFF-500 CHILLER Operator s & Installation Manual Release Date: November 3, 1996 Publication Number: 90667 Revision Date: March 25, 2014 Revision: F Visit the Cornelius web site at www.cornelius.com for
INSTRUCTION MANUAL HS-229G
 INSTRUCTION MANUAL HS-229G 510977 STEP 1 - Where to Install the Thermostatic Steam Trap Determine where to install the thermostatic steam trap based on the following information. a. The trap should be
TIDALWAVE I/G POOL PUMP INSTRUCTION MANUAL
 TIDALWAVE I/G POOL PUMP INSTRUCTION MANUAL READ THIS MANUAL CAREFULLY BEFORE USING YOUR PUMP 88 PUMP PARTS BREAKDOWN REF # Order # Mfr # Description 1 NEP4 AC 348 Lid Knobs NEP AC 380 Strainer Lid 3 NEP6
CAUTION CAUTION HCWB2 & HCWP2 SERIES IAQ HUMIDIFIERS USER S MANUAL FOR HCWB2 AND HCWP2 HUMIDIFIERS. Table Of Contents
 IAQ HUMIDIFIERS Litho U.S.A. 2007 Dallas, Texas, USA 505,289M 09/2008 Supersedes 08/2007 KAZ # C.6046 HCWB2 & HCWP2 SERIES USER S MANUAL FOR HCWB2 AND HCWP2 HUMIDIFIERS Table Of Contents Introduction....................................
5700-E Sediment Filter Installation & Start-Up Guide
 Clean Water Made Easy www.cleanwaterstore.com 5700-E Sediment Filter Installation & Start-Up Guide Thank you for purchasing a Clean Water System! With proper installation and a little routine maintenance
EFX 600. aquamanta. Instruction Manual. 4year guarantee. the experts in aquatic technology. >600 Litres
 EFX 600 aquamanta TM the experts in aquatic technology >600 Litres Coldwater Tropical Marine 4year guarantee Instruction Manual Important Safeguards This appliance is not intended for use by persons (including
INSTALLATION INSTRUCTIONS
 INSTALLATION INSTRUTIONS 20007013160 Important We recommend that this product is installed by a qualified professional plumber who is certified by NVQ (National Vocational Qualification) or SNVQ (Scottish
NT1-P CONDENSATE NEUTRALIZATION TANK WITH PUMP INSTALLATION, OPERATION, AND MAINTENANCE INSTRUCTIONS
 NT1-P CONDENSATE NEUTRALIZATION TANK WITH PUMP INSTALLATION, OPERATION, AND MAINTENANCE INSTRUCTIONS NOTE - Check with your local water authority for regulations regarding discharge of treated condensate
Dishwasher Installation Instructions DW 24XT/DW 24XV
 Dishwasher Installation Instructions DW 24XT/DW 24XV Installation Instructions Dishwasher BEFORE YOU BEGIN Read these instructions completely and carefully. IMPORTANT Observe all governing codes and ordinances.
INSTALLATION INSTRUCTIONS Cased N Coil, Horizontal ENH4X
 INSTALLATION INSTRUCTIONS Cased N Coil, Horizontal ENH4X NOTE: Read the entire instruction manual before starting the installation. TABLE OF CONTENTS PAGE SAFETY CONSIDERATIONS... 1 INTRODUCTION... 1 INSTALLATION...
Pulldown Kitchen Faucet
 P25200 1 of 7 Thank You For Choosing Kallista We appreciate your commitment to Kallista quality products. Please take a moment to review this manual before you install your Kallista product. If you encounter
PWC 7000 PureWaterCooler SERVICE MANUAL. for. PureWaterCooler by Vertex Model Copyright 2012 Vertex Water Products
 SERVICE MANUAL for by Vertex Model 7000 Table of Contents 1. Introduction 2. Cooler Set-up 3. Top Cover Removal 4. Remove/Replace Mechanical Float Valve Assembly 5. Removing/Replacing Control Panel and
KITCHEN FAUCET COS-KF222C
 KITCHEN FAUCET COS-KF222C USER S MANUAL & INSTALLATION GUIDE Thank You Thank you for your purchase. We know that you have many brands and products to choose from and we are honored to know that you have
INSTRUCTION MANUAL MM-601REVI. Series FS4-3 General Purpose Liquid Flow Switch
 INSTRUCTION MANUAL MM-601REVI 246796 Series FS4-3 General Purpose Liquid Flow Switch SPECIFICATIONS Maximum Liquid Pressure: 160 psi (11.3 kg/cm 2 ) Liquid Temperature Range (TL): 32-300 F (0-149 C) Ambient
Cable Drum Machine. Operation Manual 40 SERIES. Cleans 2" to 4" lines up to 75' N O T F O R R O O T S
 Cable Drum Machine Operation Manual 40 SERIES Cleans 2" to 4" lines up to 75' Used For: Sinks, Showers & Floor Drains N O T F O R R O O T S WARNING - Read All Instructions, When Using Electric Tools, Basic
DOUBLE O-RING GEO-PRIME TANK Non-Pressurized Flow Center System INSTALLATION INSTRUCTIONS. Model: DORGPT-1 NOTE:
 INSTALLATION INSTRUCTIONS DOUBLE O-RING GEO-PRIME TANK Non-Pressurized Flow Center System Model: DORGPT-1 NOTE: This guide provides the installer with instructions specific to the Bard Double O-Ring Geo-Prime
Explorer CleaningPartsDirect.com Carpet Extractor. Operator and Parts Manual. Home Find... Go To.. Model No.: Can.
 Explorer 1500 Carpet Extractor Model No.: 608808 609231 Can. Operator and Parts Manual CleaningPartsDirect.com 662-393-3045 NOBLES 12875 RANSOM STREET HOLLAND MI 49424 U.S.A. CUSTOMER SERVICE: 1-800-365-6625
INSTALLATION AND INSTRUCTION MANUAL
 BATH PRO TM 5.1 UNIT INSTALLATION AND INSTRUCTION MANUAL INSTALLATION & INSTUCTION INDEX PAGE HydroSurge Bath Pro TM 5.1Unit Components...3 Before Starting...3 Installing the HydroSurge Bath Pro TM 5.1
INSTALLATION GUIDE Little Butler Hot Water Dispensing Faucets and Drinking Water Dispensing Faucets
 INSTALLATION GUIDE Little Butler Hot Water Dispensing Faucets and Drinking Water Dispensing Faucets DW000 / LB00 Series LB00 Series DW00 / LB00 Series LB00 Series DW7000 / LB700 Series LB700 Series DW8000
569, 570, 571, 572 Series
 Please read and save this Repair Parts Manual. Read this manual and the General Operating Instructions carefully before attempting to assemble, install, operate or maintain the product described. Protect
BACK WASH INSIDE THE SPA
 BACK WASH INSIDE THE SPA Lower the temperature to 90 degrees and let the unit run approximately 10-15 minutes. This gives the heating element the chance to cool down. Now unplug the power pack Using a
Instant Hot Water Dispenser Owner s Manual
 Model Hot1 Instant Hot Water Dispenser Owner s Manual Installation, Care & Use Instalacion, cuidado & uso Installation, soin et utilisation WHAT YOU SHOULD KNOW BEFORE YOU BEGIN For your satisfaction and
ADVANTAGE-100H-SC EXTRACTOR
 ADVANTAGE-100H-SC EXTRACTOR 120V INFORMATION & OPERATING INSTRUCTIONS CAUTION: DO NOT OPERATE MACHINE UNTIL YOU HAVE READ ALL SECTIONS OF THIS INSTRUCTION MANUAL IMPROPER USE OF THE MACHINE WILL VOID THE
PUREPOWER SERIES CENTRAL VACUUM POWER UNITS PP500, PP600 & PP650
 USER GUIDE PUREPOWER SERIES CENTRAL VACUUM POWER UNITS PP500, PP600 & PP650 AB0039 FOR RESIDENTIAL USE ONLY!! MODELS SFDB-DQ, SFDB-DR AND SFDB-DS 30042509E IMPORTANT SAFETY INSTRUCTIONS SAVE THESE INSTRUCTIONS
A PROUD HERITAGE OF EXPERIENCE & QUALITY DISHWASHER BR- DWSH01- S
 A PROUD HERITAGE OF EXPERIENCE & QUALITY DISHWASHER BR- DWSH01- S W W W. V I N O T E M P. C O M Installation Instructions Dishwasher BEFORE YOU BEGIN Read these instructions completely and carefully. IMPORTANT
SERVING CANADA INSTALLATION INSTRUCTIONS REVISED: AUGUST 2014
 SERVING CANADA INSTALLATION INSTRUCTIONS REVISED: AUGUST 2014 INDEX: UNPACKING INSTRUCTIONS page 2 INSTALLATION INSTRUCTIONS page 3 CONNECTIONS page 6 Equipment must be installed in compliance with all
! WARNING. Replacement Head Mechanism INSTRUCTION MANUAL MM-413F
 INSTRUCTION MANUAL MM-413F Replacement Head Mechanism With Switch Assembly: 93-HD, 94-HD 93-M-HD, 94-M-HD 93-7B-HD, 94-7B-HD 93-7B-M-HD, 94-7B-M-HD Without Switch Assembly: 93-HDLS 94-HDLS Replacement
569, 570, 571, 572 Series
 Please read and save this Repair Parts Manual. Read this manual and the General Operating Instructions carefully before attempting to assemble, install, operate or maintain the product described. Protect
24 VAC SYSTEM CONTROL KIT
 24 VAC SYSTEM CONTROL KIT Model: CK-43 Tubing MG1 Barometric Draft Control The CK-43 is designed for use with the SWG Series Power Venter for controlling Natural Gas and L.P. Gas Draft Induced appliances.
Fleck 2510 Softener Installation & Start Up Guide
 Clean Water Made Easy www.cleanwaterstore.com Fleck 2510 Softener Installation & Start Up Guide Thank you for purchasing a Clean Water System! With proper installation and a little routine maintenance
Home Set-up and Maintenance. Maintenance
 Home Set-up and Maintenance Home Set-up and Maintenance When moving into a resale home, there are some things that you will want to take care of. This list focuses on things related to the house, rather
HE360 Humidifier Installation Kit
 HE360 Humidifier Installation Kit INSTALLATION INSTRUCTIONS WELCOME To the comfortable world of humidified air. When you use your Honeywell humidifier, you notice that your skin is not as dry, and that
DESCRIPTION AND INSTALLATION
 STRAINER VACUUM GAGE CONTROL PANEL CHECK VALVE SOLENOID DISCHARGE VALVE DISCHARGE VENTURI AIR VENT VALVE FLOAT SWITCH DISCHARGE MANIFOLD MULTI-JET NOZZLE CENTRIFUGAL PUMP MOUNTING PADS FOR DUPLEX CENTRIFUGAL
Metermatic Water Softener. Operation Manual
 Metermatic Water Softener Operation Manual Page 5 of this manual contains important maintenance procedures for the continued proper operation of your unit. These MUST be performed regularly for your guarantee
INSTALLATION INSTRUCTIONS
 Model: MPN: AN5534 INSTALLATION INSTRUCTIONS Version: 1.0 READ ALL INSTRUCTIONS BEFORE UNPACKING THE PRODUCT INSTRUCTIONS THAT, IF IGNORED COULD RESULT IN DEATH OR SERIOUS INJURY CAUSED BY INCORRECT HANDLING
Mobile Milker. Filling the oil reservoir to HALF FULL
 1 2 Mobile Milker Upon receiving the unit check if there is any visible damage to pump, motor etc... If there is any damage do not attempt to run the unit! Call 800-245-8222 for assistance. Preparing to
PRE-ASSEMBLED RADIANT CONTROL PANEL INSTALLATION MANUAL
 FloorHeat PRE-ASSEMBLED RADIANT CONTROL PANEL INSTALLATION MANUAL Thank you for purchasing this radiant control panel assembly. Following are some important notes that will make the installation successful.
The Danger signal indicates an immediately hazardous situation which, if not avoided, will result in death or serious injury.
 The Danger signal indicates an immediately hazardous situation which, if not avoided, will result in death or serious injury. The Warning signal alerts you to potential hazards or unsafe practices which,
EEMAX ProAdvantage Series 1
 EEMAX ProAdvantage Series 1 ELECTRIC INSTANTANEOUS WATER HEATER INSTALLATION GUIDE AND OWNER S MANUAL MODELS COVERED: PA004120T 1Φ 120V PA008208T 1Φ 208V PA005240T 1Φ 240V PA007240T 1Φ 240V PA010240T 1Φ
Installation Instructions
 CNPHP Cased N Coils Horizontal Heating --- Cooling NOTE: Read the entire instruction manual before starting the installation. TABLE OF CONTENTS PAGE SAFETY CONSIDERATIONS... 1 INTRODUCTION... 1 INSTALLATION...
Tankless Water Heater
 Tankless Water Heater USER S INFORMATION MANUAL Models WGRT**150 / WGRT**199 / WGRTC**199 **A suffix of LP denotes propane gas **A suffix of NG denotes natural gas NOTICE: Westinghouse reserves the right
PWC 1800 PureWaterCooler SERVICE MANUAL. for. PureWaterCooler by Vertex Model PWC P/N man Copyright 2011 Vertex Water Products
 SERVICE MANUAL for by Vertex Model PWC-1800 P/N man-7011 Table of Contents 1. Introduction 2. Cooler Set-up 3. Remove Top Cover 4. Remove/Replace Float 5. Remove/Replace Hot Tank 6. Dispensing Solenoid
Tap Master Artesian Hydro Gardener Series Installation & Service Manual
 Perfect Water Technologies 7 Tips for an Easy and Successful Installation 1. Keep it simple - there are 3 connections to make, and the tubing is color coded. 2. Have plenty of time, light, space, and towels
Lavatory Faucet INSTALLATION INSTRUCTIONS P24490-CR, P24490-LV, P24491-CR, P24491-LV, P24492-CR, P24492-LV, P24700, P24705, P24706, P24736, P24800
 P24490-CR, P24490-LV, P24491-CR, P24491-LV, P24492-CR, P24492-LV, P24700, P24705, P24706, P24736, P24800 2018 1 of 7 KALLISTA THANK YOU FOR CHOOSING KALLISTA We appreciate your commitment to KALLISTA quality
Astro 2 circulator models. Installation and operating instructions
 Astro 2 circulator models Installation and File No: 10.89 Date: august 05, 2013 Supersedes: 10.89 Date: june 26, 2013 contents 1.0 Introduction 4 2.0 Installing 4 2.1 Terminal box 4 2.2 Electrical wiring
Water Softener Installation Guide Effective for all Softeners from our Range
 Water Softener Installation Guide Effective for all Softeners from our Range Planning Your Installation Always observe the water byelaws. Ensure there is only one rising main, that you have allowed space
Autotrol Performa FA Valve
 Autotrol Performa FA Valve With 400 Series Control Water Conditioning Control System Dealer Installation, Operation, and Maintenance Manual Table of Contents Installation................................
Vari-Cyclone Ceiling Fans
 Installation Instructions For Vari-Cyclone Ceiling Fans Installation Instructions For Vari-Cyclone Ceiling Fans Vari-Cyclone Ceiling Fans DC powered fans designed to operate on 12 or 24 vdc only! Toll
Top Control Dishwasher
 INSTALLATION GUIDE Top Control Dishwasher NS-DWH2BS8/NS-DWH2SS8/NS-DWR2BS8/NS-DWR2WH8/NS-DWR2SS8 Before using your new product, please read these instructions to prevent any damage. Contents Introduction......................................................................................................
6700 Valve Downflow. Automatic Water Softeners Operation Manual. Read all instructions carefully before operation. #51431 Rev.
 6700 Valve Downflow Automatic Water Softeners Operation Manual Read all instructions carefully before operation. #51431 Rev. 11/08 US Performance and Specifications Downflow Capacity at Various Salt Dosages
FEB 16 Rev T
 ORIGINAL INSTRUCTIONS Hand Crimping Tools 46673, 46673-1, and 46988 for STRATO-THERM* Terminals Instruction Sheet 408-1535 12 FEB 16 Rev T PROPER USE GUIDELINES Cumulative Trauma Disorders can result from
INSTANT HOT WATER DISPENSER
 INSTANT HOT WATER DISPENSER Tank Installation Materials required (not provided) 2 mounting bracket screws (and 2 plastic anchors if attaching to drywall) Shut-Off valve and T fitting Components When you