Z 4 Z40 KULLANMA KILAVUZU /01
|
|
|
- Jasper Vernon Cross
- 5 years ago
- Views:
Transcription

1 Z /01 K UL L A NM A K IL AV U Z U
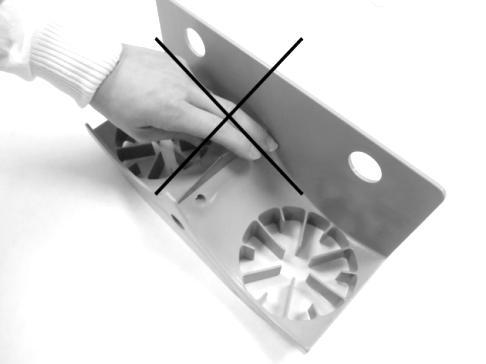
2 ZUMMO, INNOVACIONES MECÁNICAS, S.A., in an ongoing effort to improve its products, reserves the right to modify machines without prior warning; for this reason, the present instruction booklet may not include the last product updates. INDEX... Page: 1 TECHNICAL DATA IMPORTANT SAFETY INSTRUCTIONS INSTALLATION START UP STOPPING COUNTER FUNCTION SELECTOR LOCKING FUNCTION (only Z40 model) CHANGING OPERATIONAL MODE STAND BY SAFETY SYSTEMS CLEANING MACHINE ACCESSORIES MAINTENANCE ADVICE FOR USE IDENTIFYING DAMAGES ELECTRICAL DIAGRAM LIST OF COMPONENTS PHOTOS PARTS DIAGRAMS TECHNICAL DATA CONSUMPTION (W) 290 FRUITS PER MINUTE 40 HOPPER CAPACITY 20Kg HEIGHT (mm) 980 DIMENSIONS WIDTH (mm) 598 DEPTH (mm) 545 REGULAR CUPS (Ø 76) FRUIT SIZE LARGE CUPS * (Ø 88) Ø (mm) EXTRA LARGE CUPS * (Ø 100) NET WEIGHT (Kg.) 81.5 * optional accessories, not included as standard 2 IMPORTANT SAFETY INSTRUCTIONS Dear customer: Before starting to use your juicer for the first time, please read this instructions manual carefully. The machine exerts a great deal of pressure when operating; for this reason, never place hands or other objects in the squeezing area. (Fig. 1) 2
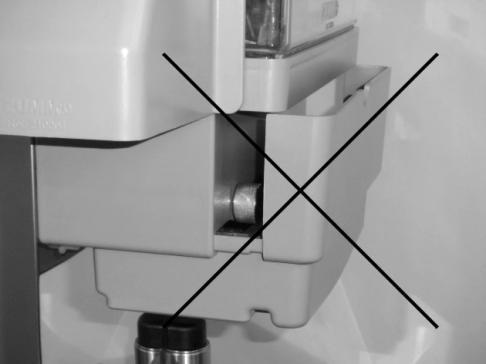
3 Always make sure the Juice Tray and Cups Fastening Nuts are properly tightened; otherwise, serious damage to the machine may result. (Fig. 2) Take special care when handling the Blade to avoid the risk of injury. (Fig. 3) To prevent any risks, all repairs should be performed by technical personnel. ZUMMO assumes no liability whatsoever if damage is due to improper machine use or failure to follow the instructions contained in this manual. Request technical service to the distribution company that supplied your machine; in the event that you cannot locate it, contact the factory (data on the cover of this manual). 3 INSTALLATION Attention! The machine weighs 81.5 Kg. When moving the machine, we suggest that this should be accomplished by two people. The best way to lift the machine is to grab the rear of the machine from underneath, with one hand and with the other hand, grab the shaft from underneath, as well. (Fig. 4) Place the machine on a sufficiently sturdy and stable base and secure the machine to the base by screws. Make sure that the machine s voltage and frequency match the values of your electrical installation. See the identification plate. (Fig. 5) Use an electrical outlet equipped with an effective ground connection (0.03A). This outlet should be used exclusively by the juice extraction machine. Do not plug other appliances into the outlet. Before operating the machine, wash all machine parts that will be in contact with juice: Balls, Blade, Juice tray, Filter Tray, Filter and Front Cover. Turn ON the power switch (Fig. 6 ( I=On, O=Off )). If no message appears on the display (Fig. 7), there is lack of power supply. Make sure you have connected the plug to a powered circuit and that the power switch is switched on. Once this is done, the Programmer display will show one of the following messages: (Disp. 1a) (Disp. 1b) (Disp. 2) (Disp. 3) (Disp. 4) (Disp. 5) a. (Z40 or Z40 Service Model) If the display shows a number (Disp. 1a), the machine is ready to start operating. (Self-service Model) If an orange icon is displayed on the digital screen (Disp. 1b), the machine is ready to operate. b. If the display shows the Error message (Disp. 2), then the Front Cover is not in place, and it should be place it correctly. c. If the display shows the Error message (Disp. 3), the Juice Tray is not correctly assembled and should be re-assembled correctly. d. If the display shows the Error message (Disp. 4), the side covers are not correctly assembled and should be re-assembled correctly. e. If the display shows the Error MEM (Disp. 5), it means the Programmer is faulty. Contact your local supplier for technical assistance. 3
4 4 START UP Depending on the size of the oranges to be squeezed, select the correct size of cup and ball and the fruit classifier for the basket and position the lower fruit classifier correctly (see fig. 8a-8b). See the section on MACHINE ACCESSORIES. Fit all the parts in their correct positions. See assembly in the section on CLEANING THE MACHINE. If you have a service model (with a tank), fit the support on the base of the machine (see fig. 9). ATTENTION!!!: Do NOT place your hand into the basket while the machine is operating (Fig. 10). Z40 or Z40 Service Model - Once the machine is switched on, the display will show either a number between 1 and 50 or the letter C. The number indicates the quantity of fruits to be squeezed, while the letter C sets the machine to squeeze continuously for approximately 30 minutes. - To st the number of oranges to squeeze, press the SELECT button repeatedly to increase the number (from 1 to 50, followed by the letter C; 1,2,3,...48,49,50,C,1,2,3...). Alternatively, press and hold the SELECT button for 2 seconds and the number will decrease. Continue until you visualize the wanted number. - The selected number will be stored on the display after the first complete squeeze cycle is finished. The number will be stored even if the machine is switched off. You may change the number repeating the complete number selection process. - Press the ON button to start squeezing. During the process, the display will show the remaining amount of fruits to be squeezed. If you wish to repeat the process, simply press ON. To stop the process, press the STOP button. Self-service Model - Once the machine is turned on, the screen displays an orange icon. This means that the machine is ready to squeeze fruit. - When you press the tap down, the juicer will start working and the screen will display a Clock icon and the word "Run", while the machine is working. In order to stop the machine, just release the tap. 5 STOPPING (Z40 or Z40 service Model) To stop the machine when is operation, press the Stop button. The display will show a timer and the message Stop. The machine will stop once finish the cycle. Once the machine completely stops, the display will show again the number of fruits to squeeze. (Self-service Model) Once you release the tap, the juicer will finish the cycle, and the digital screen displays a "Clock icon and a Stop sign". Once the machine stops, the screen will display an orange icon, indicating that the juicer is ready to squeeze again. The cups must always be in an upright position. 4

5 6 COUNTER FUNCTION The display stores the total number of cycles* completed. To visualize the figure, With the machine stopped and in stand-by, press the STOP button The figure will appear on the display for a few seconds. Bear in mind that all machines show a minimum of cycles completed for quality control testing. *(cycle = complete set of movements to squeeze a piece of fruit) 7 SELECTOR LOCKING FUNCTION (only Z40 model) In order to lock the SELECT button to avoid unwanted changes of the number of fruits to squeeze, carry out the following operations: Select the number on the display you wish to lock. Press the button ON and wait until the machine stops. Switch off the machine using the power switch. Being the machine switched off, press and hold STOP. Switch on the power keeping STOP button pressed for four seconds. The display will show a four digits number. Press the button SELECT (this button controls the two right digits) and press the button ON (this button controls the two left digits) at the same time to select the number Press STOP and the display will show Turn off the machine using the power switch. If you fail to do this, the display will keep showing the message Switch on the machine. Now the SELECT button is locked and the display will show Lock. To unlock the SELECT button, repeat exactly the same operation. 8 CHANGING OPERATIONAL MODE TO GO FROM NORMAL TO SELF-SERVICE OPERATING MODE (from Z40 to selfservice) Turn off the machine by the main power switch. With the machine turned off, press STOP, keep it held down, and then turn the main power switch on, holding it for 4 seconds, until a screen with four numbers appears. When this screen is displayed, find number pressing ON moves through the two digits on the right, and pressing SELECT moves through those on the left then press STOP (when you press STOP the display will show ----) and then turn the machine off by the main power switch (if the machine is not turned off, you cannot move out of this display). When you turn the machine on again (you will first see the programme version and then code 4104) the ON and SELECT buttons will have been disabled and the machine will start working when you turn on the tap. 5
6 TO TURN ON THE NORMAL FUNCTION AGAIN Repeat the process by entering the code This will enable the ON and SELECT buttons and the machine is now ready to select the number of oranges you want to squeeze and start operating when you press the ON button. 9 STAND BY The machine has a stand-by power-saving system which is activated automatically after 5 minutes. When the machine is on stand-by, the display light goes out and all the icons except the one for the machine are disabled. To exit this situation, press any of the three buttons on the plate. 10 SAFETY SYSTEMS The machine has various safety systems: 1 If the front cover is not assembled or is improperly assembled, the display will show an Error message with the area of the front cover flashing. 2 If the tray is not assembled or is not in place, the machine will not operate and the display will show an Error message by displaying a flashing dark tray. 3 If the side covers are not assembled or are improperly assembled, the display will show an Error message with the area of the side covers flashing. 4 If for any reason the machine gets blocked during operation, after a few seconds the motor will stop automatically and the display will show an Error message with a faulty flashing icon, until the cause of the blockage is removed. 5 Thanks to a thermal protection system in the motor, in the event of overheating the machine will stop and the display will show an Error message and a thermometer icon. In this case, please wait approximately 10 minutes to allow the motor temperature to decrease. The error message will disappear. Please check that the ventilation gratings and the fan are not obstructed. 6 If there is no message on the display, it means there is no power supply. Check that the power switch is on and that the plug fuse is not burnt out (Fig. 31). 6
7 11 MACHINE CLEANING The machine squeezing area and parts must be cleaned daily. If the machine is in operation, stop it always using the Programmer StoP bottom. Never attempt to stop the machine using the main switch. Failure to follow this recommendation will cause the machine to stop in a position that impedes cleaning; possibly leading to breakage of parts due to poor handling. Disconnect the machine turning the power switch off. (Fig. 6) Then the digital display will turn off. (Fig. 7). Remove the cover by releasing it from the sides covers (see fig. 11) and clean it with a cloth moistened in a neutral soapy solution (IMPORTANT! NEVER clean it with abrasive products which might scratch it). Remove the sides covers by pulling gently upwards (see fig. 12) Z40 o Service Model - Remove the filter tray or the tank with its filter to get access to the nuts fixing the squeezer tray (see fig. 13a-13b). - Remove the squeezer tray, blade and cups simultaneously. To do so, gently unscrew the nuts securing the cups and, using them as supports, pull outwards and they will come loose so they can be removed easily. Unscrew the nuts of the tray shafts and pull outwards horizontally to remove all the parts (see fig. 14). For a very thorough clean, unscrew the balls inside the squeezer tray (see fig. 15); underneath them there should be a washer. You can either put these parts in a dishwasher or wash them by hand. TAKE GREAT CARE WITH THE BLADE (fig. 3) as it is very sharp and could cause cuts. Self-service model - Unscrew the nuts of the shafts of the tray and pull outwards horizontally to remove the faucet tray and the filter (see fig. 16). Clean the faucet tray with a cloth moistened in a neutral soapy solution (IMPORTANT! NEVER clean it with abrasive products which might scratch it). - Remove the squeezer tray, blade and cups simultaneously. To do so, gently unscrew the fastening nuts and, using them as a support, pull outwards and they will come loose so they can be removed easily. For a very thorough clean, unscrew the balls inside the squeezer tray (see fig. 15); underneath them there should be a washer. You can either put these parts in a dishwasher or wash them by hand. TAKE GREAT CARE WITH THE BLADE (fig. 3) as it is very sharp and could cause cuts. Assembly After cleaning the whole unit, it is re-assembled as follows: 1 Screw the balls into the squeezer tray. Make sure you have fitted the washers first and TIGHTEN the balls well! Then adjust the position of the balls correctly (see fig. 17). 2 Insert the blade in the squeezer tray and slot the ribs into the grooves of the balls (see fig. 18). Check that the blade slides easily. 3 Square up the squeezer tray set and blade to their respective shafts (see fig. 19) and then insert the cups in the squeezer tray and square them up to the shafts (see fig. 20). Assemble this set in the machine at the same time and tighten the nuts well. 4 Fit the shafts and the pulp scraper filter in the filter, fit the filter correctly in its position in the filter tray, self-service tray or tank (THE DRIVE SHAFT SHOULD OVERHANG THE TRAY OR TANK see fig. 21a-21b-21c) and fit the set into the machine. Check that the tray or tank is fitted properly which will also indicate that the filter is in the right position (THE DRIVE SHAFT (Fig. 22a) SHOULD DOVETAIL WITH THE HEXAGONAL FILTER ACTUATOR see fig. 22b). 5 Fit the sides covers to the machine (see fig. 12). 6 Finally, fit the cover to the sides covers (see fig. 11). 7
8 Before operating the machine, make sure that: Juice tray and Blade are properly fitted in place. Fastening Nuts are properly tightened. The correct set of squeezing parts (Balls, Cups and Fruit Selector) are fitted. (see Accessories in this manual). If Blade, Juice tray, Balls or Cups are not correctly assembled, serious damage may be caused to these parts or to the interior components of the machine. (Operator faults not covered by the guarantee) (Z40 or Z40 Service Model) The display will show the number of oranges to be squeezed. The machine is now ready for operation. (Self-service Model) When the machine is ready to work, the display show the "machine icon and the orange icon". Cleaning the feeder Remove the external basket by turning it gently (fig. 23). Unscrew the Nut located inside the basket. (Fig. 24) Remove the Hopper Fruit Classifier pulling it upwards. (Fig. 25) Remove the basket together with the lower fruit classifier by pulling upwards until it is completely released from its shaft (see fig. 26). Clean all the pieces with soapy water or put them in the dishwasher. Reassemble in this order: first fit the basket together with the lower fruit classifier onto the shaft (fit the lower fruit classifier in the position of the calibre of oranges you intend to squeeze, either for the medium kit (see fig. 8a) or the large kit (see fig. 8b); for the extralarge kit it should be removed (see fig. 27) and then turn the basket manually until it is anchored (the pivots should enter their respective holes). Then affix the fruit classifier inside the basket, making sure it fits properly and cannot turn (see fig. 25), screw in the nut and finally fit the external basket (see fig. 23). Important Notice The normal use of the machine may cause the plastic parts that are exposed to juice to turn orange colour. This is completely normal and does not imply a hygiene problem or affect the physical properties of the plastic. 12 MACHINE ACCESSORIES The machine has various squeezing sets of Cups, Balls and Fruit Classifiers to use depending on the size of the fruit you wish to squeeze. a b c Dark grey-coloured Cups and Balls plus Hopper Fruit Classifier for fruits with diameters between 53 and 76 mm (Fig. 28). Light grey-coloured Cups and Balls plus Hopper Fruit Classifier for fruits with diameters between 64 and 88 mm (Fig. 29). (Optional set not included with the machine) Very light grey-coloured Cups and Balls plus Hopper Fruit Classifier for fruits with diameters between 77 and 100mm (Fig. 30) (Optional set not included with the machine) Regardless of the squeezing set use, the Blade will always be the same. ATTENTION!: Never mix components of different sets. 8
9 13 MACHINE MAINTENANCE Exterior machine maintenance: Consists of just daily cleaning. Interior of the machine: After every 600,000 cycles, the inner machine guides must be lubricated and a full cleaning carried out. 14 ADVICE FOR USE Always make sure you are using the right squeezing set of Balls, Cups and Fruit Classifier for the size of fruit you wish to squeeze. If the fruit to squeeze is too big or too small for the squeezing kit used, the quality of the juice may decrease, resulting in a bitter juice flavour. The Hopper Fruit Classifier must be correctly selected according to the size of the fruit to squeeze. If fruits are too large for the Fruit Classifier, the fruit will not fall into the Cup. If fruits are otherwise too small, numerous pieces of fruits will fall at the same time into the Cup. We recommend to switch off the machine when is not in use. (Fig. 6) 15 IDENTIFYING DAMAGES Damage The display is not lit The display shows message Error The display shows message Error and a flashing Icon. Cause and/or solution No power supply. Fuse burnt out. (Fig. 31) Power cable not properly connected. Switch power on. (Fig. 6) Damp circuit board. Supply dry heat to the board. Front cover not fitted correctly. (Fig. 32) Tray not assembled or incorrectly assembled. (Fig.33a-33b) Side covers not fitted correctly. (Fig. 34) Overheating motor. See section SAFETY SYSTEMS. Check if the fruit is frozen. Check for piled-up fruit peels inside the Juice tray. Check if Balls are correctly tightened. Check to see if the orange peels are stuck to the inside of the Cups. Check if components of different squeezing sets are mixed. The skin of the fruit may be too thick. Remove the washer from underneath the ball. Blocked machine Blade breaks The filter cleaner is not removing the pulp from the filter Not enough juice is being extracted from the fruit Hooper is not delivering fruits so the squeezing area Hooper is delivering several oranges at the same time into the squeezing area To unblock the machine, use the 5mm Allen key located at the right of the lower lid. Insert it into the hole on the right side and, with the machine switched off, turn anticlockwise until the cups are raised, removing the obstruction. WARNING: Make sure the Allen key is removed before switching the machine on. Cup nuts are too loose. Balls are loose. A piece of orange peel is preventing the movement of the pulp scraper filter. The filter set has been assembled in reverse. Check that the drive shaft dovetails properly with the hexagonal actuator (Fig. 22a-22b) The ball washers (which are placed underneath the balls) are missing. Fruit peel is too thin. Place one extra washer under each ball. Fruit is too big for the fruit classifier in use. Check the position of the lower fruit classifier. (Fig. 8a) Fruit is too small for the fruit classifier in use. Check the position of the lower fruit classifier. (Fig. 8b) Hopper not properly assembled. See cleaning the feeder in section cleaning. For any advice or to request spare parts, you should state the model and serial number of your machine (Fig. 5). 9
10 16 ELECTRICAL DIAGRAM 1 Fuse 2 Power switch 3 Circuit board 4 Motor 5 Condenser 6 Tray micro-switch 7 Front cover magnetic sensor 8 Left side cover micro-switch 9 Right side cover micro-switch 10 Counter micro-switch 11 Self service magnetic sensor 12 Fan 17 LIST OF COMPONENTS BOTTLE RACK BODY BOTTLE RACK TRAY BOTTLE RACK Z BOLT & PINIONS WASHER A FASTENING NUT WITH RAKED JOINT A-1 CUP NUT A-2 FASTENING NUT JOINT Ø PEEL EXTRACTING BANDS MICRO (LONG) ELECTRIC LEAD POWER BASE BLACK BIPOLAR SWITCH CONNECTION FUSE SUPPORT 5X20 UL ELECTRIC LEAD UL FUSE 10A UL FUSE HOLDER CAP FUSE HOLDER FLANGE BLANKING PLUG Ø17, WIRE PRESS FAN GRILL G FAN MOTOR 120X / FAN MOTOR 120X / PEELS BASKET 50L HOPPER BOLT HOPPER SECTOR DRIP TRAY Z DRIP GRILL Z TOMLINSON SILICONE JOINT FAUCET RING MAGNETIC UNIT DIRTY WATER TUBE 2/13/9 TANK FAUCET 2/13/9-1 SEAT CUP SILICONE TOMLINSON FAUCET 2/15 SUPPORT CAP 3/9/1G GREY TOP BLANKING PLUG CHASIS CHASIS LOCKING PUSHING PLATE BUFFER 10
11 MACHINE FRONT MACHINE BACK FRONT COVER SIDE COVER SLIDE COVER FRONT BOLT HOPPER NUT PULLEY FILTER SHAFT BASE LID SUPPORT SUPPORT WASHER PINION BACKING PINION SUPPORT PINION BEARING PINION SHAFT LOWER PINION UPPER PINION CONICAL PINION CONICAL CROWN CROWN HEAD BASE CROWN WASHER SELF-LUBRICATING BEARING RING GASKET HOPPER BEARING LID HOPPER TRACK BASE HOPPER TRACK EXTERNAL BASKET INTERNAL BASKET FRUIT CLASSIFIER FRUIT CLASSIFIER FRUIT CLASSIFIER LOWER FRUIT CLASSIFIER CHAIN Ø STICKER Ø64-88 STICKER Ø53-76 STICKER INTERNAL BASKET STICKER Z40 CALIBRATOR Z40 HOPPER BASKET Z40 CYCLE COPIER SET MOTOR 230V 50Hz B MOTOR 220V 60Hz C MOTOR 110V 60Hz D MOTOR 240V-250V CONDENSER (230V) B CONDENSER (115V) C CONDENSER (240V) Z40 GEAR BOX TYPE SX-50 15: Z40 GEAR BOX SX-50 SHAFT MOTOR PULLEY 10 L (60Hz) MOTOR PULLEY 12 L (50Hz) GEAR BOX PULLEY 30 L L 050 BELT MOTOR ANCHORING Z CONNECTING ROD BLADE SLIDE BLADE SLIDE BOLT BEARING BOLT BLADE SHAFT PUSHER SLIDE PUSHER SLIDE BOLT PRESSING SET PUSHING PLATE WEDGE SPRING WEDGE CLASP CUP SLIDE LEFT RATCHET RIGHT RATCHET INTERNAL UNION PLATE EXTERNAL UNION PLATE CUP SLIDE BOLT UNBLOCK SCREW MOTOR FILTER PULLEY PUSHING PLATE SUPPLEMENT RATCHET BUFFER BOLT PUSHER SLIDE WASHER RATCHET SPRING FRONT FLAT BAR REAR FLAT BAR TRAY SHAFT CUP SHAFT Z40 SQUEEZER TRAY Z40 FILTER TRAY Z40 BLADE Z40 SELF SERVICE TRAY EXTRA LARGE BALL Ø EXTRA LARGE CUPS Ø LARGE BALL Ø LARGE CUP Ø REGULAR BALL Ø REGULAR CUP Ø MOTOR FILTER SHAFT DRIVE FILTER SHAFT FILTER PULP SCRAPER FILTER COMPLETE Z40 FAUCET TRAY LARGE Z40 SQUEEZING KIT EXTRA LARGE Z40 SQUEEZING KIT Z40 TANK FAUCET PROGRAMER CPU (230-50/60Hz) PROGRAMER CPU (110-50/60Hz) CPU SEPARATOR CPU SERIGRAPHY MICRO COUNTER HOLDER LEFT SIDE COVER MICRO HOLDER SELF SERVICE SENSOR HOLDER SQUEEZING TRAY MICRO HOLDER TOP MAGNETIC SENSOR SQUEEZING TRAY MICRO CLAMP SIDE COVER MICRO CLAMP SELF SERVICE MAGNETIC SENSOR Z40 DRIP TRAY Z40 DRIP GRILL Z40 JUICE TANK Z40 TANK LID SELF SERVICE MAGNET HOLDER SELF SERVICE ACTIVATE LEVER Z40 TANK SUPPORT DRIP TRAY DRAIN Z40 TANK SHAKER Z40 LEFT BIN Z40 RIGHT BIN M20 STAINLESS STEEL NUT COMPLETE Z40 JUICE TANK 11
12 BLOCKED FAUCET PLATE MECHANISED DRIP TRAY COMPLETE DRIP TRAY MDP Z40 LID MSP Z40 LID CABINET BODY LEFT DOOR MDP RIGHT DOOR MSP RIGHT DOOR DRIP TRAY SUPPORT BOTTLE RACK SUPPORT LEFT CABINET CHUTE RIGHT CABINET CHUTE I-933-M4x20 I-965-M3x8 I-965-M4x10 S. STEEL HEXAGON HEAD SCREW M4X20 S. STEEL CROSS RECESSED COUNTERSUNK HEAD SCREW M3X8 DIN-965 S. STEEL CROSS RECESSED COUNTERSUNK HEAD SCREW M4X10 DIN-965 I-985-M4 I-1587-M3 I-7985-M4x8 T-Ø30/15/30-M6 T-933-M8x30 T-934-M8 T-DOWEL- M6x70 ROD.6201ZZ V0029 V0070 V0071 V0126 V0133 V0158 V0159 V0184 S. STEEL PREVAILING TORQUE HEXAGON NUT M4 DIN-985 S. STEEL HEXAGON DOMED CAP NUT M3 S. STEEL CROSS RECESSED RAISED CHEESE HEAD SCREW M4X8 DIN-7985 SILENT-BLOCK Ø30/15/30MM-M6 SCREW M8X30 DIN-933 HEX NUT M8 DIN-934 ZINC PLATED FIXING STUD Ø6.5/M6x70MM BEARING 6201ZZ ROLLER CATCH 60MM ALLEN KEY 5MM ALLEN KEY HOLDER 5MM DOOR STOP JUICE TRAY WASHER NON-BREAKING SWIVEL CASTER BREAKING SWIVEL CASTER ALLEN KEY HOLDER 3MM 12


13 a 8b a 13b 13


14 a 21b 21c 22a 22b


15 a 33b 34 15
16
17
18
19
20
21
22
YOUR SAFETY & INSTRUCTION MANUAL PLEASE READ CAREFULLY SLOW JUICER MODEL N23001
 YOUR SAFETY & INSTRUCTION MANUAL PLEASE READ CAREFULLY SLOW JUICER MODEL N23001 TECHNICAL DATA Description: Model: Rated Voltage: Frequency: Power consumption: Slow Juicer N23001 220-240V 50/60Hz 400W
Hot Chocolate Dispenser
 Hot Chocolate Dispenser Instruction manual Model: CN219-A AU Telephone Helpline: 1300225960 Safety Tips Position on a flat, stable surface. A service agent/qualified technician should carry out installation
INDEX. Granita Machine. Operation a nd Instruction Manual
 INDEX Index 2 Unpacking 3 Positioning the machine 3 Familiarizing yourself with the Controls 4 Cleaning and Sanitizing instructions 5 Part ONE. Disassembly and Cleaning of Dispenser 5 Part TWO. Re-assemble
Service Documentation Market Release 7/84. Braun Kitchen machine KM 32 B 4209 with lamp
 Market Release 7/84 Braun Kitchen machine KM 32 B 4209 with lamp 4209 Exploded Drawing BAG Rev: 7/84 4209 4209-2 Service Information BAG Rev: 12/88 4209 Pos. No. Part Description Part Number 1 Male drive
The following Manual refers to the model Minex. Please read the instructions carefully in order to make the most of your machine.
 ZUMEX MINEX The following Manual refers to the model Minex. Please read the instructions carefully in order to make the most of your machine. EN GENERAL INDEX FIGURES IMPORTANT GENERAL INFORMATION TECHNICAL
MODEL 1308-C & 1308-N
 Grand Rapids, Michigan, U.S.A. 49504-5298 USER S OPERATING AND INSTRUCTION MANUAL MODEL 1308-C & 1308-N HEAT SEALER 1308S20000CV1 INDEX Section Description Document No. Page No. DESCRIPTION/SPECIFICATIONS
Electric 700W Juice Extractor JE7607 Series
 Electric 700W Juice Extractor JE7607 Series Before using please read the instruction manual and keep it for future. ovente.com BEFORE FIRST USE Your appliance has been packaged carefully to ensure the
Chapter 3 Cooling, heating and ventilation systems
 3 1 Chapter 3 Cooling, heating and ventilation systems Contents Antifreeze mixture..............................see Chapter 1 Cooling fan assembly - testing, removal and refitting.............8 Cooling
I N ST R UC T I ON. MODEL HAB500 AroMatic TM BREAD SLICERS MODEL FORM (4-99) AROMATIC BREAD SLICER 701 S. RIDGE AVENUE TROY, OHIO
 AROMATIC BREAD SLICER 701 S. RIDGE AVENUE TROY, OHIO") I N ST R UC AROMATIC BREAD SLICER T I ON S MODEL HAB500 AroMatic TM BREAD SLICERS MODEL HAB500 ML-104845 701 S. RIDGE AVENUE TROY, OHIO 45374-0001 FORM 34198 (4-99) TABLE OF CONTENTS GENERAL..........................................................
I N ST R UC AROMATIC BREAD SLICER T I ON S MODEL HAB500 AroMatic TM BREAD SLICERS MODEL HAB500 ML-104845 701 S. RIDGE AVENUE TROY, OHIO 45374-0001 FORM 34198 (4-99) TABLE OF CONTENTS GENERAL..........................................................
USER S MANUAL MANUAL DE USUARIO MANUEL DE L UTILISATEUR BEDIENUNGSANLEITUNG MANUALE D USO
 USER S MANUAL MANUAL DE USUARIO MANUEL DE L UTILISATEUR BEDIENUNGSANLEITUNG MANUALE D USO Figuras Drawing Figures Abbildung Figure DIAGRAMS WITH PARTS: ESSENTIAL BASIC 9 10 8 7 6 5 4 3 11 2 12 13 6 14
Parts and Service Manual
 Section II Parts and Service Manual (70241A) CLARKE TECHNOLOGY Operator's Manual - MINI MAX Page -29- Frame and Front Cover Assembly Drawing 2/01 Page -30- CLARKE TECHNOLOGY Operator's Manual -MINI MAX
SLICING MACHINE. Installation and Operation Manual
 SLICING MACHINE Prima 250 Prima 300 Installation and Operation Manual S/N: Rev.: 2.0 Dear Customer, Congratulations on deciding to choose a Metos appliance for your kitchen activities. You made an excellent
wc431 Slimline Integrated Dishwasher Manual for Installation, Use and Maintenance
 wc431 Slimline Integrated Dishwasher Manual for Installation, Use and Maintenance Contents Contents... 2 Important... 3 Important Notes... 4 Recommendations... 5 Before First Use... 5 Control Panel...
INSTRUCTIONS AND WARRANTY
 INSTRUCTIONS AND WARRANTY MODEL: SJM40 SALTON 350W STAINLESS STEEL JUICER Congratulations on purchasing our Salton 350W Stainless Steel Juicer. Each unit is manufactured to ensure safety and reliability.
THE SOURCE OF THE BEST JUICE
 THE SOURCE OF THE BEST JUICE Once you have tasted the best juice, nothing is ever the same again. Vending Range ZV25 Natural juice at any time The small-size vending solution that enables customers to
Machine MANUAL. Spaceman USA, LLC. Sales and Product Information Sunday Saturday 8 AM 5 PM Mountain. 226 Commerce Street Suite B Broomfield, CO 80020
 Machine MANUAL MODEL SM-6455H FROZEN BEVERAGE - COUNTERTOP - TWO FLAVOR Customer Service Spaceman USA, LLC Sales and Product Information Sunday Saturday 8 AM 5 PM Mountain 226 Commerce Street Suite B Broomfield,
Machine MANUAL. Spaceman USA, LLC. Sales and Product Information Sunday Saturday 8 AM 5 PM Mountain. 226 Commerce Street Suite B Broomfield, CO 80020
 Machine MANUAL MODEL SM-6650 FROZEN BEVERAGE - COUNTERTOP - ONE FLAVOR Customer Service Spaceman USA, LLC Sales and Product Information Sunday Saturday 8 AM 5 PM Mountain 226 Commerce Street Suite B Broomfield,
AUTOMATIC GRANULAR ICE FLAKER
 AUTOMATIC GRANULAR ICE FLAKER INSTRUCTIONS AND WARNINGS 24480 rev. 01 It is strictly forbidden to reproduce this instruction manual or any part thereof. Dear Customer, Congratulations on choosing a
CHIPPER PC1 INSTRUCTIONS FOR INSTALLATION OPERATION AND MAINTENANCE. Series 35
 Cl/SfB (73.4) X CHIPPER PC1 INSTRUCTIONS FOR INSTALLATION OPERATION AND MAINTENANCE Series 35 Imperial Machine Company (Peelers) Limited Harvey Road, Croxley Green, Herts WD3 3AX, England Telephone: 01923
INSTRUCTION MANUAL FOR DUTCHESS MODEL 260 BAGEL & BUN SLICER
 INSTRUCTION MANUAL FOR DUTCHESS MODEL 260 BAGEL & BUN SLICER Table of Contents Safety Information I thru VII Uncrating Instructions 1 Introduction 2 Adjustment Instructions 3 Operating Instructions, Cleaning,
Instruction Manual for Electric Ovens OO757X OO986X
 Instruction Manual for Electric Ovens OO757X OO986X 1 2 DEAR CUSTOMER, We thank you and congratulate you on your choice. This new carefully designed product, manufactured with the highest quality materials,
RA 701 B Batterie assembling. As at: 01/15/10 Time:21:19
 Batterie assembling As at: 01/15/10 Time:21:19 Batterie assembling As at: 01/15/10 Time:21:19 Pos. Description Reference 01 Battery container 701.210 02 Guide rail 710.356 03 Hexagon screw M 6x12 P...486
monty 4200 Truck Tire Changer Spare Parts list
 monty 4200 Truck Tire Changer Spare Parts list Date 08/12/09 Figure 1 Baseframe Date 08/12/09 Page 2 Monty 4200 Spare Parts list Figure 2A Carriage with Mounting Arm Date 08/12/09 Page 3 Monty 4200 Spare
Sanitise Syrup Lines & Valves. Taylor PH61 Cleaning every 14 days
 Taylor PH61 Cleaning every 14 days Drain the Syrup Lines Remove each syrup feed tube from syrup bottle and let excess syrup drain from the feed tube back into the syrup bottle. When flow of syrup from
Contents. 1. Instructions for safety and use 20
 Contents 1. Instructions for safety and use 20 2. Positioning in the counter top 21 2.1 Fixing to the supporting structure 21 2.2 Positioning the adhesive sponge 22 2.3 Positioning the fastening clips
MODULAR AUTOMATIC GRANULAR ICE FLAKER
 MODULAR AUTOMATIC GRANULAR ICE FLAKER INSTRUCTIONS AND WARNINGS 24479 rev. 03 It is strictly forbidden to reproduce this instruction manual or any part thereof. Dear Customer, Congratulations on having
Instruction Manual Model: PLA0375 Rocket Blender IMPORTANT SAFETY INSTRUCTIONS READ CAREFULLY AND KEEP FOR FUTURE REFERENCE
 Instruction Manual Model: PLA0375 Rocket Blender IMPORTANT SAFETY INSTRUCTIONS READ CAREFULLY AND KEEP FOR FUTURE REFERENCE Carefully read this manual before using this appliance. Ensure that you know
MANUAL VERSION SERIAL # X-1 MINI PRO OWNER S MANUAL ASSEMBLY & OPERATOR INSTRUCTIONS 1.0
 SERIAL # MANUAL VERSION 1.0 Introduction WARNING: To limit risk of potential injury and material damage, all users must read these instructions in their entirety and follow them strictly. Check our YouTube
hp Dust Collector With Vacuum Attachment
 Please dispose of packaging for the product in a responsible manner. It is suitable for recycling. Help to protect the environment, take the packaging to the local amenity tip and place into the appropriate
Fig. 1. Bottle Height---Top of bottle MUST be at this height or slightly higher.
 P12 Corker Addendum: Setup and Maintenance Read this addendum and the MEP manual carefully before operating the corker. One person should be assigned to maintain the corker. Only this primary operator
OPERATING INSTRUCTIONS
 OPERATING INSTRUCTIONS BAKE-KING KING OVEN BEDIENUNGSANLEITUNG MODE D EMPLOI GEBRUIKSAANWIJZING PLEASE READ CAREFULLY (Rev 1; 01/03/2012 INSTALLATION INSTRUCTIONS We recommend that wherever possible, the
INSTALLATION AND MAINTENANCE OF THE "THOMPSON-BRITISH" AUTOMATIC PLATEN
 INSTALLATION AND MAINTENANCE OF THE "THOMPSON-BRITISH" AUTOMATIC PLATEN Installation and Maintenance of The "Thompson-British" Auto Platen Lifting Bolt. Motor. Direction of rotation. Oiling. The machine
BSM60SS / BSM60WH BUILT IN MULTI-FUNCTION ELECTRIC FAN OVEN. Instruction Manual
 BSM60SS / BSM60WH BUILT IN MULTI-FUNCTION ELECTRIC FAN OVEN Instruction Manual Please read these instructions carefully before use and retain for future reference CONTENTS Safety Instructions 2 Specifications
Food Waste Disposer Instruction Manual
 Food Waste Disposer Instruction Manual See insert for specific information about your new disposer NOTE: IMPORTANT: CAUTION: This Food Waste Disposer has been designed to operate on 110-120 Volt, 60 Hz
Spiral Dough Mixer. Instruction manual. Model: CP821
 Spiral Dough Mixer Instruction manual Model: CP821 SPARE PARTS LIST OF CP821 NO. Description QTY. NO. Description QTY. 1. Small chain wheel of main shaft 1 29. Chain 06B-1-70L 2 2. Big chain wheel 3 30.
ORIGINAL SPARE PARTS CHD-6330
 ORIGINAL SPARE PARTS CHD-6330 85010075/02 Revision 02/2013 FRAME 1.0 FRAME 1.0 Rif Code Description 1 *4399880 SCREW TE 10x40 2 *4399378 WASHER D.10 (10,5x21x2) 3 *6611330 SUPPORT 4 *7910913 CHUCK 5 *4399288
MW402 Integrated Dishwasher
 MW402 Integrated Dishwasher Manual for Installation, Use and Maintenance 1 Customer Care Department The Group Ltd. Harby Road Langar Nottinghamshire NG13 9HY T : 01949 862 012 F : 01949 862 003 E : customer.care@cda.eu
Before Putting Into Use. Important. Tips for Energy Savings
 Before Putting Into Use Before connecting the appliance to the power supply, let it stand for about 2 hours, which will reduce a possibility of malfunctions in the cooling system due to transport handling.
DISHWASHER - PART RECOGNITION GUIDE
 DISHWASHER - PART RECOGNITION GUIDE SPRAY ARM HOLDER UPPER SPRAY ARM FILTER ASSEMBLY LOWER SPRAY ARM ASSEMBLY SUMP DISHWASHER - PART RECOGNITION GUIDE DISPENSER DOOR SPRING DOOR HINGE INNER DOOR DOOR THERMOSTAT
MAYFIELD CEILING FAN LISTED E ITEM # MODEL #BTH44ABZC5C BTH44BNK5C Español p. 20 ATTACH YOUR RECEIPT HERE.
 Harbor Breeze is a registered trademark of LF, LLC. All Rights Reserved. ITEM #0331094 0331096 MAYFIELD CEILING FAN MODEL #BTH44ABZC5C BTH44BNK5C Español p. 20 ATTACH YOUR RECEIPT HERE Serial Number Purchase
POWER JUICER ELITE
 Operating Manual Contents 4 5 6 7 10 11 13 14 Important Safety Information Helpful Hints Parts/Main Unit Assembly/Main Unit Assembly/E-Z Loader Attachment Disassembly/Main Unit Cleaning Your Power Juicer
COMPACT FOOD PROCESSOR
 INSTRUCTION BOOKLET COMPACT FOOD PROCESSOR Model: 31887 PREPR COMPACT FOOD PROCESSOR Thank you for choosing the PrepR Compact Food Processor. Please take a little time to read this booklet before getting
HD Kompakt Service Manual
 HD Kompakt Service Manual English 5.906-583.0 Rev. 00 (08/13) 1 1 Contents 1 Contents.................................................... 2 2 Preface.....................................................
OWNER S MANUAL MODULAR DIRECT CONNECTED TILTING STEAM JACKETED KETTLE
 OWNER S MANUAL MODULAR DIRECT CONNECTED TILTING STEAM JACKETED KETTLE MODELS: MT6 MT6T6 MT10 MT10T10 MT10T6 LFT6 LFT10 LFT10T6 LFT10T10 Form Number: S-2306 REV:C 10/12 Printed in U.S.A. 35 Garvey Street
on the use of the device and understand the dangers its use involves. User cleaning and maintenance may not be done by unsupervised
 Safety warnings: If the ceramic glass breaks or cracks, immediately unplug the stovetop to avoid electric shocks. This appliance is not designed to work with an external timer (not built into the appliance)
Manual de Instrucciones Campanas Extractoras ND.3. Bedienungsanleitung Dunstabzugshauben ND.3. Instructions Manual Kitchen Hoods ND.
 Manual ND.qxd 12/01/2005 17:10 Page 1 Manual de Instrucciones Campanas Extractoras ND.3 Bedienungsanleitung Dunstabzugshauben ND.3 Instructions Manual Kitchen Hoods ND.3 Manuel d instructions Hottes aspirantes
INSTALLATION GUIDE / USER GUIDE GB IE
 BUILT-IN OVEN OB60 double oven under bench models INSTALLATION GUIDE / USER GUIDE GB IE Contents 1 Safety and warnings 2 Installation instructions 6 Using your oven for the first time 14 Clock and timer
M5 BLUE BOY FIVE GALLON PAINT MIXER Owner s Manual
 M5 BLUE BOY FIVE GALLON PAINT MIXER Owner s Manual Introduction..3 Safety Precautions 4 Installation Instructions 5 Electrical Connections..7 Operating Instructions..8 Maintenance Procedures...8 Parts
Technical Data. Name: ERIKA Automat fully automatic machine to divide and to round dough pieces of the same size
 AUTOMAT MANUAL 1 Technical Data Name: ERIKA Automat fully automatic machine to divide and to round dough pieces of the same size Type Divisions Dough Portions (in ounces) Plate Nos. 3 30 1.0 3.5 #35 4/40A
AUTOMATIC MODULAR ICE-CUBE MAKER WITH VERTICAL EVAPORATOR SYSTEM
 AUTOMATIC MODULAR ICE-CUBE MAKER WITH VERTICAL EVAPORATOR SYSTEM INSTRUCTIONS AND WARNINGS 24481 ed. 11-2007 It is strictly forbidden to reproduce this instruction manual or any part thereof. Dear
Instructions. 1 Instructions. 1.2 This user manual. 1.1 Introduction. 1.3 Intended use
 Contents 1 Instructions 4 1.1 Introduction 4 1.2 This user manual 4 1.3 Intended use 4 1.4 General safety instructions 5 1.5 Manufacturer liability 7 1.6 Identification plate 7 1.7 Disposal 7 2 Description
Owner s manual for. Venco 87mm & 100mm. (3 1/ 2 & 4 ) De-airing Pugmill
 De-airing Pugmill") Owner s manual for Venco 87mm & 100mm (3 1/ 2 & 4 ) De-airing Pugmill Venco Products 29 Owen Road Kelmscott, Western Australia 6111 ph +61 8 9399-5265 fax +61 8 9 497 1335 email: venwest@iinet.net.au www.venco.com.au
Owner s manual for Venco 87mm & 100mm (3 1/ 2 & 4 ) De-airing Pugmill Venco Products 29 Owen Road Kelmscott, Western Australia 6111 ph +61 8 9399-5265 fax +61 8 9 497 1335 email: venwest@iinet.net.au www.venco.com.au
SERVICE/INSTALLATION MANUAL ICE ONLY DISPENSERS MODELS-IOD150, IOD200 AND IOD250
 SERVICE/INSTALLATION MANUAL ICE ONLY DISPENSERS MODELS-IOD150, IOD200 AND IOD250 Ice-O-Matic 11100 East 45th Ave Denver, Colorado 80239 Part Number 9081305-01 Date 10/08 Introduction IOD150,IOD200,IOD250
[NESCAFE MILANO M8120 ] [version 1.1]
![[NESCAFE MILANO M8120 ] [version 1.1]](/thumbs/76/73165014.jpg "[NESCAFE MILANO M8120 ] [version 1.1]") vending machine [NESCAFE MILANO M8120 ] [version 1.1] spare parts manual Manual PDF Generated on 17-12-2012 10:27 CABINET Pag.2 CABINET Pos. Code Description 1 0010024615NA CABINET STRUCTURE (BLACK) 2
vending machine [NESCAFE MILANO M8120 ] [version 1.1] spare parts manual Manual PDF Generated on 17-12-2012 10:27 CABINET Pag.2 CABINET Pos. Code Description 1 0010024615NA CABINET STRUCTURE (BLACK) 2
CABINET PARTS REFRIGERATOR
 CABINET PARTS REFRIGERATOR 1 94 Litho In U.S.A. 1 Part No. CABINET PARTS 2 2152011 Front Roller (2) 3 489393 Screw, 4 981122 Roller (Rear) (2) 5 488454 Screw 6 2155013 Clip, Grille 7 489242 Screw 9 836196
MODELS: TJ45 TJ90 Operator s Manual
 ICE DISPENSER MODELS: TJ45 TJ90 Operator s Manual Part No. 90614 Revision: H Revision Date: May 26, 2014 THIS DOCUMENT CONTAINS IMPORTANT INFORMATION This Manual must be read and understood before installing
Before Putting Into Use. Important. Tips for Energy Savings
 Before Putting Into Use Before connecting the appliance to the power supply, let it stand for about 2 hours, which will reduce a possibility of malfunctions in the cooling system due to transport handling.
PROF. RANGE COOKER MODEL: EPRC-A6456GE(SS) Owner s Manual Please read this manual carefully before operating your set. Retain it for future reference.
 Owner s Manual Please read this manual carefully before operating your set. Retain it for future reference.") PROF. RANGE COOKER MODEL: EPRC-A6456GE(SS) Owner s Manual Please read this manual carefully before operating your set. Retain it for future reference. Record model number and serial number of the set.
PROF. RANGE COOKER MODEL: EPRC-A6456GE(SS) Owner s Manual Please read this manual carefully before operating your set. Retain it for future reference. Record model number and serial number of the set.
Instruction Manual of Slow Masticating Juicer JW-SJ001
 Instruction Manual of Slow Masticating Juicer JW-SJ001 CONTENTS IMPORTANT SAFEGUARDS 1 PRODUCT CONTENTS LIST 2 INSTALLATION ORDER 3 INSTALLATION INSTRUCTIONS 4 OPERATION INSTRUCTIONS 7 PROHIBITED MATERIALS
Global-Tek (Singapore) Pte Ltd
 Pte Ltd") Global-Tek (Singapore) Pte Ltd Door Type G-TEK G-TEK WWW.GLOBAL-TEK.COM.SG 1 P a g e Door Type, CONTENTS Wash and Rinse Arm Assembly....... 3-4 Booster Heater... 5-6 Wash Chamber.. 7-8 Door Lift Assembly...9-10
Global-Tek (Singapore) Pte Ltd Door Type G-TEK G-TEK WWW.GLOBAL-TEK.COM.SG 1 P a g e Door Type, CONTENTS Wash and Rinse Arm Assembly....... 3-4 Booster Heater... 5-6 Wash Chamber.. 7-8 Door Lift Assembly...9-10
MW401 Integrated Dishwasher
 MW401 Integrated Dishwasher Manual for Installation, Use and Maintenance Customer Care Department The Group Ltd. Harby Road Langar Nottinghamshire NG13 9HY T : 01949 862 012 F : 01949 862 003 E : service@cda.eu
MW001 Integrated Dishwasher. Manual for Installation, Use and Maintenance
 MW001 Integrated Dishwasher Manual for Installation, Use and Maintenance Important The CDA Group Ltd cannot be held responsible for injuries or losses caused by incorrect use or installation of this product.
Suits all KPF849 models
 Kambrook - Australia Ground Floor, Suite 2, 170-180 Bourke Rd Alexandria NSW 2015, Australia Locked Bag 2000 Botany NSW 1455 Customer Service Line 1300 139 798 Customer Service Fax 1800 621 337 www.kambrook.com.au
BUILT-IN OVEN MODEL: EBO-E7081D(SS) Owner s Manual Please read this manual carefully before operating your set. Retain it for future reference.
 Owner s Manual Please read this manual carefully before operating your set. Retain it for future reference.") BUILT-IN OVEN MODEL: EBO-E7081D(SS) Owner s Manual Please read this manual carefully before operating your set. Retain it for future reference. Record model number and serial number of the set. See the
BUILT-IN OVEN MODEL: EBO-E7081D(SS) Owner s Manual Please read this manual carefully before operating your set. Retain it for future reference. Record model number and serial number of the set. See the
Glass and Dishwashers AMX / AUX Series
 Glass and Dishwashers AMX / AUX Series INSTALLATION OPERATION REV. 8.xx 04.07.2005 Installation and Operation Instructions for Models of AMX / AUX Series Content Page 1 Installation... 3 2 Connections...
DOCUMENT CREASING MACHINE
 DOCUMENT CREASING MACHINE OPERATORS MANUAL Morgana Systems Limited Snowdon Drive Winterhill Milton Keynes Buckinghamshire MK6 1AP United Kingdom Telephone: ( 01908 ) 608888 Facsimile: ( 01908 ) 692399
Hakki Pilke Raven spare parts manual
 1 ENGLISH Hakki Pilke Raven spare parts manual Valimotie 1, FI-85800 Haapajärvi, FINLAND Tel. +358 8 772 7300, Fax +358 8 772 732 info@maaselankone.fi, www.maaselankone.fi 2 Table of contents 1 Upper section
OPERATING INSTRUCTIONS
 EN TABLE AND STAND FAN OPERATING INSTRUCTIONS Read the instructions carefully before operating the appliance or carrying out maintenance operations. Observe all the safety instructions; failure to observe
LA7800XPW0 TABLERO (S/P) (S/P) DESCONTINUADO (S/P) (S/P) (S/P) (S/P) (S/P) (S/P) DESCONTINUADO (S/P) (S/P) DESCONTINUADO DESCONTINUADO (S/P) (S/P)
 (S/P) DESCONTINUADO (S/P) (S/P) (S/P) (S/P) (S/P) (S/P) DESCONTINUADO (S/P) (S/P) DESCONTINUADO DESCONTINUADO (S/P) (S/P)") LA7800XPW0 TABLERO LA7800XPW0 TABLERO 1 8066156 PANEL, REAR (S/P) 2 355326 SCREW, 13-16 X 5/8 (S/P) 3 64211 SCREW DESCONTINUADO 4 285653 CAP, END (L.H.) (S/P) 5 93770 BUMPER, RUBBER 6 285653 CAP, END.
LA7800XPW0 TABLERO LA7800XPW0 TABLERO 1 8066156 PANEL, REAR (S/P) 2 355326 SCREW, 13-16 X 5/8 (S/P) 3 64211 SCREW DESCONTINUADO 4 285653 CAP, END (L.H.) (S/P) 5 93770 BUMPER, RUBBER 6 285653 CAP, END.
PARTS MANUAL. Standard Nagel M2 Bookletmaker
 PARTS MANUAL Standard Nagel M2 Bookletmaker Read this manual, and thoroughly familiarize yourself with its contents before operating or servicing this equipment. M2/PM THIS PAGE LEFT BLANK INTENTIONALLY
OPERATION MANUAL.
 www.beerinnоvations.com www.beerinnovations.com/evolution_operation_manual CONTENTS. PEGAS Evolution device diagram 2. Function of device 3. Technical data. Assembly and installation. Typical connection
RA 431 B Angled tube. As at: 01/15/10 Time:17:17
 Angled tube As at: 01/15/10 Time:17:17 Angled tube As at: 01/15/10 Time:17:17 Pos. Description Reference 01 Lower angled tube 436.255 02 Disk 436.340 03 Cylindrical screw M 10x35 P...487 HA 04 Upper handle
AUTOMATIC ICE-CUBE MAKER - INSTRUCTIONS AND WARNINGS
 AUTOMATIC ICE-CUBE MAKER - INSTRUCTIONS AND WARNINGS Dear Customer, Congratulations on having chosen a quality product which will certainly fully meet your expectations. Thank you for having purchased
52 CEILING FAN READ AND SAVE THESE INSTRUCTIONS FAN RATING AC 120V.
 Irene 52 CEILING FAN READ AND SAVE THESE INSTRUCTIONS FAN RATING AC 120V. 60Hz TABLE OF CONTENTS Tools and Materials Required... 1 Package Contents... 1 Safety Rules... 2 Mounting Options... 3 Hanging
CADDY 5 UL OPERATOR S MANUAL
 CADDY 5 UL CADDY ENGLISH 10 UL OPERATOR S MANUAL CADDY 1 TECHNICAL CHARACTERISTICS Read electrical ratings written on the data plate under the individual units. The serial number of the unit is preceded
14 Upright Vacuum with HEPA Filter & Dual Power
 E29990-00 14 Upright Vacuum with HEPA Filter & Dual Power Operator and Parts Manual 1001 Brown Avenue Toledo, Ohio 43607-0127 Customer Service: 888-GO-BETCO Fax: 800-445-5056 Technical Service: 877-856-5954
INDEX. Granita Machine. Operation and Instruction Manual
 OPERATION AND INSTRUCTION MANUAL GRANITA MACHINE Models : REF.: SL900491248 GB 220 SF BLACK 115 V. 60 Hz. INDEX Index 2 Unpacking 3 Positioning the machine 3 Familiarizing yourself with the Controls 4
Glass and Dishwashers AMX / AUX Series
 Glass and Dishwashers AMX / AUX Series INSTALLATION OPERATION VERSION 24.02.04 Important Notes Use in Accordance with Regulations This machine is exclusively to be used to wash ware such as plates, cups,
ICE ONLY DISPENSERS MODELS-IOD150, IOD200 AND IOD250 INSTALLATION/SERVICE MANUAL
 ICE ONLY DISPENSERS MODELS-IOD150, IOD200 AND IOD250 INSTALLATION/SERVICE MANUAL Ice-O-Matic 111000 East 45th Ave Denver, Colorado 80239 Part Number 9081305-01 Rev. C Revision Date: September 19, 2011
XC-18. NOTE: *Machine shown without Lift-Up Safety Guard. This guard is included with machine. Machine should not be operated without this guard.
 XC-18 NOTE: *Machine shown without Lift-Up Safety Guard. This guard is included with machine. Machine should not be operated without this guard. EXTREMA MACHINERY COMPANY, INC. PO BOX 1450, ALBANY, LOUISIANA
XPS-ProDry User s Guide Dryer Base
 XPS-ProDry User s Guide XPS-ProDry User s Guide Dryer Base For Use with Inkjet Imaging Systems Manual Part#: M-3120 Revision: August 2005 XPS-ProDry User s Guide Written by Frank Mauri & John Brand Published
OWNER'S MANUAL IMPORTANT: READ OWNER'S MANUAL CAREFULLY MODEL : CHEETAH DC2000 FOR YOUR CONVENIENCE, RECORD THE FOLLOWING IMPORTANT INFORMATION MODEL:
 OWNER'S MANUAL IMPORTANT: READ OWNER'S MANUAL CAREFULLY MODEL : CHEETAH DC2000 FOR YOUR CONVENIENCE, RECORD THE FOLLOWING IMPORTANT INFORMATION MODEL: SERIAL NUMBER:-------- DATE PURCHASED: PURCHASED FROM:
WC600 Integrated Dishwasher Installation, Use and Maintenance
 WC600 Integrated Dishwasher Installation, Use and Maintenance Customer Care Department The Group Ltd. Harby Road Langar Nottinghamshire NG13 9HY T : 01949 862 012 F : 01949 862 003 E : customer.care@cda.eu
Power Juicer Instruction Manual Model Reference: GCSD80A
 IM-GCSD80A25032015 Power Juicer Instruction Manual Model Reference: GCSD80A Thank you for choosing the JD Williams Power Juicer. Remove all packaging material. You may wish to keep the packaging for future
ER MANUAL FOR YOUR BAUMATIC
 BW18BL 50 litre thermoelectric beverage centre BW28BL 70 litre thermoelectric beverage centre ER MANUAL FOR YOUR BAUMATIC BW18BL 50 litre thermoelectric beverage centre BW28BL 70 litre thermoelectric beverage
Service part catalogue
 Service part catalogue SelfCookingCenter whitefficiency CD-Ges_101207 2011 Rational Technical Service All Rights reserved SelfCookingCenter whitefficiency 2 SelfCookingCenter whitefficiency Pos. Part No.
Floor Standing Bath Shower Mixer. Fitting instructions. Please keep these instructions for future reference and request of replacement parts.
 Floor Standing Bath Shower Mixer Fitting instructions Please keep these instructions for future reference and request of replacement parts. We have taken great care to ensure that this product reaches
AUTOMATIC ICE-CUBE MAKER
 AUTOMATIC ICE-CUBE MAKER INSTRUCTIONS AND WARNINGS 24478 ed. 11-2007 It is strictly forbidden to reproduce this instruction manual or any part thereof. Dear Customer, Congratulations on having chosen
MODEL MC-UL592 MC-UL594 POWER SOURCE. 230V - 240V ~ 50 Hz MAX INPUT 1400 W 1500 W NOMINAL INPUT DIMENSIONS (W x L x H)
") Order Number: PMMA091040CE Vacuum Cleaner MC-UL592/MC-UL594 SPECIFICATION MODEL MC-UL592 MC-UL594 POWER SOURCE 230V - 240V ~ 50 Hz MAX INPUT 1400 W 1500 W NOMINAL INPUT DIMENSIONS (W x L x H) 1200-1300
Order Number: PMMA091040CE Vacuum Cleaner MC-UL592/MC-UL594 SPECIFICATION MODEL MC-UL592 MC-UL594 POWER SOURCE 230V - 240V ~ 50 Hz MAX INPUT 1400 W 1500 W NOMINAL INPUT DIMENSIONS (W x L x H) 1200-1300
INDEX I.- FINAL TEST FOR PRODUCT SAFETY 3 II.- REPLACEMENT PROCEDURES 3 III.- TROUBLE SHOOTING CHART 5 IV.- WIRING DIAGRAM 6 V.- ELECTRICAL RATING 6
 INDEX I.- FINAL TEST FOR PRODUCT SAFETY 3 II.- REPLACEMENT PROCEDURES 3 III.- TROUBLE SHOOTING CHART 5 IV.- WIRING DIAGRAM 6 V.- ELECTRICAL RATING 6 VI.- EXTERNAL PARTS FOR UPRIGHT VACUUM CLEANER PARTS
INSTALLATION and OPERATION BALL WASHER, HIGH CAPACITY MODEL NO: BW-022AN
 Easy Picker Golf Products, Inc. 415 LEONARD BLVD. N., LEHIGH ACRES, FL 33971 PH: 239-368-6600 FAX: 239-369-1579 Service: 800-982-4653 SALES: 800-641-4653 www.easypicker.com salesdept@easypicker.com INSTALLATION
User s Manual and Operating Instructions
 User s Manual and Operating Instructions Model Numbers: PT-18W-DDF-A, PT-20F-DDF-A, PT-20S-DDF, PT-24O-DDF, PT-24-DDF, PT-24-DDF-F, PT-30-DDF, PT-30P-DDF-A, PT-30P-DDF-AF READ AND SAVE THESE INSTRUCTIONS
Operating Instructions
 Operating Instructions COOKER AND OVEN English, 1 I5ESH/UK I5ESH1/UK Contents WARNING,2 Installation, 3 Positioning and levelling Electrical connection Table of characteristics Description of the appliance,
WF140 Freestanding Dishwasher
 WF140 Freestanding Dishwasher Installation, Use and Maintenance Customer Care Department The Group Ltd. Harby Road Langar Nottinghamshire NG13 9HY T : 01949 862 012 F : 01949 862 003 E : customer.care@cda.eu
π H-2268 SANITAIRE UPRIGHT VACUUM SAFETY uline.com
 π H-2268 SANITAIRE UPRIGHT VACUUM 1-800-295-5510 uline.com SAFETY PAGE 1 OF 7 NOTE: When using an electrical appliance, basic precautions should always be followed, including the following: READ ALL INSTRUCTIONS
Products documentation (REVISION DATE: 03/10/2011) OMFP6010 (60cm PIROLITIC OVEN)
 OMFP6010 (60cm PIROLITIC OVEN)") Products documentation (REVISION DATE: 03/10/2011) OMFP6010 (60cm PIROLITIC OVEN) Ovens Service Manual Models OMFP6010 CONTENTS This document has been published to be used for service only. The contents
Products documentation (REVISION DATE: 03/10/2011) OMFP6010 (60cm PIROLITIC OVEN) Ovens Service Manual Models OMFP6010 CONTENTS This document has been published to be used for service only. The contents
Machine MANUAL. Soft Serve - Countertop - Two Flavor + Twist. Spaceman USA, LLC. Sales and Product Information Sunday Saturday 8 AM 5 PM Mountain
 Machine MANUAL MODEL SM-6235H Soft Serve - Countertop - Two Flavor + Twist Customer Service Spaceman USA, LLC Sales and Product Information Sunday Saturday 8 AM 5 PM Mountain 226 Commerce Street Suite
C-IV 60 CEILING FAN READ AND SAVE THESE INSTRUCTIONS. FAN RATING AC 120V. 60Hz
 C-IV 60 CEILING FAN READ AND SAVE THESE INSTRUCTIONS FAN RATING AC 120V. 60Hz Please do not use any electric or battery powered tools in the assembly and installation of this or any Matthews Fan Company
Safety Instructions. Do not work out immediately after meals!
 Safety Instructions To ensure the best safety of the exerciser, regularly check it for damage and worn parts. If you pass on this exerciser to another person or if you allow another person to use it, make
vending machine [CINO EC PRO] spare parts manual Latest Update 10/01/2014 Manual PDF Generated on :47
![vending machine [CINO EC PRO] spare parts manual Latest Update 10/01/2014 Manual PDF Generated on :47](/thumbs/80/81908193.jpg "vending machine [CINO EC PRO] spare parts manual Latest Update 10/01/2014 Manual PDF Generated on :47") vending machine [CINO EC PRO] spare parts manual Latest Update 10/01/2014 Manual PDF Generated on 28-04-2014 08:47 CABINET (UNPLUMBED VERSION) Pag.2 CABINET (UNPLUMBED VERSION) Pos. Code Description 1
vending machine [CINO EC PRO] spare parts manual Latest Update 10/01/2014 Manual PDF Generated on 28-04-2014 08:47 CABINET (UNPLUMBED VERSION) Pag.2 CABINET (UNPLUMBED VERSION) Pos. Code Description 1