INSTALLATION & OPERATIONAL MANUAL
|
|
|
- Elisabeth Payne
- 5 years ago
- Views:
Transcription


1 INSTALLATION & OPERATIONAL MANUAL VK / TR SERIES GAS FRYERS With KleenScreen PLUS Filtration Systems MODELS: 1VK45A ML TR45A ML VK45D ML TR45AF ML VK45C ML TR45AF ML VK65A ML TR45AF ML VK65D ML TR45AF ML VK65C ML TR45D ML VK85A ML TR45DF ML VK85D ML TR45DF ML VK85C ML TR45DF ML VK45AF ML TR45DF ML VK45DF ML TR45C ML VK45CF ML TR45CF ML VK65AF ML TR45CF ML VK65DF ML TR45CF ML VK65CF ML TR45CF ML VK85AF ML TR65A ML VK85DF ML TR65AF ML VK85CF ML TR65AF ML VK45AF ML TR65AF ML VK45DF ML TR65AF ML VK45CF ML TR65D ML VK65AF ML TR65DF ML VK65DF ML TR65DF ML VK65CF ML TR65DF ML VK85AF ML TR65DF ML VK85DF ML TR65C ML VK85CF ML TR65CF ML VK45AF ML TR65CF ML VK45DF ML TR65CF ML VK45CF ML TR65CF ML VK65AF ML TR85A ML VK65DF ML TR85AF ML VK65CF ML TR85AF ML VK85AF ML TR85AF ML VK85DF ML TR85AF ML VK85CF ML TR85D ML VK45AF ML TR85DF ML VK45DF ML TR85DF ML VK45CF ML TR85DF ML VK45C Shown 4VK65AF ML TR85DF ML VK65DF ML TR85C ML VK65CF ML TR85CF ML VK85AF ML TR85CF ML VK85DF ML TR85CF ML VK85CF ML TR85CF ML For additional information on Vulcan-Hart or to locate an authorized parts and service provider in your area, visit our website at VULCAN-HART 3600 NORTH POINT BLVD. DIVISION OF ITW FOOD EQUIPMENT GROUP, LLC BALTIMORE, MD F REV. M (June 2013)
2 IMPORTANT FOR YOUR SAFETY THIS MANUAL HAS BEEN PREPARED FOR PERSONNEL QUALIFIED TO INSTALL GAS EQUIPMENT, WHO SHOULD PERFORM THE INITIAL FIELD START-UP AND ADJUSTMENTS OF THE EQUIPMENT COVERED BY THIS MANUAL. POST IN A PROMINENT LOCATION THE INSTRUCTIONS TO BE FOLLOWED IN THE EVENT THE SMELL OF GAS IS DETECTED. THIS INFORMATION CAN BE OBTAINED FROM THE LOCAL GAS SUPPLIER. IMPORTANT IN THE EVENT A GAS ODOR IS DETECTED, SHUT DOWN UNITS AT THE MAIN SHUTOFF VALVE AND CONTACT THE LOCAL GAS COMPANY OR GAS SUPPLIER FOR SERVICE. FOR YOUR SAFETY DO NOT STORE OR USE GASOLINE OR OTHER FLAMMABLE VAPORS OR LIQUIDS IN THE VICINITY OF THIS OR ANY OTHER APPLIANCE. Improper installation, adjustment, alteration, service or maintenance can cause property damage, injury or death. Read the installation, operating and maintenance instructions thoroughly before installing or servicing this equipment. -2-
3 TABLE OF CONTENTS IMPORTANT FOR YOUR SAFETY. 2 INTRODUCTION 4 GENERAL 4 ORDERING PARTS 4 FRYER CAPACITIES. 4 UNPACKING 5 INSTALLATION. 5 Clearances... 5 Location CODES AND STANDARDS.. 6 ASSEMBLY.. 6 FLUE CONNECTION. 7 ELECTRICAL CONNECTION. 7 GAS CONNECTION. 8 Quick-Disconnect for Units on Casters 8 GAS PRESSURE... 8 TEST GAS SUPPLY 8 FRYERS WITH CASTERS 8 LEVELING THE FRYER 9 OPERATION 10 OVER-TEMPERATURE SHUTDOWN. 10 BEFORE FIRST USE Cleaning BASIC FRYING INSTRUCTIONS.. 11 Fry Basket Guidelines. 11 EXTENDED SHORTENING LIFE 12 TURNING ON THE FRYER 12 PROGRAMMING THE SOLID STATE KNOB (A) CONTROL 13 PROGRAMMING THE SOLID STATE (D) CONTROL 14 PROGRAMMING THE COMPUTER (C) CONTROL 15 TURNING OFF THE FRYER. 15 DRAINING THE TANK FREE STANDING FRYERS. 16 BOIL OUT PROCEDURE FREE STANDING FRYERS CLEANING. 17 Daily. 17 EXTENDED SHUTDOWN.. 17 KLEENSCREEN PLUS INSTALLATION & OPERATION MANUAL GENERAL 19 ASSEMBLY 19 REMOVE & REPLACE KLEENSCREEN PLUS FILTER ENVELOPE 20 OPERATION 21 FILTERING PROCEDURE FILTERING SOLID STATE KNOB (A) CONTROLS. 23 FILTERING SOLID STATE (D) CONTROLS. 24 FILTERING COMPUTER (C) CONTROLS. 25 FILTERING TIP. 26 REMOVING EXCESS DEBRIS FROM THE FILTER.. 26 FLUSH AND DISCARD.. 26 BOIL OUT BYPASS.. 27 THERMAL OVERLOAD PROTECTION RESET BUTTON 27 MAINTENANCE.. 28 FLUE VENT INSPECTION.. 28 Service in the US and Canada Alarms and Error Messages.. 28 TROUBLESHOOTING.. 29 Troubleshooting Chart
4 INTRODUCTION GENERAL Vulcan Fryers are produced with quality workmanship and material. Proper installation, usage and maintenance will result in years of satisfactory performance. Before installing the fryer, thoroughly read this manual and carefully follow all instruction. This manual is applicable to model listed on the cover page. Procedures in this manual will apply to all models unless specified. Pictures and illustrations can be of any model unless the picture or illustration needs to be model specific. ORDERING PARTS Customers may order parts directly from their local authorized service center. If not known, call Vulcan Customer Service at To speed up your order, provide the model number, serial number, gas type, part needed, item part number (if known) and quantity needed. UNPACKING This fryer was carefully inspected before leaving the factory. Upon acceptance of the shipment, the transportation company assumes full responsibility for safe delivery. Immediately after unpacking the fryer, check for possible shipping damage. If the fryer is damaged, save the packaging material and contact the carrier within 15 days of delivery. Check that the following have been included: Crumb Rack(s) Basket Hanger(s) Tank Brush for Boil Out Procedure Only Adjustable Casters (4) two locking, two non-locking for freestanding fryers. Fryer Batteries with the KleenScreen PLUS Filtration System have casters installed from the factory. Drain Pipe Extension for freestanding fryers only. Twin Fry Baskets (2) per fry tank Cleanout Rod Fryer Batteries with the KleenScreen PLUS Filtration System Filter Pan Suction Tube Screen Assembly Complimentary Pack of Micro-Filtration Envelopes High temperature discard hose Manual, Quick Start Guide(s), and Warranty Keep in safe place for future reference. -4-
5 INSTALLATION Do not use the door or its handle to lift the fryer. Before installing the fryer, verify that the type of gas (natural or propane) agrees with the specifications on the fryer data plate, which is located on the inside of the door panel. Make sure the fryer is configured for the proper elevation. Record your fryer model, device, and serial numbers for future reference in the space provided below. This information can be found on the fryer data plate. Fryer Model No: Device: Serial No: Clearances Minimum clearance from combustible construction: 6 (15 cm) from the sides of the fryer 6 (15 cm) from the back of the fryer The fryer may be installed on combustible floors Minimum clearance from noncombustible construction: 0 from the sides of the fryer 0 from the back of the fryer Between the fryer and any open-top flame units: 16 (41 cm) Allow space for servicing and operation. Location Install fryer in an area with sufficient air supply for gas combustion. Do not obstruct the flow of combustion and ventilation air. Provide adequate clearance for air openings into the combustion chamber. Do not permit fans to blow directly onto fryer. Keep the fryer area free and clear from combustibles. Avoid wall-type fans, which create cross-currents within a room. Avoid open windows next to sides or back. -5-
6 CODES AND STANDARDS The fryer must be installed in accordance with: In the United States: State and local codes, or in the absence of local codes, with: National Fuel Gas Code, ANSI-Z223.1/NFPA #54 (latest edition). Copies may be obtained from The American Gas Association Accredited Standards Committee 400 N. Capital St. NW, Washington, DC or the Secretary Standards Council, NFPA, 1 Batterymarch Park Quincy, MA NFPA Standard #96 Vapor Removal from Cooking Equipment, latest edition, available from the National Fire Protection Association, Batterymarch Park, Quincy, MA National Electrical Code, ANSI/NFPA-70 (latest edition). Copies may be obtained from The National Fire Protection Association, Batterymarch Park, Quincy, MA In the commonwealth of Massachusetts all gas appliances vented through a ventilation hood or exhaust system with a damper or with a power means of exhaust shall comply with 248 CMR. In Canada: Local codes CAN/CSA-B149.1 Natural Gas and Propane Installation Code (latest edition),available from the Canadian Standards Association, 155 Queen Street, Suite 1300, Ottawa, Ontario Canada K1P 6L1. CSA C22.1 Canadian Electric Code (latest edition), available from the Canadian Standards Association, 155 Queen Street, Suite 1300, Ottawa, Ontario Canada K1P 6L1. ASSEMBLY The fryer must be restrained to prevent tipping and the splashing of hot liquid. The means of restraint may be the manner of installation, such as connection to a battery of appliances, installing the fryer in an alcove, or by separate means such as adequate ties. -6-
7 FLUE CONNECTION Make the flue connection as follows: Comply with Vapor Removal from Cooking Equipment, ANSI-NFPA Standard #96 (latest edition), available from the National Fire Protection Association, Batterymarch Park, Quincy, MA Locate the fryer under a hood with adequate connection to an exhaust duct. The hood must extend 6 (15 cm) beyond fryer on both sides. Clearance above the fryer should be adequate for combustion byproducts to be removed efficiently. An 18 (46 cm) minimum clearance should be maintained between the flue vent and the filters of the hood venting system. Never make flue connections directly to the fryer. Do not obstruct the flow of the gases from the appliance. Proper air balance should be maintained in the room. Ensure that your ventilation system does not cause a down draft at the fryer s flue opening. Down drafts will not allow the fryer to exhaust properly and will cause overheating which may cause permanent damage. Damage caused by down drafts will not be covered under equipment warranty. NEVER allow anything to obstruct the flue of combustibles or ventilation exiting from the fryer flue. DO NOT put anything on top of flue area. ELECTRICAL CONNECTION Electrical Grounding Instructions: This appliance is equipped with a three prong (grounding) plug for your protection against shock hazard and should be plugged directly into a properly grounded three-prong receptacle. Do not cut or remove the grounding prong from this plug. Fryer must be electrically grounded in accordance with local codes, or in the absence of local codes, with the National Electrical Code, ANSI/NFPA 70, or the Canadian Electrical Code, CSA C22.2, as applicable. Electrical diagram located on inside of door. -7-
8 GAS CONNECTION All gas supply connections and any pipe joint compound must be resistant to the action of propane gases. The gas inlet is located on the lower rear of the fryer. Codes require that a gas shutoff valve be installed in the gas line ahead of the fryer. The gas supply line must be at least the equivalent of ½ (12.7 mm) iron pipe for single units and 1-1/4 (31.75 mm) for batteries. If using the optional quick-disconnect flex hose, ¾ (19 mm) iron pipe for single units and 1-1/4 (31.75 cm) iron pipe for batteries. Make sure the pipes are clean and free of obstructions, dirt, and piping compound. A battery requires one or two connections of appropriate size for the gas requirement. Prior to lighting, check all joints in the gas supply line for leaks. Use soap and water solution. Do not use an open flame. After piping has been checked for leaks, fully purge gas pipes to remove air. GAS PRESSURES (ALL MODELS): The gas measured exiting the gas valve should be set at.08 W.C. (Water Column) (0.02 kpa) for natural gas and.08 W.C. (.02 kpa) for propane gas. This fryer has been gas calibrated at the factory to achieve maximum performance. Do not make any adjustments to the gas valve assembly. A external gas pressure regulator has been installed to the fryer and has been set at the factory. There should be no need to make any further adjustments. TESTING THE GAS SUPPLY PIPING SYSTEM: When test pressures exceed ¼ PSI (1.73 kpa), the fryer and its individual shutoff valve must be disconnected from the gas supply piping system. When test pressures are ¼ PSI (1.73 kpa) or less, the fryer must be isolated from the gas supply piping system by closing its individual shutoff valve. Fryers with Casters: Separate instructions for installing casters are included with the casters: The installation shall be made with a connector that complies with the Standard for Connectors for Movable Gas Appliances, ANSI Z21.69, CAN/CGA- 6.16, and a quick-disconnect device that complies with the Standard for Quick- -8-
9 Disconnect Devices for Use with Gas Fuel, ANSI z21.41.csa 6.9 or Quick- Disconnect Devices for Use with Gas Fuel. When installing a quick disconnect you must also install a means for limiting the movement of the fryer. This device will prevent the gas line or quick disconnect from being strained. The restraining device should be attached to the cutout on the back panel. See illustration for location. The fryer must be installed with a connector (not supplied by Vulcan) complying with the above codes. The fryer must be installed with restraining means to guard against transmission of strain to the connector. See illustration. The fryer must be installed with the casters provided. If the restraint is ever to be disconnected, first turn the gas supply off. If disconnection of the restraint is necessary, to reconnect this restraint after the fryer has been returned to its originally installed position. LEVELING THE FRYER Check the level of the fryer by placing a level on top of the fryer after gas connections have been made. Ensure that the fryer is level front-to-back and side-to-side in the final installed position. If using casters, lock the wheels after unit is level. -9-
10 OPERATION Hot oil and parts can cause burns. Use care when operating, cleaning and servicing the fryer. Spilling hot frying compound can cause severe burns. Do not move fryer without draining all frying compound from the tank. Fryer is not to be used during a power outage. OVER-TEMPERATURE SHUTDOWN If the shortening becomes overheated, a high-temperature shutoff device will turn the gas valve off. If the fryer shuts down due to overheating, DO NOT power up the fryer until the shortening temperature is below 300 F (149 C). If an overheating situation persists, contact your local Vulcan-Hart authorized service office. BEFORE FIRST USE Cleaning New units are wiped down at the factory to remove any visible signs of dirt, oil, grease, etc. remaining from the manufacturing process. Before any food preparation, thoroughly wash the protective oil from all surface parts and the tank interior with hot soapy water to remove any film residue and dust or debris. Do not use chlorine or sulfate/sulfide cleaners. Wash any accessories shipped with unit. Rinse fryer and accessories thoroughly and drain the fryer. Wipe tank completely dry with a soft, clean cloth. Close the drain valve. Fill the fryer tank with liquid shortening. Shortening level should be between the min and max lines in the fryer tank. Shortening will expand when heated. Do not fill the fryer tank past the MAX line. Add fresh shortening as needed to maintain oil level. -10-
11 BASIC FRYING INSTRUCTION Set the desired temperature and allow shortening to heat up to that temperature. Fry items that are the same size to ensure equal doneness. Drain or wipe dry raw or wet foods to minimize splatter when lowering into hot shortening. Add fresh shortening as needed. Fry Basket Guidelines Do not overfill baskets. (See table for recommended basket capacities below) Carefully lower basket into oil. When frying doughnuts and fritters, turn product only once during frying. When cooking French fries or onion rings, shake the basket several times. Batter covered foods should be dropped carefully, one by one, into shortening or basket. If you use the basket, first dip the basket into the shortening to reduce batter-build up on basket surfaces. When frying is completed, remove basket or product. Hang basket on rear hanger. Fry Basket Capacity: 1VK / TR45: Recommended pounds per basket are 2.5 lbs. (1.1 kg). 1VK / TR65: Recommended pounds per basket are 3.0 lbs. (1.4 kg). 1VK / TR85: Recommended pounds per basket are 3.5 lbs. (1.6 kg). EXTENDING SHORTENING LIFE Shortening life can be extended by the following guidelines: Do not salt foods over the fryer. Use good-quality shortening. Filter shortening daily (at a minimum). Replace shortening if it becomes poorly flavored. Keep equipment and surrounding clean. Use tank covers when not in use. (accessory). Set thermostat correctly. Remove excess moisture and particles from food products before placing on fryer. -11-
 Start Button Open the door to the fryer.")
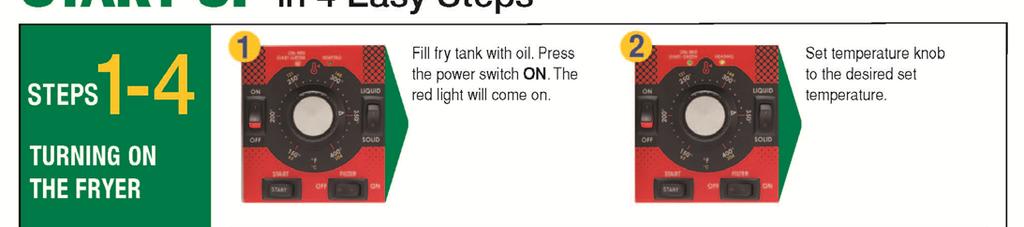
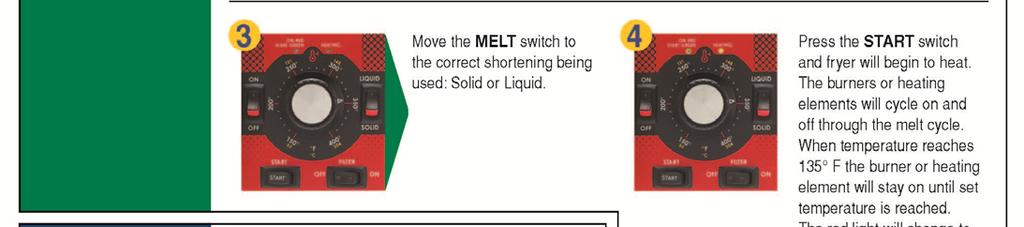
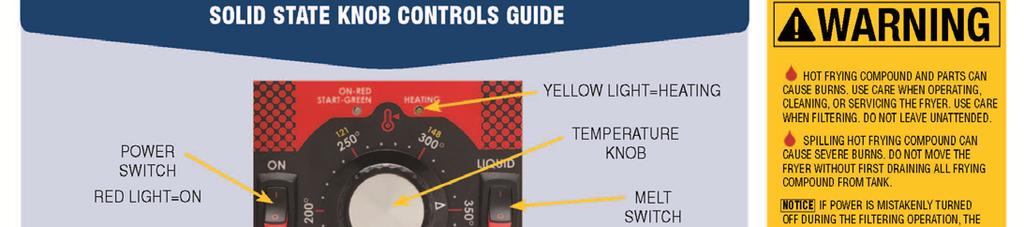
12 TURNING ON THE FRYER VK / TRA solid state knob control: Indicator Lights (On/Start/Heating) Open the door to the fryer. Turn the power switch to the on position. Temperature Knob Control Melt Switch Power Switch Filter Switch (For those models with KleenScreen PLUS Filter Systems) Start Button Open the door to the fryer. Select Liquid or Solid Shortening pressing the switch to the desired selection. Set temperature by turning the knob to the desired temperature. Press the power switch to the ON position. The burners will not light until the next step is completed. Press the START switch once for the burners to light. The START switch is a momentary switch and will reset after being pressed. The indicator light will change from Red to Green. Heating light will glow Yellow. The power burner will cycle on and off throughout the melt cycle. When the fry tank oil reaches 135 F the burners will stop cycling and remain on until the set temperature is reached. Once set temperature is reached the burners will cycle on and off to maintaining the set temperature. VK / TRD solid state digital and VK / TRC programmable controls: For solid state digital and programmable computer controls the power burner will light automatically. The power burner will cycle on and off throughout the melt cycle and continue afterwards maintaining the set temperature. -12-

13 -13-

14 Programming the Solid State Control Programming the Computer Control -14-

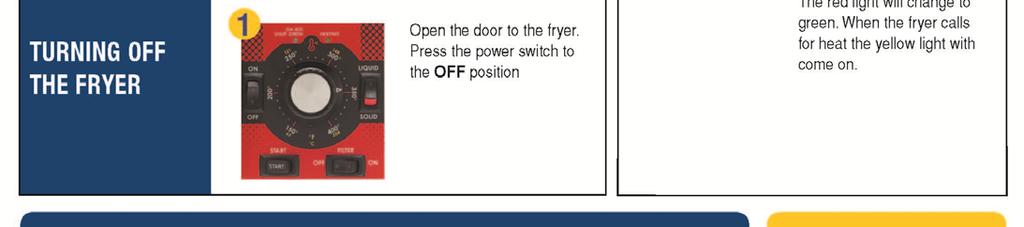
15 TURNING OFF THE FRYER Open the door to the fryer. Press the power switch to the OFF position. EXTENDED SHUTDOWN 1. Thoroughly drain the fryer. Refer to DRAINING THE FRYER. 2. Clean the fryer according to CLEANING. 3. Turn off the main gas shutoff valve. 1. Press the power switch to the off position. TURNING OFF THE FRYER -15-
16 Freestanding Models ONLY: 1. Turn off fryer. DRAINING THE TANK 2. Insert the drain extension into the drain valve. Tighten only hand tight. 3. Direct the drain spout into the container that you want to drain the shortening into. 4. Open the drain valve. The oil will drain into the container. When the container is full or the fryer tank is empty, close the drain valve. Repeat this step until the fryer is empty. Remove the drain extension and place it back into the provided holder. 5. It is recommended to now boil out your fry tank. Follow the Boil Out procedure. Then perform the weekly clean-out as described under CLEANING. 6. Once tank is completely empty, boiled out and cleaned, add new shortening. Turn on the power switch to begin heating the oil to desired temperature. Weekly or when oil is replaced: Freestanding Models ONLY: BOIL OUT PROCEDURE 1. Drain the tank as described under DRAINING THE OIL. 2. Close the drain valve and fill tank with water. Use a boil out solid degreaser low which can be ordered from your local dealer. Follow the instructions on the side of the package. Do not use chlorine or sulfate/sulfide cleaners. 3. Solution level must be between the MIN and MAX levels on the fryer tank. 4. Turn the power switch to the on position. With solid state knob controls (A), set the temperature knob to 200 F. Press the start button. Water boils at 212 F. For solid state digital models (D) and computer models (C) models, the temperature will automatically set for F. Do not bring water temperature to an overly active boil. 5. Use the tank brush; clean the sides, bottom and heat exchanger tubes. 6. Screw the drain extension in the drain valve and hand tighten only. Drain the cleaning solution from the tank into a container. 7. Close the drain valve and refill the tank with water. Add 1 cup (1/4 L) of vinegar to neutralize alkaline left by the cleaner. Solution level must be between the MIN and MAX level on the fryer tank. Press the start button for (A) and Temp Button for (D) and C) models, to allow the solution to heat up. Allow solution to stand for a few minutes. 8. Drain the tank according to DRAINING THE TANK. Rinse thoroughly with clear, hot water. All traces of cleaner must be removed. Dry the tank thoroughly. -16-
17 9. Close the drain valve and add shortening. Follow the FILLING TANK WITH SHORTENING procedure in this manual. The fryer is now ready for use. Press the start button for (A) and Temp Button for (D) and C) models, to allow the solution to heat up. CLEANING Daily Hot oil and hot parts can cause burns. Use care when operating, cleaning, and servicing the fryer. Clean your fryer regularly with the tank brush along with a damp cloth, and polish with a soft dry cloth. If regular cleaning is neglected, grease will be burned on and discolorations may form. Fingerprints are sometimes a problem on highly polished surfaces of stainless steel. They can be minimized by applying a cleaner that will leave a thin oily or waxy film. Clean all exterior surfaces of your fryer at least once daily. Use a damp cloth with warm water and a mild soap or detergent. Do not use chlorine or sulfate/sulfide cleaners. Rinse thoroughly, and then dry with a soft dry cloth. Keep the fryer exterior clean and free of accumulated grease to prevent stubborn stains from forming. If regular cleaning is neglected, grease will be burned on and discolorations may form. Remove discolorations by washing with any detergent or soap and water. Use a self-soaping, non-metallic scouring pad for particularly stubborn discolorations. Always rub with the grain of the stainless steel. Do not use a metallic scoring pad or harsh cleaners. Air Filter Cleaning (VK fryers only): The air filter needs to be cleaned at least once every three months. Pull the air filter off and clean in a dishwasher or by hand. Dry thoroughly before replacing it into position. There is no need to tighten the band clamp with tools. EXTENDED SHUTDOWN 1. Thoroughly drain the fryer. Refer to DRAINING THE FRYER. 2. Clean the fryer according to CLEANING. 3. Push Power switch to the off position 4. Turn off the main gas shutoff valve. -17-
. Only one tank can be drained and filtered at a time. Under no circumstances should both tanks be drained at the same time.")
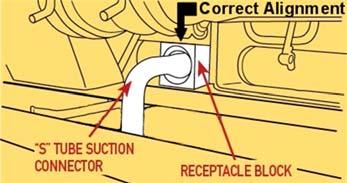
18 KleenScreen Plus Filtration System Installation & Operational Manual for VK / TRAF, VK / TRDF and VK / TRCF Models General The KleenScreen PLUS filtration system filters the oil as it is pumped back into its respective tank(s). Only one tank can be drained and filtered at a time. Under no circumstances should both tanks be drained at the same time. Assembly After unpacking, wash the filter pan, crumb basket and filter screen assembly. Make sure you remove the insert located inside the filter screen. Use dishwashing detergent and warm water, (parts are dishwasher safe). Rinse the filter pan, crumb basket and filter screen components completely and wipe all parts dry with a clean cloth. Pull out the filter drawer all the way leaving the filter pan opening exposed. Place the filter tank into the filter drawer making sure that the pins on the bottom of the filter pan line up with the holes in the filter drawer. Position the filter screen assembly into the suction tube clip in the filter pan positioning the filter screen assembly flat on the bottom of the filter pan. Place the primary crumb basket onto the left handle of the filter pan. Carefully line up the suction tube nozzle so that it mates with the oil receptacle block mounted on the frame of the fryer battery. Close the drawer. See Figures 1, 2 3 and 4 Suction Tube Filter Screen Filter Insert Knurled Bottom Fitting Fig


19 Fully assembled filter screen assembly: Fig. 2 Secure Tube with Suction Tube Clip Filter Screen Lays Flat On Bottom of Filter Pan Fig. 3 Micro-Filtration Fabric Envelope Assembly: Same Suction Tube Fabric Envelope Insert (Different from Screen Assembly) Fabric Envelope Same Knurled Knob Closing Clip Fig
.")


20 INSTRUCTIONS TO REMOVE & REPLACE KLEENSCREEN PLUS FILTER ENVELOPE FOR ABSOLUTE FILTRATION & MAXIMUM FLOW RATE WE RECOMMEND YOU CHANGE YOUR FILTER ENVELOPES AT EVERY OIL CHANGE (10-14 DAYS DEPENDING ON OIL USAGE). Step 1 Discard all oil from the filter vessel, (see pages 23 or 24). When the filter pan is empty, use a spatula and scrape off all debris left on the filter envelope and in the filter pan. Step 2 Unscrew S Tube from filter by turning the Bottom Knurled fitting counter- clockwise. Step 3 Remove SST Closure Clip by lifting off one side. Step 4 Remove SST Filter Screen Insert and wash insert with hot water and dry thoroughly. The Filter Screen Insert is dishwasher safe. Place the insert into a new KleenScreen PLUS Filter envelope. DO NOT WASH FABRIC ENVELOPE Step 5 Place Filter Screen Insert into the fabric envelope making sure that the holes line up. Fold over the other end of the envelope and place SST Closure Clip on hinge over and firmly press clip all the way down to secure and seal filter assembly. Making sure that the folded end is face down; screw S Tube Assembly onto the Filter Assembly. Tighten the Bottom Knurled fitting. When tightened, the S Tube assembly should be perpendicular to the long side of the filter assembly. Step 6 Reposition the filter tube into the provided clip. Align filter tube so that the end of the S Tube engages the Oil Receptacle fitting each time the drawer is opened and closed. -20-
21 Operation Hot oil and parts can cause burns. Use care when operating, cleaning and servicing the fryer. Spilling hot frying compound can cause severe burns. Do not move fryer without draining all frying compound from the tank. Never run water or boil out solution through filter and motor / pump. Doing so will void your fryer warranty. Filter ONLY one fry tank at a time FILTERING PROCEDURE KleenScreen PLUS Models ONLY Filter shortening at least once a day. 1. Do NOT turn off the power to the fryer. Leave power on. 2. Vulcan recommends adding an oil treatment media to the oil prior to filtering. 3. Make sure that the filter drawer is closed completely and that the suction tube and receptacle block are in the correct position. Fig. 5 Fig A cold fryer will not drain easily. Always filter shortening between 250 F and 350 F. The shortening in the cold zone area will remain hard if the heat is only on for a few minutes. If necessary, use the clean-out rod to carefully move the hard shortening to an area above the cold zone where it will melt. 5. Slowly open the drain valve to allow oil to flow from the fry tank to the filter pan. Then open the drain valve all the way. Please note the gas power burner will automatically turn off at this point. DRAINING will appear on the digital display for solid state digital (D) and DRAINING OIL will display on computer models (C). -21-
22 6. When fry tank is empty turn on the filter pump by pressing the filter button on the (A) control or by holding your finger on the filter icon for 3-4 seconds on the solid state digital models (D) and for computer models (C). Allow the pump to filer the oil for a couple of minutes BEFORE closing the drain valve. 7. Close the drain valve. The display will change to; FILL TANK for solid state digital models (D) and FILL TANK for computer models (C). 8. Fill tank with new shortening. Fill to a minimum of the MIN level but no higher than halfway between MIN and MAX. Oil will expand as it is heated. 9. On solid state digital models (D) and computer models (C) models, the display will ask if the tank is full; TANK FULL, HIT TEMP. If the tank is full, press the Temp Button on the display. Once pressed, the gas power burner will ignite and begin heating the oil to desired temperature. 10. Press the START button for solid state knob control (A) and gas power burner with ignite and begin heating the oil. -22-
23 -23-

24 Filtering Instructions for Solid State Controls -24-


25 Filtering Instructions for KleenScreen PLUS Fryers with Computer Controls -25-

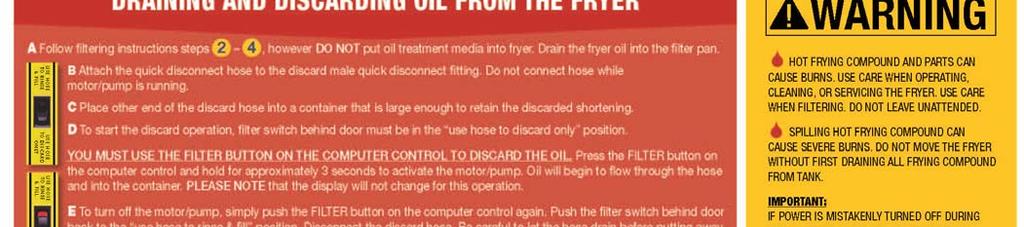
26 FILTERING TIP: Open the filtering drawer approximately 1 to allow any oil in the return line to run back into the filter pan. This will take about 30 seconds to complete. Then open the drawer completely to clean filter components. REMOVING EXCESS DEBRIS FROM THE SCREEN FILTER: 1. Pull the filter drawer out and remove the crumb basket and empty any debris into the trash. 2. Remove the filter screen assembly. Scrape debris from the filter screen. Then remove the insert by unlatching the latch. Clean all parts thoroughly as mentioned in the Assembly section on page Scrape debris from the bottom of the filter pan and discard in the trash. Clean all parts thoroughly as mentioned in the Assembly section on page 19. Clean all parts thoroughly as mentioned in the Assembly section on page Reassemble all filter components after being dried thoroughly as in the Assembly section on page 19. FLUSH/RINSE AND DISCARD OIL: 1. Follow filtering instructions 1-3, however do not put oil treatment media into the fryer. Drain the fryer oil into the filter pan. 2. Attach the quick disconnect hose to the discard male quick disconnect fitting, 3. To discard the oil, place the nozzle end of the discard hose into a container that is large enough to retain the discarded shortening. Press the filter switch behind the door to the USE HOSE TO DISCARD ONLY position. This will allow all of the oil to be pumped through the hose only. 4. For flushing/rinsing the tank with filtered oil to remove the particulates that have accumulated, press the filter switch behind the door to the USE HOSE TO RINSE AND FILL position. This will allow the oil to pass through the hose and come in from behind the tank at the same time. 5. With the power switch still ON; press the discard/flush switch on. Press and hold the filter button for at least 3 seconds and the Motor/Pump will begin to operate. NOTE: Oil will exit immediately out of the nozzle end of the hose. 6. Once the oil has been discarded completely and the filter pan is empty, press the filter button to turn off the Motor/ Pump. Then press the discard/flush switch off. -26-


 Drain Tube End (Larger Size Threads) THERMAL OVERLOAD PROTECTION BUTTON: The motor/pump supplied with")

27 7. Disconnect the discard hose. The hose connection will be hot due to the temperature of the oil that was discarded. Be careful to let the hose drain before putting away. Close the drain valve and fill the fry tank with new oil. BOIL OUT PROCEDURE: Use the Boil Out By-Pass drain extension allowing the boil out solution to exit the fry tank without using the filtering system. Do NOT allow water to run through the motor / pump. Drain the boil out solution into a bucket or place a high temperature rated water hose on the end of the drain extension allowing the other end to flow into a floor drain. In Fig. 6 the arrow is pointing to the drain extension. It is threaded into the top coupling of the oil drain tube. Drain extension needs to be only hand tightened. Boil Out By-Pass Extension Tube Fig. 6 Standard Hose End (Smaller Thread Side) Drain Tube End (Larger Size Threads) THERMAL OVERLOAD PROTECTION BUTTON: The motor/pump supplied with the filtering system has a thermal overload protection circuit that senses when excess heat occurs. This can occur due to filtering for long periods of time or under heavy load prior to discarding debris buildup. If the thermal overload protection is tripped, wait 5 minutes and then reset the motor by pushing in the red button. The arrow in Figure 7 shows the location of the reset button; located on the front of the motor / pump facing towards you. Hot oil and hot parts Fig 7. can cause burns. -27-
28 MAINTENANCE Hot oil and hot parts can cause burns. Use care when operating, cleaning, and servicing the fryer. Spilling hot fryer compound can cause severe burns. Do not move fryer without draining all frying compound from the tank. FLUE VENT INSPECTION When the fryer is cool, inspect annually. Check the flue and clear any obstructions. Service in the US and Canada Contact you local Vulcan-Hart Service office or address on the front of this manual. ALARMS AND ERROR MESSAGES NO OR LOW GAS SUPPLY If no action is taken after 90 seconds, an alarm sounds continuously, the heat demand is disabled and any running cooking cycles are cancelled. The digital display the following message: D Solid State IGNITION LOCKOUT C Computer IGNITION LOCKOUT CHECK GAS SUPPLY The fryer must be turned off, then back on to re-initialize the control and to have normal functions resumed. OPEN PROBE If an open probe is detected, the heat demand is disabled and any running cooking cycles are cancelled. All operator buttons are disabled. The digital control displays the following message: D Solid State OPEN PROBE C Computer PROBE OPEN -28-
29 SHORTED PROBE If a shorted probe is detected, the heat demand is disabled and any running cooking cycles are cancelled. All operator buttons are disabled. The digital control displays the following message: D Solid State SHORTED PROBE C Computer PROBE SHORT Hi TEMPERATURE If the temperature is greater than or equal to 415 F (212 C), the heat demand is disabled and any running cooking cycles are cancelled. All operator buttons are disabled. The control displays the following message: D Solid State HIGH TEMP C Computer HIGH TMP HIGH TMP Troubleshooting Chart: Problem: No Heat: Insufficient or too much heat: Tank will not drain: Motor / pump will not pump oil: Probable Cause: Power switch not turned on. Gas supply not turned on. Wire connections loose (call service) Wires connections need cleaning High Limit (call service) Temperature not set to desired temperature. High limit tripped (call service) Temperature probe (call service) Shortening too cold. Drain pipe clogged with debris. Suction tube not seated correctly in receptacle block. Filter screen is clogged and needs cleaning. Shortening is too thick / cold. Heat oil up to min. 300º F. Discard valve lever not fully engaged either for filtering or discarding. Thermal overload protection button tripped. -29-
INSTALLATION & OPERATIONAL MANUAL
 INSTALLATION & OPERATIONAL MANUAL LG SERIES GAS FRYERS MODELS: LG300 LG400 LG500 ML-136528 ML-136622 ML-136643 For additional information on Vulcan-Hart or to locate an authorized parts and service provider
INSTALLATION & OPERATIONAL MANUAL
 INSTALLATION & OPERATIONAL MANUAL 1HFD & HFC SERIES ELECTRIC FRYERS With KleenScreen PLUS Filtration Systems MODELS: 1HF50D 1HF85CF ML-136500 ML-136819 1HF85CF Shown - Computer Control ENERGY STAR Qualified
INSTALLATION & OPERATIONAL MANUAL
 INSTALLATION & OPERATIONAL MANUAL ERA, ERD & ERC SERIES ELECTRIC FRYERS With KleenScreen PLUS Filtration Systems MODELS: 1ER50A ML-136730 1ER50D ML-136496 1ER50C ML-136498 1ER85A ML-136740 1ER85D ML-136497
INSTALLATION & OPERATION MANUAL
 INSTALLATION & OPERATION MANUAL EF SERIES ECONOFRY GAS FRYERS MODEL EF3 EF4 EF5 ML-52099 ML-114943 ML-114944 MODEL EF3 For additional information on Vulcan-Hart or to locate an authorized parts and service
PRO SERIES GAS FRYERS OWNER S MANUAL
 PRO SERIES GAS FRYERS OWNER S MANUAL MODELS: PF-1 PRO-FRYER, PF2 DUAL PRO-FRYER REVISED OCTOBER, 2009 *PLEASE RETAIN FOR FUTURE REFERENCE This appliance has been tested according to ANSI Z83.116-2009/CSA1.86-2009.
Gas Countertop Fryer lb Model lb Model NG and LPG Models
 Gas Countertop Fryer 35-40 lb Model 45-50 lb Model NG and LPG Models This manual contains important information regarding your unit. Please read this manual thoroughly prior to equipment set-up, operation
INSTALLATION & OPERATION MANUAL GAS CHARBROILERS
 INSTALLATION & OPERATION MANUAL GAS CHARBROILERS MODELS VCCB25 VCCB36 VCCB47 VCCB60 VCCB72 VCCB47 SCB25 SCB36 SCB47 SCB60 SCB72 SCB47 ITW Food Equipment Group, LLC 3600 North Point Blvd. Baltimore, MD
INSTALLATION & OPERATION MANUAL FOR Achiever Charbroilers
 INSTALLATION & OPERATION MANUAL FOR Achiever Charbroilers MODELS MLS VACB20 ML-135285 VACB25 ML-710543 VACB36 ML-710544 VACB47 ML-710545 VACB60 ML-710546 VACB72 ML-135286 www.vulcanhart.com MODELS MLS
INSTALLATION AND OPERATION MANUAL GAS SKILLETS MODELS: GTS-30 GTS-40
 INSTALLATION AND OPERATION MANUAL GAS SKILLETS MODELS: GTS-30 GTS-40 CROWN FOOD SERVICE EQUIPMENT LTD. 70 OAKDALE ROAD, DOWNSVIEW, (TORONTO), ONTARIO, CANADA, M3N 1V9 TELEPHONE: (416) 746-2358, FAX: (416)
Owner s Guide Installation & Operation
 Owner s Guide Installation & Operation Fryer HFR Series Hestan Commercial Corporation 3375 E. La Palma Ave Anaheim, CA 92806 (888) 905-7463 RETAIN THIS MANUAL FOR FUTURE REFERENCE P/N 002137 REV 1 IMPORTANT
Owner s Guide Installation & Operation
 Owner s Guide Installation & Operation Hot Top HHT Series Hestan Commercial Corporation 3375 E. La Palma Ave Anaheim, CA 92806 (888) 905-7463 RETAIN THIS MANUAL FOR FUTURE REFERENCE P/N 002130 REV 1 IMPORTANT
GPC PASTA PRO INSTALLATION & USER OPERATION MANUAL
 GPC-14/18/20 GPC PASTA PRO INSTALLATION & USER OPERATION MANUAL GPC-18 shown with optional rinse station. NOTICE! After installation of your equipment, immediately contact your local gas supplier to obtain
INSTALLATION & OPERATION MANUAL
 INSTALLATION & OPERATION MANUAL VCD & VCW SERIES CHIP WARMERS MODELS: VCD22* ML-138037 VCD44 ML-138069 VCW26 VCW46 *Formerly VCD5 VULCAN 3600 NORTH POINT BLVD. DIVISION OF ITW FOOD EQUIPMENT GROUP, LLC
OPERATION MANUAL KLEENSCREEN FILTRATION SYSTEM SUPPLEMENT INSTRUCTION MANUAL FOR: Gas Fryer Models. Electric Fryer Models
 OPERATION MANUAL KLEENSCREEN FILTRATION SYSTEM SUPPLEMENT INSTRUCTION MANUAL FOR: Gas Fryer Models GR35F ML-126998 GR45F ML-126999 GR65F ML-135534 GR85F ML-135535 GRD35F ML-126732 GRD45F ML-126735 GRD65F
Owner s Guide Installation & Operation
 Owner s Guide Installation & Operation Char Broiler HCH Series Hestan Commercial Corporation 3375 E. La Palma Ave Anaheim, CA 92806 (888) 905-7463 RETAIN THIS MANUAL FOR FUTURE REFERENCE P/N 002134 REV
INSTALLATION & OPERATION MANUAL
 CBFT SERIES CORRECTIONAL HEATED HOLDING CABINETS INSTALLATION & OPERATION MANUAL MODELS: CBFT CBFTHS ML-152028-0000Z ML-152029-0000Z VULCAN 3600 NORTH POINT BLVD. DIVISION OF ITW FOOD EQUIPMENT GROUP,
INSTALLATION & OPERATION MANUAL
 V SERIES HEATED HOLDING TRANSPORTATION CABINETS MODELS: INSTALLATION & OPERATION MANUAL VBP5I VBP7I VBP13I VBP15I VBP18 VHFA9 VHFA18 VHP7 VHP15 VPT7 VPT13 VPT15 VPT18 ML-138030 ML-126358 ML-126359 ML-126360
TRI-STAR INC SOUTH STANDARD AVENUE, SANTA ANA, CA Ph: Fax: MODEL #. OWNER S MANUAL
 TRI-STAR INC 2205 SOUTH STANDARD AVENUE, SANTA ANA, CA 92707 Ph: 714 424 9380 Fax: 714 424 9385 MODEL #. OWNER S MANUAL INSTALLATION OPERATION MAINTENANCE All equipments manufactured by Tri-star Inc. for
INSTALLATION & OPERATION MANUAL
 INSTALLATION & OPERATION MANUAL VW & VSL SERIES DRAWER WARMERS VCW1, VCW2 CHIP WARMERS MODELS: CHIP WARMERS: VCW1 ML-138038 VCW2 ML-138041 DRAWER WARMERS: CAFÉ : VW1S ML-126500 VW2S ML-126502 VW3S ML-126504
INSTALLATION, OPERATION & MAINTENANCE AVANTCO SERIES 177AG OWNER S MANUAL
 INSTALLATION, OPERATION & MAINTENANCE AVANTCO SERIES 177AG OWNER S MANUAL Manual Griddles: Radiant Charbroilers: Hot Plates: 177AG24MG 177AG36MG 177AG24RC 177AG36RC 177AGR212 All equipment manufactured
INSTALLATION & OPERATION MANUAL
 INSTALLATION & OPERATION MANUAL GS, GL & GT SERIES FULLY STEAM JACKETED GAS KETTLES MODEL GS25E GS30E GL40E GS60E GL80E GT100E GT5E GT150E ML-52633 ML-52634 ML-52635 ML-52660 ML-52637 ML-52638 ML-52639
INSTALLATION & OPERATION MANUAL
 INSTALLATION & OPERATION MANUAL V SERIES FOOD HEATED HOLDING PROOFER CABINET MODEL: VP18 ML-138089 For additional information on Vulcan-Hart or to locate an authorized parts and service provider in your
INSTALLATION & OPERATION MANUAL
 INSTALLATION & OPERATION MANUAL V SERIES FOOD HOLDING & TRANSPORTATION CABINETS MODELS: VB90 VB96 VB150 VBP5I VBP7I VBP13I VBP15I VBP33 VBP77I VBS15 VHA9 VHA18 VHDP5 VHFA9 VHFA18 VHP3 VHP7 VHP8 VHP15 VHP20
INSTALLATION & OPERATION MANUAL
 CHIP WARMERS MODELS: 500-CW 700-CW 500-CW-EX (New 2014) 700-CW-EX (New 2014) INSTALLATION & OPERATION MANUAL For additional information on WITTCO or to locate an authorized parts and service provider in
PLEASE RETAIN THIS MANUAL FOR FUTURE REFERENCES. This equipment is design engineered for commercial use only
 OWNER S MANUAL INSTALLATION OPERATION MAINTENANCE FRYER SRF-40/50 All equipment manufactured by SIERRA CORP. is for use with the type of gas specified on the rating plate and for installation will be in
JADE TACO RANGES MODEL: JTR and JTRB Series JADE STOCK POT RANGES MODEL: JSP Series
 Jade Range LLC, A Middleby Company 2650 Orbiter Ave. Brea, CA 92821 Telephone (714) 961-2400 FAX (714) 961-2550 JADE TACO RANGES MODEL: JTR and JTRB Series JADE STOCK POT RANGES MODEL: JSP Series INSTALLATION,
INSTALLATION & OPERATION MANUAL
 DRAWER WARMERS CHIP WARMERS MODELS: CHIP WARMERS: 200-1-CW 200-2-CW DRAWER WARMERS: CAFÉ : 200-1R-C 200-2R-C 200-3R-C 200-4R-C CAFE BUILT-IN: 200-1R-BI-C 200-2R-BI-C 200-3R-BI-C 200-3R-BI-C INSTALLATION
R-RCM & R-RSB SERIES
 R-RCM & R-RSB SERIES CHEESEMELTER & SALAMANDER BROILERS INSTALLATION - OPERATION - MAINTENANCE CHEESEMELTERS R-RCM-24 R-RCM-36 R-RCM-48 R-RCM-60 SALAMANDERS R-RSB-24 R-RSB-36 R-RSB-48 Telephone: (802)
INSTALLATION & OPERATION MANUAL
 INSTALLATION & OPERATION MANUAL VHU SERIES INSULATED HUMIDIFIED HEATED TRANSPORTATION CABINETS MODELS: VHU7 VHU18 F47668 1 IMPORTANT FOR YOUR SAFETY THIS MANUAL HAS BEEN PREPARED FOR PERSONNEL QUALIFIED
ULTRA-MAX GAS RADIANT CHARBROILER. ULTRA-MAX GAS LAVA ROCK CHARBROILER MODELS 8024CBB, 8036CBB, 8048CBB, 8060CBB, and 8072CBB
 Star Manufacturing International Inc. 10 Sunnen Drive St. Louis, MO 63143 Phone: (314) 678-6303 Fax: (314) 781-2714 Installation and Operating Instructions 2M-Z20327 Rev. A 10/05/15 ULTRA-MAX GAS RADIANT
GAS DECK OVENS INSTALLATION & OPERATING MANUAL
 GAS DECK OVENS INSTALLATION & OPERATING MANUAL MODELS: MB42, MB60, MB236, MB260, MB866, SD236, SD248, SD260, SD448, SD660, SD1048, SD1060, SD866, SD10866, WF42, WF60 FOR YOUR SAFETY DO NOT STORE OR USE
SR42G/52G Series Gas Fryers
 SR42G/52G Series Gas Fryers Installation & Operation Manual PRINTED IN THE UNITED STATES For Service, Call (318) 865-1711 Dean, 8700 Line Avenue, PO Box 51000, Shreveport, Louisiana 71135-1000 Shipping
USER MANUAL Gas Countertop Charbroilers
 Gas Countertop Charbroilers REVISED 2/209 382799 LAVA BRIQUETTE MODELS: 35CLCPG5NL, 35CLCPG24NL, 35CLCPG36NL, 35CLCPG48NL, 35CLCPG60NL, 35CLCPG72NL Congratulations on your purchase of Cooking Performance
Filtration. General Instructions
 Filtration General Instructions Ultrafryer Systems 302 Spencer Lane P.O. Box 5369 San Antonio, TX 78201 Local: (210) 731-5000 Toll-Free: (800) 525-8130 Fax: (210) 731-5099 Web: www.ultrafryer.com 30A181-Jul2007
INSTALLATION & OPERATION MANUAL
 INSTALLATION & OPERATION MANUAL VGC SERIES GAS CONVEYOR OVENS MODELS VGC3018 VGC3624 VGC3632 VGC4018 VGC4824 VGC4832 VGC6024 VGC6032 ML-126196 ML-114829 ML-114830 ML-126197 ML-114831 ML-114832 ML-114834
MODELS: JGM, JGGM, JGT, JGTS, JGTSD, JGTSDS, JGGT, JGGTS, JTYG GRIDDLES AND JHP, JHPE HOT PLATES
 Jade Range LLC, A Middleby Company 2650 Orbiter Ave. Brea, CA 92821 Telephone (714) 961-2400 FAX (714) 961-2550 MODELS: JGM, JGGM, JGT, JGTS, JGTSD, JGTSDS, JGGT, JGGTS, JTYG GRIDDLES AND JHP, JHPE HOT
CINCINNATI, OH USA
 INSTRUCTION MANUAL Part No. 89731 Revised October 1997 CINCINNATI, OH 45241-4807 USA GAS SAFETY PRECAUTIONS Instructions on what to do when a user smells gas can be obtained from the local gas supplier.
STAR-MAX PROPANE GAS GRIDDLE
 Star Manufacturing International Inc. 10 Sunnen Drive St. Louis, MO 63143 Phone: (314) 781-2777 Fax: (314) 781-3636 Installation and Operating Instructions 2M-Z3793 Rev. B 3/28/03 STAR-MAX PROPANE GAS
OPERATING, INSTALLATION, SERVICE & PARTS MANUAL FOR MEDIUM DUTY GAS CHAR BROILERS MGB-A SERIES
 OPERATING, INSTALLATION, SERVICE & PARTS MANUAL FOR MEDIUM DUTY GAS CHAR BROILERS MGB-A SERIES VULCAN-HART COMPANY, P.O. BOX 696, LOUISVILLE, KY 40201-0696, TEL. (502) 778-2791 FORM 990503 (09-88) ! IMPORTANT
Using it in an enclosed space can kill you.
 38 X 56 GAS FIRE PIT - OWNER S MANUAL Carlisle Chat Fire Table Base Model # 00GBC7 (6877B) Fits 6877A Carlisle Chat Fire Table Top For Propane and *Natural Gas (*See Page 7) Certified to CSA International
INSTALLATION and OPERATION MANUAL DIRECT STEAM KETTLES MOUNTED ON ELECTRIC BOILER BASE CABINET MODELS: EMT-6 EMT-10 EMT-12 EMT-6-6 EMT-10-6 EMT-10-10
 INSTALLATION and OPERATION MANUAL DIRECT STEAM KETTLES MOUNTED ON ELECTRIC BOILER BASE CABINET MODELS: EMT-6 EMT-10 EMT-12 EMT-6-6 EMT-10-6 EMT-10-10 CROWN FOOD SERVICE EQUIPMENT LTD. 70 OAKDALE ROAD,
OWNERS MANUAL INSTALLATION, OPERATION, & MAINTENANCE INSTRUCTIONS
 OWNERS MANUAL INSTALLATION, OPERATION, & MAINTENANCE INSTRUCTIONS 1128 Sherborn Street Corona, CA 92879-2089 (951) 281-1830 (951) 281-1879 IPC SERIES PASTA COOKER All Imperial Mfg. Co. equipment is manufactured
V SERIES HDR GAS RANGES
 SERVICE MANUAL ONE POWERFUL PACKAGE V SERIES HDR GAS RANGES TOPS Open Top Hot Top Griddle Top Work Surface BASES Standard Oven Convection Oven Cabinet Base - NOTICE - This manual is prepared for use by
CBO-750 HYBRID-R OVEN Instructions Manual
 CBO-750 HYBRID-R OVEN Instructions Manual ELECTRICAL DIAGRAM IS LOCATED BEHIND FRONT PANEL THIS OVEN MAY BE OPERATED OUTDOORS. ELECTRICAL DIAGRAMS ARE LOCATED BEHIND FRONT PANEL. KEEP THIS MANUAL FOR FUTURE
OWNER S MANUAL INSTALLATION OPERATION MAINTENANCE CONVECTION OVEN MODEL # RDCO-32
 OWNER S MANUAL INSTALLATION OPERATION MAINTENANCE CONVECTION OVEN MODEL # RDCO-32 All Rankin-Delux, Inc. equipment is manufactured for use with the type of gas specified on the rating plate and for installation
OWNER S MANUAL INSTRUCTIONS, INSTALLATION, OPERATION, MAINTENANCE RHPE & RTGE SERIES (ELECTRIC COUNTERTOPS) RETAIN THIS MANUAL FOR FUTURE REFERENCES.
 RETAIN THIS MANUAL FOR FUTURE REFERENCES.") 3245 Corridor Drive, Eastvale, CA 91752 800.769.2414 951.360.1600 951.360.7500 (Fax) OWNER S MANUAL INSTRUCTIONS, INSTALLATION, OPERATION, MAINTENANCE RHPE & RTGE SERIES (ELECTRIC COUNTERTOPS) FOR YOUR
3245 Corridor Drive, Eastvale, CA 91752 800.769.2414 951.360.1600 951.360.7500 (Fax) OWNER S MANUAL INSTRUCTIONS, INSTALLATION, OPERATION, MAINTENANCE RHPE & RTGE SERIES (ELECTRIC COUNTERTOPS) FOR YOUR
GAS COOKTOP INSTALLATION INSTRUCTIONS
 INSTALLATION AND SERVICE MUST BE PERFORMED BY A QUALIFIED INSTALLER. IMPORTANT: SAVE FOR LOCAL ELECTRICAL INSPECTOR'S USE. READ AND SAVE THESE INSTRUCTIONS FOR FUTURE REFERENCE. WARNING If the information
I NS T RUC T ION MODEL HP15G & HP15GF GAS PRESSURE FRYERS MODELS. Pressure Fryers FORM (2-97)
") I NS Pressure Fryers T RUC T ION MODEL HP15G & HP15GF GAS PRESSURE FRYERS S MODELS HP15G HP15GF ML-114793 ML-114790 EXECUTIVE OFFICES 701 RIDGE AVENUE TROY, OHIO 45374-0001 FORM 33691 (2-97) IMPORTANT
I NS Pressure Fryers T RUC T ION MODEL HP15G & HP15GF GAS PRESSURE FRYERS S MODELS HP15G HP15GF ML-114793 ML-114790 EXECUTIVE OFFICES 701 RIDGE AVENUE TROY, OHIO 45374-0001 FORM 33691 (2-97) IMPORTANT
FRYMASTER TCF. Chicken Fryer
 Hardee s Food Systems, Inc. FRYMASTER TCF Chicken Fryer EQUIP 501 Chicken Fryer October 1, 1994 CALIBRATION EQUIPMENT and TOOLS Digital Thermometer Flat Blade or Phillips w/immersion Probe Screwdriver
STAR-MAX GAS GRIDDLES MODELS 615MA 624MA 636MA 648MA 615TA 624TA 636TA 648TA 624TSPA 636TSPA 648TSPA
 Star Manufacturing International Inc. 10 Sunnen Drive St. Louis, MO 63143 Phone: (314) 781-2777 Fax: (314) 781-3636 Installation and Operating Instructions 2M-Z1351 Rev. B 4/23/04 STAR-MAX GAS GRIDDLES
DESIGN CLASS FUNCTION
 PROFESSIONAL QUALITY COOKING EQUIPMENT INSTALLATION MANUAL FOR PERFORMER SLIDE-IN COOK TOPS MODEL NUMBERS: AROBSCT-424, AROBSCT-242GD, AROBSCT-24X2GR, AROBSCT-430, AROBSCT-636, AROBSCT-436GD, AROBSCT-436GR,
INSTRUCTION MANUAL. Gas Range/Griddle Combos
 INSTRUCTION MANUAL Gas Range/Griddle Combos This manual contains important information regarding your unit. Please read this manual thoroughly prior to equipment set-up, operation and maintenance. Failure
Installation and Operation Manual Covering Model 40S, 40C, 40D with Millivolt Gas Valve
 IMPORTANT FOR FUTURE REFERENCE Please complete this information and retain this manual for the life of the equipment: Model #: Serial #: Date Purchased: ENGLISH Installation and Operation Manual Covering
INSTALLATION AND OPERATION MANUAL GAS SKILLETS MODELS:
 INSTALLATION AND OPERATION MANUAL GAS SKILLETS MODELS: ACGS-30 ACGS-40 ACCUTEMP PRODUCTS, INC. 8415 North Clinton Park Dr. Fort Wayne, IN 46825 800 210-5907 Office 260 493-0415 Fax www.accutemp.net PART
Installation and Operation Manual For Electric Fryers. Covering Models SE, SEH, SEM Series
 Installation and Operation Manual For Electric Fryers Covering Models SE, SEH, SEM Series Pitco Frialator, Inc., P.O. Box 501, Jct I-89 & I-93 Concord, NH 03302-0501 509 Route 3A, Bow, NH 03304 (603) 225-6684
GAS COOKTOP MODELS: CTG365D, CTG305D, CTG304D TO REDUCE THE RISK OF FIRE, ELECTRIC SHOCK, OR INJURY TO PERSONS, OBSERVE THE FOLLOWING
 By CNP INDUSTRIES, INC. P.O. Box 18645 Anaheim, Ca 92817 (877) 387-6721 INSTALLATION INSTRUCTIONS GAS COOKTOP MODELS: CTG365D, CTG305D, CTG304D IMPORTANT: Before beginning installation please read these
PF50 Series Portable Filtration Systems
 PF50 Series Portable Filtration Systems Operating Manual SERIES PF50 & PF50S Please read all sections of this manual and retain for future reference. Frymaster, a member of the Commercial Food Equipment
Multi-Function Cooktop
 INSTALLATION GUIDE Multi-Function Cooktop Contents Wolf Multi-Function Cooktop.................... 3 Multi-Function Cooktop Specifications............ 4 Multi-Function Cooktop Installation...............
Jade Salamander Broilers Model: JSB Series
 Jade Range LLC, A Middleby Company 2650 Orbiter Ave. Brea, CA 92821 Telephone (714) 961-2400 FAX (714) 961-2550 Jade Salamander Broilers Model: JSB Series Installation, Operation and Maintenance Instructions
Operator s Manual CAYENNE GAS COUNTERTOP CHAR BROILER ENGLISH
 NGLISH CAYNN GAS COUNTRTOP CHAR BROILR Thank you for purchasing this Vollrath Counter Top Cooking quipment. Before operating the equipment, read and familiarize yourself with the following operating and
INSTRUCTION MANUAL. Full Size Gas Convection Oven
 INSTRUCTION MANUAL Full Size Gas Convection Oven This manual contains important information regarding your unit. Please read this manual thoroughly prior to equipment set-up, operation and maintenance.
DESIGN CLASS FUNCTION
 PROFESSIONAL QUALITY COOKING EQUIPMENT INSTALLATION MANUAL FOR MEDALLION DUAL FUEL RANGES MODEL NUMBERS: ARR-304DF, ARR-366DF, ARR-364GDDF, ARR-364GRDF, ARR-486GDDF, ARR-486GRDF, ARR-4822GDDF, ARR-484X2GRDF,
OWNERS MANUAL RON-36, RON-27, RON-24
 OWNERS MANUAL For Outdoor Use Only Installation, Operation, Maintenance Instructions And Parts List Models: RON-36, RON-27, RON-24 Royal Range of California, Inc. 3245 Corridor Drive, Eastvale, CA 91752
USER MANUAL Gas Step Up Hot Plate
 USER MANUAL Gas Step Up Hot Plate MODELS: CK HPSU, CK HPSU, CK HPSU 0 / 07 IMPORTANT FOR FUTURE REFERENCE Please complete this information and retain this manual for the life of the equipment. For Warranty
Use, Care, and Installation Guide
 Use, Care, and Installation Guide Model PSU-E30AS XP022421(1) 182766 Safety Notice... 2-3 List of Materials... 4 D ucting Calculation Sheet... 5 Mounting Height & Clearance... 6 Ducting Options... 7 Hood
INSTALLATION & OPERATION MANUAL
 INSTALLATION & OPERATION MANUAL VHX24, VHL2, VHL3 & VH3616 SERIES FOOD STEAMERS & MHB24 SERIES STEAM GENERATORS MODELS VHX24E VHX24E5 VHX24G VHX24G5 VHX24D VHX24D5 VHL2G VHL3G VHL2E VHL3E VHL2D VHL3D MHB24E
INSTALLATION AND OPERATION MANUAL FOR 77 SERIES & SG77 SERIES GAS RESTAURANT RANGES
 INSTALLATION AND OPERATION MANUAL FOR 77 SERIES & SG77 SERIES GAS RESTAURANT RANGES MODEL TK35 VULCAN-HART COMPANY, P.O. BOX 696, LOUISVILLE, KY 40201-0696, TEL. (502) 778-2791 FORM 30899 (12-94) (Formerly
Viking Installation Guide
 Viking Installation Guide Viking Range, LLC Front Street Greenwood, Mississippi 890 USA (66) 55-00 For product information, call -888-85-6 or visit the Viking Web site at vikingrange.com Professional Freestanding
OWNER'S, SERVICE & INSTRUCTION
 OWNER'S, SERVICE & INSTRUCTION M A N U A L GAS DECK OVENS MODELS 209, 209SS X 309, 309SS 212, 212SS X 312, 312SS 215, 215SS X 315, 315SS IMPORTANT INSTRUCTIONS FOR OVEN INSTALLATION, OPERATION AND MAINTENANCE
Gas Cooktop Installation, User and Service Instructions GMS 955.1
 Gas Cooktop Installation, User and Service Instructions GMS 955.1 IMPORTANT: SAVE FOR LOCAL ELECTRICAL INSPECTOR S USE. READ AND SAVE THESE INSTRUCTIONS FOR FUTURE REFERENCE. OBSERVE ALL FEDERAL, STATE
Installation and Operation Manual Covering Model 35C+, 45C+ with Millivolt Gas Valve
 IMPORTANT FOR FUTURE REFERENCE Please complete this information and retain this manual for the life of the equipment: Model #: Serial #: Date Purchased: ENGLISH Installation and Operation Manual Covering
Super Runner Series Electric Fryers
 Super Runner Series Electric SR114E Super Runner Series Electric Fryers Installation & Operation Manual NON-CE & Dean, a member of the Commercial Food Equipment Service Association, recommends using CFESA
I N ST R UC T I ON MODEL HPGF15 GAS PRESSURE FRYERS ML FORM (September 2001)
") I N ST R UC T I ON MODEL HPGF15 GAS PRESSURE FRYERS S ML-126825 701 S. RIDGE AVENUE TROY, OHIO 45374-0001 www.hobartcorp.com FORM 34709 (September 2001) IMPORTANT FOR YOUR SAFETY THIS MANUAL HAS BEEN PREPARED
I N ST R UC T I ON MODEL HPGF15 GAS PRESSURE FRYERS S ML-126825 701 S. RIDGE AVENUE TROY, OHIO 45374-0001 www.hobartcorp.com FORM 34709 (September 2001) IMPORTANT FOR YOUR SAFETY THIS MANUAL HAS BEEN PREPARED
Operating Instructions
 Operating Instructions Fryer KM 403 To prevent accidents and reduce machine damage, read these lnstructions before installation or use. UV M.-Nr. 05 825 170 2 Contents IMPORTANT SAFETY INSTRUCTIONS.................................
OWNER S MANUAL INSTRUCTIONS, INSTALLATION, OPERATION, MAINTENANCE RRE SERIES (ELECTRIC RANGE & CONVECTION)
") 3245 Corridor Drive, Eastvale, CA 91752 800.769.2414 951.360.1600 951.360.7500 (Fax) OWNER S MANUAL INSTRUCTIONS, INSTALLATION, OPERATION, MAINTENANCE RRE SERIES (ELECTRIC RANGE & CONVECTION) **READ THIS
3245 Corridor Drive, Eastvale, CA 91752 800.769.2414 951.360.1600 951.360.7500 (Fax) OWNER S MANUAL INSTRUCTIONS, INSTALLATION, OPERATION, MAINTENANCE RRE SERIES (ELECTRIC RANGE & CONVECTION) **READ THIS
Apollo Series Fryers
 INSTALLATION & OPERATION MANUAL Apollo Series Fryers ModelA-3-NAT A-3-LP (3 Burners Fryer) Model A-4-NAT A-4-LP (4 Burners Fryer) Model A-5-NAT A-5-LP ( 5 Burners Fryer) WARNING: IMPROPER INSTALLATION,
User Manual. 110 Cup (55 Cup Raw) Gas Rice Cooker. Model: 177GRCLP, 177GRCNAT 12/2018. Please read and keep these instructions. Indoor use only.
 Gas Rice Cooker. Model: 177GRCLP, 177GRCNAT 12/2018. Please read and keep these instructions. Indoor use only.") 110 Cup (55 Cup Raw) Gas Rice Cooker Intertek 5010781 Conforms to ANSI STD Z83.11-2016 Model: 177GRCLP, 177GRCNAT 12/2018 FOR YOUR SAFETY Do not store or use gasoline or other flammable vapors or liquids
110 Cup (55 Cup Raw) Gas Rice Cooker Intertek 5010781 Conforms to ANSI STD Z83.11-2016 Model: 177GRCLP, 177GRCNAT 12/2018 FOR YOUR SAFETY Do not store or use gasoline or other flammable vapors or liquids
GAS COOKTOP INSTALLATION INSTRUCTIONS BEFORE YOU BEGIN. IMPORTANT Save these instructions for local electrical inspector s use.
 GAS COOKTOP INSTALLATION INSTRUCTIONS Please read this guide thoroughly before installation. To contact LG Electronics, 24 hours a day, 7 days a week: 1-800-243-0000 (U.S.A.) 1-888-542-2623 (Canada) Or
Installation Guide. 5 Series VGC and VGSU Built-In Gas Cooktops
 Installation Guide 5 Series VGC and VGSU Built-In Gas Cooktops Table of Contents Warnings & Important Safety Instructions 3 Dimensions VGC Cooktops 6 Specifications VGC Cooktops 7 Dimensions VGSU Cooktops
Installation Instructions Dual Fuel Ranges
 Installation Instructions Dual Fuel Ranges E30DF74EPS E36DF76EPS E48DF76EPS 5995447082 2 Safety IMPORTANT SAFETY INSTRUCTIONS Safety Precautions Do not attempt to install or operate your unit until you
INSTALLATION AND OPERATION MANUAL GAS FIRED STEAMERS MODELS: GSX-5HE GSX-7HE GSX-10HE GSX-16HE
 INSTALLATION AND OPERATION MANUAL GAS FIRED STEAMERS MODELS: GSX-5HE GSX-7HE GSX-10HE GSX-16HE CROWN FOOD SERVICE EQUIPMENT LTD. 70 OAKDALE ROAD, DOWNSVIEW, (TORONTO), ONTARIO, CANADA, M3N 1V9 TELEPHONE:
Sectional Deep Fryer
 IMPORTANT FOR FUTURE REFERENCE Please complete this information and retain this manual for the life of the equipment: Model #: Serial #: Date Purchased: OPERATOR S MANUAL Model P16-FR45 and P20-FR65 Sectional
southbend A MIDDLEBY COMPANY INSTALLATION AND OPERATION MANUAL CG214 (E) CG314 (E) CG414 (E) CG220 (E) CG320 (E) CG325 (E) GAS BOILERS MODELS:
 CG314 (E) CG414 (E) CG220 (E) CG320 (E) CG325 (E) GAS BOILERS MODELS:") INSTALLATION AND OPERATION MANUAL GAS BOILERS MODELS: CG214 (E) CG314 (E) CG414 (E) CG220 (E) CG320 (E) CG325 (E) southbend A MIDDLEBY COMPANY 1100 Old Honeycutt Road Fuquay-Varina, NC 27526 (919) 552-9161
INSTALLATION AND OPERATION MANUAL GAS BOILERS MODELS: CG214 (E) CG314 (E) CG414 (E) CG220 (E) CG320 (E) CG325 (E) southbend A MIDDLEBY COMPANY 1100 Old Honeycutt Road Fuquay-Varina, NC 27526 (919) 552-9161
INSTANT HOT WATER DISPENSER
 INSTANT HOT WATER DISPENSER Tank Installation Materials required (not provided) 2 mounting bracket screws (and 2 plastic anchors if attaching to drywall) Shut-Off valve and T fitting Components When you
INSTALLATION AND OPERATION MANUAL STEAM COIL BASE CONVECTION STEAMER MODEL SCX-16
 INSTALLATION AND OPERATION MANUAL STEAM COIL BASE CONVECTION STEAMER MODEL SCX-16 CROWN FOOD SERVICE EQUIPMENT LTD. 70 OAKDALE ROAD, DOWNSVIEW, (TORONTO), ONTARIO, CANADA, M3N 1V9 TELEPHONE: (416) 746-2358,
INSTALLATION GUIDE Dual Fuel Ranges
 INSTALLATION GUIDE Dual Fuel Ranges Contents Wolf Dual Fuel Ranges......................... 3 Safety Instructions............................ 4 Dual Fuel Range Specifications.................. 5 Dual Fuel
OVATION SERIES FIRE TABLES ASSEMBLY INSTRUCTIONS
 OVATION SERIES FIRE TABLES ASSEMBLY INSTRUCTIONS CSA Model98900 DRS02403 Installer: Leave these instructions with consumer. Consumer: Keep these instructions for future reference. DANGER If you smell gas:
ELECTRIC COMPACT DECK OVEN INSTALLATION - OPERATION - MAINTENANCE
 1415 ELECTRIC COMPACT DECK OVEN INSTALLATION - OPERATION - MAINTENANCE BLODGETT OVEN COMPANY www.blodgett.com 44 Lakeside Avenue, Burlington, Vermont 05401 USA Telephone: (802) 658-6600 Fax: (802)864-0183
INSTALLATION AND OPERATION MANUAL
 INSTALLATION AND OPERATION MANUAL CG-48F, CG-60F AND CG-72F PRODUCTION GRIDDLES FOR YOUR SAFETY: DO NOT STORE OR USE GASOLINE OR OTHER FLAMMABLE VAPORS OR LIQUIDS IN THE VICINITY OF THIS OR ANY OTHER APPLIANCE
Hanover Outdoor Furniture IMPORTANT. If you have any problems with this product (missing or damaged parts, assembly issues, etc.),
,") Hanover Outdoor Furniture IMPORTANT If you have any problems with this product (missing or damaged parts, assembly issues, etc.), PLEASE DO NOT RETURN TO THE RETAILER/STORE from where you purchased the
Hanover Outdoor Furniture IMPORTANT If you have any problems with this product (missing or damaged parts, assembly issues, etc.), PLEASE DO NOT RETURN TO THE RETAILER/STORE from where you purchased the
INSTRUCTIONS. Installation, operation and care of CLD COLD SERIE MULTIDECK COLD FOOD DISPLAY CASES IMPORTANT READ BEFORE USING DISPLAY CASE
 INSTRUCTIONS Installation, operation and care of CLD COLD SERIE MULTIDECK COLD FOOD DISPLAY CASES MODELS MULTIDECK CLD25 Cold MODEL CLD25 Cold IMPORTANT READ BEFORE USING DISPLAY CASE www.frijado.com Part-number
GAS RACK OVENS WITH ELECTRONIC OVEN CONTROL
 GAS RACK OVENS WITH ELECTRONIC OVEN CONTROL MODELS DRO2G DRO2GH GAS GAS 701 S. RIDGE AVENUE TROY, OHIO 45374-0001 937-332-3000 www.hobartcorp.com FORM 19202 Rev. D (Dec. 2003) IMPORTANT FOR YOUR SAFETY
I N ST ML (3-PAN, SELF-SERVICE) ML (4-PAN, SELF-SERVICE)
 ML (4-PAN, SELF-SERVICE)") I N ST R UC T I ON HUV SERIES DELI DISPLAY CASES S MODELS HUV3P HUV4P HUV5P HUV3P/2 ML-132065 (3-PAN, FULL-SERVICE) ML-132066 (3-PAN, SELF-SERVICE) ML-132067 (4-PAN, FULL-SERVICE) ML-132068 (4-PAN, SELF-SERVICE)
I N ST R UC T I ON HUV SERIES DELI DISPLAY CASES S MODELS HUV3P HUV4P HUV5P HUV3P/2 ML-132065 (3-PAN, FULL-SERVICE) ML-132066 (3-PAN, SELF-SERVICE) ML-132067 (4-PAN, FULL-SERVICE) ML-132068 (4-PAN, SELF-SERVICE)
INSTALLATION & OPERATION MANUAL
 INSTALLATION & OPERATION MANUAL VEC SERIES ELECTRIC CONVEYOR OVENS MODELS VEC3018 10KW 15KW VEC4018 VEC3624 VEC3632 VEC4824 VEC4832 VEC6024 VEC6032 ML-126198 ML-126401 ML-126199 ML-114836 ML-114837 ML-114838
Instruction Manual for the APOLLO Gas Countertop Griddle Models: Manually Controlled: AMG-24, AMG-36, AMG-48 & AMG-60
 Instruction Manual for the APOLLO Gas Countertop Griddle Models: Manually Controlled: AMG-24, AMG-36, AMG-48 & AMG-60 For Service on Your Gas Griddle: Please call the APOLLO Service Department and ask
WEST BEND DEEP FRYER L 5179
 WEST BEND DEEP FRYER L 5179 TO PREVENT PERSONAL INJURY OR PROPERTY DAMAGE, READ AND FOLLOW THE INSTRUCTIONS AND WARNINGS IN THIS CARE AND USE INSTRUCTION MANUAL. Register this and other West Bend products
INSTALLATION & OPERATION MANUAL
 INSTALLATION & OPERATION MANUAL ENDURANCE SERIES GAS RESTAURANT RANGES MODEL G36 *G36C G60 *G60C G260 *G260C *Availability to be announced. G36 For additional information on Vulcan-Hart or to locate an
OPERATOR S. MODEL Computron 2000 PRESSURE FRYER REGISTER WARRANTY ONLINE AT
 OPERATOR S M A N U A L PRESSURE FRYER MODEL 500 600 Computron 2000 REGISTER WARRANTY ONLINE AT WWW.HENNYPENNY.COM This manual should be retained in a convenient location for future reference. A wiring
For use with models: PGM304-1, versions M-B PGM365-1, versions M-E, M-F & M-G
 PGM-1 Cooktops For use with models: PGM304-1, versions M-B PGM365-1, versions M-E, M-F & M-G Install ation Instructions Part No. 65476 Rev. B Table of Contents Appliance Safety...1 Important Safety Instructions...2
PARAGON GAS FRYER INSTALLATION INSTRUCTIONS SAFETY INSTRUCTIONS USER INSTRUCTIONS MODEL : PDGF/PDGFP
 Page 1 of 13 INSTALLATION INSTRUCTIONS SAFETY INSTRUCTIONS USER INSTRUCTIONS PARAGON GAS FRYER MODEL : PDGF/PDGFP Page 2 of 13 IMPORTANT PLEASE READ INSTRUCTIONS FULLY BEFORE USE MODEL PDGF FRYER & PDGFP