Vinfinity Wine Preservation System
|
|
|
- Marshall Glenn
- 5 years ago
- Views:
Transcription


1 Operation Manual & Parts List A Family Company Manufacturing In The USA Since 1969 Vinfinity Wine Preservation System DBCA-12-V DS12 DBGR-24-RS-V Glastender, Inc North Michigan Road Saginaw, MI Fax Rev Glastender, Inc.
2 Index System Description...1 CVU-V Vertical Identification Photo...2 CVU-H Horizontal Identification Photo...2 Vacuum Stations...3 System Installation Testing the Installation Control Panel Instructions...7 Maintenance...8 Parts Troubleshooting...11 Warranty...12 Terms and Conditions...13 IMPORTANT!! - Attention Service Companies Please review the important warranty information on page 12 of this manual. If labor warranty applies, authorization must be obtained from the factory prior to the service being performed. Please call the factory between 8:00AM and 5:00PM EST, Monday through Friday. System Description The Vinfinity Wine Preservation System works on the concept of a Standing Central Vacuum that is instantly available at multiple locations along the vacuum lines within a bar or restaurant. The concept is much the same as that of a soda or beer keg systems, which by analogy can be thought of as standing central beverage systems. Whereas soda or tap beer systems work under pressure and dispense a liquid, Vinfinity works under vacuum and removes air. The Vinfinity System consists of three major components. Central Vacuum Unit (CVU) The CVU consists of a self-contained electric vacuum pump and a digital controller that regulates vacuum level and monitors system parameters. The CVU creates a vacuum in the tank and maintains it at a predetermined range. Vacuum Tank This is simply a vacuum storage device that also acts as a water trap to prevent damage to the pump. Vacuum Stations A Vacuum Station can be either Vacuum Gun, which is mobile, or a Vacuum Pod, which is stationary, and is where the system vacuum is applied to an open bottle. Guns and Pods are connected by vacuum lines to the Vacuum Tank in a closed system. They serve exactly the same purpose and the choice of one or the other is a matter of functional needs. 1


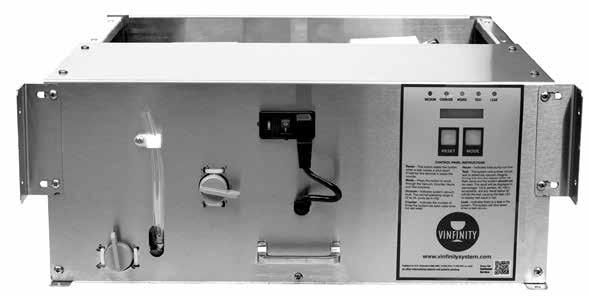
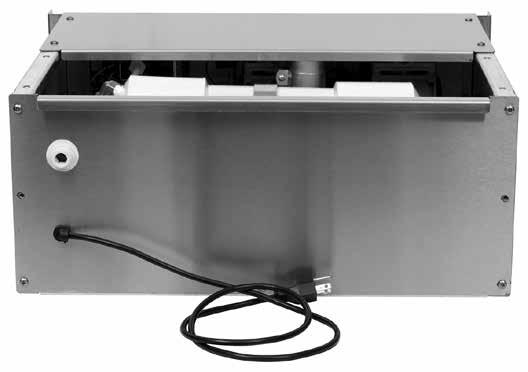
3 CVU-V Vertical Front Left Side CVU-H Horizontal Front Back 2


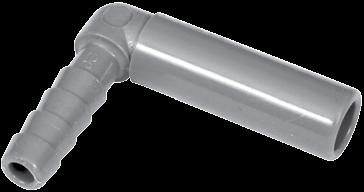
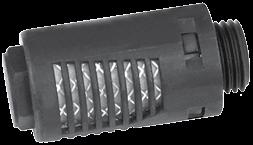
4 Vacuum Stations Vacuum Stations can be any combination of Guns and Pods; they should always be located downstream of the tank and never in a direct line to the CVU. There s no limit to the number of Vacuum Stations a single CVU can support or how far they are from the Vacuum Tank or each other. Important Note: The most important decision made when installing the Vinfinity System is the location and type of Vacuum Station. A poor location or wrong type of Vacuum Station may make it less likely the system will be used as intended. Vacuum Gun The ideal location for a Gun is at the bar near where the wines are poured, which is usually near a soda gun. As with a soda gun, the flexible vacuum hose gives you about a three foot reach. As many Guns as necessary can be installed off of one system; the most typical number is two, one at the main bar and one at the service bar. A shut off valve is provided and should be installed on the line as close to the Gun as possible for easy access. Vacuum Pod Pods work in the same way as Guns except that they re stationary. Important Note: Care must be taken to insure there is enough room to bring the bottle into the nozzle as intended. Vacuum Gun Vacuum Pod 3

 to the under side of the bar top at the desired location(s).")
5 System Installation System Installation The vacuum modules must be securely mounted in Glastender equipment that is designed specifically to house the modules. Modules are shipped mounted inside the cabinets and secured with phillips head screws. Remove the phillips head screws securing the vacuum module and slide it out for access to plug in the electrical supply cord and connect the vacuum lines during installation. Mount the vacuum gun(s) to the under side of the bar top at the desired location(s). Connect the vacuum gun(s) to the vacuum module with the tubing, fittings, and clamps provided in the vacuum gun kit. Route electrical supply cord through the opening at the back of the cabinet and plug in to a 120V, 15A outlet. Slide the vacuum module back in to place in the cabinet and fasten it to the cabinet with the phillips head screws. DS12 models have the vacuum lines connected to the vacuum pod at the factory and only require the electrical supply to be plugged in to a 120V, 15A outlet, unless additional vacuum guns will be installed. Route electrical supply cord through the opening at the back of the cabinet Connect the vacuum gun(s) to the vacuum module with tubing, fittings, and clamps For instruction on connecting external vacuum guns to Model DS12, see page 5. 4


6 To vacuum tank System Installation To additional vacuum guns External vacuum guns can be connected to Model DS12. Tee in additional vacuum guns with 3/8ʺ barbed tee and clamps provided with VGK Vacuum Gun Kit. To DS12 vacuum pod Testing The Installation It s critical that the Vinfinity System be installed as leak free as possible. To that end, the CVU features internal software to test for leaks and rate the Vacuum Integrity of the installation. There are two types of leaks. Static leaks are related to the main line and fittings. Dynamic leaks are related to the Vacuum Guns and Pods. The installation must be tested for both static and dynamic leaks, and the former must be done successfully before the later can done with reliable results. Important Note: When installing the Vinfinity System at an elevation greater than one thousand feet above sea level, an elevation adjustment must be made on the Control Panel. This should be done once the installation is complete, just before the Static Vacuum Integrity Test. Elevation Setting on the CVU As atmospheric pressure changes with elevation, the Vinfinity System must be set to the right elevation to work properly. The default setting on the system is 1, corresponding to an elevation of 0-1,000 feet above sea level. Accordingly, an elevation setting of 2 correspond to an elevation of 1,000-2,000 and so on up to maximum setting of 12 corresponding to an elevation of 11,000-12,000 feet above sea level. 1. Upon power up, while the software version (such as 1002 ) is displayed on the LED panel, press both the Mode and Reset buttons simultaneously to enter the Elevation Setting mode. The display will change to a number of Press the Mode button to scroll through the numbers (they will wrap back to 1) to set the elevation. 3. Press Reset button to lock the elevation setting. 5

7 Testing The Installation Static Vacuum Integrity (SVI) Test The SVI is design to detect vacuum line leaks upstream of the shut off valves (See photo below). 1. Close the shut off valve located at the base of each Gun or Pod in the system. This isolates any potential leaks to the main vacuum lines and fittings between the shut off valves and the CVU. 2. Tap the Mode button on the CVU Control Panel until the green LED on the right scrolls down to Test mode. At this point the CVU will initiate a three minute test for leaks as indicated by a countdown from 180 to 0 on the display panel. When the test is completed, the display panel will briefly flash a number from This number indicates the SVI and will be displayed for 10 seconds. A test result of 100 indicates no measurable leak, and a good installation should return a result of 99.5 or higher. If the SVI test fails, the red LED labeled Leak/Flood will flash and the SVI test result will be displayed on the LED display panel. The lower this number is, the bigger the static vacuum leak. Check all the static connections in the lines, then reset the CVU and run the SVI test again. Important Note: The system should not be used while the tests are in progress. The result of the test will flash for only 10 seconds before the system goes back to displaying vacuum level. Dynamic Vacuum Integrity (DVI) Test The DVI is designed to detect vacuum leaks related to a Gun or Pod downstream of the shut off valves (see photo below). The result of a DVI test will not be accurate if there are static vacuum leaks in the system; therefore the system must pass the SVI before a reliable DVI can be conducted. 1. Open the shut off valve for each Gun or Pod in the system. 2. Tap the Mode button on the CVU Control Panel until the green LED on the right scrolls down to Test mode. At this point the CVU will initiate a three minute test for leaks as indicated by a countdown from 180 to 0 on the display panel. The new result indicates the Dynamic Vacuum Integrity of the system, which includes any leaks at the Guns or Pods. This test result may lower than that of the SVI test, but should still be over 99 for a good installation. As with the SVI test, a result of 97.5 or better will pass. If the dynamic leak test fails, check the connections downstream of the check valves and run the test again. If the system has more than one Vacuum Station, isolate each station by closing the shut off valves of all but one station and run the test again in a process of elimination for each station until the leak is found. Important Note: Before the installation is considered completed, the system should pass the dynamic leak test with all shut-off valves open. Shut Off Valve 6
.")
8 Control Panel Instructions Mode - Press this button to scroll through the Vacuum, Counter, Hours, Test, and Leak/Flood functions on the right side of the control panel. Reset -This button resets the system when a leak or flood causes the system to shut down (see Leak/Flood below). If held down for five seconds while in Counter mode, it will also reset the total usage counter (see Counter). Vacuum - When this LED is on, the system vacuum level will be displayed in the digital readout on the Control Panel. Vacuum is the default mode and normally reads In Hg (Inches of Mercury, the standard American measure of vacuum) when the pump is idle under normal operating conditions. Whenever the vacuum level drops below 22 In Hg, the pump is activated and recharges the vacuum level back up to 25 In Hg. Counter - Scroll to this function using the Mode button. This keeps a running total of the number of times the system has been applied and allows to compare usage versus glasses sold to monitor compliance. The counter adds one to every three counts as the fourth glass results in an empty bottle. It can be reset to zero by holding down the reset button for five seconds while in Counter mode. Hours - Scroll to this function using the Mode button. This number indicates the total vacuum pump run time for the life of the system in hours. The number cannot be reset. Test - Scroll to this function using the Mode button. This function will run a three minute leak test on the system to insure proper installation and to diagnose leaks. While the test is running, the display panel will show a countdown from 180 to 0, indicating the amount of time left on the test. The system should not be used while running the leak test. When finished, the result will be displayed for 10 seconds by a flashing number between 0 and 100. This number is a measure of the systems Vacuum Integrity in percentage; 100% means no measurable leaks. A result of less than 97% fails the test, causing the Leak/Flood LED to flash red. If the test fails, see Troubleshooting a Leak in the Installation and Operating Manual. If the test passes, the system will automatically return to displaying vacuum level after 10 seconds. Leak/Flood When this LED is blinking it indicates a system leak; when solid it indicates that the system is flooded. See CVU under Maintenance and Troubleshooting if either of these conditions is encountered. 7

9 Maintenance Central Vacuum Unit (CVU) There is no regular maintenance required for the CVU under normal conditions. The unit is self-protected against negligence and accidents by software that will detect leaks or a system flood and will turn the system off under certain conditions to prevent permanent damage to the CVU. Vacuum Guns The only regular maintenance Vacuum Guns require is to clean them nightly by rinsing them in warm water for about 20 seconds while flicking the valve nozzle (see A. below). Only warm water should be used as cleansing agents can be corrosive. The Vacuum Guns should never be dipped in water while connected to the coiled hose as it would flood the system, and should never be left soaking in water overnight as this will shorten their working life. The coiled hose itself may need cleaning from time to time. This can be done with a wet rag while the hose is connected to the system. If a more thorough cleaning is necessary, close the shut off valve at the base of the Vacuum Gun assembly by turning it 90 degrees counterclockwise, then remove the coiled hose by holding down the retaining ring on the shut off valve while pulling the hose. Reinsert the coiled hose and open the shut off valve to re-activate the Vacuum Gun. Vacuum Pods Vacuum Pods need to be cleaned nightly just like Vacuum Guns. Wet a cleaning rag in warm water and push it into the nozzle of the Vacuum Pod (see B. below) for seconds while pushing the nozzle in and out with the system active. This will flush warm moisture through the system and dissolve any sugars and other solids that might have accumulated during the day in the moving parts of the Vacuum Pod. A. B. 8
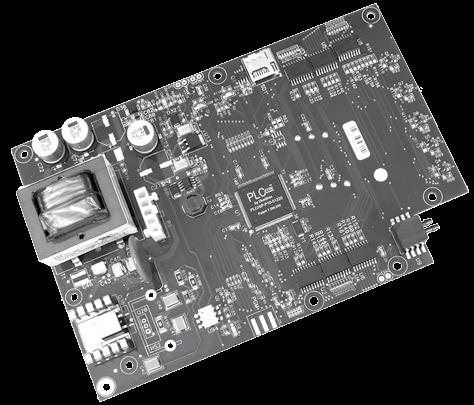
10 CVU-V and CVU-H Service Parts Part No. Description Price Vacuum hose, 1/8 ID x 1/4 OD, flexible PVC $1.00 per foot Vacuum hose, 1/4 ID x 3/8 OD, flexible PVC 1.25 per foot Vacuum hose, 3/8 ID x 5/8 OD, flexible PVC 2.50 per foot Clamp, stainless steel, 3/8 vacuum hose Clamp, stainless steel, 1/4 vacuum hose Vacuum check valve, 1/4 barb x 1/4 barb Elbow, 90, 3/8 stem x 1/4 barb Shut off valve, 3/ Elbow, 90, 3/8 NPT x 1/4 barb Vacuum filter, 3/8 NPT female (black nylon) Tee, 1/4 barb x 1/8 barb, x 1/4 barb Bulkhead fitting, 3/8 x 3/ Fitting, 3/8 tube x 3/8 barbed straight Pump, vacuum 1, Board, controller Foot, vibration damping Muffler, vacuum pump Vac-U-Vin Stopper 5.00 each VGK* Vacuum gun kit. Includes 25ʹ of vacuum hose, shut off valve, and fittings *For separate vacuum guns contact Vinfinity Wine Preservation System at , 9


11 CVU-V and CVU-H Service Parts


12 Troubleshooting If the CVU turns off and indicates a vacuum leak (red LED labeled Leak/Flood flashing) or a system flood (red LED labeled Leak/Flood on continuous) first try resetting the system by pressing the RESET button on the control panel. If the fault persists then follow the system diagnosis/fix procedures below. 1. Vacuum Leak (red Leak/Flood LED flashing) To determine if the leak is upstream or downstream of the vacuum station shut off valves, run a SVI (static vacuum integrity) test. If the SVI test fails, then the leak is in the vacuum line between the CVU and vacuum stations. If the SVI test passes, then the leak is downstream of the vacuum station shut off valves. Run the DVI (dynamic vacuum integrity) test with the shut off valve to one vacuum station at a time opened to isolate which station has a leak. A leak at a vacuum gun may be due to build up of dirt and debris on the moving parts of the gun. Try cleaning and re-run the DVI test. If problem persists, replace the vacuum gun. 2. System Flood (red Leak/Flood LED on continuous) The system flood fault occurs when the system senses that a large amount of fluid is in the system. The vacuum tank must be drained to correct the fault. Release the vacuum by slowly opening the vent valve (see photos below). When the vacuum is released, unhook the drain hose and open the drain valve (see photo below right) to drain the fluid from the vacuum tank. When all fluid has been drained, close both the vent and drain valves and press the RESET button on the control panel to restart the system. Vent Valve Closed Vent Valve Open Drain Valve Closed Drain Valve Open Drain Hose Unhooked 11
13 Glastender, Inc. warrants all products to be free of defects in material and workmanship. One-year labor and parts warranty applies to all glasswashers, self-contained refrigeration models, and BDS model bottle disintegration units. In established areas, a start up is included with GT-24 and GT-30 model glasswashers. Warranty is effective for one year from the date of installation or up to 18 months from date of factory shipment, whichever occurs sooner. Glastender, Inc. will replace any part or assembly found defective under normal use and service. For warranty labor claims beyond 15 months from the date of factory shipment, proof of date of installation or occupancy must be provided. Authorization for labor must be obtained from Glastender within the warranty period and prior to the service being performed. Labor warranty applies to the United States and Canada only. Remote refrigeration models and beer line chillers include a one-year parts warranty only. There is no labor warranty on these products. Field replacement parts not covered under the original warranty include a 90-day part warranty from the date of installation. FOUR YEAR ADDITIONAL COMPRESSOR WARRANTY: Glastender will warrant to the original user the compressor for all selfcontained refrigeration models for an additional four years following the regular one-year warranty period. This plan applies to the compressor only. A completed warranty claim form MUST accompany all returned defective parts or assemblies. Upon request, a defective part or assembly must be returned to Glastender, Inc., Saginaw, Michigan, with all transportation and delivery charges prepaid. Warranty repairs or replacements will be shipped FOB factory in Saginaw, Michigan. Reimbursement for applicable freight charges covers ground service only. Glastender provides in-warranty repairs during a service company s regular working days and hours. There is no provision for payment of a premium rate during overtime hours. When warranty service is requested during other than normal working hours, the end user will be charged the premium portion of the overtime rate. The warranty covers substantiated travel expenses for up to 2 hours / 100 miles round trip up to a maximum of $150. Any additional costs due to installations that require extra work, time, or travel to gain access for service are the sole responsibility of the equipment purchaser. Any exceptions to these travel and access limitations must be pre-approved by a factory representative. The warranty does not cover door gaskets, chemical tubing, pump squeeze tubing, and/or any equipment subjected to accidents, freight damage, alterations from the original design, improper power and/or plumbing hookups, improper chemical use, general misuse, or lack of routine required maintenance as determined by Glastender, Inc. Installation, normal control adjustments, general maintenance, correcting an installation error, or service calls that reveal the unit is functioning normally will not be reimbursed under warranty. Condenser coils on self-contained refrigeration products must be cleaned regularly. Failure to provide adequate air flow to a refrigeration unit will void the warranty. Glastender shall not be liable for loss of use, revenue, or profit, or for any other indirect, incidental, special, or consequential damage including, but not limited to, product spoilage or loss. This warranty is conditioned upon Glastender receiving notice of any defect subject to this warranty within sixty (60) days of its discovery by the end user or dealer. All products are warranted only for the initial place of installation. Removal of a product automatically terminates this warranty. Warranty Statement APPLICABLE TO ALL PRODUCTS SOLD WITHIN THE UNITED STATES AND CANADA SECOND YEAR EXTENDED PARTS & LABOR WARRANTY: Glastender s one-year parts and labor warranty on self-contained refrigeration units, excluding beer line chillers, can be extended to two years with the purchase of a two year parts and labor warranty. Specify part number EWR2 ($150 net price) when ordering. EXPORT WARRANTY - One year parts only. EXCLUSION OF WARRANTIES EXCEPT AS PROVIDED ABOVE, GLASTENDER MAKES NO WARRANTIES, EXPRESS OR IMPLIED, INCLUDING, BUT NOT LIMITED TO, ANY IMPLIED WARRANTY OF MERCHANTABILITY, FITNESS FOR A PARTICULAR PURPOSE OR NON-INFRINGEMENT. LIMITATION OF REMEDIES AND DAMAGES If Buyer makes a valid and timely claim as outlined above, Glastender s liability and Buyer s remedies under this agreement will be limited solely to labor charges authorized and/or replacement or credit, at Glastender s option, with respect to Products returned at Buyer s expense within thirty (30) days after warranty repair. GLASTENDER S LIABILITY WILL IN NO EVENT BE GREATER IN AMOUNT THAN THE PURCHASE PRICE OF THE RETURNED PRODUCTS. GLASTENDER WILL NOT BE LIABLE UNDER ANY CIRCUMSTANCE FOR CONSEQUENTIAL OR INCIDENTAL DAMAGES, INCLUDING, BUT NOT LIMITED TO, LABOR COSTS EXCEPT AS COVERED UNDER OUR WARRANTY, LOST PROFITS OR THE LOSS OF PERISHABLE PRODUCTS RESULTING FROM THE USE OF OR INABILITY TO USE OUR PRODUCTS OR FROM OUR PRODUCTS INCORPORATION INTO OR BECOMING A COMPONENT OF ANY OTHER PRODUCT. NEITHER PARTY WILL HAVE ANY NEGLIGENCE OR OTHER TORT LIABILITY TO THE OTHER, OR TO ANY THIRD PARTY, ARISING FROM ANY BREACH OF THIS AGREEMENT. GOVERNING LAW - JURISDICTION The terms and conditions of an order are to be governed and construed according to the laws of the State of Michigan, without regard to conflict of laws principles. Buyer hereby consents to the jurisdiction and venue of the courts located in Saginaw County, Michigan. No representative, distributor, dealer, or any other person is authorized to modify this warranty. This warranty replaces all other written or verbal warranties. NOTE: Glastender, Inc. s policy of constant quality improvement means that prices, specifications, and policies are subject to change without notice. Questions regarding this warranty should be directed to Glastender s Warranty Administrator IMPORTANT!! Attention Service Companies Please review the important warranty information on this page. If you believe a service call should be covered by the factory, please call the factory for authorization between 8AM and 5PM EST, Monday through Friday. 12
14 Terms and Conditions Prices: All prices are LIST. Applicable taxes will be added. Quotations: Unless otherwise stated, quotations are effective for 30 days only. Acceptance: All orders are subject to acceptance by Glastender, Inc. s headquarters in Saginaw, Michigan. Possession of the Product Directory and Price List is not an offer to sell. Shipments: F.O.B. factory in Saginaw, Michigan. Freight terms are Third Party or Collect if shipped directly to you. Prepay and Add to Invoice freight terms are available upon request. The approximate shipping weights of all products are listed with the prices. Partial shipments will be made unless otherwise specified by the customer. Surface freight classifications are: GT-24/GT-30/GW24 Glasswashers - Class 175 GT-18 Glasswashers - Class 250 All Underbar Equipment - Class 175 Bar Die Orders Class 250 Portable Bars - Class 175 Remote refrigerators (i.e., no compressor) or dry storage back bar equipment - Class 175 Self-contained refrigeration equipment - Class 150 Ice Display Units (IDU and GDU) - Class 85 Lighted Liquor Displays - Class 85 Beer line chillers and beer towers (beverage dispensing equipment) - Class 92.5 Bottle Disintegration System - Class 150 Ice Cream Freezers - Class 77.5 All small items are evaluated to see the most cost effective means for shipment. Many small items ship via UPS or FedEx; however, when dimensional weight is excessive, LTL carriers are the most cost effective choice. Spare parts orders received before 1:00 PM EST can usually be shipped the same day. The order department is happy to assist with routing or shipping questions. Delivery: The majority of equipment is manufactured to order and typically ships within three to six weeks after complete order information is received by the factory. In-stock equipment typically ships within two to three days of the factory receiving complete order information. Returns: Items specified as Manufactured to Order are NOT returnable. A Return Authorization number must be issued by the factory in advance for any items that are returnable. The number MUST be noted on the outside of the returned package. Returns must be received within 90 days of the issue date. Shipping charges must be prepaid. A minimum 20% restocking charge will be applied to all authorized returns if received in new, unused condition in the original packaging. The above conditions apply to spare part returns, except spare part returns must be received within 30 days of original shipment for electronic or electrical parts or within 90 days for all other parts. Loss or Damage: For customer routed shipments, Glastender, Inc. is not responsible for any loss, damage, or delay of merchandise during shipment. Such transit claims must be filed with the carrier. Merchandise must be examined on arrival. If shortages occur, Glastender, Inc. must be notified in writing within five (5) days of delivery to honor any shortage claim. Glastender will assume responsibility for freight claims on Prepay and Add shipments but the customer must inspect freight and note any damage upon receipt. Failure to do so may result in losses at the customer s expense. Custom Orders: Custom orders must be paid in advance and are not subject to cancellation. Laminates: Some products include common, readily available plastic laminates of the customer s selection. There may be an additional charge if uncommon varieties are ordered. 12/14/17 Payment Terms: Cash should be included with all orders unless credit terms have been arranged. To establish credit, banking and trade references are required. A convenient credit application is available upon request. Payment via credit card is not our normal means of receiving payment. Visa and MasterCard will be accepted, but must be charged at the time of shipment. In addition, a payment via credit card for orders totaling more than $500 will incur a 3% convenience fee on the total transaction amount. 13
Operation Manual & Parts List
 Operation Manual & Parts List A Family Company Manufacturing In The USA Since 1969 GT-2, GT-30 Glasswashers (Manufactured after June 1, 1990 with digital temperature gauges) GT-2-CW GT-30-CCW Glastender,
Operation Manual and Parts Directory
 Operation Manual and Parts Directory ST24, ST36, ST48, ST60, ST72 and ST96 Slide Top Coolers - Prior to 2009/2010* *Slide Top Cooler Serial Number Information This manual is specific to ST24, ST36, ST48,
Operation Manual & Parts List. Slide Top Coolers Manufacture date beginning in 2009 and prior to March 27, 2017*
 Operation Manual & Parts List A Family Company Manufacturing In The USA Since 1969 Slide Top Coolers Manufacture date beginning in 2009 and prior to March 27, 2017* Models: ST24, ST36, ST48, ST60, ST72,
Operation Manual. C1SL48 with compressor right, black vinyl-clad doors, and stainless top
 Operation Manual Self-Contained, Side Serviced Coolers A Family Company Manufacturing In The USA Since 1969 *Cooler Model Information This manual is specific to the following self-contained, side serviced
GT-18, GT-18+1, GT-18+1L, GT-18+1R, GT-18+2, GT-18+2-IC Glasswashers (Manufactured after October 1, 1994 with motor driven drain stopper)
") Parts Directory GT-18, GT-18+1, GT-18+1L, GT-18+1R, GT-18+2, GT-18+2-IC Glasswashers (Manufactured after October 1, 1994 with motor driven drain stopper) GT-18+2 GT-18 Glastender, Inc. 5400 North Michigan
Parts Directory GT-18, GT-18+1, GT-18+1L, GT-18+1R, GT-18+2, GT-18+2-IC Glasswashers (Manufactured after October 1, 1994 with motor driven drain stopper) GT-18+2 GT-18 Glastender, Inc. 5400 North Michigan
Mug Frosters and Plate Chillers*
 Operation Manual, Parts Directory, and Price List Mug Frosters and Plate Chillers* MF24, MF36, MF48 A Family Company Manufacturing In The USA Since 1969 *This manual is specific to Mug Frosters manufactured
Operation Manual, Parts Directory and Price List
 Operation Manual, Parts Directory and Price List MFV Reach-In Mug Chillers MFV-SS(L) with optional casters This manual applies to MFV models manufactured prior to SN0876N and July 0, 0. For MFV models
Operation Manual and Parts Directory
 Operation Manual and Parts Directory Lettuce Crisper LC Glastender, Inc. 5400 North Michigan Road Saginaw, MI 48604-9780 800.748.0423 989.752.4275 Fax 800.838.0888 / 989.752.4444 www.glastender.com Rev.
Operation Manual and Parts Directory
 Operation Manual and Parts Directory ST24, ST36, ST48, ST60, ST72 and ST96 Slide Top Coolers ST36-B ST48-SF Glastender, Inc. 5400 North Michigan Road Saginaw, MI 48604-9780 800.748.0423 989.752.4275 Fax
Front Venting Self-Contained Coolers*
 Operation Manual, Parts Directory, and Price List A Family Company Manufacturing In The USA Since 1969 Front Venting Self-Contained Coolers* and Mug Frosters* FV24, FV48 MFV24, MFV48 *This manual is specific
Front Venting Self-Contained Coolers*
 Operation Manual, Parts Directory, and Price List A Family Company Manufacturing In The USA Since 1969 Front Venting Self-Contained Coolers* and Mug Frosters* FV24, FV48 MFV24, MFV48 *This manual is specific
Operation Manual, Parts Directory, and Price List
 Operation Manual, Parts Directory, and Price List *Cooler Serial Number Information This manual is specific to self-contained LP coolers manufactured in 2010 and after and prior to SN 134169912 purchased
Bottle Disintegration System
 Operation Manual & Parts List A Family Company Manufacturing In The USA Since 1969 Bottle Disintegration System Glastender BDS Operation and Maintenance Video - http://www.glastender.com/videos/ This video
Operation Manual and Parts Directory
 Operation anual and Parts Directory LC65, LC85, LC86, LC44, LC47 Draft Pro Remote Glycol Line Chillers LC65 LC44 Glastender, Inc. 5400 North ichigan Road Saginaw, I 48604-9780 800.748.0423 989.752.4275
Operation Manual and Parts Directory
 Operation Manual and Parts Directory MF, MF6, MF8 Mug Frosters and Plate Chillers MF-S MF8-B Glastender, Inc. 00 North Michigan Road Saginaw, MI 860-9780 800.78.0 989.7.7 Fax 800.88.0888 / 989.7. www.glastender.com
Operation Manual, Parts Directory, and Price List
 Operation Manual, Parts Directory, and Price List BB60, BB84, BB108, ND52, ND72, ND92, BB60BW, BR, WR, BB84BW, BR, WR, BB108BW, BR, WR, ND52BW, BR, WR, ND72BW, BR, WR, ND92BW, BR, WR 2008 Energy Star Compliant
Operation Manual, Parts Directory, and Price List
 Operation Manual, Parts Directory, and Price List Self-Contained Back Bar Coolers A Family Company Manufacturing In The USA Since 1969 *Cooler Serial Number Information This manual is specific to self-contained
ELECTRONIC FAUCETS INSTRUCTION MANUAL. Toll Free: (800) Haul Road Wayne, NJ krowne.
 Haul Road Wayne, NJ krowne.") ELECTRONIC FAUCETS INSTRUCTION MANUAL 100 Haul Road Wayne, NJ 07470 Toll Free: (800) 631-0442 customerservice@krowne.com krowne.com Model 16-196 1 3 2 4 6 5 7 1. 2. 3. 4. 5. 6. 7. Aerator Sensor with Cable
ELECTRONIC FAUCETS INSTRUCTION MANUAL 100 Haul Road Wayne, NJ 07470 Toll Free: (800) 631-0442 customerservice@krowne.com krowne.com Model 16-196 1 3 2 4 6 5 7 1. 2. 3. 4. 5. 6. 7. Aerator Sensor with Cable
Compact Equipment Warranty Policy
 006 07.15 Compact Equipment Warranty Policy 07/2015 Table of Contents Preface Page 1 Distributor s Warranty Responsibilities Page 1 Standard Warranties Page 2 Warranty Coverage Page 2 Warranty Limitations
A PROUD HERITAGE OF EXPERIENCE & QUALITY. Beverage Cooler VT-SC-1
 A PROUD HERITAGE OF EXPERIENCE & QUALITY Beverage Cooler VT-SC-1 O W N E R S M A N U A L W W W. V I N O T E M P. C O M Your Beverage Cooler This unit can be used for Storage and/or Service. The cooler
Operation Manual, Parts Directory and Price List
 Operation Manual, Parts Directory and Price List Vertical Door Coolers* A Family Company Manufacturing In The USA Since 969 Self-Contained Models - BB, BB36, BB60, BB8, BB08, ND5, ND7, ND9, FV, FV8, LP60,
CLIMAGUARD Air-to-Air Outdoor Heat Exchangers INSTRUCTION MANUAL. Rev. H 2015 Pentair Equipment Protection P/N
 CLIMAGUARD Air-to-Air Outdoor Heat Exchangers TX23, TX33, TX38, TX52 Model INSTRUCTION MANUAL Rev. H 2015 Pentair Equipment Protection P/N 10-1008-221 87976519 TABLE OF CONTENTS RECEIVING THE HEAT EXCHANGER...3
OWNER S MANUAL. Installation Operation Maintenance. Saturn Equipment
 OWNER S MANUAL Saturn Stainless Steel Sandwich/Salad Table & Mega Top Refrigerators Undercounter Refrigerators & Undercounter Freezers Installation Operation Maintenance Saturn Equipment www.saturnequipment.com
IMPORTANT INFORMATION - PLEASE READ CAREFULLY
 Honeywell Garrett Direct Fit Performance Intercooler 2015+ 3.5L / 2.7L Ford F150 EcoBoost Bill of Materials and Precautions Application: 2015+ Ford F150 3.5L / 2.7L Eco Boost Part Number: 870702-6001 Part
INSTALLATION AND OPERATING MANUAL
 INSTALLATION AND OPERATING MANUAL Refrigerated Merchandisers with Air-Over Displays Refrigerated Low-Profile Mobile Merchandiser Refrigerated High-Profile Mobile Merchandiser Refrigerated Grab-N-Go Merchandiser
REFRIGERATED DROP-INS (2-6)FT-DI Installation and Operating Manual
FT-DI Installation and Operating Manual") REFRIGERATED DROP-INS (2-6)FT-DI Installation and Operating Manual For service information call 800-544-3057 Please have the following information available before calling. Information can be found on
REFRIGERATED DROP-INS (2-6)FT-DI Installation and Operating Manual For service information call 800-544-3057 Please have the following information available before calling. Information can be found on
OPERATING INSTRUCTIONS
 OPERATING INSTRUCTIONS SPECIALTY REFRIGERATED TRANSPORT CABINETS FOR SATELLITE LOCATIONS RBQ-96 Caution: Read the instructions before using the machine. CONGRATULATIONS......and thank you for purchasing
Installation & Operation Manual Ice Cream Freezers
 Installation & Operation Manual Ice Cream Freezers Please read this manual completely before installing or operating this unit! BACF11 BACF15 Blue Air reserves the right to make product modification at
INSTALLATION AND OPERATING MANUAL
 INSTALLATION AND OPERATING MANUAL Salad Bars Olive Bars Food Prep Cases Refrigerated Cases with Air-Over Displays Refrigerated Cases with Coppered Cold Well Displays Cases with Under-Counter Refrigerators
Air Pump Up to 800 gallons
 Air Pump Up to 800 gallons REMINDER CALL 1-888-755-6750 BEFORE RETURNING TO STORE. PACKAGE CONTENTS ITEM #PBPAPK40W Questions, problems, missing parts? Before returning to your retailer, call our customer
INSTRUCTION MANUAL HS-229G
 INSTRUCTION MANUAL HS-229G 510977 STEP 1 - Where to Install the Thermostatic Steam Trap Determine where to install the thermostatic steam trap based on the following information. a. The trap should be
INSTALLATION AND OPERATING MANUAL
 INSTALLATION AND OPERATING MANUAL Refrigerated Cases with Air-Over Displays Refrigerated High Profile Grab-N-Go FOR PARTS & SERVICE Contact: Piper Products, Inc. Phone: (800) 544-3057 Ask for Service Department
INSTALLATION AND OPERATING MANUAL
 INSTALLATION AND OPERATING MANUAL Refrigerated Island Merchandiser FOR PARTS & SERVICE Contact: Piper Products, Inc. Phone: (800) 544-3057 Ask for Service Department IMPORTANT! This manual contains important
Turbo Air Speed up the Pace of Innovation TBB-4SB CAUTION! PLEASE KEEP POWER SWITCH ON BEFORE OPERATING THIS EQUIPMENT
 Turbo Air Speed up the Pace of Innovation CAUTION! PLEASE KEEP POWER SWITCH ON BEFORE OPERATING THIS EQUIPMENT Underbar Equipment Back Bars Installation and Operation Manual Please read this manual completely
Mixing Degas Vessel (MDV) EC-1, EC-2, EC-4, Total Eclipse 2 or 4, and TrioPure-25 or TrioPure-50
 EC-1, EC-2, EC-4, Total Eclipse 2 or 4, and TrioPure-25 or TrioPure-50") INSTALLATION MANUAL for MDV Mixing Degas Vessel (MDV) EC-1, EC-2, EC-4, Total Eclipse 2 or 4, and TrioPure-25 or TrioPure-50 MANUFACTURED BY 3428 Bullock Lane San Luis Obispo, CA 93401 800-676-1335 4-0635
INSTALLATION MANUAL for MDV Mixing Degas Vessel (MDV) EC-1, EC-2, EC-4, Total Eclipse 2 or 4, and TrioPure-25 or TrioPure-50 MANUFACTURED BY 3428 Bullock Lane San Luis Obispo, CA 93401 800-676-1335 4-0635
TL-105 COLUMN HEATER
 TL-105 COLUMN HEATER INSTRUCTION MANUAL Timberline Instruments Inc. 1880 S. Flatiron Ct., Unit I Boulder, Colorado 80301 Ph: (303) 440-8779 Fx: (303) 440-8786 info@timberlineinstruments.com www.timberlineinstruments.com
Honeywell Garrett Drop-in Intercooler for 2.3L Mustang EcoBoost IMPORTANT INFORMATION - PLEASE READ CAREFULLY
 Honeywell Garrett Drop-in Intercooler for 2.3L Mustang EcoBoost Bill of Materials and Precautions Application: 2015+ Ford Mustang 2.3L EcoBoost Part Number: 857564-6001 Part List: Item Description QTY
WatchDog NXT60. Installation and Operations Manual. Seaira Global, LLC NC Highway 50 Surf City, NC (910)
") WatchDog NXT60 Installation and Operations Manual Seaira Global, LLC 14021 NC Highway 50 Surf City, NC 28445 (910) 660-0962 Table of Contents Important Notes 2 Warranty Registration 2 Specifications 3
WatchDog NXT60 Installation and Operations Manual Seaira Global, LLC 14021 NC Highway 50 Surf City, NC 28445 (910) 660-0962 Table of Contents Important Notes 2 Warranty Registration 2 Specifications 3
Operating Instructions Model 4400/VC-115V Portable Powder Filler (115VAC. Model)
") Operating Instructions Model 4400/VC-115V Portable Powder Filler (115VAC. Model) First Release... 6/18/96 Rev. C... 1/16/98 Rev. D... 5/01/00 Operating Instructions, Model 4400/VC (Rev. D, 5/01/2000)...
Operating Instructions Model 4400/VC-115V Portable Powder Filler (115VAC. Model) First Release... 6/18/96 Rev. C... 1/16/98 Rev. D... 5/01/00 Operating Instructions, Model 4400/VC (Rev. D, 5/01/2000)...
MCD. Corona Discharge Ozone Generators MANUFACTURED BY Bullock Lane San Luis Obispo, CA
 MCD Corona Discharge Ozone Generators MANUFACTURED BY 3428 Bullock Lane San Luis Obispo, CA 93401 4-0622 Copyright 2005 DEL Ozone, Inc. IMPORTANT SAFETY INSTRUCTIONS When installing and using DEL Models
TrueClean ToteCleaner
 TrueClean ToteCleaner Installation, Operation, and Maintenance Manual www.trueclean.us TrueClean Check Valve Table of Contents Introduction.... 1 About... 1 Warranty... 2 Safety... 3 Important Safety Information....
IAQ Series. Bosch IAQ Photo Catalytic Oxidizer (PCO) Residential Application. Installation Manual and Owner s Guide
 Residential Application. Installation Manual and Owner s Guide") Installation Manual and Owner s Guide IAQ Series Bosch IAQ Photo Catalytic Oxidizer (PCO) Residential Application PCOB-09012-0--A - 9" PCO BULB PCOB-14024-0--A - 14" PCO BULB 67202220344 Revised 07-12
Installation Manual and Owner s Guide IAQ Series Bosch IAQ Photo Catalytic Oxidizer (PCO) Residential Application PCOB-09012-0--A - 9" PCO BULB PCOB-14024-0--A - 14" PCO BULB 67202220344 Revised 07-12
American Dish Service
 Effective: June, 2008 American Dish Service ADS UPRIGHT DISHWASHERS MODELS: AF/AFC-3D, AF/AFC-3DS, LW/LWC, 5AG, AF/AFC/AFB, AD25 OWNERS MANUAL 900 Blake Street Edwardsville, Kansas 66111 (913)-422-3700
IMPORTANT INFORMATION - PLEASE READ CAREFULLY
 Honeywell Garrett Direct Fit Performance Intercooler 2015+ 3.5L / 2.7L Ford F150 EcoBoost Bill of Materials and Precautions Application: 2015+ Ford F150 3.5L / 2.7L Eco Boost Part Number: 870702-6001 Part
TrueClean ToteCleaner
 TrueClean ToteCleaner Installation, Operation, and Maintenance Manual www.trueclean.us TrueClean Check Valve Table of Contents Introduction.... 1 About... 1 Warranty... 2 Safety... 3 Important Safety Information....
USE AND CARE GUIDE FOR MODEL MEK1, MEK15. Express Cordless Kettle
 USE AND CARE GUIDE FOR MODEL MEK1, MEK15 Express Cordless Kettle IMPORTANT SAFEGUARDS When using electrical appliances, basic safety precautions should always be followed, including the following: 1. Read
RPI Industries, Inc.
 IMPORTANT: THE FOLLOWING INFORMATION SHOULD BE RETAINED FOR FUTURE REFERENCE RPI Industries, Inc. building a better case for sales BAKERY and DELI USE AND SERVICE MANUAL WARRANTY INFORMATION SPECIFICATIONS
DBF 4XL Dryer Booster Fans
 Installation and Operation Manual Item #: 401315 Rev Date: 050814 DBF 4XL Dryer Booster Fans DBF4XL Kit Includes: Dryer Booster Fan, 1 pc Fan Mounting Bracket and Hardware, 1 pc Wall Label (Mount on wasll
OWNERS MANUAL For IN ROOM BREWING SYSTEM MODEL REFILLABLE CAPSULES K901. Includes: Installation Use & Care Servicing Instructions
 634 10 Sunnen Drive St. Louis, MO 63143 telephone: 314-678-6336 fax: 314-781-2714 www.bloomfieldworldwide.com OWNERS MANUAL For IN ROOM BREWING SYSTEM MODEL REFILLABLE CAPSULES K901 Includes: Installation
Model NT20e Installation Guide
 Model NT20e Installation Guide Rev 1.4 Page 2 of 14 1. Preparing for Installation CAUTION Do not remove the NT20e from the Electro-static bag until instructed from this installation guide. The NT20e is
PROAIR Water-Cooled Air Conditioner. CR43WC Model INSTRUCTION MANUAL
 PROAIR Water-Cooled Air Conditioner CR43WC Model INSTRUCTION MANUAL Rev. F 2018 nvent P/N 10-1008-167 87976466 TABLE OF CONTENTS HANDLING & TESTING THE AIR CONDITIONER...3 INSTALLATION INSTRUCTIONS...4
RATIO:GUARD Model E-1S EC Monitor
 EC probe Probe tees Probe retention clips Temperature probe E-1S monitor box UNPACKING Please open and inspect your package upon receipt. Your package was packed with great care and all the necessary packing
Air Cleaning Equipment, Inc. 303 N. Main St. Broadway, NC iers.com
 Read and Save These Instructions Horizon Galaxy - Installation and Operations Manual Air Cleaning Equipment, Inc. 303 N. Main St. Broadway, NC 27505 www.horizondehumidif iers.com 1 Safety Notes: The Horizon
DIGITAL STEEL FIRE & SECURITY
 Models 2111-2115 DIGITAL STEEL FIRE & SECURITY Read this manual carefully and never store it inside the safe! Digital Steel Fire & Security Safe Models 2111-2115 PACKAGE CONTENTS 1 Digital Steel Fire &
Blue Air. Commercial Refrigeration Inc. Installation & Operation Manual Ice Cream Freezers
 Blue Air Commercial Refrigeration Inc. Installation & Operation Manual Ice Cream Freezers Please read this manual completely before installing or operating this unit! BACF11 BACF15 BACRF14 Blue Air reserves
Next Generation Corona Discharge Auto Voltage Sensing Installation Manual
 Next Generation Corona Discharge Auto Voltage Sensing Installation Manual 4-2122-01 Rev.B IMPORTANT SAFETY INSTRUCTIONS When installing and operating the Spa Eclipse ozone generator, basic precautions
Service Parts, Kits and Accessories
 The parts identification guides on the following pages have been designed to give a quick reference to component parts used on pilot ignition agricultural building heaters. The guides identify components
WMWLB / WMWFM / WTWLB / WTWFM Series Hydronic Heating Unit
 January 2008 WMWLB / WMWFM / WTWLB / WTWFM Series Hydronic Heating Unit Installation Operation Maintenance The units are designed for permanent up flow, counter flow, or horizontal left or right airflow
A2Z Ozone, Inc. PRODUCT MANUAL
 A2Z Ozone, Inc. PRODUCT MANUAL INSTALLATION & OPERATION MANUAL CE www.a2zozone.com Rev. 02142018 CONTENTS Page Important Safety Instructions... Specifications... Installation Instructions... 3 4 5 Troubleshooting...
IW-25-2 Dehumidifier Installation & Operations. Manual
 IW-25-2 Dehumidifier Installation & Operations Installation and Operation Manual Manual IW-25-1 Dehumidifier Please Read and Save These Instructions Please Read and Save These Instructions Innovative Dehumidifier
Power Pack Service Manual
 Power Pack Service Manual MMPP4301-EP MMPP4301 MMPP4301-WC MMPP4301-PKG MMPP4301-PKG-WC MMPP4302 MMPP4302-WC MMPP4302-PKG MMPP4302-PKG-WC MMPP4303-PKG MMPP4303-PKG-WC MMPP4303-PKG-3 MMPP4305-PKG MMPP4305-PKG-WC
Ozone + UV Sanitation
 Ozone + UV Sanitation Installation Manual 4-2177-01 Rev.C IMPORTANT SAFETY INSTRUCTIONS When installing and operating the DEL Spa Solar Eclipse, basic precautions should always be followed: READ AND FOLLOW
FTC-350A. ual. Instruction and Operation Manual. Thermo NESLAB Manual P/N Rev. 11/08/00
 FTC-350A Flow Through Cooler Thermo NESLAB Manual P/N 002679 Rev. 11/08/00 Instruction and Operation Manual ual FTC-350A Flow Through Cooler Instruction and Operation Manual PREFACE SECTION I Safety SECTION
INSTALLATION & OPERATING INSTRUCTIONS MODEL #17900 KEGERATOR MANUAL
 INSTALLATION & OPERATING INSTRUCTIONS MODEL #17900 KEGERATOR MANUAL TABLE OF CONTENTS PAGE # SAFETY INSTRUCTIONS......... 2 INSTALLATION INSTRUCTIONS................... 3 CABINET LOCATION GUIDELINES...
Installation and Testing of Inverted Bucket Steam Traps Manual
 Installation and Testing of Inverted Bucket Steam Traps Manual 307-EN Please read and save these instructions Armstrong IB Traps Installation Before Installing Run pipe to trap. Before installing the trap,
OZONE SYSTEM FOR IN-GROUND POOLS New and Existing
 INSTALLATION & OPERATIONS MANUAL FOR Z0-910/912 OZONE SYSTEM FOR IN-GROUND POOLS New and Existing MANUFACTURED BY 3428 Bullock Lane San Luis Obispo, CA 93401 800-676-1335 4-0454-041900/03 IMPORTANT SAFETY
COMPRESSED AIR DRYER. SAFETY... Page 2 MAINTENANCE... Page 5. INSTALLATION... Page 3 PARTS AND KITS... Page 6
 OWNERS MANUAL BOSS COMPRESSED AIR DRYER Distributed by Air & Vacuum Process, Inc. Phone: 281-866-9700 Fax: 281-866-9717 Email: sales@airvacuumprocess.com SAFETY... Page 2 MAINTENANCE... Page 5 INSTALLATION...
MIGHTY PRO 1/4 HP CHILLER
 1 MIGHTY PRO 1/4 HP CHILLER FOR TANKS UP TO 170 GALLONS TOP QUALITY & HIGHLY EFFICIENT INTEGRATED DUAL STAGE THERMOSTAT 2 ASSEMBLY PARTS FRONT TOP VIEW BACK 3 SET UP INSTRUCTIONS 1. Remove chiller and
Because you re not like everyone else. PORTABLE CLEAR ICE MAKER IM200SS OWNER S MANUAL. Manual v1.0
 Because you re not like everyone else. PORTABLE CLEAR ICE MAKER IM200SS OWNER S MANUAL Manual v1.0 2 BECAUSE YOU RE NOT LIKE EVERYONE ELSE And neither are we. Always at the forefront of our industry, our
Xaact Spot. Xaact Hot Spot
 Xaact Spot & Xaact Hot Spot INFORMATION & OPERATING INSTRUCTIONS READ AND UNDERSTAND THESE INSTRUCTIONS BEFORE OPERATING THE MACHINE 78-00012 Rev. 101211 1 CONTENTS: Machine Specifications............
Light Construction Equipment Consumer Warranty Policy
 018b 01.13 Light Construction Equipment Consumer Warranty Policy 01/2013 Table of Contents Preface Page 1 Distributor s Warranty Responsibilities Page 1 Standard Warranties Page 2 Warranty Coverage Page
Henny Penny Blast Chiller/Freezer Models BCC/BCR-140 Models BCC/BCR-175 Models BFR/BCR-350
 Henny Penny Blast Chiller/Freezer Models BCC/BCR-140 Models BCC/BCR-175 Models BFR/BCR-350 TECHNICAL MANUAL Section TABLE OF CONTENTS Page Section 1. TROUBLESHOOTING... 1-1 1-1. Introduction... 1-1 1-2.
Ion Endeavor Pump Controller Digital Level Control with Pump Alternation and High Water Alarm
 Ion Endeavor Controller Digital Level Control with Alternation Page 1 of 8 General Overview The Ion Endeavor is a pump controller that senses a water level of up to 72", has a configurable water level/pump
IMPORTANT SAFETY INSTRUCTIONS EC-AG1-25 EC-AG1, EC-AG2 SAVE THESE INSTRUCTIONS.
 IMPORTANT SAFETY INSTRUCTIONS 2 1. Read and Follow All Instructions 2. Read this manual completely before attempting installation. 3. All permanent electrical connections should be made by a qualified
GLASSWASHERS COCKTAIL STATIONS COOLERS FROSTERS BEER SYSTEMS
 2017 Product Directory & Price List Prices effective March 1, 2017 GLASSWASHERS COCKTAIL STATIONS COOLERS FROSTERS BEER SYSTEMS Terms and Conditions Prices: All prices are LIST. Applicable taxes will be
InstructIon Manual KrEs EQuIPMEnt stands
 Instruction Manual Instruction Manual SELF-CONTAINED AND REMOTE Kairak KRES model refrigerated equipment stand units are available in many lengths from 36 to 120 inches long. These units are available
INSTRUCTIONN MANUAL. for Angle Curved MMF9106 MMF9109 MMF9112
 INSTRUCTIONN MANUAL for Angle Curved Top Chest Freezer MMF9106 MMF9109 MMF9112 Please read this user s manual thoroughly before using. Keep this manual handy for further reference. Email: Service@atosausa.com
Pressurized Filter Up to 1250 gallons
 Pressurized Filter Up to 1250 gallons REMINDER CALL 1-888-755-6750 BEFORE RETURNING TO STORE. ITEM #FP1250UV Questions, problems, missing parts? Before returning to your retailer, call our customer service
RPI Industries, Inc.
 IMPORTANT: THE FOLLOWING INFORMATION SHOULD BE RETAINED FOR FUTURE REFERENCE RPI Industries, Inc. building a better case for sales CONFECTIONERY USE & SERVICE MANUAL WARRANTY INFORMATION For Models Bradford
Power Pack Service Manual
 Power Pack Service Manual MMPP4301-EP MMPP4301 MMPP4301-PKG MMPP4302 MMPP4302-PKG MMPP4305-PKG MMPP4301-WC MMPP4302-WC MMPP4305-PKG-WC www.micromatic.com 1 TABLE OF CONTENTS Equipment Specifications...
Professional Warming Drawer and Warming Drawer Cabinet
 Professional Warming Drawer and Warming Drawer Cabinet Care & Use/Installation Instructions Models: (C)VQEWD5300SS (C)VQEWD5420SS IMPORTANT SAFETY INSTRUCTIONS WARNING: Read this manual carefully and completely
CA 120 Owners Manual of 10
 CA 120 Owners Manual 1 of 10 Your System has many features and available options some of which are selected at time of installation. Consult your installing dealer for options that may have been installed
Because you re not like everyone else. EVAPORATIVE COOLER EC220W OWNER S MANUAL
 Because you re not like everyone else. EVAPORATIVE COOLER EC220W OWNER S MANUAL 2 BECAUSE YOU RE NOT LIKE EVERYONE ELSE. And neither are we. Always at the forefront of our industry, our goal is to offer
Wax Base Heater & Dispenser
 Wax Base Heater & Dispenser Service Manual Models: IDWB2/0900, IDWB2/0775, IDWB3/0900, IDWB3/0775, IDWB4/0900, IDWB4/0775 Introduction............................................................................
AUTO SPEED BLENDER INSTRUCTION MANUAL MODEL: BLCLMB1
 AUTO SPEED BLENDER INSTRUCTION MANUAL MODEL: BLCLMB1 1 TABLE OF CONTENTS IMPORTANT SAFEGUARDS 3 POLARIZED PLUG 4 PRODUCT DIAGRAM 5 USAGE INSTRUCTIONS PREPARING YOUR AUTO SPEED BLENDER FOR USE 6 HOW TO
Rev. None AUGUST 2012 MDM SERIES MODULAR MEMBRANE AIR DRYERS OPERATOR MANUAL MDM1 MDM4 MDM9 MDM13 MDM24 MDM49 MDM66 MDM106 MDM138
 7428146 Rev. None AUGUST 2012 MDM SERIES MODULAR MEMBRANE AIR DRYERS OPERATOR MANUAL MDM1 MDM4 MDM9 MDM13 MDM24 MDM49 MDM66 MDM106 MDM138 1.0 SAFETY All compressed gases, including air, can be dangerous.
Frosty Factory of America, Inc.
 Frosty Factory of America, Inc. 2301 S. Farmerville St., Ruston, LA 71270 frostyfactory.com (318) 255-1162 (800) 544-4071 (318) 255-1170 fax Auto Fill System & Tank Service Manual All technical data, pictures
Owner s Manual Refrigerated Compressed Air Dryers Model F-100
 Owner s Manual Refrigerated Compressed Air Dryers Model F-100 Read carefully before attempting to assemble, install, operate or maintain the product described. Protect yourself and others by observing
Remote Vehicle Control System
 1 Remote Vehicle Control System PC 5100 TM Owner's Manual Factory Keyless Upgrade System IMPORTANT NOTE: The operation of the PowerCode as described in this manual is applicable to most vehicles. However,
VX SERIES Wireless Thermostat with Occupancy Sensor
 VX SERIES Wireless Thermostat with Occupancy Sensor INSTRUCTION MANUAL Table of Contents Thermostat Installation... 7 Installing the Wireless Control Card...8 Mounting the thermostat to the wall...9 Thermostat
ELECTRIC FIREPLACE OWNER S MANUAL
 ELECTRIC FIREPLACE OWNER S MANUAL MODELS EL1346C 4001358 WARNING: If the information in this manual is not followed exactly, a fire or electrical shock may result causing property damage, personal injury
MANUAL 8/12/05. Model BKP TM 100 INSTALLATION, OPERATION & MAINTENANCE. Commercial High Efficiency Heat Pipe Dehumidifier
 MANUAL 8/12/05 INSTALLATION, OPERATION & MAINTENANCE Commercial High Efficiency Heat Pipe Dehumidifier Model BKP TM 100 Heat Pipe Technology, Inc. 6904 Parke East Blvd. Tampa FL 33610 Tel: (813) 470-4250
Horizontal Bottle Cooler Installation and Operation Manual
 Speeds Up the Pace of Innovation Horizontal Bottle Cooler Installation and Operation Manual Please read this manual completely before attempting to install or operate this equipment! TBC-50SD, 50SB/ TBC-95SD,
Labconco Small Stoppering Chamber
 LABCONCO CORPORATION 8811 Prospect Ave, Kansas City, MO 64132 (816) 333-8811, Fax (816) 363-0130, (800) 821-5525 Labconco Small Stoppering Chamber 7569000 Introduction- The Small Stoppering Chamber is
AIC Brazed Plate Heat Exchanger Operating and Instruction Manual
 AIC Brazed Plate Heat Exchanger Operating and Instruction Manual Advanced Industrial Components Page 1 of 8 Customer Service Call: 1-888-738-1350 1.0 Installation 1.1 Mounting/support unit: a) On a shelf
SH-2000, SH-2500, AB-3000 Bimetallic Steam Traps Installation and Operation Manual SH-2000
 SH-2000, SH-2500, AB-3000 Bimetallic Steam Traps Installation and Operation Manual 65 SH-2500 SH-2000 AB-3000 Table of Contents General Safety Information.............. 2 Product Information..................3
Table of Contents Thank you 2 Accessories 2 Installation 2 Tapping your first mini keg 3 Operation 9 Cleaning 9 Important safeguards 10 Limited
 Table of Contents Thank you 2 Accessories 2 Installation 2 Tapping your first mini keg 3 Operation 9 Cleaning 9 Important safeguards 10 Limited warranty 10 1 Thank you Thank you for purchasing this EdgeStar
Because you re not like everyone else. PORTABLE CLEAR ICE MAKER IM200SS OWNER S MANUAL
 Because you re not like everyone else. PORTABLE CLEAR ICE MAKER IM200SS OWNER S MANUAL 2 BECAUSE YOU RE NOT LIKE EVERYONE ELSE. And neither are we. Always at the forefront of our industry, our goal is
CWR265SZ 26 Bottle Built-in Wine Cooler Owner s Manual
 CWR265SZ 26 Bottle Built-in Wine Cooler Owner s Manual This owner s manual provides instructions on safe installation use, and troubleshooting assistance. Please read it carefully and save it for reference
Blade Series Heat Exchanger Operation and Installation
 Blade Series Heat Exchanger Operation and Installation *IMPORTANT* For safe and satisfactory operation, please read the following instructions. Keep these instructions for future reference. Some information