Fig. 1 Fig. 2 Fig. 3 Fig. 4. Fig. 5 Fig. 6 Fig. 7 Fig. 8. Fig. 9 Fig. 10 Fig. 11 Fig. 12. Fig. 12a Fig. 12b Fig. 13 Fig. 13a Fig.
|
|
|
- Harriet Boyd
- 5 years ago
- Views:
Transcription

1


2 Fig. 1 Fig. 2 Fig. 3 Fig. 4 Fig. 5 Fig. 6 Fig. 7 Fig. 8 Fig. 9 Fig. 10 Fig. 11 Fig. 12 Fig. 12a Fig. 12b Fig. 13 Fig. 13a Fig. 14 Fig. 15 Fig. 16 Fig. 17 Fig. 18 Fig. 19 Fig. 20


3 Fig. 21 Fig. 22 Fig. 23 Fig. 24 O3 O2 LECOLOGICO AS805 - AS806 SPECIAL PETS - Cod. M0S Edizione 1I07
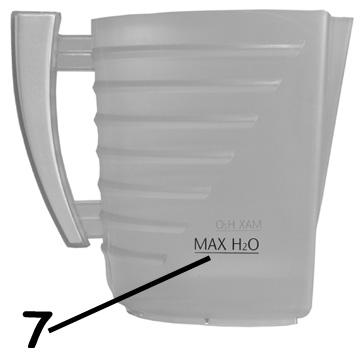
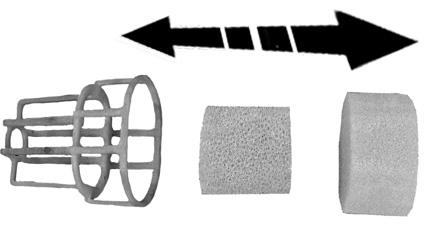
4 Dear Customer, We would like to thank you for choosing this Polti appliance. By choosing Lecologico, you have made a healthy choice for your home. Lecologico by Polti is a friend of the environment and an enemy to dust, pollens, dust mites and their allergens. With its EcoActive-Filter, Lecologico traps dust in water; then the dirty water is simply poured away- so no risk of dispersing the dust into the air around you. When you ve finished, you can put your Lecologico away perfectly clean. With Polti s Lecologico you can breathe a big sigh of relief. Its 6-stage filtering system with HEPA filter guarantees that the air coming out of the vacuum cleaner is perfectly clean. The EcoActive-Filter also does away with the need for dusty bags and all the unpleasant handling of them. With Lecologico you can vacuum up dry dirt, including large objects. Or even vacuum up a limited amount of liquids, solving the problem of minor household spills. A complete set of accessories is provided to help you do all cleaning tasks quickly and without fatigue. We suggest that you read this instruction booklet carefully before using your Lecologico. What is the EcoActive-Filter? The EcoActive-Filter is the revolutionary green heart of Lecologico, because its effectiveness is based on the natural purifying force of water. It is the flow of water contained in the special filter and its bubble that imprison dirt, preventing all contact with dust, and avoiding dispersal of dust back into the air. What is the HEPA filter? Lecologico has a special extra powerful washable HEPA filter, previously used only in professional applications requiring the utmost hygiene. This filter stops even the finest dust, pollens, dust mites and other microorganisms and is easily rinsed clean when dirty. LEGEND ACCESSORIES 1. Main switch 2. Cable winder switch 3. Carry handle 4. Container handle 5. Rear wheels 6. EcoActive-Filter water container 7. MAX level (fig. 4) 8. Air outlet grid 9. Cover on filter housing (fig. 16) 9a. Lever for opening filter cover (fig. 16) 10. Hepa filter (fig. 18) 10a. Hepa filter retainer (fig. 17) 10b. Dual filter assembly (fig. 17) 11. Tool holder housing 12. Casters 13. Power cable plug 14. Indicator lights 15. Connection 16. Eco Active Filter water filter 17. Filter cage cover 17a. Filter body with fine mesh 17b. Sponge filter 17c. Filter nozzle 18. On/off and increased suction switch 19. Decreased suction switch A. Telescopic tube A1. Telescopic tube release button B. Joker brush B1. Hardwood floor tool C. Universal brush C1. Brush selector D. Hose D1. Suction opening E. Multipurpose nozzle F. Lance for cleaning corners/skirting board G. Soft brush H. Tool holder I. Flexo joint L. Radiator brush M. Jointed tube N. Mini turbo brush O. Turbo brush (optional mod. AS805) P. Wheel cover for hardwood floors P1. Joints for anchoring wheel covers in place W. Float Y. Flexo joint cursor (Fig. 11) Z. Brush for cleaning water bucket This unit conforms with EC-directives 89/336 as amended by 93/68 (EMC) and 73/23 as amended by 93/68 (low voltage).
5 Polti S.p.A. reserves the right to change equipment or accessory specification without prior notice. PRECAUTIONS KEEP THESE INSTRUCTIONS Read these instructions for use carefully before using the appliance. Use which does not comply with these instructions will invalidate the warranty. The wiring system to which the appliance is connected must always comply with the laws in force. Before connecting the appliance, make sure that the mains voltage is the same as the voltage indicated on the data label of the appliance and that the power outlet is connected to earth. Always turn off the appliance at the on/off switch before unplugging it. If the appliance is left unused, always disconnect it from the mains. Never leave the appliance unattended with the cable plugged into the mains. Always make sure the appliance is unplugged before performing maintenance work of any kind. Do not pull the power cord out of the socket, but grasp the plug itself to avoid damage to the socket. Do not allow the power cord to be twisted, crushed, stretched, or come into contact with sharp or hot surfaces. Do not use the appliance if the power cable or other important parts are damaged. Do not use electric extension leads that are not authorized by the manufacturer, as they may cause damage or fire. If it is necessary to replace the power supply cable, please refer to the nearest Polti authorised service centre, since the use of a special tool is necessary. Never touch the appliance with wet hands or feet with the cable plugged into the mains. Do not use the appliance when barefoot. Do not use the appliance near a bathtub, shower or container full of water Never immerse the appliance, the cable or the plugs in water or another liquid. Use of the appliance in places where there is a danger of explosions is prohibited. Do not use the product with toxic substances. Do not lay the hot appliance on surfaces sensitive to heat. Do not leave the appliance exposed to wind or rain. Do not place the appliance near a live element, an electric stove or any other source of heat. Do not expose the appliance to extreme temperatures Never let children or people who are not familiar with how the appliance works use it. Do not press the buttons hard or with a pointed object such as a pen. Always rest the appliance on a stable surface. In case of accidental fall of the appliance it is necessary to have it checked by an authorized Service Centre as the internal safety features may have been affected. In case of breakdown or malfunction switch off the appliance and never attempt to disassemble it, but refer to an authorized Service Centre. In order to avoid prejudicing the safety of the appliance, use only original spare parts and accessories approved by the manufacturer. Do not wind the power cord around the appliance, especially when the appliance is still hot. Do not use the appliance to suck up acids or solvents, as these might cause serious damage to the appliance and above all do not suck in explosive dust or liquids, as these could cause explosions on coming into contact with the inside components of the appliance. Do not vacuum up toxic substances. Do not suck up burning or incandescent objects such as embers, ash or other material in which combustion is taking place. It is necessary to keep the unit in horizontal position during operation. Water tank can be filled with tap water. Do not vacuum up materials such as cement, chalk etc. which solidify once they came in contact with water thus damaging the appliance. CORRECT USE OF THE PRODUCT This appliance is intended for home use for vacuuming liquids and solids in accordance with the descriptions and instructions provided in this manual. Please read these instructions carefully and keep them safely where you or other users can refer to them: they may be useful in the future. ATTENTION This appliance is built according to current regulations for recycling. Do not throw away the packing materials used to protect the appliance during transportation, but take them to relevant collecting centres. Filters and accessories are sold in authorised
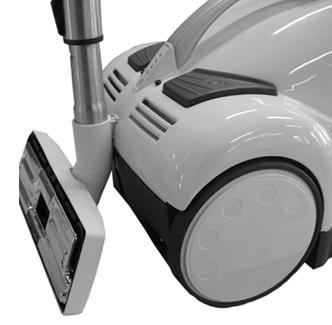
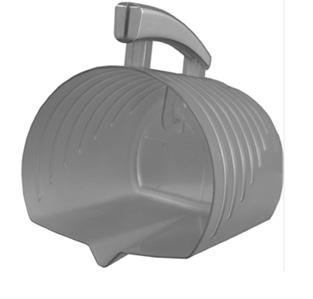
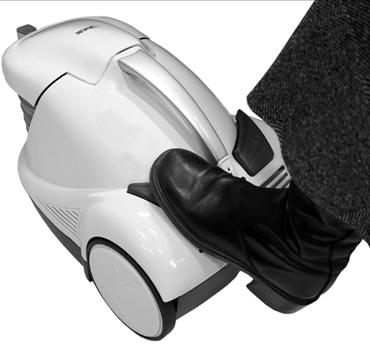
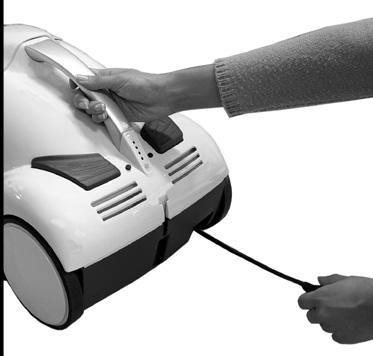
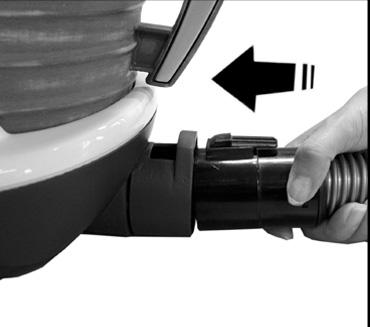
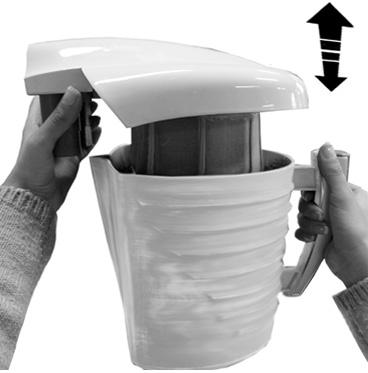
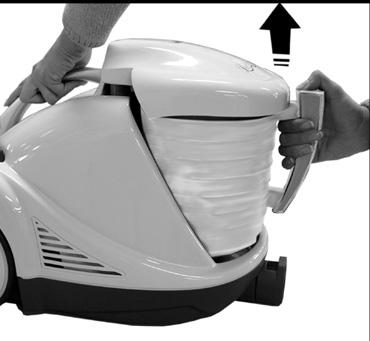
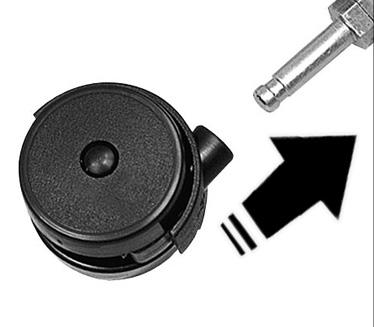
6 assistance centres and in all major appliance shops. Use only original Polti spare parts. Polti declines liability for any damage or accident derived from any use of LECO- LOGICO which is not in conformity with the instructions contained in this booklet. INSTALLATION Before using Lecologico, assemble the casters (12) as shown in figure 1. PREPARATION FOR USE Remove the water container (6) from the appliance, holding it by the handle (4) (fig. 2). Remove the filter unit (16) (fig. 3). Fill the water container (6) with ordinary tap water up to the MAX H2O indicator (7) as shown in figure 4. The required quantity is 800cc of water. Place the filter assembly (16) in the water container (6), being careful to align them perfectly. Put the water container (6) back inside the appliance, performing the operations listed above in reverse order. Insert the suction opening (D1) on the hose (D) into connection (15) (fig. 5). FUNCTIONING Unwind the cable (13) to remove it COMPLETE- LY from its housing, pulling the plug toward you (fig. 7). Plug into a suitable power outlet. Press the main switch (1) (fig. 8) and the first level of the indicator lights (14) will begin flashing. This means Lecologico is in the pause position. Hold down the button (18) for more than one second, then release it. Lecologico will begin operating at minimum speed, and the first indicator light (14) will stay on. There are four power levels. We recommend minimum power for curtains, medium low power for sofas, armchairs and cushions, medium high for carpets and high for floors and hard surfaces (ceramics, marble, etc.). Press button (18) to increase speed; each time you press button (18) motor power will increase by one step. Each time the speed increases another level, the next level of indicator lights come on. Press button (19) to decrease speed, every time you press, motor power will drop one step and one indicator light will go out. To restore the appliance to the pause position, hold down button (18) for more than one second, then release it. DRY LIQUID SUCTION The appliance is used in the same way to vacuum up dust or limited amount of liquids. If the water is very dirty, replace it as described in the section on Emptying and cleaning the water container. When the dirt collected in the water container (6) reaches the maximum permitted level, the safety float (W) will automatically stop the suction. The motor will turn over audibly faster. After 10 seconds the appliance will automatically pause and the four indicator lights (14) will start flashing. To resume cleaning, perform the operations described in the section on emptying and cleaning the container, then top up the water level in the container. BIOECOLOGICO We recommend use of Bioecologico, an anti-bacterial gent scented with natural anti-allergenic substances. Add regularly to the water you use to fill Lecologico water container (6) to prevent proliferation of bacteria and micro-organisms and inhibit allergens. As well as providing a sanitising action, Biecologico also eliminates odours from collected dust in the water. Use: add 8 ml each time you fill the water container. Bioecologico is sold by appliance dealers or by mail order from the authorised Polti Service Centres. Bioecologico is available in the neutral unscented version or in mountain pine or citrus. EMPTYING AND CLEANING THE WATER CONTAINER (6) Turn off the appliance with the main switch (1) and unplug the power cable. This precaution also resets the safety device. Remove the water container (6) from the appliance, holding it by the handle (4) (fig. 2). Remove the filter assembly (fig. 3) and empty out the container, tipping it toward the side with the spout (fig. 10), and then rinse it out. Top up the water level if you want to continue working. Reassemble the filter cage and put it back inside the appliance. The appliance is now ready to be put away. Note: water in the container will not damage the appliance, but it is advisable to empty the container before putting away Lecologico. One of the great-
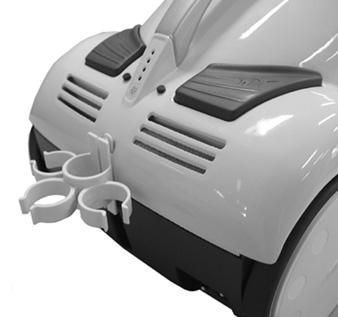
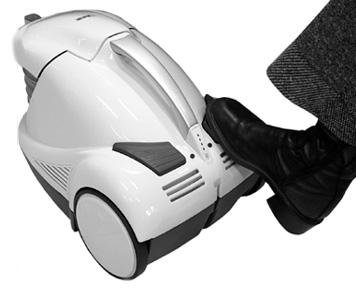
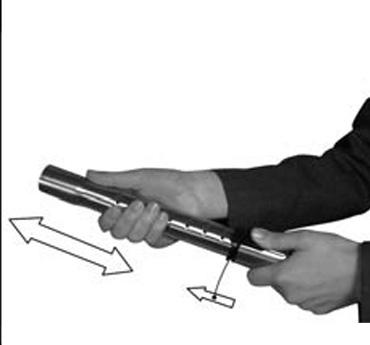
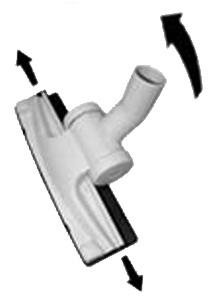
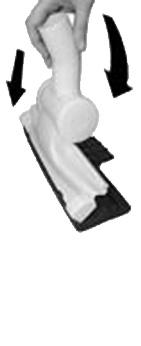
7 est benefits offered by Lecologico is the fact that you can put it away clean, unlike vacuum cleaners with bags, which must be put away with the dirt in the bag. USING TOOLS Tools may be connected directly to the hose (D) or to the telescopic tube (A) or the jointed tube (M). Using the telescopic tube (A) The tube is about 60 cm long when closed, 1 m when extended to its greatest length. To increase or decrease length, press the catch positioned as shown in fig. 6 and extend or reduce length as desired. Jointed tube (M) The handy jointed tube is particularly adaptable as it can be folded and adjusted to suit the task in hand. It is handy for cleaning spots that are hard to reach with traditional tools, such as high shelves, the tops of wardrobes, underneath furniture, etc. All other tools may be fitted to the jointed tube (fig. 20). Using the joker brush (B) The Joker brush may be used to vacuum up solids or a limited amount of liquids on any kind of surface. Using the hardwood floor tool (B1) and the hardwood floor wheel cover (P) Position the Joker brush (B) on the hardwood floor tool (B1) as shown in figure 13. Apply the tool to the brush, following the direction of the arrow so that it is aligned properly and they connect together. To release the hardwood floor tool from the Joker brush, pull the two levers on the sides of the frame outward and lift the brush (fig. 13a). You should also use wheel covers (P) to prevent damage to your hardwood floor. To assemble wheel covers, simply fit together the two joints (P1) in the housings on the bottom of the appliance (fig.14). To release the tool, simply press the two joints (P1) inward and lift off the wheel cover. Using the universal brush (C) Connect the brush to the telescopic tube. If you move the selector on the brush (C1) and press with a foot, you can change the suctioning surface without bending down. The position with bristles extended is recommended for all non-carpeted floors. The position without bristles is recommended for carpets. Multipurpose nozzle (E) The multipurpose nozzle is recommended for cleaning upholstery surfaces such as the joints of sofas, armchairs, mattresses, car upholstery, etc. Lance for cleaning corners/skirting boards (F) radiator brush (L) The lance (F) is recommended for thorough vacuum cleaning of hard-to-reach spots such as skirting boards and folds in sofas, armchairs, upholstered furniture and car upholstery. Apply the radiator brush (L) to the tip of the lance (F) to clean inside radiator elements and remove accumulated dust. Soft brush (G) The soft brush has soft bristles for dusting delicate surfaces such as picture frames, books, etc. Using the tool holder (H) and tool holder housing (11) The tool holder may be used to fasten tools onto the body of the appliance or the handle. Installation on the handle: Hook one of the tool holder rings to the handle. Insert the tools you want to keep handy in the rings (fig. 12). Replacing on the appliance body: Slide the tool holder guide into the groove on the back of the appliance as shown in figure 12a, proceeding to anchor the tools as described above. You may perform the same operation to replace the universal brush (C) with the telescopic tube (A) attached to it (fig. 12b). Using the flexo joint (I) This special joint allows you to reach hard-to-reach spots without bending down. Insert the Flexo joint between the hose and the telescopic tube, holding the notch on the front part of the handle. To change its inclination, rotate the cursor (Y) (fig.11) by a half turn. The joint that allows you to alter the working angle of the tube will then appear (fig.11). Put the joint back in its original position when you have finished, and cover it with the cursor to lock it in place. Mini turbo brush (N) The mini turbo brush is particularly recommended for cleaning sofas and armchairs, car upholstery, fabric-covered walls, etc. It easily removes dust, dandruff and textile residues. It is useful for preventing allergies, as the mechanical action of the roller with bristles vacuums up animal hair.
. Close the brush again, performing these operations in reverse order (fig.24).")

 (fig.")
. Fig. A Fig. C Fig. B Fig.")

. Move the scissors to catch the threads or hairs, then cut them and remove them manually or using a small-sized pair of pliers.")
. Reassemble the parts repeating this operation in reverse order. Make sure that the two sections fit together properly.")
8 Periodically clean the mini turbo brush as follows: Slacken the screws on the base of the tool (fig.21). Separate the two parts that make up the brush (fig.22). Vac up dirt inside the brush with the tube with no tool on it (fig.23). Close the brush again, performing these operations in reverse order (fig.24). Turbo Brush (O) (Optional mod. AS805) The turbo brush is designed for perfect cleaning of carpets with a maximum pile length up to 15 mm. The rotating brush effortlessly picks up threads, hair, animal hair and other particles which are normally particularly difficult to vacuum up. The turbo brush may successfully be used on hard surfaces too. On the front of the turbo brush you can see a slide for adjustment to every type of carpet: for low pile carpets or hard floors, move the cursor to the left (O2) (fig. A), for long pile carpets move it to the right (fig. B). Move the turbo brush slowly forward and backward over the carpet, on fringes or near corners move it in the direction of the arrow (fig. C). Fig. A Fig. C Fig. B Fig. D Cleaning It may happen that the turbo brush decreases its rotation speed while in use, becoming less effective. This may be caused by clogged hairs and threads around the brush or because the turbine becomes blocked. If this happens, then proceed with the following cleaning operation: Cleaning the rotating brush: insert the points of a pair of scissors into the brush roller slots (fig. D). Move the scissors to catch the threads or hairs, then cut them and remove them manually or using a small-sized pair of pliers. Cleaning the turbine: unscrew the four screws (O3) on the bottom side (fig. E). Turn the turbo brush over and remove the cover (fig. F). Clean the turbine and the other parts (fig. G). Reassemble the parts repeating this operation in reverse order. Make sure that the two sections fit together properly. Fig. E Fig. G Fig. F AUTOMATIC CABLE WINDER Before putting the vacuum cleaner away, rewind the power cable by pressing the button (2), as shown in fig.9, being careful to accompany it during winding. GENERAL MAINTENANCE Always make sure the appliance is unplugged before performing maintenance work of any kind. CLEANING THE WATER FILTER ASSEMBLY (16): Pull the nozzle (17c) until it comes off the filter cage. Separate the body of the cage (17a) from the filter cover (17).
9 Remove the sponge filter (17b) from the cage. If the filter is damaged, replace it. Rinse all components under running water. Let the sponge filter dry before putting it back into the appliance. Reassemble the filter assembly, repeating the operations in the reverse order. Note: Make sure that the filter nozzle (17c) is correctly positioned, checking that the arrow on the nozzle is aligned with the notch on the bottom of the cage (17a) (fig.15). If the filter needs replacing, always use an original Polti filter, available by mail order from the Technical Service Centre. A cleaning brush (Z) is supplied for easy cleaning of the water container (6); it may also be used to clean the appliance s hose connections and the inside of tools. NOTE: Do not use the brush for cleaning the outside of the appliance CLEANING THE HEPA FILTER (10) AND THE DUAL FILTER ASSEMBLY (10b) Proceed as follows to clean filters: press the two levers on the filter cover (9a) and pull off the filter cover (9) (fig.16). Pull on the dual filter (10b) to remove it from its housing and then remove the microfilter and moisture protection filter that compose it (fig.19). Rotate the filter retainer (10a) as shown in fig.17 and remove the Hepa filter (10) (fig.18). Rinse the filters in cold running water. Shake them gently after washing to eliminate any residual dirt and excess water. When dry, put the filters back in the appliance, performing the same operations in reverse order. NOTE: let the filters dry naturally, far away from light and heat sources. You should wait 24 hours before reassembling filters in the appliance. Replace the filters if they are torn. Filters should be cleaned every 4 months. WARNING: do not clean filters with the brush, as this could damage them, decreasing their filtering capacity. Do not use detergents, do not scrape filters, and do not attempt to wash them in a dishwasher. TROUBLESHOOTING The vacuum cleaner won t start: check that the appliance is plugged in The vacuum cleaner goes off during use and the four indicator lights come on: a) there is too much liquid in the container. Restore the correct level. b) The selected power level is too high for the type of surface you are cleaning. In both cases, press the switch (1), unplug the power cable and leave it unplugged for a few seconds so that the safety device will be reset. Suction power is decreased: The nozzle, hose or tools may be blocked up, or the Hepa filter may be dirty. Clean the Hepa filter and remove any obstructions from the hose. Leakage of water when suctioning up liquids: The float may be blocked up. Clean the filter assembly and make sure that the water level in the container is correct.
10 ELECTRICAL SAFETY No earth required. Ensure the mains voltage suits your appliance. Fitting the mains plug important The wires in the mains lead are coloured in accordance with the following code: Blue: Neutral Brown: Live The wire which is coloured BLUE must be connected to the Terminal which is marked with the letter N or coloured BLACK. The wire which is coloured BROWN must be connected to the Terminal which is marked with the letter L or coloured RED. It is important that the outer sheath is clamped correctly into the 3-pin plug. If in doubt consult your local Service Dealer or qualified electrician before the machine is used. A 13 AMP FUSE MUST BE FITTED TO THE MAINS PLUG. BLACK OR BLUE N E L F U SE RED OR BROWN
Fig. 1 Fig. 2 Fig. 3 Fig. 4. Fig. 5 Fig. 6 Fig. 7 Fig. 8. Fig. 9 Fig. 10 Fig. 11 Fig. 12. Fig. 13 Fig. 14 Fig. 15 Fig. 16
 Special Allergy Fig. 1 Fig. 2 Fig. 3 Fig. 4 Fig. 5 Fig. 6 Fig. 7 Fig. 8 Fig. 9 Fig. 10 Fig. 11 Fig. 12 Fig. 13 Fig. 14 Fig. 15 Fig. 16 Fig. 17 Fig. 18 Fig. 19 Fig. 19a Fig. 20a Fig. 20b Fig. 20c Fig. 20d
c o m p a c t AS 801 c o m p a c t AS 801
 compact AS 801 9 2 8 27 7 19a 17 18 21 20 18b 22 3 16 19 18 18a 23 4 N 24 25 26 10 11 6 M 12 5 1 4 A 13 14 15 L I H F A1 J B 5-A G B1 C E D L ECOLOGICO AS801- Cod. - Cod. M0S05631 M0S05407 - Edizione -
M D. 17b B1 6-A. 17a. 17c. L ECOLOGICO AS810 - Cod. M0S Edizione 2G09. L ECOLOGICO AS810 - Cod. M0S Edizione 1F04
 AS 810 15 1 14 3 5 6 4 8 12 A 24 N 9 11 10 13 20 2 21 14 20 23 22 E 19 22 21 C M M D L C1 B F I O H G B1 6-A L ECOLOGICO AS810 - Cod. M0S04076 - Edizione 1F04 16 W 17b 17a 17c L ECOLOGICO AS810 - Cod.
Fig.1 Fig.2 Fig.3. Fig.4 Fig.5 (8a)
") Fig.1 Fig.2 Fig.3 Fig.4 Fig.5 (8a) Fig.6 (8b) Fig.7 5 2 4 9 8 20 24 1 3 8 7 21 22 6 14 25 8 19 23 8 15 17 27 26 16 T S B F E H D A C G I O N J O K M Q K L P 10a 8 10 10a R 11 12 13 28 18 - M0S08412 Edizione
Fig.1 Fig.2 Fig.3 Fig.4 Fig.5 (8a) Fig.6 (8b) Fig.7 5 2 4 9 8 20 24 1 3 8 7 21 22 6 14 25 8 19 23 8 15 17 27 26 16 T S B F E H D A C G I O N J O K M Q K L P 10a 8 10 10a R 11 12 13 28 18 - M0S08412 Edizione
Fig. 2. Fig. 1. Fig. 3. Fig. 4. Fig. 5. Fig. 7 Fig. 6. Fig. 9. Fig. 8. Fig. 10 MAX H2O
 R 1 2 23 3 5 6 7 10 9 8 4 13 19 23 18 12 17 21 16 11 22 14 15 20 Fig. 1 Fig. 2 2 1 Fig. 3 Fig. 4 MAX H2O 1 Fig. 5 2 Fig. 7 Fig. 6 Fig. 9 Fig. 8 Fig. 10 E N G L I S H KEY 1) Carrying handle 2) Mains ON/OFF
VAPORETTINO LUX A B C E. Fig.1 Fig.2 Fig.3 Fig.4. Fig.5 Fig.6 Fig.7 Fig.8. Fig.9 Fig.10 Fig.11. Vaporettino Lux 1R02
 H A B 4 1 G D 8 6 5 7 10 2 C E F 9 3 Fig.1 Fig.2 Fig.3 Fig.4 Fig.5 Fig.6 Fig.7 Fig.8 Fig.9 Fig.10 Fig.11 Vaporettino Lux 1R02 Read these instructions carefully before using the appliance. KEY GENERATOR
Polti S.p.A. reserves the right to change equipment or accessory specification without prior notice.
 R E N G L I S H KEY 1. Handle 2. Motor 3. Rotating hooks for cable storage 4. Power supply cable 5. Handle locking screw 6. Mains ON/OFF switch 7. Eyelet 8. "Full bag" red indicator light 9. Cover of bag/filter
Stira e Aspira M0S O08
 Stira e Aspira M0S05484 1O08 Read these instructions carefully before using the appliance. KEY 1) Ironing surface 2) Opening handle 3) Vaporella supporting-grill 4) On/off switch 5) Suction switch 6) Supply
Polti S.p.A. reserves the right to change equipment or accessory specification without prior notice.
 Daisy R 1) Iron temperature adjustment knob 2) Boiler ON/OFF switch 3) Steam button 3a) Iron heating indicator light 3b) Pressure indicator light 3c) Continuous steam jet button 4) Iron on/off switch 5)
VAPORELLA. Fig. 1 Fig. 2. Fig. 3 Fig. 4
 3b 3 1 6 3a 4 2 7 8 9 5 Fig. 1 Fig. 2 Fig. 3 Fig. 4 1) Iron temperature adjustment knob 2) Boiler ON/OFF switch 3) Steam button 3a) Iron heating indicator light 3b) Continuous steam jet button 4) Iron
a V E1 B1 A5 E3 E4 P E5 W1 X 25-A T Z. Vtt LECOASPIRA Cod. M0S Edizione 2H01
 aspira 910 18 16 21 20 22 24a 22 19 34 17 24 23 29 13 11 13 30 31 14 15 6 5 1 15 14 4 10 12 11 28 26 33 32 27 7 3 2 9 8 25 C N V E1 C E E1 E2 U A3 A4 A2 A1 O P E5 E3 E4 B3 B1 A5 G F D C C 25-A L Q C J
Fig. 1 Fig. 2 Fig. 3 Fig. 4 Fig. 5. Fig. 6 Fig. 7 Fig. 8 Fig. 9 Fig. 10. Fig. 11 Fig. 12 Fig. 13. VL Super Pro - M0S Edizione 1L08
 9 1 15 13 12 8 6 5 4 2 3 10 14 7 11 16 Fig. 1 Fig. 2 Fig. 3 Fig. 4 Fig. 5 Fig. 6 Fig. 7 Fig. 8 Fig. 9 Fig. 10 Fig. 11 Fig. 12 Fig. 13 VL Super Pro - M0S06995 - Edizione 1L08 VAPORELLA Dear Customer, Thank
Vaporetto Lecoaspira Intelligent - M0S07972 Edizione 1N11
 X1 F X Y Y1 R W1 W2 W4 W3 W Q G S B3 Q T Z W5 B2 M E7 Vaporetto Lecoaspira Intelligent - M0S07972 Edizione 1N11 C D C B3 B1 B2 A5 A1 A3 A4 A2 U P E5 24 25 26 23 17 27 13 14 15 16 18 19 22 20 20-A O O1
VL FOREVER 600 INOX - VL FOREVER VL FOREVER 600 PRO
 VL FOREVER 600 INOX 7 10 VL FOREVER 600 11 8 3a 10 11 7 9 3 VL FOREVER 600 PRO 6 4 5 2 1 10a 11 6a 7 10 Fig.1 Fig.2 Fig.3 Fig.4 Fig.5 Fig.6 VL FOREVER 600 / INOX /PRO - M0S09515 1Q09 Read these instructions
VL FOREVER 600 INOX - VL FOREVER 600
 7 10 8 3a 11 9 3 7 11 6 4 5 2 1 10 8 6a 3a 9 3 Fig.1 2 Fig.2 1 Fig.3 Fig.4 Fig.5 VL FOREVER 600 /600 INOX M0S08218 1O07 Read these instructions carefully before using the appliance. KEY 1) Cable winder
7a Fig.1. Fig.3. Fig.2. Fig.4 M0S U01
 7a 7 5 4 2 8 3 1 10 6 9 11 Fig.1 1 2 3 Fig.2 1 2 Fig.3 Fig.4 M0S10908 1U01 @ESPRESSO PRECAUTIONS KEEP THESE INSTRUCTIONS Read these instructions for use carefully before using the appliance. Any use which
Power System. Sprint. Easy Steam. Super Pro. Forever 450. Forever 900 Pratica. Forever Forever Clean. Vaporettino Power.
 P06959_VL POWER_syCOPE 19-01-2006 16:30 Pagina 2 PowerSystem Eco Pro 3000 Forever Clean Forever 450 Forever 1000 2300 Sprint 1300 2085 900 Easy Steam Super Pro Forever 900 Pratica 2H Professional Easy
Model No.: VUM33AS20G
 Model No.: VUM33AS0G USER MANUAL IMPORTANT SAFETY INSTRUCTIONS Before operating the appliance for the first time, read these instructions carefully. Please store this user manual for future reference..
Fig.1A Fig.1B Fig.1C. Fig.3. Fig.6. Fig.8. Fig.10 Fig.11 Fig.12
 Fig.1A Fig.1B Fig.1C Fig.1D Fig.2 Fig.3 Fig.4 Fig.5 Fig.6 Fig.7 Fig. Fig.9 Fig.10 Fig.11 Fig.12 - M0S0172 Edizione 1P06 1 2 5 4 3 7 6 9 10a 11 10a 10 12 13 14 15 16 17 1 22 21 20 24 27 26 25 2 19 23 A
I K. V.lla ADVANCED SYSTEM - M0S Edizione 1H10
 Advanced System O M N E G H J J1 F C P W Q D A I K B L R X V.lla ADVANCED SYSTEM - M0S06060 - Edizione 1H10 ENGLISH Vaporella Advanced System Advanced System A) Tank cap B) Main switch C) Board main switch
Easy Guide Luna 1300 Luna 1400 PARTS CHECKLIST - LUNA 1300 AND LUNA ONLY. Telescopic extension tube. Carpet washer. Hose and hand grip
 R Easy Guide Luna 1300 Luna 1400 PARTS CHECKLIST - LUNA 1300 AND LUNA 1400 1400 ONLY Telescopic extension tube Hose and hand grip Carpet washer Quick Clip tube (for washing) Hard floor washer Luna Washing
2 000W CYCLONIC BAGLESS VACUUM
 2 000W CYCLONIC BAGLESS VACUUM /GVAVK08 Instruction Manual Contents Guide to the Appliance Caring for the Environment Safety Information and Warnings Basic Set Up Care and Maintenance Troubleshooting 2
O INSTRUCTION MANUAL P V* S N W* J F X* E R L** M** A Y* PRINTED IN P.R.C
 T G H* U O INSTRUCTION MANUAL U T P V* S N Q I W* J C F K B D X* E R L** M** PRINTED IN P.R.C. 48005539 1 A Y* *Certain models only ** 2 3 4 5 14 15 16 17 ** * 6 7 8 9 18 19 20 21 10 11 12 13 22 23 *Certain
BX3. Instructions for use
 BX3 Instructions for use 1 Your vacuum cleaner............................................3 Intended use..................................................4 Safety information..............................................4
M* U INSTRUCTION MANUAL ENGLISH N* O* P* Q** R I PRINTED IN P.R.C * Certain models only ** May vary depending on model
 48004107 - Ultra - UK IM.pdf 1 6/24/2011 10:29:10 AM L M* U INSTRUCTION MANUAL ENGLISH GB J C M Y V* CM MY CY CMY K N* O* P* E D C W* F K S PRINTED IN P.R.C. 48007324 1 Q** R I H G B A T X* * Certain models
Congratulations on purchasing a bennett read Hydro.
 USER GUIDE Congratulations on purchasing a bennett read Hydro. We are confident that it will give you years and years of outstanding service. Everything we know about floorcare went into the design and
User Manual. Compact Bagged Vacuum Cleaner. Dog & Cat W2000
 User Manual Compact Bagged Vacuum Cleaner 3 Features 1 2 On/off button Flexible hose 4 7 3 4 Telescopic wand Wand length adjustment 2 8 5 Cord rewind button 6 7 Variable speed control Combination floor
Polti S.p.A Bulgarograsso (CO) - Italy - Via Ferloni, 83 MAX. Fig. 10. Fig. 6. Fig. 6a. Fig. 14. Fig. E. Fig. 9. Fig.
 - Italy - Via Ferloni, 83 MAX. Fig. 10. Fig. 6. Fig. 6a. Fig. 14. Fig. E. Fig. 9. Fig.") COP - - M0S09128 1Q01:V_tto_1300cop.qxd 18/01/2010 16.43 Pagina 2 Fig. 1 Fig. 5 Fig. 2 Fig. 3 Fig. 4 Fig. 6 Fig. 6a Fig. 7 Fig. 9 Fig. 10 Fig. 12 Fig. 14 MAX Fig. 8 Fig. 11a Fig. 11b Fig. 13 Fig. C Fig.
COP - - M0S09128 1Q01:V_tto_1300cop.qxd 18/01/2010 16.43 Pagina 2 Fig. 1 Fig. 5 Fig. 2 Fig. 3 Fig. 4 Fig. 6 Fig. 6a Fig. 7 Fig. 9 Fig. 10 Fig. 12 Fig. 14 MAX Fig. 8 Fig. 11a Fig. 11b Fig. 13 Fig. C Fig.
Eco Pro Forever 450. Forever 980. Forever 980 Inox. Forever 900. Forever Forever Clean Pratica. 2H Professional.
 COP-LECOASPIRA 715 - M0S07830-1N02.qxp 08/02/2007 15.50 Pagina 2 Eco Pro 3000 Aspirovapor 715 Forever Clean Pratica Forever 440 Super Pro Forever 1000 2H Professional Forever 980 Easy Professional Forever
V.lla Pro 5200 R - Cod. M0S Edizione 1H04
 Pro 5200 R 3 12 10 7 8 1 11 2 6 9 5 4 13 V.lla Pro 5200 R - Cod. M0S05387 - Edizione 1H04 ENGLISH Vaporella Pro 5200 R R Pro 5200 R 1) Patented safety cap 2) 3-Position switch 3) Iron heating indicator
Ireland. Australia. New Zealand
 UK Ireland Australia New Zealand 2 3 4 5 Intended use Your Black & Decker vacuum cleaner has been designed to vacuum dry substances. This product is intended for household use only. Safety instructions
Ireland. Australia. New Zealand
 UK Ireland Australia New Zealand 2 3 4 5 Intended use Your Black & Decker vacuum cleaner has been designed to vacuum dry substances. This product is intended for household use only. Safety instructions
DYSON CUSTOMER HELPLINE
 DCO3 Operating manual DCO3 Absolute DYSON CUSTOMER HELPLINE 7000 35 756 Mon-Fri 9am-6pm, Sat 9am -1pm DCO3 quick reference page Brush control system Fit adaptor tool to reverse wand The brush control system
CA N* Q1** T* M* HF P* Q2** O* F T* P* E C O* L D USER MANUAL B V* J GP R K A I X* Q** PRINTED IN P.R.C
 M* CA N* N* Q1** T* M* HF S P* Q2** O* U* F T* P* E C O* L D USER MANUAL B V* J G H W* GP R PRINTED IN P.R.C. 48011352 1 K A I X* Q** * Certain models only ** Certain models only, nozzles may vary according
- 2 - IMPORTANT SAFETY REMINDERS
 USER MANUAL IMPORTANT SAFETY REMINDERS This appliance should only be used for domestic cleaning, as described in this user guide. Please ensure that this guide is fully understood before operating the
ITALIANO KUBOX ESPAÑOL FRANÇAIS DEUTSCH ENGLISH ROMÂNĂ
 PORTUGUÊS Nederlands DEUTSCH ITALIANO FRANÇAIS ESPAÑOL 1 ROMÂNĂ 1 2 9 3 8 5c 4 7 5a 5 6 5b Fig. 1 Fig. 2 Fig. 3 Fig. 4 Fig. 5 Fig. 6 Fig. 7 Fig. 8 Fig. 9 KUBOX 2-1S01 Read these instructions carefully
User Manual. Deep Cleaning Bagless Vacuum with Powerhead. Deep Clean W3000
 User Manual Deep Cleaning Bagless Vacuum with Powerhead Deep Clean W3000 Features 1 2 3 4 5 6 7 8 9 10 11 On/off button Flexible hose Telescopic wand Wand length adjustment Cord rewind button Combination
Vaporetto Lecoaspira Parquet - M0S10067 Edizione 1S01
 PARQUET Fig. 1 Fig. 2 Fig. 3 Fig. 4 Fig. 5 Fig. 6 Fig. 6a Fig. 7 Fig. 8 Fig. 9 Fig. 10 Fig. 11a Fig. 11b Fig. 11c Fig. 12 Fig. A1 Fig. B Fig. C 1c Fig. D Fig. A2 Fig. A3 2c Vaporetto Lecoaspira Parquet
ANTIBACTERIAL HAND VAC
 Gebruiksaanwijzing User manual Gebrauchsanweisung Mode d emploi Navodila za uporabo ANTIBACTERIAL HAND VAC WITH UV LIGHT CVH5743M 09/09 HOME APPLIANCES 1 SAFETY REGULATIONS 1. Before using the device,
INSTRUCTION MANUAL Model: SU3022
 INSTRUCTION MANUAL Model: SU3022 GUARANTEE This product is guaranteed for 2 years from the date of original purchase. If any defect arises due to faulty materials or workmanship, the unit will, either
VACUUMING AND SANITISING AT THE SAME TIME? LET NATURE DO IT.
 VACUUMING AND SANITISING AT THE SAME TIME? LET NATURE DO IT. Why settle for an ordinary vacuum cleaner when you can vacuum and sanitise the home at the same time? Vaporetto Lecoaspira is a revolutionary
USER MANUAL. Q1a Q1b Q1c Q1* Q1* H. Q2a Q2d. Q2c M Q2b Q2* L P C B N** GP O** I. ** Certain models only, nozzles may vary according to model
 Q1a Q1b Q1c J R Q1* H Q1* Q2a Q2d Q2c M Q2b Q2* L P K USER MANUAL D F C B G N** GP E A O** I CA HF 1 N1** N2** S* T* U* V* PRINTED IN P.R.C. 48011752 ** 2 3 4 5 * * 14 15 16 17 ** ** 6 7 8 9 18 19 20 21
SWAN CYCLONIC UPRIGHT. INSTRUCTION MANUAL Model: SU3017
 SWAN CYCLONIC UPRIGHT INSTRUCTION MANUAL Model: SU3017 GUARANTEE This product is guaranteed for 2 years from the date of original purchase. If any defect arises due to faulty materials or workmanship,
24 2A A4 A2 E2 B1 E3 E4 A1 A5 F O1 N G O L K T W1 X X1 PQ S 20-A. Polti S.p.A Bulgarograsso (CO) - Italy - Via Ferloni, 83
 - Italy - Via Ferloni, 83") COP- - M0S09417-1Q07:V_tto_1300cop.qxd 09/07/2010 16.29 Pagina 2 24 2A 4 6 7 3 5 8 10 25 23 2 26 9 1 11 12 17 18 27 16 22 15 14 20 19 13 B3 B2 A3 E1 E5 E E1 E6 A4 A2 E2 B1 E3 E4 A1 A5 F O1 N G D C P K1
COP- - M0S09417-1Q07:V_tto_1300cop.qxd 09/07/2010 16.29 Pagina 2 24 2A 4 6 7 3 5 8 10 25 23 2 26 9 1 11 12 17 18 27 16 22 15 14 20 19 13 B3 B2 A3 E1 E5 E E1 E6 A4 A2 E2 B1 E3 E4 A1 A5 F O1 N G D C P K1
Vacuum Cleaner MC-E3003 MC-E3001. Operating Instructions. Model No.
 Operating Instructions Vacuum Cleaner Model No. MC-E3003 MC-E3001 We would recommend that you carefully study these Operating Instructions before attempting to operate the unit and that you note the Important
Bagless cylinder vacuum cleaner
 73270 rev2 27/10/08 09:52 Page 1 Bagless cylinder vacuum cleaner Please read and keep these instructions Getting the best from your new cleaner... If your cleaner is not picking up as well as it should,
Due to continual improvement in design or otherwise, the product you purchase may differ slightly from the illustration in this book.
 Kambrook - Australia Building 2, Port Air Industrial Estate 1A Hale Street Botany NSW 2019 Australia Customer Service Line 1300 139 798 Customer Service Fax 1800 621 337 www.kambrook.com.au Kambrook -
- 2 - IMPORTANT SAFETY REMINDERS
 USER MANUAL IMPORTANT SAFETY REMINDERS This appliance should only be used for domestic cleaning, as described in this user guide. Please ensure that this guide is fully understood before operating the
Storm pets cylinder vacuum cleaner
 70313 rev3 3/7/06 13:59 Page 1 Storm pets cylinder vacuum cleaner Please read and keep these instructions Getting the best from your new cleaner... If your cleaner is not picking up as well as it should,
IMPORTANT SAFETY REMINDERS
 USER MANUAL IMPORTANT SAFETY REMINDERS This appliance should only be used for domestic cleaning, as described in this user guide. Please ensure that this guide is fully understood before operating the
Congratulations on the purchase of your new Hoover Smart.
 USER INSTRUCTIONS IMPORTANT SAFETY REMINDERS User s manual - This cleaner should only be used for its intended purpose as described in these instructions. Ensure that these are fully understood before
User Manual GV25 GV35 GV702. Company information: Original instructions GV12066 (1)
") User Manual Original instructions GV25 GV35 GV702 Company information: www.vipercleaning.eu info-eu@vipercleaning.com GV12066 (1) 2012-04-10 USER MANUAL ENGLISH TABLE OF CONTENTS Introduction... 4 Manual
User Manual Original instructions GV25 GV35 GV702 Company information: www.vipercleaning.eu info-eu@vipercleaning.com GV12066 (1) 2012-04-10 USER MANUAL ENGLISH TABLE OF CONTENTS Introduction... 4 Manual
Operating Instructions
 EN Operating Instructions 9 20 6 21 22 23 24 5 25 8 10 12 7 11 26 4 28 3 27 13 14 15 16 29 17 30 31 1 19 32 18 35 34 33 2 39 40 41 36 38 37 SL B24 AA0 UK SL B22 AA0 UK SL B20 AA0 UK SL B18 AA0 UK SL B16
ERGO BACKPACK VACUUM OWNER S MANUAL
 ERGO BACKPACK VACUUM OWNER S MANUAL Model: VACBP1 120V 12A, 1400W ETL US Canada Atrix 1350 Larc Industrial Blvd. Burnsville, MN 55337 www.atrix.com sales@atrix.com Telephone: 952.894.6154 Toll Free Telephone:
Bagless upright vacuum
 U89 U90 & U91-P2 Power 2 Series User Guide V2.0:U90-P2 User Guide 13/08/2010 11:44 Page 1 Vax Careline: (UK) 0844 412 8455 (ROI) 1-800 928 308 Bagless upright vacuum Vax model number: U91-P2 Series U90-P2
VACUUM CLEANER. Before operating this unit, please read the instructions carefully. Indoor use only.
 Operating Instructions VACUUM CLEANER Before operating this unit, please read the instructions carefully. Indoor use only. Register your product at www. samsung. com/ global/ register IMPORTANT SAFEGUARDS
- 2 - IMPORTANT SAFETY REMINDERS IT IS IMPORTANT THAT YOU:
 USER MANUAL IMPORTANT SAFETY REMINDERS This cleaner should only be used for domestic cleaning, as described in this user guide. Please ensure that this guide is fully understood before operating the appliance.
PerformAir Profile bagged cylinder vacuum cleaner
 70069 rev1:vc70069 MUK Rev1 05/10/2009 09:55 Page 1 PerformAir Profile bagged cylinder vacuum cleaner Please read and keep these instructions Getting the best from your new cleaner... If your cleaner is
INSTRUCTIONS FOR SAFE USE INSTRUCTIONS FOR SAFE USE
 USER MANUAL INSTRUCTIONS FOR SAFE USE This appliance should only be used for domestic cleaning, as described in this user guide. Please ensure that this guide is fully understood before operating the appliance.
Important: The wires in the mains power lead are coloured in accordance with the following code: Blue - Neutral Brown - Live
 User Instructions P1 P2 P3 P4 P5 P6 P7 P8 P9 P10 P11 P12 P13 P14 P15 P16 P17 P18 P19 P20 P21 Freespace_bag_std t7_v3.qxp 13/03/2007 12:23 Page 1 IMPORTANT SAFETY REMINDERS: This cleaner should only be
Compact Cyclonic Bagless Upright Vacuum Cleaner
 Compact Cyclonic Bagless Upright Vacuum Cleaner Model Number: RHUV20MR05 For Customer Services & Spare Parts please call 0345 209 7461 Opening times: Monday - Friday 8am 8pm & Saturday 9am 1pm Or visit
- 1- IMPORTANT SAFETY REMINDERS
 USER MANUAL IMPORTANT SAFETY REMINDERS This appliance should only be used for domestic cleaning, as described in this user guide. Please ensure that this guide is fully understood before operating the
INSTRUCTIONS FOR USE... 2
 5095109600 Rev. 1 19-03-2012 825440 INSTRUCTIONS FOR USE... 2 De Longhi Australia Pty Ltd ABN 49 104 012 857 Po Box 4540 Casula Mall NSW 2170 Australia Phone: 1800 126 659 Fax: 1800 007 289 www.kenwood-australia.com
COMMERCIAL GRADE, ULTRA EFFICIENT VACUUMING SYSTEM USER GUIDE
 COMMERCIAL GRADE, ULTRA EFFICIENT VACUUMING SYSTEM USER GUIDE Congratulations on purchasing a Bennett Read Stealth vacuum cleaner. This product is packed with the power and technology to provide fast,
Bagged Vacuum Cleaner with Powerhead. Compact Powerhead for a Powerful Clean Washable HEPA Filtration High Efficiency Soft Start Motor
 Bagged Vacuum Cleaner with Powerhead Compact Powerhead for a Powerful Clean Washable HEPA Filtration High Efficiency Soft Start Motor 3 1 2 5006PH Mode Congratulations on the purchase of your new HOOVER
(A) V.lla NEW CONCEPT 450 PATENT - M0S Edizione 1H09
 V.lla NEW CONCEPT 450 PATENT - M0S Edizione 1H09") (A) 8 12 7 10 10a 11 3a 1 9 2 5 4 6 3a 3 V.lla NEW CONCEPT 450 PATENT - M0S05855 - Edizione 1H09 ENGLISH Vaporella New Concept 450 1) Boiler cap 2) Illuminated ON/OFF switch 3) Removable tank 3a) Tank
(A) 8 12 7 10 10a 11 3a 1 9 2 5 4 6 3a 3 V.lla NEW CONCEPT 450 PATENT - M0S05855 - Edizione 1H09 ENGLISH Vaporella New Concept 450 1) Boiler cap 2) Illuminated ON/OFF switch 3) Removable tank 3a) Tank
DCO3 Operating Manual DYSON CUSTOMER HELPLINE am to 8pm, 7 DAYS A WEEK
 DCO Operating Manual DYSON CUSTOMER HELPLINE 0990 7510 8am to 8pm, 7 DAYS A WEEK DCO quick reference page Adaptive Brush Control The Adaptive Brush Control is a simple device to allow cleaning of hard
THE SUPER-SILENT, ULTRA-POWERFUL SOLUTION FOR PREMIUM HOME CLEANING USER GUIDE
 THE SUPER-SILENT, ULTRA-POWERFUL SOLUTION FOR PREMIUM HOME CLEANING USER GUIDE Thank you for purchasing a BENNETT READ WHISPER vacuum. Your WHISPER vacuum incorporates the latest technological advances
BATTERY POWERED BACKPACK VACUUM
 BATTERY POWERED BACKPACK VACUUM Operation Instructions Read all instructions before using this appliance IMPORTANT SAFETY INSTRUCTIONS Per CFR 49, Lithium Ion batteries are considered hazardous goods.
Atrix Back Pack Vacuum
 1 Atrix Back Pack Vacuum OWNER S MANUAL Model: VACBP1 120V 12A, 1400W ETL US Canada Model: VACBP2 230V 6A, 1400W EAC Atrix International, Inc. 1350 Larc Industrial Blvd. Burnsville, MN 55337 www.atrix.com
R20SC, R20E & R20ENT. Owner s Manual
 R20SC, R20E & R20ENT Owner s Manual Contents Getting Started Important Safety Instructions... 2 Polarization Instructions... 3 State of California Proposition 65 Warnings... 3 Description of the Vacuum...
Get Cleaning... What s your Vax s model number? User Guide. Multifunction SpinScrub. vax.com.au. Vax Careline: AU: NZ:
 User Guide Vax Careline: AU: 1300 361 505 NZ: 0800 800 900 Multifunction SpinScrub Get Cleaning... What s your Vax s model number? WV S S 7 1 5 1 What s your serial number? (Located on the base of the
IMPORTANT SAFETY REMINDERS
 USEr manual IMPORTANT SAFETY REMINDERS This appliance should only be used for domestic cleaning, as described in this user guide. Please ensure that this guide is fully understood before operating the
Owner s Guide. Powerhead Canister Vacuum Cleaner
 Owner s Guide Powerhead Canister Vacuum Cleaner INDEX 1. Important Safety Instructions 2. Components & Accessories 3. Assembly 4. How to Operate a. On/Off Switch b. Check bag indicator c. Variable suction
EN Bagged Vacuum Cleaner
 SVC 8500TI EN Bagged Vacuum Cleaner - 1 - EN Bagged Vacuum Cleaner Important safety instructions READ CAREFULLY AND STORE FOR FUTURE USE. This vacuum cleaner may be used by children 8 years of age and
Power Advance. vax.com.au vax.co.nz CYCLONIC BARREL VACUUM LET S GET STARTED. VACUUM CLEANER VX77
 Power Advance VACUUM CLEANER CYCLONIC BARREL VACUUM LET S GET STARTED. VX77 vax.com.au vax.co.nz Let s talk safety Basic safety precautions This vacuum cleaner is intended for household use only and NOT
USER S GUIDE IMPORTANT SAFETY INFORMATION READ ALL INSTRUCTIONS BEFORE USING VACUUM CLEANER USE ONLY AS DIRECTED. WATER FILTRATION VACUUM CLEANER
 WATER FILTRATION VACUUM CLEANER USER S GUIDE WATER FILTRATION VACUUM CLEANER MODEL: SA861-80 USER S GUIDE U.S. Distributed by: Thane International, Inc. La Quinta, CA 92253 U.S.A. www.thane.com IMPORTANT
ANTIBACTERIAL HAND VAC WITH UV LIGHT
 User manual ANTIBACTERIAL HAND VAC WITH UV LIGHT CVH5743M 02/12 HOME APPLIANCES 1) Press the lever down. 2) Insert the vacuum cleaner while holding the lever down. 3) Once the vacuum cleaner is inserted
English. Important Read this user manual carefully before you use the appliance and save it for future reference.
 FC849-FC840 3 3 4 5 6 7 8 9 0 34 3 4 5 3 30 6 33 7 9 8 3 8 7 6 5 4 9 3 0 6 English Introduction Congratulations on your purchase and welcome to Philips! To fully benefit from the support that Philips offers,
Vacuum Cleaner. user manual. Please read the User Manual thoroughly before operating the vacuum. For indoor use only.
 SU10F70 SERIES Vacuum Cleaner user manual Please read the User Manual thoroughly before operating the vacuum. For indoor use only. English Thank you for purchasing a Samsung product. Contents YOUR VACUUM
USER MANUAL KGNVCTBVAA
 USER MANUAL KGNVCTBVAA IMPORTANT SAFETY INSTRUCTIONS When using an electrical appliance, basic precautions should always be followed, including the following: READ ALL INSTRUCTIONS BEFORE USING THIS APPLIANCE
IMPORTANT SAFETY REMINDERS
 USER INSTRUCTIONS GB IMPORTANT SAFETY REMINDERS This appliance should only be used for domestic cleaning, as described in this user guide. Please ensure that this guide is fully understood before operating
Vacuum Cleaner. user manual. Please read the User Manual thoroughly before operating the vacuum. For indoor use only.
 SC07F70 Series SC08F70 Series SC20F70 Series Vacuum Cleaner user manual Please read the User Manual thoroughly before operating the vacuum. For indoor use only. English Thank you for purchasing a Samsung
Bagless upright. vax.co.uk. Vax Careline: (UK) (ROI) Mach 1 series Mach 2 series. Vax model number: Version 1.
 (ROI) Mach 1 series Mach 2 series. Vax model number: Version 1.") U91-M1 & M2 Mach Series User Guide v1.2:user Guide 31/08/2010 19:19 Page 1 Vax Careline: (UK) 0844 412 8455 (ROI) 1-800 928 308 Bagless upright MACH Vax model number: Mach 1 series Mach 2 series WARNING:
U91-M1 & M2 Mach Series User Guide v1.2:user Guide 31/08/2010 19:19 Page 1 Vax Careline: (UK) 0844 412 8455 (ROI) 1-800 928 308 Bagless upright MACH Vax model number: Mach 1 series Mach 2 series WARNING:
Prolux Tritan INSTRUCTION MANUAL
 Prolux Tritan INSTRUCTION MANUAL For your safety please read the Owners Manual in its entirety Congratulations on your purchase of your new Prolux Tritan Vacuum! With the Prolux Tritan s adjustable operation
IMPORTANT SAFETY REMINDERS
 USER Manual IMPORTANT SAFETY REMINDERS This appliance should only be used for domestic cleaning, as described in this user guide. Please ensure that this guide is fully understood before operating the
Get Cleaning... What s your Vax s model number? User Guide. Carpet Washer Vax Careline: AU: NZ:
 User Guide Vax Careline: AU: 1300 361 505 NZ: 0800 800 900 Carpet Washer Get Cleaning... What s your Vax s model number? W8 W8 W0 W0 W0 W W W W W What s your serial number? (Located on the base of the
Register your new Bosch now:
 Register your new Bosch now: www.bosch-home.com/welcome ww.bos com/welcome BSGL5... en Operating instructions Table of content Safety information..................................4 Intended use.......................................4
Read through the instructions carefully before using the appliance for the first time. Safeguard them for future reference.
 Table of Contents Important Safeguards... 2 Additional Caution for Blower... 2 Parts... 3 Installing Charger Base... 4 Charging the Battery... 4 Important Note for Charging... 5 Indication Lights... 5
Essentials Family and Pets+ permanent bagged cylinder vacuum cleaner
 70255 rev1 12/9/07 09:49 Page 1 Essentials Family and Pets+ permanent bagged cylinder vacuum cleaner Please read and keep these instructions Getting the best from your new cleaner... If your cleaner is
INSTRUCTION MANUAL. Cylinder Bagless Vacuum Cleaner BVC1805
 INSTRUCTION MANUAL BVC1805 Cylinder Bagless Vacuum Cleaner Warranty Helpline: 1800 509 394 (Australia) 0800 450 259 (New Zealand) The Gold Technical Support Line: 1902 215 259 Personal Product Support
S6 Upright Vacuum Cleaner Instruction Manual
 S6 Upright Vacuum Cleaner Instruction Manual CONTENTS 1. Parts List Contents Of Packaging Assembly 01 01 01 2. Important Safety Instructions 02 3. User Instructions 05 4. Troubleshooting 08 5. Cleaning
MULTI - CYCLONIC VACUUM CLEANER VCC 7070
 MULTI - CYCLONIC VACUUM CLEANER VCC 7070 EN I J K A B C D E O P Q F G H L R S M N 3 ENGLISH 16-25 4 SAFETY Please read this instruction manual thoroughly prior to using this appliance! Follow all safety
IMPORTANT SAFETY REMINDERS:
 User Instructions P1 P2 P3 P4 P5 P6 P7 P8 P9 P10 P11 P12 P13 P14 P15 P16 P17 P18 P19 P20 P21 STD cyclonic t7_v2.qxp 12/03/2007 17:11 Page 1 IMPORTANT SAFETY REMINDERS: GB This cleaner should only be used
User Guide Vax Careline: AU: NZ:
 User Guide Vax Careline: AU: 1300 361 505 Bagless Cylinder Get Cleaning... What s your Vax s model number? V C Z 1 6 0 0 / V C Z P 1 6 0 0 / V C Z R 1 6 0 0 What s your serial number? (Located on the base
Combivac Operating Instructions Combivac
 Combivac 17-36 Operating Instructions Combivac General Table of contents General...2 Table of contents...2 Information about the operating instructions...3 Liability...3 Notices in the operating instructions...3
Get Cleaning... User Guide Vax Service line AU: NZ: Bagged Cylinder What s your Vax s model number?
 Bagged Cylinder User Guide AU: 00 0 NZ: 0800 800 900 Get Cleaning... What s your Vax s model number? 0 0 0 What s your serial number? (Located on the base of the machine) Note these down in case you need
User Guide. Please read carefully before use. Your Hoover Guarantee. Your Hoover Guarantee. Contents. IMPORTANT Safety Reminders
 Your Hoover Guarantee Contents Your Hoover Guarantee During year 1 HOOVER engineers will replace or repair all defective parts free of charge, except for parts subject to fair wear and tear such as belts,
VACUUM CLEANER USER GUIDE
 VACUUM CLEANER USER GUIDE CHH01 MODEL Vytronix Ltd CHH07/0330 IMPORTANT SAFETY INSTRUCTIONS When using an electrical appliance, basic precaution should always be followed, including the following: READ
Australia. New Zealand
 .... Australia New Zealand 2 5 3 4 JA JB JC JD JE JF JG JH JI JJ JK JL JM JN JO 5 Intended use Your Black & Decker vacuum cleaner has been designed to vacuum dry substances. This product is intended for