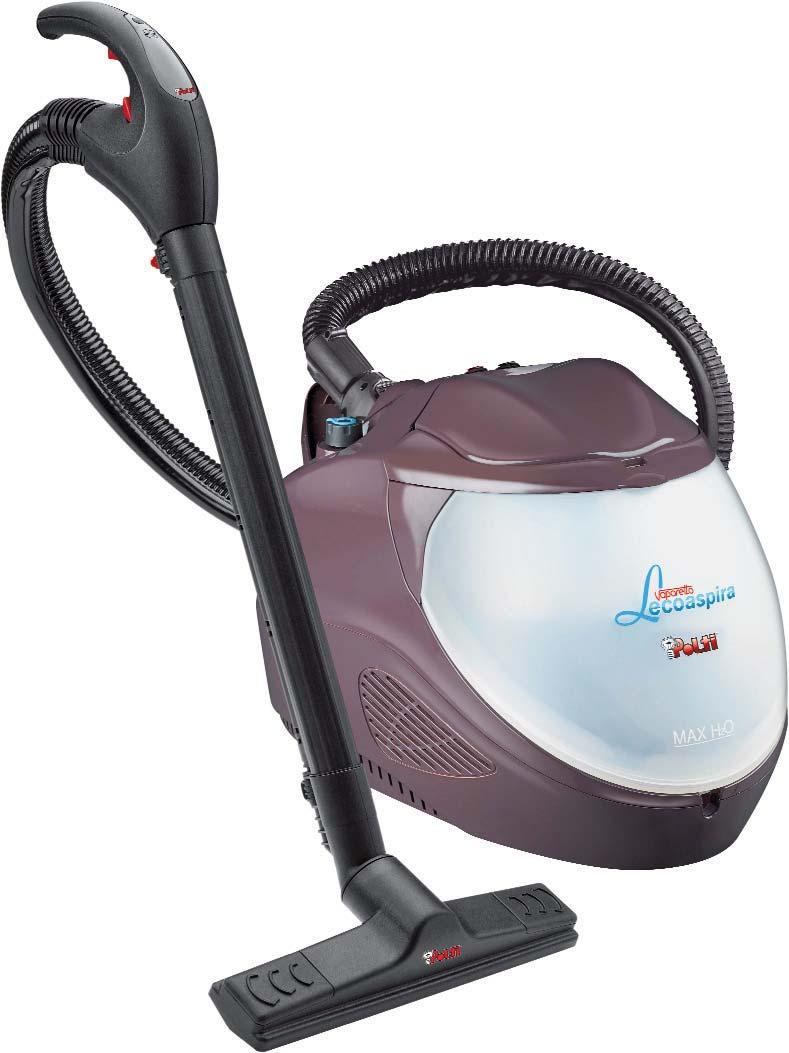
Vaporetto Lecoaspira Parquet - M0S10067 Edizione 1S01
|
|
|
- Dennis King
- 6 years ago
- Views:
Transcription


1 PARQUET


2 Fig. 1 Fig. 2 Fig. 3 Fig. 4 Fig. 5 Fig. 6 Fig. 6a Fig. 7 Fig. 8 Fig. 9 Fig. 10 Fig. 11a Fig. 11b Fig. 11c Fig. 12 Fig. A1 Fig. B Fig. C 1c Fig. D Fig. A2 Fig. A3 2c Vaporetto Lecoaspira Parquet - M0S10067 Edizione 1S01


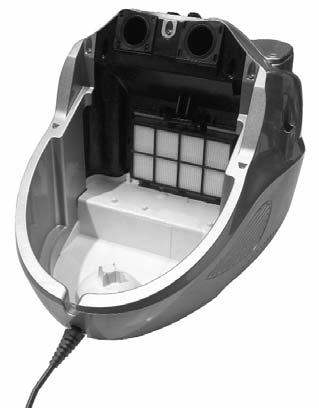
3 O3 O1 R P H E2 F M M1 L I IA OPTIONAL A7 A A6 A5 A1 A3 A4 A2 Q C C4 C4 C2 C3 C1 B B2 D D3 D2 D1 N B1 O2 G S1 S2 S4 A7 A6 S5 S3 S T E E1 E A MAX 21
4 KEY 1) Main switch 2) Boiler button terracotta / parquet floor function 2A) Parquet function indicator light 3) Out of water indicator lamp 4) Pressure indicator lamp 5) Suction UP indicator lamps 6) Carrying handle 7) Sealing cap of the self-filling tank 8) Steam control knob 9) Flap of the built-in socket 10) Built-in socket 11) Air outlet grill 12) Pivoting wheels 13) Power supply cable 14) Supply cable canal 15) Supply cable storage 16) Accessories holder 17) Hepa filter 18) Unhooking lever for Hepa filter 19) Hepa filter holders 20) Dirt container 21) MAX level 22) Dirt container handle 23) Eco-Active water filter assembly 24) Eco-Active water filter assembly cover 25) Shaped filtering sponge 26) Filter body with microholed net 27) Elbow tube SUCTION - STEAM ACCESSORIES A) Flexible steamsuction hose A1) Fitting for connecting accessories A2)Handle A3)Safety button A4)Suction button A5)Steam button A6)Monobloc plug A7)Locking button of the monobloc plug B) Steamsuction extension tube B1)Steamsuction extension tube with parking B2)Accessory locknut C) Universal brush C1) Bristle insert for universal brush C2) Rubber insert for universal brush C3) Rigid insert for universal brush C4) Slides for locking fittings into place D) Steamsuction nozzle LECOASPIRA PARQUET D1) 200 mm window cleaning insert for stemsuction nozzle D2) 130 mm window cleaning insert for steamsuction nozzle D3) Bristle insert for steamsuction nozzle E) 120 steamsuction accessory E1)Steam lance E3)Coloured brushes for 120 steamsuction accessory O1) Terry cloth O2) Cloth O3) Parquet cloth P) Spare gaskets Q) Filler bottle R) Tank cleaning brush SUCTION ACCESSORIES E2) Small suction nozzle F) Suction lance G) Upholstery suction nozzle H) Suction brush with soft bristles I) Telescopic suction tube IA) Telescopic tube release button L) Parquet brush T) Biecologico OPTIONAL ACCESSORIES M) Turbo-brush M1) Surface type selector N) Mini turbo-brush S) Professional iron S1) Continuous steam button S2) Steam request button S3) Iron heating indicator light S4) Temperature adjustment knob S5) Iron rest mat N.B. - For easy identification, accessories are marked by the reference specified in this table. 122

5 Read these instructions carefully before using the appliance. Dear Customer, Thank you for purchasing our product. By choosing Vaporetto Lecoaspira, you will have a complete appliance for cleaning your home, capable of vacuuming solids and liquids, sanitising with steam, drying and eliminating dust mites and allergens. You can decide, depending on your needs, whether to use the steam and suction together for complete cleaning, just the suction to effectively collect dust or just the steam for specific cleaning tasks. The suction feature: The heart of the filtration system is represented by the exclusive Eco-Active water filter, patented by Polti. The Eco-Active water filter uses the natural purifying force of water to trap dirt, preventing dispersion of dust into the environment. In addition, the HEPA filter collects impurities including pollen as well as dust mites. The steam feature: The Lecoaspira steam is dry and powerful. Thanks to the heat, it removes and dissolves dirt eliminating grease, germs and dust mites. The sanitising force of steam is completely natural and has a cleaning power that even the most modern chemical detergents cannot equal. You can find useful suggestions on our website to take full advantage of all the features of your Lecoaspira. Please consult the Guide for a Healthy and Clean Home found on the home page of the website. We hope you enjoy your Polti product. This unit conforms with EC-directives 2004/108/CE (EMC) and 2006/95/CE (low voltage). Polti S.p.A. reserves the right to change equipment or accessory specification without prior notice. 123

6 PRECAUTIONS KEEP THESE INSTRUCTIONS Read these instructions carefully before using the appliance. Any use which does not comply with these instructions will invalidate the warranty. SAFETY WARNINGS Risk of electric shock and/or short circuit: - The wiring system to which the appliance is connected must always comply with the laws in force. - Before connecting the appliance, make sure that the mains voltage is the same as the voltage indicated on the data label of the appliance and that the power outlet is connected to earth. - Always turn off the appliance at the on/off switch before unplugging it. - If the appliance is left unused, disconnect it from the mains. Never leave the appliance unattended with the cable plugged into the mains. - Always make sure the appliance is unplugged before performing maintenance work of any kind. - Do not pull the power cable out of the socket, but grasp the plug itself to avoid damage to the socket. - Do not allow the power cable to be twisted, crushed, stretched, or come into contact with sharp or hot surfaces. - Do not use the appliance if the power cable or other important parts of the appliance are damaged. Instead, contact an authorised service centre. - Do not use electric extension leads that are not authorized by the manufacturer, as they may cause damage or fire. - Never touch the appliance with wet hands or feet with the cable plugged into the mains. - Do not use the appliance when barefoot. - Do not use the appliance near washbasins, bathtubs, showers or containers full of water. - Never immerse the appliance, the cable or the plugs in water or another liquid. - Do not direct the steam jet at live electrical and/or electronic equipment or at the appliance itself. - If the supply cord is damaged, it must be replaced by the manufacturer, its service agent or similarly qualified persons in order to avoid a hazard. SAFETY WARNINGS: Risk of injuries and/or burns when using the appliance: - Use of the appliance in places where there is a danger of explosions is prohibited. - Do not use the product with toxic substances. - This appliance is not intended for use by persons (including children) with reduced physical, sensory or mental capabilities, or lack of experience and knowledge, unless they have been given supervision or instruction concerning use of the appliance by a person responsible for their safety. - Children should be supervised to ensure that they do not play with the appliance. WARNING: High temperature. Danger of burns! Do not touch the parts indicated on the product. - In case of accidental fall of the appliance it is necessary to have it checked by an authorized Service 124

7 Centre as the internal safety features may have been affected. - In case of breakdown or malfunction switch off the appliance and never attempt to disassemble it, but refer to an authorized Polti Service Centre. - This appliance is equipped with safety devices which are to be replaced only by a suitably qualified technician. - Before cleaning or storing the appliance, always first ensure that the appliance has cooled down completely. - Do not direct the steam jet at people, animals or debris. - High-pressure jets can be dangerous if used improperly. - Do not direct the steam jet at people, live electrical equipment or the appliance itself. - Never place your hands inside the jet of steam. ATTENTION: Danger of burns! - While refilling with water, switch off and disconnect the appliance from the mains. - Do not use if the appliance has been dropped, has visible signs of damage or leaks. - Do not use the appliance to suck up acids or solvents, as these might cause serious damage to the appliance and above all do not suck up explosive dust or liquids, as these could cause explosions on coming into contact with the inside components of the appliance. - Do not suck up toxic substances. - Do not suck up burning or incandescent objects such as embers, ash or other material in which combustion is taking place. - If ironing whilst sitting down, take care to ensure that the jet of steam is not angled towards your legs. Steam can scald. - Before connecting the appliance to the current, ensure that the continuous steam jet button is not pressed. - Never leave the iron unattended when it is plugged in. SAFETY WARNINGS using the appliance: - By nature, water contains magnesium, mineral salts and other deposits that favour the formation of scale. To prevent these deposits from causing damage to the appliance, use KALSTOP FP 2003, a special natural descaling agent that removes scale. This allows avoiding scale formation and protecting the metal walls of the boiler. KALSTOP FP 2003 can be found in small appliance stores and Polti service centres. Alternatively, use a 50/50 mixture of tap water and demineralised water. - Never use distilled water or scented water. - Do not put any detergent or chemical substance in the boiler. - We recommend you use original Polti products only, as products of other brands may not be suitable for use in Polti products and could cause damage. - Never leave the appliance exposed to the weather. - Do not place the appliance near a live element, an electric stove or any other source of heat. - Do not expose the appliance to temperatures unde 32 F (0 C) e superiori ai 104 F (40 C). - Press the buttons only with a finger, without excessive force and avoid using a pointed object such as a pen. - Do not wind the power cable around the appliance, especially when the appliance is still hot. 125

8 - To avoid prejudicing the safety of the appliance when repairing or replacing accessories, use only original spare parts. - Let the appliance cool down before cleaning it. - Before storing the appliance make sure that it has completely cooled down. - The water container can be filled with tap water. - Do not suck up materials such as cement, chalk etc. which solidify once they come in contact with water thus damaging the appliance. - It is necessary to keep the unit in horizontal position during operation. - Always rest the appliance on a stable surface. - Iron only on supports that are heat resistant and which allow the steam to permeate. - If the iron rest mat needs to be replaced, only use original spare parts. - The iron must be used and rested on a stable surface. - When placing the iron on its stand, make sure that the surface on which the stand is placed, is stable. - Do not place the hot appliance on heat-sensitive surfaces. - If the iron rest mat needs to be replaced, only use original spare parts. CORRECT USE OF THE PRODUCT This appliance is intended for home use as a generator of steam and as a vacuum of liquids, dust and dirt in accordance with the instructions provided in this manual. Please read these instructions carefully and keep them, as you may find them useful in future. Polti S.p.A. declines all liability for any damage or accident deriving from any use of this appliance which is not in conformity with the instructions contained in this booklet. ATTENTION Directive 2002/96/EC (Waste Electrical and Electronic Equipment - WEEE): information for users This product complies with EU Directive 2002/96/EC. The crossed-out wastebasket symbol on the appliance means that at the end of its useful lifespan, the product must be disposed of separately from ordinary household wastes. The user is responsible for delivering the appliance to an appropriate collection facility at the end of its useful lifespan. Appropriate separate collection to permit recycling, treatment and environmentally compatible disposal helps to prevent negative impact on the environment and human health and promotes the recycling of the materials making up the product. For more information on available collection facilities, contact your local waste collection service or the shop where you bought this appliance 126
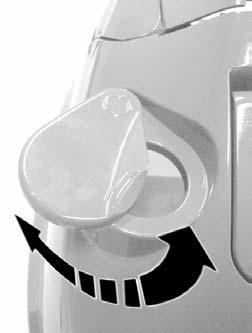
9 Lecoaspira Parquet is a multi-function appliance which, depending on the need and type of cleaning you want to do, can be used: - Just as a vacuum to remove dust from surfaces. In this case, remember to add water to the dirt collection container (see Paragraph 1 of the preparing for use ) - Just as a steam cleaner to sanitise surfaces. For this feature, the container must be filled with water to supply the boiler (see Paragraph 2 of the preparing for use ) - To use the suction and steam features at the same time to vacuum, wash and dry at the same time. Naturally, in this case both the dirt collection container and the tank must be filled. PREPARING FOR USE 1) IF YOU HAVE TO VACUUM: 1.A) FILL THE DIRT COLLECTION CONTAINER/FILTER WITH WATER Lift the handle (22) of the dirt collection container (20) (Fig. 3). Remove the container (20) from its housing, turning the handle (22) of the container backwards (Fig. 4), in order to remove the Eco- Active water filter unit (23). Fill the container with about 1.2 L of plain tap water up to the MAX indicator (21). You can also add Bioecologico, the natural, anti-foam liquid and deodorant to the container which, in addition to filling the room with a pleasant perfume, prevents the formation of foam in the water filter, guaranteeing the correct operation of the appliance. Replace the filter assembly (23) in the dirt container (20) restoring it to its original position. Reposition the dirt container (20) in the specific space and turn the handle until it returns to its starting position. 1.B) WATER REPLACEMENT DURING USE Dust, solids or liquids can be vacuumed equally with this product. When the dirt sucked into the water container (20) reaches the maximum allowed level, suction will be automatically blocked by the special safety float.this can also occur when the water in the container is very dirty. In these cases, there is an increase in the motor rpm and after 10 seconds the device automatically pauses. When this occurs, the water must be replaced in the container. Turn off the appliance and only restart it when the level of the water in the container has been restored as described in the chapter Emptying and cleaning the dirt container. Any immediate restarting when the appliance has gone into pause mode can damage the air outlet filter. 2) IF YOU NEED TO USE THE STEAM FEATURE: 2.A) FILLING THE TANK Turn the cap of the tank outwards (7) (Fig. 1). Fill the self-filling tank with approx. 560 cc in any case to above the maximum level of the float (Fig. 2) of normal water using the filler bottle (Q). N.B. Ordinary tap water may also be used. However, since water contains limescale by nature, which may cause scaling in the long run, we recommend using a mixture of 50% tap water and 50% demineralised water. To use tap water only and avoid scale formation, we recommend the addition of the special natural scale removal agent KALSTOP FP
10 Do not use only demineralised water but mix it as described above with tap water. We recommend you use original Polti products only, as products of other brands may not be suitable for use in Polti products and could cause unwelcome problems. Never use distilled water or scented water. 2.B ) FILLING THE BOILER DURING USE Thanks to the self-filling system, it is no longer necessary to stop and wait before refilling the boiler once again with water. When the water in the boiler is at the minimum level, the level sensor automatically draws off water from the tank by means of a pump which fills the boiler. When the water in the self-filling tank runs out, the Out of water indicator light (3) will light up and a buzzer will sound. To continue working, just follow the indications in the paragraph Preparing for use 3) SWITCHING ON Open the built-in socket door (9), insert the built-in plug (A6) of the flexible hose (A) pushing it until you hear the click of the hooking mechanism (A7) (Fig. 6-6a). Connect the power plug to a suitable electric socket. N.B. The handle of the flexible hose (A2) is fitted with a safety button (A3) to prevent the accidental activation of steam delivery by children or people who do not know how it works. Should the appliance be left momentarily unguarded, move the safety button (A3) to the off position.to continue steam delivery, move the switch back to its original position. 4) HOW TO USE Lecoaspira Parquet can operate in the following modes: SUCTION ONLY, STEAM ONLY, SUCTION STEAM Switch it on by pressing the main switch (1), the first level of the suction indicator lamps (5),will begin to flash. 4.1) VACUUM ONLY MODE By simply pressing the button (A4), on the handle (a2), you can begin to vacuum at the lowest speed: the first level of the indicator light (5), will stop flashing and will remain on. Keeping the button (A4), pressed, you can select the suction power according to the type of surface you are cleaning. When the suction power is increased, an indicator light (5), will come on. When the suction power is decreased, the indicator light (5), will go off. The suction function can be adjusted to 3 levels of strength, for cleaning: - Level 1: curtains, sofas and cushions - Level 2: rugs/carpets - Level 3: floors or for suctioning liquids To stop suction, just press the button (A4). Suction will stop. N.B. When the appliance is switched on again, the suction level will be that set last time it was used. 128
11 4.2) STEAM ONLY MODE Press the boiler button - terracotta/parquet floor function (2). Wait for the pressure indicator lamp (4) to come on. This indicates that the appliance is ready for use. By pressing the steam button (A5) on the handle you can dispense steam. To stop the steam flow, simply release the button (A5). If you decide you no longer wish to use the steam, you can switch off the boiler by pressing the relative button (2). You can optimise the steam flow by means of the steam control knob (8) on the handle (Fig. 7). To increase the flow, turn the regulator control clockwise. Turn the control anticlockwise to reduce the flow. - Strong steam: to remove scale, stains, grease and sanitise; - Normal steam: for carpets, rugs, glass, floors; - Gentle steam: to steam plants, clean delicate fabrics, wall coverings, sofas, etc. N.B. When first operating it, there may be some drops of water mixed with the steam due to imperfect thermal stabilization. We therefore recommend that the first jet of steam be directed onto a rag. 4.3) STEAM SUCTION MODE You can use the steam and suction features at the same time, by activating them both as described in the preceding paragraphs (4.1 and 4.2). 5) CONNECTING THE ACCESSORIES 5.1) STEAM SUCTION EXTENSION TUBES To connect the two extension tubes together B and B1 it is important to pay attention to the direction indicated by the arrows. The appliance is in fact equipped with a parking system on which it is possible, when you have finished using them, to replace the extension tube accessory B1. Incorrect assembly of the two parts, B and B1, will not allow this feature to be used. Hook both extension tubes B and B1 to the connecting accessories (A1) of the flexible hose (A). 5.2) TELESCOPIC SUCTION TUBE The length of the telescopic suction tube can be adjusted from a minimum of 60 cm to a maximum of 1 metre. To increase or decrease length, press the release button (IA) and extend or reduce length as desired. Then connect the telescopic suction tube (I) to the connecting accessories (A1) of the flexible hose (A). Warning - the telescopic suction tube can only be used in suction mode to vacuum liquids and solids. Absolutely do NOT use in steam mode. 5.3) USE OF THE ACCESSORIES STORAGE The accessories storage (16) allows you to fasten the tube (B1) with or without the brush assembled onto the appliance body. To connect the tube (B1) to the appliance, slide the hook located on the tube into the accessories storage on the appliance (Fig. 9). 129
. To connect the specific accessories for the suction and steam features (B-B1-C-D-E) proceed as follows: - Move the locknut (B2) of the accessory, if present, to the OPEN position (Fig.")
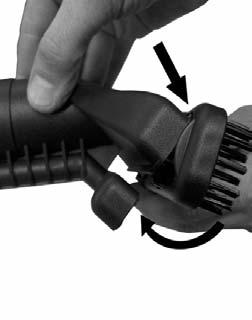
12 5.4) CONNECTING THE ACCESSORIES All the Vaporetto Lecoaspira accessories can be connected directly to the connecting accessories (A1) or to the extension tubes (B) or (B1), previously assembled (see paragraph 5.1). To connect the specific accessories for the suction and steam features (B-B1-C-D-E) proceed as follows: - Move the locknut (B2) of the accessory, if present, to the OPEN position (Fig. A1). - Attach the desired accessory to the handle. - Move the accessory locknut (B2) to the CLOSED position (Fig. A2). - Check the strength of the connection. - On the steam - suction extension tubes B and B1 there is an additional fastening button: proceed as described previously for the accessories and release the tubes by sliding the button as far as the lock position (fig. A3). Fig. A1 Fig. A2 Fig. A3 - To connect the special accessories only for suction (E2-F-G-H-I-L-M-N) it is only necessary to attach them without coupling them to the locknut. To connect the steam lance (E1) with the 120 accessory (E), just screw it on. The same operation can be carried out for the coloured brushes (E3), which can in turn be screwed onto the 120 accessory (E) and onto the steam lance (E1). The different colours allow you to always use the same brush on the same surface. Attention: In this case, the steam function must be disabled by pressing the safety button (A3), to prevent the accidental release of steam. 130
, move outwards the two slides (C4) on the back of the brush.")
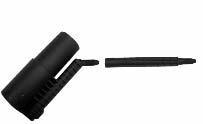
: To fit the insert (D1 - D2 - D3), first insert the external")
13 5.5) ASSEMBLY INSERTS LECOASPIRA PARQUET To fit the inserts on the universal brush (C): To fit the insert (C1 - C2 - C3), move outwards the two slides (C4) on the back of the brush. Fit the insert into the lower part of the brush and block it by moving the slides (C4) inwards. To fit the inserts on the steam-suction nozzle (D): To fit the insert (D1 - D2 - D3), first insert the external side (1c), then turn it until it clicks into place (2c). 1c 2c 131
14 A - ORDINARY CLEANING A1) HARD FLOORS (MARBLE, GRANITE, TILE) ACCESSORIES TO BE USED: extension tubes (B-B1) or telescopic suction tube (I) only in suction mode, universal brush (C) with insert, as per the following table: ACCESSORIES REFERENCE LETTER PICTURE FUNCTION Extension tubes or telescopic tube (B B1) or I C universal brush C1 bristle insert or Vacuuming dust Extension tubes universal brush rubber insert (B B1) C C2 Liquid aspiration; steam flow and floor drying VACUUM FUNCTION To vacuum up dust and liquids or effectively remove animal hair Press the suction button (A4) o begin vacuuming. Adjust suction to level 3 (see paragraph 4.1) to vacuum up dust or liquid. To stop suction, just press the button (A4) once. STEAM AND VACUUM FUNCTION Wash and vacuum even the dirtiest floors. This function enables the sanitisation of all types of hard flooring, such as marble, granite and ceramic. N.B. Before steaming surfaces, we recommend vacuuming up any hair or dust, using the vacuum only function. Switch on the boiler and set the steam pressure according to how dirty the surface to be treated is, following the instructions in the relative paragraph (4.2). Press the button (A5) on the handle to dispense steam over the surface to be cleaned. To stop the steam flow, simply release the button (A5). Then activate suction by means of the button (A4) to dry the surface treated. Keeping the button pressed (A4), select the desired suction power (see paragraph 4.1). N.B. If the floor is not very dirty, you can activate steam and vacuum together, to wash and dry at the same time. 132
15 A2) CARPETS/RUGS N.B. Before treating delicate fabrics with steam, consult the manufacturer s instructions and always carry out a test on a hidden part or on a sample of the material. Allow the steamed part to dry to make sure that no changes in colour or deformations have occurred. ACCESSORIES TO BE USED: extension tubes (B-B1) or telescopic suction tube (I) only in suction mode, universal brush (C) with insert, as per the following table: ACCESSORIES REFERENCE LETTER PICTURE FUNCTION Extension tubes or telescopic tube (B B1) or I C universal brush C3 rigid insert or Suction / steam delivery VACUUM FUNCTION To vacuum up dust and animal hair. Press the suction button (A4) to begin vacuuming. Adjust suction to level 2 (see paragraph 4.1) to vacuum up dust or liquid. To stop suction, just press the button (A4) once. STEAM-VACUUM FUNCTION To wash, vacuum and sanitise carpets and rugs. N.B. Before steaming surfaces, we recommend vacuuming up any hair or dust, using the vacuum only function. Switch on the boiler and set the steam pressure according to how dirty the surface to be treated is, following the instructions in the relative paragraph (4.2). Press the button (A5) on the handle to dispense steam over the surface to be cleaned. To stop the steam flow, simply release the button (A5). Then activate suction by means of the button (A4) to dry the surface treated. Keeping the button pressed (A4) select the desired suction power (see paragraph 4.1). 133

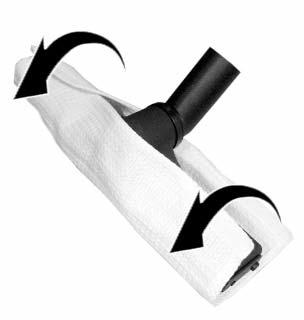
16 A3) PARQUET AND TERRACOTTA The parquet function is specifically for cleaning parquet and delicate floors. The function involves the combined action of a delicate intermittent flow of steam with adequate suction force. Delicate surfaces must always be cleaned using the special parquet cloth (O3) provided, fitted onto the universal brush(c) (Fig. D). N.B. Please pay careful attention when cleaning wooden surfaces and treated terracotta flooring with steam as prolonged use of steam may damage the wax, polish or colour of the surfaces to be cleaned. We therefore recommend dispensing steam on these surfaces only for short periods of time and suggest always using a cloth, avoiding direct steam being dispensed onto the surface. In the case of old or particularly delicate floors, clean with cloth steamed previously, without dispensing steam directly on the surface. ACCESSORIES TO BE USED: extension tubes (B-B1) or telescopic suction tube (I) only in suction mode, parquet brush (L), universal brush (C) with insert, as per the following table: ACCESSORIES REFERENCE LETTER PICTURE FUNCTION Extension tubes or telescopic tube parquet brush or (B B1) or I L Vacuuming dust* Extension tubes or telescopic tube (B B1) or I C universal brush C2 rubber insert Extension tubes universal brush rigid insert parquet cloth (B B1) C C3 O3 or Vacuuming liquids Steam washing feature** * The parquet brush (L) is designed to clean delicate surfaces; it has bristles and wheels in a special material to avoid damaging such surfaces. **After fitting the rigid insert, you must cover the universal brush with the parquet cloth provided (Fig. D). 134
17 PARQUET AND TERRACOTTA VACUUM FUNCTION To vacuum up dirt and dust on parquet/terracotta Press the suction button (A4) to begin vacuuming. Adjust suction to level 2 (see paragraph 4.1) to vacuum up dust or liquid. To stop suction, just press the button (A4) once. WASHING FUNCTION To wash parquet or delicate floors N.B. To prevent steam temperature or pressure from damaging the parquet, use the brush with the inserts, always wrapping it in a cloth. Switch on the boiler following the instructions in paragraph 4.2. As soon as the pressure indicator lamp (4) remains on, press the terracotta/parquet function boiler button again (2), thereby activating the terracotta/parquet function; displayed by the lighting of the indicator (2A). Press the button (A5) on the handle to obtain the alternate steam dispenser cycle, and to start up suction at an intermediate power (the suction power cannot be adjusted). Release the button (A5) to stop the steam flow, while suction will continue for about 4 second more to dry the surface treated. Press the button (2) again to terminate the operation. N.B. Before steaming surfaces, we recommend vacuuming up any hair or dust, using the vacuum only function. 135
 * To remove dirt in hidden spaces and corners, use the steam lance (E1).")
18 A4) BATHROOMS/TAPS AND FITTINGS/KITCHEN WORK SURFACES ACCESSORIES TO BE USED: 120º accessory (E) with insert as shown in the following table: ACCESSORIES REFERENCE LETTER PICTURE FUNCTION 120º accessory steam lance coloured brush cloth EE1 E3 O2 Steam delivery* (to reach hidden corners and to remove stubborn dirt) * To remove dirt in hidden spaces and corners, use the steam lance (E1). Dry the surfaces cleaned, or remove any dirt residues, using the cloth (O2) provided. STEAM FUNCTION To remove deposited scale and grease and polish chrome and similar surfaces. To clean these surfaces, we recommend using the steam mode. Switch on the boiler and set the steam pressure according to how dirty the surface to be treated is, following the instructions in the relative paragraph (4.2). Press the button (A5) on the handle to dispense steam over the surface to be cleaned. To stop the steam flow, simply release the button (A5). Then activate suction by means of the button (A4) to dry the surface treated. Keeping the button pressed (A4) select the desired suction power (see paragraph 4.1). Then use a cloth to dry the surface. 136
19 A5) TILED WALLS ACCESSORIES TO BE USED: steam suction nozzle (D) with insert as per the following table: ACCESSORIES Steam suction nozzle and 200 mm window cleaning insert REFERENCE LET- TER D D1 PICTURE FUNCTION To vacuum and clean large surfaces with steam Steam suction nozzle and 130 mm window cleaning insert D D2 To vacuum and clean medium-small surfaces with steam STEAM-VACUUM FUNCTION To dissolve deposited scale, remove grease, polish and remove smears. Switch on the boiler and set the steam pressure according to how dirty the surface to be treated is, following the instructions in the relative paragraph (4.2). Press the button (A5) on the handle to dispense steam over the surface to be cleaned. To stop the steam flow, simply release the button (A5). Then activate suction by means of the button (A4) to dry the surface treated. Keeping the button pressed (A4) select the desired suction power (see paragraph 4.1). N.B. For best results, press the rubber window cleaning fitting against the surface to be dried, moving from the top to the bottom. N.B.If the surface is very dirty, we recommend vacuuming and washing deep-down, activating both steam and suction simultaneously (therefore pressing button (A5) immediately followed by button (A4). This will ensure that surfaces are cleaned and dried in a single trip. 137
20 B - EXTRAORDINARY CLEANING B1) GLASS/MIRRORS/SHOWER CUBICLE ACCESSORIES TO BE USED: steam suction nozzle (D) with insert as per the following table: ACCESSORIES Steam nozzle suction and window cleaning fitting 200 mm Steam nozzle suction and window cleaning fitting 130 mm REFERENCE LETTER D D1 PHOTO FUNCTION Vacuum/steam cleaning for large surfaces D D2 Vacuum/steam cleaning for medium small surfaces STEAM-VACUUM FUNCTION To dissolve deposited scale, remove grease, polish and remove smears. To clean glass surfaces in particularly cold seasons, preheat the windows by starting to dispense steam from a distance of about 50 cm from the surface. Switch on the boiler and set the steam pressure according to how dirty the surface to be treated is, following the instructions in the relative paragraph (4.2). Press the button (A5) on the handle to dispense steam over the surface to be cleaned. To stop the steam flow, simply release the button (A5). Then activate suction by means of the button (A4) to dry the surface treated. Keeping the button pressed (A4) select the desired suction power (see paragraph 4.1). N.B. If the surface is very dirty, we recommend vacuuming and washing deep-down, activating both steam and suction simultaneously (therefore pressing button (A5) immediately followed by button (A4). This will ensure that surfaces are cleaned and dried in a single trip. For best results, press the rubber window cleaning fitting against the surface to be dried, moving from the top to the bottom. 138

21 B2) REMOVING STAINS FROM CARPETS/UPHOLSTERY ACCESSORIES TO BE USED: accessory 120 (E) with accessory as per the following table: ACCESSORIES REFERENCE LETTER PHOTO FUNCTION 120º accessory cloth E O2 Suction / steam delivery STEAM-VACUUM FUNCTION To eliminate a specific mark Switch on the boiler and set the steam pressure according to how dirty the surface to be treated is, following the instructions in the relative paragraph (4.2). Press the button (A5) on the handle to dispense steam over the surface to be cleaned. To stop the steam flow, simply release the button (A5). Then activate suction by means of the button (A4) to dry the surface treated. Keeping the button pressed (A4) select the desired suction power (see paragraph 4.1). N.B. Direct the steam directly onto the mark with the greatest possible angle (never vertically to the surface to be treated) and position a cloth beyond the stain, in order to collect up the dirt that has been blown away by the steam pressure. N.B. If there are remains of dirt or humidity, you can attach the 120 accessory (E), the most suitable accessory for your needs (steam lance (F), small suction nozzle (E2). Then activate suction by means of the button (A4) to finish work on the surface treated. Keeping the button pressed (A4) select the desired suction power (see paragraph 4.1). 139

22 B3) UPHOLSTERY/WALL COVERINGS/CAR INTERIORS N.B. Before treating leather or delicate fabrics with steam, consult the manufacturer s instructions and always carry out a test on a hidden part or on a sample of the material. Allow the steamed part to dry to make sure that no changes in colour or deformations have occurred. ACCESSORIES TO BE USED: suction nozzle (G), suction lance (F), steam/suction nozzle (D) with accessory as per the following table: ACCESSORIES REFERENCE LETTER PICTURE FUNCTION Upholstery suction nozzle G Suction Suction lance F Suction Steamsuction nozzle bristle insert terry cloth D D3 O1 Steam delivery* * After fitting the bristled insert, the steam suction nozzle must be covered with the terry cloth supplied (O1). 140
23 UPHOLSTERY/WALL COVERINGS/CAR INTERIORS VACUUM FUNCTION To vacuum up dust, human hair and animal hair. Press the suction button (A4) to begin vacuuming. To vacuum up dust, adjust suction to level 2 (see paragraph 4.1). To stop suction, just press the button (A4) once. STEAM-VACUUM FUNCTION Clean fabrics, eliminate mites and unpleasant odours Before steaming surfaces, we recommend vacuuming up any hair or dust, using the vacuum only function in manual mode. Switch on the boiler and set the steam pressure according to how dirty the surface to be treated is, following the instructions in the relative paragraph (4.2). Press the button (A5) on the handle to dispense steam over the surface to be cleaned. To stop the steam flow, simply release the button (A5). Then activate suction by means of the button (A4) to dry the surface treated. Keeping the button pressed (A4) select the desired suction power (see paragraph 4.1). N.B. For best use, we recommend delivering steam at minimum whilst vacuuming at the same time, in order to try the fabric immediately. Once finished, we recommend airing the room to allow for perfect drying. 141
24 B4) BEDS/MATTRESSES ACCESSORIES TO BE USED: suction nozzle (G), steam/suction nozzle (D) with accessory as per the following table: ACCESSORIES REFERENCE LETTER PICTURE FUNCTION Upholstery suction nozzle G Suction Steamsuction nozzle bristle insert terry cloth D D3 O1 Steam delivery* *After fitting the bristled insert (D3), the steam suction nozzle (D) must be covered with the terry cloth supplied (O1). VACUUM FUNCTION To vacuum up dust, human hair and animal hair. Press the suction button (A4) to begin vacuuming. To vacuum up dust, adjust suction to level 2 (see paragraph 4.1). To stop suction, just press the button (A4) once. STEAM-VACUUM FUNCTION Clean fabrics, eliminate mites and unpleasant odours Before steaming surfaces, we recommend vacuuming up any hair or dust, using the vacuum only function in manual mode. Switch on the boiler and set the steam pressure according to how dirty the surface to be treated is, following the instructions in the relative paragraph (4.2). Press the button (A5) on the handle to dispense steam over the surface to be cleaned. To stop the steam flow, simply release the button (A5). Then activate suction by means of the button (A4) to dry the surface treated. Keeping the button pressed (A4) select the desired suction power (see paragraph 4.1). N.B. For best use, we recommend delivering steam at minimum whilst vacuuming at the same time, in order to try the fabric immediately. Once finished, we recommend airing the room to allow for perfect drying. 142
25 B5) LIMESCALE/SPACE BETWEEN TILES ACCESSORIES TO BE USED: accessory 120 (E) with accessory as per the following table: ACCESSORIES REFERENCE LETTER PICTURE FUNCTION Accessory 120 small suction nozzle coloured brushes E E2 E3 To remove dirt with the steam, wiping the surface and vacuuming. Accessory 120 steam lance suction lance E E1 F To remove dirt with the steam in less accessible points, then vacuuming. N.B. For both functions, you can combine the accessories differently according to your needs: - E E2 E3 The steam function is enhanced by the mechanical action of the brush (E3). You can then switch on suction thanks to the use of the suction nozzle (E2). - E E1 F The steam lance (E1) is ideal for reaching even the most hidden corners. You can then switch on suction thanks to the use of the suction nozzle (F). STEAM - VACUUM FUNCTION To remove deposited scale, remove dirt in tile grouting Switch on the boiler and set the steam pressure according to how dirty the surface to be treated is, following the instructions in the relative paragraph (4.2). Press the button (A5) on the handle to dispense steam over the surface to be cleaned. To stop the steam flow, simply release the button (A5). Then activate suction by means of the button (A4) to dry the surface treated. Keeping the button pressed (A4) select the desired suction power (see paragraph 4.1). 143
26 B6) DOUBLE CURTAINS ACCESSORIES TO BE USED: steam/suction nozzle (D) with insert as per the following table: ACCESSORIES REFERENCE LETTER PICTURE FUNCTION Steam nozzle bristle insert terry cloth D D3 O1 Steam delivery N.B. After having assembled the bristle insert, the steam suction nozzle must be covered with the cloth supplied (O1). STEAM-VACUUM FUNCTION Mites and dust can be removed. The steam binds to any odours permeating fabrics and removes them, with no need for washing. Switch on the boiler and set the steam pressure according to how dirty the surface to be treated is, following the instructions in the relative paragraph (4.2). Press the button (A5) on the handle to dispense steam over the surface to be cleaned. To stop the steam flow, simply release the button (A5). N.B. If necessary, activate suction by means of the switch (A4) to dry the surface treated. 144
27 B7) PLANTS AND HUMIDIFICATION OF THE ROOMS ACCESSORIES TO BE USED: we recommend using the flexible hose (A). STEAM FUNCTION Dust can be removed from the leaves and flowers of house plants, refreshing them. Plants breathe better and will be cleaner and brighter. Steam can also be used to refresh rooms. Steam use is also recommended in areas where people smoke. Switch on the boiler and set the steam pressure according to how dirty the surface to be treated is, following the instructions in the relative paragraph (4.2). Press the button (A5) on the handle to dispense steam over the surface to be cleaned. To stop the steam flow, simply release the button (A5). N.B. To take care of your plants, we recommend spraying them from a minimum distance of 50 cm. OTHER SUGGESTIONS FOR THE USE OF ACCESSORIES T) BIOECOLOGICO Bioecologico is an anti-foaming and deodorising product based on natural substances which prevents foaming inside the water filter thus ensuring a correct working of the appliance. Diluted inside the dirt collection tank, Bioecologico also acts as an effective deodoriser while the appliance is running, and thanks to its composition which contains Tea Tree and other natural substances, it prevents bad smells inside the dirt collection tank and releases a fresh clean fragrance in the environment. Use: shake the bottle before use and remove the lid; hold the bottle upright and squeeze 5 ml into the dispenser. Stop squeezing and pour the contents of the dispenser into the dirt container of the appliance; add water according to the instructions of the appliance. use the recommended quantity of Bioecologico at any refill of the dirt collection tank. recommended quantity: 5 ml Note: a possible change in colour of the liquid does not alter the functional character and the efficiency of the product. Do not swallow. Keep out of the reach of children. CONTAINS: Eugenol, Citral, Cinnamal* Contents: 100 ml Bioecologico is available in pine or citrus scents. Bioecologico is available to purchase from your local Polti retailer. *May cause allergic reaction (in direct contact with the skin). 145
28 S) PROFESSIONAL IRON LECOASPIRA PARQUET C - OPTIONAL ACCESSORIES Vaporetto Lecoaspira Parquet can quickly become an extremely efficient ironing system, allowing you to iron more quickly and with less effort. Simply connect the iron accessory to the product for Vaporetto Lecoaspira (Mod. PFEU0021). The iron can be purchased from Polti service centres and the best electrical appliance stores. Plug the built-in plug (A6)of the iron (3) into the built-in socket (10) switch on the appliance by pressing the main switch ((1), and then proceed as indicated in paragraph 4.2. Before ironing an item of clothing, always check the symbols on its label, for the instructions provided by the manufacturer. Check, based on the following table, the most appropriate type of ironing: Steam ironing allowed For dry ironing, set temperature adjustment knob on Steam ironing allowed For dry ironing, set temperature adjustment knob on Check the fabric's resistance to steam ironing or dry iron with temperature adjustment knob set on - do not iron - steam ironing or treatment not allowed STEAM IRONING For steam ironing, adjust the temperature of the iron by positioning the temperature adjustment knob (S4) to COTTON-LINEN. Wait a few minutes for the iron heating indicator light (S3) to go off, indicating that the iron has reached the established temperature. Press the steam request button (S2) to allow steam to escape. Releasing the button, the flow stops. When first operating the iron, some drops of water may leak from the plate mixed with the steam due to imperfect thermal stabilization. We therefore recommend that the first jet of steam be directed onto a rag. To have a continuous jet of steam move the button forward (S1). The steam will continue to come out even when the button is released (S2). To stop the steam, move the continuous jet insert button backward (S1). DRY IRONING For dry ironing, before switching on the boiler, adjust the temperature of the iron by turning the knob (S4) to the temperature required according to the fabric, indicated on the knob itself. M) TURBO BRUSH 146

.")
29 The turbo brush uses a turbine system which operates on suction power only, without electricity. The turbo brush increases the effectiveness and efficiency of suction on soft furnishings such as carpets and fitted carpeting since it combines suction with a mechanical action to remove dust and dirt (organic and inorganic) and fibres (hair, etc.). By using the turbo-brush on carpets you can refresh the fibres thanks to the action of the roller, which separates them so that the cleaner can reach right down into the carpets. The turbo brush can be used as a traditional brush on hard surfaces since it has a by-pass system which diverts the air flow directly to the suction pipe. The mechanical rotary action of the turbo brush is ideal for removing animal hair from hard surfaces, rugs and carpets, even shag carpets. N) MINI TURBO BRUSH The mini turbo brush is particularly recommended for cleaning sofas and armchairs, car upholstery, fabric-covered walls, etc. It easily removes dust, dandruff and textile residues. It is useful for preventing allergies, as the mechanical action of the roller with bristles vacuums up animal hair. The mini turbo brush also has a hard rubber bristle attachment, useful on more difficult dirt. STEAM DISINFECTOR (mod. PAEU0189) The Steam Disinfector is the sanitiser for household surfaces that can connect up to your Vaporetto Lecoaspira to deliver steam at high temperatures (up to 180 C) together with the sanitising solution HPMed. The system allows for the elimination of the bacterial, fungous and viral load on the surfaces and fabrics to which it is applied in just a few seconds. This helps prevent the risk of possible infections. When surfaces and fabrics are sanitised using the Steam Disinfector, the risk of contagion deriving from surface contamination is drastically reduced. The Steam Disinfector is a Polti exclusive and is only available from the best electrical appliance stores. AFTER USE 1) OPERATIONS TO BE CARRIED OUT AFTER USE Switch off the appliance by pressing the main switch (1) (Fig. 7) and disconnect the plug from the electricity socket. Disconnect the monoblock plug (A6) from the appliance by pressing the button (A7) and by pulling the plug to remove it from the appliance. 147
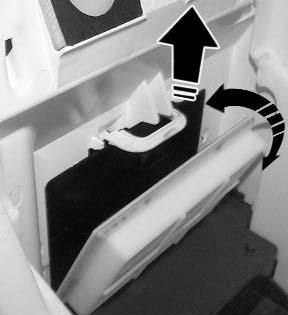
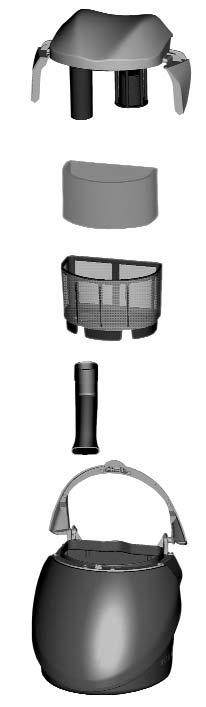
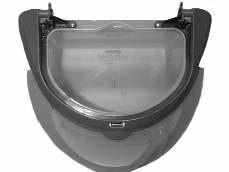
30 2) EMPTYING AND CLEANING THE DIRT CONTAINER After having turned the appliance off and disconnecting it from the electricity, empty the water container (20) One of the great advantages of Vaporetto Lecoaspira is in fact the possibility of cleaning it, thereby avoiding all risk of the spread of micro-organisms. Lift the water container (20) removing it with the container handle (22)(Fig. 3). Turn the handle as per (fig. 4) eand remove the Eco-Active water filter assembly (23). Empty the container by tilting it towards the spout (Fig.10). Pull the elbow tube (27) from the filter body with the micro pore net (26) until it slides off (Fig. 11a). Separate all the components and rinse them under running water. (If the filter sponge has tears, replace it. To purchase one, contact an authorized Polti Service centre). After drying the various components of the Eco-Active water filter, reinsert the water filter assembly, in the water container (20). ATTENTION: align the arrow located on the elbow pipe (27) with the reference notch located on the filter body (26) (Fig. 11b - 11c). Replace the water container (20) as described in the chapter preparing for use. A recommendation for cleaning the container and the extension tubes, if particularly dirty: once cleaning is complete, empty the container as described and place it back in its housing on the body of the appliance. Connect the appliance to the mains. Then vacuum up approximately 1.5 litres of clean water using the suction function for a few seconds. The water vortex created inside the container will rinse the sides and remove any dirt. The clean water will also clean the inside of the tubes as it travels through them. Empty the container again and put Vaporetto Lecoaspira away. 3) CABLE STORAGE Before putting Vaporetto Lecoaspira away, store the power cable (13) in the specific space (15) proceeding as described below: Remove the water container (20) as described in the chapter preparing for use. manually wind the cable evenly and replace it in the specific space (15), making it go into the cable storage (14) (Fig. 8); replace the water container (20) in its storage making sure to position it correctly. 4) WASHABLE HEPA FILTER ATTENTION: the HEPA filter (17) included with Vaporetto Lecoaspira is washable. To clean the filters, proceed as follows: Unhook the water container handle (22) and remove the container (20) as described in the chapter PREPARING FOR USE. Lift the HEPA filter release lever and remove the filter (18) from its housing (fig.12). Rinse the filter under cold running water. After washing it, shake it gently to eliminate any reside of dirt and excess water. NOTE: allow the filter to dry naturally, away from direct sources of light and heat. It is advisable to wait 24 hours before replacing the filter in the appliance. 148
31 Replace the filter with a new one if it is torn. The filter should be cleaned every 4 months. To correctly position the HEPA filter (17) make sure that it is lodged in its housings (19) and is then blocked by the lever (18) (Fig.14). ATTENTION: Do not clean the filter with the brush as it can be damaged, thereby reducing its filtering capacity. Do not use detergents, do not rub the filter, and do not wash it in a dishwasher. GENERAL MAINTENANCE Before any kind of maintenance, make sure that the power cable is not plugged in to the mains. After using the brushes, we recommend letting the bristles cool down in their natural position, in order to avoid any deformation. Regularly check the status of the seals located in the monoblock socket (A6). If necessary, replace with the appropriate spare part (P). Perform the same check on the connection seals of the extension tubes (B and B1) and the handle (A2). To clean the outside, simply use a moist cloth. Do not use solvents or detergents as these could damage the plastic surfaces. To clean the Eco-Active water filter cage and to clean or replace the sponge filter, proceed as described in the paragraph EMPTYING AND CLEANING THE DIRT CONTAINER. RECOMMENDATIONS FOR CLEANING DELICATE SURFACES Before steam treating leather, special fabrics and wood surfaces, consult the manufacturer s instructions and always carry out a test on a hidden part or on a sample of the material. Allow the steamed part to dry to make sure that no changes in colour or deformations have occurred. Please pay careful attention when cleaning wooden surfaces (furniture, doors, etc.). and treated terracotta flooring as prolonged use of steam may damage the wax, polish or colour of the surfaces to be cleaned. We therefore recommend only steaming these surfaces for short periods of time, or cleaning using a previously steamed cloth. On particularly delicate surfaces (i.e. synthetic materials, lacquered surfaces, etc.) we recommend using minimum steam. To clean glass surfaces in particularly cold seasons, preheat the windows starting from a distance of about 50 cm from the surface. To take care of your plants, we recommend spraying them from a minimum distance of 50 cm. 149
VAPORETTINO LUX A B C E. Fig.1 Fig.2 Fig.3 Fig.4. Fig.5 Fig.6 Fig.7 Fig.8. Fig.9 Fig.10 Fig.11. Vaporettino Lux 1R02
 H A B 4 1 G D 8 6 5 7 10 2 C E F 9 3 Fig.1 Fig.2 Fig.3 Fig.4 Fig.5 Fig.6 Fig.7 Fig.8 Fig.9 Fig.10 Fig.11 Vaporettino Lux 1R02 Read these instructions carefully before using the appliance. KEY GENERATOR
Fig.1 Fig.2 Fig.3. Fig.4 Fig.5 (8a)
") Fig.1 Fig.2 Fig.3 Fig.4 Fig.5 (8a) Fig.6 (8b) Fig.7 5 2 4 9 8 20 24 1 3 8 7 21 22 6 14 25 8 19 23 8 15 17 27 26 16 T S B F E H D A C G I O N J O K M Q K L P 10a 8 10 10a R 11 12 13 28 18 - M0S08412 Edizione
Fig.1 Fig.2 Fig.3 Fig.4 Fig.5 (8a) Fig.6 (8b) Fig.7 5 2 4 9 8 20 24 1 3 8 7 21 22 6 14 25 8 19 23 8 15 17 27 26 16 T S B F E H D A C G I O N J O K M Q K L P 10a 8 10 10a R 11 12 13 28 18 - M0S08412 Edizione
TURBO & ALLERGY. Polti S.p.A Bulgarograsso (CO) - Italy - Via Ferloni, 83 Vaporetto Lecoaspira Turbo & Allergy M0S T07
 - Italy - Via Ferloni, 83 Vaporetto Lecoaspira Turbo & Allergy M0S T07") COP - LECOASPIRA TURBO & ALLERGY NUOVA IMPOSTAZIONE:V_tto_1300cop.qxd 12/07/2013 11.08 Pagina 2 TURBO & ALLERGY Polti S.p.A. - 22070 Bulgarograsso (CO) - Italy - Via Ferloni, 83 www.polti.com Vaporetto
COP - LECOASPIRA TURBO & ALLERGY NUOVA IMPOSTAZIONE:V_tto_1300cop.qxd 12/07/2013 11.08 Pagina 2 TURBO & ALLERGY Polti S.p.A. - 22070 Bulgarograsso (CO) - Italy - Via Ferloni, 83 www.polti.com Vaporetto
PARQUET. Polti S.p.A Bulgarograsso (CO) - Italy - Via Ferloni, 83 Vaporetto Lecoaspira Parquet - M0S T10
 - Italy - Via Ferloni, 83 Vaporetto Lecoaspira Parquet - M0S T10") COP - LECOASPIRA PARQUET NUOVA IMPOSTAZIONE 1T10:V_tto_1300cop.qxd 23/10/2013 9.18 Pagina 2 PARQUET Polti S.p.A. - 22070 Bulgarograsso (CO) - Italy - Via Ferloni, 83 www.polti.com Vaporetto Lecoaspira
COP - LECOASPIRA PARQUET NUOVA IMPOSTAZIONE 1T10:V_tto_1300cop.qxd 23/10/2013 9.18 Pagina 2 PARQUET Polti S.p.A. - 22070 Bulgarograsso (CO) - Italy - Via Ferloni, 83 www.polti.com Vaporetto Lecoaspira
Fig. 1 Fig. 2 Fig. 3 Fig. 4 Fig. 5. Fig. 6 Fig. 7 Fig. 8 Fig. 9 Fig. 10. Fig. 11 Fig. 12 Fig. 13. VL Super Pro - M0S Edizione 1L08
 9 1 15 13 12 8 6 5 4 2 3 10 14 7 11 16 Fig. 1 Fig. 2 Fig. 3 Fig. 4 Fig. 5 Fig. 6 Fig. 7 Fig. 8 Fig. 9 Fig. 10 Fig. 11 Fig. 12 Fig. 13 VL Super Pro - M0S06995 - Edizione 1L08 VAPORELLA Dear Customer, Thank
VL FOREVER 600 INOX - VL FOREVER VL FOREVER 600 PRO
 VL FOREVER 600 INOX 7 10 VL FOREVER 600 11 8 3a 10 11 7 9 3 VL FOREVER 600 PRO 6 4 5 2 1 10a 11 6a 7 10 Fig.1 Fig.2 Fig.3 Fig.4 Fig.5 Fig.6 VL FOREVER 600 / INOX /PRO - M0S09515 1Q09 Read these instructions
VL FOREVER 600 INOX - VL FOREVER 600
 7 10 8 3a 11 9 3 7 11 6 4 5 2 1 10 8 6a 3a 9 3 Fig.1 2 Fig.2 1 Fig.3 Fig.4 Fig.5 VL FOREVER 600 /600 INOX M0S08218 1O07 Read these instructions carefully before using the appliance. KEY 1) Cable winder
Fig. 1 Fig. 2 Fig. 3 Fig. 4. Fig. 5 Fig. 6 Fig. 7 Fig. 8. Fig. 9 Fig. 10 Fig. 11 Fig. 12. Fig. 12a Fig. 12b Fig. 13 Fig. 13a Fig.
 Fig. 1 Fig. 2 Fig. 3 Fig. 4 Fig. 5 Fig. 6 Fig. 7 Fig. 8 Fig. 9 Fig. 10 Fig. 11 Fig. 12 Fig. 12a Fig. 12b Fig. 13 Fig. 13a Fig. 14 Fig. 15 Fig. 16 Fig. 17 Fig. 18 Fig. 19 Fig. 20 Fig. 21 Fig. 22 Fig. 23
24 2A A4 A2 E2 B1 E3 E4 A1 A5 F O1 N G O L K T W1 X X1 PQ S 20-A. Polti S.p.A Bulgarograsso (CO) - Italy - Via Ferloni, 83
 - Italy - Via Ferloni, 83") COP- - M0S09417-1Q07:V_tto_1300cop.qxd 09/07/2010 16.29 Pagina 2 24 2A 4 6 7 3 5 8 10 25 23 2 26 9 1 11 12 17 18 27 16 22 15 14 20 19 13 B3 B2 A3 E1 E5 E E1 E6 A4 A2 E2 B1 E3 E4 A1 A5 F O1 N G D C P K1
COP- - M0S09417-1Q07:V_tto_1300cop.qxd 09/07/2010 16.29 Pagina 2 24 2A 4 6 7 3 5 8 10 25 23 2 26 9 1 11 12 17 18 27 16 22 15 14 20 19 13 B3 B2 A3 E1 E5 E E1 E6 A4 A2 E2 B1 E3 E4 A1 A5 F O1 N G D C P K1
Vaporetto Lecoaspira Intelligent - M0S07972 Edizione 1N11
 X1 F X Y Y1 R W1 W2 W4 W3 W Q G S B3 Q T Z W5 B2 M E7 Vaporetto Lecoaspira Intelligent - M0S07972 Edizione 1N11 C D C B3 B1 B2 A5 A1 A3 A4 A2 U P E5 24 25 26 23 17 27 13 14 15 16 18 19 22 20 20-A O O1
VAPORELLA. Fig. 1 Fig. 2. Fig. 3 Fig. 4
 3b 3 1 6 3a 4 2 7 8 9 5 Fig. 1 Fig. 2 Fig. 3 Fig. 4 1) Iron temperature adjustment knob 2) Boiler ON/OFF switch 3) Steam button 3a) Iron heating indicator light 3b) Continuous steam jet button 4) Iron
Stira e Aspira M0S O08
 Stira e Aspira M0S05484 1O08 Read these instructions carefully before using the appliance. KEY 1) Ironing surface 2) Opening handle 3) Vaporella supporting-grill 4) On/off switch 5) Suction switch 6) Supply
Polti S.p.A. reserves the right to change equipment or accessory specification without prior notice.
 Daisy R 1) Iron temperature adjustment knob 2) Boiler ON/OFF switch 3) Steam button 3a) Iron heating indicator light 3b) Pressure indicator light 3c) Continuous steam jet button 4) Iron on/off switch 5)
Polti S.p.A Bulgarograsso (CO) - Italy - Via Ferloni, 83 MAX. Fig. 10. Fig. 6. Fig. 6a. Fig. 14. Fig. E. Fig. 9. Fig.
 - Italy - Via Ferloni, 83 MAX. Fig. 10. Fig. 6. Fig. 6a. Fig. 14. Fig. E. Fig. 9. Fig.") COP - - M0S09128 1Q01:V_tto_1300cop.qxd 18/01/2010 16.43 Pagina 2 Fig. 1 Fig. 5 Fig. 2 Fig. 3 Fig. 4 Fig. 6 Fig. 6a Fig. 7 Fig. 9 Fig. 10 Fig. 12 Fig. 14 MAX Fig. 8 Fig. 11a Fig. 11b Fig. 13 Fig. C Fig.
COP - - M0S09128 1Q01:V_tto_1300cop.qxd 18/01/2010 16.43 Pagina 2 Fig. 1 Fig. 5 Fig. 2 Fig. 3 Fig. 4 Fig. 6 Fig. 6a Fig. 7 Fig. 9 Fig. 10 Fig. 12 Fig. 14 MAX Fig. 8 Fig. 11a Fig. 11b Fig. 13 Fig. C Fig.
Fig.1A Fig.1B Fig.1C. Fig.3. Fig.6. Fig.8. Fig.10 Fig.11 Fig.12
 Fig.1A Fig.1B Fig.1C Fig.1D Fig.2 Fig.3 Fig.4 Fig.5 Fig.6 Fig.7 Fig. Fig.9 Fig.10 Fig.11 Fig.12 - M0S0172 Edizione 1P06 1 2 5 4 3 7 6 9 10a 11 10a 10 12 13 14 15 16 17 1 22 21 20 24 27 26 25 2 19 23 A
Power System. Sprint. Easy Steam. Super Pro. Forever 450. Forever 900 Pratica. Forever Forever Clean. Vaporettino Power.
 P06959_VL POWER_syCOPE 19-01-2006 16:30 Pagina 2 PowerSystem Eco Pro 3000 Forever Clean Forever 450 Forever 1000 2300 Sprint 1300 2085 900 Easy Steam Super Pro Forever 900 Pratica 2H Professional Easy
a V E1 B1 A5 E3 E4 P E5 W1 X 25-A T Z. Vtt LECOASPIRA Cod. M0S Edizione 2H01
 aspira 910 18 16 21 20 22 24a 22 19 34 17 24 23 29 13 11 13 30 31 14 15 6 5 1 15 14 4 10 12 11 28 26 33 32 27 7 3 2 9 8 25 C N V E1 C E E1 E2 U A3 A4 A2 A1 O P E5 E3 E4 B3 B1 A5 G F D C C 25-A L Q C J
ITALIANO KUBOX ESPAÑOL FRANÇAIS DEUTSCH ENGLISH ROMÂNĂ
 PORTUGUÊS Nederlands DEUTSCH ITALIANO FRANÇAIS ESPAÑOL 1 ROMÂNĂ 1 2 9 3 8 5c 4 7 5a 5 6 5b Fig. 1 Fig. 2 Fig. 3 Fig. 4 Fig. 5 Fig. 6 Fig. 7 Fig. 8 Fig. 9 KUBOX 2-1S01 Read these instructions carefully
c o m p a c t AS 801 c o m p a c t AS 801
 compact AS 801 9 2 8 27 7 19a 17 18 21 20 18b 22 3 16 19 18 18a 23 4 N 24 25 26 10 11 6 M 12 5 1 4 A 13 14 15 L I H F A1 J B 5-A G B1 C E D L ECOLOGICO AS801- Cod. - Cod. M0S05631 M0S05407 - Edizione -
7a Fig.1. Fig.3. Fig.2. Fig.4 M0S U01
 7a 7 5 4 2 8 3 1 10 6 9 11 Fig.1 1 2 3 Fig.2 1 2 Fig.3 Fig.4 M0S10908 1U01 @ESPRESSO PRECAUTIONS KEEP THESE INSTRUCTIONS Read these instructions for use carefully before using the appliance. Any use which
Fig. 1 Fig. 2 Fig. 3 Fig. 4. Fig. 5 Fig. 6 Fig. 7 Fig. 8. Fig. 9 Fig. 10 Fig. 11 Fig. 12. Fig. 13 Fig. 14 Fig. 15 Fig. 16
 Special Allergy Fig. 1 Fig. 2 Fig. 3 Fig. 4 Fig. 5 Fig. 6 Fig. 7 Fig. 8 Fig. 9 Fig. 10 Fig. 11 Fig. 12 Fig. 13 Fig. 14 Fig. 15 Fig. 16 Fig. 17 Fig. 18 Fig. 19 Fig. 19a Fig. 20a Fig. 20b Fig. 20c Fig. 20d
Eco Pro Forever 450. Forever 980. Forever 980 Inox. Forever 900. Forever Forever Clean Pratica. 2H Professional.
 COP-LECOASPIRA 715 - M0S07830-1N02.qxp 08/02/2007 15.50 Pagina 2 Eco Pro 3000 Aspirovapor 715 Forever Clean Pratica Forever 440 Super Pro Forever 1000 2H Professional Forever 980 Easy Professional Forever
V.lla Pro 5200 R - Cod. M0S Edizione 1H04
 Pro 5200 R 3 12 10 7 8 1 11 2 6 9 5 4 13 V.lla Pro 5200 R - Cod. M0S05387 - Edizione 1H04 ENGLISH Vaporella Pro 5200 R R Pro 5200 R 1) Patented safety cap 2) 3-Position switch 3) Iron heating indicator
Fig. 2. Fig. 1. Fig. 3. Fig. 4. Fig. 5. Fig. 7 Fig. 6. Fig. 9. Fig. 8. Fig. 10 MAX H2O
 R 1 2 23 3 5 6 7 10 9 8 4 13 19 23 18 12 17 21 16 11 22 14 15 20 Fig. 1 Fig. 2 2 1 Fig. 3 Fig. 4 MAX H2O 1 Fig. 5 2 Fig. 7 Fig. 6 Fig. 9 Fig. 8 Fig. 10 E N G L I S H KEY 1) Carrying handle 2) Mains ON/OFF
M D. 17b B1 6-A. 17a. 17c. L ECOLOGICO AS810 - Cod. M0S Edizione 2G09. L ECOLOGICO AS810 - Cod. M0S Edizione 1F04
 AS 810 15 1 14 3 5 6 4 8 12 A 24 N 9 11 10 13 20 2 21 14 20 23 22 E 19 22 21 C M M D L C1 B F I O H G B1 6-A L ECOLOGICO AS810 - Cod. M0S04076 - Edizione 1F04 16 W 17b 17a 17c L ECOLOGICO AS810 - Cod.
I K. V.lla ADVANCED SYSTEM - M0S Edizione 1H10
 Advanced System O M N E G H J J1 F C P W Q D A I K B L R X V.lla ADVANCED SYSTEM - M0S06060 - Edizione 1H10 ENGLISH Vaporella Advanced System Advanced System A) Tank cap B) Main switch C) Board main switch
Vaporettino Extra AS705 AS300 AS570 AS530. Polti S.p.A Bulgarograsso (CO) - Italy - Via Ferloni, 83
 - Italy - Via Ferloni, 83") COP - VT 2600-2600 KIT M0S07612 1O03:V_tto_1300cop.qxd 02/04/2008 9.51 Pagina 2 Aspirovapor Eco Pro 3000 2600 Vaporettino Extra 1600 Sprint 2085 AS910 AS710 Kit AS810 AS710 AS807 Easy Pocket AS715 AS705
COP - VT 2600-2600 KIT M0S07612 1O03:V_tto_1300cop.qxd 02/04/2008 9.51 Pagina 2 Aspirovapor Eco Pro 3000 2600 Vaporettino Extra 1600 Sprint 2085 AS910 AS710 Kit AS810 AS710 AS807 Easy Pocket AS715 AS705
(A) V.lla NEW CONCEPT 450 PATENT - M0S Edizione 1H09
 V.lla NEW CONCEPT 450 PATENT - M0S Edizione 1H09") (A) 8 12 7 10 10a 11 3a 1 9 2 5 4 6 3a 3 V.lla NEW CONCEPT 450 PATENT - M0S05855 - Edizione 1H09 ENGLISH Vaporella New Concept 450 1) Boiler cap 2) Illuminated ON/OFF switch 3) Removable tank 3a) Tank
(A) 8 12 7 10 10a 11 3a 1 9 2 5 4 6 3a 3 V.lla NEW CONCEPT 450 PATENT - M0S05855 - Edizione 1H09 ENGLISH Vaporella New Concept 450 1) Boiler cap 2) Illuminated ON/OFF switch 3) Removable tank 3a) Tank
VACUUMING AND SANITISING AT THE SAME TIME? LET NATURE DO IT.
 VACUUMING AND SANITISING AT THE SAME TIME? LET NATURE DO IT. Why settle for an ordinary vacuum cleaner when you can vacuum and sanitise the home at the same time? Vaporetto Lecoaspira is a revolutionary
DUAL OPTIONAL. USA POLTI ( ) Monday - Friday: 8am - 6pm EST
 Monday - Friday: 8am - 6pm EST") COP - ECOSTEAMVAC DUAL - M0S10604 2T07:esv dual 3 ante 04/07/2013 10.58 Pagina 1 22 2A 3 5 4 6 8 PRINTED ON RECYCLED PAPER 10 7 23 11 9 21 2 24 DUAL 1 12 16 25 15 20 14 MAX 19 18 17 13 A7 A6 C4 C D1 C4
COP - ECOSTEAMVAC DUAL - M0S10604 2T07:esv dual 3 ante 04/07/2013 10.58 Pagina 1 22 2A 3 5 4 6 8 PRINTED ON RECYCLED PAPER 10 7 23 11 9 21 2 24 DUAL 1 12 16 25 15 20 14 MAX 19 18 17 13 A7 A6 C4 C D1 C4
EN Bagged Vacuum Cleaner
 SVC 8500TI EN Bagged Vacuum Cleaner - 1 - EN Bagged Vacuum Cleaner Important safety instructions READ CAREFULLY AND STORE FOR FUTURE USE. This vacuum cleaner may be used by children 8 years of age and
INSTRUCTIONS FOR USE... 2
 5095109600 Rev. 1 19-03-2012 825440 INSTRUCTIONS FOR USE... 2 De Longhi Australia Pty Ltd ABN 49 104 012 857 Po Box 4540 Casula Mall NSW 2170 Australia Phone: 1800 126 659 Fax: 1800 007 289 www.kenwood-australia.com
2 A C 3 1 D U R S E T. Vtt 1500 No-Volt - M0S Edizione 1H05
 R B I 2 A C 3 M G 5 2a 1 D 6 4 U R S Q F H E T 5 6 7 4 21 9 9 12 15 22 9 8 10 23 13 17 16 16 14 18 19 20 24 Vtt 1500 No-Volt - M0S05365 - Edizione 1H05 ENGLISH Vaporetto 1500 GENERATOR A) Patented Safety
Pulitore a vapore Steam cleaner Nettoyeuse à vapeur Dampfreiniger Limpiador de vapor limpador a vapor stoomreiniger ατμοκαθαριστής Пароочиститель
 Pulitore a vapore Steam cleaner Nettoyeuse à vapeur Dampfreiniger Limpiador de vapor limpador a vapor stoomreiniger ατμοκαθαριστής Пароочиститель очищувач паром البخار االنظف 4145 A L I B C D E F G H 1
MOD COD REV. 0 del 30/07/2013
 MOD. 6431 COD. 2105100200 REV. 0 del 30/07/2013 De Longhi Appliances Srl Divisione Commerciale Ariete Via San Quirico, 300 50013 Campi Bisenzio (FI) - Italy E-Mail: info@ariete.net Internet: www.ariete.net
FSMH1621 English 5 12
 www.blackanddecker.com FSMH1621 English 5 12 A B C D E 2 F G H I J K 3 L M 4 (Original instructions) ENGLISH FSMH1621 STEAM MOP Technical data Steam Mop FSMH1621 Voltage V ac 220-240 Power W 1600 Tank
Utility Master. Steam cleaner. User Guide. Performance is everything. S10 Series. vax.co.uk
 Utility Master Steam cleaner User Guide S10 Series vax.co.uk Performance is everything. Contents Contents 1 Machine Overview 2 General Safety Information 3 Getting Started 4 How To Use 5 Looking After
Pro6 Duo. Stampa Novaprint - Tel cod USER MANUAL
 Pro6 Duo Stampa Novaprint - Tel.0424-539449 - www.novaprint.it cod.10161031310 USER MANUAL 9. Troubleshooting PROBLEM CAUSE SOLUTION Boiler fails to heat up. Device not plugged in. Button 3 and/or 4 not
S4501 series OWNER S GUIDE
 WWW.SHARKCLEAN.COM S4501 series OWNER S GUIDE IMPORTANT SAFETY INSTRUCTIONS For Household Use Only WHEN USING YOUR SHARK STEAM POCKET MOP, BASIC SAFETY PRECAUTIONS SHOULD ALWAYS BE FOLLOWED, INCLUDING
VAC-THEN-STEAM MV2010UKL OWNER S GUIDE
 VAC-THEN-STEAM MV00UKL OWNER S GUIDE MV00UKL_IB_ENG_00.indd IMPORTANT SAFETY INSTRUCTIONS SAVE THESE INSTRUCTIONS For Household Use Only WHEN USING YOUR SHARK VAC- THEN-STEAM, BASIC SAFETY PRECAUTIONS
Professional SLIM STEAM POCKET MOP S3455UKL OWNER S GUIDE
 Professional SLIM STEAM POCKET MOP S3455UKL OWNER S GUIDE IMPORTANT SAFETY INSTRUCTIONS For Household Use Only WHEN USING YOUR SHARK STEAM MOP, BASIC SAFETY PRECAUTIONS SHOULD ALWAYS BE FOLLOWED, INCLUDING
USER GUIDE LET S GO. Bagless Cylinder. dirtdevil.com.au. Dirt Devil Service Line AU: / NZ:
 USER GUIDE Dirt Devil Service Line AU: 1300 361 505 / NZ: 0800 800 900 Bagless Cylinder LET S GO. What s your Dirt Devil s model number? D D R C What s your serial number? (Located on the base of the machine)
Index. page 8. 1 Description of appliance. Description of accessories. page 4. 3 Precautions for use. page 5. 4 Getting started
 Index 1 Description of appliance page 2 2 Description of accessories page 3 3 Precautions for use 4 Getting started page 4 page 5 5 Practical use of the accessories page 5 6 Continuous refilling page 6
BX3. Instructions for use
 BX3 Instructions for use 1 Your vacuum cleaner............................................3 Intended use..................................................4 Safety information..............................................4
FSMH1621-XE Australia New Zealand
 www.blackanddecker.com.au FSMH1621-XE Australia New Zealand A B C D E 2 F G H I J K 3 L M 4 (Original instructions) ENGLISH Intended use Your Black & Decker steam mop has been designed for sanitising and
* depending on model.
 EN EASY PRESSING * * depending on model www.tefal.com 1 2 3 4 5 7* 8 9 10 11 6 12 14* 13* 15 * * depending on model Click!! Click!! fig. 1 fig. 2 fig. 3 fig. 4 fig. 5 fig. 6 fig. 7 fig. 8 fig. 9 ¾ fig.
Grime Pro+ Detergent + Steam Handheld Let s get started
 Grime Pro+ Detergent + Steam Handheld Let s get started S4S-A+ vax.co.uk Let s talk safety This steam cleaner is intended for household use only and NOT for commercial or industrial use. Only use the steam
IMPORTANT Read this manual thoroughly before using the appliance. This will ensure optimum results and maximum safety.
 GB IMPORTANT Read this manual thoroughly before using the appliance. This will ensure optimum results and maximum safety. Save these instructions for future reference. IMPORTANT SAFEGUARDS Read the following
ANTI-CALC.
 EN ANTI-CALC www.tefal.co.uk 6 7* 8 5 4 3 2 1 9 10 11 12 13 14 15 16 2 1 EN Depending on model * fig.1 fig.2 fig.3 fig.4 fig.5 fig.6 * fig.7 fig.8 fig.9 EN Depending on model * fig.10 fig.11 fig.12 fig.13
- 1- IMPORTANT SAFETY REMINDERS
 USER MANUAL IMPORTANT SAFETY REMINDERS This appliance should only be used for domestic cleaning, as described in this user guide. Please ensure that this guide is fully understood before operating the
Steam Mop Instructions for Use
 Technical details: 220-240Vac 50Hz 1300W Key features of the Steam Mop A. Handle B. Power switch with LED ON/OFF light C. Main body D. Water tank E. Water tank cover F. Power cable G. Upper cable wrap
Designed in the UK. Rapide Ultimate. User Guide Vax Rapide Ultimate
 Designed in the UK Rapide Ultimate User Guide Vax Rapide Ultimate VCWRU Contents Contents 1 Machine Overview 2 General Safety Information 3 Getting Started 5 How To Use 6 Looking After Your Machine 9 FAQs
Steam Fresh Let s get started
 Steam Fresh Let s get started VX22 vax.com.au Let s talk safety This steam mop is intended for household use only and NOT for commercial or industrial use. WARNING: Danger of scalding WARNING: The stick
P.O.D. Pressure On Demand
 P.O.D. Pressure On Demand OWNERS MANUAL & INSTRUCTIONS Please! Read all these instruction carefully before use and save these instructions for future reference. SAFETY INSTRUCTIONS NEVER open the Pressure
Vacuum Cleaner User Manual
 Vacuum Cleaner User Manual VCM 7180 P EN 01M-8837713200-0217-02 Please read this manual first! Dear Valued Customer, Thank you for selecting this Beko appliance. We hope that you get the best results from
U V S R2 W INSTRUCTION MANUAL ENGLISH G H PRINTED IN P.R.C /01
 T C U V B A INSTRUCTION MANUAL ENGLISH F E S R W D GB R M G H PRINTED IN P.R.C. 48007909/0 I J K L Q N O P P P3 P4 P5 3 4 5 4 5 6 7 6 7 8 9 8 9 0 0 3 3 4 5 IMPORTANT Safety reminders This cleaner should
Professional SLIM STEAM POCKET MOP S3455UKJR OWNER S GUIDE
 Professional SLIM STEAM POCKET MOP S3455UKJR OWNER S GUIDE IMPORTANT SAFETY INSTRUCTIONS For Household Use Only WHEN USING YOUR SHARK STEAM MOP, BASIC SAFETY PRECAUTIONS SHOULD ALWAYS BE FOLLOWED, INCLUDING
Ireland. Australia. New Zealand
 UK Ireland Australia New Zealand 2 3 4 5 Intended use Your Black & Decker vacuum cleaner has been designed to vacuum dry substances. This product is intended for household use only. Safety instructions
AA Z** V2** W** U1* V** U2** USER MANUAL U* E D L U3* M N S ** T* O Q P P3 P2 P1 R** AD* PRINTED IN P.R.C /01
 AA Z** V2** H F Y* G AB X* I J AC W** U1* C B A K V** U2** USER MANUAL U* E D L U3* M N S ** T* O PRINTED IN P.R.C. 48022156/01 Q P P3 P2 P1 R** AD* *Certain models only **May vary according to the model
Polti S.p.A. reserves the right to change equipment or accessory specification without prior notice.
 R E N G L I S H KEY 1. Handle 2. Motor 3. Rotating hooks for cable storage 4. Power supply cable 5. Handle locking screw 6. Mains ON/OFF switch 7. Eyelet 8. "Full bag" red indicator light 9. Cover of bag/filter
JUNEAU JUN. 08/51193/0 Issue 0
 JUNEAU JUN 08/51193/0 Issue 0 The product complies with the European Safety Standards EN60335-2-30 and the European Standard Electromagnetic Compatibility (EMC) EN55014, EN60555-2 and EN60555-3 These cover
2 000W CYCLONIC BAGLESS VACUUM
 2 000W CYCLONIC BAGLESS VACUUM /GVAVK08 Instruction Manual Contents Guide to the Appliance Caring for the Environment Safety Information and Warnings Basic Set Up Care and Maintenance Troubleshooting 2
O INSTRUCTION MANUAL P V* S N W* J F X* E R L** M** A Y* PRINTED IN P.R.C
 T G H* U O INSTRUCTION MANUAL U T P V* S N Q I W* J C F K B D X* E R L** M** PRINTED IN P.R.C. 48005539 1 A Y* *Certain models only ** 2 3 4 5 14 15 16 17 ** * 6 7 8 9 18 19 20 21 10 11 12 13 22 23 *Certain
SUS-12 Steam Cleaner User Manual
 SUS-12 Steam Cleaner User Manual Steam Cleaner SUS-12 User Manual IMPORTANT SAFETY INSTRUCTIONS Read all instructions before using your Steam Cleaner. When using an electrical appliance, basic precautions
Get Cleaning... What s your Vax s model number? User Guide. Steam Cleaner. Vax Careline: AU: NZ: VSTHM1600
 User Guide Vax Careline: AU: 1300 361 505 NZ: 0800 800 900 Steam Cleaner Get Cleaning... What s your Vax s model number? WV S T H M 1 6 0 0 What s your serial number? (Located on the base of the machine)
Ireland. Australia. New Zealand
 UK Ireland Australia New Zealand 2 3 4 5 Intended use Your Black & Decker vacuum cleaner has been designed to vacuum dry substances. This product is intended for household use only. Safety instructions
Vax Ltd., Kingswood Road, Hampton Lovett, Droitwich, Worcestershire, WR9 OQH, UK - website: vax.co.uk. Version 1.
 --- Vax Ltd., Kingswood Road, Hampton Lovett, Droitwich, Worcestershire, WR9 OQH, UK email: info@vax.co.uk - website: vax.co.uk Version 1.2 User Guide Vax Careline: (UK) 0844 412 8455 Steam cleaner Get
User Manual GV25 GV35 GV702. Company information: Original instructions GV12066 (1)
") User Manual Original instructions GV25 GV35 GV702 Company information: www.vipercleaning.eu info-eu@vipercleaning.com GV12066 (1) 2012-04-10 USER MANUAL ENGLISH TABLE OF CONTENTS Introduction... 4 Manual
User Manual Original instructions GV25 GV35 GV702 Company information: www.vipercleaning.eu info-eu@vipercleaning.com GV12066 (1) 2012-04-10 USER MANUAL ENGLISH TABLE OF CONTENTS Introduction... 4 Manual
Attention. Please handle this product with care and inspect it regularly to ensure it is in good working order.
 Attention Please handle this product with care and inspect it regularly to ensure it is in good working order. If the product, power supply cord or plug shows any signs of damage: stop use, unplug and
Bagless upright vacuum
 U89 U90 & U91-P2 Power 2 Series User Guide V2.0:U90-P2 User Guide 13/08/2010 11:44 Page 1 Vax Careline: (UK) 0844 412 8455 (ROI) 1-800 928 308 Bagless upright vacuum Vax model number: U91-P2 Series U90-P2
B W E F K J N T PRINTED IN P.R.C
 A B W C V U D L E F G I K J M N O P T PRINTED IN P.R.C. 48014372 H Q Q R S 1 2 3 4 13 14 5 6 7 8 15 16 + + 9 10 11 12 17 18 19 INSTRUCTIONS FOR SAFE USE This appliance should only be used for domestic
COMMERCIAL GRADE, ULTRA EFFICIENT VACUUMING SYSTEM USER GUIDE
 COMMERCIAL GRADE, ULTRA EFFICIENT VACUUMING SYSTEM USER GUIDE Congratulations on purchasing a Bennett Read Stealth vacuum cleaner. This product is packed with the power and technology to provide fast,
SWAN CYCLONIC UPRIGHT. INSTRUCTION MANUAL Model: SU3017
 SWAN CYCLONIC UPRIGHT INSTRUCTION MANUAL Model: SU3017 GUARANTEE This product is guaranteed for 2 years from the date of original purchase. If any defect arises due to faulty materials or workmanship,
Register your new Bosch now:
 Register your new Bosch now: www.bosch-home.com/welcome ww.bos com/welcome BSGL5... en Operating instructions Table of content Safety information..................................4 Intended use.......................................4
Congratulations on purchasing a bennett read Hydro.
 USER GUIDE Congratulations on purchasing a bennett read Hydro. We are confident that it will give you years and years of outstanding service. Everything we know about floorcare went into the design and
User Manual. Compact Bagged Vacuum Cleaner. Dog & Cat W2000
 User Manual Compact Bagged Vacuum Cleaner 3 Features 1 2 On/off button Flexible hose 4 7 3 4 Telescopic wand Wand length adjustment 2 8 5 Cord rewind button 6 7 Variable speed control Combination floor
Hard floor cleaner. Vax careline V-120. Vax model number:
 Vax V-120 User Guide.qxd 9/10/07 12:43 Page 1 Vax careline 0870 6061248 Hard floor cleaner Vax model number: V-120 instruction manual Please read carefully before using this cleaner. lways fully extend
- 2 - IMPORTANT SAFETY REMINDERS IT IS IMPORTANT THAT YOU:
 USER MANUAL IMPORTANT SAFETY REMINDERS This cleaner should only be used for domestic cleaning, as described in this user guide. Please ensure that this guide is fully understood before operating the appliance.
Get Cleaning... What s your Vax s model number? User Guide. Multifunction SpinScrub. vax.com.au. Vax Careline: AU: NZ:
 User Guide Vax Careline: AU: 1300 361 505 NZ: 0800 800 900 Multifunction SpinScrub Get Cleaning... What s your Vax s model number? WV S S 7 1 5 1 What s your serial number? (Located on the base of the
English. Important Read this user manual carefully before you use the appliance and save it for future reference.
 FC849-FC840 3 3 4 5 6 7 8 9 0 34 3 4 5 3 30 6 33 7 9 8 3 8 7 6 5 4 9 3 0 6 English Introduction Congratulations on your purchase and welcome to Philips! To fully benefit from the support that Philips offers,
USER MANUAL. Q1a Q1b Q1c Q1* Q1* H. Q2a Q2d. Q2c M Q2b Q2* L P C B N** GP O** I. ** Certain models only, nozzles may vary according to model
 Q1a Q1b Q1c J R Q1* H Q1* Q2a Q2d Q2c M Q2b Q2* L P K USER MANUAL D F C B G N** GP E A O** I CA HF 1 N1** N2** S* T* U* V* PRINTED IN P.R.C. 48011752 ** 2 3 4 5 * * 14 15 16 17 ** ** 6 7 8 9 18 19 20 21
STEAM LITE S3251UKJR OWNER S GUIDE
 STEAM LITE S3251UKJR OWNER S GUIDE IMPORTANT SAFETY INSTRUCTIONS For Household Use Only WHEN USING YOUR SHARK STEAM MOP, BASIC SAFETY PRECAUTIONS SHOULD ALWAYS BE FOLLOWED, INCLUDING THE FOLLOWING: WARNING:
Steam Fresh Let s get started
 Steam Fresh Let s get started S86-SF-A vax.co.uk Let s talk safety This steam mop is intended for household use only and NOT for commercial or industrial use. WARNING: Danger of scalding Only use the steam
OWNER S GUIDE S3501UKL
 OWNER S GUIDE S3501UKL S3501UKL_IB_ENG_101006.indd 1 IMPORTANT SAFETY INSTRUCTIONS SAVE THESE INSTRUCTIONS For Household Use Only WHEN USING YOUR SHARK STEAM MOP, BASIC SAFETY PRECAUTIONS SHOULD ALWAYS
COMPACT AND LIGHTWEIGHT FOR OUTDOOR CLEANING
 COMPACT AND LIGHTWEIGHT FOR OUTDOOR CLEANING LET S GET STARTED. VPW1 Let s talk safety PLEASE KEEP THESE ORIGINAL INSTRUCTIONS. Basic safety precautions This pressure washer is intended for household use
COMBY 4000 & 9000 STEAM CLEANER OPERATOR MANUAL
 COMBY 4000 & 9000 STEAM CLEANER OPERATOR MANUAL Clemas & Co. Unit 5 Ashchurch Business Centre, Alexandra Way, Tewkesbury, Gloucestershire, GL20 8NB. Tel: 01684 850777 Fax: 01684 850707 Email: info@clemas.co.uk
Steam cleaner with attachments
 70530 Rev 4 2/6/04 2:53 PM Page 1 Steam cleaner with attachments Please read and keep these instructions getting the best from your new steam cleaner... Quick start 1 Fill the tank up to a maximum of 1.4
IMPORTANT SAFETY REMINDERS
 USEr manual IMPORTANT SAFETY REMINDERS This appliance should only be used for domestic cleaning, as described in this user guide. Please ensure that this guide is fully understood before operating the
INSTRUCTIONS FOR SAFE USE INSTRUCTIONS FOR SAFE USE
 USER MANUAL INSTRUCTIONS FOR SAFE USE This appliance should only be used for domestic cleaning, as described in this user guide. Please ensure that this guide is fully understood before operating the appliance.
Carpet washer. Vax careline V-135B. Vax model number:
 V-135B Infinity User Guide.qxd:V-135B User Guide 6/10/08 16:37 Page 1 A N T I A L L E R G E N A D D I T I V E Vax careline 0870 6061248 Carpet washer Vax model number: V-135B AAA instruction manual Please
- 2 - IMPORTANT SAFETY REMINDERS
 USER MANUAL IMPORTANT SAFETY REMINDERS This appliance should only be used for domestic cleaning, as described in this user guide. Please ensure that this guide is fully understood before operating the
Model No.: VUM33AS20G
 Model No.: VUM33AS0G USER MANUAL IMPORTANT SAFETY INSTRUCTIONS Before operating the appliance for the first time, read these instructions carefully. Please store this user manual for future reference..
Steam Fresh Combi Classic
 Steam Fresh Combi Classic Let s get started S86-SF-CC vax.co.uk Let s talk safety Thank you for buying this Steam Fresh Combi Classic This steamer is intended for household use only and NOT for commercial
USER S GUIDE IMPORTANT SAFETY INFORMATION READ ALL INSTRUCTIONS BEFORE USING VACUUM CLEANER USE ONLY AS DIRECTED. WATER FILTRATION VACUUM CLEANER
 WATER FILTRATION VACUUM CLEANER USER S GUIDE WATER FILTRATION VACUUM CLEANER MODEL: SA861-80 USER S GUIDE U.S. Distributed by: Thane International, Inc. La Quinta, CA 92253 U.S.A. www.thane.com IMPORTANT
VaporMax PC800 Steam Cleaner
 GB VaporMax PC800 Steam Cleaner Thank you for purchasing a Simac steam cleaner. It is the result of expert research and development to produce a quality functional product. Rigorous quality control ensures
DESIGNED FOR HEAVY DUTY, OUTDOOR CLEANING
 DESIGNED FOR HEAVY DUTY, OUTDOOR CLEANING LET S GET STARTED. VPW2BC Let s talk safety PLEASE KEEP THESE ORIGINAL INSTRUCTIONS. Basic safety precautions This pressure washer is intended for household use
Instruction Manual. Please read these instructions fully before using this product. Smart Living Steam Mop. With all new design enhancements
 Instruction Manual Please read these instructions fully before using this product Smart Living Steam Mop With all new design enhancements Contents SAFETY INSTRUCTION 2-3 Safety Instruction GETTING STARTED
Compact Cyclonic Bagless Upright Vacuum Cleaner
 Compact Cyclonic Bagless Upright Vacuum Cleaner Model Number: RHUV20MR05 For Customer Services & Spare Parts please call 0345 209 7461 Opening times: Monday - Friday 8am 8pm & Saturday 9am 1pm Or visit
User Manual. Deep Cleaning Bagless Vacuum with Powerhead. Deep Clean W3000
 User Manual Deep Cleaning Bagless Vacuum with Powerhead Deep Clean W3000 Features 1 2 3 4 5 6 7 8 9 10 11 On/off button Flexible hose Telescopic wand Wand length adjustment Cord rewind button Combination
DS English... 5 Français Español CONSUMO DE ENERGIA. 1. En Operación: 287,82 Wh 2. En Modo de Espera: N/A Modelo: DS 5.
 DS 5.600 English.... 5 Français... 11 Español... 17 CONSUMO DE ENERGIA 1. En Operación: 287,82 Wh 2. En Modo de Espera: N/A Modelo: DS 5.600 59634180 (04/12) 2 3 4 Dear Customer, Please read and comply