WELCOME TO ZODIAC. PRIVATE BAG X127 HALFWAY HOUSE 1685 CUSTOMER CARE HELPLINE 0860 ZODIAC ( )
|
|
|
- Theresa Griffin
- 6 years ago
- Views:
Transcription

1
2 WELCOME TO ZODIAC ZODIAC: YOUR PARTNER IN POOL CARE Renowned worldwide for the quality and reliability of our products in the swimming pool industry, Zodiac is proud to be the market leader here in South Africa too. With our Clearwater Technology, expertise and experience, Zodiac brings you the reassurance of top quality equipment in terms of design and performance. A real guarantee of efficiency and peace of mind! ZODIAC: SUCCESS THROUGH INNOVATION One of the keys to Zodiac s success is its continuous presence on the cutting edge of innovation and technology. This enables Zodiac to offer products that are efficient, safe, and compliant with the strictest standards and certification requirements. Numerous patents are the result of R&D programmes focusing on quality and performance. ZODIAC: PEACE OF MIND Zodiac strives to offer consumers superior quality products and service excellence. With dedicated staff throughout South Africa, you can be certain of premium after-sales service. Should you require assistance on your Zodiac product, need to locate a dealer near you or just wish to find out more information, log onto our website or call our customer help line. Please read this information before installation. Always read all labels and the operation manual before installing your unit. Please retain your manual as it contains your warranty information. PRIVATE BAG X127 HALFWAY HOUSE 1685 CUSTOMER CARE HELPLINE 0860 ZODIAC ( )

3 WARRANTY CHLORINATOR WARRANTY Your Clearwater Ei Salt Chlorinator has been manufactured with the greatest of care and from the best available materials. The Chlorinator, excluding the electrodes, is covered by a manufacturing defects warranty for a period of 36 months. Parts will be replaced or repaired at the discretion of the manufacturer. The warranty period begins on the date of manufacture as encoded on the product, unless proof of purchase is supplied. This warranty will be voided if parts other than ZODIAC approved parts are used for repairs. PRO RATA CELL ELECTRODE WARRANTY The Electrodes are covered by a 12 month unconditional warranty, plus a further 24 month pro rata warranty, whereby the manufacturer will contribute to the cost of a replacement cell electrode on a sliding scale, based on the age of the unit, which will be determined by the date encoded on the product, unless proof of purchase is provided. Thank you for choosing ZODIAC. We wish you many happy years of enjoyment in your Clearwater pool. Don t forget to complete purchase details on the last page of this manual and return your Reply Paid Warranty Card to ZODIAC Pool Care South Africa (Pty) Ltd. Note: This product is designed and manufactured for domestic/residential use only. Use on commercial or non residential pools voids all warranties. NB. Parts damaged by power surges or lightning are not considered as warranty. Note: If the moulded plug is removed from this product and it is hard wired, this operation should be performed by a qualified electrician. Failing to do so will result in the warranty being voided.
4 INDEX SAFETY 1 GENERAL WARNINGS 2 ELECTRICAL HAZARD 3 CONTENTS OF THE CARTON 4 CLEARWATER TECHNOLOGY 5 YOUR COMPLETE FILTRATION SYSTEM 6 INSTALLATION 7 CONTROL PANEL 12 SETTING THE CLOCK 13 SETTING THE TIMERS 14 CLEARING THE TIMERS, SETTING THE LANGUAGE PREFERENCE 15 MANUAL OPERATION, USING AN EXTERNAL TIMER 16 SETTING THE OUTPUT LEVEL HOUR SAFETY TIMEOUT 18 BACKUP BATTERY 19 CLEANING THE CELL 20
5 SAFETY At Zodiac, we take safety seriously. The Clearwater Ei unit is designed with many built in safety features but you should always exercise caution when using electrical appliances and follow the instructions closely. Failure to do so could result in permanent injury, electrocution or drowning. Important things to consider! Before you begin installation please turn the filtration equipment off and close off all your valves to prevent water from escaping when drilling into the pipe. Ensure you have a suitable place on the plumbing return line for your Clearwater Ei cell, as the cell must be installed in an upright position. WARNING! The installation and use of your Clearwater Ei Salt Chlorinator must comply with the instructions and recommendations presented in this manual. For additional information please contact your pool professional. PLEASE NOTE: Your Clearwater Ei unit has been designed to be suitable for DIY installation, however should you prefer to have it installed by a professional please contact our customer care team on and they will provide you with details of your closest approve installer. 1

6 GENERAL WARNINGS WARNINGS Clearwater Ei Salt Chlorinators are designed for domestic swimming pool use only. Contrary use could affect performance and void the warranty. Operating a salt chlorinator without water flowing through the cell may cause a build up of flammable gases, resulting in fire or explosion. Keep equipment out of reach of children. A damaged supply cord should only be replaced by the manufacturer, service agent or electrician. When installing and using this electrical equipment, always follow basic safety precautions. Before performing installation, disconnect all power. Free available chlorine in your pool should be maintained between 1 and 3 ppm (parts per million) at all times. SERVICE TO ZODIAC EQUIPMENT SHOULD ONLY BE CARRIED OUT BY A QUALIFIED POOL PROFESSIONAL. THE USE OF EYE PROTECTION IS RECOMMENDED WHEN WORKING WITH POOL CHEMICALS. CHILD SAFETY Children should not be allowed to operate or perform maintenance... on this product. No one, particularly children, should sit, step, lean, or climb on any of your pool s operational system. In the interest of child safety, all components of a pool s operational system should be located at least 3 metres away from the pool. 2
7 ELECTRICAL HAZARD To avoid accidental contact with lawn mowers and hedge... trimmers, power cords should remain within sight and above ground at all times. The Clearwater Ei Power pack must not come into contact with pool water and should be installed at least 3 metres from the inside wall of your swimming pool. Should a lack of water flow be detected, the unit s electronic flow switch is designed to turn off the system. Interfering with the electronic flow switch could result in personal injury and/or damage to the cell. One pump per electrical socket only (no ancillary equipment should be connected to the same outlet). This appliance is not intended for use by persons (including children) with reduced physical, sensory or mental capabilities, or lack of experience and knowledge, unless they have been given supervision or instruction concerning use of the appliance by a person responsible for their safety. Children should be supervised to ensure that they do not play with the appliance. The installation of the chlorinator should be carried out by a qualified pool professional. Please contact our customer care helpline on for your nearest pool professional. 3

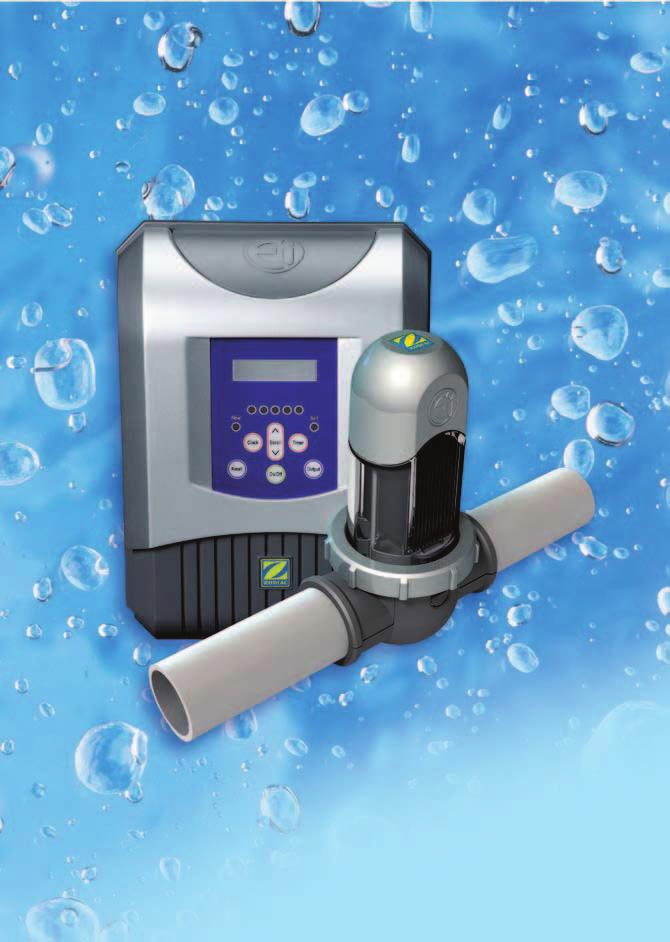
8 CONTENTS OF THE CARTON The Clearwater Ei unit has been designed to be the world s simplest salt chlorinator. Simple to install, operate and maintain, the Clearwater Ei unit will provide you many years of trouble free operation and keep your pool safe and sparkling for the whole family to enjoy. C - Additional contents D - E - F - G- Carton contents: A. B. C. D. 4 1 x Ei Power pack 1 x Ei Chlorine generating cell 1 x Power pack bracket 1 x Pipe spacer E. F. G. H. 1 x Tightening tool 1 x Screw set (includes wall plugs) 1 x Hole saw 1 x Owners manual/warranty card


9 CLEARWATER TECHNOLOGY Common salt (sodium chloride) is made up of two elements, sodium and chloride. When your chlorinator is installed a measured quantity of salt is dissolved in the pool water to make it slightly salty. As part of the daily filtration cycle, the pool water is passed through a electrolysis cell to produce chlorine which is dissolved instantly into the water. Your chlorinator also produces ozone in the cell, as a by-product. In simple, non-technical terms, the chlorine instantly starts to destroy bacteria, viruses, and algae and in doing this, reverts to dissolved salt. This cycle continues, with more new chlorine being produced from the salt water in the chlorinator cell, sanitising the pool and changing once more back to dissolved salt. Each day, when the chlorinator and filtration systems are switched on, dust and debris are trapped by the filter and the chlorinator sanitises the water to make it safe and sparkling clean. PREFERRED WATER CHEMISTRY READINGS Salt Concentration 4,000ppm ph * Chlorine Stabiliser 40-80ppm (Cyanuric Acid) (up to 100ppm in hotter regions) Total Alkalinity ppm* Cacium Hardness ppm* Free Chlorine 1-3ppm *Values may vary, within their ranges, depending on pool surface i.e. concrete, fibreglass or vinyl ppm: parts per million * When using chemicals, always follow manufacturers directions and follow the advice of your pool professional. Always use protective clothing, gloves and glasses. Store and use chemicals out of reach of children. 5

10 YOUR COMPLETE FILTRATION SYSTEM Your filtration system should look like this, once the Clearwater Ei unit is installed. The Clearwater Ei cell should be the last piece of equipment on the plumbing line back to the pool. Your new Clearwater Ei system 6

 A power point needs to be located no more than 1.")
11 INSTALLATION Tools required before you begin Before you begin installing your Clearwater Ei salt chlorinator please check you have the right tools and a suitable location to install the Clearwater Ei unit. Please also ensure you have read and understood the Safety and General Warnings sections, in this manual. 1) 2) 3) 4) 5) 6) An electric drill A 6mm hammer drill bit if you need to drill into brick or concrete A pencil or marking pen A screwdriver or screwdriver bit (for the drill) A straight horizontal length of pipe on the return line after the filter and all accessories/equipment (the Clearwater Ei unit should be the last piece of equipment) A power point needs to be located no more than 1.5m away from where you mount the power pack Mounting the control unit 1) Screw the power pack bracket into position ensuring it is no more than 1.5m from a power point. 2) Position the power pack in place by aligning the bracket with the corresponding holes. 7
 Plug it into the power point but")
 Ensure placement of Clearwater Ei")


12 Less than 1.5m 3) Plug it into the power point but do not turn on yet. 4) Ensure placement of Clearwater Ei cell on pipe is no more than 1.5m from power pack. 7) Invert the lower housing half of the saddle clamp to mark the holes for drilling. 8) Drill holes using the hole saw provided and ensure holes are clean and smooth. 8
 Lower part of he saddle clamp.")
 Fit the saddle clamp around")
13 5) Upper part of the saddle clamp. 6) Lower part of he saddle clamp. 9) Use spacer as shown on your 50 mm pipe. 10) Fit the saddle clamp around pipe. 9


 Note: Ensure the locking ring is level when")

14 11) Clamp together the 2 halves of the saddle clamp, ensuring both clips are engaged. 12) Make sure the O-ring is seated in the channel and position the clear cell firmly on the O-ring, as shown. 15) Note: Ensure the locking ring is level when engaging the threaded housing. Warning: Do not over tighten the locking ring. 16) Securely connect the cell leads to the terminals. 10


 Fit the cap.")
15 13) Position the locking ring with the alignment details as shown, before threading. 14) Screw down the locking ring to the threaded housing, ensuring it s level. 17) Fit the cap. 18) Turn the pwer pack on. 11
16 CONTROL PANEL Indicates the level of chlorine output production, each light indicates 20% production Indicates insufficient flow through the cell Indicates salt level should be checked (4000 ppm is required). 12

17 SETTING THE CLOCK 1) 2) 3) 4) Apply power to the Clearwater Ei unit. Wait for the start up sequence to finish (±5 seconds). Press and hold the Clock button. While holding the Clock button, press the Hours button to increment the hours to the correct time. Note: Hours button can be held to speed up increments. 5) While holding the Clock button, press the Minute button to increment the minutes to the correct time. Note: Minute button can be held to speed up increments. 6) Release the Clock button - the clock is now set. NOTE: The clock display is in 24 hour format 13
18 SETTING THE TIMERS The Clearwater Ei unit has 2 ON/OFF timers available, which can be set to enable the chlorinator to run up to 2 cycles each day. For most pools we recommend running your filtration equipment 3hrs in the morning and 3hrs in the evening during summer, and 2hrs in the morning and 2hrs in the evening during winter. You may need to adjust this depending on bather load and climate conditions. 1) From the main operating screen, press the Timer button. 2) Wait for message to clear. 3) Press the Hours button to increment the hours setting to the desired setting. Note: Hours button can be held to speed up increments. 4) Press the Minute button to increment the minutes to the desired setting. Note: Minute button can be held to speed up increments. 5) Once a suitable ON time is set, press the Timer button to move to setting the OFF time. (There is a factory preset Off time of 3hrs after the On time, simply adjust if you require more or less) 6) Repeat steps 3 and 4 to set the desired off time. 14 If a timer setting has been set, a small T symbol will appear in the top right corner of the screen.
 Press the Output button, TIMERS CLEARED will appear on the screen. 4) Press the Clock Button to return to the main operating screen.")

19 CLEARING THE TIMERS 1) From the main operating screen, press the Timer button. 2) Wait for message to clear. 3) Press the Output button, TIMERS CLEARED will appear on the screen. 4) Press the Clock Button to return to the main operating screen. SETTING THE LANGUAGE PREFERENCE 1) 2) 3) 4) Switch on the Clearwater Ei unit. Wait for the start up sequence to finish (± 5 seconds). Press the Hours key for about 5 seconds and the current language will be displayed on the screen. To change the language keep pressing the Hours key until the desired language is displayed on the LCD screen. Release the key to set the language. 15

20 MANUAL OPERATION In addition to running off a timer, the Clearwater Ei unit can also be operated manually by pressing the On/Off button. The Clearwater Ei unit will run until the next OFF time is reached, then will operate from the timers. NOTE: If the Clearwater Ei unit is manually turned on and no OFF time is set, the Clearwater Ei unit will run for a maximum of 30 hours continuously, then turn OFF to prevent over chlorination. USING AN EXTERNAL TIMER In some cases it may be desirable to connect the Clearwater Ei unit to an external time switch. In this case, the chlorine output must turn on whenever power is supplied to the power pack. To set the Clearwater Ei unit up to run this mode, NO TIMERS should be set. 1) Clear any timers that are set, refer to page 15. (A small T symbol will be visible in the top right corner of the screen if a timer is set). 2) 3) 16 Turn the chlorine output on and set to the desired output level. (See SETTING THE OUTPUT LEVEL ). Set the external timer to the desired setting.
21 SETTING THE OUTPUT LEVEL When setting the chlorine output level you must consider the size of the pool, the amount of use the pool will be receiving and how hot the weather is. All these factors weigh greatly on the level of output needed. Simply adjust the output level needed using the following steps. 1) Turn the chlorinator ON by pressing the On/Off button. 2) Press the Output button to reach the desired output level. One amber level is the minimum setting (20%) and the output can be adjusted in increments of 20% up to 100%. 3) If the Output button is pressed beyond 100%, the output level setting will drop to 20%. NOTE: If your output is set at 20% (one light) the Clearwater Ei unit will run for 2mins every 10mins, 40% (2 lights) it will run for 4mins every 10mins and so on. Safety Alert: if using a pool cover of any kind always reduce your chlorine output to a minimum. High levels of chlorine in your pool will corrode or damage some equipment such as ladders, pool cleaners etc. 17
22 24 HOUR SAFETY TIMEOUT To prevent the possibility of hazardous over-chlorination, the Clearwater Ei unit has a built-in safety shutdown. If the Clearwater Ei salt chlorinator is manually turned ON (with no timers set), and left on, chlorine generation will automatically turn OFF after 24 hours. The Clearwater Ei salt chlorinator can be turned ON as normal after this time. NOTE: If using the Clearwater Ei unit with an external timer the 24 hour timer is reset whenever power is cut to the Clearwater Ei unit. CHLORINATOR REVERSAL The Clearwater Ei salt chlorinator has a reverse polarity cell. This means that every 5 hours the cell will switch its polarity to help prevent any build up of calcium on the cell plates. This is sometimes referred to as self cleaning. During the transition between changing its polarity there is a 5 minute wait time when the cell will not produce any chlorine. Don t be alarmed, once it has changed polarity it will continue producing chlorine. ** CLEANING ** will be displayed on the screen during the 5 minute WAIT period. (The output level indicator will remain as set during the CLEANING period). 18
23 BACKUP BATTERY The Clearwater Ei unit is fitted with a long life rechargeable battery. This battery should last in excess of 500 hours without the mains being connected. The battery will retain ALL settings in the event of a power failure. In addition the Microprocessor in the unit will retain some settings permanently, in the event of the battery going flat or being replaced: Operating hours Cell hours Controller setting ERRORS / WARNINGS NO FLOW Diagnosis: Insufficient water flow in the cell. This could mean the circulation pump has ceased to function, or the filter needs cleaning. The chlorine output will be turned off at this time. CHECK SALT Diagnosis: The salt concentration in the pool is insufficient and/or the water temerature is too low. (The orange salt indicator light is on). Always maintain a salt level of 4000 ppm. If you don t know what your salt level is or how to test it, consult your local pool care professional. OUTPUT FAULT Diagnosis: There could be a problem with the power supply. Turn power off at the power point and consult your local pool care professional. 19
24 CLEANING THE CELL Before you remove the cell for cleaning ensure you shut off any necessary valves to prevent any water loss. WARNING wear correct safety protection 1) Remove the cap 2) Undo the cell cable 3) Undo the locking ring 4) Remove the cell 5) ACID 6) Pouring acid 20
25 Inspecting and cleaning the electrode In zones where the water is hard (high TH) the Ei electrode may have to be cleaned. To clean the Ei electrode: 1. Turn off the Ei Chlorinator, then the filtering system, close the cut-off valves and remove the cell cap. Remove the cell cable. 2. Unscrew the locking ring and remove the electrode from the saddle clamp (pay attention to the small translucent vertical valve). The ring is crimped, making it easier to remove by hand (or using the supplied tightening tool). If a scale deposit is present, place the electrode upside down and pour some cleaning solution into it. 3. If you do not want to use a commercial cleaning solution you can make your own by carefully mixing one (1) part of hydrochloric acid with nine (9) parts of water ( Warning: always pour the acid into the water, never the opposite!). A stronger solution will reduce the electrode s life span. 4. Leave the cleaning solution to dissolve the scale deposit for about fifteen minutes. Dispose of the solution in an approved local waste collection centre; never pour it into the rainwater drain or into the sewers. 5. Rinse the electrode in clean water and replace it in the cell body, taking note of the alignment marks. 6. Replace the locking ring, reconnect the cell cable and put the cap back into place. Turn the filtering system on, then the Ei chlorinator. 7. Confirm chlorine production and operating settings on the Ei command box. The clock settings are saved automatically. 21
26 RECORD OF PURCHASE DETAILS RECORD YOUR ZODIAC SALT WATER CHLORINATOR PURCHASE DETAILS HERE: Clearwater Ei Salt Chlorinator Date of purchase: Purchased from: Suburb: Province: Postal code: Clearwater Ei Salt Chlorinator Serial No: Please quote this number when you contact us KEEP YOUR OWNER S MANUAL FOR YOUR RECORDS
27
28
OPERATING INSTRUCTIONS Zodiac Group Australia: YOUR LOCAL SUPPLIER For all you pool needs, visit
 YOUR LOCAL SUPPLIER For all you pool needs, visit www.zodiac.com.au Zodiac is a registered trademark of Zodiac Group Australia Pty Ltd ABN 87 002 641 965 Zodiac Group Australia: PO box 7238 Wetherill Park,
THIS KIT CONTAINS: Part: Qty: Description: a. 1 MagnaPool Control Centre b. 1 Hydroxinator cell c. 1 Power pack bracket d. 2 Reducing bushes
 Installation and Operator Guide THIS KIT CONTAINS: Part: Qty: Description: a. 1 MagnaPool Control Centre b. 1 Hydroxinator cell c. 1 Power pack bracket d. 2 Reducing bushes WELCOME TO ZODIAC Congratulations
Section 1. Information before installation
 2 3 Section 1. Information before installation 1.1 General delivery conditions All equipment, even carriage and packaging paid, is shipped at the recipient s risk. If damaged caused during transport is
welcome to ZodiaC Congratulations on your purchase of the Zodiac TRi-XO CrossOver Chlorinator. TRi-XO allows users to select between using normal pool
 Chlorinator use with salt and mineral salts welcome to ZodiaC Congratulations on your purchase of the Zodiac TRi-XO CrossOver Chlorinator. TRi-XO allows users to select between using normal pool salt or
SALT WATER CHLORINE GENERATOR. Model: SMC20TA & SMC30TA SMC INSTRUCTION MANUAL
 SALT WATER CHLORINE GENERATOR Model: SMC20TA & SMC30TA SMC INSTRUCTION MANUAL DISCLAIMER While every effort has been made to ensure that the information contained in this guide is accurate and complete,
PANEL HEATERS OPERATING INSTRUCTIONS
 PANEL HEATERS OPERATING INSTRUCTIONS GPH110 GPH210/220 GPH310/320 GPH410/420 WARNINGS AND SAFEGUARDS 1. Use only the voltage specified on the rating plate of the appliance. 2. Keep all objects at least
Platinum Series Electronic Panel Heaters
 Operating Instructions Platinum Series Electronic Panel Heaters Models: GPPH500, GPPH510, GPPH520, GPPH530 General Care and Safety Guide Thank you for choosing a Goldair Panel Heater. This Goldair Heater
THE ULTIMATE NON-CHEMICAL POOL/SPA WATER STERILISATION
 THE ULTIMATE NON-CHEMICAL POOL/SPA WATER STERILISATION Contents Welcome to Steritron... Page 01 Features and Benefits... Page 01 The Steritron Package Inclusions... Page 02 The Unit - Figure 1 The Anode
Product waste disposal - Protection of the environment:
 Product waste disposal - Protection of the environment: In accordance with the provisions of the Waste Electrical and Electronic Equipment (WEEE - 2002/ 96/ EC) Directive, used electric and electronic
Owners Manual and Warranty Information. Please read thoroughly before starting device
 Owners Manual and Warranty Information Please read thoroughly before starting device Contents Your ph Perfect has been designed to maintain your pools ph at an ideal balance. Your pools ph balance is the
Instructions for installation and use English
 Instructions for installation and use English H0402400.A - W2503A - 2013/02 Read this manual carefully before installing, maintaining or repairing this device! The symbol indicates important information
PANEL HEATER OPERATING INSTRUCTIONS. For Models: TWFP10000, TWFP PK
 PANEL HEATER OPERATING INSTRUCTIONS For Models: TWFP10000, TWFP10000-2PK This page is intentionally left blank General Care and Safety Guide Thank you for choosing a Living & Co Panel Heater. This Living
1. How to install your CYBERNAUT Page 20 Unpacking Installation Electrical connection
 C O N T E N T S Zodiac, mastering the elements. Renowned worldwide for the quality and reliability of its products in the aeronautical and marine sectors, Zodiac has now brought its expertise to swimming
INSTRUCTION BOOK. BioDoser. Simple, Fully Programmable Dosing System. BioDoser. Version 1.0b, 25-Oct Please read before you call us for advice.
 INSTRUCTION BOOK BioDoser TM S u s t a i n a b l e P o o l S y s t e m s BioDoser TM DOSING ON / OFF PROGRAM / SET DOWN UP CANCEL www.bionizer.com.au www.bionizer.com Please read before you call us for
WARNING. H Rev -
 OWNER'S Manual English FRANÇAIS H0367100 Rev - WARNING FOR YOUR SAFETY - For anything other than the routine cleaning and maintenance described in this manual, this product must be serviced by a contractor
PERSONAL COOL MIST ULTRASONIC HUMIDIFIER
 PERSONAL COOL MIST ULTRASONIC HUMIDIFIER MODEL # EE-5949 PLEASE READ AND SAVE ALL INSTRUCTIONS TO ENSURE THE SAFE AND EFFCTIVE USE OF THIS APPLIANCE. TABLE OF CONTENTS Table of Contents P. 1 Safety Instructions
155mm. 820mm. 540mm E D. 940mm. 600mm
 TOLUCA DELUXE EN The product complies with the European Safety Standards EN60335-2-30 and the European Standard Electromagnetic Compatibility (EMC) EN55014, EN60555-2 and EN60555-3. These cover the essential
AP24MT, AP24ET, AP15ET, AP10ET. Convection Panel Heaters. Instruction Manual
 AP24MT, AP24ET, AP15ET, AP10ET Convection Panel Heaters Instruction Manual Important Safety Instructions 1. Disconnect the power plug before dismantling, assembling or before cleaning. 2. Make sure the
Ceramic Wall Heater With Remote
 Operating Instructions Ceramic Wall Heater With Remote Model: GCH500 General Care and Safety Guide Thank you for choosing a Goldair Ceramic Heater. This Goldair Heater has been designed and manufactured
HAYWARD POOL PRODUCTS, INC. 620 Division Street Elizabeth, NJ Tel:
 IS270T-05 Rev. B OWNER S MANUAL INSTALLATION, OPERATION & PARTS MODEL S270T PRO SERIES HIGH-RATE SAND FILTER Basic safety precautions should always be followed, including the following: Failure to follow
Owner s Manual Zodiac Pool Systems, Inc.
 Zodiac Pool Systems, Inc. 2620 Commerce Way Vista, CA 92081 Tel: 800-822-7933 Fax: 877-327-1403 www.baracuda.com 2009 Zodiac Pool Systems, Inc. All rights reserved. TL-3200 W1833A 2/09 Owner s Manual IMPORTANT
IMPORTANT SAFETY INSTRUCTIONS READ AND FOLLOW ALL INSTRUCTIONS SAVE THESE INSTRUCTIONS
 Operating Manual MODEL RC554P AND 554200 ph Digital Controller FEED ph FLOW ALERT AUTO MODE SET LEVEL FEED TIME ph CALIB FLOW SWITCH ph ph OUTPUT POWER IMPORTANT SAFETY INSTRUCTIONS READ AND FOLLOW ALL
Installation & Operating Instructions
 PREMIUM Installation & Operating Instructions AQP-20SIL Signature Filtered Water Cooler Premium Selection Congratulations on your purchase of a Aquaport Signature Filtered Water Cooler This unit is easy
PERSONAL COOL MIST ULTRASONIC HUMIDIFIER
 PERSONAL COOL MIST ULTRASONIC HUMIDIFIER MODEL # EE-5949 PLEASE READ AND SAVE ALL INSTRUCTIONS TO ENSURE THE SAFE AND EFFCTIVE USE OF THIS APPLIANCE. TABLE OF CONTENTS Table of Contents P. 1 Safety Instructions
EVAPORATIVE COOL MIST HUMIDIFIER Instruction Manual
 EVAPORATIVE COOL MIST HUMIDIFIER Instruction Manual FOR MODEL: EE-7002 If you have any questions about the operation of your humidifier, please contact Crane Customer Care. Toll Free: 888-599-0992 Email:
PZ1, PZ3 & PZ6 Installation Guide
 PZ1, PZ3 & PZ6 Installation Guide PROZONE INTERNATIONAL, INC. Ozone Water Purification Systems INSTALLATION GUIDE Prozone PZ1, PZ3 and PZ6 Series Ozone Generator Systems SAFETY READ AND FOLLOW ALL INSTRUCTIONS.
Stand Fan. English. Owner s Guide. Model F R
 Digital Oscillating Stand Fan Owner s Guide English Model F-7508 61302-01 R20151201 CONTENTS Safety Precautions... 3 Fused Plug... 4 Fan Assembly... 5 Operating Instructions... 6 Care and Maintenance...
COMMERCIAL STRENGTH POLYMER MEDIA FILTER OWNERS MANUAL
 COMMERCIAL STRENGTH POLYMER MEDIA FILTER OWNERS MANUAL INTRODUCTION Congratulations on choosing the Poolrite S6000 mk2, S5000 mk2, S8000 mk1 or S9000 mk4 High Rate Media Filter fitted with the exclusive
Turbo Vac Pro 18V 2 in 1 Cordless Cleaner
 Turbo Vac Pro 18V 2 in 1 Cordless Cleaner Model Number: RHSV1801 For Customer Services & Spare Parts please call 0345 209 7461 Opening times: Monday - Friday 8am 8pm & Saturday 9am 1pm Or visit us at www.productcare.co.uk
Ozone Generator Systems
 PZ2-4V - Commercial and Residential Pools & Spas Ozone Generator Systems INSTALLATION GUIDE and OPERATION MANUAL T. O3 NATURAL TECHNOLOGY Reduces Chemical Usage, Improves Sanitation Produces Crystal Clear
HARMSCO INSTALLATION AND OPERATION MANUAL UPFLOW SWIMMING POOL CARTRIDGE FILTER CARTRIDGE CLEANING INSTRUCTIONS HARMSCO CARTRIDGES
 HARMSCO INSTALLATION AND OPERATION MANUAL UPFLOW SWIMMING POOL CARTRIDGE FILTER CARTRIDGE CLEANING INSTRUCTIONS HARMSCO CARTRIDGES May be cleaned and reused before replacement is necessary. Cartridge cleaning
IMPORTANT SAFETY INSTRUCTIONS READ AND FOLLOW ALL INSTRUCTIONS SAVE THESE INSTRUCTIONS
 Operating Manual MODEL RC554X AND 554230 ORP Digital Controller FEED ALERT ORP FLOW AUTO MODE SET LEVEL FEED TIME FLOW SWITCH ORP ORP OUTPUT POWER IMPORTANT SAFETY INSTRUCTIONS READ AND FOLLOW ALL INSTRUCTIONS
Ozone Generator Systems
 PZ2-1 & PZ2-2 - Commercial and Residential Pools & Spas Ozone Generator Systems INSTALLATION GUIDE and OPERATION MANUAL T. O3 NATURAL TECHNOLOGY Reduces Chemical Usage, Improves Sanitation Produces Crystal
SPA-QUIP LTD 3 BUTTON ELECTRONIC STANDARD SPA POOL CONTROLLER DEALER STAMP: DATE INSTALLED SERIAL NUMBER SOLD BY INSTALLED BY STARTUP TESTING
 DEALER STAMP: SPA-QUIP LTD DATE INSTALLED SERIAL NUMBER SOLD BY INSTALLED BY STARTUP TESTING 3 BUTTON ELECTRONIC STANDARD SPA POOL CONTROLLER Intui3butbk.99-PSE/NRC Contents 1...OPERATING INSTRUCTIONS:
Robotic Pool Cleaner Owner's Manual WARNING TYPE EM14-- TYPE EM15--
 TYPE EM14-- TYPE EM15-- Robotic Pool Cleaner Owner's Manual H0574000 RevA WARNING FOR YOUR SAFETY - For anything other than the routine cleaning and maintenance described in this manual, this product must
PERSONAL Ultrasonic Cool Mist Humidifier
 PERSONAL Ultrasonic Cool Mist Humidifier FOR MODEL: EE-5951 If you have any questions about the operation of your humidifier, please contact Crane Customer Care. Toll Free: 888-599-0992 Email: customer-service@crane-usa.com
PANEL HEATER OPERATING INSTRUCTIONS. For Models: CELEPANEL, CELEPANELT
 PANEL HEATER OPERATING INSTRUCTIONS For Models: CELEPANEL, CELEPANELT WARNINGS AND SAFEGUARDS 1. Use only the voltage specified on the rating label of the appliance. 2. Keep all objects at least 1 metre
INSTALLATION & USER INSTRUCTIONS
 INSTALLATION & USER INSTRUCTIONS Skålvik LED Electric Stove Skålvik LED Electric Stove All instructions must be handed to the user for safekeeping. Revision A - 12/15 1 I N S TA L L AT I O N & U S E R
READ AND FOLLOW ALL INSTRUCTIONS SAVE THESE INSTRUCTIONS
 READ AND FOLLOW ALL INSTRUCTIONS SAVE THESE INSTRUCTIONS 1 IMPORTANT SAFETY INSTRUCTIONS Read the instructions The appliance is not to be used by persons (including children) with reduced physical, sensory
ADORABLE Ultrasonic Cool Mist Humidifier
 ADORABLE Ultrasonic Cool Mist Humidifier FOR MODELS: EE-865, EE-3186, EE-3189, EE-3190, EE-3191, EE-4139, EE-4140, EE-5058, EE-6369, EE-7270, EE-8189, EE-8190, EE-8243, EE-8245, EE-8246, EE-8247, EE-8248,
General Care and Safety Guide
 GECO203 General Care and Safety Guide Thank you for choosing a ecosave Panel Heater. This ecosave heater has been designed and manufactured to high standards of engineering and with proper use and care,
EcoMaster - Residential Pools up to 40,000 Gallons
 - Residential Pools up to 40,000 Gallons INSTALLATION/ OPERATION GUIDE Reduces Chemical Usage, Improves Sanitation Produces Crystal Clear Water Copyright 2013 Prozone Water Products: 3004 11 th Ave. -
1.5 GALLON ULTRASONIC HUMIDIFIER MODEL # EE-5303W
 smartdrop Humidifier 1.5 GALLON ULTRASONIC HUMIDIFIER MODEL # EE-5303W If you have any questions about the operation of your ultrasonic humidifier, please contact Crane Customer Care. Toll Free: 888-599-0992
On/off button with booster (max) function* Fine filter Prefilter. Dust container Release button Charging indicator light. Vacuum cleaning cover
 function* Fine filter Prefilter. Dust container Release button Charging indicator light. Vacuum cleaning cover") Thank you for choosing an Electrolux Rapido vacuum cleaner. Rapido is a rechargeable handheld vacuum cleaner intended for use of light dry household debris. These Operating Instructions cover most Rapido
Thank you for choosing an Electrolux Rapido vacuum cleaner. Rapido is a rechargeable handheld vacuum cleaner intended for use of light dry household debris. These Operating Instructions cover most Rapido
Ultraviolet Systems UV-C 50 INSTALLATION INSTRUCTIONS & PRODUCT MANUAL
 Ultraviolet Systems Inc. UV-C 50 INSTALLATION INSTRUCTIONS & PRODUCT MANUAL TABLE OF CONTENTS SECTION 1 General Information 1A. Description...1 1B. Specifications...1 SECTION 2 Installation 2A. Pool Preparation...
Multi-Temp Jug Kettle CPK17U
 Multi-Temp Jug Kettle CPK17U Important Safeguards When using electrical appliances, basic safety precautions should always be followed, including the following: 1. The appliance is not intended to be operated
SP16. 08/50740/1 (UK) - Issue 1
 - Issue 1") SP16 08/50740/1 (UK) - Issue 1 The product complies with the European Safety Standards EN60335-2-30 and the European Standard Electromagnetic Compatibility (EMC) EN55014, EN60555-2 and EN60555-3 These
SP16 08/50740/1 (UK) - Issue 1 The product complies with the European Safety Standards EN60335-2-30 and the European Standard Electromagnetic Compatibility (EMC) EN55014, EN60555-2 and EN60555-3 These
FOR THE FOLLOWING MODELS: If you have any questions about the operation of your ultrasonic humidifier, please contact Crane Customer Care.
 Droplet Humidifiers FOR THE FOLLOWING MODELS: EE-5302 EE-5302A EE-5302W If you have any questions about the operation of your ultrasonic humidifier, please contact Crane Customer Care. Toll Free: 888-599-0992
Hydroxynator H A /01. Instructions for installation and use English. More languages on:
 Hydroxynator Instructions for installation and use English EN NL ES PT More languages on: www.zodiac-poolcare.com H0451600.A - 2014/01 Read this notice carefully before installing, maintaining or repairing
General Care and Safety Guide
 General Care and Safety Guide Thank you for choosing a Goldair product. This Goldair unit has been designed and manufactured to high standards of engineering and with proper use and care, as described
DIGITAL Warm & Cool Mist Humidifier
 DIGITAL Warm & Cool Mist Humidifier FOR MODEL: EE-6902 If you have any questions about the operation of your humidifier, please contact Crane Customer Care. Toll Free: 888-599-0992 Email: customer-service@crane-usa.com
General Care and Safety Guide
 General Care and Safety Guide Thank you for choosing a Celsius Convection Panel Heater. This Celsius appliance has been designed and manufactured to high standards of engineering and with proper use and
Koolbreeze. Portable Air-conditioner User s Manual. For Model : CLIMATEASY 14 P14HCP. Downloaded from manuals search engine
 Koolbreeze Portable Air-conditioner User s Manual For Model : CLIMATEASY 14 P14HCP Table of Contents 1. Installation.. 2 2. General Safety Reqirements.. 4 3. Product safety.... 5 4. Safety Awareness....
Instruction Manual Model: IM03A
 Ice Maker Instruction Manual Model: IM03A 1. Important Safety Instructions Please read these instructions thoroughly before using this product and retain them for future use. WARNING: This appliance must
Electronic Ceramic Tower Heater
 Operating Instructions Electronic Ceramic Tower Heater Model: GCT430 General Care and Safety Guide Thank you for choosing a Goldair Ceramic Fan Heater. This Goldair Heater has been designed and manufactured
40cm Pedestal Fan with Remote Control
 Instruction Manual 40cm Pedestal Fan with Remote Control Model: HF40BRG READ AND SAVE THESE INSTRUCTIONS Please read and follow the instructions in this user manual even if you feel you are familiar with
Sunbeam Tower Fan with Night Mode
 Sunbeam Tower Fan with Night Mode Instruction Booklet FA7250 90cm Remote Controlled Tower Fan Please read these instructions carefully and retain for future reference. SM8650 featured Contents Sunbeam
OPERATORS MANUAL FOR Mi-T-M CORONA DISCHARGE OZONE GENERATORS
 OPERATORS MANUAL FOR Mi-T-M CORONA DISCHARGE OZONE GENERATORS CAUTION RISK OF INJURY! READ MANUAL BEFORE OPERATING! This manual is an important part of the Corona Discharge Ozone Generator and must remain
PANEL HEATER OPERATING INSTRUCTIONS. For Model: CELEPANELD
 PANEL HEATER OPERATING INSTRUCTIONS For Model: CELEPANELD WARNINGS AND SAFEGUARDS 1. Use only the voltage specified on the rating label of the appliance. 2. Keep all objects at least 1 metre from the front
INSTALLATION AND USER INSTRUCTION GUIDE. Electric Fire With Remote Control. Model: WM-3522CF. Please read all instructions carefully and
 INSTALLATION AND USER INSTRUCTION GUIDE Electric Fire With Remote Control Model: WM-3522CF Please read all instructions carefully and retain for future reference IMPORTANT: THESE INSTRUCTIONS SHOULD BE
 Installation Guide BI-98 Ice Maker www.u-lineservice.com Phone (414) 354-0300 FAX (414) 354-7905 Service & Parts Tech Lines Phone (800) 779-2547 FAX (414) 354-5696 OnlineService@U-Line.com 2005 U-Line
WATER FILTRATION SYSTEM (USF3) OWNER S MANUAL
 OWNER S MANUAL") WATER FILTRATION SYSTEM (USF3) OWNER S MANUAL 1 INTRODUCTION Congratulations on choosing Permatech to improve the quality of your water. You will immediately begin to notice the numerous benefits of having
WATER FILTRATION SYSTEM (USF3) OWNER S MANUAL 1 INTRODUCTION Congratulations on choosing Permatech to improve the quality of your water. You will immediately begin to notice the numerous benefits of having
Closing procedures for in-ground pools
 Closing procedures for in-ground pools Note: Carefully read this entire document before proceeding with the closure of your pool. In order to avoid unpleasant surprises, please check with your insurance
Contact Details. Please note that some of the contact details on this PDF document may not be current.
 Contact Details Please note that some of the contact details on this PDF document may not be current. Please use the following details if you need to contact us: Telephone: 0844 879 3588 Email: customer.services@gdcgroup.co.uk
Installation & Service Manual
 Installation & Service Manual Table of Contents Unpacking & Inspection... 2 Basic Guidelines... 2 Specifications... 3 Before Starting Installation Where to install the filter... 4 Tools, pipe, fittings
IMPORTANT SAFETY INFORMATION:
 08/53542/0 (AU/NZ) Issue 1 Owner s Manual Model BLF5051-AU/ PRISM 50" EN IMPORTANT SAFETY INFORMATION: Always read this manual first before attempting to install or use this fireplace. For your safety,
WARNING: Warns of health hazards and identifies possible risks of injury. CAUTION: Indicates possible dangers to the machine or other objects.
 VBT3ASV USER GUIDE SAFETY INFORMATION About this user guide Read this user guide completely before using the machine. Keep this user guide for reference. If you pass your machine on to third parties, it
INSTALLATION & USER INSTRUCTIONS
 INSTALLATION & USER INSTRUCTIONS LED ELECTRIC STOVE Christchurch, Dorset BH23 2BT Tel: 01202 588 638 Fax: 01202 499 639 www.ekofires.co.uk e-mail: sales@ekofires.co.uk MODELS COVERED BY THESE INSTRUCTIONS
Multi-Temp Jug Kettle CPK17BPU
 Multi-Temp Jug Kettle CPK17BPU Congratulations on your purchase of the Cuisinart Multi-Temp Jug Kettle. For over 30 years Cuisinart s aim has been to produce the very finest kitchen equipment. All Cuisinart
10L Evaporative Cooler with Timer
 10L Evaporative Cooler with Timer / GVAEC10 Instruction Manual 1 Important Safety Instructions Thank you for choosing this GVA product. This GVA appliance has been designed and manufactured to high standards
INSTALLATION MANUAL. PP2 Ozone System (No Filter Cartridge) PP3 Ozone System (With Filter Cartridge) nspdevelopment.com
 PP3 Ozone System (With Filter Cartridge) nspdevelopment.com") INSTALLATION MANUAL PP2 Ozone System (No Filter Cartridge) PP3 Ozone System (With Filter Cartridge) IN DECK CIRCULATION/FILTRATION UNIT PERFECT POOL OZONE GENERATOR! NOTE TO INSTALLER: GIVE THIS MANUAL
INSTALLATION MANUAL PP2 Ozone System (No Filter Cartridge) PP3 Ozone System (With Filter Cartridge) IN DECK CIRCULATION/FILTRATION UNIT PERFECT POOL OZONE GENERATOR! NOTE TO INSTALLER: GIVE THIS MANUAL
SP420 & SP14 SP520 & SP15 SP920 & SP19. 08/19222/9 (UK) - Issue 9
 - Issue 9") SP420 & SP14 SP520 & SP15 SP920 & SP19 08/19222/9 (UK) - Issue 9 1 100 964 min. SP420 & SP14 170 100 1200 min. SP520 & SP15 182 100 1010 min. SP920 & SP19 168 664 650 696 'a' 300 min. (600 recommended)
SP420 & SP14 SP520 & SP15 SP920 & SP19 08/19222/9 (UK) - Issue 9 1 100 964 min. SP420 & SP14 170 100 1200 min. SP520 & SP15 182 100 1010 min. SP920 & SP19 168 664 650 696 'a' 300 min. (600 recommended)
WINTERIZATION INDUSTRY BEST PRACTICE
 WINTERIZATION INDUSTRY BEST PRACTICE Zodiac Pool Systems, Inc. 1-800-822-7933 Regional Extension www.zodiacpoolsystems.com Zodiac Academy zodiac.academy@zodiac.com www.zodiacacademy.com Instructor: Email:
ELECTRIC FIREPLACE with Remote Control
 INSTALLATION AND USER INSTRUCTION GUIDE ELECTRIC FIREPLACE with Remote Control Model: EF431SL Please read all instructions carefully and retain for future reference 1 Important Safety Instructions When
EH Fin Oil-Filled Radiator with timer
 EH1365 11-Fin Oil-Filled Radiator with timer 3 Heat settings Adjustable thermostat 24-hour timer Convenient built-in carrying handle Castors for ease of mobility Safety overload cut-out 2 year guarantee
OWNERS INSTRUCTION MANUAL
 Congratulations on your purchase of a Kent Portable Electric Appliance. Please read the following instructions carefully before use and retain for future reference. BEFORE FIRST USE Read and follow all
Manual update 2016 MC37/MFC3600
 Manual update 2016 MC37/MFC3600 SETUP INSTRUCTIONS Evaporative cooling works on the principle of heat absorption by moisture evaporation. Simply put, heat is removed from the air as water evaporates. You
Product Catalogue 2008/2009
 Product Catalogue 2008/2009 your ultimate poolcare solution Contents Integrated Pool Products 5 Products - Automatic Pool Cleaners 7 Products - Automatic Pool Cleaners 9 Products - Salt Chlorinator 11
READ AND FOLLOW ALL INSTRUCTIONS SAVE THESE INSTRUCTIONS
 READ AND FOLLOW ALL INSTRUCTIONS SAVE THESE INSTRUCTIONS International Patent #9,938,166 Patented Micro-Ozone cell ozone technology: Patent #8367007 1 IMPORTANT SAFETY INSTRUCTIONS Read the maintenance
AC-12200E Portable Air Conditioner
 AC-12200E Portable Air Conditioner OWNERS MANUAL Read and save these instructions. A Name You Can Trust Trust has to be earned and we will earn yours. Customer happiness is the focus of our business. 2
80cm Tower Fan With Remote Control
 Operating Instructions 80cm Tower Fan With Remote Control Item: GCTF300 General Care and Safety Guide Thank you for choosing this Goldair Venti product. This Goldair Venti appliance has been designed and
3 In 1 AIR CONDITIONER with REMOTE CONTROL MODEL NO: CA9000 PART No: OPERATION & MAINTENANCE INSTRUCTIONS
 3 In 1 AIR CONDITIONER with REMOTE CONTROL MODEL NO: CA9000 PART No: 32305600 OPERATION & MAINTENANCE INSTRUCTIONS 0304 Parts List Item Part No Description Qty 1 FT900001 Top Cover 1 2 FT900002 Filter
Owner s Manual RD432-0 Chemical Controller
 Owner s Manual RD432-0 Chemical Controller Table of Contents I. Introduction page 2 A. Water Chemistry page 2 B. Safety page 3 C. System Components page 4 D. Specifications page 7 E. Controller Panel Descriptions
ULTRASONIC HUMIDIFIER
 To Buy: Visit www.sylvane.com or call (800) 934-9194 For Product Support: Contact Sunpentown at 1-800-330-0388 ULTRASONIC HUMIDIFIER [ADORABLE MONKEY] To prolong the life of this humidifier, using distilled
INSTALLATION & USER INSTRUCTIONS
 INSTALLATION & USER INSTRUCTIONS LED ELECTRIC STOVE Christchurch, Dorset BH23 2BT Tel: 01202 588 638 Fax: 01202 499 639 www.ekofires.co.uk e-mail: sales@ekofires.co.uk MODELS COVERED BY THESE INSTRUCTIONS
SUPER CLEAN FILTER PUMP USER S MANUAL 29P414XX/29P415XX/29P416XX/29P417XX
 FP13-15-GB SUPER CLEAN FILTER PUMP USER S MANUAL 29P414XX/29P415XX/29P416XX/29P417XX 1 Attention: Read all instructions carefully before installing filter pump. TABLE OF CONTENTS Instruction...... 2-3
WELCOME BLUE - NEUTRAL BROWN LIVE GREEN AND YELLOW - EARTH
 Zephyr 16 DC FAN WELCOME Thank you and congratulation for choosing an EcoAir DC Fan to help you improve the air quality within your home. Inside you will find many helpful tips on how to use and maintain
INSTALLATION INSTRUCTIONS USER GUIDE
 INSTALLATION INSTRUCTIONS USER GUIDE Tilted wall cooker hood HT90GHB2 model GB IE CONTENTS Introduction 3 Safety and warnings 4 Installation instructions 8 About your cooker hood Energy efficiency 18
EH1688. Over Door Heater & Fan Chauffage de Porte & Ventilateur
 EH1688 Over Door Heater & Fan Chauffage de Porte & Ventilateur 1 IMPORTANT Installer and Users please note: These instructions should be read carefully and left with the user of the product for future
General safety precautions English
 English 1 1 1.1 About the documentation The original documentation is written in English. All other languages are translations. The precautions described in this document cover very important topics, follow
General Care and Safety Guide
 General Care and Safety Guide Thank you for choosing a Celsius Ceramic Tower Heater. This Celsius appliance has been designed and manufactured to high standards of engineering and with proper use and care,
40cm Wall Fan With Pull Cord Operation
 Instruction Manual 40cm Wall Fan With Pull Cord Operation Model: WAL40P READ AND SAVE THESE INSTRUCTIONS Please read and follow the instructions in this user manual even if you feel you are familiar with
1 GALLON / 3.78 LITER ULTRASONIC HUMIDIFIER
 Adorable Humidifiers 1 GALLON / 3.78 LITER ULTRASONIC HUMIDIFIER FOR THE FOLLOWING MODELS: EE-0865 EE-3186 EE-3189 EE-3190 EE-3191 EE-4139 EE-4140 EE-5058 EE-6369 EE-7270 EE-8189 EE-8190 EE-8243 If you
Installation Instructions
 Installation Instructions For NoFrost Combined Refrigerator-Freezers CS 1400 PC CS 1400 R CS 1410 7085 589-00 Important Please Read and Follow these Instructions These instructions contain Danger, Warning
Manual for MC21A SETUP INSTRUCTIONS
 Manual for MC21A SETUP INSTRUCTIONS Evaporative cooling works on the principle of heat absorption by moisture evaporation. Simply put, heat is removed from the air as water evaporates. You feel this principle
DUST EXTRACTOR INSTRUCTION MANUAL. 550W (3/4 HP) INDUCTION MOTOR 1850W AUTOMATIC POWER OUTLET 65L COLLECTION BAG ø100mm X 2.
 INDUCTION MOTOR 1850W AUTOMATIC POWER OUTLET 65L COLLECTION BAG ø100mm X 2.") KNOW YOUR PRODUCT DUST EXTRACTOR 550W (3/4 HP) INDUCTION MOTOR 1850W AUTOMATIC POWER OUTLET 65L COLLECTION BAG ø100mm X 2.5M SUCTION HOSE INSTRUCTION MANUAL WARNING: Read all safety warnings and all instructions.
KNOW YOUR PRODUCT DUST EXTRACTOR 550W (3/4 HP) INDUCTION MOTOR 1850W AUTOMATIC POWER OUTLET 65L COLLECTION BAG ø100mm X 2.5M SUCTION HOSE INSTRUCTION MANUAL WARNING: Read all safety warnings and all instructions.
USE & CARE MANUAL WALL HANGING FIRE. CO9126 V2_110512
 WALL HANGING FIRE CO9126 V2_110512 USE & CARE MANUAL www.adamfires.co.uk SECTION 01 These notes must be read before installation These instructions are for your safety. Please read through them thoroughly
EH0533 Indoor Climate Control
 EH0533 Indoor Climate Control 2.8 kw of cooling, 2.9 kw of heating Air Conditioning Efficient heating (air-source heat-pump) Cooling Remote control Suitable for low-wall installation No external unit required
all-rounder Mini Compact Bagless Vacuum Cleaner Cyclonic Bagless Technology Washable HEPA Filtration Compact, Lightweight & Stylish Design all-rounder
 all-rounder all-rounder Mini Compact Bagless Vacuum Cleaner Cyclonic Bagless Technology Washable HEPA Filtration Compact, Lightweight & Stylish Design 1 3 2 4 5 6 8 9 11 12 10 14 13 7 15 2. 5011 All-Rounder
7Litre Evaporative Cooler With Remote
 Operating Instructions 7Litre Evaporative Cooler With Remote Item: CELECOOLER General care and safety guide Thank you for choosing this Celsius Fan. This Celsius appliance has been designed and manufactured