COMMERCIAL STRENGTH POLYMER MEDIA FILTER OWNERS MANUAL
|
|
|
- Rosamond Atkins
- 5 years ago
- Views:
Transcription


1 COMMERCIAL STRENGTH POLYMER MEDIA FILTER OWNERS MANUAL
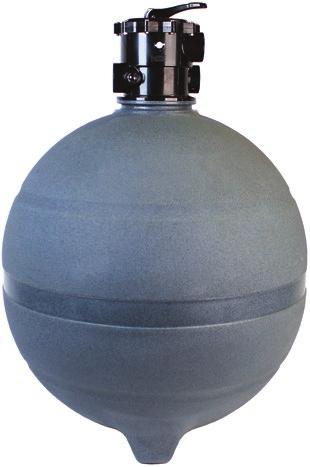
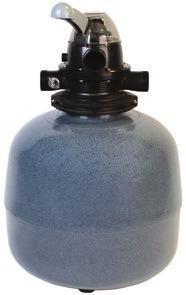
2 INTRODUCTION Congratulations on choosing the Poolrite S6000 mk2, S5000 mk2, S8000 mk1 or S9000 mk4 High Rate Media Filter fitted with the exclusive Poolrite V2000 valve. These systems incorporate the very latest technology in swimming pool media filtration. These filter tanks are moulded from a very advanced Engineering Polymer which enables the Evolve Group to apply a 10 year Warranty to these filter tanks. Poolrite s micro-slot underdrain system, featuring our exclusive folding lateral arm technology, combined with the use of a deep, dual-media Diamond Kleen bed, gives longer filter cycles and more efficient backwashing, resulting in less time being spent on maintaining your equipment and more time left to allow you to use and enjoy your pool. The V2000 valve represents the culmination of several years of research and development at Poolrite to produce a filter control valve which provides far less noise and restriction to water flow, is easier to operate and requires no maintenance. The V2000 valve also has an inbuilt Sight Glass to give you a positive indication when backwashing is complete, thus eliminating guesswork and reducing waste of pool water. To ensure maximum performance, all systems should be fitted with a proven high performance Poolrite Pump featuring corrosion resistant design. All equipment is weather resistant and constructed to protect your valuable investment. Australian design and manufacture is your guarantee of after-sales backup. 1
3 CONTENTS Introduction...1 How A High Rate Sand Filter Works...3 Delivery of Your High Rate Sand Filter...3 Attention Installer...4 Installation Instructions...5 Starting Up Procedure...7 Priming The Pump Starting The Filter Backwashing...8 Filter By-Pass / Waste...8 Recirculating...9 Valve Closed...9 Vacuum Cleaning...9 Trouble Shooting...10 Specifications...11 Warranty...13 Warranty Conditions
4 HOW A HIGH RATE MEDIA FILTER WORKS The filter pump draws water from the pool and forces it under pressure into the multi-function V2000 Valve where it is directed into the top of the filter tank via an overdrain diffuser. The water then flows down through the media bed, into the underdrain and back to the pool. The action of the water containing suspended particles passing through the filter bed causes the larger particles to be trapped and retained by the Diamond Kleen. Some of the very small particles may, however, pass completely through the filter and return to the pool, but in the process will have gained an electrostatic charge due to their high velocity over the media. This charge causes these particles to be attracted together to form clusters which are then large enough to be trapped by the Diamond Kleen on their next pass through the filter. This is a normal characteristic of all high rate media filters. As the quantity of suspended particles trapped in the media bed increases, the passage of water becomes progressively restricted, but this also results in an improvement in filtration fineness. However when this restriction to flow becomes excessive (as indicated by the rise in gauge pressure) the filter must be cleaned to restore a normal flow of water. Cleaning is achieved by reversing the flow of water so it flows upwards through the media bed causing the individual grains of filter media to become buoyant and allow the bed to expand and release the trapped dirt particles which are then flushed out of the filter to the waste drain. This process is called BACKWASHING. DELIVERY OF YOUR MEDIA FILTER Each Poolrite filter/pump is delivered in two cartons as follows: CARTON 1 Factory assembly filter includes: - Lateral - Tank - Clamp bands - Gasket - Installation & Owners Manual with Warranty Card. CARTON 2 (if ordered) Factory assembly V2000 Valve includes: - V2000 Multiport Valve - Three 50 x 50mm take-off unions with O Rings. - Three 50 x 40mm reducing bushes. 3
5 ATTENTION INSTALLER 1) BOTTOM OF INTERNAL STANDPIPE MUST BE LOCATED ON SPIGOT AT BOTTOM OF TANK BEFORE ADDING MEDIA!! 2) THIS MANUAL MUST BE GIVEN TO THE POOL OWNER FOR COMPLETION OF WARRANTY DETAILS!! OPERATIONAL CHECK POINTS Failure to adhere to the following directions will void the Warranty! 1. Filter Pump should not be connected via extension leads as damage to motor can result. 2. At least 130mm clearance must be provided at fan cowl (rear) end of motor for efficient ventilation. 3. Should the filter system be housed in an enclosure, provision must be made for adequate ventilation. 4. Filter system must be installed in a position with effective drainage to guard against potential flooding in heavy rain or malfunctions in plumbing. 5. The pool water level must be at least half way up the skimmer box opening. 6. Make sure both skimmer box basket and pump basket are in place. 7. On initial vacuum cleaning of the pool, it is wise to use a filter sock in the pump strainer basket to prevent excess debris damaging the pump impeller seal. 8. Do not operate the filter system in FILTER mode unless the free chlorine level is between 0.5 and 3.0 ppm and the ph level is between 7.0 and 7.8 for concrete pools and 6.8 and 7.2 for other types of pools, or as recommended by the Pool Builder. 9. Do not vacuum clean the pool when the filter valve is in the BACKWASH position. 10. Do not operate the filter valve handle while the pump is running. IMPORTANT Read the following instructions carefully to ensure trouble free efficient operation of your filtration system for many years! 4
6 INSTALLATION INSTRUCTIONS IMPORTANT Tighten all backnuts by hand only DO NOT USE TOOLS! Pump/Filter should be installed between 1.0 metre above or 1.0 metre below mean pool water level for correct operation. 5
7 Connecting The Pump To Filter 1. Place filter tank on a level concrete slab having minimum dimensions as shown under SPECIFICATIONS (Page 11). 2. Position tank filter label to the front then place pump on the left side with suction port facing front. (For above-ground pools this may have to be rotated 180 ). 3. Fit all of the moulded couplings to the V2000 Valve ports and the pump ports. 4. Using standard PVC pressure pipe and fittings, fabricate suitable connecting plumbing between the top pump discharge port and the PUMP port on the V2000 valve. 5. Make all remaining connections from the pool and waste plumbing to the pump and V2000 Valve. 6. Remove V2000 Valve after disconnecting PUMP, RETURN and WASTE plumbing and Split Clamp Band. 7. To ensure correct separation from internal standpipe assembly: a) Lift the V2000 Valve approximately 250mm. b) With other hand, reach under valve then twist and pull standpipe downwards until separated. 8. Place valve and rubber gasket in a clean place. 9. Re-position bottom of standpipe assembly in bottom of tank. 10. While holding standpipe central in the neck of the tank, gently push outer ends of all lateral arms down until they contact the tank wall. 11. Fit white moulded standpipe locater between top of standpipe and tank neck. Fit red plastic cap to top of standpipe (this will prevent media entering standpipe during filling). 12. Quarter fill tank with water. Add the correct amount of graded M20 Diamond Kleen (refer specifications) and distribute evenly across the bottom of the tank. 13. This should completely cover all parts of the underdrain assembly. 14. Add the correct amount of graded M10 Diamond Kleen (refer to specification), levelling the bed when needed. 15. Remove black moulded standpipe locater, then clean all media and dust from neck area of tank. 16. Replace, rubber gasket and multiport valve. 17. Refit and tighten Split Clamp Band. 18. Re-connect PUMP, RETURN and WASTE plumbing to V2000 Valve. 6
8 STARTING UP PROCEDURE Priming The Pump Priming the pump is required if the installation is above the pool water level. If the pump is installed below the water level isolating valves should be fitted then go to Starting The Filter. 1. Remove clear pump lid, then fill pump bowl with water to the suction inlet level. 2. Check the rubber pump lid seal is clean and lightly lubricated with silicone-based grease and is correctly located in the groove. 3. Replace clear lid. P O O L RI T E BY T H E E V O LV E G RO U P Starting The Filter (New Pools) 1. Set V2000 Valve to WASTE position. 2. Vacuum clean pool to waste to remove excess debris from pool and pipes (refer to VACUUM CLEANING section page 9). (Existing Pools) 3. Set V2000 Valve to BACKWASH position. 4. Ensure all plumbing lines to and from the pool are clear (i.e. shut off valves are OPEN). 5. Switch the pump ON. V M U LT IP O R T VA LV E 6. Observe reaction through clear pump lid: The pump will first draw water in surges until all the air within the pump bowl and suction piping has been expelled. If air is still present after approximately 3 minutes repeat Priming The Pump instructions, then if air is still present, check the following: a) Pump lid correctly tightened onto seal. b) O Rings fitted under unions. c) Backnuts tightened fully (by hand only). d) Plumbing joints (all glued) e) Sufficient water in pool. f) Skimmer weir is free and not jammed. g) Strainer baskets not blocked. h) All appropriate in-line valves open. i) If air is still present the suction pipe to the skimmer should be checked. 7. After pump has fully primed, run for approximately three (3) minutes or until water in Sight Glass becomes clear. 8. Switch pump OFF. 9. Turn valve handle to RINSE position. 10. Switch pump ON and run until water in Sight Glass is again clear (approx. 20 seconds). 11. Switch pump OFF. 7
9 12. Turn valve handle to FILTER position. 13. Switch pump ON. 14. The filter system is now filtering the pool and the pressure gauge should be reading in the green FILTER range. 15. When the pressure gauge reading reaches the start of the red CLEAN band, the filter must be cleaned by BACKWASHING. BACKWASHING 1. Switch pump OFF 2. Remove vacuum cleaner plate (if fitted) from skimmer. 3. Turn V2000 Valve handle to BACKWASH position. 4. Switch pump ON and run until water in Valve sight glass is completely clear. 5. Switch pump OFF. 6. Turn Valve handle to RINSE position. 7. Switch pump ON and run until water in Valve sight glass is completely clear (about 20 seconds). 8. Switch pump OFF. 9. Turn Valve handle to FILTER position. 10.Switch pump ON. 11. Reconnect automatic vacuum cleaner (if fitted) to skimmer. The system is now filtering normally again and the pressure gauge should be reading in the lower portion of the green FILTER band. IMPORTANT: Before and after backwashing, check that the pool water level is correct. FILTER BY-PASS / WASTE If the pool is often overfilled by rain and to return it to its normal level, proceed as follows: 1. Switch pump OFF. 2. Set V2000 Valve to WASTE position. 3. Switch pump ON. The excess water is discharged to waste. 4. When correct water level has been restored, switch pump OFF. 5. Set Valve to FILTER position. 6. Switch pump ON. The filter is now operating normally A USEFUL HINT: When lowering the pool level with the V2000 Valve set in the WASTE position (only), vacuum cleaning may be performed at the same time, as under this condition the filter will not collect sludge and debris as it will all be discharged to WASTE. 8
10 RECIRCULATE With V2000 Valve set in RECIRCULATE position the pool or spa water is recirculated via the pump without passing through the filter. This can be useful to provide extra flow for boosting spa jets or added circulation for heating. VALVE CLOSED The pump must always be switched OFF when V2000 Valve is in the CLOSED position. This setting is used to prevent the filter contents draining back through the pump when the lid is removed to enable cleaning of the strainer basket. Ensure V2000 valve is in the FILTER position before restarting the pump. 9
11 TROUBLE SHOOTING Filter Pressure Build Up Rapidly Air Bubbles Back to Pool Water Drains Back to Pool when Pump Switched Off Pump Loses Suction Algae/Milky Coloured Water Check eyeballs in pool are open. Check for algae in pool. Vacuum cleaning has been done with valve in backwash position. Ineffective backwashing due to poor water flow. Check for restrictions from blocked strainer baskets or air leaks in pump or suction plumbing. Check that automatic pool cleaner has not been left connected to skimmer during backwashing. Check for algae inside filter. Check sufficient water flow. Check suction pipe connectors are tight. Check pump lid seal is clean, lubricated with silicone grease and correctly fitted and tightened. Check pump lid for leaks. Check valve for leaks. Check backnuts are tight on all pipe connectors. Check strainer baskets in pump and skimmer box are not blocked with debris. NOTE: After opening the pump strainer pot lid air will have entered the filtration system. Re-priming the pump may be necessary when the system is started again. Check filter condition from pressure gauge and backwash if necessary. Contact your pool builder or local pool shop for advice on chemical balancing the water, as damage to the filtration equipment or pool surface may result if not corrected. 10
12 SPECIFICATIONS S9000 S8000 S6000 S5000 SUITABLE POOLRITE PUMP MODELS SQI700 SQI600 SQI500 SQI600 SQI500 SQI400 SQI400 Max. Flow Rate (L/min) Fine Diamond Kleen Grade (mm) M10 M10 M10 M10 Fine Diamond Kleen Weight (kg) Coarse Diamond Kleen Grade (mm) M20 M20 M20 M20 Coarse Diamond Kleen Weight (kg) DIMENSIONS S
13 DIMENSIONS S-6000 S-8000 S
14 WARRANTY CARD Name of Purchaser... Address... Purchased From... Date... Equipment and Model... IMPORTANT: This Warranty Card should be filled in and returned to: Marco Engineering Pty. Ltd. PO Box 1491, Browns Plains QLD 4118 Australia KEEP WITH PROOF OF PURCHASE 13
15 WARRANTY CONDITIONS Marco Engineering Pty. Ltd. ABN POOLRITE FILTRATION SYSTEMS Your POOLRITE Filtration Equipment is manufactured to the highest possible standards and most up-to-date technology. Accordingly the equipment carries the following Warranty, should a fault occur due to faulty manufacture or materials. IMPORTANT In the event of a fault covered by Warranty occurring, the Purchaser must, in the first instance, contact Marco Engineering or the nearest authorised Poolrite Distributor. S5000 mk2 / S6000 mk2 / S8000 mk1 / S9000 mk4 1. All components in the Filtration System, with the exception of the Filter Tank, carry a one year (12 months) Warranty from the Date of Purchase by the Original Owner. 2. Due to Marco Engineering s Advanced Moulding Technology, the Filter Tank (the most important part of your Filtration System) carries a special Extended Warranty of ten years from the Date of Purchase by the Original Owner. The terms of this Warranty cover full replacement, excluding the cost of labour, of a defective Filter Tank for the Original Owner for a period of 10 years. 3. No claim in pursuance of this Warranty will be recognised unless received by Marco Engineering during Warranty period. 4. The Filter Tank is defined as the Filter Housing Moulding only, without any attachments such as Valves, Internal Fittings or Plumbing, etc. 5. The Warranty is void if the following are not adhered to: The equipment must be installed and used in accordance with the instructions supplied. The Equipment is designed to be used with swimming pool or spa pool water, chemically balanced in accordance with the Langelier Saturation Index with a ph of 6.8 to 8.0 that is regularly treated with a sanitising system utilising chlorine either added in compound form or generated in situ in concentrations as recommended by the relative State Health Departments. Should other chemical treatment systems or parameters be used, Marco Engineering will not be responsible for damage done by corrosion, scaling and stress cracking of the equipment or the shortened filter cycles resulting If, in the opinion of Marco Engineering, the equipment has been subjected to other than normal swimming pool or spa pool use or has been improperly serviced or maintained. 6. This Warranty is applicable to workmanship and materials only. Marco Engineering will replace, at no charge, all parts returned freight paid, which display faulty workmanship or materials. Marco Engineering Pty. Ltd. accepts no responsibility for loss, damage or injury to person or property arising from Warranty failure of equipment, or installation of that equipment, unless with the express authority of Marco Engineering or its Authorised Distributors and this Warranty shall not extend to any expenditure otherwise incurred. PROOF OF PURCHASE SUPPLIED 14
16 P F E poolrite@evolvegrp.com PO Box 1491, Browns Plains, QLD 4118, AUSTRALIA
HIGH PERFORMANCE POOL & SPA PUMPS
 HIGH PERFORMANCE POOL & SPA PUMPS INSTALLATION AND OPERATION MANUAL PREMIUM PR SERIES PR50F, PR75F, PR100F, PR125F, PR150F, PR200F Reltech Australia Pty Ltd 43-45 Kylta Rd West Heidelberg Vic 3081 Ph:
ECOFLO V3 POOL & SPA PUMP
 ECOFLO V3 POOL & SPA PUMP INSTALLATION AND OPERATION MANUAL Reltech Australia Pty Ltd 43-45 Kylta Rd West Heidelberg Vic 3081 Ph: (03) 9459 3838 Fax: (03) 9459 4038 www.reltech.com.au Page 1 of 11 Read
PRO-230 PRO-350 PRO-400 PRO-500 PRO-500DS ECO-PRO
 GERMAN ENGINEERED PUMPS SINCE 1909 PRO SERIES PUMPS INSTALLATION AND OPERATION MANUAL PRO-230 PRO-350 PRO-400 PRO-500 PRO-500DS ECO-PRO 1 PRO SERIES PUMPS INSTALLATION AND OPERATION MANUAL PRO-230 PRO-350
ACROBAT GT OPERATING AND TROUBLESHOOTING GUIDE. Automatic Pool Cleaner. We hope you enjoy your ACROBAT GT automatic pool cleaner!
 ACROBAT GT Automatic Pool Cleaner OPERATING AND TROUBLESHOOTING GUIDE 36 fin disc and flexible foot constructed of quality polyurethane Proven technology: Diaphragm driven strength & quietness Unique hose
Owner s Manual H _REVB
 Owner s Manual H0566000_REVB 1 Important Information Notice for Vinyl Liner Pools: Before installing your pool cleaner, examine the interior of your pool carefully. If the vinyl liner is brittle or has
2 SPEED PUMP INSTRUCTION MANUAL READ THIS MANUAL CAREFULLY BEFORE USING YOUR 2 SPEED PUMP
 2 SPEED PUMP INSTRUCTION MANUAL READ THIS MANUAL CAREFULLY BEFORE USING YOUR 2 SPEED PUMP 8308 PUMP PARTS BREAKDOWN Ref # Part # Manf. # Descrip on 1 NEP2134 AC 81361 PUMP LID 2 NEP2135 AC 81396 PUMP LID
TIDALWAVE I/G POOL PUMP INSTRUCTION MANUAL
 TIDALWAVE I/G POOL PUMP INSTRUCTION MANUAL READ THIS MANUAL CAREFULLY BEFORE USING YOUR PUMP 88 PUMP PARTS BREAKDOWN REF # Order # Mfr # Description 1 NEP4 AC 348 Lid Knobs NEP AC 380 Strainer Lid 3 NEP6
INSTALLATION AND OPERATING INSTRUCTIONS
 INSTALLATION AND OPERATING INSTRUCTIONS I INSTALLATION AND OPERATING INSTRUCTIONS LX 300 Pool Bolero ND Pump Cleaner INSTALLATION AND OPERATING INSTRUCTIONS Melbourne: 03 8796 8600 Gold Coast: 07 5552
MAXI PUMP INSTRUCTION MANUAL NE6151B /NE6171B READ THIS MANUAL CAREFULLY BEFORE USING YOUR MAXI PUMP
 MAXI PUMP INSTRUCTION MANUAL NE6151B /NE6171B READ THIS MANUAL CAREFULLY BEFORE USING YOUR MAXI PUMP 8104 MAXI-PUMP PARTS BREAKDOWN Re f # 1 2 3 4 5 6 7a 7b 8 9 10 11 12 13 14 15 16 2 Part # NEP2134 NEP2135
CHAMPION PUMP OWNER S MANUAL
 CHAMPION PUMP OWNER S MANUAL IMPORTANT SAFETY INSTRUCTIONS READ AND FOLLOW ALL INSTRUCTIONS SAVE THESE INSTRUCTIONS WARNING: Before installing this product, read and follow all warning notices and instructions
HAYWARD POOL PRODUCTS, INC. 620 Division Street Elizabeth, NJ Tel:
 IS270T-05 Rev. B OWNER S MANUAL INSTALLATION, OPERATION & PARTS MODEL S270T PRO SERIES HIGH-RATE SAND FILTER Basic safety precautions should always be followed, including the following: Failure to follow
ProMaster VSD ECO-SERIES
 ProMaster VSD ECO-SERIES Installation and Operating Instructions Model: PM200SV WARNING: Failure to follow these instructions and comply with all applicable codes may cause serious bodily injury and/or
SMF PUMP OWNER S MANUAL
 SMF PUMP OWNER S MANUAL IMPORTANT SAFETY INSTRUCTIONS READ AND FOLLOW ALL INSTRUCTIONS SAVE THESE INSTRUCTIONS WARNING: Before installing this product, read and follow all warning notices and instructions
ECONO FLO 2.7HP VARIABLE SPEED PUMP OWNER S MANUAL
 ECONO FLO 2.7HP VARIABLE SPEED PUMP OWNER S MANUAL IMPORTANT SAFETY INSTRUCTIONS READ AND FOLLOW ALL INSTRUCTIONS SAVE THESE INSTRUCTIONS WARNING: Before installing this product, read and follow all warning
TFM, TFC & TFN Filters. Installation and Operating Instructions
 TFM, TFC & TFN Filters Installation and Operating Instructions WARNING For proper operation, the inlet water pressure must be between 140kPa (20psi) and 690kPa (100 psi) except for Model XFN12 where the
Instructions for installation and use English. More documents on: H B /09
 TM Instructions for installation and use English EN More documents on: www.zodiac-poolcare.com H0538700.B - 2015/09 Read this manual carefully before installing, maintaining or repairing this appliance!
Patriot. Automatic Pool Vacuum Cleaner. Patent No. 5,794,293. Owner's Guide. Model *Recommended for 3/4 HP and above
 Patriot Model 5-2046-000 Automatic Pool Vacuum Cleaner Patent No. 5,794,293 Owner's Guide *Recommended for 3/4 HP and above 365-1926-1 CAUTIONS 1. Remove the vacuum from the pool prior to super chlorinating
ECONO FLO VSA 165 VARIABLE SPEED PUMP OWNER S MANUAL
 ECONO FLO VSA 165 VARIABLE SPEED PUMP OWNER S MANUAL IMPORTANT SAFETY INSTRUCTIONS READ AND FOLLOW ALL INSTRUCTIONS SAVE THESE INSTRUCTIONS WARNING: Before installing this product, read and follow all
IMPORTANT SAFETY INSTRUCTIONS READ AND FOLLOW ALL INSTRUCTIONS SAVE THESE INSTRUCTIONS. Table of Contents WARNING.
 Eagle Pump Owners Manual IMPORTANT SAFETY INSTRUCTIONS READ AND FOLLOW ALL INSTRUCTIONS SAVE THESE INSTRUCTIONS Table of Contents SECTION I. INSTALLATION... 2 SECTION II. OPERATION & MAINTENANCE... 2 SECTION
Classic Heater Pool Controller
 Classic Heater Pool Controller Installation and Operating Instructions Please pass these instructions on to the operator of this equipment. INSTALLATIONS INSTRUCTIONS PLEASE READ CAREFULLY GENERAL The
Clean & Clear. Cartridge Filter System Owner s Manual IMPORTANT SAFETY INSTRUCTIONS READ AND FOLLOW ALL INSTRUCTIONS SAVE THESE INSTRUCTIONS
 Clean & Clear Cartridge Filter System Owner s Manual IMPORTANT SAFETY INSTRUCTIONS READ AND FOLLOW ALL INSTRUCTIONS SAVE THESE INSTRUCTIONS SECTION I. SECTION II. SECTION III. SECTION IV. SECTION V. SECTION
HARMSCO INSTALLATION AND OPERATION MANUAL UPFLOW SWIMMING POOL CARTRIDGE FILTER CARTRIDGE CLEANING INSTRUCTIONS HARMSCO CARTRIDGES
 HARMSCO INSTALLATION AND OPERATION MANUAL UPFLOW SWIMMING POOL CARTRIDGE FILTER CARTRIDGE CLEANING INSTRUCTIONS HARMSCO CARTRIDGES May be cleaned and reused before replacement is necessary. Cartridge cleaning
Elite Primer Baldor Series External Pond Pump
 Elite Primer Baldor Series External Pond Pump ( 5250PPB21, 6440PPB23, 7550PPB26, 9600PPB28) Installation and User s Guide IMPORTANT SAFETY INSTRUCTIONS, READ AND FOLLOW ALL INSTRUCTIONS. SAVE THESE INSTRUCTIONS
INSTRUCTIONS FOR USE PORTABLE VACUUM SYSTEM LEI Part # s / , , , IMPORTANT INFORMATION
 INSTRUCTIONS FOR USE PORTABLE VACUUM SYSTEM LEI Part # s / 27-009, 27-010, 27-015, 27-020 IMPORTANT INFORMATION UNATHORIZED CHANGES OR ALTERATIONS TO ANY LINCOLN PORTABLE VACUUM SYSTEM WILL AUTOMATICALLY
IMPORTANT SAFETY INSTRUCTIONS EC-AG1-25 EC-AG1, EC-AG2 SAVE THESE INSTRUCTIONS.
 IMPORTANT SAFETY INSTRUCTIONS 2 1. Read and Follow All Instructions 2. Read this manual completely before attempting installation. 3. All permanent electrical connections should be made by a qualified
POOL WINTERIZING INSTRUCTIONS
 TASK CHECKLIST 1. Clean the Filter 2. Remove the Deck Equipment 3. Clean the Pool 4. Lower the Water Level 5. Apply Chemicals 6. Freeze Proof Equipment & Plumbing Lines 7. Put on the Winter Cover Note:
Homeowners Manual. Thank you!
 Homeowners Manual Thank you! Thank you for purchasing a Blue Square Q360 In-Floor Cleaning System! With over 20 years of pool building and in-floor knowledge, this system was designed with you, our pool
Lo-Carbon T-series Window & Roof Models
 Lo-Carbon T-series Window & Roof Models Installation & User Instructions WIRED 456165A (9 WW) 456168A (9 RF) 456173A (12 WW) 456176A (12 RF) WIRELESS 456169A (9 WW) 456172A (9 RF) 456177A (12 WW) 456180A
HAYWARD POOL PRODUCTS POMONA, CA CLEMMONS, NC NASHVILLE, TN
 IS210T90 Rev. D OWNER S MANUAL INSTALLATION, OPERATION & PARTS MODEL S210T, S210T93 PRO SERIES HIGH-RATE SAND FILTRATION SYSTEM Basic safety precautions should always be followed, including the following:
T-SERIES. Window & Roof Models. Installation, Set-up and Operating Instructions. 230V/1/50Hz
 T-SERIES Window & Roof Models Installation, Set-up and Operating Instructions Stock Ref. Nos. WIRED 456165A (9" WW) 456168A (9" RF) 456173A (12" WW) 456176A (12" RF) WIRELESS 456169A (9" WW) 456172A (9"
Pool Weasel Vacuum Users Guide
 Pool Weasel Vacuum Users Guide Welcome to best way to keep your swimming pool or fountain clean. WE have done everything to insure that the Pool Weasel is the safest pool vacuum system available, You have
PORTAPAC / DELTA HOT. Installation and Operation Manual. ! WARNING
 PORTAPAC / DELTA HOT Installation and Operation Manual! WARNING This equipment must be installed and serviced by a qualified technician. Improper installation can create electrical hazards which could
ASSEMBLY INSTRUCTIONS
 ABOVE-GROUND POOL CLEANER ASSEMBLY INSTRUCTIONS Congratulations on purchasing a Nemo Automatic Pool Cleaner! MODEL NE4380 NE4380 PARTS LIST Re f. # 1 2 3 4 5 6 7 8 9 10 11 Orde r # NEP2276 NEP2277 NEP2278
HAYWARD POOL PRODUCTS, INC. 620 Division Street Elizabeth, NJ Tel:
 IS310S Rev B OWNER S MANUAL INSTALLATION, OPERATION & PARTS MODELS S310S PRO SERIES HIGH RATE SAND FILTERS Basic safety precautions should always be followed, including the following: Failure to follow
PoolSweepa FloorCova Pool Cleaner. Operating Instructions
 PoolSweepa FloorCova Pool Cleaner Operating Instructions 8151633 PoolSweepa FloorCova Pool Cleaner Operating Instructions Contents 1. INTRODUCTION...2 2. SPECIFICATIONS...2 3. WARNINGS AND CAUTIONS...2
QUIETFLO OWNER S MANUAL
 QUIETFLO OWNER S MANUAL INSTALLATION, OPERATION & PARTS To prevent potential injury and to avoid unnecessary service calls, read this manual carefully and completley. CAUTION - We highly recommend a qualified
Classic Heater Spa Pool Controller
 Classic Heater Spa Pool Controller Installation and Operating Instructions Note: The pump is not intended for use by young children or infirm persons without supervision. Please ensure that young children
Assembly- and Usermanual. Rainmaker. Code No GB. Edition: 09/2007
 Assembly- and Usermanual Rainmaker Code No. 99-97-1729 GB Edition: 09/2007 Table of contents Page I 1 Overview and system specifications.................................. 1 1.1 Purpose of Evaporative
OWNER S MANUAL. Vintage Classic HEAT COOL models. Proudly Made in the USA
 OWNER S MANUAL Vintage Classic HEAT COOL models Proudly Made in the USA support@aquacomfort.com www.aquacomfort.com/service-and-support 888-475-7443 Manufacturing High Quality, High Efficiency Heat Pump
HEAVY DUTY BRASS SHOWER PUMPS
 HEAVY DUTY BRASS SHOWER PUMPS YOUR GUARANTEE IS AT RISK IF PUMP NOT INSTALLED CORRECTLY. SEE SECTION 2 IMPORTANT INSTRUCTIONS Performance Shower Products SERVICE HELPLINE TEL: 01883 730339 1. GENERAL Your
SUPER CLEAN FILTER PUMP USER S MANUAL 29P414XX/29P415XX/29P416XX/29P417XX
 FP13-15-GB SUPER CLEAN FILTER PUMP USER S MANUAL 29P414XX/29P415XX/29P416XX/29P417XX 1 Attention: Read all instructions carefully before installing filter pump. TABLE OF CONTENTS Instruction...... 2-3
PoolSweepa FloorCova Pool Cleaner. Operating Instructions
 PoolSweepa FloorCova Pool Cleaner Operating Instructions 8151633 PoolSweepa FloorCova Pool Cleaner Operating Instructions Contents 1. INTRODUCTION...2 2. SPECIFICATIONS...2 3. WARNINGS AND CAUTIONS...2
SwimPro by HAYWARD 620 Division Street Elizabeth, NJ Tel:
 OWNER S MANUAL INSTALLATION, OPERATION & PARTS ISSW256T Rev. B SW96T75XS SERIES SW236TX5S SERIES SW256TX5DS SERIES SW256TX5S SERIS HIGH-RATE SAND FILTER SYSTEMS SW96T SW236T SW256T HIGH RATE SAND FILTERS
OWNER S MANUAL. Models: AC110, AC125, AC150 made from 2003 through Proudly Made in the USA
 OWNER S MANUAL Models: AC110, AC125, AC150 made from 2003 through 2010 Proudly Made in the USA support@aquacomfort.com www.aquacomfort.com/service-and-support/ (888) 475-7443 Manufacturing High Quality,
Leonardo Cell Easy to use with advanced features
 Model # RNOC2012 Ecosystem enabled OWNER S MANUAL Leonardo Cell Easy to use with advanced features contents RadioNet Congratulations on your decision to purchase a RadioNet Outdoor Computer/Leonardo Cell.
WARRANTY BOOKLET. EHPA Electric Heat Pump Water Heaters. Register online at
 WARRANTY BOOKLET EHPA Electric Heat Pump Water Heaters Register online at www.rinnai.com.au Rinnai EHPA Series Electric Heat Pump Water Heater Product Warranty Warranty Terms The warranty terms in this
OWNER S MANUAL. Vintage Signature Series models: AC750, AC1050, AC1100, AC1250, AC1500, AC1750. Proudly Made in the USA.
 OWNER S MANUAL Vintage Signature Series models: AC750, AC1050, AC1100, AC1250, AC1500, AC1750 Proudly Made in the USA support@aquacomfort.com 888-475-7443 Manufacturing High Quality, High Efficiency Heat
Domestic Spa Control Panel
 Domestic Spa Control Panel Installation Manual Important Note Please make sure on commissioning that ALL connections are tightened and overloads set as the pump size used. Page c Contents Dimensions
SPA-QUIP LTD 3 BUTTON ELECTRONIC STANDARD SPA POOL CONTROLLER DEALER STAMP: DATE INSTALLED SERIAL NUMBER SOLD BY INSTALLED BY STARTUP TESTING
 DEALER STAMP: SPA-QUIP LTD DATE INSTALLED SERIAL NUMBER SOLD BY INSTALLED BY STARTUP TESTING 3 BUTTON ELECTRONIC STANDARD SPA POOL CONTROLLER Intui3butbk.99-PSE/NRC Contents 1...OPERATING INSTRUCTIONS:
Owner s Manual Guide du propriétaire Manual de Usuario. H Rev -
 H0343700 Rev - Owner s Manual Guide du propriétaire Manual de Usuario Important Information WARNING RISK OF SUCTION ENTRAPMENT HAZARD, WHICH, IF NOT AVOIDED CAN RESULT IN SERIOUS INJURY OR DEATH. Ensure
INDUSTRIAL VACUUM CLEANER WITH AUTO START/STOP
 INSTRUCTIONS FOR INDUSTRIAL VACUUM CLEANER WITH AUTO START/STOP MODEL NO: PC200SDAUTO.V3 Thank you for purchasing a Sealey product. Manufactured to a high standard, this product will, if used according
Electronically controlled instantaneous water heater. MCX: 27300, and models. Installation instructions
 Electronically controlled instantaneous water heater MCX: 27300, 27400 and 27600 models Installation instructions These appliances deliver water not exceeding 50 ºC in accordance with AS3498. 1. Overview
ILVAN AUSTRALIA PTY. LTD.
 Instruction Manual MANFC400 REV A 15/12/16 FC400 SILVAN AUSTRALIA PTY. LTD. ABN 48 099 851 144 VICTORIA (HEAD OFFICE) 244-266 Greens Rd Dandenong South 3175 Australia Telephone: +61 (03) 9215 2700 Facsimile:
Installation & Operating Instructions
 3WAY TAP Installation & Operating Instructions AQP-TAP-3S Three Way Tap AQP-TAP-3G Three Way Tap SYSTEM Congratulations on your purchase of the Filtered Water Sink Mixer 3 Way Tap AQUAPORT SELECT 3 STEP
Specifications. Vacuum motor power consumption(w/hp) 1200 / 1.6. Exhaust water pump power consumption(w/hp 800 / 1.1
 1200 / 1.6. Exhaust water pump power consumption(w/hp 800 / 1.1") Specifications Rated voltage (V) AC 110-120V or 220-240V / 50-60Hz Vacuum motor power consumption(w/hp) 1200 / 1.6 Exhaust water pump power consumption(w/hp 800 / 1.1 Exhaust water pump flow (GPH/LPH)
Specifications Rated voltage (V) AC 110-120V or 220-240V / 50-60Hz Vacuum motor power consumption(w/hp) 1200 / 1.6 Exhaust water pump power consumption(w/hp 800 / 1.1 Exhaust water pump flow (GPH/LPH)
aquamanta the experts in aquatic technology
 HFX 70/100/150/200 TM aquamanta the experts in aquatic technology Coldwater Tropical Marine 2+1 year guarantee Instruction Manual Instruction version: 05/06/2012 Technical Information MODEL: HFX 70 HFX
SUBMERSIBLE WATER PUMPS
 OPERATING & MAINTENANCE INSTRUCTIONS SUBMERSIBLE WATER PUMPS Model Nos. HIPPO-3 and 3A 6/97 Thank you for purchasing this CLARKE, HIPPO Submersible Pump. These highly efficient pumps are designed for pumping
WARRANTY BOOKLET. Hotflo (HFE) Series. Electric Storage Water Heaters. Register online at
 Series. Electric Storage Water Heaters. Register online at") WARRANTY BOOKLET Hotflo (HFE) Series Electric Storage Water Heaters Register online at www.rinnai.com.au Rinnai Hotflo (HFE) Series Electric Water Heating Product Warranty Warranty Terms The warranty
WARRANTY BOOKLET Hotflo (HFE) Series Electric Storage Water Heaters Register online at www.rinnai.com.au Rinnai Hotflo (HFE) Series Electric Water Heating Product Warranty Warranty Terms The warranty
PoolSweepa Wallclima / Optima Pool Cleaners. Operating Instructions
 PoolSweepa Wallclima / Optima Pool Cleaners Operating Instructions 8151634 PoolSweepa Wallclima / Optima Pool Cleaners Operating Instructions Contents 1. INTRODUCTION... 2 2. SPECIFICATIONS... 2 3. WARNINGS
Closing procedures for in-ground pools
 Closing procedures for in-ground pools Note: Carefully read this entire document before proceeding with the closure of your pool. In order to avoid unpleasant surprises, please check with your insurance
Closing procedures for above-ground pools
 Closing procedures for above-ground pools Note: Carefully read this entire document before closing your pool. The following procedures are also available in video format under the «Videos» tab at www.trevi.com.
VADA - Rain2Main Automatic Rainwater Controller
 PRODUCT OVERVIEW / APPLICATION The Vada Rain2Main is designed to select between stored rainwater (when available) and mains supply water, and send this water to your toilet cistern, washing machine, garden
SPARUS 160 ENERGY EFFICIENT AQUACULTURE DUTY PUMP
 AQUATIC ECO-SYSTEMS SPARUS 160 ENERGY EFFICIENT AQUACULTURE DUTY PUMP INSTALLATION AND USER S GUIDE IMPORTANT SAFETY INSTRUCTIONS READ AND FOLLOW ALL INSTRUCTIONS SAVE THESE INSTRUCTIONS i CUSTOMER SERVICE
WARRANTY BOOKLET. Commercial Hot Water. Register online at
 WARRANTY BOOKLET Commercial Hot Water Register online at www.rinnai.com.au Rinnai Commercial Water Heating Products Warranty Warranty Terms The benefits to the consumer given by this warranty are in addition
SALT WATER CHLORINE GENERATOR. Model: SMC20TA & SMC30TA SMC INSTRUCTION MANUAL
 SALT WATER CHLORINE GENERATOR Model: SMC20TA & SMC30TA SMC INSTRUCTION MANUAL DISCLAIMER While every effort has been made to ensure that the information contained in this guide is accurate and complete,
MiniSkim. Inspiring Excellence in Fish Keeping! Instruction version: 17/08/2012.
 MiniSkim 80 Inspiring Excellence in Fish Keeping! www.aquaone.com.au Instruction version: 17/08/2012 Important Safeguards To guard against injury, basic safety precautions should be observed, including
INSTRUCTION BOOK. BioDoser. Simple, Fully Programmable Dosing System. BioDoser. Version 1.0b, 25-Oct Please read before you call us for advice.
 INSTRUCTION BOOK BioDoser TM S u s t a i n a b l e P o o l S y s t e m s BioDoser TM DOSING ON / OFF PROGRAM / SET DOWN UP CANCEL www.bionizer.com.au www.bionizer.com Please read before you call us for
V80-H Multistage Pump Instruction Manual
 V80-H Multistage Pump Instruction Manual PRODUCT OVERVIEW The VADA horizontal multistage centrifugal pumps combine the functional benefits of centrifugal pumps and the practical benefits of self priming
CLEAN WATER PUMP. MODEL No: Hippo4A OPERATION & MAINTENANCE INSTRUCTIONS. Part No:
 CLEAN WATER PUMP MODEL No: Hippo4A Part No: 7230535 OPERATION & MAINTENANCE INSTRUCTIONS 0807 INTRODUCTION Thank you for purchasing this CLARKE clean water pump. This highly efficient pump is designed
EFX 600. aquamanta. Instruction Manual. 4year guarantee. the experts in aquatic technology. >600 Litres
 EFX 600 aquamanta TM the experts in aquatic technology >600 Litres Coldwater Tropical Marine 4year guarantee Instruction Manual Important Safeguards This appliance is not intended for use by persons (including
8L DEHUMIDIFIER OPERATING INSTRUCTIONS
 8L DEHUMIDIFIER OPERATING INSTRUCTIONS Attention: This Dehumidifier is rated to extract 8L per day in an environment of 80% humidity and temperature of 30 C. This is the world-wide standard for rating
FOR THE RECORD. You should record the model and serial numbers, which can be found on the back of the unit, for future reference.
 FOR THE RECORD You should record the model and serial numbers, which can be found on the back of the unit, for future reference. Warranty: 18 mo. on unit and 1 year on check valve assembly Model: The Ozone
The Classeq under counter range
 Installation & Operators Manual The under counter range Part number 902.0011 Revision C Effective date January 2010 Language English Glasswashers Eco 1 Eco 2 Eco 3 Duo 2 Duo 3 Dishwasher Hydro 500 Hydro
Camping Toilet USER MANUAL PLEASE READ AND UNDERSTAND THIS MANUAL COMPLETELY BEFORE OPERATING & USING THE CAMPING TOILET
 Camping Toilet USER MANUAL PLEASE READ AND UNDERSTAND THIS MANUAL COMPLETELY BEFORE OPERATING & USING THE CAMPING TOILET Safety Information: Take care when moving and using the Camping Toilet Ensure that
Owner s Manual for Swimming Pool Heat Pump
 Owner s Manual for Swimming Pool Heat Pump FC Series nirvanahp.com CONTENTS How it works 1 Installation 2 3 Settings 4 5 6 7 Start-up 8 Winterizing 9 Maintenance 10 Troubleshooting 11 12 13 Warranty 14
Section 1. Information before installation
 2 3 Section 1. Information before installation 1.1 General delivery conditions All equipment, even carriage and packaging paid, is shipped at the recipient s risk. If damaged caused during transport is
WALLACE MAXIPUMP 3000, 5000, 6000 and HYDROJET 30P, 30C, 140 AND HJ400 INSTALLATION AND MAINTENANCE INSTRUCTIONS
 6 th June 2006 Page 1 WALLACE MAXIPUMP 3000, 5000, 6000 and HYDROJET 30P, 30C, 140 AND HJ400 INSTALLATION AND MAINTENANCE INSTRUCTIONS Please read and follow all these instructions carefully before proceeding
Owner's Manual. WS Series. Water Softener
 Owner's Manual WS-165-150 Series Water Softener Table of Contents WHAT'S INCLUDED 3 OPERATING CONDITIONS 4 ASSEMBLY INSTRUCTIONS 6 FLUSHING THE WATER LINES 13 MASTERPROGRAMMING 14 PROGRAMMING KEYAND GENERAL
General Care and Safety Guide
 General Care and Safety Guide Thank you for choosing a Goldair Select Dehumidifier. This Goldair Select appliance has been designed and manufactured to high standards of engineering and with proper use
INSTALLATION INSTRUCTIONS
 INSTALLATION INSTRUCTIONS VARIABLE SPEED BOOSTER PUMP IMPORTANT SAFETY INSTRUCTIONS READ AND FOLLOW ALL INSTRUCTIONS SAVE THESE INSTRUCTIONS IMPORTANT SAFETY INFORMATION WARNING: RISK OF ELECTRICAL SHOCK
Panel Radiators. Installation and operating instructions. ThermaRad Classic.
 ThermaRad Hurlcon Panel Radiators Installation and operating instructions ThermaRad Classic ThermaDesign ThermaStyle www.hurlconheating.com.au enquiries@hurlconheating.com.au Melbourne: 03 9554 2275 Sydney:
T-SERIES. Wall & Panel Models. Installation, Set-up and Operating Instructions. 230V/1/50Hz
 T-SERIES Wall & Panel Models Installation, Set-up and Operating Instructions Stock Ref. Nos. WIRED 456166A (9" WL) 456167A (9" PL) 456174A (12" WL) 456175A (12" PL) WIRELESS 456170A (9" WL) 456171A (9"
Installation & Operating Instructions
 PREMIUM Installation & Operating Instructions AQP-20SIL Signature Filtered Water Cooler Premium Selection Congratulations on your purchase of a Aquaport Signature Filtered Water Cooler This unit is easy
Important Safety Instructions
 8 THE BUBBLE MIST STOPS COMING BACK INTO THE POOL: Note: Our suction side installation method requires a portion of the pump s power. Anything affecting the pump s performance affects our air draw. Under
LC Series - Light Commercial Pump Station Installation and Operation Manual
 LC Series - Light Commercial Pump Station Installation and Operation Manual Please keep this manual with the pump station Content Rain Bird LC Series Overview... Safety Instruction... Operation... 3 Pump
Installation and Operating Instructions for Microlene Underbench System
 Installation and Operating Instructions for Microlene Underbench System WARNING : Microlene underbench system installation must be in compliance with all local legislative requirements, and installed by
UPP7500E2 AUTOMATIC PRESSURE POT CLEANER
 USER MANUAL UPP7500E2 AUTOMATIC PRESSURE POT CLEANER UNI-RAM CORPORATION ONTARIO CANADA REV 2012-12 INTRODUCTION Uni-ram holds many patents on designs used in its innovative products. Every machine is
SUBMERSIBLE WATER PUMP. Model Nos. CSE1 - CSE1A - CSE2 - CSE2A CSD3- -CSD3A CSV1A - CSV2 - CSV2A - CSW1A OPERATING & MAINTENANCE INSTRUCTIONS
 1117 SUBMERSIBLE WATER PUMP Model Nos. CSE1 - CSE1A - CSE2 - CSE2A CSD3- -CSD3A CSV1A - CSV2 - CSV2A - CSW1A OPERATING & MAINTENANCE INSTRUCTIONS GUARANTEE This product is guaranteed against faults in
OWNERS GUIDE TO INSTALLATION AND OPERATION
 OWNERS GUIDE TO INSTALLATION AND OPERATION SPM SERIES HIGH POWER CENTRIFUGALS READ THESE INSTRUCTIONS CAREFULLY Read these installation instructions in detail before installing your pump. Be sure to check
Model pictured: ST6001
 ST6001 Issue: 1 Description: ROBINHOOD SUPERTUB SGL DRW Model Number: ST6001 All dimensions in mm Model may vary slightly from images pictured Model pictured: ST6001 1 Overview Contents of packaging: 1
Installation and Operation Manual. ACF-18 Automatic Chlorinating Feeder
 Installation and Operation Manual ACF-18 Automatic Chlorinating Feeder Operating Specifications Inlet Flow: 1.0-1.5 gpm Outlet Flow: = Inlet Flow Inlet Pressure: 10-45 psi Maximum Output: 26 lbs. of Available
VADA - V80-H PRODUCT OVERVIEW CONSTRUCTION USAGE LIMITATIONS MOTOR WARRANTY
 PRODUCT OVERVIEW The VADA horizontal multistage centrifugal pumps combine the functional benefits of centrifugal pumps and the practical benefits of self priming pumps. They warrant high hydraulic and
Table of Contents Important Safeguards 2 Introduction 3 Installation 4 Operation 5 Cleaning Pattern 5 Automatic Shutoff and Removal 6 Maintenance 6
 Table of Contents Important Safeguards 2 Introduction 3 Installation 4 Operation 5 Cleaning Pattern 5 Automatic Shutoff and Removal 6 Maintenance 6 Warranty 8 WARNING: To reduce the risk of fire, electrical
SYSTEMS for CATALYTIC FILTERS
 OP40U5F, OP40B5F, OP80U10F, OP80B10F, OP120U15F & OP120B15F INSTALLATION, OPERATION & SERVICE INSTRUCTIONS Hydrogen Sulfide Removal SYSTEMS for CATALYTIC FILTERS NO DIAPHRAGMS OR AIR CELLS COMPLETELY CORROSION
MOCCA CUBIC AUS/NZ. 08/53066/0 Issue 2
 MOCCA CUBIC AUS/NZ 08/53066/0 Issue 2 The product complies with the European Safety Standards EN60335-2-30 and the European Standard Electromagnetic Compatibility (EMC) EN55014, EN60555-2 and EN60555-3
INSTALLATION & OPERATING INSTRUCTIONS
 INSTALLATION & OPERATING INSTRUCTIONS WARNING RISK OF ELECTRIC SHOCK. CONNECT ONLY TO A CIRCUIT PROTECTED BY A GROUND-FAULT CIRCUIT-INTERRUPTER. THE UNIT SHOULD BE INSTALLED BY A QUALIFIED SERVICE REPRESENTATIVE.
OWNER S MANUAL. Convair Tower Heater CTH09. (English) (CTH09)
 (CTH09)") OWNER S MANUAL Convair Tower Heater CTH09 (English) (CTH09) SAFETY General Safety Please read these instructions before using the heater and keep for future reference. This appliance is not intended for
OWNER S MANUAL Convair Tower Heater CTH09 (English) (CTH09) SAFETY General Safety Please read these instructions before using the heater and keep for future reference. This appliance is not intended for
Green Water Systems OWNERS MANUAL. Includes: Installation Procedures, Warranties, Service & Operation Guidelines.
 Green Water Systems OWNERS MANUAL Includes: Installation Procedures, Warranties, Service & Operation Guidelines. GS Elite GS PRO GS1 1 Cu. Ft. S. C. S. GS1.5 1 Cu. Ft. S. C. S. GS2 2 Cu. Ft. S. C. S. 7000
2000 WATT CYCLONIC BAGLESS VACUUM CLEANER
 Instruction Manual 2000 WATT CYCLONIC BAGLESS VACUUM CLEANER Model Rated Voltage (V) Rated Frequency (Hz) Rated Power (W) V0409 220-240 V 50 Hz 2000 Watts Model: V0409 Please read this Instruction Manual
THE ULTIMATE NON-CHEMICAL POOL/SPA WATER STERILISATION
 THE ULTIMATE NON-CHEMICAL POOL/SPA WATER STERILISATION Contents Welcome to Steritron... Page 01 Features and Benefits... Page 01 The Steritron Package Inclusions... Page 02 The Unit - Figure 1 The Anode