PANEL HEATERS OPERATING INSTRUCTIONS
|
|
|
- Arthur Flynn
- 6 years ago
- Views:
Transcription

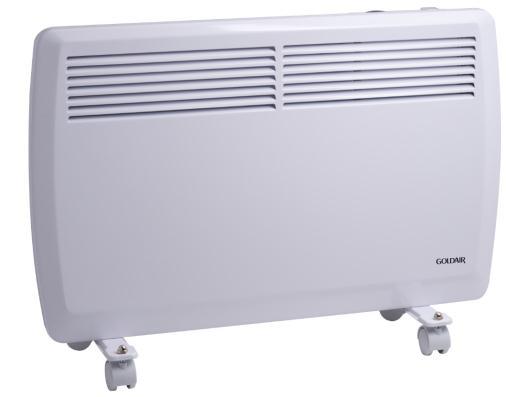
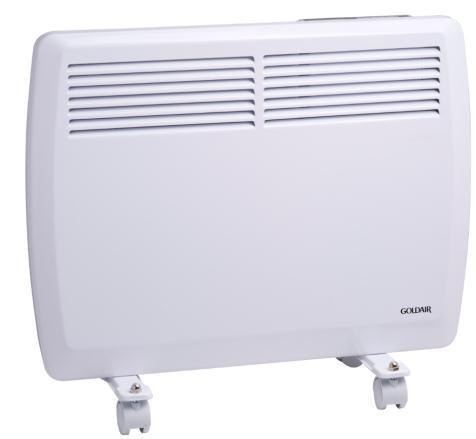
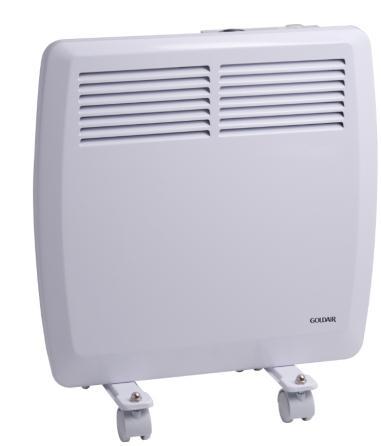
1 PANEL HEATERS OPERATING INSTRUCTIONS GPH110 GPH210/220 GPH310/320 GPH410/420
2 WARNINGS AND SAFEGUARDS 1. Use only the voltage specified on the rating plate of the appliance. 2. Keep all objects at least 1 metre from the front, sides and rear of the appliance. Do not place appliance close to radiant heat source. 3. Do not operate in areas where petrol, paint or other flammable liquids are used or stored. 4. Do not insert or allow foreign objects to enter any ventilation or exhaust opening, as this may cause an electric shock, fire or damage to the appliance. 5. Do not operate this appliance with a damaged cord, plug or after the appliance malfunctions or has been dropped or damaged in any manner. Return to a qualified electrical person for examination, electrical service or repair. 6. This appliance is intended for household use only and not for commercial or industrial use. 7. Use this appliance only as described in this manual. Any other use is not recommended by the manufacturer and may cause fire, electrical shock or injury. 8. The common cause of overheating is deposits of dust or fluff in the appliance. Ensure these deposits are removed regularly by unplugging the appliance and vacuum cleaning the air vents and grills. 9. Do not use abrasive cleaning products on this appliance. Clean with a damp cloth (not wet) rinsed in hot soapy water only. Always removed plug from the mains supply before cleaning. 10.Do not connect the appliance to mains voltage until completely assembled and adjusted. 11.Switch off and use handles provided when moving. 12.Do not operate with cord set coiled up as a heat build up is likely, which could be sufficient to become a hazard. 13.The use of an extension cord with this appliance is not recommended. 14.Do not remove plug from power socket until the appliance has been switched off. 15. Do not remove plug from power socket by pulling cord always grip plug. 16. The heater must not be located immediately below a socket outlet. 17. Always unplug appliance when not in use. 18. Do not twist, kink or wrap the cord around the appliance, as this may cause the insulation to weaken and split. Always ensure that all cord has been removed from any cord storage area and is unrolled before use. 19. This appliance is not intended for use by persons (including children) with reduced physical, sensory or mental capabilities, or lack of experience or knowledge, unless they have been given supervision or instruction concerning use of the appliance by a person responsible for their safety. 20. Do not use this appliance in the immediate surrounds of a bath, a shower, or a swimming pool or other liquids. The appliance must not be immersed in any liquids. 21. If the heater is wall mounted in a bathroom; it is to be installed so that switches and other controls cannot be touched by a person in the bath or shower. 22. When the appliance has been unpacked, check if for transport damage and ensure all parts have been delivered. If parts are missing or the appliance has been damaged, contact the Goldair Customer Services Team. (refer to details on back page) 23. If your appliance does not work, or is not working properly, contact the place of purchase or the Goldair Customer Services Team. (refer to details on back page). Repair work on the appliance by unqualified persons can cause serious risk to the user. 24. There are no user serviceable parts installed in the unit. 25. Do not put your fingers or other articles into or near the air inlet or outlet. Do not sit on the unit. 26. Do not place the unit in wardrobes or other enclosed spaces as this may cause fire hazards. 27. This unit is not supposed to be used in or around locations where foodstuffs, works of art or delicate articles of science, etc are stored. 28. Indoor use only. 29. To avoid overheating, do not cover the heater.

3 FREE STANDING 1. Ensure the heater is unplugged and power switches are off. 2. Set heater upside down. 3. Locate the four holes at each end of the base of the heater. 4. Secure the foot plates to the base using the provided one-way screws through these holes. Please note once these one-way screws are in they cannot be removed. 5. Set heater upright and plug into a standard 240 volt AC electrical outlet. WALL MOUNTED Free Standing 1. Make sure the heater is unplugged and power switches are off. 2. Position the panel heater within one metre of a wall socket. Do not mount in front of or below the wall socket. Ensure there is at least 150mm clearance on all sides of the heater. 3. Detach the mounting bracket from the back of the panel heater by unscrewing the two locking screws (located on the top of the mounting bracket). 4. Position the mounting bracket on the wall and mark the hole positions with a pen or pencil and check they are horizontal with a spirit level. Ensure the two bottom mount holes are at least 150mm from the floor and drill holes as required. 5. Secure the mounting bracket to the wall with the four mounting screws. (For masonry walls use the plastic sheaths). 6. Slot the back of the heater onto the mounting bracket locating the bottom plugs first and secure with two locking screws. 7. Plug heater into a standard 240 volt AC electrical outlet. 150mm 150mm 150mm Wall Mounting Position Wall Mounted
4 OVERVIEW OF YOUR GOLDAIR PANEL HEATER (Manual Thermostat model) OPERATING YOUR HEATER (Manual thermostat model) Always choose a safe location for the heater, keeping in mind the safety precautions outlined. Ensure all packaging has been removed form the unit before use. Check that the heater is switched off before plugging into the mains supply. Switch on the on/off switch on the control panel to the -. To turn off the heater, switch the on/off switch to the O position THERMOSTAT Turn the thermostat knob clockwise until the maximum position is reached on the graduated scale. When the desired room temperature is reached, slowly turn the knob anti-clockwise until the heater turns off (you will hear a click). The heater will now cycle on and off to maintain this temperature.

5 OVERVIEW OF YOUR GOLDAIR PANEL HEATER (Electronic display model) OPERATING YOUR HEATER (Electronic display model) Always choose a safe location for the heater, keeping in mind the safety precautions outlined. Ensure all packaging has been removed form the unit before use. Check that the heater is switched off before plugging into the mains supply. Push button number 12 to turn the heater on/off. The back light will illuminate (if the back light does not illuminate within 5 seconds the back light may not be functional). The clock symbol and day/time display will flash when used for the first time, or after a long period of non-use. Default settings of the unit maintain comfort temperature (CC program) and the red indicator light (1) will glow. The timer must be set, so that it can activate a control program.
6 OPERATING YOUR HEATER (Electronic display model) 1. Setting the Time Day Press the time button (11). The day will flash Use the up and down buttons (6 & 7) to set the correct day Hour Press the time button (11) again. The hour number will flash Use the up and down buttons (6 & 7) to set the correct hour Minutes Press the time button (11) again. The minute number will flash Use the up and down buttons (6 & 7) to set the correct minutes. Press the timer button (11) for a fourth time to end the time setting. The control panel will show the last selected program or the UP program (program for the week set by the user) if you haven t selected another program previously 2. Setting the Economy Temperature Press the temperature button (13). The temperature and economy symbol will flash. Use the up and down buttons (6 & 7) to set the required economy temperature Press the temperature button (13) again to end the temperature setting. The control panel will now show the last selected program. NOTE: The default set temperature is 17 C. The temperature cannot be set higher than 4 C below the programmed comfort temperature. 3. Setting the Comfort Temperature Press the temperature button (13). The temperature and comfort symbol will flash Use the up and down buttons (6 & 7) to set the required comfort temperature. The factory-set temperature is 30 C. The temperature cannot be set lower than 4 C above the programmed economy temperature. If desired the temperature read out can be changed from Celsius to Fahrenheit by pressing and holding the temperature button (5 seconds)
7 OPERATING YOUR HEATER (Electronic display model) 4. Description of programs (as per diagram below) P1 - Heat during the afternoon and evening P2 Heat during the morning, afternoon and evening P3 Heat during the morning, afternoon and evening P4 Staying at home P5 Lunch and afternoon P6 Office (Short opening hours) P7 Office (Long opening hours) P8 Kids Bedroom P9 Bedroom CF Constant frost protection (5 C) CE Constant energy saving temperature CC Constant comfort temperature UP Program for the week set by the user
.")
8 OPERATING YOUR HEATER (Electronic display model) 5. Selecting a pre-set program See the description of al programs, explaining their content and how they are used. The program contents cannot be altered. Press the program selection button (5). The display will now show the day, the program type (which will flash), the temperature and the program sequence Use the up and down buttons to select the program Press the program selector button (5) again to end the setting. The program type will stop flashing. The program is now active and will run. 6. Selecting the User Program (UP) program 6.1 Select UP program type Select program type UP as described in section 5 Press the programming the button (8). The day, time (00:00, midnight), the program sequence and the word Prog are displayed If you would like the program to start on a particular day, for example Saturday, press the timer button (11) until this day is displayed 6.2 Programming the Economy periods Use the down button (7) to enter the required economy periods. The timer will advance in steps of an hour. When the down button (7) is released, the next comfort period unit will flash 6.3 Programming the Comfort periods Use the up button (6) to enter the required comfort periods. The timer will advance in steps of an hour. When the up button (6) is released, the corresponding comfort period unit in the program sequence will flash 6.4 Programming a 24-hour day Complete the programming for the whole 24-hour day with economy and comfort periods. After programming the full 24 hours, the timer will display 00:00 (midnight). The unit is now ready for programming the next 24-hour day. Press the up and down buttons at the same time to start programming over again
9 OPERATING YOUR HEATER (Electronic display model) 6.5 Copying a 24-hour program If the same 24 hour program works for several days in the week, just copy the program into corresponding days Enter or find the 24-hour program you would like to copy Press the Copy button (10). The word Copy will be shown. The day will flash as well Press the timer button (11) to display the day onto which you would like to copy the program. The day will flash Press the copy button (10) to complete the operation. The word Copy will disappear from the display and the day will stop flashing. Repeat this operation to copy the program onto another day. Press the Copy button (10). The word Copy is displayed and the day flashes 6.6 Terminate the week s program Press the programming button (8) again to terminate the week s programs. The control panel will now show the correct, program type UP, the temperature, corresponding red or green light, and the program sequence for the present day. The program is now active and running in real-time. The program information is stored and will be lost when a factory-set program is used. 6.7 Altering the user program for the week Display the UP program type if another program is operating. See above for how to select the program Press the programming button (8) to open the program Make the required alterations as explained in sections about programming. You have to alter the complete 24-hour program 7. Adjust the temperature of a running program for the week The temperature of the temperature sensor is relative to the position of the heater in the room. If the actual temperature is higher than the setting, you can compensate this by adjusting the temperature setting. For example, if the comfort temperature is set at 24 o C but the actual room temperature is 26 o C compensate for this by lowering the setting to 22 o C. Similarly increase the temperature setting if the actual room temperature is lower than the setting. Note: do not make these adjustments if the temperature is stable. Press temperature button (13). The temperture setting and comfort symbol flash. Use the up and down arrows to adjust the temperature to your desired setting. Press the temperature button (13) again so that the economy symbol is displayed. Adjust the economy temperature in the same way. Terminate by pressing the temperature button again. The heater will revert to the last selected program. 8. Temperature Switch Press the button (13) for more than 3 seconds, the temperature can be switched between Fahrenheit (F) and Celsius temperature (C). The default setting is Celsius temperature.

10 OPERATING YOUR HEATER (Electronic display model) 9. Timer 1 When the machine is on, press the timer button (14) for timing shutdown, then press the up button (6) or down button (7) to set timer. When this selected time has elapsed, the heater will turn off. 2 When the machines is off, press the timer button (14) for timing start up, then press the up button (6) or down button (7) to set timer. When the selected time has elapsed the heater will turn on. The timer setting is one hour unit within 24 hours. Note: You cannot set a specific turn on or turn off time. 10. Locking the control panel Press the program selector button (5) to make the program type flash Press the programming button (8) and the setting of the time button (11) at the same time until the lock symbol (padlock) is displayed. All the control functions are now locked, and the buttons will no longer operate until unlocked. Do the same sequence to unlock the control panel 11. Low battery indicator When the timer battery is low, the LCD screen will flash the low battery symbol to remind you to replace the battery.

11 OVERVIEW OF YOUR GOLDAIR PANEL HEATER CARE AND CLEANING The heater requires regular cleaning to ensure trouble free operation: Unplug the heater from the mains supply before cleaning. Use a damp cloth to wipe the exterior of the heater to remove dust and dirt Use a vacuum cleaner to remove dust and fluff from the inlet and outlet grills. To clean behind the heater (when mounted on a wall); unfasten the two locking screws located on the top of the mounting bracket, press down on the two release catches on the mounting bracket to tilt the heater forward. When the heater is tilted forward, it is easier to clean behind it. It is important to return the heater to its original position after cleaning and to refasten the locking screws. Ensure the heater is dry before plugging back into the mains supply. GOLDAIR SLIMLINE PANEL HEATER SPECIFICATION Model No: GPH110, GPH210/220, GPH310/320, GPH410/420 Power Supply: V, 50Hz AC only Power: 500W, 1000W, 1500W, 2000W PROOF OF PURCHASE To receive warranty retain receipt as proof of purchase. (Refer to back of booklet). SUPPORT AND TECHNICAL ADVICE North Shore City, Auckland, New Zealand Monday Friday 8am-5pm Phone: Website:
12 TWO YEAR WARRANTY Your Goldair product has been inspected and tested and is guaranteed subject to the following for a period to two years from the date of purchase against defects in workmanship and materials. During this period, such defects will be rectified by repair or replacement of the product purchased. Your product contains no user serviceable components and this warranty becomes invalid if in our opinion the product has been misused, abused, incorrectly installed, tampered with, connected to an electrical supply not corresponding with the name plate specification, or subjected to power surges. The warranty does not include any labour or other associated expense that may be involved in removal or installation of the product. Normal wear and tear is expressly excluded. If your Goldair product fails to operate satisfactorily, please return it to the retailer from whom it was purchased. To obtain a repair or replacement product under this warranty, you will need to produce satisfactory evidence of date of purchase. The completed warranty and purchase receipt must be presented with the product. The warranty should be filled out at the time of purchase. It is in your interest to make sure this is done. If the product is to be replaced (cannot be repaired) then that replacement will be of the same or similar product or accessory excluding packaging, instruction card etc. Where a replacement product is supplied, this shall be guaranteed for the balance of the original warranty period. Any model that is no longer available will be replaced by a model of a value and with such features as we consider appropriate in the circumstances. Goldair Ltd is not responsible for freight forwarding charges, losses or damage in transit. If service is required after the warranty period has expired, the product should be returned to a qualified electrical technician. Service outside of the warranty period will be at your cost. Consumers Guarantee Act (1993). In accordance with the above act consumers are advised that: The manufacturer does not undertake that repair facilities and parts are necessarily available for this product. If any of the provisions of the foregoing are contrary to any relevant legislation, then that provision shall be deemed to be excluded from the warranty and the rest of the provisions will continue to apply. IMPORTANT: PLEASE RETAIN THIS WARRANTY CARD NAME: ADDRESS: PURCHASED FROM: SUBURB: DATE OF PURCHASE: NAME OF PRODUCT: MODEL No:
General Care and Safety Guide
 GECO203 General Care and Safety Guide Thank you for choosing a ecosave Panel Heater. This ecosave heater has been designed and manufactured to high standards of engineering and with proper use and care,
Platinum Series Electronic Panel Heaters
 Operating Instructions Platinum Series Electronic Panel Heaters Models: GPPH500, GPPH510, GPPH520, GPPH530 General Care and Safety Guide Thank you for choosing a Goldair Panel Heater. This Goldair Heater
PANEL HEATER OPERATING INSTRUCTIONS. For Models: TWFP10000, TWFP PK
 PANEL HEATER OPERATING INSTRUCTIONS For Models: TWFP10000, TWFP10000-2PK This page is intentionally left blank General Care and Safety Guide Thank you for choosing a Living & Co Panel Heater. This Living
7Litre Evaporative Cooler With Remote
 Operating Instructions 7Litre Evaporative Cooler With Remote Item: CELECOOLER General care and safety guide Thank you for choosing this Celsius Fan. This Celsius appliance has been designed and manufactured
General Care and Safety Guide
 General Care and Safety Guide Thank you for choosing a Celsius Convection Panel Heater. This Celsius appliance has been designed and manufactured to high standards of engineering and with proper use and
PANEL HEATER OPERATING INSTRUCTIONS. For Models: CELEPANEL, CELEPANELT
 PANEL HEATER OPERATING INSTRUCTIONS For Models: CELEPANEL, CELEPANELT WARNINGS AND SAFEGUARDS 1. Use only the voltage specified on the rating label of the appliance. 2. Keep all objects at least 1 metre
Electronic Ceramic Tower Heater
 Operating Instructions Electronic Ceramic Tower Heater Model: GCT430 General Care and Safety Guide Thank you for choosing a Goldair Ceramic Fan Heater. This Goldair Heater has been designed and manufactured
Operating Instructions. Oil Column Heater. Models: GOC155, GOC157, GOC1511
 Operating Instructions Oil Column Heater Models: GOC155, GOC157, GOC1511 General Care And Safety Guide Thank you for choosing a Goldair Oil Heater. This Goldair Heater has been designed and manufactured
PANEL HEATER OPERATING INSTRUCTIONS. For Model: CELEPANELD
 PANEL HEATER OPERATING INSTRUCTIONS For Model: CELEPANELD WARNINGS AND SAFEGUARDS 1. Use only the voltage specified on the rating label of the appliance. 2. Keep all objects at least 1 metre from the front
Ceramic Wall Heater With Remote
 Operating Instructions Ceramic Wall Heater With Remote Model: GCH500 General Care and Safety Guide Thank you for choosing a Goldair Ceramic Heater. This Goldair Heater has been designed and manufactured
General Care and Safety Guide
 General Care and Safety Guide Thank you for choosing a Goldair product. This Goldair unit has been designed and manufactured to high standards of engineering and with proper use and care, as described
12L DEHUMIDIFIER OPERATING INSTRUCTIONS
 12L DEHUMIDIFIER OPERATING INSTRUCTIONS Attention: This Dehumidifier is rated to extract 12L per day in an environment of 80% humidity and temperature of 30 C. This is the world-wide standard for rating
2200W RADIANT HEATER GVARH350. Instruction Manual
 2200W RADIANT HEATER GVARH350 Instruction Manual Contents Guide to the Appliance 2 Caring for the Environment 3 Safety Information and Warnings 4 Operation Instructions 5 Care and Maintenance 6 Technical
General Care and Safety Guide
 General Care and Safety Guide Thank you for choosing a Celsius Ceramic Tower Heater. This Celsius appliance has been designed and manufactured to high standards of engineering and with proper use and care,
20L Electronic Dehumidifier
 Operating Instructions 20L Electronic Dehumidifier Attention: This Dehumidifier is rated to extract 20L per day in an environment of 80% humidity and temperature of 30 C. This is the world-wide standard
1500W CERAMIC HEATER. Instruction Manual
 1500W CERAMIC HEATER GVACH110 Instruction Manual Contents Guide to the Appliance 2 Caring for the Environment 3 Safety Information and Warnings 4 Operation Instructions 5 Care and Maintenance 6 Technical
Operating Instructions
 Operating Instructions 10L Dehumidifier Attention: This Dehumidifier is rated to extract 10L per day in an environment of 80% humidity and temperature of 30 C. This is the world-wide standard for rating
8L DEHUMIDIFIER OPERATING INSTRUCTIONS
 8L DEHUMIDIFIER OPERATING INSTRUCTIONS Attention: This Dehumidifier is rated to extract 8L per day in an environment of 80% humidity and temperature of 30 C. This is the world-wide standard for rating
General Care and Safety Guide
 General Care and Safety Guide Thank you for choosing a Goldair Select Dehumidifier. This Goldair Select appliance has been designed and manufactured to high standards of engineering and with proper use
Operating Instructions. 2200W Hair Dryer. Item: GPHD100B, GPHD100R
 Operating Instructions 2200W Hair Dryer Item: GPHD100B, GPHD100R General care and safety guide Thank you for choosing this GOLDAIR Hair Dryer. This GOLDAIR appliance has been designed and manufactured
Cyclonic Vacuum Cleaner Model GVC350
 Cyclonic Vacuum Cleaner Model GVC350 OPERATING INSTRUCTIONS GVC350: 220-240V~, 50Hz, 1800W, Vacuum Cleaner Thank you for choosing a Goldair Electric Vacuum. This Goldair appliance has been designed and
80cm Tower Fan With Remote Control
 Operating Instructions 80cm Tower Fan With Remote Control Item: GCTF300 General Care and Safety Guide Thank you for choosing this Goldair Venti product. This Goldair Venti appliance has been designed and
Contemporary Heated Towel Rails
 Contemporary Heated Towel Rails With Left or Right cord entry and Combination Leg options OPERATING INSTRUCTIONS Contemporary Ladder Series SAFETY INFORMATION When using any electrical appliance, basic
2.9kW Portable Air Conditioner
 Operating Instructions 2.9kW Portable Air Conditioner Item: GCPAC290 General Care and Safety Guide Thank you for choosing this Goldair product. This Goldair appliance has been designed and manufactured
2.9kW Portable Air Conditioner
 Operating Instructions 2.9kW Portable Air Conditioner Item: GCPAC210 General Care and Safety Guide Thank you for choosing this Goldair product. This Goldair appliance has been designed and manufactured
Infrared Electric Grill
 Operating Instructions Infrared Electric Grill Models: FEG200 General care and safety guide Thank you for choosing this GOLDAIR Electric Grill. This GOLDAIR appliance has been designed and manufactured
1L Deep Fryer Model FDF100 OPERATING INSTRUCTIONS
 1L Deep Fryer Model FDF100 OPERATING INSTRUCTIONS GENERAL CARE AND SAFETY GUIDE IMPORTANT SAFETY INSTRUCTIONS: Read all instructions before use. Always follow these basic precautions when using an electrical
Operating Instructions. 550W Stand Mixer. Models: FMX300R, FMX300S
 Operating Instructions 550W Stand Mixer Models: FMX300R, FMX300S General care and safety guide Thank you for choosing this GOLDAIR Stand Mixer. This GOLDAIR appliance has been designed and manufactured
500W Stick Blender Set
 Operating Instructions 500W Stick Blender Set Item: FSB390 General care and safety guide Thank you for choosing this GOLDAIR Stick Blender. This GOLDAIR appliance has been designed and manufactured to
40cm DC Pedestal Fan with WiFi
 Operating Instructions 40cm DC Pedestal Fan with WiFi Item: GCPF315 General Care and Safety Guide Thank you for choosing this Goldair product. This Goldair appliance has been designed and manufactured
With Mattress Protector
 Electric Blanket Operating Instructions With Mattress Protector FOR GOLDAIR GUB SERIES ELECTRIC BLANKETS General Care and Safety Guide To obtain maximum benefit from your Goldair Electric Blanket please
10L Evaporative Cooler with Timer
 10L Evaporative Cooler with Timer / GVAEC10 Instruction Manual 1 Important Safety Instructions Thank you for choosing this GVA product. This GVA appliance has been designed and manufactured to high standards
Deep Fryer Model FDF300
 Deep Fryer Model FDF300 OPERATING INSTRUCTIONS FDF300: 240V, 50Hz, 2000W Thank you for choosing this GOLDAIR deep fryer. This GOLDAIR appliance has been designed and manufactured to high standards of engineering
USER MANUAL KAHTP22XXXA
 USER MANUAL KAHTP22XXXA Table of Contents BEFORE FIRST USE... 1 Important Safeguards... 1 OVERVIEW OF THE APPLIANCE... 3 Specifications... 3 Control Panel... 3 Operation Guide... 4 USAGE TIPS... 5 Cleaning
Panel Convector Heater User Instructions
 Panel Convector Heater User Instructions LEVPH750TPR, LEVPH1250TPR, LEVPH1500TPR, LEVPH2200TPR IMPORTANT SAFEGUARDS Before use, please read and follow these instructions carefully, even if you feel you
OWNERS INSTRUCTION MANUAL
 Congratulations on your purchase of a Kent Portable Electric Appliance. Please read the following instructions carefully before use and retain for future reference. BEFORE FIRST USE Read and follow all
CDE2TI, CDE2TIB, CDE2ECC, CDE2ECCB, CDE24ECC & CDE24ECCB AUS/NZ
 CDE2TI, CDE2TIB, CDE2ECC, CDE2ECCB, CDE24ECC & CDE24ECCB AUS/NZ 08/50841/3 Issue 3 1 614 770 250 250 13 : 17 605 605 2kW 2.4kW CDE2Ti(B) (Fig.3) CDE2ECC(B) & CDE24ECC(B) (Fig.2) 2 3 4 LCD x o eco X Y eco
FAN HEATER FH118 User Manual
 FAN HEATER FH118 User Manual PLEASE READ AND SAVE THESE INSTRUCTIONS FOR FUTURE REFERENCE IMPORTANT SAFEGUARDS When using electrical appliances, basic safety precautions should always be followed to reduce
Convection Panel Heater
 Convection Panel Heater 2200 Watt Instruction Booklet HE4200 Please read these instructions carefully and retain for future reference. Contents Sunbeam s Safety Precautions 2 Safety precautions for your
Operation Manual NOVA LIVE S
 Operation Manual NOVA LIVE S Models: NLS 1000, NLS 1500 and NLS 2000 IMPORTANT SAFEGUARDS Before use, please read and follow these instructions carefully, even if you feel you are familiar with the product.
1500W Black Glass Portable Electric Panel Heater KAHTP20BLKA
 1500W Black Glass Portable Electric Panel Heater KAHTP20BLKA Attention Please handle this product with care and inspect it regularly to ensure it is in good working order. If the product, power supply
4.2kW GAS CABINET HEATER OPERATING INSTRUCTIONS. For Model: TWGC100
 4.2kW GAS CABINET HEATER OPERATING INSTRUCTIONS For Model: TWGC100 This page is intentionally left blank WARNINGS AND SAFEGUARDS 1. DO NOT locate the heater so that it may restrict means of escape from
Radiant Heater. Instruction Manual QH-200 N13275
 Radiant Heater Instruction Manual QH-200 N13275 2 Contents Important Safety Instructions 3 Product Overview 6 Getting Started 7 Instructions 8 Other Useful Information 10 Important Safety Instructions
OSCILLATING FAN HEATER INSTRUCTION MANUAL
 OSCILLATING FAN HEATER INSTRUCTION MANUAL MODEL: FH221B Read the instruction manual carefully before use and retain these instructions for reference GENERAL SAFEGUARDS When using electrical appliances,
OWNER'S MANUAL CERAMIC HEATER FAN ITEM NO.: MG-MTPTC113
 OWNER'S MANUAL CERAMIC HEATER FAN ITEM NO.: MG-MTPTC113 120V ~ 60Hz 1500W For a better use of your new device, we recommend you to read carefully this user manual and keep it for record. Thank you for
PRODUCT MANUAL OPERATION, INSTALLATION AND MAINTENANCE MANUAL. Indoor Convective Panel Heater
 PRODUCT MANUAL OPERATION, INSTALLATION AND MAINTENANCE MANUAL Indoor Convective Panel Heater CONTENTS Rev A NOV14 1. Product Overview 2. Specification Data 3. Operations 4. Installation 5. Safety 6. Maintenance
THERMOFILM CONVECTIVE PANEL HEATER INSTALLATION, OPERATION AND MAINTENANCE MANUAL. Models: CP 2400 CP 2000 CP 1500 CP 1000 TABLE OF CONTENTS
 THERMOFILM CONVECTIVE PANEL HEATER Rev C JUL13 INSTALLATION, OPERATION AND MAINTENANCE MANUAL Models: CP 2400 CP 2000 CP 1500 CP 1000 TABLE OF CONTENTS 1. Important Safety Instructions 2. Specification
2kW UPRIGHT FAN HEATER INSTRUCTIONS FOR USE
 2kW UPRIGHT FAN HEATER Model Number: IG9020 INSTRUCTIONS FOR USE Thank you for purchasing this product Please read these instructions 1 SAFETY INSTRUCTIONS Read and follow all of the instructions even
compact ceramic heater
 compact ceramic heater gcch2k17 Instruction Manual Contents Guide to the Appliance 2 Caring for the Environment 3 Safety Information and Warnings 4 Items in the Box 11 Operation Instructions 12 Troubleshooting
Operating Instructions. 9.0L Mini Oven. Item No: FMO100
 Operating Instructions 9.0L Mini Oven Item No: FMO100 General care and safety guide Thank you for choosing this GOLDAIR Mini Oven. This GOLDAIR appliance has been designed and manufactured to high standards
AH-470. Flat Panel Micathermic Space Heater OWNERS MANUAL. Read and save these instructions.
 Flat Panel Micathermic Space Heater AH-470 OWNERS MANUAL Read and save these instructions. A Name You Can Trust Trust has to be earned and we will earn yours. Customer happiness is the focus of our business.
Operating Instructions. Slow Cooker. Model: GSL150
 Operating Instructions Slow Cooker Model: GSL150 General care and safety guide Thank you for choosing a Goldair electric Slow Cooker. This Goldair appliance has been designed and manufactured to high standards
Oil-filled Radiator NY23EC-11L User Manual
 Oil-filled Radiator NY23EC-11L User Manual PLEASE READ AND SAVE THESE INSTRUCTIONS FOR FUTURE EFERENCE IMPORTANT INSTRUCTION When using any electrical appliance, basic precautions should always be followed
MICATHERMIC PANEL HEATER
 EN MICATHERMIC PANEL HEATER OPERATING INSTRUCTIONS Read the instructions carefully before operating the panel or carrying out maintenance operations. Observe all the safety instructions; failure to observe
Curved Metal Panel Heater
 Curved Metal Panel Heater INSTRUCTION MANUAL MODEL: NDH-24D AFTER SALES SUPPORT (AU) 1300 886 649 (NZ) 0800 836 761 2 Contents Important Safety Instructions 3 Product Overview 6 Getting Started 8 Operating
Convection Panel Heater
 Convection Panel Heater INSTRUCTION MANUAL MODEL: JCPH-2000 AFTER SALES SUPPORT (AU) 1300 886 649 (NZ) 0800 836 761 Contents Important Safety Instructions 3 Product Overview 6 Getting Started 8 Operating
Models: RP-10, RP-15, RP-20. User Manual
 Models: RP-10, RP-15, RP-20 User Manual Contents Thank you for purchasing the Ducasa Sunburst Radiant Panel Heater. Index Safety Precautions & Important Safeguards:... 3 Specifications:... 5 Features...
Quartz 2 in 1 Convection and Radiant Heater Model : HQ12-15M
 Quartz 2 in 1 Convection and Radiant Heater Model : HQ12-15M PLEASE READ CAREFULLY BEFORE USE AND SAVE THESE IMPORTANT SAFEGUARDS PET OWNERS WARNING: The health of some small pets including birds are extremely
INSTALLATION & USER INSTRUCTIONS
 INSTALLATION & USER INSTRUCTIONS LED ELECTRIC STOVE Christchurch, Dorset BH23 2BT Tel: 01202 588 638 Fax: 01202 499 639 www.ekofires.co.uk e-mail: sales@ekofires.co.uk MODELS COVERED BY THESE INSTRUCTIONS
Instruction Manual Item No.: V~, 60Hz
 Energy- Saving Mode Portable AC 10,000 BTU Model: MW-L3-10C Montgomery Ward Customer Service 1112 7th Avenue, Monroe, WI 53566 8:00 am to Midnight, Monday through Friday 1 888 557 3848 Instruction Manual
OPERATING INSTRUCTIONS
 EN CERAMIC FAN HEATER OPERATING INSTRUCTIONS Read the instructions carefully before installing and operating the appliance or performing maintenance operations. Observe all the safety instructions; failure
Suits all KPF849 models
 Kambrook - Australia Ground Floor, Suite 2, 170-180 Bourke Rd Alexandria NSW 2015, Australia Locked Bag 2000 Botany NSW 1455 Customer Service Line 1300 139 798 Customer Service Fax 1800 621 337 www.kambrook.com.au
CERAMIC FAN HEATER URBAN
 EN CERAMIC FAN HEATER URBAN OPERATING INSTRUCTIONS Read the instructions carefully before installing and operating the appliance or performing maintenance operations. Observe all the safety instructions;
OPERATING INSTRUCTIONS
 EN OIL FILLED RADIATOR OPERATING INSTRUCTIONS Read the instructions carefully before operating the panel or carrying out maintenance operations. Observe all the safety instructions; failure to observe
Instruction Manual Item No.: V~, 60Hz
 Energy- Saving Mode Portable AC 8,000 BTU Model: MW-O-08C Montgomery Ward Customer Service 1112 7th Avenue, Monroe, WI 53566 8:00 am to Midnight, Monday through Friday Wards.com 1 888 557 3848 Instruction
OFC1000, OFC1500, OFC2000, OFC2500 OFC1000TI, OFC1500TI, OFC2000TI & OFC2500TI
 OFC1500TI OFC1000, OFC1500, OFC2000, OFC2500 OFC1000TI, OFC1500TI, OFC2000TI & OFC2500TI 08/35286/5 (UK) Issue 5 Products comply with the European Safety Standard: EN 60335-2-30 and the European Standards
User Instructions for Remote Controlled 2kW Rotisserie Effect Fan Heater Model 1276
 200662_2 Page 1 User Instructions for Remote Controlled 2kW Rotisserie Effect Fan Heater Model 1276 These instructions should be read carefully and retained for future reference. Important Notes These
20L Dehumidifier. Model Number: LDH V AC 50/60Hz 440W
 20L Dehumidifier Model Number: LDH2002 220-240V AC 50/60Hz 440W For Customer Services & Spare Parts please call 0345 209 7461 Opening times: Monday - Friday 8am 8pm & Saturday 9am 1pm Or visit us at www.productcare.co.uk
10L Dehumidifier. Model Number: LDH V AC 50/60Hz 290W
 10L Dehumidifier Model Number: LDH1001 220-240V AC 50/60Hz 290W For Customer Services & Spare Parts please call 0345 209 7461 Opening times: Monday - Friday 8am 8pm & Saturday 9am 1pm Or visit us at www.productcare.co.uk
2.4kW Ceramic Heater Model: DHCER24SW
 2.4kW Ceramic Heater Model: DHCER24SW INSTRUCTION MANUAL PLEASE READ THE INSTRUCTION MANUAL CAREFULLY BEFORE USING THE UNIT TABLE OF CONTENTS WARNINGS AND PRECAUTIONS...1 STRUCTURE...3 OPERATION...4 CLEANING
FAN-FORCED UTILITY HEATER
 ITEM #0167507 FAN-FORCED UTILITY HEATER Utilitech and UT Design and Grounded in Quality are registered trademarks of LF, LLC. All Rights Reserved. MODEL #SH-UH-1-T Français p. 8 Español p. 14 ATTACH YOUR
INSTRUCTIONS AND WARRANTY
 INSTRUCTIONS AND WARRANTY MODEL NO. RHHD22 RUSSELL HOBBS HAIR DRYER Congratulations on purchasing our Russell Hobbs Hair dryer. Each unit is manufactured to ensure safety and reliability. Before using
Brita. Water Filter & Chiller. Instruction Booklet WF6000. Please read these instructions carefully and retain for future reference.
 Therapeutics Brita Water Filter & Chiller Instruction Booklet WF6000 Please read these instructions carefully and retain for future reference. Contents Sunbeam s Safety Precautions 2 Features of your
Sunbeam Tower Fan with Night Mode
 Sunbeam Tower Fan with Night Mode Instruction Booklet FA7250 90cm Remote Controlled Tower Fan Please read these instructions carefully and retain for future reference. SM8650 featured Contents Sunbeam
Model: Ecostrad Thermostrip with Remote
 Model: Ecostrad Thermostrip with Remote Model no.: AH18NCPR 1800 W Ratings: 220 V 240 V; 50 Hz; Class I; IP65 Introduction The Ecostrad Thermostrip is a versatile infrared heater that provides radiant
Aquarius Cordfree 1.7L Kettle KAK36. Instruction Booklet
 Aquarius Cordfree 1.7L Kettle KAK36 Instruction Booklet Important Please retain your instruction book for future use. In the event that you need some assistance with your Kambrook appliance, please contact
CERAMIC HEATER MODEL NO: DEVIL 350B 230V/110V OPERATING & MAINTENANCE INSTRUCTIONS PART NO: & ORIGINAL INSTRUCTIONS GC ISS 1
 CERAMIC HEATER MODEL NO: DEVIL 350B 230V/110V PART NO: 6920330 & 6920332 OPERATING & MAINTENANCE INSTRUCTIONS ORIGINAL INSTRUCTIONS GC1218 - ISS 1 INTRODUCTION Thank you for purchasing this CLARKE Ceramic
40cm Pedestal Fan with Remote Control
 Instruction Manual 40cm Pedestal Fan with Remote Control Model: HF40BRG READ AND SAVE THESE INSTRUCTIONS Please read and follow the instructions in this user manual even if you feel you are familiar with
FFP200 OPERATING INSTRUCTIONS
 Food Processor Model FFP200 OPERATING INSTRUCTIONS FFP200: 220-240V ~, 50Hz, 250W Thank you for choosing this Goldair Food Processor. This Goldair appliance has been designed and manufactured to the highest
Noirot Spot Plus Digital Timer
 Noirot Spot Plus Digital Timer Electric Convection Panel Heater Operating & Installation Instructions In Order To Qualify For Your Lifetime Warranty Please Visit our Website and complete the Online Registration
INSTRUCTIONS AND WARRANTY
 INSTRUCTIONS AND WARRANTY MODEL NO. RHHD20 RUSSELL HOBBS 2000W PROFESSIONAL HAIR DRYER Congratulations on purchasing our Russell Hobbs 2000W Professional Hair dryer. Each unit is manufactured to ensure
40cm Wall Fan With Pull Cord Operation
 Instruction Manual 40cm Wall Fan With Pull Cord Operation Model: WAL40P READ AND SAVE THESE INSTRUCTIONS Please read and follow the instructions in this user manual even if you feel you are familiar with
READ AND SAVE THESE INSTRUCTIONS
 Instruction Manual 45cm Pedestal Fan Model: PED45CG READ AND SAVE THESE INSTRUCTIONS Please read and follow the instructions in this user manual even if you feel you are familiar with the product, and
METAL CERAMIC FAN HEATER
 EN METAL CERAMIC FAN HEATER OPERATING INSTRUCTIONS Read the instructions carefully before installing and operating the appliance or performing maintenance operations. Observe all the safety instructions;
Mobile Air Conditioner Instruction Manual Model TC-N9KM
 Mobile Air Conditioner Instruction Manual Model TC-N9KM Please read and retain these instructions for future reference SPECIFICATION Model no. Cooling capacity Power/Ampere consumption for cooling* Air
The Vitro-i. Radiant / Convector Combination Heater. Instructions for Operation and Installation
 E1400250 The Vitro-i Radiant / Convector Combination Heater Instructions for Operation and Installation (Read these instructions carefully and retain for further reference.) Models: Vitro-i 750 Black Vitro-i
INSTRUCTIONS AND WARRANTY
 INSTRUCTIONS AND WARRANTY MODEL NO. RHHS47 RUSSELL HOBBS PRO STRAIGHTENER 1 Congratulations on purchasing our Russell Hobbs Pro Straightener. Each unit is manufactured to ensure safety and reliability.
Australia. New Zealand
 .... Australia New Zealand 2 5 3 4 JA JB JC JD JE JF JG JH JI JJ JK JL JM JN JO 5 Intended use Your Black & Decker vacuum cleaner has been designed to vacuum dry substances. This product is intended for
Operating Instructions. Electric Frypan. Item: FEP210
 Operating Instructions Electric Frypan Item: FEP210 General care and safety guide Thank you for choosing a Goldair Electric Fry Pan. This Goldair appliance has been designed and manufactured to high standards
Instruction Manual. Oil Heaters. Model: OIL5, OIL7, OIL9 & OIL11T READ AND SAVE THESE INSTRUCTIONS
 Instruction Manual Oil Heaters Model: OIL5, OIL7, OIL9 & OIL11T READ AND SAVE THESE INSTRUCTIONS Read and follow the instructions in this user manual even if you feel you are familiar with the product,
This page is intentionally left blank
 This page is intentionally left blank General Care and Safety Guide Thank you for choosing a Celsius Electric Micro Fleece Throw. This Throw has been designed and manufactured to high standards of engineering
Panel Heater Slim 1.5kw MODEL: NDK15-12K
 Panel Heater Slim 1.5kw MODEL: NDK15-12K Version 1.0 2015 GD Midea Environment Appliances MFG. Co.Ltd. No.28,Dong Fu Road,HeSui East Industrial Area,Dong Feng Town, ZhongShan,GuangDong,China. READ AND
15,000 BTU Portable Air Conditioner
 Instruction Manual 15,000 BTU Portable Air Conditioner Model: HYAC15 READ AND SAVE THESE INSTRUCTIONS Please read and follow the instructions in this user manual even if you feel you are familiar with
PERFECT CURLS 2-IN-1
 PERFECT CURLS 2-IN-1 USE & CARE MANUAL PLEASE READ PRIOR TO USE To register your product go to www.remington-products.com.au www.remington.co.nz 2 YEAR WARRANTY CI63E1AU IMPORTANT SAFEGUARDS Warning: When
BRITA. Water Filter & Chiller II. Chilled water filter. Instruction Booklet WF6100
 BRITA Chilled water filter Instruction Booklet WF6100 Water Filter & Chiller II Please read these instructions carefully and retain for future reference. Contents Sunbeam s Safety Precautions 1 Features
KERATIN & ARGAN OIL NOURISH HAIR DRYER
 KERATIN & ARGAN OIL NOURISH HAIR DRYER IONIC CONDITIONING TECHNOLOGY USE & CARE MANUAL PLEASE READ PRIOR TO USE To register your product go to www.remington-products.com.au www.remington.co.nz 3 YEAR WARRANTY
INSTALLATION & USER INSTRUCTIONS
 INSTALLATION & USER INSTRUCTIONS INSET LED ELECTRIC FIRE MODELS COVERED BY THESE INSTRUCTIONS Focal Point Fires Christchurch, Dorset BH23 2BT Tel: 01202 588 632 Fax: 01202 499326 www.focalpointfires.co.uk
AP24MT, AP24ET, AP15ET, AP10ET. Convection Panel Heaters. Instruction Manual
 AP24MT, AP24ET, AP15ET, AP10ET Convection Panel Heaters Instruction Manual Important Safety Instructions 1. Disconnect the power plug before dismantling, assembling or before cleaning. 2. Make sure the
Instruction manual. Aluminium radiator with ceramic heart. Smart Electric Heaters
 Instruction manual Aluminium radiator with ceramic heart Smart Electric Heaters READ THIS CAREFULLY BEFORE USING THIS DEVICE FOR THE FIRST TIME. PAY ATTENTION: to avoid overheating, do not cover the appliance.
Ceramic Oscillating Heater. Instruction Booklet KCE95
 Kambrook - Australia Building 2, Port Air Industrial Estate 1A Hale Street Botany NSW 2019 Australia Customer Service Line 1300 139 798 Customer Service Fax 1800 621 337 www.kambrook.com.au Kambrook -