Underfloor Heating Inscreed Cable System
|
|
|
- Amy Flowers
- 6 years ago
- Views:
Transcription


1 The world s best-selling floor heating brand Installation Manual: Underfloor Heating Inscreed Cable System TECHNICAL HELPLINE IMPORTANT Read this manual before attempting to install your inscreed heater. Incorrect installation could damage the heater and will invalidate your warranty.
2 Contents Do s and don ts Heater information & testing Technical information Electrical provision for the heater(s) Subfloor Information Suitable screeds & cable spacing information Installation Warranty Sizing guide table Your Warmup Inscreed Heater has been designed so that installation is quick and straight forward, but as with all electrical systems, certain procedures must be strictly followed. Please check the sizing guide at the back of this manual to ensure that you have the correct heater(s) for the area you wish to heat. Warmup plc, the manufacturer of the Warmup Inscreed Heating System, accepts no liability, expressed or implied, for any loss or consequential damage suffered as a result of installations which in any way contravene the instructions that follow. 2 If these instructions are followed you should have no problems. However, if you do require help at any stage, please call our FREE helpline: Warmup Technical Helpline You can also find a copy of this manual, wiring instructions, a list of frequently asked questions and more helpful information on our website:
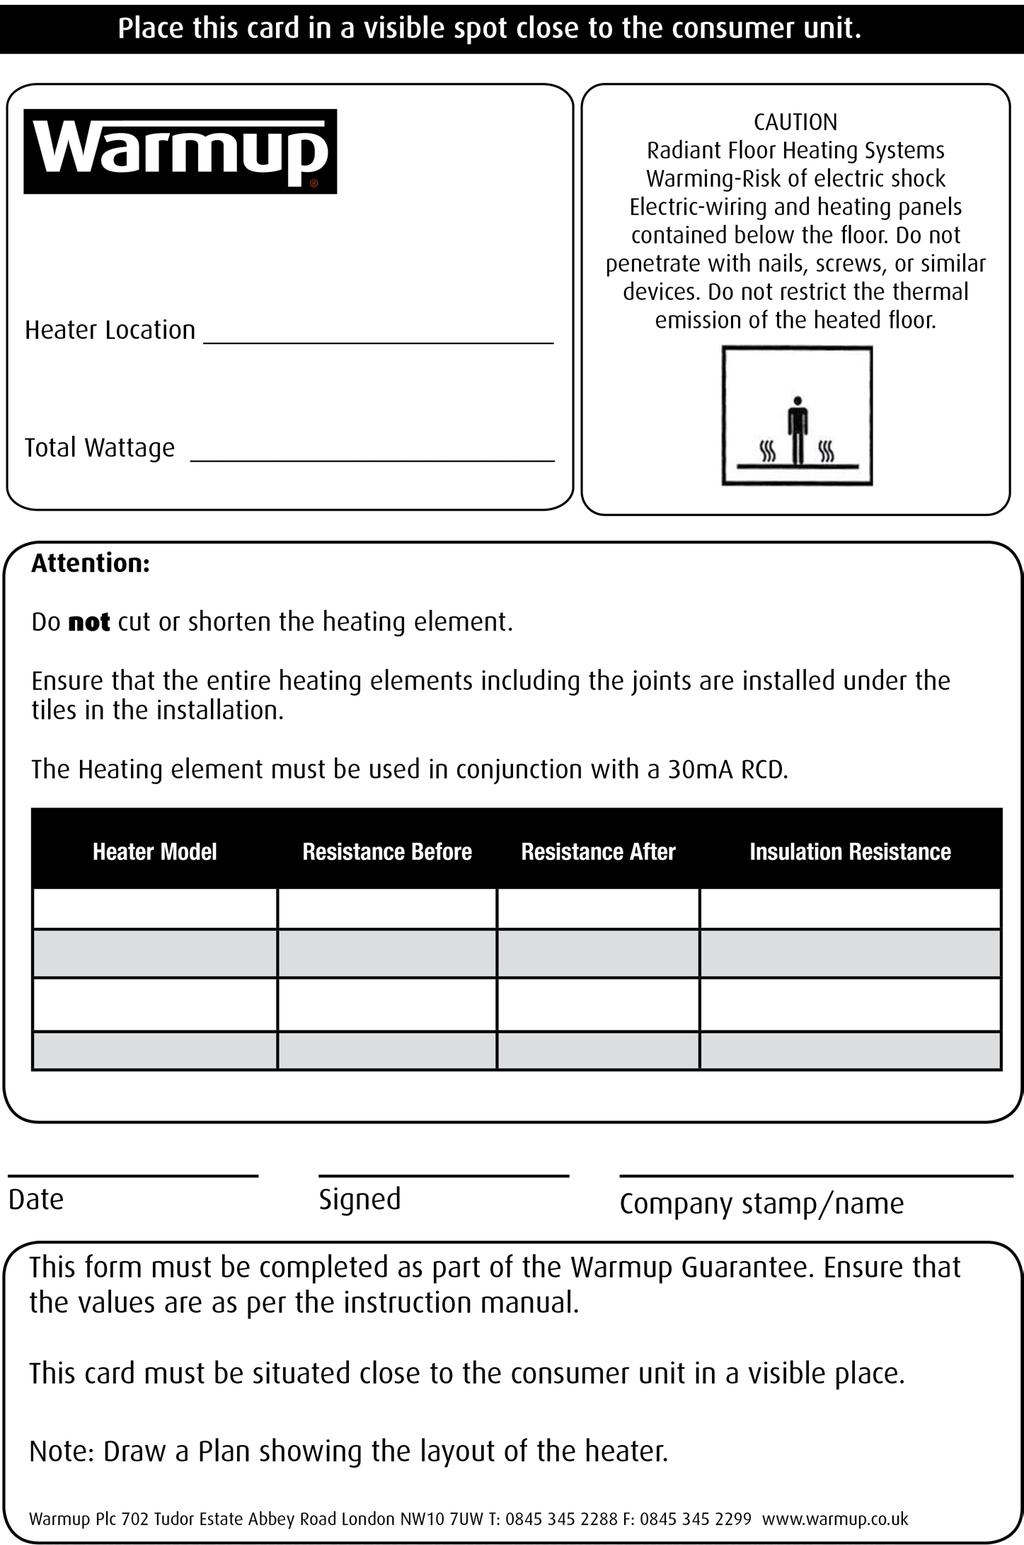
3 Do s and don ts DO Carefully read this installation manual before commencing installation Keep the heating element at least 50mm apart at all times Ensure that all of the heating element, including the cold lead joint and end joint are laid within a minimum of 50mm screed. Space the heating element evenly across the floor to ensure even heat distribution Test the heating element before, during and after installation Ensure that the control card at the back of the manual is completed and fixed at the main consumer unit along with any plans and electrical test records. As per the current BS7671 wiring regulations Ensure that a heat loss calculation has been carried out and heating requirements have been met if you are using the heating system as a primary source of heating Ensure that all mains electrical connections must be undertaken by a Part P certified electrician. All work must conform to current IEE Wiring Regulations. Ensure that the heating element is protected by a 0mA RCD Ensure the heating element is separated from other heat sources such as luminaries and chimneys Install the floor sensor centrally between two adjacent runs of heating element Allow sufficient drying time of the floor/slab after installation. Minimum of 1mm per day drying time. DON T Cut, shorten or alter the length of the heating element in any circumstances Cross or overlap the heating element at any point Install the heating element up stairways or walls Install the heating element onto a new concrete floor for at least 0 days to allow the concrete to dry Tape over the manufactured joints to hold them in place Attempt a DIY repair if you damaged the heating element. Contact Warmup immediately Overlap the floor sensor cable over or under the heating element Turn on the heating element to help dry out the screed Turn on the heating element until the screed on top has been given sufficient time to dry out Install the floor sensor close to other heat sources such as hot water pipes Bend the heating element under 60mm radius Do Not wire the heaters in series, the heaters must be connected in parallel.

4 Heater Information The heaters consist of a fixed length of heating wire terminated at one end by a sealed joint and the other end by a 2.5m power supply cable (cold tail). The cable is a twin conductor surrounded by an earth shield for electrical protection. The wire has been designed to be placed within a cementitious screed of at least 50mm in thickness. The product is designed for a 20 Volt electrical supply and produces between 100 to 200 Watts per square meter of heating, depending on the spacing of the wire (see sizing guide for details at rear of the manual) Sheath Metal Shielding Insulation Cores Testing the heater The heaters must be tested before, during and after tiling. We recommend the use of a digital multi-meter set to a range of 0-2 K ohms for testing. The resistance (ohms) of each heater should be measured. You should carry out the following tests and should expect the results detailed below: Live to neutral should show the Ohms value listed in the table on page 5. A +/- 5% Ohm reading tolerance is allowed under manufacturing guidelines. Record the readings on the control card at the back of the manual. Live to earth and neutral to earth should show infinity. NOTE: Due to the high resistance of the heating element, it may not be possible to get a continuity reading from the heater and as such, continuity testers are not recommended. When checking resistance, make sure your hands do not touch the meter s probes as the measurement will include your internal body resistance and render the measurement inaccurate. If you do not get the expected results or at any time you believe there may be a problem, please contact Warmup s Technical Team on for guidance. Floor Sensor Ensure that the floor sensor is tested before the final floor finish has been laid. When testing the floor sensor ensure that the meter can read up to 20k ohms.
5 Technical Information Heaters Heater length Wattage Voltage Amps (-5%) Ohms (+5%) WIS WIS WIS WIS WIS WIS WIS WIS WIS WIS WIS WIS WIS WIS WIS As with all electrical projects which are subject to Part P Building Regulations, all electrical work should be carried out by a certified/qualified electrician. All work must conform to latest version of BS 7671 IEE Wiring Regulations. 5
6 Making electrical provision for the heater As with all electrical projects governed by Part P regulations, all mains electrical connections must be undertaken by a certified electrician. All work must conform to current IEE Wiring Regulations. The Underfloor heating must be controlled via a floor sensor thermostat at all times. Installing a Residual Current Device (RCD) Warmup Inscreed Heaters must be wired via an 0mA RCD. You must install a dedicated RCD if one is not already present. You may wish to use a fused spur/rcd. No more than.8kw of heating may be connected to a single 0mA RCD. Power supply via fused spur /RCD. Power Lead (coldtail) Warmup Thermostat Floor Sensor NOTE: It is possible to run the heater from an existing circuit. Consult a certified electrician to determine whether or not the circuit can handle the load and if it is RCD protected. Installing Electrical Boxes and Trunking You will require a deep (5-0mm) back box for the thermostat. If you are installing more than two heaters, a junction box will be required. The wiring from the heater to the thermostat should be protected by conduit or plastic trunking. Warmup Inscreed Cable NOTE: Always run the power supply cable and floor sensor cable in separate conduit /trunking Connecting the Thermostat The thermostat must be connected to the mains electrical supply via a double pole isolator fused spur or RCD that has a contact separation in all poles providing full disconnection under over-voltage category III conditions. The thermostat should be installed within the room to be heated. In most bathroom installations the thermostat cannot be located within the bathroom itself must be located outside of Zone 2. In such cases the thermostat must be fitted to the outside of an internal wall of the bathroom, as close to the underfloor installation as possible. Warmup thermostats are rated up to 16 amps. For larger installations exceeding 16 amps multiple thermostats or a suitable contactor will be required. For further advice contact Warmup on Once the electrical connections have been made and the system has been tested, the electrician must complete the control card at the back of this installation manual. As per BS7671 this information must be displayed at or near to the consumer unit 6
 Final Floor Finish 1 * Insulation must be either foil faced or concrete faced and suitable for use with electric")
7 Subfloor Considerations Option 1 - Wire laid directly on insulation. For use where the concrete base is thicker than 100mm or uninsulated. 1 Subfloor 2 Insulation* 6 Fixing Strips 5 Inscreed Heater Screed (min 50mm) Final Floor Finish 1 * Insulation must be either foil faced or concrete faced and suitable for use with electric underfloor heating Option 2 - Wire Laid directly onto concrete pad For use where the concrete base is less than 100mm thick and insulated. 1 Subfloor 2 Insulation Concrete Pad Fixing Strips Inscreed Heater Screed (min 50mm) 1 7 Final Floor Finish While it is acceptable to lay the heating element directly onto an insulated concrete base, insulation directly below the heater will improve the efficiency of the system. Ensure that the levels of insulation will meet your heating requirements. The subfloor of the project should be suitable for screeding. The floor should be rigid, of a suitable material and free of debris and dust. Any holes in the floor should be sealed or filled with a suitable material. Any sharp objects or materials which may potentially damage the heating wire should be removed. Note: The inscreed cable should be covered with a minimum 65mm screed in order to comply with the Part L building regulations. 7
8 Suitable screeds Sand & Cement (with added fibres) Sand and cement screeds are a mixture of sand and cement generally in a to 1 mixture ratio with water. Fast Drying Screeds This type of screeds have additives mixed along with the cement sand mixture to improve their drying time. Anhydrite (Calcium Sulphite) Screeds Anhydrite screeds is made from calcium sulphate, sand, water and other chemicals to form a liquid screed. Unlike sand and cement screeds (which are spread, compacted and levelled), the screed is poured onto the floor. Large areas can be covered much quicker with this screed type. It is essential however, that the floor and edge insulation must be fully waterproofed by sealing all joints with a suitable sealing tape or silicone. Important Information The floor should be allowed to cure and dry naturally until full strength is reached as per British Standards and manufacturer s instructions. The full drying time of the floor will depend on the depth and products used. Choosing the correct heater Firstly you will need to calculate the total m 2 of floor area you have in the room to be heated. Then deduct any areas which will be unheated i.e. where any fixed units such as baths, shower trays, kitchen units etc. This will give you the total area to be heated. How the cable spacing is calculated To calculate the spacing between each run of heating element you simply multiply the total floor area to be heated by 1000 divided by the total length of heating element used. (See the back of the manual for the correct cable spacing for each system) For Example 16.8m 2 * 1000 / 168.5m = 100mm spacing How the wattage output per m 2 is calculated To calculate the wattage output per m 2 you will have, divide the wattage listed for your cable/s by the m 2 free floor area that you have to heat. For Example 10W / 20.9sqm = 150W 8

9 Installation (using metal fixing strips) Step 1 It is advised that a floor plan is drawn up to determine the placement of the thermostat, heating cable and the floor sensor. This diagram should be kept for future reference. A The subfloor should be solid, level, dust and debris free. The inscreed cable MUST always be laid on a cement or foil facing insulation board. Ensure that the entire subfloor is of the same construction in order to provide even performance. NOTE: Always confirm with the manufacturer of the insulation or Warmup for suitability of the insulation. 0.75m Lay out fixing strips The inscreed cable MUST NOT be installed on top of a soft insulation material, it must have a layer of self levelling compound to ensure an even spread of heat. Alternatively you can lay the inscreed cable directly onto a well insulated concrete base, however additional insulation is recommended. B Step 2 When installing two or more heaters, begin by reading the sizing guide at the back of this booklet to ensure that you have the correct number and size of heaters for the area you wish to heat. Next test the resistance of the heaters to ensure they are in line with the resistance readings at the back of this manual. A +/- 5% ohm reading tolerance is allowed under manufacturing guidelines. If the heater is not working call the technical helpline on Lay out heating cable Step To secure the inscreed cable to the subfloor you will need metal fixing strips. The metal fixing strips should be laid out perpendicular to the heating element. These fixing strips must be secured to the insulation board or the concrete floor using fixing nails or an adhesive. It is important to ensure there is no movement of the fixings. C The fixing strips should be evenly spread across the floor at intervals of 0.75 meters. The fixing strips should be placed so as to leave a 100mm border all the way around the room as the heating cables should not touch walls, kickboards etc. Clip cable to fixing strip 9
10 Installation (using metal fixing strips) 10 Step The heating cable should then be laid up and down the room and clipped into the fixing strip. The cable spacing is determined by the product model (see sizing guide). The cables should be evenly spaced at all times to ensure an evenly heated floor (minimum spacing = 50mm). The cables should never cross or touch each other. Similarly the floor sensor should not cross or go over or under the heating cables. If you find that you have too much heating cable left over after the heater has been laid DO NOT shorten the heating element. Contact Warmup on All of the heating element including the coldtail joint and end termination joint must be laid within the area to be heated and embedded within the screed. DO NOT cover these joints with tape to hold them in place. Other fixing Methods Tape The Inscreed heating cable may also be fixed to the base using heavy-duty tape. It is important to ensure that there are no air pockets between the heating cable and the tape. When using this method ensure that the base is dry and clean. Do not tape over the cold lead joint or end termination joint as air pockets in the tape can cause the joints to overheat and fail. Fixing to reinforcement mesh with cable ties The Warmup Inscreed heating cables can also be secured directly to a reinforcement mesh using cable ties. Reinforcement mesh is often used to strengthen screed beds and help prevent them cracking. It consists of a grid made up of thick metal bars which the screed is then poured over the top of. When installing an inscreed cable it is possible to lash the cable to the reinforcement mesh with cable ties rather than having to use the fixing strips provided. If this method is chosen it is important to ensure the cable spacing remains even. Other fixing methods are available. Please contact Warmup on if you require further information. Step 5 Up to 2 heating cables can be wired into the back of the thermostat. More than 2 cables will require a junction box. If total heating required exceeds the amperage rating of your thermostat (16A), your electrician can install a contactor to allow the heating system to operate using a single thermostat. Alternatively you will have to split the load using multiple thermostats. Instructions for fitting the Warmup Thermostat can be found inside the thermostat box. Sensor Location The Floor sensor supplied with the thermostat should be fitted as close to the final floor finish as possible. The sensor can be installed a number of ways: Placed directly in the top 10mm of screed covering the heating wire. Cemented into a channel cut out of the surface of the screed. Placed in a flexible conduit in the top 10mm of screed.
11 Installation Remember to test the heater/s with a multi-meter again before you commence with the top layer of screed. If you do not intend to screed over the heater straight away keep any traffic above the cable to a minimum. DO NOT cut tiles over the heated area or drop sharp objects or tiles onto the cables as this can crush or cut into them. Make sure to regularly check the resistance of the cable with a multi-meter during installation. Contact Warmup on if you do not get a resistance reading or the resistance falls outside the +/- 5% tolerance. Step 6 The cementitious screed should be carefully poured over the heating cables to an even depth of at least 50mm. DO NOT use the heating cables to dry out the screed, as this could lead to the screed cracking. The screed must be allowed to dry completely before laying the floor covering. Once the screed or levelling compound has fully dried the final floor covering can be laid. Tiles If a tiled floor is being laid, flexible tile adhesive and grout must be used with the underfloor heating. Laminate/Wood With laminate or engineered board floors it is essential that it is no more than 18mm thick to ensure that the heat can transfer through the covering. If you are using a layer of soft insulation beneath the flooring it must be compatible with installation on top of an underfloor heating system. Carpet For carpeted floors, hessian backed carpets must be used and the Tog rating of the carpet and underlay must not exceed 2.5 tog. 11
12 Warranty Ver Terms and conditions apply Model: Inscreed heater manufactured by Warmup plc - THE 10 YEAR GUARANTEE DOES NOT EXTEND TO THERMOSTATS WHICH ARE COVERED BY SEPARATE GUARANTEES. THIS GUARANTEE DOES NOT AFFECT YOUR STATUTORY RIGHTS. The Warmup Inscreed Heater is guaranteed by Warmup plc ( Warmup ) to be free from defects in materials and workmanship under normal use and maintenance, and is guaranteed to remain so subject to the limitations and conditions described below. The INSCREED HEATER is guaranteed for 10yrs, except as provided below (and your attention is drawn to the exclusions listed at the end of this guarantee). This 10yr guarantee applies: 1. only if the unit is registered with Warmup within 0 days after purchase. Registration can be completed by filling out the card accompanying this guarantee or online at co.uk. In the event of a claim, proof of purchase is required, so keep your invoice and receipt - such invoice and receipt should state the exact model that has been purchased; and 2. only if the heater has been earthed and protected by a Residual Current Device (RCD) at all times. Thermostats are guaranteed for a period of YEARS from the date of purchase, except as provided below. Neither guarantee continues if the floor covering over the heater(s) is damaged, lifted, replaced, repaired or covered with subsequent layers of flooring. The guarantee period begins on the date of purchase. Registration is confirmed only when a letter of confirmation is sent by Warmup plc. During the period of the guarantee Warmup will arrange for the heater to be repaired or (at its discretion) have parts replaced free of charge. The cost of the repair or replacement is your only remedy under this guarantee which does not affect your statutory rights. Such cost does not extend to any cost other than direct cost of repair or replacement by Warmup and does not extend to costs of relaying, replacing or repairing any floor covering or floor. If the heater fails due to damage caused during installation or tiling, this guarantee does not apply. It is therefore important to check that the heater is working (as specified in the installation manual) prior to tiling. WARMUP PLC SHALL IN NO EVENT BE LIABLE FOR INCIDENTAL OR CONSEQUENTIAL DAMAGES, INCLUDING BUT NOT LIMITED TO EXTRA UTILITY EXPENSES OR DAMAGES TO PROPERTY. WARMUP PLC is not responsible for: 1. Damage or repairs required as a consequence of faulty installation or application. 2. Damage as a result of floods, fires, winds, lightening, accidents, corrosive atmosphere or other conditions beyond the control of Warmup plc.. Use of components or accessories not compatible with this unit.. Products installed outside the United Kingdom. 5. Normal maintenance as described in the installation and operating manual, such as cleaning thermostat. 6. Parts not supplied or designated by Warmup. 7. Damage or repairs required as a result of any improper use, maintenance, operation or servicing. 8. Failure to start due to interruption and/or inadequate electrical service. 9. Any damage caused by frozen or broken water pipes in the event of equipment failure. 10. Changes in the appearance of the product that does not affect its performance. 12 Warmup Plc 702 & 70 Tudor Estate, Abbey Road, London, NW10 7UW T F E. uk@warmup.com warmup.co.uk
13 Documentation of Ownership, Installation & Part P Electrical Connection This form must be filled out completely, otherwise you may invalidate your warranty Owner s Name Owner s Address Post Code Telephone Installer s Name Installer s Telephone Number I hereby confirm that I have read & understand the contents of the installation manual & that the heater(s) has been installed as specified therein. I acknowledge that no claim can be brought against the manufacturer or its agents for any consequential loss or damage whatsoever. I confirm that the heater(s) was working prior to tiling. Installer s Signature Date Electrician s Name Electrician s Address Electrician s Telephone Number Electrician s Part P Certificate Number Table of heaters installed: Heater/Room Model No. Serial No. Batch No. RCD Rating Resistance Reading 1 2 5
14
15 Notes Note: Draw a plan showing the layout and location of the inscreed heater (s)
16 Heater Sizing & Wire Spacing Guide Heater Model Heater Length Overall Resistance Voltage Total Wattage Total Amperage 100W/m² 2 150W/m 2 200W/m 2 0W/ m 2 Spacing 200mm Spacing 1mm Spacing 100mm Area covered (sqm) Area covered (sqm) Area covered (sqm) WIS WIS WIS WIS WIS WIS WIS WIS WIS WIS WIS WIS WIS WIS WIS NOTE: All spacings have been based on square areas for calculation purposes. Therefore actual spacing will vary according to the shape of the area to be heated. All spacings should be measured from the centre of the wire. Warmup Plc 702 & 70 Tudor Estate, Abbey Road, London, NW10 7UW T F E. uk@warmup.com warmup.co.uk The WARMUP word and associated logos are trade marks. Warmup Plc Regd. TM Nos , 099, 09926, E & OE. V1. 015
Foil Heaters. Installation Manual: TECHNICAL HELPLINE
 Installation Manual: Foil Heaters TECHNICAL HELPLINE 0345-345-2288 Complete and submit the warranty form online at www.warmup.co.uk IMPORTANT Read this manual before attempting to install your foil heater.
Underlaminate Foil Heater
 Installation Manual: Underlaminate Foil Heater TECHNICAL HELPLINE 0845 345 2288 n online at warmup.co.uk IMPORTANT Read this manual before attempting to install your foil heater. Incorrect installation
Installation Manual. Frost Protection Cable. Warmup Ireland Web: Telephone:
 Installation Manual Frost Protection Cable Warmup Ireland Web: www.warmup.ie Email: ie@warmup.com Telephone: 1 800 937 429 TECHNICAL HELPLINE 0845 345 2288 IMPORTANT Read this manual before attempting
Underfloor Heating Cable Installation Manual
 Affordable Underfloor Heating Underfloor Heating Cable Installation Manual Technical Helpline 0845 034 8272 www.sunstone.co.uk SunStone Wire Manual V3.1.indd 1 09/01/2015 14:00:49 BEFORE YOU BEGIN INSTALLATION...
Underfloor Heating Mat Installation Manual
 Affordable Underfloor Heating Underfloor Heating Mat Installation Manual Technical Helpline 0845 034 8272 www.sunstone.co.uk 1 SunStone Mat Manual V3.1.indd 1 09/01/2015 13:58:26 DO S & DON TS ENSURE CORRECT
IMPORTANT NOTES. Electric Underfloor Heating Mats For use with Touchsceen underfloor heating Thermostat
 For any assistance or further information, go online at bathstore.com Electric Underfloor Heating Mats For use with Touchsceen underfloor heating Thermostat - 61000012339 Model Dimensions Area Covered
CoziMat. 1. Introduction and Brief Description COZIMAT INSTALLATION INSTRUCTIONS & SAFETY REQUIREMENTS
 CoziMat 1. Introduction and Brief Description The CoziMat underfloor heating mat is designed for underfloor heating of rooms where the floor thickness needs to be kept to a minimum. CoziMat underfloor
Model Dimensions Coverage 230v 230Vac. Pack Contents. Measuring Up
 Installation and Operating Instructions Electric tile-warming system Model Dimensions Coverage Wattage @ 230v Amps@ 230Vac RTS1M 2.0m x 0.5m 1.0m 2 160W 0.70A RTS1.5M 3.0m x 0.5m 1.5m 2 240W 1.04A RTS2M
Installation Manual Loose cable underfloor heating. A large print version can be downloaded from our website. www. underfloorheatinghq.co.
 English Installation Manual Loose cable underfloor heating A large print version can be downloaded from our website www. underfloorheatinghq.co.uk Phone: 0800 328 4980 E-mail: enquiries@underfloorheatinghq.co.uk
Underlaminate Foil Heater
 - Installation Manual: Underlaminate Foil Heater TECHNICAL HELPLINE 0845 345 2288 IMPORTANT! Do not place items such as bean bag furniture, thick rugs or floor-flush furniture on your heated floor covering.
Contact Details. Please note that some of the contact details on this PDF document may not be current.
 Contact Details Please note that some of the contact details on this PDF document may not be current. Please use the following details if you need to contact us: Telephone: 0844 879 3588 Email: customer.services@gdcgroup.co.uk
Undertile Heating Mat. Instructions. CORGI Underfloor Heating - Quality, Flexibility, Safety 1
 Undertile Heating Mat Instructions CORGI Underfloor Heating - Quality, Flexibility, Safety 1 It is vital that you read through these instructions fully before installing your CORGI undertile heating mat.
LIFETIME. INSTALLATION MANUAL emat Pro 100w/150w/200w WARRANTY
 INSTALLATION MANUAL emat Pro 100w/150w/200w LIFETIME WARRANTY Before you begin installing, read through these instructions carefully and check that you have all the components required. 01473 276677 www.elementsunderfloorheating.co.uk
amuheat Cable Mat floor heating systems Installation Manual CM02-12
 amuheat floor heating systems Cable Mat Installation Manual CM02-12 Table of Contents Introduction 1 2 Cable Mat Important Installation Guidelines Tools & Materials Needed for Installation Kit Contents
Underwood Heater Installation Manual
 Underwood Heater Installation Manual Contents Important Safeguards and Warnings... 3 1 General Information... 3 1.1 Use of the Manual... 3 1.2 Safety Guidelines... 3 1.3 Remember to measure resistance...
emat Pro 100/150/200 Installation Manual
 emat Pro 100/150/200 Installation Manual www.electricunderfloorheating.co.uk Before you begin installing read through these instructions carefully and check that you have all the components required. Introduction
Electric Warm-Stretch under floor heating
 Electric Warm-Stretch under floor heating bath store Installation Manual Please read these instructions before you start your installation. Any damage to the system due to incorrect installation will invalidate
LIFETIME. INSTALLATION MANUAL efoil WARRANTY
 INSTALLATION MANUAL efoil LIFETIME WARRANTY Before you begin installing, read through these instructions carefully and check that you have all the components required. 01473 276677 www.elementsunderfloorheating.co.uk
Carbon Film Installation Instructions
 Contents Page 2 Page 3 Page 4 Page 5 Page 8 Product Overview Pre-Installation & Electrical Provision Depron Underlay Installation Carbon Film Installation - Under Wood/Laminate Flooring Notes & Trouble
Installation And User Instructions GB/IRE. Devimat Warm Floor System Installation Instructions User Guide Trouble Shooter
 GB/IRE Installation And User Instructions Devimat Warm Floor System Installation Instructions User Guide Trouble Shooter Please retain this booklet for homeowners future reference. For Devireg 55 setup
HEATING USER GUIDE. Philex Support Line: Monday to Friday 9.00am to 5.00pm (Local rate - UK only)
") HEATING Underfloor Heating Kit USER GUIDE WARNING: Before installation make sure you have selected the right sized mat - you cannot cut the cable to make it shorter - slightly too small is better than
HEATING Underfloor Heating Kit USER GUIDE WARNING: Before installation make sure you have selected the right sized mat - you cannot cut the cable to make it shorter - slightly too small is better than
Uponor Comfort E AL-Foil Mat
 Uponor Comfort E AL-Foil Mat Contents Important notes on the intended use, safety and warranty...3 Intended use...3 Uponor Declaration of Warranty...3 System description...4 Floor construction...4 Technical
US: CA:
 Warmup DCM-PRO Installation Manual Technical Helpline US:1-888-927-6333 CA:1-888-592-7687 IMPORTANT! Please read this manual before attempting to install your Warmup product. Complete and submit your warranty
FloorHeat Installation Manual
 FloorHeat Installation Manual Transforming frosty floor surfaces into radiant warmth Transforming frosty floor surfaces into radiant warmth Contents Important Instructions!... 3 Safety Instructions:...
Overview Frost Heave Prevention for Freezer floors on ground.
 PLEASE NOTE The floor sensor MUST be installed such that it may be REMOVED for service if required! The sensor probe should be installed into a conduit with no more than one wide-angle bend. This should
Introduction. Please read the following instructions carefully before commencing installation.
 Introduction Please read the following instructions carefully before commencing installation. Installation involves simple processes. These are explained step by step in the following pages. Should you
Installation Guide For your AHT Underfloor Heating System
 Installation Guide For your AHT Underfloor Heating System Dear AHT Customer, Thank you for choosing the AHT underfloor heating system. It is designed to be simple to install and cost efficient to operate.
Intro. Intro. Table of Contents
 EN Intro Intro Dear AHT Customer, Thank you for choosing the AHT underfloor heating system. It is designed to be simple to install and cost efficient to operate. This guide provides the information you
UNDERWOOD HEATING SYSTEM
 INSTALLATION MANUAL Suitable for most wooden/laminate fl oors (always check with fl oor manufacturer) Ideal for most wood/laminate fl oors Easy to install Fully compliant to latest regulations CE approved
Installation Guide. Heating cables. Thin concrete (< 3 cm) Intelligent solutions with lasting effect. Visit DEVI.com
 Intelligent solutions with lasting effect. Visit DEVI.com") Installation Guide Heating cables Thin concrete (< 3 cm) Intelligent solutions with lasting effect Visit DEVI.com Table of contents 1 Introduction.................... 2 1.1 Safety Instructions...............2
Installation Guide Heating cables Thin concrete (< 3 cm) Intelligent solutions with lasting effect Visit DEVI.com Table of contents 1 Introduction.................... 2 1.1 Safety Instructions...............2
Operating Guide: for the Warmup tempo Digital Programmable Thermostat Part of the Element Series Introduction
 Operating Guide: for the Warmup tempo Digital Programmable Thermostat Part of the Element Series Introduction The tempo has been designed with simplicity in mind and is highly intuitive in its programming.
I.D.L. Heaters Thermal Products Ltd. IdealMat Installation Manual
 I.D.L. Heaters Thermal Products Ltd. IdealMat Installation Manual 0 1 The Most Luxurious and Safe System For Underfloor Heating Table of Contents Important Instructions 3 Safety Instructions 4 Before Starting
Foil Heating System. Installation Manual. for Carpet and Laminate TECHNICAL HELPLINE 0800 WARMUP ( )
") Installation Manual Foil Heating System for Carpet and Laminate IMPORTANT Read this manual before attempting to install your heater. Incorrect installation could damage the heater and will invalidate your
Installation Manual Foil Heating System for Carpet and Laminate IMPORTANT Read this manual before attempting to install your heater. Incorrect installation could damage the heater and will invalidate your
Always make sure to check the heating film before, during, and after installation of the floor covering.
 Installation of floor heating film for ceramic tiles, granite and other stone or composite flooring Read through this entire manual before starting installation. All electrical connections must be made
ELEKTRA RadiantFloor Heating
 www.elektra.eu ELEKTRA RadiantFloor Heating single-side powered MD Heating Mats Installation manual ELEKTRA Heating Mats For the proper installation and operation of the ELEKTRA radiant floor heating system,
INSTRUCTION. Danfoss heating cable mats type 100/150 Danfoss heating cable mats for thin floors. Danfoss heating cable mat type 100/150
 INSTRUCTION GB Danfoss heating cable mats type 100/150 Danfoss heating cable mats for thin floors NB! Read page 2 before installing the product if you intend to connect 2 mats to the same thermostat Danfoss
Installing Underfloor Heating Film. 1. Layout of electric underfloor heating systems
 Read through this entire manual before starting installation. May be installed under laminate, engineered wood or approved hardwood floors. See flooring manufacturer s specifications and instructions.
Installation And User Instructions. Devimat Warm Floor System Installation Instructions User Guide Trouble Shooter
 GB Installation And User Instructions Devimat Warm Floor System Installation Instructions User Guide Trouble Shooter 1 Existing Floor Wooden Floors Concrete Floors Maximum load per m 2 100 W/m 2 150 W/m
Installation Instruction
 GB/DAS Installation Instruction Devimat DTIF 100/150 Heating cable mats for thin floors NB! Read page 3 before installing the product if you intend to connect 2 mats to the same thermostat 1 Devimat 100/150
amuheat Laminate Panel 14 floor heating systems Installation Manual LP12-V1
 amuheat floor heating systems Installation Manual LP12-V1 Table of Contents Installation Manual Introduction 1 2 Product Important Installation Guidelines Tools & Materials Needed for Installation Kit
Installation And User Instructions
 GB Installation And User Instructions Devimat Warm Floor System Installation Instructions User Guide Trouble Shooter 1 Existing Floor Maximum load per m 2 Wooden Floors 100 W/m 2 Concrete Floors 150 W/m
WARM WATER UNDERFLOOR HEATING SYSTEMS. Guidance Notes
 WARM WATER UNDERFLOOR HEATING SYSTEMS Guidance Notes 02 WARM WATER UNDERFLOOR HEATING SYSTEMS Introduction Underfloor heating systems consist of a series of pipes which are integrated into the floor structure
floor heating system
 floor heating system Installation manual Instrukcja montażu Инструкция по установке EN PL RU EN The package contains: Thin self-adhesive heating mat Thermostat and temperature sensor (option) Installation
Technical Helpline. Installation Manual. WHS-M-S3-Series Manifolds. Hydronic Heating System
 3 3 4 9 3 8 6 WHS-M-S3-Series Manifolds Installation Manual 3 Technical Helpline 34 34 2288 IMPORTANT! Please read this manual before attempting to install your Warmup product. Complete and submit your
Classic Mats Installation Manual
 Classic Mats Installation Manual 1 Classic Mats WarmTouch Classic Mats are the ideal Electric floor warming systems, designed by DomoTecK, for installation under tile, stone or marble. WarmTouch Classic
Under Carpet Heater Kit Installation Guide
 Under Carpet Heater Kit Installation Guide Please watch the under carpet heater installation video at www.coldbuster.com.au/learning-centre/videos/ WARNING: Failure to read this guide prior to installing
Operating Guide: for the Warmup Tempo Digital Programmable Thermostat Part of the Element Series
 Operating Guide: for the Warmup Tempo Digital Programmable Thermostat Part of the Element Series Introduction The Tempo has been designed with simplicity in mind and is highly intuitive in its programming.
Installation Manual. Electric Underfloor Heating. heatingthroughinnovation.
 Installation Manual Electric Underfloor Heating heatingthroughinnovation. 02 Electric Underfloor Heating Contents 1.0 General Information 03 2.0 Preparation 04 3.0 Installation 05 4.0 Measuring Values
IdealFILM. Do-It-Yourself Installation Manual
 IdealFILM Do-It-Yourself Installation Manual Comfortable Warm Floors Benefits of using RSG Idealfilm Heats from the floor up for better heat distribution throughout the room No dust or allergens blown
ELECTRIC HEATING THERMOSYSTEM
 ELECTRIC RADIANT MAT 8200E INSTALLATION AND USE MANUAL heating passion ELECTRIC HEATING THERMOSYSTEM WARNING: For the guarantee to be valid, the product must be installed and handled as indicated in this
HEAT CABLE underfloor heating
 HEAT CABLE underfloor heating Installation Manual Thermosoft Heat Cable Installation Manual Page 1 INSTALLATION INSTRUCTIONS TM u n d e r f l o o r h e a t i n g c a b l e Please read these notes carefully
ELECTRIC UNDERFLOOR HEATING SYSTEMS. Operating Guide & Guarantee. The Underfloor Heating Specialists Tel:
 ELECTRIC UNDERFLOOR HEATING SYSTEMS The Underfloor Heating Specialists Tel: 0800 954 8862 Operating Guide & Guarantee www.myheat.co.uk Operating Guide Operation of your heating system is similar to other
I.D.L. Heaters Thermal Products Ltd. Roll n Warm Installation Manual
 I.D.L. Heaters Thermal Products Ltd. Roll n Warm Installation Manual 0 The Most Luxurious and Safe System For Underfloor Heating Table of Contents Important Instructions 2 Safety Instructions 3 Before
Royden. Look how easy it is to roll out the heat
 Royden Look how easy it is to roll out the heat 6 good reasons to select Royden infloor heating foil 1. Easily installed Royden heating foil comes on the roll, ready to fit. Whatever the room size or shape
TT302 (200W) Wireless receiver Pull cord Dimmer
 Wireless receiver Pull cord Dimmer") TT302 (200W) Wireless receiver Pull cord Dimmer Product Description The TT302 Wireless receiver allows you to convert a standard 1 way light switch or pull cord in to a taptile compatible Dimmer circuit
TT302 (200W) Wireless receiver Pull cord Dimmer Product Description The TT302 Wireless receiver allows you to convert a standard 1 way light switch or pull cord in to a taptile compatible Dimmer circuit
Installation Guide - Heating Cables. Installation Guide. Heating cables. for In-Slab and In-Screed Applications BROCDEV135.1
 - Installation Guide Heating cables for In-Slab and In-Screed Applications BROCDEV135.1 Table of Contents SECTION TITLE PAGE 1. Introduction... 3 2. Cable and Application Overview... 4 3. Safety Instructions...
Electric Floor Warming Systems Installation and Operation Instructions. Mat Heating Systems and Cable Heating Systems. UL Listed for USA and Canada
 Electric Floor Warming Systems Installation and Operation Instructions Mat Heating Systems and Cable Heating Systems UL Listed for USA and Canada Thank you for your purchase of a Warming Systems electric
F1202 TRACE HEATING. Road & Ramp
 Trace Heating Specialists Road & Ramp ROAD & RAMP HEATING ESH Trace Heating Ltd provide a comprehensive range of products to prevent the settlement of snow and formation of ice on roads, ramps and stairs.
WARRANTY INSTALLATION MANUAL. Ideal for most wood/ laminate fl oors Easy to install. Fully compliant to latest regulations CE approved
 INSTALLATION MANUAL LIFETIME WARRANTY Ideal for most wood/ laminate fl oors Easy to install Fully compliant to latest regulations CE approved Suitable for most wooden/laminate fl oors (always check with
ELEKTRA HEATING MATS. Designed to be installed under laminate flooring and/or engineered wood UK PL RU. Installation manual
 www.elektra.eu ELEKTRA HEATING MATS Designed to be installed under laminate flooring and/or engineered wood Installation manual Instrukcja montażu Èíñòðóêöèÿ ïî ìîíòàæó UK PL RU Purpose The ELEKTRA WoodTec
WARRANTY INSTALLATION MANUAL. Ideal for most wood/ laminate fl oors Easy to install. Fully compliant to latest regulations CE approved
 INSTALLATION MANUAL LIFETIME WARRANTY Ideal for most wood/ laminate fl oors Easy to install Fully compliant to latest regulations CE approved Suitable for most wooden/laminate fl oors (always check with
QuickNet System Installation Manual Manuel d installation du système QuickNet Manual de instalación del sistema QuickNet
 QuickNet System Manual Manuel d installation du système QuickNet Manual de instalación del sistema QuickNet Floor heating system Système de chauffage par le plancher Sistema de calefacción de pisos Table
CoziStat. 1. Introduction and Brief Description COZISTAT INSTALLATION I NSTRUCTIONS &OPERATING MANUAL
 COZISTAT INSTALLATION I NSTRUCTIONS &OPERATING MANUAL CoziStat 1. Introduction and Brief Description The CoziStat is an easy-to-use, programmable thermostat with digital display. CoziStat can be used with
BLOW DRY & GO HAIR KIT
 BLOW DRY & GO HAIR KIT LSGS11P Instruction Manual My BLow DRy and go HAiR KiT is perfect with everything you need to style your hair the way you want - wherever you are. This kit includes accessories for
Carbon Heating Film. Failure to follow these instructions may result in fire, electrical shock, property damage, personal injury, or death.
 Carbon Heating Film Easy to install. Does not circulate pollutants, dust, dirt, allergens or dry air. May be installed on wall, ceiling, under laminate, engineered wood floors or tile. Brings soothing
4iE Smart WiFi Thermostat Operating Guide
 4IE-01-XX-01/4IE-01-XX-02 4iE Smart WiFi Thermostat Operating Guide See reverse for Installation Guide Smartphone control Use your smartphone, tablet or computer to control your heating online Self-adjusting
Academy The Straightener IM.indd 1 24/06/ :10. Instruction Manual LSHS16
 Academy The Straightener IM.indd 1 24/06/2016 11:10 Instruction Manual LSHS16 Using advanced technology, The Straightener is ready to use in just 10 seconds. With an ultra-fast even heat up thanks to the
Installation instructions
 Installation instructions Ceramic hobs KM 6200 / 6202 / 6203 KM 6204 / 6206 / 6207 / 6208 KM 6212 / 6213 / 6215 / 6216 To avoid the risk of accidents or en-gb damage to the appliance it is essential to
Polymer solutions Heating mat EM2-CM
 1.5 Polymer solutions 1. Application EM2-CM is a constant wattage heating mat for simple, fast, and effective ramp and accessway heating to prevent snow and ice formation. The EM2-CM mat is particularly
Installation Instruction Devidry - for installation with Devidry Pro Kit
 Installation Instruction Devidry - for installation with Devidry Pro Kit UK Devidry TM Congratulations with your new DEVI floor heating system. DEVI is Europe s leading floor heating manufacturer with
CoCo LoCo BLOW & GO NUTS DRYER. LSHD24 Instruction Manual
 CoCo LoCo BLOW & GO NUTS DRYER LSHD24 Instruction Manual This GORGeous PiNK and rose gold dryer is infused with coconut oil to give your hair a boost when it s driving you nuts. With a powerful 2400W motor
HEAVY DUTY BRASS SHOWER PUMPS
 HEAVY DUTY BRASS SHOWER PUMPS YOUR GUARANTEE IS AT RISK IF PUMP NOT INSTALLED CORRECTLY. SEE SECTION 2 IMPORTANT INSTRUCTIONS Performance Shower Products SERVICE HELPLINE TEL: 01883 730339 1. GENERAL Your
Installation And User Instructions. devimat Warm Floor System Installation Instructions User Guide Trouble Shooter
 GB Installation And User Instructions devimat Warm Floor System Installation Instructions User Guide Trouble Shooter Existing Floor Wooden Floors Concrete Floors Maximum load per m 2 100 W/m 2 150 W/m
Toll Free:
 1 ProLine s electric radiant floor heating system is one of the most popular and durable floor heating solutions on the market. Available pre-spaced in mats with an adhesive backing or on the spool, the
Warm Feet For Uncoupling Membrane Pour membrane de désolidarisation. Installation Guide Floor Heating Cable
 Warm Feet For Uncoupling Membrane Pour membrane de désolidarisation Installation Guide Floor Heating Cable 119A Sir Wilfrid Laurier Saint-Basile-le-Grand, (Québec), J3N 1M2 Tel: 1-450-482-1919 Toll Free:
Installation and User Guides
 Installation and User Guides Mats and Cable Trademat Plus+ Softmat Loose Cable Control Units Gloss Touch-Screen Stat Touch-Screen Stat Wireless Timerstat Manual Thermostat Contents Contents 3 Mats and
CERTIFIED UNDERFLOOR HEATING WITH 15 YEARS GUARANTEE
 Electric underfloor heating Simple to install Cheap to install Simple to regulate Safe to use Maintenance free CERTIFIED UNDERFLOOR HEATING WITH 15 YEARS GUARANTEE WHY CHOOSE HEATCOM? Heatcom is a leading
PERFORMANCE SHOWER PRODUCTS
 INSTALLER PLEASE LEAVE INSTRUCTIONS WITH CUSTOMER PERFORMANCE SHOWER PRODUCTS INSTALLATION INSTRUCTIONS FOR REGENERATIVE MAINS SHOWER PUMP Model: PR35D Medium pressure twin PR50D Medium pressure twin PR50S
Installation Guide. Maximum Area 20m 2
 Installation Guide Maximum Area 20m 2 i PLEASE READ THIS INSTALLATION GUIDE CAREFULLY BEFORE BEGINNING ANY WORK TO ENSURE A SAFE & TROUBLE FREE INSTALLATION. Parts provided with pack 4 Parts provided with
Simple. Smart. Solutions. ROOM PACK Z2105/239/0812. Step by Step Installation Guide
 Simple. Smart. Solutions. ROOM PACK Z2105/239/0812 Step by Step Installation Guide 1. Room Pack Overview 2. Temperature Settings 3. Operation 4. Wiring 5. Installing Your Room Pack Before you get started
BOILING UNIT REDITAP. Installation and User Guide. IMPORTANT: This booklet should be left with the user after installation and demonstration
 in tap Boiling water to in tap sink Drain Valve (as high as possible) REDITAP CONNECTION SUMMARY Amp mains supply cold mains water into in tap optional filter cold water in hot water BOILING UNIT Installation
REDRING POWERSTREAM UNVENTED INSTANTANEOUS WATER HEATER. Installation and User Guide
 REDRING POWERSTREAM UNVENTED INSTANTANEOUS WATER HEATER Installation and User Guide IMPORTANT: This booklet should be left with the user after installation and demonstration. It should be kept in a safe
Instantaneous Electric Over-Sink Hand Wash Installation and User Instructions
 3 Flow Instantaneous Electric Over-Sink Hand Wash Installation and User Instructions IMPORTANT This Step-by-Step guide should be given to the customer after installation and demonstration. CONTENTS 1.
INSTALLATION. For more information on this product or to order samples call or visit our website at builddirect.com.
 Page 1 Page 2 Section 1. Introduction The Perfectly Warm Floating Floor Heat Heating System (PWF) is a unique heating system that is installed below floating flooring materials to create warm, comfortable
DC Heat Recovery Unit MVHR Wholehouse heat recovery unit
 DC Heat Recovery Unit MVHR Wholehouse heat recovery unit Stock Ref. N DC Heat Recovery Unit MVHR 443423 Installation, Maintenance & Users Instructions PLEASE READ INSTRUCTIONS IN CONJUNCTION WITH ILLUSTRATIONS.
INSTALLATION INSTRUCTIONS SINGLE CIRCUIT
 INSTALLATION INSTRUCTIONS SINGLE CIRCUIT Unit 1 79 Friar Street Worcester WR1 2NT Tel: 01905 616 928 Fax:01905 611 240 E-mail: info@underfloorheatingsystems.co.uk Website: www.underfloorheatingsystems.co.uk
SECTION RADIANT-HEATING ELECTRIC CABLES / MATS
 SECTION 238313- RADIANT-HEATING ELECTRIC CABLES / MATS PART 1 - GENERAL 1.1 SECTION INCLUDES A. Electric radiant snow melting mats or cables embedded in concrete or asphalt slabs, or embedded under brick
Installation Guide. Heating cables. Pipe tracing. Intelligent solutions with lasting effect. Visit DEVI.com
 Installation Guide Heating cables Pipe tracing Intelligent solutions with lasting effect Visit DEVI.com Table of Contents 1 Introduction.................... 3 1.1 Safety Instructions...............3 1.2
INSTANTANEOUS ELECTRIC SHOWER
 GUARANTEE / SERVICE POLICY INSTANTANEOUS ELECTRIC SHOWER GUARANTEE Designa guarantee this DS3000 product for a period of two years, from date of purchase, against mechanical and electrical defects arising
Installation Guide Heating Elements
 Page: 1 of 20 Table of Contents SECTION TITLE PAGE 1. Introduction... 3 2. Cable and Application Overview... 4 3. Safety Instructions... 5 4. Cable Requirements... 5 5. Important... 6 INSTALLATION SUMMARY...
radiant floor heating Floor Heating Mats Floor Heating Cables Thermostats
 radiant floor heating Floor Heating Mats Floor Heating Cables Thermostats Radiant floor heating: A modern comfort solution Floor heating s vertical temperature distribution is the closest form of heating
I n s t r u c t i o n m a n u a l f o r b u i l t - i n h o o d. Model code: BORA600
 I n s t r u c t i o n m a n u a l f o r b u i l t - i n h o o d Model code: BORA600 Contact Caple on 0844 8003830 or for spare parts www.4caple.co.uk 1 Y O U R A P P L I A N C E Thank you for buying your
Installation & User Instructions: Model: e600s e600gf e700s e1000s e1000gf e1030gf/2/3 e1500gf/2/3
 Installation & User Instructions: Model: e600s e600gf e700s e1000s e1000gf e1030gf/2/3 e1500gf/2/3 Once installed, the installer should take the appropriate steps To ensure that the user understands how
INSTALLATION INSTRUCTIONS ONE LARGE ZONE
 INSTALLATION INSTRUCTIONS ONE LARGE ZONE Unit 1 79 Friar Street Worcester WR1 2NT Tel: 01905 354 791 Fax: 01905 352 100 E-mail: info@underfloorheatingsystems.co.uk Website: www.underfloorheatingsystems.co.uk
Click & Plug Floor Heating. Installation instruction Devidry Kit
 Click & Plug Floor Heating UK Installation instruction Devidry Kit Devidry Congratulations with your new DEVI floor heating system. DEVI is Europe s leading floor heating manufacturer with more than 45
DEVIL CERAMIC SPACE HEATERS
 DEVIL CERAMIC SPACE HEATERS Devil 330 Part Nos: 6920264 (110V) & 6920265 (230V) OPERATING & MAINTENANCE INSTRUCTIONS GC0310 INTRODUCTION Thank you for purchasing this CLARKE Ceramic Space Heater. Please
WATCH OUT! UNDERNEATH THE WOODEN FLOORING IS A 230 VOLT HEATING FOIL SYSTEM! NEVER DRILL OR SCREW INTO THE FLOOR!
 WATCH OUT! UNDERNEATH THE WOODEN FLOORING IS A 230 VOLT HEATING FOIL SYSTEM! NEVER DRILL OR SCREW INTO THE FLOOR! SEE SCHEDULE/PICTURE FOR THE POSITION OF THE KLIMA FOIL. Control measurements: Type foil
OPERATION MANUAL AND WARRANTY ELECTRONIC INFRARED ZONE HEATING SYSTEM
 OPERATION MANUAL AND WARRANTY ELECTRONIC INFRARED ZONE HEATING SYSTEM SH-1500LCD PLEASE READ THIS MANUAL 12 Safety Notice Please read this entire Operation and Warranty Manual BEFORE operating your new
G Series SAVE THESE INSTRUCTIONS. (Model B) Convector Heater for Hazardous Locations GENERAL! INSTALLATION
 Convector Heater for Hazardous Locations GENERAL! INSTALLATION") G Series (Model B) Convector Heater for Hazardous Locations Type G-Series Convection Heaters are designed for use in Class I, Div. I hazardous environments. Units without control options are suitable for
G Series (Model B) Convector Heater for Hazardous Locations Type G-Series Convection Heaters are designed for use in Class I, Div. I hazardous environments. Units without control options are suitable for
POWER SHOWERS Models 4500M 5002M 4500T 5002T
 II POWER SHOWERS Models 4500M 5002M 4500T 5002T Performance Shower Products CUSTOMER SERVICE HELPLINE: 01883 730339 CONTENTS PLEASE READ THESE INSTRUCTIONS CAREFULLY: This booklet covers all models in