OPERATING INSTRUCTIONS B
|
|
|
- Delphia Ryan
- 6 years ago
- Views:
Transcription

1 OPERATING INSTRUCTIONS B
2
3 Contents CONTENTS Introduction... 2 Safety instructions... 2 Technical data... 4 Dispenser components... 5 Dispenser components / front... 5 Service panel components... 6 Operating panel components... 7 Dispenser components / back... 8 Operation... 9 Putting into operation... 9 Switching the dispenser off... 0 Delivery of beverages... Delivery modes... 2 Delivery examples... 3 Adjusting the cup or pot stop... 4 Counter display... 5 Resetting the counter... 5 Programming the delivery mode 'free' or 'pay'... 6 Reading out the counter displays... 6 Setting of prices... 7 Blocking the beverage delivery... 7 Changing the beverage strength (coffee, decaf, tea and cocoa)... 8 Programming the time... 9 Programming the date Programming happy hours... 2 Programming the energy saving programme Finishing the programming Options Version with tank Version for the delivery of café cool Cleaning and maintenance General instructions Maintenance schedule Daily cleaning Combi-trough (model without mixing unit) Combi-trough (model with mixing unit) Trough box... 3 Mounting the combi-trough and trough box Cup carrier Drip grid Drip tray Rinsing the dispenser Cleaning the kit High Volume (option) Cleaning the water tank (option) Weekly cleaning Cooling compartment Brew basket Trouble shooting
4 Introduction/Safety instructions INTRODUCTION The dispenser is to be used for the delivery of hot beverages such as coffee, decaf, tea or lactiferous beverages (e.g. cappuccino, café au lait, milk or beverages containing cocoa). For the delivery of espresso, cappuccino or a lactiferous beverage, a mixer is required which is available as an option. Beverages can be delivered on the right and left-hand side. In the middle only hot water can be delivered. The dispenser can be used to fill cups, pots, small pots or pump-action thermos flasks. The dispenser is used with liquid beverage concentrates (such as coffee, decaf, tea, milk or a cocoa containing beverage) in non-returnable packs. Several functions can be programmed by our service technicians to suit the customer's requirements. Different payment systems can be attached to the dispenser. The dispenser is to be installed on a table. If the dispenser is used for a purpose other than that indicated in these instructions, the manufacturer is not liable for any damage. The dispenser can be delivered with several options. (see chapter Options) The Service Technician can change the dispenser over for the additional delivery of "café cool", "iced cappuccino", "iced choco" (optional). Before putting the dispenser into operation, read the chapter Safety instructions. SAFETY INSTRUCTIONS Before putting the dispenser into operation, the operating instructions must be read and understood. The dispenser should not be installed outside. The dispenser must be placed where it can be looked after by trained personnel. The dispenser should not be installed on a surface near to where jets of water are used (e.g. for cleaning). After the dispenser has been installed, the power supply plug must be accessible. Rinse the dispenser before putting into operation for the first time (see chap. Maintenance) The liquids delivered by the dispenser are very hot! In order to prevent scalds, take your hands and other parts of the body out of the delivery area before pressing any delivery button. The drinking water quality must be checked prior to the delivery of cold beverages. Observe the rules and regulations of the country where the dispenser is installed. Never touch the power supply plug with wet hands or plug it in if the plug itself is wet
5 Safety instructions If the power supply cable of the dispenser is damaged it may only be replaced by a workshop named by the manufacturer. Special tools are needed for the replacement. Regular cleaning of the dispenser is necessary for functional and hygienic reasons. When cleaning, take care of sharp edges. There is danger of injuries! Switch off the ON/OFF switch before cleaning the dispenser. Clean the dispenser inside and outside with a wet cloth; do not spray it off. Use a cleaning agent approved by the food industry and recommended by your Cafitesse supplier only Observe safety instructions and instructions for use on the pack of the cleaning agent. To clean the box and the combi-trough only use a food approved cleaning agent. When cleaning the combi-trough do not bring into close contact with magnetic cards or credit cards as this can invalidate them. There is great danger of being injured if the glass panel at the front is cleaned improperly and breaks. When connecting the dispenser to the drinking water line and the electric line, follow the local regulations. The dispenser must be connected to an electric circuit which is protected by a fuse. We recommend to install a fault current safety switch. The connection must be made using a safety plug earthed according to the regulations. Follow the local regulations! If the dispenser will not be used for a longer period of time (e. g. at night or during the weekend), close the water cock. Switch off the ON/OFF button. Do not pull out the power supply plug because otherwise the cooling system will not function any more. The dispenser must not be used when the water supply is interrupted because otherwise the boiler will not be filled. Do not switch off the dispenser be-tween beverage deliveries in order to keep the optimum water temperature in the boiler. Use only original spare parts. The dispenser may only be installed, programmed and repaired by specially trained service technicians who are familiar with the safety and hygiene aspects of the dispenser. The dispenser may not be subject to frost during operation, storage and transport. - In order to prevent damage due to frost, the service technician must completely drain the water from the boiler prior to storage and transport and must also remove any residual water from hoses and valves. - It is recommended to store and transport the dispenser in its original packaging. - However, if there is the danger of damage due to frost, the service technician must check and replace boiler, hoses and valves if required prior to reconnecting the dispenser and he should additionally carry out a functional test. 3
6 Technical data TECHNICAL DATA Dimensions: Height: 770 mm (30.3 in) Width: 320 mm (2.60 in) Depth: 55 mm (20.28 in) Weight: 29 kg (63.9 lbs) (net weight), 44 kg (97 lbs) filled Water connection: Drinking water line with stop valve. Connection to hot water supply via copper pipes only. Supply system requirements: Temperature: max. 75 C (67 F) Dynamic pressure: min. 0.8 bar ( psi) with 0l/min (2.64 US gal/min. / 2.20 UK gal/min.) Static pressure: max. 0 bar (40 psi) Cold water connection: Dynamic pressure: min. 0.8 bar ( psi) with.2 l/min (0.3 US gal/min. / 0.26 UK gal/min.) Static pressure: max. 7 bar (98 psi) Water filling capacity: 0 l (2.64 US gal / 2.20 UK gal) (pressureless boiler) Beverage capacity: 00 cups à 00 ml/hour (6. in 3 /hour) per KW heating capacity Concentrate capacity: Coffee, tea, milk or packs containing lactiferous beverages with a contents of 2 l (0.53 US gal / 0.44 UK gal) each Electrical data: See the rating plate for the electrical data. The adjustments might be changed by a service technician. Max. values: -phase operation Europe/Japan/Australia max. 3.5KW at 230V~ / 2.7KW at 200V~ 3-phase operation Europe/Australia max. 8.KW at 3N~ 400V -phase operation USA max.,8kw at 20V~ 2-phase operation USA max. 2,4/3,kW at 208/240V~/2,9/3,8kW at 208/240V~ max. 4,4/5,8kW at 208/240V~ / 6,8/8,9kW at 208/240V~ Electric connection: Only by power cable and plug, otherwise a contact breaking device (min. 3mm) for all poles must be installed. The dispenser is radioshielded acc. to EN 5504/VDE 0875,T4. The connection must be earthed! The installation of a fault current safety switch is recommended. Length of the power cable: approx..80m (5.9 ft) Acoustic emission: The A-weighted sound pressure level of the dispenser is below 70 db. General installation requirements: Height: up to 2000 m (6562 ft) Ambient temperature: 5 C - max. 32 C (4 F - max. 90 F) Min. distance to the wall: 50 mm (.997 in) (from backside of the machine) The dispenser is protected against dripping water. The dispenser is marked with the CE label. (Directive about electrical equipment of low voltage, directive about electromagnetic compatibility) Subject to changes!
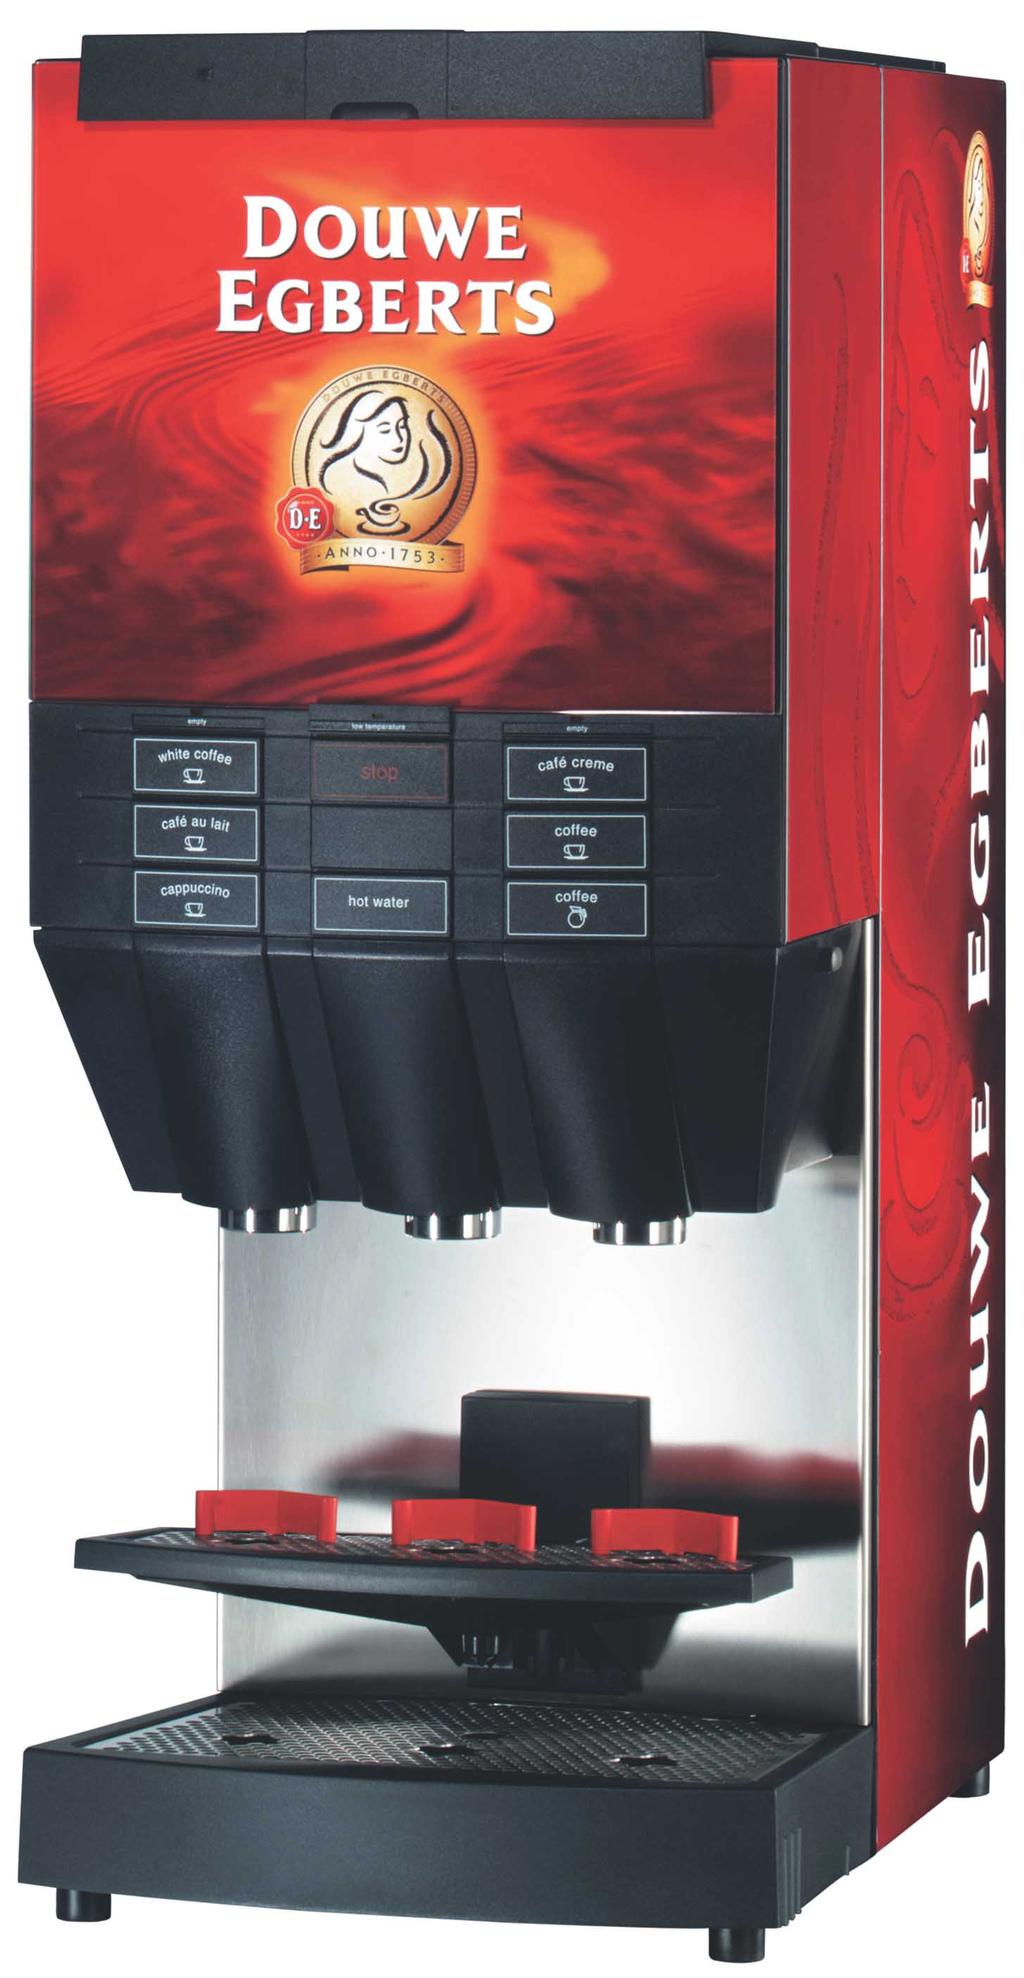
7 empty low temperatur empty Dispenser components coffee coffee coffee stop hot water tea tea tea DISPENSER COMPONENTS/ FRONT (FIG. ) - brew basket 2 - outlet spouts, right and left-hand side 3 - cup stop, pot stop 4 - cooling compartment cover 5 - service panel 6 - glass panel 7 - operating panel 8 - hot water outlet 9 - drip grid of the cup carrier 0 - cup carrier - drip grid 2 - drip tray
8 . Dispenser components SERVICE PANEL COMPONENTS (FIG. 2) 3 - display 4 - LED: lights = dispenser ready flashes = - Cooling compartment temperature not reached or - the dispenser must be cleaned or - serious malfunction (see chap. Trouble shooting) 5 - push-button, mode 7 - push-button (-) for going through the menu in the downward direction (decrease the values) 8 - ON/OFF button for switching the dispenser ON or OFF 9 - key switch with 3 positions: pos., pos. 2 and neutral (= dispenser is ready). Make sure that the cap of the switch is not turned when the key was not inserted completely bush for service device (Service Technician) 2 - rinse button, left-hand side 22 - rinse button, right-hand side 23 - rinse button prior to delivering café cool 24 - key store place (cover) (Fig. 3) Make sure that the cover is not twisted while opening it (fig. 3). 6 - push-button (+) for going through the menu in the upward direction (increase the values)
9 Dispenser components 2 3 empty low temperatur empty coffee stop tea 4 7 coffee tea coffee hot water tea OPERATING PANEL COMPONENTS (FIG. 4) *- display for the flexipack on the lefthand side (-lights red when the flexipack is empty, - flashes during a serious malfunction or when the dispenser must be cleaned) 2 - low temperature indicator for boiler, yellow There is the possibility to have the delivery of beverages blocked by a service technician if the boiler temperature is too low. 3*- display for the flexipack on the righthand side (-lights red when the flexipack is empty, - flashes during a serious malfunction or when the dispenser must be cleaned) 4 - delivery buttons for the left-hand side 5 - stop button (stops the delivery of beverages and hot water) 6 - delivery button for hot water 7 - delivery buttons for the right-hand side A large selection of various push button covers is available. * The corresponding LED goes out if a flexi pack is replaced or if the dispenser is switched off and on (depends on the programming by the service technician.)
10 Dispenser components DISPENSER COMPONENTS/ BACK (FIG. 5),6 - LEDs (red): shines = empty flexipack flashes = - serious malfunction or - dispenser must be cleaned 2 - advertising panel (optional) 3 - power cable connection 4 - water connection for the delivery of "café cool", "iced capuccino", "iced choco" 5 - water connection 7 - LED (green) = ON/OFF button - LED flashes = Cooling compartment temperature not reached 8 - air filter
11 Operation A. kaffee heißes wasser tee B. C. t hé PUTTING INTO OPERATION Open the water cock. Plug in the power supply plug. Open the cover of the cooling compartment (fig 6) Switch on the dispenser with the ON/ OFF button (). (fig. 7B) Depending on the programming by the service technician the display will show: A 'on' or B aternately the cooling compartment temperature and 'on' or C 'bloc' if the delivery has been blocked If an accounting system is connected the display shows "FREE" or "PAY". The low temperature indicator lights yellow when the boiler is cold. When the flexipack is empty, the empty indicator will light red, and the fexipack has to be replaced. If necessary, switch the dispenser off and on after replacing the flexi packs. If the cooling compartment is too warm for putting the dispenser into operation, the warning message Code 8 will be displayed. The warning message will be displayed until the cooling compartment has the correct temperature, which can take a few hours. If the dispenser has been out of operation for a long period of time, put a collecting vessel underneath the hot water outlet, actuate the hot water delivery button () and let at least 0 l flow out before using the dispenser. (fig. 8) 9
12 Operation. 9 SWITCHING THE DISPENSER OFF Actuate the ON/OFF button () on the service panel to switch off the dispenser. (fig. 9) The cooling system will continue to operate. If the dispenser will not be used for a long period of time (e. g. at night or during the weekend), close the water cock. Do not pull out the power supply plug because otherwise the cooling system will not function any more
13 Operation A 2 empty low temperatur empty Position 2 coffee stop tea B coffee tea coffee hot water tea 0 Front side DELIVERY OF BEVERAGES According to the customer's requirements the dispenser can deliver the beverages indicated in the chapter Introduction. Beverage delivery can be blocked by means of the service panel: Set the key switch to position 2: Now you can select between: bloc = delivery is blocked (boiler and cooling system remain switched on) (fig. 0A) and No bl = delivery is possible (fig. 0B) When the key switch is set to the neutral position and the dispenser is programed to 'bloc' this message will appear on the display when the dispenser is switched on. The cup carrier can be adjusted to the required height by a service technician. It can even be swung up if the height is still insufficient for the delivery. The drip grid and the drip tray can be removed as well. (see also chapter Adjusting the cup or pot stop) When the LEDs (, 2) on the front and back of the dispenser light red, the corresponding flexipack is either not installed or it is empty and has to be replaced. (fig. ) When replacing the flexipack pay particular attention to the instructions on the packing of coffee, tea, milk, and cocoa containing beverages. Insert the flexipack in such a way that the left pack is guided at the left side wall and the right pack is guided at the right side wall
14 Operation empty low temperatur empty coffee stop tea coffee tea coffee hot water tea Front side 2 DELIVERY MODES Depending on how the dispenser has been adjusted during installation, the mode for the delivery of beverages and hot water will be one of the following: ) Delivery in portions: The volume of a portion can be adjusted by a service technician. The next beverage is only delivered when - the delivery of the previous beverage has been finished and - the button for the previous beverage has been released, - the programmed pause is over and - the button for the next beverage has been pressed. 2) Continuous delivery The delivery is continued as long as the corresponding delivery button is pressed. 3) Constantly repeated delivery in portions The delivery of a portioned quantity is constantly repeated as long as the corresponding delivery button is pressed. This description only refers to one side. The delivery on the other side of the dispenser can be carried out independently - depending on the type of beverages to be delivered. The beverage delivery buttons and the hot water button can be programmed by our service technicians according to the dispenser type. When pressing the stop button () the delivery of beverages or hot water will be interrupted at once. (fig. 2)
15 Operation dispenser type beverages for delivery left-hand side - right-hand side standard dispenser coffee - coffee (dispenser for 2 products) decaf - coffee coffee - decaf tea - coffee coffee - tea tea - tea café au lait - coffee standard dispenser with: hose adapter which allows the delivery on the left-hand side to take place in half the time* coffee - coffee dispenser type standard dispenser with: mixer, left-hand side mixer left and right-hand side beverages for delivery left-hand side - right-hand side espresso - coffee hot chocolate - coffee cappuccino - coffee espresso - espresso hot chocolate - coffee / espresso café au lait*/milk - coffee cappuccino* - coffee cappuccino* - espresso Espresschoc* - coffee * In this case deliveries on the left and right-hand side cannot be carried out simultaneously. DELIVERY EXAMPLES The delivery of a beverage is initiated by simply pressing the corresponding button The liquids delivered by the dispenser are very hot. In order to prevent scalds, take your hands out of the delivery area. Possible portion volumes (can be adjusted by a service technician): small cup normal cup mug glass glass café cool small pot pot pump-action thermos flask It is possible to program the dispenser so that it switches over automatically to a larger beverage concentrate reserve (2 x 2 l). This has to be done by a service technician. In this case - both concentrates have to be the same. - the delivery takes place on the lefthand side only. For further delivery modes, especially for milk and lactiferous beverages, and portion sizes, please, ask your Service Technician. 3
16 Operation A B ADJUSTING THE CUP OR POT STOP Insert the stop () in the openings of the cup carrier or mount it on the drip grip. (fig. 3) Adjust the stop () according to the size of the cup or pot, so that its centre is positioned underneath the outlet. (fig. 3) The cup carrier can be adjusted vertically. downwards: press with the thumb in the recess (2) against the notch locking and push the support downwards. (Fig. 4A) upwards: hold the support on both sides and push it upwards. (Fig. 4B) When the support is in the required position, the cup carrier must be locked. (Fig. 5)
17 Operation empty low temperatur empty coffee stop tea coffee tea 3 Position 2 Position Position neutral coffee hot water tea 6 7 COUNTER DISPLAY RESETTING THE COUNTER (if this function has been programmed by a Service Technician) If an accounting system is connected the display shows 'PAY' or 'FREE'. The counter displays the number of delivered portions for each delivery button and for the hot water delivery button separately. By pressing the 'Mode' button (3) the following menus can be called up consecutively: 'Free' or 'Pay', 'Cnt F' and 'Cnt P'. (fig. 6) To finish programming, turn the key switch to the neutral position and remove it. (if this function has been programmed by a Service Technician) The counter can be reset when "Cnt F" or "Cnt P" is indicated in the display. By activating the stop button () and the corresponding delivery button the counter can be separately reset for each individual delivery button. (fig. 7) To finish programming, turn the key switch to the neutral position and remove it
18 Operation 2 3 Position Position Position PROGRAMMING THE DELIVERY MODE 'FREE' OR 'PAY' Turn the key switch to position. (fig. 8) The display shows = present state of the delivery mode: "FREE" or PAY" " (fig. 8). To change the adjustment: Press button (2) = + or (3) = - If the key switch is left in position, free beverages will be delivered for all buttons until the key switch is returned to its original position and removed from the dispenser. To finish programming, turn the key switch to the neutral position and remove it. READING OUT THE COUNTER (if this function has been programmed by a Service Technician) Leave the key switch in position. Actuate the the 'Mode' button () The display shows: "Cnt F". (fig. 9) Press the corresponding delivery button and the number of delivered free portions for this button will be displayed. Leave the key switch in position. (fig. 8) Press the 'Mode' button (). (fig. 20) The display shows: "Cnt P". Press the corresponding delivery button and the number of paid delivered portions for this button will be displayed. To finish programming, turn the key switch to the neutral position and remove it
19 empty low temperatur empty Operation A Display Display L50 r Position 2L50 3L50 coffee coffee coffee stop hot water t 050 tea tea tea 2r50 3r50 B Position SETTING OF PRICES (possible for certain paying systems) Leave the key switch in postion. Actuate the 'Mode' button (). (fig. 2) The display will show ''Price'. Now you can enter the price for each button. Actuate the corresponding delivery button (fig. 22): If, for example, you actuate the top left button the display shows: 'L50'. 50 = price Changing the price: Actuate the button (2) = + or (3) = (fig. 2) Setting range: from 000 = free delivery to max For the display of all other buttons refer to fig. 22. To finish programming, turn the key switch to the neutral position and remove it. BLOCKING THE BEVERAGE DELIVERY Set the key switch to position 2. The display will show the current setting 'bloc' or 'No bl'. (fig. 23) 'bloc' = Delivery is blocked The dispenser remains switched on 'No bl' = Beverage delivery is possible Changing the setting: Actuate the button (2) = + or (3) = (fig. 2) To finish programming, turn the key switch to the neutral position and remove it
20 Operation L empty low temperatur empty coffee stop tea R L2 coffee tea R2 2 3 Position 2 L3 coffee hot water tea R CHANGING THE BEVERAGE STRENGTH (COFFEE, DECAF, TEA AND COCOA) (not for milk) (if the function has been programmed by a Service Technician). (ratio = concentrate-water ratio) Turn the key switch to position 2 = programming position. (fig. 24) Actuate the 'Mode' button () until the display shows "RATIO". Press the corresponding delivery button and the value for this button will be displayed. Example: L 20 = upper button on the left side = set ratio = :20 For the numbering of the buttons see fig. 25. To change the adjustment: Press the button (2) = + or (3) = - The beverage strength can be changed by ±5%. The beverage strength can be changed individually for each delivery button. If you want to change the beverage strength by more than ±5%, call a Service Technician. To finish programming, turn the key switch to the neutral position and remove it
21 Operation Position Position PROGRAMMING THE TIME Turn the key switch to position 2. (fig. 26) Actuate the 'Mode' button () until the display shows "CLOC". Press the 'Mode' button () again if you want to programm one of the following functions:. Time (hours and minutes) 2. Date 3. Happy hours 4. Energy saving programme After sec. the time will be displayed. Example: h (fig. 27) To change the time by minute: Press button (2) = + or (3) = - Press button (2) or (3) continuously to change the time quickly. (fig. 27) To finish programming, turn the key switch to the neutral position and remove it
22 Operation Day Month 2 3 Position Position PROGRAMMING THE DATE Turn the key switch to position 2. (fig. 28) Actuate the 'Mode' button () until the display shows "DATE". After sec. the date will be displayed. To change the date by one step: Press button (2) = + or (3) = - Press button (2) or (3) continuously to change the date quickly. (fig. 29) To finish programming, turn the key switch to the neutral position and remove it
23 Operation Position Position Position PROGRAMMING HAPPY HOURS If an accounting system is installed, it is possible to program 3 different happy hours, i. e. periods during which all beverages are delivered free. Turn the key switch to position 2. (fig. 30) Press the 'mode' button () until the display shows: "HAPS" After sec. the beginning of the first 'happy hour' is displayed. Example: 9-00 h (fig. 3) To change the time by minute: Press button (2) = + or (3) = - Press button (2) or (3) continuously to change the time quickly. (fig. 3) Press the 'Mode' button () to have the end of the first 'happy hour' displayed: "HAPE" (fig. 32) To change the adjustment: Press button (2) = + or (3) =
24 Operation Position Position Position neutral Press the 'Mode' button (). Display: "HAP2S" After sec. the beginning of the second 'happy hour' is displayed. (fig. 33) To change the adjustment: Press button (2) = + or (3) = - Press the 'Mode' button () to have the end of the second 'happy hour' displayed: "HAP2E" (fig. 34) To change the adjustment: Press button (2) = + or (3) = - To finish programming, turn the key switch to the neutral position and remove it. If a third 'happy hour' is to be programmed the display shows "HAP3S". If a beverage is delivered during the 'happy hours' the display shows "HAPPY". (fig. 35) If no accounting system is connected the display shows "ON"
25 Operation 2 3 Position Position PROGRAMMING THE ENERGY SAVING PROGRAMME During the energy saving programme the heating of the boiler is switched off (e.g. when the dispenser is not used for a longer period). The cooling system remains on. Keep in mind that the boiler needs a certain time for heating up after the energy saving programme has finished. The water cock must remain open. Turn the key switch to position 2. Press the 'Mode' button () until the display shows "EN S". After sec. the beginning of the energy saving programme is displayed. (fig. 36) To change the adjustment: Press button (2) = + or (3) = - Press the 'Mode' button () and "EN E" will be displayed. After sec. the end of the energy saving programme is displayed. (fig. 37) To change the adjustment: Press button (2) = + or (3) = - To finish programming, turn the key switch to the neutral position and remove it. Press the ON/OFF (4) switch to stop the energy saving programme for one period. In this case the delivery of beverages will not be interrupted. (fig. 37)
26 Operation Position neutral Position FINISHING THE PROGRAMMING As long as the energy saving programme is running the display shows "E-OFF". When the period for the energy saving programme is over the dispenser is switched on automatically. The display shows: "ON", resp. "PAY" or "FREE". If the ON/OFF button has been set to OFF during the energy saving programme, the dispenser is not switched on automatically. The display shows: "OFF" The key switch is in position 2. (fig. 39) Turn the key switch to the neutral position. (fig. 38) Remove the switch only in the neutral position. (fig. 38) Take care to change all programmed data in time when the time is changed from summer to winter or from winter to summer time and in leap years. All programmed data remain stored if the power supply is interrupted!
27 Options Options Mixer Water tank Kit 'café cool' Kit high volume Drainage kit Advertising panel, back Various spouts Function Producing foam on a beverage (espresso, cappuccino and café creme) Delivery of beverages independent of the water system Delivery of "café cool", "iced cappuccino" "iced choco" Delivery on the left-hand side twice as fast as on the right-hand side Automatic drainage of drip tray and boiler overflow Transparent foil for customer related advertisements Adaptation of the delivery height to specific cups/pots Options Coin/card module Filter cloth with cover Lock in cooling compartment cover Table fastening Foot extender Water stop valve Carber sponge Function Payment activates beverage delivery Cover for water and mains connection if the supply lines are led through the table Lockable cooling compartment Attaching the dispenser to a table device Greater distance between dispenser and table Overflow protection when the supply line is faulty Collection of lime contained in the boiler water OPTIONS VERSION WITH TANK If no water connection is provided or the quality of the drinking water is bad, our service technicians can equip your dispenser with an additional tank which allows to fill in the water manually. To fill the dispenser: Plug the power supply plug into the socket Switch on the ON/OFF button to fill the boiler. While the boiler is filled, take care that there is always enough water in the water tank. If the water quantity in the boiler is insufficient, fault ERR5 is displayed. The fault indication is cleared by pulling the power supply plug out off the socket and plugging it in once again after approx. 2-3 sec. Use only drinking water for filling the tank. Replace the water daily. If a tank is installed, it is not possible to deliver beverages on both sides simultaneously. 25
28 Options VERSION FOR THE DELIVERY OF CAFÉ COOL Check the drinking water quality prior to the delivery of café cool. Observe the rules and regulations of the country where the dispenser is installed. Rinse the dispenser once to clear water from the dispenser's pipes prior to delivering café cool - especially when the dispenser has not been used for a longer period of time (e.g. over night or during the weekend). Place a container (capacity 200 ml) underneath the right outlet. (fig. 40) To carry out rinsing simultaneously actuate the buttons () and (2) on the service panel. (fig. 4) Each actuation of the buttons produces one portioned delivery (50 ml). Remarks on the delivery of café cool: For the delivery of café cool the dispenser must have been changed over by a Service Technician. The concentrate (flexi pack) for café cool must be inserted on the right side. It is also possible to deliver "iced cappuccino" or "iced choco". Ask the service technician for the required dispenser configuration
29 CLEANING AND MAINTENANCE GENERAL INSTRUCTIONS Before starting to clean the dispenser, switch off the ON/OFF button. Observe the instructions for cleaning on the dispenser. All works listed in the schedule below must be carried out at the given intervals because otherwise the guarantee will be null and void. Before starting to clean the dispenser, read the corresponding sections in these operating instructions so that you can carry out the works properly. When cleaning the dispenser, keep in mind that there is the danger of being injured by sharp edges. Never plunge the dispenser into water or clean it under running water. Simply clean it with a wet cloth. Use a cleaning agent approved by the food industry and recommended by your Cafitesse supplier only. Observe safety instructions and instructions for use on the pack of the cleaning agent. Do not use any scouring agents for cleaning. Cleaning and maintenance To clean the box and the combi-trough only use a food approved cleaning agent. We recommend to have a large bucket/container ready when cleaning the cup carrier, the brew basket and the drip tray. Make sure that all components are installed correctly after cleaning. When replacing the flexi pack pay particular attention to the instructions on the packing of coffee, tea, milk, and cocoa containing beverages. MAINTENANCE SCHEDULE Interval Type of work Daily cleaning Replace the box and combi-trough * after finishing beverage delivery Clean the kit high volume (option) Clean the cup carrier Clean the drip grid and the drip tray Carry out rinsing operation At least weekly after finishing beverage delivery (depending on how dirty, more often) Clean the cooling compartment Clean the brew basket Clean the housing * The box and combi-trough are available as an exchange kit and can be cleaned in a dish washer. It is not safe to put the other parts in a dish washer
30 empty low temperature empty Cleaning and Maintenance 2. kaffee stop tee kaffee tee kaffee heißes wasser tee 42 t hé DAILY CLEANING COMBI-TROUGH (MODEL WITHOUT MIXING UNIT) Once every day the message 'clean' will appear on the display. The ON/OFF LED () flashes. After another 4 hours delivery is blocked. The ON/OFF LED and the 'empty' LEDs start flashing (fig. 42). The message 'clean' appears 4 hours before the programmmed rinsing time. Open the cooling compartment (fig. 43) Switch off the dispenser with the ON/ OFF button (2). (fig. 42) Follow the cleaning sequence described here. Remove the brew basket. Press the push buttons to the right and left of the brew basket together. Then the brew basket can be removed from below. (fig. 44) It is recommended, to have a combi-trough readily available that has already been cleaned in a dishwasher, so that the combitrough has simply to be replaced
31 Cleaning and Maintenance DAILY CLEANING COMBI-TROUGH (MODEL WITHOUT MIXING UNIT) The combi-trough () is held by magnets. (fig. 45) When cleaning the combi-trough do not bring into close contact with magnetic cards or credit cards as this can invalidate them. When the combi-trough has been removed, cleaned and reinserted the display will show 'Flush'. The ON/OFF LED () and the 'empty LEDs start flashing. (fig. 46) For hygienic reasons clean the combi-trough at 60 C in the dishwasher. Make sure that the diaphragm (2) is not damaged during cleaning (fig. 47). Carefully remove the combi-trough (). (fig. 45) *) Use a cleaning agent approved by the food industry and recommended by your Cafitesse supplier only. Observe safety instructions and instructions for use on the pack of the cleaning agent If no dishwasher is available: Soak the combi trough for 5 minutes in warm water with cleaning agent* ), rinse it with warm water and dry with a paper towel. 29
32 Cleaning and Maintenance A with mixing unit 4 2 B 3 with 2 mixing units COMBI-TROUGH (MODEL WITH MIXING UNIT) The combi-trough () is held by magnets. (fig. 48A) When cleaning the combi-trough () do not bring into close contact with magnetic cards or credit cards as this can invalidate them. (fig. 48A) Carefully pull the lever (3) downwards. (fig. 49) Carefully remove the combi-trough (). (fig. 48A) When the combi-trough has been removed, cleaned and reinserted the display will show 'Flush'. The ON/OFF LED (2) and the 'empty LEDs start flashing. (fig. 48B) For hygienic reasons clean the combi-trough and the delivery spouts at 60 C in the dishwasher. Make sure that the diaphragm (4) is not damaged during cleaning. (fig. 50) It is recommended, to have a combi-trough readily available that has already been cleaned in a dishwasher, so that the combitrough has simply to be replaced
33 Cleaning and Maintenance TROUGH BOX It is recommended, to have a trough box readily available that has already been cleaned in a dishwasher, so that the trough box has simply to be replaced. Rotate the sash fastener () to the side. (fig. 5) Remove the box (2) by carefully pulling it downwards out of the motor housing. (fig. 5) Do not insert the box at an angle as the hooks (3) could be broken off. (fig. 5) For hygienic reasons clean the trough box at 60 C in the dishwasher. Make especially sure that the troughs are thoroughly cleaned when delivering cocoa containing beverages. If no dishwasher is available: Soak the trough box for 5 minutes in warm water with cleaning agent* ), rinse it with warm water and dry with a paper towel. *) Use a cleaning agent approved by the food industry and recommended by your Cafitesse supplier only. Observe safety instructions and instructions for use on the pack of the cleaning agent
34 Cleaning and Maintenance MOUNTING THE COMBI-TROUGH AND TROUGH BOX Mount the parts in the following order:. Insert the trough box (4). (fig. 53) 2. Correctly close the sash fastener (5). (fig. 54) 3. Install the combi-trough (2) with the diaphragm and the outlet pipes from below into the trough box (if a mixing unit is installed, pull the lever (3) up) (fig. 52, 53). Make sure when mounting that - the trough box is correctly notched into the motor housing - the combi-trough is correctly attached to the magnets - the lever is correctly notched in - the brew basket is correctly inserted When the combi-trough has not been installed correctly an error message appears (ERR 23). The dispenser then switches itself off
35 Cleaning and maintenance thé thé thé café café stop heißes wasser thé thé café café stop heißes wasser thé thé café café stop heißes wasser thé thé café café café CUP CARRIER Remove the drip grid () of the cup carrier. (Fig. 55) Withdraw the cup carrier (2) towards the top. (Fig. 55) Soak the drip grid and the cup carrier for 5 minutes in a container filled with warm water and cleaning agent* ). DRIP GRID Remove the drip grid (). (Fig. 56) Remove the support (2) for the drip grid. (Fig. 56) Soak the drip grid and the support for 5 minutes in a container filled with warm water and cleaning agent* ). DRIP TRAY Pull the drip tray (3) towards the front. (Fig. 57) Soak the drip tray for for 5 minutes in a container filled with warm water and cleaning agent* ). Afterwards rinse the cup carrier, the two drip grids, the support and the drip tray in clear water and dry them with a paper towel. *) Use a cleaning agent approved by the food industry and recommended by your Cafitesse supplier only. Observe safety instructions and instructions for use on the pack of the cleaning agent
36 Cleaning and maintenance kaffee heißes wasser tee RINSING THE DISPENSER Switch on the dispenser. Wait until the dispenser has heated up. Put one vessel (with a capacity of approx. 2 l) underneath both outlets. (fig. 58) The display shows 'Flush' and the ON/ OFF LED (4) and the 'empty' LEDs flash when the dispenser must be rinsed. The rinsing time can be programmed by the service technician. (fig. 59) Delivery is blocked if the rinsing process is not carried out within 4 hours. If the dispenser is rinsed and cleaned 4 hours before the programmed time no message will be displayed. Keep your hands and other parts of the body out of the delivery area. There is an increased risk of being scalded by hot water. Simultaneously actuate the 'Mode' button () and one of the following buttons: button (2): to rinse the left-hand side. (fig. 59) and then button (3): to rinse the right-hand side. (fig. 59) Rinsing is done as a portioned delivery (,5 l). If the stop button is activated during the rinsing process, the rinsing process must be repeated
37 Cleaning and maintenance CLEANING THE KIT HIGH VOLUME (OPTION) Switch off the dispenser with the ON/ OFF button. Remove the brew basket (see fig. 44) and pull the hose out of the left outlet. Push the locking plate () back. (fig. 60) Remove the coupling (2) with the hose (3). (fig. 60) Soak the coupling and the hose for at least 5 minutes in a container with warm water and cleaning agent* ). Then rinse them in clear water and dry them with a paper towel. Then clean the combi-trough and the trough box. Mounting is done in the reverse order. Then execute a rinsing cycle on the left side. (see 'Rinsing the dispenser') During mounting make sure that the coupling (2) and the hose (3) are correctly positioned in the locking plate (). (fig. 60) *) Use a cleaning agent approved by the food industry and recommended by your Cafitesse supplier only. Observe safety instructions and instructions for use on the pack of the cleaning agent
38 Cleaning and Maintenance CLEANING THE WATER TANK (OPTION) The water tank must never be subjected directly to sunlight. The kit water tank must only be applied as a temporary and not as a permanent installation. The water tank must be filled with new drinking water every day. The pumps in the tank must always be covered with water. Switch off the device by means of the main switch. Unscrew the closure of the water tank. (Fig. 6) Remove the pump unit (). (Fig. 62) Clean the pump unit by means of a soft brush and rinse it several times. Empty the water tank, rinse it twice with hot drinking water and fill it with drinking water. (9 l) Fill the tank with cold drinking water only (max. 30 C). Observe local regulations regarding the drinking water quality. Insert the pump unit into the water tank and close it with the closure. Make sure that the hoses are not bent. Switch on the device and check the correct functioning
39 Cleaning and maintenance kaffee heißes wasser tee ,5 l warm water + cleaning agent 66 WEEKLY CLEANING COOLING COMPARTMENT The combi-trough, the trough box and the brew basket must be mounted. Open the cover for the cooling compartment (). (fig. 64) Switch the dispenser off with the ON/OFF-button (2). (fig. 64) Remove the flexipacks. Place a container (each containing approx. 2 l) under both the outlets. (fig. 65) Fill 0.5 l of warm water containing cleaning agent* ) into a measuring jug then pour it slowly into the cooling compartment. (fig. 66) *) Use a cleaning agent approved by the food industry and recommended by your Cafitesse supplier only. Observe safety instructions and instructions for use on the pack of the cleaning agent
40 empty low temperature empty Cleaning and Maintenance A. kaffee stop tee 0,5 l warm water 67 2 B. 68 kaffee kaffee heißes wasser tee tee 69 Fill the measuring jug with warm water. Slowly pour the water into the cooling compartment. (fig. 67) Empty the 2l containers. Dry the cooling compartment with a paper towel. Reinsert the flexi packs. 'Code 8' is shown on the display when warm water and cleaning agent is poured into the cooling compartment. (fig. 68 A) If the cooling compartment has not been cleaned for more than 80 h 'sanit' appears in the display. The ON/OFF LED (2) flashes. After another 4 hours delivery is blocked. The ON/OFF LED (2) and the 'empty' LEDs start flashing. (fig. 68 B) The complete cleaning process must be carried out. BREW BASKET Remove the brew basket. Press the push buttons on the left and right of the brew basket together. Then the brew basket can be removed from below. (fig. 69) Soak the brew basket in a container holding warm water and cleaning agent* ) for at least 5 min. Afterwards rinse with clear water and dry with a paper towel. Subsequently carry out the daily cleaning. *) Use a cleaning agent approved by the food industry and recommended by your Cafitesse supplier only. Observe safety instructions and instructions for use on the pack of the cleaning agent
41 Trouble shooting TROUBLE SHOOTING Clearing simple faults Normally, the troubles listed below can be cleared by the operators of the dispensers themselves. Thus our service technicians will be brought into action only when it is necessary. You should call a Service Technician when the fault numbers 2, 3, 4, 6, 7, 9, 0,, 2, 3, 4, 6, 7, 8, 20, 22, 30, 3, 32, 33, 34 or 35 are displayed. With error numbers 6 and 7 the cooling sytem is inoperative. Remove the flexi packs from the dispenser and store them in a refrigerator. If ERR 22 is shown in the display, leakage problems may be the reason. Danger of slipping because of drained water! Close the water cock and call a Service Technician
42 Trouble shooting FAULT/DISPLAY Dispenser does not work a) no deliveries/no indications b) no deliveries/indications c) no beverage delivery when connected to a payment system Only delivery of water No deliveries "Empty" indicator lights up ERR5 is displayed on the service panel Code 8 is displayed on the service panel CAUSE - Power supply interrupted (power supply plug, fuse, fault current safety switch). - Dispenser not switched on (ON/OFF button). - Key switch not in neutral position. - Not enough credit on the card or too little money inserted. - Payment system is defective - Flexipack inserted improperly. - Dosing tube positioned improperly in the slotted hole of the pack. - Flexipack empty. - Not enough water in the boiler or water level reached too late. - The cooling compartment is just being cleaned. - Temperature too high because flexipack has not been stored in a refrigerator. - Cooling compartment cover not closed. - Dispenser installed too near to the wall. - Air channel, blower or air filter dirty / defective. REMEDY - Check the power supply plug, fuse or fault current safety switch. - Press the ON/OFF button. - Turn the key switch to the neutral position. - Increase credit on card or insert enough money. - Inform service technician. - Insert the flexipack properly or replace it. - Position the dosing tube properly. - Replace the flexipack, switch the dispenser off and on if necessary. - Check whether the water cock is completely open. Pull out the power supply plug and plug it in once again after approx. 2-3 sec. Call a Service Technician if the fault could not be cleared. - The dispenser is ready for operation when the cleaning process is completed and the correct cooling compartment temperature has been reached. - Wait until the temperature has been reached, then the fault will be cleared automatically. - Close the cooling compartment cover. - Check the distance to the wall (min. 50 mm). Check whether the air supply is sufficient. - Call a Service Technician
43 Trouble shooting FAULT/DISPLAY Display shows 'clean' (the ON/OFF LED and the 'empty' LEDs are flashing) Display shows 'sanit' (the ON/OFF LED and the 'empty' LEDs are flashing). Delivery is blocked Display shows 'Flush' (the ON/OFF LED and the 'empty' LEDs are flashing) Display shows 'bloc' ERR5 is displayed on the service panel ERR9 is displayed on the service panel ERR2 is displayed on the service panel ERR23 is displayed on the service panel CAUSE - The combi-trough has not been cleaned - The cooling compartment has not been cleaned for more than 84 hours - 'clean' has been displayed and the combitrough has been removed - The beverage delivery has been blocked - Diaphragm sluggish - Sluggish left mixer - Sluggish right mixer - Combi-trough has not been mounted correctly REMEDY - Remove the combi-trough, carry out the cleaning process and rinse the dispenser - Clean the cooling compartment - Clean the combi-trough and the trough box, then rinse the dispenser (if the dispenser is not cleaned within 4 hours the delivery is blocked) - Change the programming by means of the service panel - Clean combi-trough (see chapter 'Maintenance'). If the malfunction cannot be cleared call a Service Technician. - Carry out the rinsing operation on the left hand side (see chapter 'Maintenance'). If the malfunction cannot be cleared call a Service Technician. - Carry out the rinsing operation on the right hand side (see chapter 'Maintenance'). If the malfunction cannot be cleared call a Service Technician. - Mount combi-trough correctly. If the malfunction cannot be cleared call a Service Technician. 4
OPERATING INSTRUCTIONS CAFITESSE 300
 COFFEE CAUTION: HOT LIQUIDS / PRECAUCION! LIQUIDO CALIENTE Release handle when cup is 3/4 full / Deje de actuar el mango cuando la taza está llenada por 3/4 OPERATING INSTRUCTIONS CAFITESSE 300 B-2226
OPERATING INSTRUCTIONS. Cafitesse
 OPERATING INSTRUCTIONS Cafitesse 2000 75508300 02.2004 Contents CONTENTS Introduction... 4 Safety Instructions... 5 Technical Data... 6 Vending Machine Components... 8 Machine front... 8 Operating panel...
Operating instructions
 Operating instructions for Winterhalter Gastronom dishwasher GS 502 and GS 515 Contents Page 1 Intended use... 1 2 Installation and commissioning... 1 3 Safety instructions... 2 4 Operating panel... 3
Cafitesse Excellence Compact
 Cafitesse Excellence Compact USER MANUAL ENGLISH (US) Cafitesse Excellence Compact Operator Manual Safety 2 Part overview description 4 Technical data 6 Machine start up & storage 7 Hygiene and pack handling
Hot Chocolate Dispenser
 Hot Chocolate Dispenser Instruction manual Model: CN219-A AU Telephone Helpline: 1300225960 Safety Tips Position on a flat, stable surface. A service agent/qualified technician should carry out installation
HX-30/40 and HX-30/40 S Glass and Dishwashers
 HX-30/40 and HX-30/40 S Glass and Dishwashers INSTALLATION OPERATION VERSION 18/01/00 2 Installation and Operation Instructions for Model HX-30/40 and HX-30/40 S (with built-in softener) Content Page 1
Manual. Above-counter dispenser for hot drinks OTHG /12
 Manual Above-counter dispenser for hot drinks OTHG 105 1 It is in your own interests to observe all the hazard and safety information. This helps you to prevent accidents and technical malfunctions. Only
Instruction Manual. Model S05 / CAPO
 Instruction Manual Model S05 / CAPO Table of contents 1 2 3 4 5 6 7 8 9 10 11 12 Introduction Intended use... 25 Follow the instructions - Symbols... 25 Your Map Coffee contact... 25 Safety warnings...
FLAVIA CREATION C500 User Guide
 FLAVIA CREATION C500 User Guide www.marsdrinks.com CONTENTS Page Safety & Installation Guidelines... 1-2 Brewer Layout... 3 Setting up your Brewer... 4-5 Selecting Cups to Use... 6 The FLAVIA CREATION
Virtu 40 series. Coffee machine
 Virtu 40 series Coffee machine Users manual Model: Virtu 40 Machine type: 9FEC Revision B, English Reference: 5DUFEK20 Your supplier is: The manufacturer of the machine is: De Jong Duke Postbus 190 3360
Glass and Dishwashers AMX / AUX Series
 Glass and Dishwashers AMX / AUX Series INSTALLATION OPERATION VERSION 24.02.04 Important Notes Use in Accordance with Regulations This machine is exclusively to be used to wash ware such as plates, cups,
How to Use and Care for Your Sleek
 How to Use and Care for Your Sleek Table of Contents Get to know the important buttons, lights and key parts.. 3 This part should be read carefully: it s about safety!...4 First time using The Sleek? Follow
Installation and Setup
 NFORMATION NO: 007 Self Fill Lavazza Colibri with changegiver Congratulations on choosing to drink great coffee using the unique Lavazza pod vending system. The machine is easy to use. Follow the simple
Cafitesse Compact Excellence USER MANUAL ENGLISH HENRI
 Cafitesse Compact Excellence USER MANUAL ENGLISH HENRI Cafitesse Excellence Compact Operator Manual Safety 2 Part overview description 4 Technical data 6 Machine start up & storage 7 Hygiene and pack handling
Coffee Machine Zia series
 Coffee Machine CoEx Brewer - Freshbrew EN Picture: Filename: Zia-6000_9CND_UserManual_5DUCNP20a_EN_v01-02.docx Disclaimer Manufacturer: Although this user manual has been put together with the utmost care,
Glass and Dishwashers AMX / AUX Series
 Glass and Dishwashers AMX / AUX Series INSTALLATION OPERATION REV. 8.xx 04.07.2005 Installation and Operation Instructions for Models of AMX / AUX Series Content Page 1 Installation... 3 2 Connections...
SERVICE MANUAL. Ecoboiler Model range: T20 ( ) T30 ( )
 T30 ( )") SERVICE MANUAL Ecoboiler Model range: T20 (1000662) T30 (1000663) Marco Beverage Systems Ltd. 63d Heather Road, Sandyford Industrial Estate, Dublin 18, Republic of Ireland Ireland Tel: (01) 295 2674 Ireland
SERVICE MANUAL Ecoboiler Model range: T20 (1000662) T30 (1000663) Marco Beverage Systems Ltd. 63d Heather Road, Sandyford Industrial Estate, Dublin 18, Republic of Ireland Ireland Tel: (01) 295 2674 Ireland
Coffee Machine Siro Touch 600 series
 Coffee Machine Siro Touch 600 series CoEx brewer - Freshbrew Picture: Filename: SiroTouch-600_9CND_UserManual_5DUCNH20b_EN_v01-01.docx Disclaimer Manufacturer: Although this user manual has been put together
Coffee Machine Zia series
 Coffee Machine CoEx Brewer - Bean to Cup User Manual User Manual EN Picture: Zia 8.000 Serie Filename: Zia-8000_9CND_UserManual_5DUCNP20b_EN_v01-01.docx Disclaimer Manufacturer: Although this user manual
Model S06HS Imported by Maranatha Pty Limited Unit 33 / 9 Hoyle Avenue, Castle Hill, N.S.W. 2154
 Model S06HS Imported by Maranatha Pty Limited Unit 33 / 9 Hoyle Avenue, Castle Hill, N.S.W. 2154 Phone: 02 9846 0307 E-Mail: info@maranathaimport.com.au Web Site Contact: www.caffitalysystem.com.au Coffee
Ecoboiler T20 & T30 SERVICE MANUAL. Marco Beverage Systems Ltd. 63d Heather Road, Sandyford Industrial Estate, Dublin 18, Republic of Ireland
 Ecoboiler T20 & T30 SERVICE MANUAL Marco Beverage Systems Ltd. 63d Heather Road, Sandyford Industrial Estate, Dublin 18, Republic of Ireland Ireland Tel: (01) 295 2674 Ireland Fax: (01) 295 3715 UK Tel:
C90 Instruction Manual
 C90 Instruction Manual Please read this Instruction Manual and the safety instructions on pages 1 and 2 before operating the appliance! IMPORTANT SAFEGUARDS When using electrical appliances, basic safety
Cafissimo Compact. Model S04. Brought to you by. Manuale di istruzioni Instruction book Mode d'emploi Bedienungsanleitung
 Manuale di istruzioni Instruction book Mode d'emploi Bedienungsanleitung Cafissimo Compact Brought to you by Italiano English Français Deutsch Model S04 Table of contents 1 2 3 4 5 6 7 8 9 10 11 Introduction
3. To protect against electric shock, do not immerse cord, plugs, or machine in water or other liquid.
 1 IMPORTANT SAFEGUARDS When using electrical appliances, basic safety precautions should always be followed to reduce the risk of fire, electric shock, and/or injury to persons, including the following:
Virtu 60 and 80 series. Coffee machine
 Virtu 60 and 80 series Coffee machine Users manual Model: Virtu 60 and 80 Machine type: 9CND Revision B, English Reference: 5DUCNK20 Your supplier is: The manufacturer of the machine is: De Jong Duke Postbus
Rack conveyor dishwashing machine STR. Operating instructions
 Rack conveyor dishwashing machine STR Operating instructions Operating Instructions for Winterhalter STR Rack Conveyor Dishwashing Machine (translation of the original German operating instructions) Table
QUICK REFERENCE GUIDE FOR OPERATION AND MAINTENANCE
 EQUIPMENT SETUP GUIDE Read and follow the BUNN ULTRA Installation & Operating Guide included with your kit. This Equipment Setup Guide is not intended to replace any manufacturer s process or procedure.
Coffee Machine Zia series
 Coffee Machine Uni brewer - Filterfresh User Manual User Manual EN Picture: Filename: Zia-2000_9FND_UserManual_5DUFNP20a_EN_v01-01.docx Disclaimer Manufacturer: Although this user manual has been put together
CQUBE EVO OPERATION MANUAL EVO_OM_VKI_EN. Part No.: _06
 EVO_OM_VKI_EN Part No.: 1764212_06 CQUBE EVO OPERATION MANUAL CONTENTS GENERAL INFORMATION...3 Introduction... 3 Warnings... 3 Precautions... 4 Intended use... 4 Hazard intensity levels... 4 Facts & weight...
Operating principle. Quinto
 Operating principle Quinto All rights reserved. No part of this document may be copied and/or published by means of printing, photocopying, microfilming or by any other means whatsoever without the prior
Operating Instructions
 ZLQ WHU K OWHU Operating Instructions Winterhalter Gastronom Glasswasher GS 24 Summary 1. Application 2. Installation and initial start-up 3. Safety instructions for the operator 4. General information
MOD. 605 E. Made in Italy INSTRUCTION MANUAL
 MOD. 605 E Made in Italy INSTRUCTION MANUAL General information Caution. The manufacturer accepts no liability for damage caused by: Use which is improper or which does not conform to that which is intended;
Glass and Dishwashers 402/452/502. (original instructions) (incl. Australian /502) Starting from Serial No.:
 (incl. Australian /502) Starting from Serial No.:") Glass and Dishwashers ECOMAX 402/452/502 (incl. Australian 452-90/502) INSTALLATION AND OPERATION INSTRUCTIONS (original instructions) Starting from Serial No.: 8663 4000 REV. 05.10.2015 EN IMPORTANT NOTES
Glass and Dishwashers ECOMAX 402/452/502 (incl. Australian 452-90/502) INSTALLATION AND OPERATION INSTRUCTIONS (original instructions) Starting from Serial No.: 8663 4000 REV. 05.10.2015 EN IMPORTANT NOTES
11/2012. Mod: D281/EKA-NP. Production code:
 11/2012 Mod: D281/EKA-NP Production code: 916658 INSTRUCTION MANUAL FOR DISHWASHERS UK CONTENTS CHAP 1 PREFACE... 2 CHAP 2 INSTALLATION... 2 2.1 UNPACKING... 2 2.2 POSITIONING... 3 2.3 ELECTRICAL CONNECTION...
Operating principle. Bolero XL (2008)
") Operating principle Bolero XL (2008) All rights reserved. No part of this document may be copied and/or published by means of printing, photocopying, microfilming or by any other means whatsoever without
Operating principle Bolero XL (2008) All rights reserved. No part of this document may be copied and/or published by means of printing, photocopying, microfilming or by any other means whatsoever without
Coffee wakes up the world. Betriebsanleitung User Manual. Filter Kaffeemaschine Filter coffee machine. Deutsch English 150 F
 Coffee wakes up the world Betriebsanleitung User Manual Filter Kaffeemaschine Filter coffee machine 150 F Deutsch English 00.00.000 Typenreihe/Model Series 6415 Bestell-Nr./Order number 33 4040 0000 Ausgabe/Edition
The Classeq under counter range
 Installation & Operators Manual The under counter range Part number 902.0011 Revision C Effective date January 2010 Language English Glasswashers Eco 1 Eco 2 Eco 3 Duo 2 Duo 3 Dishwasher Hydro 500 Hydro
Carmen. Operating Instructions. 1
 Carmen Operating Instructions Streamline Supplies 9 Joseph Baldwin Place, Shepparton Victoria Ph: Fax: www.streamlinesupplies.com.au Introduction Please read this technical handbook carefully since it
Autofill counter top water boiler
 Autofill counter top water boiler Please read and keep these instructions For Burco counter top water boilers 76500 (SKU 444448531) and 76502 (SKU 444448533) Getting the best from your water boiler Remove
Betriebsanleitung Operating instructions Manuel d utilisation GS 402
 Betriebsanleitung Operating instructions Manuel d utilisation GS 402 Winterhalter Gastronom GmbH Tettnanger Straße 72 D-88074 Meckenbeuren Telefon 07542/402-0 Telefax 07542/402-199 www.winterhalter.de
Glass and Dishwashers. BarAid 500/800. Installation and. Starting from Serial No.:
 Glass and Dishwashers BarAid 500/800 Installation and operation Instructions Starting from Serial No.: 8652 0001 REV. 19.01.2009 1617-A-01-09 Content Page 1 Important Notes... 4 2 Installation... 5 2.1
User Manual WMF Cup&Cool WMF Cup
 coffee wakes up the world User Manual WMF Cup&Cool WMF Cup Add-on Equipment English bistro! 2000S presto! 1400 prestolino! 1300 Model Series 9018 / 9019 Order Nr. 33 0916 1000 Edition 04.2010 General Information
FAVORIT 34502VI0. EN User manual
 FAVORIT 34502VI0 EN User manual 2 www.aeg.com CONTENTS 1. SAFETY INSTRUCTIONS...................................................... 3 2. PRODUCT DESCRIPTION.....................................................
All spares available from. System-Matic Ltd
 All spares available from System-Matic Ltd 0844 272 0556 Copyright Notice: All rights reserved. No parts of this manual may be reproduced in any form without express written permission of Maidaid-Halcyon
AQUARIUS 45 MARINE SERVICE MANUAL
 AQUARIUS 45 MARINE SERVICE MANUAL CONTENTS: PAGE 1. INTRODUCTION 3 2. SAFETY INSTRUCTIONS 4 3. BASIC INSTRUCTIONS 5 3.1. Installation Details 5 3.2. Operating the Boiler for the First Time 6 3.3. Troubleshooting
RC411 Operator Manual
 RC411 Operator Manual Page 1 of 14 FOREWORD 1. Read the instructions contained in the enclosed booklet carefully, because it contains important information on installation, operation and maintenance safety.
Operating Instructions. Accessory Units Melitta Cafina XT Series. Melitta Professional Coffee Solutions
 Operating Instructions Accessory Units Melitta Cafina XT Series Melitta Professional Coffee Solutions Contents General... 4. Manufacturer information... 4.2 About these instructions... 4.3 Explanation
3. Before switching the equipment on, make sure that the model plate data conforms to that of the electrical and water distribution network.
 Manuale di istruzione per lavastoviglie Notice d utilisation pour lave-vaisselle Gebrauchsanweisung für Geschirrspüler Instruction manual for dishwashers Manual de instrucciones para lavavajillas LF315
Coffee Machine Siro Touch 1200 series
 Coffee Machine Siro Touch 1200 series Uni brewer - Bean to Filter Picture: Filename: SiroTouch-1200_9FND_UserManual_5DUFNH20b_EN_v01-02.docx Disclaimer Manufacturer: Although this user manual has been
Coffee Machine Siro Touch 1400 series
 Coffee Machine Siro Touch 1400 series Uni brewer Bean to Filter Picture: Filename: SiroTouch-1400_9FEC_UserManual_5DUFEH20b_EN_v01-01.docx Disclaimer Manufacturer: Although this user manual has been put
Slim Line Service Manual
 Slim Line Service Manual SLIM LINE Juice Machine Din återförsäljare / Your retail dealer S / EN...... Rev. 090914 List Of Contents Index Main Index List of contents page 2 General description page 3 Dispenser
AUTOMATIC MODULAR ICE-CUBE MAKER WITH VERTICAL EVAPORATOR SYSTEM
 AUTOMATIC MODULAR ICE-CUBE MAKER WITH VERTICAL EVAPORATOR SYSTEM INSTRUCTIONS AND WARNINGS 24481 ed. 11-2007 It is strictly forbidden to reproduce this instruction manual or any part thereof. Dear
Refrigerator KE T
 Refrigerator KE 680-1-3T Service Manual: H8-74-07 Responsible: U. Laarmann KÜPPERSBUSCH HAUSGERÄTE AG E-mail: uwe.laarmann@kueppersbusch.de Tel.: (0209) 401-732 Customer Service Fax: (0209) 401-743 Postfach
CAFFÈ LATTE. Coffee experience engineered in Switzerland
 CAFFÈ LATTE Coffee experience engineered in Switzerland EN Various 2 3 For your safety First read this entire operating manual, and keep it in a safe place for other users To avoid damage, only use genuine
Service Manual - Series 450/451 IG IGV IG IGV IG IG IG IGV IG
 Service Manual - Series 450/451 IG 448... IGV 449... IG 458... IGV 459... IG 459... IG 4408.0 IG 4406.0 IGV 4408.0 IG 4408.1 Service Manual: H7-71-04 Responsible: Dieter Rutz KÜPPERSBUSCH HAUSGERÄTE AG
User manual. Dishwasher ZDT12041FA
 EN User manual Dishwasher ZDT12041FA Contents Safety instructions 2 Control panel 3 Programmes _ 4 Options _ 4 Before first use _ 5 Daily use _ 7 Hints and tips 9 Care and cleaning 9 Troubleshooting 10
Promesso User manual. Version April 2016
 Promesso User manual Version 1.22 - April 2016 1 Introduction The Promesso is a two bag-in-box (bib) hot/cold beverage dispenser designed to serve premium coffee and milk based drinks (like cappuccino,
Service manual NORDIC. Juice machine S / EN. Rev Din återförsäljare / Your retail dealer
 Service manual NORDIC Juice machine Din återförsäljare / Your retail dealer S / EN...... Rev. 090915 Dispenser Dispenser description for Nordic Nordic is a dispenser for cooling water and mixing juice-
- 1 - Updated on 18 March, 2010
 - 1 - Updated on 18 March, 2010 TABLE OF CONTENTS 1. SPECIFICATION & PARTS IDENTIFICATION...3 2. OPERATION & FUNCTION OF PARTS...4, 5 A. Cooling Operation B. Heating Operation C. Function of Parts 3. LOCATION
INDEX. Granita Machine. Operation a nd Instruction Manual
 INDEX Index 2 Unpacking 3 Positioning the machine 3 Familiarizing yourself with the Controls 4 Cleaning and Sanitizing instructions 5 Part ONE. Disassembly and Cleaning of Dispenser 5 Part TWO. Re-assemble
EcoSmart boiler SERVICE MANUAL
 EcoSmart boiler SERVICE MANUAL Marco Beverage Systems Ltd. 63d Heather Road, Sandyford Industrial Estate, Dublin 18, Republic of Ireland Ireland Tel: (01) 295 2674 Ireland Fax: (01) 295 3715 UK Tel: (0207)
User Manual. Dishwasher ZDM17301SA ZDM17301WA
 EN User Manual Dishwasher ZDM17301SA ZDM17301WA Contents Safety information 2 Safety instructions 3 Product description 4 Control panel 5 Programmes 6 Daily Use 7 Hints and tips 10 Care and cleaning 11
USER S MANUAL. Bottom-Load Water Cooler MODEL NO. CLBL420
 R USER S MANUAL Bottom-Load Water Cooler MODEL NO. CLBL420 Thank you for purchasing a Lago water cooler. Please read this user s manual thoroughly for using the water coolers safely and appropriately.
MILK FROTHER INSTRUCTIONS FOR USE
 MILK FROTHER MODEL: HM250A INSTRUCTIONS FOR USE SAFETY WARNINGS - After removing the packaging, check that the appliance is intact. If in doubt do not use the appliance and contact your sales agent. -
4L Instant Water Boiler Instructions for Use
 Power Details: 220-240Va.c. 50Hz-60Hz 2200-2600W Capacity: 4.0L Accessories: 2 Water aid trays Water Filters are not included and can be purchased separately Item Code 10747 IMPORTANT NOTES FOR YOUR INSTANT
D100 Instruction Manual
 D100 Instruction Manual Please read this Instruction Manual and the safety instructions before operating the appliance! Coffee button Lever Coffee outlet Coffee button Capsule container for 12-14 capsules**
WATER BOILER METOS MARINE WKI MG MW,
 WATER BOILER METOS MARINE WKI MG4164349MW, 4164349, 4164354, 4164356 User manual WKI10n 27.10.2015 27.10.2015 Water boiler Metos Marine WKI M L K J A B I C H G F D E fig. 1 / Abb. 1 2 Water boiler Metos
DAILY REFERENCE GUIDE PRODUCT DESCRIPTION APPLIANCE CONTROL PANEL. Before using the appliance carefully read Health and Safety guide.
 DAILY REFERENCE GUIDE EN THANK YOU FOR BUYING A HOTPOINT PRODUCT. In order to receive a more complete assistance, please register your appliance on: www.hotpoint.eu/register You can download the Safety
User and Installation Instructions. Wall Mounted Water Boiler WMB3F/B and WMB3F/W IS435 ECN3461
 User and Installation Instructions Wall Mounted Water Boiler WMB3F/B and WMB3F/W IS435 ECN3461 Dear Customer Thank you for purchasing this Lincat product. With correct use and careful maintenance as described
B 353 COFFEE BREWING MACHINES MACHINES A CAFE KAFFEEBRUEHMASCHINEN KOFFIEZETAPPARATEN
 Chiller A B C1 C2 C3 C4 C D E L H G F J M I K N Fig. 1 Principal components and Control organs E=154 W=78 115 572 755 200 35 482 415 245 E/W = 61 Fig. 2 Dimensions Bravilor Bonamat GB Operating instructions
User manual. Dishwasher ZDT15002
 EN User manual Dishwasher ZDT15002 Contents Safety information 2 Product description _ 3 Control panel 4 Programmes 4 Options _ 5 Before first use _ 5 Daily use 7 Care and cleaning 9 Troubleshooting 10
Service Information. WNes 2956 appliance documentation. Service Information no. 27/2004 LHG/TKD-Fe/June SI
 After Sales Service International Service Information Service Information no. 27/2004 LHG/TKD-Fe/June 2004 WNes 2956 appliance documentation Page 1/26 Contents 2.0. Extract from Operating Instructions
51AKS I S O OWNER S MANUAL
 LLOYD'S REGISTER QUALITY ASSURANCE 51AKS I S O 9 00 1 OWNER S MANUAL This manual applies to the following models Stand-alone Split 51AKS 085--- 51AKS 010--- 51AKS 185--- 51AKS 013--- 51AKS 113--- 51AKS
Autofill wall mounted water. boiler. Getting the best from your water. boiler. Please read and keep these instructions
 Autofill wall mounted water boiler Please read and keep these instructions For Burco wall mounted boilers 76700 (SKU 444448534), 76702 (SKU 444448546), & 76704 (SKU444448548) Getting the best from your
This manual was originally written in English. All other languages in this document are a translation of the English source text.
 gebruiksaanwijzing user manual betriebsanleitung mode d emploi Copyright 2012 nimo No part of this document may be reproduced and/or made public in print, microfilm, electronic media or any other form
Contents Safety instructions...3
 Contents Safety instructions...3 Machines Overview...7 Start-up...8 Preparing beverages...9 Programming cup capacity...10 Cleaning the machine every day (after the last time you use it)...11 Optional:
MODULAR AUTOMATIC GRANULAR ICE FLAKER
 MODULAR AUTOMATIC GRANULAR ICE FLAKER INSTRUCTIONS AND WARNINGS 24479 rev. 03 It is strictly forbidden to reproduce this instruction manual or any part thereof. Dear Customer, Congratulations on having
CHH30 Dishwasher. Wiring Diagram. Spare Parts List. Installation / Operation
 CHH30 Dishwasher Installation / Operation Spare Parts List Wiring Diagram jw-06-2006 GB USE AND MAINTENANCE MANUAL Pag. 1 CONTENTS CHAP. 1 INTRODUCTION... 3 CHAP.2 INSTALLATION... 3 2.1 HANDLING AND UNPACKING...
IMPORTANT WARNINGS Therefore, to avoid breaking it, do not turn it manually in order to seek the correct position.
 IMPORTANT WARNINGS Before use check that the voltage power supply corresponds to the one shown on the appliance data plate. Only connect the appliance to electrical sockets which have a minimum load of
Water Distillation System Instruction Manual Nutriteam TC-501
 Water Distillation System Instruction Manual Nutriteam TC-501 Thank you for purchasing the Nutriteam TC-501 Water Distillation System. It will provide your household with freshly made, ultra clean, great
Installation & Operators Manual
 Installation & Operators Manual Eco, Hydro and Duo under counter range Part number 902.0011 Revision A Installation and Operation instructions For Classeq under counter range of glass and dishwashers.
User manual. Dishwasher ZDT15010FA
 EN User manual Dishwasher ZDT15010FA Contents Safety instructions 2 Control panel 3 Programmes _ 4 Options _ 5 Before first use _ 6 Daily use _ 7 Hints and tips 9 Care and cleaning _ 10 Troubleshooting
FAVORIT34502VIO. EN User Manual
 FAVORIT34502VIO EN User Manual 2 www.aeg.com CONTENTS 1. SAFETY INFORMATION...3 2. SAFETY INSTRUCTIONS... 4 3. PRODUCT DESCRIPTION... 6 4. CONTROL PANEL...6 5. PROGRAMMES... 7 6. SETTINGS... 8 7. BEFORE
AUTOMATIC MODULAR ICE-CUBE MAKER
 AUTOMATIC MODULAR ICE-CUBE MAKER INSTRUCTIONS AND WARNINGS 24851 ed. 06-2012 It is strictly forbidden to reproduce this instruction manual or any part thereof. Dear Customer, Congratulations on having
Operating and installation instructions
 Operating and installation instructions Plate warming drawer EGW 3060-10 To avoid the risk of accidents or en-gb damage to the appliance it is essential to read these instructions before it is installed
VFCB. Ice Frost 2 and 3 Bowl Post-Mix and 2 Bowl Pre-Mix. Installation, Service, and Operator s Manual
 VFCB Ice Frost 2 and 3 Bowl Post-Mix and 2 Bowl Pre-Mix Installation, Service, and Operator s Manual Release Date: April 19, 2004 Publication Number: M620919596OPR Revision Date: June 14, 2007 Revision:
Water Boilers ME10EN, ME15EN. Table of Contents
 Water Boilers ME10EN, ME15EN Operator Manual Model ME15EN Model ME10EN Safety Information...2 Rough-In Drawing...3 Installation...4 Priming...5 Cleaning...5 Table of Contents Adjustments...6 Maintenance...7
Ecoboiler SERVICE MANUAL. Marco Beverage Systems Ltd. 63d Heather Road, Sandyford Industrial Estate, Dublin 18, Republic of Ireland
 Ecoboiler SERVICE MANUAL Marco Beverage Systems Ltd. 63d Heather Road, Sandyford Industrial Estate, Dublin 18, Republic of Ireland Ireland Tel: (01) 295 2674 Ireland Fax: (01) 295 3715 UK Tel: (0207) 274
FAVORIT VI DISHWASHER USER MANUAL
 FAVORIT 55002 VI DISHWASHER USER MANUAL 2 CONTENTS 4 SAFETY INFORMATION 6 PRODUCT DESCRIPTION 7 CONTROL PANEL 8 PROGRAMMES 9 OPTIONS 10 BEFORE FIRST USE 13 DAILY USE 16 CARE AND CLEANING 17 TROUBLESHOOTING
Slimline Dishwasher Instruction Manual
 Slimline Dishwasher Instruction Manual Model Number: RHSLDW1 Please read these instructions carefully and keep them for future reference For Customer Services, Spare Parts & Manufacturer s Warranty Information,
Servicing manual. Wall-mounted condensing gas boiler 600 Series - 11S / 19S / 24S / 24C /2002 GB(EN) For trade use
 For trade use") GB122 7210 1300-12/2002 GB(EN) For trade use Servicing manual Wall-mounted condensing gas boiler 600 Series - 11S / 19S / 24S / 24C Please read thoroughly before attempting to diagnose fault List of contents
GB122 7210 1300-12/2002 GB(EN) For trade use Servicing manual Wall-mounted condensing gas boiler 600 Series - 11S / 19S / 24S / 24C Please read thoroughly before attempting to diagnose fault List of contents
Servicing manual. 600 Series - 11S / 19S / 24S / 24C. Wall-mounted condensing gas boiler. For trade use
 GB122 Servicing manual Wall-mounted condensing gas boiler 600 Series - 11S / 19S / 24S / 24C For trade use Please read thoroughly before attemting to diagnose fault 7217 4900 (03/2010) GB/IE List of contents
One-Touch Dispense. Multi-temp selections. 208 F For tea, coffee, instant noodle. 194 F Keep warm around 194 F. 176 F Keep warm around 176 F.
 Instruction Manual Automatic Dispensing Hot Water Pot with Multi-temperature Function Automatic Dispensing One-Touch Dispense FEATURES Reboil Function 5 Temperature Settings Image Of SP-5016 208 F For
INDEX 1. GENERAL INFORMATION CLEANING AND MAINTENANCE MACHINE DESCRIPTION SAFETY HANDLING AND STORAGE...
 INDEX 1. GENERAL INFORMATION...3 1.1. Manufacturer...3 1.2. Authorized persons...3 1.3. Layout of the manual...3 1.3.1. Purpose and contents...3 1.3.2. Who must read the manual...3 1.3.3. How to keep the
AUTOMATIC GRANULAR ICE FLAKER
 AUTOMATIC GRANULAR ICE FLAKER INSTRUCTIONS AND WARNINGS 24480 rev. 01 It is strictly forbidden to reproduce this instruction manual or any part thereof. Dear Customer, Congratulations on choosing a
A few simple steps to ensure perfect water, every time.
 A few simple steps to ensure perfect water, every time. Use and Care Guide MODELS: A9CTELECTRICSS A9ELECTRICBLK A9ELECTRICWHT Registration Please visit the website below to register your new water cooler
INSTALLATION AND OPERATION INSTRUCTIONS LC-D SERIES COFFEE CONCENTRATE BREWER WITH DIGITAL ELECTRONIC CONTROL CENTER
 107353 1-00 INSTALLATION AND OPERATION INSTRUCTIONS LC-D SERIES COFFEE CONCENTRATE BREWER WITH DIGITAL ELECTRONIC CONTROL CENTER PLUMBER'S INSTALLATION INSTRUCTIONS CAUTION: Power to brewer must be OFF
Contents. Safety instructions...4. Machines Overview...8. Start-up...9. Preparing beverages Programming cup capacity...11
 2 Safety instructions...4 Contents Machines Overview...8 Start-up...9 Preparing beverages...10 Programming cup capacity...11 Cleaning the machine (daily/monthly)...12 Descaling the machine - monthly...14
4 liter Solo and 8 liter Combi
 4 liter Solo and 8 liter Combi User and installation guide for the water heater 2 ENGLISH The HotSpot boiling water tap With the purchase of the HotSpot boiling water tap you can be sure that you have
SERVICE/INSTALLATION MANUAL ICE ONLY DISPENSERS MODELS-IOD150, IOD200 AND IOD250
 SERVICE/INSTALLATION MANUAL ICE ONLY DISPENSERS MODELS-IOD150, IOD200 AND IOD250 Ice-O-Matic 11100 East 45th Ave Denver, Colorado 80239 Part Number 9081305-01 Date 10/08 Introduction IOD150,IOD200,IOD250