Making the Gattling Gun Condenser Materials: Method: 10.
|
|
|
- Agatha Craig
- 6 years ago
- Views:
Transcription
1 Making the Gattling Gun Condenser This condenser is designed for the Nixon-Stone offset head style still. I wanted it to be removable for cleaning so I made it slip fit into the Nixon-Stone still head. Effective length of cooling pipe is 12 X 350mm = 4200mm. Materials: 1 X 350mm of 50mm copper pipe (water jacket) 12 X 350mm of 6mm copper pipe (condenser core) 2 X 35mm of 6mm pipe (water outlets, could use tubing nipples) 2 X 1.5 mm up to 2.5mm, 60mm X 60mm copper plates (for the end circles, I used a single plate and cut both circles out of it.) Easy Flow Silver Brazing Rods (I used 45% silver) Easy Flow Flux MAPP Gas torch and Gas * No special tools needed, just Sand Paper, Assorted Files, Drill bits and Hack Saw. I made a small wooden bench for the drilling stage (helped to clamp the circles onto it for drilling! I used an angle grinder to cut and make the circle end caps lots of work and a slow job but a labor of love! Clean all joints well with sand paper before you flux. You need them very, very clean. Method: 1. Cut 2 X 50 mm circles to house and locate the tubes and act as the water jacket ends. You could use end caps but I prefer the slip in condenser style so I made the jacket ends recessed into the jacket. This requires patience to get it right. I traced over the 50mm tube onto the copper plate, cut the rough shape of the circle (leaving plenty to take off later as I got it more round. A long time and a lot of care with the angle grinder and you can get a beautiful round shape that will sit in the 50mm pipe when tapped with a rubber hammer. You need it to be a snug fit! The other circular end needs to be slightly smaller to slide down through the 50mm pipe. I made it 49.5 mm diameter to be able to slide through the 50mm tubing when the condenser core was finished. Taking care with the fit at this stage makes a lot of things easier later. 2. Drill out both circular caps to the pattern you can see in the pictures. 12 X 6mm holes are perfect for 2 condenser. 3. Braze the 6mm pipes into the first circle end. 4. Slide the other circular end over the pipes and position it so that when installed in the condenser jacket the circle ends would both be recessed by about 1-2mm. 5. Braze the other circular end to the 6mm pipes. 6. Trim of any excess length from the 6mm pipes with a grinder or hack saw. 7. Drill two holes for the water connectors. I put 1 hole about 50mm from the end so when I slide the condenser into the 50mm connector the water connector is not in the way. The other one (top one) is drilled as close to the end as you want. (about 5-10mm). Important you do this now before brazing in the core as you may damage the core when drilling these holes if it is already installed! 8. Flux both ends well and slide the condenser core into the 50mm pipe. 9. Braze both circular ends to the 50mm pipe. 10. Braze the water connectors to the 50mm pipe. There you have it!
2 Running it. Slip in the condenser into the head. (You will need to have a head that has a joiner for 2 pipe.) It should be a tight fit. Use whatever you can to seal it. I use a dough mix, is easy to clean and does the job well. Because the head slips in around 2 to 2.5 even if not sealed I found very little escapes because it condenses inside the slip fitting anyway and runs down to the collector. Connect the water source to the bottom cooling connector. The water will exit the top. You will find the condenser does not heat up from the half way point and runs much cooler than expected. After a couple of runs I noticed that it seems only the bottom half is being used, judging by the inspection I made of the cooling core tubes with a torch. This seems to run really efficiently, I have noticed that no vapor escapes the top. My cooling water no longer needs to be cooled after return to the reservoir. I use a closed system with a pond pump to preserve water and control the water flow better. My reservoir is a large plastic garbage can. The return water goes through a mini shower fitting to turn it into a fine spray before re-entering the reservoir. This helps cool down the return water by exposing it to more air before entering the reservoir.


3 Photos of the various Stages of making it. The Workbench, you can see the still column in the foreground. You will need MAPP gas torch to get the required heat for the silver brazing rods


4 Don t forget the flux! The Circular Water Jacket End, Drilled with 12 X 6mm holes. You will need 2 of these. One slightly smaller to slide inside the water jacket pipe.


5 The 6mm pipes, brazed in place. I used the 50mm Water Jacket as a stand to help hold the pipes while the brazing was done.
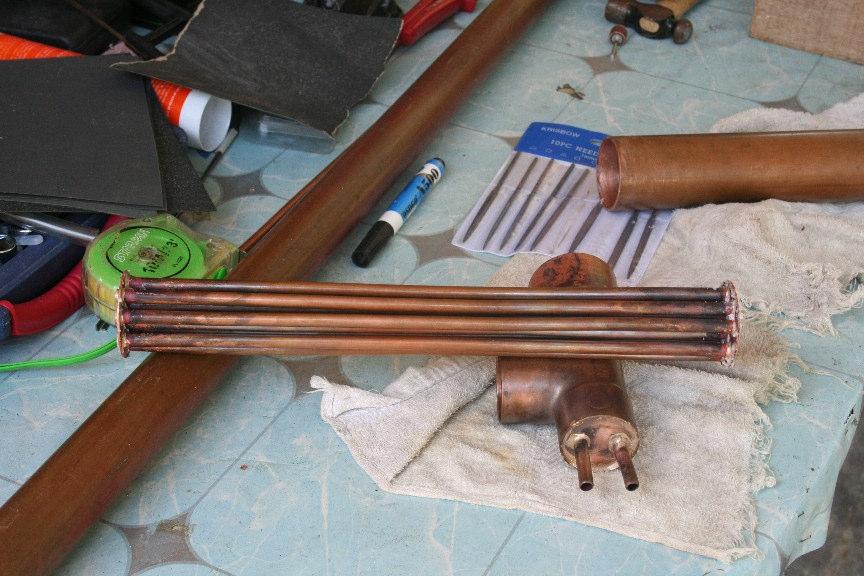
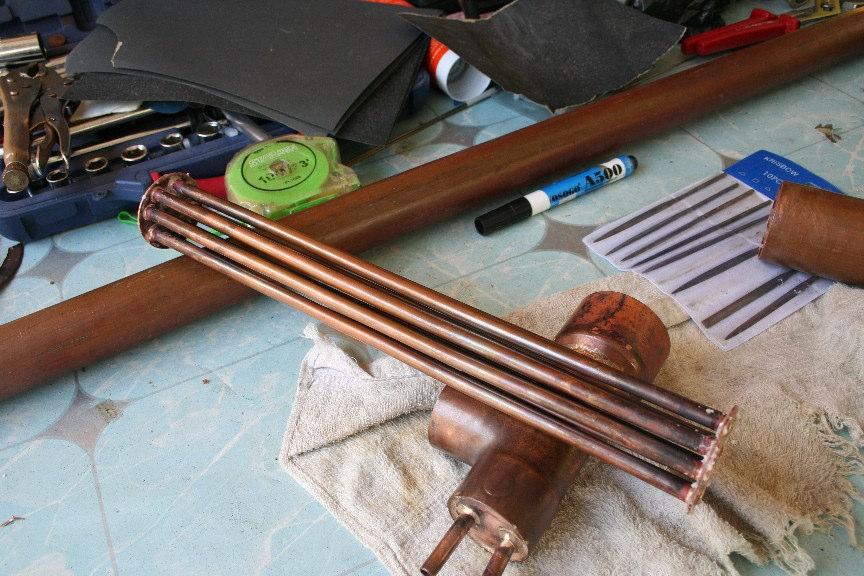
6

 Flux those ends well.")
7 The completed inner core fluxed and ready to be inserted. (Resting on the reflux valve/condenser connecting section and the column pipe.) Flux those ends well. Only 1 go at soldering it into the jacket!


8 Sliding the core inside the jacket Position the cooling line connectors and solder them in


9 Completed condenser with water connectors brazed in, waiting for cleaning.


10 Slipping the condenser into the top of the still head for a test fit You will notice I have used a 2 connector on the condenser receiver so the head slips in with a tight fit.


11 Fitted into place. Perfect! Finished, apart from the cleaning of course! Ahh Time to sit down, have a couple of drinks and behold the thing of beauty we have created!
Smith's Heater Core DIY version
 Smith's Heater Core DIY version Some time ago there was an article in the LRO about how to make a new core for the old round Smith's heaters that involved wrapping a number of loops of 8mm diameter micro
This site is based on a but applies to all 1971-on Saab 99 and Saab 900.
 by Mark Jeter updated: December 8, 2004 originally web-published June 27, 2001 This document shows how the original waterpump in a Saab "B" engine can be eliminated and replaced with a reliable, efficient
Aquapeutics GENERAL INSTALLATION GUIDE. Toll Free Customer Service line 1 (800)
") Aquapeutics GENERAL INSTALLATION GUIDE Toll Free Customer Service line 1 (800) 290-6812 Thank you for choosing an Aquapeutics product. Please read the following guide in its entirety before assembling
Aquapeutics GENERAL INSTALLATION GUIDE Toll Free Customer Service line 1 (800) 290-6812 Thank you for choosing an Aquapeutics product. Please read the following guide in its entirety before assembling
pushing the tube into the rear of the water outlet housing with a slight twisting motion to evenly distribute the adhesive. After cleaning off any ext
 I chose an original FE expansion tank that had the filler neck on the driver's side of the tank but still had the radiator hose outlet facing the passenger side. I figured using such a tank would afford
Fun with the Ventilation System
 Not long after I got my 33, I was foolish and inexperienced in the ways of Alfas. So when I noticed squealing noises from the ventilation fan motor and miserable airflow out of the air vents, I decided
173 Index of Materials
 73 Index of Materials IBC Tank 9 Polystyrene Sheet 2 200 Litter Blue Barrels 0 Plumbers Tape (Teflon) 3 Fish Tank Shading Cable Ties 4 Plastic Net 2 Waterproof Eclectic Box 5 Concrete Blocks 3 0 mm Wide
ZD-985 Desoldering Station
 ZD-985 Desoldering Station 2 Contents Contents... 3 Unpacking and Setting Up Your ZD-985 Desoldering Station... 4 Setting Up the Unit... 5 Auto Tip Saver Function... 8 Tips and Techniques... 8 Alloy Melt
Shay Boiler Nelson Riedel
 Shay Boiler Nelson Riedel Nelson@NelsonsLocomotive.com Initial: 11/13/03 Last Revised: 06/06/2004 Early in the project I decided to contract the boiler fabrication to a professional. This was primarily
plumbing for greywater
 plumbing for greywater october 2015 christina bertea ~union trained journeywoman plumber (1978) ~plumbing contractor (1996) ~greywater action singingwater@jps.net plumbing for greywater basic parts of
Threaded Faucet Installation
 Threaded Faucet Installation !"#$%&'"()'*&+(%',%--%.'*/(0'1--%23.4 M$-"3773"'#$&P'3,93Q )*+'$,-!"#$%&!'$(.CCD&EFGF&!'7'5#$% J#=*K= @347(&8%"B%%$ J#=*K=&3$L&!'$( A""35;&!'$(&B'";.CCD&EFGF&!'7'5#$%../01&2345%"&6#7%.H/I1&6#7%.1
Section 2 Safety, Tools and Equipment, Shop Practices Unit 5 Tools and Equipment
 Section 2 Safety, Tools and Equipment, Shop Practices Unit 5 Tools and Equipment Unit Objectives After studying this chapter, you should be able to: Describe hand tools used by the air-conditioning, heating,
Section 2 Safety, Tools and Equipment, Shop Practices Unit 5 Tools and Equipment. Unit Objectives 3/1/2012. General Hand Tools (1 of 6)
") Section 2 Safety, Tools and Equipment, Shop Practices Unit 5 Tools and Equipment Unit Objectives After studying this chapter, you should be able to: Describe hand tools used by the air-conditioning, heating,
Section 2 Safety, Tools and Equipment, Shop Practices Unit 5 Tools and Equipment Unit Objectives After studying this chapter, you should be able to: Describe hand tools used by the air-conditioning, heating,
Installation Instructions PRO SERIES
 Installation Instructions PRO SERIES If you are a plumber installing this unit, please leave this owners manual & warranty card with the owner when you finish the installation. Thank You! DO NOT USE THIS
Everest Star 7900 II Series and 8012II
 Installation of an Atwood Everest Star LP Furnace into a 1985 Volkswagen Vanagon Westfalia After spending a lot of time on the internet scanning through a multitude of Westy websites I quickly came to
PolyMax H2-24 Dutch Bucket System
 11234 PolyMax H2-24 Dutch Bucket System *Actual system may differ. PolyMax Dutch Buckets Versatile PolyMax Dutch Buckets are ideal for both small- and large-scale hydroponic growing. 2017 FarmTek All Rights
There are a few tips to follow, and I will definitely go into more detail on them. But, first the TIPS!
 Guide to Better Landscaping Let s Begin: There are a few tips to follow, and I will definitely go into more detail on them. But, first the TIPS! 1. Placement and Reasonability 2. Quality Over Quantity
PolyMax H1-10 Dutch Bucket System
 112529 PolyMax H1-10 Dutch Bucket System *Actual system may differ. PolyMax Dutch Buckets Versatile PolyMax Dutch Buckets are ideal for both small- and large-scale hydroponic growing. STK# DIMENSIONS 112529
Ebb & Flow System
 113501 Ebb & Flow System Actual system may differ from what is shown. System requires a timer to control the main pump and to set watering cycles. Additional purchase required. 2016 FarmTek All Rights
Powertools Ecoline. Ecoline Powertool set 5pcs. Ecoline Cordless screwdriver. Ecoline Mouse sander. High quality reliable tools.
 Powertools 871125271776 Cordless screwdriver with charger, 5-7h charging Voltage: 3,6V RPM: 180 871125271781 Mouse sander 140x140x80mm Wattage: 130W RPM: 0-1300 871125271782 Powertool set 5pcs Impact drill
Shay Plumbing IX - Feed Water Pipes
 Shay Plumbing IX - Feed Water Pipes Nelson Riedel Nelson@NelsonsLocomotive.com Initial: 11/28/03 Last Revised: 06/06/2004 Feed Water Pipe Orientation: Photos of a couple of the Cass shays were reviewed
Male elbow, copper x BSP taper male thread
 Male elbow, copper x BSP taper male thread YP13 Elbow Size Pattern No. Pack 1 Qty Pack 2 Qty Code Barcode Price ( ) ex VAT test 15mm x 1/2" YP13 10 240 08333 5022050083333 16.22 22mm x 3/4" YP13 5 100
Save Money by Conserving Water!
 Save Money by Conserving Water! According to the City of Vancouver, 40% of household water is sprinkled on lawns and gardens-- which is not the most efficient way to water plants. 40%! That's an incredible
PackardInfo.com. HOW TO: Rebuild a Trico Mag Nu Matic Vacuum Washer Pump. Introduction
 Introduction So here hopefully ends the saga of my Trico Mag Nu Matic washer pump. I found the pump at the 2009 Packards International swap meet for $35. I thought I had the deal of a lifetime as it looked
Ecodrain V1000. Selection and Installation Guide for Residential Applications TM MC TM
 Ecodrain V1000 Selection and Installation Guide for Residential Applications TM MC TM PRECISION ENGINEERING LEADS TO HIGH PERFORMANCE 2 3 WHAT S INCLUDED IN THE BOX Lead Free Brass Cast Manifold, with
This guide will be posted in several chunks so please don't post till im done, cheers.
 vx220.org.uk > General Discussion > VX220 Discussion Radiator Replacement Guide Options SteveA Jan 10 2007, 00:47 Post #1 This guide will be posted in several chunks so please don't post till im done,
Redneck Air Conditioner
 Redneck Air Conditioner I have been somewhat successful in gleaning information from multiple sources and have put together a portable 12 volt and ice powered air conditioner. In an effort to give back,
Radiator Coolant Flush
 Radiator Coolant Flush Should be done every couple years. Fairly easy job, need a Phillips head screwdriver, 10mm deep socket, couple gallons of water, a gallon of silicate free anti-freeze, needle nose
Construction of the weather station Sensor Grenade Bill Ellis N5ZTW April 2, 2001
 Construction of the weather station Sensor Grenade Bill Ellis N5ZTW April 2, 2001 I designed and built a prototype Grenade to house the humidity and temperature sensors for my 1-Wire weather station. http://www.ibutton.com/weather/index.html#adding
Installation Instructions. For the 18 Built-In Dishwasher and Front Color Panels
 Installation Instructions For the 18 Built-In Dishwasher and Front Color Panels Printed in USA 154232102 Before You Begin DO NOT INSTALL DISHWASHER UNTIL YOU HAVE READ ALL INSTRUCTIONS. FOR YOUR SAFETY,
*Fan In A Drum* April 7, 2005
 *Fan In A Drum* April 7, 2005 A friend asked if I'd be willing to make a saferoom fan for them. Seeing how I made one not that long ago, I figured that it would be a simple thing to make another one. Unfortunately,
Vertical Termination Part No: 3CGRVT 16 7/8" 18 Vent Pipe Extension Part No: 3CG18 9 7/8" Wall Hanger Part No: 3CGWH 7 7/8" 7 3/8"
 Corr/Guard Direct Vent Water Heater Vent/Air Intake System Installation and service must be performed by a qualified installer, service agency or the gas supplier. Installation must meet all state and
Bubbling Rock Fountain Installation Manual
 Bubbling Rock Fountain Installation Manual Layout & mark appropriate basin area: Locate your fountain near your preferred viewing area where both water and electricity services are accessible. Clear the
RECON Strobe Install. Here I Will Explain How To Install RECON s 90 Watt Strobe Kit. You Should Have:
 RECON Strobe Install Here I Will Explain How To Install RECON s 90 Watt Strobe Kit *Now, There Are Many Ways of Installing Them, Including Wiring Methods, Wiring Connectors, And Other Variables - In This
What Kind of Still? Pot Stills
 What Kind of Still? Pot Stills P ot stills were the earliest kind of stills. They simply had a pot to boil the fermented mash in, and an output tube that passed through something cooler (air or water etc.)
SHARKBITE CONNECTING SYSTEM
 INDEX CASH ACME valves with sharkbite connectors ball valves... 14-8 check valves... 14-8 connectors bullnose... 14-3 reducing... 14-3 straight... 14-3 couplings reducing... 14-2 straight... 14-2 elbows
Union coupling. copper x copper. Cone joint to BS 1010.
 Union coupling. copper x copper. Cone joint to BS 00. YP Size Pattern No. Pack Qty Pack 2 Qty Code Barcode Price ( ) ex VAT 8mm YP 5 00 08250 502205008250 2.78 5mm YP 0 00 0825 502205008250 8.4 22mm YP
Glass Vessel Sink Installation
 Glass Vessel Sink Installation Required Supplies & Tools A. One of these two type of Faucets Threaded Faucet Nut & Bolt Faucet B. Under Counter Supply/Drain Lines & Shutoff Valves Water Supply Lines +
INSTALLATION AND OPERATION. -, 3. -is INSTRUCTIONS FOR COOLAIR S EVAP-PAD COOLING SYSTEM. Coo/ah AMERICAN COOLAIR CORPORATION
 I -, 3. -is INSTALLATION AND OPERATION INSTRUCTIONS FOR COOLAIR S EVAP-PAD COOLING SYSTEM e Coo/ah AMERICAN COOLAIR CORPORATION TABLE OF CONTENTS PAGE I. CONCEPT OF EVAPORATIVE COOLING....2 II. RECOMMENDEDTOOLS......3
Fleck 5600 SXT. Installation Guide. Make a list of all of the plumbing fittings needed to install; a typical list looks like this:
 Installation Guide Before you assemble your new system, be sure that the following conditions have been met for placement of your softener: Getting Started Level, firm surface, such as concrete, on which
Fixing my Fisher and Paykel Fridge Active Smart Fridge/Freezer Model E440T
 Fixing my Fisher and Paykel Fridge Active Smart Fridge/Freezer Model E440T ** DISCLAIMER ** I am not a fridge technician, an electrician or a representative of Fisher and Paykel. I am an average Australian
Installation Instructions
 Installation Instructions For the 18" Built-In Dishwasher Sears, Roebuck and Co. Sears Canada, Inc. Hoffman Estates, IL 60179 U.S.A. Toronto, Ontario, Canada M5B 2B8 154435201 Before You Begin DO NOT INSTALL
HydroFlux Welder Torch System T0-102 / T0-103
 HydroFlux Welder Torch System T0-102 / T0-103 Setting Up The HydroFlux 1. Location - The HydroFlux Welder must be placed on a level surface with adequate ventilation. We recommend a minimum of 4 inches
:: Sleeve styles :: There are three main types of crimp sleeve in common use. 1. Round section 2. Oval section 3. Double barrel
 Crimping or swaging as it sometimes called is a quick and reliable method for making joins in monofilament and cable. However some of the techniques are misunderstood and fish are often lost due to poorly
General System Layout Sketch
 General System Layout Sketch EZ-37 Solar Panels PV panel Glycol Fill Valve Expansion Tank ` 1 Introduction This document describes how to install a Heliatos GH type solar water heating system. These systems
Water Heater. Promising endless. Installing an On-Demand
 Installing an On-Demand Water Heater Pluses include endless hot water and a compact design, but the installation means a lot of pipes in a small space by Tom Cardillo Promising endless hot water and taking
PIPE DREAMS 96. Aeroponic Garden IMPORTANT:
 1 WARNING: BEFORE PUTTING WATER PUMP INTO OPERATION FILL UP NUTRIENT TANK TO TOP OF PUMP. THE PUMP MUST NEVER RUN DRY OTHERWISE, WARRANTY WILL BE DECLINED. READ FILLING INSTRUCTIONS BEFORE USE. Welcome
Alternate Energy Technologies PO Box Jacksonville, FL INSTALLATION OPERATION MAINTENANCE MANUAL DX DRAINBACK
 Alternate Energy Technologies PO Box 61326 Jacksonville, FL 32236 904-781-8305 INSTALLATION OPERATION MAINTENANCE MANUAL DX DRAINBACK CONTENTS Introduction Basic Tools and Materials 1. Collector Location
1SC-SSC Splice Connection Kit Installation Instructions
 1SC-SSC Splice Connection Kit Installation Instructions Description The 1SC-SSC is a NEMA 4 rated splice connection kit for use with Raychem 1SC30, 40, 50, 60, 70, 80 (-CT) and 1SC/H30, 40, 50, 60, 70,
For more information contact: Baker Water Systems Phone:
 HAND PUMP SYSTEMS SELECTION GUIDE SELECTING THE HAND PUMP Model 11HA This is the most basic hand pump. Not to be used if cylinder is to be set more than 25 feet. NOTE: The 11HA does not have a sealed packing
PPE HAZARD ASSESSMENT CERTIFICATION FORM
 PPE HAZARD ASSESSMENT CERTIFICATION FORM Name of Work Place Work Place Address Work Area(s) Assessment Conducted By Date of Assessment Job / Task(s) USE A SEPARATE SHEET FOR EACH JOB, TASK, OR WORK AREA
Installation Instructions
 Installation Instructions The energy you need Accessories/PFGHRD 60/100 Passive Flue Gas Heat Recovery Device Explanation of Symbols a DANGER: Risk of injuries. The PFGHRD is an integral part of the flue
Acrylic Claw Foot Tub
 Acrylic Claw Foot Tub Wrench or socket Drill & Bits Parts Recommended 2-2 x12 boards 4 Lag Bolts 4 Flat Washers Be sure to re-inforce the floor before securing tub. We recommend 2-2 x12 s securely fastened
POWER PAK 480V Commercial Steam bath Generator
 Installation Instructions POWER PAK 480V Commercial Steam bath Generator THREE PHASE With Mechanical Timer For machine of manufacture post May 2001 DO NOT USE THIS PRODUCT UNLESS YOU HAVE CONSULTED YOUR
Time Sow seeds: 30 min First seedlings: A few days Cress: About 1 week
 Sow seeds: 30 min First seedlings: A few days Cress: About 1 week Cress seeds Small bowls to sow seeds in Soil or cotton wool Plastic We put cress seeds on damp cotton or in moist soil and cover with plastic.
Installation Instructions Day Spa Generator
 Installation Instructions Day Spa Generator If you are a plumber installing this unit, please leave this owner s manual & warranty card with the owner when you finish the installation. This Instruction
1 What is the name of the tool shown in the diagram? Basin wrench Footprint wrench Stilson wrench Torque wrench.
 36 Exam Success Plumbing and Heating 6189-11 and 6189-21 Sample test The sample test below is for paper 6189-005, Understand and carry out site preparation, and pipework fabrication techniques for domestic
Installation and use of Strong Central Vacuum Cleaning System
 Installation and use of Strong Central Vacuum Cleaning System System type 7,5kW 7,5kW-FC 11kW www.strong.fi System units and parts ** Pre-separator Main Filter Motor Extra pre-separator *** (Only for some
Installing the Turbo Floor Model System
 Installing the Turbo Floor Model System Location 1. Locate as close as possible to water supply source. 2. Locate as close as possible to a three-prong grounding receptacle. 3. Locate the System on a smooth
 www.whitakerbrothers.com The Challenge Machinery Company provides owner's manuals on its products solely as a courtesy to its customers. See the information below before using this manual. These manuals
Retrofit an evacuated tube collector to an existing cylinder Updated
 Run On Sun Australia Retrofit an evacuated tube collector to an existing cylinder Updated 2-8-2018 To contact Run On Sun Australia Pty Ltd Phone Andrew on (02) 6734 6322 Email: andrew@runonsun.com.au Website:
Pixel Pot Vertical Planting Kit
 Pixel Pot Vertical Planting Kit Installation Instructions HOLMAN GreenWall Pixel Pot - Vertical Planting Kit Product Code: GW1016 For more information regarding this product and to watch the video of how
Installation Instructions
 www.aquanta.io Aquanta by Sunnovations Inc. www.sunnovations.com Installation Instructions For online instructions go to: https://portal.aquanta.io/setup 1 Tools Needed: Phillips screw driver Flathead
INSTALLATION INSTRUCTIONS
 ,t_2007 Lennox Industries Inc. Dallas, Texas, USA INSTALLATION INSTRUCTIONS CH33 Series Units EVAPORATOR 505,264M (65484504) 10/07 Supersedes 09/06 COILS n _putech blications ical Litho U.S.A. RETAIN THESE
INSTALL AN ELECTRIC SHOWER
 INSTALL AN ELECTRIC SHOWER The plumbing and wiring involved in installing an electric shower requires sound basic skills in both areas of expertise. Ensure that wiring and plumbing are properly installed.
BASE-RAY CAST IRON BASEBOARD RADIATION
 INSTALLATION MANUAL FOR BASE-RAY CAST IRON BASEBOARD RADIATION TABLE OF CONTENTS PAGE 2 RATINGS 4 ASSEMBLY CHART 5 SYSTEM TYPES 6 SERIES LOOP SYSTEMS 7 SERIES LOOP DESIGN 8 INSTALLATION DETAILS 9 INSTALLATION
HEAVY REFRIGERATION MECHANIC// SR. HEAVY REFRIGERATION MECHANIC
 HEAVY REFRIGERATION MECHANIC// Activity Hazard Identification Required Precautions 1. Driving to and from work site. 1. Motor vehicle accident; striking pedestrians, bicyclists, or individuals using rollerblades.
Primitive water distillation construction notes and lessons learned (13 Jan 05)
") Four different basic ways of distilling water are tested and the lessons learned are discussed. Gradient steps in complexity of construction are shown. Any one trying to distill water will most likely
Four different basic ways of distilling water are tested and the lessons learned are discussed. Gradient steps in complexity of construction are shown. Any one trying to distill water will most likely
Lead Safety for Renovation, Repair, and Painting. Requirements in the EPA RRP Rule:
 Requirements in the EPA RRP Rule: The RRP Rule prohibits the use of certain practices. These prohibited practices are discussed in this module. This module also contains recommendations regarding how to
Acrylic Claw Foot Tub
 Acrylic Claw Foot Tub Wrench or socket Drill & Bits Parts Recommended 2-2 x12 boards 4 Lag Bolts 4 Flat Washers Be sure to re-inforce the floor before securing tub. We recommend 2-2 x12 s securely fastened
ISLAMAYA ENGLISH SCHOOL
 1 (a) Some water is poured onto a plastic table-top, forming a puddle. The same volume of water is poured into a plastic dish, which is placed alongside the puddle. This is illustrated in Fig. 7.1. water
APEX Water Filters MODEL RO 5. Treat your body to pure goodness with Apex filtered water INSTRUCTION MANUAL. pure water in every drop
 APEX Water Filters pure water in every drop MODEL RO 5 INSTRUCTION MANUAL Treat your body to pure goodness with Apex filtered water A Water supply adapter valve B Cold water shut-off valve C Hot water
C4 ASSEMBLY INSTRUCTIONS
 C4 ASSEMBLY INSTRUCTIONS Designed and manufactured in Australia by The Loudspeaker Kit (ABN 39 118 869 962) www.theloudspeakerkit.com 11 Websters Road, Templestowe, Victora 3106 Tel: (03) 9036 2896 Email:
How to reduce ChiliCube noise level by
 How to reduce ChiliCube noise level by replacing fans Description for how to replace noisy fans which come with the ChiliCube with 3-speed fans which are quieter even on high, and allow speed selection.
DUST CAP. 2mm MICROPHONE CABLE FROM THE SERVOREELER REED SWITCH OUTPUT PLUGS INTO SERVOREELER NON-MAGNETIC CLAMP
 DUST CAP 2mm MICROPHONE CABLE FROM THE REED SWITCH OUTPUT PLUGS INTO DUST CAP INSTALLED NON-MAGNETIC CLAMP STOP SWITCH OUTPUT CABLE HANDLE WITH CARE, DO NOT SUBJECT TO EXCESSIVE PULL. BEZEL HOUSING 1.375"
ARIN THERMOSTATIC SHOWER SYSTEM
 ARIN THERMOSTATIC SHOWER SYSTEM INSTALLATION INSTRUCTIONS Before installing, read entire shower system installation instructions. Observe all local building and safety codes. For the following installation
Installation & Service Guide
 Reverse Osmosis Ontario Soft Water.ca Kitchener, Canada 519-579-0500 Installation & Service Guide Pentair 75 gpd Encapsulated Membrane System Standard System 75gpd Membrane Your New Reverse Osmosis System
Table of Contents What to Expect with Your Installation. Tools Needed. Motor Housing.
 Table of Contents Congratulations on purchasing your new Casablanca ceiling fan! It will provide comfort and performance in your home or office for many years. This installation and operation manual contains
BUBBLE-Maker. Necessary tools and materials:
 106.326 BUBBLE-Maker Necessary tools and materials: Fretsaw and board Wood file, glasspaper Pillar drill Hole maker 2mm dia.+ 3.5mm Cross and normal screwdriver Allen key ( 7mm ) Wood glue, all purpose
Sears, Roebuck and Co., Chicago, IL U.S.A.
 BLENDING TANK WARRANTY... PG 2 DIMENSIONS-SPECIFICATIONS.PG 2 OPERATION... PG 3 INSTALLING... PG 3 MAINTENANCE... PG 5 REPAIR PARTS... PG 5 Sears, Roebuck and Co., Chicago, IL 60684 U.S.A. BLENDING TANK
IMPORTANT INFORMATION. Revised Dishwasher Installation Instructions
 IMPORTANT INFORMATION Revised Dishwasher Installation Instructions To obtain a revised copy of the entire Dishwasher User s Manual, go to www.eurotechappliances.com. SPECIAL EDITION 11-20-02 SAVE THESE
Fast and Easy Cooler Mash Tun Build
 Fast and Easy Cooler Mash Tun Build This is my version of a very simple mash tun build. There are many ways of building a mash tun but to me this way provides a robust and simple method for making a mash
N54 Silicone Intake install tips
 N54 Silicone Intake install tips Thank you for your purchase of the VTT BMW N54 Silicone Intake set! First thing to do when you open your box is to make sure all parts are in their respective bags and
CEILINGS BACKSPLASHES WALLS PROJECTS INSTALLATION GUIDE.
 CEILINGS BACKSPLASHES WALLS PROJECTS INSTALLATION GUIDE Installation videos available online at: /videos Ceiling Components: A tin ceiling is comprised of two primary components and two optional components.
OVER 55 YEARS OF STEAM SHOWER INNOVATION
 Signature Series Control +Steamhead Installation Manual For Tutorials and Troubleshooting visit www.thermasol.com/solutions SET-NTS-XX Traditional, SEM-NTS-XX Modern, SEMR-NTS-XX Modern Recessed. SEC-NTS-XX
Premium Micro Desoldering station
 www.jbctools.com English Premium Micro Desoldering station Ref. DSS-D Packing List The following items should be included: DI Control Unit... 1 unit Ref. DI-1D (120V) DI-2D (230V) DI-9D (100V) Electric
REFRIGERANT PIPING SYSTEM
 PART 1 GENERAL 1.01 DESCRIPTION A. The requirements of this section apply to the refrigerant piping system connecting refrigeration and HVAC equipment specified in other sections of these specifications.
FPD - Flame Photometric Detector
 FPD - Flame Photometric Detector FPD Overview - The FPD detector is can be configured for 2 modes of operation, one is highly selective for Sulfur compounds and the other mode highly selective for Phosphorus
AQUAPEUTICS MONACO INSTALLATION MANUAL
 AQUAPEUTICS MONACO INSTALLATION MANUAL Monaco schmatic diagram Cross sectional illustration of gaskets Recommended tools 4 5 5 5 5 Installation steps Steam generator hook-ups Troubleshooting n Steam dispenser
DIY Cabinet Painting Guide
 Before tackling a cabinet project on your own consider these simple steps to getting the job done like a pro without the trial and error Color Theory 2 Process Overview Looking at Colors Materials and
APPENDIX A: MICROSCALE APPARATUS AND TECHNIQUES A.1 CRAIG TUBES: RECRYSTALLIZATION
 APPENDIX A: MICROSCALE APPARATUS AND TECHNIQUES This Chapter describes and illustrates the apparatus and microscale techniques that are used in the experiments you will perform but are not necessarily
6ft Wide Polytunnel Assembly Instructions
 CONTENTS Section Page 1. FOUNDATION TUBES: Option A Hammered-In Foundation Tubes 3 2. FOUNDATION TUBES: Option B Ground Anchor Plates 4 3. FOUNDATION TUBES: Option C Concreted Foundation Tubes 5 4. STEEL
Fix It. Do all of these:
 Preparation for: Home Repairs Automotive Maintenance Traffic Safety Fix It Do all of these: 1 Den Meeting + homework to complete Takeaways Home repair knowledge and skills A Scout is Helpful 1. Put a Fix
Steam and Gas Power Systems Prof Ravi Kumar Department of Mechanical and Industrial Engineering Indian Institute of Technology - Roorkee
 Steam and Gas Power Systems Prof Ravi Kumar Department of Mechanical and Industrial Engineering Indian Institute of Technology - Roorkee Module No # 02 Lecture No # 09 Boilers Mountings and Accessories
Industrial Contractors Supplies
 Industrial Contractors Supplies - Dust Director Division - 15061 Route 30, N. Huntingdon, PA 15642 Phone: 412. 824. 6933 Fax: 412. 824. 4704 www.dustdirector.com 2010 Catalog 2010 Catalog 2010 Catalog
For Tutorials and Troubleshooting visit
 MicroTouch Control +Steamhead Installation Manual For Tutorials and Troubleshooting visit www.thermasol.com/solutions MTT-NTS-XX Tradtional, MTM-NTS-XX Modern, MTMR-NTS-XX Modern Recessed, MTC-NTS-XX Contemporary,
Handshower, Hose & Handshower Accessories
 P24443, P24445, P24446, P24452, P24453, P24456 1 of 6 INSTALLATION INSTRUCTIONS Thank You For Choosing KALLISTA We appreciate your commitment to KALLISTA quality products. Please take a moment to review
Installation Instructions
 Instructions Created by an: 86-95 Suzuki Samurai Heater Case Clean-Out (SKU# SIB-HEATERCASECLEANOUT) Installation Instructions This set, which includes a 1.5 hole saw, can be purchased through our website.
General System Layout Sketch
 General System Layout Sketch EZ-37 Solar Panels PV panel Can use Standard Copper, CPVC or PEX Pipes Pump Existing Water Heater Bottom Feed Connector 1 Introduction This document describes how to install
Geothermal Energy Nutrient Reservoir & Trench cooling System
 Geothermal Energy Nutrient Reservoir & Trench cooling System The Reservoir and Trench portions of this design can be used separately but work better when combined. Geothermal Energy is free energy. Meaning
Component #1. Tiny House Design Plan
 Component #1 Tiny House Design Plan Directions: You will complete this handout to help you plan out the design of your tiny house. Your tiny house needs to be within 100 400 square feet. 1. Size of Tiny