pushing the tube into the rear of the water outlet housing with a slight twisting motion to evenly distribute the adhesive. After cleaning off any ext
|
|
|
- Nigel Barrett
- 5 years ago
- Views:
Transcription
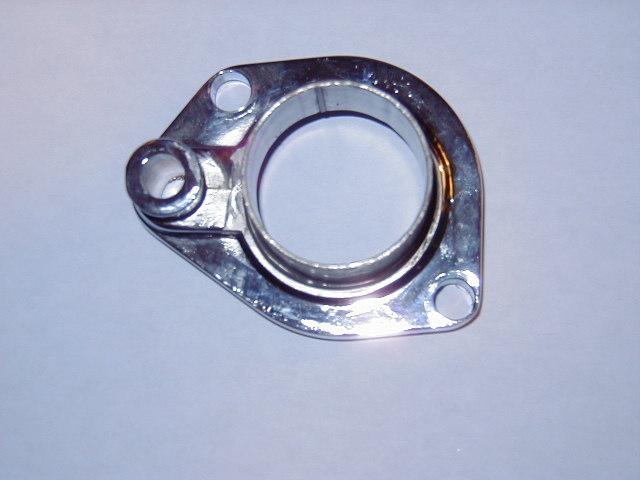
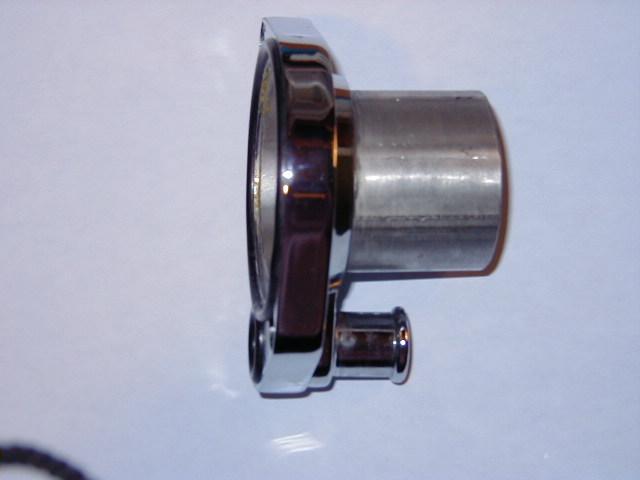
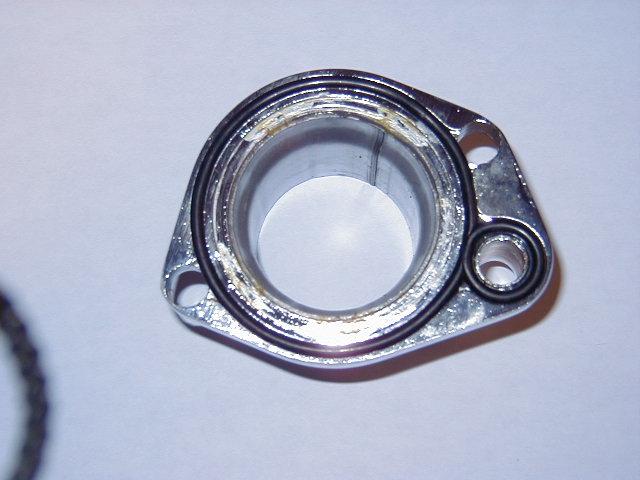
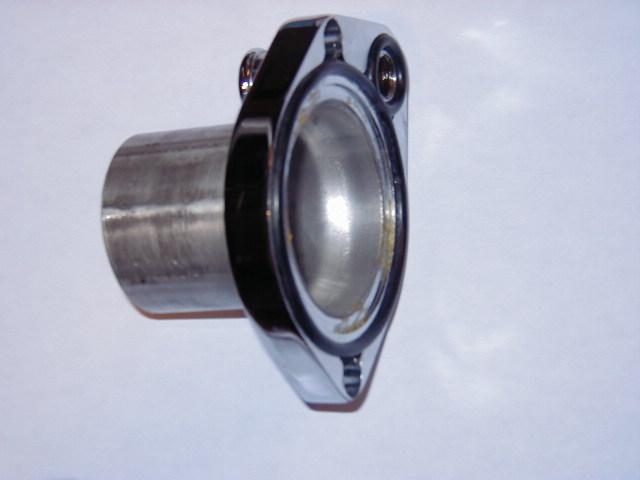
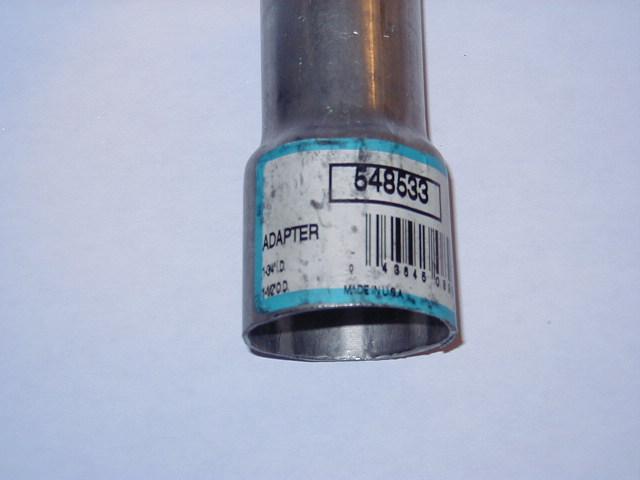
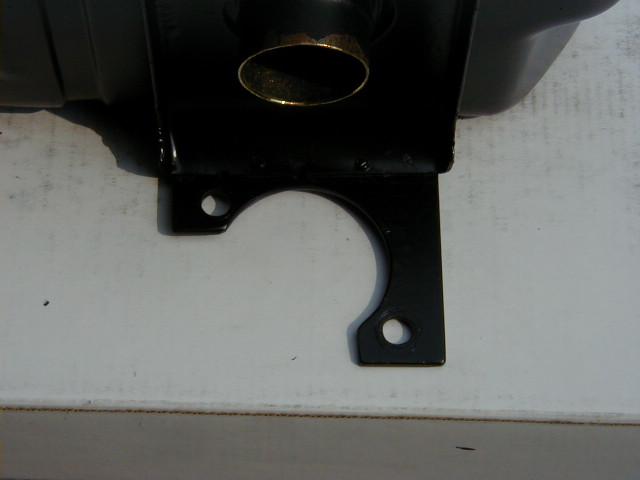
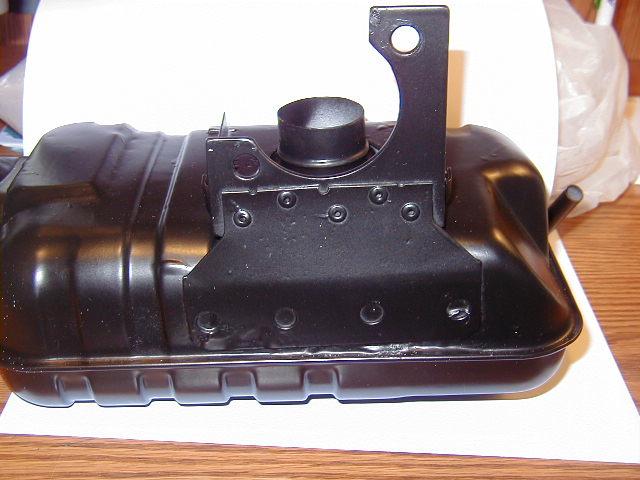
1 I chose an original FE expansion tank that had the filler neck on the driver's side of the tank but still had the radiator hose outlet facing the passenger side. I figured using such a tank would afford me a little more hood clearance because the hood bows up in the center. This tank would also solve the problem of the filler neck of my radiator being slightly lower than the thermostat housing outlet which is a NO NO. In theory I decided that if I could cut off the original thermostat housing from the FE tank and modify a small block thermostat housing into a straight hose fitting I could connect the two parts with a " radiator hose elbow and a couple of hose clamps and support the tank with a custom made bracket bolted to the front of the thermostat housing. The first order of business was to prepare the tank by getting rid of the piece I didn't need. Measuring from the underside of my hood down to the top of the thermostat mount on the intake manifold gave me 4 7/8" of vertical clearance. Using a band saw I sliced through the 1 1/2" tube underneath the tank approximately 1 1/2 inches down from the underside of the tank. Then I cut through the rear support brackets approximately 7/8" down from the underside of the tank to separate the original FE thermostat flange from the unit. The lower segment of tubing, support bracket, and FE thermostat housing was then discarded. A mounting bracket was then fabricated from a piece of 3/32" thick aluminum plate measuring 3 1/4" square. and fashioned to fit around the radiator hose nipple on a small block thermostat housing and attach using the two stock bolt holes in the water outlet. I used a piece of cereal box cardboard to make a template because the cardboard is stiff enough to retain shape yet thin enough to cut and form easily. A water outlet gasket was used as a guide to locate the holes for the mounting bolts and the large center hole being certain to make the template perfectly perpendicular to the horizontal plane of the engine. I first cut a 2 1/8" hole in the center of the bracket blank to clear the radiator hose. Then I superimposed the cardboard template to locate the bolt holes. Finally I trimmed away the lower portion of the bracket so it would install around the radiator hose nipple while the water outlet was in place. I chose a chrome Mr. Gasket 45 thermostat housing that uses a rubber O-ring seal rather than a gasket. The thermostat housing itself was modified by first sawing off the 45 angle radiator hose nipple. Then I removed more material down to the level of the bypass hose boss on the housing using a bench top milling machine and a 1/2" end mill to create a nice finished edge. A satisfactory result can also be obtained by chucking the housing in a vise and using a hack saw. I ended up leaving a 1 5/8" diameter hole and grafting on a straight pipe as shown in the photos below. I used a 1 3/4" ID to 1 1/2" OD (Pep Boys #548533) exhaust pipe reducer inserted through the rear of the thermostat housing. When the pipe was inserted and straight, using a scribe I marked the 1 3/4" end of the reducer flush with the thermostat ledge in the rear of the water outlet housing, removed the pipe and cut off the excess with a fine tooth hack saw. The rear edge of the 1 3/4" end must be flush with the recess for the thermostat. Then I measured 2" forward from that cut surface up to the 1 1/2" side of the reducer and cut off the excess 1 1/2" tube ending up with a 2" long length of pipe. All burrs and rough edges were smoothed. Using 220 grit sandpaper I roughed up the outside of the adapter as well as the inside of the water outlet housing, mixed up a batch of JB Weld and joined the two items together by buttering both surfaces to be joined and
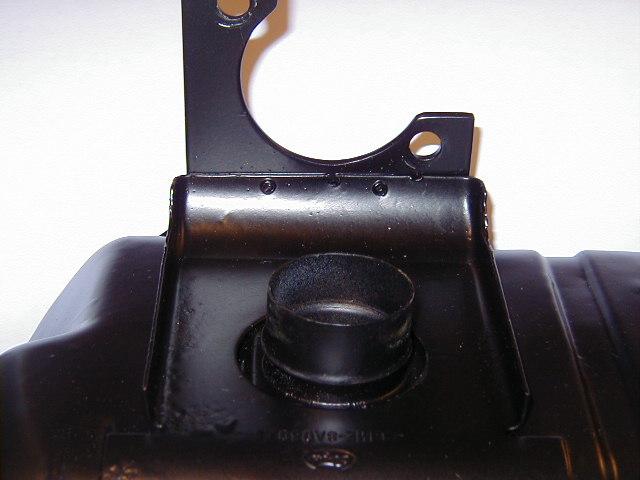
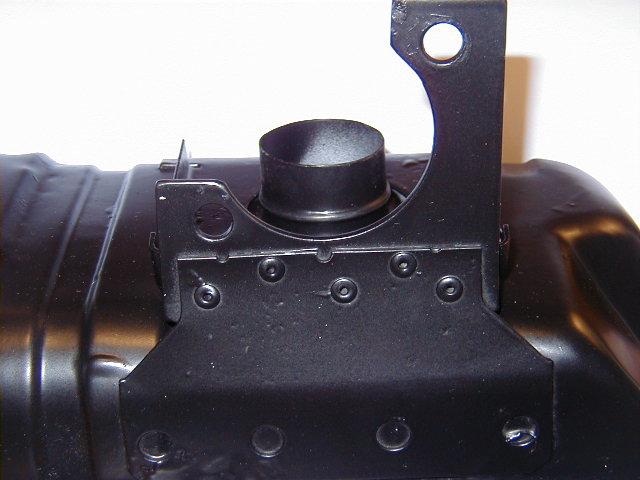
2 pushing the tube into the rear of the water outlet housing with a slight twisting motion to evenly distribute the adhesive. After cleaning off any extra JB Weld with lacquer thinner and making sure the assembly was straight I set the unit aside overnight to cure. I connected the 1 1/2" straight thermostat housing to the 1 1/2" diameter pipe stub remaining on the underside of the expansion tank with a 1 1/2" hose elbow cut from a radiator hose (Pep Boys #D71821, has TWO 1 1/2" 90 bends) and a pair of hose clamps I had laying around. After adjusting the aluminum mounting bracket and remaining original steel tank supports for an installed height of 4 3/4" measured from the top of the intake manifold thermostat mount to the top of the expansion tank filler neck I leveled the tank and pop riveted the bracket onto the tank supports. Note that the aluminum bracket slides up between the front and rear original tank supports so the pop rivets draw the original tank brackets tightly against the aluminum bracket. 1/8" or 3/32" x 3/8" steel pop rivets work nicely. If I was running a 302 rather than a 351W I could have easily made the tank height 1" higher without hood interference. I then trimmed the radiator hose elbow for best fit. I ended up shortening the brass tube on the underside of the tank to around 1 1/8" so the rubber elbow hose would fit properly. The support bracket plus the radiator hose elbow yields a strong support for the tank. Since my thermostat housing uses a rubber O-ring seal I didn't have to mess with a gasket and gasket sealer. A 1/8" hole was drilled in the top of the thermostat to help relieve any air pockets that might form in the water jacket of the manifold. When mounting the thermostat into the housing I applied four tiny dabs of silicone gasket sealer around the edge of the thermostat to hold the thermostat in place in its groove. Many times while mounting the thermostat housing the thermostat wants to slip out of the mounting flange resulting in a leak when the bolts are tightened. The silicone holds the thermostat in place nicely eliminating that problem. I opted to use a pair of 2 1/4" long carburetor studs rather than bolts to attach the water inlet housing to the intake figuring the studs would make aligning the outlet housing and the support bracket much easier. After mounting the tank I fabricated an upper radiator hose using a /4" hose elbow off the tank to a 1 3/4" OD x 1 1/2" OD exhaust pipe reducer and then a /2" hose elbow to the upper radiator inlet. In order to be able to easily bleed off any air pockets in the radiator I installed a 18 lb. Stant Lev-R-Vent cap on the radiator. I used a standard 13 lb. cap on the expansion tank along with a catch can borrowed from a 1973 MGB to complete the coolant recovery system.
3
4
5
6

7
8
9
10
11
12

13
SAN JUAN FRESH WATER COOLING SYSTEMS
 SAN JUAN FRESH WATER COOLING SYSTEMS 4.3-5.7 GI VOLVO Block Only Cooling, Mounted Off Engine Kit #V-111 Installation Instructions San Juan Engineering Heat Exchangers provide thermostatically controlled
JOHN DEERE GATOR HPX/XUV 2 PASSENGER HEATER INSTALLATION INSTRUCTIONS (p/n: 9PH20S30)
") P. 1 of 12 JOHN DEERE GATOR HPX/XUV 2 PASSENGER HEATER INSTALLATION INSTRUCTIONS (p/n: 9PH20S30) Item: Qty: Description: 1 2 1 x 1 x 5/8 Tee Fitting 2 2 Plastic Snap-in Hose Grommet 3 4 1-1/2" Hose Clamps
P. 1 of 12 JOHN DEERE GATOR HPX/XUV 2 PASSENGER HEATER INSTALLATION INSTRUCTIONS (p/n: 9PH20S30) Item: Qty: Description: 1 2 1 x 1 x 5/8 Tee Fitting 2 2 Plastic Snap-in Hose Grommet 3 4 1-1/2" Hose Clamps
Installation Instructions. For the 18 Built-In Dishwasher and Front Color Panels
 Installation Instructions For the 18 Built-In Dishwasher and Front Color Panels Printed in USA 154232102 Before You Begin DO NOT INSTALL DISHWASHER UNTIL YOU HAVE READ ALL INSTRUCTIONS. FOR YOUR SAFETY,
PackardInfo.com. HOW TO: Rebuild a Trico Mag Nu Matic Vacuum Washer Pump. Introduction
 Introduction So here hopefully ends the saga of my Trico Mag Nu Matic washer pump. I found the pump at the 2009 Packards International swap meet for $35. I thought I had the deal of a lifetime as it looked
This site is based on a but applies to all 1971-on Saab 99 and Saab 900.
 by Mark Jeter updated: December 8, 2004 originally web-published June 27, 2001 This document shows how the original waterpump in a Saab "B" engine can be eliminated and replaced with a reliable, efficient
JOHN DEERE X465, X475, X485, X495, X575, X585
 JOHN DEERE X465, X475, X485, X495, X575, X585 and X595 X700 SERIES (X700, X720, X720se, X724, X728, X728se, X729, X740, X744, X748, X748se, X749) CAB MOUNTING INSTRUCTIONS A-11271 Manufactured by: BOX
Can Am Commander 1000 Radiator Relocation Installation Instructions
 Can Am Commander 1000 Radiator Relocation Installation Instructions What comes with the kit 2 CNC Machined Aluminum mounting brackets 2 pcs M6 x 1.0 x 60mm long SHCS 2 pcs M6 x 1.0 x75mm long SHCS 4 pc
N54 Silicone Intake install tips
 N54 Silicone Intake install tips Thank you for your purchase of the VTT BMW N54 Silicone Intake set! First thing to do when you open your box is to make sure all parts are in their respective bags and
Engine Block Heater Service Kits (Tank Type) 30RZ/33RZ/45RZ (CSG 649 Ford Powered) Standby Generator Sets
 30RZ/33RZ/45RZ (CSG 649 Ford Powered) Standby Generator Sets") TT 880 INSTRUCTIONS 7/92 Engine Block Heater Service Kits (Tank Type) 30RZ/33RZ/45RZ (CSG 649 Ford Powered) Standby Generator Sets Model Voltage Kit No. All Models 120 276380 All Models 240 276381 This
TT 880 INSTRUCTIONS 7/92 Engine Block Heater Service Kits (Tank Type) 30RZ/33RZ/45RZ (CSG 649 Ford Powered) Standby Generator Sets Model Voltage Kit No. All Models 120 276380 All Models 240 276381 This
Adjust-a-Sink K100 SERIES **INSTALLATION INSTRUCTIONS**
 10/2011 Adjust-a-Sink K100 SERIES **INSTALLATION INSTRUCTIONS** Congratulations on the purchase of your new Adjust-a-Sink System-the elevating sink that offers the ultimate in comfort and safety. The Adjust-a-Sink
Caution: Dual-Flex rim
 INSTALLATION Caution: All installation types need to allow room for faucet installation. Ensure adequate clearance behind the basin for your faucet and backsplash, as well as the full range of motion for
Chapter 39 Cooling System Fundamentals Test
 TERRY FOX AUTOMOTIVE Chapter 39 Cooling System Fundamentals Test When you are done this test guess what you think you will receive for a mark below. If you are within 2 of your actual score you will receive
Thermo-Bob 4 Installation Manual KT5A Kit
 Thermo-Bob 4 Installation Manual KT5A Kit 2009-2016 KTM 400/450/500 EXC, XC-W 2008-2011 KTM 530 EXC-R 2011 Husaberg FS510 2013-2014 Husaberg FE501 2014-2016 Husqvarna FE501 IM TB4-KT5A V1 Watt-man.com
Installation Guide. Install your new sink with step-by-step instructions.
 Installation Guide Install your new sink with step-by-step instructions. Installation Guide Bath Sinks Drop-In Undermount Dual Flex Vessel Drains Bathtubs Freestanding Overflow and Waste Kit Rough-In Kit
Installation Instructions
 Installation Instructions For the 18" Built-In Dishwasher Sears, Roebuck and Co. Sears Canada, Inc. Hoffman Estates, IL 60179 U.S.A. Toronto, Ontario, Canada M5B 2B8 154435201 Before You Begin DO NOT INSTALL
Over-the-Range Microwave Oven Installation Instructions MVH130* MVH230* MVH330*
 Over-the-Range Microwave Oven Installation Instructions MVH130* MVH230* MVH330* * Additional alphanumeric characters representing other models in the series may follow each model number. Keep these instructions
PERFECT FIT IN-DASH HEAT/ COOL/ DEFROST PLYMOUTH BELVEDERE
 PERFECT FIT IN-DASH HEAT/ COOL/ DEFROST 1966-67 PLYMOUTH BELVEDERE CONTROL & OPERATING INSTRUCTIONS The controls on your new Perfect Fit system. Offers complete comfort capabilities in virtually every
SAAB 99 Series H Type Engine. Installation Guide Silicone Cooling System Hoses. Classic Silicone Hoses
 SAAB 99 Series 1981 1984 H Type Engine Installation Guide Silicone Cooling System Hoses Classic Silicone Hoses http://www.classicsiliconehoses.com/ Disclaimer This document is for reference purposes only.
INSTALLATION OF DURAVENT POLYPRO SINGLE WALL POLYPROPYLENE VENTING SYSTEMS
 SUPPLEMENT VENTING INSTRUCTIONS FOR INSTALLATION AND OPERATION INSTRUCTION MANUALS FOR THE FOLLOWING PRODUCT TYPES: HIGH EFFICIENCY CONDENSING COMMERCIAL, COMMERCIAL POWER DIRECT VENT, LIGHT DUTY COMMERCIAL
Heat Exchanger Block Replacement Instructions
 Series 1-4 Gas-fired water boiler Heat Exchanger Block Replacement Instructions Ultra-80 S1-4 Heat Exchanger Block Replacement Kit, Part No. 383-500-773 Ultra-105 S1-4 Heat Exchanger Block Replacement
Acrylic Claw Foot Tub
 Acrylic Claw Foot Tub Wrench or socket Drill & Bits Parts Recommended 2-2 x12 boards 4 Lag Bolts 4 Flat Washers Be sure to re-inforce the floor before securing tub. We recommend 2-2 x12 s securely fastened
OWNER S MANUAL AND INSTALLATION GUIDE PLEASE READ THIS MANUAL CAREFULLY BEFORE ATTEMPTING INSTALLATION
 ClearChoice Economy Under Sink Drinking Water System OWNER S MANUAL AND INSTALLATION GUIDE PLEASE READ THIS MANUAL CAREFULLY BEFORE ATTEMPTING INSTALLATION Congratulations on the purchase of your ClearChoice
Helpful Tip: NOTE:
 Grounded electrical supply required. Do not run drain lines, water lines or electrical wiring where they can interfere with or contact dishwasher motor or legs. The location where the dishwasher will be
Camaro A/C Install Instructions
 1967-1968 Camaro A/C Install Instructions This kit is designed for the 1967-1968 non A/C equipped Camaro. This kit can be used with or without Astro vents Step One Remove the following factory components:
Installation Manual PS-200 & PS-201
 Installation Manual PS-200 & PS-201 Table of Contents Pre-Uncrating Checklist... 1 Verifying System Requirements... 2 Verifying System Direction... 2 Verifying the Electrical Requirements... 2 Removal
BMW E36 Thermostat Removal And Coolant Flush
 BMW E36 Thermostat Removal And Coolant Flush Disclaimer: The cooling system is critical to the proper operation of your car. Failure to properly install all of the components of the cooling system could
BC BRONCOS AIR CONDITIONING UNIT
 BC BRONCOS AIR CONDITIONING UNIT CAUTION If you are not familiar with the principals of air conditioning, have an authorized air conditioning technician evacuate and charge the system. Serious damage to
Installation Manual PS-225 & PS-275
 Installation Manual PS-225 & PS-275 Table of Contents Pre-Uncrating Checklist... 1 Verifying System Requirements... 2 Verifying System Direction... 2 Verifying the Electrical Requirements... 2 Removal
TOOLS REQUIRED: Crimping tool A/C Recovery Unit Wrench set up to 1 ¼ 4 Hole saw
 INSTALL INSTRUCTIONS PT-A-401 HVAC UNIT for 2003-2018 CHEVROLET/GMC VAN (For 2007 ALL WHITE Prisoner Transport Inserts ONLY) Not Recommended for diesel engine application because of lack of space needed
Handshower, Hose & Handshower Accessories
 P24443, P24445, P24446, P24452, P24453, P24456 1 of 6 INSTALLATION INSTRUCTIONS Thank You For Choosing KALLISTA We appreciate your commitment to KALLISTA quality products. Please take a moment to review
INSTALLATION INSTRUCTIONS
 INSTALLATION INSTRUCTIONS Accessory Application Publication No. HEATER KIT P/N 0SE01-HL3-102 (SXS700M2/M4) P/N 0SE01-HL3-103 (SXS700M2D/M4D) SXS700M2/M2D/M4/M4D MII 14607-15172 Issue Date REVISED: June
SWIVEL HEAD WASTE AND OVERFLOW INSTALL
 SKU(s): 921385 SWIVEL HEAD WASTE AND OVERFLOW INSTALL BEFORE YOU BEGIN We recommend consulting a professional if you are unfamiliar with installing bathroom fixtures and plumbing. Signature Hardware accepts
VM99 TANK REPLACEMENT PARTS 1. COVER BOLT BOLT (4 REQ'D FOR 21-34), 1/4"-20 x 1" THERMAL CUT-OUT THERMAL TRIP PLUG
, 1/4-20 x 1 THERMAL CUT-OUT THERMAL TRIP PLUG") VM99 TANK REPLACEMENT PARTS 1. COVER BOLT BOLT (4 REQ'D FOR 21-34), 1/4"-20 x 1" 700300-013 2. THERMAL CUT-OUT 409560-001 THERMAL TRIP PLUG 409210-010 3. HEATER TERMINAL COVER VM99 2-4 HEATER TERMINAL
VM99 TANK REPLACEMENT PARTS 1. COVER BOLT BOLT (4 REQ'D FOR 21-34), 1/4"-20 x 1" 700300-013 2. THERMAL CUT-OUT 409560-001 THERMAL TRIP PLUG 409210-010 3. HEATER TERMINAL COVER VM99 2-4 HEATER TERMINAL
INSTALLATION INSTRUCTIONS
 Web Site: http//www.atomic4.com e-mail: thomas.stevens@cox.net INSTALLATION INSTRUCTIONS INDIGO ELECTRONICS AT-4T THERMOSTAT KIT ATOMIC 4 - MECHANICAL FWC This Indigo Thermostat Kit is designed for use
GE Monogram. Installation. Instructions. Stainless Steel Bottom Mount Built-In Refrigerators. Models ZICS36N RH ZICS36N LH
 GE Monogram Installation Instructions Stainless Steel Bottom Mount Built-In Refrigerators Models ZICS36N RH ZICS36N LH Before you begin - Read these instructions completely and carefully. IMPORTANT - Save
ACRYLIC PEDESTAL TUB
 BEFORE YOU BEGIN We recommend consulting a professional if you are unfamiliar with installing bathroom fixtures and plumbing. Signature Hardware accepts no liability for any damage to the floor, walls,
INSTALLATION INSTRUCTIONS
 Accessory Application Publication No. INSTALLATION INSTRUCTIONS HEATER KIT P/N 0SE01-HL3-101 SXS700M4/M2 Honda Dealer: Please give a copy of these instructions to your customer. PARTS LIST REPAIR KIT (P/N
INSTALLATION INSTRUCTIONS PT-A HEAT/AC STANDARD KIT FORD E-SERIES VANS
 INSTALLATION INSTRUCTIONS PT-A-402 - HEAT/AC STANDARD KIT 2007-2014 FORD E-SERIES VANS with Gas engine (To be used with 2007 and newer Prisoner Transport Inserts ONLY) Warning do not attempt to install
This guide will be posted in several chunks so please don't post till im done, cheers.
 vx220.org.uk > General Discussion > VX220 Discussion Radiator Replacement Guide Options SteveA Jan 10 2007, 00:47 Post #1 This guide will be posted in several chunks so please don't post till im done,
Product Support Bulletin
 MODEL: SUBJECT: CONVENTIONAL, W/ C7 CAT ENGINE WEBASTO TSL-17 HEATER Body DATE: APRIL 13, 2004 INDEX: 6 PAGE: 1 OF 16 Before you start this procedure, perform Freightliner Service Bulletin #20-7 first.
INSTALLATION & OWNER S MANUAL
 Rev. A, p. 1 of 8 INSTALLATION & OWNER S MANUAL HONDA PIONEER 700-2 AND 700-4 HEATER INSTALLATION p/n: 9PH20S64 The contents of this envelope are the property of the owner. Be sure to leave with the owner
INSTALLATION INSTRUCTIONS John Deere One Series; 1023E, 1025R and 1026R Models A HEATER KIT. Figure 1 (General Layout and Parts I.D.
 A-11978 HEATER KIT Figure 1 (General Layout and Parts I.D.) Read these instructions and identify all components. Please retain these instructions for future reference and parts ordering information. Refer
Rotary XL (558 Series) and Classic (548 Series)
 and Classic (548 Series)") INSTALLATION and OPERATING INSTRUCTIONS ROOF MOUNT AIR CONDITIONER Rotary XL (558 Series) and Classic (548 Series) QUICK START SHUR START MODELS MODELS 54812.041 54812.042 55812.041 55812.042 54815.041
INSTALLATION and OPERATING INSTRUCTIONS ROOF MOUNT AIR CONDITIONER Rotary XL (558 Series) and Classic (548 Series) QUICK START SHUR START MODELS MODELS 54812.041 54812.042 55812.041 55812.042 54815.041
Installation guide Sahara & Sahara Plus
 Installation guide Sahara & Sahara Plus Installation requirements. Components for Billi Sahara 310, 320, 360 & 3120 Models Before commencing installation, ensure you have identified the following. 1. Underbench
Hose Clamps, Charge Air Cooler, Replacement page 2
 Volvo Trucks North America Greensboro, NC USA DService Bulletin Trucks Date Group No. Page 5.2008 265 24 1(9) Hose Clamps, Charge Air Cooler, Replacement D11F, D13F and D16F Cummins ISX Hose Clamps, Charge
INSTALLATION INSTRUCTIONS
 Web Site: http//www.atomic4.com e-mail: thomas.stevens@cox.net INSTALLATION INSTRUCTIONS INDIGO ELECTRONICS AT-4T THERMOSTAT KIT ATOMIC 4 - ELECTRIC FWC This Indigo Thermostat Kit is designed for use with
Service Bulletin No.: DAC Rev 0 Date Issued: November 9, 1999 Title: Powerplant Cooling Page: 1 of 10
 Title: Powerplant Cooling Page: 1 of 10 1. ATA Code: 7920 2. Effectivity: All DA20-C1 Aircraft. 3. General: This service bulletin addresses improvements to engine cooling, specifically the lowering of
Vertical Termination Part No: 3CGRVT 16 7/8" 18 Vent Pipe Extension Part No: 3CG18 9 7/8" Wall Hanger Part No: 3CGWH 7 7/8" 7 3/8"
 Corr/Guard Direct Vent Water Heater Vent/Air Intake System Installation and service must be performed by a qualified installer, service agency or the gas supplier. Installation must meet all state and
Making the Gattling Gun Condenser Materials: Method: 10.
 Making the Gattling Gun Condenser This condenser is designed for the Nixon-Stone offset head style still. I wanted it to be removable for cleaning so I made it slip fit into the Nixon-Stone still head.
INSTALLATION OF CENTROTHERM INNOFLUE SINGLE WALL POLYPROPYLENE VENTING SYSTEMS
 SUPPLEMENT VENTING INSTRUCTIONS FOR INSTALLATION AND OPERATING INSTRUCTION MANUALS 238 48384 00, 238 44727 00, 238 44445 00, 238 48144 00, 238 47936 00, 238 45917 00, 238 45637 00, 238 47448 00, 238 48071
Kawasaki Teryx Firestorm Heater Kit Instructions.
 Please read all instructions before beginning installation. When working on cooling systems always allow vehicles to cool to avoid being burned or scalded by hot coolant. Always disconnect vehicle s negative
Installation Instructions
 Installation Instructions Electric Drop-In Range JDS28, JDP39 Questions? Call 800.GE.CARES (800.432.2737) or Visit our Website at: ge.com BEFORE YOU BEGIN Read these instructions carefully and completely.
I had to remove front splash shield to drain the radiator.
 At the start of 2013, my cooling was losing significant coolant that seemed to be coming from the water pump. The car had about 107,000 miles on it at the time. I had to remove front splash shield to drain
Service Bulletin Trucks Date Number Page
 Mack Trucks, Inc. Allentown, PA USA (Does not apply to Mack Trucks Australia) (Supersedes SB215025 dated 03/27/07) Service Bulletin Trucks Date Number Page 11/04/08 SB215025 1(25) Cooling System Revisions
K100 SERIES **INSTALLATION INSTRUCTIONS**
 2/2016 K100 SERIES **INSTALLATION INSTRUCTIONS** Congratulations on the purchase of your new Adjust-a-Sink System! The Adjust-a-Sink System utilizes a unique hydraulic lift mechanism and a cupc listed,
Installation Instructions
 Installation Instructions Self-Cleaning Radiant Electric Drop-In Range JDP47, JD968, JD900 If you have questions, call 1.800.GE.CARES or visit our website at: ge.com Before You Begin Read these instructions
INSTALLATION OF VENTING SYSTEM COMPONENTS WARNING
 INSTALLATION OF VENTING SYSTEM COMPONENTS WARNING When installing the EVERHOT IGI model series direct vent water heaters, use only EVERHOT vent/air intake system kits and components. Installation and service
ASSEMBLY INSTRUCTIONS - NXS SERIES. INFRARED RADIANT TUBE HEATER Single and Two Stage Pull Through System (Negative Pressure)
") ASSEMBLY INSTRUCTIONS - NXS SERIES OWNER / INSTALLER: For your safety this manual must be carefully and thoroughly read and understood before installing, operating or servicing this heater. INFRARED RADIANT
ASSEMBLY INSTRUCTIONS - NXS SERIES OWNER / INSTALLER: For your safety this manual must be carefully and thoroughly read and understood before installing, operating or servicing this heater. INFRARED RADIANT
ENGINE COOLING 14-1 CONTENTS THERMOSTAT... 3 SERVICE SPECIFICATIONS... 2 LUBRICANT... 2 WATER PUMP... 5 ON-VEHICLE SERVICE... 2
 14-1 ENGINE COOLING CONTENTS SERVICE SPECIFICATIONS.............. 2 LUBRICANT............................. 2 ON-VEHICLE SERVICE.................. 2 Coolant Replacement...................... 2 THERMOSTAT...........................
GE Monogram. Installation. Instructions. Component Cooktop System. Models ZEW145V ZGW124EN3 ZGW125EN3 ZEW155N ZEW166Y ZEW176Y
 GE Monogram Installation Instructions Component Cooktop System Models ZEW145V ZGW124EN3 ZGW125EN3 ZEW155N ZEW166Y ZEW176Y Before you begin Read these instructions completely and carefully. IMPORTANT: Save
Corr/Guard PRESSURE RATED VENTING SYSTEM IMPORTANT: DO NOT INSTALL WITHOUT FIRST READING THESE INSTRUCTIONS VERY CAREFULLY.
 CORR/GUARD INSTALLATION INSTRUCTIONS This symbol on the nameplate means this product is listed by Underwriters Laboratories Inc. Tested to UL1738 / CAN / ULCS636-1995 Listing No. MH26687 Testing No. 11EN
MOUNTING INSTRUCTIONS
 A-12093 JDX 2014 HEATER KIT With Gas Engine Connection Fittings 2014 and Newer ROPS Cabs A-12098 (Kit A-12092, Diesel Engine Connection Fittings are sold separately for diesel models) 12VDC, 2-Speed, 15,000
ACRYLIC CLAWFOOT TUB
 ACRYLIC CLAWFOOT TUB INSTALLATION INSTRUCTIONS AND CARE GUIDE CONTENTS Tub Installation...2 Rough-In...2 Drain Installation...3 Drain without Overflow...3 Waste and Overflow Drain...3 Trimming Drain Pipes...4
an ISO 9001:2008 Registered Company GOLL ST. - SAN ANTONIO, TX ph fax MINI SPACE SAVER HEAT /COOL
 an ISO 9001:2008 Registered Company 18865 GOLL ST. - SAN ANTONIO, TX. - 78266 - ph.210-654-7171 - fax 210-654-3113 MINI SPACE SAVER HEAT /COOL 01000-QUX-A 01000-VUX-A 900101-VUX-A REV C 3/5/14, MINI SPACE
PRELIMINARY INSTALLATION. Operation & Service Manual. Carrier Transicold Europe 03/09/07 Viento - Installation/Rev- #1/56
 INSTALLATION Carrier Transicold Europe 03/09/07 Viento - Installation/Rev- #1/56 INSTALLATION Table of content Introduction...4 Preparation before installation...5 Vehicle partition... 6 Box preparation...7
HX Field Replacement Kit
 Quantity Kit Part Number Description PE 110 Natural Gas Stainless Steel Condensate Pan PT 110 Natural Gas Polypropylene Condensate Pan Model PE 110 LP Stainless Steel Condensate Pan PT 110 LP Polypropylene
STOP ACRYLIC TUB WITH INTEGRAL DRAIN PLANNING BEFORE YOU BEGIN TOOLS AND MATERIALS: GETTING STARTED INSTALLATION INSTRUCTIONS.
 BEFORE YOU BEGIN We recommend consulting a professional if you are unfamiliar with installing bathroom fixtures and plumbing. Signature Hardware accepts no liability for any damage to the floor, walls,
Installation Instructions
 GE Consumer & Industrial Appliances Installation Instructions Junction Box Cover Within this user bag, you will find a junction box cover and a #10 hex head screw used to attach the junction box cover
Silverware Pre-washing System INSTALLATION
 Silverware Pre-washing System INSTALLATION 1 WARNING! Be sure to follow all applicable national and local electrical codes when installing the electrical supply for this system. All field connections must
O.D / 2" (444) 15 1 / 2 " (393) Maximum I.D / 4 " (336) 1 3 / 4 " (45) 1 1 / 4 " (32)
 15 1 / 2 (393) Maximum I.D / 4 (336) 1 3 / 4 (45) 1 1 / 4 (32)") standard basin 100 Specifications 1.1.3 Standard Round Basin with Overflow Item No. 100 For Undercounter Mount Installation Recommended openings for Under Counter mounting: Min. Diameter: 13 1 / 4 (337).
standard basin 100 Specifications 1.1.3 Standard Round Basin with Overflow Item No. 100 For Undercounter Mount Installation Recommended openings for Under Counter mounting: Min. Diameter: 13 1 / 4 (337).
Installation Instructions
 Installation Instructions Above the Cooktop Microwave Oven JVM60 and JVM65 Questions? Call -800-56- or Visit our Website at: GEAppliances.ca BEFORE YOU BEGIN Read these instructions completely and carefully.
Installation Instructions
 Installation Instructions Built-In Dishwasher If you have questions, call 800-GECARES or visit our website at: www.geappliances.com BEFORE YOU BEGIN Read these instructions completely and carefully. IMPORTANT
Chevrolet Pickup Condenser Kit with Drier with Condenser Mounted Forward From Stock Position (021553)
") an ISO 900:2008 Registered Company 97-55 Chevrolet Pickup Condenser Kit with Drier with Condenser Mounted 3 8 Forward From Stock Position (02553) 8865 Goll St. San Antonio, TX 78266 Phone: 20-65-77 Fax:
an ISO 900:2008 Registered Company 97-55 Chevrolet Pickup Condenser Kit with Drier with Condenser Mounted 3 8 Forward From Stock Position (02553) 8865 Goll St. San Antonio, TX 78266 Phone: 20-65-77 Fax:
Installation Instructions
 Installation Instructions Over the Range Microwave Oven BEFORE YOU BEGIN (Read these instructions completely and carefully.) IMPORTANT IMPORTANT Save these instructions for local inspector s use. Observe
PERFECT FIT IN-DASH HEAT/ COOL/ DEFROST FORD PICKUP
 specializing in AIR CONDITIONING, PARTS AND SYSTEMS for your classic vehicle PERFECT FIT IN-DASH HEAT/ COOL/ DEFROST 1960-66 FORD PICKUP CONTROL & OPERATING INSTRUCTIONS The controls on your new Perfect
Installation Instructions
 GE Consumer & Industrial Appliances Installation Instructions Junction Box Cover Within this user bag, you will find a junction box cover and a #10 hex head screw used to attach the junction box cover
METIS. Installation instructions. Riser rail kit INSTALLERS PLEASE NOTE THESE INSTRUCTIONS ARE TO BE LEFT WITH THE USER.
 METIS Riser rail kit Installation instructions INSTALLERS PLEASE NOTE THESE INSTRUCTIONS ARE TO BE LEFT WITH THE USER 2180531A September 2006 CONTENTS Page General installation notes 1 Main components
Mopar B-Body Condenser Kit with Drier
 an ISO 900:2008 Registered Company 966-70 Mopar B-Body Condenser Kit with 05066 Fits: Plymouth: Belvedere, Satellite, Road Runner (Except 970), GTX Dodge: Charger (Except 966-67), Coronet, Super Bee 8865
Undercounter Refrigeration
 INSTALLATION GUIDE Undercounter Refrigeration Contents Undercounter Refrigeration..................... 3 Undercounter Specifications.................... 4 Site Preparation..............................
Heater with Air Conditioning. E-Series Ford Aeromaster
 Service Guide Heater with Air Conditioning E-Series Ford Aeromaster Contents Blower Motor...2 Plenum Removal...3 Control Module...6 Servo Motors...8 Coolant Valve and Servo Motor...8 Evaporator Recirculation
PERFECT FIT SERIES IN-DASH HEAT/ COOL/ DEFROST CHEVROLET CHEVELLE/ EL CAMINO NOTE: INSTRUCTIONS DEPICT CHEVELLE
 specializing in AIR CONDITIONING, PARTS AND SYSTEMS for your classic vehicle PERFECT FIT SERIES IN-DASH HEAT/ COOL/ DEFROST 1964-65 CHEVROLET CHEVELLE/ EL CAMINO NOTE: INSTRUCTIONS DEPICT CHEVELLE CONTROL
Installation Instructions
 Installation Instructions For Fully Integrated NoFrost Combined Refrigerator-Freezers HCB 1560/1561 7084 429-00 Important Please read and follow these instructions These instructions contain Danger, Warning
IMPORTANT INFORMATION. Revised Dishwasher Installation Instructions
 IMPORTANT INFORMATION Revised Dishwasher Installation Instructions To obtain a revised copy of the entire Dishwasher User s Manual, go to www.eurotechappliances.com. SPECIAL EDITION 11-20-02 SAVE THESE
an ISO 9001:2008 Registered Company ShortPac HEAT/COOL (05000-QUX-A/05000-VUX-A)
") an ISO 9001:2008 Registered Company ShortPac (05000-QUX-A/05000-VUX-A) 18865 GOLL ST. - SAN ANTONIO, TX. - 78266 - ph.210-654-7171 - fax 210-654-3113 900499 REV C 3/7/14, ShortPac EVAPORATOR KIT PG 1 OF
an ISO 9001:2008 Registered Company ShortPac (05000-QUX-A/05000-VUX-A) 18865 GOLL ST. - SAN ANTONIO, TX. - 78266 - ph.210-654-7171 - fax 210-654-3113 900499 REV C 3/7/14, ShortPac EVAPORATOR KIT PG 1 OF
Hydrotherapy Jets (Remote Water Quality System)
") Page 1 of 6 Parts List (_) - 50 Roll of Flex PVC pipe 1-3/4 HP Circulating Centrifugal Pump 1 25 Roll of Flex PVC pipe 4-1 1 / 2 " Tees 2-1 1 / 2 " Ball Valves 2 - Female slip couplers 4-1/2" 90 degree
Page 1 of 6 Parts List (_) - 50 Roll of Flex PVC pipe 1-3/4 HP Circulating Centrifugal Pump 1 25 Roll of Flex PVC pipe 4-1 1 / 2 " Tees 2-1 1 / 2 " Ball Valves 2 - Female slip couplers 4-1/2" 90 degree
STONE TROUGH CONSOLE SINK
 STONE TROUGH CONSOLE SINK INSTRUCTIONS CONTENTS Console Installation Sink Support 2 2 Backsplash 2 Undermount Sink Semi-Recessed Sink 3 4 Vessel Sink 5 Drain Installation 6 1 CONSOLE SINK Read entire Console
TECHNICAL INSTRUCTIONS
 TECHNICAL INSTRUCTIONS Benchmark 3.0LN 24-Month Maintenance Kit# 58015-04 This kit applies to units with an Ignitor and a separate gas injector. For units with an Ignitor-Injector (P/N 58023), see Kit
Catch Cans. What makes the RX performance the most effective oil separating catchcan on the market?
 R X Catch Cans (For the 5 th Gen Camaro, L99 A6 V8) What makes the RX performance the most effective oil separating catchcan on the market? There are several factors that come into play to effectively
Built-In Dishwasher. Installation Instructions. BEFORE YOU BEGIN Read these instructions completely and carefully. IMPORTANT The dishwasher MUST be
 Installation Instructions Built-In Dishwasher If you have questions, call 800.GE.CARES (800.432.2737) or visit our website at: www.ge.com BEFORE YOU BEGIN Read these instructions completely and carefully.
an ISO 9001:2015 Registered Company
 an ISO 9001:2015 Registered Company Mark IV (672001-VHY) 18865 Goll St. San Antonio, TX 78266 Phone: 800-862-6658 Sales: sales@vintageair.com Tech Support: tech@vintageair.com www.vintageair.com 902001-VHY
MILLENIUM MEMBRANE REPLACEMENT. Tools and Materials Required. Initial Preparation
 MILLENIUM MEMBRANE REPLACEMENT Tools and Materials Required Screwdriver (flat & Phillips) ¼ or 3/8 drive ratchet wrench 7/16 socket (thin-wall) 8 to 10 extension New o-rings and seals New fittings (optional)
Installation Instructions
 Installation Instructions Over the Range Microwave Oven PVM88 Questions? Call -800-56-44 or Visit our Website at: GEAppliances.ca BEFORE YOU BEGIN Read these instructions completely and carefully. IMPORTANT
Radiator Coolant Flush
 Radiator Coolant Flush Should be done every couple years. Fairly easy job, need a Phillips head screwdriver, 10mm deep socket, couple gallons of water, a gallon of silicate free anti-freeze, needle nose
STOP RESIN TUB WITH INTEGRAL DRAIN PLANNING BEFORE YOU BEGIN TOOLS AND MATERIALS: GETTING STARTED INSTALLATION INSTRUCTIONS.
 BEFORE YOU BEGIN We recommend consulting a professional if you are unfamiliar with installing bathroom fixtures and plumbing. Signature Hardware accepts no liability for any damage to the floor, walls,
HydroCycle Vertical Aeroponic Systems
 HydroCycle Vertical Aeroponic Systems 2018 Growers Supply All Rights Reserved. Reproduction is prohibited without permission. 113700 4' Vertical System (24 Grow Sites) Revision date: 01.10.18 1 Important
OP44-1 REV 2: Removed depiction of air intake hole in the CB-907A Right Aft Case Baffle.
 REVISION DESCRIPTION: OP44-1 REV 2: Removed depiction of air intake hole in the CB-907A Right Aft Case Baffle. OP44-4 REV 1: Steps rewritten to describe the air intake hole on the CB-907A Right Aft Case
Installation Operation Care
 Installation Operation Care Duette and Applause Honeycomb Shades Vertiglide System CONTENTS Getting Started: Product View... 1 Tools and Fasteners Needed... 2 Installation: Installation Overview... 3 Outside
Heating and ventilation system,
 Page 1 of 24 87-151 Heating and ventilation system, servicing Instrument panel air outlets and air guide ducts CAUTION! Before working on the electrical system: Obtain security code for anti-theft radio.
Installation Instructions
 Installation Instructions For Fully Integrated NoFrost Combined Refrigerator-Freezers HCB 1560/1561 HC 1550 7084 327-00 Important Please Read and Follow these Instructions These instructions contain Danger,
INSTALLATION MANUAL. Manufactured by AQUA-AIR MANUFACTURING. (801) or (800) FAX (801)
 or (800) FAX (801)") INSTALLATION MANUAL Manufactured by AQUA-AIR MANUFACTURING 542 W. 47 Confluence East 800 South, Ave., Salt Ivins, Lake Utah City, 84738 Utah 84123 (801) 265-9699 or (800) 916-5777 FAX (801) 268-3856 (435)
INSTALLATION MANUAL Manufactured by AQUA-AIR MANUFACTURING 542 W. 47 Confluence East 800 South, Ave., Salt Ivins, Lake Utah City, 84738 Utah 84123 (801) 265-9699 or (800) 916-5777 FAX (801) 268-3856 (435)