Aquapeutics GENERAL INSTALLATION GUIDE. Toll Free Customer Service line 1 (800)
|
|
|
- Megan Shepherd
- 5 years ago
- Views:
Transcription
 290-6812")
1 Aquapeutics GENERAL INSTALLATION GUIDE Toll Free Customer Service line 1 (800)

2 Thank you for choosing an Aquapeutics product. Please read the following guide in its entirety before assembling your unit. It is also very important to follow the safety suggestions outlined below at every use. 1.Please keep in mind that like most shiny bathroom surfaces when they get wet they may become slippery. Take care not to slip or fall. 2.Children should only use this product under adult supervision. 3.Users who suffer from heart disease or have high blood presser should exercise greater care when using this product. 4.Senior citizens, pregnant women and those who are of ill health are advised to get a doctors opinion on the recommended frequency of use of this product. Shipment information Upon arrival your Aquapeutics spa it is IMPERATIVE that you inspect for exterior damage to the shipping crates before signing the delivery receipt. DO NOT refuse the shipment if you see external damage! Simply note the damage on the delivery receipt with the driver. Very rarely does external damage equate to internal damage to the unit. In the rare event that there is internal damage we can replace the piece that is damaged rather then replace the entire unit.

3 It is recommended that all rough plumbing and electrical work be completed before the assembly of your product begins. Typical Installation Requirements A Water supply: Hot and cold water supply lines are half inch NPT pipe thread Power supply:a 220Volt,13 amp service with GFI is necessary to energize the steam room-spa and a 110 volt 11.8 amp circuit with GFI is needed for the whirlpool bath. Please note: If you have purchased atub with the additional heater option it is very important to understand that the electrical requirements for your unit have changed. The heater requires a second separate electrical circuit that can supply13 amps at 110 volts with GFI in addition to what your tub had originally needed. B The size of breakers and wire gages needed is determined by local, state and national codes as interpreted by the installing electrician. The length of the wire going to the steam generator from the wall should be 5 feet, while the length of the telephone line needed is 7 feet. This allows the unit to be pulled out from the side walls if maintenance is ever needed. C.Drainage: The diameter of the drain pipe needs to be at least 2 inches. The position of the drain hole can be within 6 inches from the hole shown in the drawing. It is also very important that the drain line not have a trap. It must be a straight drain line, as the shower-spa has its own built in trap for your convenience. Drain pipe can be offset as much as 6-12 inches from tub drain and the Drain pipe should be at least 2 inches in diameter.
 (2) It is recommended that the water pressure be at least 43 PSI and both the cold and hot water pressure should be as equal as possible.")
4 1) The distance from the top of the steam room to the ceiling of the area where it is installed should be 4 inches or greater. (The room should be at least 4 inches taller than the spa.) (2) It is recommended that the water pressure be at least 43 PSI and both the cold and hot water pressure should be as equal as possible. If the pressure is lower than required, have your plumber install the necessary equipment to increase the water supply pressure. (3) Please have ground fault interrupter (GFI) protection on all power supply lines to the spa. (4) It is easier to line up all panels with the hardware loose. During initial assembly please attach all fasteners loosely, then when the unit is completely erected, snug up all bolts and screws. At least two people are required to lift the larger pieces into position during installation. Typical supplied hardware Elbow w/washer 1/4 x 1 1/4 inch bolt Hardware bag 1/4 x 1 inch bolt 1/4 x 5/8 bolt 1/4 inch nuts with washers Tool 3/16 x 5/8 inch self taping screw Larger washer
 16-24 inches from its final installed location.")
5 Typical tools needed Wooden hammer Wrench Level Tape Screwdriver Pencil Step 1 tub, Shower/ tub combo or shower base 1.Place the shower / tub floor unit (as pictured to the right) inches from its final installed location. Now adjust the leveling feet to bring the unit flat and level by using a 3 foot level and an open end or adjustable wrench to turn the adjusting nuts. (2 shown of 4) This will raise or lower each corner as needed. Once the unit is level and flat lock each leg into position with its locking nut. Shower base


6 Step 2 9 Are typical steam shower assembly instructions Step 2B Carefully lift (two p e o p l e a r e recomended) the back panel onto the bathtub. Fasten them together using 1/4x1 inch bolts with the gaskets in place. Step 3 Step 4 3. Lift the left back-panel onto the bathtubs back edge (two people are recommended) as shown in the drawings and photos, align the mounting holes of the backpanel with the holes drilled into the bathtub. Connect the sides of both panels with ¼ x 5/8 inch bolts and connect the bottom of the panel to the tub with ¼ x 1 inch bolts hand tight. 4. Assemble the right side as you did the left.

 Step 6 3/16 x5/8 Screws Drill 1/16 pilot holes first Lift the fixed glass frame onto the bathtub as shown in photo; slide it into the aluminum extrusion of the right side panel.")
7 Step 5 3/16 x5/8 Screws Drill 1/16 pilot holes first Lift the fixed glass frame onto the bathtub as shown; slide it into the aluminum extrusion of the left side panel. When it has bottomed out into the vertical extrusion and the bottom of the glass panel is lying flat on the tub-lip surface as shown, attach with two 3/16 x 5/8 inch self-tapping screws from the side as shown. (Two people are recommended for this procedure. One to hold the pieces in place while the other screws the panel in place.) Step 6 3/16 x5/8 Screws Drill 1/16 pilot holes first Lift the fixed glass frame onto the bathtub as shown in photo; slide it into the aluminum extrusion of the right side panel. When it has bottomed out into the vertical extrusion and the bottom of the glass panel is lying flat on the tub-lip surface as shown, drill two 1/16 inch pilot holes. After you have inserted the middle glass frame with the sliding glass door and the alignment has been checked to be square and plumb, attach with two 3/16 x 5/8 inch selftapping screws from the side as shown. (Two people are recommended for this procedure. One to hold the pieces in place while the other drills and screws the panel in place.)


8 Step 67 Lift the middle glass section ( with the sliding glass door section)(two people are recommended) onto the bathtub as shown in the photo, slip it into the aluminum extrusions on the left and right sides, making sure they bottom out into the vertical extrusions. (You may have to tap them into place with a rubber mallet) the complete glass wall and back panel assembly should be able to stand by itself without additional support. After the roof/ ceiling has been secured, some final self-tapping screws will be used to fasten the glass wall to the bathtub. Step 8 All the panels and glass sections should still be loose or only slightly hand tight. Lift the roof-ceiling section onto the top of the shower assembly and align all the holes. Connect the roof with the back-panel with 1/4 X 5/8 inch hex bolts, and connect to the aluminum extrusions of the glass door frame with 3/16 X 5/8 self-tapping screws. Now snug up all fasteners (Except as mentioned in step 9) while making sure the unit is plumb and square. Step 9 After the roof-ceiling has been secured, 2 self-tapping screws will be used to fasten the glass wall to the bathtub. Please pre-drill pilot holes through the extrusion (Two people are recommended for this procedure, one to hold the pieces in place while the other drills and screws the door frame onto the bathtub) before screwing it in place. The photos below (by way of the black lines) show recommended positions for the screw holes but any two convenient places will do.

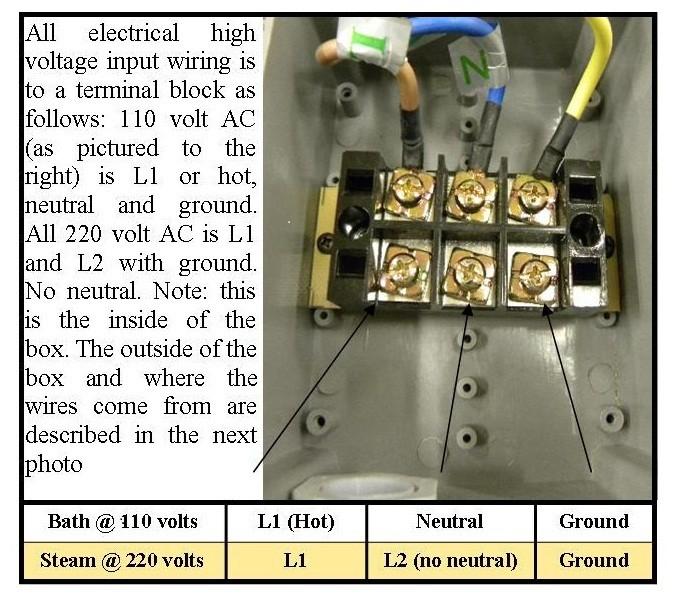
9 110 and 220 volt Electrical
 connected to the Steam Generator.")

10 Steam generator plumbing Electrical Steam outlet break-out Black insulated steam hose Steam drain Connect all hoses to and from the Steam generator. The appropriate outlets/ inlets are labeled in the diagram and are visible in the photo. The Steam generator drain hose is pushed onto the fitting (straight or elbow) connected to the Steam Generator. It is secured to this fitting by a clamp and a 3/16 X 5/8 inch round head fastener as is shown in the above figure. It is also shown assembled in the photo below. The all silver water supply hose threads in here Steam generator Electrical feed Black insulated hose Connect the insulated black high temperature steam pipe, which comes from the steam outlet of the steam generator, to the steam jet s connector on the spa s back panel. When bending the insulated steam hose, please Use Extreme Care not to crimp the hose as you feed it through the appropriate hole in the tub section. (as shown on next page) Also insert the larger rubber washer (as pictured in the parts page of this manual) into the connector before threading it into place on the steam jet. Front and side view of Steam outlet


11 Step 10 Water supply Hole for steam hose The silver braided hose goes to the steam generator Long gray hose that goes to the rainfall shower. The red striped braided hose goes to the hot water supply The blue striped braided hose goes to the cold water supply Step 12 The long gray hose goes to the rainfall shower and is connected to the elbow on the roof of the shower with a clamp as in the drawing.

12 Step 12 Please refer to the labels (with icons) on the wires of the various low voltage components. They include Telephone, CD, loudspeaker, LED lights, fan, control panel, and the ozonizer O3 shower self cleaner, Connect the wires sharing the same labels and/or properly mated connector pairs. The radio antenna is shown in its coiled condition. It must be uncoiled and draped down the back of the shower panel for best reception. Step 13 The coupling at the end of the sprayer hose should be screwed in to the nozzle located in the high left-hand corner of the back panel as you enter the tub. Then the hand-held shower head can be inserted into its storage cradle as shown in the drawing. Step 14 Use the same technique to install the foot massage unit.if applicable Its nozzle is located in the lower right-hand corner of the back panel as you enter the tub. When using the foot massager open the cover of the unit as depicted in the illustration.

13 Please note: If you have purchased a Tub with the additional heater option it is very important to understand that the electrical requirements for your unit have changed. The heater requires a second separate electrical circuit that can supply 13 amps at 110 volts in addition to what your tub had originally needed. Pick a side wall water jet pipe that is convenient to work on. Measure the distance taken up by the water heater. (Approximately 7 and 5/8 inches). Cut this part out. Glue the ends of the water heater and wait until the glue sets as per the manufactures instructions. Plug the heater in. It has its own thermostatically controlled on/off and temperature controls. It will turn on when there is water present and the temperature is below 102degrees and will shut off at 104 degrees. Remember that this heater is plugged into a separate GFI 110 volt circuit. Optional water Heater: for use with tubs or shower tubs only While the unit is still inches away from its final installed position all joints and seams should be calked with a high grade silicone sealant. Then fully test the unit. Then slide it into its final installed position. Attention: Within your warrantee period please do not break the seal on the electrical box or the steam generator. Doing so will void your warrantee. There are no user serviceable parts inside. DO NOT repair or replace these units on your own. If you do experience any problems, please contact Aquapeutics Toll Free Customer Service line 1 (800) for after-sale service.
AQUAPEUTICS MONACO INSTALLATION MANUAL
 AQUAPEUTICS MONACO INSTALLATION MANUAL Monaco schmatic diagram Cross sectional illustration of gaskets Recommended tools 4 5 5 5 5 Installation steps Steam generator hook-ups Troubleshooting n Steam dispenser
LEVENS STEAM SHOWER ENCLOSURE
 LEVENS STEAM SHOWER ENCLOSURE INSTALLATION AND USER MANUAL CONTENTS Steam Shower Enclosure Installation...2 Technical Information...2 Plumbing Requirements...2 Assembly...3 Tools and Materials...3 Installation...3
FREWIN STEAM SHOWER ENCLOSURE
 FREWIN STEAM SHOWER ENCLOSURE INSTALLATION AND USER MANUAL CONTENTS Steam Shower Enclosure Installation...2 Technical Information...2 Plumbing Requirements...2 Assembly...3 Tools and Materials...3 Installation...3
ARLEY STEAM SHOWER ENCLOSURE
 ARLEY STEAM SHOWER ENCLOSURE INSTALLATION AND USER MANUAL CONTENTS Steam Shower Enclosure Installation...2 Technical Information...2 Plumbing Requirements...2 Assembly...3 Tools and Materials...3 Installation...3
COPPER FREESTANDING TUB
 COPPER FREESTANDING TUB INSTALLATION INSTRUCTIONS AND CARE GUIDE CONTENTS Tub Installation...2 Rough-In...2 Drain Installation...3 Drain without Overflow...3 Waste and Overflow Drain...3 Trimming Drain
INSTALLATION MANUAL FOR MODELS: TERAZZA, TRACCIO, MILANO, CERRATO
 INSTALLATION MANUAL FOR MODELS: TERAZZA, TRACCIO, MILANO, CERRATO TABLE OF CONTENTS ROOM SPECIFICATIONS ELECTRICAL SPECIFICATIONS PLUMBING SPECIFICATIONS TECHNICAL SPECIFICATIONS INTRODUCTION ASSEMBLY
INSTALLATION MANUAL FOR MODELS: SOVANNA, BREZZA, TERRACINA, VENADO
 INSTALLATION MANUAL FOR MODELS: SOVANNA, BREZZA, TERRACINA, VENADO 1 STRADA, TERCERA, SEDONA, MARVIN STEAM SHOWERS SPECIFICATION SHEET 87.8 30 24 SOVANNA, VENADO, BREZZA, TERRACINA STEAM SHOWER UNIT DIMENSIONS
Installation and Operation Manual MG-304. Please read this manual carefully before use.
 Installation and Operation Manual MG-304 Please read this manual carefully before use. 1 P a g e Important Safety Instructions: Warning! Use this unit only for its intended purposes or as described in
Acrylic Claw Foot Tub
 Acrylic Claw Foot Tub Wrench or socket Drill & Bits Parts Recommended 2-2 x12 boards 4 Lag Bolts 4 Flat Washers Be sure to re-inforce the floor before securing tub. We recommend 2-2 x12 s securely fastened
NEPTUNE Steam Room Installation Instructions
 NEPTUNE Steam Room Installation Instructions IMPORTANT Please read carefully the following instructions before installing your shower cabin. If you have any questions on this shower cabin installation
Whirlpool Bathtub Model Number: MT618
 INSTALLATION AND OWNER'S MANUAL Whirlpool Bathtub Model Number: MT618 Please carefully read these instructions before you begin to install the products. 07/11 Rev A P/N:100056-03 Thank you for purchasing
RESIN FREESTANDING TUB
 RESIN FREESTANDING TUB INSTALLATION INSTRUCTIONS AND CARE GUIDE CONTENTS Tub Installation...2 Rough-In...2 Drain Installation...3 Air Tub Installation...4 Electrical Installation...4 Remote Control Installation...5
Before you begin, carefully read the installation instructions below. Observe all local electrical safety and plumbing codes.
 AIR TUB INSTALLATION Before you begin, carefully read the installation instructions below. Observe all local electrical safety and plumbing codes. Unpack and inspect tub and parts for damage. If any damage
Acrylic Claw Foot Tub
 Acrylic Claw Foot Tub Wrench or socket Drill & Bits Parts Recommended 2-2 x12 boards 4 Lag Bolts 4 Flat Washers Be sure to re-inforce the floor before securing tub. We recommend 2-2 x12 s securely fastened
Steam Room Installation Manual L52 Series (L528) All set up dimensions are in Millimeters
 All set up dimensions are in Millimeters") Steam Room Installation Manual L52 Series (L528) All set up dimensions are in Millimeters L528 Steam Room structure Size:1400x940x2260mm 1200 1050 100 2 1 3 4 5 6 7 9 10 14 15 16 17 18 19 20 21 1000 1500
Steam Room Installation Manual L52 Series (L528) All set up dimensions are in Millimeters L528 Steam Room structure Size:1400x940x2260mm 1200 1050 100 2 1 3 4 5 6 7 9 10 14 15 16 17 18 19 20 21 1000 1500
E2 Series Installation
 E Series Installation Residential Modular Steam Shower Systems IMPORTANT: The following information should be used in conjunction with guidance from your electrician, plumber, architect and other contractors
Cascade Premier and Elite Premier Bathing Systems with Aqua-Aire Installation / Assembly Instructions
 Cascade Premier and Elite Premier Bathing Systems with Aqua-Aire Installation / Assembly Instructions Premier Elite Premier PENNER PATIENT CARE, INC Box 523 / 102 Grant St. Aurora, NE 68818 360745P Revision
Kallista Bath Flip Drain
 P21586 Page 1 of 7 THANK YOU FOR CHOOSING KALLISTA We appreciate your commitment to Kallista quality products. Please take a moment to review this manual before you install your Kallista product. If you
ARIN THERMOSTATIC SHOWER SYSTEM
 ARIN THERMOSTATIC SHOWER SYSTEM INSTALLATION INSTRUCTIONS Before installing, read entire shower system installation instructions. Observe all local building and safety codes. For the following installation
AIR MASSAGE KIT INSTALLATION INSTRUCTIONS
 BEFORE YOU BEGIN We recommend consulting a professional if you are unfamiliar with installing bathroom fixtures and plumbing. Signature Hardware accepts no liability for any damage to the floor, walls,
INSTALLATION AND OWNER'S MANUAL
 INSTALLATION AND OWNER'S MANUAL Steam Shower Model Number: ZA218 Please carefully read these instructions before you begin to install the products. 07/11 Rev A P/N: 100053-01 Thank you for purchasing your
1-866-PENNERS
 Cascade Premier and Elite Premier Bathing Systems with Aqua-Aire Installation / Assembly Instructions Premier Elite Premier PENNER PATIENT CARE, INC Box 523 / 102 Grant St. Aurora, NE 68818 360745P Revision
Installation Manual for M-G014 & M-G015
 Installation Manual for M-G014 & M-G015 M-G014 M-G015 1 Contents 1. Electrical specifications 2. Plumbing 3. Installation of Water connections 4. Installation of Drain 5. Operation of Bathtub 6. Troubleshooting
STEAM ROOM with TUB. Installation & Operation Manual MK547
 By STEAM ROOM with TUB Installation & Operation Manual MK545 MK557/33 MK547 Note: You must read all installation & operation instructions prior to assembly and use of this unit. 1 P a g e Table of Contents
CAST IRON CLAWFOOT TUB
 BEFORE YOU BEGIN We recommend consulting a professional if you are unfamiliar with installing bathroom fixtures and plumbing. Signature Hardware accepts no liability for any damage to the floor, walls,
24. Exhaust Fan. 2. ½ NPT Brass nut. 1. Brass Elbow. 4. Speaker. 6. Rain Shower head. 5. White LED Light. 16. Flex Drain Assembly
 1. Brass Elbow 2. ½ NPT Brass nut 4. Speaker 5. White LED Light 6. Rain Shower head 12. Steamer Cleaning Port 13. Massage Jet 14. Foldable Seat 16. Flex Drain Assembly 22. Door Handles 24. Exhaust Fan
Assembly instructions. Alexandria Pedicare System ALEXANDRIA. Perfect design. Personal service.
 R Assembly instructions Alexandria Pedicare System ALEXANDRIA Perfect design. Personal service. IMPORTANT SAFETY PRECAUTIONS 1. Read and follow all instructions.. Danger: To reduce the risk of injury,
CAST IRON PEDESTAL TUB
 BEFORE YOU BEGIN We recommend consulting a professional if you are unfamiliar with installing bathroom fixtures and plumbing. Signature Hardware accepts no liability for any damage to the floor, walls,
INSTALLTION MANUAL FOR M-A6012
 INSTALLTION MANUAL FOR M-A6012 Make the most of your shower, make the best for your home! Thank you for choosing our computerized steam rooms. Our best wishes are to warm your lovely life by our elaborate
SWIVEL HEAD WASTE AND OVERFLOW INSTALL
 SKU(s): 921385 SWIVEL HEAD WASTE AND OVERFLOW INSTALL BEFORE YOU BEGIN We recommend consulting a professional if you are unfamiliar with installing bathroom fixtures and plumbing. Signature Hardware accepts
Unity 180 Premium Whirlpool 180/80/62 cm
 Unity 180 Premium Whirlpool 180/80/62 cm Operating and installation instructions Is there a problem with your product or do you have any questions? Please feel free to contact our hotline: 020-8528 1729
Concepts Serving Systems
 Concepts Serving Systems Installation Manual Please read this manual completely before attempting to install or operate this equipment! Notify carrier of damage! Inspect all components immediately. February
Cable Drain & Cable Drain Trim Kit
 INSTALLATION INSTRUCTIONS Cable & Cable Trim Kit P21581 & P21582 1 of 6 INSTALLATION INSTRUCTIONS Cable & Cable Trim Kit THANK YOU FOR CHOOSING KALLISTA We appreciate your commitment to Kallista quality
Handshower, Hose & Handshower Accessories
 P24443, P24445, P24446, P24452, P24453, P24456 1 of 6 INSTALLATION INSTRUCTIONS Thank You For Choosing KALLISTA We appreciate your commitment to KALLISTA quality products. Please take a moment to review
Installation Instructions PRO SERIES
 Installation Instructions PRO SERIES If you are a plumber installing this unit, please leave this owners manual & warranty card with the owner when you finish the installation. Thank You! DO NOT USE THIS
INSTALLTION MANUAL FOR M-A011
 INSTALLTION MANUAL FOR M-A011 Thank you for choosing our computerized shower room. Our best wishes are to warm your lovely life by our elaborate design. It is such an honor to have you enjoyed. For your
Installation Instructions. For the 18 Built-In Dishwasher and Front Color Panels
 Installation Instructions For the 18 Built-In Dishwasher and Front Color Panels Printed in USA 154232102 Before You Begin DO NOT INSTALL DISHWASHER UNTIL YOU HAVE READ ALL INSTRUCTIONS. FOR YOUR SAFETY,
Figure 1 - Steam Generator. Electrical Installation Instructions. 01/09 Pub. No. 200-A - 1 -
 Electrical Installation Instructions C US Steambath Generators The Steamist TSG Generator operates with a TSC control mounted inside and optional TSR remote control located outside the steamroom. It s
INSTALLATION INSTRUCTIONS
 INSTALLATION INSTRUCTIONS INSTALLATION REQUIREMENTS Tools and Parts Gather required tools and parts before starting installation. Tools needed: Optional tools: Flashlight Options: Bucket Pedestal: You
STONE TROUGH CONSOLE SINK
 STONE TROUGH CONSOLE SINK INSTRUCTIONS CONTENTS Console Installation Sink Support 2 2 Backsplash 2 Undermount Sink Semi-Recessed Sink 3 4 Vessel Sink 5 Drain Installation 6 1 CONSOLE SINK Read entire Console
AirBath Hydro-Massage Tubs UL1795 Installation and Operating Instructions
 Tools you might need for proper installation Galvanized Nails or Screws - For Units with a Tiling Flange Four Foot Level Shims Caulking Gun Screw Gun Adhesive Thank you for purchasing the Praxis AirBath
General System Layout Sketch
 General System Layout Sketch EZ-37 Solar Panels PV panel Glycol Fill Valve Expansion Tank ` 1 Introduction This document describes how to install a Heliatos GH type solar water heating system. These systems
Electrical Installation Instructions
 Steambath Generators Models: SM-2 and SM-5! Electrical Installation Instructions C US LISTED 995C WARNING: Elderly persons, pregnant women, or those suffering from heart disease, high blood pressure, diabetes,
DISHWASHER. Models DW2432 and DW2432SS. Installation Manual. Write Serial Number (on inner door of unit) here:
 here:") DISHWASHER Models DW2432 and DW2432SS Installation Manual Write Serial Number (on inner door of unit) here: Felix Storch, Inc. Summit Appliance Division 770 Garrison Avenue Bronx, New York 10474 www.summitappliance.com
DISHWASHER Models DW2432 and DW2432SS Installation Manual Write Serial Number (on inner door of unit) here: Felix Storch, Inc. Summit Appliance Division 770 Garrison Avenue Bronx, New York 10474 www.summitappliance.com
CONTEMPORARY STEAM ROOM
 by CONTEMPORARY STEAM ROOM Installation & Operation Manual Note: You must read all installation & operation instructions prior to assembly and use of this unit. 1 P a g e Table of Contents Notice to Installers..
AWP 3260 CWH Installation Instructions Hydro-massage Bathtub - UL 1795
 Tools you might need for proper installation galvanized nails or screws large level hammer or screw gun shims adhesive Thank you for purchasing Praxis Bathware. For best results, please read and follow
DRAIN WATER TEMPERING INSTALL
 ! WARNING! CAUTION DRAIN WATER TEMPERING KIT - 0601-00-07-86 WARNING! This kit should be installed only by qualified service personnel to reduce the risk of electric shock, serious injury, or fire. A plumbing
Aqua-Aire Sit-Bath System 6300 Installation / Assembly Instructions
 Aqua-Aire Sit-Bath System 6300 Installation / Assembly Instructions PENNER PATIENT CARE, INC Box 523 / 102 Grant St. Aurora, NE 68818 350745 Rev F 02/23/11 1-866-PENNERS 1-866-736-6377 1-800-732-0717 E-mail
Helpful Tip: NOTE:
 Grounded electrical supply required. Do not run drain lines, water lines or electrical wiring where they can interfere with or contact dishwasher motor or legs. The location where the dishwasher will be
A301 SHOWER PANEL INSTALLATION GUIDE
 A301 SHOWER PANEL INSTALLATION GUIDE Shower Panel Installation Read Before Using Your New Shower Panel Congratulations on purchasing an Ariel Shower Panel. Your new shower panel will be a great addition
Installation Manual PS-225 & PS-275
 Installation Manual PS-225 & PS-275 Table of Contents Pre-Uncrating Checklist... 1 Verifying System Requirements... 2 Verifying System Direction... 2 Verifying the Electrical Requirements... 2 Removal
I<enmore Elite. instructions dlnstallation. Installation Guide Instrucciones de Instalaci6n. English / Espafiol/Frangais
 Installation Guide Instrucciones de Instalaci6n instructions dlnstallation English / Espafiol/Frangais Models/Modelos/Mod_les: 630.1390% 630.1 391_ I
SUPPLEMENTARY INSTRUCTIONS
 www.burcam.com 2190 Dagenais Blvd.West TEL: 514.337.4415 LAVAL (QUEBEC) FAX: 514.337.4029 CANADA H7L 5X9 info@burcam.com SUPPLEMENTARY INSTRUCTIONS MODEL 450475 Dear consumer, We thank and congratulate
Luxury Spas Inc. Instruction Manual E-35 Steam Shower. Instruction Manual 1
 Instruction Manual Instruction Manual 1 LUXURY SPAS, INC. E-35 STEAM SHOWER INSTRUCTION MANUAL Electrical Diagrams 3-5 Plumbing Diagrams 6-7 E-35 Features 8 Center panel 8 Steam Output/Aromatherapy 9 Drain/
Instant Hot Water Dispenser Owner s Manual
 Model Hot1 Instant Hot Water Dispenser Owner s Manual Installation, Care & Use Instalacion, cuidado & uso Installation, soin et utilisation WHAT YOU SHOULD KNOW BEFORE YOU BEGIN For your satisfaction and
SAVE THESE INSTRUCTIONS
 Built-In Dishwasher Dishwashers Write the model and serial numbers here: Model # Serial # You can find them on the tub wall just inside the door or. the lower part of back. Installation Instructions DDW1802W
ELLA SOAKING WALK IN BATHS OWNERS MANUAL. Representing these model numbers: L / R Elite Soaking L / R Royal Soaking
 Representing these model numbers: 03057 L / 03058 R Deluxe Soaking 03107 L / 03108 R Elite Soaking 03167 L / 03168 R Petite Soaking 03085 Companion Soaking 03117 L / 03118 R Royal Soaking ELLA SOAKING
Owner s Manual FS-10/FreshSpa
 Owner s Manual FS-10/FreshSpa Table of Contents Product Features................ Page 2 Parts List....................... Page 3 Configuration................... Page 4 Installation.....................
BUILT-IN DISHWASHER INSTALLATION INSTRUCTIONS
 BUILT-IN DISHWASHER INSTALLATION INSTRUCTIONS PLEASE READ COMPLETE INSTRUCTIONS BEFORE YOU BEGIN LEAVE INSTALLATION INSTRUCTIONS AND USER'S GUIDE WITH OWNER ALL ELECTRIC WIRING AND PLUMBING MUST BE DONE
This site is based on a but applies to all 1971-on Saab 99 and Saab 900.
 by Mark Jeter updated: December 8, 2004 originally web-published June 27, 2001 This document shows how the original waterpump in a Saab "B" engine can be eliminated and replaced with a reliable, efficient
STAINLESS STEEL TUB INSTALLATION
 BEFORE YOU BEGIN We recommend consulting a professional if you are unfamiliar with installing plumbing fixtures. Signature Hardware accepts no liability for any damage to the faucet, plumbing, sink, counter
Installation Guide. 1 & 3 Series Built-In Dishwashers. Viking Range, LLC 111 Front Street Greenwood, Mississippi USA (662)
") Guide Viking Range, LLC 111 Front Street Greenwood, Mississippi 38930 US (662) 455-1200 For product information, call 1-888-845-4641 or visit our web site in the US at www.vikingrange.com or in Canada
Guide Viking Range, LLC 111 Front Street Greenwood, Mississippi 38930 US (662) 455-1200 For product information, call 1-888-845-4641 or visit our web site in the US at www.vikingrange.com or in Canada
ESSENCIA INSTALLATION INSTRUCTIONS IMPORTANT INFORMATION FOR THE INSTALLER AND THE OWNER TO BE KEPT BY THE OWNER
 IMPORTANT INFORMATION FOR THE INSTALLER AND THE OWNER TO BE KEPT BY THE OWNER TABLE OF CONTENT IMPORTANT SAFETY INSTRUCTIONS...1 PARTS & TOOLS...3 SITE PREPARATION...6 INSTALLATION REMOTE MOUNTING OF TURBINE
INSTALLATION INSTRUCTIONS UNDERCOUNTER DISHWASHERS
 INSTALLATION INSTRUCTIONS UNDERCOUNTER DISHWASHERS VIKING 111 Front Street Greenwood, Mississippi 38930 USA (662) 455-1200 IMPORTANT - PLEASE READ AND FOLLOW Before beginning - please read these instructions
FOOD WASTE DISPOSER INSTALLATION AND USE MANUAL
 FOOD WASTE DISPOSER INSTALLATION AND USE MANUAL English only (Australia and New Zealand) 1a 1 1b 1 1c 11 3 1 17 3 13 4 1 7 14 1 0 1 7174 Rev C www.insinkerator.com 01 InSinkErator, a business unit of Emerson
Installation Instructions
 Installation Instructions For the 18" Built-In Dishwasher Sears, Roebuck and Co. Sears Canada, Inc. Hoffman Estates, IL 60179 U.S.A. Toronto, Ontario, Canada M5B 2B8 154435201 Before You Begin DO NOT INSTALL
IMPORTANT INFORMATION. Revised Dishwasher Installation Instructions
 IMPORTANT INFORMATION Revised Dishwasher Installation Instructions To obtain a revised copy of the entire Dishwasher User s Manual, go to www.eurotechappliances.com. SPECIAL EDITION 11-20-02 SAVE THESE
Installation Guide. Install your new sink with step-by-step instructions.
 Installation Guide Install your new sink with step-by-step instructions. Installation Guide Bath Sinks Drop-In Undermount Dual Flex Vessel Drains Bathtubs Freestanding Overflow and Waste Kit Rough-In Kit
ACRYLIC PEDESTAL TUB
 BEFORE YOU BEGIN We recommend consulting a professional if you are unfamiliar with installing bathroom fixtures and plumbing. Signature Hardware accepts no liability for any damage to the floor, walls,
Remote Water Quality System Standard Equipment (supplied by EPI) Remote Water Quality System Optional Equipment (supplied by EPI)
 Remote Water Quality System Optional Equipment (supplied by EPI)") Page 1 of 11 Parts List Remote Water Quality System Standard Equipment (supplied by EPI) 20sq ft Skimmer-Filter Remote Water Quality Plumbing Kit Heater-Controller Keypad Control 220V 3/4HP Circulation
Page 1 of 11 Parts List Remote Water Quality System Standard Equipment (supplied by EPI) 20sq ft Skimmer-Filter Remote Water Quality Plumbing Kit Heater-Controller Keypad Control 220V 3/4HP Circulation
Installation Manual PS-200 & PS-201
 Installation Manual PS-200 & PS-201 Table of Contents Pre-Uncrating Checklist... 1 Verifying System Requirements... 2 Verifying System Direction... 2 Verifying the Electrical Requirements... 2 Removal
Standard and CELDEK Evaporative Cooler Modules Installation, Operation, and Maintenance Manual
 Standard and CELDEK Evaporative Cooler Modules Installation, Operation, and Maintenance Manual Standard Evaporative Cooler CELDEK Evaporative Cooler RECEIVING AND INSPECTION Upon receiving unit, check
MIRAGE EVO 250 PEDICURE SYSTEM
 Welcome to the world of the Mirage Pipeless Pedicare System from. The Mirage 250 EVO is a sophisticated piece of equipment and it requires preventative maintenance and care. MIRAGE PEDICARE INSTALLATION
Destination Collection Whirlpool Bath Installation Instructions
 Tools you might need for proper installation Galvanized Nails or Screws Large Level Hammer or Screw Gun Shims Adhesive Thank you for purchasing Praxis Bathware. For best results, please read and follow
62" LED SPYRA. Product images may vary slightly from actual product. INSTRUCTION MANUAL
 62" LED SPYRA Product images may vary slightly from actual product. INSTRUCTION MANUAL TABLE OF CONTENTS SAFETY RULES...4 TOOLS AND MATERIALS REQUIRED...5 PACKAGE CONTENTS...5 MOUNTING OPTIONS...6 HANGING
ACRYLIC CLAWFOOT TUB
 ACRYLIC CLAWFOOT TUB INSTALLATION INSTRUCTIONS AND CARE GUIDE CONTENTS Tub Installation...2 Rough-In...2 Drain Installation...3 Drain without Overflow...3 Waste and Overflow Drain...3 Trimming Drain Pipes...4
A B A B4
 TM TM SERVICE INSTRUCTIONS Thermo-Aire Heater Kits and Air-Heater Assemblies 383808-A4 383808-B4 383880-A4 383880-B4 DESCRIPTION The Thermo-Aire Heater is used in situations where oils of heavier viscosity
Sundance Spas SPA EQUIPMENT SYSTEM. Installation Instructions. P/N Rev. A
 Sundance Spas SPA EQUIPMENT SYSTEM Installation Instructions P/N 6530-456 Rev. A Contents Important Notices 1 Important Safety Instructions 2 Where to Place the Equipment System 3 Connecting Pipes Between
Decor Star 1. Decor Star PL-037-SS
 Decor Star PL-037-SS Features - Stunning stylish European inspired design - Durable stainless steel frame construction - Square stainless thin profile shower head - 3 swivel massage jets - 4 stage shower
#PSBTWE1000 INSTALLATION GUIDE
 Electronic Bidet with Integrated Toilet #PSBTWE1000 INSTALLATION GUIDE INSTALLATION MANUAL Thank you for choosing our product! Please read and carefully follow the instructions before installation. Secure
Installation Instructions
 Installation Instructions For Free Standing NoFrost Combined Refrigerator-Freezers CS 1660 7084 203-00 Important Please Read and Follow these Instructions These instructions contain Danger, Warning and
HydroCycle Vertical Aeroponic Systems
 HydroCycle Vertical Aeroponic Systems 2018 Growers Supply All Rights Reserved. Reproduction is prohibited without permission. *Actual system may differ from system shown. 113593 8' Vertical System (44
Gen II Entree Bath - All Models
 Gen II Entree Bath - All Models Installation Manual Important Safety Instructions Read & Follow All Instructions Thoroughly Important safety instructions. Read and follow all instructions thoroughly. CAUTION:
WATTS WALL-MOUNT WIDESPREAD BATHROOM FAUCET INSTALLATION
 SKU(s): 940842 WATTS WALL-MOUNT WIDESPREAD BEFORE YOU BEGIN We recommend consulting a professional if you are unfamiliar with installing plumbing fixtures. Signature Hardware accepts no liability for any
REFLECTION STEAM CABIN INSTALLATION INSTRUCTIONS
 REFLECTION STEAM CABIN INSTALLATION INSTRUCTIONS IMPORTANT DreamLine TM reserves the right to alter, modify or redesign products at any time without prior notice. For the latest up-to-date technical drawings,
Dishwasher. Installation manual DW60M9990AP
 Dishwasher manual DW60M9990AP DW9000M_DD68-00197B-00_EN.indd 1 6/1/2017 4:34:14 PM Contents Contents 3 What s included 3 requirements 7 Dimensions and specifications 9 Step-by-step installation 11 2 English
HydroCycle Vertical Aeroponic Systems
 HydroCycle Vertical Aeroponic Systems 2018 Growers Supply All Rights Reserved. Reproduction is prohibited without permission. 113700 4' Vertical System (24 Grow Sites) Revision date: 01.10.18 1 Important
OUTDOOR DISHWASHER INSTALLATION INSTRUCTIONS
 OUTDOOR DISHWASHER INSTALLATION INSTRUCTIONS IMPORTANT! Read all of these instructions before installing the dishwasher. AUTOMATIC HIGH LOOP The drain hose is fastened to the back of the machine at the
3MNLR72XXD Series Fan. Owner s Guide and Installation Manual. UL Model NO. : 3MNLR72
 Owner s Guide and Installation Manual 3MNLR72XXD Series Fan UL Model NO. : 3MNLR72 Attach sales receipt to this card and retain as your proof of purchase DATE OF PURCHASE: MODEL NUMBER: RETAILER NAME:
installation and operation manual for Hunter Ceiling Fans
 For Your Records and Warranty Assistance Model Name: Catalog/Model No.: Serial No.: Date Purchased: Where Purchased: For reference also attach your receipt or a copy of your receipt to the manual. installation
MAJESTIC Steam Cabin Installation Instructions
 MAJESTIC Steam Cabin Installation Instructions IMPORTANT Please read carefully the following instructions before installing your steam cabin. If you have any questions on this steam cabin installation,
Oahu Showerspa Model #1035 Owner's Manual
 O A H U Oahu Showerspa Model #1035 Owner's Manual Oahu ShowerSpa Model #1034 Please Read The Following Instructions COMPLETELY Before Beginning! Our goal is to ensure your installation goes smoothly and
EDISON DUAL HANDLE VESSEL SINK FAUCET
 SKU(s): 929281 BEFORE YOU BEGIN We recommend consulting a professional if you are unfamiliar with installing plumbing fixtures. Signature Hardware accepts no liability for any damage to the faucet, plumbing,
Owner s Guide and Installation Manual
 For Your Records and Warranty Assistance For reference, also attach your receipt or a copy of your receipt to the manual. Model Name Type 2 Models Owner s Guide and Installation Manual Model No. Catalog
1. SAFETY RULES WARNING WARNING. 8. Avoid placing objects in the path of the blades.
 1 1. SAFETY RULES 1. To reduce the risk of electric shock, insure electricity has been turned off at the circuit breaker or fuse box before beginning. 2. All wiring must be in accordance with the National
Section 2 Safety, Tools and Equipment, Shop Practices Unit 5 Tools and Equipment
 Section 2 Safety, Tools and Equipment, Shop Practices Unit 5 Tools and Equipment Unit Objectives After studying this chapter, you should be able to: Describe hand tools used by the air-conditioning, heating,
Section 2 Safety, Tools and Equipment, Shop Practices Unit 5 Tools and Equipment. Unit Objectives 3/1/2012. General Hand Tools (1 of 6)
") Section 2 Safety, Tools and Equipment, Shop Practices Unit 5 Tools and Equipment Unit Objectives After studying this chapter, you should be able to: Describe hand tools used by the air-conditioning, heating,
Section 2 Safety, Tools and Equipment, Shop Practices Unit 5 Tools and Equipment Unit Objectives After studying this chapter, you should be able to: Describe hand tools used by the air-conditioning, heating,
Ebb & Flow System
 113501 Ebb & Flow System Actual system may differ from what is shown. System requires a timer to control the main pump and to set watering cycles. Additional purchase required. 2016 FarmTek All Rights
breeze easytm model # F100-1W
 DewStop breeze easytm model # F100-1W Installation Guide Read and Save These Instructions LISTED Questions, Problems, Missing Parts? Please Call 1-360-876-2974 or E-Mail info@dewstop.com please retain
BURWELL BIDET TOILET SEAT INSTALLATION
 BEFORE YOU BEGIN We recommend consulting a professional if you are unfamiliar with installing plumbing fixtures. Signature Hardware accepts no liability for any damage to the product, plumbing, toilet,