The ORIGINAL Hard Cover Spa OWNER S MANUAL MODELS E1-E2-E3-E4
|
|
|
- Gladys Clarke
- 5 years ago
- Views:
Transcription
1 1 By: Fusion Pacific The ORIGINAL Hard Cover Spa OWNER S MANUAL MODELS E1-E2-E3-E4 IMPORTANT SAFETY INSTRUCTIONS INSIDE. READ ENTIRE MANUAL BEFORE INSTALLING SPA. PLEASE SAVE THIS MANUAL FOR FUTURE REFERENCE. OWNER S RECORD Please record the following important information here for handy reference. MODEL #: SERIAL #: DATE PURCHASED: PRICE PAID (BEFORE TAX): $ DATE INSTALLED: DEALER NAME: DEALER ADDRESS: CITY STATE ZIP DEALER TELEPHONE: March 2017
2 2 FACTORY LIMITED WARRANTY This warranty begins on date of delivery and it extends to the original purchaser of any model ECO SPA manufactured January 2015 or later. If your ECO SPA develops a defect that is covered under the terms of this warranty, it will be repaired by Fusion Pacific Inc. (FPI) or its authorized dealer. The original owner must register their product through our website at or mail their warranty card within thirty (30) days from purchase or taking delivery, whichever comes first, to activate this warranty. LIFETIME STRUCTURAL The structural integrity of the ECO SPA is warranted to be free of defects for lifetime. Should the ECO SPA structure develop a defect and not hold water within the warranty period, it will be repaired or replaced (at FPI s discretion) by FPI. Any related shipping charges are the responsibility of the Spa owner. LIFETIME ECO-HARDCOVER WITH ATTACHED ARMS The ECO-HARDCOVER WITH ATTACHED ARMS is warranted for Lifetime to be free from defect in materials and workmanship. Clamps are provided and should be used to better trap heat and keep the cover true to the spa. 3 YEARS PLUMBING ECO SPA warranties all plumbing parts to be free from defects in material and workmanship for a period of three (3) years from original date of purchase. This limited warranty specifically covers leaks from wall fittings jet fittings, internal plumbing, internal glue joints, drains, air controls, diverter valve and light lens. Jet damage caused by chemical extremes and/or chemical imbalances in the water is not covered by this warranty. 3 YEARS COMPONENTS ECO SPA components, including top side control, spa control pack, pump, pillows, heater and, if so equipped, ozone unit and LED lighting systems, are warranted to be free of defects or leaks for a period of three (3) years from the OEM date of manufacturing. Defective components within three (3) years will be replaced or repaired (at FPI s discretion) by FPI. Component damage caused by chemical extremes and/or chemical imbalances in the water is not covered by this warranty. 3 YEARS LABOR ECO SPA will provide a 3-year labor warranty. Refer to your dealer for warranty service. DISCLAIMER FPI assumes no liability or responsibility for incidental, consequential or other damage including, but not limited to, removal of a deck or other custom fixture(s), transportation or shipping charges, telephone charges, rental of a like product during the time warranty service is being performed, travel, loss or damage to personal property and loss of revenue, use, time or inconvenience resulting from the loss of use of any ECO SPA covered by this warranty, as applicable by state laws. This warranty does not cover any spa that has been subject to misuse, neglect, negligence, accident, civil disturbance, acts of nature or that has been operated in a way contrary to the recommended operating instructions or that has not been installed as specified in the ECO SPA Owner s operating manual; this warranty does not cover any Spa that has been modified or altered, except with parts or options that are authorized by FPI and installed according to recommended installation instructions, This warranty also does not cover any problems caused by improper water chemistry, improper PH balance, improper wiring, use of extension cords or failure to provide an isolated electrical service. Not covered are electrical issues or other problems which are not from defects in manufacturing. This warranty does not cover any ECO SPA that is being used for commercial purposes or has been operated extensively on display or that has been left uncovered or without water for long periods of time.
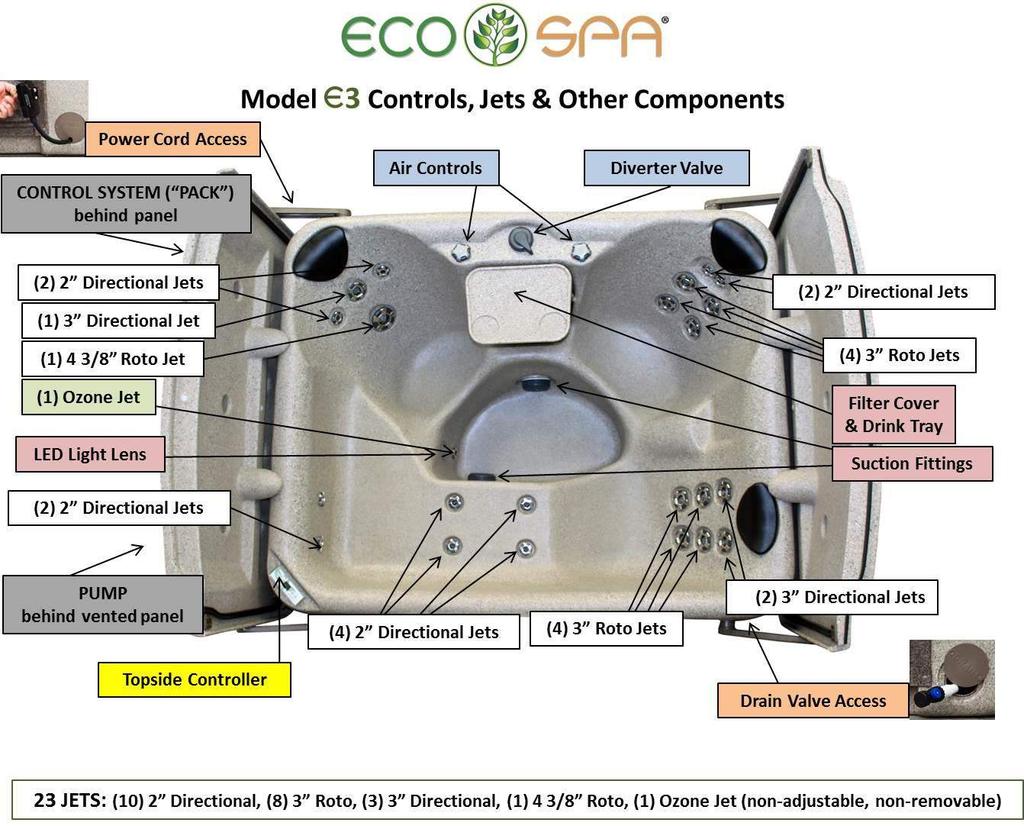
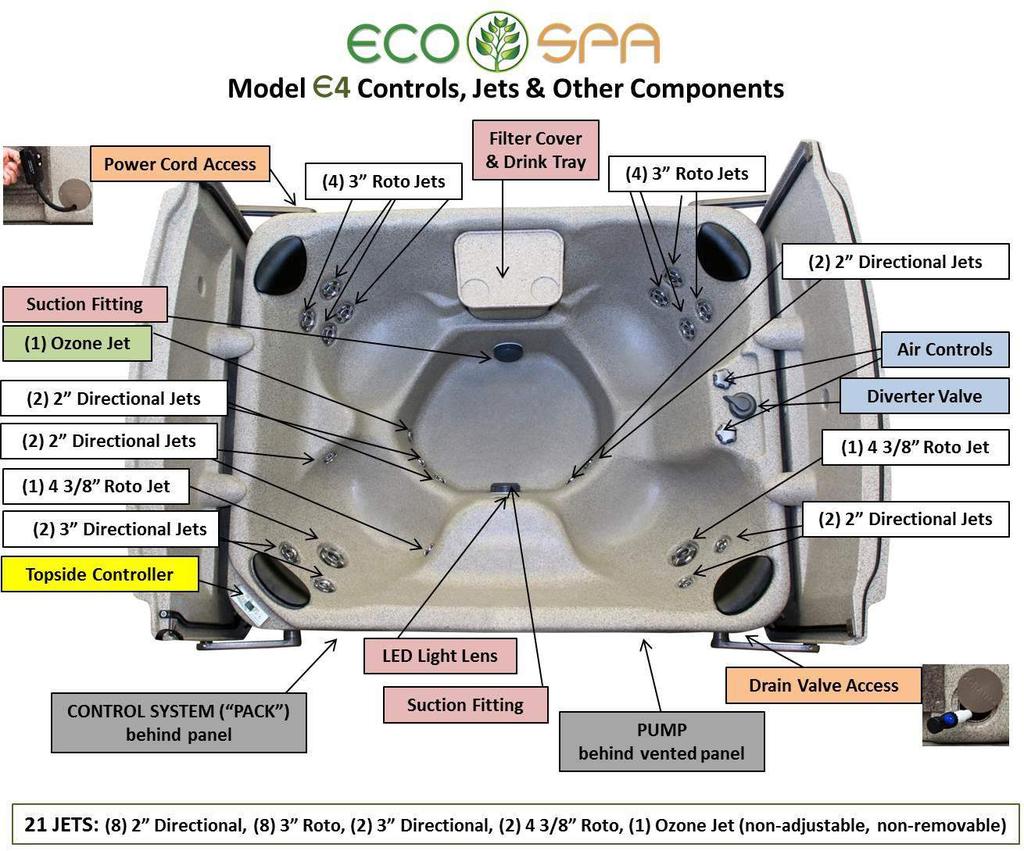
3 TABLE OF CONTENTS GENERAL INFORMATION COVER, OWNER S RECORD.. PAGE 1 FACTORY LIMITED WARRANTY. PAGE 2 TABLE OF CONTENTS... PAGE 3 THANK YOU, HELPFUL HINTS... PAGE 4 IMPORTANT SAFETY INSTRUCTIONS.... PAGES 5 7 INSTALLATION GUIDE.. PAGES 8-9 SETTING UP AND FILLING YOUR NEW ECO SPA... PAGE 10 CARE AND MAINTENANCE INSTRUCTIONS. PAGES AUTOMATED FEATURE FUNCTIONS POWER UP/BOOT SEQUENCE PAGE 13 AUTOMATIC DRY-FIRE PROTECTION PAGE 13 AUTOMATIC WATER TEMPERATURE REGULATION. PAGE 13 AUTOMATIC HEATER ELEMENT COOLDOWN.. PAGE 13 AUTOMATIC SMART WINTER MODE. PAGE 14 FILTER CYCLE.. PAGE 14 ECONOMY MODE... PAGE 14 UNDERSTANDING & USING YOUR ECO SPA TOPSIDE CONTROLLER WHAT THE ICONS IN THE WINDOW MEAN..... PAGE 15 SPA FUNCTIONS OFF MODE.... PAGE 15 JETS, LIGHT, WARM & COOL BUTTONS.... PAGES PROGRAMMING SETTING THE CLOCK.... PAGE 16 PROGRAMMING SETTING THE FILTER CYCLE..... PAGE 17 PROGRAMMING SETTING ECONOMY MODE.... PAGE 17 PROGRAMMING SETTING TEMPERATURE UNITS... PAGE 17 JET, COMPONENT AND EQUIPMENT OPERATING INSTRUCTIONS JET OPERATION MASSAGE JETS..... PAGE 18 AIR CONTROLS PAGE 18 DIVERTER VALVE.... PAGE 19 OZONE JET..... PAGE 19 SUCTION FITTINGS.. PAGE 19 LED LIGHT... PAGE 19 TROUBLESHOOTING.... PAGES LOCATIONS OF CONTROLS, JETS & OTHER COMPONENTS MODEL E1. PAGE 23 MODEL E2. PAGE 24 MODEL E3. PAGE 25 MODEL E4.... PAGE 26 WIRING FOR 110/220 VOLT OPERATION.... PAGE 27 BREAKER SETTING PAGE 27 MAINTENANCE LOG PAGE 28 WARRANTY ACTIVATION CARD PAGE 29 3
4 4 THANK YOU! Congratulations On Your Decision To Purchase An Easy-To-Operate And Easy-To-Maintain ECO SPAs are built with simplicity of operation and easy maintenance in mind. ECO SPA uses superior quality materials and top-of-the-line components and controls to provide you with as trouble-free a hot tub experience as possible. Side panel removal allows easy access to all interior ECO SPA plumbing and equipment for easy maintenance or repair. Refer to the diagrams found on pages to identify the locations of the components of your particular model ECO SPA. Most service calls can be handled over the phone with your dealer. Original spare or replacement ECO SPA parts are available by contacting your dealer. Please refer to the Owner s Record information that you recorded on the cover of this manual to assist your dealer in determining your needs. HELPFUL HINTS The covers and Air Controls must be closed for the ECO SPA to heat up efficiently. Heating time can vary depending on ambient air temperature, but generally if operating on 110 Volts your ECO SPA will heat after fill-up at the rate of approximately 1.5 F per hour. If the spa is operating at 220 Volts heating time will improve considerably to a rate of approximately 3-6 F per hour depending on the model s size & water volume. While heating, condensation may develop and pool in various locations, especially underneath the body of the spa and on the undersides of the spa s covers which may drip down the sides of the spa when the covers are opened. This accumulated condensation can cause you to believe that the spa is leaking, but these seemingly apparent leaks should be observed for a few days with the ECO SPA not in use before proceeding with further investigation. All Jets should be wide open to provide better water circulation for proper heating and filtration when your ECO SPA is not in use.
5 5 IMPORTANT SAFETY INSTRUCTIONS READ AND FOLLOW ALL INSTRUCTIONS WARNING Connect to a grounded, Grounding Type Receptacle Only. To reduce the risk of electric shock, replace damaged cord immediately. Do not bury the cord. DANGER To reduce the risk of injury to persons, do not remove Suction Fittings. TO REDUCE THE RISK OF INJURY: The water in the spa or hot tub should never exceed 40 C (104 F). Water temperatures between 38 C (100 F) and 40 C (104 F) are considered safe for a healthy adult. Lower water temperatures are recommended for extended use (exceeding minutes) and for younger children. Since excessive water temperatures have a high potential for causing fetal damage, during the early months of pregnancy, pregnant or possibly pregnant women should limit spa or hot tub temperatures to 38 C (100 F). Before entering a spa or hot tub, the user should measure the water temperature with an accurate thermometer since the tolerance of temperature regulating devises may vary as much as plus or minus 3 C (5 F). The use of alcohol, drugs or medication before or during spa or hot tub use may lead to unconsciousness with the possibility of drowning. Persons suffering from obesity or with a medical history of heart disease low or high blood pressure, circulatory system problems, or diabetes should consult a physician before using a spa or hot tub. Persons using medication should consult a physician before using a spa or hot tub since some medication may induce drowsiness while other medication may affect heart rate, blood pressure, and circulation. WARNING The use of Alcohol, Drugs or medication can greatly increase the risk of fatal hyperthermia. Hyperthermia occurs when the internal temperature of the body reaches a level several degrees above the normal body temp plus or minus temperature of 98.6 F. The symptoms of hyperthermia include dizziness, fainting, drowsiness, lethargy and an increase in the internal body temperature. The affects of hyperthermia include (1) unawareness of impending hazard, (2) Failure to perceive heat, (3) Failure for the need to exit the Spa, (4) Physical inability to exit Spa, (5) Fetal damage to pregnant women, and (6) Unconsciousness resulting in a danger of drowning.
6 6 IMPORTANT SAFETY INSTRUCTIONS READ AND FOLLOW ALL INSTRUCTIONS DANGER: RISK OF ELECTRICAL SHOCK Do not permit any electric appliance such as a light, telephone, radio, or television within 5 feet of a spa or hot tub. WARNING: CHILDREN SHOULD NOT USE A SPA OR HOT TUB WITHOUT ADULT SUPERVISION. AVERTISSEMENT: NE PAS LAISSER LES ENFANTS UTILISER UNE CUVE DE RELAXATION SANS SURVEILLANCE. WARNING: DO NOT USE A SPA OR HOT TUB UNLESS ALL SUCTION GUARDS ARE INSTALLED TO PREVENT BODY AND HAIR ENTRAPMENT. AVERTISSEMENT: POUR EVITER QUE LES CHEVEUX OU UNE PARTE DU CORPS PUISSENT ETRE ASPIRES, NE PAS UTILISER UNE CUVE DE RELAXATION SI LES GRILLES DE PRISE D ASPIRATION NE SONT PAS TOUTES EN PLACE. WARNING: PEOPLE USING MEDICATIONS AND/OR HAVING ADVERSE MEDICAL HISTORY SHOULD CONSULT A PHYSICIAN BEFORE USING A SPA OR HOT TUB. TAVERTISSEMENT: LES PERSONNES QUI PRENNENT DES MEDICAMENTS OU ONT DES PROBLEMES DE SANTE DEVRAIENT CONSULTER UN MEDECIN AVANT D UTILISER UNE CUVE DE RELAXATION. WARNING: PEOPLE WITH INFECTIOUS DISEASES SHOULD NOT USE A SPA OR HOT TUB. AVERTISSEMENT: LES PERSONNES ATTEINES DE MALADIES INFECTIEUSES NE DEVRAIENT PAS UTILISER UNE CUVE DE RELAXATION. WARNING: TO AVOID INJURY EXERCISE CARE WHEN ENTERING OR EXITING A SPA OR HOT TUB. AVERTISSEMENT: POUR EVITER DES BLESSURES, USER DE PRUDENCE EN ENTRANT DANS UNE CUVE DE RELAXATION ET E SORANT. WARNING: DO NOT USE DRUGS OR ALCOHOL BEFORE OR DURING THE USE OF A SPA OR HOT TUB TO AVOID UNCONSCIOUSNESS AND POSSIBLE DROWNING AVERTISSEMENT: POUR EVITER L EVANOUISSEMENT ET LA NOYADE EVENTUELLE, NE PRENDE NI DROGUE NI ALCOOL AVANT D UTILISER UNE CUVE DE RELAXATION NI QUAND ON S Y TROUVE.
7 7 IMPORTANT SAFETY INSTRUCTIONS READ AND FOLLOW ALL INSTRUCTIONS WARNING: PREGNANT OR POSSIBLY PREGNANT WOMEN SHOULD CONSULT A PHYSICIAN BEFORE USING A SPA OR HOT TUB. AVERTISSEMENT: LES FEMMES ENCEINTES, QUE LEUR GROSSESSE SOIT CONFIRMEE OU NON, DEVRAIENT CONSULTER UN MEDECIN AVANT D UTILISER UNE CUVE DE RELAXATION. WARNING: WATER TEMPERATURE IN EXCESS OF 40 C (104 F) MAY BE INJURIOUS TO YOUR HEALTH. AVERTISSEMENT: IL PEUT ETRE DANGEREUX POUR LA SANTE DE SE PLONGER DANS DE L EAU A PLUS 40 C (104 F). WARNING: BEFORE ENTERING A SPA OR HOT TUB MEASURE THE WATER TEMPERATURE WITH AN ACCURATE THERMOMETER. AVERTISSEMENT: AVANT D UTILISER ONE CUVE DE RELAXATION MESURE LA TEMPERATURE DE L EAU A L AIDE D UN THERMOMETRE PRECIS. WARNING: DO NOT USE A SPA OR HOT TUB IMMEDIATELY FOLLOWING STRENUOUS EXERCISE. AVERTISSMENT: NE PAS UTILISER ONE CUVE DE RELAXATION IMMDIATEMENT APRES UN EXERCISE FATIGANT. WARNING: PROLONGED IMMERSION IN A SPA OR HOT TUB MAY BE INJURIOUS TO YOUR HEALTH. AVERTISSMENT: L UTILISATION PROLONGEE D UNE CUVE DE RELAXATION PEUT ETRE DENGEREUSE POUR LA SANTE. WARNING: DO NOT PERMIT ELECTRIC APPLIANCES (SUCH AS A LIGHT, TELEPHONE, RADIO, TELEVISION, ETC.) WITHIN 1.5 M OF THIS SPA OR HOT TUB. AVERTISSMENT: NE PAS PLACER D APPAREIL ELECTRIQUE (LUMINARE, TELEPHONE, RADIO, TELEVISEUR, ETC.) A MOINS DE 1.5 M DE CETTE CUVE DE RELAXATION. CAUTION: MAINTAIN WATER CHEMISTRY IN ACCORDANCE WITH THE CHEMICAL MANUFACTURER S INSTRUCTIONS. ATTENTION: LA TENEUR DE LEAU EN MATIERS DISSOUTES DOIT ETRE CONFORME AUX DIRECTIVES DU FABRICANT DE LES CHIMIQUES.
8 8 INSTALLATION GUIDE Please Read and Understand All Instructions Before Operating Your SELECTING THE INSTALLATION LOCATION Your new ECO SPA is completely self-contained. It can be set up on a patio, deck, or indoors with special consideration. Your ECO SPA must be installed on a relatively smooth, solid, flat and level surface that will support 3,000 pounds. Concrete, bricks, pavers or wood deck are acceptable permanent surfaces. The majority of the weight of the spa is placed under the foot well area of the spa. This area must be firmly supported at all times. DO NOT USE SHIMS, WEDGES, OR OTHER TYPES OF LEVELING DEVICES TO LEVEL THE SPA It is critical that you do not use shims, wedges or other types of leveling devices to level the spa. 100% CONTACT OF THE SPA S FLOOR WITH THE SITE IS NECESSARY TO PREVENT LONG TERM DISTORTION OF THE SPA SHELL (BODY) WHICH COULD AFFECT THE FIT OF THE COVERS. IMPROPER INSTALLATION IN THIS MANNER MAY VOID YOUR WARRANTY. Do not place your ECO SPA in an area where the water will puddle around it. Drainage of water away from the spa s power cord and electrical equipment compartment is necessary. Place your ECO SPA away from areas where debris or dirt may be tracked into it. Your ECO SPA should not be placed near or below electrical or telephone cables. Consider privacy and wind shielding. A sheltered environment can result in lower operating and maintenance costs. Leave a minimum of 24 inches of open space at each end of the spa to ensure that the cover will open and close properly. Leave adequate space around the spa to allow full access to the Control System and Pump access panels, Drain Cover and Power Cord cover plates. (See pages of this manual for a diagram of where these are located on your particular ECO SPA model). The proper site of your ECO SPA should be an area that is Not Accessible to Children. Security fencing or Pool Yard gates should be in place to separate Children from the Spa.
9 9 If you are going to operate your ECO SPA at 110 Volts your ECO SPA draws a maximum of 12 Amps operating at 110 Volts. A GFCI power cord is supplied with all 110 Volt models. Locate the round plate labeled POWER CORD on the outside bottom corner of the rear side of the spa, remove it and pull out the electrical cord with the attached GFCI unit that is located behind this plate. Assure that the cord will reach a grounded wall outlet of a 110 Volt 15 amp circuit without using an extension cord. IF YOU MUST USE AN EXTENSION CORD, IT MUST BE GROUNDED (3-PRONG), AT LEAST 10 GAUGE AND AS SHORT AS POSSIBLE. USING AN INFERIOR EXTENSION CORD WILL LIKELY CAUSE A VOLTAGE DROP WHICH WILL CAUSE THE SPA S CONTROLS TO MALFUNCTION AND COULD DAMAGE COMPONENTS. If there is not a 110 Volt 15 Amp grounded outlet close enough to the spa to do so you may want to consider contacting a Licensed Electrician to supply power to the Spa in a proper manner. Do not plug the power cord into the outlet until the spa is completely filled with water to the proper water level. If you are going to operate your spa at 220 Volts, you must hire a certified electrician to install a 220V, 50 Amp GFCI breaker and to connect the wiring to your spa per all local and national codes. (See page 27 of this manual for instructions on how to convert your ECO SPA from 110V to 220V operation). Ensure that the 220V breaker is disconnected until the spa is completely filled with water to the proper level. SPECIAL CONSIDERATIONS FOR INDOOR INSTALLATION Install your spa on water resistant, non-slip floor, preferably with a drain to remove the water that is splashed from the spa. Do not install on carpet or other material that will be damaged by moisture. Take into consideration the room humidity which will exist due to high temperatures. Providing natural or forced ventilation in the room will help maintain comfort and minimize moisture damage to the surrounding environment. Indoor second story installation above finished living space should be avoided due to the possibility of water and humidity damage. Allow full access to the spa equipment for service.
10 10 SETTING UP AND FILLING YOUR NEW See Pages for Model E1-E2-E3-E4 Locations of Jets, Components & Equipment 1. Ensure that your ECO SPA s electrical power cord is NOT plugged in or that power to the spa is turned OFF. Do not turn on power to the spa until it is full to the proper water level. 2. Check that your ECO SPA drain valve (located behind the spa s DRAIN COVER plate) is closed and capped securely so as to prevent leaking. 3. Connect a Pre-Filter to your standard garden hose to ensure that you start out with cleaner water. 4. Open the spa covers, remove the filter cover and unscrew and remove the filter cartridges. 5. Make sure that the spa s 2 Air Control knobs are in the OPEN position and that the Diverter Valve is pointed to center. 6. Turn all Jets counter-clockwise to the full OPEN position. Doing so will minimize the amount of air in the water lines to help avoid causing a potential airlock and will make priming the pump easier. 7. Fill your ECO SPA to an approximate water level of 2" above the top of the highest jet. Once the spa is filled to this level, power can then be supplied to your ECO SPA. 8. Carefully re-install the 2 filter cartridges into their sockets and re-install the Filter Cover. 9. Plug in the GFCI unit of the 110 Volt power cord and depress the reset button on it or, if applicable, connect the power for 220 Volt operation. 10. Once the power is on, the pump should come on at High Speed for 1 minute to purge air from the water lines and verify adequate water flow and then it will shift down to Low speed. Meanwhile, the window of the Topside Control panel will display a series of codes, then a series of dashes ( ----) and finally settle on toggling between displaying Time and Temperature. 11. The and icons will be flashing in the window of Topside Control Panel indicating the spa is taking a water temperature reading and may be calling for heat. 12. The icon will then show solid in the window of Topside Control Panel as the heater will automatically begin heating to the Temperature Set Point you programmed on your Topside Control Panel. (See ECO SPA Topside Controller Instructions on pages ) 13. Once the water temperature has reached at least 80 F (27 C) so that chemicals can dissolve properly you can now test and balance the ph Level of your water and sanitize it per the chemistry guidelines supplied by your dealer. 14. ECO SPA is not responsible for damage to the spa from improper or excessive chemical use. ECO SPA recommends that you read and understand the spa chemistry guidelines supplied by your dealer or consult with a local spa supply retailer.

11 11 CARE AND MAINTENANCE INSTRUCTIONS HARD COVERS & SPA SURFACES When not in use please keep your ECO SPA hard covers clamped down at all times, especially in extreme weather conditions. Consistent use of the clamps will help maintain the fit of the covers to the spa. It is best and easiest to pull the covers open and down from the ends of the spa using the handles as this helps to maintain even weight balance. Lifting the covers by one side or the other instead of pulling them open in this manner puts undue stress on the lifter arm(s) due to the unbalanced weight. CLEANING YOUR ECO SPA The high-grade resin from which your ECO SPA is constructed can easily be cleaned with a vinegar and water solution. CLEANING THE FILTER CARTRIDGES The filter cartridges should be rinsed and cleaned at least once every month or more frequently for high bather loads. You may wish to also soak excessively dirty cartridges overnight in filter cartridge cleaner solution; if you do, be sure to rinse them out thoroughly before re-installing. Disconnect power to your ECO SPA. Remove the filter cover. Remove the filter cartridges from their sockets by unscrewing them (counter clockwise). Attach a filter cleaner nozzle to your garden hose and rinse dirt and debris from the cartridge pleats thoroughly. Allow the filter cartridges to air dry completely before reinstalling them. Drying allows the fabric of the cartridges to expand properly in order to filter effectively. Replace the filter cartridges, aligning them with care to not cross-thread them in their sockets. Do not tighten them excessively. Reinstall the Filter Cover. Power to your ECO SPA can then be turned back on.


12 12 DRAINING YOUR SPA Drain and refill your ECO SPA with fresh water to the recommended level as necessary. Depending on the frequency and length of your spa sessions and water quality management, you may have to do so more or less frequently. Hint: once water chemistry becomes difficult to control and/or maintain properly, the water needs to be changed. Unplug or disconnect the ECO SPA s electrical power supply. The ECO SPA must remain unplugged until re-filled with water. Rotate the Air Controls to the fully OPEN position. Remove the cap from the ECO SPA's Drain valve and connect it to a standard garden hose. Place the opposite end of the garden hose in the desired drainage area and twist the knob on the ECO SPA s Drain Valve to open it and commence draining. WINTERIZING If your ECO SPA is to be transported or stored in temperatures 32º F (0º C) or lower, it is critical that your ECO SPA be fully winterized. The ECO SPA must be fully drained and emptied. (See DRAINING YOUR SPA, above) 1. The Drain Valve must remain in the open position with the Drain Valve Cap removed and stored. 2. The Filter Cartridges must be removed, dried and stored. 3. Unscrew and remove the plug located at the bottom of the pump housing. The pump is located behind the panel with the louvered vent. (For the location of this panel on your spa, see the diagram of your model on pages 23-26).
13 13 AUTOMATED FEATURE FUNCTIONS POWER UP/BOOT UP DISPLAY SEQUENCE Once power to your Eco Spa has been turned on, each of the following parameters initially appears in the Topside Controller Display for 2 seconds in this sequence: Software Number Software Revision Low- Level Selection AUTOMATIC DRY-FIRE PROTECTION After the above sequence of parameters has appeared at power up, the Topside Controller s Display will show and the pump starts on Low Speed for 2 minutes as the Eco Spa s System performs a flow check to verify a proper water flow rate to the heater of 18 GPM to protect the heater from firing prematurely ( dry fire ). Once proper water flow rate is verified, the current water temperature will then be shown in the display, toggling with the current time. AUTOMATIC WATER TEMPERATURE REGULATION Every 15 to 90 minutes the pump will come on at Low Speed to ensure accurate water temperature as well as to avoid heater activation in dry fire conditions (inadequate or absent water flow through the heater element). Over time, the system will learn your spa s water temperature variations and thus at what time interval it needs to check and adjust it. After verifying water flow, pump activation on Low Speed and taking a water temperature reading, if the water temperature has fallen below the Set Point, the system automatically turns the heater on to reach and maintain water temperature at Set Point. Once the water temperature has reached the Set Point value plus 0.8 F the heater is turned off. The Set Point icon flashes when taking water temperature reading. To override this mode and immediately turn on the heater simply press the WARM button. AUTOMATIC HEATER ELEMENT COOLDOWN If the Heater has been On, the pump will continue to run on Low speed for 2 minutes to cool the heater element and help prolong its useful life. If the water temperature is below the desired set point, the pump will stay on Low speed to operate the heater until the desired temperature set point has been reached, and then run an additional 2 minutes to cool down the heater element.
14 14 AUTOMATIC SMART WINTER MODE The indicator appears in the display window when freezing temperature is detected and flashes when the pump is active. FILTER CYCLE The FILTER CYCLE is composed of the following parameters: Filter Start Time (FS), Filter Duration (Fd) and Filter Frequency (FF). A FILTER CYCLE consists of starting the pump on High speed for 1 minute to purge possible air bubbles from the water lines and then running the pump on Low speed for the remainder of the filter cycle duration, activating the Ozone Generator, if so equipped, and introducing Ozone into the water supply via the Ozone Jet to aid in sanitizing. Factory Preset Defaults for the Filter Cycle are: Start Time: 12PM; Duration: 2 Hours; Frequency: 2 times per 24 Hours. The icon shows solid in the display window when the Filter Cycle is active and flashes when the Filter Cycle cannot activate or is suspended because the Jets are not on at Low speed. Also, when your spa is in an active Filter Cycle you can suspend the Filter Cycle for 20 minutes by pressing any button on the Topside Control panel. The icon will show flashing at this time and again show solid once the Filter Cycle has resumed activity. ECONOMY MODE Our Smart Winter Mode function is preset at the factory to automatically protect your spa from the cold by turning on the pump several times a day to prevent water from freezing in the spa s plumbing system. You do not have to program this function and cannot alter it. The ECONOMY MODE allows you to conserve energy during a certain period of the day or over a number of days by minimizing operation of the Heater by temporarily reducing the temperature set point of the spa by 20 F (11 C) during this programmed cycle. The ECONOMY MODE is composed of the following parameters: Economy Program (EP), Economy Start Time (ES) and Economy Duration (Ed). When the ECONOMY MODE is active, the display will toggle between the Eco message, the current time, and the current water temperature. Factory preset default for the Economy Mode is: EP, 0 (Disabled). When disabled, the Economy Start Time and Economy Duration settings are irrelevant.

15 15 UNDERSTANDING & USING YOUR ECO SPA TOPSIDE CONTROLLER What The Icons In The Window Mean Smart Winter Mode: appears only when the spa has automatically activated its Smart Winter Mode. Heater: Flashes when taking a reading of the current water temperature or if calling for heat. Shows solid when the heater is on. Filter Cycle: Shows solid when Filter Cycle is active. Flashes when Filter Cycle cannot activate or is suspended because the Jets are not on at Low Speed. Set Point: Flashes when reading the spa s current water temperature; shows solid when displaying the desired water Temperature Set Point SPA FUNCTIONS OFF Mode Press & hold the JETS button for 5 seconds to enable the OFF Mode. Once the OFF Mode is active, the display will toggle between the OFF message, the Clock and the current Water Temperature. The spa light will flash for a few seconds before the end of the 30 minutes to warn you that the system is about to resume its normal operation. Press the JETS button again once to exit the OFF Mode and restart the system before the expiration of the OFF Mode s 30 minute delay. When the system resumes its normal operation, the display shows ON for 3 seconds, then resumes toggling between the Clock and current Water Temperature. JETS Button The OFF Mode allows you to temporarily stop all outputs including automatic functions such as Filter cycle, Heat request, Economy and Smart Winter mode for 30 minutes to perform quick spa maintenance without having to disconnect the electrical power to your spa. Press the JETS button ONCE to turn Pump on at LOW Speed. The indicator light will be flashing red to indicate Low Speed. Press the JETS Button a SECOND time to switch the pump to HIGH Speed. The indicator light adjacent to the button will be lit solid red to indicate High Speed. Press the JETS Button a THIRD time to turn the pump OFF. NOTE: A built-in timer automatically turns pump Off after 20 minutes of continuous operation to conserve energy as well as to safeguard against the spa possibly having been left operating unattended. Simply press the JETS button once again to resume operation.
16 16 LIGHT Button Press the LIGHT button to turn On the spa s underwater Multi-Color LED Mood Light, if so equipped. The red indicator light adjacent to the button indicates that the Light is On. Press the LIGHT button a second time to turn the light Off. Repeat this on/off operation to change the light s various colors. A built-in timer automatically turns light off after 2 hours of continuous use to conserve energy. WARM & COOL Buttons Use the WARM or COOL button to set your desired water temperature. For your health and safety, the temperature Set Point limit has been preset at the factory to not exceed 104 F (40 C). The temperature Set Point will be displayed for 2 seconds to confirm your new selection. (The "Set Point" icon showing solid in the display at this time indicates that the display shows the desired temperature, NOT the current water temperature). PROGRAMMING PROGRAM Menu The following parameters are set using the PROGRAM Menu: Clock Filter Cycle Economy Mode Temperature Units Before accessing the Program Menu, be prepared with what you want your settings to be for each of these parameters because once in the Program Menu if there is no action taken for 10 seconds, the system will exit the Program Menu without saving any changes and you ll have to start over. While you are in the PROGRAM Menu, use the WARM or COOL button to adjust a parameter UP or DOWN as needed. Press the LIGHT button to jump to the next parameter. Any changes made will be saved after confirmation of the last parameter only. To access the PROGRAM Menu press and hold the LIGHT button FOR A FULL 5 SECONDS. SETTING THE CLOCK Access the PROGRAM Menu by pressing and holding the LIGHT button for a full 5 seconds. The display will show the current clock setting with the Hour flashing. Observe whether AM or PM is displayed above the Hour digits and use the WARM or COOL button to adjust the Hour to the correct current time. Press the LIGHT button to jump to view the next parameter, Minutes, flashing in the display, and use the WARM or COOL button to adjust the Minutes to the correct time. Press the LIGHT button to jump to the next parameter, the FILTER START time (FS).
17 17 SETTING FILTER CYCLE START TIME The display will show FSXX, XX representing the starting hour of the Filter Cycle. Observe whether AM or PM is displayed above the Hour digits and use the WARM or COOL button to adjust the Hour to the desired start time. Press the LIGHT button to jump to the next parameter, Filter Duration (Fd). SETTING FILTER CYCLE DURATION The display will show FdXX, XX representing the duration in hours of the Filter Cycle. Use the WARM or COOL button to adjust the duration. (24 = 24 Hours or Continuous Filtration; 0 = 0 Hours or No Filtration. It is NOT recommended to set this to 0). Press the LIGHT button to jump to the next parameter, Filter Frequency (FF). SETTING FILTER CYCLE FREQUENCY The display will show FFXX, XX representing the number of Filter Cycles desired per 24-hour period. Use the WARM or COOL button to adjust the Frequency. Press the LIGHT button to jump to the next parameter, Economy Mode (EP). SETTING THE ECONOMY MODE The display will show EP X, X representing the state of the Economy Program. (0 = Disabled, 1 = Enabled). Use the WARM or COOL button to Enable or Disable Economy Mode. Press the LIGHT button to jump to the next parameter, Economy Start Time (ES). SETTING ECONOMY START TIME The display will show ES XX, XX representing the hour at which the Economy Mode will become active. Observe whether AM or PM is displayed above the Hour digits and use the WARM or COOL button to adjust the Hour to the desired Economy Start time. Press the LIGHT button to jump to the next parameter, Economy Duration (Ed). SETTING ECONOMY DURATION The display will show EdXX, XX representing the Duration in hours of the Economy Mode. Use the WARM or COOL button to adjust the duration. (24 = 24 Hours or Continuous Economy) Press the LIGHT button to jump to the next parameter, Temperature Units. SETTING TEMPERATURE UNITS Water temperature can be displayed in either Fahrenheit ( F) or Celsius ( C). The display will show F or C. Use the WARM or COOL button to change the setting as desired. SAVING YOUR PROGRAM SETTINGS AND EXITING THE PROGRAM MENU After setting the Temperature Units, press the LIGHT button one final time to save all parameter settings and exit the Program Menu. The display will return to its normal toggling of the current time and current water temperature.

 of the jet to aim it in the desired direction.")

18 18 JET, COMPONENT AND EQUIPMENT OPERATING INSTRUCTIONS See Pages for Model E1-E2-E3-E4 Locations of Jets, Components & Equipment JET OPERATION Your ECO SPA is designed with a versatile jet system to allow you to select a wide variety of massage patterns and tailor your ECO SPA to your specific massage and hydrotherapy needs. MASSAGE JETS DIRECTIONAL JETS (2 or 3 ) produce a tight massage stream with that of 2 jets slightly more vigorous than that of larger 3 jets. To adjust the flow of Directional Jets toward a particular part of your body, rotate the nozzle ("eyeball") of the jet to aim it in the desired direction. ROTO (Rotational) JETS (3 or 4-3/8 ) provide a loose, swirling massage stream with jets slightly softer than that of smaller 3 jets. To adjust the flow pressure of either a Directional or Roto Jet, turn the OUTER RING counter-clockwise to increase flow to a maximum and clockwise to decrease flow to a minimum or Off. DO NOT FULLY DECREASE (CUT OFF) FLOW OF ALL OF THE JETS AT THE SAME TIME as this may cause your pump to malfunction and could cause your ECO SPA to leak. AIR CONTROLS The two AIR CONTROLS are used to introduce air into the water flow of the Massage Jets for more robust, vigorous massage. Turn the Air Control knob counter-clockwise to the Open position to increase jet pressure, and clockwise to the Closed position to decrease jet pressure. Note: When you are not using your ECO SPA and the covers are closed, ensure that the Air Control knobs are in the CLOSED position. This will prevent air from entering the water stream to help to maintain your water temperature more efficiently when your ECO SPA is heating or in Filter Mode.
 water flow is directed to all jets.")


19 19 DIVERTER VALVE The 3-position DIVERTER VALVE allows water to be diverted to a zone of jets, if desired. When the Pointer Arrow of the Diverter Valve is centered in the middle (pointed towards the inside of the spa) water flow is directed to all jets. Turning the Pointer Arrow of the Diverter Valve knob all the way to the right or all the way to the left diverts all water flow to a zone of jets on one side of the spa or the other resulting in more robust massage jet action from that zone of jets. OZONE JET The special 2 OZONE JET, if so equipped, located low in the footwell area of each ECO SPA, has a fixed position nozzle; its jetstream cannot be aimed and its flow pressure cannot be adjusted like the massage jets. SUCTION FITTINGS Whenever the pump is running, this jet serves as a virtual foot massage jet. However, its true purpose is to introduce Ozone into the water supply during an active Filter Cycle. Venturi action feeds Ozone from the Ozone Generator unit into this jet s water supply and the Ozone jet in turn releases it into the water to aid in sanitizing by killing and breaking down certain organic materials. Keep the SUCTION FITTINGS (located in the foot well area) of the ECO SPA unobstructed and free from debris at all times. Do not remove the suction-fitting screen while the ECO SPA is connected to electrical power. LED LIGHT The underwater LED LIGHT in your ECO SPA, if so equipped, provides you with a variety of colorful mood lighting options with its 9-LED 12 volt bulb, ranging from solid colors to various multi-color sequence light shows. Push the LIGHT BUTTON once on the TOPSIDE CONTROL PANEL to turn the light ON and once again to turn it OFF. Each successive ON-OFF operation of the LIGHT BUTTON will change the lighting from one solid color to another and eventually to cycle through the light show variations and then Off. A built-in timer automatically turns off the LED LIGHT after 2 hours of continuous operation.
20 20 TROUBLESHOOTING WARNING: SHOCK HAZARD Spa systems contain live electricity. Any work within spa systems should only be performed by qualified personnel. The GFCI power cord must be tested to insure proper operation. To test, simply depress the button marked TEST on the GFCI unit. The unit should stop operating and the button marked RESET should pop up. Push the RESET button and the unit s pilot light will come on indicating that the unit is operating normally. IF THE INTERRUPTER DOES NOT PERFORM IN THIS MANNER, A GROUND CURRENT IS FOLLOWING INDICATING THE POSSIBILITY OF ELECTRIC SHOCK. DISCONNECT THE POWER UNTIL THE FAULT HAS BEEN IDENTIFIED AND CORRECTED. NO POWER TO SPA (RUNNING ON 110 VOLTS) If the spa is connected to a 110 Volt 15 Amp grounded outlet, test and reset the Power Cable GFCI. If this doesn t restore power to the spa, check the outlet s circuit breaker in the house s main electrical service panel. If the spa is connected to a 110 Volt 15 Amp grounded outlet but this outlet circuit also serves other appliances besides the spa, it may cause the breaker for this circuit in the main house panel to trip. If this occurs, you may need to upgrade this outlet circuit to 20 Amps to handle the spa as well as the other appliances or add a dedicated outlet circuit for the spa. In either case, please consult your licensed electrician. GFCI IS TRIPPING (RUNNING ON 220 VOLTS) For a new 220 Volt installation or for an ECO SPA recently converted from 110 Volt to 220 Volt operation the problem is most likely with the wiring of the 220 Volt circuit s GFCI breaker. If GFCI trips instantly the problem is usually the neutral wire path in the GFCI. For an ECO SPA that has been installed and running satisfactorily for some time, the problem can be isolated by unplugging or disconnecting the Ozonator unit, Heater, Pump and Light from the Control System ( Pack ) one at a time and resetting the GFCI each time to see if the spa stops tripping. PUMP SURGES CONSTANTLY This is caused by low water level. Check that the water level is 2 above the highest jet. Be sure you are using the correct closed-top Filter Cartridges. JET LOW FLOW PROBLEMS Check to be sure that the Jets are turned to the Open position (Counterclockwise) and that the Air Controls are in the Open position (Counterclockwise). Jets can be removed if necessary to check for blockage or for replacement by turning the Jet counterclockwise until you hear a click. Then pull the Jet straight out of the Jet Body. Reinstall the Jet by pushing it into the Jet Body, making sure it s in the correct position with the square tab on the underside of the Jet face aligned to the slot in the Jet Body, and turn it clockwise.
21 21 TOPSIDE CONTROLLER ERROR MESSAGES Should an error occur, the Topside Controller Display will show one of the following error messages, toggled with the clock and the water temperature: The system does not detect sufficient water flow while the pump is running. Check for adequate water level. Check and clean the filters. Check and open water valves. If the problem persists, call your dealer or service supplier for technical assistance. The water temperature in the spa has reached 108 F (42 C). DO NOT ENTER THE WATER! Open the spa s covers and allow the water to cool down to a lower temperature. If the problem persists, call your dealer or service supplier for technical assistance. The system has shut the heater down because the temperature at the heater has reached 119 F (48 C). DO NOT ENTER THE WATER! Open the spa s covers and allow the water to cool down to at least 104 F (40 C), then shut power off and power up your spa again to reset the system. You may have to reset the correct time. Temperature inside the spa skirt is too high, causing the internal temperature in the control system to increase above normal limits. Remove the panel that the control system is located behind to allow more airflow to attempt to cool the system and wait until error clears. A problem is detected with the temperature probe. Call your dealer or service supplier for technical assistance. An internal hardware error has been detected in the control system. Call your dealer or service supplier for technical assistance. SPA WON T HEAT UP If operating on 110 Volts, your ECO SPA will only gain 1.5 degree per hour and will not heat with the pump on high speed. If operating on 220 volts, your ECO SPA will gain from 3 to 6 degrees per hour and will heat with the pump on low or high speed. Turn the Air Controls to Off and close the covers for most efficient heating. Allow proper warm up time. Check for error messages in the Topside Controller display. Check to see that your ECO SPA is not in Economy Mode.


22 22 SPA RUNS CONSTANTLY Allow up to 24 hours for initial warm up. Check that the Filter Cycle is set to operate at your desired start times and duration. Check the Topside Controller display for Error Codes. PUMP RUNS BUT DOES NOT MOVE WATER This condition is most likely caused by an airlock, essentially an air bubble around the pump s impeller preventing the pump from getting traction on the water supply. See the correct procedure for filling your ECO SPA on page 10 to help prevent an airlock from developing while filling the spa. An airlock may also develop if the pump is operated with an inadequate water level, particularly below the tops of the filter cartridges. To disperse an airlock: Try burping the spa by pushing the Jets button 3 times to turn the pump on Low speed, then on High Speed, then Off and repeat this sequence of pushes on the Jets button several more times or until you see air bubbles coming from a jet or jets which indicate air being released from the water supply. Another way to burp the spa is to: Turn off power to the spa. Wearing a rubber glove may help to get a firm enough grip to hand-loosen the collar nut of the Diverter Valve 1 full turn counter-clockwise. Leave it this way about 3-5 minutes. You should hear some air escaping through the collar. Then, re-tighten the collar nut, return power to the spa and start the pump. If this then doesn t succeed in getting water flowing normally again, turn off power to the spa and remove the access panel with the louvered vent to expose and gain access to the pump. Use channel-lock pliers to loosen the upper pump union no more than 1 turn to allow air to bleed for 3-5 minutes, then re-tighten the union, return power to the spa and start the pump. SPA APPEARS TO BE LEAKING Unless there is a distinct and definite decrease in the spa s water level that can t be explained otherwise, make sure visible water is not from condensation, lid run off or overflow of the tub from displacement caused by spa occupants. Make sure the drain valve is closed and capped securely. Remove access panels to inspect further for leak.
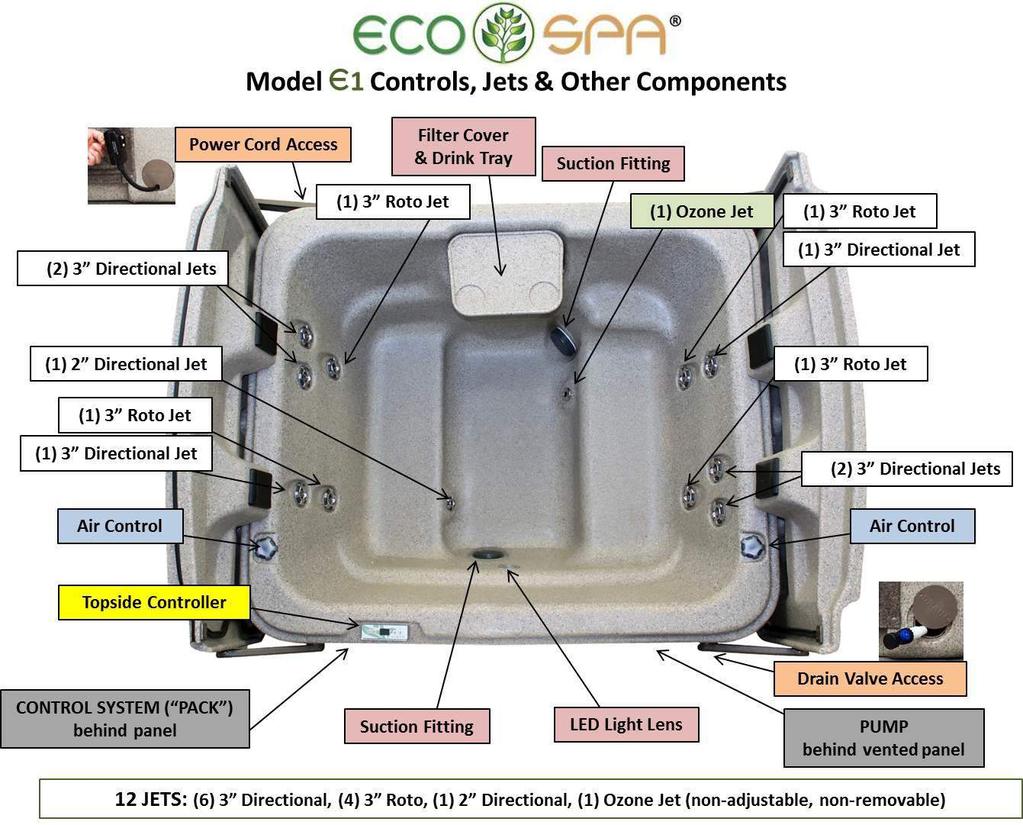
23 23

24 24
25 25
26 26


27 27 WIRING CONNECTIONS FOR 110 VOLT OPERATION POWER CONNECTIONS If your Eco Spa is wired for 110 Volt operation, the Control System ( Pack ) power terminal block 3 wiring connections should look like this: HEATER CONNECTION For the heater to operate at 1 kw on 110 Volts the brown jumper wire s yellow-jacketed spade lug is correctly and completely connected from P12 to P10 like this: WIRING CONNECTIONS FOR 220 VOLT OPERATION POWER CONNECTIONS Wired for 220 Volt operation, your Eco Spa s Control System power terminal block 4 wiring connections should look like this: HEATER CONNECTION For the heater to operate at 4 kw on 220 Volts the brown jumper wire s yellow-jacketed spade lug is correctly and completely connected from P12 to P9 like this BREAKER SETTING It s important to specify the rating of the GFCI being used to ensure safe & efficient power management by the Control System and avoid GFCI breaker tripping. To access the Breaker Setting menu, press and hold the LIGHT button for at least a full 30 seconds. After 5 seconds, the Program menu parameters will appear in the display during this time until the display stops on the factory breaker setting of b.16 if your Eco Spa was set at the factory for 110 Volt operation. If your Eco Spa was set at the factory to operate on 220 Volts the breaker setting will read b.40. If you are converting your Eco Spa from 110 Volt to 220 Volt operation, use the WARM or COOL button to adjust the value from b.16 to b.40. Press the LIGHT button once to set the rating and exit this task. The settings values displayed by the system correspond to 80% of the GFCI s maximum amperage capacity. This allows headroom to protect the system equipment from current spikes. GFCI b 20A 16 50A 40 60A 48
28 28 MAINTENANCE LOG Use this page to record any maintenance performed on your ECO SPA DATE CLEAN FILTERS CHANGE FILTERS OTHER MAINTENANCE NOTES
29 29 Warranty Activation Card To enjoy the full benefits of your Eco Spa warranty, please fill out the form below completely and mail it with copy of your sales receipt or purchase agreement within 30 days of original installation date to: ECO SPAS KOALA ROAD ADELANTO, CA PURCHASED BY: SPA INFORMATION NAME: MODEL ADDRESS: E1 E2 E3 E4 CITY: STATE: PACKAGE: ZIP: PHONE: STANDARD (110V/1.5HP Pump) ADDRESS: ORIGINAL INSTALLATION LOCATION: PERFORMANCE (220V/4HP Pump/+12 Jets) DATE OF PURCHASE: ADDRESS: PRICE (BEFORE TAX): $ CITY: STATE: SERIAL #: PURCHASED FROM: STORE/DEALER NAME: ADDRESS: CITY: ZIP: STATE: PHONE: DATE OF ORIGINAL INSTALLATION: INSTALLED BY (CIRCLE ONE): CONSUMER DEALER CONTRACTOR THIS CARD MUST BE MAILED TO ECO SPAS WITHIN 30 DAYS OF PURCHASE TO ACTIVATE WARRANTY. OR REGISTER ONLINE AT
30 30 By: Fusion Pacific The ORIGINAL Hard Cover Spa ECO SPAS KOALA ROAD ADELANTO, CA
INSTALLATION & INSTRUCTION MANUAL
 INSTALLATION & INSTRUCTION MANUAL Quick Start Up Guide Congratulations on your decision to purchase an easy to operate and easy to maintain South Pacific Spa. Follow this guide for quick and easy start
European Owners Manual
 European Owners Manual Dealer: Dealer Address: Dealer Telephone: Spa Model: Roman Spa Serial No: Liters: 1150 Total Weight Full: 1270 KL 1565 County Road 18 Lakefield, Ontario Canada K0L 2H0 1 Introduction
Owners Manual. Serial No:
 Owners Manual Dealer: Liquid Leisure Hot Tubs Dealer Address: Box 290, Woodlands, MB Dealer Telephone: (204) 477-8827 Spa Model: RSO1 Serial No: Gallons / Liters: 270 gal 300 gal (1020 L 1134 L) Weight:
Spa Control System OWNER S MANUAL
 LIMITED WARRANTY ONE YEAR LIMITED WARRANTY: UNITED SPAS, INC. warrants, to the original purchaser, the Spa Equipment against defects in materials or workmanship for a period of one year from date of purchase.
POOL LINK Dual Timer Module Control System
 Operation Data Owner's Man u al POOL LINK Dual Timer Module Control System H0280200- WARNING FOR YOUR SAFETY - This product must be installed and serviced by a pro fes sion al pool/ spa service technician.
ULT L IMAT A E SERIES SOLID-STA T T A E SYSTEM OPERAT A ION MANUAL 8600
 ULTIMATE SERIES SOLID-STATE SYSTEM OPERATION MANUAL 8600 CONTENTS Important Safety Instructions 2 INTRODUCTION Major Component Illustration 4 SYSTEM OPERATION Heater Operation Spaside Control Spa Light
Spa Startup Directions 21 Fill the Spa With Water 21 Apply Power 21 Activate Water Pump 22 Skimmer Side Filter 22 Add Start-Up Chemicals 22
 TABLE OF CONTENTS Important Safety Instructions 2 Personal Safety Precautions 4 Installation and Set-Up Instructions 5 Electrical Requirements (VS-500 & 501) 5 GFCI Wiring Installation (220v) 7 Electrical
TRANQUILITY ADVANCED HEATING SYSTEM
 TRANQUILITY ADVANCED HEATING SYSTEM MODELS: PBES-6010 PBES-6040 1000W Advanced Heating System 4000W Advanced Heating System Operation / Installation Instructions 85-0059-G Rev.03-6/13 INTRODUCTION The
4230/6230/9230 SERIES OWNERS OPERATION GUIDE
 4230/6230/9230 SERIES OWNERS OPERATION GUIDE 104 CONTENTS Important Safety Instructions 2 INTRODUCTION Major Component Illustration 4 SYSTEM OPERATION Features & Function Visual Diagnostic System (VDS)
6500/7500 SERIES OWNERS OPERATION GUIDE
 6500/7500 SERIES OWNERS OPERATION GUIDE CONTENTS Important Safety Instructions Introduction 2 4 FEATURES & FUNCTION Ground Fault Circuit Interrupter (GFCI) Heater On Indicator Spaside Control Setting Filtration
UNIVERSAL AIR SERIES SYSTEM OPERATION MANUAL
 UNIVERSAL AIR SERIES SYSTEM OPERATION MANUAL CONTENTS Important Safety Instructions 2 INTRODUCTION Major Component Illustration 4 SYSTEM OPERATION Illustration System Mis-Wire System Over Temperature System
Dimension One Series Owner s Manual. Spa Information. My Spa. Gallons/Liters: Notes: Dealer Information: Dealer s Name: Address:
 Spa Information My Spa Model Name: Date Purchased: Serial Number: Date Installed: Gallons/Liters: Notes: Dealer Information: Dealer s Name: Address: City: State, Zip: Telephone: Fax: i Table of Contents
OWNERS OPERATION GUIDE
 4220/6220/9220 SERIES OWNERS OPERATION GUIDE CONTENTS Important Safety Instructions 2 INTRODUCTION Major Component Illustration 4 SYSTEM OPERATION Features & Function Visual Diagnostic System (VDS) Spaside
Escape Series Walk-in Bathtub Models 5128 and 5332 (soaker, water, air and microbubble jet models)
") INSTALLATION INSTRUCTIONS Escape Series Walk-in Bathtub Models 58 and 5 (soaker, water, air and microbubble jet models) 09 Includes instructions for: Models with an end panel for corner installations and
INSTALLATION INSTRUCTIONS Escape Series Walk-in Bathtub Models 58 and 5 (soaker, water, air and microbubble jet models) 09 Includes instructions for: Models with an end panel for corner installations and
Filling Directions Fill the Spa With Water 21 Skimmer Side Filter 21 Add Start-Up Chemicals 21
 2016 Owner s Manual TABLE OF CONTENTS Important Safety Instructions 2 Personal Safety Precautions 5 Installation and Set-Up Instructions 5 Electrical Requirements (VS100, VS-500 & 502) 5 GFCI Wiring Installation
Spa Startup Directions 21 Fill the Spa With Water 21 Skimmer Side Filter 21 Add Start-Up Chemicals 21
 2011 Owner s Manual TABLE OF CONTENTS Important Safety Instructions 2 Personal Safety Precautions 5 Installation and Set-Up Instructions 5 Electrical Requirements (VS-500 & 501) 5 GFCI Wiring Installation
4230/6230/9230 SERIES OWNERS OPERATION GUIDE
 4230/6230/9230 SERIES OWNERS OPERATION GUIDE CONTENTS Important Safety Instructions 2 INTRODUCTION Major Component Illustration 4 SYSTEM OPERATION Features & Function Visual Diagnostic System (VDS) Spaside
4200/6200/9200 SERIES
 4200/6200/9200 SERIES OWNERS OPERATION GUIDE 85-0063-A Rev 9 04/09 CONTENTS Important Safety Instructions 2 INTRODUCTION Major Component Illustration 4 SYSTEM OPERATION Features & Function Visual Diagnostic
T8-S / T8-X Topside. Installation Manual & User s Guide. For C5 Series Spa Controls with the T8-S / T8-X Topside. Revision 09.13
 T8-S / T8-X Topside Installation Manual & User s Guide For C5 Series Spa Controls with the T8-S / T8-X Topside Revision 09.13 Disclaimers End User Disclaimer: United Spa Controls systems have absolutely
4100/6100/7100 SERIES OWNERS OPERATION GUIDE
 4100/6100/7100 SERIES OWNERS OPERATION GUIDE CONTENTS Important Safety Instructions 2 INTRODUCTION Major Component Illustration 4 SYSTEM OPERATION Features & Function Visual Diagnostic System (VDS) Spaside
SPA HEATER INSTALLATION, OPERATION AND MAINTENANCE
 SPA INSTALLATION, OPERATION AND MAINTENANCE MODELS: ST SERIES 5.5 & 11kW 240V SINGLE PHASE BEFORE YOU BEGIN CHECK ALL ELECTRICAL CONNECTIONS TO ALL COMPONENTS WITHIN THE FOR TIGHTNESS. CONNECTIONS CAN
4200/6200/9200 SERIES OWNERS OPERATION GUIDE
 4200/6200/9200 SERIES OWNERS OPERATION GUIDE CONTENTS Important Safety Instructions 2 INTRODUCTION Major Component Illustration 4 SYSTEM OPERATION Features & Function Visual Diagnostic System (VDS) Spaside
Owner s Manual. Model PH050006
 Owner s Manual Model PH050006 Manufactured By: Shanghai Qinxu Plastics Products Co., Ltd. No. 5151, Dongchuan Road Heqing Town, Pudong New Area Shanghai, CN 201201 IMPORTANT SAFETY INSTRUCTIONS The following
Dimension One Spas Reflections Owner s Manual. Dealer s Name:
 Spa Information My Spa: Model Name: Date Purchased: Serial Number: Date Installed: Gallons/Liters: Notes: Dealer Information: Dealer s Name: Address: City: State: Zip: Telephone: Fax: Dimension One Spas,
6000 AIR SERIES SYSTEM OPERATION MANUAL A-AZ Rev.0 5/07
 000 AIR SERIES SYSTEM OPERATI MANUAL -00A-AZ Rev.0 /0 CTENTS NOTES Important Safety Instructions INTRODUCTI Major Component Illustration SYSTEM OPERATI Illustration GFCI (Ground Fault Circuit Interrupter)
Dimension One Spas Reflections Owner s Manual. Model Name: Serial Number: Date Purchased: Date Installed: Dealer s Name:
 Spa Information My Spa: Model Name: Serial Number: Date Purchased: Date Installed: Gallons/Liters: Notes: Dealer Information: Dealer s Name: Address: City: State: Zip: Telephone: Fax: Dimension One Spas,
AquaLink RS. Installation Man u al. All Button and OneTouch TM Control Systems
 Installation Data Installation Man u al AquaLink RS All Button and OneTouch TM Control Systems Dual Equipment Systems Sheet #6840, Rev. F WARNING FOR YOUR SAFETY - This product must be installed and serviced
Whirlpool Bathtub Model Number: MT618
 INSTALLATION AND OWNER'S MANUAL Whirlpool Bathtub Model Number: MT618 Please carefully read these instructions before you begin to install the products. 07/11 Rev A P/N:100056-03 Thank you for purchasing
ELECTRIC SPA-PAK HEATER INSTALLATION & OPERATING INSTRUCTIONS
 ELECTRIC SPA-PAK HEATER INSTALLATION & OPERATING INSTRUCTIONS CATALOG NO.: 6100.53O Effective: 03-15-05 Replaces: 02-01-05 INTRODUCTION The SPA-PAK Spa Heaters have been designed to provide efficient,
FREWIN STEAM SHOWER ENCLOSURE
 FREWIN STEAM SHOWER ENCLOSURE INSTALLATION AND USER MANUAL CONTENTS Steam Shower Enclosure Installation...2 Technical Information...2 Plumbing Requirements...2 Assembly...3 Tools and Materials...3 Installation...3
Guide to Hot Tub Ownership
 Guide to Hot Tub Ownership READ THIS MANUAL BEFORE PROCEEDING WITH INSTALLATION KEEP THIS MANUAL HANDY ABER Hot Tub Manufacturing Ltd. British Columbia, Canada INTRODUCTION Congratulations on your purchase
ARLEY STEAM SHOWER ENCLOSURE
 ARLEY STEAM SHOWER ENCLOSURE INSTALLATION AND USER MANUAL CONTENTS Steam Shower Enclosure Installation...2 Technical Information...2 Plumbing Requirements...2 Assembly...3 Tools and Materials...3 Installation...3
LEVENS STEAM SHOWER ENCLOSURE
 LEVENS STEAM SHOWER ENCLOSURE INSTALLATION AND USER MANUAL CONTENTS Steam Shower Enclosure Installation...2 Technical Information...2 Plumbing Requirements...2 Assembly...3 Tools and Materials...3 Installation...3
2004 Dimension One Spas Owners Manual
 Spa Information It is very important that you gather the following information on your spa and enter it in the blanks provided below. This information can then be used to complete your Warranty Registration,
TABLE OF CONTENTS LETTER OF INTRODUCTION...2 SPA RECORD KEEPING INFORMATION...3 IMPORTANT SAFETY INSTRUCTIONS...4 HYPERTHERMIA INFORMATION...
 TABLE OF CONTENTS LETTER OF INTRODUCTION...2 SPA RECORD KEEPING INFORMATION...3 IMPORTANT SAFETY INSTRUCTIONS...4 HYPERTHERMIA INFORMATION...6 SAFETY PRECAUTIONS...6 SAFETY SIGN...7 SPA CAUTIONS...7 SPA
INSTALLATION & INSTRUCTION MANUAL
 INSTALLATION & INSTRUCTION MANUAL CONTENTS TUFF SPA INSTALLATION REQUIREMENTS........3 IMPORTANT SAFETY INSTRUCTIONS... 4 WARNINGS... 5 IMPORTANT CAUTION... 6 WIRING DIAGRAM... 7 110v to 220v CONVERSION...
ABER HOT TUB MANUFACTURING LTD British Columbia, Canada. Owner s Manual. Read This Manual Before Proceeding With Installation
 ABER HOT TUB MANUFACTURING LTD British Columbia, Canada Owner s Manual Read This Manual Before Proceeding With Installation INTRODUCTION Congratulations on your purchase of a Pacific Hot Tub! Pacific Hot
Signature Spa Owner s Manual
 Signature Spa Owner s Manual (with Gecko components) Customer Service 1 800 787 6649 email: support@strong9.com READ AND FOLLOW ALL INSTRUCTIONS Unit is IPX5 Compliant Congratulations on your purchase
NEXT SOLID-STATE SYSTEM. P u m p. * A u x. e f
 e f s a i ECO-1 SERIES SOLID-STATE SYSTEM OPERATION MANUAL P u m p * Pum p 2 1 * A i r Light POWER CONTROL SWITCH Ref r to Oper tion Ma nual o r test ng and operational p r o c e d u r e c System V D S
CONTENTS CONSIDERATIONS. General Plumbing Component Connection ILLUSTRATION. Control System CONFIGURATION. Voltage Verification CONNECTION
 AIR SERIES SYSTEM INSTALLATION MANUAL CONTENTS CONSIDERATIONS General Plumbing Component Connection 2 2 2 ILLUSTRATION Control System 3 CONFIGURATION Voltage Verification 4 CONNECTION Component Connection
Experience the Ultimate. Owners Guide. Built by May Manufacturing Inc. Victorville, California
 Experience the Ultimate GOLDClass Owners Guide Built by May Manufacturing Inc. Victorville, California TABLE OF CONTENTS CONGRATULATIONS 3 SAFETY WARNINGS 4 SPA CONFIGURATION and WATER CAPACITIES 7 ELECTRICAL
UK & Ireland Edition. PACIFIC SPAS OWNER S MANUAL. Congratulations on your decision to enjoy a Pacific Spa!
 PACIFIC SPAS OWNER S MANUAL UK & Ireland Edition Congratulations on your decision to enjoy a Pacific Spa! Welcome to the Pacific Spas family! Your Pacific Spa has been engineered and built to the highest
CERTIFICATE OF AUTHENTICITY
 CERTIFICATE OF AUTHENTICITY Thank you for your purchase. This certificate hereby verifies that the spa you have purchased from an Artesian Spas (May Manufacturing, LLC) authorized dealer is authentic,
INSTALLATION/OPERATING INSTRUCTIONS. AQUEFIER POOL HEATERS Model TK125T
 INSTALLATION/OPERATING INSTRUCTIONS FOR AQUEFIER POOL HEATERS Model TK125T Trevor-Martin Corp., 4151 112 th Terrace North, Clearwater, FL 33762 Bulletin PH-125T Rev. 3 1 IMPORTANT SAFETY INSTRUCTIONS READ
UNIVERSAL TEE STYLE Hydromassage Bath Heater INSTALLATION INSTRUCTIONS
 UNIVERSAL TEE STYLE Hydromassage Bath Heater INSTALLATION INSTRUCTIONS This Manual Covers: 7 Models SG100-15UP - 120V, 1500W SG202-20UP - 240V, 2000W CARTON CONTENTS: A - One (1) Whirlpool Bath Heater
Installation and user s manual Read carefully and keep it for later reference
 For ASPEN / MALIBU / MONTANA / ROVER / SILVER spa Installation and user s manual Read carefully and keep it for later reference IMPORTANT SAFETY INSTRUCTIONS For your own safety and that of your product,
WARNING FOR YOUR SAFETY:
 Operation Data Owner's Manual AquaLink RS - Pool Digital Assistant Pool/Spa Combination Systems and Pool Only/Spa Only Systems (Models PS4, PS6, PS8, P4, and P8) WARNING FOR YOUR SAFETY: This product must
ECO SPA & POOL OWNERS MANUAL & INSTALLATION GUIDE
 ECO SPA & POOL OWNERS MANUAL & INSTALLATION GUIDE MODELS: ECO SPA 5.5-11 / ECO POOL 18-27 IMPORTANT SAFETY INSTRUCTIONS,INSTALLATIONIN STRUCTIONS,USER INSTRUCTIONS As when installing or using any high
Owner s Manual
 2006-2008 Owner s Manual SPA WARRANTY INFORMATION Twenty-Five Year Full Structure Warranty Should a defect in the fiberglass laminate result in a loss of water through the body and appear within twenty-five
TP600 and TP400 Control Panels
 TP600 and TP400 Control Panels Balboa Water Group Revolution Series User Interface and Programming Reference Simplified Menus System Model: BP1500 / BP1600 - Other BP-Series Systems as required. Software
Installation and Operation Manual MG-304. Please read this manual carefully before use.
 Installation and Operation Manual MG-304 Please read this manual carefully before use. 1 P a g e Important Safety Instructions: Warning! Use this unit only for its intended purposes or as described in
Owner's Man u al. All Button Control Systems
 Operation Data Owner's Man u al All Button Control Systems For use with Pool/Spa Combination, Pool Only/Spa Only, and Dual Equipment AquaLink RS Systems with Rev O.2 Firmware 6593M WARNING FOR YOUR SAFETY
Thanks for shopping with Improvements! Spa N a Box - Portable Spa Item #
 Thanks for shopping with Improvements! Spa N a Box - Portable Spa Item # 416969 To order, call 1-800-642-2112 West Chester, OH 45069 If you have any questions regarding this product, call 1-800-642-2112
Owner s Manual for the Passport Series Rooms PS 44 With SaunaLogic Control
 Owner s Manual for the Passport Series Rooms PS 44 With SaunaLogic Control Precautions before Use. 2 Read Before Installation... 3 Room Assembly 4 Lighting Operation 10 Sauna Heater Operation 11 Maintenance..
Whirlpool Tub USER S MANUAL
 Whirlpool Tub USER S MANUAL Model: PH050006/PH050011, 110V~, 60Hz, 1500W BLUE WAVE PRODUCTS 1745 WALLACE AVE. ST. CHARLES, IL 60174 Read this manual before operation IMPORTANT SAFETY INSTRUCTIONS WARNING1:
Introduction. Information on Your Spa
 Introduction Congratulations on your purchase of the finest spa on the market today. Emerald Spa Corporation welcomes you to the Emerald Spa life-style! We are confident that this purchase will fulfill
IMPORTANT SAFETY WARNINGS
 IMPORTANT SAFETY WARNINGS NOTE: When installing using this equipment, basic safety precautions should always be taken to reduce the risk of electrical shock, to ensure safe usage, to safeguard the user
IMPORTANT SAFETY INSTRUCTIONS READ AND FOLLOW ALL INSTRUCTIONS SAVE THESE INSTRUCTIONS
 IMPORTANT LEAVE THESE INSTRUCTIONS WITH THIS UNIT Whirlpool / Chromatherapy / BubbleAir Operating Instructions IMPORTANT SAFETY INSTRUCTIONS READ AND FOLLOW ALL INSTRUCTIONS SAVE THESE INSTRUCTIONS INSTRUCTIONS
INSTALLATION, OPERATION AND MAINTENANCE
 POOL HEATER INSTALLATION, OPERATION AND MAINTENANCE MODELS: PHS-CN SERIES, 5, 8, 4, 0, 6, 45, 54 & 57kW 08V, 40V, 480, 600V SINGLE & THREE PHASE BEFORE YOU BEGIN CHECK ALL ELECTRICAL CONNECTIONS TO ALL
CERTIFICATE OF AUTHENTICITY
 CERTIFICATE OF AUTHENTICITY Thank you for your purchase. This certificate hereby verifies that the spa you have purchased from an Artesian Spas (May Manufacturing, LLC) authorized dealer is authentic,
POOL HEATER INSTALLATION, OPERATION AND MAINTENANCE
 POOL HEATER INSTALLATION, OPERATION AND MAINTENANCE MODELS: TR SERIES, 5 & 8kW 08V, 40V, 480V, 600V BEFORE YOU BEGIN CHECK ALL ELECTRICAL CONNECTIONS TO ALL COMPONENTS WITHIN THE HEATER FOR TIGHTNESS.
Water s Edge Spas. Owner s Guide Book
 Owner s Guide Book Dealer Support and Service For technical assistance or warranty service requests, contact your local dealer. Please take pictures of your area of concern and have them ready if the dealer
Spas with 2 or 3 Pumps
 Topside Control Instructions for Spas with 2 or 3 Pumps 15bp501tp60102 1 Programming Menu Sequence 2 Powering on Your Spa After filling the spa through the filter assembly to the correct level remove the
Owner s Manual for. Spas with Multiple Pumps
 Owner s Manual for Spas with Multiple Pumps Service and Technical Support For technical assistance or warranty service requests, please call a technical support representative at 844-894-6659. Factory
OPERATION & INSTALLATION MANUAL
 OPERATION & INSTALLATION MANUAL BAPTISTRY HEATER AND CONTROL SYSTEM BES6000-HC & BES6000T-HC SERIES 5.5KW BES6005-HC & BES6005T-HC SERIES 11.0KW 510A N. SHERIDAN ST. CORONA, CA 92880 TABLE OF CONTENTS
AWP 3260 CWH Installation Instructions Hydro-massage Bathtub - UL 1795
 Tools you might need for proper installation galvanized nails or screws large level hammer or screw gun shims adhesive Thank you for purchasing Praxis Bathware. For best results, please read and follow
CERTIFICATE OF AUTHENTICITY
 CERTIFICATE OF AUTHENTICITY Thank you for your purchase. This certificate hereby verifies that the spa you have purchased from an Artesian Spas (May Manufacturing, LLC) authorized dealer is authentic,
CelebrityHotTubs DROP IN FOR SOME FUN! 2012 Owner s Manual
 CelebrityHotTubs DROP IN FOR SOME FUN! 2012 Owner s Manual OWNER S MANUAL Congratulations on your new Celebrity Hot Tub! We sincerely hope your spa life is a pleasant experience. If problems should arise,
Owner s Manual for. Single Pump Spas
 Owner s Manual for Single Pump Spas Service and Technical Support For technical assistance or warranty service requests, please call a technical support representative at 844-894-6659. Factory trained
Contractor Series OWNER S MANUAL
 Contractor Series OWNER S MANUAL OWNER S MANUAL Welcome To Ultimate Relaxation! Please read the entire Owner s Manual before installing and using your spa. The goal of this manual is to provide you with
USER MANUAL
 USER MANUAL 1 Contents Content Page Number Warning 3-4 Caution Notice 5 Installation Notice 6 Assembly 7-9 Operation 10 Maintenance of water in the water tank body 13 Maintaining water 14 Cleaning the
RELAX. REVITALIZE. RESTORE. LUXURY SPA UNIT Installation Manual. English. For Model Numbers 2848, 2853, 3153 and 3255
 RELAX. REVITALIZE. RESTORE. LUXURY SPA UNIT Installation Manual For Model Numbers 2848, 2853, 3153 and 3255 English RELAX. REVITALIZE. RESTORE. Thank you for choosing a Secure Spa Luxury Spa Unit. Secure
TABLE OF CONTENTS TABLE OF CONTENTS...1 IMPORTANT SAFETY WARNINGS...4 LETTER OF INTRODUCTION...5 SPA RECORD KEEPING INFORMATION...
 OWNER S MANUAL TABLE OF CONTENTS TABLE OF CONTENTS...1 IMPORTANT SAFETY WARNINGS...4 LETTER OF INTRODUCTION...5 SPA RECORD KEEPING INFORMATION...6 IMPORTANT SAFETY INSTRUCTIONS...7 DOS AND DON'TS...10
EL/GL Series - Mach 3 ML550 User Guide
 EL/GL Series - Mach 3 ML550 User Guide Heat Cool Warm Jets 1 Jets 2 Blower Light Mode Note regarding EL and GL systems: Mach 3 EL and GL systems function identically, but conform to different International
Control Series Operation Instructions Page 1. "Digi VII"
 Control Series Operation Instructions Page 1 Do not take a sauna if using alcohol, drugs or medications. "Digi VII" Control Models Digi VII 60 min or Digi VII 24 hr (Model # 1601-15, and 1601-15-1) Read
MASTER SPAS OWNER S MANUAL
 OWNER S MANUAL MASTER SPAS OWNER S MANUAL Welcome To Ultimate Relaxation! Thank you for choosing your new spa built by Master Spas. Please read the entire Owner s Manual before installing and using your
Lifestyle Series. Designed with assistance from medical professionals to. Improve Well Being with Relaxation Therapy
 Lifestyle Series Designed with assistance from medical professionals to Improve Well Being with Relaxation Therapy Service and Technical Support For technical assistance or warranty service requests, please
Installation, Operation & Service Procedures
 Installation, Operation & Service Procedures Baptistry Heater System Model EQAS-CH HEATER ONLY PT#: 04-10029 REV.02 85-0139-C 08/12 TABLE O CONTENTS TABLE O CONTENTS/WARRANTY 1 IMPORTANT SAETY INSTRUCTIONS
OWNER S MANUAL. MasterSpaParts.com
 OWNER S MANUAL MASTER SPAS TWILIGHT OWNER S MANUAL Welcome To Ultimate Relaxation! Thank you for choosing your new spa built by Master Spas. Please read the entire Owner s Manual before installing and
OWNER S MANUAL 1-2 PERSON SAUNA
 Rev. 9/5, Ver. 5 OWNER S MANUAL -2 PERSON SAUNA WITH CARBON HEATERS SA2402 TABLE OF CONTENTS ASSEMBLY TIPS & WARNINGS PARTS IDENTIFIER ASSEMBLY INSTRUCTIONS OPERATION INSTRUCTIONS ENJOYING YOUR SAUNA HEALTH
OWNER S MANUAL THREE-PERSON & FOUR-PERSON CORNER SAUNAS
 OWNER S MANUAL THREE-PERSON & FOUR-PERSON CORNER SAUNAS SA3/SA30 / SA4DX/SA40DX TABLE OF CONTENTS ASSEMBLY TIPS & WARNINGS PARTS IDENTIFIER ASSEMBLY INSTRUCTIONS OPERATION INSTRUCTIONS ENJOYING YOUR SAUNA
INSTALLATION MANUAL SPA HIGH OFF LOW POOL HEATER AUX 1 AUX 2
 INSTALLATION MANUAL SPA HIGH OFF ON ON Switch LOW POOL HEATER AUX 1 AUX 2 Important Safety Precautions When installing and using this electrical equipment, basic safety precautions should always be followed,
Portable Air Conditioner with Heat Pump Technology Operating Instructions. Model No.: HCB-P13HP-D. Reference No.: BPD13HP V140217
 Portable Air Conditioner with Heat Pump Technology Operating Instructions 3092402 Model No.: HCB-P13HP-D Reference No.: BPD13HP V140217 Thank you for choosing a Soleus Air Portable Air Conditioner with
Quick Start Guide. For product manuals and further installation / operation procedures visit
 Quick Start Guide For product manuals and further installation / operation procedures visit www.aquacal.com Important Read This Guide Before Installing or Operating Heat Pump LTP0093 Rev 1 03/21/2014 Page
Factory Direct Walk-In Tubs WALK-IN TUB. Installation Manual. For Model Numbers VT2848, VT2853, VT3153 and VT3255
 Factory Direct Walk-In Tubs WALK-IN TUB Installation Manual For Model Numbers VT2848, VT2853, VT3153 and VT3255 FACTORY DIRECT WALK-IN TUBS Thank you for choosing an Vitality Tubs Walk-In Tub. Vitality
OWNER S MANUAL ONE-PERSON & TWO-PERSON SAUNAS WITH CERAMIC OR CARBON HEATERS
 OWNER S MANUAL ONE-PERSON & TWO-PERSON SAUNAS WITH CERAMIC OR CARBON HEATERS SA400/SA40/SA406/SA409/SA309 TABLE OF CONTENTS ASSEMBLY TIPS & WARNINGS PARTS IDENTIFIER ASSEMBLY INSTRUCTIONS OPERATION INSTRUCTIONS
This manual covers your new TidalFit
 This manual covers your new TidalFit Table of Contents Certificate of Authenticity... Important Safety Instructions... 1 TidalFit Specifications... 5 Electrical Requirements and Installation... 6 Electrical
WARNING FOR YOUR SAFETY
 Installation and Operation Data Installation and Operation Manual Wireless Handheld Remote (For use with AquaLink RS OneTouch and All Button Systems) WARNING FOR YOUR SAFETY - This product must be installed
maxxus optima majesta cameo
 maxxus optima majesta cameo Attention New Hot Tub Owner! Congratulations on the purchase of your new Sundance Hot Tub! The following is a list of automated functions performed by your hot tub. These functions
Aquatic Fitness System 2003 Owner s Manual
 ii Table of Contents IMPORTANT SAFETY INSTRUCTIONS...1 READ AND FOLLOW ALL INSTRUCTIONS CAREFULLY... 1 HYPERTHERMIA... 4 DO S AND DON T S...5 Do s...5 Don ts...5 DANGER SIGN...6 AQUATIC FITNESS SYSTEM
DistributedBy. 7215BermudaRoadLasVegas,NV89119 TolFree: Fax:
 DistributedBy 7215BermudaRoadLasVegas,NV89119 TolFree:800-237-9937 Fax:866-909-7278 www.aliedinnovations.com Y Series Total flexibility, total compatibility, total satisfaction. This product is the simplest,
INTERNATIONAL OWNER S MANUAL
 INTERNATIONAL OWNER S MANUAL MASTER SPAS TWILIGHT OWNER S MANUAL Welcome To Ultimate Relaxation! Thank you for choosing your new spa built by Master Spas. Please read the entire Owner s Manual before
spatouch Menued Control Panels
 spatouch Menued Control Panels Balboa Water Group BP Series Systems User Interface and Programming Reference The spatouch menued panel is compatible with all BP systems that already support the TP800 and/or
Acrylic Spa Owner s Manual
 Acrylic Spa Owner s Manual Featuring our patented, maintenance-free DURA-LAST Cabinet System with HEATSHIELD Insulation Technology U.S. Pat. 7,784,120 Customer Service 1 800 787 6649 READ AND FOLLOW ALL
Destination Collection Whirlpool Bath Installation Instructions
 Tools you might need for proper installation Galvanized Nails or Screws Large Level Hammer or Screw Gun Shims Adhesive Thank you for purchasing Praxis Bathware. For best results, please read and follow
Rotationally-Molded Spa Owner s Manual
 Rotationally-Molded Spa Owner s Manual Customer Service 1 800 787 6649 READ AND FOLLOW ALL INSTRUCTIONS Unit is IPX5 Compliant Congratulations on your purchase Your new spa will bring you years of enjoyment
AquaLink RS. Owner's Man u al. PDA - Pool Digital Assistant
 Operation Data Owner's Man u al AquaLink RS PDA - Pool Digital Assistant Pool/Spa Combination Systems and Pool Only/Spa Only Systems (Models PS4, PS6, PS8, P4, and P8) Firmware Revision 2.6 WARNING FOR
Lifestyle Series. Designed with assistance from medical professionals to. Improve your Well Being with Relaxation, Massage & Hydro Therapies
 Lifestyle Series Designed with assistance from medical professionals to Improve your Well Being with Relaxation, Massage & Hydro Therapies Service and Technical Support For technical assistance or warranty
Warranty MyControl Bathing System Signature Series
 Warranty MyControl Bathing System Signature Series With Touch Assist Touch Screen Technology PDF VERSION Please review product warranty carefully prior to purchase Accessible Bath Technologies, LLC For
Introduction. Spa Model: Power Pack Model: Serial #:
 Introduction Congratulations on your purchase of the finest whirlpool spa on the market today. Emerald Spa Corporation welcomes you to the Emerald Whirlpool Spa Life-style! We are confident that this purchase