REQUEST FOR ALTERNATE TO BID (SUBMITTAL FORM ATTACHED)
|
|
|
- Alexander Henry
- 5 years ago
- Views:
Transcription


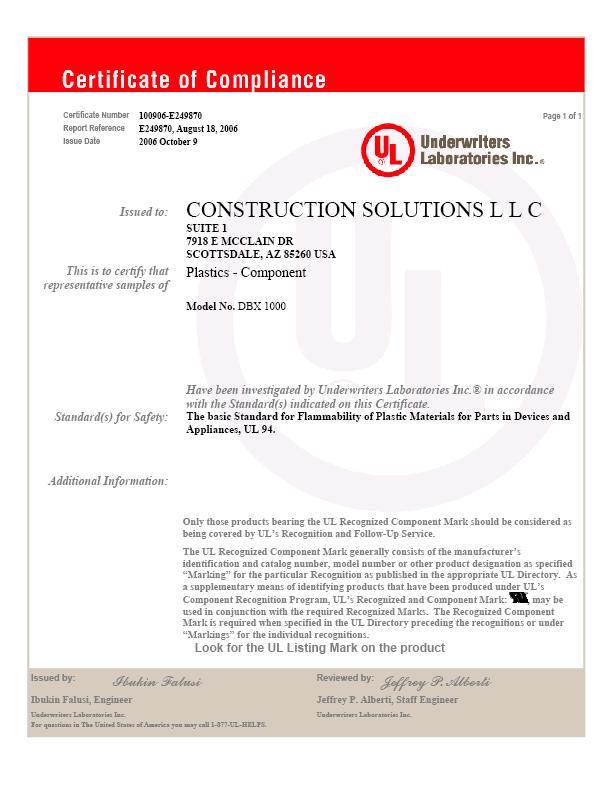
1 REQUEST FOR ALTERNATE TO BID (SUBMITTAL FORM ATTACHED) requests to add and/or substitute the DBX1000 Dryer Vent Box, manufactured by Construction Solutions, on the following project. The utilization of the DBX1000 will employ the following benefits: ATTRACTIVE Has a clean white appearance that coordinates with the washer boxes now being installed in most new homes. PRACTICAL - Conceals the dryer vent and gas valve connection in the wall away from harms way, available for easy access hook-up connection. DURABLE - Manufactured from durable high impact polystyrene plastics. Easy to clean and is heat and moisture resistant. ELIMINATES CALLBACKS The patented trim ring reduces job walkthrough tags for the drywall and painting contractor s touch-up repairs around the metal vent receptacle. ADDED VALUE - The DBX1000 recoups up to five feet of living space by positioning the dryer closer to the wall and even with the washer. EASY TO INSTALL - Can be installed with several nails or screws. The patented trim ring provides an attractive finished appearance. MULTIFUNCTIONAL The DBX 1000 is multi-positional for field conversion as an up/down/or direct vent. It can also be used behind gas ranges or stoves to keep the gas valve and connection in the wall.
2 SUBMITTAL FORM PROJECT INFORMATION Project Name: Project Address: City: State/Zip: Start Date for Dryer Venting: Builder/Contractor: CONTRACTOR INFORMATION THIS PRODUCT SUBMITTAL PACKAGE HAS BEEN FURNISHED BY: Contractor Name: Address: City: State/Zip: Contact: Phone/Fax: SUBMITTAL INFORMATION THIS SUBMITTAL PACKAGE INCLUDES: Alignment Considerations/Specifications and Scope of Work: Installation Instructions: UL Mark Reference Documents:
3 Alignment Considerations For standard, side-by-side washer & dryer alignments, the DBX 1000 should always be installed on the bottom framing plate. In many cases job superintendents or subcontractors think the DBX 1000 should be installed 5 or 6 inches above the floor when in fact they are taking away the main benefit of using the DBX Installing the unit above the baseboard eliminates the ability to move the clothes dryer all the way back against the wall because the flex hose now has to bend upwards to reach the receptacle area. As shown in the diagram below, most standard American dryers locate the 4 Inch exhaust port at the bottom center of dryer's rear panel, 3 Inches above floor level. With that in mind, the DBX 1000 is properly installed when set on the bottom framing plate and aligned with the dryer location. Ideally, the center of the DBX 1000 should be located in the wall as close to the center of the proposed dryer location as possible. Figure 1 14 ½ Clothes Dryer (Side View) Dryer Flex Hose 4 Inch Exhaus t Vent DBX 1000 Framing Plate Dryer Exhaust Vent 42 ½ Clothes Dryer (Rear View) Washer/Dryer Placement Considerations Dryer Left of Washer Alignment. The DBX1000 should be installed on the bottom framing plate with its left edge from 4 to 14 inches from a left perpendicular wall. Dryer Right of Washer Alignment. The DBX1000 should be installed on the bottom framing plate with its left edge from 38 to 52 inches from a left perpendicular wall. 2 Inches 30 Inches Dryer Washer Washer Dryer Dryer Left Dryer Right Specifications and Scope of Work Builder Specification Wording for HVAC Recessed Dryer Vent Receptacle with Trim Ring Construction Solutions DBX1000 Architectural Technical Specifications for DBX 5.01 (6 Construction) and DBX (4 Construction) Model Number DBX 5.01 (6 Construction) by Construction Solutions Model Number DBX (4 Construction) by Construction Solutions Made of High Impact Polystyrene which Meets UL Standards for 94HB Flammability Testing and is recognized by Underwriters Laboratories Inc. Representative samples of this component have been evaluated by UL and meet applicable UL requirements. Provide a 16 or 24 on center stud bay with 2 X 6 or 2 X 4 wall structure.
4 4 Inch Wall Material used in the DBX 1000 meets UL94 HB Flammability Testing and is recognized by Underwriters Laboratories Inc. Representative samples of this component have been evaluated by UL and meet applicable UL requirements. For optimum results, install the DBX1000 recessed vent receptacle for 4 Inch Walls as follows: Box Installation - 16 Inch On-Center Spacing: 1. Orient box to match desired venting direction, score & remove appropriate top or rear 4-inch oval vent pipe knock out. Allow minimum of 4 inches of vent of pipe to extend inside box 2. If gas line is to be installed, locate 1⅝ straw clamp on top of box. Cut the webs between the 8 fins with a utility knife. Push the gas line through the straw clamp. The fins will flex inward holding the pipe. 3. Slide box into position taking care to correctly align vent pipe and gas pipe (if present). 4. Spacing tabs will automatically position box so that bottom, inside edge is from 2¼ to 2⅝ inches 5. Attach box directly to both right and left studs using the six flange screw holes. Screws are recommended for mounting. Box Installation - 24 Inch On-Center Spacing: 1. Orient box to match desired venting direction, score & remove appropriate 4-inch oval vent pipe knock out. Allow minimum of 4inches of vent of pipe to extend inside box. 2. If gas line is to be installed, locate 1⅝ straw clamp on top or bottom of box. Cut the webs between the 8 fins with a utility knife. Push the gas line through the straw clamp. The fins will flex inward holding the pipe. 3. Slide box into position taking care to correctly align vent pipe and gas pipe (if present). 4. Spacing tabs will automatically position box so that bottom, inside edge is from 2¼ to 2⅝ inches 5. Attach one side of box directly to stud using the three flange screw holes. 6. Snap in the two mounting straps on the other side of the box and attach these to the second stud using the strap screw holes. Screws are recommended for mounting. Trim Instructions: 1. Snap out left or right trim ring cut out (see detail below). 2. Leave 1¾ inches between inside edge of box and end of baseboard to allow for trim ring clearance. 3. Snap trim ring into opening, no caulking required. 4. Leave unfinished or paint with desired color. 4 Vent Pipe Knockouts Box made from High Impact Polystyrene ( HIPS ) Meets UL94 HB Flammability Testing Install in up to 24 on center location, brackets included Easy to remove 4 oval knockouts Top and Bottom Straw clamps for gas pipe Snap on trim ring accommodates up to ¾ drywall US Patented Product 6,938, ⅛ 1⅝ Straw Clamp 1¾ 4 Rear Knockout Top Oval Clearance Notches 1⅝ Straw Clamp (on Bottom) Mounting Straps For 24 OC 1 Depth 3½ 1¼ 4 Wall DBX 1000 Recessed Vent Box 1¾ Clearance to Edge of Baseboard 2¼ to 2 ⅝ Clearance to Unfinished Floor 1¾ Snap On Trim Ring ¼
5 1 6 Inch Wall Material used in the DBX 1000 meets UL94 HB Flammability Testing and is recognized by Underwriters Laboratories Inc. Representative samples of this component have been evaluated by UL and meet applicable UL requirements. For optimum results, install the DBX1000 recessed vent receptacle for 6 Inch Walls as follows: Box Installation - 16 Inch On-Center Spacing: 6. Orient box to match desired venting direction, score & remove appropriate, top or rear, 4-inch vent pipe knock out. Allow minimum of 4 inches of vent of pipe to extend inside box 7. If gas line is to be installed, locate 1⅝ straw clamp on top of box. Cut the webs between the 8 fins with a utility knife. Push the gas line through the straw clamp. The fins will flex inward holding the pipe. 8. Slide box into position taking care to correctly align vent pipe and gas pipe (if present). 9. Spacing tabs will automatically position box so that bottom, inside edge is from 2¼ to 2⅝ inches 10. Attach box directly to both right and left studs using the six flange screw holes. Screws are recommended for mounting. Box Installation - 24 Inch On-Center Spacing: 7. Orient box to match desired venting direction, score & remove appropriate 4-inch vent pipe knock out. Allow minimum of 4inches of vent of pipe to extend inside box. 8. If gas line is to be installed, locate 1⅝ straw clamp on top or bottom of box. Cut the webs between the 8 fins with a utility knife. Push the gas line through the straw clamp. The fins will flex inward holding the pipe. 9. Slide box into position taking care to correctly align vent pipe and gas pipe (if present). 10. Spacing tabs will automatically position box so that bottom, inside edge is from 2¼ to 2⅝ inches 11. Attach one side of box directly to stud using the three flange screw holes. 12. Snap in the two mounting straps on the other side of the box and attach these to the second stud using the strap screw holes. Screws are recommended for mounting. Trim Instructions: 5. Leave 1¾ inches between inside edge of box and end of baseboard to allow for trim ring clearance. 6. Snap trim ring into opening, no caulking required. 7. Leave unfinished or paint with desired color. 4 Vent Pipe Knockouts Box made from High Impact Polystyrene ( HIPS ) Meets UL94 HB Flammability Testing Install in up to 24 on center location, brackets included Easy to remove 4 knockouts Top and Bottom Straw clamps for gas pipe Snap on trim ring accommodates up to ¾ drywall US Patented Product 6,938, ⅛ 1⅝ Straw Clamp 1¾ 4 Rear Knockout 1⅝ Straw Clamp (on Bottom) Mounting Straps For 24 OC Depth 5½ 1¾ 1¼ 6 Wall DBX 1000 Recessed Vent Box 1¾ Clearance to Edge of Baseboard 2¼ to 2 ⅝ Clearance to Unfinished Floor Snap On Trim Ring ¼
 used in the DBX 1000 is recognized by Underwriters Laboratories Inc.")
6 Subject: DBX 1000 Dryer / In-Wall Recess Receptacle Dear Customer, This letter is to answer any questions you may have concerning Underwriters Laboratories evaluation of the materials used in the DBX The High Impact Polystyrene Material (HIPS) used in the DBX 1000 is recognized by Underwriters Laboratories Inc. Representative samples of this component have been evaluated by UL and meet applicable UL 94 requirements in both the United States and Canada. This is the only material used in the manufacture of our product (Receptacle, Trim Ring and Straps). The authorized designation for the HIPS material used in the DBX 1000 dryer vent is a UL Recognized Component and the UL authorized identifying mark is shown as: The material in the DBX 1000 meets UL standard 94HB and fully satisfies the International Residential Code (Section M1502). It is not suitable for a one hour fire rated wall system. The same is true for laundry room washer boxes. What does UL 94 HB Mean? UL 94 flammability testing is part of plastic Recognition and subsequent certification in the "Plastics Recognized Component Directory" (formerly known as "Yellow Cards"). HB rated materials are considered appropriate for mechanical and/or decorative purposes including enclosures, structural parts and insulators. We hope this addresses any concerns you may have. Should you have any questions regarding this matter, please don t hesitate to contact Construction Solutions at You may also verify our status on the UL website at (Navigate to certifications and enter Construction Solutions file number E ) You may also contact UL at Thank you for your confidence in our quality products! Sincerely, Craig M. Liston National Sales Manager Constructions Solutions
7
Sizes. Colors. Features
 LAUNDRY ACCESSORIES 10 28 13 Construction Solutions, LLC 1. Product Name DBX1000 Dryer Vent Boxes with Snap-On Trim Rings 2. Manufacturer Construction Solutions, LLC 7801 E. Gray Rd. Suite 110-120 Scottsdale,
INSTALLATION INSTRUCTIONS
 FORCED AIR DISTRIBUTION KIT AC01363 INSTALLATION INSTRUCTIONS THE FORCED AIR DISTRIBUTION KIT (AC01363) WITH HEAT ACTIVATED SYSTEM, CAN BE INSTALLED ONLY WITH THE GRAVITY KIT - MODERN STYLE (AC01385),
SAFETY AND INSTALLATION MANUAL MODEL 8100
 SAFETY AND INSTALLATION MANUAL ENERGY RECOVERY VENTILATORS MODEL 8100 Provides year-round fresh air Recovers 77% of the apparent heating or cooling energy from the exhausted air See Warnings Page 3 Table
SECTION (15820) - AIR DUCT ACCESSORIES
 - AIR DUCT ACCESSORIES") PART 1 GENERAL 1.01 SUMMARY A. Section includes: SECTION 23 33 00 (15820) - AIR DUCT ACCESSORIES 1. Manual-Volume Dampers 2. Fire Dampers 3. Turning Vanes 4. Duct-Mounted Access Doors 5. Flexible Connectors
PART 1 GENERAL 1.01 SUMMARY A. Section includes: SECTION 23 33 00 (15820) - AIR DUCT ACCESSORIES 1. Manual-Volume Dampers 2. Fire Dampers 3. Turning Vanes 4. Duct-Mounted Access Doors 5. Flexible Connectors
Microwave Oven Hood Combination
 IMPORTANT: Read and save these instructions. IMPORTANT: Installer: Leave Installation Instructions with homeowner. Homeowner: Keep Installation Instructions for future reference. Save Installation Instructions
DaVinci Heat Exchanger Touch-Screen Version
 Compatibility Notes This kit must be installed in conjunction with a DaVinci pre-configured for heat-exchanger use. NOTE: Does not work for island or bay configurations or any unit with 58 tall glass.
Installation instructions for vented tumble dryer DOMESTIC. Dear Customer,
 Dear Customer, Read these instructions carefully and completely before you install the machine. The installation should be carried out by a qualified person who is familiar with all local codes and ordinances
SECTION PANELBOARDS Painting Wire and Cable Overcurrent Protective Devices.
 SECTION 16470 PANELBOARDS PART 1 GENERAL 1.01 SUMMARY A. Related Sections: 1. 09900 - Painting. 2. 16120 - Wire and Cable. 3. 16475 - Overcurrent Protective Devices. 1.02 SYSTEM DESCRIPTION A. Performance
DaVinci Heat Exchanger
 Compatibility Notes This kit must be installed in conjunction with a DaVinci pre-configured for heat-exchanger use. NOTE: Does not work for island or bay configurations or any unit with 58 tall glass.
C44 INSTRUCTION MANUAL HEAT DISTRIBUTION / TV KIT N A T U R A L LY V E N T E D [ ] PLEASE KEEP THESE INSTRUCTIONS FOR FUTURE REFERENCE
![C44 INSTRUCTION MANUAL HEAT DISTRIBUTION / TV KIT N A T U R A L LY V E N T E D [ ] PLEASE KEEP THESE INSTRUCTIONS FOR FUTURE REFERENCE](/thumbs/81/83520390.jpg "C44 INSTRUCTION MANUAL HEAT DISTRIBUTION / TV KIT N A T U R A L LY V E N T E D [ ] PLEASE KEEP THESE INSTRUCTIONS FOR FUTURE REFERENCE") PLEASE KEEP THESE INSTRUCTIONS FOR FUTURE REFERENCE C44 HEAT DISTRIBUTION / TV KIT N A T U R A L LY V E N T E D [ 5 0-3 2 1 3 ] INSTRUCTION MANUAL 4001609 This Heat Distribution Kit has been tested for
PLEASE KEEP THESE INSTRUCTIONS FOR FUTURE REFERENCE C44 HEAT DISTRIBUTION / TV KIT N A T U R A L LY V E N T E D [ 5 0-3 2 1 3 ] INSTRUCTION MANUAL 4001609 This Heat Distribution Kit has been tested for
Shutters, Mounts & Vents. Finish your masterpiece.
 Shutters, Mounts & Vents Finish your masterpiece. Feel free to call them new beginnings. How durable, strong and well-engineered do you like your shutters, mounts and vents? We hope very because we set
Installation Instructions
 Installation Instructions Type B Gas Vent Model E/R 3" 8" ECCO TYPE B GAS VENT AND ACCESSORIES ARE FOR USE ONLY WITH LISTED CATEGORY 1 GAS-FIRED APPLIANCES OR APPLIANCES LISTED FOR USE WITH TYPE B GAS
B. Product Data: Provide manufacturers catalogue information. Indicate valve data and ratings.
 DIVISION 21 21 05 00 COMMON WORK RESULTS FOR FIRE SUPPRESSION PART 1 GENERAL 1.1 SECTION INCLUDES A. Pipe, fittings, sleeves, escutcheons, seals, and connections for sprinkler systems. 1.2 RELATED REQUIREMENTS
Installation & Maintenance Instructions
 B2451 & B2452 Series Wall Heaters SPECIFICATIONS MODEL VOLTS HZ AMPS WATTS BTUH B2451 120 60 12.5 1500 5120 B2452 240 60 8.3 2000 6826 208 60 7.2 1500 5120 DIMENSIONS OVERALL Height - 14 1/4 Width - 11
INSTALLATION INSTRUCTIONS
 42" WOODBURNING FIREBOX Model C42EC2 Circulating (Louvered) INSTALLATION INSTRUCTIONS SAVE THIS BOOK This book is valuable. In addition to instructing you on how to install and maintain your appliance,
Finish your masterpiece.
 Measurements & Dimensions We offer an array of shapes, colors and designs so you can quickly find the right shutters, mounts and vents to complete each project. If you d like more information, product
INSTALLATION INSTRUCTIONS
 FRESH AIR INTAKE REGISTER WITH AIRTIGHT DAMPER AC01345 AC01347 AC01349 3" 4" 5" INSTALLATION INSTRUCTIONS CAUTION: THE FRESH AIR INTAKE REGISTER WITH AIRTIGHT DAMPER MUST NOT BE IN A CLOSED POSITION WHEN
BDM Direct Vent systems are for use with direct vent gas fired appliances.
 INSTALLATION INSTRUCTIONS Pro-Form DIRECT VENT SYSTEM Tested to ANSI Z21.88-2009 /CSA 2.33-2009 REPORT # 369-P-02b-6.5 Read through all venting and appliance instructions before beginning your installation.
Installation Instructions
 Dear customer! Thank you for choosing this quality product from ASKO. We hope it will meet your expectations and fulfil your needs for many years to come. Scandinavian design combines clean lines, everyday
By Bernard Dalsin Mfg. Co. Installation and Operating Instructions Read these instructions and keep them for future reference
 By Bernard Dalsin Mfg. Co. 5205 208 th St Farmington MN 55024 L-VENT TYPE 3 "and 4" Factory-built venting system for wood pellet, corn or biomass and low-temperature gas or liquid fuel appliances Installation
INSTALLATION INSTRUCTIONS TD75. Vented tumble dryer DOMESTIC. Carefully read the instructions for use before using the dryer.
 INSTALLATION INSTRUCTIONS TD75 Vented tumble dryer DOMESTIC Carefully read the instructions for use before using the dryer. Dear Customer, Read these instructions carefully and completely before you install
Questions on Installation? Call: 800.GE.CARES (US) WARNING RISK OF FIRE TOOLS YOU WILL NEED 4" DIA. METAL DUCT (RECOMMENDED)
 WARNING RISK OF FIRE TOOLS YOU WILL NEED 4 DIA. METAL DUCT (RECOMMENDED)") Installation Instructions Electric Dryer 04 Questions on Installation? Call: 800.GE.CARES (US) www.geappliances.com (US) BEFORE YOU BEGIN Read these instructions completely and carefully. IMPORTANT- IMPORTANT-
Installation Instructions Electric Dryer 04 Questions on Installation? Call: 800.GE.CARES (US) www.geappliances.com (US) BEFORE YOU BEGIN Read these instructions completely and carefully. IMPORTANT- IMPORTANT-
Installation Instructions. For the 18 Built-In Dishwasher and Front Color Panels
 Installation Instructions For the 18 Built-In Dishwasher and Front Color Panels Printed in USA 154232102 Before You Begin DO NOT INSTALL DISHWASHER UNTIL YOU HAVE READ ALL INSTRUCTIONS. FOR YOUR SAFETY,
RVAC-100 VACUUM CLEANER MANUAL. For Household Use Only
 VACUUM CLEANER MANUAL RVAC-100 For Household Use Only 790 Rowntree Dairy Road, Woodbridge, ON Canada L4L 5V3 t: 905.851.6701 f: 905-851.8376 e: info@reversomatic.com Toll Free: 1.800.810.3473 (Canada)
SUBJECT: SELKIRK MODEL DT DIRECT VENT SYSTEM FOR PELLET & CORN FIRED APPLIANCES / TERMINATION CLEARANCES TO OPENINGS IN BUILDINGS
 Selkirk LLC Selkirk LLC Research & Development State Route 93 North & Sutton Road P.O. Box 631 Logan, OH 43138 9/21/2006 TO: Our Valued Customers FROM: Glen Edgar Director R&D SUBJECT: SELKIRK MODEL DT
beautiful detail. Shutters, Mounts & Vents Measurements & Dimensions Build bold ROYAL85 royalbuildingproducts.com 2017 Royal Building Products
 Measurements & Dimensions We offer an array of shapes, colors and designs so you can quickly find the right shutters, mounts and vents to complete each project. If you d like more information, product
A. Section Includes: Fire extinguishers and cabinets including necessary accessories.
 SECTION 10522 FIRE EXTINGUISHERS PART 1 GENERAL 1.01 SUMMARY A. Section Includes: Fire extinguishers and cabinets including necessary accessories. B. Related Sections: 1. 09900 - Painting 2. 10400 - Identifying
beautiful detail. Shutters, Mounts & Vents Measurements & Dimensions Build bold ROYAL85 royalbuildingproducts.com 2017 Royal Building Products
 Measurements & Dimensions We offer an array of shapes, colors and designs so you can quickly find the right shutters, mounts and vents to complete each project. If you d like more information, product
INSTRUCTION MANUAL HEAT DISTRIBUTION / TV KIT N A T U R A L LY V E N T E D [ ]
![INSTRUCTION MANUAL HEAT DISTRIBUTION / TV KIT N A T U R A L LY V E N T E D [ ]](/thumbs/75/71727476.jpg "INSTRUCTION MANUAL HEAT DISTRIBUTION / TV KIT N A T U R A L LY V E N T E D [ ]") PLEASE KEEP THESE INSTRUCTIONS FOR FUTURE REFERENCE C Series HEAT DISTRIBUTION / TV KIT N A T U R A L LY V E N T E D [ 5 0-3 3 9 5 ] INSTRUCTION MANUAL 4001609 This Heat Distribution Kit has been tested
PLEASE KEEP THESE INSTRUCTIONS FOR FUTURE REFERENCE C Series HEAT DISTRIBUTION / TV KIT N A T U R A L LY V E N T E D [ 5 0-3 3 9 5 ] INSTRUCTION MANUAL 4001609 This Heat Distribution Kit has been tested
INSTALLATION GUIDE. Horizontal series. HRV MODEL 8160 and MODEL 8220 ERV MODEL 3160 and MODEL 3220
 INSTALLATION GUIDE Horizontal series HRV MODEL 8160 and MODEL 8220 ERV MODEL 3160 and MODEL 3220 INSTALLATION GUIDE Peace of Mind All GeneralAire products are backed by the best limited warranty in the
Installation & Maintenance Data IM Contents
 Installation & Maintenance Data IM 254-4 Group: Fan Coil Part Number: 107133000 Date: June 1999 SeasonMaker HiLine Fan-coil Units Type KZZ Contents Inspection..................................... 2 Riser
C Series. Cool Surface System INSTRUCTION MANUAL SIDE VENT [ ] PLEASE KEEP THESE INSTRUCTIONS FOR FUTURE REFERENCE
![C Series. Cool Surface System INSTRUCTION MANUAL SIDE VENT [ ] PLEASE KEEP THESE INSTRUCTIONS FOR FUTURE REFERENCE](/thumbs/75/71727510.jpg "C Series. Cool Surface System INSTRUCTION MANUAL SIDE VENT [ ] PLEASE KEEP THESE INSTRUCTIONS FOR FUTURE REFERENCE") PLEASE KEEP THESE INSTRUCTIONS FOR FUTURE REFERENCE C Series Cool Surface System SIDE VENT [50-3455] INSTRUCTION MANUAL 4001609 This Cool Surface System has been tested for compliance to Standards: ANSI
PLEASE KEEP THESE INSTRUCTIONS FOR FUTURE REFERENCE C Series Cool Surface System SIDE VENT [50-3455] INSTRUCTION MANUAL 4001609 This Cool Surface System has been tested for compliance to Standards: ANSI
Installation. Leveling
 Your refrigerator was packed carefully for shipment. Remove and discard shelf packaging and tape. Do not remove the serial plate. Location Do not install refrigerator near oven, radiator or other heat
TERRACE VIEW APARTMENTS
 TERRACE VIEW APARTMENTS HUNT CLUB ROAD BLACKSBURG, VIRGINIA APARTMENT FINISHES AND UPGRADES UNIT TYPE 2A x 1 Phase 5-8 Unit Number 13 Units Total 1) 4400C 2) 4400G 3) 4400K 4) 4900C 5) 5000C 6) 5100K 7)
INSTALLATION INSTRUCTIONS
 INSTALLATION INSTRUCTIONS TM DishDrawer dishwasher DD4D 7 & DD4DT 7 models US CA 59004D 04.3 FOLLOW THE INSTALLATION SEQUENCE RELEVANT TO YOUR MODEL STANDARD HEIGHT DOUBLE MODELS TALL HEIGHT DOUBLE MODELS
Questions on Installation? Call: 800.GE.CARES (US) WARNING RISK OF FIRE 4" DIA. METAL DUCT (RECOMMENDED) 4" DUCT CLAMPS (2) OR 4" SPRING CLAMPS (2)
 WARNING RISK OF FIRE 4 DIA. METAL DUCT (RECOMMENDED) 4 DUCT CLAMPS (2) OR 4 SPRING CLAMPS (2)") Installation Instructions Electric Dryer 01 Questions on Installation? Call: 800.GE.CARES (US) www.geappliances.com (US) PEDESTALS FOR DRYERS (comes with individual installation instructions) Three models
Installation Instructions Electric Dryer 01 Questions on Installation? Call: 800.GE.CARES (US) www.geappliances.com (US) PEDESTALS FOR DRYERS (comes with individual installation instructions) Three models
TEMSPEC INC. VERTICAL FAN COIL UNIT MODELS TVA, TVE, TVS
 6720 Columbus Road Mississauga, Ontario Canada, L5T 2G1 Tel: (905) 670 3595 Fax: (905) 670 3592 Web: www.temspec.com TEMSPEC INC. VERTICAL FAN COIL UNIT MODELS TVA, TVE, TVS INSTALLATION AND MAINTENANCE
Questions? Call 800.GE.CARES ( ) or visit our Web site at: GEAppliances.com In Canada, call or visit
 or visit our Web site at: GEAppliances.com In Canada, call or visit") Installation Instructions Electric Dryer 01 Questions? Call 800.GE.CARES (800.432.2737) or visit our Web site at: GEAppliances.com In Canada, call 1.800.561.3344 or visit www.geappliances.ca BEFORE YOU
Installation Instructions Electric Dryer 01 Questions? Call 800.GE.CARES (800.432.2737) or visit our Web site at: GEAppliances.com In Canada, call 1.800.561.3344 or visit www.geappliances.ca BEFORE YOU
Installation Instructions
 Installation Instructions Above the Cooktop Microwave Oven JVM60 and JVM65 Questions? Call -800-56- or Visit our Website at: GEAppliances.ca BEFORE YOU BEGIN Read these instructions completely and carefully.
Installation Instructions for Heat Recovery Ventilators with 2 Speed RNC Electronics. RNC Series. Residential Heat Recovery Ventilators (HRV)
") Installation Instructions for Heat Recovery Ventilators with 2 Speed RNC Electronics RNC Series Models RNC95 RNC155 RNC200 RNC10 RNC20 RNC120D RNC5-TPD Residential Heat Recovery Ventilators (HRV) Manufactured
Installation Instructions for Heat Recovery Ventilators with 2 Speed RNC Electronics RNC Series Models RNC95 RNC155 RNC200 RNC10 RNC20 RNC120D RNC5-TPD Residential Heat Recovery Ventilators (HRV) Manufactured
DESIGN AND CONSTRUCTION STANDARDS SPECIFICATION GUIDELINES
 SECTION 10 00 00 - SPECIALTIES 10 28 12 - TOILET PARTITIONS: Owner Preferences: Solid core phenolic, polymer based solid surfacing, and solid plastic toilet compartment and screen systems. No Stainless
The most advanced Supply Box System from Oatey - the choice of plumbing professionals.
 T MT M INFINITE SOLUTIONS The most advanced Supply Box System from Oatey - the choice of plumbing professionals. UNIVERSAL SINGLE BOX PLATFORM SNAP-LOCK DESIGN INSTALLATION VERSATILITY Oatey 2017 Oatey
Dryer. User manual DV22K6800** DV22K A-00_EN (US)_ indd :15:41
_ indd :15:41") Dryer User manual DV22K6800** DV22K6800-03650A-00_EN (US)_151211.indd 1 2015-12-11 7:15:41 Before installation Read through the following instructions before installing the dryer, and keep this manual
Dryer User manual DV22K6800** DV22K6800-03650A-00_EN (US)_151211.indd 1 2015-12-11 7:15:41 Before installation Read through the following instructions before installing the dryer, and keep this manual
BUILDER S PRE-INSPECTION CHECKLIST
 Warrenton Fire Protection District 606 Fairgrounds Rd. Warrenton, MO 63383 Ph: 636-456-8935 Fax: 636-456-7764 www.warrenton-fire.org BUILDER S PRE-INSPECTION CHECKLIST This checklist is designed as a general
WARNING: ELECTRICAL GROUNDING INSTRUCTIONS
 BK AND BKT BLOWER ACCESSORY INSTALLATION INSTRUCTIONS Model BK Manually led Blower Model BKT Thermostatically led Blower WARNING: ELECTRICAL GROUNDING INSTRUCTIONS This appliance is equipped with a three-prong
Important Instructions
 Important Instructions Subject: Installing Elevated Base Pedestal on Frontload Washers and Dryers Use With: PDR08W, PDR08B, PDR08U, PDR08G, PDR08D, PDC06B, PDC08B, PDC0B, PDCB Elevated Base Pedestals This
Planning and Design Guide 2002 Vrs 2.0
 Planning and Design Guide 2002 Vrs 2.0 DISHWASHERS WASHERS DRYERS ACCESSORIES INSTALLATION S Dimensions & Technical Data D1706...2 D1716...3 D1776...4 D1976...5 Changing Standard Front Panels...6 D1796FI
12.0 cu.ft., 2 way, 4-door, R.V. refrigerator with ice maker.
 Installation Manual For 1200ACXX models: For 120XAC-IMXX models: 12.0 cu.ft., 2-way, 4-door, R.V. refrigerator. 12.0 cu.ft., 2 way, 4-door, R.V. refrigerator with ice maker. The letter X, in the model
Installation Electric Dryers Instructions 01
 Installation Electric Dryers Instructions 01 Questions? Call 800.GE.CARES (800.432.2737) or visit our Web site at: GEAppliances.com This is the safety alert symbol. This symbol alerts you to potential
Questions? Call 800.GE.CARES ( ) or visit our Web site at: GEAppliances.com In Canada, call or visit
 or visit our Web site at: GEAppliances.com In Canada, call or visit") Installation Instructions Electric Dryer 01 Questions? Call 800.GE.CARES (800.432.2737) or visit our Web site at: GEAppliances.com In Canada, call 1.800.561.3344 or visit www.geappliances.ca BEFORE YOU
Installation Instructions Electric Dryer 01 Questions? Call 800.GE.CARES (800.432.2737) or visit our Web site at: GEAppliances.com In Canada, call 1.800.561.3344 or visit www.geappliances.ca BEFORE YOU
Installation Instructions
 Installation Instructions Electric Drop-In Range JDS28, JDP39 Questions? Call 800.GE.CARES (800.432.2737) or Visit our Website at: ge.com BEFORE YOU BEGIN Read these instructions carefully and completely.
SECTION (15767) - UNIT HEATERS
 - UNIT HEATERS") SECTION 23 82 39 (15767) - UNIT HEATERS PART 1 GENERAL 1.01 SUMMARY A. Section includes: 1. Unit Heaters. 2. Cabinet Unit Heaters. 3. Duct Heaters. 4. Baseboard Heaters. B. Related Sections: 1. Section
SECTION 23 82 39 (15767) - UNIT HEATERS PART 1 GENERAL 1.01 SUMMARY A. Section includes: 1. Unit Heaters. 2. Cabinet Unit Heaters. 3. Duct Heaters. 4. Baseboard Heaters. B. Related Sections: 1. Section
TWIN-FLOIII HEATER INSPECT THE SHIPMENT IMMEDIATELY WHEN RECEIVED TO DETERMINE IF ANY DAMAGE HAS OCCURRED DURING SHIPMENT.
 TFII-11 Beacon/Morris TWIN-FLOIII HEATER INSTALLATION INSTRUCTIONS TYPES K, W, & F ATTENTION: READ THESE INSTRUCTIONS CAREFULLY BEFORE ATTEMPTING TO INSTALL, OPERATE, OR SERVICE THE BEACON MORRIS TWIN-FLO
TERRACE VIEW APARTMENTS
 TERRACE VIEW APARTMENTS HUNT CLUB ROAD BLACKSBURG, VIRGINIA APARTMENT FINISHES AND UPGRADES UNIT TYPE 2 x 1.5 Phase 5-8 Unit Number 11 Units Total 1) 4200C 2) 4200K 3) 4500D 4) 4500G 5) 4500H 6) 5400A
TERRACE VIEW APARTMENTS
 TERRACE VIEW APARTMENTS HUNT CLUB ROAD BLACKSBURG, VIRGINIA APARTMENT FINISHES AND UPGRADES UNIT TYPE 3A x 1.5 Phase 5-8 Unit Number 4 Units Total 1) 6600F 2) 6800K 3) 7600G 4) 7900H SCOPE OF WORK A-108-E
SMALL DIAMETER CORR/GUARD & SLEEVED CORR/GUARD
 CORR/GUARD INSTALLATION INSTRUCTIONS This symbol on the nameplate means this product is listed by Underwriters Laboratories Inc. Tested to UL1738 / CAN / ULCS636-08 Listing No. MH26687 Testing No. 11EN
Table of Contents What to Expect with Your Installation. Top Housing. Ceiling Plate. Tools Needed.
 Table of Contents Congratulations on purchasing your new Hunter ceiling fan! It will provide comfort and performance in your home or office for many years. This installation and operation manual contains
The most advanced Supply Box System from Oatey - the choice of plumbing professionals.
 TM INFINITE SOLUTIONS The most advanced Supply Box System from Oatey - the choice of plumbing professionals. UNIVERSAL SINGLE BOX PLATFORM SNAP-LOCK DESIGN INSTALLATION VERSATILITY Oatey 2017 Oatey is
BUILDER S PRE-INSPECTION CHECKLIST
 Warrenton Fire Protection District 606 Fairgrounds Rd. Warrenton, MO 63383 Ph: 636-456-8935 Fax: 636-456-7764 www.warrenton-fire.org BUILDER S PRE-INSPECTION CHECKLIST This checklist is designed as a general
Ventilating Fan FV-05VFL2 FV-08VFL2 FV-11VFL
 Ventilating Fan FV-05VFL FV-08VFL FV-VFL READ AND SAVE THESE INSTRUCTIONS. Please read these instructions carefully before attempting to install, operate or service the Panasonic Ventilating Fan. Failure
ELECTRIC DRYER INSTALLATION INSTRUCTIONS
 ELECTRIC DRYER INSTALLATION INSTRUCTIONS Para una version de estas instrucciones en español, visite www.whirlpool.com Table of Contents DRYER SAFETY... 2 Installation Requirements... 3 Tools and Parts...
Owner s Guide and Installation Manual
 For Your Records and Warranty Assistance For reference, also attach your receipt or a copy of your receipt to the manual. Model Name Type 3 Models Owner s Guide and Installation Manual Model No. Date Purchased
SonusClip Installation for walls or ceilings on wood or steel framing. Installation Instructions for Wall & Ceilings
 SonusClip Installation for walls or ceilings on wood or steel framing If you have questions during installation please contact Regupol at 717-675-2190 Sound Isolation Clips SonusClip Sound Isolation Clip
ZC Kit AGP Pellet Insert
 ZC Kit AGP Pellet Insert Compatibility AGP Pellet Insert Lopi AGP Pellet Insert Overview Packing List ZC Can Rear Panel ZC Can Top/Side Panel Bottom Panel (Fiber Board with Steel) (40) # 8 x 3/8 Type A
Vertical Stack Fan Coil Units Models: TVA, TVE, TVS
 6720 Columbus Road Mississauga, Ontario Canada, L5T 2G1 Tel: (905) 670 3595 Fax: (905) 670 3592 www.temspec.com Vertical Stack Fan Coil Units Models: TVA, TVE, TVS INSTALLATION, OPERATION AND MAINTENANCE
INSTALLATION. Glass Panel Doors (select models) CAUTION
 CAUTION") Location Do not install refrigerator near oven, radiator or other heat source. If not possible, shield refrigerator with cabinet material. Do not install where temperature falls below 55 F (13 C) or rises
Location Do not install refrigerator near oven, radiator or other heat source. If not possible, shield refrigerator with cabinet material. Do not install where temperature falls below 55 F (13 C) or rises
UL 94 Flammability Ratings: Introduction
 UL 94 Flammability Ratings: Introduction UL intends this standard to serve as a preliminary indication of a plastics acceptability for use as part of a device or appliance with respect to its flammability.
INSTALLATION INSTRUCTIONS WALL MOUNT LINER INSERT
 Read and Save These Instructions All Hoods Must Be Installed By A Qualified Installer INSTALLATION INSTRUCTIONS WALL MOUNT LINER INSERT Read All Instructions Thoroughly Before Beginning Installation WARNING
B. Shop Drawings: For fire protection cabinets. Include plans, elevations, sections, details, and attachments to other work.
 PART 1 - GENERAL 1.1 RELATED DOCUMENTS A. Drawings and general provisions of the Contract, including General and Supplementary Conditions and Division 01 Specification Sections, apply to this Section.
BK AND BKT BLOWER ACCESSORY INSTALLATION INSTRUCTIONS
 BK AND BKT BLOWER ACCESSORY INSTALLATION INSTRUCTIONS MODEL BK MANUALLY CONTROLLED BLOWER MODEL BKT THERMOSTATICALLY CONTROLLED BLOWER WARNING: ELECTRICAL GROUNDING INSTRUCTIONS This appliance is equipped
CONTENTS DESCRIPTION UNPACKING DIMENSIONS
 INSTALLATION INSTRUCTIONS Ventilating Fan ModelNo.FV-08VRE CONTENTS GENERAL SAFETY INFORMATION DESCRIPTION UNPACKING SUPPLIED ACCESSORIES DIMENSIONS WIRING DIAGRAM INSTALLATION (BETWEEN JOISTS MOUNTING)
Corr/Guard PRESSURE RATED VENTING SYSTEM IMPORTANT: DO NOT INSTALL WITHOUT FIRST READING THESE INSTRUCTIONS VERY CAREFULLY.
 CORR/GUARD INSTALLATION INSTRUCTIONS This symbol on the nameplate means this product is listed by Underwriters Laboratories Inc. Tested to UL1738 / CAN / ULCS636-1995 Listing No. MH26687 Testing No. 11EN
INSTALLATION INSTRUCTIONS WALL MOUNT LINER INSERT
 Read and Save These Instructions All Hoods Must Be Installed By A Qualified Installer INSTALLATION INSTRUCTIONS WALL MOUNT LINER INSERT Read All Instructions Thoroughly Before Beginning Installation WARNING
INSTALLATION GUIDE NZ AU E
 GAS COOKTOP CG604DX & CG905DX models INSTALLATION GUIDE NZ AU 590447E 08.17 1 SAFETY AND WARNINGS Electrical shock hazard WARNING! Before carrying out any work on the electrical section of the appliance,
TERRACE VIEW APARTMENTS
 TERRACE VIEW APARTMENTS HUNT CLUB ROAD BLACKSBURG, VIRGINIA APARTMENT FINISHES AND UPGRADES UNIT TYPE 4 x 2 Phase 5-8 Unit Number 1 Unit Total 1) 4300G SCOPE OF WORK A-111-B 4 Bedroom 2 Bath RENOVATION
SUPPLEMENTARY INSTRUCTIONS
 www.burcam.com 2190 Dagenais Blvd.West TEL: 514.337.4415 LAVAL (QUEBEC) FAX: 514.337.4029 CANADA H7L 5X9 info@burcam.com SUPPLEMENTARY INSTRUCTIONS MODEL 450475 Dear consumer, We thank and congratulate
A. Product Data: Include rated capacities, operating characteristics, furnished specialties, and accessories.
 SECTION 238113 - PACKAGED TERMINAL AIR CONDITIONERS PART 1 - GENERAL 1.1 RELATED DOCUMENTS A. Drawings and general provisions of the Contract, including General and Supplementary Conditions and Division
SECTION FIRE-SUPPRESSION STANDPIPES
 PART 1 - GENERAL 1.1 DESCRIPTION Fire-suppression wet and manual dry standpipes. 1.2 SCOPE OF WORK SECTION 21 12 00 A. Design, installation and testing shall be in accordance with NFPA 14 except for specified
BUILDING CODE GUIDELINE FOR MECHANICAL INSPECTIONS
 BUILDING CODE GUIDELINE FOR MECHANICAL INSPECTIONS Building Code compliance is the obligation of design professionals and/or contractors. Plan Review and Inspection Guidelines are intended to be used by
Installation Instructions
 Installation Instructions Self-Cleaning Radiant Electric Drop-In Range JDP47, JD968, JD900 If you have questions, call 1.800.GE.CARES or visit our website at: ge.com Before You Begin Read these instructions
INSTALLATION INSTRUCTIONS
 INSTALLATION INSTRUCTIONS Backguard for Professional Ranges BGRV2 models US CA www.dcsappliances.com 591091A 04.16 1 SAFETY AND WARNINGS! WARNING! Cut Hazard Take care - panel edges are sharp. Failure
Installation and Care Instructions
 Installation and Care Instructions THANK YOU for purchasing a Hunter Douglas product. Your new blind has been custom built for you from the highest quality materials. Once in your window, it will provide
DOUBLE DISHDRAWER TM DISHWASHER
 DOUBLE DISHDRAWER TM DISHWASHER DD4DDFT & DD4DVT models INSTALLATION GUIDE US CA 5985 A 08.7 SAFETY AND WARNINGS! WARNING! Electrical Shock Hazard Before installing the dishwasher, remove the house fuse
LABORATORY AIR COMPRESSORS AND VACUUM PUMPING SYSTEMS
 SECTION 22 20 00 LABORATORY AIR COMPRESSORS AND VACUUM PUMPING SYSTEMS PART 1 - GENERAL 1.1 RELATED DOCUMENTS: A. The Conditions of the Contract and applicable requirements of Division 1, "General Requirements",
Inspection Checklist Mechanical Rough in
 Property Owner Name: Property Address: Permit Number: Inspectors Name: Review Date: Permits and Plans 1. Job address is posted in a visible location. (R319.1) 2. Permit and approved plans are on site and
IMPORTANT: Read and save these instructions. Washer Dryer 120 Volt Installation Instructions. Gas Large Capacity Thin Twin IMPORTANT:
 Home Appliances Gas Large Capacity Thin Twin Washer Dryer 120 Volt Installation Instructions IMPORTANT: Read and save these instructions. IMPORTANT: Installer: Leave Installation Instructions with the
Concepts Serving Systems
 Concepts Serving Systems Installation Manual Please read this manual completely before attempting to install or operate this equipment! Notify carrier of damage! Inspect all components immediately. February
Q U A L I T E D E P U I S
 QUALITY SINCE 1967 CALIDAD DESDE 1967 Q U A L I T E D E P U I S 1 9 6 7 QUALITY SINCE 1967 CALIDAD DESDE 1967 Q U A L I T E D E P U I S 1 9 6 7 MISSION STATEMENT Innovation, Quality, Service and Reliability
C. All components of the systems described shall meet the requirements as stated herein and shall be approved by the Architect and Consultant.
 SECTION 218800 - FIRE PROTECTION 1. GENERAL A. Provisions of Division 1, GENERAL REQUIREMENTS, and Section 230000, MECHANICAL GENERAL CONDITIONS, and Section 230050, SEISMIC PROTECTION are a part of this
FIRE SUPPRESSION SPRINKLER SYSTEM
 PART 1 GENERAL 1.01 DESCRIPTION A. The provisions of the General Requirements, Supplementary Requirements, and Division 1 apply to the plumbing work specified in this Division. B. The requirements of this
SERIES 500. Installation & Maintenance Instructions. Ceiling Mounted Fan Forced Heater WARNING SAVE THESE INSTRUCTIONS. Recessed Mount.
 Recessed Mount Ceiling Mounted Fan Forced SERIES 500 Surface Mount Installation & Maintenance Instructions Dear Owner, Congratulations Thank you for purchasing this new heater manufactured by Marley Engineered
Sprinkler Guards Model C Model D
 Bulletin 208 Rev. G Sprinkler Guards Model C Model D Bulletin 208 Rev. G Model C Sprinkler Guards Model C Series sprinkler guards are designed to be assembled onto installed sprinklers. They are constructed
INSTALLATION INSTRUCTIONS
 ELIMINATOR 36 Wood Burning Fireplace Models: 36E Non-Circulating (Smooth Face) I36E Non-Circulating (Smooth Face) Fully Insulated INSTALLATION INSTRUCTIONS SAVE THIS BOOK This book is valuable. In addition
Installation and Maintenance Instructions
 Commercial & Industrial Positive Pressure or Condensing AL 29-4C Stainless Steel High Challenge Special Gas Vent Also for Natural Draft Appliances 3",4",5",6",7",8",9",10" and 12" Diameter Special Gas
Z-VENT MODEL SVE SERIES III INSTALLATION AND MAINTENANCE INSTRUCTIONS
 Z-VENT MODEL SVE SERIES III INSTALLATION AND MAINTENANCE INSTRUCTIONS 3 & 4 SPECIAL STAINLESS STEEL VENTING SYSTEM FOR GAS BURNING APPLIANCES CATEGORY I, II, III, & IV TESTED AND LISTED BY UNDERWRITERS
INSTALLATION INSTRUCTIONS
 INSTALLATION INSTRUCTIONS MODEL: BISTRO THERMO SHOWER KIT (RH-5344) 1 Restoration Hardware Thermo Shower Kit Specification Diagram 2 All Threaded Connections are 3/4 NPT Dimensions are in Inches and Approximation
Pentz EF5 Installation Guide
 Pentz EF5 Installation Guide Clear Vue Cyclones 145 Nix Road Liberty, SC 29657 888-299-0221 www.clearvuecyclones.com Disclaimers & Warnings WARNING: All persons, by purchasing a motorized dust collection
24 IN. (61 CM) ELECTRIC WASHER/DRYER INSTALLATION INSTRUCTIONS WASHER/DRYER SAFETY DANGER WARNING
 ELECTRIC WASHER/DRYER INSTALLATION INSTRUCTIONS WASHER/DRYER SAFETY DANGER WARNING") 4 IN. (6 CM) ELECTRIC WASHER/DRYER INSTALLATION INSTRUCTIONS WASHER/DRYER SAFETY... INSTALLATION INSTRUCTIONS... Tools and Parts... Alternate Parts... Location Requirements... Drain System... Electrical
4 IN. (6 CM) ELECTRIC WASHER/DRYER INSTALLATION INSTRUCTIONS WASHER/DRYER SAFETY... INSTALLATION INSTRUCTIONS... Tools and Parts... Alternate Parts... Location Requirements... Drain System... Electrical
PAC International, Inc. RSIC-1 FS System 37" and Larger (200 lb max)
") 1 2 3 4 5 SIDE VIEW 1. RSIC-1 with retro Washer 2. 7/8" Drywall Furring Channel (By others) 3. ¾ Finish Grade Plywood (Painted, stained, or covered with fabric/carpet) ( By others) 4. Flat Screen wall
1 2 3 4 5 SIDE VIEW 1. RSIC-1 with retro Washer 2. 7/8" Drywall Furring Channel (By others) 3. ¾ Finish Grade Plywood (Painted, stained, or covered with fabric/carpet) ( By others) 4. Flat Screen wall
Catalog Broiles Drive Jacksonville, TX Tel: Fax: buildersbest.com
 Catalog 2016 201 Broiles Drive Jacksonville, TX 75766 Tel: 888-368-7233 Fax: 800-259-8368 buildersbest.com Proper dryer venting can be a very inexpensive way to increase the energy efficiency of a home,