Oil Management Guide. Transition to TFF Shortening
|
|
|
- Shona Goodman
- 5 years ago
- Views:
Transcription

1 Oil Management Guide Transition to TFF Shortening
2
3 TFF Shortening Overview As of January 1, 2014 all LJS restaurants have transitioned to a 0 grams trans fat oil. This means we can now share with our guests that ALL products, not just fried versions, served at LJS contain Zero Grams of Trans Fat. This provides several advantages for the brand: Ÿ It provides a higher quality, lighter tasting option for our guests. Ÿ It allows us to be proactive and transition earlier than required by the FDA. The recently announced requirements by the FDA stipulates that ALL food products must transition to 0 grams trans fat in the next 2 years. Though the transition is a positive move for the brand, the new shortening is a liquid soy product that exhibits significant differences in characteristics from our previous shortening. Due to these differences it is necessary to make changes to our current shortening management system. Shortening is typically one of the costliest areas of operating a LJS restaurant. Therefore, it is critical to follow the new shortening management practices to maximize the useful life of the shortening. The purpose of this guide is to further explain the characteristics of the new oil and provide step-by-step instructions for following the new oil management procedures. This Guide Includes Review of Standards Changes Provides a brief description of each standards change required for the new oil. Training Plan Provides detailed information for each standards change as well as direction for training your restaurant team on the new Oil Management System. Oil Management Procedures A copy of each procedure related to oil management is included. Please note that all changes to standards are highlighted in red. Oil Management Quiz A way to ensure your team understands the changes and the importance of adhering to the new standards. Frequently Asked Questions and Answers A list of questions and answers related to the oil management changes that may address some of your concerns and questions. Reminder Alerts - Adhesive Labels A set of labels you can post at specific stations that will remind your team of important standards changes. Fryer Labels Labels for each fryer that designates which products are cooked in which fryers. Fryer Temp and Oil Level Chart Chart for documenting fryer temperatures, oil levels and discard dates.
4 Review of Standards Changes After extensive research, consulting experts and testing our new oil, the following changes to our oil management system have been determined necessary to ensure product quality and to extend the usable life of oil as long as possible: Crumblie Holding and Disposal Ÿ Crumblies held in holding units must be discarded 2 times daily, at 3 pm and close, following specific disposal process. Ÿ The maximum depth of Crumblies in holding units cannot exceed 1 inch. Ÿ Crumb dumps must be emptied three times daily, at 3 pm, 2 hours before close and close, following specific disposal process. Shortening Temperature Guidelines Ÿ Temperatures of all fryers must be checked twice daily, once before each meal period and adjusted as necessary. Shortening cannot exceed 355 F. Shortening Replenishment Procedure Ÿ The fresh top-off method for replenishing shortening in fryers will be replaced with the standard rotation method used prior to the new shortening. Filtering Procedure Ÿ Fryer number one will no longer be filtered in the morning. The fryer used to cook Crumblies will be filtered after making first batch of Crumblies. Ÿ Dry magnesol powder will be replaced with a slurry mixture (mixture of magnesol powder and shortening). Designated Fryer for Products Ÿ Breaded products are now cooked in fryer 1 or 2 instead of 3, 4 or 5 Ÿ Battered products are now cooked in fryer 2, 3, 4 or 5 instead of 1 and 2 Ÿ Fryer 1 is now the primary fryer for breaded products Ÿ Fryer 2 is the primary fryer for battered products and the secondary fryer for breaded products Ÿ Fryers 3, 4 and 5 are the secondary fryers for battered products Shortening Quality Testing Ÿ The shortening quality test will now be performed only once per day on fryer 1 Shaking Products After Removing From Fryer prior to 8:00 filtering. Ÿ Product must now be shaken times after removing from fryer instead of 8-10 times.
5 Training Plan Prepare NOTES Schedule training meeting with Team Prepare equipment and product - Ensure temperature of shortening in all fryers is 350 F - Prepare Crumblies and place some in both holding units and crumb dump Gather and review training materials Overview Page Review of Standards Changes Training Plan Job Aids (included in this kit) Reminder Alert Labels Product - Fryer Designation Chart Fryer Labels Using procedures gather all required smallwares and tools: Present/Perform/Follow-up Introduction Review agenda - Overview of Changes - Walk-thru and demonstration of standards changes in detail -Q&A - Certification Share Overview of Standards Changes and Reasons for Changes Share Details from Overview - Crumblie Holding and Disposal - Shortening Temperature Guidelines - Shortening Replenishment - Product -Designated Fryer(s) - Filtering - Shortening Quality Testing - Shaking Products after Removing from Fryer NOTES
6 Review and Demonstrate Each Standards Change Crumb Dump Emptying Crumb dumps must be emptied three times daily, at 3 pm, 2 hours before close and close, following this procedure: 1. Fill orange, 5-gallon plastic bucket with ½ gallon of cold soapy water from the 3-comp. sink. If your sink is not equipped with an automatic soap dispenser, demonstrate using water from the wash compartment of the 3-comp. sink. 2. Wearing heat resistant filter gloves, empty contents from crumb dump into orange debris bucket. 3. Add another ½ gallon of cold, soapy water on top of debris in bucket. 4. Allow debris to remain in soapy water for at least 10 minutes before discarding. After setting in water debris will solidify slightly. 5. Empty contents of bucket after 10 minutes into a box with plastic bag liner or small trash can liner, tie plastic bag closed and discard into trash can. DO NOT DUMP DEBRIS FROM CRUMB DUMP DIRECTLY INTO TRASH. Crumblie Holding and Disposal The maximimum depth of Crumblies in holding units cannot exceed 1 You must still maintain a minimum of 1/2 of Crumblies in holding units at all times. In addition, the new standard also stipulates a maximum depth of 1. This allows for air ciculation and controls density that will prevent excessive increase in product temperature, post-cook. Crumblies held in holding units (standard/duke) must be discarded 2 times daily, at 3 pm and close Follow the same procedure used when emptying the crumb dump. Note that the debris from the crumb dump and Crumblies from the holding units may be disposed of together. DO NOT DUMP CRUMBLIES FROM HOLDING UNITS DIRECTLY INTO TRASH. Reason for Changes The detergent added to the water helps to neutralize the oxidation reaction and prevent high crumb temperatures. NOTES
7 Oil Temperature Guidelines The acceptable oil temperature range is F - the target temperature is 350. Oil temperature must not be allowed to go above 355 F. Oil temperatures in all fryers must be checked twice daily, once before each meal period and adjusted as necessary, following procedure below: 1. Insert thermometer probe to a depth of 2 into oil at least 6 from thermostat guard and check temperature. Temperature should be between 345 F 355 F. 2. If temperature is not within this range, adjust temperature dial and check temperature again. Reasons for Changes Temperature has a much greater affect on the new oil than it did on our previous oil. As shown in the chart below, for every 18 degree increase in temperature above 350 F, the oxidation rate of the oil doubles. The reason this is so important is that an increase in oxidation rate: Shortens life of oil drastically Causes rancid taste in food Negatively affects overall quality of food and oil Oxidation Rate for Heated Oil Increase in oxidation rate Doubles for Every 18 Increase Above 350 F Oxida tion rate Note drastic increase in oxidation rate with temperature above 350ºF Temperature - F Temperature F 350º F Increase in Oxidation Rate: Shortens Oil Life Drastically Causes Rancid Taste in Food Negatively Affects Overall Quality of Oil and Food
8 Oil Replenishment Procedure The fresh top-off method for replenishing oil in fryers will be replaced with the rotation method. This means you will discontinue the fresh top off method for replinishing fryers and revert back to the rotation method. Replenishing Fryer Always test quality before filtering. If strip indicates discard point has been reached, (see Oil Quality Chart). Discard oil following morning prior to opening, when oil is cool. Step 1: Estimate Oil Use 1. Refer to half-hourly readings for sales comparisons. 2. Estimate expected sales for revenue period. Subtract sales of non-fried products. 3. Using restaurant s projected fried sales, determine amount of shortening needed based on Shortening Projection Chart on following page. Projected level may necessitate replenishing this fryer during meal period. Step 2: Determine Actual Oil Levels of Each Fryer Wear safety equipment when checking shortening levels. Using stainless steel ruler measure oil depth in each fryer and record on Food Prep Chart. Step 3: Adjust Oil Levels 1. Compare actual oil level with correct level for each fryer and determine if oil needs replenished to reach correct level. 2. If oil needs replenished, do so by moving oil from one fryer to another in sequence following chart below. Only highest numbered fryer for your system (3, 4 or 5) receives new oil. Use stainless steel pitcher to move oil from one fryer to another. If it is necessary to add new oil to fryer 3, 4 or 5, subtract actual oil level from correct oil level to determine amount you need to raise level. Use Adding Oil chart below to determine how much oil you should add for each fryer size. Oil Rotation Sequence Discard oil according to Oil Quality Chart. Filter all fryers before rotating shortening Fryer 1 Fryer 2 4 Fryer System Replenish from fryer 2 Replenish from fryer 3 Fryer 1 Fryer 2 Replenish from fryer 4 Fryer 3 Replenish from fryer 4 Fryer 3 Fryer 4 Replenish from fryer 5 Fryer 4 Fryer 5 Replenish with new shortening Replenish with new shortening Fryer 1 Fryer 2 5 Fryer System Replenish from fryer 2 Replenish from fryer 3 Fryer 3 Shortening Projection Chart Projected Levels at 2.5 lbs./$100 Sales (minimum shortening level is 3 ¼) Oil Depth In Inches Fryer 3 $ Sales Between Filtering Fryer 1 Fryer 2 Fryer 4 Fryer 5 $ /4 3 1/2 3 1/2 Off Off $300 - $ /2 3 1/2 3 1/2 Off Off $600 - $ /2 3 3/4 3 1/2 3 1/4 Off $900 - $ /2 3 3/4 3 1/2 3 1/4 Off $ $ / /2 3 1/4 Off $ $ /4 4 1/4 3 3/4 3 1/2 3 1/4 $ /4 4 1/ /4 3 1/2 3Fryer System Replenish from fryer 2 Replenish from fryer 3 Replenish with new shortening
9 Filling Empty Fryer 1. Pour oil from container into empty fryer to correct depth. Use metal ruler to check correct depth. 2. Turn thermostat to 200 F after fryer has been filled with new oil. Do not allow temperature to rise above 200 F when not using melt cycle. This will prevent premature oil breakdown. 3. Maintain thermostat at 200 F until indicator light signifies temperature has been reached. Some bubbling of new shortening is normal. 4. When light indicates temperature has been reached, set temperature to 350 F. Filtering Procedure Fryer 1 will no longer be filtered in the morning. The fryer used to cook the first batch of Crumblies in the morning is filtered after final batch of Crumblies is removed (the fryer with the newest oil in use). Dry magnesol powder will be replaced with a slurry mixture (mixture of magnesol powder and oil). Filtering Frequency and Sequence All fryers will be filtered twice daily following the schedule below. 1. Perform an oil quality test at 8:00 pm on fryer one prior to filtering. 2. Filter fryers following the schedule below. Morning Filter fryer used to cook Crumblies (cook Crumblies in newest oil in use) 2:30 8:30-9:00 pm Fryer 5 Begin with Fryer 5 Fryer 4 Fryer 4 1 Hour Before Close Fryer 3 Fryer 3 Fryer 2 Fryer 2 Fryer 1 15 min. Before Close 8:00 pm Fryer 1 Fryer 1 Prepare Filter Powder Slurry Wear filtering gloves and neoprene apron when preparing slurry and filtering fryers. 1. Remove oil from any fryer using a metal pitcher and transfer into a metal bucket. The depth of oil in bucket should be approximately 2 inches. This is equal to filling the pitcher approximately ¾ full. 2. Add 40 oz. of Magnesol powder to oil in bucket slowly. This will prevent the powder from blowing back into the air. 3. Stir mixture of Magesol Powder and oil carefully using whisk. Stir slowly and carefully to prevent splashing. Filter powder should be mixed thoroughly to remove any lumps. New slurry mixture should be added before each filtering cycle begins, once at 2:30 and again 1 hour before close. Reason for Changes: The change to a slurry mixture is not related to the transition to 0 grams trans fat oil but to address the issue of powder residue accumulating under fryers, resulting in maintenance issues. Mixing the powder with oil before adding to the filter screen will prevent the powder from billowing up and collecting on fryer components as the picture on the next page illustrates.


10 Using Dry Magnesol Powder Note white residue on cables and components Using Slurry Mixture Note clean cables and components Shortening Quality Testing Oil quality in fryer 1 is tested once a day before the 8:00 filtering. Follow criteria on the Oil Quality Chart to determine if oil should be discarded. Oil must be dumped every 7 days regardless of the quality test results. Always test each fryer before filtering. If strip indicates discard point has been reached, (see Oil Quality Chart below). Discard oil following morning prior to opening, when shortening is cool. Reason for Changes: Because of the change back to rotation it is now necessary to only test fryer one once per day. The new oil reacts differently to the test strip so to ensure the oil in fryer does not deteriorate it is important to discard at least once per week. Designated Fryer for Products Breaded products are now cooked in fryer 1 or 2 instead of 3, 4 or 5. Battered products are now cooked in fryer 2, 3, 4 or 5 instead of 1 and 2. Fryer 1 is now the primary fryer for breaded products Fryer 2 is the primary fryer for battered products and the secondary fryer for breaded products Fryers 3, 4 and 5 are the secondary fryers for battered products Refer to job aid for detailed information on which fryer is designated for all the products.


11 Q&A Certify Participants - Ask participants Review Questions. When you are comfortable everyone can perform procedures correctly, have them record name/date on certification section.
12
13 TRAINING TRACKER Team Member Name Each Team Member should sign their name after they have completed training for this event. Crumblie Disposal Oil Temp. Oil Replenishment Filtering Oil Quality Testing Fanning Products Date Complete
14
15 Oil Filtering Filtering Schedule Time Step Fryer 1. Add Filter Powder Slurry (40 oz.) to Filter Screen Morning Fryer Used to 2. Filter for 15 minutes (after making Crumblies ) Cook Crumblies (newest in use) 5 4 2:30 PM 1. Filter for 15 minutes (only filter fryers in use) :00 PM 1. Test Fryer One Using Test Strip 2. Filter for 15 Minutes (if fryer 1 passes oil quality test) 1 1. Scrape Filter Powder From Filter Screen 8:30 9:00 PM 2. Add Filter Powder Slurry (40 oz.) 3. Filter for 15 Minutes 5 (only filter fryers in use) 4 1 hr. before close Filter for 15 Minutes (leave fryer 2 and/or 3 on for use) 3 (only filter fryers in use) 2 15 min. before close 1. Filter for 15 Minutes (leave fryer 2 and/or 3 on for use) 1 Closing Heat-Resistant Filtering Gloves Safety Glasses Neoprene Apron Magnesol Filter Powder Clean Filter Machine Filtering is the most important step of the oil management process. Proper filtering removes harmful components from oil which improves oil quality and ensures optimal oil life. Follow all safety precautions when handling hot oil. Wear heat-resistant filtering gloves, safety glasses and neoprene apron when filtering fryers. Wash, rinse and dry hands. Sanitize hands. All employees must wear a hat/visor when preparing products. NOTE: A blue bandage and gloves must be worn over a cut. Gloves must be worn over nail polish or Filtering Process Wear heat-resistant filtering gloves, safety glasses and a neoprene apron when filtering fryers. TOOLS Magnesol Measuring Cup Filtering Tools Steel Ruler OPERATIONAL CONTROL POINTS TECHNIQUES Whisk Stainless Steel Bucket Stainless Steel Pitcher with Handle acrylic nails and wherever required by state and/or local ordinance Crumb dump MUST BE emptied THREE TIMES A DAY, at 3 pm, 2 hours before close and close or whenever depth of debris is 4 or greater. See Emptying Crumb Dump section. All Crumblies in holding units (standard and Duke) MUST BE discarded TWO TIMES A DAY, at 3 pm, and at close. See Removing Crumblies from Holding Units section. Maintain Crumblie depth in holding units at ½. Depth must not exceed 1 inch. Ensure oil recirculating hose and drain pipe flow. Filter fryers according to filtering schedule above. G:\TRAIN\Opsman\Product\Oil-Filtering Trans Fat Free January 2014 Page 1 of 4
16 Oil Filtering Prepare Filter Powder Slurry Wear filtering gloves and neoprene apron when preparing slurry and filtering fryers. 1. Remove oil from any fryer using metal pitcher and transfer into metal bucket. Depth of oil in bucket should be approximately 2 inches. This is equal to filling pitcher approximately ¾ full. 2. Add 40 oz. of Magnesol powder to oil in bucket slowly. This will prevent powder from blowing back into air. 3. Stir mixture of Magnesol Powder and oil carefully using whisk. Stir slowly and carefully to prevent splashing. Filter powder should be mixed thoroughly to remove any lumps. Filtering 1. Turn off fryer to be filtered and allow to cool for 5 minutes. 2. Pull filter pan out from fryer cabinet. 3. Remove filter pan lid. 4. Place clean assembled filter screen in pan (first filtering of day). Make sure pick-up tube is placed properly on right side. 5. Add slurry mixture to filter pan. Ensure bottom of filter pan is evenly coated with slurry mixture. Fresh slurry mixture is added two times during filtering cycle. Morning first filtering of day 8:30PM to 9:00PM before filtering (scrape existing powder from screen before adding fresh powder). 6. Place crumb tray in filter pan. 7. Replace filter pan lid and connect filter machine. Make sure pick-up tube is through hole in pan lid and drain pipes are aligned. 8. Strain fryer using designated strainer for breaded or battered fryer 9. Check Oil quality of fryer once at 8: Remove drain plug from fryer. 11. Open drain valve located under fryer and allow all oil to drain from fryer into filter machine. 12. Scrape down fryer walls using squeegee to remove all oil from fryer. 13. Pull blue drain flush lever on filter machine to begin filtering process. Filter for 15 minutes. 14. Push blue drain flush lever on filter machine to stop filtering process. Cleaning Fryers During each filtering cycle, before returning oil to fryer, clean fryers using KAY Fryer Cleanser and green scratch pad with holder. 1. Sprinkle KAY Fryer Cleanser onto green scratch pad with holder and scrub walls of fryer. Avoid knocking or touching temperature probe. They are very sensitive and can be damaged easily. 2. After scrubbing thoroughly, squeegee sides of fryers to remove any remaining fryer cleanser. Exercise caution around thermostat probe. 3. Return small amount of oil to fryer; squeegee sides and bottom again to remove cleanser and squeegee oil back into drain. 4. Use clean paper towels to thoroughly dry interior of fryer. Exercise caution around thermostat probe. Return Oil to Fryer 1. Replace drain plug and close drain valve under fryer. 2. Move yellow lever under fryer to return oil to fryer. 3. Allow filter to pump oil into fryer until there are bubbles in fryer. 4. Once bubbles appear, run pump an additional 10 to 15 seconds. 5. Move yellow lever under fryer in opposite direction to turn off pump. Filtering Cycles Fryers must be filtered in recommended sequence for a minimum of 15 minutes to ensure proper oil quality. Morning 1. Add filter powder slurry mixture to filter screen. 2. Filter fryer used for making Crumblies in morning (newest available oil). Do not remove filter powder from screen at this time. Leave filter machine with used powder for 2:30 filtering. Page 2 of 4 January LJS Operations G:\TRAIN\Opsman\Product\Oil-Rotation.doc
17 Oil Filtering 2:30 PM 1. Filter fryers in following order: Do not add additional filter powder mixture use powder left on screen from previous filtering. Fryer 5 (five-fryer systems) Fryer 4 (four and five-fryer systems) Fryer 3 Fryer 2 Fryer 1 Filter fryer 1 last. Never filter during periods of high revenue. Do not remove filter powder from screen at this time. Leave filter machine with used filter powder for 8:00 filtering. In no case is fryer 1 to be filtered before 2:30 p.m. Filtering later in afternoon minimizes time between filterings, improving product quality. 8:00 PM 1. Check oil quality in fryer 1 using monitor strip. If oil does not pass quality test as indicated by RGM Oil Quality Chart: 1. Discontinue cooking in fryer 1 and move to fryer 2 for cooking breaded products. 2. Allow oil in fryer 1 to cool overnight. Entire fryer should be dumped next morning. Do not pre-filter fryer 2. If oil passes quality test: 1. Filter fryer 1 for 15 minutes. Oil in fryer 1 must be discarded every seven days regardless of test results. Count begins day oil is discarded and replenished. 8:30 9:00 PM 1. Scrape used filter powder from filter screen and discard. 2. Add fresh slurry mixture on filter screen. 3. Filter fryers 5 and 4 if used (four and five fryer systems) once they are no longer needed for cooking. 1 hour before close 1. Filter fryer 3, leave on for use. 2. Filter fryer 2, leave on for use. 15 minutes before close 1. Filter fryer 1. Do not add fresh filter powder mixture use powder left on screen from previous filtering. After Close 1. Thoroughly strain any fryers used in last hour of business and turn off. 2. Clean filter screen thoroughly and let air dry overnight before reassembling. Close 1. Thoroughly strain any fryers used in last hour of business and turn off. 2. Clean filter machine thoroughly and let air dry overnight before reassembling. Cleaning Filter Screen 1. Disassemble filter screens and spray screen and frame parts with hot water. 2. Fan each screen to remove excess water and lay on paper towels. 3. Allow to air dry overnight. 4. Make sure screens are completely dry before placing in filter machine. Discarding Oil Oil should be discarded in morning after it has been allowed to cool overnight. Always dump entire fryer as indicated by 3M monitor strip (see Oil Quality Chart). 1. Put on heat-resistant filter gloves. 2. Drain entire fryer. 3. Take cooled oil to drum designated for inedible waste to be picked up by rendering company. Emptying Crumb Dump Crumb dump MUST BE emptied THREE TIMES DAILY, at 3 pm, 2 hours before close and close, following procedure below. 1. Fill orange, 5-gallon plastic bucket with ½ gallon of cold soapy water from 3-comp. sink. If your sink is not equipped with an automatic soap dispenser, use soapy water from wash compartment of 3-comp. sink. 2. Wearing heat resistant filter gloves, empty contents from crumb dump into bucket. 3. Add another ½ gallon of cold, soapy water on top of debris in bucket. 4. Allow debris from crumb dump to remain in soapy water for at least 10 minutes before discarding. After setting in water debris will solidify slightly. 5. Empty contents of bucket after 10 minutes. Empty contents of bucket into box with plastic bag liner or small trash can liner. Tie plastic bag closed and discard into trash can. G:\TRAIN\Opsman\Product\Oil-Rotation.doc January LJS Operations Page 3 of 4
18 Oil Filtering DO NOT DUMP CONTENTS FROM CRUMB DUMP DIRECTLY INTO TRASH. All Crumblies held in holding units (standard and Duke) MUST BE discarded TWO TIMES A DAY, at 3 pm, and close, following procedure below. 1. Follow steps 1 through 5 in Emptying Crumb Dump procedure above. Note: Crumblies from holding units and contents of crumb dump may be combined and placed in bucket together. DO NOT DUMP CRUMBLIES FROM HOLDING UNIT DIRECTLY INTO TRASH. Page 4 of 4 January LJS Operations G:\TRAIN\Opsman\Product\Oil-Rotation.doc
19 LONG JOHN SILVER S Oil Adding Fryer Product Assignment Fryer System Fryer 1 Fryer 2 Fryer 3 Fryer 4 Fryer 5 Five Fryer Primary - Breaded Primary Battered Secondary Breaded Secondary Battered Secondary Battered Secondary Battered Four Fryer Primary Breaded Primary Battered Secondary Breaded Secondary Battered Secondary Battered Three Fryer Primary Breaded Primary Battered Secondary Breaded Secondary Battered Oil Rotation Sequence Discard oil according to Oil Quality Chart. Filter all fryers before rotating oil 5 Fryer System 4 Fryer System 3Fryer System Fryer 1 Replenish from fryer 2 Fryer 1 Replenish from fryer 2 Fryer 1 Replenish from fryer 2 Fryer 2 Replenish from fryer 3 Fryer 2 Replenish from fryer 3 Fryer 2 Replenish from fryer 3 Fryer 3 Replenish from fryer 4 Fryer 3 Replenish from fryer 4 Fryer 3 Replenish with new oil Fryer 4 Replenish from fryer 5 Fryer 4 Replenish with new oil Fryer 5 Replenish with new oil Heat Resistant Filter Gloves Safety Glasses/Goggles Neoprene Apron Wash, rinse and dry hands. Sanitize hands. Filtering Tools Metal Ruler All employees must wear a hat or visor when preparing products. NOTE: A blue bandage and gloves must be worn over a cut. Gloves must be worn over nail polish or acrylic nails and whenever required by state and/or local ordinance. Discard oil according to Oil Quality Chart. Filter all fryers before rotating oil If strip indicates discard point has been reached, (see Oil Quality Chart). Discard oil following morning prior to opening, when oil is cool. Step 1: Estimate Oil Use 1. Refer to half-hourly readings for sales comparisons. 2. Estimate expected sales for revenue period. Subtract sales of non-fried products. 3. Using restaurant s projected fried sales, determine amount of oil needed based on Oil Projection Chart on following page. Projected level may necessitate replenishing this fryer during meal period. Step 2: Determine Actual Oil Levels of Each Fryer Wear safety equipment when checking oil levels. Using stainless steel ruler measure oil depth in each fryer and record on Food Prep Chart. TOOLS OPERATIONAL CONTROL POINTS TECHNIQUES Kevlar Burn Sleeves Stainless Steel Pitcher with Handle The objective of the rotation system is to maintain consistently high-quality oil. Follow all safety precautions when handling hot oil. To avoid danger of flash fire and possibility of warping fryer make sure entire bottom surface of fryer is covered with oil. Step 3: Adjust Oil Levels 1. Compare actual oil level with correct level for each fryer and determine if oil needs replenished to reach correct level. 2. If oil needs replenished, do so by moving oil from one fryer to another in sequence following chart above. Only highest numbered fryer for your system (3, 4 or 5) receives new oil. Use stainless steel pitcher to move oil from one fryer to another. If it is necessary to add new oil to fryer 3, 4 or 5, subtract actual oil level from correct oil level to determine how much you need to raise oil. Use Liquid Oil Chart on following page to determine how much oil you should add for each fryer size. G:\TRAIN\Opsman\Product\Oil-Adding Trans Fat Free.doc January 2014 Page 1 of 2
20 Oil-Adding Adding Oil to Fryer Empty Fryer Only add new oil to fryer 5. Other fryers should be replenished with oil from other fryers based on rotation sequence outlined on previous page. 1. Pour oil from container into empty fryer to correct depth. Use metal ruler to check correct depth. 2. Turn thermostat to 200 F after fryer has been filled with new oil. Do not allow temperature to rise above 200 F when not using melt cycle. This will prevent premature oil breakdown. 3. Maintain thermostat at 200 F until indicator light goes out. Some bubbling of new oil is normal. 4. When light goes out, set temperature to 350 F. Electric Fryer Cautions When filling, remove grid pan (false bottom), if applicable, and pour oil into fryer to at least 1 inch above height of heating elements. Set thermostat to 200 F. When red indicator light goes out, set thermostat to 350 F and carefully replace grid pan. Raise Oil level by: Liquid Oil Chart In a 24 x 24 fryer, add: In a 18 x 24 fryer, add: ¼ inch pounds pounds ½ inch 8.75 pounds pounds ¾ inch pounds pounds 1 inch 17.5 pounds pounds 2 inches 35 pounds 27.5 pounds 3 inches 52.5 pounds pounds 4 inches 70 pounds 55 pounds $ Sales Between Filtering Oil Projection Chart Projected Levels at 2.5 lbs./$100 Sales (minimum oil level is 3 ¼) Oil Depth In Inches Fryer 1 Fryer 2 Fryer 3 Fryer 4 Fryer 5 $ /4 3 1/2 3 1/2 Off Off $300 - $ /2 3 1/2 3 1/2 Off Off $600 - $ /2 3 3/4 3 1/2 3 1/4 Off $900 - $ /2 3 3/4 3 1/2 3 1/4 Off $ $ / /2 3 1/4 Off $ $ /4 4 1/4 3 3/4 3 1/2 3 1/4 $ /4 4 1/ /4 3 1/2 G:\TRAIN\Opsman\Product\Oil-Adding Trans Fat Free.doc January 2014 Page 2 of 2
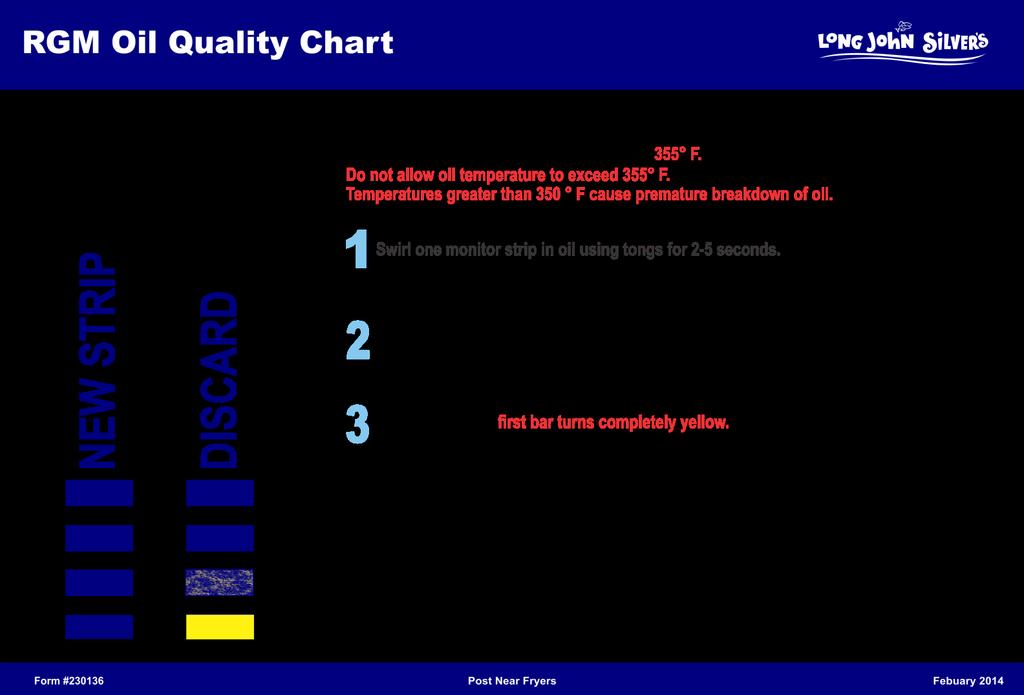
21 Long John Silver s 3M Oil Monitor Strips Oil Quality Chart TOOLS 2 Fryer Strainers Kevlar Sleeves Oil Evaluating & Maintaining Quality Apron Calibrated rmometer OPERATIONAL CONTROL POINTS Long John Silver s uses only a 0 grams Trans Fat liquid soy oil. Clean oil enhances look and taste of fried products and prevents premature oil breakdown. To remove crumbs and sediment, oil must be strained after each load of fried product is removed from fryer. Strain fryers once after each load of battered product is removed and twice after each load of breaded product is removes. Make sure all sediment is removed from bottom of fryer. Floating crumbs will not stick to product as much as sediment will. Strain carefully to avoid splashes and burns. Always wear Kevlar burn sleeves and apron when cooking and straining. If front edge of strainer is bent or warped, straighten it before using. If it cannot be straightened, or if there are holes in mesh, replace strainer. One strainer is designated for use after cooking breaded products and one for battered products. Crumb dump MUST BE emptied THREE TIMES A DAY, at 3 pm, 2 hours before close and close or whenever depth of debris is 4 or greater. See Emptying Crumb Dump section. All Crumblies in holding units (standard and Duke) MUST BE discarded TWO TIMES A DAY, at 3 pm, and at close. See Removing Crumblies from Holding Units section. Maintain Crumblie depth in holding units at ½. Depth must not exceed 1. Oil Breakdown Managers evaluate oil daily using 3M oil monitor strip (see Oil Quality Chart). Signs of poor oil quality: Cooled liquid oil tastes rancid. Heated oil smokes excessively. Small, "lazy" bubbles are formed, rather than big, "healthy" ones. Foam remains longer than it does on fresh oil after products are removed from fryer, Products are greasy and dark. Crumblies are small and unappetizing. Oil is dark. Causes of premature oil breakdown include: Heat Do not heat fryers that are not needed. When fryer is heated but not used, breakdown is visible as gummy residue. Turn unnecessary fryers off during slow periods. Check set point of each thermostat daily and adjust if necessary. Check oil temperature in all fryers (in use) twice daily, once before each revenue period. Do not allow oil temperature to exceed 355 F. Oxidation rate doubles for every 18 degree increase above 350 F (see chart on page 5). Increase in oxidation rate: Shortens Oil Life Drastically Causes Rancid Taste in Food Negatively Affects Overall Quality of Oil and Food Water Do not allow water from thawed products or wet utensils to come in contact with oil. Soap Utensils such as batter pans, batter buckets, baskets, lifters, tongs and vat dividers must be rinsed thoroughly. Filter Powder Filter powder leakage can cause oil to become cloudy. Ensure screens are properly assembled. If filter machine is working properly, oil will be clear after filtering. Cloudy oil indicates a poor seal. Correct immediately. Brass and Copper Hushpuppy scoop is chrome-covered brass. Inspect it before each use to make sure no brass is exposed. If brass shows, do not use scoop. Do not use brass or copper drain valves. Light/Air Cover fryers when not in use to reduce exposure to air/light and keep foreign matter from falling in fryers. Ensure partially used liquid oil is stored with cap securely tightened. G:\TRAIN\Opsman\Product\Shortening January 2014 Page 1 of 4 Evaluating & Maintaining Quality
22 Oil Evaluating & Maintaining Quality Using 3M Oil Monitor Strip Oil test should be performed on fryer one at 8:00 pm. before filtering. Always test before adding fresh oil. If strip indicates discard point has been reached, (see Oil Quality Chart). Discard oil following morning prior to opening, when oil is cool. Oil must be discarded every seven days regardless of test results. Count begins day oil is discarded and replenished. CAUTION: DO NOT DISCARD HOT OIL. BUCKET SHOULD ONLY BE ¾ FULL WHEN DISCARDING. Using a calibrated thermometer, check to make sure temperature of oil in fryer is between 345 F and 355 F. Do not allow oil temperature to exceed 355 F. Oxidation rate doubles for every 18 degree increase above 350 F. (See chart on page 5) Increase in oxidation rate: Shortens Oil Life Drastically Causes Rancid Taste in Food Negatively Affects Overall Quality of Oil and Food Using tongs, swirl monitor strip in oil for two to five seconds. NOTE: For test accuracy, do not exceed five seconds. Remove strip from oil and wait 15 seconds. Compare strip to examples on Oil Quality Chart and discard oil when first bar of strip is solid yellow. CAUTION: DO NOT DISCARD HOT OIL. BUCKET SHOULD ONLY BE ¾ FULL WHEN DISCARDING. Delivery and Storage of 3M monitor strips 3M monitor strips are delivered by McLane. 3M monitor strips must be delivered refrigerated. Unused 3M monitor strips must be stored in their original plastic bottle in cooler. Discard 3M monitor strips when use-by-date expires. TECHNIQUES Handling Cases of Oil One case of oil contains one 35 lb. jug of creamy soy oil. Date-mark cases as they are delivered. Store oil on lower stockroom shelves away from moisture. Do not store oil or any food product on floor. Oil Levels Follow oil projection tables in LJS Operations Oil Adding. Maximum oil level is 4 ½. If oil level is too high it will break down prematurely. Risks: Heat exposure Food particle contamination Exposure to moisture and air Minimum oil level is 3 ¼". If oil falls below this level, risk of undercooked product increases. If oil level drops below thermostat probe (approximately 2 ½") oil can overheat and cause a fire. Minimum oil level of 3 ¼" must be maintained at all times. Fryer Loads Overloading drops oil temperature, increasing risk of undercooked product and excessive oil absorption. Do not exceed recommended drop loads. Fryer Recovery Fryer must recover to a range of 345 F to 355 F before new load is dropped. Check set point of each thermostat daily and adjust when necessary. Indicator light will signify when fryer has recovered to proper range. Vat Dividers It is necessary to use vat dividers properly, ensuring maximum use of fryer. Fryer Usage Use minimum number of fryers by maximizing drop loads in fryers 1 and 2. Do not use fryers 4 or 5 until fryer 3 is fully loaded. Crumbing Fryer Use fish lifter to remove crumbs after battered products have cooked 1 to 1 ½ minutes. Fanning Products G:\TRAIN\Opsman\Product\Shortening January 2014 Page 2 of 4 Evaluating & Maintaining Quality
23 Oil Evaluating & Maintaining Quality All products must be fanned times. Shake excess oil from product with ten to twelve, firm, up-and-down motions of fish lifter or basket. Do not bang lifter or basket on range. Straining Fryer Crumbs continue to cook and burn in fryer. Unstrained fryers are primary cause of premature oil breakdown. Fries and breaded products leave sediment in oil. Fryer should be strained twice after each breaded product load. 1. Insert strainer gently into front, right-hand corner of fryer. 2. Use scooping motion to touch bottom of fryer with strainer, moving strainer toward back of fryer. 3. When you reach back of fryer, lift strainer to top of oil. 4. Repeat on left side of fryer. 5. Repeat down middle of fryer. 6. Discard crumbs and sediment. Emptying Crumb Dump Crumb dump MUST BE emptied THREE TIMES DAILY, at 3 pm, 2 hours before close and close, following procedure below. 1. Fill orange, 5-gallon plastic bucket with ½ gallon of cold soapy water from 3-comp. sink. If your sink is not equipped with an automatic soap dispenser, use soapy water from wash compartment of 3-comp sink. 2. Wearing heat resistant filter gloves, empty contents from crumb dump into bucket. 3. Add another ½ gallon of cold, soapy water on top of debris in bucket. 4. Allow debris from crumb dump to remain in soapy water for at least 10 minutes before discarding. After setting in water debris will solidify slightly. 5. Empty contents of bucket after 10 minutes. Empty contents of bucket into box with plastic bag liner or small trash can liner. Tie plastic bag closed and discard into trash can. DO NOT DUMP CONTENTS FROM CRUMB DUMP DIRECTLY INTO TRASH. All Crumblies held in holding units (standard and Duke) MUST BE discarded TWO TIMES A DAY, at 3 pm, and close, following procedure below. 1. Follow steps 1 through 5 in Emptying Crumb Dump procedure above. Note: Crumblies from holding units and contents of crumb dump may be combined and placed in bucket together. DO NOT DUMP CRUMBLIES FROM HOLDING UNIT DIRECTLY INTO TRASH. G:\TRAIN\Opsman\Product\Shortening January 2014 Page3 of 4 Evaluating & Maintaining Quality

24 Oil Evaluating & Maintaining Quality G:\TRAIN\Opsman\Product\Shortening January 2014 Page 4 of 4 Evaluating & Maintaining Quality
25 LONG JOHN SILVER S Crumblies Cook Time Cooked Temp Storage Batter mix: dry storage 0:30 Cooked Hold Time N/A Serve/Hold Temp Prep Prepped Hold Drop Load N/A Use prepared batter Discard Crumblies two times daily (3:00 pm and close) One sixth batch of batter mix in fryer 1 (cooked in newest available oil) N/A N/A Cook Time Cook Cycle 30 seconds Fan cooked product times Disposable Gloves Kevlar Sleeves Apron TOOLS Crumbly Maker Fish Lifter Fryer Strainer (designated for battered product) Tongs 5-gallon, Orange Bucket Wash, rinse, and dry hands. Sanitize hands. NOTE: A blue bandage and gloves must be worn over cuts. Gloves must be worn over nail polish or acrylic nails and wherever required by state and/or local ordinance. All employees must wear hat when preparing products. Crumblies are cooked in newest available oil. Crumblies are small pieces of cooked batter. They have the following uses: Provide protective, absorptive layer under all battered products in hot holding unit. Serve as bed and garnish to all battered and breaded products served to Customers. Served as side order. Cooking Crumblies: Cook enough Crumblies in morning to provide ½ layer of Crumblies in holding unit (or Duke tray). For average restaurant this would be 1 batch of batter (6 Crumbly makers full). Adjust amount of Crumblies to cook according to size of your holding unit. Cook Crumblies as needed to maintain ½ Crumblies in holding units at all times. Crumblies are cooked in newest available oil. 1. Wash, rinse, dry and sanitize hands. 2. Twenty minutes before opening, mix Batter according to procedures and pour into Crumblie maker until Crumblie maker is half full. (see OPS Manual/Product/Batter for preparing batter procedures) Do not fill Crumblie Maker completely full. This will make it more difficult to manage and OPERATIONAL CONTROL POINTS Wear Kevlar burn sleeves and apron when frying product. Oil could splash up and burn you. All Crumblies in holding units (standard and Duke) MUST BE discarded TWO TIMES A DAY, at 3 pm, and at close. See Removing Crumblies from Holding Units section. Maintain Crumblie depth in holding units at ½. Depth must not exceed 1 inch. TECHNIQUES increase risk of pouring batter from top of Crumblie maker instead of spout. 3. Wearing Kevlar burn sleeves, hold Crumblie maker 12 inches above fryer (about even with crumb dump) with spout facing side of fryer 4. Tip Crumbly maker forward and quickly move side to side along midline of fryer for count of 12. Be extremely careful to avoid steam burns. If Crumblie maker is full, do not tip too far forward. This will cause batter to pour from top of Crumblie maker instead of spout. 5. Set 30 second cook time. Do not stir Crumblies. G:\TRAIN\OPSManual\Product\Crumblies.doc January 2014 Page 1 of 2
26 Crumblies 7. When alarm sounds, remove Crumblies with fish lifter. Fan 10 to 12 times to remove excess oil and transfer to holding unit. There should be ½ of Crumblies in holding unit at all times. 8. Strain fryer twice after cooking full batch of Crumblies using strainer designated for battered products. 9. In afternoon or evening, if more Crumblies are needed, cook in fryer with newest available oil before filtering. OR 10. Use Batter approaching end of holding time to make more Crumblies and maintain ½ bed of Crumblies in holding unit. 11. Wash, rinse and sanitize Crumbly Maker after each use and allow to air dry. Accumulating Crumblies: Crumblies are cooked specifically using mixed batter or they can be accumulated while cooking battered products. 1. Accumulate Crumblies throughout day by skimming Crumblies during normal cooking of battered products. 2. Skim Crumblies from fryer 1½ to 2 minutes after last piece of protein is dropped. Fan Crumblies thoroughly (at least 10 to 12 times) to remove excess oil. 3. Place Crumblies in holding unit. Do not throw Crumblies on cooked product already in holding unit. 4. Discard Crumblies left at end of day. Straining the Fryer Strain carefully to avoid splashes and burns. Always wear Kevlar burn sleeves when straining fryer. Use strainer designated for battered products. 1. Insert strainer gently into front right-hand corner of fryer. 2. Use scooping motion to touch bottom of fryer with strainer, moving strainer toward back of fryer. Make sure all sediment is removed from bottom of fryer. Floating crumbs will not stick to product as much as sediment will. 3. When you reach back of fryer, lift strainer to top of oil. 4. Repeat on left side of fryer. 5. Repeat down middle of fryer. 6. Discard crumbs and sediment in crumb dump. Serving Crumblies: 1. Serve portion of Crumblies under all battered and breaded products and as a garnish to all meals, one portion (.75 ounces) is equal to one tong-full of Crumblies served with plated meals. 2. Serving side orders of Crumblies: Individual side order (1.5 ounces) = two tongs-full of Crumblies. Eat-in 6-oz. food tray (chip tray) To-go finger food box Family Size side order (3 ounces) = four tong-fulls of Crumblies. Eat-in 1-lb. food tray To-go finger food box Removing Crumblies from Holding Units All Crumblies held in holding units (standard and Duke) MUST BE discarded TWO TIMES A DAY, at 3 and close, following procedure below. 1. Fill orange, 5-gallon plastic bucket with ½ gallon of cold soapy water from 3-comp. sink. If your sink is not equipped with an automatic soap dispenser, use soapy water from the wash compartment of the 3-comp. sink. 2. Remove Crumblies from holding unit(s) and place in bucket on top of water. 3. Add another ½ gallon of cold, soapy water on top of Crumblies in bucket. 4. Allow Crumblies to remain in soapy water for at least 10 minutes before discarding. After setting in water Crumblies will solidify slightly. 5. Empty contents of bucket after 10 minutes or allow it to remain until next time holding unit is emptied. 6. Empty contents of bucket into box with plastic bag liner or small trash can liner, tie plastic bag closed and discard into trash can. DO NOT DUMP CRUMBLIES FROM HOLDING UNITS DIRECTLY INTO TRASH. Page 2 of 2 January 2014 G:\TRAIN\OPSManual\Product\Crumblies.doc
CM4-S COMPUTER OPERATION (PROGRAMMED FOR TEXAS CHICKEN) Programming button. Setting up the Fryer for Initial Use
 Programming button. Setting up the Fryer for Initial Use") 1 2 3 4 5 6 7 8 9 10 CM4-S COMPUTER OPERATION Texas Chicken Operation CM4-S computers on fryers prepared for Texas Chicken are specially programmed for use with either the restaurant's chicken or french
1 2 3 4 5 6 7 8 9 10 CM4-S COMPUTER OPERATION Texas Chicken Operation CM4-S computers on fryers prepared for Texas Chicken are specially programmed for use with either the restaurant's chicken or french
FRYMASTER TCF. Chicken Fryer
 Hardee s Food Systems, Inc. FRYMASTER TCF Chicken Fryer EQUIP 501 Chicken Fryer October 1, 1994 CALIBRATION EQUIPMENT and TOOLS Digital Thermometer Flat Blade or Phillips w/immersion Probe Screwdriver
CM4-S(t) COMPUTER OPERATION (PROGRAMMED FOR CHURCH S CHICKEN) Programming Key. Setting up the Fryer for Initial Use
 COMPUTER OPERATION (PROGRAMMED FOR CHURCH S CHICKEN) Programming Key. Setting up the Fryer for Initial Use") 1 2 3 4 5 6 7 8 9 10 8700 Line Ave. Shreveport, LA 71106 Service Hotline 800-551-8633 CM4-S(t) COMPUTER OPERATION Church s Chicken Operation CM4-S computers on fryers prepared for Church s Chicken are
1 2 3 4 5 6 7 8 9 10 8700 Line Ave. Shreveport, LA 71106 Service Hotline 800-551-8633 CM4-S(t) COMPUTER OPERATION Church s Chicken Operation CM4-S computers on fryers prepared for Church s Chicken are
Operating Instructions
 Operating Instructions Fryer KM 403 To prevent accidents and reduce machine damage, read these lnstructions before installation or use. UV M.-Nr. 05 825 170 2 Contents IMPORTANT SAFETY INSTRUCTIONS.................................
Filtration. General Instructions
 Filtration General Instructions Ultrafryer Systems 302 Spencer Lane P.O. Box 5369 San Antonio, TX 78201 Local: (210) 731-5000 Toll-Free: (800) 525-8130 Fax: (210) 731-5099 Web: www.ultrafryer.com 30A181-Jul2007
PARAGON FRYERS INSTALLATION INSTRUCTIONS SAFETY INSTRUCTIONS USER INSTRUCTIONS MODEL: PF9 MODEL: PSF3 MODEL: PSPF9 MODEL: PDPF6 MODEL: PDPF9
 INSTRUCTION REF: IN123 ISSUE No. 1 DATE 23.02.06 Page 1 of 10 TELEPHONE: SERVICE (44) 01332 875665 FAX: SERVICE (44) 01332 875536 INSTALLATION INSTRUCTIONS SAFETY INSTRUCTIONS USER INSTRUCTIONS PARAGON
Clean grill Daily GR 1 D1
 Clean grill Daily GR 1 D1 Why To maintain food quality standards Time required 35 minutes to prepare 90 minutes to complete, per grill Time of day During low-volume periods For 24-hour restaurants: during
G3830, G3860, G3865 Fryers USERS INSTRUCTIONS. Falcon Foodservice Equipment. T Ref.1 SECTION 1 - GENERAL DESCRIPTION
 G3830, G3860, G3865 Fryers USERS INSTRUCTIONS SECTION 1 - GENERAL DESCRIPTION SECTION 2 - LIGHTING and OPERATIONS SECTION 3 - COOKING HINTS SECTION 4 - CLEANING and MAINTENANCE This appliance has been
Register your product within 30 days of purchase to activate its one-year WARRANTY IS ONLY VALID IF YOU REGISTERED WITHIN 30 DAYS AFTER PURCHASE.
 WARRANTY Register your product within 30 days of purchase to activate its one-year limited manufacturer s warranty at /register WARRANTY IS ONLY VALID IF YOU REGISTERED WITHIN 30 DAYS AFTER PURCHASE. LIMITED
OPERATION MANUAL KLEENSCREEN FILTRATION SYSTEM SUPPLEMENT INSTRUCTION MANUAL FOR: Gas Fryer Models. Electric Fryer Models
 OPERATION MANUAL KLEENSCREEN FILTRATION SYSTEM SUPPLEMENT INSTRUCTION MANUAL FOR: Gas Fryer Models GR35F ML-126998 GR45F ML-126999 GR65F ML-135534 GR85F ML-135535 GRD35F ML-126732 GRD45F ML-126735 GRD65F
G3830, G3860, G3865 Fryers USERS INSTRUCTIONS. Falcon Foodservice Equipment. T Ref. 2 SECTION 1 - GENERAL DESCRIPTION
 G3830, G3860, G3865 Fryers USERS INSTRUCTIONS SECTION 1 - GENERAL DESCRIPTION SECTION 2 - LIGHTING and OPERATIONS SECTION 3 - COOKING HINTS SECTION 4 - CLEANING and MAINTENANCE This appliance has been
WEST BEND DEEP FRYER L 5179
 WEST BEND DEEP FRYER L 5179 TO PREVENT PERSONAL INJURY OR PROPERTY DAMAGE, READ AND FOLLOW THE INSTRUCTIONS AND WARNINGS IN THIS CARE AND USE INSTRUCTION MANUAL. Register this and other West Bend products
DFPS08. Deep Fryer. User Manual
 DFPS08 Deep Fryer User Manual IMPORTANT SAFETY INFORMATION Please follow all the precautions listed below for safety and to reduce the risk of fire, injury or electrical shock. Read all the instructions
Standard Operation Procedures - Inferno 4500 Daily Startup
 Daily Startup 1. Turn on the ventilation hoods and lights in the morning. 2. Plug the grease reservoir into the outlet on the side of the oven marked ALWAYS ON. 3. Position the hand lever from CLEAN to
The Complete Guide to the Commercial Deep Fryers. Fry like a Pro with our Deep Fryer Buying Guide
 The Complete Guide to the Commercial Deep Fryers Fry like a Pro with our Deep Fryer Buying Guide Learn how to choose the best deep fryer for your needs with this in-depth guide. Having a commercial deep
CM4-S(t) COMPUTER OPERATION (PROGRAMMED FOR POPEYE S) Programming key. Figure 1: CM4-S Computer with tactile switches.
 COMPUTER OPERATION (PROGRAMMED FOR POPEYE S) Programming key. Figure 1: CM4-S Computer with tactile switches.") 1 2 3 4 5 6 7 8 9 10 8700 Line Ave. Shreveport, LA 71106 Service Hotline 800-551-8633 CM4-S(t) COMPUTER OPERATION Computer Operation CM4-S computers are specially programmed for use with either the restaurant's
1 2 3 4 5 6 7 8 9 10 8700 Line Ave. Shreveport, LA 71106 Service Hotline 800-551-8633 CM4-S(t) COMPUTER OPERATION Computer Operation CM4-S computers are specially programmed for use with either the restaurant's
FR 2 Frymaster Fryer
 FRYERS FR 2 Frymaster Fryer Electric and Gas models using an M2000 Computer Weekly maintenance task FR 2 W1 Clean area behind fryers Bi-weekly maintenance task FR 2 B1 Calibrate fryer Monthly maintenance
Adapted from materials developed by the Broome County Health Department.
 FOOD SAFETY CLASS Environmental Health Division Tompkins County Health Department Adapted from materials developed by the Broome County Health Department. POTENTIALLY HAZARDOUS FOODS (Foods that support
User Manual. 3.5L Deep Fryer Stainless Steel Model Number: MDF35
 User Manual 3.5L Deep Fryer Stainless Steel Model Number: MDF35 READ AND SAVE THESE INSTRUCTIONS IMPORTANT Read and follow the instructions in this user manual even if you feel you are familiar with the
Registered Dietitian Consulting Group
 Preparing for State Inspection The Basics Objectives: 1. After the in-service, employees will be able to identify two reasons to label and date foods in the kitchen 2. After the in-service, employees will
FR 6 Frymaster. Controller Model M4000. Model BIGLA30-T
 FRYER FR 6 Frymaster Model numbers BIELA14-T & BIGLA30-T LOV Low Oil Volume Daily maintenance tasks FR 6 D1 Cleaning fryer FR 6 D2 Maintenance Filter Weekly maintenance tasks FR 6 W1 Clean Behind Fryer
616B & 616BT. Open Kettle Fryer. Operator s Manual and. Technical Supplement
 Open Kettle Fryer 616B & 616BT Operator s Manual and Technical Supplement Belshaw Bros., Inc. 814 44th Street NW, Suite 103 Auburn, WA 98001 USA Tel: (206) 322-5474 Fax: (206) 322-5425 Toll Free (US):
AIR FRYER. Instruction Manual. item no. 048-GM (949)
") AIR FRYER Instruction Manual item no. 048-GM-48212 www.dellaproductsusa.com (949)344-2588 Manual_929TS_48212.indd 1 Manual_929TS_48212.indd 2 TABLE OF CONTENTS Product Introduction... 4 Important Safeguards...
AIR FRYER Instruction Manual item no. 048-GM-48212 www.dellaproductsusa.com (949)344-2588 Manual_929TS_48212.indd 1 Manual_929TS_48212.indd 2 TABLE OF CONTENTS Product Introduction... 4 Important Safeguards...
WEST BEND DEEP FRYER L 5181
 WEST BEND DEEP FRYER L 5181 TO PREVENT PERSONAL INJURY OR PROPERTY DAMAGE, READ AND FOLLOW THE INSTRUCTIONS AND WARNINGS IN THIS CARE AND USE INSTRUCTION MANUAL. Register this and other West Bend products
Cleaning and Sanitation Procedures Module Deli
 Deli Triple Sink System (Clean, Rinse, Sanitize) A. Preparation 1) Wash your hands with anti-microbial soap before and after cleaning and whenever hands are dirty. 2) Dawn appropriate PPE s 3) Place safety
Thank you for choosing AMI FRY. We hope you enjoy the convenience, quality and affordability of your new unit.
 Thank you for choosing AMI FRY. We hope you enjoy the convenience, quality and affordability of your new unit. You will find AMI Fry of extreme benefit to your frying needs with its fast recovery and temperature
INSTRUCTIONS FOR USE. Deep Fryer. Model : EW-3K043 Voltage: 120V~60Hz Wattage: 1600W
 INSTRUCTIONS FOR USE Deep Fryer Model : EW-3K043 Voltage: 120V~60Hz Wattage: 1600W THIS PRODUCT IS ONLY FOR HOUSEHOLD USE ONLY. READ AND SAVE THESE SAFETY INSTRUCTIONS BEFORE USE IMPORTANT SAFEGUARDS When
ICED CAPPUCCINO MACHINE Taylor MODEL: 390
 4.8.6.3 ICED CAPPUCCINO MACHINE Taylor MODEL: 390 LOCATION: Front of House WHEN CLEANED: Daily, Weekly, Monthly, Seasonal TOOLS/SUPPLIES REQUIRED: Salmon Cloth 2 or 3-Compartment Sink Sink Detergent Sanitizer
User Manual. 3.5L Deep Fryer Stainless Steel Model Number: MDF35S READ AND SAVE THESE INSTRUCTIONS
 User Manual 3.5L Deep Fryer Stainless Steel Model Number: MDF35S READ AND SAVE THESE INSTRUCTIONS IMPORTANT Read and follow the instructions in this user manual even if you feel you are familiar with the
Cool-Touch Deep Fryer / Fondue Maker
 Cool-Touch Deep Fryer / Fondue Maker Use and Care Instructions Model EP64 For information or assistance call 514-842-8691 EURO-PRO Corporation In U.S.: 178 West Service Rd., Champlain, NY 12919 In Canada:
PARAGON GAS FRYER INSTALLATION INSTRUCTIONS SAFETY INSTRUCTIONS USER INSTRUCTIONS MODEL : PDGF/PDGFP
 Page 1 of 13 INSTALLATION INSTRUCTIONS SAFETY INSTRUCTIONS USER INSTRUCTIONS PARAGON GAS FRYER MODEL : PDGF/PDGFP Page 2 of 13 IMPORTANT PLEASE READ INSTRUCTIONS FULLY BEFORE USE MODEL PDGF FRYER & PDGFP
HE Type Filtration Procedures
 HE Type Filtration Procedures WARNING : TO ASSURE PRODUCING A QUALITY PRODUCT WHILE PROLONGING THE LIFE EXPECTANCY OF THE FRYER, ENSURE FILTERING, BOIL-OUT AND CLEANING INSTRUCTIONS ARE STRICTLY ADHERED
Fire and burn safety at home
 Fire and burn safety at home Safe signals in the home Kitchen safety Bathroom safety Bedroom safety Living area safety Storage or utility safety Smoke and carbon monoxide detectors Doors and windows Fire
Allegheny County Health Department Food Safety Program 3901 Penn Ave, Pittsburgh, PA Phone: Fax:
 Client ID: Address: City: Municipality: 31 South Hills Village Pittsburgh Bethel Park State: PA Inspector: Zip: 15241 Turner, Kathy Category Code: 212-Chain Restaurant without Liquor Re- Inspection: Pending
Safe Food Handling Practices. for Student Nutrition Programs
 Safe Food Handling Practices for Student Nutrition Programs For Further Information Contact: Haldimand-Norfolk Health Unit Healthy Environment Team Simcoe: 12 Gilbertson Dr. - 519-426-6170 / 905-318-6623
TEMPORARY FOOD SERVICE ESTABLISHMENT REQUIREMENTS
 TEMPORARY FOOD SERVICE ESTABLISHMENT REQUIREMENTS The following items are required for compliance with the Illinois Department of Public Health s (IDPH) Food Service Sanitation Rules and Regulations pertaining
Tierset Case. Assembled Chocolate Fountain. Auger & Stabilizer. Auger. Crown. Cylinder. Cylinder. D A Crown. Stabilizer. Basin Case. Bowl.
 2) Assembling the Chocolate Fountain a) To assemble the chocolate fountain, first remove the chocolate fountain base unit from the basin case 1. (See Photo 2.3) b) Place the chocolate fountain base on
WINNEBAGO COUNTY HEALTH DEPARTMENT GUIDELINES FOR THE CHAIRPERSON FOR SAFE FOOD HANDLING AT SPECIAL EVENTS
 WINNEBAGO COUNTY HEALTH DEPARTMENT GUIDELINES FOR THE CHAIRPERSON FOR SAFE FOOD HANDLING AT SPECIAL EVENTS Due to the nature, location, and variety of conditions surrounding the operation of temporary
Mechanical Ware Washing
 Mechanical Ware Washing 1 Objectives At the end of the reading, students should be able to: List correctly the ways in which sanitization may be achieved using a ware washing machine Differentiate between
Read this manual carefully before installing and using the appliance. This will ensure optimum results and maximum safety.
 GB Read this manual carefully before installing and using the appliance. This will ensure optimum results and maximum safety. DESCRIPTION (see drawing on cover) A. Lid B. Viewing window (not all models)
Food Safety Basics. for Occasional. Food Service. Colorado State University Extension Morgan County. Morgan County Extension Center Revised 6/2014
 Food Safety Basics for Occasional Food Service Morgan County Extension Center Revised 6/2014 Colorado State University Extension Morgan County NOTES Developed July 2002 with assistance from Sherry Jones,
WEST BEND DELUXE DEEP FRYER L 5265
 WEST BEND DELUXE DEEP FRYER L 5265 TO PREVENT PERSONAL INJURY OR PROPERTY DAMAGE, READ AND FOLLOW THE INSTRUCTIONS AND WARNINGS IN THIS CARE AND USE INSTRUCTION MANUAL. Register this and other West Bend
HACCP Applications (Hazard Analysis Critical Control Points) Key vocabulary and definitions
 Key vocabulary and definitions") HACCP Applications (Hazard Analysis Critical Control Points) Key vocabulary and definitions Clean Free of visible soil such as dirt, dust or food waste. Cross Contamination Transfer of harmful microorganisms
HACCP Applications (Hazard Analysis Critical Control Points) Key vocabulary and definitions Clean Free of visible soil such as dirt, dust or food waste. Cross Contamination Transfer of harmful microorganisms
The University of Michigan Small Group Housing Kitchen Guidelines
 The University of Michigan Small Group Housing Kitchen Guidelines Introduction The University of Michigan Department of Environment, Health & Safety (EHS) conduct kitchen inspections in off-campus housing
USER S MANUAL DIGITAL AIR FRYER DAF-530D-2
 USER S MANUAL DIGITAL AIR FRYER DAF-530D-2 Introduction Thank you for purchasing Kitchen Couture Air Fryer. The Kitchen Couture Air Fryer evenly circulates hot air rapidly around food. The Kitchen Couture
FQ30-T FRYER COMMISSION AND DEMONSTRATION FORM 8700 LINE AVENUE SHREVEPORT, LA (800) Date
 Date") FQ30-T FRYER COMMISSION AND DEMONSTRATION FORM 8700 LINE AVENUE SHREVEPORT, LA 71106 (800) 551-8633 Date Store Technician Store # (if applicable) Service Agency Address Address City/State City/State Store
FQ30-T FRYER COMMISSION AND DEMONSTRATION FORM 8700 LINE AVENUE SHREVEPORT, LA 71106 (800) 551-8633 Date Store Technician Store # (if applicable) Service Agency Address Address City/State City/State Store
Food Handler Training
 Food Handler Training PLEASE NOTE: This PowerPoint is for informational use only. Viewing of this PowerPoint does not satisfy the Illinois Department of Public Health s (IDPH) Food Handler Training Requirement.
EZ Melt Fill & Filter EZ18, EZ24 & EZ34. Operator s Manual
 EZ Melt Fill & Filter EZ18, EZ24 & EZ34 Operator s Manual Belshaw Bros., Inc. 814 44 Tth Street NW, Suite 103 Auburn, WA 98001 USA Phone: (206) 322-5474 Fax: (206) 322-5425 Email: service@belshaw.com http://www.belshaw.com
Operating Instructions for the Fryer KM 402
 Operating Instructions for the Fryer KM 402 To prevent accidents and reduce machine damage, ]ö read the Operating Manual before installation or use. M.-Nr. 05 052 110 Contents Contents Description of the
THREE RIVERS HEALTH DISTRICT APPLICATION FOR A TEMPORARY FOOD ESTABLISHMENT PERMIT
 THREE RIVERS HEALTH DISTRICT APPLICATION FOR A TEMPORARY FOOD ESTABLISHMENT PERMIT Health Department Use Only: Date Application received Amt Received: $ How was fee paid? Cash Check No Credit Card Auth
1. Pan 2. Basket 3. Basket release button 4. Basket handle 5. Safety lock 6. Timer (0-60min)/Power on knob 7. Temperature control knob (80-200C )
/Power on knob 7. Temperature control knob (80-200C )") Introduction Your new Kogan air-fryer allows you to prepare your favourite ingredients and snacks in a healthier way. The air-fryer uses hot air in combination with high-speed air circulation (Rapid Air)
Introduction Your new Kogan air-fryer allows you to prepare your favourite ingredients and snacks in a healthier way. The air-fryer uses hot air in combination with high-speed air circulation (Rapid Air)
product safety Please read these instructions before operating the appliance and retain them for future use.
 product safety Please read these instructions before operating the appliance and retain them for future use.! This product is not suitable for use by children, and may not be suitable for persons requiring
Task #1. Quick Overview: Wipe white residue build- up off one of the show tanks (class tank) Procedure: 10. Wash hands.
 Procedure: 10. Wash hands.") Task #1 Quick Overview: Wipe white residue build- up off one of the show tanks (class tank) 2. Get green bin labeled #1, which contains supplies. 3. If needed, make hydrogen peroxide (H 2 O 2 ) solution.
Task #1 Quick Overview: Wipe white residue build- up off one of the show tanks (class tank) 2. Get green bin labeled #1, which contains supplies. 3. If needed, make hydrogen peroxide (H 2 O 2 ) solution.
EN User Guide
 EN User Guide www.tefal.com 1 2 3 4 5 6 7 11 9 8 10 * Depending on model. fig 1 fig 2 fig 3 fig 4 fig 5 fig 6 fig 7 fig 8 fig 9 1 min. 30 sec 0L fig 10 fig 11 fig 12 Click X1 Click fig 12a fig 13 fig 14
IMPORTANT WARNINGS Therefore, to avoid breaking it, do not turn it manually in order to seek the correct position.
 IMPORTANT WARNINGS Before use check that the voltage power supply corresponds to the one shown on the appliance data plate. Only connect the appliance to electrical sockets which have a minimum load of
ENVIRONMENTAL HEALTH INFORMATIONAL BULLETIN
 ENVIRONMENTAL HEALTH INFORMATIONAL BULLETIN TO: FROM: Commercial Temporary Event Food Vendors & Commercial Event Coordinators City of Berkeley, Division of Environmental Health SUBJECT: Temporary Food
User Guide. * Depending on model. EN 1. TE_FRYERS_FILTRA-ONE_UK_NC _Mise en page 1 06/12/13 15:36 PageC1.
 TE_FRYERS_FILTRA-ONE_UK_NC00122287_Mise en page 1 06/12/13 15:36 PageC1 EN 1 2 3 4 5 6 7 8 9 Réf. NC00122287 12/2013 ESPACE GRAPHIQUE User Guide www.tefal.com 12 13 * Depending on model. 10 11 TE_FRYERS_FILTRA-ONE_UK_NC00122287_Mise
Air Fryer. Model# GAF-570 USER MANUAL
 Air Fryer Model# GAF-570 USER MANUAL Read this manual thoroughly before using and save it for future reference Welcome to the Exciting World of Air Frying from Gourmia Model: GAF-570 2017 Gourmia www.gourmia.com
Smart Health Air Fryer VSLAF130
 Smart Health Air Fryer VSLAF130 Introduction The Smart Health Air Fryer provides an easy and healthy way of preparing your favorite foods by using hot rapid air circulation. Using our Advanced Smart Air
Air Fryer MAF-A988 USER MANUAL. facebook.com/morganappliances
 MAF-A988(IM)240214_Layout 1 //14 2:00 PM Page 1 USER MANUAL Market Expansion Services by www.dksh.com E-mail: electrical.appliance@dksh.com www.morgan.my facebook.com/morganappliances Air Fryer MAF-A988
GDF101W Deep Fat Fryer. User Guide IMPORTANT: RETAIN FOR FUTURE REFERENCE
 GDF101W Deep Fat Fryer User Guide IMPORTANT: RETAIN FOR FUTURE REFERENCE 2 WARNINGS: IMPORTANT SAFETY INSTRUCTIONS PLEASE READ ALL INSTRUCTIONS CAREFULLY BEFORE USE RETAIN FOR FUTURE REFERENCE WARNING:
Safety In Chemistry. Identified Risks and Hazards
 Safety In Chemistry ] Introduction Students have a duty of care to minimize and eliminate chemical risk and hazards through proper use of laboratory equipment and to be prudent of potential dangers associated
Health, Safety, and Sanitation in Child Care Homes. Child Care Answers Child and Adult Care Food Program
 Health, Safety, and Sanitation in Child Care Homes { Child Care Answers Child and Adult Care Food Program 1. Cleaning and Sanitizing 2. Handwashing in Child Care 3. Proper food handling and storage 4.
DIGITAL AIR FRYER USER MANUAL MODEL: PKAIRFR28
 DIGITAL AIR FRYER USER MANUAL MODEL: PKAIRFR28 Introduction This all new Air FRYER provides an easy and healthy way to prepare your favorite ingredients. By using hot rapid air circulation and a grill,
GPF101SS Deep fat fryer. User Guide IMPORTANT: RETAIN FOR FUTURE REFERENCE
 GPF101SS Deep fat fryer User Guide IMPORTANT: RETAIN FOR FUTURE REFERENCE WARNINGS: IMPORTANT SAFETY INSTRUCTIONS PLEASE READ ALL INSTRUCTIONS CAREFULLY BEFORE USE RETAIN FOR FUTURE REFERENCE WARNING:
eware Handling & Cleaning Procedures
 Procedures Best practice in ware washing, equipment and hard surfaces Why am I doing this program? An important part of your job is to enhance the safety and satisfaction of your customers and co-workers.
Air Fryer. Model# GAF-535 USER MANUAL
 Air Fryer Model# GAF-535 USER MANUAL Read this manual thoroughly before using and save it for future reference Welcome to the Exciting World of Air Frying from Gourmia Model: GAF-535 2017 Gourmia www.gourmia.com
L&C Deep Fryer INSTRUCTION MANUAL MODEL:
 L&C Deep Fryer INSTRUCTION MANUAL MODEL: IMPORTANT SAFEGUARDS.... 1 Part Name... 3 To Use... 4 General Frying Advice... 7 Cleaning and Maintenance... 9 The Reset Feature... 10 Troubleshooting... 11 Technical
Sanitise Syrup Lines & Valves. Taylor PH61 Cleaning every 14 days
 Taylor PH61 Cleaning every 14 days Drain the Syrup Lines Remove each syrup feed tube from syrup bottle and let excess syrup drain from the feed tube back into the syrup bottle. When flow of syrup from
User Guide HOLSEM-A1 KNOB.
 User Guide HOLSEM-A1 KNOB www.holsem.com Specification & Feature: -----Voltage: 120V~60Hz -----Wattage: 1500Watts -----Capacity of basket: 3.4 Quart -----Adjustable temperature: 175 400 -----Timer (0-30
FOOD WORKER CERTIFICATION MANUAL
 FOOD WORKER CERTIFICATION MANUAL MADISON COUNTY HEALTH DEPARTMENT Department of Environmental Health Phone: (859) 626-4249 Fax: (859) 626-4277 www.madisoncountyhealthdept.org TESTING SCHEDULE Richmond
User Guide HOLSEM-A2 LED DISPLAY.
 User Guide HOLSEM-A2 LED DISPLAY www.holsem.com Specification & Feature: -----Voltage:120V~ 60Hz -----Wattage: 1500Watts -----Capacity of basket: 3.4 Quart -----Adjustable temperature:170 400 -----Timer
Induction Fryer. Instruction manual. Model Modèle Modell Modello Modelo Malli: CP793
 Induction Fryer Instruction manual Model Modèle Modell Modello Modelo Malli: CP793 UK Safety Tips Position on a flat, stable surface. A service agent/qualified technician should carry out installation
Microwave Grill. Microwave Grill. with Grill Press Lid. OWNER S MANUAL For Model #KK-1502
 Microwave Grill with Grill Press Lid Microwave Grill with Grill Press Lid Should you have any problem, our friendly customer service staff is here to help you. 973-287-5176 Microwave Grill with Grill Press
3.4 QT Air Fryer. Owner s Manual. Save These Instructions - For Household Use Only Model: CM-17034
 3.4 QT Air Fryer Owner s Manual Save These Instructions - For Household Use Only Model: CM-17034 When using electrical appliances, basic safety precautions should always be followed. Do not use the Air
Operator s Manual. Frozen Beverage Granita Machines
 Thank you for purchasing this Vollrath equipment. Before operating the equipment, read and familiarize yourself with the following operating and safety instructions. SAVE THESE INSTRUCTIONS FOR FUTURE
Contents Introduction...4 Unpacking...4 Product Overview...5 Positioning the Fryer...6 Preparation...6 Cooking with the Fryer...
 DEEP FAT FRYER INSTRUC TION MANUAL C20FFW10 Contents Introduction... 4 Unpacking... 4 Product Overview... 5 Positioning the Fryer... 6 Preparation... 6 Removing the frying basket...6 Removing the lid...6
GCZNAF Manual Air Fryer. Instruction Manual Model Ref: GCZNAF1501
 GCZNAF1501 22072016 Manual Air Fryer Instruction Manual Model Ref: GCZNAF1501 Introduction Thank you for choosing the Cucina by Giani Manual Air Fryer. All products brought to you by Giani are manufactured
USER S GUIDE. Model:AF550. Air fryer HOUSEHOLD USE ONLY
 USER S GUIDE Model:AF550 Air fryer HOUSEHOLD USE ONLY Introduction Thank you for buying this top quality air fryer. You will now be able to cook a wide assortment of food in a healthier manner with little
Series HD9720-HD9727
 Series HD9720-HD9727 2 ENGLISH TABLE OF CONTENTS Important 3 Electromagnetic fields (EMF) 5 Introduction 6 General description 6 Before first use 8 Preparing for use 8 Placing the removable mesh bottom
Department of Code Administration And Development Services Environmental Health Division
 Department of Code Administration And Development Services Environmental Health Division 150 Dexter Court ELGIN IL 60120 Fax (847)931-6790 Brad Bohner, Public Health Coordinator (847) 931-5934 Tad Koeune,
Chatham-Kent Public Health Unit Special Events Food Vendor Package
 Chatham-Kent Public Health Unit Special Events Food Vendor Package Community-based special events are a great way for local organizations to bring people together and to add richness to our communities.
Body Fluid Clean Up Kit: Supplies to ensure personal protection from bloodborne pathogens and bodily fluids.
 GEORGIA DEPARTMENT OF JUVENILE JUSTICE Applicability: { } All DJJ Staff { } Administration { } Community Services {x} Secure Facilities (RYDCs and YDCs) Chapter 9: FOOD Effective Date: 8/1/17 Subject:
Southampton Craft Show Food Vendor Application Form
 Southampton Craft Show Food Vendor Application Form The following is to be completed by each food vendor and forwarded to the Grey Bruce Health Unit one week prior to the craft show. A Public Health Inspector
ROTISSERIE OVEN PROGRAM GUIDE
 ROTISSERIE OVEN PROGRAM GUIDE Goslyn, LP 1904 University Business Dr. #310 McKinney TX 75071 Phone: 888-648- 5040 Fax: 214-618- 3765 WWW.GOSLYN.COM DEC 2013 table of contents general overview 3 Installation
Gila River Indian Community Environmental Health Services (EHS) Guidelines for Temporary Food Establishments BOOTHS & TENTS
 Guidelines for Temporary Food Establishments BOOTHS & TENTS") Gila River Indian Community Environmental Health Services (EHS) Guidelines for Temporary Food Establishments PERMIT APPLICATION An application MUST be submitted to Environmental Health Services at least
Gila River Indian Community Environmental Health Services (EHS) Guidelines for Temporary Food Establishments PERMIT APPLICATION An application MUST be submitted to Environmental Health Services at least
INSTALLATION & OPERATIONAL MANUAL
 INSTALLATION & OPERATIONAL MANUAL 1HFD & HFC SERIES ELECTRIC FRYERS With KleenScreen PLUS Filtration Systems MODELS: 1HF50D 1HF85CF ML-136500 ML-136819 1HF85CF Shown - Computer Control ENERGY STAR Qualified
FLOOR FINISH. Extended Performance Floor Finish
 Assemble mop buckets. Fill two rinse mop buckets with clean water. If using an auto scrubber [for rinsing only] fill with clean water. Assemble two mop sticks with clean cotton mop heads. In one bucket
PF50 Series Portable Filtration Systems
 PF50 Series Portable Filtration Systems Operating Manual SERIES PF50 & PF50S Please read all sections of this manual and retain for future reference. Frymaster, a member of the Commercial Food Equipment
Owner s Manual PS-200
 Owner s Manual PS-200 Table of Contents Product Introduction Page 1 Explanation of Warning Messages Page 2 Danger Warning Chemical Hazard Personal Injury Requirements for Detergents and Sanitizers Page
Manchester Health Department 1528 Elm Street Manchester NH Tel: (603) , Fax: (603)
 , Fax: (603)") 1528 Elm Street Manchester NH 03101 Tel: (603) 624-6466, Fax: (603) 628-6004 TEMPORARY FOOD PERMIT APPLICANTS Enclosed are the requirements and an application for a permit to operate a temporary food establishment
1528 Elm Street Manchester NH 03101 Tel: (603) 624-6466, Fax: (603) 628-6004 TEMPORARY FOOD PERMIT APPLICANTS Enclosed are the requirements and an application for a permit to operate a temporary food establishment
Please read this manual carefully before you use the appliance and save it for future reference.
 The all new Kogan Air Fryer provides an easy and healthy way of preparing your favourite meals and snacks. By using hot rapid air circulation and a top grill, it is able to prepare a variety of tasty dishes
STAINLESS STEEL DEEP FRYER OWNER S MANUAL
 STAINLESS STEEL DEEP FRYER OWNER S MANUAL ITEM# 23245 Page 1 of 7 Thank you very much for choosing a Kitchener product! For future reference, please complete the owner s record below: Model: Purchase Date:
Smart Health Air Fryer VSLAF14LCD
 Smart Health Air Fryer VSLAF14LCD Introduction The Smart Health Air Fryer provides an easy and healthy way of preparing your favorite foods by using hot rapid air circulation. Using our Advanced Smart
Deep Fryer. Stainless Steel Electric
 Stainless Steel Electric Deep Fryer Delicious deep fried foods, fast and easy. Brushed stainless steel exterior. Anodized aluminum interior for fast, even heating. Space saving 1 liter size. Adjustable
Cleaning and Sanitation Procedures Module Cafe/Dining Restroom
 Cafe/Dining Restroom Restrooms Materials Requirement Planning A. Materials requirement planning (MRP) a. Clean rags b. Mop buckets and wringers c. Cotton wet mops and handles d. Dust mop and dustpan e.
Standard Operating Procedures (SOPs)
") Standard Operating Procedures (SOPs) for Food Business Operators Table of Contents 1. Employee Illness and Injury SOP... 4 2. Personal Hygiene SOP... 6 3. Hand washing and Glove Use SOP... 8 4. Purchasing
Standard Operating Procedures (SOPs) for Food Business Operators Table of Contents 1. Employee Illness and Injury SOP... 4 2. Personal Hygiene SOP... 6 3. Hand washing and Glove Use SOP... 8 4. Purchasing
Manual Air Fryer Instruction Manual Model Reference: GCHF-599
 IM-GCHF-59919022016 Manual Air Fryer Instruction Manual Model Reference: GCHF-599 Introduction Thank you for choosing the Cucina by Giani Manual Air Fryer. All products brought to you by Giani are manufactured
Installation and Operation Manual For Electric Fryers. Covering Models SE, SEH, SEM Series
 Installation and Operation Manual For Electric Fryers Covering Models SE, SEH, SEM Series Pitco Frialator, Inc., P.O. Box 501, Jct I-89 & I-93 Concord, NH 03302-0501 509 Route 3A, Bow, NH 03304 (603) 225-6684
Special Events Food Vendor s Requirements. The Health Department has been notified that you will be serving food/drinks at an event in Halton Region.
 Special Events Food Vendor s Requirements Dear Food Vendor: The Health Department has been notified that you will be serving food/drinks at an event in Halton Region. Each year, every food vendor must