E. F. G. H. I. J. K. L. M. Alternate Energy Technologies, LLC. P F
|
|
|
- Shauna Woods
- 5 years ago
- Views:
Transcription
 top or side connect tank. List of components: A.")


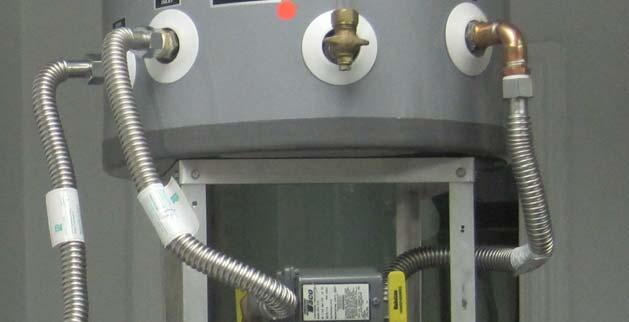
1 UDX No Sweat Kit instuctions The No Sweat Kit is intended to be used in conjunction with the AET s DB-10-10XC and DB-15-15XC on a 120 or 80 gallon OST (American Water Heater) top or side connect tank. List of components: A. One HX out assembly (12BCN, 3412BPA, 3490BE and 34X25BN) B. Three CC-34X18FF Stainless steel flex connects C. Two BV-75MXF ¾ male X female ball valves D. One 12BCN ½ brass close nipple E. One 3412BPA ¾ X ½ brass adapter F. Two 34BHN Hex brass nipple G. One 34FIPXMIP unionized brass female X male NPT 90 H. One 34X25BN ¾ x2.5 brass nipple I. Two each of IFS-75 ¾ Webstone Isolation Flange J. One Brass Tee 34BT K. One ¾ Brass Close Nipple 34BCN L. One PBRK-F pump bracket for Taco 009 M. Two Stainless steel self tapping screws A. B. C. D. E. F. G. H. I. J. K. L. M.

 D. & E. the ½ nipple and ½ to ¾ adapter go to the HX inlet. One of the F. brass hex nipples goes to the Drainback tank outlet. (fig.2) Fig 1 Fig 2 5.")
2 1. Assemble the tank stand that comes with the Drainback reservoir. (Directions are attached to the stand.) 2. Apply Teflon tape to all of the male threads on all the components and the dielectric nipples at the top of the storage tank. 3. Apply thread compound to the female pipe threads on the Drainback tank and the components. 4. Install the No Sweat components in proper orifices of the Drainback tank. A. The HX out Assembly is installed. (fig 1) D. & E. the ½ nipple and ½ to ¾ adapter go to the HX inlet. One of the F. brass hex nipples goes to the Drainback tank outlet. (fig.2) Fig 1 Fig 2 5. Install the sight glass fittings and pressure relief valve in the appropriate location. (Those fittings are standard with the Drainback tank, not part of this additional kit) 6. Install the other hex nipple (F.) in the outlet side of the 003 taco stainless steel pump. The inlet gets the male side of the unionized brass 90 (G.) Tip: the male side of (G.) has two spines on the inside that accept a special tool for tightening. If that tool is not available, a flat piece of steel and an adjustable wrench will work. The handle you will discard in step 9. works well for tightening this part. Note: always use Teflon tape and thread compound.

 of the storage tank. Then install the female part of part (G.) to the ball valve on the TO SOLAR, front left. This will allow you to attach the 003 Taco pump to the storage tank.")
. On the other install the bottom fill drain assembly. It is the brass tee, close nipple and boiler drain.")

3 7. Remove the nut that holds the handle in place on the male X female ball valves (C.) and flip the handle then reinstall the nut. Do this to both ball valves. Note: the stops do not work properly after this step but this is necessary for installation. Some installers will leave the handles off to prevent curious home owners from tampering with the system. 8. After installing the dip tubes that come with the American Water Heater in the proper locations (see chart) tighten the ball valves to the dielectric nipples on the front two top connects (TO SOLAR and FROM SOLAR) of the storage tank. Then install the female part of part (G.) to the ball valve on the TO SOLAR, front left. This will allow you to attach the 003 Taco pump to the storage tank. 9. The isolation flanges (I.) come with two sets of handles remove the stock straight handle and install the tee style handle. Note: the straight handle will no longer be needed. 10. On one isolation flange install a 2 brass nipple (H.). On the other install the bottom fill drain assembly. It is the brass tee, close nipple and boiler drain. NOTE: the boiler drain comes with the drainback tank and stand. 11. Remove the four bolts from the 009 Taco pump and turn the pump motor so the electrical connection cover is facing out. Now the arrow on the volute should be pointing down as in the picture below. 12. As you replace the bolts that hold the motor to the pump volute install the pump mounting bracket as shown. Note: Do not over tighten the bolts and use a cress-cross pattern. Wrist tight with a nut driver is plenty. Also, make sure the rubber gasket stays properly aligned. 13. With all the parts assembled as shown here and above you are ready to go to the job site. 14. With the tank in place or at least close to the final location attach the 009 pump to the side of the tank with the self tapping screws included in the kit. 15 Now attach the 003 pump to the union at the top of the tank. 16. Set the stand on top of the tank and place the drainback tank in place. 17. Finally install the stainless steel flex connects to the proper locations. Note it makes for a much cleaner installation if you use un-split insulation and install it before you make the final connections. Where this is not possible use quality insulation glue and a sharp knife to miter ends.

4
5 Dip Tube Placement Chart in American Water Heater Solar Tank Cold Water Feed from City Antisiphon Hole Open End From Tank TO Solar No Hole Open End Return From Solar Disbursing Holes Closed End
Instruction Sheet AquaMotionHot One AMH1K-1 Point of Use Hot Water Recirculation System
 Effective: 5/13/15 Supersedes: New IS-AM09-601 Instruction Sheet Point of Use Hot Water Recirculation System THANK YOU for purchasing a new Aquamotion Hot System! For optimum reliability and performance
TOWEL WARMERS ARE HEAVY! WE RECOMMEND THAT TWO PEOPLE INSTALL THE TOWEL WARMER!
 1. Please follow instructions carefully to ensure that the towel warmer is properly attached to the wall or floor. FAILURE TO FOLLOW THESE STEPS COULD RESULT IN PROBLEMS. 2. Do not use an abrasive or chlorine-based
215 Gallon Waste Oil Tank With Bypass Regulator Installation Instructions
 215 Gallon Waste Oil Tank With Bypass Regulator Installation Instructions Lanair Products LLC 4109 Capital Circle Janesville, Wisconsin 53546 1-888-370-6531 www.lanair.com BEFORE YOU BEGIN INSTALLATION...
Remote Water Quality System Standard Equipment (supplied by EPI) Remote Water Quality System Optional Equipment (supplied by EPI)
 Remote Water Quality System Optional Equipment (supplied by EPI)") Page 1 of 11 Parts List Remote Water Quality System Standard Equipment (supplied by EPI) 20sq ft Skimmer-Filter Remote Water Quality Plumbing Kit Heater-Controller Keypad Control 220V 3/4HP Circulation
Page 1 of 11 Parts List Remote Water Quality System Standard Equipment (supplied by EPI) 20sq ft Skimmer-Filter Remote Water Quality Plumbing Kit Heater-Controller Keypad Control 220V 3/4HP Circulation
HELIATOS Bottom Feed Connector Installation Instructions Introduction. Step 1
 Introduction The Bottom Feed solar water heater connector is meant to connect solar water heater panels directly to your existing standard water heater. It's main advantages are ease of installation, efficiency,
General System Layout Sketch
 General System Layout Sketch EZ-37 Solar Panels PV panel Glycol Fill Valve Expansion Tank ` 1 Introduction This document describes how to install a Heliatos GH type solar water heating system. These systems
BUILT-IN DISHWASHER INSTALLATION INSTRUCTIONS
 BUILT-IN DISHWASHER INSTALLATION INSTRUCTIONS PLEASE READ COMPLETE INSTRUCTIONS BEFORE YOU BEGIN LEAVE INSTALLATION INSTRUCTIONS AND USER'S GUIDE WITH OWNER ALL ELECTRIC WIRING AND PLUMBING MUST BE DONE
Hydrotherapy Jets (Remote Water Quality System)
") Page 1 of 6 Parts List (_) - 50 Roll of Flex PVC pipe 1-3/4 HP Circulating Centrifugal Pump 1 25 Roll of Flex PVC pipe 4-1 1 / 2 " Tees 2-1 1 / 2 " Ball Valves 2 - Female slip couplers 4-1/2" 90 degree
Page 1 of 6 Parts List (_) - 50 Roll of Flex PVC pipe 1-3/4 HP Circulating Centrifugal Pump 1 25 Roll of Flex PVC pipe 4-1 1 / 2 " Tees 2-1 1 / 2 " Ball Valves 2 - Female slip couplers 4-1/2" 90 degree
DRAIN WATER TEMPERING INSTALL
 ! WARNING! CAUTION DRAIN WATER TEMPERING KIT - 0601-00-07-86 WARNING! This kit should be installed only by qualified service personnel to reduce the risk of electric shock, serious injury, or fire. A plumbing
Installation and Operating Instructions
 Installation and Operating Instructions WaterQuick Pro II Advanced - Hot Water Circulation Pump WaterQuick Pro II Advanced Step 1. Choose the appropriate place to install the pump and Flow Monitor: WaterQuick
Acrylic Claw Foot Tub
 Acrylic Claw Foot Tub Wrench or socket Drill & Bits Parts Recommended 2-2 x12 boards 4 Lag Bolts 4 Flat Washers Be sure to re-inforce the floor before securing tub. We recommend 2-2 x12 s securely fastened
4-1 1 / 2 " Tees / 2 " hole saw w/ 1/4" drill bit / 2 " Male slip plugs
 Section 1: Parts List 1-50 Flex PVC pipe 2-1 1 / 2 " Ball Valves 4-1/2" 90 degree elbows 4 - Lengths of 1/2" PVC 4 - Jet bodies 4 - Jet nozzles 4 - Female slip/female slip unions 2 - Female slip/fpt union
Acrylic Claw Foot Tub
 Acrylic Claw Foot Tub Wrench or socket Drill & Bits Parts Recommended 2-2 x12 boards 4 Lag Bolts 4 Flat Washers Be sure to re-inforce the floor before securing tub. We recommend 2-2 x12 s securely fastened
WARNING DESCRIPTION PART NUMBER QTY PLUMBING, DYNATEMP DRAIN QUENCH BRACKET, THERMOSTAT DRAIN QUENCH
 ! WARNING WARNING: This kit should be installed only by qualified service personnel to reduce the risk of electric shock, serious injury, or fire. A plumbing permit and the services of a licensed plumber
TECHNICAL INSTRUCTIONS
 TECHNICAL INSTRUCTIONS 24-Month Maintenance Kit P/N 58015-02 For BMK2.0 (Nozzle Mix) Description of Document: This TID provides the procedures to perform recommended 24-Month maintenance on the following
HX Field Replacement Kit
 Quantity Kit Part Number Description PE 110 Natural Gas Stainless Steel Condensate Pan PT 110 Natural Gas Polypropylene Condensate Pan Model PE 110 LP Stainless Steel Condensate Pan PT 110 LP Polypropylene
JOHN DEERE GATOR HPX/XUV 2 PASSENGER HEATER INSTALLATION INSTRUCTIONS (p/n: 9PH20S30)
") P. 1 of 12 JOHN DEERE GATOR HPX/XUV 2 PASSENGER HEATER INSTALLATION INSTRUCTIONS (p/n: 9PH20S30) Item: Qty: Description: 1 2 1 x 1 x 5/8 Tee Fitting 2 2 Plastic Snap-in Hose Grommet 3 4 1-1/2" Hose Clamps
P. 1 of 12 JOHN DEERE GATOR HPX/XUV 2 PASSENGER HEATER INSTALLATION INSTRUCTIONS (p/n: 9PH20S30) Item: Qty: Description: 1 2 1 x 1 x 5/8 Tee Fitting 2 2 Plastic Snap-in Hose Grommet 3 4 1-1/2" Hose Clamps
WARNING. Failure to install this kit within the guidelines might adversely affect safety, performance, component life and warranty coverage.
 ! WARNING WARNING: This kit should be installed only by qualified service personnel to reduce the risk of electric shock, serious injury, or fire. A plumbing permit and the services of a licensed plumber
TECHNICAL INSTRUCTIONS
 TECHNICAL INSTRUCTIONS Benchmark 3.0LN 24-Month Maintenance Kit# 58015-04 This kit applies to units with an Ignitor and a separate gas injector. For units with an Ignitor-Injector (P/N 58023), see Kit
TECHNICAL INSTRUCTIONS
 TECHNICAL INSTRUCTIONS 24-Month Maintenance Kit P/N 58025-06 For BMK2.0LN Boilers Description of Document: This TID provides the procedures to perform recommended 24-Month maintenance on the following
A B A B4
 TM TM SERVICE INSTRUCTIONS Thermo-Aire Heater Kits and Air-Heater Assemblies 383808-A4 383808-B4 383880-A4 383880-B4 DESCRIPTION The Thermo-Aire Heater is used in situations where oils of heavier viscosity
PERFECT FIT IN-DASH HEAT/ COOL/ DEFROST FORD PICKUP
 specializing in AIR CONDITIONING, PARTS AND SYSTEMS for your classic vehicle PERFECT FIT IN-DASH HEAT/ COOL/ DEFROST 1960-66 FORD PICKUP CONTROL & OPERATING INSTRUCTIONS The controls on your new Perfect
PERFECT FIT IN-DASH HEAT/ COOL/ DEFROST PLYMOUTH BELVEDERE
 PERFECT FIT IN-DASH HEAT/ COOL/ DEFROST 1966-67 PLYMOUTH BELVEDERE CONTROL & OPERATING INSTRUCTIONS The controls on your new Perfect Fit system. Offers complete comfort capabilities in virtually every
/99 USA. Installation Manual SU Save These Instructions!
 46992 7/99 USA Installation Manual SU 160-200 Save These Instructions! TABLE OF CONTENTS 1 General Guidelines 3 2 Technical Data and Tank Connections 4 3 Transportation and Placement 5 4 Installation 6
Kallista Bath Flip Drain
 P21586 Page 1 of 7 THANK YOU FOR CHOOSING KALLISTA We appreciate your commitment to Kallista quality products. Please take a moment to review this manual before you install your Kallista product. If you
Parts & Material Included
 O² Hydro Well System Installation, Use & Care Guide Parts & Material Included 1. Funnel 11. Drain Line 21. Air Head 2. Media Tank Distributer Tube 12. Air Release 22. Drain Fitting 3. Air Tank Distributer
Pre-Fab Easy Installation For Model 0011-CF-USK Installation and Operating Instructions for Existing Homes Or Buildings with Standard Piping
 Instruction Sheet 102-153 Pre-Fab Easy Installation For Model 0011-CF-USK Installation and Operating Instructions for Existing Homes Or Buildings with Standard Piping Plant I.D. 001-1184 EFFECTIVE: June
READ CAREFULLY INSTALLATION INSTRUCTIONS AND SPECIFICATIONS FOR MODEL 3370-S
 INSTALLATION INSTRUCTIONS AND SPECIFICATIONS FOR MODEL 3370-S READ CAREFULLY MIRACO A DIVISION OF AHRENS AGRICULTURAL INDUSTRIES, INC. BOX 686 GRINNELL, IOWA 50112 PHONE 641-236-5822 TOLL FREE 1-800-541-7866
Allcan TM Installation Manual
 Allcan TM Installation Manual NOTICE: READ THESE INSTRUCTIONS CAREFULLY. FAILURE TO FOLLOW INSTRUCTIONS VOIDS WARRANTY. Introduction: The PHP Allcan (USA patent pending) is a complete primary/secondary
ULTIMATE REVERSE OSMOSIS SYSTEM
 ULTIMATE REVERSE OSMOSIS SYSTEM INSTALLATION INSTRUCTION & OWNER S MANUAL Ver 3.1 All Rights Reserved APEC Water Systems Please keep this Owner s Manual for future reference. It contains useful information
HOT WATER BOILER ( MBH)
") GAS-FIRED DIRECT VENT CONDENSING HOT WATER BOILER (25-200 MBH) Repair PARTS MANUAL P/N 24000523, Rev. C [09/08] TABLE OF CONTENTS I. Circulator Pumps (Optional)...2 II. Burner Assembly...3 III. Boiler
GAS-FIRED DIRECT VENT CONDENSING HOT WATER BOILER (25-200 MBH) Repair PARTS MANUAL P/N 24000523, Rev. C [09/08] TABLE OF CONTENTS I. Circulator Pumps (Optional)...2 II. Burner Assembly...3 III. Boiler
WM-450-PT WM-900-PT Commercial Wall Mounted Reverse Osmosis
 WM-450-PT WM-900-PT Commercial Wall Mounted Reverse Osmosis Installation And Service Manual Watts Pure Water 1725 W. Williams Dr. C-20., Phoenix, Arizona 85027 Phone: 888-774-7405 Fax: 602-588-0356 www.wattspurewater.com
13.2 Component Illustrations, Parts Lists, and Part Numbers
 Page 0 LAARS Heating Systems Section REPLACEMENT PARTS Use only genuine LAARS replacement parts.. General Information To order or purchase parts for the LAARS MagnaTherm Appliance, contact your nearest
Taco 00 Series Cartridge Circulators
 Water Circulation Pumps & Circulators Taco 00 Series Cartridge Circulators For over 70 years, Taco has led the industry with the highest quality circulators you can buy. Designed for a wide range of residential
SAN JUAN FRESH WATER COOLING SYSTEMS
 SAN JUAN FRESH WATER COOLING SYSTEMS 4.3-5.7 GI VOLVO Block Only Cooling, Mounted Off Engine Kit #V-111 Installation Instructions San Juan Engineering Heat Exchangers provide thermostatically controlled
Heat Exchanger Block Replacement Instructions
 Series 1-4 Gas-fired water boiler Heat Exchanger Block Replacement Instructions Ultra-80 S1-4 Heat Exchanger Block Replacement Kit, Part No. 383-500-773 Ultra-105 S1-4 Heat Exchanger Block Replacement
specializing in AIR CONDITIONING, PARTS AND SYSTEMS for your classic hi l PERFECT FIT SERIES IN-DASH HEAT/ COOL/ DEFROST FORD TRUCK
 specializing in AIR CONDITIONING, PARTS AND SYSTEMS for your classic hi l PERFECT FIT SERIES IN-DASH HEAT/ COOL/ DEFROST 1967-72 FORD TRUCK CONTROL & OPERATING INSTRUCTIONS The controls on your new Perfect
TECHNICAL DATA. Wet 26a. February 22, 2009
 February 22, 2009 Wet 26a 1. DESCRIPTION The Viking Alarm Check Valve serves as a check valve by trapping pressurized water above the clapper and preventing reverse flow from sprinkler piping. The valve
Installation and Operation Manual
 How To Install, Operate and Maintain Your Reverse Osmosis System FILTER CARTRIDGE CONFIGURATION MAY BE SUBJECT TO CHANGE. 475 PRO SERIES 475BP PRO SERIES INSTALLERS: PLEASE READ ALL INSTRUCTIONS BEFORE
Click here for a labelled version of above
 Click here for a labelled version of above Download Of This Page: Click Here to download this whole page. (773 Kb Adobe Acrobat File) Biodiesel Processor Diagram: Click Here to download a detailed diagram
ASSEMBLY and INSTALLATION INSTRUCTIONS. Pipe wrench Ratchet 3/8 socket 9/16 socket 11/16 socket 3/16 Allen key 3/32 Allen key 9/64 Allen key
 ASSEMBLY and INSTALLATION INSTRUCTIONS Gas Conversion Kit Tube Heaters View these instructions online at www.lbwhite.com Kit Contents: DESCRIPTION QTY. Instructions 1 Burner orifi ce 1 Manifold pipe 1
General System Layout Sketch
 General System Layout Sketch EZ-37 Solar Panels PV panel Can use Standard Copper, CPVC or PEX Pipes Pump Existing Water Heater Bottom Feed Connector 1 Introduction This document describes how to install
AQUAS POOL PACKAGE INSTALLATION INSTRUCTIONS FOR MODELS: AP AQUAS Pool Package
 100285340_2000542910_Rev A AQUAS POOL PACKAGE INSTALLATION INSTRUCTIONS FOR MODELS: AP 400-850 AQUAS Pool Package The AQUAS pool package system is a high efficiency commercial condensing boiler, pre-piped
TECHNICAL INSTRUCTIONS
 TECHNICAL INSTRUCTIONS 24-Month Maintenance Kit P/N 58025-04 For BMK3.0LN Boilers Description of Document: This TID provides the procedures to perform recommended 24-Month maintenance on the following
Settlement Agreement. Schedule 1: Covered Products
 Settlement Agreement Schedule 1: Covered Products COVERED PRODUCT BRANDS BRASSCRAFT PLUMBSHOP PEERLESS SOLUTIONS MASTER PLUMBER COVERED PRODUCT CATEGORIES - WATER SUPPLIES SUPPLY STOPS WATER SUPPLY CONNECTORS
Lavatory Faucet INSTALLATION INSTRUCTIONS P24490-CR, P24490-LV, P24491-CR, P24491-LV, P24492-CR, P24492-LV, P24700, P24705, P24706, P24736, P24800
 P24490-CR, P24490-LV, P24491-CR, P24491-LV, P24492-CR, P24492-LV, P24700, P24705, P24706, P24736, P24800 2018 1 of 7 KALLISTA THANK YOU FOR CHOOSING KALLISTA We appreciate your commitment to KALLISTA quality
PIPE DREAMS 96. Aeroponic Garden IMPORTANT:
 1 WARNING: BEFORE PUTTING WATER PUMP INTO OPERATION FILL UP NUTRIENT TANK TO TOP OF PUMP. THE PUMP MUST NEVER RUN DRY OTHERWISE, WARRANTY WILL BE DECLINED. READ FILLING INSTRUCTIONS BEFORE USE. Welcome
Installation. S19-320A (6' cable) S19-320D (12' cable) Flow Switch Alarm System. Table of Contents
 S19-320D (12' cable) Flow Switch Alarm System. Table of Contents") S19-320A (6' cable) S19-320D (12' cable) Flow Switch Alarm System Table of Contents Pre- Information....2 Assembly of Components....3....4 5 Testing the Alarm System....6 Troubleshooting...6 Strobe Flashtube
S19-320A (6' cable) S19-320D (12' cable) Flow Switch Alarm System Table of Contents Pre- Information....2 Assembly of Components....3....4 5 Testing the Alarm System....6 Troubleshooting...6 Strobe Flashtube
DISCONTINUED. Installation. S19-320A (6' cable) S19-320D (12' cable) Flow Switch Alarm System. Table of Contents
 S19-320D (12' cable) Flow Switch Alarm System. Table of Contents") S19-320A (6' cable) S19-320D (12' cable) Flow Switch Alarm System Table of Contents Pre- Information....2 Assembly of Components....3....4 5 Testing the Alarm System....6 Troubleshooting...6 Strobe Flashtube
S19-320A (6' cable) S19-320D (12' cable) Flow Switch Alarm System Table of Contents Pre- Information....2 Assembly of Components....3....4 5 Testing the Alarm System....6 Troubleshooting...6 Strobe Flashtube
Technical Data TYPE T14 & T14D TEMPERATURE PILOT SPENCE ENGINEERING COMPANY, INC. 150 COLDENHAM ROAD, WALDEN, NY SD 4511A T14 PILOT
 Technical Data SD 4511A SPENCE ENGINEERING COMPANY, INC. 150 COLDENHAM ROAD, WALDEN, NY 12586-2035 TYPE T14 & T14D TEMPERATURE PILOT PRINTED IN U.S.A. SD 4511A/9811 5 13 /16 D 4 7 /8 1 13 /16 T14 PILOT
TECHNICAL ASSISTANCE TOLL FREE TELEPHONE NUMBER TECHNICAL ASSISTANCE FAX:
 ACORN SAFETY P.O. BOX 3527 CITY OF INDUSTRY, CA 91744-0527 UNITED STATES OF AMERICA WWW.ACORNSAFETY.COM INSTALLATION, OPERATION AND MAINTENANCE INSTRUCTIONS ELECTRIC ALARM WITH LIGHT AND HORN Model: S0000-AL2-C1D1-DB1
propanel Series Installation Manual
 propanel Series Installation Manual propanel Series Installation Manual is published by Uponor Wirsbo 5925 148th Street West Apple Valley, MN 55124 (952) 891-2000 2003 Uponor Wirsbo All rights reserved
ARIN THERMOSTATIC SHOWER SYSTEM
 ARIN THERMOSTATIC SHOWER SYSTEM INSTALLATION INSTRUCTIONS Before installing, read entire shower system installation instructions. Observe all local building and safety codes. For the following installation
OptiSoft Softeners Simple Install Steps 1-17
 OptiSoft Softeners Simple Install Steps 1-17 (models OS-10, OS-13, OS-20 & OS-29) Refer to Installation, Operation & Maintenance Manual for More Details v Installation Requirements Installation must conform
IH091: Home Wastewater Disposal System Installation Instructions & Warranty Information
 IH091: Home Wastewater Disposal System Installation Instructions & Warranty Information The Environment One grinder pump is a well-engineered, reliable and proven product. Proper installation ensures years
General System Layout Sketch
 General System Layout Sketch SW-38 Solar Panel(s) Hot Water Cold Water PV panel Glycol RV Water Heater WITH built in Heat Exchanger Water Ports ` Glycol Fill Valve 1 Pump Solar Powered Expansion Tank Glycol
Ultra Boiler Series 1 & 2 Jacket Parts
 GAS Ultra Boiler Series 1 & 2 Jacket Parts 9 10 8 6 7 1 5 2 3 Fig. Part Description Model Mfr. 1 383-500-135 Jacket Front Door 595-000-000 595-000-001 595-000-002 595-000-003 Panel Door Jacket Plastic
INSTALLATION INSTRUCTIONS GEO PRIME TANK. (Patent Pending) GPC
 GPC") INSTALLATION INSTRUCTIONS GEO PRIME TANK (Patent Pending) GPC Table of Contents General Description 2 Installation 3 Flushing and Purging 5 Initial Start up 7 Adding or Checking Fluid 8 Replacing a Pump
INSTALLATION INSTRUCTIONS GEO PRIME TANK (Patent Pending) GPC Table of Contents General Description 2 Installation 3 Flushing and Purging 5 Initial Start up 7 Adding or Checking Fluid 8 Replacing a Pump
GV Series 4 Section Assembly
 GV Series 4 Section Assembly 192 Current Service Parts GV Series 4 Section Assembly Fig. No. Part No. Description Size Notes 1 322-200-280 Section Assembly, GV-3 (Repair Kit Required) 3 1 322-200-281 Section
PERFECT FIT SERIES IN-DASH HEAT/ COOL/ DEFROST MUSTANG
 specializing in AIR CONDITIONING, PARTS AND SYSTEMS for your classic vehicle PERFECT FIT SERIES IN-DASH HEAT/ COOL/ DEFROST 1965-66 MUSTANG CONTROL & OPERATING INSTRUCTIONS The controls on your new Perfect
INSTALLATION INSTRUCTIONS
 2008 Lennox Industries Inc. Dallas, Texas, USA INSTALLATION INSTRUCTIONS CH33 Series Units EVAPORATOR COILS 505,264M (65484504) 05/08 Supersedes 10/07 Litho U.S.A. RETAIN THESE INSTRUCTIONS FOR FUTURE
Weil-McLain part numbers are found in Weil-McLain Boilers and Controls Repair Parts Lists.
 gas-fired water boiler Manual Replacement parts Replacement parts must be purchased through a local Weil-McLain distributor. When ordering, specify boiler model and size and include description and part
AD Technical Bulletin
 AD Technical Bulletin Upgrade or Addition: Pressure Relief Valve Upgrade Date Introduced: Around 7/1/15 Machines Needing Upgrade: All Machines manufactured before 7/1/15 Description: The boiler pressure
INSTALLATION INSTRUCTIONS
 Please read carefully and retain for future reference. CONTENTS 1. Important Information 2. Included Parts 3. Filter Head Assembly Instructions 4. Installation Instructions 4.1. Auxiliary Tap Connection
User Manual / Care Instructions
 Product Code: MYWEO140 User Manual / Care Instructions PRODUCT #: MYWEO140 ITEM: Classic Wall Mount from Myson BRAND: Myson SOURCE FOR PURCHASE: SpaEquip, Inc. 211 Wappo Ave., Calistoga, CA 94515 p: 707.737.1100
Installation Instructions. For the 18 Built-In Dishwasher and Front Color Panels
 Installation Instructions For the 18 Built-In Dishwasher and Front Color Panels Printed in USA 154232102 Before You Begin DO NOT INSTALL DISHWASHER UNTIL YOU HAVE READ ALL INSTRUCTIONS. FOR YOUR SAFETY,
Weil-McLain part numbers are found in Weil-McLain Boilers and Controls Repair Parts Lists.
 Replacement parts Replacement parts must be purchased through a local Weil-McLain distributor. When ordering, specify boiler model and size and include description and part of replacement part. Results
TS40 Product Assembly & Service Information Manual
 TS40 Product Assembly & Service Information Manual MODEL: SERIAL NUMBER(S): MANUFACTURE DATE: Please review all the information in this manual before attempting assembly and/or maintenance. ASSEMBLY FOR:
Single-Control Lavatory Faucet
 P22740 P23201 P24407 1 of 5 Thank You For Choosing KALLISTA We appreciate your commitment to KALLISTA quality products. Please take a moment to review this manual before you install your KALLISTA product.
Installation Instructions
 Installation Instructions For the 18" Built-In Dishwasher Sears, Roebuck and Co. Sears Canada, Inc. Hoffman Estates, IL 60179 U.S.A. Toronto, Ontario, Canada M5B 2B8 154435201 Before You Begin DO NOT INSTALL
The Flush Kit: The perfect companion to Harvest Right home freeze dryers. The Flush Kit. User s Manual
 The Flush Kit: The perfect companion to Harvest Right home freeze dryers The Flush Kit User s Manual Freeze Dryer Accessories LLC 2608 W. 510 N. Hurricane, UT 84737 (435)215-5136 web: freezedryeraccessories.com
Single-Control Bathroom Sink Faucet
 P24407 1 of 5 THANK YOU FOR CHOOSING KALLISTA We appreciate your commitment to KALLISTA quality products. Please take a moment to review this manual before you install your KALLISTA product. If you encounter
CYCLONE XHE - MODEL BTH-300A/400A See Page 2
 POWERED ANODE ASSEMBLY See Page 8 COMMERCIAL WATER HEATER PARTS LIST Model BTH-300A Model BTH-400A Series 974/975 OPERATING CONTROL WIRING See Page 4 CYCLONE XHE - MODEL BTH-300A/400A See Page 2 GAS VALVE
PERFECT FIT IN-DASH HEAT/ COOL/ DEFROST 1968 CHEVROLET IMPALA
 specializing in AIR CONDITIONING, PARTS AND SYSTEMS for your classic vehicle PERFECT FIT IN-DASH HEAT/ COOL/ DEFROST 1968 CHEVROLET IMPALA CONTROL & OPERATING INSTRUCTIONS The controls on your new Perfect
OPERATION MANUAL ODS 300 ODS 310
 300 Series Oil Disposal Shuttle OPERATION MANUAL ODS 300 ODS 310 FM07-635J Table of Contents Safety... iii Chapter 1 Introduction...1 1.1 Introduction...1 1.2 Technical Support...1 1.3 Model Configuration
Dual Billet Bottle Bracket Assembly Instructions
 Nitrous Outlet 5427 N ST HWY 6 SUITE 1 WACO TX 76712 Dual Billet Bottle Bracket Assembly Instructions This product should only be installed by a professional who has extensive experience with nitrous systems.
WATER HEATER PARTS CTN. QTY.
 WATER HEATER PARTS Drip Pans & Accessories 40-0050 1 Bottom or side drain drip pan 30 & 40 gal. Capacity Styrene 40-0100 1 Bottom drain drip pan 30 & 40 gal. Capacity Aluminum 40-0110 1 Side drain drip
TECHNICAL INSTRUCTIONS
 TID-0004_0A TECHNICAL INSTRUCTIONS Hardware Procedure: Coil and Riser Replacement Procedures for All Styles of A, B, C, and D Indirect-Fired Water Heaters Applies to: Indirect-Fire Water Heaters. Description
INSTALLATION OF DURAVENT POLYPRO SINGLE WALL POLYPROPYLENE VENTING SYSTEMS
 SUPPLEMENT VENTING INSTRUCTIONS FOR INSTALLATION AND OPERATION INSTRUCTION MANUALS FOR THE FOLLOWING PRODUCT TYPES: HIGH EFFICIENCY CONDENSING COMMERCIAL, COMMERCIAL POWER DIRECT VENT, LIGHT DUTY COMMERCIAL
Description Model Weil-McLain part number. Vent Termination Kit for 3" Stainless Steel All
 Replacement parts Figure 96 Miscellaneous parts Description Model Weil-McLain part number Vent Termination Kit for 3" PVC All 383-500-397 Vent Termination Kit for 3" Stainless Steel All 382-200-430 Vent
Installation S
 Installation S59-2025 Thermostatic Mixing Valve (TMV25) with Optional Cabinet S59-2025RE (with Recess-Mounted Enamel Cabinet) S59-2025RS (with Recess-Mounted Stainless Steel Cabinet) S59-2025SE (with Surface-Mounted
PL Series Premier Indoor Plenum Coils
 IM-PLC-0667392-04 April 2016 PL Series Premier Indoor Plenum Coils Installation Instructions GENERAL ADP evaporator coils are designed for use with condensing units or heat pump units. These instructions
Venco 75mm (3 ) Standard and De-airing Pugmill
 Standard and De-airing Pugmill") Owner s manual for Venco 75mm (3 ) Standard and De-airing Pugmill Venco Products 29 Owen Road Kelmscott, Western Australia 6111 ph +61 8 9399-5265 fax +61 8 9 497 1335 email: venwest@iinet.net.au www.venco.com.au
Owner s manual for Venco 75mm (3 ) Standard and De-airing Pugmill Venco Products 29 Owen Road Kelmscott, Western Australia 6111 ph +61 8 9399-5265 fax +61 8 9 497 1335 email: venwest@iinet.net.au www.venco.com.au
Installer s Guide IMPORTANT INFORMATION Read This Document First On completion, sign and leave with owner
 IMPORTANT INFORMATION Read This Document First On completion, sign and leave with owner Pre Boosted Gas Solar Water Heater MP15 Models: DN15DS DL15DS DN15CS DL15CS Installation only by a licensed tradesperson
Series SFN Unbraided Flexible Hose Assemblies Series SFB Braided Flexible Hose Assemblies
 Series SFN Unbraided Flexible Hose Assemblies Series SFB Braided Flexible Hose Assemblies SprinkFLEX Stainless Steel Sprinkler Fittings connect the branch line to the sprinkler using a flexible stainless
PERFECT FIT SERIES IN-DASH HEAT/ COOL/ DEFROST CHEVROLET CHEVELLE/ EL CAMINO NOTE: INSTRUCTIONS DEPICT CHEVELLE
 specializing in AIR CONDITIONING, PARTS AND SYSTEMS for your classic vehicle PERFECT FIT SERIES IN-DASH HEAT/ COOL/ DEFROST 1964-65 CHEVROLET CHEVELLE/ EL CAMINO NOTE: INSTRUCTIONS DEPICT CHEVELLE CONTROL
SERVICE PARTS LIST for
 T-0PL Manual SERVICE PARTS LIST for MODELS AC0 & AC0 With BT Digital Display or 80P/8P Electronic Thermostat T-0PL REV. 06/0 0 Mobile Climate Control TABLE OF CONTENTS TABLE OF CONTENTS... i CONDENSER
Tier1 Water Home Filtration System
 Tier1 Water Home Filtration System Carbon+KDF Series OWNERS MANUAL BEFORE YOU BEGIN INSTALLATION, READ THIS ENTIRE MANUAL. FOLLOW THE INSTALLATION INSTRUCTIONS CAREFULLY. 1. Avoid pinched o-rings during
DRAINBACK DOMESTIC HOT WATER SOLAR SYSTEM WITH DIFFERENTIAL CONTROL MODELS SLCR60DC-80DB, SLCR64DC-80DB, SLCR80DC-80DB SLCR40DC-80DB & SLCR32DC-80DB
 DRAINBACK DOMESTIC HOT WATER SOLAR SYSTEM WITH DIFFERENTIAL CONTROL MODELS SLCR60DC-80DB, SLCR64DC-80DB, SLCR80DC-80DB SLCR40DC-80DB & SLCR32DC-80DB INSTALLATION MANUAL Solene 927 Fern St. Suite 1500 Altammonte
LP30 High Integrity Low Level Alarm Probe Installation and Maintenance Instructions
 4024750/9 IM-P402-44 AB Issue 9 LP30 High Integrity Low Level Alarm Probe Installation and Maintenance Instructions 1 General safety information 2 General product information 3 Installation 4 Wiring 5
Tap Master Artesian Hydro Gardener Series Installation & Service Manual
 Perfect Water Technologies 7 Tips for an Easy and Successful Installation 1. Keep it simple - there are 3 connections to make, and the tubing is color coded. 2. Have plenty of time, light, space, and towels
Armstrong J Series Float, Thermostatic Steam Traps, Condensate Controllers & Liquid Drainers Installation and Maintenance Manual
 Armstrong J Series, Thermostatic Steam Traps, Condensate Controllers & Liquid Drainers Installation and Maintenance Manual This bulletin should be used by experienced personnel as a guide to the installation
Eureka - Fall Maintenance Crew 2017 List of material for plumbing works for sealift 2017
 Eureka - Fall Maintenance Crew 2017 List of material for plumbing works for sealift 2017 Item Location /Description Ref Qty Price EOB-M23A General Mechanical Division 23 New Garage, Water Heater 1 3/4
REF. NO Clamp Assembly 8 1 set Gasket (4 per set) S.S. Lock-washer 3/8 x 1/ Brass Impeller 3.
 S.S. Lock-washer 3/8 x 1/ Brass Impeller 3.") 4.4 SUPPLY PUMPAK ASSEMBLY NOTE: This section applies only to systems, which include a supply pumpak. Only the H6, XA, and XC series systems contain a supply pumpak. If your system is a single zone, H6
4.4 SUPPLY PUMPAK ASSEMBLY NOTE: This section applies only to systems, which include a supply pumpak. Only the H6, XA, and XC series systems contain a supply pumpak. If your system is a single zone, H6
Model AV Alarm Valve With and Without Model RC-1 Retard Chamber European Conformity Valve Trim General Description
 Worldwide Contacts www.tyco-fire.com Model AV--00 Alarm Valve With and Without Model RC- Retard Chamber European Conformity Valve Trim General Description The TYCO Model AV--00 Alarm Valves DN, DN0, DN0,
A HEATER KIT With Diesel Engine Connection Fittings
 A-12142 HEATER KIT With Diesel Engine Connection Fittings Figure 1 (General Layout and Parts I.D.) Page 1 of 6 Read these instructions and identify all components. Please retain these instructions for
Series 47 and 247 Mechanical Water Feeders. Series 47-2 and Combination Mechanical Water Feeder/Low Water Cut-Off ! WARNING
 Series 47 and 247 Mechanical Water Feeders McDonnell & Miller Installation & Maintenance Instructions MM-316(C) Series 47-2 and 247-2 Combination Mechanical Water Feeder/Low Water Cut-Off Series 47 Water
USSC LLC 4 ONE LLC FIELD MODIFICATION INSTRUCTIONS
 and Retrofit of G2E Quick Release Cushion Upholstery 1 OF 32 A 1.0 PURPOSE: To replace both Back and Cushion Upholstery on the G2E seats. 2.0 Tools Required: 2.1 1/2 Socket and Wrench 2.2 5/8 Socket 2.3
! WARNING. Before using product, read and understand instructions.
 McDonnell & Miller Installation & Maintenance Instructions MM-607(B) Series FS7-4 Industrial Liquid Flow Switch (specified models only) Series FS7-4 OPERATION This control is an independently mounted water
STONE TROUGH CONSOLE SINK
 STONE TROUGH CONSOLE SINK INSTRUCTIONS CONTENTS Console Installation Sink Support 2 2 Backsplash 2 Undermount Sink Semi-Recessed Sink 3 4 Vessel Sink 5 Drain Installation 6 1 CONSOLE SINK Read entire Console