Installation record. Company Name: Installer Name: Address: License Number: Phone Number: Address: Installation Date Solar Loop.
|
|
|
- Ross Sullivan
- 5 years ago
- Views:
Transcription

1
2 Installation record Company Name: Installer Name: Address: License Number: Phone Number: Address: Installation Date Solar Loop Date Pressure Solar Loop ph Service Notes
3 USING THIS MANUAL This manual contains text boxes to warn of potentially hazardous or damaging situations. The following descriptions define the meaning of each text box: WARNING indicates a potentially hazardous situation which, if not avoided, could result in death or serious injury. CAUTION with the safety alert symbol indicates a potentially hazardous situation which, if not avoided, may result in minor or moderate injury. CAUTION used without the safety alert symbol indicates a potentially hazardous situation which, if not avoided, may result in property damage. 3
4 CONTENTS 1. General Information How It Operates System Component Overview System Diagram: Dimensions Connections and Components Installation Requirements Solar Collector elevation limitation: Storage Sizing guidelines: Collector Sizing Guidelines Evacuated Tube Collector sizing (Assuming 52mmx1800mm glass/glass tubes): Flat Plate Collector sizing (Assuming single layer glazing): Storage Tank Guidelines Expansion tank Closed loop vent Anti-scald valve Excess heat dump device Temperature Sensors Electrical Connections AC Power T1 Collector Sensor T2 Storage Bottom Sensor T3 Auxiliary Sensor (Storage TOP) Auxiliary Outputs AUX1 Tank Auxiliary Heating Thermostat AUX2 - Tank Auxiliary Heating / Cooling Thermostat Potable Loop Piping Connections Piping Materials Piping Arrangements Drain valve solar return / Cold water dip tube solar draw Using a specially ported storage tank Keep in mind that the storage tank required does NOT require an internal heat exchanger. Some solar storage tanks are available with internal heat exchangers. The SPS-1 series product line is designed for use with these tanks. Lower Element Port in/out Drain valve cold inlet in/out System flush Air elimination Solar Loop Piping Pump head basics Solar Loop line sizing EXAMPLE 1: EXAMPLE 2: Expansion tank / fittings Air eliminator / fittings Connections Piping to and from Collector(s) Pressure test System flush Insulation Pressure relief drain System controller functions Overview
5 6.2. Controller Indicators and Buttons Controller Basic Functions View Current Temperatures View Min/Max Temperatures Clock Display Adjusting Basic Setpoints: Manual Activation of AUX1: Pump Modes Controller Advanced Functions Sub-Menu...28 ı Advanced Configuration Functions Events Schedule Operating Modes Programming the events schedule Adjusting the Clock and day of the week Temperature Units Sub-Menu...34 ı 6.7. Controller troubleshooting System Startup and Operation Solar Loop Fluid Using a compression sprayer as a charge pump Charging Monitoring performance Operation Check System Maintenance Solar loop fluid check Potable loop heat exchanger fouling Expansion Tank check Air vent check Network Capability Electrical Diagram
6 1. General Information 1.1.How It Operates The SPS-2-AC / DC Solar Pump Station is a prepackaged solar hot water appliance that includes most components required for a solar hot water installation in a single appliance. The SPS-2-AC / DC forms the basis for a Closed Filled Loop system. It circulates a heat transfer fluid to the collectors and back to a heat exchanger, where the heat is transferred to the stored potable (drinkable) water for use. The solar loop is completely filled with fluid, and since it is exposed to outdoor temperatures, requires a non-freezing mixture of water and Propylene Glycol (not automotive antifreeze) in areas prone to freezing. In this closed filled loop system, there are two loops, or piping circuits. The solar loop runs from the solar collector and back, and the potable loop draws water from the storage tank and returns it warmer. The two loops are separate and do not mix, but both connect to the heat exchanger in the SPS-2-AC where heat is transferred from the solar loop to the potable loop. In the solar loop, the unit has the heat exchanger, a circulator pump, a pressure/temperature gauge, a pressure relief valve, fill and drain valves, and a check valve. In addition to the collectors, a fluid expansion tank and air vent is required to be installed external to the SPS-2-AC on the solar loop. For the potable loop, the unit contains the heat exchanger and a circulator pump. The SPS-2-AC also contains controls for powering the pumps when needed, monitoring for faults, and eliminating excess heat from the system if necessary. 1.2.System Component Overview A solar hot water system with the SPS includes the following major components Storage tank. This tank stores the solar heated water. Storage tank size is based upon need. Solar Collector(s). These collect solar energy and transfer the heat to a fluid pumped through them. The size and number of collectors is based upon the storage tank size. SPS-2-AC / DC Solar Pump Station. The Pump Station includes pumps and other components for the potable and the solar loops. Piping. Piping is required between the collector(s) and the SPS-2-AC, and between the SPS-2-AC / DC and the storage tank. Size and material is addressed later in this manual. Expansion tank. An expansion tank is required on the solar loop piping between the SPS-2-AC / DC and the collector(s) to absorb the expansion of the solar fluid as it is heated. Air vent / Eliminator. An air vent is required on the solar loop piping at the highest point to eliminate air from the closed loop. 6

7 1.3.System Diagram: 1.4.Dimensions 7
8 8
9 1.5.Connections and Components NETWORK PORT RS-485 SENSOR TERMINAL BLOCK CONTROLLER AC POWER CABLE PRESSURE/ TEMPERATURE GAUGE FROM COLLECTOR DRAIN VALVE TO COLLECTOR FILL VALVE TO STORAGE PRESSURE RELIEF VALVE FROM STORAGE 9
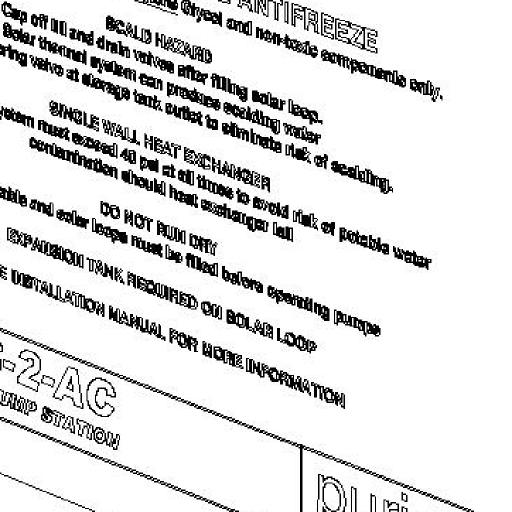
10 2. Installation Requirements 2.1.Solar Collector elevation limitation: The solar loop on the SPS-2-AC / DC has a pressure relief valve set to 40 PSI to eliminate or significantly reduce the possibility of contamination of the potable water from the solar loop. This pressure relief valve also limits the maximum elevation of the solar panels above the SPS unit. Since water has weight in the fluid lines, higher collectors increase the pressure at the bottom of the loop. It is therefore necessary that the solar collector(s) be less than 75 feet in elevation above the SPS system. 2.2.Storage Sizing guidelines: A solar thermal system should be sized to provide 100% of domestic hot water during the summer months. This way, it will not be necessary to dump a significant amount of excess heat in the summer. Storage tank size and collector(s) size are the two basic figures to be determined in sizing a solar hot water system. Tank size is based upon both usage and the ability to ride through periods of low sun. Typical daily hot water usage for a household is as follows: 20 Gallons of hot water for each of the first two people 15 gallons for each additional person. Size up to the next standard sized tank. For example, a family of four might require 20 x 2 = 40 plus 15 x 2 =30, or 70 gallons of hot water. A standard tank to fit this application might be 75 or 80 gallons. A family of two would only require about gallons of hot water storage. An increase in storage for a given usage will provide better performance during periods of low sun, but will also require an increase in collector area to provide fully heated water. An energy efficient home with low flow sinks and showerheads, energy efficient appliances and other measures will have lower the hot water requirements. 10
11 2.3.Collector Sizing Guidelines The SPS appliance is designed to be used with any of several types of collectors, including the most popular types, flat plate collectors and evacuated tube collectors. Collector manufacturers can provide accurate data for collector sizing. The following guidelines are for rough estimates only. Collector site, angle, shadows and other factors can affect these figures significantly Evacuated Tube Collector sizing (Assuming 52mmx1800mm glass/glass tubes): Cold Climates 0.6 tubes per gallon storage Mild Climates 0.5 tubes per gallon storage Warm Climates 0.4 tubes per gallon storage Flat Plate Collector sizing (Assuming single layer glazing): Cold Climates ft2 per gallon storage Mild Climates ft2 per gallon storage Warm Climates ft2 per gallon storage 2.4.Storage Tank Guidelines The SPS-2 will work with any conventional water heater as a solar storage tank. It is preferred to have a dedicated tank for solar storage, which will then act as a preheat tank for a second water heater or boiler. The second water heater may be electric, gas or other fuel, and may be conventional or instantaneous type. If instantaneous, then it must have modulating burners which vary heat input based upon the incoming water temperature. THE SPS-2 IS CURRENTLY TESTED FOR USE WITH UP TO 180 GALLONS OF STORAGE. Please consult with the factory before attempting to use this product with a larger volume of hot water storage. 2.5.Expansion tank An expansion tank is required on the solar loop to provide expansion for both fluid volume changes due to heating, and volume changes should the solar fluid boil out of the collector during power outages or other failures. The expansion tank size required is dependent upon several factors; Collector volume (in case of fluid boiling during over-temperature stagnation). The expansion tank must be able to accept at least the total volume of the collectors. This is usually the largest requirement for expansion tank volume. Piping System Volume (Fluid itself will expand 5-10% when heated) The expansion tank must be able to accept 10% of the total solar loop volume. Whichever of the above is greater should provide the basis for selection of an expansion tank. In cases where the result is close, select the next larger tank as a safety factor. 11
12 It is important to note that the expansion tank be sized based upon its acceptance volume and not its overall volume. The pre-charged diaphragm in the tank takes up some of the volume even when at the pre-charge pressure. The following lists standard expansion tank sizes and their acceptance volumes: SIZE ACCEPTANCE The fitting on the tank should face up to allow air to escape during system charging. The expansion tank should be charged with an air pump to a value equal to: Collector Elevation above Tank psi For example, for a 30 foot elevation (3-story building), the charge pressure should be 30/ = 18 psi. 2.6.Closed loop vent An automatic or manual air vent is required at the highest point in the collector loop piping to allow all air to escape so the loop will fill completely. Because the vent can blow off steam in the event of a malfunction in the system or a loss of electrical power the air vent should be located outside. It is recommended that the air vent be fitted with an isolation valve, as they are prone to failure after several years. A high quality air vent with all-metal construction is recommended. 2.7.Anti-scald valve An anti-scald must be installed in the potable water outlet of the solar storage tank to fixtures to minimize the possibility of scalding water. Please note that only true anti-scald point of use fixtures give 100% protection. SCALD HAZARD Solar thermal system can produce extremely hot water. Use a tempering valve at storage tank outlet to minimize risk of scalding. 2.8.Excess heat dump device A device to relieve the system of excess heat is required to prevent the potable water tank from overheating. Though the system will shut off the pumps at the over-temperature setpoint, this can cause damage to the solar fluid. The SPS-2 has output AUX2 on the back of the controller for powering the heat dump device if this is required. The supply is 120 VAC, 1A for the AC version and 12VDC, 1A for the DC version. Conduit connections are located on top of the box to accept standard Class2 AC control transformers such as Hammond BD2G to step down to lower AC voltages. The heat relieving device can be one of several types, below are examples: 12
13 Solenoid to drain. This is the simplest method, requiring a small solenoid valve that opens and dump hot water from the tank to a drain when thermostat temperature is reached. This will allow low temperature water to enter and cool the system. AUX2 must be programmed to operate the valve. Diverter valve + finned tube radiator / heat dissipator. A diverter valve such as V8044A1010 connected to the solar circulation loop containing a finned tube radiator or coil of tubing can be used to dump excess heat from the system. The loop should be connected to the solar loop circuit to take advantage of the existing closed loop controls (fill/drain valves, expansion tank, etc.) AUX2 must be programmed to operate the valve. Thermostatic valve on solar loop. A thermostatic valve is similar to a thermostat in an automobile, and opens at a set temperature. A three way thermostatic valve can be used to open a bypass at a set temperature. This method does not require the use of the controller thermostat circuit. 2.9.Temperature Sensors Temperature sensors are placed in or on the piping close to the collector outlet and at the bottom and top of the storage tank, with wires to the terminal block on the SPS-2. Temperature sensors are 10K-Ohm thermistors. SPECIAL SENSORS FOR EVACUATED TUBES Evacuated tube collectors can achieve extremely high temperatures (>200C) when stagnated during power outages. Due to the extremes of heat that can occur in evacuated tube manifolds, it is recommended that provided sensor is strapped to piping immediately adjacent to the hot out side of the collector manifold. 13
14 3. Electrical Connections Follow the electrical code requirements of the local authority having jurisdiction. In the absence of such requirements, follow the latest edition of the National Electrical Code ANSI/NFPA 70 in the U.S. or the latest edition of CSA C22.1 Canadian Electrical Code, Part 1, in Canada. When servicing or replacing parts within the SPS, label all wires prior to disconnection to facilitate an easy and error free reconnection. Wiring errors can cause improper and dangerous operation. Verify proper operation after servicing. 3.1.AC Power AC Power is provided by a standard 120 VAC grounded plug on an 8 ft cable. A receptacle should be provided for this connection. Do not use an extension cord. If local codes or the installation require fixed wiring to the AC supply, the strain relief may be removed and replaced with a ½ conduit hub connector. 3.2.T1 Collector Sensor Figure 1: Electrical Connection Locations The collector sensor is to be 10K-Ohm thermistor type. 14
15 It is to be installed in or on the hot water line at the outlet of the collector, as close to the collector as possible. The sensor should be well insulated and protected to obtain the most accurate reading possible. The collector sensor cable should be rated for the highest stagnation temperatures of the collector. Note that evacuated tube collectors can reach temperatures above 200C on stagnation. The supplied collector sensor is provided with a 6 ft cable, but will require extension wire to connect to the SPS-2 terminals. Extension wire should be 18 AWG, two conductor cable with a PVC jacket. Belden 8760 is recommended for indoor use or Belden 8428 for use outdoors. Solder the wire splices to ensure low resistance and durable connections. The storage sensor should be connected to the terminals marked Collector Sensor. Polarity does not matter. 3.3.T2 Storage Bottom Sensor The storage sensor is to be 10K-Ohm thermistor type. The storage sensor is to be connected to the storage tank at a point near the bottom of the tank. A typical location is connected to the lower heater element, which is not connected on solar storage tanks. The sensor should be in very tight and secure connection to the tank and be well insulated to obtain the most accurate reading possible. The storage sensor is provided with a 6 ft cable, and can often be directly connected to the SPS-2. If extra wire is needed then solder the splices to ensure accurate readings. The storage sensor should be connected to the terminals marked Storage Sensor. Polarity does not matter. 3.4.T3 Auxiliary Sensor (Storage TOP) The Auxiliary sensor is to be 10K-Ohm thermistor type. The Auxiliary sensor is to be connected to the storage tank at a point near the TOP of the tank. A typical location is connected to the upper heater element, which is typically not connected on solar storage tanks unless electricity is to supply the water heating backup. The sensor should be in very tight and secure connection to the tank and be well insulated to obtain the most accurate reading possible. The auxiliary sensor is used to control the auxiliary outputs of the controller. 3.5.Auxiliary Outputs In addition to the Pump output, the system is provided with 2 additional outputs for control of devices to add or extract heat from the storage tank AUX1 Tank Auxiliary Heating Thermostat AUX1 can be used to control an auxiliary heat source, such as the electric heating element of the storage tank, based upon the temperature at T3, and the setpoint SP2. In this way it functions as a thermostat for heating the storage tank. AUX1 is linked to an events schedule, which can be programmed for daily, weekly, or weekday schedules if desired. If it is desired for AUX1 to be on at all times that T3 is above SP1, the scheduler should be adjusted for continuous operation. See the Controller Programming section for more details. 15
16 The AUX1 output is sourcing power from the AUX1 terminal on the SPS-2. Connect to the load and connect the neutral lead from the load to the power source Neutral leg AUX2 - Tank Auxiliary Heating / Cooling Thermostat AUX2 can be used in one of several modes, depending upon system configuration. AUX2 can be used to control an auxiliary heat source, such as the electric heating element of a tank. In this way it is described at a thermostat for heating. AUX2 can also be used to control an auxiliary device for taking heat out of the tank, such as a radiant heat zone valve, pump, or solenoid valve. In this way it is described at a thermostat for cooling. Modes available for AUX2 include the following: Mode 0 Thermostat for cooling the storage tank. AUX2 output will energize when T3 > SP1 Mode 1 - Thermostat for heating the storage tank. AUX2 output will energize when T3 < SP1 Mode 2 - Thermostat for cooling the storage tank (as Mode 0), during an active event in the event schedule. Mode 3 - Thermostat for heating the storage tank (as Mode 1), during an active event in the event schedule Mode 4 - Cyclic timer with initial state on Mode 5 - Cyclic timer with initial state on during an active event in the event schedule The AUX2 output is sourcing power from the AUX2 terminal. Connect to the load and connect the neutral lead from the load to the power source Neutral leg. 16
17 4. Potable Loop Piping 4.1.Connections Connections are ½ copper unions with sweat connections. Remove the fittings from the SPS-2 before soldering. 4.2.Piping Materials Recommended tubing is 1/2 copper tubing for installations with 2 collectors, 3/4 copper tubing for installations with 3 collectors. 4.3.Piping Arrangements There are several acceptable methods to hook up potable water piping to a water storage tank: Drain valve solar return / Cold water dip tube solar draw. This method involves drawing potable water from a tee at the dip tube and returning solar heated potable water to the drain port. The cold water inlet to the tank is fed to the drain port This will draw and return the solar heated potable water to the lower portion of the tank allowing for optimized stratification and gradual heating. This method also minimizes tank modification and has proven to be as efficient as any other tank connection system Using a specially ported storage tank. Special tanks with additional ports for the external heat exchanger are available, such as the Rheem Solaraide and Marathon Solar Ported Tank Keep in mind that the storage tank required does NOT require an internal heat exchanger. Some solar storage tanks are available with internal heat exchangers. The SPS-1 series product line is designed for use with these tanks. Lower Element Port in/out This method requires modification to the lower heating element, or replacement using a special element adapter. Standard parts are available for many conventional water heaters Drain valve cold inlet in/out This method involves changing the drain valve to an assembly that includes potable outlet to SPS, potable return from SPS with and injector tube, and replaces the drain valve. The injector tube should inject solar heated water as high as possible into the tank to prevent mixing the tank. 4.4.System flush The piping should be flushed with TSP or other cleanser to remove flux residue and clean the piping. 17
18 4.5.Air elimination Before starting the pumps, it is important to get the air out of the potable loop. This is easily possible when the potable system has been pressurized by simply cracking the upper union fitting until a small amount of water comes out. DO NOT RUN PUMPS DRY. Rotor of pumps can overheat and fail quickly if run dry. 18
19 5. Solar Loop Piping 5.1.Pump head basics The SPS-2 solar loop pump provides pressure in the solar loop to push the fluid through the collector, lines, heat exchanger and fittings. This pressure is called head and is the driving force for flow in the loop. Opposing the pump head are frictional losses in the loop. These include the friction caused by the pipe itself as well as the restrictions of the fittings and heat exchanger. Variations in the solar loop piping therefore cause what is known as head loss. The pump head must overcome the head losses to produce adequate flow. The head pressure developed by the solar loop pump in the SPS-2 can be graphed in a pump curve. Larger diameter tubing produces a smaller amount of head loss, but costs more and reduces system efficiency since all the fluid in the tubing must be heated before useful energy can be delivered to the storage tank. For economy and efficiency, it is best to use the smallest size tubing that will provide adequate flow. It is also wise to design the piping run of the solar loop to be as short as possible, both to save tubing cost and to reduce head loss. Shorter tube runs produce less head loss. Below is a pump curve for the solar loop pump of the SPS-2: SOLAR LOOP PUMP HEAD PRESSURE HEAD PRESSURE FT head ft FLOW RATE GPM Figure 2: Solar Loop Pump Head Pressure If we assume that the heat exchanger, fittings and collector(s) produce about 1 ft H2O head loss, we can determine the required tube size for the solar loop. 19
20 5.2.Solar Loop line sizing The first step in determining line size for the solar loop piping is to determine the required flow rate for the collectors. This is available from collector manufacturer and is typically about 1 GPM per collector. Using the combined flow rate of all collector(s), refer to Figure 2: Solar Loop Pump Head Pressure to determine the head pressure available at this flow rate. Subtract 1 ft H2O to allow for heat exchanger, fittings, collector(s) head loss, and a correction factor for glycol (Head drop tables are based upon water). You will now have an available head pressure and flow rate. You can determine the solar loop line length by measuring the distance from SPS-2-AC to the collectors. A fairly accurate estimate is all that is required. Using these values, refer to Figure 4: Head Loss Chart - 1/2" ID Tube, and Figure 5: Head Loss Chart - 3/4" ID Tube to determine the minimum tube size required at the required flow rate. HEAD LOSS 3/8" TUBE HEAD LOSS ft H2O GPM FEET OF TUBING Figure 3: Head Loss Chart, 3/8" ID Tube (1/2 OD) 20
21 HEAD LOSS 1/2" TUBE HEAD LOSS ft H2O GPM 2 GPM FEET OF TUBING Figure 4: Head Loss Chart - 1/2" ID Tube (5/8 OD) HEAD LOSS 3/4" TUBE HEAD LOSS 1 GPM 2 GPM 3 GPM 4 GPM FEET OF TUBING Figure 5: Head Loss Chart - 3/4" ID Tube (7/8 OD) 21
22 5.2.1.EXAMPLE 1: (1) 30 tube evacuated tube collector. Recommended flow rate of.026 GPM per tube, or.78 GPM total. 100 foot total loop length Refer to Figure 2: Solar Loop Pump Head Pressure. It can be seen that with.78 GPM flow, there is about 10ft H2O head available from the SPS-2-AC pump. We then subtract 1 ft of head for fittings and heat exchanger losses and assume 9 ft H2O is available for line losses. Now looking at ½ tube on Figure 4: Head Loss Chart - 1/2" ID Tube, we see that ½ tube will allow 1 GPM flow rate to a length of over 200 ft, with a head loss of 6ft H2O. ½ tubing is a good choice for the application, but lets see if it can be done with 3/8. Now looking at 3/8 tube on Figure 3: Head Loss Chart, 3/8" ID Tube, we see that 3/8 tube will allow 1 GPM flow rate to a length of about 85 ft, with a head loss of our maximum 9ft H2O. Since the head loss at 100 ft length is above 10 ft H2O, the pumps could not push the fluid through the solar loop. If the solar loop line length was shorter than 85 ft, 3/8 tube would become an option EXAMPLE 2: (2) 3 x 8 flat plate collectors Recommended flow rate of 1 GPM per collector 80 foot total loop length Refer to Figure 2: Solar Loop Pump Head Pressure. It can be seen that with 2 GPM flow, there is about 8ft H2O head available from the SPS-2-AC pump. We then subtract 1 ft of head for fittings and heat exchanger losses and assume 7 ft H2O is available for line losses. Now looking at ½ tube on Figure 4: Head Loss Chart - 1/2" ID Tube, we see that ½ tube will provide the 2 GPM flow rate up to a length of about 70ft (from Figure 2). 5.3.Expansion tank / fittings The expansion tank must be rated for hot water service (240 F). It must be sized to absorb the expansion that will occur in the fluid volume contained in the collectors, piping and the SPS-2 unit. For longest service life it should be installed in the supply line running from the SPS-2 to the collectors. Follow the manufacturer s guidelines for sizing and orientation. Typically the fitting should be located on the top to allow air to escape easily. Install the expansion tank with nonhardening pipe dope that is rated to work with glycol solutions. 5.4.Air eliminator / fittings The air eliminator should be placed at the highest elevation in the system. Because the vent can blow off steam in the event of a malfunction in the system or a loss of electrical power the air vent should be located outside. 22
23 The air vent should be used with a baseboard tee with an internal scoop, to assist in air elimination. Many installers opt to include a Spirovent style air elimination device in the closed loop as well. These are effective in eliminating microbubbles that can merge to cause blockage of flow. Install the expansion tank with non-hardening pipe dope that is rated to work with glycol solutions. 5.5.Connections Connections are ½ copper unions with sweat connections. Remove the fittings from the SPS-2-AC before soldering. 5.6.Piping to and from Collector(s) Follow line sizing guidelines in the beginning of this section. Run lines through insulated space whenever possible. Slope lines towards SPS unit to assist in charging and servicing system. Avoid upward bends that create air pockets that can be difficult to remove during charging.. Recommended tubing is flexible copper refrigeration type tubing (note that flexible tubing does not follow standard sizes used with rigid copper.) Rigid ½ copper has an (OD) of 5/8. Rigid ¾ has an outer diameter of 7/8 5.7.Pressure test Pressurize the system with a garden hose and tap water by flushing into fill valve and out drain valve to remove most air from system, then shutting off fill AND drain valve and pressurizing slowly to 40 psi. DO NOT EXCEED 45 PSI on the solar loop or the pressure relief valve will vent. Watch for any pressure drop that will indicate a leak. If the pressure drops the leak will be evident. NOTE that the system can also be tested with air. 5.8.System flush The piping should be flushed with TSP or other cleanser to remove flux residue and clean the piping. It is possible to flush through the system with a garden hose and bucket to remove most particulate. 5.9.Insulation All portions of the solar loop inside and outside should be insulated to the greatest extent possible using materials that can withstand the highest temperatures produced by the selected collector(s). Outside the insulation should be covered with UV stabilized pvc shells to ensure optimal performance over many years. Piping exposed to outdoor temperatures should be insulated to R-6. Typically, open cell foam is not acceptable for these lines, and closed cell products such as Armaflex or Armaflex HT are better selections. PVC jacketed rigid fiberglass insulation is best on the first 20 feet of the tubing on evacuated tube collectors due to the higher possible temperatures they can genrerate.. 23
24 5.10.Pressure relief drain The pressure relief valve should be piped to within 6 of the floor, or according to local codes. Only a small amount of fluid will be contained in the solar loop. 24

25 6. System controller functions 6.1.Overview The SPS-2-AC controller performs several basic functions in a solar hot water system. Its primary function is that of a differential temperature controller. This means that it looks at the storage bottom temperature T2 and the collector temperature T1, and if T1 is greater than T2 by the programmed differential ON temperature DT, it turns on pumps to start flowing the solar loop and transferring solar heat to the storage tank. The pump will then turn off at the lower differential OFF setpoint. The controller also can be used to control two additional devices either add heat or relieve excess heat if the tank upper sensor T3 reaches [SP1] (AUX1) or [SP2] (AUX2) thermostat setpoints. AUX1 can only be used to add heat to the tank. If the temperature continues to rise above the maximum safe temperature of the tank setpoint [HT2], the system switches the pumps off and the HT2 error will be displayed. All setpoints are provided with hysteresis settings to prevent short cycling of the pumps or devices. 6.2.Controller Indicators and Buttons Refer to Figure 6: Controller Faceplate PUMP indicator AUX1 indicator AUX2 indicator SET button UP arrow button DOWN arrow Button Illuminates when the pump power is on. Illuminates when AUX1 is activated Illuminates when AUX2 is activated Used for menu navigation Used for menu navigation Used for menu navigation Figure 6: Controller Faceplate 25
26 6.3.Controller Basic Functions The controller includes two menus, basic and advanced. Access to basic menu involves pressing buttons on the faceplate for various time periods. The advanced menu is accessible by pressing buttons and entering a pass code. The basic menu allows reading the current temperatures, min/max temperatures, and clock time. It also provides access to common setpoints ı, and as well as selection of pump mode and AUX1 manual mode. The following chart describes the button presses required to access: PRESS QUICK 2 SECOND 10 SECOND UP SCROLL MIN/MAX TEMPS AUX1 MANUAL ON FOR TIME ı ı RE-PRESS AND HOLD TO RESET MIN/MAX SET CLOCK HR/MIN/DAY# ADJUST ı DOWN DISPLAY CURRENT TEMP ı REPRESS TO TOGGLE View Current Temperatures By pressing the DOWN button quickly (and repressing until desired sensor is reached), you can view the current temperatures for each sensor, as well as the current temperature differential. Note this is differential is NOT the differential temperature setpoint displaying the actual current value of T1-T View Min/Max Temperatures it is By pressing the UP button quickly, you can view the maximum and minimum temperatures (since last reset) for each sensor, as well as the minimum and maximum temperature differential. The controller will scroll through ı, showing the minimum, then maximum temperatures. If the UP key is re-pressed, the values are reset and the message will be shown on the display Clock Display To see the current clock time and date, press SET quickly The current hour (24 hour clock) will be displayed, followed by the minutes, and then the day of the week. For ease of understanding the menus, Day 1 should be set to Sunday, and day 7 to Saturday. ADJUST PUMP MODE 26
27 6.3.4.Adjusting Basic Setpoints: The following settings can be adjusted at the basic menu level by pressing the SET button for 2 seconds. Each Setpoint name will be displayed, followed by the current setpoint. Use the up and down buttons to adjust the setpoints as required, and press SET to store the value. Variable Description Values Default Celsius ı AUX1 Setpoint. AUX1 output will energize if S3 < SP1 Pump Mode AUX2 Setpoint. AUX2 output will energize if S3 < or > SP2 Overheat temperature for sensor T2. To shut down pumps when tank is too hot Manual Activation of AUX1: 6.4. AUX1 output can be manually overridden to ON for the time specified in function ı. Note that AUX1 will not turn on if ı is set to zero. Since AUX1 can only be used to add heat to the tank, this function would be useful to enable an auxiliary heating supply or heating element for a short period Pump Modes ı ı (See advanced menu.) (See advanced menu.) The following chart describes the basic pump modes available to adjust: Description Circulation pumps always OFF Circulation pumps always ON CAUTION PUMP DAMAGE WILL OCCUR IF PUMPS ARE NOT FILLED WITH FLUID. IT REQUIRES AT LEAST 15 SECONDS TO CHANGE MODE! Default Fahrenheit Circulation pumps operating in automatic mode WITHOUT sensor 3 temperature validation. In this mode the circulation pump will be activated only by the differential of temperature (T1-T2). Circulation pumps operating in automatic mode WITH sensor 3 temperature validation. In this mode the circulation pump will be activated by the differential temperature (T1-T2) as well as when the temperature at T1 is hotter than at T3. 27
28 6.5.Controller Advanced Functions Sub-Menuı the advanced menus, press UP and DOWN arrow buttons simultaneously for two seconds until appears (presses must be very closely timed), then release them. When appears, press SET button, and enter the menu codeı using the arrow buttons. When the code is in the display, press SET the pass code will be confirmed. Use the UP and DOWN arrow buttons to access the other functions in the Sub-menu and proceed in the same manner to adjust them. To leave each menu and return to normal operations, press SET button for a several seconds until appears. Several function submenus are available after the menu code ı has been accepted. Toggle between them and press SET to modify parameters in those menus. See the following sections for more details: Menu Menu Description Section Access Code Entry above Advanced Configuration Functions Events Planner Operating Mode Programming of the Events Schedule Adjustment of the clock and the day of the week
29 Function Advanced Configuration Functions When the Description menu is selected, the following variable can be adjusted: Default Default Celsius Fahrenheit 3 3 Indicator displayed sensor temperature (T1, T2, T3). This establishes the default temperature reading on the display Differential setpoint for turning on the pump (T1-T2) 8 14 ı Differential setpoint for turning off the pump (T1-T2) Value must be less than Minimum time for the pump off, in seconds. Prevents short cycling of pump. Temperature of T1 to turn the pump on. Can be used for freeze / slush protection. Overheat temperature for T1 to turn the pump off Can be used for protection of PEX solar loop piping (Note: Use of PEX piping and this function is not recommended) ı Overheated hysteresis for T1 to turn the pump back on. 1 1 Prevents short cycling of pump. Overheat temperature for T2 to turn the pump off Overheated hysteresis for T2 to turn the pump back on. 1 1 Prevents short cycling of pump. ı AUX1 Hysteresis. Prevents short cycling of AUX ı AUX1 Minimum setpoint Sets basic menu limits. ı AUX1 Maximum setpoint. Sets basic menu limits ı AUX1 Time, in minutes, for manual activation of AUX1 0 0 when basic menu manual mode is set. Set to 0 to disable manual override of AUX1. This could be used to run an electric element for a short period to add heat when using a single tank. AUX2 Mode of Operation Mode 0 Thermostat for cooling the storage tank.aux2 output will energize when T3 > SP1 Mode 1 - Thermostat for heating the storage tank. AUX2 output will energize when T3 < SP1 Mode 2 - Thermostat for cooling the storage tank (as Mode 0), linked to the event schedule. Mode 3 - Thermostat for heating the storage tank (as Mode 1), linked to the event schedule Mode 4 - Cyclic timer with initial state on Mode 5 - Cyclic timer with initial state on, linked to the event schedule
30 Function Celsius Fahrenheit Description Default Default Hysteresis of the AUX2 operation. Prevents short cycling of AUX Minimum setpoint of the AUX2 operation Sets basic menu limits. Maximum setpoint of the AUX2 operation Sets basic menu limits. Cyclical timer time on, in minutes 1 1 Cyclical timer time off, in minutes 1 1 Auxiliary Mode 0 0 Method for connecting the AUX outputs to the events agenda. AUX1 is only enabled with an event active. AUX2 can be linked or separated from the events schedule with Mode o AUX1 active with events 1,2,3,4 o AUX2 active with events 1,2,3,4 Mode ı o AUX1 active with event 1 o AUX2 active with events 2,3,4 Mode o AUX1 active with events 1,2 o AUX2 active with events 3,4 Mode o AUX1 active with events 1,2,3 o AUX2 active with event 4 ı Indication offset for the temperature of the T1, for calibration. 0 0 Indication offset for the temperature of the T2, for calibration. 0 0 Indication offset for the temperature of the T3, for calibration. 0 0 Address of the controller on the RS485 network, 1 to Events Schedule Operating Modes menu is selected, the following variables can be adjusted. These When the define the time basis for events programming. For ease of understanding the menus, note that day 1 is Sunday, and day 7 is Saturday. Days 2 through 6 are Monday through Friday. 30
31 31
32 32
33 Function Description ıı In this mode, the controller can configure up to 4 events for each individual day of the week. In this mode, the controller can configure up to 4 events for weekdays (days 2 though 6) and 4 different events for Saturday and Sunday (day 7 and 1). ı In this mode, the controller can configure up to 4 events to be used for all days of the week Programming the events schedule. Mode ıı ı The events schedule can be used to restrict the operation of the AUX1 or AUX2 outputs to specific time periods. For each defined time period, the ON/OFF times are set for the configured AUX outputs established with Function Menu function. AUX1 will only function during active events schedule time periods. If it is desired to have AUX1 active any time T3>SP1, then a continuous event should be set to enable the output at all times. AUX2 will only function during active time periods if variable Mode 2, 3 or 5. is set to modes 0, 1 and 4 disable the events schedule for AUX2 and allow it to operate any time that T3>SP2. Once the Events Schedule Operating Mode [section 6.5.2] has been selected, the Programming mode will adapt to the selected mode, and provide options for each available time period. The time periods available for each Mode option are defined below: Time Periods ı = Day 1 Sunday = Day 2 Monday = Day 3 Tuesday = Day 4 Wednesday = Day 5 Thursday = Day 6 Friday = Day 7 Saturday = Day 2 though 6, Monday through Friday = Day 7 Saturday ı = Day 1 Sunday ı= All days of the week, Day 1-7 are programmed the same. Up to 4 event times can be programmed for each Time Period. The start and end times of each event are configured using the following parameters: Function Description ı Start (ON) time for Event 1 ı End (OFF) time for Event 1 33
34 Start (ON) time for Event 2 End (OFF) time for Event 2 Start (ON) time for Event 3 End (OFF) time for Event 3 Start (ON) time for Event 4 End (OFF) time for Event 4 It should be clear that if the event to activate 4 event on and off times for 7 separate days. is ıı, then there are 8 x 7 times that can be set If all events are not required, they can be disabled by increasing the time until it reads If it is desired to have the event continue though midnight to the next day, increase the time until it reads. Also, configure the event for the next time period to begin at 00hr and 00min Adjusting the Clock and day of the week After entering the menu item, press the SET key and the settings will appear in the following order: Current Hour, Minutes, Day of the Week. Adjust as required using up and down arrows and press SET when complete. For ease of understanding the menus, Day 1 should be set to Sunday, and day 7 to Saturday. 6.6.Temperature Units Sub-Menu ı To enter the Temperature Units submenu to select Celsius or Fahrenheit units, follow the directions in section 6.5, but select code ı. Select the units desired (Celsius or Fahrenheit), and press SET. 6.7.Controller troubleshooting Controller errors are displayed on the screen as error codes. The following are failure / warning codes and their causes: Function ı ı Description T1 sensor (collectors) disconnected or out of range T2 sensor (tank bottom) disconnected or out of range T3 sensor (tank top) disconnected or out of range Temperature for sensor 1 is freezing Temperature for sensor 1 is overheated Temperature for sensor 2 is overheated Configuration parameters not programmed or out of range Circulation pump in manual ON mode Circulation pump in manual OFF mode 34
35 7. System Startup and Operation This section pertains to startup of the system after all lines have been installed and tested, and the system is properly installed electrically as well. ENSURE THAT THE POTABLE LOOP IS FILLED BEFORE PROCEEDING Before starting the pumps, it is important to get the air out of the potable loop. This is easily possible when the potable system has been pressurized by simply cracking the upper union fitting until a small amount of water comes out. It is then typically safe to run the potable pump, but listen to the pumps for changes in sound. If it goes from low pitch to high pitch and stays there, it may be a good idea to crack the union fitting again momentarily to ensure the pump is filled. DO NOT RUN DRY Both potable and solar loops must be filled before operating pumps 7.1.Solar Loop Fluid Solar loops fluid shall be distilled water with non-toxic propylene glycol freeze protection additives only. Refer to the manufacturers guidelines for diluting the glycol mixture to provide adequate freeze protection for your area. Note that the minimum dilution will provide higher efficiency, as water has a higher capacity to transfer heat than propylene glycol. DO NOT USE AUTOMOTIVE ANTIFREEZE Solar loop fluid must be water with Propylene Glycol and non-toxic components only 7.2.Using a compression sprayer as a charge pump 7.3.Charging A compression sprayer, sold at hardware stores for spraying herbicides and pesticides, can be used as a charge pump with minor modifications. Simply cut off the end of the spray hose just before the spray nozzle and fit it with a barb fitting to female hose bib adapter. The barb fitting should be pressed into the end of the spray hose and a clamp should be applied. The female hose bib will then attach to the fill valve on the SPS-2. Assembled charge kits are available from Purist Energy. The basic method of charging requires the air vent to be open and the drain valve closed. Hook up charge pump to the fill valve and pump the system full of fluid. When system pressure is up to 35 psi, as read on the SPS-2 pressure gauge, close the fill valve leave the pump attached. At this point both pumps should be filled with water either potable or solar, and it is safe to start the pumps manually to eliminate more air from the solar loop. Press the manual ON on the controller button and you should hear the pumps start. Run the pump as you observe the pressure gauge. If it drops below 35 psi, open the fill valve slightly with the pressurized charge pump on. Repressurize the 35
36 system to 35 psi. If air is eliminated from the top of the loop, it will drop the pressure and will require more fluid to maintain pressure. Repeat the pressurizing every 10 minutes for one hour and the line should be charged properly. After several hours of operation the system should be rechecked for pressure. SCALD HAZARD Cap off fill and drain valves after filling solar loop. Solar thermal system can produce scalding water. Use tempering valve at storage tank outlet to minimize risk of scalding. 8. Monitoring performance 8.1.Operation Check When the system has been installed, charged and brought into operation, it is simple to check functionality on a day with solar energy available. Feel the supply and return tubes to the collector and you should notice an increase in temperature on the return from the collector(s). If you do not, check the solar loop pressure and make sure it is still filled with fluid and at sufficient pressure to reach the top. 9. System Maintenance 9.1.Solar loop fluid check Propylene Glycol solar loop fluid will degrade with years of heating, and will degrade faster with overheating. Excessive temperatures (above 250 F) will cause propylene glycol solutions to degrade. These temperatures can occur during power outages on sunny days, or if heat dumping mechanism cannot eliminate excess heat at a sufficient rate. Solar Loop Fluid should be checked at least once per year using Litmus paper. ph should stay above 8.0 (slightly alkaline). If ph drops below this value it is advisable to replace the fluid and flush the system with water in through the fill valve and out the drain valve with a garden hose. The system then should be drained, flushed, and fluid replaced as described in section 7 System Startup and Operation. 9.2.Potable loop heat exchanger fouling Areas with high mineral content (hard) water will require a heat exchanger flush periodically depending upon the extent of the mineral concentration. If the water is known to have high mineral content, the potable loops should be flushed with vinegar or other solution for this purpose by disconnecting the unions to connect a flush source. To reduce the occurrence, a water conditioner should be installed on the potable water supply. 36
37 9.3.Expansion Tank check Expansion tanks usually have a lifetime of approximately 15 years. The expansion tank should be checked yearly for proper pressure and condition. 9.4.Air vent check 10.Network Capability Automatic air vents should be provided with isolation valves for ease of replacement. The air vent should be checked during system fluid check. The SPS-2 includes Serial Communications via an RS-485 conenction. Accessory adapters are available from Purist Energy to convert the RS-485 to RS-232 for connection to a Personal computer. Software is also available from Purist Energy to connect the SPS-2, (with adapter and connected PC) to the internet, allowing remote monitoring, control, and data logging of the system. 11.Electrical Diagram The electrical connection diagram is provided on the following page for reference. Please contact Purist Energy or your or an authorized service representative should any problems arise with system operation. 37
38 38


39 Manufac tu red by: Puris t Energy, LLC i s t ene rgy. com Technica l help : tech@puris t ene rgy. com 39
Your Solar Home Inc. SolarSheat Hot Water System. Installation, Operation and Maintenance Manual
 Your Solar Home Inc. SolarSheat Hot Water System Installation, Operation and Maintenance Manual Rev. 8.3 1 of 44 Table of Contents Section Description Page 1.0 The System 5 1.1 What is Included 5 1.2 What
Heat Transfer Products, Inc. 120 Braley Road East Freetown, MA The first totally integrated multiple boiler management control.
 Heat Transfer Products, Inc. 120 Braley Road East Freetown, MA 02717 The first totally integrated multiple boiler management control. USING THIS MANUAL USING THIS MANUAL A. INSTALLATION SEQUENCE Follow
INSTALLATION MANUAL GEO-BOOST GROUND LOOP HEAT EXCHANGER
 1103 N HIGH CROSS RD URBANA, IL 61802 1-773-492-1893 INSTALLATION MANUAL GEO-BOOST GROUND LOOP HEAT EXCHANGER REV 1.0 The Geo-Boost system consists of the Geo-Boost heat exchanger and a relay controller
Installation & Operation Manual Models: TSU
 TSU-I-O Rev A Installation & Operation Manual Models: TSU 150-940 CAUTION: This appliance is not intended for potable water. This manual must only be used by a qualified heating installer / service technician.
Product Instructions. Hydronic Mixing Block Version Wiring Terminal Block Pressure/Temperature Sensor Delivery Fitting (3) Display Screen
 Display Screen") Hydronic Mixing Block Version 1.104 The Hydronic Mixing Block is a mixing device and boiler control, with a built in circulator and system controller. The block can provide either a fixed or reset water
Hydronic Mixing Block Version 1.104 The Hydronic Mixing Block is a mixing device and boiler control, with a built in circulator and system controller. The block can provide either a fixed or reset water
INSTALLATION MANUAL GEO-BOOST GROUND LOOP HEAT EXCHANGER
 INSTALLATION MANUAL GEO-BOOST GROUND LOOP HEAT EXCHANGER Build Equinox support@buildequinox.com (773)-492-1893 Rev 2.0-05/10/2018 Build Equinox 2018 The Geo-Boost system consists of the Geo-Boost heat
Aqua Balance. AquaBalance TM CONTROL MODULE QUICK START GUIDE LEGEND
 Aqua Balance AquaBalance TM CONTROL MODULE QUICK START GUIDE 10 1 Domestic Hot Water temperature setpoint decreasing button 2 Domestic Hot Water temperature setpoint increasing button 3 Central Heating
User s Manual
 997-060180-4e User s Manual 8403-060 Menu Driven Display 1120-445 I. CONTROLLER OPERATION ADJUSTING TEMPERATURE (Temporary Override when in Programmable mode) 1. Before you can adjust the temperature,
INSTALLATION AND OPERATION MANUAL STEAM COIL BASE CONVECTION STEAMER MODEL SCX-16
 INSTALLATION AND OPERATION MANUAL STEAM COIL BASE CONVECTION STEAMER MODEL SCX-16 CROWN FOOD SERVICE EQUIPMENT LTD. 70 OAKDALE ROAD, DOWNSVIEW, (TORONTO), ONTARIO, CANADA, M3N 1V9 TELEPHONE: (416) 746-2358,
SOLARHOT. SuperVox. Description / Applications System Overview. Installation/ Owner s Manual
 SOLARHOT SuperVox Installation/ Owner s Manual Description / Applications System Overview The SOLARHOT SuperVox solar thermal glycol system. The SuperVox allows for easy installation of large solar water
TMC. Installation and Operation Manual TMC. Temperature and Pressure Monitoring for Heating and Cooling Applications. Temperature Monitoring Control
 Installation and Operation Manual Temperature and Pressure Monitoring for Heating and Cooling Applications Temperature Monitoring Control VALVE OPEN ALARM System= 128 o F Alarm At= 130 o F RESET /BACK
Product Manual SZ1009
 Product Manual SZ1009 Conventional Heating & Cooling Thermostats with Heat Pump Mode Communicating Thermostats Description The SZ1009 is a microprocessor-based mable thermostats designed for conventional
CAUTION. Installation Manual
 System Controller SC-301-6M CAUTION Installation Manual In order to use this product safely, read this installation manual carefully and follow the installation instructions. Potential dangers from accidents
Installation, Start-Up, and Operating Instructions
 Installation, Start-Up, and Operating Instructions CONTENTS Page SAFETY CONSIDERATIONS...1 GENERAL...1 INSTALLATION...1-5 Install Batteries...1 Select Transmitter Location (Optional)...1 Mount Transmitter
A hydronic system controls comfort by delivering heated or cooled fluid to the conditioned space through pipes.
 Introduction to Hydronics A hydronic system controls comfort by delivering heated or cooled fluid to the conditioned space through pipes. Hydronic heating systems use hot water or steam to deliver the
Use & Care Manual. Electric Tankless Water Heaters. With Installation Instructions for the Installer AP15447 (10/10)
") Use & Care Manual With Installation Instructions for the Installer Electric Tankless Water Heaters The purpose of this manual is twofold: one, to provide the installer with the basic directions and recommendations
Use & Care Manual With Installation Instructions for the Installer Electric Tankless Water Heaters The purpose of this manual is twofold: one, to provide the installer with the basic directions and recommendations
Solar Water Heaters. Bastián Acevedo Bustos. Electronic Engineering Student, Tarapacá University. Environmental Studies Student, York University
 Solar Water Heaters Bastián Acevedo Bustos Electronic Engineering Student, Tarapacá University Environmental Studies Student, York University Systems Active System Active systems use one or more pumps
Installation, Start-Up, and Operating Instructions
 Installation, Start-Up, and Operating Instructions IMPORTANT: Read entire instructions before starting the installation. SAFETY CONSIDERATIONS Read and follow manufacturer instructions carefully. Follow
INSTALLATION & MAINTENANCE MANUAL FOR QuickDraw
 INSTALLATION & MAINTENANCE MANUAL FOR QuickDraw SEMI-INSTANTANEOUS ENERGY: STEAM TO WATER U-TUBE SINGLE-WALL & DOUBLE-WALL HEAT EXCHANGERS FLOOR DRAIN Typical Construction Figure 34-1 FLOOR DRAIN 1. U-tube
- Data Brochure Universal Reset Module 422
 - Data Brochure Universal Reset Module 422 D 422 08/07 1 Information Brochure Choose controls to match application Application Brochure Design your mechanical applications 2 3 Rough-in Wiring Rough-in
union swing check valve spring loaded check valve purging valve pressure relief valve relief valve metered balancing valve
 VENT APPENDIX A: PIPING SYMBOL LEGEND GENERIC COMPONENTS CALEFFI COMPONENTS circulator circulator w/ ThermoBloc union circulator w/ swing check spring loaded balancing balancing w/ gate check globe s purging
- Data Brochure D 260. Boiler Control /09
 - Data Brochure Boiler Control 260 D 260 03/09 The Boiler Control 260 is designed to control a single stage heat source in order to provide outdoor reset or Domestic Hot Water () operation. The control
- Data Brochure Boiler Control 274
 - Data Brochure Boiler Control 274 274_D 03/17 The Boiler Control 274 operates up to four on/off boilers to provide outdoor reset operation, domestic hot water and setpoint operation with priority. When
CAH SERIES INSTALLATION & MAINTENANCE MODELS CAH CAH
 CAH SERIES INSTALLATION & MAINTENANCE MODELS CAH 33-44-50 CAH 49-54-70 CAH VARIABLE SPEED AIR HANDLERS DIMENSIONS... 3 TECHNICAL SPECS... 4 INSTALLATION DON TS... 5 INSTALLATION DO S... 6 FREEZE STAT REQUIRED
TWLC - Tempered Water Logic Controller. The Intelligent Control
 TWLC - Tempered Water Logic Controller The Intelligent Control Chiller Controls Features: Up to six (6) stages: individual board for each stage maximizes redundancy. Menu driven access and programming.
RC-112 Two Speed Heat Pump 3 Stage Heat / 2 Stage Cool With Energy Efficient Control
 O M N I S T A T ELECTRONIC COMMUNICATING THERMOSTAT Installation Manual RC-112 Two Speed Heat Pump 3 Stage Heat / 2 Stage Cool With Energy Efficient Control Document Number 13I00-5 November, 1997 CONTENTS
Bosch. Gas Condensing Boiler. Applications Manual. 100, 151 Combi Boiler 57, 100, 131, 151 Heating Boiler
 WARNING: Improper installation, setup, modification, operation or maintenance of the heating system can cause personal injury and property damage. Follow each appliances' instructions precisely. For assistance
INSTALLATION/OPERATING INSTRUCTIONS BCP-3. Hot Water Reset Control For up to 3 Boilers. How the BCP-3 operates... 1:4 1:3 1:2 1:1.
 INSTALLATION/OPERATING INSTRUCTIONS BCP-3 Hot Water Reset Control For up to 3 Boilers The BCP-3 establishes ambient comfort by varying the temperature of the heating system's circulating hot water in response
Rev B, 9/2/2009. Kodiak Chiller Overview
 930-0001 Rev B, 9/2/2009 Kodiak Chiller Overview Presentation Outline Phone: 781-933-7300 Lytron Technical Support Contact Information 3 Introduction 4 Part I: Unpacking 5 Part II: Installation 7 Part
INSTALLATION, OPERATION, AND MAINTENANCE MANUAL FOR THE HUBBELL MODEL JTX / JHX TANKLESS BOOSTER HEATER
 INSTALLATION, OPERATION, AND MAINTENANCE MANUAL FOR THE HUBBELL MODEL JTX / JHX TANKLESS BOOSTER HEATER ELECTRIC HEATER COMPANY * The Hubbell Model JTX is designed for use with conveyor and flight type
- Data Brochure Mixing Control 361
 TIME PRGM 1 2 AMPM UN OVR S M T W T F S - Data Brochure Mixing Control 361 D 361 05/00 The Mixing Control 361 is designed to control the supply water temperature to a hydronic system in order to provide
User s Information Manual
 User s Information Manual Gas-Fired Water Boilers With or without Aqua Logic (CWH) Now available Matching High Performance Companion Water Heater (Unit sold separately) If the information in this manual
USER'S INFORMATION MANUAL
 USER'S INFORMATION MANUAL WARNING: If the information in this manual is not followed exactly, a fire or explosion may result causing property damage, personal injury or loss of life. Do not store or use
User Manual Models: 502, 752, 1002, 1302, 1501, 1701, and 2001 Up To 5:1 Turndown
 PBX-PFX-USER Rev D User Manual Models: 502, 752, 1002, 1302, 1501, 1701, and 2001 Up To 5:1 Turndown If the information in this manual is not followed exactly, a fire or explosion may result causing property
INSTALLATION, OPERATION, AND MAINTENANCE MANUAL FOR THE HUBBELL MODEL JTX TANKLESS BOOSTER HEATER ELECTRIC HEATER COMPANY
 INSTALLATION, OPERATION, AND MAINTENANCE MANUAL FOR THE HUBBELL MODEL JTX TANKLESS BOOSTER HEATER ELECTRIC HEATER COMPANY Edition 2011 HUBBELL ELECTRIC HEATER COMPANY P.O. BOX 288 STRATFORD, CT 06615-0288
NAVIEN AMERICA INC FITCH AVENUE IRVINE, CALIFORNIA, USA
 Navien America Inc. Specification Details for the Navien models: CR-210 CR-210A For Indoor Installation Only For Potable Water Heating and Space Heating NAVIEN AMERICA INC. 17855 FITCH AVENUE IRVINE, CALIFORNIA,
GeyserWise MAX. Instruction manual. All in one hot water management
 GeyserWise MAX All in one hot water management Before operating and installation, carefully read all instructions. Do not discard this manual. DISPLAY The display is the feedback mechanism to the user
GOLD Plus 30/40/60/80
 PLUS Line Indirect-Fired Water Heaters Series 3 Manual Installation Startup Maintenance Parts PLUS 100/110/119 GOLD Plus 30/40/60/80 Plus 40/60/80 This manual must only be used by a qualified heating installer/service
SOLAR HOT WATER HEATERS
 ALTERNATIVE ENERGY SOLAR HOT WATER HEATERS Solar Hot Water The shallow water of a lake is usually warmer than the deep water. That's because the sunlight can heat the lake bottom in the shallow areas,
Manifold Installation Controller MIC-180. Installation and Operation Instructions
 Manifold Installation Controller MIC-180 Installation and Operation Instructions For Use With Rheem-Ruud and Paloma Commercial Tankless Water Heaters Table of Contents Safety Information... 1-2 Manifold
- Data Brochure Mixing Control 360
 - Data Brochure Mixing Control 360 D 360 03/09 The Mixing Control 360 is designed to control the supply water temperature to a hydronic system in order to provide outdoor reset or setpoint operation. The
CodeNotes. Solar Water Heating Systems Based on the 2015 International Solar Energy Provisions. Introduction. Solar Water Heating System Designs
 CodeNotes is provided courtesy of the ICC PMG Official Membership Council CodeNotes Solar Water Heating Systems Based on the 2015 International Solar Energy Provisions Introduction Solar water heating
Niles Steel Tank Hot Water Generator Installation and Operation Manual
 Niles Steel Tank Hot Water Generator Installation and Operation Manual Contents: Contents 1 Hazard definitions 1 1. General Information.... 2 Availability... 3 Optional Control Packages... 5 2. Installation....
Better Design, Better Control, Better Systems.
 Product Catalog Better Design, Better Control, Better Systems. At tekmar Control Systems, we believe the indoor comfort of a building depends on the performance of its heating, ventilating & air conditioning
INSTALLATION INSTRUCTIONS and OPERATING MANUAL. *Aquastat is a registered trademark of Honeywell International, Inc.
 MODEL 3200-Plus Temp Limit / LWCO Control with Thermal Targeting for Water Boilers 120 VAC Input / 24 VAC Burner Circuit PATENT. 8,931,708; 8,844,834; 7,891,572; others pending INSTALLATION INSTRUCTIONS
- Data Brochure Steam Control 279
 - Data Brochure Steam Control 279 D 279 12/07 The tekmar Steam Control 279 can operate a single on-off steam boiler or an on-off steam valve using outdoor reset. The control determines the on time of the
SB SERIES SE SERIES. Installation Operation Maintenance WITH BACK-UP HEAT EXCHANGER WITH BACK-UP ELECTRIC ELEMENT E113265
 E113265 Installation Operation Maintenance SB SERIES WITH BACK-UP HEAT EXCHANGER SE SERIES WITH BACK-UP ELECTRIC ELEMENT The solar energy system described in this manual, when properly installed and maintained,
Rooftop Thermostat Controller Specification and Installation Instructions. Model TRT2422
 ºF / º C Rooftop Thermostat Controller Model TRT2422 Description The TRT2422 is a combination controller and thermostat with a built-in scheduler, which is designed for simple and accurate control of single
Hydronic & HVAC Control Systems
 tekmar 218 Full Line Catalog Hydronic & HVAC Control Systems HVAC Multi-Staging Alternative Energy Zoning Snow Melting Setpoint tekmarcontrols.com tekmarcontrols.com Better Design, Better Control, Better
CodeNotes. Solar Water Heating Systems Based on the 2018 International Solar Energy Provisions (ISEP ) Introduction OFFICIAL
 Introduction OFFICIAL") CodeNotes is provided courtesy of the ICC PMG Official Membership Council OFFICIAL CodeNotes Solar Water Heating Systems Based on the 2018 International Solar Energy Provisions (ISEP ) Introduction Solar
CodeNotes is provided courtesy of the ICC PMG Official Membership Council OFFICIAL CodeNotes Solar Water Heating Systems Based on the 2018 International Solar Energy Provisions (ISEP ) Introduction Solar
USER'S INFORMATION MANUAL
 USER'S INFORMATION MANUAL WARNING: If the information in this manual is not followed exactly, a fire or explosion may result causing property damage, personal injury or loss of life. Do not store or use
INSTALLATION MANUAL AND OPERATING INSTRUCTIONS
 AMB4/AMB8 MULTIPLE BOILER SEQUENCERS INSTALLATION MANUAL AND OPERATING INSTRUCTIONS ARGO (Technical Support) 2201 Dwyer Avenue Utica, NY 13501 (Corporate Sales) 85 Middle Road An ISO 9001-2000 Certified
TABLE OF CONTENTS. NOTE: Read the entire instruction manual before starting the installation. TROUBLESHOOTING... 13
 R 410A Duct Free Split System Air Conditioner and Heat Pump Product Family: DFS4(A/H) System, DFC4(A/H)3 Outdoor, DFF4(A/H)H Indoor NOTE: Read the entire instruction manual before starting the installation.
L A signature series TA T N E RE O, A L L A T S IN
 signature series COMMERCIAL STEAM GENERATORS INSTALLATION, OPERATION AND MAINTENANCE MANUAL INSTALLATION MANUAL COMMERCIAL STEAM GENERATOR SIGNATURE SERIES (SS) INTRODUCTION Steam Sauna manufactures steam
Residential Gas Condensing Boiler Greenstar ZBR16/21/28/35/42-3A... ZWB28/35/42-3A...
 70 80 99-00-O Residential Gas Condensing Boiler ZBR//8/35/4-3A... ZWB8/35/4-3A... 70 80 993 (03/03) CA/US Operating Instructions Contents Contents Key to symbols and safety instructions............................
Boiler Demand Mix 1 Demand Mix 2 Demand DHW Demand Setpoint Demand
 Date Code - Data Brochure Universal Reset Control 374 D 374 10/03 The tekmar Universal Reset Control 374 is designed to maximize the comfort and effi ciency provided by a hydronic heating system. The control
INSTALLATION INSTRUCTIONS and OPERATING MANUAL. *Aquastat is a registered trademark of Honeywell International, Inc.
 MODEL 3200-Plus Temp Limit / LWCO Control with Thermal Targeting for Water Boilers 120 VAC Input / 24 VAC Burner Circuit PATENT. 8,931,708; 8,844,834; 7,891,572; others pending INSTALLATION INSTRUCTIONS
- 12 VDC. HHE M - 12 VDC.
 R OWNER S MANUAL Model Number HHE-200-09E - 12 VDC. HHE-500-09M - 12 VDC. OWNER S INFORMATION Owner s Name: Address: City: State: Zip Code: CUT HERE AND MAIL IN Telephone: E-mail Address: Motorhome Model:
TWINTEMP JR. HYDRONIC SYSTEM 2/2013
 TWINTEMP JR. HYDRONIC SYSTEM 2/2013 TwinTemp Description of Operation and Sequence of Operation Technical Description of Operation The TwinTemp systems provide quiet space heating utilizing liquid to air
GeyserWise MAX. Thermostat instruction manual. SANS 181 compliant. All in one hot water management
 GeyserWise MAX Thermostat instruction manual SANS 181 compliant All in one hot water management Before operating and installation, carefully read all instructions. Do not discard this manual. Index Warranty
INSTALLATION & MAINTENANCE MANUAL EZ PLATE INSTANTANEOUS WATER HEATER
 INSTALLATION & MAINTENANCE MANUAL EZ PLATE INSTANTANEOUS WATER HEATER Installation and service must be performed by a qualified service installer, service agency or qualified plumbing contractor. IMPORTANT:
PRE-ASSEMBLED RADIANT CONTROL PANEL INSTALLATION MANUAL
 FloorHeat PRE-ASSEMBLED RADIANT CONTROL PANEL INSTALLATION MANUAL Thank you for purchasing this radiant control panel assembly. Following are some important notes that will make the installation successful.
Models CHB/CCB APPLICATION GUIDE WALL MOUNTED GAS BOILER
 Models CHB/CCB APPLICATION GUIDE WALL MOUNTED GAS BOILER This manual has been prepared for use with the appropriate Installation, Operation and Maintenance Manual. For use with CCB/CHB Boilers ONLY. Manufactured
INSTALLATION INSTRUCTIONS & HOME OWNERS MANUAL AUTOBOOSTER IMPORTANT SAFETY INFORMATION
 INSTALLATION INSTRUCTIONS & HOME OWNERS MANUAL AUTOBOOSTER IMPORTANT SAFETY INFORMATION When installing or using any high voltage electrical appliance, basic safety precautions should always be followed.
Installation & Operation Manual Models:
 SJS-I-O Rev C Installation & Operation Manual Models: 60-119 : If the information in this manual is not followed exactly, a fire or explosion may result causing property damage, personal injury or loss
Service Manual Models:
 Models: 50-210 WARNING This manual must only be used by a qualified heating installer / service technician. Read all instructions, including this manual and the Knight Wall Mount Installation and Operation
Rev Pulse Modulating and Anti- Sweat Control (PMAC II Solo) Installation and Operation Manual
 Installation and Operation Manual") 026-1503 Rev 0 3-20-03 Pulse Modulating and Anti- Sweat Control (PMAC II Solo) Installation and Operation Manual 1640 Airport Road, Suite 104 Kennesaw, GA 31044 Phone: (770) 425-2724 Fax: (770) 425-9319
026-1503 Rev 0 3-20-03 Pulse Modulating and Anti- Sweat Control (PMAC II Solo) Installation and Operation Manual 1640 Airport Road, Suite 104 Kennesaw, GA 31044 Phone: (770) 425-2724 Fax: (770) 425-9319
HOMEADVANTAGE II IMPORTANT SAFETY INFORMATION
 INSTALLATION INSTRUCTIONS & HOME OWNERS MANUAL HOMEADVANTAGE II HA008240 HA011240 HA013240 HA018240 HA024240 HA027240 HA036240 IMPORTANT SAFETY INFORMATION When installing or using any high voltage electrical
ARGO (Technical Support) 2201 Dwyer Avenue Utica, NY (Corporate Sales) 85 Middle Road
 2201 Dwyer Avenue Utica, NY (Corporate Sales) 85 Middle Road") ARGO (Technical Support) 2201 Dwyer Avenue Utica, NY 13501 (Corporate Sales) 85 Middle Road An ISO 9001-2000 Certified Company Dunkirk, NY 14048 www.argoindustries.com P/N 240005498A, Rev. 1.5 [02/07]
ARGO (Technical Support) 2201 Dwyer Avenue Utica, NY 13501 (Corporate Sales) 85 Middle Road An ISO 9001-2000 Certified Company Dunkirk, NY 14048 www.argoindustries.com P/N 240005498A, Rev. 1.5 [02/07]
User s Manual. TIGER S EYE E-Series Mark V Jockey. TIGERFLOW Systems, Inc Mint Way Dallas, Texas
 User s Manual TIGER S EYE E-Series Mark V Jockey TIGERFLOW Systems, Inc. 4034 Mint Way Dallas, Texas 75237 214-337-8780 www.tigerflow.com TABLE OF CONTENTS Introduction... 4 Sequence of Operation... 5
USER'S INFORMATION MANUAL
 USER'S INFORMATION MANUAL WARNING: If the information in this manual is not followed exactly, a fire or explosion may result causing property damage, personal injury or loss of life. Do not store or use
be liable for any other loss or damage, whether direct, indirect, incidental or consequential.
 Integrated HydroStat 3200-Plus for Slant Fin Boilers Part No. 48-3200-03 and 48-3200-04 120 VAC Input / 24 VAC Burner Circuit PATENT S. 8.391,708; 7,891,572; 8,844,834; Others Pending INSTALLATION INSTRUCTIONS
THE HEATING BOX. Training Manual. Model KD-HBO100 & KD-HBC100. * KD-HB100 (Open-Loop System) * KD-HBC100 (Close-Loop System)
 * KD-HBC100 (Close-Loop System)") THE HEATING BOX Training Manual Model KD-HBO100 & KD-HBC100 * KD-HB100 (Open-Loop System) * KD-HBC100 (Close-Loop System) Automatic Hot Water Management System A Combination System for Domestic Water and
THE HEATING BOX Training Manual Model KD-HBO100 & KD-HBC100 * KD-HB100 (Open-Loop System) * KD-HBC100 (Close-Loop System) Automatic Hot Water Management System A Combination System for Domestic Water and
INSTALLATION, OPERATION, AND MAINTENANCE MANUAL FOR THE HUBBELL MODEL TX / HX TANKLESS WATER HEATER
 INSTALLATION, OPERATION, AND MAINTENANCE MANUAL FOR THE HUBBELL MODEL TX / HX TANKLESS WATER HEATER ELECTRIC HEATER COMPANY Edition 2012A HUBBELL ELECTRIC HEATER COMPANY P.O. BOX 288 STRATFORD, CT 06615-0288
User s Information Manual
 User s Information Manual Series 2 Models 1000-2000 MBH Commercial Condensing Gas-fired water boilers If the information in this manual is not followed exactly, a fire or explosion may result, causing
RC-101 Heat Pump Real Time Pricing System 2 Stage Heat / 1 Stage Cool
 O M N I S T A T ELECTRONIC COMMUNICATING THERMOSTAT Installation Manual RC-101 Heat Pump Real Time Pricing System 2 Stage Heat / 1 Stage Cool Document Number 13I00-4 January, 1997 Copyright 1997 Home Automation,
TRI-PLATE B INSTALLATION, OPERATION, AND MAINTENANCE INSTRUCTIONS PART NO EFFECTIVE MARCH 1, 1983 REPRINT APRIL 16, 1999
 TRI-PLATE B INSTALLATION, OPERATION, AND MAINTENANCE INSTRUCTIONS PART NO. 8801469 EFFECTIVE MARCH 1, 1983 REPRINT APRIL 16, 1999 THE MILK COOLING SYSTEMS SPECIALISTS TM FRE-HEATER Part No. 8801469 Table
Installation Requirements for Models:
 900 & 9100 Series Refrigerators Installation Requirements for Models: 9162 9163 9182 9183 962 963 982 983 WARNING Improper installation, adjustment, alteration, service, or maintenance can cause injury
- Data Brochure tekmarnet 4 Thermostat 542e
 - Data Brochure tekmarnet 4 Thermostat 542e D 542e 03/08 1 Information Brochure Choose controls to match application 2 Application Brochure Design your mechanical applications 3 Rough In Wiring Rough-in
Programmable Interactive User Manual
 67504B 02/16 (ALA) DH E RT 102/BW Programmable Interactive User Manual www.schluter.com 1. Contents 2. Menu Overview..............3 3. Introduction................ 4 4. General Operation............5 4.1.Navigation
INSTALLATION INSTRUCTIONS & HOME OWNERS MANUAL ECO 18 ECO 24 ECO 27 IMPORTANT SAFETY INFORMATION
 INSTALLATION INSTRUCTIONS & HOME OWNERS MANUAL ECO 18 ECO 24 ECO 27 IMPORTANT SAFETY INFORMATION As when installing or using any high voltage electrical appliance, basic safety precautions should always
TCA-9102 Series Surface Mount Temperature Controllers with High and Low Alarm
 TCA-9102 Series Surface Mount Temperature Controllers with High and Low Alarm General Description & Applications The TCA-9102 Series Temperature Controller with Alarm offers a versatile solution for a
INSTALLATION INSTRUCTIONS GEO PRIME TANK. (Patent Pending) GPC
 GPC") INSTALLATION INSTRUCTIONS GEO PRIME TANK (Patent Pending) GPC Table of Contents General Description 2 Installation 3 Flushing and Purging 5 Initial Start up 7 Adding or Checking Fluid 8 Replacing a Pump
INSTALLATION INSTRUCTIONS GEO PRIME TANK (Patent Pending) GPC Table of Contents General Description 2 Installation 3 Flushing and Purging 5 Initial Start up 7 Adding or Checking Fluid 8 Replacing a Pump
Operation and Maintenance Haskris LX-Series, R-Series, WW-Series, OPC-Series
 Section 1: Temperature Control Your Haskris will have one of three different types of controller. Use table 1-1 to identify the relevant controller. The controller may appear different than examples. Contact
USER S INFORMATION MANUAL
 USER S INFORMATION MANUAL HOT WATER HEATING BOILERS DOMESTIC WATER HEATERS 150,000-300,000 Btu/hr MODELS EB-EWU-02 IMPORTANT INSTALLER - AFFIX INSTALLATION MANUAL ADJACENT TO THE BOILER CONSUMER - RETAIN
INSTALLATION INSTRUCTIONS AND OWNER S MANUAL FOR
 INSTALLATION INSTRUCTIONS AND OWNER S MANUAL FOR ELECTRIC ON-DEMAND TANKLESS WATER HEATERS: SpecAdvantage with PhD Technology SafeAdvantage with PhD Technology 208 and 480 VAC three phase 32 144 kw 600
Instruction Sheet. Press & Hold: Item, to view settings, to test. 24 V ±10% 50/60 Hz 3 VA 120 V (ac) 5 A 1/6 hp pilot 240 VA 20 to 260 V (ac) 2 VA
 5 A 1/6 hp pilot 240 VA 20 to 260 V (ac) 2 VA") Instruction Sheet PC2 1 Two Stage Reset & Control SUPERSEDES : 102-106, dated June 1, 2000 EFFECTIVE: March 1, 2004 Plant ID# 9300-1059 Item 102-106 The PC2-1 is a microprocessor-based control designed
Instruction Sheet PC2 1 Two Stage Reset & Control SUPERSEDES : 102-106, dated June 1, 2000 EFFECTIVE: March 1, 2004 Plant ID# 9300-1059 Item 102-106 The PC2-1 is a microprocessor-based control designed
PRO SERIES IMPORTANT SAFETY INFORMATION
 INSTALLATION INSTRUCTIONS & HOME OWNERS MANUAL PRO SERIES IMPORTANT SAFETY INFORMATION When installing or using any high voltage electrical appliance, basic safety precautions should always be followed.
B-40/B-41 Modulating Temperature Controller
 INSTALLATION & OPERATING INSTRUCTIONS B-40/B-41 Modulating Temperature Controller For Raytherm Boilers & Water Heaters H2 514-4001 WH2 2100-4001 Catalog No. 5000.70 Effective: 12-21-11 Replaces: NEW P/N
... Green Building Details
 Combining Solar HW with Radiant Floor using a Demand Water Heater back-up and a Tempering Tank with a line voltage three-way valve to prevent heating the solar storage with the gas DHW... A short list
INSTALLATION and OPERATION MANUAL DIRECT STEAM KETTLES MOUNTED ON ELECTRIC BOILER BASE CABINET MODELS: EMT-6 EMT-10 EMT-12 EMT-6-6 EMT-10-6 EMT-10-10
 INSTALLATION and OPERATION MANUAL DIRECT STEAM KETTLES MOUNTED ON ELECTRIC BOILER BASE CABINET MODELS: EMT-6 EMT-10 EMT-12 EMT-6-6 EMT-10-6 EMT-10-10 CROWN FOOD SERVICE EQUIPMENT LTD. 70 OAKDALE ROAD,
ProLine XE Combi Boiler
 100298581_2000552611_Rev A ProLine XE ProLine XE User Manual Models: 110-150 - 199 If the information in this manual is not followed exactly, a fire or explosion may result causing property damage, personal
SAMPLE MANUAL - INSTALLATION - FOR REFERENCE ONLY. ChemScan mini Analyzer. Parameter. Method #### Installation, Operation & Maintenance Manual
 Parameter Method ####, Operation & Maintenance Manual Rev 3/26/2018 Contact Information Document Information Customer Name: Plant Name/Location: Date: Analyzer Serial #: ASA, Inc. (Applied Spectrometry
EW 40 Wireless Fan Control
 Installation & Operating Manual EW 40 Wireless Fan Control USA CAN Product Information... Chapters 1 + 2 Mechanical Installation... Chapter 3 Electrical Installation... Chapter 4 Start Up and Configuration...
General System Layout Sketch
 General System Layout Sketch EZ-37 Solar Panels PV panel Glycol Fill Valve Expansion Tank ` 1 Introduction This document describes how to install a Heliatos GH type solar water heating system. These systems
ЭКСПЛУАТАЦИЯ И МОНТАЖ ПРОТОЧНЫЕ ВОДОНАГРЕВАТЕЛИ С ЭЛЕКТРОННЫМ УПРАВЛЕНИЕМ
 ЭКСПЛУАТАЦИЯ И МОНТАЖ ПРОТОЧНЫЕ ВОДОНАГРЕВАТЕЛИ С ЭЛЕКТРОННЫМ УПРАВЛЕНИЕМ OPERATION 1. General information 2 1.1 Safety information 2 1.2 Other symbols in this document 3 2. Safety 3 2.1 Intended use 3
INSTALLATION, OPERATION, AND MAINTENANCE MANUAL FOR THE HUBBELL TANKLESS WATER HEATER
 INSTALLATION, OPERATION, AND MAINTENANCE MANUAL FOR THE HUBBELL TANKLESS WATER HEATER ELECTRIC HEATER COMPANY Edition 2016A HUBBELL ELECTRIC HEATER COMPANY P.O. BOX 288 STRATFORD, CT 06615-0288 PHONE:
TANKLESS PRODUCT GUIDE
 TANKLESS PRODUCT GUIDE SOLID. STATE. When it comes to building durability into a product, nobody does it like State. In fact, we've tested our water heaters in some of the most hostile environments and
INSTALLATION INSTRUCTIONS and OPERATING MANUAL. *Aquastat is a registered trademark of Honeywell International, Inc.
 MODEL 3200-Plus Temp Limit / LWCO Control with Thermal Targeting for Water Boilers 120 VAC Input / 24 VAC Burner Circuit PATENT. 7,891,572 INSTALLATION INSTRUCTIONS and OPERATING MANUAL Saves Fuel Features
APC BC300 Series 40kW 208/450/480V User Guide
 APC BC300 Series 40kW 208/450/480V User Guide Copyright 2002 APC Denmark ApS This manual is subject to change without notice and does not represent a commitment on the part of the vendor Thank You Thank