1. WARNINGS FOR YOUR SAFETY 2. TECHNICAL SPECIFICATIONS. Allowable Ambient Temperatures: Maximum Film Quantities: 3. INTRODUCTION
|
|
|
- Marion Stanley
- 5 years ago
- Views:
Transcription


1 Instructions for the AutoLab ATL-500 #4235 and the AutoLab ATL 800 #4237 ATL-800 ATL-500 Index 1. WARNINGS FOR YOUR SAFETY 2. TECHNICAL SPECIFICATIONS Allowable Ambient Temperatures: Maximum Film Quantities: 3. INTRODUCTION 4. PACKAGE CONTENTS AND UNPACKING 5. THE ATL-500/ ATL-500/800 CONTROLS 6.1 Operating the ATL-500/ Special Features Turning off the processor Run a cleaning program to prevent contamination
2 You can save on chemicals Fast heating 6.3 Details of Pre-set Programs 6.4 SET-MENU: Modification of Process Data, Options Pre-wash versus pre-heat 6.5 About Temperature and Process Changes 6.6 Selecting Languages for the LCD 7. LOADING TANKS AND REELS 7.1 Loading the Processing Tank: 7.2 Loading Sheet Film 8. PROCESSING IN THE ATL 500/ C and 45 C Processes 8.2 Auto-Start and Standby Modes Filling the chemical storage bottles C and 24 C B/W Film Processing (ATC) 9. BATTERY BACKUP 10. OPTIONAL RECLAMATION RACK 11. MAINTENANCE 12. SHIPMENT OF PROCESSOR FOR SERVICE 13. ERROR MESSAGES 14. DEVELOPING FAULTS Trouble, Cause, Remedy 15. SERVICE INSTRUCTIONS
3 WARNINGS FOR YOUR SAFETY Instructions for the AutoLab ATL-500 #4235 and the AutoLab ATL 800 # WARNINGS FOR YOUR SAFETY 1. The unit should only be used at the voltage indicated on the specification plate at the side of the unit, right under the socket for the electrical power. 2. Use only a grounded, proper socket, with GFCI protection. Never touch the main power switch with wet fingers. 3. Before you ever open the unit, disconnect the electrical cord from the Mains. 4. Only an authorized person should service the unit. 5. Make sure, that no moisture can enter the air vents at the top of the unit. 6. Never place the appliance in a sink where draining water can rise up and damage the unit. 7. Never transport or move the unit while it is filled with water. (See Section 12) 8. Strong motors drive this unit, therefore never reach into the running unit with your hands. 9. The unit is equipped with a battery back up which automatically operates, when electric power fails. The processor can only be stopped by using the reset mode ("Up Arrow"+"Down Arrow"+F1). 10. When switching off the appliance, the lift arm moves into the position, where it empties the water jacket and only 5 minutes afterwards comes back to its rest position to switch off the unit completely. 11. The processor is built only for use with standard photographic chemicals. 12. To protect your eyes, skin and respiratory tract we recommend you take appropriate safety measures when handling chemicals. Follow the warning instructions of the chemical manufacturers. 13. The processor transfers water and liquid chemicals, therefore it is always necessary to operate it with a tank connected.
4 2. TECHNICAL SPECIFICATIONS 2. Technical Specifications ATL-500 ATL-800 Front-to-Back Size: 35 cm, 13¾ inches 39.5 cm, 15½ inches Height: 42 cm, 16½ inches 130 cm, 51¼ inches Width: 40 cm, 15¾ inches 44 cm, 17½ inches Empty Weight: 12 kg, 26½ lbs. 27 kg., 60 lbs. Water-jacket Volume 5 liters, 1.3 gallons 5 liters, 1.3 gallons Voltage: 230V 50Hz or 115V 60Hz 230V 50Hz or 115V 60Hz Power: 1100 W, 4.8 Amps at 230V 1100 W, 4.8 Amps at 230V 9.6 Amps at 115V 9.6 Amps at 115V Allowable Ambient Temperatures: operation +18 to +27 C 64 to 80 F storage +5 to +40 C41 to 104 F shipping-30 to +40 C-22 to 104 F Maximum Film Quantities: 2 APS (24mm) x5" (with sheet film reel, Item No. 2509n, included with ATL-800) 3. INTRODUCTION Thank you for buying the JOBO AutoLab 500/800. This compact automatic processor is designed to process APS, 35mm, 120/220 and 4x5" sheet film using standard 3-bath E-6 and C-41 chemistry as well as conventional black and white materials. 24 programs are pre-set at the factory giving a full range of process conditions, including several push and pull film speed options for both E-6 and C-41. Each process program can be fully edited to provide personalized custom times and temperatures. All the AutoLab needs is a power connection, a cold water supply and a drain. Five liter storage capacity makes the ATL-800 ideal for repeated process runs with the same chemistry. Up to 30 films can be processed before the solutions will need to be replenished.


5 4. PACKAGE CONTENTS AND UNPACKING Unpack the AutoLab carefully. Be sure to keep all the packaging materials, as these will be required should it be necessary to return the unit for service or repair. The following items are included with the ATL-500: ATL-500 Processor Unit, Item No small film tank, with center core for processing 1 film large film tank with center core for processing 2 x 35mm or 120 roll film, or 6 sheets of 4x5" film 2 #2502 roll film reels 1 cold water pressure hose 5 drain hoses for chemistry, rinse and waterjacket drainage 1 power cord 2 way drain adapter Instruction manual For the ATL-800 processor, the following items are included: ATL-800 Processor Unit, Item No.4237 metal frame with reclamation rack gray cover plate 3 five liter containers with hose-connections, 2 blue, 1 translucent 3 five liter translucent containers 1 small film tank, with center core for processing 1 film large film tank with center core for processing 2 x 35mm or 120 roll film, or 6 sheets of 4x5" film 2 #2502 roll film reels 1 sheet film reel #2509n for processing up to 6 sheets of 4x5" film 1 cold water pressure hose # power cord 2 drain hoses 2 way drain adapter 1 changing bag instruction manual The ATL processor should be positioned on a firm, dry and level surface, close to a cold water supply, drain and power source. The water supply should be capable of supplying cold water at a pressure between 2 and 6 bar (36 to 108 p.s.i.). If the water pressure is higher than this, a pressure reducer should be used. The AutoLab should be installed in accordance with local water and sewerage regulations. If the ATL-500 is to be installed with the optional reclamation rack, Item No. 4245, please see chapter 10 of this manual for installation instructions. The ATL-800's metal frame can be placed on the floor, on a low table or attached to a wall. If the frame is placed
 each, and that the unit is level. Please ensure that the unit is not installed in the direct vicinity of air conditioning systems or radiators.")
6 on the floor, take care to ensure that the water outlet has a natural fall to the drain. When wall mounting, make sure the mounting hardware can support at least 30 kg (66 lbs.) each, and that the unit is level. Please ensure that the unit is not installed in the direct vicinity of air conditioning systems or radiators. Never place the ATL-500/800 into a sink where water can rise up to the machine. For safety reasons the bottom plate of the ATL-500 has openings at various points. Penetrating water can damage the unit. If the AutoLab is standing in a basin filled with water, do not put your hand into the water! Pull the power plug first to prevent an electric shock. Warning: To avoid the possibility of damage to the processor, make sure the water supply valves are within reach in case there is a leak. Always close the taps when the processor is not in use! Turn the ATL unit onto its back, and make the hose connections as follows: Connect the cold water pressure hose between the cold water supply point and input connector 'W. Connect drain hoses to points '1', '2' and '3'. These are the drains for the first, second and third chemical baths respectively. The other ends of these hoses can be positioned in a sink, over a drain or in separate containers for chemistry reclamation. There should be a natural fall of the hoses to facilitate drainage. Connect a drain hose to point 'D'. This is the drainage point for rinse water, and should be positioned either over a drain, or connected to the main drainage system using the adapter provided. Connect a drain hose to point 'D2'. This is the drain for the processor water jacket. The other end should be positioned over a drain point, or connected to the main drainage system using the adapter provided. Connect the battery plug to its matching receptacle. Restore the ATL to its working position. For the ATL-800 the following additional steps are needed for installation. The ATL-800 is supplied with three chemical hoses connected with a coupling device at the end. Place the processor on the reclamation rack in its working position, guiding the hoses between the processor and the metal frame.

7 The ATL-800 should be positioned with its feet in the positioning holes in the reclamation unit. The drain outlets for the three chemistry baths connect to the storage containers without the need of interconnecting hoses. When lowering the processor, be certain that the outlets align with the tubes of the reclamation containers. The rinse water and drain hoses need to be routed to a drain at the side of the unit, and care needs to be taken to make sure these hoses are not trapped between the reclamation unit and the ATL-800 chassis. Place the five-liter storage tanks on top of the metal frame in their positions. Working from left to right, start with the blue container marked "1", then place the blue container marked "2", and finally place the translucent container marked "3" on the right. Connect the three hoses from the processor unit to the five-liter containers using the coupling devices. Cover the three hoses with the gray plate, which hangs on the four round connectors. Connect the ATL-500/800 to a grounded power supply capable of providing 115V at 10A or 230V at 6A, as appropriate. It is recommended that a Ground Fault Circuit Interrupt (GFCI) be used for safety reasons. Note: In certain locations, the use of a GFCI may be mandatory for this equipment. All hoses must provide natural fall for drainage.

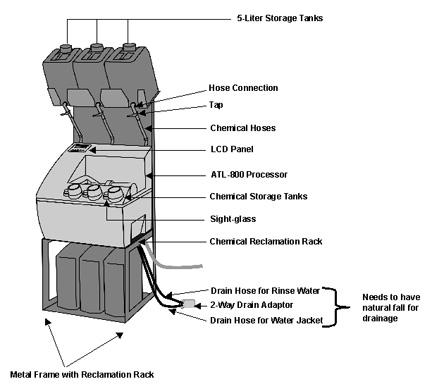
8 ATL-800 Detailed Description:
9 5. THE ATL-500/800 The ATL-500/800 is designed to process small quantities of film to professional standards using standard 3-bath processes. It can handle APS, 35mm, 120/220 roll film and sheet film in sizes from 6x9cm to 4x5 inch. It can process up to 2 x 135 films or up to 2 x 120 roll films per run using the reels and tanks provided, and up to 6-4x5 inch sheet films per processing run using the optional #2509n sheet film reel. (The #2509n reel is included with the ATL-800.) Film is loaded into the tank in complete darkness, and the tank then coupled to the processor in normal lighting. The chemical storage bottles are then filled with the correct quantities of solutions, and the processor started. On the ATL-500, measuring the chemicals and then pouring them into the chemical bottles. On the ATL-800, this is done by opening the taps on the five liter storage bottles, while looking at the level indicators located to the left of the filling caps. When half of the indicator turns black, the bottles contain 150ml of solution, suitable for processing 1 roll of 35mm film in the small tank. When the indicator turns black fully, the bottles contain 300ml of solution, suitable for processing all film quantities and types in the large tank. The processor can then be started. The ATL-500/800 will then temper the water jacket, chemicals and rinse water to the correct process temperature. The process sequence can then be started. The chemical baths and rinses are introduced into the processing tank in turn for the programmed times, and then drained separately. At the end of the process run, the processor will give an audible signal and the tank will continue to rotate. Pressing (ENTER) will stop the rotation and cause the lift arm to raise. The tank can then be removed from the processor. Any stabilization should be carried out away from the processor, out of the tank and off the reels. Then the films should be dried. The five-liter storage containers of the ATL-800 should be used for the most frequently used process. Fill the bottles manually for less frequently used processes as described for the ATL-500. Select and run a cleaning program each time the process is changed to clean the processor, hoses, and bottles. In that case, fill the bottles with no more than 700 ml of fresh water, connect the large tank to the processor, and start the processor The chemical bottles should be filled as follows: Bottle No: E-6 FD CD BL/FIX C-41 2-Bath CD BL/FIX C-41 3-Bath CD BL FIX B&W D STOP FIX

10 6. ATL-500/800 CONTROLS The operating controls of the ATL-500 and ATL-800 are identical. The ATL-800 includes chemical supply and recovery bottles in a single, framed unit to provide extra convenience for those running a single process most of the time. 6.1 Operating the ATL-500/800 Power to the ATL-500/800 is controlled by a power switch at the rear left hand side of the unit. Five buttons are used to control the functions of the processor: The 'Up' and 'Down' arrow buttons allow scrolling through the various functions. The F1 key allows access to special functions. The 'Enter' button confirms data entry. START This button is used to start processing. "UP"+ "Down" + F1This combination will reset the processor's electronics. F1 + SET-Mode is displayed, primarily for programming functions. A 16 character, alphanumeric LCD panel displays function and menu choices. 6.2 Special Features
11 Turning off the processor When switching off the processor with the main switch at the side of the unit, it automatically empties the water jacket. After 5 minutes the lift arm goes back to its rest position and then turns off the unit completely. Run a cleaning program to prevent contamination When changing processes (from E-6 to C-41), it is necessary to clean the hoses and storage bottles. The ATL 500/800 is supplied with several cleaning programs. You can read more about them under Section 6.5 ABOUT TEMPERATURE AND PROCESS CHANGES. It is also recommended that you run a cleaning program at the end of each processing session, to prevent chemical buildup within the supply bottles. You can save on chemicals For processing 1 roll of 120 film, or 1 or 2 sheets of 4x5" film, only 150 ml of working solution is needed. For this to work, the JOBO reels are loaded only in their outer spirals. Fast heating The extremely short heating phase is reached by temporarily overheating the water jacket during warm-up. The electronically controlled system assures accuracy when the process starts. 6.3 Details of Pre-set Programs The following process programs are pre-set at the factory: No. name temp. pre- pre- warm wash chem1 wash1 chem2 wash2 chem3 wash3 1 E-6 38 C 7:00 6:30 2:30 6:00 2:30 6:00 4:00 2 E C 7:00 8:30 2:30 6:00 2:30 6:00 4:00 3 E C 7:00 12:00 2:30 6:00 2:30 6:00 4:00 4 E C 7:00 14:00 2:30 6:00 2:30 6:00 4:00 5 E C 7:00 4:30 2:30 6:00 2:30 6:00 4:00 6 Cleaning 7 C41 3B 38 C 7:00 3:15 6:00 1:00 6:00 4:00 8 C41 3B+1 9 C41 3B+2 38 C 7:00 3:45 6:00 1:00 6:00 4:00 38 C 7:00 4:30 6:00 1:00 6:00 4:00 10 Cleaning 11 C41 2B 38 C 7:00 3:15 * 6:00 4:00 12 C41 2B+1 13 C41 2B+2 14 Cleaning 38 C 7:00 3:45 * 6:00 4:00 38 C 7:00 4:30 * 6:00 4:00 15 C41 2B 45 C 7:00 2:00 * 4:00 2:00 16 C41 2B+1 17 C41 2B+2 45 C 7:00 2:20 * 4:00 2:00 45 C 7:00 2:50 * 4:00 2:00 1=CD 2=Empty 3=BX 1=CD 2=Empty 3=BX 1=CD 2=Empty 3=BX 1=CD 2=Empty 3=BX 1=CD 2=Empty 3=BX 1=CD 2=Empty 3=BX
12 18 Cleaning 19 B/W 5 ATC20 5:00 5:00 1:00 6:00 4:00 20 B/W 7 ATC20 5:00 7:00 1:00 6:00 4:00 21 B/W 9 ATC20 5:00 9:00 1:00 6:00 4:00 22 B/W 11 ATC20 5:00 11:00 1:00 6:00 4:00 23 B/W 13 ATC20 5:00 13:00 1:00 6:00 4:00 * Bottle 2 not used!! #3 E C' indicates that process 3 has been selected, an E-6 process with a two stop push running at 38 C. If the processor is in 'Temp' mode, the selected process can be changed within the same group. For example E-6 or C-41 2-Bath are two separate groups. As the process proceeds, the LCD panel will indicate the step in progress as follows: 'Preheat 5:00' indicates the processor is in the preheat stage, and 5 minutes still have to run. 'Chemical 1 3:15' indicates the processor is in the first chemical bath stage, and there are 3 minutes 15 seconds left to run. The time indication will count down as the process step proceeds. (Press F1 to display the running process) Note: The wash water is heated up automatically to the process temperature. The wash water is changed at minimum every 40 seconds including filling and emptying. This ensures efficient rinsing and reduced water consumption. 6.4 SET-MENU: Changing Process Times, Options The process selected, the process temperature, the individual times of each process and the language can be modified using the 'SET' mode. To enter 'SET' mode, press F1 and. The display will show SET:, Escape: F1 Press, and the display will show Process data (By pressing the "down arrow" button you can select the language used in the display. Pressing the "Down Arrow: button again brings you to the OptionMenu. ) In the Process Data menu, press the (Enter) key again. One of the 24 process channels will be displayed. The cursor can be advanced horizontally with the (Enter)button and the values (process number, temperature and time) can be changed with the "Up Arrow" and "Down "Arrow" buttons. The temperature can be adjusted to ATC 20,
13 ATC 24, 35 degrees C and 45 degrees C. (ATC stands for automatic temperature conversion and is used for b/w film processing.) Values are confirmed by pressing (Enter) which then advances you to the next adjustable space within the current step of the process. Set the cursor on the first digit and select steps with the "Up Arrow" or "Down Arrow" buttons. Press F1 to escape the SET-mode. The available processing steps are as follows: Preheat Pre-wash Chemical 1 Wash 1 Chemical 2 Wash 2 Chemical 3 Wash 3 A pre-wash of 5 minutes is generally preferred for B&W processing, a pre-heat of 7 minutes for all other processes (changing them is not recommended). Pre-wash versus pre-heat Pre-wash immerses the film in a single rinse of water for the programmed time. If it were used with a color process, it could cause a very slight color shift. But using it for B/W film helps to prevent the contrast from getting too high due to the constant agitation of rotary processing. Pre-heat rotates the tank in the water bath, but with no liquid inside the tank for the programmed time. Its purpose is to raise the temperature of the tank, reel, and film so they will not chill the developer when it flows into the tank. The ATL-500/800 will only use a single pre-wash quantity, irrespective of the prewash time. Rinses, however, are changed every 40 seconds, as follows: Up to 40 seconds - no change (one rinse)
14 Up to 80 seconds - one change (two rinses) 120 seconds or longer - two changes (three rinses) Final washes consist of three changes (four rinses) for wash times between 160 and 200 seconds, and four changes (five rinses) for wash times longer than 200 seconds. Special changes can be activated under options. As of this writing, the only option available is the alignment of the horizontal position of the lift arm. Press (Enter) and the display will show Pos. lift arm Press (Enter) to continue with the alignment. Make sure the processor itself is level before continuing. The lift arm will move up and down and then stop at what it expects to be the horizontal position for normal processing activity. Put the big tank on and check it with a level. If it needs to be raised or lowered to achieve a true horizontal position, press the "Up Arrow" or "Down Arrow" buttons. After you press the arrow buttons once, the lift arm will raise and lower to a new position. Continue to adjust the lift arm using the arrow keys until it is level. Then press the (Enter) button to confirm its position. Now press F1 to exit this option menu. 6.5 About Temperature and Process Changes The ATL-500/800 is pre-programmed to process color at 38 C and 45 C, and B&W at 20 C. If you wish to change from a process using a temperature of 38 C or 45 C, to a B&W process, then a cleaning program needs to be used. This is available as process No. 6,10, 14, 18 or 24, and can be selected using the "Up Arrow" or "Down Arrow" buttons. Attach a large tank without reels to the lift arm and fill the bottles with 700 ml of clean water. This process will empty the chemical bottles in the water jacket, drain the water jacket and empty pre-warmed rinse water. When the next process is started, the processor is refilled automatically with cold water ready for the new temperature process. 6.6 Changing Process Temperature To set the temperature: Enter SET mode by pressing F1+ Advance the cursor through the fields until the temperature field is blinking. Use the
15 "Up Arrow" + "Down Arrow" buttons to select ATC 20, ATC 24, or any temperature between 35 C and 45 C. Confirm by pressing Then press F1 three times to exit the SET mode and return to the operating mode. 6.7 Selecting Languages for the LCD Enter the SET mode by pressing F1+ The display will show: SET: Escape: F1. Press Enter) and use the "Up Arrow" + "Down Arrow" buttons to select from French, ( F; Langue), Spanish (E; Idioma), Italian (I; Lingua), German (D; Sprache), or English (GB; Language). Press to confirm. Then press F1 three times to exit the SET mode and return to the operating mode.

16 7. LOADING TANKS AND REELS 7.1 Loading the Processing Tank: The #2502 film reels provided can process both 35mm and 120/220 roll films. Two 120 films can be processed simultaneously by using the DuoClip. The reel can be set to the film width required by turning either half counterclockwise, setting the correct width, and locking the reel back together by turning clockwise. Now, in total darkness: Cut off the end of 35mm film at right angles. With 120/220 film, remove the paper backing. Then snip off the corners on the lead end of the film. With the emulsion side inwards, introduce the film into "mouth" of the reel until it is past the recessed section of the reel. (The "window") Put your right hand finger on the film edge protruding through the window. Turn the right hand side of the reel away from you until it stops. Lift your right hand index finger and repeat the operation with the left side of the reel and your left-hand index finger. By turning the reel halves alternately, load the film completely into the reel.

17 If two 120 roll films are to be processed, press the DuoClip into position, after loading the first roll, to separate the two films, and load the second film in the same way as the first.
18 Place the loaded reels onto the center core of the tank, and place them in the tank ensuring, that the larger inside-diameter of the center core is towards the lid of the tank, and the larger outside diameter of the center tube at the bottom of the tank. Place the cover on the tank, ensuring that the funnel is positioned in the top of the center core, and the locking ring is in the upward position. With both hands, press down on the red locking ring until it clicks into place, locking the tank cover. Check to be sure that it is tight, by twisting the lid. Switch on the room lights. 7.2 Loading Sheet Film Sheet film can be processed in the ATL-500/800 using the sheet film reel, #2509n. This reel can be adjusted to suit 6x9cm, 9x12 cm and 4x5 inch formats in essentially the same way as the #2502 film reel. While sheet films can be loaded manually, it is recommended to use the optional sheet film loader, #2508, along with film templates #2510 for 6x9cm, #2511 for 9x12 cm, and #2512 for 4x5inch film.


19 After inserting the all the film into the spirals of the reel, attach the black panels to lock the film into place. It is essential to use these panels when processing 9x12cm and 4x5 inch films to assure the best possible results. 6x9cm film does not need the panels.
20 8. PROCESSING IN THE ATL 500/ C and 45 C Processes Switch on the ATL. The processor will automatically perform a self-check. When this is complete, the LCD display will show the previously used process number and type. All displayed digits will blink on and off. Then, using the "Up arrow" or "Down arrow" buttons, select the required process number and type. 8.2 Auto-Start and Standby Modes The ATL 500/800 now offers you two alternative modes of operation: Auto-Start -- Start the process with the tank coupled to the processor. In this case, the typical warm-up time from room temperature to 38 C will be approximately minutes. Standby Mode -- Temper the water jacket first. Coupling the tank and adding solutions later. In this case, tempering time will be reduced to approximately minutes. Auto-Start: Mount the loaded tank to the processor by coupling it to the lift arm. Fill the chemical bottles with the correct amount of solution using a graduated cylinder as follows: Small Tank 1x ml Big Tank 1x ml 1-2 sheets of 4x5" film 150 ml 2x ml 2x ml 3-6 sheets of 4x5" film 300 ml On the ATL-800 you can also select the easy-fill technique, when using the chemicals in the upper supply bottles. Just open the taps and let the solution fill into the bottles until one half of the level indicator turns black for 150 ml or until the whole indicator turns black for 300 ml. Then close the taps. Press the 'START' button Select 'big' or 'small' tank using the "Up Arrow" or "Down Arrow" buttons Press the 'START' button again. The processor will start heating the water, chemicals and tank, and 'START' will blink. As soon as the correct process temperature is reached in the first chemical bottle, the process will start automatically and finish with the final wash. After pressing Enter) the tank will stop rotating, the lift arm will rise, and the tank can be removed from the processor. The processor will then remain in its waiting position, with the heater switched off and the LCD display flashing. If no further processing is planned, the ATL-500/800 can be switched off using the main power switch. The film can then be removed from the reel, and stabilized in a separate container for one minute. The film should then be wiped using a clean squeegee (such as the JOBO #3350 Film Wiper) and hung up to dry, preferably in a closed film dryer (such as the JOBO #3523 Mistral II.)


21 Standby Mode: This is a suggested mode of operation to allow the ATL-500/800 to be prepared for processing before a tank is loaded. The application here would be a photographer who wanted the unit to be ready for immediate processing after photography. Fill the chemistry bottles with an appropriate amount of solution. (Make sure to close the bottle caps firmly.) Switch on the ATL- 500/800. The processor will automatically perform a self-check. When this is complete, the LCD window will show the previously used process number and type. All displayed digits will blink on and off. Using the "Up arrow" or "Down Arrow" buttons, select the required process, and confirm using the Enter) button. Select either the big or small tank by using the arrow buttons. If the temperature is less than 22.1 C, the temperature will flash. Press Enter) to activate the Standby Mode. The wash water and chemistry will now temper, and the ATL-500/800 will enter the standby mode, awaiting tank connection. Connect the tank to the processor lift arm.
22 Press the START button. The tank will rotate during a 5 to 7 minute pre-warm cycle, and then the process will start automatically. Note: The chemicals and tank should not be pre-warmed outside the processor. Mounting the tank, filling in chemicals and pressing 'START' should be done in a quick sequence. When operating in standby mode, the water jacket is tempered continuously. To avoid excess energy consumption, this mode should not be used continuously. Filling the chemical storage bottles: Make sure the bottle caps are closed firmly, as air pressure is used to transport the chemicals to the tank C and 24 C B/W Film Processing (ATC) The ATL-500/800 continuously measures the temperature of both the wash water and the chemistry for the 20 C and 24 C processes. If either of these is higher than the selected process temperature, the ATL-500/800 will automatically increase the process temperature to the higher measured temperature. It will start the process once the chemistry in bottle 1 and the wash water are all at the correct temperature. The developer time will then be modified according to the time and temperature curves shown below. This function is ATC, automated temperature conversion.

23 The maximum allowable temperature difference is +4 C from the selected process temperature. If the difference is higher, the process will stop, displaying: "out of range". Select a 24 C process instead of a 20 -process, if 20 C-process is out of range.

24 9. BATTERY BACKUP If the power fails during a process run, a built-in battery backup system will ensure the process continues to the end, providing at least one chemical bath has been started. It should be noted that while the battery is powering the processor, the heater is not in operation. This means that all-subsequent chemical baths, the waterjacket, and wash water will gradually cool following the power interruption, and there could be a reduction in process quality. Generally temperature accuracy requirements become more tolerant with each step of the process. An '!' will appear in the display during battery operation The battery is maintained in a charged state and is ready for use at any time. It requires no maintenance, and life is expected to be in the order of six years. If the processor needs to be switched off during the process or while powered by the battery, this can be done by pressing RESET ("Up Arrow"+"Down Arrow"+F1 simultaneously).
. This provides storage for up to 5 liters of each of the chemical baths in translucent containers.")
 each, and the unit needs to be mounted so that it is absolutely level.")

25 10. OPTIONAL RECLAMATION RACK The ATL-500/800 allows for separate collection of used chemicals using the optional reclamation rack, Item No (included with the ATL-800). This provides storage for up to 5 liters of each of the chemical baths in translucent containers. It consists of a sturdy metal frame, which can be placed on a level floor or hung on the wall by means of 3 mounts. These need to have a minimum carrying capacity of 25kg (55 lbs.) each, and the unit needs to be mounted so that it is absolutely level. The processor should be positioned with the feet in location holes in the reclamation unit. The drain outlets for the three chemistry baths connect with the storage containers without the need of interconnecting hoses. Drain hoses for rinse water and the water jacket must be connected. When lowering the processor, take care that the outlets of the processor align to the tubes of the reclamation rack.


26 11. MAINTENANCE The ATL-500/800 unit requires little maintenance. If the unit is not used for some time, it is wise to perform a cleaning program before processing film. Use a coupled tank without reels and fill the bottles with 700ml of clean water. The unit should be stored with all water drained out. The outside of the unit may be cleaned, but use a damp cloth only. Do not put the unit under running water for cleaning, do not use caustic detergents, and make sure no cleaning fluids enter the unit via the ventilation slots. 12. SHIPMENT OF PROCESSOR FOR SERVICE Before shipping, close the water tap and carry out a cleaning program with a tank connected (fill all the chemical bottles with 700ml of water) Switch off the unit and disconnect the power cable Disconnect all of the chemical and water hoses as well as the cold water pressure hose from the bottom of the unit. Slowly lift the processor on the left side and turn it completely to the right side. The water will drain out of the system. After a few minutes lift the processor according to the picture below so that any remaining water can escape through the ventilation slots at the top rear of the processor. This prevents penetration of water which might cause damage to electronic parts in the processor during shipping If the unit is completely empty it can be packed for shipping. If shipping will involve freezing temperatures, remove any remaining water in the solenoid valve by draining it completely.
27 13. ERROR MESSAGES The ATL-500/800 performs a self-test each time it is switched on. If an error occurs during the self-test, the display will indicate an abbreviation of the error. If an error occurs during a process, the LCD display will alternately display an error indication number. No.--Indication --Cause Remedy 1. WATERJACKET PUMP Water jacket pump defective. Needs to be replaced, inform service department. 2. RINSE WATER PUMP Rinse water pump defective. Needs to be replaced. Inform service department. 3. AIR DISTRIBUTOR Air distributor defective. Inform service department. 4. DRUM NOT RAISED Lift arm defective. Inform service department. 5. WATERJAC. SENSOR Water-jacket sensor needs to be replaced. Inform service department. 6. RINSE WATER SENS Rinse water sensor defective Needs to be replaced, Inform service department. 7. CHEMISTRY SENSOR Chemistry sensor defective Needs to be replaced, Inform service department. 8. WATER SUPPLY? No water entering the processor. Open water tap. CHEMDISTRIB Used chemistry distribution error: If the self-test shows an error in the distribution of used chemistry, the self-test procedure will be interrupted, and the error indicated on the LCD. The user, however, has the option of ignoring the error by pressing (Enter). The self-test will then continue, and processing can take place. If this happens, used chemistry may not be routed to the correct disposal drains. Water jacket empties slowly during processing. Either the drain valve has become dirty or the lift arm is constantly pressing on the valve lever. Here s how the valve works: The overflow valve (at the right side in the unit) is pressed on the bottom of the unit by means of a spring. In case this overflow valve, which is a tube, gets out of position, the seal will leak. Remedy: Agitate the valve lever so that dirt in the valve area is cleaned away. In case the lift arm is out of position, select SET menu (see section 6.4); options; adjust the lift arm and follow the next paragraph. Loss of original calibration in the electronics. (The battery has lost power, or p.c. board was exchanged) The ATL-500/800 automatically recalibrates itself during the self-test. Part of this recalibration is to determine the distance between lift arm and overflow tube support. When this is 2-4 mm, it is correct. If the distance is not correct, the operator can adjust this setting by using the "Up Arrow" or "Down Arrow" keys. Difference in the volume of used and collected chemical solutions: The drain hoses for wash water and the water jacket must be positioned to guarantee an absolutely free flowing outlet.
28 14. DEVELOPING FAULTS Trouble, Cause, Remedy Streaks Not enough solution. Check the filling quantity of solutions Processor is not level. Check with a level. Tank is not dry. Use only dry tanks, reels and lids. Light fog. The center core is missing; always use a center core. The light trap funnel missing; insert a light trap funnel
MODEL A5-2 SOLVENT & WATER RECOVERY SYSTEMS (EXPLOSION PROOF UNITS)
") MODEL A5-2 SOLVENT & WATER RECOVERY SYSTEMS (EXPLOSION PROOF UNITS) FOR PROPER AND SAFE USE OF THIS CHEMCHAMP EQUIPMENT, PLEASE FOLLOW THIS DOCUMENT AND LOCAL AUTHORITY. KEEP THIS DOCUMENT FOR FUTURE REFERENCE.
MODEL A5-2 SOLVENT & WATER RECOVERY SYSTEMS (EXPLOSION PROOF UNITS) FOR PROPER AND SAFE USE OF THIS CHEMCHAMP EQUIPMENT, PLEASE FOLLOW THIS DOCUMENT AND LOCAL AUTHORITY. KEEP THIS DOCUMENT FOR FUTURE REFERENCE.
/2010 US/CA
 6 720 646 148-11/2010 US/CA (en) For the user User s Instructions Condensing gas boiler Logamax plus GB162-L.B. 80 kw/100 kw Please read thoroughly before operating This manual is available in the English
Manual. Snow machine S-2
 Manual Snow machine S-2 Table of contents 1. Safety instructions... 3 1.1. Instructions for a safe and efficient operation... 3 1.2. More information on safe use... 4 2. Introduction... 4 2.1. Product
MODEL A18 SOLVENT RECOVERY SYSTEMS (EXPLOSION PROOF UNITS)
") MODEL A18 SOLVENT RECOVERY SYSTEMS (EXPLOSION PROOF UNITS) FOR PROPER AND SAFE USE OF THIS CHEMCHAMP EQUIPMENT, PLEASE FOLLOW THIS DOCUMENT AND LOCAL AUTHORITY. KEEP THIS DOCUMENT FOR FUTURE REFERENCE.
MODEL A18 SOLVENT RECOVERY SYSTEMS (EXPLOSION PROOF UNITS) FOR PROPER AND SAFE USE OF THIS CHEMCHAMP EQUIPMENT, PLEASE FOLLOW THIS DOCUMENT AND LOCAL AUTHORITY. KEEP THIS DOCUMENT FOR FUTURE REFERENCE.
Product waste disposal - Protection of the environment:
 Product waste disposal - Protection of the environment: In accordance with the provisions of the Waste Electrical and Electronic Equipment (WEEE - 2002/ 96/ EC) Directive, used electric and electronic
Automatic Mixer Operating Instructions
 English Automatic Mixer Operating Instructions PROTEC Medizintechnik GmbH & Co. KG Lichtenberger Strasse 35, D-71720 Oberstenfeld, Germany Telephone: +49-7062-9255-0 e-mail: service@protec-med.com Machine
Operator Guide. Publication No. OI /97-Eng. KODAK Automixer II Plus
 Operator Guide Publication No. OI 3439-1/97-Eng KODAK Automixer II Plus ii PLEASE NOTE The information contained herein is based on the experience and knowledge relating to the subject matter gained by
Multi Function Food Processor
 G2SMFP3001 Multi Function Food Processor User Guide Important: retain for future reference ASDA G2SMFP3001 Food processor.indd 1 22/06/2012 15:26 WArnings: IMPORTANT SAFETY INSTRUCTIONS PLEASE READ ALL
Manual. Fazer DFZ-800
 Manual Fazer DFZ-800 Table of contents 1. Safety instructions... 3 1.1. Instructions for a safe and efficient operation... 3 1.2. More information on safe use... 4 2. Introduction... 4 2.1. Product description...
English. Your Model Number is: HD1500 IMPORTANT
 Your Model Number is: HD1500 IMPORTANT Attention Valued Customer: The serial number of your machine and date of purchase is necessary information to facilitate warranty claims and the ordering of replacement
BEFORE USING THE DISHWASHER/CONNECTIONS
 INSTRUCTIONS FOR USE BEFORE USING THE DISHWASHER/CONNECTIONS ELECTRICAL CONNECTION PRECAUTIONS AND GENERAL RECOMMENDATIONS HOW TO FILL THE SALT CONTAINER HOW TO FILL THE RINSE AID DISPENSER HOW TO FILL
Model No.: PS08-01 PS10-01 Ref: KY80 KY100
 8,000/10,000/12,000 BTU Portable Air Conditioner Operating Instructions Model No.: PS08-01 PS10-01 Ref: KY80 KY100 Model No.: PS12-03 Ref: KY120 3119233 V160310 Thank you for choosing a Soleus Air Portable
Installation and Operating Instructions DÜRR Regeneration Unit for X-ray developers XR 24, XR24 II, XR 24 Nova, XR 24 Pro
 Installation and Operating Instructions DÜRR Regeneration Unit for X-ray developers XR 24, XR24 II, XR 24 Nova, XR 24 Pro 2006/01 Content Important Information 1. Notes... 3 1.1 CE - Labeling... 3 1.2
FC 5 FC 5 Premium. OPERATOR MANUAL Floor Cleaner...2 MANUAL DE USUARIO Limpiador de piso...22 MANUEL D UTILISATION Nettoyant pour sols...
 FC 5 FC 5 Premium OPERATOR MANUAL Floor Cleaner.................2 MANUAL DE USUARIO Limpiador de piso............22 MANUEL D UTILISATION Nettoyant pour sols...........44 59682960 2018.03 FLOOR CLEANER
5) Do not start or stop the unit by inserting or pulling out the power plug.
 Do not start or stop the unit by inserting or pulling out the power plug.") 3058080 V170306 PURCHASE INFORMATION Thank you for choosing a Soleus Air Portable Air Conditioner. This Owner s Manual will provide you with valuable information necessary for the proper care and maintenance
3058080 V170306 PURCHASE INFORMATION Thank you for choosing a Soleus Air Portable Air Conditioner. This Owner s Manual will provide you with valuable information necessary for the proper care and maintenance
Drying Cabinet Installation and Operating Manual
 Drying Cabinet Installation and Operating Manual Model:- ECO Dryer 2.0 HP Heat Pump Technology CONTENTS THIS USER MANUAL 3 DATA PLATE DETAILS 3 ADVICE ON SAFE OPERATION 3 DESCRIPTION OF THE CABINET 4 AIR
BEFORE OPERATING THE MACHINE: WARNING
 BEFORE OPERATING THE MACHINE: Read the manual carefully and completely before attempting to operate the unit. This manual has important information for the use and safe operation of the machine. Keep this
Compact Cyclonic Bagless Cylinder Vacuum Cleaner
 Compact Cyclonic Bagless Cylinder Vacuum Cleaner Model Number: RHCV35BM01 220-240V AC 50/60Hz 700W For Customer Services & Spare Parts please call 0345 209 7461 Opening times: Monday - Friday 8am 8pm &
Compact Cyclonic Pro Bagless Cylinder Vacuum Cleaner
 Compact Cyclonic Pro Bagless Cylinder Vacuum Cleaner Model Number: RHCV15SB05 220-240V AC 50/60Hz 1000W For Customer Services & Spare Parts please call 0345 209 7461 Opening times: Monday - Friday 8am
Q: What can be done if my dishes have a cloudy, white film on them after a wash?
 TROUBLESHOOTING 45 TROUBLESHOOTING FAQs: Frequently Asked Questions Q: Does this dishwasher require a rinse aid to be used? A: Rinse aid is strongly recommended to enhance the drying performance of the
A few simple steps to ensure perfect water, every time.
 A few simple steps to ensure perfect water, every time. Use and Care Guide MODELS: A7BOTTLELESS A7BOTTLELESSBLK Registration Please visit the website below to register your new water cooler within the
Silencer Preheater unit Electric post-heating unit Water circulated post-heating unit CO 2 sensor %RH sensor Pressure difference switch LON converter
 VALLOX Product Code: 3158400 L 3158410 R SILENCER (OPTIONAL) INSTRUCTIONS FOR USE AND MAINTENANCE WATER CIRCULATED POST-HEATING UNIT (OPTIONAL) ELECTRIC POST-HEATING UNIT (OPTIONAL)) PREHEATER (OPTIONAL)
Tank, Heater, and Control Operation Manual REV. E DATE: 04May2015
 Tank, Heater, and Control Operation Manual 25-710-804 REV. E DATE: 04May2015 Hanson Research Corporation 9810 Variel Avenue Chatsworth, CA 91311 USA (800) 821-8165 (818) 882-7266 FAX (818) 882-9470 www.hansonresearch.com
Autofill wall mounted water. boiler. Getting the best from your water. boiler. Please read and keep these instructions
 Autofill wall mounted water boiler Please read and keep these instructions For Burco wall mounted boilers 76700 (SKU 444448534), 76702 (SKU 444448546), & 76704 (SKU444448548) Getting the best from your
Portable Air Conditioner 6,000 BTU 8,000 BTU 10,000 BTU
 Portable Air Conditioner 6,000 BTU 8,000 BTU 10,000 BTU OPERATING INSTRUCTIONS PCR-06-01 PCR-08-01 PCR-10-01 3058080 V170223 PURCHASE INFORMATION Thank you for choosing a Chigo Portable Air Conditioner.
A few simple steps to ensure perfect water, every time.
 A few simple steps to ensure perfect water, every time. Use and Care Guide MODELS: A8CTBOTTLELESSWHT A8CTBOTTLELESSBLK Registration Please visit the website below to register your new water cooler within
Technical Training Prodigy Undercounter Cubers. Models CU1526, CU2026 and CU3030
 Technical Training Prodigy Undercounter Cubers Models CU1526, CU2026 and CU3030 List of Major Topics Introduction Installation Operation Maintenance Diagnosis Service Prodigy with a Bin 3 models CU1526
GB User manual. Washing machine ZWQ 5130
 GB User manual 2 Washing machine ZWQ 5100 ZWQ 5101 ZWQ 5130 Product description 1 1. The control panel 2. Lid handle 3. Adjustable levelling feet 2 3 The control panel 1 2 3 4 5 6 1. Programme selector
OPERATING INSTRUCTIONS
 OPERATING INSTRUCTIONS Paraffin Wax Embedding Centre MPS/P2 INS3100GB 03-2011-06 Instructions MPS/P2 1 Instructions MPS/P2 2 CONTENTS 1. INTENDED USE... 4 2. SYMBOLS... 4 3. SAFETY NOTES... 4 4. COMPONENTS...
One-Touch Dispense. Multi-temp selections. 208 F For tea, coffee, instant noodle. 194 F Keep warm around 194 F. 176 F Keep warm around 176 F.
 Instruction Manual Automatic Dispensing Hot Water Pot with Multi-temperature Function Automatic Dispensing One-Touch Dispense FEATURES Reboil Function 5 Temperature Settings Image Of SP-5016 208 F For
CER-1 & CER-2 Installation & Testing Instructions
 CER-1 & CER-2 Installation & Testing Instructions i Read all installation instructions completely before installing this device. 1 2 3 INTRODUCTION This document details the installation procedure for
4L Instant Water Boiler Instructions for Use
 Power Details: 220-240Va.c. 50Hz-60Hz 2200-2600W Capacity: 4.0L Accessories: 2 Water aid trays Water Filters are not included and can be purchased separately Item Code 10747 IMPORTANT NOTES FOR YOUR INSTANT
Dryer Controller M720
 User Manual Dryer Controller M720 Hardware version 2.00 Software version 2.00 Manual M720 Dryer controller Page 1 of 60 Document history Preliminary version: - Created in April, 2009 Hardware Version 2.00,
IMPORTANT WARNINGS Therefore, to avoid breaking it, do not turn it manually in order to seek the correct position.
 IMPORTANT WARNINGS Before use check that the voltage power supply corresponds to the one shown on the appliance data plate. Only connect the appliance to electrical sockets which have a minimum load of
INSTALLATION. and INSTRUCTION MANUAL. for QUALITY AIR BREATHING SYSTEMS. Model ABM - 715
 INSTALLATION and INSTRUCTION MANUAL for QUALITY AIR BREATHING SYSTEMS Model ABM - 715 M A R T E C H S E R V I C E S C O M P A N Y P.O. Box 7079 OFFICE: 800-831-1525 Mazeppa, MN 55956 Fax : (507)843-4953
USER MANUAL. Portable Air Conditioner and Heater With Heat Pump Technology PAC18. Please read this manual carefully prior to operating the product.
 USER MANUAL Portable Air Conditioner and Heater With Heat Pump Technology PAC12 PAC15 PAC18 Please read this manual carefully prior to operating the product. TABLE OF CONTENTS INTRODUCTION... 3 IMPORTANT
Hydrogen Generator Model HPNM 1. Instruction manual. 166 Keystone Drive Montgomeryville, PA Phone: Fax:
 Hydrogen Generator Model HPNM 1 Instruction manual 166 Keystone Drive Montgomeryville, PA 18936 Phone: 215-641-2700 Fax: 215-641-2714 Introduction Index INDEX... 2 INTRODUCTION... 3 SCOPE OF THE MANUAL...
ICED CAPPUCCINO MACHINE Taylor MODEL: 390
 4.8.6.3 ICED CAPPUCCINO MACHINE Taylor MODEL: 390 LOCATION: Front of House WHEN CLEANED: Daily, Weekly, Monthly, Seasonal TOOLS/SUPPLIES REQUIRED: Salmon Cloth 2 or 3-Compartment Sink Sink Detergent Sanitizer
Rules for Safe Operation
 Rules for Safe Operation Important: Do not attempt to operate the CleanStation until you have read thoroughly and understand all instructions and safety rules contained in this manual. Failure to comply
CARVER CASCADE 2 & CASCADE 2 GE CARAVAN WATER HEATER INSTALLATION INSTRUCTIONS LEAVE THESE INSTRUCTIONS WITH THE USER
 CARVER - CASCADE 2 & CASCADE 2 GE CARAVAN WATER HEATER INSTALLATION INSTRUCTIONS LEAVE THESE INSTRUCTIONS WITH THE USER 1:0 SPECIFICATIONS Water capacity Water connections Water supply 9 litres (2 gallons)
Endoscope Reprocessor Installation Instructions Endoscope Reprocessing System
 Endoscope Reprocessor Installation Instructions Endoscope Reprocessing System Introduction The following document outlines the installation procedure for the CER 1 and CER 2 reprocessor(s). Please refer
CHESNEY S. Bio-Ethanol Installation & User Manual. model: EFB1200 with resevoir. Issue 01
 CHESNEY S Bio-Ethanol Installation & User Manual model: EFB1200 with resevoir Issue 01 1 2 Thank you for choosing this Chesney s Bio-Ethanol fire. Please read this information guide carefully in order
CONTROL PANEL INTERFACE ACTIVATE THE GENERATOR DISPLAY INTERFACE MENUS. Control Panel USING THE AUTO/OFF/MANUAL SWITCH
 CONTROL PANEL INTERFACE USING THE AUTO/OFF/MANUAL SWITCH With the switch set to AUTO, the engine may crank and start at any time without warning. Such automatic starting occurs when utility power source
Water Softener & Single Tank Triple Treat System Installation Overview. Using 1850 Metered Valves
 Water Softener & Single Tank Triple Treat System Installation Overview Using 1850 Metered Valves System Installation CAUTION: Do not use systems on untreated well water that is microbiologically unsafe.
14,000 BTU Portable Air Conditioner 14,200 BTU Heat Pump Model Number: LX-140 Operating Instructions. Model No. LX Soleus Air International
 14,000 BTU Portable Air Conditioner 14,200 BTU Heat Pump Model Number: LX-140 Operating Instructions 3092402 Model No. LX-140 2012 Soleus Air International Thank you for choosing a Soleus Air LX-140 Portable
HW-17 Record Cleaning Machine Setup and Instruction Manual
 HW-17 Record Cleaning Machine Setup and Instruction Manual VPI Industries, Inc., 77 Cliffwood Ave. #3B, Cliffwood, NJ 07721 Phone: 732-583-6895, Email: Sales@vpiindustries.com http://www.vpiindustries.com
COMMERCIAL WASHERS MODELS T-300/350/400/450/600/650/750/900/950/1200/1450 VENDED C-SERIES CONTROL
 COMMERCIAL WASHERS MODELS T-300/350/400/450/600/650/750/900/950/1200/1450 VENDED C-SERIES CONTROL OPERATOR S MANUAL INSTALLATION & OPERATION INSTRUCTIONS Please read this information and retain for reference.
User Manual. Dryer Controller M720
 User Manual Dryer Controller M720 Hardware version 1.00 Software version 1.00 Preliminary version Manual M720 Dryer controller Page 1 of 42 Document history Preliminary version: - Created in April, 2009
IFOR YOUR BEST IMAGE
 JOBO AG Page 1 of 18 > Home D >HomeGB >_Seryice IFOR YOUR BEST IMAGE ;»*»»«»»».»**»< «: >Back E-Mail Formular Webmaster Impressum JOBO AG Service Analog Instruction Manual for the Fujimoto CP51 Roller
MacDonald Steel Limited
 DELUXE FILLER / CROWNER MODEL - DFC4 1 REV 00 CAUTION / WARNING READ MANUAL BEFORE OPERATING MACHINE DO NOT EXCEED 50 PSI ON Co2 OR BEER LINES DO NOT EXCEED 100 F (35 C) ON Co2 OR BEER LINES DO NOT HOSE
3 In 1 AIR CONDITIONER with REMOTE CONTROL MODEL NO: CA9000 PART No: OPERATION & MAINTENANCE INSTRUCTIONS
 3 In 1 AIR CONDITIONER with REMOTE CONTROL MODEL NO: CA9000 PART No: 32305600 OPERATION & MAINTENANCE INSTRUCTIONS 0304 Parts List Item Part No Description Qty 1 FT900001 Top Cover 1 2 FT900002 Filter
Portable Air Conditioner with Heat Pump Technology Operating Instructions. Model No.: HCB-P13HP-D. Reference No.: BPD13HP V140217
 Portable Air Conditioner with Heat Pump Technology Operating Instructions 3092402 Model No.: HCB-P13HP-D Reference No.: BPD13HP V140217 Thank you for choosing a Soleus Air Portable Air Conditioner with
Portable Air Conditioner with Heat Pump Technology PH4-10R-01, PH4-12R-01, & PH4-14R-01 Operating Instructions
 Portable Air Conditioner with Heat Pump Technology PH4-10R-01, PH4-12R-01, & PH4-14R-01 Operating Instructions 3092402 2006 Soleus Air International Thank you for choosing a Soleus Air Portable Air Conditioner
Instruction Manual. Portable Air Conditioner
 Instruction Manual Portable Air Conditioner Model: WA-9010E It is important that you read these instructions before using your portable air conditioner and we strongly recommend that you keep them in a
Hello. Classic. User s manual
 Hello Classic User s manual Congratulations on your BIBO purchase! Congratulations and thank you for buying a BIBO Classic. You are moments away from enjoying pure, filtered water boiling and chilled at
QuickStart Guide. Automated Support Removal System. PostProcess Technologies, Inc. REV C
 CENTI QuickStart Guide Automated Support Removal System PostProcess Technologies, Inc. www.postprocess.com REV C Copyright Copyright 2018 by PostProcess Technologies Inc. POSTPROCESS. All rights reserved.
BL Series INSTRUCTIONS
 BL Series Models: EX5204/BL514 EX5204/BL515 EX5214/BL524 EX5214/BL525 EXT5214/BL524 EXT5214/BL525 EX5404/BL614 EX5404/BL615 EX5414/BL624 EX5414/BL625 EXT5214H/BL528 EXT5214H/BL529 Automatic Backlatcher
TECHNICAL INFORMATION Touchtronic Clothes Dryers
 TECHNICAL INFORMATION Touchtronic Clothes Dryers Includes: T1302, T1303, T1322, T1329ci T1403 & T1405 2004 Miele This page intentionally left blank. Table of Contents GENERAL INFORMATION A. Warning and
 14,000 BTU Portable Air Conditioner 12,000 BTU Heat Pump LX-140 / LX-140BL Operating Instructions Model No. LX-140 2006 Soleus Air International Thank you for choosing a Soleus Air LX-140/LX-140BL Portable
A few simple steps to ensure perfect water, every time.
 A few simple steps to ensure perfect water, every time. Use and Care Guide MODELS: A9CTELECTRICSS A9ELECTRICBLK A9ELECTRICWHT Registration Please visit the website below to register your new water cooler
3. Thermal switch (70 o C thermostat) with a 3 m connection cable
 with a 3 m connection cable") Essence pump Installation and operating manual Contents page page 1. Purpose and operating principle 1 7. Operation 6 2. Safety instructions 2 8. Feed volume setting 7 3. Technical data 3 9. Maintenance
Essence pump Installation and operating manual Contents page page 1. Purpose and operating principle 1 7. Operation 6 2. Safety instructions 2 8. Feed volume setting 7 3. Technical data 3 9. Maintenance
CR13000-PAC OWNER S MANUAL. Portable Air Conditioner. PORTABLE AIR CONDITIONER with HEAT PUMP. Operating and Servicing Instructions
 OWNER S MANUAL Operating and Servicing Instructions CR13000-PAC PORTABLE AIR CONDITIONER with HEAT PUMP Portable Air Conditioner Questions or concerns? For assistance, please call Customer Service ClimateRight
Operations Manual. Part Number: For Research Use Only
 Operations Manual Part Number: 470230-598 For Research Use Only Ph: 1-800-962-2660 - Web: www.wardsci.com Thank you for choosing our Bench top sterilizers. Prior to operating this instrument, please read
Tornado Operations & Maintenance Manual
 Tornado Industries, LLC 333 Charles Court West Chicago, IL 60185 www.tornadovac.com Tornado Operations & Maintenance Manual MODEL NO. 99414 Form No. L9740AB Tornado Industries, LLC. All rights reserved
DS English... 5 Français Español CONSUMO DE ENERGIA. 1. En Operación: 287,82 Wh 2. En Modo de Espera: N/A Modelo: DS 5.
 DS 5.600 English.... 5 Français... 11 Español... 17 CONSUMO DE ENERGIA 1. En Operación: 287,82 Wh 2. En Modo de Espera: N/A Modelo: DS 5.600 59634180 (04/12) 2 3 4 Dear Customer, Please read and comply
Operating Instructions
 PH5-13R-35D Portable Air Conditioner with Heat Pump Operating Instructions 3092402 Item Number: LX-130 Model Number: PH5-13R-35D 201 Soleus Air International Thank you for choosing a Soleus Air PH5 Series
IMPRESSA F7 Quick Reference Guide
 IMPRESSA F7 Quick Reference Guide The IMPRESSA F7 Instructions for Use together with these short instructions IMPRESSA F7 Quick Reference Guide has been awarded the seal of approval by the independent
AUC Cell Washer. User Manual
 AUC Cell Washer User Manual WARRANTY Spin Analytical Inc., warrants this product to be defect free in both material and workmanship for 90 days from the date of shipment. Labor services are guaranteed
Air Conditioner PORTABLE. Instruction Manual. Your Guarantee. Portable Air Conditioner / Heater. For models WA-1010E, WA-1010H, WA-1010M
 Portable Air Conditioner / Heater Your Guarantee If this product is found to be faulty as a result of faulty materials or workmanship within one year from date of purchase, it will be repaired or replaced
JUNEAU JUN. 08/51193/0 Issue 0
 JUNEAU JUN 08/51193/0 Issue 0 The product complies with the European Safety Standards EN60335-2-30 and the European Standard Electromagnetic Compatibility (EMC) EN55014, EN60555-2 and EN60555-3 These cover
Safety Is a Good Habit to Get Into
 Safety Is a Good Habit to Get Into NOTICE Carefully read the instructions contained in this manual, as they provide important information which is essential to safe and proper installation, use and maintenance
12,000 BTU Portable Air Conditioner PE3-12R-03. Model No. PE3-12R Soleus Air International
 12,000 BTU Portable Air Conditioner Operating PE3-12R-03 Instructions 3092402 Model No. PE3-12R-03 2010 Soleus Air International Thank you for choosing a Soleus Air PE3-12R-03 Portable Air Conditioner.
CQUBE EVO OPERATION MANUAL EVO_OM_VKI_EN. Part No.: _06
 EVO_OM_VKI_EN Part No.: 1764212_06 CQUBE EVO OPERATION MANUAL CONTENTS GENERAL INFORMATION...3 Introduction... 3 Warnings... 3 Precautions... 4 Intended use... 4 Hazard intensity levels... 4 Facts & weight...
Model No. GB-PAC-08E4. 8,000 BTU Portable Air Conditioner Operating Instructions
 Model No. GB-PAC-08E4 8,000 BTU Portable Air Conditioner Operating Instructions Thank you for choosing a Soleus Air Powered by Gree Portable Air Conditioner. This owner s manual will provide you with valuable
O p e r a t i n g I n s t r u c t i o n s
 O p e r a t i n g I n s t r u c t i o n s www.masterblasterfoam.co.uk Page 1 of 10 Contents Page 2 Page 3 Page 4 Page 5 Page 6 Page 7 Page 8 Page 9 Introduction & Features Safety Instructions Warnings,
CHESNEY S. Bio-Ethanol Installation & User Manual. model: EFB1200. Issue 01
 CHESNEY S Bio-Ethanol Installation & User Manual model: EFB1200 Issue 01 1 2 Thank you for choosing this Chesney s Bio-Ethanol fire. Please read this information guide carefully in order to safely install,
What to expect from your water softener
 What to expect from your water softener All water softeners work on the same basic principal. Hard water flows through a bed of resin and the calcium and magnesium, the minerals that are responsible for
A few simple steps to ensure perfect water, every time.
 A few simple steps to ensure perfect water, every time. Use and Care Guide MODELS: A4BLWTRCLR Registration Please visit the website below to register your new water cooler within the first 30 days of purchase.
User Instruction Manual
 User Instruction Manual 4 & 6 Slot Toasters This covers the Burco 4 & 6 slot toasters TSSL14 & TSSL16 444440355 & 444440356 Red End Cap 4 slot 444440606 Red End Cap 6 slot 444440608 Cream End Cap 4 slot
DANGER Any appliance is electrically. WARNING To reduce the risk of IMPORTANT SAFETY INSTRUCTIONS
 IMPORTANT SAFETY INSTRUCTIONS When using electrical appliances, especially when children are present, basic safety precautions should always be taken, including the following: READ ALL INSTRUCTIONS BEFORE
USER INSTRUCTION MANUAL. Autofill Water Boiler
 USER INSTRUCTION MANUAL Autofill Water Boiler GH187 GC719 (FILTERED PRODUCT) Buffalo Warranty 1 Year Parts 1 Year Labour 083347300-03/06/14 Introduction Thank you for purchasing this Buffalo appliance.
INSTALLATION GUIDE HIGH PRESSURE CLEANER (1800C) If there is any question during using, please feel free to contact us by
 If there is any question during using, please feel free to contact us by") INSTALLATION GUIDE HIGH PRESSURE CLEANER (1800C) Contact us If there is any question during using, please feel free to contact us by email: service@paxcess.com sale05@gadgetwoo.com After unpacking the
INSTALLATION GUIDE HIGH PRESSURE CLEANER (1800C) Contact us If there is any question during using, please feel free to contact us by email: service@paxcess.com sale05@gadgetwoo.com After unpacking the
1/2011 V1. Puzer AINO USER MANUAL. Read this instruction before using the vacuum cleaner! Keep the instructions near the vacuum cleaner for later use!
 Puzer AINO USER MANUAL Read this instruction before using the vacuum cleaner! Keep the instructions near the vacuum cleaner for later use! 1 Vacuum cleaner parts 1 Part numbers 1. Wall inlet 2. Display
Air Conditioner. Instruction Manual. For Models WA-1010E, WA-1010H, WA-1010M WA-1230E, WA-1230H P O R T A B L E
 R Instruction Manual For Models WA-1010E, WA-1010H, WA-1010M WA-1230E, WA-1230H P O R T A B L E Air Conditioner It is important that you read these instructions before using your new purchase and we strongly
1 GALLON / 3.78 LITER ULTRASONIC HUMIDIFIER
 Adorable Humidifiers 1 GALLON / 3.78 LITER ULTRASONIC HUMIDIFIER FOR THE FOLLOWING MODELS: EE-0865 EE-3186 EE-3189 EE-3190 EE-3191 EE-4139 EE-4140 EE-5058 EE-6369 EE-7270 EE-8189 EE-8190 If you have any
Operating Instructions Undercounter Glassware Washer
 Operating Instructions Undercounter Glassware Washer Dear Customer, Thank you for choosing this quality product from UNIVERSAL SCIENTIFIC, INC. We hope it will meet your expectations and fulfill your needs
OPERATING MANUAL. for the modular heat presses. Secabo TC5 SMART and TC7 SMART
 OPERATING MANUAL for the modular heat presses Secabo TC5 SMART and TC7 SMART Congratulations on the purchase of your Secabo heat press! Please read this operating manual carefully to ensure a smooth production
DAILY REFERENCE GUIDE PRODUCT DESCRIPTION APPLIANCE CONTROL PANEL. Before using the appliance carefully read Health and Safety guide.
 DAILY REFERENCE GUIDE EN THANK YOU FOR BUYING A ARISTON PRODUCT. In order to receive a more complete assistance, please register your appliance on: www.aristonbrand.com You can download the Safety Instructions
EVac II Programmable Digital Vacuum Gauge
 EVac II Programmable Digital Vacuum Gauge Thank you for your purchase of the YELLOW JACKET evac II Digital Vacuum Gauge. The evac II is the most accurate and precise vacuum gauge available today with patented
PORTABLE AIR CONDITIONER OWNER S MANUAL
 PORTABLE AIR CONDITIONER OWNER S MANUAL ASSEMBLY AND OPERATING INSTRUCTIONS MODELS: JHS-A018-10KR SKU#: 130004 JHS-A018-12KRH SKU#: 130005 WARNING: Read and follow all warnings and instructions in this
Autofill counter top water boiler
 Autofill counter top water boiler Please read and keep these instructions For Burco counter top water boilers 76500 (SKU 444448531) and 76502 (SKU 444448533) Getting the best from your water boiler Remove
Introduction... 3 Setup & Suggestions... 4 Basic Use... 4 Setting Time... 4 Setting Temperature... 5 Setting Height / Pressure...
 Table of of Contents Contents... 2 Introduction... 3 Setup & Suggestions... 4 Basic Use... 4 Setting Time... 4 Setting Temperature... 5 Setting Height / Pressure... 6 Aligning the pedestal... 6 Guidelines
Eco-Safe Digester. Installation Manual For E3 Series Digesters. Version 1.6 Published: Apr. 13, 2017
 Eco-Safe Digester Installation Manual For E3 Series Digesters Version 1.6 Published: Apr. 13, 2017 Eco-Safe Digester Installation Manual Table of Contents Preface... iv 1. Document Revision History...
USER MANUAL. Version: 1.0. ROBE Show Lighting s.r.o. Czech Republic
 USER MANUAL Version: 1.0 ROBE Show Lighting s.r.o. Czech Republic www.robe.cz Table of contents 1.Introduction 4 2.Cautions 4 3. Unpacking & Inspection 5 4. Setup 5 5. Operation 5 5.1.Control Module Operation
50L/D DEHUMIDIFIER. Model Number: IG9805 INSTRUCTIONS FOR USE
 50L/D DEHUMIDIFIER Model Number: IG9805 INSTRUCTIONS FOR USE Thank you for purchasing this product. Please read these instructions carefully before use. SAFETY INSTRUCTIONS IMPORTANT: This appliance is
Dual Column Dehydrating Breather Manual
 Dual Column Dehydrating Breather Manual DCB-MANUAL 1.6 Read and understand this manual prior to operating or servicing the products. SPX Transformer Solutions, Inc., Service & Components Division U.S.
Specifications: NORTH AMERICA
 Please read and save these instructions. Read carefully before attempting to assemble, install, operate or maintain the product described. Protect yourself and others by observing all safety information.
PRESSURE WASHER MODEL NO: JETSTAR 1750 OPERATION & MAINTENANCE INSTRUCTIONS. WARNING Read the instructions before using the machine PART NO:
 WARNING Read the instructions before using the machine PRESSURE WASHER MODEL NO: JETSTAR 1750 PART NO: 7333230 OPERATION & MAINTENANCE INSTRUCTIONS LS0711 INTRODUCTION Thank you for purchasing this CLARKE
U V S R2 W INSTRUCTION MANUAL ENGLISH G H PRINTED IN P.R.C /01
 T C U V B A INSTRUCTION MANUAL ENGLISH F E S R W D GB R M G H PRINTED IN P.R.C. 48007909/0 I J K L Q N O P P P3 P4 P5 3 4 5 4 5 6 7 6 7 8 9 8 9 0 0 3 3 4 5 IMPORTANT Safety reminders This cleaner should
User Instruction Manual
 User Instruction Manual Mulled Wine Heater Please read and keep these instructions You will need: -32 amp plug socket -Temperature thermometer These instructions cover the Mulled Wine Heater Mulled Wine