VC 20 U VC 40 U VC 40-UE
|
|
|
- Grant Powell
- 5 years ago
- Views:
Transcription

1 VC 20 U VC 40 U VC 40-UE English Français Español Português en fr es pt

2 1

3

4 1 Information about the documentation 1.1 Conventions Warning signs The following warning signs are used: General warning Warning: hot surface Prohibition signs The following prohibition signs are used: Transport by crane is not permissible Symbols The following symbols are used: Read the operating instructions before use. Instructions for use and other useful information Typographical emphasis The following typographical features are used in this technical documentation: 1 These numbers refer to the corresponding illustrations. 1 The numbering in the illustrations reflects the order of the work steps and may deviate from the numbering in the text. 1.2 On the appliance 1.3 Operating instructions It is essential that the operating instructions are read before initial operation. Always keep these operating instructions together with the appliance. Ensure that the operating instructions are with the appliance when it is given to other persons. Changes and errors excepted. 1.4 Product information The type designation and serial number are printed on the type identification plate. Make a note of this data in the following table and always refer to it when making an enquiry to your Hilti representative or Hilti Service Center. Product information Type: Generation: 02 Serial no.: 1
5 2 Safety 2.1 Warnings The purpose of warnings Warnings alert persons to hazards that occur when handling or using the product. Description of the key words used DANGER Draws attention to imminent danger that will lead to serious personal injury or fatality. WARNING Draws attention to a potentially dangerous situation that could lead to serious personal injury or fatality. CAUTION Draws attention to a potentially dangerous situation that could lead to slight personal injury or damage to the equipment or other property. 2.2 Safety instructions Important safety instructions WARNING! READ ALL INSTRUCTIONS BEFORE USING THIS APPLIANCE. Failure to follow all the instructions listed below may result in electric shock, fire and/or serious injury. KEEP THESE INSTRUCTIONS IN A SAFE PLACE General safety instructions In addition to the safety instructions given in the various sections of these operating instructions, the following points must be strictly observed at all times. Read all the instructions. Failure to follow all the instructions listed below may result in electric shock, fire and/or serious injury. If the appliance is used in conjunction with an electric tool, read and follow the operating instructions for the electric tool and all the warnings. Modification of the appliance is not permitted. Use the right appliance for the job. Do not use the appliance for purposes for which it was not intended. Use it only as directed and when in faultless condition. Before beginning work with the appliance, find out how to operate it correctly and about any hazards associated with the materials it will be picking up and how these materials can be disposed of. Take the influences of the surrounding area into account. Do not use the appliance where there is a risk of fire or explosion. The appliance may only be used by persons who are familiar with it, have been trained on how to use it safely and who understand the resulting hazards. The appliance is not intended for use by children. Store appliances in a secure place when not in use. When not in use, appliances must be stored in a dry, high place or locked away out of reach of children Personal safety Stay alert, watch what you are doing and use common sense when working with the product. Do not use the vacuum cleaner while you are tired or under the influence of drugs, alcohol or medication. A moment of inattention while operating the appliance may result in serious personal injury. The user and any other persons in the vicinity must wear suitable eye protection, a hard hat, ear protection, protective gloves, safety footwear and breathing 2
6 protection while the appliance is in use or while maintenance work on it is being carried out. Engage the wheel brakes so that the vacuum cleaner stands securely. If the wheel brakes are disengaged the vacuum cleaner may run away out of control. If devices are provided for the connection of dust extraction and collection facilities, ensure these are connected and properly used. Use of a vacuum cleaner can reduce dust-related hazards Use and care of the appliance Never leave the appliance unattended. Do not deactivate the filter cleaning system when picking up hazardous dusts, especially when the appliance is used in conjunction with electric tools that generate dust. Protect the appliance from frost. Clean the water level limiting device regularly with a brush, in accordance with the instructions, and check it for signs of damage. When fitting the top section of the vacuum cleaner, take care to avoid pinching your fingers or damaging the supply cord. This presents a risk of injury or damage. Check the appliance and its accessories for any damage. Guards, safety devices and any slightly damaged parts must be checked carefully to ensure that they function faultlessly and as intended. Check that moving parts function faultlessly, without sticking, and that no parts are damaged. In order to ensure faultless operation of the appliance, all parts must be fitted correctly and must meet the necessary requirements. Have the appliance serviced by a qualified repair person using only genuine Hilti spare parts. The safety of the appliance can thus be maintained. Always unplug the supply cord from the power outlet when the appliance is not in use (during breaks), before cleaning and maintenance and before changing the filter or accessories. This preventive safety measure reduces the risk of starting the appliance accidentally. Never pull the vacuum cleaner by the supply cord to a new working position. Do not run the wheels of the vacuum cleaner over the supply cord. Do not transport the appliance by crane Electrical safety The plug on the supply cord of the appliance must match the outlet. Do not change the plug in any way. Do not use adapter plugs with earthed (grounded) appliances. Unmodified plugs and matching outlets reduce risk of electric shock. Insert the plug in a suitable earthed/grounded power outlet which has been correctly and safely installed and is in compliance with local regulations. If you are in doubt about the effectiveness of the power outlet s earth/ground connection, have it checked by a qualified specialist. Avoid body contact with earthed or grounded surfaces such as pipes, radiators, cookers, stoves and refrigerators. There is an increased risk of electric shock if your body is grounded. Do not expose the appliance to rain or wet conditions. Water entering an electric appliance will increase the risk of electric shock. Check to ensure that the supply cord does not lie in a puddle of water. Check the appliance s supply cord at regular intervals and have it replaced by Hilti Service if damage is found. Check extension cords at regular intervals and replace them if found to be damaged. 3
7 Do not touch the supply cord or extension cord if they are damaged while working. Disconnect the supply cord plug from the power outlet. Damaged supply cords or extension cords present a risk of electric shock. The electric supply cord may be replaced only with a cord of the type specified in the operating instructions. Do not abuse the cord. Never use the cord for carrying, pulling or unplugging the appliance. Keep the cord away from heat, oil, sharp edges or moving parts. Damaged or entangled cords increase the risk of electric shock. When operating an electric appliance outdoors, use only extension cords of a type suitable for outdoor use. Use of an extension cord suitable for outdoor use reduces the risk of electric shock. In the event of an interruption in the electric supply, switch the appliance off and unplug it from the power outlet. Use the electric tool power outlet only for the purposes described in the operating instructions. Never operate the appliance when it is dirty or wet. Dust (especially dust from conductive materials) or dampness adhering to the surface of the appliance may, under unfavorable conditions, lead to electric shock. Dirty or dusty appliances should thus be checked by Hilti Service at regular intervals, especially if used frequently for working on conductive materials Workplace Ensure that the workplace is well lit. Ensure that the workplace is well ventilated. Exposure to dust at a poorly ventilated workplace may result in damage to the health. Keep the workplace tidy. Objects which could cause injury should be removed from the working area. Untidiness at the workplace can lead to accidents. Do not operate the appliance in explosive atmospheres, such as in the presence of flammable liquids, gases or dust. Electric appliances cause sparks which may ignite the dust or fumes. Use extra care when working on stairs The material picked up Do not use the appliance to pick up flammable or explosive dusts (magnesium or aluminum dust etc.) or dusts that present a health hazard. Do not use the appliance to pick up materials with a temperature of over 60 C (e.g. glowing cigarettes, hot ash). Do not use the appliance to pick up flammable, explosive or aggressive liquids (coolants and lubricants, gasoline, solvents, acids (ph < 5), alkalies (ph > 12.5), etc.). Switch the appliance off immediately if foam or liquids escape from it. Wear protective gloves when using the vacuum cleaner to pick up hot materials up to a temperature of 60 C. When working with mineral drilling slurry, wear protective clothing and avoid skin contact with the slurry (ph > 9: caustic). Avoid contact with alkaline or acidic liquids. If contact accidentally occurs, rinse with water. In the event of the liquid coming into contact with the eyes, rinse the eyes with plenty of water and consult a doctor. 4
8 3 Description 3.1 Overview of the product Electric tool power outlet ; Automatic filter cleaning = Control switch % Hose socket & Waste material container ( Grip recess ) Catch + Vacuum cleaner top section Filter cover / Grip : Supply cord hook Catch for filter cover $ Filter cleaning ON/OFF button Automatic filter cleaning system status indicator 3.2 Use as directed The products described here are industrial vacuum cleaners designed for universal, commercial use. They can be used for wet or dry applications. Hilti products are designed for professional use and may be operated, serviced and maintained only by trained, authorized personnel. The product and its ancillary equipment may present hazards when used incorrectly by untrained personnel or when used not as directed. Use of the product to clean down persons or animals is not permissible. Underwater use is not permissible. Before beginning work with the product, find out how to operate it correctly and about any hazards associated with the materials you will be working with and how these materials can be disposed of safely. Do not use the product for continuous, stationary operation in automatic or semiautomatic systems. To reduce the risk of injury, use only genuine Hilti tools and accessories. Use an antistatic suction hose in order to avoid electrostatic effects. Do not pick up objects or materials that could cause injury by piercing through the dust bag (e.g. pointed or sharp objects). Do not stand on the product (do not use it as a substitute for a ladder). This product is suitable for the following applications in commercial use: Collecting large quantities of dust from Hilti diamond grinders, diamond cutters, rotary hammers and core drilling machines using dry-cutting core bits. Picking up drilling slurry (mineral materials) with Hilti diamond core bits or Hilti diamond saws and liquids up to a temperature of < 60 C (140 F). Picking up oil or liquid substances with a temperature of up to < 60 C (140 F). Wet and/or dry cleaning of wall and floor surfaces. 3.3 Possible misuse Do not operate the industrial vacuum cleaner when it is laid on its side. Do not use the industrial vacuum cleaner to pick up substances that present a risk of explosion, glowing, burning or flammable substances or aggressive dusts (e.g. magnesium or aluminum dust, etc.) (exception: wood chips or shavings). Do not use the industrial vacuum cleaner to pick up flammable liquids (e.g. gasoline, solvents, coolants and lubricants, etc.). Working with materials hazardous to health (e.g. asbestos) is not permissible. 5
9 3.4 Items supplied Wet/dry vacuum cleaner including filter element, suction hose complete with rotary connector (at the vacuum cleaner end) and accessory nozzle connector, PE VC 20/40 plastic dust bag, operating instructions. Note To help ensure safe and reliable operation, use only genuine Hilti spare parts and consumables. Spare parts, consumables and accessories approved by us for use with the product can be found at your local Hilti Center or online at: Automatic filter cleaning The vacuum cleaner is equipped with an automatic filter cleaning system that removes most of the dust adhering to the filter element. The filter cleaning system can be switched off by pressing the Automatic filter cleaning ON/OFF button and switched back on by pressing the button again. Status Meaning LED lights. The filter cleaning system is active. LED doesn t light. The filter cleaning system is not active. The filter cleaning system is activated automatically each time the vacuum cleaner is switched on. The filter element is cleaned automatically by a blast of air (a pulsating noise is heard). Note In order to achieve continuously high suction performance in system applications (especially grinding and sanding, cutting and slitting) or when picking up large quantities of dust, the filter cleaning system must be active. The filter cleaning system functions only when a suction hose is connected. 3.6 Instructions for use Accessories and how they are used Accessories PE VC 20 synthetic dust bag (203854) PE VC 40 synthetic dust bag (203852) VC 20 paper dust bag (203858) VC 40 paper dust bag (203856) VC 20/40 dry filter ( ) VC 20/40 universal filter ( ) VC 20/40 performance filter ( ) Suction hose, 27 x 3.5 m AS Suction hose, 36 mm Suction hose, 36 x 5 m AS Type of use Working with mineral materials, wet and dry Working with mineral materials, wet and dry Working with wood Working with wood Dry Universal use, wet and dry Heavy use, wet and dry Wet and dry Mainly wet, not for dust Wet and dry 6
10 4 Technical data Note When powered by a generator or transformer, the generator or transformer s power output must be at least twice the rated input power shown on the rating plate of the appliance. The operating voltage of the transformer or generator must always be within +5% and -15% of the rated voltage of the appliance. The information given applies to a rated voltage of 120 V. The data may vary in the event of deviations from the rated voltage and for country-specific versions. Please refer to the appliance s rating plate for details of its voltage, frequency, current and input power ratings. VC 20 U VC 40 U VC 40-UE AC frequency 60 Hz 60 Hz 60 Hz Weight Dimensions 28.4 lb (12.9 kg) 19.9 in x 15.0 in x 19.7 in (505 mm x 380 mm x 500 mm) Mains connection (type) SJTW 3/16 AWG Maximum volumetric flow rate (air) 1200 W 16 liq. gal US /s (61 l/s) Maximum vacuum 1200 W 3 psi (23 kpa) Container capacity Effective dust capacity Effective water capacity 6 liq. gal US (21 l) 51 lb (23 kg) 3.6 liq. gal US (13.5 l) Air temperature ( ) 32.2 lb (14.6 kg) 19.9 in x 15.0 in x 24.0 in (505 mm x 380 mm x 610 mm) SJTW 3/16 AWG 16 liq. gal US /s (61 l/s) 3 psi (23 kpa) 10 liq. gal US (36 l) 88 lb (40 kg) 7 liq. gal US (25 l) ( ) 32.2 lb (14.6 kg) 19.9 in x 15.0 in x 24.0 in (505 mm x 380 mm x 610 mm) SJTOW 3/12 AWG 16 liq. gal US /s (61 l/s) 3 psi (23 kpa) 10 liq. gal US (36 l) 88 lb (40 kg) Automatic filter cleaning, all 15 s 15 s 15 s Protection class I I I 7 liq. gal US (25 l) Protection class IP X4 IP X4 IP X ( ) 5 Before use CAUTION Risk of injury presented by the appliance running away out of control. The vacuum cleaner may run away out of control if the wheel brakes are not engaged. Engage the wheel brakes so that the vacuum cleaner stands securely. 7
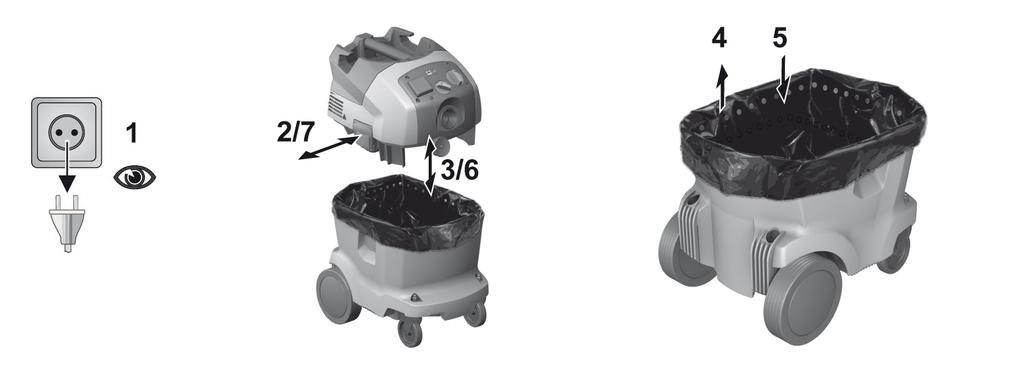
11 5.1 Operating the appliance for the first time 1. Open the two catches. 2. Lift the vacuum cleaner top section away from the waste material container. 3. Remove the accessories and packaging from the waste material container. 4. Fit a suitable dust bag in accordance with the instructions. 5. Fit the vacuum cleaner top section onto the waste material container and close the two catches. 6. Check to ensure that the vacuum cleaner top section is fitted correctly and secured. 7. Connect the suction hose to the appliance. 5.2 Fitting a paper dust bag for picking up wood chips 2 1. Open the two catches. 2. Lift the vacuum cleaner top section away from the waste material container. 3. Fit the new paper dust bag into the adapter and insert these in the waste material container. 4. Fit the vacuum cleaner top section onto the waste material container. 5. Close the two catches. 6. Check to ensure that the vacuum cleaner top section is fitted correctly and secured. 7. Connect the suction hose to the appliance. 5.3 Fitting a plastic dust bag 1. Open the two catches. 2. Lift the vacuum cleaner top section away from the waste material container. 3. Fit a new plastic dust bag (see instructions printed on it) in the waste material container. 4. Fit the vacuum cleaner top section onto the waste material container and close the two catches. 6 Operation DANGER Electrical hazards. Fatal or serious injury may result if the vacuum cleaner is not correctly connected to the electric supply. Connect the vacuum cleaner only to a properly earthed/grounded power source. WARNING Risk of injury. Damage to the filter system may allow harmful dust (health hazard) to escape. In an emergency (e.g. filter ruptured), switch the vacuum cleaner off, unplug the supply cord from the power outlet and have the vacuum cleaner checked by a trained and qualified person before further use. CAUTION Risk of injury presented by the appliance running away out of control. The vacuum cleaner may run away out of control if the wheel brakes are not engaged. Engage the wheel brakes so that the vacuum cleaner stands securely. 8
12 6.1 Operation without use of the electric tool power outlet 1. Check that the switch on the appliance is in the OFF position off before plugging the supply cord into a power outlet. 2. Plug the vacuum cleaner s supply cord into the power outlet. 3. Turn the control switch to the ON position. 6.2 Operation with use of the electric tool power outlet Note The electric tool power outlet is to be used only for powering electric tools directly from the vacuum cleaner. The operating instructions and safety instructions for the electric tool plugged into the electric tool power outlet on the vacuum cleaner must be observed. 1. Unplug the vacuum cleaner s supply cord from the power outlet. 2. Check that the maximum power drawn by the electric tool is below the maximum permissible output of the electric tool power outlet on the vacuum cleaner (please refer to the Technical data section of the operating instructions and information printed on the electric tool power outlet). 3. Check to ensure that the electric tool is switched off before plugging its supply cord into the power outlet. 4. Plug the electric tool s supply cord into the electric tool power outlet on the vacuum cleaner. 5. Plug the vacuum cleaner s supply cord into the power outlet. 6. Turn the control switch to the Auto position. 7. Switch on the power tool. Note The vacuum cleaner will continue to run for a short time after switching off the electric tool in order to ensure that all dust is removed from the suction hose. 6.3 Picking up dry dust Note Before picking up dry dust, especially dust from mineral materials, always check to ensure that the correct dust bag is fitted in the container. The material picked up by the vacuum cleaner can then be disposed of cleanly and easily. CAUTION Risk of injury. Hazardous material that has been picked up may escape if a filter element is not used. Never use the appliance without a filter element. Check that the filter element is dry and that the correct type of dust bag is fitted. 6.4 Changing the paper dust bag DANGER Risk of injury. Sharp pointed objects may pierce through the dust bag. Check that no objects have pierced through the dust bag. 9
13 1. Disconnect the supply cord plug from the power outlet. 2. Open the two catches. 3. Lift the vacuum cleaner top section away from the waste material container. 4. Carefully release the mouth of the dust bag from the adapter. 5. Close the mouth of the dust bag with the slider. 6. Clean the waste material container with a cloth. 7. Fit a new paper dust bag in the waste material container. 8. Fit the vacuum cleaner top section onto the waste material container and close the two catches. 6.5 Changing a plastic dust bag 3 1. Disconnect the supply cord plug from the power outlet. 2. Open the two catches. 3. Lift the vacuum cleaner top section away from the waste material container. 4. Use a cable tie to close the plastic dust bag below the punched holes. 5. Remove the plastic dust bag. 6. Clean the waste material container with a cloth. 7. Fit a new plastic dust bag (see instructions printed on it) in the waste material container. 8. Fit the vacuum cleaner top section onto the waste material container and close the two catches. 6.6 Picking up liquids 4 10 CAUTION Risk of injury. Hazardous material that has been picked up may escape if a filter element is not used. Never use the appliance without a filter element. 1. Check the container level monitoring system. page If possible, use a separate filter element for wet applications. Note The Hilti VC 20/40 universal ( ) filter is recommended. 3. After picking up liquids, open the two catches. 4. Lift the vacuum cleaner top section away from the waste material container and place it on a level surface so that the filter element can dry. 5. Empty the waste material container and use a water hose to rinse it out. Use a brush to clean the electrodes and clean the filter element, after allowing it to dry, by wiping it off with your hand. 6. Allow the waste material container to dry. 6.7 After use of the vacuum cleaner 1. Switch off the electric tool. 2. Turn the vacuum cleaner control switch to the OFF position. 3. Unplug the vacuum cleaner s supply cord from the power outlet. 4. Coil up the supply cord and hang it on the hook. 5. Empty the container and clean the appliance by wiping it with a damp cloth. 6. Coil up the suction hose. 7. Store the vacuum cleaner in a secure, dry place where it is inaccessible to unauthorized users.
14 6.8 Emptying dry dust from the waste material container 1. Pull the plug out of the power outlet. 2. Lift the vacuum cleaner top section away from the waste material container and place it on a level surface. 3. Remove the dust bag from the waste material container or grip the container by the recess provided and empty it by tipping out the contents. 4. Fit the vacuum cleaner top section onto the waste material container and close the two catches. 6.9 Emptying the waste material container when no dust bag is fitted (picking up liquids) 1. Disconnect the supply cord plug from the power outlet. 2. Lift the vacuum cleaner top section away from the waste material container and place it on a level surface. 3. Grip the waste material container by the recess provided and empty it by tipping out the contents. 4. Clean the edge of the waste material container with a cloth. 5. Fit the vacuum cleaner top section onto the waste material container and close the two catches. 7 Care, maintenance, transport and storage 7.1 Care and maintenance of the appliance WARNING Electrical hazards. Improper repairs to electrical parts may lead to serious injuries. Electrical parts may be repaired only by trained electrical specialists. Keep the appliance, especially its grip surfaces, clean and free from oil and grease. Do not use cleaning agents containing silicone. Never operate the vacuum cleaner when the air vents are blocked. Clean the air vents carefully using a dry brush. Do not permit foreign objects to enter the interior of the appliance. Clean the outer surfaces of the appliance with a slightly damp cloth at regular intervals. Do not use a spray system, pressure jet washer or running water for cleaning as this may negatively affect the electrical safety of the appliance. 7.2 Automatic filter cleaning Note Do not attempt to clean the filter element by knocking it against a hard object and do not use pointed instruments. This will reduce the life of the filter element. Do not use compressed air to clean the filter element. This may cause tears in the filter material. The condition of the filter element deteriorates with use. Replace the filter element at least every six months. However, if used intensively, the filter element should be replaced more often. 11
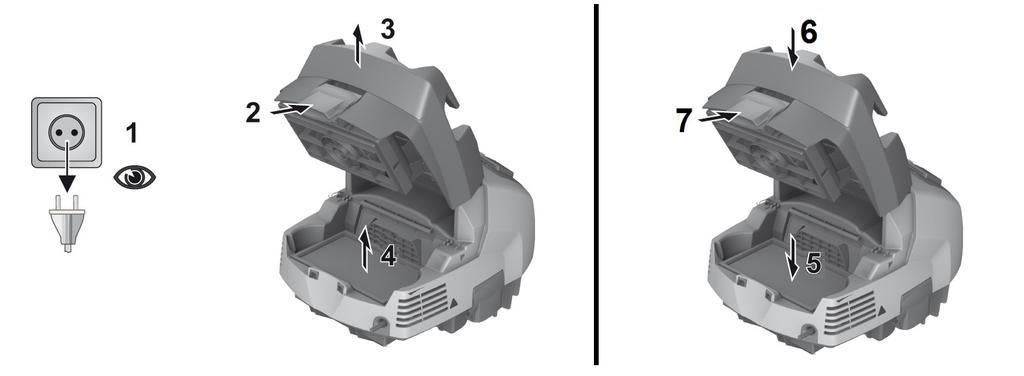
15 7.3 Changing the filter element 5 1. Disconnect the supply cord plug from the power outlet. 2. Open the filter cover catches. 3. Open the filter cover. 4. Carefully remove the filter element, gripping it at the areas provided in the holder. 5. Clean the sealing surface with a cloth. 6. Fit the new filter element. 7. Close the filter cover by flipping the cover catch forward. 8. Close the filter cover catch. 7.4 Checking the container level monitoring system 1. Engage the wheel brakes so that the vacuum cleaner stands securely. 2. Disconnect the supply cord plug from the power outlet. 3. Open the two catches. 4. Lift the vacuum cleaner top section away from the waste material container and place it on a level surface. 5. Check the cut-out contacts and clean them with a brush if necessary (if dirty). 6. Check the seal at the vacuum cleaner top section and clean it with a cloth if necessary. 7. Fit the vacuum cleaner top section onto the waste material container and close the two catches. 7.5 Checks after cleaning and maintenance 1. After cleaning or carrying out maintenance, check that the vacuum cleaner is assembled correctly and that it functions faultlessly. 2. Test each of the functions. 7.6 Transport Do not carry the appliance when it is full of waste material. The appliance may not be lifted directly by crane. When necessary, remove the power conditioner and any loose accessories from their holders or attachment points. Empty the appliance before carrying it to another location. Do not tip the appliance or transport it lying on its side after using it to pick up liquids. Use the tapered adapter to connect both ends of the hose together conveniently for transport. 7.7 Storage Store the vacuum cleaner in a secure, dry place where it is inaccessible to unauthorized users. 8 Troubleshooting If the trouble you are experiencing isn t listed in this table or you are unable to remedy the problem by yourself, please contact Hilti Service. Trouble or fault Possible cause Action to be taken No suction power or The dust bag is full. Change the paper dust reduced suction power. bag. page 9 12 Change the plastic dust bag. page 10
16 Trouble or fault Possible cause Action to be taken No suction power or reduced suction power. Dust is blown out of the appliance. The appliance switches itself off or on inadvertently or static electricity discharges through the user. The appliance doesn t start or switches itself off after a short time. The motor doesn t restart. The motor doesn t run when set to AUTO. The filter element is clogged with dirt or dust. The suction hose or dust hood on the electric tool is blocked. The filter element is not fitted correctly. The filter element is damaged. Electrostatic charge is not conducted away the appliance is connected to an unearthed/ungrounded power outlet. The water level cut-out is activated. The mains circuit breaker has been tripped. The waste material container is full. The motor overheating protection cut-out has been activated. The motor overheating protection cut-out switches the motor off repeatedly because the air vents are clogged. The appliance is faulty or is not correctly plugged in. If the automatic filter cleaning system is deactivated, activate it and allow the vacuum cleaner to run for 30 seconds. Change the filter element. page 12 Clean the suction hose and the dust hood. Fit the filter element again correctly. Fit a new filter element. Connect the appliance to an earthed/grounded power outlet and use an antistatic suction hose. Clean the sensors and the area around the sensors with a brush. Reset the circuit breaker. Find the reason for the overload current if the circuit breaker trips again. Switch the appliance off and empty the waste material container. Empty the waste material container. page 11 Switch the appliance off and allow it to cool down for about 5 minutes. If the motor doesn t start, return the appliance to Hilti Service. Clean the air vents carefully using a dry brush. Make sure that the supply cord plug is fully plugged in and check that the appliance functions correctly. 13

17 Trouble or fault Possible cause Action to be taken The automatic filter element cleaning system doesn t work. No suction hose is connected. Connect the suction hose. 9 Disposal Most of the materials from which Hilti products are manufactured can be recycled. The materials must be correctly separated before they can be recycled. In many countries, your old tools, machines or appliances can be returned to Hilti for recycling. Ask Hilti Service or your Hilti representative for further information. Drilling slurry Disposal of drilling slurry directly into rivers, lakes or the sewerage system without suitable pretreatment presents environmental problems. Ask the local public authorities for information about current regulations. We recommend the following pretreatment: Collect the drilling slurry (for example, using a wet-type vacuum cleaner). Allow the drilling slurry to settle and dispose of the solid material at a construction waste disposal site (addition of a flocculent may accelerate the settling process). The remaining water (alkaline, ph value greater than 7) must be neutralized by the addition of an acidic neutralizing agent or diluted with a large volume of water before it is allowed to flow into the sewerage system. Drilling dust Dispose of the drilling dust collected by the vacuum cleaner in accordance with the applicable national regulations. 10 Manufacturer s warranty Please contact your local Hilti representative if you have questions about the warranty conditions. 14

18 Hilti = registered trademark of Hilti Corp., Schaan Pos * *
VC VC English
 VC 125-6 VC 125-9 English 1 Information about the documentation 1.1 About this documentation Read this documentation before initial operation or use. This is a prerequisite for safe, trouble-free handling
Printed: Doc-Nr: PUB / / 000 / 00 VC X
 VC 300-17 X 1 Information about the documentation 1.1 About this documentation Read this documentation before initial operation or use. This is a prerequisite for safe, trouble-free handling and use of
TE 300-AVR. English Français Español Português
 TE 300-AVR English Français Español Português en fr es pt 1 2 3 4 5 6 7 8 9 TE 300-AVR en Original operating instructions....................................... 1 fr Mode d'emploi original............................................
TE 2 TE 2-M TE 2-S. English Français Español Português
 TE 2 TE 2-M TE 2-S English Français Español Português en fr es pt 1 Printed: 15.12.2015 Doc-Nr: PUB / 5261122 / 000 / 00 2 3 4 5 Printed: 15.12.2015 Doc-Nr: PUB / 5261122 / 000 / 00 6 7 8 TE 2 TE 2-M TE
TE 3-M TE 3-C. English Français Español. Printed: Doc-Nr: PUB / / 000 / 01
 TE 3-M TE 3-C English Français Español en fr es Printed: 25.11.2015 Doc-Nr: PUB / 5245522 / 000 / 01 1 This Product is Certified Ce produit est homologué Producto homologado por Este produto está registrado
TE 1000-AVR. English. Printed: Doc-Nr: PUB / / 000 / 04
 TE 1000-AVR English 1 Information about the documentation 1.1 About this documentation Read this documentation before initial operation or use. This is a prerequisite for safe, trouble-free handling and
DD VP-U. Operating instructions Mode d emploi Manual de instrucciones Manual de instruções. Printed: Doc-Nr: PUB / / 000 / 01
 DD VP-U Operating instructions Mode d emploi Manual de instrucciones Manual de instruções en fr es pt Printed: 08.07.2013 Doc-Nr: PUB / 5069625 / 000 / 01 1 1 2 3 4 5 + 9 6 8 7 This Product is Listed Ce
TE 2 TE 2-M TE 2-S English
 TE 2 TE 2-M TE 2-S English 1 Information about the documentation 1.1 About this documentation Read this documentation before initial operation or use. This is a prerequisite for safe, trouble-free handling
TE 40 TE 40-AVR English
 TE 40 TE 40-AVR English 1 Information about the documentation 1.1 About this documentation Read this documentation before initial operation or use. This is a prerequisite for safe, trouble-free handling
TE 3-ML TE 3-CL. English Français Español Português 繁體中文中文
 TE 3-ML TE 3-CL English Français Español Português عربي 繁體中文中文 en fr es pt ar zh cn 1 2 3 4 Printed: 25.04.2016 Doc-Nr: PUB / 5279060 / 000 / 00 5 6 7 8 Printed: 25.04.2016 Doc-Nr: PUB / 5279060 / 000
Safety Warnings. Work area safety. Electrical Safety. Personal Safety
 Table of Contents Safety Warnings...2 Work area safety...2 Electrical Safety...2 Personal Safety...2 Power tool use and care...3 Service...3 Hammer safety warnings...3 Product Layout...4 Product Description...4
DUST EXTRACTOR INSTRUCTION MANUAL. 550W (3/4 HP) INDUCTION MOTOR 1850W AUTOMATIC POWER OUTLET 65L COLLECTION BAG ø100mm X 2.
 INDUCTION MOTOR 1850W AUTOMATIC POWER OUTLET 65L COLLECTION BAG ø100mm X 2.") KNOW YOUR PRODUCT DUST EXTRACTOR 550W (3/4 HP) INDUCTION MOTOR 1850W AUTOMATIC POWER OUTLET 65L COLLECTION BAG ø100mm X 2.5M SUCTION HOSE INSTRUCTION MANUAL WARNING: Read all safety warnings and all instructions.
KNOW YOUR PRODUCT DUST EXTRACTOR 550W (3/4 HP) INDUCTION MOTOR 1850W AUTOMATIC POWER OUTLET 65L COLLECTION BAG ø100mm X 2.5M SUCTION HOSE INSTRUCTION MANUAL WARNING: Read all safety warnings and all instructions.
VC 60-U. ar kk. Пайдалану бойынша басшылық. Printed: Doc-Nr: PUB / / 000 / 01
 VC 60-U Bedienungsanleitung Operating instructions Mode d emploi Istruzioni d uso Manual de instrucciones Manual de instruções Gebruiksaanwijzing Brugsanvisning Bruksanvisning Bruksanvisning Käyttöohje
TE 60-AVR TE 60-ATC/AVR
 TE 60-AVR TE 60-ATC/AVR English 1 Information about the documentation 1.1 About this documentation Read this documentation before initial operation or use. This is a prerequisite for safe, trouble-free
TE 60-ATC/AVR English
 TE 60-ATC/AVR English 1 Information about the documentation 1.1 About this documentation Read this documentation before initial operation or use. This is a prerequisite for safe, trouble-free handling
SAFETY AND OPERATING MANUAL
 SAFETY AND OPERATING MANUAL Random orbit sander WX655 2 3 1 9 4 5 8 6 7 A1 A2 10B 10A B C1 C2 D 11 E F E F G H1 H2 H3 H4 H4 GENERAL POWER TOOL SAFETY WARNINGS WARNING! Read all safety warnings and all
GENERAL POWER TOOL SAFETY WARNINGS
 GENERAL POWER TOOL SAFETY WARNINGS WARNING! Read all safety warnings and all instructions. Failure to follow the warnings and instructions may result in electric shock, fire and/or serious injury. Save
ENGLISH (Original instructions) INSTRUCTION MANUAL. Power Mixer UT2204 DOUBLE INSULATION. IMPORTANT: Read Before Using.
 INSTRUCTION MANUAL. Power Mixer UT2204 DOUBLE INSULATION. IMPORTANT: Read Before Using.") ENGLISH (Original instructions) INSTRUCTION MANUAL Power Mixer UT04 0078 DOUBLE INSULATION IMPORTANT: Read Before Using. ENGLISH (Original instructions) SPECIFICATIONS Model UT04 No load speed (min - )
ENGLISH (Original instructions) INSTRUCTION MANUAL Power Mixer UT04 0078 DOUBLE INSULATION IMPORTANT: Read Before Using. ENGLISH (Original instructions) SPECIFICATIONS Model UT04 No load speed (min - )
CORDLESS HAND VACUUM INSTRUCTION MANUAL
 WHAT S IN THE BOX Cordless Vacuum CORDLESS HAND VACUUM INSTRUCTION MANUAL Brush Tool SPECIFICATIONS Input: Air Flow: Dust Canister Capacity: Weight: ozito.com.au 18V 8 L/sec 540ml 0.85kg Crevice Tool Mounting
Blower UB1100 UB1101 INSTRUCTION MANUAL
 ENGLISH (Original instructions) INSTRUCTION MANUAL Blower UB00 UB0 004752 DOUBLE INSULATION WARNING: For your personal safety, READ and UNDERSTAND before using. SAVE THESE INSTRUCTIONS FOR FUTURE REFERENCE.
ATD /8 Electric Drill
 ATD-10538 3/8 Electric Drill Tool specifications: Rated Voltage: (V) 120 Rated Frequency: (Hz) 60 Rated current: (A) 3.3 No-load Speed: (RPM) 0-2700 Speed Selection: Yes Right/Left Rotation: Yes Chuck
ELECTRIC AIR PUMP 130W INSTRUCTION MANUAL SPECIFICATIONS. ozito.com.au WHAT S IN THE BOX. Electric Air Pump. 3 x Inflation Adaptors
 WHAT S IN THE BOX ELECTRIC AIR PUMP 130W INSTRUCTION MANUAL SPECIFICATIONS Voltage: 220-240V ~50Hz Power: 130W Max. Current: 0.62A Max. Pressure: 0.6PSI Flow Rate: 440L/Min Inflation Time: Under 2min (double
User Manual GV25 GV35 GV702. Company information: Original instructions GV12066 (1)
") User Manual Original instructions GV25 GV35 GV702 Company information: www.vipercleaning.eu info-eu@vipercleaning.com GV12066 (1) 2012-04-10 USER MANUAL ENGLISH TABLE OF CONTENTS Introduction... 4 Manual
User Manual Original instructions GV25 GV35 GV702 Company information: www.vipercleaning.eu info-eu@vipercleaning.com GV12066 (1) 2012-04-10 USER MANUAL ENGLISH TABLE OF CONTENTS Introduction... 4 Manual
TE 60-AVR TE 60-ATC/AVR
 TE 60-AVR TE 60-ATC/AVR English 1 Information about the documentation 1.1 About this documentation Read this documentation before initial operation or use. This is a prerequisite for safe, trouble-free
ENGLISH (Original instructions) INSTRUCTION MANUAL. Demolition Hammer HM0810TA DOUBLE INSULATION. IMPORTANT: Read Before Using.
 INSTRUCTION MANUAL. Demolition Hammer HM0810TA DOUBLE INSULATION. IMPORTANT: Read Before Using.") ENGLISH (Original instructions) INSTRUCTION MANUAL Demolition Hammer HM080TA 00079 DOUBLE INSULATION IMPORTANT: Read Before Using. ENGLISH (Original instructions) SPECIFICATIONS Model HM080TA Blows per
ENGLISH (Original instructions) INSTRUCTION MANUAL Demolition Hammer HM080TA 00079 DOUBLE INSULATION IMPORTANT: Read Before Using. ENGLISH (Original instructions) SPECIFICATIONS Model HM080TA Blows per
Drywall Screwdriver R INSTRUCTION MANUAL
 ENGLISH (Original instructions) INSTRUCTION MANUAL Drywall Screwdriver 6823 6824 6825 6825R 002604 DOUBLE INSULATION WARNING: For your personal safety, READ and UNDERSTAND before using. SAVE THESE INSTRUCTIONS
Accessories. Safety Warnings. Table of Contents
 Table of Contents Accessories...1 Safety Warnings...1 Work Area...2 Electrical Safety...2 Personal Safety...2 Power Tool Use and Care...3 Service...3 Hammer Safety Warnings...3 Usage...4 Changing Tools...4
Mini-Rooter Operating Instructions
 Mini-Rooter Operating Instructions For 1-1/4 through 4 lines (30mm 100mm) Your Mini-Rooter is designed to give you years of trouble-free, profitable service. However, no machine is better than its operator.
TE DRS-S. Printed: Doc-Nr: PUB / / 000 / 00
 TE DRS-S Bedienungsanleitung Operating instructions Mode d emploi Istruzioni d uso Manual de instrucciones Manual de instruções Gebruiksaanwijzing Brugsanvisning Bruksanvisning Bruksanvisning Käyttöohje
WET & DRY GARAGE VAC 20L CAPACITY WATT 1.5M MOTOR TANK STEEL HOSE KP702 ON BOARD ACCESSORY STORAGE SUCTION STAINLESS
 WET & DRY GARAGE VAC 20L CAPACITY 1.5M SUCTION HOSE STAINLESS STEEL TANK ON BOARD ACCESSORY STORAGE 1250 WATT MOTOR KP702 Table of Contents 20L WET & DRY GARAGE VAC Know Your Product...1 Vacuum Safety
WET & DRY VACUUM 1500W 30L WARRANTY INSTRUCTION MANUAL SPECIFICATIONS. ozito.com.au VWD-1530 WHAT S IN THE BOX
 WHAT S IN THE BOX WET & DRY VACUUM 1500W 30L INSTRUCTION MANUAL SPECIFICATIONS Mains Voltage: Input Power: Suction Power Max.: Tank Capacity: IP Rating: Product weight: ozito.com.au 230 240V ~ 50Hz 1500W
SJD 6-A22. English. Printed: Doc-Nr: PUB / / 000 / 00
 SJD 6-A22 English 1 Information about the documentation 1.1 About this documentation Read this documentation before initial operation or use. This is a prerequisite for safe, trouble-free handling and
SPECIFICATIONS MODEL NO. OZDE1015WA
 SPECIFICATIONS MODEL NO. OZDE1015WA Motor size: Input: No load speed: Exhaust connection: Hose length: Suction capacity: Dust collection drum: Noise level: Tool Weight: 1100W 230-240V ~ 50Hz 20,000 /min
SCO 6-A22. English. Printed: Doc-Nr: PUB / / 000 / 02
 SCO 6-A22 English 1 Information about the documentation 1.1 About this documentation Read this documentation before initial operation or use. This is a prerequisite for safe, trouble-free handling and
DG 150 DPC 20 English
 DG 150 DPC 20 English 1 Information about the documentation 1.1 About this documentation Read this documentation before initial operation or use. This is a prerequisite for safe, trouble-free handling
Operating Instructions
 Operating Instructions BA-003 Read and understand this manual before use. Keep this manual for future reference. CONFORMS TO UL STD.No.1017 Certified to CSA STD C22.2 No.243-10 For questions or concerns
TECMAF HIGH FREQUENCY GRINDERS WARRANTY: 06 (SIX) MONTHS FROM THE DATE OF SHIPMENT
 MONTHS FROM THE DATE OF SHIPMENT") SPECIFIC SAFETY RULES FOR POWER TOOLS Failure to follow all instructions listed below may result in electric shock, fire and/or serious injury. The term power tool in all of the warnings listed below refers
SPECIFIC SAFETY RULES FOR POWER TOOLS Failure to follow all instructions listed below may result in electric shock, fire and/or serious injury. The term power tool in all of the warnings listed below refers
ELECTRIC BODY SAW INSTRUCTIONS. Item #31660
 ELECTRIC BODY SAW INSTRUCTIONS Item #31660 The EASTWOOD ELECTRIC BODY SAW is great for use on virtually all metals including steel, aluminum, brass and more. Cuts wood, fiberglass and other materials with
BG8SS. 8 Inch Slow Speed Bench Grinder with LED Lights Assembly & Operating Instructions
 BG8SS 8 Inch Slow Speed Bench Grinder with LED Lights Assembly & Operating Instructions READ ALL INSTRUCTIONS AND WARNINGS BEFORE USING THIS PRODUCT. SAVE THESE INSTRUCTIONS FOR FUTURE REFERENCE. This
ELECTRIC DRILL INSTRUCTIONS. Item #21285
 ELECTRIC DRILL INSTRUCTIONS Item #21285 The EASTWOOD ELECTRIC DRILL is great for use on virtually all metals including steel, aluminum, brass and more. The powerful 6.3 Amp motor and 1/2 capacity chuck
PORTABLE HAND POWER THREADER 1/2-2
 PORTABLE HAND POWER THREADER 1/2-2 Read this Operator s Manual carefully before using this tool. Failure to understand and follow the contents of this manual may result in electrical shock, fire and/or
VACUUM EXTRACTOR MODEL NO: CWVE1 OPERATING & MAINTENANCE INSTRUCTIONS PART NO: GC0916
 VACUUM EXTRACTOR MODEL NO: CWVE1 PART NO: 6471168 OPERATING & MAINTENANCE INSTRUCTIONS GC0916 INTRODUCTION Thank you for purchasing this CLARKE Workshop Vacuum Extractor. Before attempting to use this
SAFETY AND OPERATING MANUAL. 450W/46cm HEDGE TRIMMER JM450PHT
 SAFETY AND OPERATING MANUAL 450W/46cm HEDGE TRIMMER JM450PHT GENERAL POWER TOOL SAFETY WARNINGS WARNING: Read all safety warnings and all instructions. Failure to follow the warnings and instructions may
ENGLISH (Original instructions) INSTRUCTION MANUAL. Belt Sander DOUBLE INSULATION. IMPORTANT: Read Before Using.
 INSTRUCTION MANUAL. Belt Sander DOUBLE INSULATION. IMPORTANT: Read Before Using.") ENGLISH (Original instructions) INSTRUCTION MANUAL Belt Sander 990 99 00336 DOUBLE INSULATION IMPORTANT: Read Before Using. ENGLISH (Original instructions) SPECIFICATIONS Model 990 99 Belt size 76 mm x
ENGLISH (Original instructions) INSTRUCTION MANUAL Belt Sander 990 99 00336 DOUBLE INSULATION IMPORTANT: Read Before Using. ENGLISH (Original instructions) SPECIFICATIONS Model 990 99 Belt size 76 mm x
Drywall Screwdriver INSTRUCTION MANUAL
 ENGLISH (Original instructions) INSTRUCTION MANUAL Drywall Screwdriver 68 00603 DOUBLE INSULATION WARNING: For your personal safety, READ and UNDERSTAND before using. SAVE THESE INSTRUCTIONS FOR FUTURE
DG 150 DPC 20 English
 DG 150 DPC 20 English 1 Information about the documentation 1.1 About this documentation Read this documentation before initial operation or use. This is a prerequisite for safe, trouble-free handling
TE 70-AVR TE 70-ATC/AVR TE 80-ATC/AVR
 TE 70-AVR TE 70-ATC/AVR TE 80-ATC/AVR English 1 Information about the documentation 1.1 About this documentation Read this documentation before initial operation or use. This is a prerequisite for safe,
English BT3600
 www.blackanddecker.com 3 English BT3600 FIG. 1 FIG. 2 150mm BENCH GRINDER BT3600 GENERAL SAFETY RULES WARNING: Read all instructions. Failure to follow all instructions listed below may result in electric
WET & DRY VACUUM 1250W 12L WARRANTY INSTRUCTION MANUAL SPECIFICATIONS VWD-1212 WHAT S IN THE BOX
 WHAT S IN THE BOX WET & DRY VACUUM 1250W 12L INSTRUCTION MANUAL SPECIFICATIONS Input Power: 1250W Suction Power Max.: 140 mbar Air Flow: 27 l/s Tank Capacity: 12 l Hose Length: 1.5m Hose Diameter: 35mm
Qualcast 500W Electric Hedge Trimmer
 Qualcast 500W Electric Hedge Trimmer Assembly Manual GHT500A1 After Sales Support UK/Ireland 0344 801 0979 Web WWW.ARGOS.CO.UK Important- Please read these instructions fully before starting assembly These
ENGLISH (Original instructions) INSTRUCTION MANUAL. Random Orbit Sander BO5020 BO5021 DOUBLE INSULATION. IMPORTANT: Read Before Using.
 INSTRUCTION MANUAL. Random Orbit Sander BO5020 BO5021 DOUBLE INSULATION. IMPORTANT: Read Before Using.") ENGLISH (Original instructions) INSTRUCTION MANUAL Random Orbit Sander BO500 BO50 00377 DOUBLE INSULATION IMPORTANT: Read Before Using. ENGLISH (Original instructions) SPECIFICATIONS Model BO500 BO50 Pad
ENGLISH (Original instructions) INSTRUCTION MANUAL Random Orbit Sander BO500 BO50 00377 DOUBLE INSULATION IMPORTANT: Read Before Using. ENGLISH (Original instructions) SPECIFICATIONS Model BO500 BO50 Pad
DD 110-D. Operating instructions Mode d emploi Manual de instrucciones Manual de instruções. Printed: Doc-Nr: PUB / / 000 / 02
 DD 110-D Operating instructions Mode d emploi Manual de instrucciones Manual de instruções en fr es pt Printed: 16.05.2014 Doc-Nr: PUB / 5127525 / 000 / 02 1 + 2 3 4 5 7 DD 110-D 8 9 1 +± 6 This Product
K 2.97 M. Specifications Operating pressure, max PSI Water volume GPM Voltage V Amp draw AMPS
 K 2.97 M High Pressure Washer Operator Manual Overview... 2 Important Precautions... 3-4 Assembly Instructions... 4 Operating Instructions... 5 GFCI Instructions... 6 Using the Accessories... 6 Working
PJ130S High Pressure Cleaner
 PJ130S High Pressure Cleaner Operator Manual Original instructions WARNING: Do not use the machine without reading the instruction sheet. Item Description OVERVIEW 1. High pressure washer 2. On/off switch
PORTABLE HAND POWER THREADER 1/2-2
 PORTABLE HAND POWER THREADER 1/2-2 Read this Operator s Manual carefully before using this tool. Failure to understand and follow the contents of this manual may result in electrical shock, fire and/or
Instructions for Use. Electric Pole Hedge Trimmer Input Power Tooth gap of cutter blade 16mm
 Voltage/Frequency 230V-240V a.c./ 50Hz Input Power 450W Tooth gap of cutter blade 16mm Strokes 1,600/min Noise emission value LWA 100 db(a) Hand / arm vibration a vhw < 2.5 m /s2 Total Length 1.9m-2.5m
PS /2 Inch Angle Grinder Assembly & Operating Instructions READ ALL INSTRUCTIONS AND WARNINGS BEFORE USING THIS PRODUCT.
 PS07214 4 1/2 Inch Angle Grinder Assembly & Operating Instructions READ ALL INSTRUCTIONS AND WARNINGS BEFORE USING THIS PRODUCT. This manual provides important information on proper operation & maintenance.
HEDGE TRIMMER. 550W 450mm WARRANTY INSTRUCTION MANUAL SPECIFICATIONS. ozito.com.au HTE-550 WHAT S IN THE BOX
 WHAT S IN THE BOX HEDGE TRIMMER 550W 450mm INSTRUCTION MANUAL SPECIFICATIONS Input: 230-240V ~ 50Hz Motor: 550W No Load Speed: 1,400/min Blade Length: 450mm Max. Cutting Capacity: 16mm Weight: 2.9kg ozito.com.au
INSTRUCTION MANUAL WET / DRY VACUUM VC HP V 60 Hz 7A. Gal
 INSTRUCTION MANUAL WET / DRY VACUUM VC445 Note : Read and understand this manual before use. Keep this manual for future reference. 4HP 4.5 Gal 20 V 60 Hz 7A When using an electrical appliance, basic precautions
Operator s Manual. Floor Vac Model No. VF408 FOR YOUR SAFETY. Read and understand this manual before use Keep this manual for future reference
 Wet/Dry Vacuums Operator s Manual Floor Vac Model No. VF408 FOR YOUR SAFETY Read and understand this manual before use Keep this manual for future reference www.vacmaster.com Cleva North America 44 Parkway
INDUSTRIAL VACUUM CLEANER WITH AUTO START/STOP
 INSTRUCTIONS FOR INDUSTRIAL VACUUM CLEANER WITH AUTO START/STOP MODEL NO: PC200SDAUTO.V3 Thank you for purchasing a Sealey product. Manufactured to a high standard, this product will, if used according
K 3.97 M. Specifications or visit our website: In USA call: Part No
 K 3.97 M High Pressure Washer Operator Manual Overview... 2 Precautions... 2-4 Assembly Instructions... 4-5 Operating Instructions... 5-6 GFCI Instructions... 6 Using the Accessories... 6 Working with
GT110
 2 3 4 1 5 6 7 www.blackanddecker.com.au www.blackanddecker.co.nz GT110 4 8 A C1 2 9 B C2 Intended use Your Black & Decker hedge trimmer has been designed for trimming hedges, shrubs and brambles. This
D O U B L E A U G E R M O R TA R M I X E R OWNER S MANUAL
 D O U B L E A U G E R M O R TA R M I X E R OWNER S MANUAL WARNING: Read carefully and understand all INSTRUCTIONS before operating. Failure to follow the safety rules and other basic safety precautions
3.5-GALLON PARTS WASHER OWNER S MANUAL
 3.5-GALLON PARTS WASHER OWNER S MANUAL WARNING: Read carefully and understand all INSTRUCTIONS before operating. Failure to follow the safety rules and other basic safety precautions may result in serious
Manual. Belt Sander BSL 115/E. ProxxonTools.com
 ProxxonTools.com Belt Sander BSL 115/E Manual 3080767 Conforms to ANSI/UL 60745-1 ANSI/UL 60745-2-4 Certified to CAN/CSA-C22.2 No. 60745-1-04 CAN/CSA-C22.2 No. 60745-2-4-04 Fig. 1 Fig. 2 Fig. 3 Fig. 4
APW-VAP-150P High Pressure Cleaner Operator Manual
 APW-VAP-150P High Pressure Cleaner Operator Manual BEFORE OPERATING THIS APPLIANCE PLEASE READ THESE INSTRUCTIONS CAREFULLY Item Description OVERVIEW 1. High pressure washer 2. On/off switch 3. Water outlet
INSTRUCTION MANUAL 4HP WET / DRY VACUUM VC V 60 Hz 7A. Gal
 INSTRUCTION MANUAL WET / DRY VACUUM VC25180 Note : Read and understand this manual before use. Keep this manual for future reference. 4HP 8 Gal 120 V 60 Hz 7A C US TABLE OF CONTENTS SECTION Warranty...
User Manual Drywall Sander Model: BNR7231A
 User Manual Drywall Sander Model: BNR7231A - Page 1- 1. PRODUCT DESCRIPTION The machine is designed for grinding drywalls, ceilings and walls of the inner and outer surfaces, clearing the floor residues,
WET & DRY VACUUM CLEANER
 VMVK1520SIWC / 1500W / 20L WET & DRY VACUUM CLEANER VMVK1520SIWC table OF CONTENTS SECTION page Warranty 3 Safety Instructions and Warnings 3 Specifications 4 Unpacking and Checking Carton Contents 4 General
K 2.90 M. Specifications Operating pressure, max PSI Water volume GPM Voltage V Amp draw AMPS
 K 2.90 M High Pressure Washer Operator Manual Overview... 2 Important Precautions... 3-4 Assembly Instructions... 4 Operating Instructions... 5 GFCI Instructions... 6 Using the Accessories... 6 Working
PRESSURE WASHER MODEL NO: JETSTAR 1750 OPERATION & MAINTENANCE INSTRUCTIONS. WARNING Read the instructions before using the machine PART NO:
 WARNING Read the instructions before using the machine PRESSURE WASHER MODEL NO: JETSTAR 1750 PART NO: 7333230 OPERATION & MAINTENANCE INSTRUCTIONS LS0711 INTRODUCTION Thank you for purchasing this CLARKE
SAFETY AND OPERATING MANUAL 400W. 125mm RANDOM ORBITAL SANDER JM400ROS
 SAFETY AND OPERATING MANUAL 400W 125mm RANDOM ORBITAL SANDER JM400ROS GENERAL POWER TOOL SAFETY WARNINGS WARNING! Read all safety warnings and all instructions. Failure to follow the warnings and instructions
BG6UL. 6 Inch Bench Grinder Assembly & Operating Instructions
 BG6UL 6 Inch Bench Grinder Assembly & Operating Instructions READ ALL INSTRUCTIONS AND WARNINGS BEFORE USING THIS PRODUCT. SAVE THESE INSTRUCTIONS FOR FUTURE REFERENCE. This manual provides important information
Electric Pressure Washer
 Electric Pressure Washer English..... 4 Español... 18 Français... 34 K2000 1.106-112.0 K2010 1.106-118.0 8.641-730.0-A 10/16 Machine Parts List 1. Water Inlet 2. High Pressure Hose Reel 3. Hose Connector
DIRTY WATER SUBMERSIBLE PUMP
 WHAT S IN THE BOX DIRTY WATER SUBMERSIBLE PUMP 780W INSTRUCTION MANUAL SPECIFICATIONS Motor: 780W Max. Flow Rate: 15,700l/h Max. Head 8m Max. Immersion: 7m Min. Suction Depth 50mm Max Particle Size: Ø35mm
Operator s Manual. 2.5 Gallon Model No. VOM205P FOR YOUR SAFETY. Read and understand this manual before use. Keep this manual for future reference.
 Wet/Dry Vacuums Operator s Manual 2.5 Gallon Model No. VOM205P FOR YOUR SAFETY Read and understand this manual before use. Keep this manual for future reference. www.vacmaster.com Cleva North America 44
EB 30/1. English 3 Français 8 Español 14. Register and win! /11
 EB 30/1 English 3 Français 8 Español 14 Register and win! www.kaercher.com 59618660 11/11 12 11 10 5 6 4 1 2 7 3 13 9 8 2 IMPORTANT SAFETY IN- EnglishSTRUCTIONS READ ALL INSTRUCTIONS BEFORE USING THIS
Electric Pressure Washer
 Electric Pressure Washer English..... 4 Español... 20 Français... 38 K1700 CUBE 1.106-113.0 K1710 CUBE 1.106-116.0 8.638-793.0-A 12/16 Machine Parts List 1. Water Inlet 2. High Pressure Outlet 3. Hose
Work-Shed Vac 1100 Watt
 Work-Shed Vac 1100 Watt Operation Manual 3 Year Replacement Warranty WVG-951 To view the full range visit: www.ozito.com.au 0209 SPECIFICATIONS MODEL NO. WVG-951 Motor: Input: Max. vacuum: Hose length:
ASSEMBLY AND OPERATING INSTRUCTIONS 3HP DUST EXTRACTOR. FOX Model F50-843
 ASSEMBLY AND OPERATING INSTRUCTIONS 3HP DUST EXTRACTOR FOX Model F50-843 1 3hp Dust Extractor FOX MODEL F50-843 TABLE OF CONTENTS Safety instructions Page 3 Specific safety instructions for dust collectors.page
20-GALLON MOBILE PARTS WASHER OWNER S MANUAL
 20-GALLON MOBILE PARTS WASHER OWNER S MANUAL WARNING: Read carefully and understand all INSTRUCTIONS before operating. Failure to follow the safety rules and other basic safety precautions may result in
DD 30-W. English. Printed: Doc-Nr: PUB / / 000 / 04
 DD 30-W English 1 Information about the documentation 1.1 About this documentation Read this documentation before initial operation or use. This is a prerequisite for safe, trouble-free handling and use
WET & DRY VACUUM CLEANERS
 WET & DRY VACUUM CLEANERS MODEL NO: CCVAC20SS, CVAC25SS & CVAC30SSR PART NO: 6471105, 6471110 & 6471120 OPERATING & MAINTENANCE INSTRUCTIONS GC0114 INTRODUCTION Thank you for selecting this VAC KING Vacuum
DIRTY WATER SUBMERSIBLE PUMP KIT
 WHAT S IN THE BOX DIRTY WATER SUBMERSIBLE PUMP KIT 1000W INSTRUCTION MANUAL SPECIFICATIONS Motor: 1000W Max. Flow Rate: 18,000l/h Max. Head 9m Max. Immersion: 7m Min. Suction Depth 50mm Max Particle Size:
INSTRUCTION MANUAL MODEL: 690E
 1 INSTRUCTION MANUAL ALEKO Drywall Sander MODEL: 690E READ THROUGH CAREFULLY AND UNDERSTAND THESE INSTRUCTIONS BEFORE USE Visit our web site for more great products, parts and accessories: 2 3 4 5 6 Caution!
PWASH Gallon Parts Washer Assembly & Operating Instructions
 PWASH20 20 Gallon Parts Washer Assembly & Operating Instructions READ ALL INSTRUCTIONS AND WARNINGS BEFORE USING THIS PRODUCT. SAVE THESE INSTRUCTIONS FOR FUTURE REFERENCE. This manual provides important
K Specifications. Max. Water Volume
 K 2.75 High Pressure Washer Operator Manual Overview... 2 Precautions... 2-4 Assembly Instructions... 4 Operating Instructions... 5 Using the Accessories... 6 Working with Detergents... 7 Shut Down and
Sip Vacuum Cleaner 1400/35 Wet & Dry
 Please dispose of packaging for the product in a responsible manner. It is suitable for recycling. Help to protect the environment, take the packaging to the local amenity tip and place into the appropriate
ELECTRIC CHARCOAL STARTER
 WHAT S IN THE BOX ELECTRIC CHARCOAL STARTER 2000W INSTRUCTION MANUAL SPECIFICATIONS Power: 2000W Input: 230V~50Hz Temperature: 600 C Weight: 0.9kg ozito.com.au Electric Charcoal Starter CFS-2000 WARRANTY
Operator s Manual. 6 Gallon Model No. VQ607SFD FOR YOUR SAFETY. Read and understand this manual before use Keep this manual for future reference
 Wet/Dry Vacuums Operator s Manual 6 Gallon Model No. VQ607SFD FOR YOUR SAFETY Read and understand this manual before use Keep this manual for future reference www.vacmaster.com Cleva North America 44 Parkway
IMpORTANT SAFETy INSTRUcTIONS
 Table of contents SAFETy SETUp OpERATION MAINTENANcE Safety... 2 Specifications... 4 Setup... 4 Operation... 6 WARNING SyMBOLS AND DEFINITIONS Maintenance... 9 Parts List and Diagram... 10 Warranty...
Model K 520 M Part No
 Model K 520 M Part No. 1.069-680.0 High Pressure Washer Operator Manual Overview... 2 Precautions... 2-4 Assembly Instructions... 4 Operating Instructions... 5 Using the Accessories... 6 Working with Detergents...
Model K 240 plus Part No
 Model K 240 plus Part No. 1.223 585.0 High Pressure Washer Operator Manual Overview... 2 Precautions... 2-4 Assembly Instructions... 4 Operating Instructions... 5 GFCI Instructions... 6 Using the Accessories...
CF1400 DO NOT RETURN PRODUCT TO PLACE OF PURCHASE. IF YOU HAVE ANY QUESTIONS, CALL OUR TOLL FREE HOTLINE:
 CF1400 DO NOT RETURN PRODUCT TO PLACE OF PURCHASE. IF YOU HAVE ANY QUESTIONS, CALL OUR TOLL FREE HOTLINE: 1-866-902-9690 8:00 am to 5:00 pm, C.S.T., Monday - Friday www.forcetoolsusa.com TABLE OF CONTENTS
Vacuum cleaner Instruction manual
 CSR Tools & Consumables Triniti 3, Level 5 39 Delhi Road North Ryde NSW 23 Australia http://www.csr.com.au Vacuum cleaner Instruction manual IMPORTANT: Read and understand all instructions before using.
2000 PSI Electric Pressure Washer
 2000 PSI Electric Pressure Washer 039-8702-2 Use and Care Guide Congratulations on the purchase of your new pressure washer. In order to ensure you have the best possible experience, please read through
HEDGE TRIMMER. 600W 550mm INSTRUCTION MANUAL SPECIFICATIONS. ozito.com.au HTER-600 WHAT S IN THE BOX. Hedge Trimmer. Blade Cover.
 WHAT S IN THE BOX HEDGE TRIMMER 600W 550mm INSTRUCTION MANUAL SPECIFICATIONS Input: 230-240V ~ 50Hz Motor: 600W No Load Speed: 1,400/min Blade Length: 550mm Max. Cutting Capacity: 20mm Weight: 3.15kg ozito.com.au
High-Velocity Floor Fan
 High-Velocity Floor Fan Owner s Manual WARNING: Read carefully and understand all ASSEMBLY AND OPERATION INSTRUCTIONS before operating. Failure to follow the safety rules and other basic safety precautions
SAFETY AND OPERATING MANUAL
 SAFETY AND OPERATING MANUAL Original instructions GENERAL POWER TOOL SAFETY WARNINGS WARNING: Read all safety warnings and all instructions. Failure to follow the warnings and instructions may result in