LIFESTYLE Digital Electric Radiators INSTRUCTIONS FOR USE & INSTALLATION
|
|
|
- Phillip King
- 5 years ago
- Views:
Transcription


1 LIFESTYLE Digital Electric Radiators INSTRUCTIONS FOR USE & INSTALLATION
2 IMPORTANT: - To prevent overheating, do not cover the radiator. - You must not sit on the radiator. - This appliance is not intended for outdoor use. - If the power cord is damaged, it must be changed by the manufacturer, its after-sales service or persons qualified to do so, to avoid possible danger. - The radiator should not be located underneath an electrical connection. The electric supply line should be protected with a high sensitivity differential device (RCBO). - The radiator must be installed so that around the radiator there is sufficient space for proper circulation of hot air, with a minimum distance of 100 mm to curtains, furniture, etc. Anyone who is in the bathtub or shower should not have access to the switches and other power operation devices, always keep at least 0.6 m between the radiator and the bath or shower.(uk: Outside zone 2, Ireland: Outside zone 3) - This heating apparatus holds a specific amount of special oil. Repairs where it is necessary to open the oil tank must only be made by the manufacturer or ATC. ATC should be contacted in case of any oil leakage. - A Fused Spur must be included in the wiring to the heater. - This appliance can be used by children aged 8 years and above and persons with reduced physical, sensory or mental abilities or lack of experience and knowledge, if they have been given supervision or appropriate training regarding the 2
3 use of the device in a safe way and they understand the dangers involved. Children should not play with the appliance. Cleaning and maintenance should not be performed by unsupervised children. - Children under 3 years should be kept out of reach of the appliance unless they are constantly supervised. - Children between age 3 and younger than 8 years old should only turn on / off the device whenever it has been placed or installed at its normal operating position provided they are supervised or have received instructions concerning use of the appliance safely and understand the risks that the device has. Children from 3 years and under 8 years old should not plug in, regulate, clean the appliance or perform maintenance. CAUTION - Some parts of this product can become hot and cause burns. Pay particular attention when children and vulnerable people are present. - If the radiator is discarded, ensure it is recycled responsibly and follow any local provisions concerning recycling of oil. - A Safety Data Sheet is available from sales@atc.ie on request. 3
4 NOTE A qualified electrician must carry out the electrical installation of this radiator. The Electrical installation must comply with the current UK and Irish regulations. Any claim on the warranty could be invalid if these requirements have not been met This product is in conformity with the Directive EU 2012/19/EU The symbol of the crossed-out wheeled bin shown on the appliance indicates that, at the end of its working life, the product must be treated separately from domestic waste and must be disposed of in a selective collection center for electrical and electronic appliances or must be returned to the distributor upon purchasing an equivalent new appliance. Users are responsible for disposing of appliances at the end of their working life in established collection centres. The correct collection of the appliance, allowing for the appliance to be recycled at the end of its working life, its treatment and its environmentfriendly dismantling help prevent any negative effects on the environment and on public health and favour the recycling of the product components. For more detailed information on the collection systems available, contact the local collection facilities or the distributor where you made your purchase. Packing List: 1x 2x 2x 2x 4x 4x Lifestyle Radiator Metal Brackets Plastic Covers (top) Locking Plastic Covers Grey Wall plugs Hex-Head Fixings Please contact sales@atc.ie if any of the above are missing. 4
5 INDEX LIFESTYLE... 1 INDEX... 5 LIFESTYLE DIGITAL ELECTRIC HEATERS... 6 Location... 6 Electrical Connection... 7 Mounting... 8 Operation Control panel: Turning the heater on and off: Selecting the Operating mode: COMFORT ECO ANTI-FROST PROGRAM CONFIGURATION Brightness level at rest Maximum brightness Time Setting the time: SET HOUR / DAY Open Window Adaptive start control RESET DEFAULT Heating and temperature display Manual mode Open Window function Adaptive start control function Keyboard lock INTERNAL PARAMETER CONFIGURATION Param. 1: Temperature Offset Param. 2: Easy Mode EASY MODE ERROR NOTIFICATIONS CHARACTERISTICS TABLE ECODESIGN TABLE NOTES WARRANTY

6 LIFESTYLE DIGITAL ELECTRIC HEATERS Thank you for choosing ATC LIFESTYLE heaters, with their modern design, state-of-the-art technology, great reliability and quality construction. ATC LIFESTYLE heaters and all the materials and components have passed strict controls to ensure their quality. Before installing and operating your heater, please read these instructions carefully as they will ensure the correct working order of the appliance. Location The ideal place to install the Lifestyle radiator is as close as possible to the coolest wall in the room. It is not recommended to install the radiator on un-insulated exterior walls, however in this case, the part of the wall behind the radiator should be insulated. In bathrooms, the radiators must not be installed inside the protected areas. In the UK the heater must be mounted outside Zone 2, In Ireland the heater must be mounted outside Zone 3. The control unit switches must not be reachable, directly or indirectly, by a person in the bath/ shower or using the wash basin. Under no circumstances should the radiator be installed below an electric power point. Choose the location of the radiator in respect of the minimum distances that are indicated below 100mm Unobstructed space each side 150mm 150mm Note: If the window sill protrudes less than 20mm the gap above the heater can be disregarded. 0,6 m 0,6 m ZONE 1 ZONE 2 ZONE 3 6
7 Electrical Connection The Lifestyle radiator must be connected to the mains supply (230V~50Hz.). It is recommended to install a switched spur for each heater. In addition, the following warnings must be considered: -The electric radiator should not be located underneath a light switch where you need to stretch over the heater to reach or operate the switch. -The electric line should be protected with a high sensitivity differential device (RCBO). -It is necessary to disconnect the power from the fixed wiring before installation. Connecting wires: Brown: Live Blue: Neutral Yellow-Green: Earth The connecting wires must be of the appropriate cross section, with regard to the length of cable, type of cable and power rating of the appliance. The appliance must be connected into a fused connecting box fitted with an appropriate sized fuse for the radiator see Technical Data on Page 21. We recommend that the connecting box is positioned 10cm to the right of the appliance and at 15cm above the floor. According to regulations, the appliance must be connected to the power supply by means of an all-pole circuit breaker with a contact gap of at least 3mm or by a thermal-magnetic circuit breaker. It is recommended to install the heaters on a circuit protected by an RCBO 7


8 Mounting The electric radiator should be fixed to the wall by the adjustable brackets supplied with the heater, using the cardboard template printed on the box. If for any reason cardboard template is missing, you can follow the instructions below: 1. Place the two metal brackets provided on the floor and against the wall as shown in image 1 below. Ensure the MB stamp on the metal bracket is at the top. 2. Check Table 1 for the A distance between the brackets for your LIFESTYLE model. 3. Mark the small hole in the metal brackets on the wall with a pencil. These two marked points determine the position of the two lower drill holes. 1 Model A (mm) LIFESTYLE LIFESTYLE LIFESTYLE LIFESTYLE LIFESTYLE Table 1 4. With the help of a level, position the brackets matching their lower holes with the previously marked points and mark the upper holes with the pencil. 5. Drill the 4 marked holes. The grey plugs supplied require an 8mm hole. 6. Insert the grey plugs into the pre-drilled holes. Screw the metal brackets to the wall with the screws provided. 2 8

 Lift the plastic bracket and pull the base of")
9 7. Attach the plastic pieces to the metal brackets: 3 4 STOP 8. Hang the heater as shown: 5 9. To detach the heater from the bracket: 1) Push the plastic bracket away from the metal bracket 2) Lift the plastic bracket and pull the base of the heater forward away from the metal bracket 9
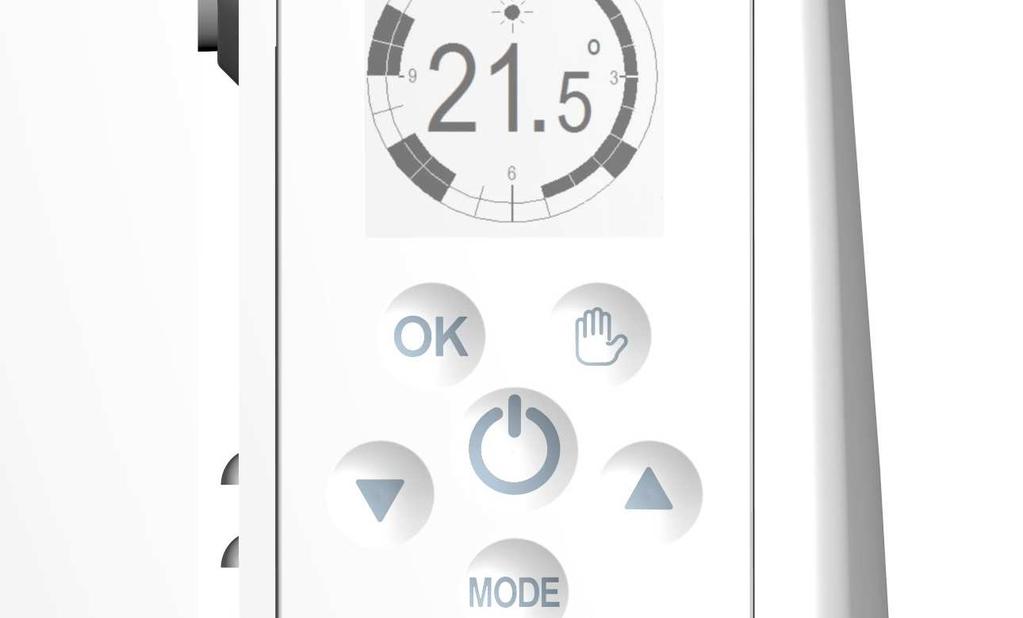
10 Operation 1. Control panel: The control panel is made with a large TFT-LCD screen with white backlight and black images for ease of legibility. There are six touch sensitive keys as outlined below. Confirm modes, days, hours, etc. TFT-LCD Screen Select operating mode Go back to the previous mode/menu Enter Manual mode Standby, turn the radiator on and off Multi-Function, Mode, temperatures, days, hours, etc. Keyboard lock 2. Turning the heater on and off: Once the radiator is connected to the power supply (230 V ~ 50 Hz), the standby icon or current operating mode will appear on the display. If the radiator is in standby mode, to turn it on, touch and hold the ON / OFF key; a double beep will sound once the heater is on. The standby screen changes to show ATC and then the heater will start then in the previous operating mode. To turn it off, touch and hold the ON / OFF key; a long beep will sound and the GOODBYE screen will appear. The back light will turn off after 1.5 seconds. When the heater is in standby mode and if you touch any key a short beep will sound and the standby screen will appear for 10 seconds. From Standby, the radiator can be locked (see page 18 of this manual). In case of any power failure or disconnection, the radiator will always remember the previous mode of operation, the temperature, and the state (if it is on or off). The day and time is saved when disconnected from the mains power for up to 10 years, depending on the button cell battery life. (Replacement Cell CR2032) 10


11 When the Button Cell is depleted a small battery backup can save the day and time with disconnections up to 1 minute. However, with longer disconnections, you will need to re-enter the day and time according to page 15 of this manual. IMPORTANT: As there are live cables inside the casing we recommend you contact an authorised electrician to replace the button cell. Daily and weekly programs are never lost even when disconnected from the power for long periods. Selecting the Operating mode: In all modes except Manual, the Mode menu is displayed by touching the MODE key once. If you are in the Manual Mode, touch the MODE key twice to access this menu. In this menu, the desired mode can be selected by and keys, to select and enter the mode touch the OK key. The radiator will return to the previous mode of operation if MODE key is touched, or after 30 seconds without touching any other keys. In each of the operating modes the screen will automatically switch the display between the current time and the day of the week. 1. COMFORT In Comfort mode the temperature is directly selected by and keys, between 12 C and 30 C in steps of 0.5 C. If the keys are held, the temperature changes faster. When the temperature reaches either the maximum or minimum value it will stop. Typical comfort temperature is C. The comfort mode is normally used during the hours the room is occupied. 2. ECO In Economy (ECO) mode, the radiator automatically sets a temperature between 0.5 C and 4.5 C less than the previously selected comfort temperature (The difference is able to be directly set by the user with the and keys). When the comfort temperature is raised or lowered, the eco temperature automatically rises or falls by the set amount. The comfort temperature can be set from 12 C to 30 C, the ECO temperature is from 7.5 C to 29.5 C, but always between 0.5 C and 4.5 C below the comfort temperature. Economy mode is used for short absence periods to prevent the temperature from falling excessively. 11


12 3. ANTI-FROST In this mode the temperature setting is 7 C and is factory set. Anti-frost is usually used as an off set point and for long periods of absence when you want to avoid freezing. 4. PROGRAM In Program mode the radiator automatically switches on and off according to the daily and weekly program set by the user. The daily program display is divided into two screens; the AM screen is from 00:00 to 11:59, and the PM screen from 12:00 to 23:59. The Program is shown around a circle, representing an analogue clock face. The screen automatically switches the display between the current time and the day of the week every 5 seconds. The program screen is shown permanently and displays its particular 12 hour program divided into half-hour intervals; the AM and PM programs will be displayed based on the time of day. Each half-hour interval of each day of the week can be programmed as comfort, eco or anti-freeze: COMFORT ECO ANTI-FROST The current half-hour interval flashes to indicate to the user what the current set point is. Also, the Sun, Moon or Frost symbol is displayed in the middle of the screen above the temperature. In Program mode, comfort and eco set points can be directly modified with and keys, when their particular mode is active, (anti-frost set point can never be modified). When the comfort temperature is raised or lowered, the eco temperature automatically rises or falls by the set amount. Adaptive start control can be applied to Program mode and can be enabled or disabled in Configuration mode (see page 18 for details of Adaptive start mode). Program mode is the only mode in which this function operates 12
13 Edit Program To enter or change the program, touch the OK key when the radiator is in Program mode. This will bring you to the program edit screen and allow the user to edit any half-hour section of any day of the week (Monday to Sunday). In the editing screen, the user chooses which day of the week the program is going to modify. The heater will default to the current day and the nearest half hour to the current time. By touching the and keys, the user can select the desired day to program the heater or the half-hour section to be modify. The relevant section will be outlined with a box around either the day or the time. Touch OK to enter the section that you wish to change. When selecting the day using the and keys, you can choose any day of the week moving forward or backward as required. The days will cycle Monday through Sunday. When the desired day is selected, its 12 hour program (AM or PM, depending on the selected hour) will be shown. Confirm the day by touching OK and then move the box to the time and touch OK to begin programming. You can freely move through the half-hour sections of the program with the and keys, going from AM program (00:00 to 11:59), and PM program (12:00 to 23:59). AM or PM is shown next to the day to ensure that the correct time setting is being changed. In the example on the right it shows Wednesday AM, and 09:30. In this particular case the interval is the ½ hour from 09:30 to 10:00, when setting this interval the time and the mode icon flash. To change the temperature set point between comfort, eco or anti-freeze mode touch the MODE key: COMFORT ECO ANTI-FROST Once you have selected the relevant mode for the ½ hour interval, use the and to move forward or backward and touch the mode button on each ½ hour section of the day selecting a temperature setting as required When the selected day program (Wednesday in the example) is finished, save the program by touching OK key, that particular day is saved and the screen returns to the program edit screen. The other days of the week can then be easily modified the same way, by selecting the desired day, entering and then amending the settings as required. 13

, allows the user to set parameters and functions for the other modes.")
 will be hidden until the screen is scrolled up or down. When finished, the MODE key can be touched to return to the previous mode.")
14 Copy Daily program If you want to copy the complete program of a particular day to the following day or consecutive days, touch and hold OK when selecting the day, and release OK when you have reached to the final day to be copied. For example, to copy the Monday program, to the 5 working days, hold OK when it shows Monday, and release the button when Friday is reached. To exit and return to Program mode from the editing screen, touch the MODE key. When editing a program and no keys are touched for 30 seconds, the heater will return to Program run mode. CONFIGURATION Configuration mode (CONFIG.), allows the user to set parameters and functions for the other modes. There are 6 menus in configuration mode, which can be selected by and keys and touching the OK key when desired menu is highlighted. The sixth submenu (either the 1 st or Last) will be hidden until the screen is scrolled up or down. When finished, the MODE key can be touched to return to the previous mode. When no keys are touched for 30 seconds the heater will return to the previous operation mode. 1. Brightness level at rest This menu sets the level of brightness that the radiator will show when it is at rest, this is the brightness level of the screen kept after the time selected in menu 2. There are 4 levels to choose from: 0: Off 1: 25 % brightness 2: 65 % brightness 3: 100 % brightness (this is the level when any buttons are touched) The level can be adjusted using the and keys, and confirmed with the OK key; the heater will then return to the CONFIG screen. 2. Maximum brightness Time This menu sets the time (in seconds) that the radiator screen is at 100% brightness, from the time that the last key is touched, before going to rest. The time value can be changed between 1 and 240 sec. The time can be adjusted using the and keys; if the keys are held then the time changes faster. Confirm the selection by touching the OK key; the heater will then return to the CONFIG screen. 14
 the time to be modified. Touch OK to enter the desired section to change.")

15 3. Setting the time: SET HOUR / DAY This menu is used to initially set the time and day, and also to change the time if required, for example during daylight saving. Use the and keys to select either the day of the week, or (if the day is correct) the time to be modified. Touch OK to enter the desired section to change. Select the day by using the and keys, you can choose from Monday to Sunday and confirm the correct day by touching OK. When setting the time, the setting starts with the hour, select from 00 to 23 by using the and keys. Once the hour is correct touch the OK key; the radiator will change to set the minutes, selecting from 00 to 59 using the and keys and confirm by touching OK. To go back to the CONFIG screen, touch the MODE key at any time. Daylight saving time will need to be manually changed. When the button cell battery life ends (see pages 10 and 11), after a power failure or disconnection from the mains of more than one minute the radiator will request the user to set the hour/day, as the system clock is reset to Monday 00:00. A battery icon will flash until the hour/day is set. After 30 seconds the heater will choose Monday and 00:00 as the day and time and will return to the last used mode of operation. The heater will request the time to be set each time there is a power disconnection of more than one minute or until the button cell is replaced. 4. Open Window This menu enables/disables the Open Window function (see page 17 of this manual). Select ON / OFF with the and keys and confirm with the OK key; the heater will return to the CONFIG screen after a selection is made. 5. Adaptive start control This menu enables/disables the Adaptive start control (see page 18 of this manual). Select ON / OFF with the and keys and confirm with the OK key; the heater will return to the CONFIG screen after a selection is made. 15

16 6. Reset Default This menu is used to reset the heater back to the default factory settings. Comfort set point is 20ºC, Economy set point is 16.5ºC, Program is set to Economy for all half-hour sections of all days, The day is set to Monday, The time to 00:00, Brightness level at rest is set to 1, Maximum brightness time is set to 10s, Open Window and Adaptive start control are disabled, The radiator returns to Standby mode. Heating and temperature display When the room temperature is below the temperature set-point the radiator will turn the element on to raise the room temperature. To show the user that the radiator is heating there is a symbol of a thermometer being filled in the top right hand corner. The room temperature is normally shown on the display, the set point temperature is only displayed when the user attempts to change it; after the setting has been adjusted the display will revert back to the room temperature: The comfort and eco set-point temperatures can be modified both from comfort and economy modes. The comfort and eco mode can be changed within program mode if they are active at the time (the anti-frost set-point can never be modified). Manual mode The manual mode allows the user to manually operate the radiator overriding the current setting. It is able to force the heater on or off for a set amount of time. After the time expires the radiator will return to the previous mode of operation. The manual mode is designed to allow a user to override the Program mode without having to change the program itself. For example if you arrive when the heater is normally off, you can heat the space to a comfortable temperature, and then have the heater return to its normal mode without changing the program. 16
17 To enter Manual mode touch the hand key, then using the and keys enter the amount of time you want to force the radiator on or off. First the number of days is selected; enter between 0 and 365 days and confirm with the OK key. If you only want a few hours, touch OK to enter 0 days. The menu then moves to the number of hours selection. The user is able to enter the amount of time to operate in 1 minute increments up to 1 hour, after which time the steps increase to 30 minute increments. When the total desired time is entered confirm with the OK key. Please note the default minimum time is 30 minutes, however this can be decreased using the key. Finally, the desired temperature can be set by the and keys, any temperature between 7 C to 30 C (in steps of 0.5ºC) can be entered. Shutdown mode can be entered from either 7 C or 30 C by entering or keys once from each extreme. Shutdown is indicated by 4 dashes on the screen.( ). When the desired temperature is entered confirm with the OK key. The screen will show DONE If no key is touched within 30 seconds before final confirmation, or the MODE key is touched, the radiator will return to the previous mode of operation. The selected time will remain on the display and count down until it is finished. Although you cannot change the set time, it is possible to change the set-point temperature during the operation of manual mode. Once the set time has elapsed, the radiator will automatically return to the previous mode of operation To exit manual mode at any time, touch the MODE key and the radiator will return to the previous mode of operation. In the case where the power is disconnected to the radiator, the manual mode settings will be saved and the remaining time will count down even though the heater is powered-off. Open Window function When the Open Window mode is enabled in the configuration menu the system automatically switches off the radiator when it detects a sudden drop in temperature (4 C in 20 minutes). This is normally caused when a window or door is opened to the outside without turning off the radiator. When the Open Window mode has activated it is indicated on the display by a single screen with an open window. In order to enable the heating again the user must touch the MODE key. The heater will then return to the previous mode of operation. Note: In installations where this function is activated very frequently, it may be appropriate to keep it disabled. * This function is taken into account by Directive 2009/125/EC regulations and will give the unit more efficiency during operation. 17
18 Adaptive start control function When the adaptive start function mode is enabled, in the configuration menu the system automatically switches on the radiator to ensure that the next on set-point is reached efficiently. The system analyses the next two hours, and if there is a set point higher than the current room temperature within that period, and knowing the heating speed of the unit, the software calculates when it needs to start heating. This calculation is made each 5 minutes. This function only runs when the radiator is in Program mode. When Adaptive Start is running a flashing clock icon is shown in the bottom left corner of the screen. The mode will only function on temperature rise e.g. from anti-frost to eco / comfort, or from eco to comfort. When Adaptive Start is running the radiator progressively increases the set-point temperature until the next programmed set point is reached. * This function is taken into account by Directive 2009/125/EC regulations and will give the unit more efficiency during operation. Keyboard lock The user can lock the keyboard on the Lifestyle heater by touching and holding the and keys for 2 seconds, un-locking is done in the same way When the keypad is locked or unlocked, the screens below are displayed: When the radiator is locked, the padlock icon will appear in the upper area of the screen. It is possible to lock the radiator in all modes, as well as standby. 18
19 INTERNAL PARAMETER CONFIGURATION There are two user configurable parameters in the Lifestyle heater. By design they are not meant to be changed often. To access the parameter selection menu, touch and hold the OK and MODE for 5 seconds until menu appears on the display. The first line shows the software version of the radiator, this information may be required if you need to contact technical support regarding your heater. It is not adjustable by the user and is only shown for information. Param. 1: Temperature Offset The 1 st parameter on the menu is the probe correction setting. Adjustment of this value is used in case the temperature measurement shown on the display of the heater is very different from temperature measurements in the space. For example, the radiator stops heating before the room temperature reaches the selected set point temperature of 21ºC, the radiator has stopped when the room temperature is only showing 19ºC. As the room temperature remains 2 C below the set point a value of -2.0 should be entered to the incorrect measurement shown on the display. The probe correction value is set by using the and keys, in steps of 0.1ºC. The value can range from -5ºC to +5ºC. Confirm the set point by touching OK The menu will then move to the 2 nd parameter. Param. 2: Easy Mode The 2 nd parameter on the menu allows the selection of an Easy Control way to control the radiator. 1P: 1P is the default value and will allow full control over all the features of the LIFESTYLE electric radiator. All the functions detailed in this manual are available in 1P 2P: 2P will enable EASY MODE (page 20), this is the most simple way to control the radiator. Select either 1P or 2P using the and keys, and confirm by touching OK. Touching OK in Parameter2 will exit the Internal Parameter Configuration mode into the selected mode (1P or 2P) During the configuration of the internal parameters, if no key is touched for 30 seconds, the radiator will return to the previous mode of operation. 19
20 EASY MODE Once the radiator is set into the Easy Mode the radiator will only allow the user to raise and lower the temperature setting. There is no access to the clock, mode or configuration changes and no keyboard lock, just the heating icon showing if the radiator is currently heating and the current room temperature. Only the standby key, the and keys are operational. The configuration values are set as shown below and cannot be modified: 1 - Brightness level at rest: 10 % 2 - Maximum brightness Time: 30 seconds 3 - Open Window: OFF The radiator temperature set-point is adjustable with the and keys between 12ºC and 30ºC, in steps of 0.5ºC ERROR NOTIFICATIONS There are 2 types of errors that the electronics can detect; if an error is detected one of the codes below will be shown on the screen until it is resolved. ERROR CODE ERROR1 ERROR2 DESCRIPTION Failure in microcontroller, EPROM or other PCB component Failure of the NTC probe (e.g. disconnected, short-circuited, etc.) When recovering from an error, the radiator will always return to Stand-by mode, the radiator will not retain any previous mode or state. If the radiator goes to Stand-by without any specific reason, it may have recovered from an error. 20
21 CHARACTERISTICS TABLE Model LIFESTYLE 500 LIFESTYLE 750 LIFESTYLE 1000 LIFESTYLE 1500 LIFESTYLE 1800 Power (W) No. elements Width A (mm) Weight (Kg) 9,3 12,9 16,3 21,7 25,8 Voltage (VAC) Class Index of protection Type of radiator 230 V ~ 50 Hz I IP24 Fluid 100 A
22 ECODESIGN TABLE Models Heat output LIFESTYLE 500 LIFESTYLE 750 LIFESTYLE 1000 LIFESTYLE 1500 LIFESTYLE 1800 Nominal heat output (Pnom) 0,5 kw 0,8 kw 1,0 kw 1,5 kw 1,8 kw Maximum continuous heat output (Pmax,c) 0,5 kw 0,75 kw 1,0 kw 1,5 kw 1,8 kw Auxiliary electricity consumption At nominal heat output (elmax) 0,5036 kw 0,755 kw 1,0063 kw 1,5094 kw 1,8111 kw At minimum heat output (elmin) 0,5036 kw 0,755 kw 1,0063 kw 1,5094 kw 1,8111 kw In standby mode (elsb) 0,0003 kw Type of heat output/room temperature control: Other control options: Electronic room temperature control plus week timer Room temperature control, with open window detection With adaptive start control ATC Electrical and Mechanical Head Office & Showrooms ATC House, Broomhill Drive, Tallaght, Dublin 24, Ireland. D24 EF99 IRL Tel: +353 (0) UK Tel: +44 (0) Fax: 353 (1)
23 NOTES 23
24 WARRANTY User Name Address Date of sale Seller Name Address Stamp and signature of the distributor WARRANTY CERTIFICATE GUARANTEE: ATC with address ATC House, Broomhill Drive, Tallaght Dublin 24. PRODUCT: This warranty is applicable to the products contained in this manual WARRANTY: 24 months from Date of Purchase (Proof of sale required) ATC assures the electronics in the control panel have a warranty of 2 years from the date of purchase. ATC assures the aluminium elements that make up the heater body are guaranteed 10 years. There are excluded in this period the other components. Unless proven otherwise, it shall be presumed that if not shown within six months of delivery that the product was fine when delivered. There is a parts warranty of two years from the date of delivery of the appliance, apart from the aluminium frame which is guaranteed 10 yrs. This warranty applies, only and exclusively, for equipment sold and installed in Ireland and the United Kingdom. Repairs will be carried out in the workshops of ATC or its nominated agent. The material replaced in warranty becomes property of ATC. SCOPE OF WARRANTY Unless there are event(s) or object(s) that prove to the opposite, it will be assumed that the products acquired are suitable and good for the purpose that it is purchased for and that always happens under the following conditions: - The guaranteed unit shall correspond to the manufacturer intended extouchly for Ireland and the United Kingdom and should be installed in Ireland and the United Kingdom. - The spare parts which are necessary to replaced, will be determined by our qualified service and in all cases, shall be original products from the manufacturer. - The warranty is valid provided that normal maintenance operations described in the technical instructions provided with the equipment have been carried out. - The consumer must inform ATC of the lack of conformity of the goods, in a period of less than two months since they learned of it. The warranty does not cover incidents caused by: - The power supply of insufficient capacity or equipment with generators or any other system that is not a stable power supply. - Products whose repairs have not been conducted by ATC qualified service personal or their authorized agents. - Corrosion, deformation, etc., caused by improper storage. - Handling of the product by other personnel not employed by ATC during the warranty period. - Installation not in accordance with the instructions provided in the equipment. - Installation of equipment by unqualified personnel. - Defects in electrical, hydraulic facilities, or by lack of flow, etc. - Defects caused by improper treatment. - Anomalies caused by atmospheric agents (ice, lightning, flooding, etc.) as well as erratic current or voltages. - By improper maintenance, neglect or misuse. Transport damages must be claimed by the user directly from the carrier VERY IMPORTANT: Radiators must be correctly sized for each room they are to heat. There is sizing information available on the website Draughty and badly insulated rooms will cause the radiator to use more power to reach the set temperature. To claim on the warranty here recognized, it will be required that the appliance is used as intended for household and commercial use only. Also, it will be necessary to deliver the radiator to the technical personnel of ATC at their premises or the premises of their nominated agent. A clear and legible copy of the invoice or receipt for the radiator together with the delivery slip must be supplied. Note: All our technical assistance service officers have the corresponding accreditation by ATC. MADE IN SPAIN Issue 1. A
AVANT DGi. Thermal Electric Radiator. Operating and Installation Instructions. (Read these instructions carefully and retain for future reference)
") (v13. 20180906) MODE CONFIG. PROG. AVANT DGi Thermal Electric Radiator Operating and Installation Instructions (Read these instructions carefully and retain for future reference) Models: AVANT-DGi 350
(v13. 20180906) MODE CONFIG. PROG. AVANT DGi Thermal Electric Radiator Operating and Installation Instructions (Read these instructions carefully and retain for future reference) Models: AVANT-DGi 350
Low Level Thermal Electric Radiator. Installation and Operation Guide. Models. Type Wattage No. of Fins Size (HxWxD) (mm) Net Weight (kg)
 (mm) Net Weight (kg)") 20160425 Sun Ray Neptune Low Level Thermal Electric Radiator Installation and Operation Guide Models Type Wattage No. of Fins Size (HxWxD) (mm) Net Weight (kg) LR950 950w 10 340x865x96 12.8 LR1425 1425w
20160425 Sun Ray Neptune Low Level Thermal Electric Radiator Installation and Operation Guide Models Type Wattage No. of Fins Size (HxWxD) (mm) Net Weight (kg) LR950 950w 10 340x865x96 12.8 LR1425 1425w
AVANT DGS. Thermal Electric Radiator. Operating and Installation Instructions. (Read these instructions carefully and retain for future reference)
") (v8 20180104) AVANT DGS Thermal Electric Radiator Operating and Installation Instructions (Read these instructions carefully and retain for future reference) Models: AVANT-DGS 350 AVANT-DGS 500 AVANT-DGS
(v8 20180104) AVANT DGS Thermal Electric Radiator Operating and Installation Instructions (Read these instructions carefully and retain for future reference) Models: AVANT-DGS 350 AVANT-DGS 500 AVANT-DGS
The Vitro-i. Radiant / Convector Combination Heater. Instructions for Operation and Installation
 E1400250 The Vitro-i Radiant / Convector Combination Heater Instructions for Operation and Installation (Read these instructions carefully and retain for further reference.) Models: Vitro-i 750 Black Vitro-i
Instruction manual. Aluminium radiator with ceramic heart. Smart Electric Heaters
 Instruction manual Aluminium radiator with ceramic heart Smart Electric Heaters READ THIS CAREFULLY BEFORE USING THIS DEVICE FOR THE FIRST TIME. PAY ATTENTION: to avoid overheating, do not cover the appliance.
AC500T, AC1000T, AC1500T, AC2000T
 Product Instruction Manual Accona AC500T, AC1000T, AC1500T, AC2000T Panel heater V18.4,1 Version 3.2 Jan 2015 Thank you for purchasing a Hyco Accona panel heater. Please ensure you read and understand
Installation and user manual
 Installation and user manual Please read carefully and retain for future reference Models EcoHeat: C3, C5, C6, C8, C9, C11, C12 Rev.1_09-07-15 Page 1 Table of Contents 1 IMPORTANT: WARNINGS 1.1 GENERAL
KYROS INSTRUCTIONS MANUAL MOUNTING, INSTALLATION, STARTING AND OPERATION TOWEL RAIL
 KYROS TOWEL RAIL INSTRUCTIONS MANUAL MOUNTING, INSTALLATION, STARTING AND OPERATION ENGLISH... 5 Thank you very much for choosing the low consumption KYROS digital electric towel raid with an exclusive
DELTA Ultimate technology
 D series with DELTA Ultimate technology radiator Instructions manual Mounting, installation, start-up and operation Thank you. Thank you very much for choosing Rointe heating. Before using the low consumption
SYGMA INSTRUCTIONS MANUAL SYGMA DIGITAL ELECTRIC RADIATOR MOUNTING, INSTALLATION, STARTING AND OPERATION
 INSTRUCTIONS MANUAL SYGMA DIGITAL ELECTRIC RADIATOR MOUNTING, INSTALLATION, STARTING AND OPERATION EN Dear Customer, WELCOME Thank you for choosing the low consumption SYGMA digital electric radiator,
PH1000T PH1500T PH2000T
 PH1000T PH1500T PH2000T ATC Sunray Panel Heater Class I - IP 20 3 Year Warranty INSTALLATION USE AND MAINTENANCE MANUAL 1. IMPORTANT SAFETY INSTRUCTIONS These instructions should be carefully read before
Colorado SCR. Electric Towel Radiator Operating and Installation Instructions. (Read these instructions carefully and retain for future reference)
") Colorado SCR Electric Towel Radiator Operating and Installation Instructions (Read these instructions carefully and retain for future reference) Models SCR 300 300W SCR 450 450W SCR 750 750W NOTE A qualified
Colorado SCR Electric Towel Radiator Operating and Installation Instructions (Read these instructions carefully and retain for future reference) Models SCR 300 300W SCR 450 450W SCR 750 750W NOTE A qualified
The Visage & Elegance Range of Electric Radiators INSTALLATION & OPERATING INSTRUCTIONS
 The Visage & Elegance Range of Electric Radiators INSTALLATION & OPERATING INSTRUCTIONS The Electric Heating Company Limited Unit 40, Block5 Third Road Blantyre Industrial Estate, Glasgow G72 0UP Tel:
THESE INSTRUCTIONS SHOULD BE READ CAREFULLY AND RETAINED FOR FUTURE REFERENCE.
 TE-700I Installation and Operating Instructions Haverland TOWELS THESE INSTRUCTIONS SHOULD BE READ CAREFULLY AND RETAINED FOR FUTURE REFERENCE. GENERAL RECOMMENDATIONS: * Please read these installation
Clima Infrared Radiant & Convection Panel
 Clima Infrared Radiant & Convection Panel Model S2030/1 Operating and Instruction Manual Please retain these instructions in a safe place for future reference. Ed. 05112015 cjw 1 References: n 1 min. 50cm
Panel Convector Heater User Instructions
 Panel Convector Heater User Instructions LEVPH750TPR, LEVPH1250TPR, LEVPH1500TPR, LEVPH2200TPR IMPORTANT SAFEGUARDS Before use, please read and follow these instructions carefully, even if you feel you
EFET 535. Installation Manual INT INT
 MAKING MODERN LIVING POSSIBLE EFET 535 Installation Manual Warning! This manual is only to be used by a professional installer to install and set up the thermostat properly. It is not intended for the
INSTALLATION USE AND MAINTENANCE MANUAL. ATC Evolution ATC EVOLUTION. Class I - IP55 INFRARED HEATER ATC ELECTRICAL & MECHANICAL
 ATC EVOLUTION ATC Evolution INFRARED HEATER Class I - IP55 INSTALLATION USE AND MAINTENANCE MANUAL EN USE AND MAINTENANCE 1. IMPORTANT SAFETY INSTRUCTIONS These instructions should be carefully read before
AUS. Devireg TM 535 Installation and user manual
 AUS Devireg TM 535 Installation and user manual 1 Congratulations with... your DEVI floor heating system Your property has been installed with a DEVI heating system. DEVI is Europe s leading floor heating
Platinum Series Electronic Panel Heaters
 Operating Instructions Platinum Series Electronic Panel Heaters Models: GPPH500, GPPH510, GPPH520, GPPH530 General Care and Safety Guide Thank you for choosing a Goldair Panel Heater. This Goldair Heater
Operation Manual. XRi Electric Radiators. Instructions & Installation Manual V~50Hz FOR INDOOR USE ONLY
 XRi Electric Radiators Instructions & Installation Manual Operation Manual 220-240V~50Hz Note: These instructions must be read fully before operating the Haverland Electric Radiator. Please retain these
CRX Single Zone Wireless Controller. Installation and User Guide. 1. Getting to know your CRX2 wireless controller
 Please read this guide carefully and retain for future use and maintenance. CRX2-01 Single Zone Wireless Controller Installation and User Guide 1. Getting to know your CRX2 wireless controller An illustration
NEXIUN ANALOGUE INERTIA RADIATOR, PROGRAMMABLE WITH PILOT WIRE INSTALLATION INSTRUCTIONS AND USER GUIDE NEX4PW NEX8PW NEX12PW NEX14PW
 INSTALLATION INSTRUCTIONS AND USER GUIDE NEXIUN ANALOGUE INERTIA RADIATOR, PROGRAMMABLE WITH PILOT WIRE NEX4PW NEX8PW NEX12PW NEX14PW Please read these instructions CAREFULLY before installing or using
CDE2TI, CDE2TIB, CDE2ECC, CDE2ECCB, CDE24ECC & CDE24ECCB AUS/NZ
 CDE2TI, CDE2TIB, CDE2ECC, CDE2ECCB, CDE24ECC & CDE24ECCB AUS/NZ 08/50841/3 Issue 3 1 614 770 250 250 13 : 17 605 605 2kW 2.4kW CDE2Ti(B) (Fig.3) CDE2ECC(B) & CDE24ECC(B) (Fig.2) 2 3 4 LCD x o eco X Y eco
Lifestyle Electric Thermal Radiator
 Lifestyle Electric Thermal Radiator Complies with Lot 20 Eco-design Heating Directive 2009/12/EC. Effective January 2018 ALUMINIUM Euro Edition Issue 1 August 2017 Next Day Delivery Order before 3.00pm
Lifestyle Electric Thermal Radiator
 Lifestyle Electric Thermal Radiator Complies with Lot 20 Eco-design Heating Directive 2009/12/EC. Effective January 2018 ALUMINIUM Euro Edition Issue 1 August 2017 Next Day Delivery Order before 3.00pm
INSTALLATION AND MAINTENANCE MANUAL BLITZ FD_
 INSTALLATION AND MAINTENANCE MANUAL IST 03 F 017-01 BLITZ FD_ Aluminium electric radiators with heat transfer fluid GB Dear customer, Thank you for choosing our product. Read this manual carefully before
ARLEC. User Instructions
 ARLEC User Instructions Used for model:ealc070, EALC090, EALC125, EALC150, EALC180 (Picture is only for reference purposes only) Products in the carton: Once open the carton, pls. check everything is complete
irad Wireless Controller
 irad Wireless Controller The irad Wireless Controller is a wireless (433MHz) programmable thermostat giving high precision room temperature control. It also had a seven day programmer with up to six temperature
HAVERLAND APP. The first self-programmable radiator and control from anywhere in the world INSTRUCTION MANUAL.
 The first self-programmable radiator and control from anywhere in the world INSTRUCTION MANUAL HAVERLAND APP ULTRA_V2_2017_MOOR@UK2017 www.haverland.co.uk Thank you for choosing Haverland radiators When
User Manual. Electric Heating Element MEG DRY MOA REG 2 REG 3
 User Manual Electric Heating Element MEG DRY MOA REG 2 REG 3 User Manual Our products have been designed and manufactured in such a way to ensure that all quality, functionality and aesthetic requirements
PANEL HEATERS OPERATING INSTRUCTIONS
 PANEL HEATERS OPERATING INSTRUCTIONS GPH110 GPH210/220 GPH310/320 GPH410/420 WARNINGS AND SAFEGUARDS 1. Use only the voltage specified on the rating plate of the appliance. 2. Keep all objects at least
ELECTRIC CONVECTOR HEATER. This product is only suitable for well insulated spaces or occasional use.
 EN ELECTRIC CONVECTOR HEATER IP24 This product is only suitable for well insulated spaces or occasional use. OPERATING INSTRUCTIONS Read the instructions carefully before installing and operating the appliance
/04.14_00. De Longhi Appliances via Seitz, Treviso Italia
 De Longhi Appliances via Seitz, 47 31100 Treviso Italia www.delonghi.com 5711010841/04.14_00 TRDS4 0820E - TRDS4 1025E DRAGON 4 OIL FILLED RADIATOR DESCRIPTION A L M B C D I F G H E N O 2 INSTRUCTIONS
INFRARED PANEL HEATER
 INFRARED PANEL HEATER ON/OFF LOCK O C/ O F SET MODE TIME FAV INSTRUCTION MANUAL CONTENTS 1. INCLUDED IN THE BOX 2. MODEL SPECIFICATIONS 3. REMOTE CONTROL/BUILT IN RECEIVER 4. WARNINGS & PRECAUTIONS 5.
INSTRUCTION MANUAL. Creda CEPE Contour Panel Heater. Installation and Operating. Models: CEP050E / CEP075E / CEP100E / CEP150E / CEP200E
 INSTRUCTION MANUAL Installation and Operating Creda CEPE Contour Panel Heater Models: CEP050E / CEP075E / CEP100E / CEP150E / CEP200E These instructions should be read carefully and retained for future
INDEX WARNINGS AND RECOMMENDATIONS 2 COMPLIANCE DECLARATIONS 3 RANGE AND SIZES 3 ELECTRICITY SUPPLY 3 INSTALLATION 4 INSTRUCTIONS FOR UNINSTALLING
 Tuscany TUS1500 INDEX WARNINGS AND RECOMMENDATIONS 2 COMPLIANCE DECLARATIONS 3 RANGE AND SIZES 3 ELECTRICITY SUPPLY 3 INSTALLATION 4 INSTRUCTIONS FOR UNINSTALLING THE RADIATOR 5 INSTRUCTIONS FOR USE 6
Dear Customer. Contents. 1) Vantage Electric Radiator characteristics Pag.3. 2) Technical specifications Pag.3. 3) Warnings Pag.4
 Vantage Electric Radiator characteristics Pag.3. 2) Technical specifications Pag.3. 3) Warnings Pag.4") IST 03 F 048-01 Dear Customer Thanks for choosing this Ecopower Heating product. Please read this manual carefully, as it contains important information on the correct and safe and installation of your
IST 03 F 048-01 Dear Customer Thanks for choosing this Ecopower Heating product. Please read this manual carefully, as it contains important information on the correct and safe and installation of your
Climapro 2. User manual. wireless room thermostat without receiver. To be left with the user.
 Climapro 2 User manual To be left with the user wireless room thermostat without receiver www.glow-worm.co.uk table of contents READ CAREFULLY BEFORE USING 1 Introducing your Climapro 2... 3 1.1 Description...
PLUG-IN PERSONAL CERAMIC FAN HEATER
 EN PLUG-IN PERSONAL CERAMIC FAN HEATER This product is only suitable for well insulated spaces or occasional use. The front metal grill becomes very hot during use. Therefore avoid contact of unprotected
Conception Wall Fire. Instruction Manual THE SCIENCE BEHIND CLEAN.
 Conception Wall Fire Instruction Manual BEHIND CLEAN www.beldray.com Please read all of the instructions carefully and retain for future reference. Safety Instructions When using electrical appliances,
Owner s Manual. Part Number 33CSCPACHP-01
 Comfort Pro Programmable Commercial Thermostat Owner s Manual Part Number 33CSCPACHP-01 SAFETY CONSIDERATIONS Read and follow manufacturer instructions carefully. Follow all local electrical codes during
VK902 Compact Combination Microwave Oven Installation, Use and Maintenance
 VK902 Compact Combination Microwave Oven Installation, Use and Maintenance Customer Care Department The Group Ltd. Harby Road Langar Nottinghamshire NG13 9HY T : 01949 862 012 F : 01949 862 003 E : customer.care@cda.eu
Elegance. SMT-700 User manual. Ver
 Elegance SMT-700 User manual Ver 3.0. 0807 Congratulations on the purchase of your new Thermostat! Your new air conditioning system thermostat has been built using the best components and design philosophy
INGENIUM INGENIUM INGENIUM. or using this appliance for the first time.
 INGENIUM INERTIA RADIATORS INGENIUM INGENIUM INGENIUM RX6ELST RX10ELST RX12ELST INSTALLATION INSTRUCTIONS AND USER GUIDE Please read these instructions beforee installing or using this appliance for the
Ceramic Wall Heater With Remote
 Operating Instructions Ceramic Wall Heater With Remote Model: GCH500 General Care and Safety Guide Thank you for choosing a Goldair Ceramic Heater. This Goldair Heater has been designed and manufactured
Electronic Ceramic Tower Heater
 Operating Instructions Electronic Ceramic Tower Heater Model: GCT430 General Care and Safety Guide Thank you for choosing a Goldair Ceramic Fan Heater. This Goldair Heater has been designed and manufactured
User Manual THR870CUK Programmable Thermostat
 User Manual UK Programmable Thermostat 50051984-001 Rev. A WARNING: This product must be correctly installed and configured to work properly (see pages 20-31). If you are not experienced in wiring electrical
Oil Filled Radiator. Model: SH60010 (all colours) Help line: This product is only suitable for well insulated spaces or occasional use
 Help line: This product is only suitable for well insulated spaces or occasional use") Oil Filled Radiator Model: SH60010 (all colours) Help line: 0333 220 6050 This product is only suitable for well insulated spaces or occasional use v1.1 SH60010_IM.indd 1 20/04/2018 09:15 IMPORTANT INFORMATION
Oil Filled Radiator Model: SH60010 (all colours) Help line: 0333 220 6050 This product is only suitable for well insulated spaces or occasional use v1.1 SH60010_IM.indd 1 20/04/2018 09:15 IMPORTANT INFORMATION
THERMAL RADIATORS INSTALLATION INSTRUCTIONS AND USER GUIDE RF3P RF4P RF5P RF6P RF8P RF10P RF12P RF14P RF3E RF4E RF5E RF6E RF8E RF10E RF12E RF14E
 INSTALLATION INSTRUCTIONS AND USER GUIDE RF THERMAL RADIATORS RF3P RF4P RF5P RF6P RF8P RF10P RF12P RF14P RF3F RF4F RF5F RF6F RF8F RF10F RF12F RF14F RF3E RF4E RF5E RF6E RF8E RF10E RF12E RF14E Please read
On initial power up the thermostat will guide you through set up procedure for the following:
 Operating Guide: for the Warmup 3iE Programmable Thermostat INTRODUCTION Your thermostat s default screen is the Home Screen. This screen displays important information such as the time, current floor
Instruction manual for models:
 Instruction manual for models: Prisma+ Prisma+ ivista Curvo+ Curvo+ ivista Cast Aluminium Electric Radiators High Performance with Intelligent Technology Incorporating high-precision electronic control
Contents. References for your electric towel-dryer radiator 2. Warning 3
 Contents References for your electric towel-dryer radiator 2 Warning 3 Installation 1/Prepare to install the electric towel-dryer radiator 4 2/Mark and drill the fixing points for the electric towel-dryer
ELECTRIC DESIGNER RADIATORS
 ELECTRIC DESIGNER RADIATORS RF4P RF6P RF8P RF10P RF12P RF14P RF4E RF6E RF8E RF10E RF12E RF14E INSTALLATION INSTRUCTIONS AND USER GUIDE Please read these instructions before installing or using this appliance
Smart Temp. Model
 Smart Temp Model 42-160 SINGLE STAGE PROGRAMMABLE THERMOSTAT 1 Heat / 1 Cool Single Stage Thermostat. 5+2 Programmable, Compatible with Gas Heat & Heat Pump System Installation and Operation Manual SPECIFICATIONS:--------------------------------------------------------------------------------
Curv-infrared.com. The Smarter Way. To Heat Your Home. Installation & Operating Instructions For Cürv, Flat, Towel Rail and Mirror Infrared Heaters
 Curv-infrared.com The Smarter Way To Heat Your Home Installation & Operating Instructions For Cürv, Flat, Towel Rail and Mirror Infrared Heaters Safety Precautions Important Notice To Purchaser Before
ST 53.1 User s manual
 Tech - 1 - ST 53.1 User s manual Table of contents I. Safety... 3 II. Description... 4 III. Installation... 4 IV. Operating the Controller... 6 IV.a) Principle of Operation... 6 IV.b) Control... 6 V. Controller
CERAMIC HEATER MODEL NO: DEVIL 350B 230V/110V OPERATING & MAINTENANCE INSTRUCTIONS PART NO: & ORIGINAL INSTRUCTIONS GC ISS 1
 CERAMIC HEATER MODEL NO: DEVIL 350B 230V/110V PART NO: 6920330 & 6920332 OPERATING & MAINTENANCE INSTRUCTIONS ORIGINAL INSTRUCTIONS GC1218 - ISS 1 INTRODUCTION Thank you for purchasing this CLARKE Ceramic
MAKING MODERN LIVING POSSIBLE. TP7001 Range Electronic 7 Day Programmable Room Thermostat. User Guide. Danfoss Heating
 MAKING MODERN LIVING POSSIBLE TP7001 Range Electronic 7 Day Programmable Room Thermostat Danfoss Heating User Guide TP7001 Electronic 7 Day Programmable Room Thermostat For a large print version of these
CS027 User Instructions
 CS027 User Instructions Battery Powered 7 Day Programmable Room Thermostat Programmable room thermostats are widely recognised as one of the best ways in which to control central heating. The CS027 programmable
Digital Thermostat Models: VS30W and VS30B
 it600 VS30W - VS30B Installer - User Manual 015_Layout 1 28.07.2014 10:28 Digital Thermostat Models: VS30W and VS30B INSTALLER / USER MANUAL it600 VS30W - VS30B Installer - User Manual 015_Layout 1 28.07.2014
Model: Available in : Sapphire Black and Glacier White. 1 Series
 Model: Available in : Sapphire Black and Glacier White 1 Series Table of Contents Product Image 1 Frost Protection 20 Table of Contents 2 Power ON/OFF 21 What is a Programmable Room Thermostat? Installation
Table of Contents. Model: Series. Available in : Sapphire Black and Glacier White. Product Image. 20 Table of Contents.
 1 Model: Available in : Sapphire Black and Glacier White Table of Contents Product Image 1 Frost Protection 20 Table of Contents 2 Power ON/OFF 21 What is a Programmable Room Thermostat? Installation Procedure
DPC-1 Programmable digital thermostat with communication Versión 2.0. Technical Information. Ref: N
 DPC-1 Programmable digital thermostat with communication Versión 2.0 Ref: N-27360 1108 Technical Information I S O 9 0 0 1 ER-0028/1991 Johnson Controls Manufacturing España, S.L. is participating in the
Portable Space Ceramic Heater
 Portable Space Ceramic Heater Quietheat15 OWNERS MANUAL Read and save these instructions. 2 A Name You Can Trust Trust has to be earned and we will earn yours. Customer happiness is the focus of our business.
Space Saver. Installation and user manual. Issue 001 March 2018 ENGLISH UK IRL SmithsEP.co.uk. Issue March 2018 smithsep.co.
 Space Saver Installation and user manual SS2E / 5 Issue 001 March 2018 ENGLISH UK IRL SmithsEP.co.uk Issue 001 - March 2018 smithsep.co.uk 1 Contents Introduction 2 Declaration of conformity 2 Symbols
7 Fin Oil Filled Radiator
 7 Fin Oil Filled Radiator 1500W INSTALLATION & INSTRUCTION MANUAL Model: DEF057232 PLEASE RETAIN THIS MANUAL FOR FUTURE REFERENCE Important Safety Instructions Please keep this instruction manual in a
TIH 300 S / TIH 400 S / TIH 500 S / TIH 700 S / TIH 900 S / TIH 1100 S
 TIH 300 S / TIH 400 S / TIH 500 S / TIH 700 S / TIH 900 S / TIH 1100 S EN OPERATING MANUAL INFRARED HEATING PANEL TRT-BA-TIH300S-TIH400S-TIH500S-TIH700S-TIH900S-TIH1100S-TC-002-EN Table of contents Notes
Installation, Start-Up, and Operating Instructions
 Installation, Start-Up, and Operating Instructions CONTENTS Page SAFETY CONSIDERATIONS...1 GENERAL...1 INSTALLATION...1-5 Install Batteries...1 Select Transmitter Location (Optional)...1 Mount Transmitter
Installation & User s Instructions
 Installation & User s Instructions 8 080 shown Part No. 00 day Wired Digital Programmer & Room Sensor Part No. 080 day Wireless Digital Programmer & Room Sensor Part No. 00 hr Wireless Digital Programmer
INSTALLATION AND MAINTENANCE MANUAL. Alcor FA
 INSTALLATION AND MAINTENANCE MANUAL IST 03 F 048-01 Alcor FA Aluminium electric radiators with heat transfer fluid EN Dear customer, Thank you for choosing our product. Read this manual carefully before
Space Saver. Installation and user manual SS3 SS5 SS7 SS9. Issue 001 September 2017 ENGLISH UK IRL SmithsEP.co.uk
 Space Saver Installation and user manual SS3 SS5 SS7 SS9 Issue 001 September 2017 ENGLISH UK IRL SmithsEP.co.uk Contents Introduction 2 Declaration of conformity 3 Symbols used in this guide 3 Important
AIR CONDITIONER OPERATING MANUAL. Duct type. Indoor Unit ARTG45LDTA ARTG54LDTA ARTG60LDTA KEEP THIS MANUAL FOR FUTURE REFERENCE. PART No.
 AIR CONDITIONER OPERATING MANUAL Duct type Indoor Unit ARTG45LDTA ARTG54LDTA ARTG60LDTA KEEP THIS MANUAL FOR FUTURE REFERENCE PART No. 98067 98067_OM_EN.indd 07-Aug-5 :40:5 OPERATING MANUAL PART No. 98067
INSTRUCTION MANUAL. This product is only suitable for well insulated spaces or occasional use.
 Electric fireplace suites* This product is only suitable for well insulated spaces or occasional use. FUI0011_V2_011217 *This manual is used for a variety products and styles. Please make sure you follow
IMPORTANT SAFEGUARDS Danger! Danger of burns!! Important!
 IMPORTANT SAFEGUARDS When using any electrical appliance, some basic safety precautions should always be observed to reduce the risk of fire, electric shock, and/or injury to persons. Read all instructions
PTC Ceramic Heater. Instruction Manual THE SCIENCE BEHIND HEAT
 PTC Ceramic Heater Instruction Manual Please read all instructions carefully and retain for future reference. Getting Started Remove the appliance from the box. Remove any packaging from the appliance.
PTC Tower Heater. Instruction Manual THE SCIENCE BEHIND HEAT.
 PTC Tower Heater Instruction Manual THE SCIENCE BEHIND HEAT www.beldray.com Please read all of the instructions carefully and retain for future reference. Safety Instructions When using electrical appliances,
Assembly- and User Manual Electric Infrared- Patio Heater MODEL: Geda HS - 2 kw Art. Nr. HS 10000
 Assembly- and User Manual Electric Infrared- Patio Heater MODEL: Geda HS - 2 kw Art. Nr. HS 10000 Seite 1 Intended Use The patio heater is exclusively designed for heating outdoor and indoor areas such
Type UCG/UDG. English...1 Français...7 Español Up button. OK button. Down button
 USER MANUAL Type UCG/UDG 57116D 06/12 (MBC) 1.10 2012 OJ Electronics A/S...1 Français...7 Español... 14 Type UCG/UDG Contents Introduction...1 First Time Settings...1 Ground Fault Circuit Interrupter (GFCI)...1
INSTALLATION MANUAL & OPERATING INSTRUCTIONS
 The Visage & Elegance range of Electric Radiators the ultimate solution for central heating INSTALLATION MANUAL & OPERATING INSTRUCTIONS 1 This appliance is not intended for use by persons (including children)
Easy-Stat. Wireless Programmable Room Thermostat Pt No
 Easy-Stat Wireless Programmable Room Thermostat Pt No 7.2000050 1 Installing the receiver The receiver must be installed into the boiler control panel, refer to the boiler installation manual for guidance.
Digital Programmable
 www.geappliances.com Digital Programmable Thermostats Operating Instructions Auto Changeover..........10 Day/Time Setting Mode.....6 Default Mode...............4 Fan Control...............10 Hold and Temporary
Operation Manual NOVA LIVE S
 Operation Manual NOVA LIVE S Models: NLS 1000, NLS 1500 and NLS 2000 IMPORTANT SAFEGUARDS Before use, please read and follow these instructions carefully, even if you feel you are familiar with the product.
/ De Longhi Appliances via Seitz, Treviso Italia
 Proudly distributed by De Longhi Australia Pty Limited P.O. BOX 4540 CASULA MALL NSW 2170 Customer Service Ph: 1800 126 659 Fax: 1800 706932 www.delonghi.com.au e-mail: delonghi@delonghi.com.au De Longhi
16 XD Mk2 Inset Electric Fire
 16 XD Mk2 Inset Electric Fire B-1005344 Packing Checklist Electric Fire Remote Control Handset 2 x AAA Batteries Log Set Ember Ice Crystal Set Instruction Manual Fascia IMPORTANT PLEASE READ THESE INSTRUCTIONS
/ De Longhi Appliances via Seitz, Treviso Italia
 Proudly distributed by De Longhi Australia Pty Limited P.O. BOX 4540 CASULA MALL NSW 2170 Customer Service Ph: 1800 126 659 Fax: 1800 706932 www.delonghi.com.au e-mail: info.au@delonghigroup.com De Longhi
Local air conditioner
 Instruction Manual Local air conditioner LAC08C16 Contents Safety Warnings...4 Unpacking...7 Product Overview...8 Front View...8 Rear View...8 Control Panel...9 Remote Control... 10 Moving the Unit...10
Portable Ceramic Space Heater
 QuietHeat15B (Black) Portable Ceramic Space Heater OWNERS MANUAL Read and save these instructions. 2 Trust should be earned and we will earn yours. Customer happiness is the focus of our business. From
MAKING MODERN LIVING POSSIBLE INT INT EFIT 550. User Guide and Installation Manual. Danfoss Heating
 MAKING MODERN LIVING POSSIBLE EFIT 550 User Guide and Installation Manual Danfoss Heating Thank you for buying a Danfoss product. With this purchase you have obtained a product of the highest quality,
ascent Installation & maintenance instructions Customer/technical services Guarantee Mono basin filler with infrared sensor GUARANTEE REGISTRATION
 Customer/technical services For any technical or installation queries please contact Vado on 01934 745163. Guarantee This product is guaranteed against manufacturing defects from the date of purchase until
Model: RT510RF. Installation Manual
 Model: RT50RF Installation Manual Contents Product compliance... 3 Safety Information... 3 Box content... 3 Introduction... 3 Features... Installation... 5. RXRT50 Receiver... 5 Button Description for
INSTALLATION & USER INSTRUCTIONS
 INSTALLATION & USER INSTRUCTIONS LED ELECTRIC FIRE MODELS COVERED BY THESE INSTRUCTIONS NDY-19 LED INSET ELECTRIC FIRE Focal Point Fires plc. Christchurch, Dorset BH23 2BT Tel: 01202 499330 Fax: 01202
Table of Contents. Product Image Table of Contents What is a Programmable Room Thermostat? Installation Procedure
 1 Model: 1 Table of Contents Product Image Table of Contents What is a Programmable Room Thermostat? Installation Procedure 1 2 3-4 5-6 Mode Select Pairing the ProTouch iq Hub Pairing the ProTouch iq What
METAL CERAMIC FAN HEATER
 EN METAL CERAMIC FAN HEATER OPERATING INSTRUCTIONS Read the instructions carefully before installing and operating the appliance or performing maintenance operations. Observe all the safety instructions;
Sun Ray Electric Radiators Stylish, Efficient, Low Energy
 Sun Ray Electric Radiators Stylish, Efficient, Low Energy SAVING ENERGY REDUCING THE CARBON FOOTPRINT Wifi Issue 6 Ireland Edition SUN RAY ELECTRIC RADIATORS Head office and Energy Showrooms Celebrating
Owner s Manual. Part Number 33CSSP2-FC BACK LIT LIQUID CRYSTAL DISPLAY MODE BUTTON
 Owner s Manual Part Number 33CSSP2-FC 33CS Fan Coil Programmable Thermostat SAFETY CONSIDERATIONS Read and follow manufacturer instructions carefully. Follow all local electrical codes during installation.
quality european heating appliances
 Superb Comfort in every room of your home quality european heating appliances AUSTRALIA Ph:03 9852 9599 www.atlantics.com.au ss@atlantics.com.au S4/13-25 Church Street Hawthorn 3122 Victoria Australia
TF1800 Thermofan Installation Guide YOUR STEP-BY-STEP GUIDE TO THE PERFECT INSTALLATION
 ! PLEASE ENSURE YOU HAVE READ AND FULLY UNDERSTOOD THIS GUIDE BEFORE INSTALLATION! TF1800 Thermofan Installation Guide YOUR STEP-BY-STEP GUIDE TO THE PERFECT INSTALLATION BATHROOM FAN HEATERS Introduction
INSTALLATION & USER INSTRUCTIONS
 INSTALLATION & USER INSTRUCTIONS LED ELECTRIC STOVE Christchurch, Dorset BH23 2BT Tel: 01202 588 638 Fax: 01202 499 639 www.ekofires.co.uk e-mail: sales@ekofires.co.uk MODELS COVERED BY THESE INSTRUCTIONS
Table of Contents. Product Image 1 Locking/Unlocking the neoair 24 Table of Contents 2 Frost Protection 25 What is a Programmable Room Thermostat?
 Table of Contents Product Image 1 Locking/Unlocking the neoair 24 Table of Contents 2 Frost Protection 25 What is a Programmable Room Thermostat? 3-4 Power ON/OFF 26 Holiday Programming 27 Installation