Installation, Operation, and Maintenance Manual RTE14S & RTE14S-2. For the Taco Bell "Rethermalizer" Model Numbers
|
|
|
- Lindsey Houston
- 5 years ago
- Views:
Transcription


1 Installation, Operation, and Maintenance Manual For the Taco Bell "Rethermalizer" Model Numbers RTE14S & RTE14S-2
2 NOTICES There are three different types of notices that you should be familiar with, a NOTICE, a CAUTION and a WARNING. A NOTICE is a special note used to call your attention to a particular important point. A CAUTION is used to point out a procedure or operation which may cause equipment damage. The WARNING notice is the most important of the three because it warns of an operation that may cause personal injury. Please familiarize yourself with your new Rethermalizer before operating it and heed the notices throughout this manual. All of these NOTICES are listed in the appropriate places. FOR YOUR SAFETY DO NOT store or gasoline or other flammable vapors or liquids in the vicinity of this or any other appliance. WARNING Improper installation, adjustment, alteration, service or maintenance can cause property damage, injury or death. Read the installation, operating and maintenance thoroughly before installing or servicing this equipment. THIS MANUAL MUST BE RETAINED FOR FUTURE REFERENCE L Rev 1 Revision Date: 29 July 1996 i
3 Table of Contents Warnings and Notices i Table of Contents 1 General Information & Installation 3 Checking Your Rethermalizer 3 Check Your Order 3 Leg Installation and Adjustment 3 Installation 4 Installation Clearances 4 Plumbing Connections 4 Electrical Connection 4 Ventilation and Fire Safety Systems 5 Visual Checks and Equipment Locations 5 Initial Cleaning 5 Electronic Temperature Control 5 Operating Instructions 6 Filling the Rethermalizer 6 Manual Operation of The Water Fill System 6 Start-Up and Use 6 Shutdown 6 Maintenance and Adjustments 7 Daily Cleaning 7 Weekly Cleaning 7 Temperature Control Programming 7 Service and Troubleshooting 8 Troubleshooting 8 Component Diagnosis 8 Temperature Control 8 Water Level Control 9 Water Fill Solenoid 9 Safety Relay (K1) 9 Temperature Probe 9 Parts 10 Part Numbers 12 Electrical Schematic Inside Rear Cover 1
4 General Information and Installation The Pitco Frialator Rethermalizer is a revolutionary new reheating unit. By using Pitco Frialator's Quick Heating Electric Elements, the Rethermalizer is up to temperature and ready to cook within 30 to 45 minutes. The cook tank holds approximately 15 gallons of water whose level is maintained automatically by the unit. The water temperature is monitored and controlled by its own Electronic Temperature Control mounted in the front panel. Each Temperature Control it is preset at the factory to maintain the water temperature at 195 F. It is fully programmable for cases of increased altitude where the cook temperature must be decreased. Quick recovery time and even temperatures are assured by using three separate heating elements. The Rethermalizer is very easy to use, allowing you to Rethermalize and not worry about the unit. However, it is important that you familiarize yourself with the operation and safety notices of this manual. This manual contains the Installation, Operation, Maintenance and Service procedures for the Taco Bell Electric Rethermalizer. Do not discard this manual, store it in a safe place for future reference. CHECKING YOUR NEW RETHERMALIZER Every effort has been made to ensure that your Rethermalizer will be delivered to you in perfect condition. As you unpack the Rethermalizer, inspect the unit for damage. If something is damaged, DO NOT sign the bill of lading, and save the packing materials. Contact the Freight Company immediately, because they are only responsible for 15 days after delivery. Check the packing list enclosed with your Rethermalizer to ensure that you have received everything on the list. If you are missing any parts, contact the dealer from whom the unit was purchased. As you unpack the Rethermalizer be careful to keep its weight evenly distributed. CAUTION To prevent equipment damage, do not tilt the unit onto any one of its legs. Locate your Pitco Frialator warranty and make note of the Date Received and Serial Number, located on the Data plate mounted on the inside of the door. Put your warranty in a safe place for future reference. DO NOT return the warranty sheet to Pitco Frialator. With the exception of the Legs, the Rethermalizer has been fully assembled for you at the factory and is ready to be installed. Check Your Order In the shipping crate with me Rethermalizer you will also find: (1) Cleaning Brush (1) Tube Screen (1) Meat Rack Leg Installation and Adjustment Installing the legs on the Rethermalizer is done with two 7/16" wrenches. The legs must be installed before connecting the unit to the electrical supply. The legs provide the necessary height to meet sanitation requirements. Attach the legs by performing me following procedure. a. Lay the Rethermalizer on its back being careful not to damage me cabinet Protect the outside of the unit with cardboard or a drop cloth when laying it down. b. Attach each leg with the supplied nuts and bolts. Each leg requires four 1/4-20 x 5/8" bolts. 3
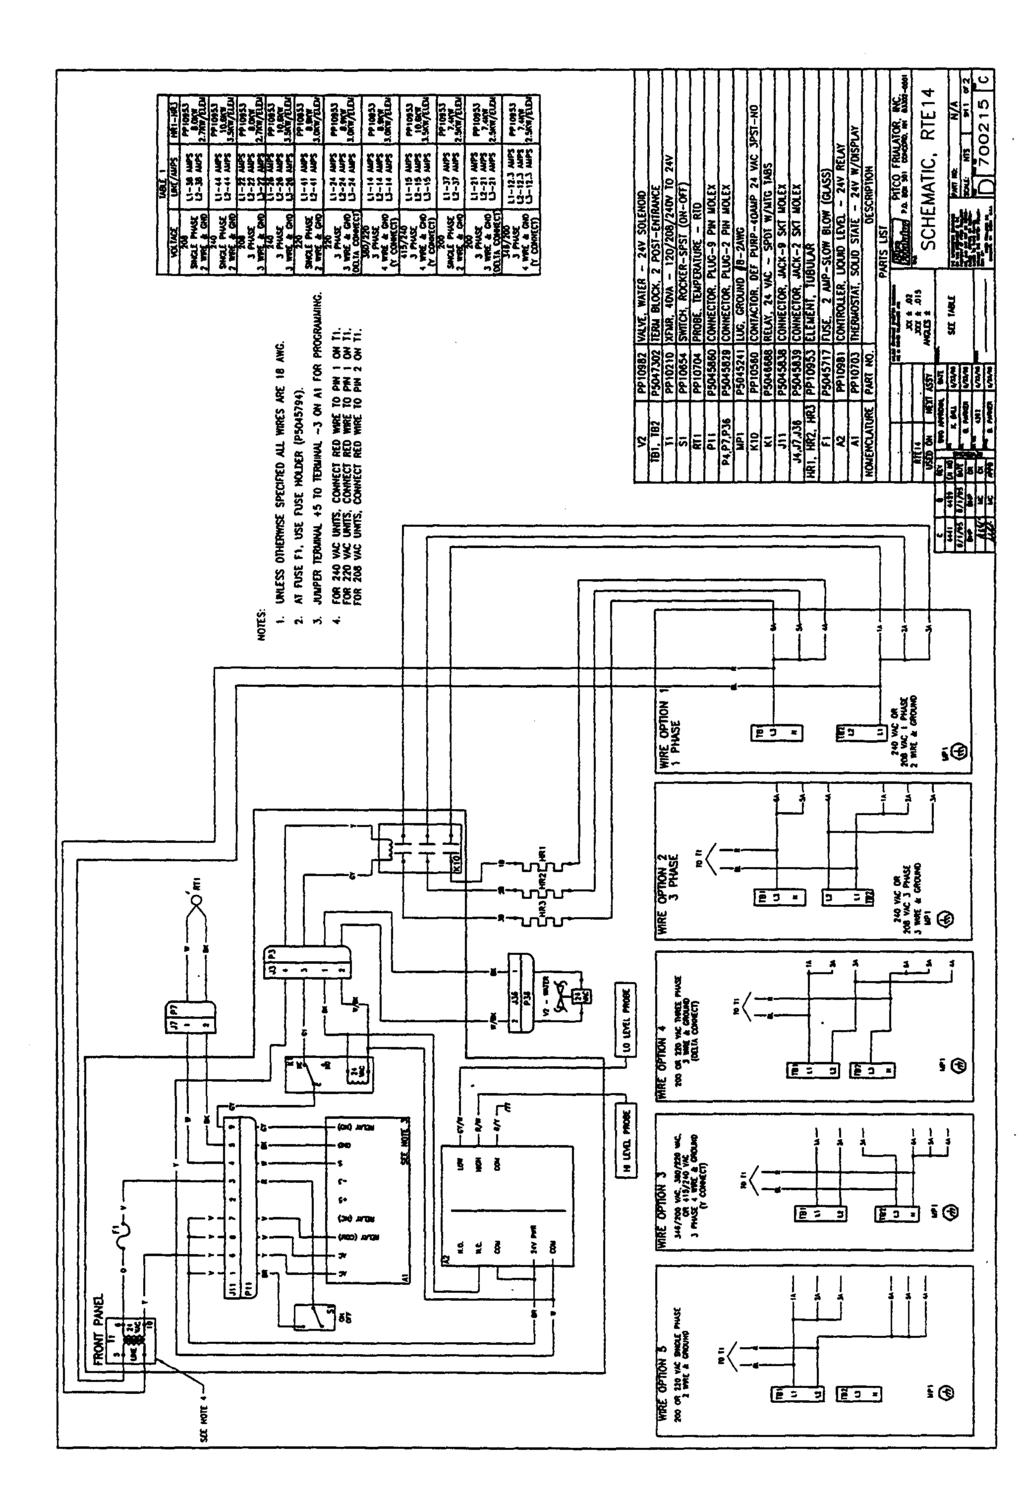
5 c. Mount the bolts from the inside of the unit with the nut on the outside. d. When all four legs are mounted, stand the unit up being careful not to put too much weight on any one leg. e. Move the Rethermalizer to the desired location and continue with the installation. INSTALLATION. It is STRONGLY recommended that you have ALL of the installation done by qualified professionals. The professionals that install your new Rethermalizer will know the local building codes and ensure that your installation is safe. This manual provides the installer with valuable information on the installation of your Rethermalizer. DO NOT allow the installer to keep this manual. Installation Clearances The Rethermalizer needs adequate clearances to allow for servicing, fire and sanitation regulations. It requires 6" clearance underneath to allow for cleaning, this is achieved by using 6" legs, which are supplied with the cooker. Plumbing Connections The plumbing installation should be done by a licensed plumber and must comply with local and national codes. The water inlet line on the Rethermalizer is located on the back of the unit and consists of a 1/2" NPT male threaded fitting. This line feeds water to the auto fill valve through the manual shut-off valve also located on the back of the unit The drain outlet is located underneath the unit and can be inserted into a drainage system. The drain line and the overflow line are connected together, this connection is made after the drain valve to provide an unobstructed overflow path. CAUTION If the water supply is in excess of 50 PSI it must have a pressure regulator installed to limit the Rethermalizers Input Water Pressure to 50 PSI max. Your Rethermalizer is supplied with an And - Siphon valve located at the inlet to the tank. Should your water supply lose pressure, this device will preclude siphoning of the tank contents into the water supply system. Electrical Connection The electrical service used by the Rethermalizer must comply with local codes. If there are no local codes that apply, refer to the National Electrical Code (NEC) to install the service, In Canada refer to CSA Standard C22.1. Wiring diagrams are provided inside the front panel of the Rethermalizer. This machine has been designed to be used with several different input voltages. The connection options are shown in the back of the Installation and Operation manual. If it is to be installed on a voltage different to that stated on the data plate (located on the inside of the door) the Input wires to the Transformer must be changed. Consult Note 4. on the wiring schematic located in the back of the Installation and Operation manual for this information. Note 4. For 240 VAC units, connect Red wire to Pin 1 on Tl. For 220 VAC units, connect Red wire to Pin 1 on Tl. For 208 VAC units, connect Red wire to Pin 2 on Tl. 4
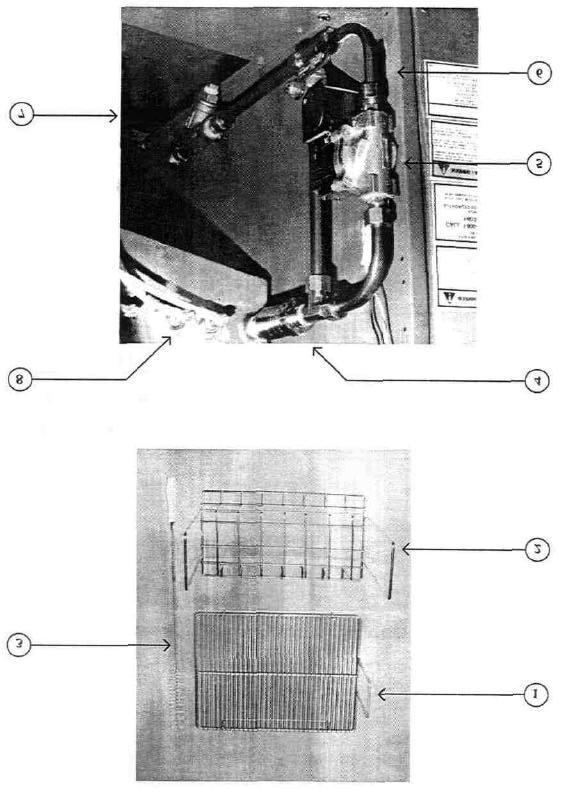
6 The power requirements for the unit are shown below. Voltage Power Current Phase 208 VAC 8KW 38Amps VAC 9KW 41 Amps VAC 10 KW 44 Amps 1 VENTILATION AND FIRE SAFETY SYSTEMS Your new Rethermalizer must have correct ventilation to function safely and properly. Your ventilation system should be designed to allow for easy cleaning. Frequent cleaning of the ventilation system and the Rethermalizer will reduce the chances of fire. It is very important to install a fire safety system. Please contact your dealer for more information on ventilation and fire safety systems. WARNING Never stand on the rethermalizer to service or clean the hood. VISUAL CHECKS AND EQUIPMENT LOCATIONS Before you begin filling the unit, perform the following visual checks: a. Move the Rethermalizer to its permanent cooking position and ensure that the Rethermalizer drain is lined up with the floor drain. b. Check all of the nuts that hold the sensor brackets in place. Ensure that the mounting screws and nuts are tight to prevent them from coming loose during operation. Figure 1 shows the location of the Temperature probe, and the Water Level sensors. Also shown are the over flow stand pipe and the water entry nozzle. Look down inside the Rethermalizer tanks to see the probes. Figure 1: Component Locations, Inside Tank INITIAL CLEANING When the Rethermalizer is shipped, many of its parts are covered with a thin coat of oil for protection. Before the unit is ready for use it must be cleaned to remove the oil coating and any foreign matter that may have accumulated during storage and shipment. Perform the cleaning as described in the WEEKLY CLEANING section. ELECTRONIC TEMPERATURE CONTROL The Electronic Temperature Control is preset at the factory to maintain 195 F. It does not require further adjustments unless you require a lower cooking temperature due to altitude. In such cases refer to the TEMPERATURE CONTROL CALIBRATION section. 5
7 Operating Instructions This chapter describes how to operate your Rethermalizer to obtain the best performance. FILLING THE RETHERMALIZER The Rethermalizer is equipped with an automatic water level fill system. To fill the unit with water place the Power Switch in the ON position. This causes the Water Fill Solenoid valve to open and supply water to fill the unit through the nozzle in the bottom of the tank. The tank will continue to fill until the water level reaches the level sensors. When both water level sensors are covered the solenoid valve will close stopping the flow of water. NOTE During normal operation the automatic water fill system will continue to control the water level in the Rethermalizer tank. If the water control system turns ON while the Elements are working the fill system will automatically turn the Elements OFF. This is normal and will not affect the operation of the Rethermalizer. When the tank refills to the high level probe the solenoid will close and the elements will resume heating automatically. MANUAL OPERATION OF THE WATER FILL SYSTEM Although the water fill system is completely automatic, the Water Fill Solenoid valve can be bypassed manually to fill the tank. To bypass the Water Fill Solenoid valve open the Manual Valve, located in the bypass pipe inside the cabinet, just behind the Water Fill Solenoid. This should only be done if the solenoid valve fails and the Rethermalizer needs to be operated. When the Rethermalizer is filled to the correct level ensure that the Manual Valve is returned to its normally closed position. CAUTION When the Manual Valve is open the automatic water fill system WILL NOT maintain the water level. When it is necessary to use the Manual Valve it is important that the water level be monitored closely. START-UP AND USE a. Place the Power Switch in the ON position. If the water level is NOT at the correct operating level the Water Fill Solenoid valve will open and fill the tank. b. When the water reaches the correct operating level, the heating elements will begin to heat, and the Temperature Control will control the water temperature. When the Temperature Control is calling for heat the red LED light on the display will also be ON. When me water temperature reaches the SET temperature (195 F, unless set to another temperature due to altitude requirements) the elements will turn off. The Rethermalizer is now up to temperature and ready to accept the food to be heated. Place the food to be heated in the rack and lower into the water. c The Temperature Control will maintain the water temperature at the SET temperature and the water fill system will keep the water at the correct level. SHUTDOWN Press the Power Switch to the OFF position. 6
8 Maintenance and Adjustments. This chapter provides you with the information and procedures necessary to perform Rethermalizer maintenance and adjustments. If, after performing maintenance on your Rethermalizer it does not operate properly, contact your Authorized Service Center. DAILY CLEANING Your Rethennalizer should be cleaned every day to maintain peak performance and appearance. Use warm water with a mild detergent, rinsing with clear water, and drying with a soft, cloth to clean exterior surfaces. Wipe down the unit using a clean soft cloth to clean up water spillage. Use a nonabrasive scouring powder or pad to clean stains if necessary. WEEKLY CLEANING The continuous filling and evaporation of water from the Rethermalizer will cause deposits to build up around the tank. At least once a week the unit should be thoroughly cleaned to remove these deposits and generally clean the unit. Perform the cleaning as described below. a. Fill the tank with water and add a mild detergent to the tank being cleaned. b. Turn the Rethermalizer on and allow it to reach normal operating temperature. Allow the unit to soak for a short time to remove residue. Use the cleaning brush to remove deposits from the tank cooking surface and elements. Pay special attention to the Water Level Probes located on the right hand side on the inside front of the tank. You can use a nonabrasive scouring powder or pad to clean stains if necessary. When the cleaning is complete, turn the unit off and drain the water. c. When the tank has cooled, rinse it thoroughly with cool water. Continue to rinse the tank until all cleaning agents have been rinsed from the tank. Now that the tank is clean, you are ready to fill and operate the Rethermalizer. CAUTION Do NOT use chlorine based cleaning agents in your tank, the chlorine will attack the metal and lead to premature failure. TEMPERATURE CONTROL PROGRAMMING The temperature controller does not need routine calibration. It will maintain its factory set values during normal operations. In some instances, where the rethermalizer has been installed at higher altitudes, the controller will require its SET temperature reprogramming. Follow the steps below if this is the case. a. Remove the front panel and install a jumper wire between me +5 and -3 terminals to enable the reprogramming function. If, during the setting procedure, you stop for longer than 15 seconds the controller will revert to the temperature display mode WITHOUT changing its settings. b. Press the F switch five times until LO shows in the display. Press the F one more time to display the LO setting. Using the Down arrow on the front of the display change the LO setting to 188 (this should be low enough for most applications). Press the F key until the display goes blank. c. Press the SET key and the display will show SP 1. Press the SET key again to display the current setting. Using the Down arrow on the front of the display change the SET value to a value at which the water stops boiling. d. Once the value is correct press the SET key again until the display goes blank. Remove the jumper wire from the +5 and -3 terminals and reinstall the front panel. 7
9 . Service and Troubleshooting WARNING To prevent bums, always ensure that the unit is completely SHUT DOWN and COOLED down before working on the Rethermalizer WARNING The power supply must be disconnected before servicing or cleaning the appliance. WARNING This section is provided for Qualified Service Personnel ONLY. This chapter is provided to help Authorized Service Personnel in the repair of most problems likely to occur with the Rethermalizer. To gain access to the front panel electrical components, remove the four screws on the front panel. Disconnect the wiring harness, remove the front panel and set aside. An electrical schematic is supplied inside the front panel for use by an Authorized Service Person. There is also an electrical schematic in the back of this manual. After servicing is complete, the diagram should be replaced for future reference. TROUBLE SHOOTING This section is provided to aid the Authorized Service Technician in the repair of your Rethermalizer. SYMPTOM Display will not light Maintains wrong temperature Display lit, but does not heat Constantly fills, or will not fill POSSIBLE CAUSE Bad Temperature Control, Fuse Holder, Fuse, Transformer or Switch Bad Probe or Display Bad K1 Relay, contactor. Probe, Display, Elements or Water Level control. Bad K1 Relay, Level Sensor Seals, Level Control or Water fill solenoid. Manual bypass valve may be open. COMPONENT DIAGNOSIS Before diagnosing any individual components, all appropriate power supplies and wiring terminations must be checked. Follow the appropriate section below to diagnose the suspected components. Temperature Control: When 24 VAC is supplied top the Temperature Control the display should be lit. When the water temperature is below the SET level 24 VAC can be found between the RELAY (NO) and AC (Yellow wire) terminals. The Red LED Heating indicator light will be ON. When problems with the Temperature Control occur it is important that the Probe be checked also. 8
10 Water Level Control: Check for 24 VAC between the COM and 24 V PWR (Power) terminals. Disconnect the HIGH, LOW and COM terminals, a 24 VAC signal can now be seen between the N.C. and COM terminals. The safety Relay (K1) and the Water Fill Solenoid will energize. Using a jumper wire, short the HIGH, LOW and COM terminals together, this will cause the Control to stop the 24 VAC signal between the N.C. and 24 V PWR terminals. Water Fill Solenoid: The Water Fill Solenoid should be open when a 24 VAC signal is applied to the two wires leading to the Actuator. With no voltage present the Solenoid should be closed. Safety Relay (K1): With a 24 VAC signal present at the coil section of the relay the switch section should have closed the circuit between the two Gray wires. Temperature Probe: Disconnect the probe from the Temperature Control at terminals S and GND. Measure the water temperature (with an independent temperature meter or thermometer) and the resistance of the probe at the same time. Consult the chart below for probe specifications. Temperature F Resistance Ohms Temperature F Resistance Ohms Temperature F Resistance Ohms 70 F F F F F F F F F F F F F F F F F 1454 IF YOU HAVE ANY QUESTIONS OR NEED ASSISTANCE WITH YOUR NEW RETHERMALIZER, PLEASE CALL US ON OUR TOLL FREE TECHNICAL SUPPORT LINE:
11 Parts 10
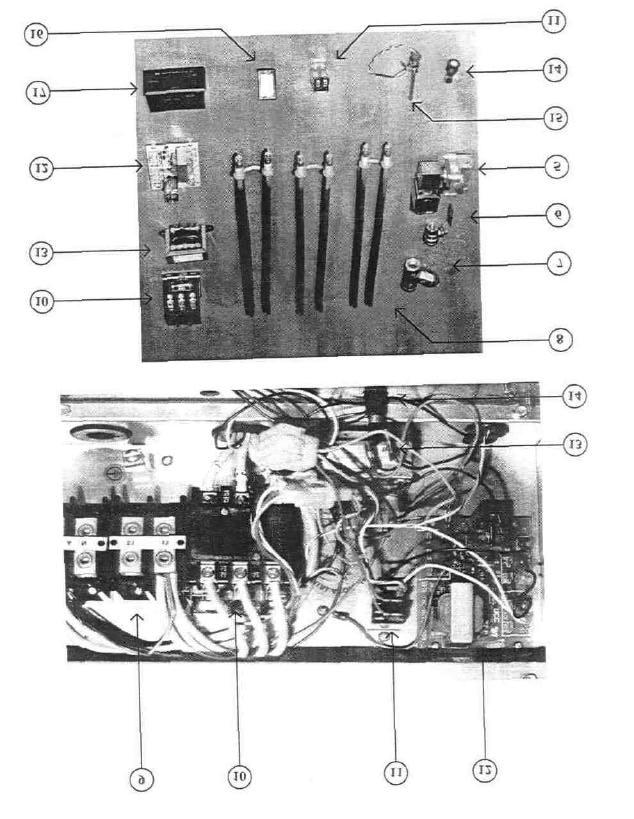
12 11
13 Part Numbers Ref # Descritpion Part Number 1 Support Rack B Portion Rack B Cleaning Brush..... PP Anti Siphon Valve..... PP Water Fill Valve PP Manual Valve PP In Line Filter..... PP Elements (Quantity of 3)..... PP Terminal Block (Quantity of 2)..... P Contactor PP Safety Relay P Water Level Control..... PP Transformer..... PP Fuse Holder... P Not Shown Fuse (2 Amp Slow Blow Glass Type) P Temperature Sensing Probe (With Gland Nut) B Power Switch PP Electronic Temperature Control... PP
14
Installation & Operation Manual Model SRTE Floor Model Electric Rethermalizer Built after 8/2005
 IMPORTANT FOR FUTURE REFERENCE Please complete this information and retain this manual for the life of the equipment: Model #: Serial #: Date Purchased: ENGLISH Installation & Operation Manual Model SRTE
Installation and Operation Manual Covering Model 40S, 40C, 40D with Millivolt Gas Valve
 IMPORTANT FOR FUTURE REFERENCE Please complete this information and retain this manual for the life of the equipment: Model #: Serial #: Date Purchased: ENGLISH Installation and Operation Manual Covering
Water Boilers ME10EN, ME15EN. Table of Contents
 Water Boilers ME10EN, ME15EN Operator Manual Model ME15EN Model ME10EN Safety Information...2 Rough-In Drawing...3 Installation...4 Priming...5 Cleaning...5 Table of Contents Adjustments...6 Maintenance...7
Installation and Operation Manual Covering Model 35C+, 45C+ with Millivolt Gas Valve
 IMPORTANT FOR FUTURE REFERENCE Please complete this information and retain this manual for the life of the equipment: Model #: Serial #: Date Purchased: ENGLISH Installation and Operation Manual Covering
ME SERIES ELECTRICALLY OPERATED BOILERS INSTALLATION - OPERATION - MAINTENANCE MODELS
 ME SERIES ELECTRICALLY OPERATED BOILERS INSTALLATION - OPERATION - MAINTENANCE MODELS M24E M36E Telephone: (802) 658-6600 Fax: (802)864-0183 www.marketforge.com PN 14-0309 Rev G (11/17) 2017 - Market Forge
UNDERCOUNTER LABORATORY REFRIGERATORS and FREEZERS Installation, Operation and Maintenance Instructions
 UNDERCOUNTER LABORATORY REFRIGERATORS and FREEZERS Installation, Operation and Maintenance Instructions INSPECTION When the equipment is received, all items should be carefully checked against the bill
OWNER S MANUAL INSTRUCTIONS, INSTALLATION, OPERATION, MAINTENANCE RHPE & RTGE SERIES (ELECTRIC COUNTERTOPS) RETAIN THIS MANUAL FOR FUTURE REFERENCES.
 RETAIN THIS MANUAL FOR FUTURE REFERENCES.") 3245 Corridor Drive, Eastvale, CA 91752 800.769.2414 951.360.1600 951.360.7500 (Fax) OWNER S MANUAL INSTRUCTIONS, INSTALLATION, OPERATION, MAINTENANCE RHPE & RTGE SERIES (ELECTRIC COUNTERTOPS) FOR YOUR
3245 Corridor Drive, Eastvale, CA 91752 800.769.2414 951.360.1600 951.360.7500 (Fax) OWNER S MANUAL INSTRUCTIONS, INSTALLATION, OPERATION, MAINTENANCE RHPE & RTGE SERIES (ELECTRIC COUNTERTOPS) FOR YOUR
Packaged Air Conditioning Units. Owner s Guide to Operating and Maintaining Your Air Conditioner. This manual should be left with the owner.
 Packaged Air Conditioning Units Owner s Guide to Operating and Maintaining Your Air Conditioner ELECTRICAL SHOCK HAZARD. Failure to follow this warning could result in personal injury, Disconnect power
INSTALLATION and OPERATION MANUAL DIRECT STEAM KETTLES MOUNTED ON ELECTRIC BOILER BASE CABINET MODELS: EMT-6 EMT-10 EMT-12 EMT-6-6 EMT-10-6 EMT-10-10
 INSTALLATION and OPERATION MANUAL DIRECT STEAM KETTLES MOUNTED ON ELECTRIC BOILER BASE CABINET MODELS: EMT-6 EMT-10 EMT-12 EMT-6-6 EMT-10-6 EMT-10-10 CROWN FOOD SERVICE EQUIPMENT LTD. 70 OAKDALE ROAD,
OWNERS MANUAL INSTALLATION, OPERATION, & MAINTENANCE INSTRUCTIONS
 OWNERS MANUAL INSTALLATION, OPERATION, & MAINTENANCE INSTRUCTIONS 1128 Sherborn Street Corona, CA 92879-2089 (951) 281-1830 (951) 281-1879 IPC SERIES PASTA COOKER All Imperial Mfg. Co. equipment is manufactured
Installation, Operation, and Maintenance Manual For McDonald's Gas Fryer Counter Top Models 12MCD
 Installation, Operation, and Maintenance Manual For McDonald's Gas Fryer Counter Top Models 12MCD NOTICES There are three different types of notices that you should be familiar with, a NOTICE, CAUTION,
KPS-E, KLS-E AND KLT-E SERIES
 KPS-E, KLS-E AND KLT-E SERIES PRODUCT LINE INSTALLATION - OPERATION - MAINTENANCE STATIONARY PEDESTAL MODELS KPS-20E KPS-25E KPS-30E KPS-40E KPS-60E KPS-80E KPS-100E STATIONARY TRI-LEG MODELS KLS-20E KLS-30E
Installation Manual. Manual P/N rev. B. PRO Series Standard Rack Conveyor Dishwashers LISTED. Models.
 Manual PRO Series Standard Rack Conveyor Dishwashers Models 44 PRO 70FF PRO HD 80HD PRO 66 PRO 44 PRO LISTED www.championindustries.com Issue Date: 8.4.17 Manual P/N 116108 rev. B For machines beginning
TRI-STAR INC SOUTH STANDARD AVENUE, SANTA ANA, CA Ph: Fax: MODEL #. OWNER S MANUAL
 TRI-STAR INC 2205 SOUTH STANDARD AVENUE, SANTA ANA, CA 92707 Ph: 714 424 9380 Fax: 714 424 9385 MODEL #. OWNER S MANUAL INSTALLATION OPERATION MAINTENANCE All equipments manufactured by Tri-star Inc. for
INSTALLATION AND OPERATION MANUAL GAS SKILLETS MODELS: GTS-30 GTS-40
 INSTALLATION AND OPERATION MANUAL GAS SKILLETS MODELS: GTS-30 GTS-40 CROWN FOOD SERVICE EQUIPMENT LTD. 70 OAKDALE ROAD, DOWNSVIEW, (TORONTO), ONTARIO, CANADA, M3N 1V9 TELEPHONE: (416) 746-2358, FAX: (416)
ELECTRIC DECK OVENS INSTALLATION & OPERATING MANUAL
 ELECTRIC DECK OVENS INSTALLATION & OPERATING MANUAL MODELS: EDO 2136-1, EDO-42-1, EDO 57-1, EDO 42-3, EDO 57-3 FOR YOUR SAFETY DO NOT STORE OR USE GASOLINE OR OTHER FLAMMABLE VAPORS AND LIQUIDS IN THE
INSTALLATION, OPERATION and MAINTENANCE MANUAL for Cres Cor Undercounter AquaTemp HUMIDITY OVENS and CONVECTION OVENS 2000 WATTS
 Rev. (/) Page of INSTALLATION, OPERATION and MAINTENANCE MANUAL for Cres Cor Undercounter AquaTemp HUMIDITY OVENS and CONVECTION OVENS 000 WATTS COXUADE0 COXUADX0 COX8DE0 COX8DX0 COXWUADE0 COXWUADX0 Rev.
INSTALLATION and OPERATION INSTRUCTIONS
 INSTALLATION and OPERATION INSTRUCTIONS SINGLE DOOR freezer MODEL NOS. FN FS Finished Stainless Steel Top Non-Finished Top FS FN IMPORTANT INFORMATION This manual has been prepared to assist you in the
Hot Water Boilers 810(E), 815(E), 830(E), 850(E) Table of Contents
, 815(E), 830(E), 850(E) Table of Contents") Hot Water Boilers 810(E), 815(E), 830(E), 850(E) Operator Manual Model 810(E) Safety Information...2 Rough-In Drawing...3 General Description...4 Installation...4 Priming...5 Cleaning...5 Table of Contents
Hot Water Boilers 810(E), 815(E), 830(E), 850(E) Operator Manual Model 810(E) Safety Information...2 Rough-In Drawing...3 General Description...4 Installation...4 Priming...5 Cleaning...5 Table of Contents
PRO SERIES GAS FRYERS OWNER S MANUAL
 PRO SERIES GAS FRYERS OWNER S MANUAL MODELS: PF-1 PRO-FRYER, PF2 DUAL PRO-FRYER REVISED OCTOBER, 2009 *PLEASE RETAIN FOR FUTURE REFERENCE This appliance has been tested according to ANSI Z83.116-2009/CSA1.86-2009.
R-RCM & R-RSB SERIES
 R-RCM & R-RSB SERIES CHEESEMELTER & SALAMANDER BROILERS INSTALLATION - OPERATION - MAINTENANCE CHEESEMELTERS R-RCM-24 R-RCM-36 R-RCM-48 R-RCM-60 SALAMANDERS R-RSB-24 R-RSB-36 R-RSB-48 Telephone: (802)
southbend A MIDDLEBY COMPANY INSTALLATION AND OPERATION MANUAL CG214 (E) CG314 (E) CG414 (E) CG220 (E) CG320 (E) CG325 (E) GAS BOILERS MODELS:
 CG314 (E) CG414 (E) CG220 (E) CG320 (E) CG325 (E) GAS BOILERS MODELS:") INSTALLATION AND OPERATION MANUAL GAS BOILERS MODELS: CG214 (E) CG314 (E) CG414 (E) CG220 (E) CG320 (E) CG325 (E) southbend A MIDDLEBY COMPANY 1100 Old Honeycutt Road Fuquay-Varina, NC 27526 (919) 552-9161
INSTALLATION AND OPERATION MANUAL GAS BOILERS MODELS: CG214 (E) CG314 (E) CG414 (E) CG220 (E) CG320 (E) CG325 (E) southbend A MIDDLEBY COMPANY 1100 Old Honeycutt Road Fuquay-Varina, NC 27526 (919) 552-9161
ELECTRIC COMPACT DECK OVEN INSTALLATION - OPERATION - MAINTENANCE
 1415 ELECTRIC COMPACT DECK OVEN INSTALLATION - OPERATION - MAINTENANCE BLODGETT OVEN COMPANY www.blodgett.com 44 Lakeside Avenue, Burlington, Vermont 05401 USA Telephone: (802) 658-6600 Fax: (802)864-0183
INSTALLATION, OPERATION and MAINTENANCE MANUAL for Cres Cor QUIKTHERM RETHERM ROLL-IN OVENS WITH RACK 18,000, 12,000 or 8,000 WATTS
 FL- Heisley Road Mentor, OH 00- Rev. 0 (/) Page of INSTALLATION, OPERATION and MAINTENANCE MANUAL for Cres Cor QUIKTHERM RETHERM ROLL-IN OVENS WITH RACK,000,,000 or,000 WATTS RRDE RRDX RRDEK RRDEK RRDXK
USERS INFORMATION MANUAL
 MODULAR DX OR CHILLED WATER COOLING WITH ELECTRIC OR HOT WATER HEATING MODELS: US, UM SERIES USERS INFORMATION MANUAL For Installation In: 1. Modular Homes & Buildings 2. Residential Homes LIST OF SECTIONS
INSTALLATION GUIDE Dual Fuel Ranges
 INSTALLATION GUIDE Dual Fuel Ranges Contents Wolf Dual Fuel Ranges......................... 3 Safety Instructions............................ 4 Dual Fuel Range Specifications.................. 5 Dual Fuel
Models: DB-2-HF, DB-3-HF, DB-4-HF, and DB-5-HF. For Service Information, Call
 Service Manual Design Basics Hot Food Tables Models: DB-2-HF, DB-3-HF, DB-4-HF, and DB-5-HF For Service Information, Call 800-544-3057 Please provide the following information: - Model number - Serial
Customer Service...1. Calibration...8. Inspection...9. Lighting Cleaning Features Control Box Digital Timers...
 Table of Contents MIRACLEAN GRIDDLE Customer Service...1 Keating of Chicago Web Site...4 Miraclean Griddle Features...7 Calibration...8 Inspection...9 Installation...10-12 Leveling...10 Gas Pressure...11
INSTRUCTIONS. Installation, operation and care of HD SERIES HOT DELI DISPLAY CASES. MODEL HD5 Full-Service IMPORTANT READ BEFORE USING DISPLAY CASE
 INSTRUCTIONS Installation, operation and care of HD SERIES HOT DELI DISPLAY CASES MODELS Full-Service Humidified Full-Service Self-Service HD3 HD4 HD5 HD7 HD3 HD4 HD5 HD7 HD3 HD4 HD5 MODEL HD5 Full-Service
CELDEK Evaporative Cooler Module Installation, Operation, and Maintenance Manual. CELDEK Evaporative Cooler
 CELDEK Evaporative Cooler Module Installation, Operation, and Maintenance Manual CELDEK Evaporative Cooler RECEIVING AND INSPECTION Upon receiving unit, check for any interior and exterior damage, and
Wilbur Curtis Company, Inc. Service Manual WB-10 Water Boiler
 MODELS INCLUDED WB-10-12 WB-10-60 CAUTION: Please use this setup procedure before attempting to use this appliance. Failure to follow the instructions can result in injury or the voiding of the warranty.
ICE ONLY DISPENSERS MODELS-IOD150, IOD200 AND IOD250 INSTALLATION/SERVICE MANUAL
 ICE ONLY DISPENSERS MODELS-IOD150, IOD200 AND IOD250 INSTALLATION/SERVICE MANUAL Ice-O-Matic 111000 East 45th Ave Denver, Colorado 80239 Part Number 9081305-01 Rev. C Revision Date: September 19, 2011
INSTALLATION, OPERATION and MAINTENANCE MANUAL for Cres Cor 8kW QUIKTHERM RETHERM OVENS
 Rev. 1 (6/13) Page 1 of 11 INSTALLATION, OPERATION and MAINTENANCE MANUAL for Cres Cor 8kW QUIKTHERM RETHERM OVENS REVOLUTION FOODS MODEL RO151033 Rev. 1 (6/13) Page 2 of 11 TABLE OF CONTENTS SUBJECT PAGE
Standard and CELDEK Evaporative Cooler Modules Installation, Operation, and Maintenance Manual
 Standard and CELDEK Evaporative Cooler Modules Installation, Operation, and Maintenance Manual Standard Evaporative Cooler CELDEK Evaporative Cooler RECEIVING AND INSPECTION Upon receiving unit, check
Super Runner Series Electric Fryers
 Super Runner Series Electric SR114E Super Runner Series Electric Fryers Installation & Operation Manual NON-CE & Dean, a member of the Commercial Food Equipment Service Association, recommends using CFESA
ICE CREAM TOPPING CABINETS REFRIGERATOR or FREEZER Installation, Operation and Maintenance Instructions
 ICE CREAM TOPPING CABINETS REFRIGERATOR or FREEZER Installation, Operation and Maintenance Instructions INSPECTION When the equipment is received, all items should be carefully checked against the bill
Fig. 1 - Unit PGD4, PGS4, WPG4
 OWNER S MANUAL 14 SEER Single -Package Air Conditioner and Gas Furnace System with R -410A Refrigerant Single Phase 2 to 5 Nominal Tons Three Phase 3 to 5 Nominal Tons PGD4andPGS4SeriesE,WPG4SeriesB Fig.
INSTALLATION AND OPERATION MANUAL STEAM COIL BASE CONVECTION STEAMER MODEL SCX-16
 INSTALLATION AND OPERATION MANUAL STEAM COIL BASE CONVECTION STEAMER MODEL SCX-16 CROWN FOOD SERVICE EQUIPMENT LTD. 70 OAKDALE ROAD, DOWNSVIEW, (TORONTO), ONTARIO, CANADA, M3N 1V9 TELEPHONE: (416) 746-2358,
Owner s Guide Installation & Operation
 Owner s Guide Installation & Operation Hot Top HHT Series Hestan Commercial Corporation 3375 E. La Palma Ave Anaheim, CA 92806 (888) 905-7463 RETAIN THIS MANUAL FOR FUTURE REFERENCE P/N 002130 REV 1 IMPORTANT
INSTALLATION, OPERATION and MAINTENANCE MANUAL for Cres Cor 12kW QUIKTHERM RETHERM OVENS
 Rev. 2 (7/13) Page 1 of 11 INSTALLATION, OPERATION and MAINTENANCE MANUAL for Cres Cor 12kW QUIKTHERM RETHERM OVENS RO151029 Rev. 2 (7/13) Page 2 of 11 TABLE OF CONTENTS SUBJECT PAGE INSTALLATION INSTRUCTIONS...
PS-3E AND PS-6E ELECTRIC CONVECTON STEAMERS PARTS AND SERVICE MANUAL
 PS-3E AND PS-6E ELECTRIC CONVECTON STEAMERS PARTS AND SERVICE MANUAL EFFECTIVE AUGUST 1, 2014 Superseding All Previous Parts Lists. The Company reserves the right to make substitution in the event that
INSTALLATION, OPERATION and MAINTENANCE MANUAL for Cres Cor 2kW RETHERMALIZER
 Rev. 0 (4/14) Page 1 of 11 INSTALLATION, OPERATION and MAINTENANCE MANUAL for Cres Cor 2kW RETHERMALIZER REVOLUTION FOODS MODEL CO15102 Rev. 0 (4/14) Page 2 of 11 TABLE OF CONTENTS SUBJECT PAGE INSTALLATION
OWNER'S, SERVICE & INSTRUCTION
 OWNER'S, SERVICE & INSTRUCTION M A N U A L GAS DECK OVENS MODELS 209, 209SS X 309, 309SS 212, 212SS X 312, 312SS 215, 215SS X 315, 315SS IMPORTANT INSTRUCTIONS FOR OVEN INSTALLATION, OPERATION AND MAINTENANCE
SE Series Modular Electric Stone-Hearth Deck Oven INSTALLATION & OPERATION MANUAL LBC BAKERY EQUIPMENT, INC st Ave NE Tulalip, WA 98271, USA
 SE Series Modular Electric Stone-Hearth Deck Oven INSTALLATION & OPERATION MANUAL LBC BAKERY EQUIPMENT, INC. 6026 31 st Ave NE Tulalip, WA 98271, USA Toll Free: 888-722-5686 Email: sales@lbcbakery.com
User s Information Manual
 48AJ,AK,AW,AY020-060 Single-Package Rooftop Gas Heating Units with COMFORTLINK Controls and Scroll Compressors User s Information Manual NOTE TO INSTALLER This manual should be left with the equipment
LHE OIL LINE HEATER ELECTRIC TYPE
 INSTRUCTIONS LHE OIL LINE HEATER ELECTRIC TYPE WARNING These instructions are intended for use only by experienced, qualified combustion start-up personnel. Adjustment of this equipment and its components
SERVICE/INSTALLATION MANUAL ICE ONLY DISPENSERS MODELS-IOD150, IOD200 AND IOD250
 SERVICE/INSTALLATION MANUAL ICE ONLY DISPENSERS MODELS-IOD150, IOD200 AND IOD250 Ice-O-Matic 11100 East 45th Ave Denver, Colorado 80239 Part Number 9081305-01 Date 10/08 Introduction IOD150,IOD200,IOD250
Product Manual. Scotsman. Models: 10150, and 10250
 Product Manual Scotsman Models: 10150, 10200 and 10250 IN TRO DUC TION This service manual is intended as a reference for the installer, user, and service agent of this Scotsman ice dispenser. It includes
Installation and Operation Manual For Electric Fryers. Covering Models SE, SEH, SEM Series
 Installation and Operation Manual For Electric Fryers Covering Models SE, SEH, SEM Series Pitco Frialator, Inc., P.O. Box 501, Jct I-89 & I-93 Concord, NH 03302-0501 509 Route 3A, Bow, NH 03304 (603) 225-6684
Owner s Information Manual
 48ES---A and 48VL---A Comfort and Performance 13 and 14 SEER Single Packaged Air Conditioner and Gas Furnace System With Puron (R---410A) Refrigerant Single and Three Phase 2---5 Nominal Tons (Sizes 24---60)
Gas Water Cooker (GWC) Service Manual. "Pasta Magic"
 Service Manual. Pasta Magic") "Pasta Magic" Gas Water Cooker (GWC) Service Manual Frymaster, a member of the Commercial Food Equipment Service Association, recommends using CFESA Certified Technicians. www.frymaster.com Original Instructions
"Pasta Magic" Gas Water Cooker (GWC) Service Manual Frymaster, a member of the Commercial Food Equipment Service Association, recommends using CFESA Certified Technicians. www.frymaster.com Original Instructions
Insta-Therm Series Service, Installation and Operation Manual
 Insta-Therm 16000 Series Service, Installation and Operation Manual Please read this manual completely before attempting to install or operate this equipment! Notify carrier of damage! Inspect all components
INSTALLATION, OPERATION and MAINTENANCE MANUAL for Cres Cor AQUATEMP TM HUMIDITY CONVECTION and RETHERM OVENS with MICROPROCESSOR CONTROLS
 9 Heisley Road Mentor, OH 0- Rev. (6/0) Page of INSTALLATION, OPERATION and MAINTENANCE MANUAL for Cres Cor AQUATEMP TM HUMIDITY CONVECTION and RETHERM OVENS with MICROPROCESSOR CONTROLS ROFWB-Q COFWUAB-Q
REFRIGERATORS AND FREEZERS Installation, Operation and Maintenance Instructions
 REFRIGERATORS AND FREEZERS Installation, Operation and Maintenance Instructions INSPECTION When the equipment is received, all items should be carefully checked against the bill of lading to insure all
INSTALLATION, OPERATION and MAINTENANCE MANUAL for Cres Cor 2kW RETHERMALIZER
 Rev. 1 (1/16) Page 1 of 12 INSTALLATION, OPERATION and MAINTENANCE MANUAL for Cres Cor 2kW RETHERMALIZER REVOLUTION FOODS MODEL CO151027 Rev. 1 (1/16) Page 2 of 12 TABLE OF CONTENTS SUBJECT PAGE INSTALLATION
Multi-Function Cooktop
 INSTALLATION GUIDE Multi-Function Cooktop Contents Wolf Multi-Function Cooktop.................... 3 Multi-Function Cooktop Specifications............ 4 Multi-Function Cooktop Installation...............
USER'S MANUAL PGE Single Package Rooftop
 USER'S MANUAL PGE Single Package Rooftop Gas Heating/Electric Cooling Units Sizes 036-150 3 to 12-1/2 Tons NOTE TO INSTALLER: This manual should be left with the equipment owner. WARNING: If the information
Installation, Operation, Maintenance, & Troubleshooting Model: CLS36-440V Electric Cruise Line Salamander Serial:
 Installation, Operation, Maintenance, & Troubleshooting Model: CLS36-440V Electric Cruise Line Salamander Serial: Lang Manufacturing Company 10 Sunnen Dr, St. Louis, MO 63143 Part No: 2M-W1257, Rev. -
Standard and CELDEK Evaporative Cooler Modules Installation, Operation, and Maintenance Manual
 Standard and CELDEK Evaporative Cooler Modules Installation, Operation, and Maintenance Manual Standard Evaporative Cooler CELDEK Evaporative Cooler RECEIVING AND INSPECTION Upon receiving unit, check
BOTTOM MOUNT REFRIGERATORS & FREEZERS Installation, Operation and Maintenance Instructions
 BOTTOM MOUNT REFRIGERATORS & FREEZERS Installation, Operation and Maintenance Instructions INSPECTION When the equipment is received, all items should be carefully checked against the Bill of Lading to
INSTALLATION, OPERATION and MAINTENANCE MANUAL for Cres Cor AQUATEMP TM HUMIDITY 12kW QUIKTHERM RETHERM OVEN
 FL-5 55 Heisley Road Mentor, OH 00-8 Rev. 8 (/5) Page of INSTALLATION, OPERATION and MAINTENANCE MANUAL for Cres Cor AQUATEMP TM HUMIDITY kw QUIKTHERM RETHERM OVEN RO5FWUA8DE RO5FWUA8DX RO5FPWUA8DE RO5FPWUA8DX
INSTALLATION, OPERATION & MAINTENANCE AVANTCO SERIES 177AG OWNER S MANUAL
 INSTALLATION, OPERATION & MAINTENANCE AVANTCO SERIES 177AG OWNER S MANUAL Manual Griddles: Radiant Charbroilers: Hot Plates: 177AG24MG 177AG36MG 177AG24RC 177AG36RC 177AGR212 All equipment manufactured
GENERAL LABORATORY REFRIGERATORS AND FREEZERS Installation, Operation and Maintenance Instructions
 GENERAL LABORATORY REFRIGERATORS AND FREEZERS Installation, Operation and Maintenance Instructions INSPECTION When the equipment is received, all items should be carefully checked against the bill of lading
INSTRUCTIONS. Installation, operation and care of CLD COLD SERIE MULTIDECK COLD FOOD DISPLAY CASES IMPORTANT READ BEFORE USING DISPLAY CASE
 INSTRUCTIONS Installation, operation and care of CLD COLD SERIE MULTIDECK COLD FOOD DISPLAY CASES MODELS MULTIDECK CLD25 Cold MODEL CLD25 Cold IMPORTANT READ BEFORE USING DISPLAY CASE www.frijado.com Part-number
BOTTOM MOUNT REFRIGERATORS AND FREEZERS Installation, Operation and Maintenance Instructions
 BOTTOM MOUNT REFRIGERATORS AND FREEZERS Installation, Operation and Maintenance Instructions INSPECTION When the equipment is received, all items should be carefully checked against the Bill of Lading
PLEASE RETAIN THIS MANUAL FOR FUTURE REFERENCES. This equipment is design engineered for commercial use only
 OWNER S MANUAL INSTALLATION OPERATION MAINTENANCE FRYER SRF-40/50 All equipment manufactured by SIERRA CORP. is for use with the type of gas specified on the rating plate and for installation will be in
Operator s Manual CAYENNE GAS COUNTERTOP CHAR BROILER ENGLISH
 NGLISH CAYNN GAS COUNTRTOP CHAR BROILR Thank you for purchasing this Vollrath Counter Top Cooking quipment. Before operating the equipment, read and familiarize yourself with the following operating and
Viking Installation Guide
 Viking Installation Guide Viking Range, LLC Front Street Greenwood, Mississippi 890 USA (66) 55-00 For product information, call -888-85-6 or visit the Viking Web site at vikingrange.com Professional Freestanding
USERS INFORMATION MANUAL
 USERS INFORMATION MANUAL DOWNFLOW For Installation In: SINGLE AND TWO STAGE 1. Manufactured (Mobile) Home 2. Recreational Vehicle ELECTRIC FURNACE 3. Modular Homes & Buildings 4. Residential Homes MODELS:
J120 STEAM BOOSTER INSTALLATION, OPERATION, AND SERVICE MANUAL J120 STEAM BOOSTER. J120 Steam Booster Manual D
 INSTALLATION, OPERATION, AND SERVICE MANUAL J120 STEAM BOOSTER J120 STEAM BOOSTER J120 Steam Booster Manual REVISION HISTORY Revision Letter Revision Date Made by Applicable ECNs Details A 10-27-04 CBW
Installation & Operations Manual for R-290 SERIES. BMG-HGP Model Bottom Mounted Full-Length Swing Glass Door Refrigerator Merchandisers 2/
 Installation & Operations Manual for R-290 SERIES BMG-HGP Model Bottom Mounted Full-Length Swing Glass Door Refrigerator Merchandisers 2/19 57-02650 2/19 57-02650 2 TABLE OF CONTENTS INTRODUCTION.. 4 STORE
Bulletin (Jan 2011) And User s Guide
 And User s Guide") Bulletin 30 32 (Jan 2011) Unichiller Installation And User s Guide Customer Service If you have questions about Installation, operation and Maintenance of the Unichiller or would like to order replacement
Bulletin 30 32 (Jan 2011) Unichiller Installation And User s Guide Customer Service If you have questions about Installation, operation and Maintenance of the Unichiller or would like to order replacement
BLG-HGP Model Bottom Mounted Full-Length Swing Glass Door Freezer Merchandisers
 Installation & Operations Manual for BLG-HGP Model Bottom Mounted Full-Length Swing Glass Door Freezer Merchandisers 2 TABLE OF CONTENTS INTRODUCTION..... 4 STORE CONDITIONS........ 4 WARNING LABELS AND
Hot Water Dispensers HWD2, HWD3, HWD5. Table of Contents
 Hot Water Dispensers HWD2, HWD3, HWD5 Operator Manual Activate your warranty now at http://gmcw.com/warranty-registration Model HWD2 Safety Information...2 Rough-In Drawing...3 Specifications...4 Installation...4
Installation & Operations Manual Master-Bilt Products 908 Highway 15 North New Albany, MS Phone: (800)
") Installation & Operations Manual Master-Bilt Products 908 Highway 15 North New Albany, MS 38652 Phone: (800) 684-8988 PN 018-90000 Rev 01-09-12 TABLE OF CONTENTS INTRODUCTION..3 STORE CONDITIONS.3 WARNING
Installation & Operations Manual Master-Bilt Products 908 Highway 15 North New Albany, MS 38652 Phone: (800) 684-8988 PN 018-90000 Rev 01-09-12 TABLE OF CONTENTS INTRODUCTION..3 STORE CONDITIONS.3 WARNING
PR-L2466W- PA. Operating Instructions. High Performance Refrigerator PR-L2466W-PA
 Operating Instructions High Performance Refrigerator PR-L2466W- PA PR-L2466W-PA Please read these instructions carefully before using this product, and save this manual for future use. See page 11 for
Fig. 1 - Unit PHD4 and WPH4
 OWNER S MANUAL 14 SEER Single -Package Heat Pump System with R -410A Refrigerant Single Phase and Three Phase 2 to 5 Nominal Tons PHD4 Series F and WPH4 Series B Fig. 1 - Unit PHD4 and WPH4 A09034 NOTE
Owner's Guide to Operating and Maintaining Your Gas/Electric Unit
 Packaged Gas Heat/Electric Cooling Units Owner's Guide to Operating and Maintaining Your Gas/Electric Unit ELECTRICAL SHOCK. FIRE OR EXPLOSION Failure to follow this warning could result in personal injury,
Installation & Operations Manual for. BMG-HGP Model Bottom Mounted Full-Length Swing Glass Door Refrigerator Merchandisers. 4/17 Rev.
 Installation & Operations Manual for BMG-HGP Model Bottom Mounted Full-Length Swing Glass Door Refrigerator Merchandisers 4/17 Rev. D 57-02398 4/17 Rev. D 57-02398 2 TABLE OF CONTENTS INTRODUCTION.. 4
Hoshizaki America, Inc.
 Hoshizaki America, Inc. Modular Crescent Cuber Models KM-1340MAH KM-1340MWH KM-1340MRH A Superior Degree of Reliability INSTRUCTION MANUAL www.hoshizaki.com Issued: 8-11-2005 IMPORTANT Only qualified service
Installation and Operation Manual
 1645 Lemonwood Dr. Santa Paula, CA 93060 USA Toll Free: 1 (800) 253-2363 Tel: 1 (805) 933-9970 Fax: 1 (805) 933-9160 www.thecoolboss.com Cool Boss Portable Evaporative Air Cooler Installation and Operation
READ AND UNDERSTAND THESE INSTRUCTIONS BEFORE OPERATING THE MACHINE
 XAACT Xtract 200 INFORMATION & OPERATING INSTRUCTIONS READ AND UNDERSTAND THESE INSTRUCTIONS BEFORE OPERATING THE MACHINE 78-00018 Rev B 032912 1 CONTENTS: Machine Specifications............ 2 Record Important
Packaged Gas/Electric Units. Owner s Guide to Operating and Maintaining Your Gas/Electric Unit
 Packaged Gas/Electric Units Owner s Guide to Operating and Maintaining Your Gas/Electric Unit ELECTRICAL SHOCK HAZARD. FIRE OR EXPLOSION HAZARD Disconnect power at fuse box or service panel before performing
Installation & Operation Manual Model SRTG Floor Model Gas Rethermalizer Built after 8/2005
 IMPORTANT FOR FUTURE REFERENCE Please complete this information and retain this manual for the life of the equipment: Model #: Serial #: Date Purchased: ENGLISH Installation & Operation Manual Model SRTG
P200E Shuttle Brewer
 P200E Shuttle Brewer Operator Manual Safety Information...2 Installation...3 Start-up...4 Operation...5 Adjustments...5 Table of Contents Model P200E Cleaning...8 Maintenance...9 Troubleshooting Guide...9
Installation & Maintenance Instructions
 B2451 & B2452 Series Wall Heaters SPECIFICATIONS MODEL VOLTS HZ AMPS WATTS BTUH B2451 120 60 12.5 1500 5120 B2452 240 60 8.3 2000 6826 208 60 7.2 1500 5120 DIMENSIONS OVERALL Height - 14 1/4 Width - 11
INSTALLATION AND SERVICE MANUAL
 INSTALLATION AND SERVICE MANUAL SPACESAVER ELECTRIC BOOSTER HOT WATER HEATERS 4 kw to 54 kw, 208 Vac to 600 Vac, Single or Three Phase 180ºF instantaneous hot water for commercial dishwashers Suitable
INSTALLATION & OPERATION MANUAL
 INSTALLATION & OPERATION MANUAL VHU SERIES INSULATED HUMIDIFIED HEATED TRANSPORTATION CABINETS MODELS: VHU7 VHU18 F47668 1 IMPORTANT FOR YOUR SAFETY THIS MANUAL HAS BEEN PREPARED FOR PERSONNEL QUALIFIED
OPERATOR S MODEL CW-216 CW-114 DISPLAY COUNTER WARMER REGISTER WARRANTY ONLINE AT
 OPERATOR S M A N U A L DISPLAY COUNTER WARMER MODEL CW-216 CW-114 REGISTER WARRANTY ONLINE AT WWW.HENNYPENNY.COM TABLE OF CONTENTS Section Page Section 1. INTRODUCTION... 1-1 1-1. Display Counter Warmer...
EBAC MODEL WM150 INDUSTRIAL DEHUMIDIFIER OWNER S MANUAL
 EBAC MODEL WM150 INDUSTRIAL DEHUMIDIFIER OWNER S MANUAL WM150 OWNERS MANUAL Page 1 of 9 INTRODUCTION Designed for a wide range of applications, the WM150 is a rugged, industrial unit, which utilizes an
SERVICE MANUAL. Bradford White ElectriFLEX HD (Heavy Duty) Commercial Electric Water Heater CEHD SERIES Immersion Thermostat Models
 Commercial Electric Water Heater CEHD SERIES Immersion Thermostat Models") Bradford White ElectriFLEX HD (Heavy Duty) Commercial Electric Water Heater CEHD SERIES Immersion Thermostat Models SERVICE MANUAL Troubleshooting Guide and Instructions for Service (To be performed ONLY
Bradford White ElectriFLEX HD (Heavy Duty) Commercial Electric Water Heater CEHD SERIES Immersion Thermostat Models SERVICE MANUAL Troubleshooting Guide and Instructions for Service (To be performed ONLY
UNDERCOUNTER DISHWASHER
 OWNER S MANUAL BLAKESLEE Division of The Legacy Companies UNDERCOUNTER DISHWASHER UC20 Blakeslee Division of The Legacy Companies 1228 Capitol Drive Addison, IL 60101 Phone (630) 532-5021 Fax (630) 532-5020
INSTALLATION & OPERATION MANUAL
 INSTALLATION & OPERATION MANUAL EF SERIES ECONOFRY GAS FRYERS MODEL EF3 EF4 EF5 ML-52099 ML-114943 ML-114944 MODEL EF3 For additional information on Vulcan-Hart or to locate an authorized parts and service
SR42G/52G Series Gas Fryers
 SR42G/52G Series Gas Fryers Installation & Operation Manual PRINTED IN THE UNITED STATES For Service, Call (318) 865-1711 Dean, 8700 Line Avenue, PO Box 51000, Shreveport, Louisiana 71135-1000 Shipping
OWNER S MANUAL. Models: Herkules Equipment Corporation 2760 Ridgeway Court Walled Lake, MI USA Fax
 Part# 1000692 7/12/99 tn INSTRUCTIONS This manual contains important information concerning the installation and operation of the gun washers listed at the right. Read manual thoroughly and keep for future
Installation & Operation Manual
 Installation & Operation Manual Glass Frosters FR Series FR48 SS shown C US Form No. Z2296 Rev. 01.16.2015 Glass Frosters Installation & Operation Manual JOB AREA ITEM NO. MODEL NO. FR24 SERIES FR36 SERIES
ELECTRIC COUNTERTOP DECK OVEN INSTALLATION & OPERATING MANUAL
 ELECTRIC COUNTERTOP DECK OVEN INSTALLATION & OPERATING MANUAL MODELS: CT-301 and CT-302 FOR YOUR SAFETY DO NOT STORE OR USE GASOLINE OR OTHER FLAMMABLE VAPORS AND LIQUIDS IN THE VICINITY OF THIS OR ANY
Owner s Guide Installation & Operation
 Owner s Guide Installation & Operation Char Broiler HCH Series Hestan Commercial Corporation 3375 E. La Palma Ave Anaheim, CA 92806 (888) 905-7463 RETAIN THIS MANUAL FOR FUTURE REFERENCE P/N 002134 REV
Installation Instructions
 Installation Instructions For Free Standing NoFrost Combined Refrigerator-Freezers CS 1660 7084 203-00 Important Please Read and Follow these Instructions These instructions contain Danger, Warning and
INSTALLATION & OWNERS MANUAL
 INSTALLATION & OWNERS MANUAL S/N 35389 & HIGHER IMPORTANT WARRANTY INFORMATION: For product warranty activation, the Product Registration Form must be submitted to AccuTemp Products, Inc. after installation