Graaf Generator. Making rollers: Assembly
|
|
|
- Frederica Brooks
- 5 years ago
- Views:
Transcription
1 Graaff GENERATOR
2 Contents Assembly... 2 Safety... 9 Operating the Generator... 9 Operation Experiments & Demonstrations Cleaning & Maintenance The Van de Graaff Machine Ancestors Motivation... 19

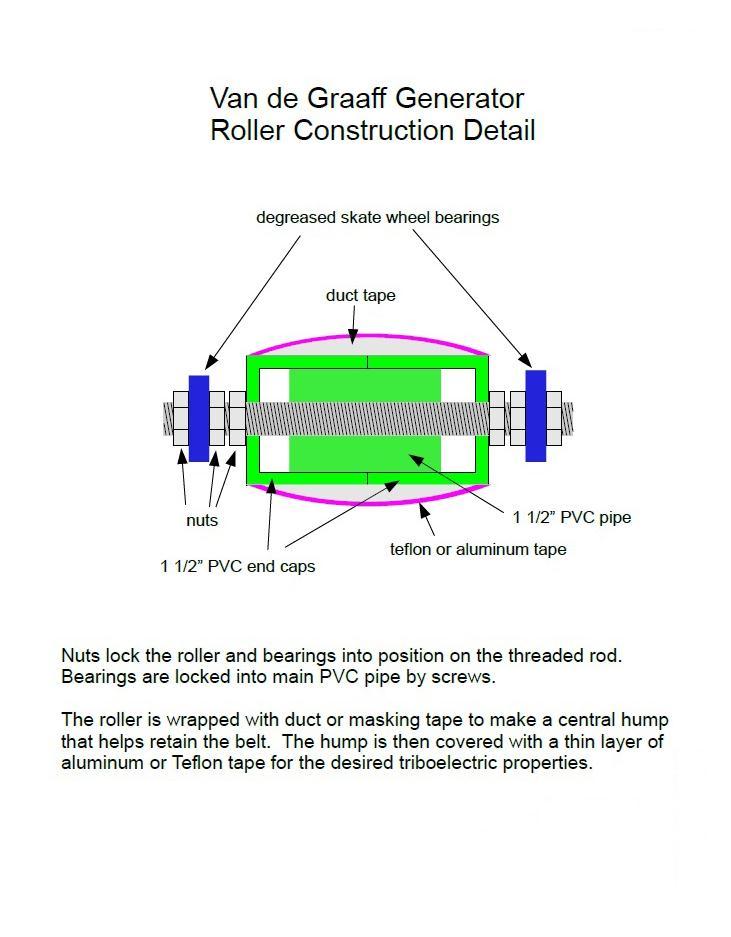
3 Graaf Generator Welcome to an exciting world of discovery with your new Graaff generator! This unique device is designed to produce electric current at exceptionally high voltages yet low, safe-to-use amperage. Assembly There are really only two tricky parts when it comes to making a VDG. You need a metal sphere for the top electrode and a rubber belt. You can use a motor or a hand crank to turn rollers/belt. The sphere came to me in the form of a pair of steel salad bowls from Ikea for about $6 each. The rubber belt is made from a "resistance band" from a Sports Authority store. I used 4" PVC pipe for the main structural tube and a flange to hold it to the wood base. Making rollers: The rollers are made of 1 1/2" PVC pipe with end caps. I drilled holes in the end caps then put a threaded rod through the roller. I used nuts to center the roller on the rod. Skate wheel bearings allow the rollers to turn smoothly. I soaked the bearings in degreaser and flushed them out before using them- a little grease in the wrong place will kill the output from a VDG. The bearings are retained on the threaded rod with more nuts and then they are retained in the side walls of the pipe with sheet metal screws. The generator turns smoothly and quietly. OK, well, the word "quietly" is stretching the truth a bit, but it isn't nearly as loud or unpleasant as a vacuum cleaner.


 The belt rubber (latex) is between aluminum and Teflon on the triboelectric series so I get extra fast")
4 Putting humps in the center of the rollers prevents the belt from slipping off. That is done by wrapping each roller with duct or masking tape, letting the tape pile up thickest at the centers of the rollers. Roller surface materials are chosen from a triboelectric series - Teflon for one and aluminum for the other. Don't worry, the rollers don't have to be made of those materials, only a thin layer on the surfaces of the rollers. I used plumber's Teflon tape for the bottom roller and aluminum tape for the top roller. (NOTE- this makes the sphere acquire positive charge- swap the rollers for negative charge) The belt rubber (latex) is between aluminum and Teflon on the triboelectric series so I get extra fast charging of the VDG. You can use any materials you want to make your VDG. Using the triboelectric series table will help you select those that provide the highest output current. Teflon is negative relative to the rubber belt in the triboelectric series so the teflon roller becomes negatively charged and the belt carries positive charge (by becoming electron deficient) up to the sphere. Aluminum is positive relative to the belt so the belt carries negative charge (electrons) downward from the sphere. If the roller locations were switched the generator polarity would be reversed. The positively charged, upward moving part of the belt passes close to the negatively charged, downward moving part of the belt. If your belt tension isn't high enough the two parts of the belt may touch each other due to the electrostatic attraction. That would cause all sorts of problems for your generator. This sort of problem can be overcome by increasing the belt tension, using bigger rollers to move the two side of the belt farther apart, or using more rollers to separate the sides of the belt further. I think you could also fit a piece of plastic inside the pipe to isolate the two sides of the belt. It's a bit of work to mess with all the skate bearings. I think it would be easier to use a couple bicycle wheel hubs for the rollers. Then the axle wouldn't have to rotate with the roller. You could use a pair of small pulleys with an O-ring as a belt to couple the motor to the bottom roller.


5 The sphere: The size of the sphere (and its smoothness) ultimately determine the maximum voltage you can get from a VDG. If you want super high voltage you need a really big sphere. Ikea sells hemispherical steel salad bowls in different sizes for very low cost. A pair of these bowls makes a nearly perfect sphere. I used a fiber reinforced cut-off wheel on a Dremel tool to cut a hole in the bottom of one bowl so it would fit over the 4" PVC pipe. The hole is a little over-sized so that a piece of slit urethane tubing would fit on the sharp edge and hold the bowl in position on the pipe. It is important to keep the sphere as smooth as possible to maximize the charge that can accumulate on it and thus the voltage - covering the sharp edge reduces charge leakage into the air. Once the generator was working properly it was time to install the top half of the sphere, an unmodified bowl. I found that the seam where the two bowls meet was the place where the most corona discharge occured and that by covering the entire seam with duct tape the output voltage of the generator increased dramatically. The belt: I went against conventional wisdom and tried using a bicycle tire tube for the belt. This time the conventional wisdom was right- I got no output from the generator at all. That set me off on a web search to find out what others were using in their VDGs. I found my answer in a Yahoo discussion group devoted to VDGs. I ran out to the local Sports Authority store and bought a package of resistance bands and used it to make the belt for the generator in less than an hour. When I turned on the power the generator immediately started throwing off sparks!

6 The resistance bands are 6" wide and about 48" long. I cut one down to about 1 1/2" wide with a pair of scissors. A little contact cement closed the ends to form a loop. My rollers are about 38" apart so I had to stretch the belt to get it over both rollers. Stretching the belt made it narrow, like you see in the pictures, so I put in a fresh one that I cut to 2 1/2" wide. After stretching it was about 2" wide and covered the rollers almost completely. The wider belt charges the generator faster. The motor: The motor isn't critical. Some people use old electric drills or motors taken from electric fans. It doesn't take a very powerful motor to turn the belt/rollers when you use ball bearings on the roller shafts. You could probably get away with a battery operated motor. I didn't have any junk motors laying around so I bought a surplus 117VAC motor from Herbach and Rademan for $8. It runs at about 1800 rpm. It is mounted to the base board of with a pair of 4" angle irons. The motor is coupled to the bottom roller shaft with a small piece of urethane air tubing that has been slit length-wise - the same stuff I used to cover the sharp edge where the bowl was cut for the bottom half of the sphere. The air tubing can flex a little so alignment of the shafts is not critical. Nylon tie-wraps hold the tubing to the the motor and roller shafts. If I were doing it all over again I think I'd bolt the motor right to the pipe and eliminate the box. The whole thing could be operated on a table top in a horizontal position, assuming the belt would be stable in that position. I'm not sure the great length is really necessary either. It might be OK to go half as long as I did. Many people have ed me about this project and many have duplicated it. One thing I am often asked is how to wire the motor - apparently Herbach & Rademan doesn't always supply a wiring diagram. I have prepared a diagram for you to download here:

.")
.")
7 Brushes: Brushes are not critical at all. I drilled holes in the pipe at the same level as the rollers then threaded some wire through them. At the top of the VDG the bare wire is aluminum taped to the metal bowl (the photo just shows it hanging and touching the bowl- I later added a piece of tape). At the bottom roller the end of the brush wire connects to the frame of the motor which is grounded to the AC power grid (use a 3-wire line cord!). The brushes are made from metal tape- I used aluminum at one end and copper at the other but the material doesn't matter as long as it is metal. Just fold the tape over the wire next to the roller, then snip away at the tape with a pair of scissors to make a bunch of pointy corners. Make sure that the brushes don't touch the belt.

8 Finishing up: Put it all together, make sure the belt and rollers turn freely. Get all your valuable electronics out of the room. Plug it in and see what happens. If it starts charging you'll know it when the hairs on your arm stand up even though you're standing a foot or two away from the VDG. Now you're ready to put the top bowl in place. Set it over the other bowl and wrap duct tape around the entire length of the seam where the bowls meet. Please note: performance of any VDG is critically dependent on the humidity of the air in which you try to operate it. I tried to operate my VDG on a rare rainy day in Phoenix once and got no sparks from it at all. If you like in a humid place or it is raining outside you may not get much or any output. I have seen patents from the 1930s for VDGs with heaters built in to dry the air inside the machine to improve performance in humid environments. If you live in a humid place try blowing warm air from a hair dryer into the machine to see if it works better.
9
10 Safety This generator produces up to 200,000 volts of electricity! When used properly, it is safe even though it produces such high voltage. The reason it is safe is because the current flow produced is very low--usually around 200 milliamps. Please read through the entire instruction manual before using your generator for the first time and follow all instructions carefully. Follow these safety instructions each time you use your generator. WARNING! The discharge of electricity produced by this generator can trigger a heart attack in individuals with heart disease (either diagnosed or undiagnosed). This generator may also cause cardiac pacemakers or electrical implant devices to malfunction or fail. Individuals with these conditions should not operate or come in contact with this generator under any circumstances. CAUTION! Electronic devices such as computers, stereos, televisions, and microwaves can also be damaged by static electricity. Operate your generator well away from these types of devices. We recommend that you operate your generator in a room that does not contain these devices. 1. Operate this generator only under adult supervision. This generator is not a toy! 2. Plug the generator into a standard grounded (3-prong) 110 volt outlet. 3. Do not operate the generator in a wet or damp location. Do not operate outdoors. 4. Check for loose or defective wires before operating the generator. Replace if necessary. 5. Unplug the generator before performing adjustments or maintenance. Never remove the base cover plate unless the generator is unplugged. A dangerous electrical shock hazard exists whenever the base cover plate is removed. 6. The electrical shock you receive from normal contact with the generator is not harmful, although it can be uncomfortable, startling, and occasionally even painful. The static shock you get from this generator is similar to, although much stronger than, the one you might get from touching a metal door knob after walking over carpet on a dry day. 7. You can get a small static shock when you unplug the electrical cord. To prevent this, touch the grounded discharge wand to the dome several times until all static electricity is dissipated. Then unplug the cord. 8. Even after your generator has been unplugged, the charge that has built up on it can still shock you. You can avoid getting shocked by touching the discharge wand to the dome before approaching it with your hand. Any charge that is left on the dome will be transferred to the wand instead of to your hand. 9. The switch on the base of the generator is not an On/Off power switch for the unit, but rather a switch for a 25- watt drying lamp in the base used for drying the unit when the humidity is high. Keep the wand in contact with the dome while switching the power on or off. Use it only as needed and only while the unit is running. Operating the Generator The generator is simple to operate. Place the unit on a plastic or wooden table. Attach the red wire from the discharge wand to the grounding terminal using the black plastic nut. Make sure the drying lamp switch is Off. Plug in the power cord to a grounded 110 volt outlet and the generator belt will begin to rotate (there is no on/off power switch). Within 30 seconds the dome will become charged. Move the discharge wand toward the dome until you get a spark. When the discharge wand is close to the dome the sparks are short and frequent (about one spark per second). As you move the discharge wand further from the dome, the sparks become longer and less frequent. Unplug the generator to turn it off.
11 When operating properly under the right conditions, your generator will consistently produce 1-2" sparks every second and 5-6" sparks every 3-5 seconds. Under ideal conditions 8-12" sparks can be produced. However, there are several variables that affect the performance of your generator including air humidity,cleanliness of the rollers and belt, and adjustments on the generator. Carefully read the Maintenance and Troubleshooting sections if your generator is not performing fully. Operation Introduction to Electric Fields Most objects have an equal positive (+) and negative (-) electrical charge, which makes them electrically neutral. Objects acquire an electrical charge by collecting or giving up electrons. Electrons are subatomic particles with a negative charge that are a normal part of all matter. An object that collects electrons develops a negative charge while an object that gives up electrons develops a positive charge. Any electrically charged object produces an electric field which attracts oppositely charged objects (e.g. a positively charged object attracts negatively charged objects) and repels similar charged objects (e.g. a positively charged object repels other positively charged objects). You can demonstrate this with a small balloon on a dry day. Rub the balloon on the hair of your lower arm. As you do, the balloon collects electrons from your arm and becomes negatively charged. At the same time the hair on your arm gives up electrons and becomes positively charged. Now bring the balloon to within 1-2" of your arm. What happens? The hair stands straight up toward the balloon. The electric field of the negative charged balloon attracts the positive charged hair on your arm! Electrical current flows when oppositely charged objects are connected together with a good conductor like a copper wire. Electrons flow from the negative charged object to the positive charged object. Electrical current can also flow from an object with very high negative charge to a second object that is less negatively charged. If the difference in electric charge is great enough, the current can even flow through a poor conductor like air. This is what happens when lightning strikes the earth. Clouds with a very strong negative charge are insulated from the earth by air. As the negative charge on the cloud builds, it finally overcomes the insulating barrier of the air, and current flows in the form of lightning from the cloud to the earth. How the Van de Graaff Generator Works The generator has a rubber belt that runs vertically (up and down) between two rollers. The lower roller is ABS plastic and the upper roller is nylon. A metal bar or "comb" is attached close to but not touching the belt at each roller. The belt assembly is enclosed in a clear plastic column that connects and insulates the base and dome. An electric motor in the base of the generator rotates the bottom roller which makes the belt turn on the rollers. The simplest way to think of a Van de Graaff generator is as an electric charge separator. As the motor turns, it moves the rubber belt which rubs against the rollers. As the belt rubs over the ABS lower roller (1), a negative charge develops (electrons collect) on the lower roller and a positive charge is produced on the part of the belt
12 moving up. This is because rubber is higher in the triboelectric series than ABS and therefore rubber develops a positive charge while ABS develops a negative charge when the two are rubbed together. The positively charged rubber belt then rubs over the nylon upper roller (2), which develops a positive charge on the upper roller and a negative charge is produced on the part of the belt moving down. In this case, nylon is higher in the triboelectric series than rubber. (Learn more about the triboelectric series on the internet.) As the generator continues to operate, electrons build on the lower roller increasing the negative charge. Then these electrons are transferred from the lower roller to the lower comb (3) and directed to the ground connection (6). At the same time, the positive charge building on the upper roller begins to attract electrons from the steel dome (5) through the upper comb (4). As this occurs, the dome builds a strong positive charge and these electrons are transferred onto the belt going to the lower roller. The positive charges continue to build on the dome and spread out uniformly, because like charges repel. With all other variables equal, the larger the dome the greater the positive charge it is able to hold. In simple terms, we can say the generator pulls electrons from the dome and moves them through the bottom of the generator to an electrical ground, as illustrated above. Eventually, the charge on the dome reaches an equilibrium state where the positive charged dome begins to pull electrons from the air. That is why you hear a crackling sound in the air around your generator as it operates. The positive charge on the dome builds until it overcomes the resistance of electron movement in the air. This causes a sudden transfer of electrons to the dome accompanied by a crackling sound. The electric potential of the positive charged dome at this point is measured in volts. Many factors affect how much voltage your generator can produce, such as air humidity and particle buildup on the dome. The moisture in humid air makes the air a better conductor, which increases the electron flow from the air to the dome. This prevents the dome from building high voltages. Dust and dirt particles on the dome create distinct points that help break the resistance to electron flow between the air and the dome. This results in a "leaking" of neutralizing electrons from the air to the dome and limits voltage potential of the dome. The first Van de Graaff generator was invented in 1931 by an American physicist named Robert Jemison Van de Graaff. He called the machine an electrostatic accelerator. This type of generator is able to produce extremely high voltages some today can produce up to 20 million volts of static electricity! Experiments & Demonstrations
13 Experiment 1 Lightning You can create sparks, or lightning, using the discharge wand that came with your generator. Attach the red wire from the discharge wand to the grounding terminal with the black grounding nut. Plug in the generator on and let it run for one or two minutes. Holding the plastic handle of the discharge wand, slowly move the ball towards the dome. Depending on humidity conditions, you should see a large, bright blue spark when the wand is anywhere from one to six inches away from the dome. The sparks that can be made are very quick like lightning. When the spark is produced, you should also hear a loud crack or pop. This demonstrates a lightning electrical discharge which is accompanied by a bright flash and loud cracking sound. It is spectacular in a dark room! When operating properly, in low humidity, your generator can consistently produce 1-2" sparks every second and 4-5" sparks every 3-5 seconds. Sparks of up to 8-12" can be produced under ideal conditions. If the air is dry enough, and you let your generator run for a few minutes without discharging the dome, you can get "lightning" from the dome to the base, a full 12". Experiment producing sparks with other objects. Try the flat of your hand or finger tips. You will discover that flat or round objects produce larger and more distinct sparks than thin or more pointed objects. Experiment 2 Raising Hair To raise your hair (or someone else s!) you will need a wooden chair or plastic step stool (it must be non-metal) that is sturdy enough to stand on and that will insulate you from the ground. If you don t insulate yourself, your hair won t be raised and you will receive an electrical shock instead. To raise your own hair, you will need someone to plug in the generator for you. While standing on the plastic stool with the generator unplugged, place one hand on top of the dome with your other hand at your side. Have your helper plug in the generator. Make sure you do not touch anything else while it is running. Depending on the humidity in the room and in your generator, it might take two to five minutes before your hair begins to stand on end. Being in contact with the running generator causes the positive charges built up in the storage dome to be transferred to your body. Once those charges are on your body, they will try to get as far away from each other as possible (like charges repel) causing the hair on your head to stand on end. You can try this experiment with different people who have different hair length or hair fineness. Or try it with people standing on different insulating objects. Which conditions produce the best results? Form a hypothesis or guess as to why particular conditions produce better results and then design an experiment to test your hypothesis. Experiment 3 Floating Objects Because of the amount of positive charge that accumulates on the outside of the dome, some objects in this experiment may be attracted to the dome at first. Once some of its positive charge is transferred to the objects, they are then forced away from the dome because both surfaces have the same charge, which causes them to move as far away from each other as possible. Place a small disposable aluminum pie or tart pan on top of the storage dome before plugging in the generator. When you plug it in, the pan should acquire the same charge as the dome, which will cause it to be repelled away from the dome! Try a stack of two or more pie pans and watch them lift off one at a time. You may have better success using a looped piece of tape or some sticky tack to attach the bottom pan to the top of the dome. You can also try this experiment by making pans from aluminum foil shaped around the bottom of a bowl. Make sure the top edges of the aluminum foil bowls are smooth as possible because all sharp edges or points will dissipate charge from the dome of your generator.
14 Another floating object experiment can be done with a small plastic or styrofoam bowl. Tape or stick the bowl to the dome. Then put a handful of dry cereal (puffed wheat or Rice Krispies work well) into the bowl. Plug in the generator and let it run for awhile. Once a positive charge builds up on the kernels of cereal they will fly out of the bowl and away from the dome. The kernels may fly out one at a time or many all at once. If the kernels do not begin flying out of the bowl within a few minutes, try reducing the charge on the dome by bringing the discharge wand near, and then waiting a few more minutes. Again, this demonstrates like charges repel and electric fields produce forces that can act on objects with mass. Experiment with other objects to see what will be repelled and what will stay. You can also blow some bubbles towards your generator while it is running. When the bubbles come near the dome, they begin to develop a positive charge as well. As the bubbles become positively charged they are repelled from the dome and move away rapidly! Experiment 4 Deflecting a Flame Your Van de Graaff generator can create an electrical wind that is powerful enough to deflect the flame of a candle and turn a toy windmill or propeller. To create a wind, attach a long, thin metal rod or needle (a darning needle or dissection pin will work well) to the side of the generator dome, near its middle, with the sharp end pointing out. Use modeling clay or a piece of tape, making sure that the metal touches the dome. Plug in your generator, light a candle, and hold it in front of the point. The flame should lean away from the generator. To see how far the effect of the wind extends, slowly move the candle away from the generator until the flame is no longer deflected. Experiment 5 St. Elmo s Fire Push a straight pin, needle, or opened up paperclip through the end of a plastic drinking straw so that the metal needle is at a 90 angle to the straw. Use this device as a point conductor. Plug in your generator and turn out the lights. Holding the end of the straw, slowly move one pointed end of the needle towards the surface of the dome while the other end of the needle is pointed away form the dome at a 90 angle. As the metal gets near the dome (usually 1-3"), a faint steady glow should appear at the tip of the needle and a stronger, larger glow will appear between the other end of the needle and the dome. This electrical discharge is called St. Elmo s fire and demonstrates how a pointed object produces a corona discharge in a strong electric field. A corona discharge produces light but no sound. Any sharp point on the surface of the dome will produce a corona or point discharge that leaks the generator's electric field into the surrounding air. This leakage is most prevalent where the two halves of the dome join and it prevents the generator from reaching its full voltage potential. Experiment with sealing the two dome halves with electrical tape to see if you can reduce this leakage and increase the spark potential of your generator. Other Experiments You can find many other experiments to do with your generator by conducting a search on the internet for "Van de Graaff." The possibilities are endless! Cleaning & Maintenance Your Van de Graaff generator requires periodic maintenance to keep it functioning properly. Follow the steps below to help ensure that your generator continues to work for many years. Be careful of the dangerous electrical shock potential when performing maintenance--unplug the power cord whenever doing maintenance. Check the belt and rollers for buildup of dirt, grit, or grease after every few hours 1. of operation. Follow the belt removal procedure and the roller and belt cleaning procedure any time you notice a buildup or if your generator is not performing properly. You may have to scrub the rollers to remove grease.
15 2. Clean the exterior parts of the generator before use with a soft cloth dampened with a little soapy water. 3. Periodically clean the inside of the plastic column with a soft cloth dampened with soapy water. Do this only with the belt and rollers removed. Do not use alcohol or solvents that could damage the plastic. 4. Remove the belt before storing the generator for extended periods of time (i.e. several months). This will keep the belt from losing its elasticity. 5. Check the belt for wear periodically. Replace worn or damaged belts. 6. Store the generator in a clean dry place to prevent dust accumulation or humidity absorption. Remove/Replace the Belt Follow this procedure to remove or replace the belt. Reinstall the belt by performing these steps in reverse. 1. Unplug the generator. 2. Remove the top of the dome. 3. Remove the base cover plate by removing the four screws and washers. 4. Slide the belt off the open end of the lower roller. 5. Lift the top roller assembly off the brass brackets. Slide the belt off the top roller assembly. 2. Clean the Belt and Rollers Dust, dirt, and grease will collect on the belt and rollers over time. Remember, these components are electrically charged during operation and therefore act as magnets to dust and grease particles in the air. Dirt or grease between the rollers and belt will interfere with the transfer of electrons from the dome to ground, preventing a charge buildup on the dome. Follow this procedure for cleaning these parts and retuning your generator to peak performance. 1. Remove the top of the dome. 2. Pull the belt back from the upper roller and look for dirt buildup on the roller. If you see dirt on the roller it is time for cleaning. 3. Remove the belt following the above procedure. 4. Scrub the top and bottom rollers using a soft cloth wetted with rubbing alcohol. You may have to scrub hard and keep using a clean section of the cloth to remove all the dirt and grease. Do not use detergents or other solvents to clean the rollers as they may damage or interfere with the electrical operation of these parts. 5. Scrub the inside and outside of the belt using a clean cloth wetted with soapy water. This is done easily by laying a section of the belt on a clean surface and rubbing the belt in strokes. You may have to rub toward the edges to remove any tiny particles on the belt that interfere with electron transfer. Rinse the belt well with water and then thoroughly dry it with a soft cloth. Finally, remove any residual water on the surface of the belt by drying for a few minutes with a hair dryer. 6. Wipe any excess grease off the upper roller shaft and spacers. Be careful not to get grease on the belt or surface of the rollers--it will interfere with the generator performance. 7. Replace the belt and rollers. Center the belt and adjust the belt tension if necessary. Adjust the combs if necessary. 3. Center the Belt and Rollers Follow these steps to center the belt within the column so that it properly carries electric charges up and down the column. Complete this procedure anytime the belt looks off center or when you replace the belt.
16 1. Remove the top of the dome. 2. Remove the base cover plate by removing the four screws and washers. 3. Operate the generator, being careful of the 110 volt shock hazard. 4. Observe the position of the belt on the top roller. The top roller should be centered above the top of the column and the belt should be riding on the center of the roller. 1. Rub marks on the column indicate that the belt has not been centered. 5. If the roller or belt is not centered, turn one of the belt tension screws as necessary to get it centered. A little experimentation here will allow you to quickly master this adjustment. 6. When the belt and top roller are centered, the generator will operate smoothly and the belt will not touch the sides of the column. 7. Now unplug the generator and set it on its side so you can observe the lower roller operation. 8. If the belt is not centered in the bottom of the column, you will need to move the lower roller on the motor shaft. Don't be concerned whether the belt is centered on the lower roller, only that it is centered in the column. 9. Unplug the generator and loosen the set screw that holds the lower roller on the 2. motor shaft. Reposition the lower roller and tighten the set screw. 10. Plug in the generator on and check to see if the belt is centered in the column again. Repeat step 9 as necessary. 11. Your generator is now ready for use. Reinstall the base cover plate and the top of the dome. Adjust Belt Tension Follow this procedure anytime you replace the belt or if the belt begins to slip on the rollers. It is normal for the belt to stretch a little over extended use. Your Van de Graaff generator is designed with belt tension screws to take out slack from stretching and extend the life of the belt while still operating at high voltages. Caution: Do not put too much tension on the belt or it will put undue stress on the motor bearing and reduce its life. Operate your generator with the belt as loose as possible as long as it does not slip or flop around on the rollers. 1. Remove the top of the dome. 2. Tighten the belt tension screws each the same amount until the belt no longer slips on the roller. 3. Follow the procedure for centering the belt and top roller to make sure your generator functions properly. 4. Replace the top of the dome. Adjust the Combs The combs located near the top and bottom rollers may affect the charge buildup on the dome. These combs must be adjusted to within 1/8" to 1/4" from the belt to produce optimal charge buildup. The lower comb especially may come out of adjustment as it is attached to the grounding terminal. 1. Remove the top of the dome. 2. Remove the base cover plate by removing the four screws and washers. 3. Inspect the upper comb. Position it so the gap between the belt and comb is between 1/8" and 1/4". The gap should be fairly uniform the entire width of the belt. You may have to loosen the comb adjustment screws to do this. 4. Set the generator on its side so you can observe the lower comb.
17 5. Inspect the lower comb. If necessary, the lower comb can be rotated toward or away from the belt and roller by first loosening the brass grounding nut. Position it so the gap between the belt and lower comb is between 1/8" and 1/4". You may also need to twist the lower comb slightly with a pair of pliers if necessary to align the comb parallel to the lower roller. 6. After making adjustments, rotate the belt by hand to make sure no part of the belt touches the combs. Note that there is variability in the thickness of the belt and some wobble of the rollers as they rotate. Make sure you rotate the belt at least one full revolution as you check for rubbing. 7. Replace the base cover plate. Clean the Column and Dome Whenever you clean the belt and roller it is also a good idea to clean the plastic column and metal dome. Dust and other particles will collect in the column over time. If the belt is misaligned, it can rub on the inside of the column and produce plastic dust from this rubbing. These particles can get on the belt and interfere with the performance of your generator. Clean the column by rubbing a soft cloth slightly dampened with soapy water up and down the length of the inside column several times. Repeat with a dry soft cloth. Blow dry with a hair dryer if necessary. Dust and grease buildup on the dome can create discharge points that leak voltage into the surrounding air. This prevents the generator from reaching its full voltage potential. Clean the dome with a clean soft cloth dampened with slightly soapy water. Dry it thoroughly. Compensate for High Air Humidity As the humidity increases, the plastic parts of the Van de Graaff generator (rollers and column), which are designed to work as insulators, begin to conduct small amounts of current. Because a Van de Graaff generator produces very high voltage and very low amperage, it takes little conductivity to prevent the generator from working well or not at all. Moisture in the air also dissipates the electric charge before it can build up on the dome. The performance of your generator may begin to fall off as the air increases above 60% relative humidity and perhaps not work at all above 80-90% relative humidity. You can easily determine if the humidity is too high by rubbing a balloon on the hair of your arm. Then, move the balloon away and back again toward the hair on your arm. If the hair stands up as the balloon approaches, the air is dry enough for the generator to work. If the hair does not stand up as the balloon approaches, then the humidity is too high for the generator to work well. If the air is humid, you can dry it out using the 25-watt drying lamp located in the base of the unit. Flip the switch on the back or the base to the On position while the unit is running. Leave it on for minutes and see if the heat form the bulb will adequately reduce the humidity in the interior of the generator. You may need to operate the drying lamp longer in higher humidity situations. This drying lamp is not designed to run continuously. Turn it on only when the unit is running and only as needed. Note that your generator may not perform well in a very high humidity environment, even with the drying lamp operating. Replace the Drying Lamp Bulb After awhile the 25-watt drying lamp bulb will burn out. The bulb is accessed by removing the base cover. Replace the drying lamp bulb with a standard 25-watt household tungsten light bulb.


18 Lubricate Bearings Apply a drop of household oil to the motor shaft and the upper roller shaft once per year. Caution: Do not get oil on the belt or roller surfaces. Oil on these surfaces may greatly reduce the performance of your generator. The Van de Graaff Machine Ancestors Otto von Guericke, using a sulphur globe frictioned by hand, builds the first electrostatic generator in The globe could be removed and used as source on electricity experiments. Figure 1. First electrical generator by Otto von Guericke. Other electrostatic generators followed this one, between them generators by induction that also used friction. In 1784, Walckiers constructed a machine with an horizontal looped silk strip passing over two wooden rollers. The young physicist Augusto Righi in 1872 in his PhD thesis described an induction electrometer this apparatus was a perfect Van de Graaff generator. However, this machine had not been conceived as a generator but as a charge magnifier for investigating weak electrostatic phenomena. Abraham Bennet in 1786 and William Nicholson in 1788 proposed their multipliers. [3] With these apparatus very small charges, too weak to be detected by a common electrometer, were multiplied by electrostatic induction until they could be measured. Righi was working in the same direction when he proposed his machine. Figure 2. Righi`s apparatus. A rubber belt carrying a large number of brass rings rotates on two metallic pulleys. The lower one, which is insulated, is connected with a crank and the upper one is grounded with a copper strip. Close to the belt, in the


![As the process continues the charges are continually added to the sphere. [3] This machine works in the same way as the Van de Graaff generator.](/docs-images/88/114988027/images/19-2.jpg "The endless-belt machines were never really popular and they could never compete with the disk induction generators of Holtz, Toepler, Voss, Carré,")
19 neighbourhood of the upper pulley, there is a small metallic conductor (the inductor) which is connected to the weakly charged object to be studied. The inductor charges one after another the brass rings of the belt which pass on the upper grounded pulley. Continuing their journey the rings enter a hollow insulated copper sphere, where they touch a third small metallic pulley fixed on its inside. Thus the charges of the rings accumulate on the external surface of the sphere. As the process continues the charges are continually added to the sphere. [3] This machine works in the same way as the Van de Graaff generator. The endless-belt machines were never really popular and they could never compete with the disk induction generators of Holtz, Toepler, Voss, Carré, Wimshurst, Wommelsdorff and others.[3] Figure 3. Holtz generator. Figure 4. Voss generator. Figure 5. Wimshurst generator.

20 Figure 6. Wommelsdorff generator. Motivation In 1917 the British physicist Ernest Rutherford introduced to Robert J. Van de Graaff the urgent need to develop a better method of accelerating atomic particles to very high speeds. During his investigation he comes across to the fact that atom smashing required very high energies. Natural radioactive elements such as the very expensive radium were sources of particles (alpha, electrons, as well as gamma rays) but their energy and their number were too low for penetrating the potential barrier of the nuclei of heavier elements. It was desirable not only such particles were available in adequate amounts and with sufficient energy to penetrate the atomic nucleus, but also that they be homogeneous and steady in energy and that they emerged from the apparatus in a parallel beam with little accompanying stray radiation. By the 1920 s the developments in nuclear physics emphasize the need of a new technique adapted to deliver enormous energies in concentrated form in order to penetrate or disrupt atomic nuclei. [5] Invention and Evolution The first working Van de Graaff generator produced 80 kv DC. A dual positive-negative Van de Graaff generator developing over 1 MEV was presented to the 1931 meeting of the American Physical Society [6]. Van de Graaff high voltage electrostatics generators were very simple using only 1 moving belt and 2 pulleys to produce high voltage direct current.

![[7] In 1931 Van de Graaff began to construct a large double generator in an unused dirigible shed at Round Hill (South Dartmouth, Mass.](/docs-images/88/114988027/images/21-1.jpg ") [3] Figure 8. The Van de Graaff generator in the Hangar. A laboratory was set up in each of the two domes.")
21 Figure 7. An early Van de Graaff generator being demonstrated by Robert J. Van de Graaff. [7] In 1931 Van de Graaff began to construct a large double generator in an unused dirigible shed at Round Hill (South Dartmouth, Mass.) [3] Figure 8. The Van de Graaff generator in the Hangar. A laboratory was set up in each of the two domes. Here, scientists could study the effect in the accelerating tube that ran between the domes. The columns were mounted on railway trucks so that the distance between them could be easily modified and also be wheeled out of and within the hangar. [7]
![Figure 9. An image of the columns connected by the accelerating tube. [8] It was functional in November 1933 and it was claimed to produce 7 million volts but in fact it developed about 5 Mev.](/docs-images/88/114988027/images/22-0.jpg "[3] Due to the difficulties of mounting the discharge tube between the spherical terminals this generator was never satisfactory as an accelerator.")
22 Figure 9. An image of the columns connected by the accelerating tube. [8] It was functional in November 1933 and it was claimed to produce 7 million volts but in fact it developed about 5 Mev. [3] Due to the difficulties of mounting the discharge tube between the spherical terminals this generator was never satisfactory as an accelerator. It was subsequently moved to MIT, where it was completely modified and used for atom smashing and high-energy X-rays research. At MIT the Van de Graaff high voltage generator was enclosed in a pressurized tank filled with a blend of insulating gases which enabled the Van de Graaff generator to achieve even higher accelerating potentials. [6] Finally in the 1950 s was donated to the Boston Museum of Science and in 1980, was installed in the Thomson Theatre of Electricity of the museum. [3] The two Van de Graaff high voltage generator terminals, were grafted together to form a singular huge terminal. The right column contained the working belts, motors, and brushes. The left column (which is now empty serves only as a support for the sphere) contained equipment to generate high energy x-rays. [8] The electrostatic generator was likewise employed with advantage in non-nuclear applications.
300KV Van de Graaff Generator Kit Builders Manual
 300KV Van de Graaff Generator Kit Builders Manual www.physicsplayground.com 300KV Design Photos (Black) 300KV Design (Orange) Introduction: Welcome to perhaps what will be your first VDG kit. This manual
400KV Van de Graaff Generator Kit Builders Manual
 400KV Van de Graaff Generator Kit Builders Manual 400KV Design Photos Introduction: Welcome to perhaps what will be your first VDG kit. This manual is designed to give you a very straight forward and streamlined
Van de Graaff Generator. Spinner Package Demonstration Guide
 Van de Graaff Generator Spinner Package Demonstration Guide Demonstrations for the Science First Van de Graaff generator and its included accessories. Teaching with Van de Graaff The Van de Graaff generator
Van de Graaff Generator Product Manual
 615-3100 Van de Graaff Generator Product Manual Contents (1) Van de Graaff generator (1) Discharge wand (1) Dual-end connector (1) Accessory adapter (12) Pith balls, mixed (1) Needle-point conductor (1)
SNC1P Electricity Practice Test
 SNC1P Electricity Practice Test Multiple Choice Identify the choice that best completes the statement or answers the question. 1. Which type of energy comes from the flow of charged particles? a. chemical
5 SAFE EXPERIMENTS USING A VAN DE GRAAFF! INSPIRING TOMORROW S SCIENTISTS THROUGH PRACTICAL SCIENCE
 5 SAFE EXPERIMENTS USING A VAN DE GRAAFF! INSPIRING TOMORROW S SCIENTISTS THROUGH PRACTICAL SCIENCE INTRODUCTION THE VAN DE GRAAFF GENERATOR IS AMONGST THE MOST RECOGNISABLE PIECES OF APPARATUS IN THE
NICHOLAS B. BLACKSHEAR HONORS PAPER. Non-working Van de Graaff generator DUE 4/20/10
 NICHOLAS B. BLACKSHEAR HONORS PAPER Non-working Van de Graaff generator DUE 4/20/10 Purpose The goal of this project was to build a working Van De Graaff generator with supplies from common shopping locations
Natural vs Human-harnessed Electricity
 What is static electricity? Why do you sometimes get shocked when you touch something metal? Why is static electricity more common in the winter? What do you think of when you think of static electricity?
Construction of a Van de Graaff Generator
 Construction of a Van de Graaff Generator Ali Haydar Kyla Morinini 20 April 2009 Introduction The goal of this project was to construct a functioning Van de Graaff generator from easily accessible parts
700KV Van de Graaf Generator
 700KV Van de Graaf Generator By Frederick W. Graff www.physicsplayground.com Frederick W. Graff 2012 www.physicsplayground.com Page 1 700KV VDG KIT Frederick W. Graff 2012 www.physicsplayground.com Page
TSOKOS Section 5-1 Van de Graaff Generator Demonstration
 IB PHYSICS Name: DEVIL PHYSICS Period: Date: BADDEST CLASS ON CAMPUS TSOKOS Section 5-1 Van de Graaff Generator Demonstration 1. Read the attached article on Van de Graaff generators. 2. The Van de Graaff
installation and operation manual for Hunter Ceiling Fans
 For Your Records and Warranty Assistance Model Name: Catalog/Model No.: Serial No.: Date Purchased: Where Purchased: For reference also attach your receipt or a copy of your receipt to the manual. installation
installation and operation manual for Hunter Ceiling Fans
 For Your Records and Warranty Assistance Model Name: Catalog/Model No.: Serial No.: Date Purchased: Where Purchased: For reference also attach your receipt or a copy of your receipt to the manual. installation
Physics Playground. Van de Graaff Generator Instructions. About Physics Playground. How a Van de Graaf Generator Works
 Van de Graaff Generator Instructions About Physics Playground HV Supplier for: 400KV DC or AC Powered VDG (built /kit) 450 KV High Current VDG (built / kit) 600 KV High Current VDG (built / kit) 700 KV
Hatteras BayTM. Patio. Instruction Manual. Includes our new CoolTouch TM Control System Looks permanent, but goes wherever you go! U.S.
 Hatteras BayTM Patio A Kichler Décor ceiling fan Designed to coordinate with a popular Kichler Lighting collection. Includes our new CoolTouch TM Control System Looks permanent, but goes wherever you go!
ValkyrieTM. Instruction Manual. Includes our new CoolTouch TM 6 Speed DC Control System Looks permanent, but goes wherever you go! U.S.
 ValkyrieTM A Kichler Décor ceiling fan Designed to coordinate with a popular Kichler Lighting collection. Includes our new CoolTouch TM 6 Speed DC Control System Looks permanent, but goes wherever you
Owner s Guide and Installation Manual
 For Your Records and Warranty Assistance For reference, also attach your receipt or a copy of your receipt to the manual. Model Name Type 2 Models Owner s Guide and Installation Manual Model No. Catalog
Owner s Guide and Installation Manual
 For Your Records and Warranty Assistance For reference, also attach your receipt or a copy of your receipt to the manual. Model Name Type 2 Models Owner s Guide and Installation Manual Model No. Date Purchased
STATIC MERRY-GO-ROUND
 Curriculum topics: Static Electricity Experimental Variables Momentum Electrically Charged vs. Uncharged STATIC MERRY-GO-ROUND Make and power a version of the first electric motor! Subject: Physical Science
AP Air Ion Counter Instructions
 AP Air Ion Counter Instructions Standard 2 million ions/cm 3 version- The 6 m long ground cord should be used to connect the meter to earth ground for most types of measurements - - especially if you are
52 DorsetTM. Instruction Manual. Basic Function Wall Control System Included. A Kichler Decor ceiling fan
 Basic Function Wall Control System Included 52 DorsetTM II A Kichler Decor ceiling fan Kichler Lighting 7711 East Pleasant Valley Road P.O. Box 318010 Cleveland, Ohio 44131-8010 Customer Service 866.558.5706
600KV Van de Graaff Generator High Current Model
 600KV Van de Graaff Generator High Current Model www.physicsplayground.com Frederick W. Graff 2012 Page 1 600KV Kit Model Frederick W. Graff 2012 Page 2 Table of Contents Introduction and Materials 4 How
ALUMA INSTRUCTION MANUAL WARRANTY CERTIFICATE
 ALUMA BY INSTRUCTION MANUAL WARRANTY CERTIFICATE Manual design and all elements of manual design are protected by U.S. Federal and/or State Law, including Patent, Trademark and/or Copyright laws. The Minka-Aire
English BT3600
 www.blackanddecker.com 3 English BT3600 FIG. 1 FIG. 2 150mm BENCH GRINDER BT3600 GENERAL SAFETY RULES WARNING: Read all instructions. Failure to follow all instructions listed below may result in electric
FerronTM. Instruction Manual A Kichler Decor ceiling fan
 Includes our new CoolTouch TM 6 Speed DC Control System Looks permanent, but goes wherever you go! U.S. Patent Pending 300160 A Kichler Decor ceiling fan HIGH EFFICIENCY DC MOTOR FerronTM Kichler Lighting
ChicagoTM. Instruction Manual. Includes our new CoolTouch TM Control System Looks permanent, but goes wherever you go! U.S.
 Includes our new CoolTouch TM Control System Looks permanent, but goes wherever you go! U.S. Patent Pending ChicagoTM A Kichler Decor ceiling fan Kichler Lighting 7711 East Pleasant Valley Road P.O. Box
Owner s Guide and Installation Manual
 For Your Records and Warranty Assistance For reference, also attach your receipt or a copy of your receipt to the manual. Model Name Type 8 Models Owner s Guide and Installation Manual Model No. Catalog
Cable Drum Machine. Operation Manual 40 SERIES. Cleans 2" to 4" lines up to 75' N O T F O R R O O T S
 Cable Drum Machine Operation Manual 40 SERIES Cleans 2" to 4" lines up to 75' Used For: Sinks, Showers & Floor Drains N O T F O R R O O T S WARNING - Read All Instructions, When Using Electric Tools, Basic
Sunburst. Instruction Manual. Includes our new Wall Control System. A Kichler Décor ceiling fan
 Includes our new Wall Control System Sunburst A Kichler Décor ceiling fan Kichler Lighting 7711 East Pleasant Valley Road P.O. Box 318010 Cleveland, Ohio 44131-8010 Customer Service 866.558.5706 8:30 AM
54" Skye. Instruction Manual Customer Service :30 AM to 5:00 PM EST, Monday - Friday A Kichler Decor ceiling fan
 54" Skye TM 300167 A Kichler Decor ceiling fan Includes wall mount control system Kichler Lighting 7711 East Pleasant Valley Road P.O. Box 318010 Cleveland, Ohio 44131-8010 Instruction Manual Customer
C-IV 60 CEILING FAN READ AND SAVE THESE INSTRUCTIONS. FAN RATING AC 120V. 60Hz
 C-IV 60 CEILING FAN READ AND SAVE THESE INSTRUCTIONS FAN RATING AC 120V. 60Hz Please do not use any electric or battery powered tools in the assembly and installation of this or any Matthews Fan Company
Figure 1. Explain how rubbing an acetate rod with a cloth causes the rod and cloth to become charged
 Q1.A student rubs an acetate rod with a cloth. Figure 1 shows the charges on the acetate rod and cloth before and after rubbing. Figure 1 (a) Explain how rubbing an acetate rod with a cloth causes the
Select. Sutter PlaceTM. Instruction Manual. A Kichler Select ceiling fan
 Sutter PlaceTM A Kichler ceiling fan Kichler Lighting 7711 East Pleasant Valley Road P.O. Box 318010 Cleveland, Ohio 44131-8010 Customer Service 866.558.5706 8:30 AM to 5:00 PM EST, Monday - Friday Instruction
Installation and Operation Manual For Hunter Ceiling Fans
 Installation and Operation Manual For Hunter Ceiling Fans 1 2 CONGRATULATIONS! Your new Hunter ceiling fan is an addition to your home or office that will provide comfort and performance for many years.
LaceyTM. Instruction Manual. Includes our new CoolTouch TM 6 Speed DC Control System Looks permanent, but goes wherever you go! U.S.
 LaceyTM A Kichler Décor ceiling fan Designed to coordinate with a popular Kichler Lighting collection. Includes our new CoolTouch TM 6 Speed DC Control System Looks permanent, but goes wherever you go!
52 CEILING FAN READ AND SAVE THESE INSTRUCTIONS FAN RATING AC 120V.
 Irene 52 CEILING FAN READ AND SAVE THESE INSTRUCTIONS FAN RATING AC 120V. 60Hz TABLE OF CONTENTS Tools and Materials Required... 1 Package Contents... 1 Safety Rules... 2 Mounting Options... 3 Hanging
60" Hatteras BayTM. Patio. Instruction Manual. Includes our new Wall Control System. A Kichler Décor ceiling fan
 Includes our new Wall Control System 60" Hatteras BayTM Patio A Kichler Décor ceiling fan Kichler Lighting 7711 East Pleasant Valley Road P.O. Box 318010 Cleveland, Ohio 44131-8010 Customer Service 866.558.5706
Owner s Guide and Installation Manual
 For Your Records and Warranty Assistance For reference, also attach your receipt or a copy of your receipt to the manual. Model Name Type 2A Models Owner s Guide and Installation Manual Model No. Date
In this activity, students will write secret messages that can only be revealed if you know how to read invisible ink!
 Invisible Ink Magic Science 15 20 minutes In this activity, students will write secret messages that can only be revealed if you know how to read invisible ink! Materials Needed Per Student: Half a lemon
Electroscope. Making Atoms Visible. Easily create an electroscope to detect static electricity and radiation. American Nuclear Society
 Easily create an electroscope to detect static electricity and radiation. Grade Level 5-12 Disciplinary Core Ideas (DCI, NGSS) 5-PS1-1, MS-PS1-1, MS-PS1-4, HS-PS1-8, HS-PS4-2, HS-PS4-5 Time for Teacher
Orrin. Instruction Manual. Includes our new CoolTouch TM Control System Looks permanent, but goes wherever you go! U.S.
 Includes our new CoolTouch TM Control System Looks permanent, but goes wherever you go! U.S. Patent Pending Orrin A Kichler Select ceiling fan Kichler Lighting 7711 East Pleasant Valley Road P.O. Box 318010
1. SAFETY RULES WARNING WARNING. 8. Avoid placing objects in the path of the blades.
 1 1. SAFETY RULES 1. To reduce the risk of electric shock, insure electricity has been turned off at the circuit breaker or fuse box before beginning. 2. All wiring must be in accordance with the National
Operating Instructions and Safety Precautions for Box-Type Violet Ray Machine with Switched Rheostat
 Operating Instructions and Safety Precautions for Box-Type Violet Ray Machine with Switched Rheostat Thanks for purchasing this quality refurbished violet ray machine. This machine has been tested and
52 Lacey LED. Instruction Manual. 6 Speed DC Wall Control System
 6 Speed DC Wall Control System 52 Lacey LED HIGH EFFICIENCY DC MOTOR Kichler Lighting 7711 East Pleasant Valley Road P.O. Box 318010 Cleveland, Ohio 44131-8010 Customer Service 866.558.5706 8:30 AM to
Static Electricity: Bending and Floating
 Static Electricity: Bending and Floating Week 3A Objectives: In this lesson students will learn: About the force of static electricity How electricity relates to our everyday life Intro to electrons Background:
FitchTM. Instruction Manual. Includes our Basic Function CoolTouch TM Control System Looks permanent, but goes wherever you go!
 Includes our Basic Function CoolTouch TM Control System Looks permanent, but goes wherever you go! FitchTM A Kichler Décor ceiling fan U.S. Patent Pending Kichler Lighting 7711 East Pleasant Valley Road
60" Lyndon Patio. Instruction Manual Customer Service :30 AM to 5:00 PM EST, Monday - Friday A Kichler Decor ceiling fan
 60" Lyndon Patio TM 310140 A Kichler Decor ceiling fan Includes wall mount control system Kichler Lighting 7711 East Pleasant Valley Road P.O. Box 318010 Cleveland, Ohio 44131-8010 Instruction Manual Customer
Parents and Educators: use #CuriousCrew #CuriosityGuide to share what your Curious Crew learned!
 Investigation: 01 Can Crusher See the power of air pressure! Soda can Tongs Gloves Container of cold water Hot plate Safety Glasses Adult Supervision 1) Fill a soda can with enough water to cover the bottom
OPERATING INSTRUCTIONS
 OPERATING INSTRUCTIONS FOR CARPET PRO UPRIGHT VACUUMS MODELS : CPU-75, CPU-75T, CPU-85, CPU-85T Before operating the vacuum, please read these instructions completely. Index Important Safety Instructions.............................................................2
π H-2268 SANITAIRE UPRIGHT VACUUM SAFETY uline.com
 π H-2268 SANITAIRE UPRIGHT VACUUM 1-800-295-5510 uline.com SAFETY PAGE 1 OF 7 NOTE: When using an electrical appliance, basic precautions should always be followed, including the following: READ ALL INSTRUCTIONS
SPACESAVER INSTRUCTION MANUAL WARRANTY CERTIFICATE
 SPACESAVER BY INSTRUCTION MANUAL WARRANTY CERTIFICATE Manual design and all elements of manual design are protected by U.S. Federal and/or State Law, including Patent, Trademark and/or Copyright laws.
Operating Instructions and Safety Precautions for Box-Type Violet Ray Machines with Interrupter Control Only
 Operating Instructions and Safety Precautions for Box-Type Violet Ray Machines with Interrupter Control Only The electrical devices we sell are meant for experimental research only & not intended to diagnose,
Van de Graaff Generator Instructions - L1000
 Van de Graaff Generator Instructions - L1000 Caution: People with cardiac pacemakers or other such electronic medical implants or devices should never operate the generator or come in contact with it.
42 Kevlar. Instruction Manual. Kichler Lighting 7711 East Pleasant Valley Road P.O. Box Cleveland, Ohio
 42 Kevlar Kichler Lighting 7711 East Pleasant Valley Road P.O. Box 318010 Cleveland, Ohio 44131-8010 Customer Service 866.558.5706 8:30 AM to 5:00 PM EST, Monday - Friday Instruction Manual 1 1. SAFETY
60" Tulle PatioTM. Instruction Manual. A Kichler Select ceiling fan
 60" Tulle PatioTM A Kichler Select ceiling fan cul Certified for Wet Location Kichler Lighting 7711 East Pleasant Valley Road P.O. Box 318010 Cleveland, Ohio 44131-8010 Customer Service 866.558.5706 8:30
KimberleyTM A Kichler Décor ceiling fan Designed to coordinate with a popular Kichler Lighting collection.
 KimberleyTM A Kichler Décor ceiling fan Designed to coordinate with a popular Kichler Lighting collection. Includes our new CoolTouch TM Control System Looks permanent, but goes wherever you go! U.S. Patent
Owner s Guide and Installation Manual
 For Your Records and Warranty Assistance For reference, also attach your receipt or a copy of your receipt to the manual. Model Name Type 2A Models Owner s Guide and Installation Manual Model No. Date
Electricity and Magnetism EOG Review (Electricity-Magnet-Hunter)
") Name: Date: 1. Marta has a radio in her room. It requires electricity in order to play. Which of the following is necessary in order for electricity to move from the source to the radio? A. a circuit B.
Name: Date: 1. Marta has a radio in her room. It requires electricity in order to play. Which of the following is necessary in order for electricity to move from the source to the radio? A. a circuit B.
Convertible Cleaner. Owners Manual
 Hoover, Model U4001 Convertible Cleaner Owners Manual HOW TO ASSEMBLE YOUR NEW HOOVER CLEANER ASSEMBLE HANDLE PIECES Remove cardboard from end of handle pieces. Slide the two handle pieces together. Check
Mopit 4 Operator s / Service Manual
 Mopit 4 Operator s / Service Manual FOR PARTS AND SERVICE 1-800-290-2833 To view Mopit 4 instructional videos scan this qr code with your smart phone. You can also find Mopit 4 instructional videos on
Manual. Belt Sander BSL 115/E. ProxxonTools.com
 ProxxonTools.com Belt Sander BSL 115/E Manual 3080767 Conforms to ANSI/UL 60745-1 ANSI/UL 60745-2-4 Certified to CAN/CSA-C22.2 No. 60745-1-04 CAN/CSA-C22.2 No. 60745-2-4-04 Fig. 1 Fig. 2 Fig. 3 Fig. 4
(10-085), (10-086), (10-285), (10-286) Van de Graaff Generator Instructions by: Caution: Model Numbers
, (10-086), (10-285), (10-286) Van de Graaff Generator Instructions by: Caution: Model Numbers") Caution: People with cardiac pacemakers or other such electronic medical implants or devices should never operate the generator or come in contact with it. Discharge of static electricity could cause the
Caution: People with cardiac pacemakers or other such electronic medical implants or devices should never operate the generator or come in contact with it. Discharge of static electricity could cause the
ELECTRIC FLAT PANEL FIREPLACE HEATER
 ELECTRIC FLAT PANEL FIREPLACE HEATER Model Numbers: 80-2000A-42 OWNER S MANUAL AC 120V 60Hz 1500W WARNING Read and understand this entire owner s manual, including all safety information, before plugging
52 StarkkTM. Instruction Manual. A Kichler Select ceiling fan
 52 StarkkTM A Kichler Select ceiling fan Kichler Lighting 7711 East Pleasant Valley Road P.O. Box 318010 Cleveland, Ohio 44131-8010 Customer Service 866.558.5706 8:30 AM to 5:00 PM EST, Monday - Friday
TCUT10UL 2.5 HP 10 Tile Saw Assembly & Operating Instructions
 TCUT10UL 2.5 HP 10 Tile Saw Assembly & Operating Instructions READ ALL INSTRUCTIONS AND WARNINGS BEFORE USING THIS PRODUCT. This manual provides important information on proper operation and maintenance.
Innes. Instruction Manual A Kichler Decor ceiling fan. Includes our new TM
 Innes 300130 A Kichler Decor ceiling fan Includes our new CoolTouch Control System Looks permanent, but goes wherever you go! U.S. Patent Pending Kichler Lighting 7711 East Pleasant Valley Road P.O. Box
SUNSEEKER BY INSTRUCTION MANUAL WARRANTY CERTIFICATE
 SUNSEEKER BY INSTRUCTION MANUAL WARRANTY CERTIFICATE Manual design and all elements of manual design are protected by U.S. Federal and/or State Law, including Patent, Trademark and/or Copyright laws. The
MALIBU STAR OWNER S MANUAL
 MALIBU STAR OWNER S MANUAL CONTENTS INTRODUCTION...................................................................... 1 MOUNTING RECOMMENDATIONS..........................................................
LIMITED LIFETIME WARRANTY
 Congratulations on your purchase of a Minka-Aire TM ceiling fan! Your new fan will be a beautiful addition to you home, and will keep you comfortable throughout the year. Minka-Aire TM offers a variety
SUPRA 52. U.S. Patents: D450,830 INSTRUCTION MANUAL WARRANTY CERTIFICATE
 SUPRA 52 BY U.S. Patents: D450,830 INSTRUCTION MANUAL WARRANTY CERTIFICATE This product is protected by United States Federal and/or State Law, including Patent, Trademark and/or Copyright laws. Manual
SAFETY, OPERATION AND MAINTENANCE MANUAL. MX-1408 SELF-CONTAINED EXTRACTOR This unit is intended for commercial use.
 SAFETY, OPERATION AND MAINTENANCE MANUAL MX-1408 SELF-CONTAINED EXTRACTOR This unit is intended for commercial use. READ & FOLLOW ALL INSTRUCTIONS, WARNINGS & CAUTIONS BEFORE USING THIS EXTRACTOR This
1. SAFETY RULES. 8. Avoid placing objects in the path of the blades.
 1 1. SAFETY RULES 1. To reduce the risk of electric shock, insure electricity has been turned off at the circuit breaker or fuse box before beginning. 2. All wiring must be in accordance with the National
Parents and Educators: use #CuriousCrew #CuriosityGuide to share what your Curious Crew learned!
 Investigation: 01 The Unpoppable Water Balloon Why won t this balloon pop? 2 balloons Water Basin Safety glasses Candle Matches Adult supervision 1) Put on safety glasses 2) Place the candle in a shallow
WAILEA OWNER S MANUAL
 WAILEA OWNER S MANUAL The blades in each pack are matched for equal weight to assure smooth fan operation. If more than one fan is being installed, be careful not to mix blades from different cartons.
Owner s Guide and Installation Manual Manual De Propietario
 Concert Breeze Owner s Guide and Installation Manual Manual De Propietario English Español Form# 45049-01 20090713 2009 Hunter Fan Co. For Your Records and Warranty Assistance For reference, also attach
Operating Instructions and Safety Precautions For Box-Type Violet Ray Machine with Rheostat
 Operating Instructions and Safety Precautions For Box-Type Violet Ray Machine with Rheostat Thanks for purchasing this quality refurbished violet ray machine. This machine has been tested and is in excellent
10-085/ / / Van de Graaf Generator Instructions
 2006 10-085/ 10-086/ 10-285/ 10-286 Van de Graaf Generator Instructions Instructions by: Dr. Zafar A. Ismail, Professor of Physics, Daemen College, Amherst, N.Y. Caution: People with cardiac pacemakers
Owner s Guide and Installation Manual
 Tribeca Owner s Guide and Installation Manual English Form# M6001-01 20120416 2012 Casablanca Fan Co. Welcome Your new Casablanca ceiling fan is an addition to your home or office that will provide comfort
CEILING FAN OWNER'S MANUAL
 Style that revolves around you. CEILING FAN OWNER'S MANUAL QUATRO 10/09 WARNING: Read and follow these instructions carefully and be mindful of all warnings shown throughout. GENERAL INSTALLATION & OPERATION
Ultra Lightweight Household & Commercial Vacuums
 Owner s Manual Ultra Lightweight Household & Commercial Vacuums Save These Instructions Index Important Safety Instructions............................................................. 2 Polarization Instructions................................................................
Operating Instructions and Safety Precautions for Box-Type Violet Ray Machine with Rheostat
 Operating Instructions and Safety Precautions for Box-Type Violet Ray Machine with Rheostat Thanks for purchasing this quality refurbished violet ray machine. This machine has been tested and is in excellent
Installation and Operation Manual For Hunter Ceiling Fans /16/2004
 Installation and Operation Manual For Hunter Ceiling Fans 1 2 CONGRATULATIONS! Your new Hunter ceiling fan is an addition to your home or office that will provide comfort and performance for many years.
62" LED SPYRA. Product images may vary slightly from actual product. INSTRUCTION MANUAL
 62" LED SPYRA Product images may vary slightly from actual product. INSTRUCTION MANUAL TABLE OF CONTENTS SAFETY RULES...4 TOOLS AND MATERIALS REQUIRED...5 PACKAGE CONTENTS...5 MOUNTING OPTIONS...6 HANGING
CS150 OWNER S MANUAL DISCRIMINATOR METAL DETECTOR
 OWNER S MANUAL DISCRIMINATOR METAL DETECTOR FEATURES ==================================================== With your Discriminator Metal Detector, you can hunt for coins, relics, jewellery, gold and silver
SSS Speedster 600 (Model SP-600, #56001) SSS Speedster 1000 OPERATION SERVICE PARTS CARE. SSS Speedster 1000 SSS Speedster 600
 SSS Speedster 1000 OPERATION SERVICE PARTS CARE. SSS Speedster 1000 SSS Speedster 600") SSS Speedster 600 (Model SP-600, #56001) SSS Speedster 1000 (Model SP-1000, #56003) OPERATION SERVICE PARTS CARE SSS Speedster 1000 SSS Speedster 600 105500/0405 For your convenience record this important
SSS Speedster 600 (Model SP-600, #56001) SSS Speedster 1000 (Model SP-1000, #56003) OPERATION SERVICE PARTS CARE SSS Speedster 1000 SSS Speedster 600 105500/0405 For your convenience record this important
INSTALLATION, OPERATION, AND MAINTENANCE MANUAL
 INSTALLATION, OPERATION, AND MAINTENANCE MANUAL TUBE AXIAL FANS BTA, WTA, HTA, DDA The purpose of this manual is to aid in the proper installation and operation of the fans. These instructions are intended
The Norwood Science Center. Energy Grade 3
 The Norwood Science Center Energy Grade 3 BACKGROUND INFORMATION: The most widely used electrostatic generator is a device that carries the name of its inventor, Robert J. Van de Graaff (1902-1967). At
MNEFDD54 & MNBCDD54 GALVANIZED WALL FANS Installation, Operation, and Maintenance Instructions
 FARM PRODUCTS DIVISION MEMBER OF AMCA AMERICAN COOLAIR CORPORATION P.O. BOX 2300 JACKSONVILLE, FLORIDA 32203 PHONE (904) 389-3646 FAX (904) 387-3449 E-MAIL - fans@coolair.com MNEFDD54 & MNBCDD54 GALVANIZED
ATD /8 Electric Drill
 ATD-10538 3/8 Electric Drill Tool specifications: Rated Voltage: (V) 120 Rated Frequency: (Hz) 60 Rated current: (A) 3.3 No-load Speed: (RPM) 0-2700 Speed Selection: Yes Right/Left Rotation: Yes Chuck
CircoloTM A Kichler Décor ceiling fan Designed to coordinate with a popular Kichler Lighting collection.
 CircoloTM A Kichler Décor ceiling fan Designed to coordinate with a popular Kichler Lighting collection. Includes our new CoolTouch TM Control System Looks permanent, but goes wherever you go! U.S. Patent
457LAVEXDM15 DUAL MOTOR HEPA UPRIGHT VACUUM CLEANER
 457LAVEXDM15 DUAL MOTOR HEPA UPRIGHT VACUUM CLEANER IMPORTANT SAFEGUARDS When using an electrical appliance, basic precautions should always be followed, including the following: READ ALL INSTRUCTIONS
Owner s Manual CPU-1QD CPU-1 CPU-1T CPU-2 CPU-2T HEAVY DUTY UPRIGHT VACUUMS. Save These Instructions
 Owner s Manual HEAVY DUTY UPRIGHT VACUUMS CPU-1QD CPU-1 CPU-1T CPU-2 CPU-2T Save These Instructions Index Important Safety Instructions.... 2 Polarization Instructions....3 Grounding Instructions.....
ALUMA INSTRUCTION MANUAL WARRANTY CERTIFICATE
 ALUMA BY INSTRUCTION MANUAL WARRANTY CERTIFICATE Manual design and all elements of manual design are protected by U.S. Federal and/or State Law, including Patent, Trademark and/or Copyright laws. Minka-Aire
Multi-Cyclonic Vacuum USER GUIDE
 Multi-Cyclonic Vacuum USER GUIDE MODEL CJTG00499B-120 Thank you for purchasing a BENNETT READ POWER UP PET vacuum. Your POWER UP PET vacuum incorporates the latest technological advances in home cleaning
Owner s Guide and Installation Manual
 For Your Records and Warranty Assistance For reference, also attach your receipt or a copy of your receipt to the manual. Model Name Type 3 Models Owner s Guide and Installation Manual Model No. Date Purchased
Ceiling Sweep Fan Assembly Instructions
 Ceiling Sweep Fan Assembly Instructions CSF Series Installation Note: This fan must be installed by a licenced electrical contractor Improperly installed ceiling sweep fans can be dangerous and expensive
BG6UL. 6 Inch Bench Grinder Assembly & Operating Instructions
 BG6UL 6 Inch Bench Grinder Assembly & Operating Instructions READ ALL INSTRUCTIONS AND WARNINGS BEFORE USING THIS PRODUCT. SAVE THESE INSTRUCTIONS FOR FUTURE REFERENCE. This manual provides important information
Van de Graaff Generator
 Van de Graaff Generator Mike Marchese H1 4/19/10 Introduction A Van de Graaff generator is an electrostatic device capable of producing very high voltages while maintaing a smaller, constant current. The
XPS-ProDry User s Guide Dryer Base
 XPS-ProDry User s Guide XPS-ProDry User s Guide Dryer Base For Use with Inkjet Imaging Systems Manual Part#: M-3120 Revision: August 2005 XPS-ProDry User s Guide Written by Frank Mauri & John Brand Published
BG8SS. 8 Inch Slow Speed Bench Grinder with LED Lights Assembly & Operating Instructions
 BG8SS 8 Inch Slow Speed Bench Grinder with LED Lights Assembly & Operating Instructions READ ALL INSTRUCTIONS AND WARNINGS BEFORE USING THIS PRODUCT. SAVE THESE INSTRUCTIONS FOR FUTURE REFERENCE. This