INSTALLATION AND OPERATING INSTRUCTIONS AUGER FOR HOMEMADE
|
|
|
- Harriet Rosalind Collins
- 5 years ago
- Views:
Transcription


1 INSTALLATION AND OPERATING INSTRUCTIONS AUGER FOR HOMEMADE CGM-04/392 ER-0170/1996
2 Thank you for choosing a DOMUSA TEKNIK heating boiler. Within the product range offered by DOMUSA TEKNIK you have chosen Auger for Homemade model. With a suitable hydraulic installation and with a correct fuel, this boiler will provide the ideal level of comfort for your home. This manual forms an essential part of the product and it must be given to the user. We recommend you read the warnings and recommendations in the manual carefully, as they contain important information on the safety, use and maintenance of the installation. These boilers must be installed by qualified personnel only, in accordance with the legislation in force and following the manufacturer s instructions. Commissioning of these boilers and any maintenance operations must only be carried out by DOMUSA TEKNIK s Authorised Technical Assistance Services. Incorrect installation of these boilers could result in damage to people, animals or property, and the manufacturer will hold no liability in such cases. DOMUSA TEKNIK informs all parties concerned that, in compliance with section 1 of the first additional provision of Law 11/1997, the responsibility for delivering packaging waste or used packaging for its proper environmental management will be that of the final owner of the product (Article 18.1 Royal Decree 782/1998). At the end of its useful life, the product must be taken to a selected collection point for electrical and electronic equipment or must be returned to the distributor at the time of purchasing a new equivalent appliance. For more detailed information on the collection schemes available, contact either the collection facilities of the local authority or the distributor where the purchase was made.
3 INDEX Page 1 WARNINGS AND SAFETY INSTRUCTIONS LIST OF COMPONENTS TOOLS REQUIRED HOMEMADE PELLET STORAGE LOCATION CONSTRUCTION RECOMMENDATIONS FOR THE INCLINED BOTTOM SOLUTION IMPACT PROTECTION MAT DOORS, WINDOWS AND HATCHES INBLOW AND EXHAUST PIPES FILLING INSTRUCTIONS INSTALLATION INSTRUCTIONS FUEL QUALITY ASSEMBLY INSTRUCTIONS INSTALLING THE SUCTION HOSE EARTH CONNECTION ELECTRICAL CONNECTION CHANGE OF MOTOR DIRECTION OPERATION OPERATION WITH CVS SUCTION SYSTEM AND BIOCLASS NG BOILER START-UP INSTALLATION DELIVERY MAINTENANCE SAFETY WARNINGS TECHNICAL DATA ELECTRICAL DIAGRAMS ELECTRICAL DIAGRAM ELECTRICAL CONNECTION FOR INSTALLATION WITH A CVS SUCTION SYSTEM MEASUREMENTS REPLACEMENT PARTS LIST TERMS OF GUARANTEE
4 Auger for Homemade 1 WARNINGS AND SAFETY INSTRUCTIONS Read this instruction manual carefully and keep it in a safe, easily-accessible place. DOMUSA TEKNIK will not be liable for any damages caused by failure to follow these instructions. To guarantee optimum functioning of this kit and a long lifetime, the installation and maintenance must be carried out by qualified personnel authorised by DOMUSA TEKNIK. The installer is responsible for the functioning of any devices or controls not supplied with the kit. This appliance must only be used for the purpose for which it has been expressly designed. Any other use is considered unsuitable and therefore hazardous. The manufacturer shall not be considered liable under any circumstances for damage caused by unsuitable, erroneous or irrational use. The DOMUSA TEKNIK Auger for Homemade has been specifically designed to transport Ø6 mm wood pellets from a homemade pellet storage to a bucket located in the Bioclass NG boiler's reserve tank, provided that it is installed along with a DOMUSA TEKNIK CVS Suction System. During installation or before any servicing, the following indications must be complied with to prevent personal injury or material damage: Remove all the packaging and check the contents are all there. In the event of any doubt, do not use the kit. Contact your supplier. Keep the packaging elements out of reach of children, as they can be dangerous. Keep children away while you are working in the pellet store. For safety reasons, another person should always be present when you access the pellet store. If access to the store is difficult, we recommend a second person waits outside to guarantee the safety of the person entering the store, able to let them out in case of hazard without endangering their own life. Switch off the boiler and the pellet extraction system, and leave the access door open for at least a quarter of an hour before entering the pellet storage area. Should the pellet store be flooded, the groundwater, soil and/or building are not at risk of contamination; however the tank and pellet removal system could be damaged. The applicable fire protection regulations must be observed. To avoid the accumulation of electrostatic charge during the silo filling process, the filler neck must be grounded. Before filling the silo it is advisable to switch off the boiler. The floor anchors should be fixed with metal screws and wall plugs. It is also important to make sure that all screws have been tightened using the correct torque, and that the Auger for Homemade is level. The powder from the pellets must be regularly cleaned from the electrical and pellet transport equipment. Always use a dust mask when cleaning. The pellet store must be protected from any humidity that could lead to pellet compaction. This compaction can result in the pellet transport system becoming jammed, and can stop its operation. 2
5 2 LIST OF COMPONENTS Read these instructions carefully before beginning the assembly process. Start by identifying and grouping together all the parts supplied with the kit, which are as follows: Motor 7 Anchors 2 Suction box 8 Worm screw 3 Dragging unit 9 Bearing 4 Electrical box 10 Worm screw cover 5 Inspection cover 11 Positioning wings 6 Suction nozzle 3
6 Auger for Homemade 3 TOOLS REQUIRED The following tools should be used to assemble the Auger for Homemade (not supplied with the kit): 3 mm Allen key. 2 Spanners Drill. Cosshead screwdriver. 4 HOMEMADE PELLET STORAGE The DOMUSA TEKNIK Auger for Homemade is designed to be installed in silo constructions. Such silo constructions support considerable weight and great care must be taken during their construction, taking safety very much into account and complying with the national, regional and local standards and regulations on this subject in force at the time and place of the installation. In particular, the relevant codes, rules and regulations relating to building construction and fire protection must be taken into account. Nevertheless, the following general recommendations should be met when building a silo: Ensure that building or other regulations permit the use of the room for storage purposes. Proper filling and discharge should be assured, ensuring easy access to the connections. The storage room should be closed-off from the rest of the building to avoid dust infiltration to adjourning rooms during blowing-in and the use of the system. Crossing the storage room with supply lines or air ducts should be avoided. If not avoidable, then the lines should be carefully sealed and protected. If the walls are damp, all contact with them should be prevented, so that the silo can have a surrounding air flow, in order to prevent condensation that could influence the quality of the pellets. Damp pellets fall apart and can also block transport lines and damage walls. During construction, the static loads on both the floor and the adjoining walls (in so far the construction is leaning against the walls) need to be considered. The enclosing walls should be able to resist static pressure imposed by the weight of the pellets (bulk density of ~650 kg/ m3) as well as the extra pressure during inblowing and associated pressure peaks. In some cases it may be necessary to consult a building engineer or architect. The inblow and discharge facilities should be professionally earthed to prevent the build-up of an electrostatic charge. The storage silo should not exceed twice the annual fuel consumption. 4
7 4.1 Location DOMUSA TEKNIK recommends installing the Auger for Homemade in a rectangular room, being the most suitable for this type of installation. The following diagram provides an example of a silo installation in a rectangular room NOTE: A smooth wall surface reduces damage to pellets during blowing in. NOTE: The silo must be constructed in such a way that it can withstand the weight load of the pellets plus the momentary load presented by pressure changes during filling. One should not include windows with glass panes. NOTE: The roof and walls of the silo should be made of a material such that the pellets are not damaged or contaminated by abrasion, contact or flaking. 5


8 Auger for Homemade 4.2 Construction recommendations for the inclined bottom solution The inclined bottom of the pellet silo lets the pellets slide to the discharge opening for screw conveyor. The bottoms should be constructed in such a way that the silo is emptied as completely as possible. When constructing the sloped bottoms, proceed as follows: The inclined bottom should preferably be made of wooden sheet material with as smooth a surface as possible. So that pellets can reach the discharge area without obstacles. The inclined bottoms should be connected to the surrounding walls in such a way that pellets cannot fall into the empty space below the bottom. The inclined bottoms should be able to withstand the weight load of the pellets (bulk density 650 kg/m3). A stable framework is necessary. Next to stable planks, one can find purpose-built angle irons that will ease the construction of the inclined bottom considerably. The supports should be at a maximum distance of cm apart. To prevent noise from being transferred to the building, the construction of the inclined as well as any passage of walls should be made in such a way that sound is not transferred. 6
9 Some of these recommendations are illustrated in the following figure: 4.3 Impact protection mat The installation of an abrasion and tear-proof impact protection mat is necessary to prevent pellets from hitting the enclosing walls, which might destroy them. It should be placed at right angles to the incoming stream of pellets near the opposite wall of the silo from the inblow pipe. During the first filling of the silo, test if the impact protection mat fulfils its function (the incoming stream of pellets must hit the mat). If there is more than one filling pipe, it may be necessary to install more than one impact protection mat. 4.4 Doors, windows and hatches Doors and hatches should be constructed in a manner that prevents dust from entering the rest of the building. Doors, windows and hatches should open outwards and have a dust-proof seal all the way around. On the inside of the door frame, wooden battens should be placed to release the pressure on the door. This allows access to the silo room at all times. 7
10 Auger for Homemade An optical filling level control method is recommended (such as small peep holes in the wooden planks). If clear plastic is used for the optical level control, then these windows can accumulate fines, attracted by static electricity. The level of fines on the plastic viewer fines is not a reliable indicator of the total amount in the silo. 4.5 Inblow and exhaust pipes Any storage facility for pellets should have an inblow connector (more than one is possible) and an exhaust ventilation connector of metal and their purpose should be clearly and permanently marked on piping and lids. The following diagram and text provide some recommendations when building blow and exhaust pipes: The connectors should be mounted about cm below the ceiling of the silo, measured from the topside of the pipe to the underside of the ceiling. After a maximum of 50 cm, a pipe bracket should be mounted to fix the pipes in place, so that they cannot turn or twist when the connector of the filling truck is attached or that the position of the filling pipe is changed. Only pressure-resistant metal pipes should be used for the filling system. Plastic pipes should never be used, since these can become electrostatically charged and release sparks during the filling operation. To avoid this, the piping should be earthed with a wire of at least 4 mm. Pipes and bends should have a smooth inner surface, so that the pellets are not damaged during blow in. No rivets or screws should extend into the pipe. The ends of the connecting pipes should be closed with special lids that permit an exchange of air between the silo and the outside. This prevents emissions and odours from the pellets. After the filling operation the connectors should be closed using the lids. The lids should allow air exchange between the silo and the outside. 8

11 4.6 Filling instructions The DOMUSA TEKNIK Auger for Homemade is designed to be installed in a homemade storage and to be filled by a tank truck, through a flexible hose that pumps the pellets into the silo. Tank trucks for pellet supply usually have a flexible hose of up to 30 metres, and the silo should therefore be installed at a maximum distance of 30 metres from the nearest truck access point (if a longer distance is required, check with the pellet supplier whether longer hoses are available). The truck access area must also have a minimum width of B = 3 m and a minimum clearance of H = 4 m. The filling nozzle must be accessible from outside the building, and so the premises in which the silo is installed must have at least one exterior wall. If this is not possible, the filling hose must be run to the outside. IMPORTANT: For safe silo filling it is essential for the filling nozzle and supply hose to be earthed during the filling process. 9


12 Auger for Homemade 5 INSTALLATION INSTRUCTIONS The DOMUSA TEKNIK Auger for Homemade must be installed and assembled by sufficiently qualified personnel, observing the relevant personal safety regulations and the warnings given bellow: 5.1 Fuel quality The Auger for Homemade is exclusively designed and intended for storage of wood pellets with a diameter of 6 mm and a length of up to 40 mm. The wood pellets used must comply with the EN standard, class A1, at least, and be certified with one of the following quality marks: ENplus-A1, DINplus, NF Bois or equivalent. IMPORTANT: The pellets are highly hygroscopic. In case of contact with water or damp walls they will swell and rot and will be unfit for use. 10

13 5.2 Assembly instructions 11

14 Auger for Homemade 12

15 5.3 Installing the suction hose The Auger for Homemade is specially designed to function as part of an installation with a DOMUSA TEKNIK CVS Suction System and a plastic hose with an interior diameter of 50 mm. This hose must have a static electricity discharge system, preferably a copper wire wound around its entire length. This copper wire must be earthed at all the hose joints and ends. Connect the pneumatic suction system's flexible hoses as indicated in the figure, and secure them using the clamps supplied with the silo. Whatever the type of hose used, it must be made of a suitable material for transporting wood pellets and it must always have an interior diameter of 50 mm. The following recommendations must also be complied with for correct installation: The maximum permitted hose length is 25 metres for flow from the main silo to the suction pot (CVS Suction System) and 25 metres for return. Bend angles of over 45º must be avoided whenever possible. If these cannot be avoided, any curves with angles over 45º must have a radius of curvature greater than 125 mm. If rigid plastic tubing is used, do not use standard 90º elbows. If these are necessary, the curves constructed must have a minimum radius of 125 mm. The maximum height difference permitted for the installation is 6 metres. Avoid any splicing or coupling in the hose installation wherever possible, as this may narrow the circuit, which can cause clogging of the pellets being transported and could block the system. Most importantly, avoid any joints in the hose section leading from the main silo to the boiler reserve tank suction pot, as the pellets are conveyed through this section. If there is no alternative to splicing and extending the installation, straight rigid tubing with an interior diameter of 50 mm must be used. It is preferable for any splicing and joining of the hose to be done in the pneumatic suction system return section, as only air is conveyed in this section. All the hose sections must be earthed at all coupling points and at the ends of the hose. The most vital factor for ensuring maximum suction power for the CVS Suction System is the airtightness of the installation, and great care must therefore be taken when installing the 13
16 Auger for Homemade tubing. All coupling points in the installation must be secured with brackets, taking special care to prevent leakage. We recommend avoiding hose crossover in the installation whenever possible. The flow and return hoses of the pneumatic installation should be laid out parallel to each other. For correct assembly of the hoses, they should be fixed to the walls and/or floor using suitable fasteners throughout the entire installation, to ensure stability. The recommended maximum distance between the fixing points is cm. Some of these recommendations are illustrated in the figure below: 14


17 IMPORTANT: IMPORTANT: At each end of the pellet suction and air return hose, the copper cables must be connected to the earth connection terminals provided for this purpose. DOMUSA TEKNIK will hold no liability for malfunctioning of the Spider Kit in combination with the CVS Suction System if the installation does not comply with the above recommendations. 15

18 Auger for Homemade 5.4 Earth connection The Auger for Homemade is specially designed to function as part of an installation with a plastic hose with an interior diameter of 50 mm. This hose must have a static electricity discharge system, preferably a copper wire wound around its entire length. This copper wire must be earthed at all the hose joints and ends. 5.5 Electrical connection The Auger for Homemade is prepared for connection to 220 V ~ on pins 1 and 2 of connector J12 as "Connection diagrams section of this manual. For the proper protection of motor will be essential to fit a magnetothermic protection of 4A between main power supply and connector (J12). 5.6 Change of motor direction The position of the suction box relative to the Auger for Homemade dragging unit is reversible. The position of the suction nozzle, where the air inlet and pellet outlet pipes are connected, and the position of the motor can be adapted to installation requirements. Bear in mind that the motor rotation direction should be adjusted to suit the installation position, by changing the motor's internal electrical connections as shown in the following diagram: 16
19 17
20 Auger for Homemade 18
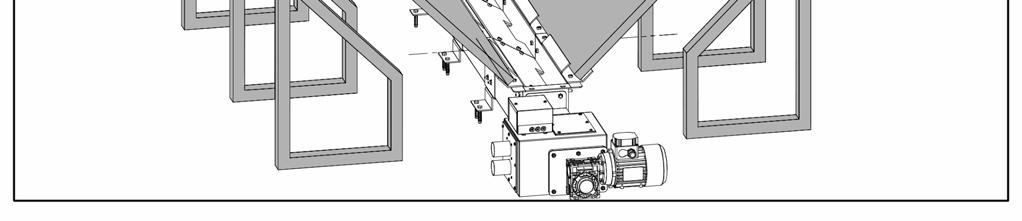
21 6 OPERATION The Auger for Homemade removes pellets to a main pellet store or silo and, in combination with the CVS Suction System, conveys these pellets to a smaller storage unit near the boiler (Reserve Tank). The Auger for Homemade basically consists of a pneumatics connection, where the pellet suction hose is connected, and a motor to turn the worm screw, which removes the pellets from the main silo and sucked up by the CVS Suction System. 6.1 Operation with CVS Suction System and BioClass NG boiler The figure below shows a functional diagram of the Auger for Homemade installed in combination with a CVS Suction System: NOTE: If the suction system becomes blocked, this could mean there are insufficient pellets in the main silo, or that the pneumatic hose installation has become blocked or is defective. General system operation is as follows: when the level sensor detects a low pellet level, the electronic control starts up the suction unit and the Auger for Homemade motor, which begins to suck up the pellets from the silo or main store and convey them to the suction pot in the upper part of the boiler reserve tank. The suction unit runs for a set duration (a cycle), while it fills the suction pot. When the cycle is complete, the suction unit stops and the hatch on the underside of the suction pot opens, emptying the pellets inside it into the reserve tank. If the level sensor continues to detect no pellets when the suction pot has been emptied, the suction unit starts up again and runs for another full cycle. When the sensor detects pellets, the electronic control disables the functioning of the CVS Suction System and then remains on standby until it requires activation again. When the cycle is complete, in order to prevent excess pellets remaining in the hose installation where they could cause an obstruction at the start of the next cycle, the controller will stop the auger motor from functioning before deactivating the suction unit. Thereby, the suction unit 19
22 Auger for Homemade continues taking in only the pellets remaining inside the hose installation, emptying it and preventing obstruction at the start of the next cycle. The optimum cycle time is the time required for the cyclone on the reserve tank to be filled to its full capacity. The auger motor's activation time is factory set to 35 seconds, and this must be maintained regardless of the type of installation, given that the amount of pellets transported is always constant. The suction unit's activation time however, will depend on installation length and route, the type of pellets used, and in particular the cleanliness of the suction unit filter. Thorough maintenance of the filter is therefore very important (see "Maintenance") to ensure a constant, uniform flow during each cycle. Bearing in mind such variable fuel characteristics, the table below shows some recommended cycle times, depending on the length of the installation: Installation length Cycle time 5 m MIN (70 sec) 15 m 95 sec 25 m 155 sec Furthermore, a programmable timer can be accessed via the display on the BioClass NG boiler so that the operation may be disabled at night to avoid any noise and disturbance, which may be caused by the suction system during its operation. It can also manage the functioning cycles of a Auger for homemade, if you choose to use this type of pellet removal system. During the time that the suction unit runs, the symbol boiler s display. is displayed blinking in the BioClass NG If the level sensor doesn t detect pellets after 9 consecutive cycles, the electronic control stops the system functioning and the alarm E-27 is activated (Automatic loading system lock out), in the display of the boiler. To unlock it, press and 9 consecutive cycles will start again unless the sensor detects pellets. The cycle time could be adjusted using the P.22 setting of the Technical menu (see instructions of BioClass NG). This setting is used to optimise the filling time for the suction pot of the tank, adapting it to the different characteristics of each pneumatic installation (suction length, type of pellet removal system, etc.). The adjustable time range is from seconds per cycle but the minimum selected time should never be less than 70 seconds.. These rotation cycles are governed by the CVS suction electronic control system. The following diagram illustrates the operating cycles governed by the CVS suction System: 20
23 NOTE: If the suction system becomes blocked, this could mean there are insufficient pellets in the main silo or that the pneumatic hose installation has become blocked or is defective. 7 START-UP In order for the guarantee to be valid, the automatic loading system must be started up by personnel authorised by DOMUSA TEKNIK. Before beginning the start-up process, the following must be complied with: The Auger for Homemade must be connected to the electrical mains power. The main storage silo must be filled with pellets. The pneumatic hose installation must have been carried out. The start-up sequence is as follows: Check the pneumatic installation of the 50 mm interior diameter hose has been performed correctly. Check the correct type of fuel is being used (EN class A1 grade or higher). Check the automatic loading system is working correctly. 8 INSTALLATION DELIVERY After the initial start-up, the Technical Assistance Service will explain to the user how the kit functions, making any observations they consider relevant. The installer is responsible for clearly explaining to the user the functioning of any control or regulation device forming part of the installation but not supplied with the boiler. 21
24 Auger for Homemade 9 MAINTENANCE To keep the Auger for homemade in perfect working order, the maintenance operations described in this section must be carried out at regular intervals. The storeroom must be thoroughly cleaned, removing the dust accumulated at the bottom of the silo, inside the dragging units, the suction box and the silo walls. Cleaning should be performed following every fifth top up, and at least once every two years. The bearing located in the final dragging unit must be properly greased. Also, to ensure correct functioning of the Bioclass NG boiler we recommend inspection of the whole pellet loading system once a year by the DOMUSA TEKNIK Authorised Technical Service, at the same time as the annual service. 9.1 Safety Warnings To prevent any damage or injury to people and property, the following safety indications must be taken into account during the maintenance operations described in the following sections: Entering a storeroom always presents a safety risk. For this reason, the number of interventions should be kept to a minimum and strict safety precautions adhered to. For safety reasons, another person should always be present when you access the pellet store. Should store access be difficult, we recommended guarding against the safety of the person entering the store by having someone else present outside that can free the person inside should an emergency arise, without endangering his or her own life. The boiler and the pellet extraction system must be switched off, and the access door to the storeroom must be kept fully open for at least a quarter of an hour before entering the pellet store. Always use a dust mask when cleaning to protect against airborne dust. Keep children away from the installation when performing maintenance operations. 10 TECHNICAL DATA TECHNICAL DATA VALUE Maximum suction length m 25 Maximum suction height m 6 Suction hose diameter mm. 50 Connection voltage V~ 50 Hz Maximum electrical consumption A 1,7 Maximum electric power W
25 11 ELECTRICAL DIAGRAMS 11.1 Electrical diagram J12: Motor connector RΩ: Timer relay R: Relay M: Motor TMS: Termal-magnetic switch 23
26 Auger for Homemade 11.2 Electrical connection for installation with a CVS Suction System J4: Communication connector. J12: Motor connector J10: Level sensor connection. ASP: Suction unit J11: Main connector. M: Motor TMS: Termal-magnetic switch 24
27 12 MEASUREMENTS TKITBIO059 TKITBIO
28 Auger for Homemade 13 REPLACEMENT PARTS LIST
29 Nº. Code Description 1 STUR SPLINE 2 SEPO REDUCER SPACER FLANGE 3 SEPO REDUCER FLANGE 4 SEPO AXLE FLANGE 5 CAIS GASKET 6 SEPO CASING 7 CAIS GASKET 8 SEPO KIT FOR BUCKET 9 SEPO INSPECTION COVER 10 CAIS GASKET 11 SEPO INSPECTION COVER 12 SELEBIO042 TIME-DELAY RELAY BOX ASSEMBLY 13 SEPO MOTOR SECTION CASING 14 SCON MOTOR SECTION CHANNEL 15 SEPO SHEET SUPPORT 16 SEPO PELLET SUPPORT ASSEMBLY 17 SEPO BOARD PROFILE 0.5 M 18 SEPO DOUBLE SHEET SUPPORT 19 CFER UCFL 204 BEARING 20 SEPO BEARING CHANNEL SECTION 21 SEPO AUGER END ANCHOR 22 SEPO CHANNEL JOINT 23 SEPO AUGER ANCHOR 24 CTOE END SECTION BEARING AXLE 25 SEPO M CHANNEL 26 SCON END SECTION AUGER 27 CTOE AUGER JOINT AXLE 28 CTOE AUGER JOINT SCREW 29 SCON M SECTION AUGER 30 CAIS MOTOR CASING GASKET 31 SCON MOTOR SECTION AUGER 32 CTOE MOTOR AXLE 33 CELC MOTOR 27
30 Auger for Homemade 14 TERMS OF GUARANTEE DOMUSA TEKNIK s commercial guarantee covers the standard functioning of the products manufactured by DOMUSA Calefacción S.Coop., in accordance with the following conditions and time periods: 1. This commercial guarantee is valid for the following periods, as from the date of purchase: - 2 Years for electrical, mechanical elements, etc. During the 6-month period following the start-up date, DOMUSA TEKNIK will carry out any repairs of original flaws or defects totally free of charge. After these 6 months have elapsed and until the end of the guarantee period, labour costs and callout charges will be payable by the user. 2. DISCLAIMERS: The commercial guarantee shall not cover the following cases, in which the total cost of repairs must be paid for by the user: - If Auger for Homemade has not been installed in accordance with the applicable laws and regulations for this type of appliance. - If the product has been manipulated by personnel not authorised by DOMUSA TEKNIK. - Breakdown caused by misuse or incorrect installation, an unsuitable electrical supply, incorrect handling of the appliance and, in general, for any reason beyond DOMUSA TEKNIK s control. - Wear and deterioration of the appearance caused by use of the appliance or the necessary maintenance operations. VERY IMPORTANT: For entitlement to this guarantee, proof of the date of receipt of the appliance, that is the purchase invoice or receipt, must be shown to the official technical support service on call-out. For CVS Suction System supplied for new build houses or flats, sufficient proof of the date of the availability for use must be provided. This guarantee does not affect the consumer s rights as stipulated by law. 28
31 NOTES: 29
32 POSTAL ADDRESS HEADQUARTERS & FACTORY Mail box No 95 Bº San Esteban s/n AZPEITIA ERREZIL (Gipuzkoa) Tel: (+34) DOMUSA TEKNIK reserves the right to make modifications of any kind to its product characteristics without prior notice. *CDOC001612* CDOC /17
INSTALLATION AND OPERATING INSTRUCTIONS
 INSTALLATION AND OPERATING INSTRUCTIONS KIT ASPIRATION CGM-04/392 ER-0170/1996 Thank you for choosing a DOMUSA product. From the range of DOMUSA products you have chosen the Kit Aspiration. Suitably installed
INSTALLATION AND OPERATING INSTRUCTIONS BIOCLASS HM
 INSTALLATION AND OPERATING INSTRUCTIONS BIOCLASS HM Thank you for choosing a DOMUSA TEKNIK heating boiler. Within the product range offered by DOMUSA TEKNIK you have chosen BioClass HM model. With a suitable
INSTALLATION AND OPERATING INSTRUCTIONS BIOCLASS HM OD (FOR EXTERNAL USE)
") INSTALLATION AND OPERATING INSTRUCTIONS BIOCLASS HM OD (FOR EXTERNAL USE) Thank you for choosing a DOMUSA TEKNIK heating boiler. Within the product range offered by DOMUSA TEKNIK you have chosen BioClass
INSTALLATION AND OPERATING INSTRUCTIONS BIOCLASS HM OD (FOR EXTERNAL USE) Thank you for choosing a DOMUSA TEKNIK heating boiler. Within the product range offered by DOMUSA TEKNIK you have chosen BioClass
INSTALLATION AND OPERATING INSTRUCTIONS KLIMA
 INSTALLATION AND OPERATING INSTRUCTIONS KLIMA - 1 - CONTENTS 1.- PRESENTATION... 2 2.- LIST OF COMPONENTS... 3 3.- CONTROL ELEMENTS... 4 4.- INSTALLATION INSTRUCTIONS... 5 4.1 LOCATION... 5 4.2 FLUE...
Pellet boiler Electronic Modulation Automatic Cleaning Grinder system Easy Installation 4 power levels: 10, 16, 25, 43 kw
 Pellet boiler Electronic Modulation Automatic Cleaning Grinder system Easy Installation 4 power levels: 0, 6, 5, 4 kw CLASS IN EN 0/5 Innovation with meaning BioClass NG IN EN 0/5 CLASS DOMUSA has managed
Recommendations for storage of wood pellets
 Recommendations for storage of wood pellets i Recommendations for storage of wood pellets i Deutscher Energieholz- und Pellet-Verband e.v. (DEPV) (German Wood Fuel and Pellet Association) Reinhardtstr.18
INSTALLATION AND OPERATING INSTRUCTIONS AVANTTIA
 INSTALLATION AND OPERATING INSTRUCTIONS AVANTTIA CGM-04/392 ER-0170/1996 Thank you for choosing a DOMUSA TEKNIK heating boiler. From the range of DOMUSA TEKNIK products you have chosen the Avanttia model.
DBF 4XL Dryer Booster Fans
 Installation and Operation Manual Item #: 401315 Rev Date: 050814 DBF 4XL Dryer Booster Fans DBF4XL Kit Includes: Dryer Booster Fan, 1 pc Fan Mounting Bracket and Hardware, 1 pc Wall Label (Mount on wasll
Instruction Manual JLCHDD601/JLCHDD901 60cm/90cm Cooker hood
 Contents 3 Introduction 3 Safety is important 3 In the box 4 Safety information 4 Important safety information 4 Warnings 5 Cautions 5 Electrical information 6 Operation 6 Automatic shut-down 7 Care and
INSTALLATION AND MAINTENANCE GUIDE TRENDY 1000 T ELECTRONIC LAVATORY FAUCET
 INSTALLATION AND MAINTENANCE GUIDE TRENDY 1000 T ELECTRONIC LAVATORY FAUCET 1 INDEX 1 TECHNICAL DATA 2 TEMPERATURE ALTERNATIVES 3 PACK CONTENTS 4 PRE-INSTALLATION INFO 5-6 FAUCET INSTALLATION 7 ADJUSTING
AXPR Wall Mounted Axial Panel Fans
 Bulletin 78-January-03-06 AXPR Wall Mounted Axial Panel Fans INSTALLATION, OPERATION, AND MAINTENANCE MANUAL This publication contains the installation, operation and maintenance instructions for the AXPR
Lo-Carbon Quadra Centrifugal Fan
 Lo-Carbon Quadra Centrifugal Fan Installation and Wiring Instructions Stock Ref. N Quadra TP Quadra TM Quadra HTP 439251A 439253A 439181A 220-240V~50Hz IPX4 PLEASE READ INSTRUCTIONS IN CONJUNCTION WITH
Inta City Concealed Shower Mixing Valve CT80010CP
 Inta City Concealed Shower Mixing Valve CT80010CP Installation and Maintenance Instructions In this procedure document we have endeavoured to make the information as accurate as possible. We cannot accept
HOT WASHER MODEL NO: KING150
 WARNING: Do not use the hot washer without reading this manual HOT WASHER MODEL NO: KING150 PART NO: 7320175 OPERATION & MAINTENANCE INSTRUCTIONS LS1215 INTRODUCTION Thank you for purchasing this CLARKE
OK, OKA, OKAF; ELD; ELDM; ELH; OKC; SC; SCA; SCAF; OK-LN; OKA-LN; OKAF-LN.
 INSTALLATION, OPERATION & SERVICE MANUAL FOR COOLER TYPES OK, OKA, OKAF; ELD; ELDM; ELH; OKC; SC; SCA; SCAF; OK-LN; OKA-LN; OKAF-LN. 1. Introduction This manual is a guide for the installation, maintenance
Lo-Carbon Quadra SELV
 Lo-Carbon Quadra SELV Installation and Wiring Instructions Stock Ref. N Quadra SVTP 442865 Quadra SVHTP 442866 Quadra SVTM 442867 Safety Extra Low Voltage IPX7 PLEASE READ INSTRUCTIONS IN CONJUNCTION WITH
INSTALLATION GUIDE NZ AU
 DISHWASHER DW60U6I & DW60U2I models INSTALLATION GUIDE NZ AU 1 SAFETY AND WARNINGS 100 lb 45 kg! WARNING! Electrical shock hazard Before installing the dishwasher, remove the house fuse or open the circuit
90cm Chimney Extractor
 90cm Chimney Extractor LAM2412 Stainless Steel LAM2413 Black Instructions and Installation www.howdens.com/appliance-registration See back page for product serial number LAMONA Appliances Dear Customer,
INSTALLATION AND OPERATING INSTRUCTIONS JAKA HFD JAKA HFS
 INSTALLATION AND OPERATING INSTRUCTIONS JAKA HFD JAKA HFS CGM-04/392 ER-0170/1996 Thank you for choosing a DOMUSA TEKNIK heating boiler. You have chosen a boiler which will provide the ideal level of comfort
UL U TR LTRASONIC S ONIC SCALE ALER PIEZO MINI
 ULTRASONIC SCALER PIEZO MINI CONTENTS XI - SYMBOLS 1. INTRODUCTION 1 Alternating current Type BF device 2. WARNINGS 1 3. PRESENTATION 1 3.1 Presentation 1 3.2 Technical description 2! Warning, please refer
Installation and Operating Instructions. Models: T4-12LOW-9IS
 Installation and Operating Instructions Models: T4-12LOW-9IS Dear Valued Customer, Thank you and congratulations on purchasing your new Parmco appliance. All Parmco products are made to the highest quality
Installation Instructions. For the 18 Built-In Dishwasher and Front Color Panels
 Installation Instructions For the 18 Built-In Dishwasher and Front Color Panels Printed in USA 154232102 Before You Begin DO NOT INSTALL DISHWASHER UNTIL YOU HAVE READ ALL INSTRUCTIONS. FOR YOUR SAFETY,
Installer manual AG-AA10. Air/air heat pump IHB GB AG-AA10-30 AG-AA10-40/50
 -30 Installer manual Air/air heat pump -40/50 IHB GB 1516-1 331554 Table of Contents 1 Important information 2 5 Installation 7 Safety information 2 Model combinations 7 Read before starting the installation
INSTALLATION AND OPERATING INSTRUCTIONS EVOLUTION EV HFM
 INSTALLATION AND OPERATING INSTRUCTIONS EVOLUTION EV HFM Thank you for choosing a DOMUSA TEKNIK heating boiler. From the range of DOMUSA TEKNIK products you have chosen the Evolution EV HFM model. This
IXL Eco Ventflo. User Guide. Model: (200mm) - Extraction Rate: 340m 3 /h Model: (250mm) - Extraction Rate: 490m 3 /h
 - Extraction Rate: 340m 3 /h Model: (250mm) - Extraction Rate: 490m 3 /h") User Guide Model: 10324 (200mm) - Extraction Rate: 340m 3 /h Model: 10326 (250mm) - Extraction Rate: 490m 3 /h Electrical Rating: 230~240 V. 50 Hz. Welcome Safety Thank you for buying this Fan. Even if
User Guide Model: 10324 (200mm) - Extraction Rate: 340m 3 /h Model: 10326 (250mm) - Extraction Rate: 490m 3 /h Electrical Rating: 230~240 V. 50 Hz. Welcome Safety Thank you for buying this Fan. Even if
60cm Integrated Turbo Extractor
 60cm Integrated Turbo Extractor LAM2201 User & Installation Guide Dear Customer, Congratulations on your choice of domestic appliance which has been designed to give you excellent service. The user manual
Parenzo Range. Basin Mixer, Bath Filler & Bath Shower Mixer. Assembly instructions
 Parenzo Range Basin Mixer, Bath Filler & Bath Shower Mixer Assembly instructions We have designed these products with your enjoyment in mind. To ensure that they work to their full potential, they need
Cooker Hood LA-72-CAN.
 Cooker Hood LA-72-CAN EN www.luxairhoods.com WARNINGS Safety This equipment can be used by children aged 8 or more, people with physical, mental and sensory disabilities or inexperienced users it they
Instruction Manual JLHDA cm Cooker hood
 Contents 3 Introduction 3 Safety is important 3 In the box 4 Safety information 4 Important safety information 4 Warnings 5 Cautions 5 Electrical information 6 Remote control 6 Programming the remote control
SMART EVO 2 - User Manual ELECTRICAL PANEL FOR 2 MOTORS
 SMART EVO 2 - User Manual ELECTRICAL PANEL FOR 2 MOTORS CONTENTS 1. INTRODUCTION... 5 2. WARNINGS... 6 3. GENERAL DESCRIPTION... 7 4. INSTALLATION... 8 5. LUMINOUS INDICATORS AND COMMANDS... 9 6. DIP-SWITCH
PC 640 GB. Built-in cooking tables 60 Instructions for installation and use
 PC 640 GB Built-in cooking tables 60 Instructions for installation and use Congratualtions on choosing an Ariston appliance, which you will find is dependable and easy to use. We recommend that you read
Centrif Duo & Centrif Duo Plus
 Centrif Duo & Centrif Duo Plus Installation and Wiring Instructions Stock Ref. N Centrif Duo P 25 61 20D Centrif Duo T 25 62 20D Centrif Duo DP 25 63 20D Centrif Duo HTP 25 64 20D Centrif Duo Centrif Duo
Grain crusher Universal. Purpose: This machine is designed for the crushing of grain in agricultural operation.
 Grain crusher Universal. Purpose: This machine is designed for the crushing of grain in agricultural operation. Operating instructions and parts catalogue This grain crusher provides you with a machine
INSTALLATION AND OPERATING INSTRUCTIONS TABLE OF CONTENTS IMPORTANT
 C US This manual must be left with owner and should be hung on or adjacent to the boilerfor reference. COMMON VENTING MODELS CHS-300 through CHS-399 INSTALLATION AND OPERATING INSTRUCTIONS TABLE OF CONTENTS
Installation manual Mini Comfort 50 S/L 07/ V EN
 Installation manual Mini Comfort 50 S/L 07/2015 - V 1.1 - EN www.veneco-ventilation.be Veneco ventilation by Elek Trends Productions nv Blauwfazantjesstraat 4 B - 7700 Moeskroen Tel. +32 (0)56 48 15 90
GUH90 90 cm Canopy Hood
 User Manual for your GUH90 90 cm Canopy Hood NOTE: This User Instruction Manual contains important information, including safety & installation points, which will enable you to get the most out of your
Intatherm Safe Touch Basin Tap IT1008CP
 Intatherm Safe Touch Basin Tap IT1008CP Installation and Maintenance Instructions In this procedure document we have endeavoured to make the information as accurate as possible. We cannot accept any responsibility
Stainless Steel Chimney Extractor
 Stainless Steel Chimney Extractor User & Installation Guide LAM2404 LAMONA Appliances Dear Customer, Congratulations on your choice of a LAMONA domestic appliance which has been designed to give you excellent
BWT6.3GL Cooker Hood 60 cm Glass chimney hood
 User Manual for your BWT6.3GL Cooker Hood 60 cm Glass chimney hood NOTE: This User Instruction Manual contains important information, including safety & installation points, which will enable you to get
INSTALLATION GUIDE ISODRIVE MOTOR. ST - 900m 3 /hr.
 INSTALLATION GUIDE ISODRIVE MOTOR ST - 900m 3 /hr www.schweigen.co.nz Welcome Thank you for purchasing your new Schweigen Isodrive system. To get the maximum output from this unit, please read through
JLBIHD624 60cm Cooker Hood
 JLBIHD624 60cm Cooker Hood User guide 2 Cooker hood user guide Contents Contents 3 Introduction 4 Safety is important 4 In the box 4 Safety information 5 Important safety information 5 Warnings 5 Cautions
HG 675 CX 60 HG 675 CN 60 HG 675 CW 60
 HG 675 X 60 HG 675 CX 60 HG 675 CN 60 HG 675 CW 60 1 2 1. : 93/68: 90/396: 2006/95/CE: 2004/108/CE: - 1935/2004:. 2002/95/CE: RoHS 2.,.,,,,...,. (,..)..,,.,. ( ),,, ;,,.,.....,.,,,,,,...,. (..),,.,..,.,,,,
SPA DE USO PRIVADO SPA FOR PRIVATE USE SPA POUR UN USAGE PRIVÉ SPA FÜR PRIVATE NUTZUNG SPA PER USO PRIVATO SPA PARA USO PRIVADO SPA VOOR PRIVE-GEBRUIK
 SPA DE USO PRIVADO SPA FOR PRIVATE USE SPA POUR UN USAGE PRIVÉ SPA FÜR PRIVATE NUTZUNG SPA PER USO PRIVATO SPA PARA USO PRIVADO SPA VOOR PRIVE-GEBRUIK MANUAL DE INSTALACIÓN INSTALLATION MANUAL MANUEL D
60cm Canopy Extractor
 60cm Canopy Extractor LAM2300 User & Installation Guide Dear Customer, Congratulations on your choice of domestic appliance which has been designed to give you excellent service. The user manual will help
Cooker Hood Instruction Manual
 Cooker Hood Instruction Manual Model number(s): RHSCH601SS/B & RHSCH901SS/B IMPORTANT: RETAIN FOR FUTURE REFERENCE Contents Safety Instructions. 3-6 Product Overview. 7 Positioning. 8 Operational modes.
EDD61 & EDD91 Extractors
 EDD61 & EDD91 Extractors Installation, Use and Maintenance Customer Care Department The Group Ltd. Harby Road Langar Nottinghamshire NG13 9HY T : 01949 862 012 F : 01949 862 003 E : customer.care@cda.eu
WAILEA OWNER S MANUAL
 WAILEA OWNER S MANUAL The blades in each pack are matched for equal weight to assure smooth fan operation. If more than one fan is being installed, be careful not to mix blades from different cartons.
Installation Instructions Use and Care Guide Instructions d installation Mode d emploi et d entretien
 Installation Instructions Use and Care Guide Instructions d installation Mode d emploi et d entretien AMCHD36SS/ AMCHD44SS/ INDEX WARNINGS AND REQUIREMENTS... 3 RECOMMENDATIONS AND SUGGESTIONS... 6 DIMENSIONS
I n s t r u c t i o n m a n u a l f o r b u i l t - i n h o o d. Model code: BORA600
 I n s t r u c t i o n m a n u a l f o r b u i l t - i n h o o d Model code: BORA600 Contact Caple on 0844 8003830 or for spare parts www.4caple.co.uk 1 Y O U R A P P L I A N C E Thank you for buying your
EPC Storage Guideline. Recommendations on the design, installation and operation of fuel stores for pellet heating appliances
 EPC Storage Guideline Recommendations on the design, installation and operation of fuel stores for pellet heating appliances 1 Introduction... 4 2 Heating with wood pellets General information... 5 2.1
Illustration shows item no Z Original operating manual. Operating manual. BlueMobil eco. Item no: Z-3278
 Illustration shows item no Z-3278 Operating manual BlueMobil eco Item no: Z-3278 Original operating manual Important Copyright It is essential that you read this manual thoroughly before the initial operation
INSTALLATION INSTRUCTIONS. WOOD BLINDS 1-3/8, 2 and 2-3/8 SLAT SIZES. COMPOSITE FAUX WOOD BLINDS 2 and 2-1/2 SLAT SIZES
 INSTALLATION INSTRUCTIONS WOOD BLINDS 1-3/8, 2 and 2-3/8 SLAT SIZES COMPOSITE FAUX WOOD BLINDS 2 and 2-1/2 SLAT SIZES POLYMER FAUX WOOD BLINDS 2 and 2-1/2 SLAT SIZES STANDARD CORDLESS LIFT Thank you for
Operating Instructions. PowerFill. Automatic Granulate Conveyor for perfectmelt SE
 Operating Instructions PowerFill Automatic Granulate Conveyor for perfectmelt SE - 020100 - 2 Contents Introduction 4 Safety instructions 5 Safety measures with respect to the adhesive 5 Safety measures
CentroPelet ZV14 TECHNICAL INSTRUCTIONS HEATING TECHNIQUE. for regulation, use and maintenance of pellet stove
 HEATING TECHNIQUE Centrometal d.o.o. - Glavna 12, 40306 Macinec, Croatia, tel: +385 40 372 600, fax: +385 40 372 611 TECHNICAL INSTRUCTIONS for regulation, use and maintenance of pellet stove CentroPelet
Section 1 - Safety Information Section 2 - Installation: Wall Mount Hoods Section 3 - Installation: Island Mount Hoods
 Range Hoods Owner s Manual Section 1 - Safety Information Section 2 - Installation: Wall Mount Hoods Section 3 - Installation: Island Mount Hoods Section 4 - Use & Care Instructions Section 5 - Control
WHE 2.24 / WHE 2.24 FF
 EN Wall-hung gas boilers WHE 2.24 WHE 2.24 FF User Guide 300011777-001-C . Contents 1 Introduction.............................................................................3 1.1 Symbols used...........................................................................................3
Instructions for use
 Instructions for use These instruction shall be available on website docs.kitchenaid.eu Important instructions for safety 4 Installation 6 Safeguarding the environment 6 Troubleshooting guide 7 After-Sales
CE Unit is suitable for material transport. The transported gas may be up to 80 C.
 The manual contains: 1 Safety regulations 1.1 Electrical 1.2 Crush risk 1.3 Hazardous dust 1.4 Suction injuries 1.5 Noise 1.6 Pneumatic 1.7 Other equipment 2 Machine Operation 3 Installation Directions
Installation and Operating Instructions. Models: T4-12LOW-9IS-1
 Installation and Operating Instructions Models: T4-12LOW-9IS-1 727626032017 p: 09 573 5678 f: 09 573 5699 e: sales@parmco.co.nz w: www.parmco.co.nz Parmco Appliances extended 7 year warranty 7 New Zealand
INSTALLATION GUIDE. Isodrive Revision V1.1. HOME APPLIANCES
 INSTALLATION GUIDE Isodrive 3200 Revision V1.1 HOME APPLIANCES www.schweigen.com.au Index 1. Welcome 3 2. Your Safety Warning 4 Before Installation 4 Electrical Cord 4 Motor Features 5 General Notes on
ZEST HOOD. Instructions Manual.
 ZEST HOOD Instructions Manual www.rangemaster.co.uk INDEX EN RECOMMENDATIONS AND SUGGESTIONS... 3 CHARACTERISTICS... 4 INSTALLATION... 6 USE... 14 MAINTENANCE... 16 2 RECOMMENDATIONS AND SUGGESTIONS The
900mm Island Canopy Manual
 900mm Island Canopy Manual MODEL ICF9BLS Installation and Operation CANOPY INSTALLATION AND OPERATION MANUAL Dear Customer, We thank you for choosing this quality appliance and hope you enjoy many years
Single Wall Flue system. Installation manual WARNING. Installation Manual CoxDENS PPs MC-CG-105 EN_892054
 MC-CG-105 EN_892054 WARNING Installation Manual CoxDENS PPs Incorrect installation of Flue System and Components, or failure to follow installation instructions, can result in property damage or serious
BWTC6510GL Cooker Hood 60 cm Glass cooker hood in stainless steel. BWTC9510GL Cooker Hood 90 cm Glass cooker hood in stainless steel
 User Manual for your BWTC6510GL Cooker Hood 60 cm Glass cooker hood in stainless steel BWTC9510GL Cooker Hood 90 cm Glass cooker hood in stainless steel NOTE: This User Instruction Manual contains important
Enzo Concealed Shower Mixing Valve
 Enzo Concealed Shower Mixing Valve EZ40010CP, EZ40013CP & EZ40014CP Installation and Maintenance Instructions In this procedure document we have endeavoured to make the information as accurate as possible.
Inta City Shower Mixing Valve CT20010CP
 Inta City Shower Mixing Valve CT20010CP Installation and Maintenance Instructions In this procedure document we have endeavoured to make the information as accurate as possible. We cannot accept any responsibility
INSTALLATION INSTRUCTIONS. WOOD BLINDS 1-3/8, 2 and 2-3/8 SLAT SIZES. FAUX WOOD BLINDS 2 and 2-1/2 SLAT SIZES
 INSTALLATION INSTRUCTIONS WOOD BLINDS 1-3/8, 2 and 2-3/8 SLAT SIZES FAUX WOOD BLINDS 2 and 2-1/2 SLAT SIZES STANDARD CORDLESS LIFT Thank you for your purchase. This blind has been custom built for you
EKF. EC kitchen extract fan range. Installation and Wiring Instructions. Stock Ref. N EKF355E1 EKF400E1 EKF450E1 EKF450E3 EKF500E3 EKF560E3
 EKF EC kitchen extract fan range Installation and Wiring Instructions Stock Ref. N EKF355E1 EKF400E1 EKF450E1 EKF450E3 EKF500E3 EKF560E3 PLEASE READ INSTRUCTIONS IN CONJUNCTION WITH THE ILLUSTRATIONS.
The Danger signal indicates an immediately hazardous situation which, if not avoided, will result in death or serious injury.
 The Danger signal indicates an immediately hazardous situation which, if not avoided, will result in death or serious injury. The Warning signal alerts you to potential hazards or unsafe practices which,
Operation Manual R205BV, R209BV
 Operation Manual R205BV, R209BV 1 Safety Instruction The rotary evaporator is manufactured according to current methods and accepted safety regulations. However, risks still exist during the installation,
CENTRAL AIR CONDITIONER SPLIT SYSTEM
 CENTRAL AIR CONDITIONER SPLIT SYSTEM WITH ELECTRONIC CONTROL SERIES: DS INSTALLATION INSTRUCTIONS INDEX GENERAL... 2 UNIT LOCATION CRITERIA... 2 DIMENSIONAL DRAWINGS... 3 INDOOR UNIT INSTALLATION... 5
DRYTEK 1 - User Manual ELECTRICAL PANEL FOR 1 MOTOR WITH POWER FACTOR CONTROL
 DRYTEK 1 - User Manual ELECTRICAL PANEL FOR 1 MOTOR WITH POWER FACTOR CONTROL CONTENTS 1. INTRODUCTION... 5 2. WARNINGS... 6 3. GENERAL DESCRIPTION... 7 4. INSTALLATION... 8 5. CONTROL PANEL... 9 5.1
Electronically controlled instantaneous water heater. MCX: 27300, and models. Instructions for the user
 Electronically controlled instantaneous water heater MCX: 27300, 27400 and 27600 models Instructions for the user These appliances deliver water not exceeding 50 ºC in accordance with AS3498. 1. Overview
WHHR Midi & Midi Lite
 WHHR Midi & Midi Lite Residential Whole House Heat Recovery Units with Low Energy EC Motors Optional - Integral LCD Installation, Operating and Maintenance Instructions Image of model with LCD screen Page
Operating instructions
 Operating instructions for automatic detergent dispensing unit AWD 10 To avoid the risk of accidents en - AU, NZ or damage to the appliance, it is essential to read these operating instructions before
SIME FORMAT WALL HUNG BOILERS MODEL 34i AND MODEL 34e. cod A
 cod. 6272262A GENERAL DATA Heating Data Heat Output Input (Adjustable) (Adjustable) Format 34i 11.2 34KW 45 145MJ/hr Format 34e 11.2 34KW 45 145MJ/hr General Specifications FORMAT 34i 34e Main burner injectors
GRUNDFOS INSTRUCTIONS. Sololift2 C-3. Installation and operating instructions
 GRUNDFOS INSTRUCTIONS Sololift2 C-3 Installation and operating instructions English (US) English (US) Installation and operating instructions Original installation and operating instructions. CONTENTS
UFM-T100H US ES CA Power Alarm Test TM
 Alarm Power TM UFM-T100H US ES CA A E F I J K G B C D H L M N O P Q R S T U V W X US 1 3 2 Power Alarm 4 6 5 Power Alarm 7 9 8 Po we Ala r rm Power Alarm 10 11 Po we Po we Ala rm r 12 Pow Ala Ala rm r
airooncentre.co.uk irconcentre.co.uk Xpelair Low Energy Wall/Window Fan Range GX6 EC2 GXC6 EC2 Quick Order Hotline or
 Xpelair Low Energy Wall/Window Fan Range GX6 EC2 GXC6 EC2 Installation and Maintenance Instructions Retain for future reference 3. To remove the impeller, unscrew the central screw with a 7mm nut runner
Model No.: VUM33AS20G
 Model No.: VUM33AS0G USER MANUAL IMPORTANT SAFETY INSTRUCTIONS Before operating the appliance for the first time, read these instructions carefully. Please store this user manual for future reference..
Electronically controlled instantaneous water heater. MCX: 27300, and models. Installation instructions
 Electronically controlled instantaneous water heater MCX: 27300, 27400 and 27600 models Installation instructions These appliances deliver water not exceeding 50 ºC in accordance with AS3498. 1. Overview
Aluminium range of condensing boilers. Works every time. Designed to meet carbon reduction targets. Lifetime service and support
 Aluminium range of condensing boilers Outputs from 30kW to 600kW Designed to meet carbon reduction targets Lifetime service and support Works every time. www.pottertoncommercial.co.uk Aluminium range of
isense & isense-ht 230V Flush Mounted Domestic Continuous Extract Fans
 isense & isense-ht 230V Flush Mounted Domestic Continuous Extract Fans Installation and Maintenance IPX4* The EMC Directive 2014/30/EU The Low Voltage Directive 2014/35/EU 1.0 SAFETY INFORMATI The installation
User Instructions for Remote Controlled 2kW Rotisserie Effect Fan Heater Model 1276
 200662_2 Page 1 User Instructions for Remote Controlled 2kW Rotisserie Effect Fan Heater Model 1276 These instructions should be read carefully and retained for future reference. Important Notes These
The Professional s Choice
 SureFlow compact range: 1000-C & 1000-M Auto-Fill Catering Water Boiler Installation And User Instructions The Professional s Choice CONTENTS CONTENTS & INTRODUCTION 2 SAFETY & ENVIRONMENTAL INFORMATION
Ontario Fire Code SECTION 5.10 COMBUSTIBLE DUST PRODUCING PROCESSES. Illustrated Commentary. Office of the Ontario Fire Marshal
 Ontario Fire Code SECTION 5.10 COMBUSTIBLE DUST PRODUCING PROCESSES Illustrated Commentary Office of the Ontario Fire Marshal Combustible Dust Illustrated Commentary 1 Mechanical Exhaust Systems 5.10.1.1.
EKO Line Pellet Boiler Wood Pellet Storage Solutions And Pellet Dosage Systems
 EKO Line Pellet Boiler Wood Pellet Storage Solutions And Pellet Dosage Systems 1 EkoLine Wood Pellet Boilers EKOLINE boilers have been designed specifically for the purpose of heating water to temperatures
60cm Chimney Extractor
 60cm Chimney Extractor LAM2401 HJA2480 User & Installation Guide Contents Page Environmental note 3 IMPORTANT SAFETY INFORMATION 4 6 Specifications of your extractor 7 8 Dimensions 7 Specifications 7-8
INSTALLATION AND OPERATING INSTRUCTIONS JAKA HFD CONDENS
 INSTALLATION AND OPERATING INSTRUCTIONS JAKA HFD CONDENS Thank you for choosing a DOMUSA TEKNIK heating boiler. You have chosen a boiler that, with a suitable hydraulic installation and using oil for fuel,
Instructions Manual SHC520X - SHC700X
 Instructions Manual SHC520X - SHC700X INDEX EN RECOMMENDATIONS AND SUGGESTIONS... 3 CHARACTERISTICS... 4 INSTALLATION... 5 USE... 7 MAINTENANCE... 8 2 RECOMMENDATIONS AND SUGGESTIONS The Instructions for
Aluminium range of condensing boilers. Works every time. Designed to meet carbon reduction targets. Lifetime service and support
 Aluminium range of condensing boilers Outputs from 30kW to 600kW Designed to meet carbon reduction targets Lifetime service and support Works every time. www.pottertoncommercial.co.uk Aluminium range of
INSTALLATION MANUAL. Split-type Air Conditioner (Cooling and Heating) Indoor Unit AQB18J6WC AQB24J2WC. Outdoor Unit UQB18J6WC UQB24J2WC
 Indoor Unit AQB18J6WC AQB24J2WC. Outdoor Unit UQB18J6WC UQB24J2WC") AQB8J6WC_IM_E_25864 2006.4.4 3:29 PM Page 7 INSTALLATION MANUAL Indoor Unit AQB8J6WC AQB24J2WC Outdoor Unit UQB8J6WC UQB24J2WC ENGLISH FRANÇAIS ESPAÑOL Split-type Air Conditioner (Cooling and Heating)
AQB8J6WC_IM_E_25864 2006.4.4 3:29 PM Page 7 INSTALLATION MANUAL Indoor Unit AQB8J6WC AQB24J2WC Outdoor Unit UQB8J6WC UQB24J2WC ENGLISH FRANÇAIS ESPAÑOL Split-type Air Conditioner (Cooling and Heating)
BT16.4SS-HK BT19.4SS-HK Cooker Hood
 BT16.4SS-HK BT19.4SS-HK Cooker Hood User Manual for your Baumatic User Manual for your Baumatic BT16.4SS-HK 60 cm Chimney Hood BT19.4SS-HK 90 cm Chimney Hood NOTE: This User Instruction Manual contains
Mio Concealed Shower Mixing Valve MI40010CP
 Mio Concealed Shower Mixing Valve MI40010CP Installation and Maintenance Instructions In this procedure document we have endeavoured to make the information as accurate as possible. We cannot accept any
INSTALLATION MANUAL. Split-type Air Conditioner (Cooling and Heating) Outdoor Unit UQB09JJWC UQB12JJWC. Indoor Unit AQB09JJWC AQB12JJWC
 Outdoor Unit UQB09JJWC UQB12JJWC. Indoor Unit AQB09JJWC AQB12JJWC") AQB09JJ6WC_IM_E_2585 2006.4.17 4:26 PM Page 17 INSTALLATION MANUAL Indoor Unit AQB09JJWC AQB12JJWC Outdoor Unit UQB09JJWC UQB12JJWC ENGLISH FRANÇAIS ESPAÑOL Split-type Air Conditioner (Cooling and Heating)
AQB09JJ6WC_IM_E_2585 2006.4.17 4:26 PM Page 17 INSTALLATION MANUAL Indoor Unit AQB09JJWC AQB12JJWC Outdoor Unit UQB09JJWC UQB12JJWC ENGLISH FRANÇAIS ESPAÑOL Split-type Air Conditioner (Cooling and Heating)
MURELLE EV HE 25/55-30/55
 UK ENSURE THAT THESE INSTRUCTIONS ARE LEFT FOR THE USER AFTER COMPLETION OF THE BENCHMARK SECTION MURELLE EV HE 25/55-30/55 User instructions 199838 Please read the Important Notice within this guide regarding
STEAM WALLPAPER STRIPPER MODEL HTW5
 STEAM WALLPAPER STRIPPER MODEL HTW5 From Serial Number 75154 (110 Volt North America only) OWNERS MANUAL & OPERATING INSTRUCTIONS 2016/11 Hiretech Part # 007717 WARNING For safe operation of this machine,
Installation Instruction Devidry - for installation with Devidry Pro Kit
 Installation Instruction Devidry - for installation with Devidry Pro Kit UK Devidry TM Congratulations with your new DEVI floor heating system. DEVI is Europe s leading floor heating manufacturer with
/ made in China -
 5715110901/02.12 made in China - Instructions for use. Keep these instructions PORTABLE AIR CONDITIONER PAC AN140HPEC Register this product online and receive a free trial issue of Cook's Illustrated.
Use and maintenance Manual Longitudinal profile welding Model: LRW-130
 LRW-130 1300 mm. IMPORTANT: Read this user manual and follow the instructions and warnings before operating this device. Any modification or transformation performed on this machine may cause loss of the