SOLAR AIR HEATER 11/01/2015 INTRODUCTION
|
|
|
- Agnes Cook
- 6 years ago
- Views:
Transcription
.")
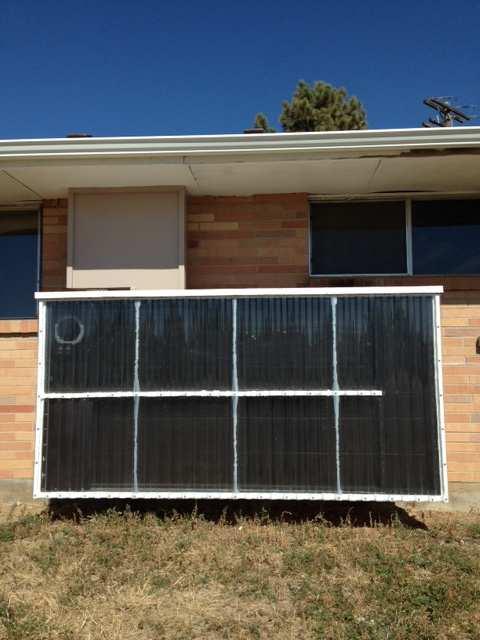
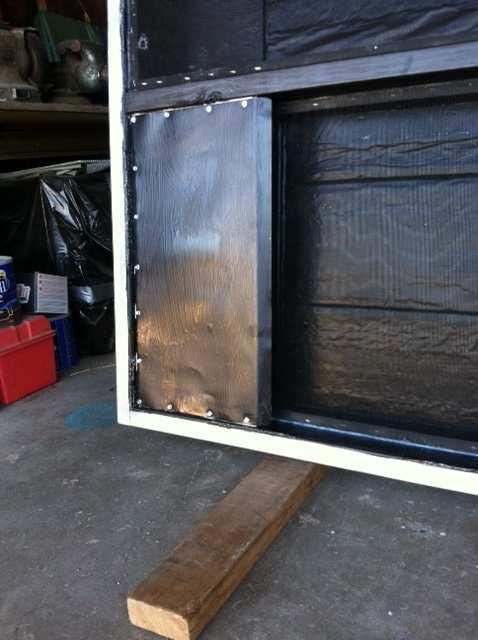
1 SOLAR AIR HEATER 11/01/2015 INTRODUCTION Here is our solar air heater. The panel is a horizontally-oriented, 4 ft. x 8 ft., down and back 2-layer screen design, mounted in the vertical plane (90 degrees tilt). The collector stands 23 inches out from the S/SE wall of our out-building on an angle iron mount, facing approximately 160 degrees azimuth.
2
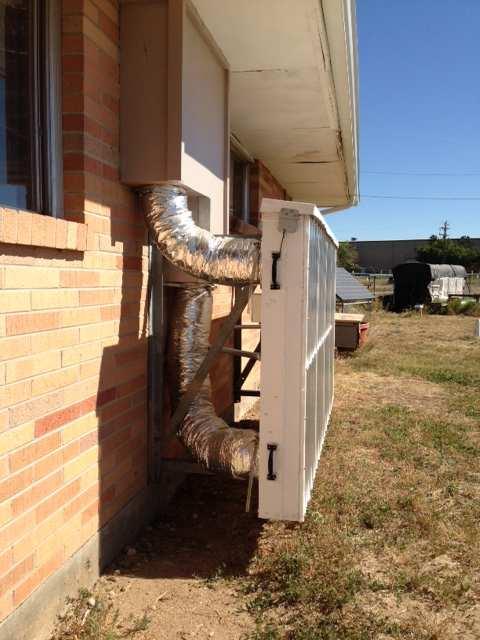
3 I used the excellent Sustainable by Design Overhang Design Tool to fine-tune panel location (link on Build It Solar). The hip-roof has wide 35 inch overhangs, only 7 ½ feet above ground level. The offset mount positions the panel out 5 inches from the edge of the overhang, with the glazing directly under the fascia. The panel enjoys full solar exposure during winter. Around the equinoxes, the overhang shades the panel only in late afternoon, when the sun angle is nearly oblique. As the sun path moves higher the panel is shaded earlier, until, at summer solstice, the panel is in full shade by solar noon. The low-profile installation preserves the unobstructed view out the windows on the south side. The wide-angle photo was taken at solar noon on Sept. 26. The other two shots were taken 2 hours earlier, with the sun directly in front of the collector. As you can see, building was not consciously designed with passive solar in mind. The south windows are mostly shaded even in mid-winter. The panel frame is built from two stacked layers of 25 ga. stud track, with a plywood back plate and SunTuf corrugated polycarbonate glazing. The air vents go through the back, in the upper and lower left corners. Two flexible, insulated 6-inch ducts carry the air up the outside wall, through the soffit, and over the brick wall into the back area of the building. Once inside, the heated air is ducted into the front room (far left window in wide-angle photo), driven by a 410 CFM centrifugal fan. An air filter box in the return duct holds a 14 x 14 pleated-paper air filter. The fan is controlled by a 24 V relay, wired in series with one of two (switch-selectable) snap discs inside the panel, and a bimetallic thermostat located in the front room. The only part of the building that is finished inside is a 22 ft. square room in the front. We use this area for office space, and this is where we direct the heated air. The resulting air-flow path is far from ideal - too long and too many turns, but it was the least disruptive to the structure. I didn t want to cut holes through the brick wall. I borrowed liberally from ideas and designs featured on Simply Solar and Build It Solar (thank you all). WALL MOUNT The mount establishes two vertical rails, 72 inches apart, for attaching the panel. I fabricated the mount from some old range fence corner-bracing that had been piled in the corner of the yard for years. The material is 2-inch angle iron, overkill-heavy, but it s galvanized and straight; also the price was right free. The mount is bolted to the brick wall using 5/16 x 1 ½ inch Red Head masonry sleeve anchors. The lateral triangular braces are fabricated from 1-inch EMT, with the ends flattened, drilled, and bent to the correct angle.


4 One limitation with this type of mount is that it doesn t provide a continuous attaching surface for the panel. The plywood back plate is what is bolted to the angle iron mount,

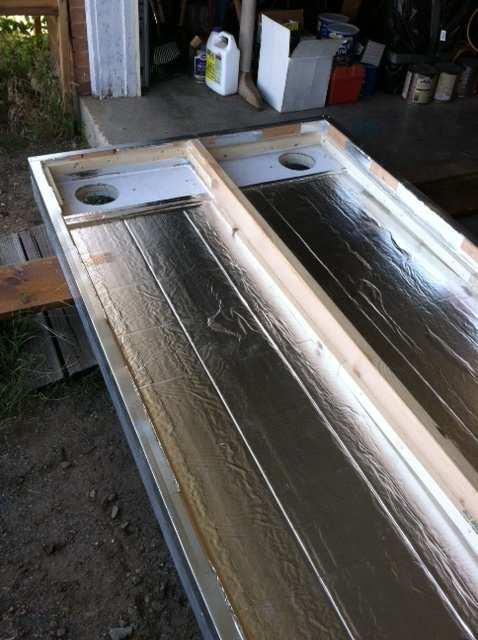
5 and what gives the panel the stiffness to bridge the span. The top and bottom bolts on each rail also pass through the back flange of the stud track. PANEL FRAME CONSTRUCTION The panel frame is made from 25 ga. metal stud track, built in two layers, 3 5/8 inch + 2½ inch. I figured I needed 6 inch depth for the slanted screen absorbers. The ends of the stud track pieces are notched and folded over 90 degrees, and the corners joined with pop rivets. I fit the 4x8 plywood sheet into the back frame before riveting the last two corners. The plywood is held in place with some home-made angle brackets screwed into the plywood and riveted to the stud track.

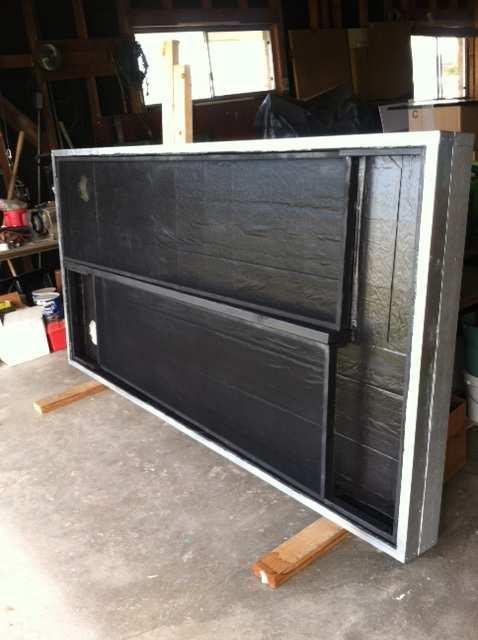
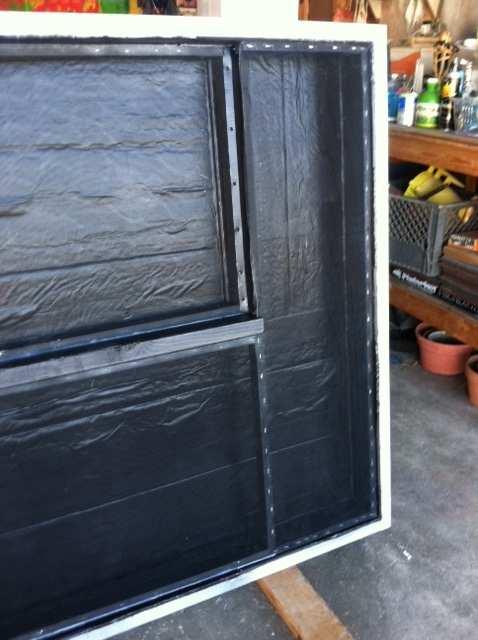
6 Once the plywood back plate was tight in the back frame, I set it in place on the mount and drilled holes through plywood and the angle iron. I hammered 5/16 in. T-nuts into the front face of the plywood and temporarily ran 5/16 x 1 inch bolts through the frame from the back and into the T-nuts. The top and bottom bolts in each row also pass through the stud track. The finished assembly is quite rigid. Once I knew everything fit, I removed the back frame from the mount to build the rest of the panel. I attached the front stud track frame to the back frame with small screws all the way around, adding a bead of silicone seal between the two sections. I also sealed the corners and all the rivets. I would have much rather just used a single piece of 6-inch stud track, but I couldn t find it at the local building supply stores. The down side of the two-level frame is that it leaves a flange running down the middle, right where you need to attach the screens. Also the flange makes it difficult to insulate inside the frame. PANEL INTERIOR CONSTRUCTON I glued 2x4 blocks into the stud-track channels to provide anchor points for the screens. The spaces between the blocks are filled in with pieces of 1-inch + 1 ½-inch polyiso. The dividing wall between the upper and lower absorber sections is a 2x8 board, ripped to match the width of the panel. The divider is screwed to the back plate and to a 2x4 block on one end. The other end stops 12 inches short to leave room for the turn-around plenum. I insulated the back with 1 inch polyiso. The following series of pictures show the internal layout two absorber sections, screens, vent details, baffle plate, and end


7 plenum. The black screen doesn t show up that well, but all the screens are there in the last photo:
8

9
10

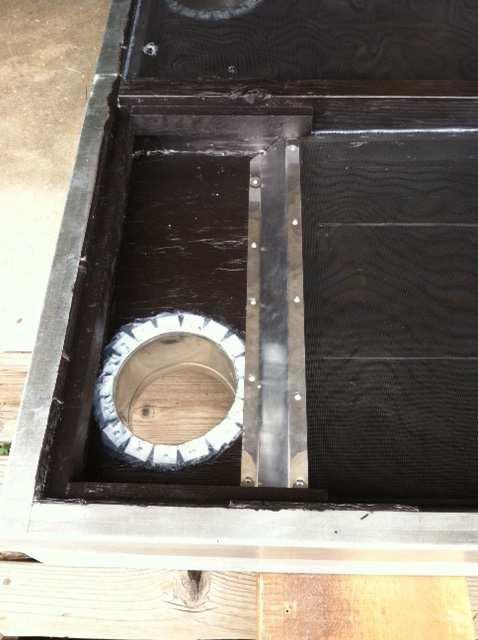
11 The 2x4 blocks fitted into the stud track were sort of a compromise; they created too many thermal bridging paths to the outside. Reconsidering, it may have been better to first insulate all around with 1 in. polyiso, and then fit an inner frame made from 1x4 s for the screens. The screens sit on angled 1x2 boards, screwed to the mounting blocks and to the center divider wall. The absorbers are simple 1x2 frames with screen stapled to both sides. I couldn t find charcoal aluminum screen except in big rolls, so I used bright aluminum screen, spray-painted flat black. I left the painted screens outside to bake in the sun for a couple days before putting them into the panel. I thought about using charcoal fiberglass screen, but I wasn t sure how it would hold up. Fiberglass may be OK; the SunTuf glazing is supposed to filter out UV anyway. The intake and output vents are located on the back - intake at lower-left, behind the baffle plate, and output at upper left. Short 6-inch duct sections have folded-over tabs, screwed to small pieces of 3/8 inch plywood. The plywood pieces are glued to the insulation board and screwed through the insulation into the plywood back plate. An aluminum baffle plate baffle directs the incoming air onto the top surface of the lower screen absorber. The air comes out (mostly) under the screen at the far end, into the turnaround plenum. The plenum is just an open area with a folded-over double layer of screen 1 inch beneath the glazing. The plenum screen is stapled to around the outside of the panel frame and to the top of the lower screen frame. I thought about covering the plenum with a piece of painted-black aluminum flashing instead of screen; I m still not sure what would work best here. After making the U-turn, the air hits the top surface of
.")
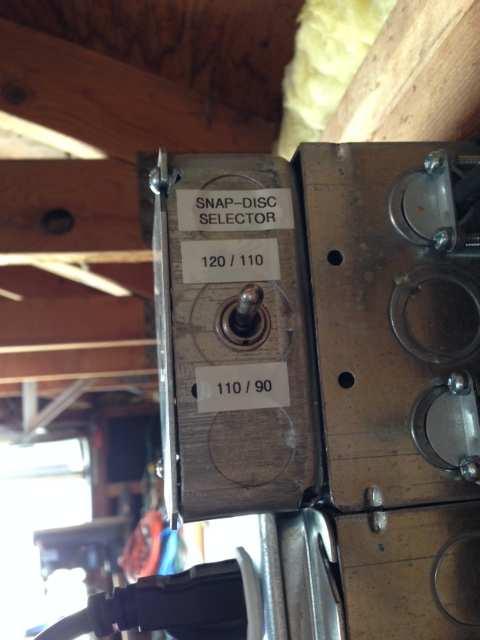
12 the upper screen, finally coming out underneath at the outlet vent in the upper left corner. Short sheet-metal ramps guide the air onto the leading edge of the absorbers. Two snap-discs are mounted to a hand-bent aluminum bracket near the outlet vent. The two snap-discs are 90/110 and 110/120, with an inside selector switch (explained below in Controls section). The wiring run through the back plate into an outdoor plastic J- box attached to the back of the panel. I forgot to put in the snap-discs until after the glazing was installed dumb mistake. I had to reach in through the output vent to screw the bracket to one of the 2x4 blocks in the side wall. The wiring to the inside is not run yet in the photo, but it comes out of the J-box and follows the mount structure, then goes inside via wall enclosure.

13 GLAZING The glazing material is Palram Suntuf polycarbonate. I wanted to use twin-wall, which I thought would perform better and be easier to work with, but it was not available locally at Home Depot or Lowes. (Note - I decided early in the project to only use readily available materials. I tried to purchase everything from the nearby Home Depot 1 mile away.) When I asked about the twin-wall, the crew at Home Depot didn t seem to know anything about it, so I went with the Suntuf instead. I was at the store a couple months later, and there was a bin full of 3/8 inch twin-wall, right next to the Suntuf! Maybe my story about building a solar air heater inspired them. I plan to try the twin-wall next time.

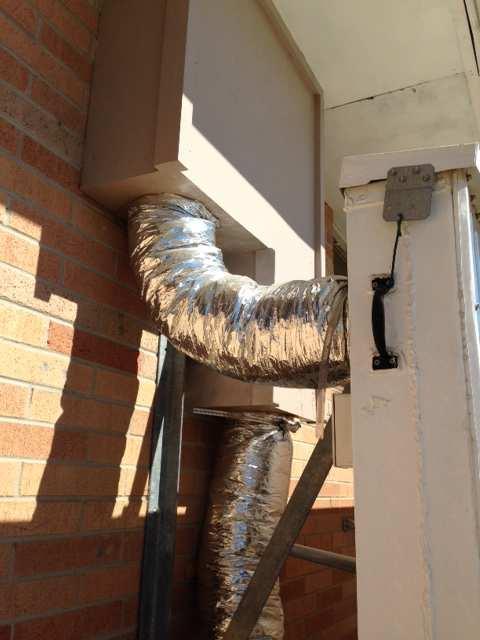
14 The Suntuf is installed with the corrugations running vertically. I cut each 2 ft. x 8 ft. piece in half, using a circular saw with a fine-pitch plywood blade. I glued the foam closure strips to the top and bottom stud tracks and the center wall with silicone. To attach the glazing, I drilled clearance holes in the Suntuf, then marked and drilled the closure strips and stud track with small pilot holes. I used the recommended wood screws with rubber washers to screw the glazing through the foam strips and stud track frame into the wood blocks below, with a generous bead of silicone between the Suntuf and the foam strips. Some of the screws just thread into the stud track, but they held OK. The Suntuf panels overlap by one corrugation; I sealed these joints with clear silicone as I set on each new piece. On the left and right sides, the Suntuf overlaps the frame at a peak. I ripped some 1x2 PVC trim into ¾ x ¾ strips, and glued and screwed the Suntuf through the trim strips and into the frame. I haven t seen any leaks, but just for extra insurance, I made a sloped rain-hat from a piece of 1x8 covered with aluminum flashing. The cover is visible in the side view photo in the Introduction section. AIR DUCTS The 6-inch air ducts run up the outside wall, through the soffit, and over the bricks. The brick facing end at the soffit level; above that there is only some ½ inch thick 1950 s insulation board (I use the term loosely), which is visible inside the back room. The rafters are 14 inches above the soffit, so I cut two holes through the insulation board and fit a plywood bulkhead plate, with 6-inch duct-splice sections, to go through the

15 openings. On the outside wall behind the heater panel, I built a plywood enclosure for the insulated ducts. I attached this housing to the brick wall with Tapcon brand 2 ¾ inch masonry screws. Insulated ducts run from the bulkhead plate on top to two more duct splices at the bottom of the outside enclosure. Two short, easily replaceable sections of insulated flex connect the duct enclosure to the heater panel. These are the only outside ducts you see in the finished installation. I cut a new soffit piece to fit around the outside enclosure, finished it off with 1x2 molding, and painted everything. Here are pictures of the bulkhead plate and the outside enclosure:

16
.")
17 Inside the back room, more flex sections take the air from the bulkhead plate to the Suncourt TF106 6-inch, 410 CFM centrifugal fan on the output side, and to a wood air filter box on the intake side. The air filter box holds a standard 14 x 14 pleated paper air filter, with a hinged door covering the access slot (door added after the photos). More flex duct carries the heated air from the fan to the upper register box on the inside wall, and return air from the lower register box to the filter box. The duct that runs up the wall is 6 inch rigid, wrapped in insulation blanket, with the whole thing surrounded by some 2x4 crash bars. Hopefully this will protect the ductwork from heavy items stacked nearby. In case you are wondering, a graphic artist once worked here. The little character on the wall is watching us work. The following pictures show the internal duct paths and the air box:


18 Total duct length adds up to 32 feet, with 12 ft. on the hot air side, and 20 ft. on the return side. In spite of the long duct runs, the 410 CFM fan runs quiet and moves a good stream
19 of air into the room. I don t have any measurements, and it hasn t gotten cold enough yet this year to run the panel more than briefly, but I can feel plenty of warm air coming out during some brief tests. NOTE: In the two weeks since this was written, it has cooled off here considerably. We are using the heater quite a bit now. On sunny days, it runs almost continuously until early afternoon. The panel puts out a lot of heat; at times it warms the room up to where the room thermostat turns off the fan. Sometimes we even open a window while it is running, an extravagance we could never indulge with the gas-fired furnace. If there are broken clouds, the snap-disc can cycle on and off, depending on cloud cover. This happens more in the afternoon, when the sun hits the panel at a greater angle. We are still experimenting with thermostat setting and with the two snap-disc ranges, but overall, the solar heater has made a big difference. We haven t run the gas furnace at all (yet). It will be interesting to sees how the solar heater does this winter. CONTROL SYSTEM I didn t want to run 120V into the panel, or outside at all, so I built a low-voltage control circuit to control the fan. The snap disc, in tandem with a bimetallic room thermostat, controls a 24V relay to energize the fan. I originally installed a 90/110 degree snap disc, but then I wasn t sure if the output air would feel too cool at snap-disc cut-off. The next size up is 110/120, which probably lowers overall efficiency by leaving more heat in the panel. I wasn t sure which was best, so I finally made a new bracket to hold two snap discs and made them switch selectable. We are running the 110/120 at this point. If the panel was heating a basement, garage or workshop, I would probably go with the 90/110. Anyway, we have both ranges available, selectable with an inside toggle switch, so we can experiment. Here is the schematic (Note: all 120V receptacles are grounded; ground connections omitted from drawing for simplicity):
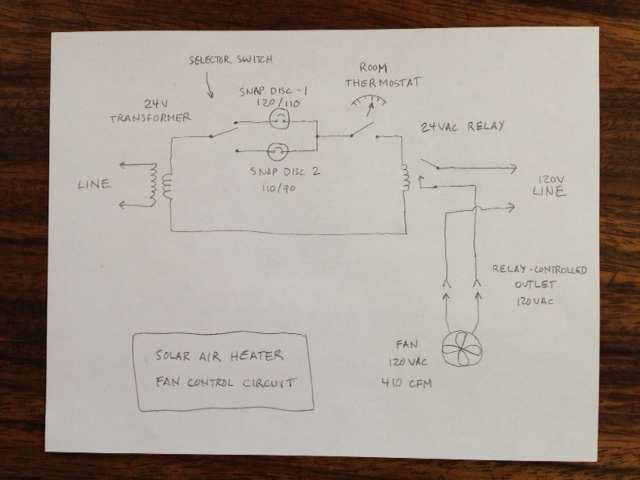
20

21 When the control loop closes, the relay is energized, feeding 120VAC to a dedicated 120V receptacle for the fan. The room thermostat is a re-cycled 1970 s electric baseboard heater thermostat. It s crude, but it s perfect for the solar heater, since it consumes no power; just open or closed, depending on where you set the dial. Calibration is not great, although repeatability is fine. The thermostat has an OFF position to disable the system during summer months. I purchased the Suncourt centrifugal fan, 24V transformer, and 24V SPST relay from Home Depot, and ordered the White-Rogers snap discs on line from SupplyHouse.com. The room thermostat came from the junk box. The following photo shows the grilles where the air feeds into the front room:
 reported good results with a space blanket reflector.")
22 WHAT S NEXT? One enhancement I would like to try is a reflector in front of the panel. I see another builder on SimplySolar (a fellow resident of the Denver, CO area no less) reported good results with a space blanket reflector. Another idea would be to power the heater fan from our home-built 540W battery-based PV system. The PV just powers some PC s in the office, but I think it will support the heater fan too ( power factor). I just need to wire another outlet from the PV / Utility transfer switch. Here is our PV array:

23 I thought of different and better ways to do almost everything during construction. I also had to change plans many times while standing in the aisle at Home Depot, deciding which almost what I wanted item would work best. More hot-air panels - of course! This business is habit-forming, and a lot of fun too. I am already sketching out a horizontal tube-type (downspout) design using some slightly squished 3-inch corrugated aluminum ducts in a 3 5/8 inch stud-track frame with twin-wall glazing. I want to try routing the air through the end wall instead of the back, with the goal of smoothing air flow inside the panel. I also want to incorporate continuous insulation and explore some ultralight construction techniques to reduce thermal mass and bridging, and speed up response time. I want to design a clean sealed air flow path, with as little wood as possible inside the panel and no painted surfaces contacting the heated air stream. Our panel put out a slight smell initially, which seems to be decreasing by the day, but I don t want to gas anybody. I have some ideas for a staked, low-impact ground mount (I have rock-hard clay a few inches below the surface no fun to dig). The new zero-pass projects I see on SimplySolar look interesting. I am always looking for ways to streamline the assembly process and minimize hardware (our panel took a long time). We will see.
Fixing my Fisher and Paykel Fridge Active Smart Fridge/Freezer Model E440T
 Fixing my Fisher and Paykel Fridge Active Smart Fridge/Freezer Model E440T ** DISCLAIMER ** I am not a fridge technician, an electrician or a representative of Fisher and Paykel. I am an average Australian
Hi Gary, More solar projectswww.builditsolar.com
 Hi Gary, My solar project is mostly done, so I thought I would send you some pictures and descriptions as you and your website are what inspired me. I'm located in Castle Rock, Colorado just South of Denver
General System Layout Sketch
 General System Layout Sketch EZ-37 Solar Panels PV panel Can use Standard Copper, CPVC or PEX Pipes Pump Existing Water Heater Bottom Feed Connector 1 Introduction This document describes how to install
Hot Water Solar in Maine Steve Smith 2012
 Hot Water Solar in Maine Steve Smith 2012 This is the 24 x8 hot water solar panel that I built on our house in western Maine. Our house is earth sheltered this is on the roof despite the dirt and grass.
Additions to Lea's Tiny House. This is a twin-wall polycarbonate and aluminum kit greenhouse from FarmTec.
 Additions to Lea's Tiny House This is a twin-wall polycarbonate and aluminum kit greenhouse from FarmTec. This is a new roof overhang, before finishing soffits, fascia, and snow-load bracing. This is the
Arctica Solar 1500 Series Heater Installation Manual
 Arctica Solar 1500 Series Heater Installation Manual A wall mounted Arctica Solar 1500 series solar heater + PV panel demonstration wall The 1500 Series Solar Air Heater from Arctica Solar is designed
10ft Wide Polytunnel Assembly Instructions
 CONTENTS Section Page 1. FOUNDATION TUBES: Option A Hammered-In Foundation Tubes 3 2. FOUNDATION TUBES: Option B Ground Anchor Plates 4 3. FOUNDATION TUBES: Option C Concreted Foundation Tubes 5 4. STEEL
Guidelines for Earthquake Bracing of Residential Water Heaters
 Guidelines for Earthquake Bracing of Residential Water Heaters Department of General Services Division of the State Architect 1102 Q Street, Suite 5100 Sacramento, CA 95814 Phone: (916) 324-7099 Fax: (916)
Modified Trickle Down Solar Heating
 Modified Trickle Down Solar Heating By Richard Heiliger I built and installed these MTD (Modified Trickle Down) collectors I assembled to help heat my home. The basic concept of trickle collectors comes
Casper Hoop House Workshop 12 Ft. x 36 Ft. Del Jimenez. 12ft x 36ft Hoop House 2
 Casper Hoop House Workshop 12 Ft. x 36 Ft. Del Jimenez 12ft x 36ft Hoop House 2 Hoop House 12 Ft. x 36 Ft. HOOP HOUSE The Hoop House, Cold Frame and High Tunnel can be basically the same structure with
AIR HANDLERS. Central Station (CS3) Roof Mounted (RT) (Modular AL Frame AHU)
 Roof Mounted (RT) (Modular AL Frame AHU)") AIR HANDLERS Central Station (CS3) (Modular AL Frame AHU) Roof Mounted (RT) CONTENTS 1. CS3 Modular Aluminium Frame AHU : Unit Types 2. Casing Structure 3. Blowers and Drives 4. Coils 5. Options and Accessory
AIR HANDLERS Central Station (CS3) (Modular AL Frame AHU) Roof Mounted (RT) CONTENTS 1. CS3 Modular Aluminium Frame AHU : Unit Types 2. Casing Structure 3. Blowers and Drives 4. Coils 5. Options and Accessory
Storing excess daytime solar energy to heat greenhouse at night!
 Storing excess daytime solar energy to heat greenhouse at night Russell Benoy March 21, 2014 Having built a well insulated greenhouse, I was amazed at how often the exhaust fan ran to maintain a reasonable
Solar Domestic Hot Water, with a Site-Built Drain-back Tank
 1 Solar Domestic Hot Water, with a Site-Built Drain-back Tank By: David Posluszny (DavidPoz) Built: Fall 2017 In this article I ll discuss how I made a solar thermal hot water system, and my decision making
TR Solar A $1000 Solar Hot Water System in Northern Canada
 TR Solar A $1000 Solar Hot Water System in Northern Canada Last fall (2008) I became interested in the possibility of solar domestic hot water, but kind of lost interest when I saw the price of commercial
Redneck Air Conditioner
 Redneck Air Conditioner I have been somewhat successful in gleaning information from multiple sources and have put together a portable 12 volt and ice powered air conditioner. In an effort to give back,
A ROUGH GUIDE TO CONSTRUCT A PASSIVE SOLAR AIR HEATER
 A ROUGH GUIDE TO CONSTRUCT A PASSIVE SOLAR AIR HEATER The passive solar air heater is an inexpensive way to generate heat without any carbon emissions. The project was undertaken by a group of volunteers
Tankless Water Heater Seminar DISCLAIMER
 Tankless Water Heater Seminar DISCLAIMER DISCLAIMER: Information presented by GMC Motorhomes International is intended only to communicate thoughts, ideas, opinions and procedures to and from GMC Motorhome
Installation Instructions. For the 18 Built-In Dishwasher and Front Color Panels
 Installation Instructions For the 18 Built-In Dishwasher and Front Color Panels Printed in USA 154232102 Before You Begin DO NOT INSTALL DISHWASHER UNTIL YOU HAVE READ ALL INSTRUCTIONS. FOR YOUR SAFETY,
IMPORTANT WARNINGS IMPORTANT SAFETY INSTRUCTIONS
 IMPORTANT WARNINGS IMPORTANT SAFETY INSTRUCTIONS Suncourt recommends professional installation of the Airiva (or by an accomplished DIY person) Please read and save these entire instructions before starting
Installation Instructions
 Installation Instructions Outdoor Installation Kit Models AD250 & AW250 Part No. 24097 Qualifications for installation of the kit: You must be able to read and understand all instructions provided with
6ft Wide Polytunnel Assembly Instructions
 CONTENTS Section Page 1. FOUNDATION TUBES: Option A Hammered-In Foundation Tubes 3 2. FOUNDATION TUBES: Option B Ground Anchor Plates 4 3. FOUNDATION TUBES: Option C Concreted Foundation Tubes 5 4. STEEL
Pallet Hop Dryer. Introduction
 Pallet Hop Dryer Introduction After reviewing some great work that the University of Vermont did to create a multi shelf hop oast (http://farmhack.org/tools/modular-hop-oast-or-tray-drier-herbs), I decided
Suntrek's Solar Pool Heating Installation Guide
 Suntrek's Solar Pool Heating Installation Guide Congratulations! You are installing a solar heating system that will give you many years of comfortable warm pool water. Suntrek solar collectors are made
General System Layout Sketch
 General System Layout Sketch EZ-37 Solar Panels PV panel Glycol Fill Valve Expansion Tank ` 1 Introduction This document describes how to install a Heliatos GH type solar water heating system. These systems
SAFETY AND INSTALLATION MANUAL MODEL 8100
 SAFETY AND INSTALLATION MANUAL ENERGY RECOVERY VENTILATORS MODEL 8100 Provides year-round fresh air Recovers 77% of the apparent heating or cooling energy from the exhausted air See Warnings Page 3 Table
Installation Instructions
 Wood Blinds Installation Instructions Heartland Woods Heartland Woods w/ Continuum *Click on any page to return to the Table of Contents* Heartland Woods Wood Blinds Mounting Inside or Outside Window Frame
Over-the-Range Microwave Oven Installation Instructions MVH130* MVH230* MVH330*
 Over-the-Range Microwave Oven Installation Instructions MVH130* MVH230* MVH330* * Additional alphanumeric characters representing other models in the series may follow each model number. Keep these instructions
Chad's Hinge Tilt Collector Bank
 Page 1 of 8 The Renewable Energy site for Do-It-Yourselfers Search Home Getting Started Projects References Half Program Experimental Site Map Chad's Hinge Tilt Collector Bank This page covers a set 6
SA-20WB-HPE SA-20WB-LPE SA-20WT-HPE SA-20WT-LPE SA-30WT-HPE SA-30WT-LPE SA-20WB-HP SA-20WB-LP SA-20WT-HP SA-20WT-LP SA-30WT-HP SA-30WT-LP
 Model Numbers: SA-20WB-HPE SA-20WB-LPE SA-20WT-HPE SA-20WT-LPE SA-30WT-HPE SA-30WT-LPE SA-20WB-HP SA-20WB-LP SA-20WT-HP SA-20WT-LP SA-30WT-HP SA-30WT-LP WARNING: Take caution during installation. Please
SECTION (15820) - AIR DUCT ACCESSORIES
 - AIR DUCT ACCESSORIES") PART 1 GENERAL 1.01 SUMMARY A. Section includes: SECTION 23 33 00 (15820) - AIR DUCT ACCESSORIES 1. Manual-Volume Dampers 2. Fire Dampers 3. Turning Vanes 4. Duct-Mounted Access Doors 5. Flexible Connectors
PART 1 GENERAL 1.01 SUMMARY A. Section includes: SECTION 23 33 00 (15820) - AIR DUCT ACCESSORIES 1. Manual-Volume Dampers 2. Fire Dampers 3. Turning Vanes 4. Duct-Mounted Access Doors 5. Flexible Connectors
Installation Instructions
 Installation Instructions Self-Cleaning Radiant Electric Drop-In Range JDP47, JD968, JD900 If you have questions, call 1.800.GE.CARES or visit our website at: ge.com Before You Begin Read these instructions
Milkweed Seed Separator
 Milkweed Seed Separator Chip Taylor s design is for a 30 gallon metal trashcan (plans and video http://monarchwatch.org/bringback-the-monarchs/milkweed/seed-separator). Bryan Bockbrader of the Wood County
Installation Instructions
 Installation Instructions Electric Drop-In Range JDS28, JDP39 Questions? Call 800.GE.CARES (800.432.2737) or Visit our Website at: ge.com BEFORE YOU BEGIN Read these instructions carefully and completely.
Everest Star 7900 II Series and 8012II
 Installation of an Atwood Everest Star LP Furnace into a 1985 Volkswagen Vanagon Westfalia After spending a lot of time on the internet scanning through a multitude of Westy websites I quickly came to
The 3 Common Landscape Challenges. & How to Transform them into Features
 The 3 Common Landscape Challenges & How to Transform them into Features Think That Your Landscape is Doomed Because of its Limited Size, Slope, or Drainage Issue? There are many common issues that homeowners
pushing the tube into the rear of the water outlet housing with a slight twisting motion to evenly distribute the adhesive. After cleaning off any ext
 I chose an original FE expansion tank that had the filler neck on the driver's side of the tank but still had the radiator hose outlet facing the passenger side. I figured using such a tank would afford
RAYCON ENGINEERS PTY LTD. Attic Mounted Whole House Fans. Owner s Manual
 RAYCON ENGINEERS PTY LTD Attic Mounted Whole House Fans Owner s Manual R E L E A S E D A T E 1 7 F E B R U A R Y 2 0 1 7 Attic Mounted Whole House Fan 3.1 Raycon Engineers Pty Ltd PO Box 959 Indooroopilly
YOUR SOLAR HOME. INSTALLATION & TECHNICAL MANUAL SolarSheat Products: 1000G, 1500G, 1500GS & 2 PAK
 Page 1 of 42 YOUR SOLAR HOME INSTALLATION & TECHNICAL MANUAL SolarSheat Products: 1000G, 1500G, 1500GS & 2 PAK Copyright 2010 Your Solar Home, All Rights Reserved SolarSheat products must be installed
Silencing The ALS-1306 Fans
 Silencing The ALS-1306 Fans This document describes measures I've taken to reduce the noise from the power supply and amplifier fans in the Ameritron ALS-1306 amplifier. The major modifications are mechanical
INSTALLATION INSTRUCTIONS FOR 6532 SERIES PACKAGE HEAT PUMP
 INSTALLATION INSTRUCTIONS FOR 6532 SERIES PACKAGE HEAT PUMP RV Products A Division of Airxcel, Inc. P.O. Box 4020 Wichita, KS 67204 1976-360 (1-02) PP TABLE OF CONTENTS 1. Warnings......................................................
Installation Instructions
 Installation Instructions Over the Range Microwave Oven BEFORE YOU BEGIN (Read these instructions completely and carefully.) IMPORTANT IMPORTANT Save these instructions for local inspector s use. Observe
IMPORTANT INFORMATION. Revised Dishwasher Installation Instructions
 IMPORTANT INFORMATION Revised Dishwasher Installation Instructions To obtain a revised copy of the entire Dishwasher User s Manual, go to www.eurotechappliances.com. SPECIAL EDITION 11-20-02 SAVE THESE
*Fan In A Drum* April 7, 2005
 *Fan In A Drum* April 7, 2005 A friend asked if I'd be willing to make a saferoom fan for them. Seeing how I made one not that long ago, I figured that it would be a simple thing to make another one. Unfortunately,
C3 Heater Core Fun and Games
 C3 Heater Core Fun and Games 1973 Heater Core Replacement A few years ago my 73 convertible developed a heater core leak, and not wanting to deal with it at the time, I didn t exactly jump right into the
STEP BY STEP INSTALLATION INSTRUCTIONS. Vertical Honeycomb Shades
 STEP BY STEP INSTALLATION INSTRUCTIONS Vertical Honeycomb Shades Everything You Need A Smooth Set-Up We want you to love your new window coverings and that includes having a smooth installation experience.
General System Layout Sketch
 General System Layout Sketch SW-38 Solar Panel(s) Hot Water Cold Water PV panel Glycol RV Water Heater WITH built in Heat Exchanger Water Ports ` Glycol Fill Valve 1 Pump Solar Powered Expansion Tank Glycol
Making the Gattling Gun Condenser Materials: Method: 10.
 Making the Gattling Gun Condenser This condenser is designed for the Nixon-Stone offset head style still. I wanted it to be removable for cleaning so I made it slip fit into the Nixon-Stone still head.
Timber Venetians Manual
 Timber Venetians Manual Measuring & Limitations Timber Venetians Measuring Architrave & Reveal Face & Reveal Corners Bays Options & Limitations Maximum Width Minimum Width Fixed Control Minimum Width Tilt
Can Am Commander 1000 Radiator Relocation Installation Instructions
 Can Am Commander 1000 Radiator Relocation Installation Instructions What comes with the kit 2 CNC Machined Aluminum mounting brackets 2 pcs M6 x 1.0 x 60mm long SHCS 2 pcs M6 x 1.0 x75mm long SHCS 4 pc
Soft Sheer Vertical. Installation and Care Guide
 Soft Sheer Vertical Installation and Care Guide Soft Sheer Vertical Blinds represent a design breakthrough in style, efficiency and function. The unique fabric structure and hardware system are designed
CMHC HOME MAINTENANCE CHECKLIST
 Make sure air vents indoors and outdoors (intake, exhaust and forced air) are not blocked by snow or debris. Check and clean range hood filters on a monthly basis. Test ground fault circuit interrupter(s)
This site is based on a but applies to all 1971-on Saab 99 and Saab 900.
 by Mark Jeter updated: December 8, 2004 originally web-published June 27, 2001 This document shows how the original waterpump in a Saab "B" engine can be eliminated and replaced with a reliable, efficient
Installation Instructions
 Installation Instructions Above the Cooktop Microwave Oven JVM60 and JVM65 Questions? Call -800-56- or Visit our Website at: GEAppliances.ca BEFORE YOU BEGIN Read these instructions completely and carefully.
Home Maintenance Schedule
 Home Maintenance Schedule Regular Maintenance is the Key Inspecting your home on a regular basis and following good maintenance practices are the best way to protect your investment in your home. Whether
TS40 Product Assembly & Service Information Manual
 TS40 Product Assembly & Service Information Manual MODEL: SERIAL NUMBER(S): MANUFACTURE DATE: Please review all the information in this manual before attempting assembly and/or maintenance. ASSEMBLY FOR:
Direct Fired Heater Model AD Specification
 Direct Fired Heater Model AD Specification Description A Direct-fired gas heating and ventilating unit(s), as indicated on the drawings shall be furnished. Unit(s) shall be tested in accordance with ANSI
While most maintenance is seasonal, there are some things you should do on a frequent basis year-round:
 Inspecting your home on a regular basis and following good maintenance practices are the best way to protect your investment in your home. Whether you take care of a few tasks at a time or several all
Vertical Blinds. Step by Step Installation Instructions
 Vertical Blinds Step by Step Installation Instructions Everything You Need A Smooth Set-Up We want you to love your new window coverings and that includes having a smooth installation experience. We recommend
Installation and Maintenance Instructions
 Commercial & Industrial Positive Pressure or Condensing AL 29-4C Stainless Steel High Challenge Special Gas Vent Also for Natural Draft Appliances 3",4",5",6",7",8",9",10" and 12" Diameter Special Gas
Installation and Care Instructions
 Installation and Care Instructions 2" Horizontal Aluminum Blinds MagnaView Tilt Feature CONTENTS Getting Started................................................ 1 Mount the Installation s....................................
ALUMINUM. ELEVATED. CEDAR RENDITIONS DESIGN SERIES INSTALLATION INSTRUCTIONS
 ALUMINUM. ELEVATED. CEDAR RENDITIONS DESIGN SERIES INSTALLATION INSTRUCTIONS CEDAR RENDITIONS BY ROYAL 2 INSTALLATION INSTRUCTIONS TABLE OF CONTENTS Important Notes...5 Wall Preparation...7 Installation
COMMERCIAL STACKED. Supersedes repair parts list located behind lower panel on washer. Models: CGT8000AQ1 (White)
") PARTS LIST for COMMERCIAL STACKED Supersedes repair parts list located behind lower panel on washer Models: CGT8000AQ1 (White) FOR CUSTOMER SATISFACTION ALWAYS USE FACTORY SPECIFICATION PARTS 201210001
PARTS LIST for COMMERCIAL STACKED Supersedes repair parts list located behind lower panel on washer Models: CGT8000AQ1 (White) FOR CUSTOMER SATISFACTION ALWAYS USE FACTORY SPECIFICATION PARTS 201210001
Installation Instructions
 Installation Instructions Over the Range Microwave Oven PVM88 Questions? Call -800-56-44 or Visit our Website at: GEAppliances.ca BEFORE YOU BEGIN Read these instructions completely and carefully. IMPORTANT
McDONALD S 30 ROOF ELEMENT
 29-10 7/16 PRE-DRILLED HOLES IN LEGS 4-8 15/16 1-7 1/4 MCDO BRACKET 1-7 1/4 RIVNUT NALDS BRACKET 10-8 2 1-7 1/4 = DISTANCE FROM BOTTOM OF BASE PLATE TO CENTER OF TIE-BACK ASSEMBLY C L 22 1/16" FROM WALL
GETTING STARTED OPTIONAL HARDWARE A
 ROLLER SHADES Continuous Cord Loop and Link System without Cassette Double Roller GETTING STARTED OPTIONAL HARDWARE A few simple tools are required: Hold Down Brackets Spacer Block Spacers Steel Tape Measure
Microwave Oven. IMPORTANT SAFETY INSTRUCTION Never operate the oven when it is empty or without the glass turntable.
 Microwave Oven Introduction Installation Manual IMPORTANT SAFETY INSTRUCTION Never operate the oven when it is empty or without the glass turntable. Your Over-the-Range microwave oven comes complete with
Water Heater. Promising endless. Installing an On-Demand
 Installing an On-Demand Water Heater Pluses include endless hot water and a compact design, but the installation means a lot of pipes in a small space by Tom Cardillo Promising endless hot water and taking
ENRGY CURB APPLICATION GUIDE FOR TPO ROOFING SYSTEMS
 1. Introduction The ENRGY Curb mounting system is a lightweight, nonpenetrating, roof-integrated, photovoltaic (PV) mounting system designed to maintain roof integrity and maximize power density. This
Installation Instructions
 Installation Instructions For the 18" Built-In Dishwasher Sears, Roebuck and Co. Sears Canada, Inc. Hoffman Estates, IL 60179 U.S.A. Toronto, Ontario, Canada M5B 2B8 154435201 Before You Begin DO NOT INSTALL
ATCO How a Cooling Unit Works
 G A L V A N I Z E D Contents of this PDF How a Cooling Unit Works pages 1 2 pages 3 6 How a Cooling Unit Works RV refrigeration manufacturers have known the value of zinc protection for decades. In fact,
INSTALLATION INSTRUCTIONS WALL MOUNT LINER INSERT
 Read and Save These Instructions All Hoods Must Be Installed By A Qualified Installer INSTALLATION INSTRUCTIONS WALL MOUNT LINER INSERT Read All Instructions Thoroughly Before Beginning Installation WARNING
Installation and Care Instructions
 Installation and Care Instructions 2" Horizontal Aluminum Blinds MagnaView Tilt Feature Thank you for your purchase. Your new blinds have been custom built for you from the highest quality materials. Properly
How To Measure For Curtains, Drapes & Other Window Coverings: Fabulous Fall with Fabric.com
 Published on Sew4Home How To Measure For Curtains, Drapes & Other Window Coverings: Fabulous Fall with Fabric.com Editor: Liz Johnson Thursday, 25 September 2014 1:00 Window coverings seem to be one of
HONEYCOMB AND PLEATED SHADES
 HONEYCOMB AND PLEATED SHADES GETTING STARTED BRACkET INFORMATION A few simple tools are required: The brackets you received with your product are REQUIRED for proper installation. Brackets should be installed
JOHN DEERE GATOR HPX/XUV 2 PASSENGER HEATER INSTALLATION INSTRUCTIONS (p/n: 9PH20S30)
") P. 1 of 12 JOHN DEERE GATOR HPX/XUV 2 PASSENGER HEATER INSTALLATION INSTRUCTIONS (p/n: 9PH20S30) Item: Qty: Description: 1 2 1 x 1 x 5/8 Tee Fitting 2 2 Plastic Snap-in Hose Grommet 3 4 1-1/2" Hose Clamps
P. 1 of 12 JOHN DEERE GATOR HPX/XUV 2 PASSENGER HEATER INSTALLATION INSTRUCTIONS (p/n: 9PH20S30) Item: Qty: Description: 1 2 1 x 1 x 5/8 Tee Fitting 2 2 Plastic Snap-in Hose Grommet 3 4 1-1/2" Hose Clamps
COMMERCIAL STACKED GAS DRYER/WASHER
 COMMERCIAL STACKED GAS DRYER/WASHER MODEL NO. CGT8000XQ0 c 2012 WHIRLPOOL CORPORATION 5 12 Litho In U.S.A. (CMS) (bay) Part No. Rev. H CONTROL PANEL PARTS 2 CONTROL PANEL PARTS 1 Literature Parts W10335467
Heat Exchanger Block Replacement Instructions
 Series 1-4 Gas-fired water boiler Heat Exchanger Block Replacement Instructions Ultra-80 S1-4 Heat Exchanger Block Replacement Kit, Part No. 383-500-773 Ultra-105 S1-4 Heat Exchanger Block Replacement
Norcold Instillation Instructions ARP Yahoo Group DRAFT Norcold General Installation Instructions
 Norcold General Installation Instructions Introduction The following are general instructions for the installation of the ARP control. The refrigerator used as an example is a Norcold N641.3. Most of the
Alternate Energy Technologies PO Box Jacksonville, FL INSTALLATION OPERATION MAINTENANCE MANUAL DX DRAINBACK
 Alternate Energy Technologies PO Box 61326 Jacksonville, FL 32236 904-781-8305 INSTALLATION OPERATION MAINTENANCE MANUAL DX DRAINBACK CONTENTS Introduction Basic Tools and Materials 1. Collector Location
Standard Installation Manual
 Standard Installation Manual READ THIS MANUAL BEFORE INSTALLATION Caution If you plan to install your solar heater system on a roof be sure you are experienced in working on roofs and have the proper safety
COMPACT DRYER GDZ5-1 Training Presentation
 HAIER COMPACT DRYER GDZ5-1 Training Presentation HAIER COMPACT DRYER GDZ5-1 11 lbs. Electric Dryer Stackable Built in Free Standing 4.13cu ft Stainless Steel Drum Dual Temperature Operation Dry Time Selector
Installation and Care Instructions
 Installation and Care Instructions THANK YOU for purchasing a Hunter Douglas product. Your new blind has been custom built for you from the highest quality materials. Once in your window, it will provide
Shay Plumbing IX - Feed Water Pipes
 Shay Plumbing IX - Feed Water Pipes Nelson Riedel Nelson@NelsonsLocomotive.com Initial: 11/28/03 Last Revised: 06/06/2004 Feed Water Pipe Orientation: Photos of a couple of the Cass shays were reviewed
PRODUCT INFORMATION MANUAL SECTION: 3 VERI SHADES VERI SHADES
 VERI SHADES Where innovation meets style and functionality. A contemporary take on a classic window covering, Veri Shades combines the versatility of a vertical blind with the elegant appeal of a soft
INSTALLATION AND OPERATION MANUAL
 F OR I NGROUND P OOLS INSTALLATION AND OPERATION MANUAL How Solar Pool Heating Works Why SunHeater TM Works Best Using your pool pump, water is automatically pumped through the solar collectors. The water
Camaro A/C Install Instructions
 1967-1968 Camaro A/C Install Instructions This kit is designed for the 1967-1968 non A/C equipped Camaro. This kit can be used with or without Astro vents Step One Remove the following factory components:
04 Case studies. Szykula Kitchen
 04 Case studies Szykula Kitchen This is an example of a kitchen in a brand-new home. The home is quite large, over 8,000 sq. ft., so space was not at a premium. The area reserved for the kitchen opened
OP44-1 REV 2: Removed depiction of air intake hole in the CB-907A Right Aft Case Baffle.
 REVISION DESCRIPTION: OP44-1 REV 2: Removed depiction of air intake hole in the CB-907A Right Aft Case Baffle. OP44-4 REV 1: Steps rewritten to describe the air intake hole on the CB-907A Right Aft Case
Vertical Termination Part No: 3CGRVT 16 7/8" 18 Vent Pipe Extension Part No: 3CG18 9 7/8" Wall Hanger Part No: 3CGWH 7 7/8" 7 3/8"
 Corr/Guard Direct Vent Water Heater Vent/Air Intake System Installation and service must be performed by a qualified installer, service agency or the gas supplier. Installation must meet all state and
Installation and Operation Manual For Hunter Ceiling Fans
 Installation and Operation Manual For Hunter Ceiling Fans 1 2 CONGRATULATIONS! Your new Hunter ceiling fan is an addition to your home or office that will provide comfort and performance for many years.
Level 6 Using Physics: Investigate how physics knowledge is used in a technological application.
 WHAT S COOKING WITH SOLAR? TEACHER NOTES Rationale for the Activity The activity enables students to see how scientific concepts are applied in the design and construction of effective technologies, and
Installation Manual. Breeder Control Installation Manual Patented U.S. Patent No. 7,980,129 and Patents Pending
 Breeder Control Installation Manual Patented U.S. Patent No. 7,980,129 and Patents Pending 11/25/2013 Table of Contents Installation Overview... 3 Components... 3 BinTrac Breeder Control... 3 Load Cell
Atmos EasySolar. Installation Instructions for. In-roof and flat roof installation with flat plate collectors
 Atmos EasySolar Installation Instructions for Atmos EasySolar In-roof and flat roof installation with flat plate collectors Atmos Heating Systems West March Daventry Northants, NN11 4SA Tel: 01327 871990
THE BLACK BOX MONITORING AND CONTROL OF SOLAR WATER HEATERS
 THE BLACK BOX MONITORING AND CONTROL OF SOLAR WATER HEATERS This article gives details of the "black box" mentioned in a previous article "Customizing a commercial solar water heater". The device is basically
INSTALLATION INSTRUCTIONS UNDERCOUNTER DISHWASHERS
 INSTALLATION INSTRUCTIONS UNDERCOUNTER DISHWASHERS VIKING 111 Front Street Greenwood, Mississippi 38930 USA (662) 455-1200 IMPORTANT - PLEASE READ AND FOLLOW Before beginning - please read these instructions
Adding a Cooling Fan to The Big Red Pig (BRP)
") Adding a Cooling Fan to The Big Red Pig (BRP) As many XR650R owners are aware, the bike comes from the factory very restricted in terms of jetting and airflow. This needs to be corrected both for proper
Adding a Cooling Fan to The Big Red Pig (BRP) As many XR650R owners are aware, the bike comes from the factory very restricted in terms of jetting and airflow. This needs to be corrected both for proper
5"x 8" DIRECT VENT INSTALLATION INSTRUCTIONS FOR DECORATIVE GAS APPLIANCES AND DIRECT VENT HEATERS APPLICATION
 5"x 8" DIRECT VENT INSTALLATION INSTRUCTIONS FOR DECORATIVE GAS APPLIANCES AND DIRECT VENT HEATERS APPLICATION These instructions apply to the Simpson Dura-Vent 5"x 8" Direct Vent System. This venting
INSTALLATION MANUAL GEO-BOOST GROUND LOOP HEAT EXCHANGER
 1103 N HIGH CROSS RD URBANA, IL 61802 1-773-492-1893 INSTALLATION MANUAL GEO-BOOST GROUND LOOP HEAT EXCHANGER REV 1.0 The Geo-Boost system consists of the Geo-Boost heat exchanger and a relay controller
Geothermal Energy Nutrient Reservoir & Trench cooling System
 Geothermal Energy Nutrient Reservoir & Trench cooling System The Reservoir and Trench portions of this design can be used separately but work better when combined. Geothermal Energy is free energy. Meaning
BR342 Ducted Installation Instructions Australian Version Electronic Wall Control
 Australian Version Electronic Wall Control 1 Introduction The BR342 reverse cycle rooftop air-conditioner is designed for installation onto Recreational Vehicles (RV s) at the time of manufacture or as