GENESIS TM ULTRASONIC GENERATORS 25 khz, 40 khz, and 68 khz
|
|
|
- Posy Washington
- 6 years ago
- Views:
Transcription

1 INSTRUCTION MANUAL IM GENESIS TM ULTRASONIC GENERATORS 25 khz, 40 khz, and 68 khz ULTRASONIC CLEANING TANKS with instructions for all standard options IMMERSIBLE TRANSDUCERS standard and bulkhead models Scotch Road at Mercer County Airport P.O. Box 7266, Trenton, New Jersey U.S.A CREST ULTRASONICS
2 TABLE OF CONTENTS PREFACE: The Scope of This Manual 5 SECTION 1: Ultrasonic Cleaning 6 1.a Ultrasonic Energy 6 1.b De-gassing 6 1.c Frequency 6 1.d Transducers 6 1.e Cleaning Chemistry 7 SECTION 2: Equipment Versatility 8 2.a Equipment Line 8 2.b Reliability is Built-in 8 2.c Two Modes of Degassing Modulation 9 SECTION 3: Product Descriptions 10 3.a Transducer Modules 10 3.b Plug-in Generator Modules 10 - Product Design 10 - Power and Grounding Requirements 10 - Potentiometers 11 - Generator Classification 11 - Controls (Standard) 12 Figure 1: Generator Front Panel 12 Figure 2: Generator Rear Panel 13 - Controls (Optional) 13 Duty Cycle PIC (Power Intensity Control) 13 Frequency Control 14 Wattmeter 14 Single Channel Network 14 Three-Channel Network 15 - Electrical Design Details 15 Logic Board 15 Power Board 15 Back Panel 16 Jumper 16 Multiple Generator Systems 16 Transformer 16 Publication Number IM
3 TABLE OF CONTENTS Ease of Maintenance 16 Radio Frequency Interference (RFI) Suppression 17 Sweep Frequency 17 3.c Transducerized Tanks Description 17 - Construction 17 - Coaxial Cables 17 - Heated Tanks 18 3.d Tank Accessories 19 - Recirculating Filter System 19 - Low Liquid Level Safety 20 - Tank Covers and Rinse Tanks 21 - Workbasket and Drain Valves 21 WARNING REGARDING FLAMMABLE AND COMBUSTIBLE CHEMICALS 22 - Water Jacket and Condensing Collar 22 - Sealed Skirt with Nitrogen Purge Fittings 23 - Heat Exchanger 23 - Hinged Cover with Fusible Link 23 3.e Radiating Diaphragm - Minimum Erosion Feature 24 3.f Immersible Transducers 25 SECTION 4: Operating Instructions 27 4.a Tanks and Generators 27 4.b Immersible Transducers and Generators 29 4.c Bulkhead Models Type EB, BB, and DBB 30 4.d Special Options - Tanks 31 SECTION 5: Routine Maintenance 32 Figure 3: Generator Chassis Module with Case Removed (Interior) 33 SECTION 6: Troubleshooting 34 6.a Foil Testing (an indicator of ultrasonic activity) 34 3
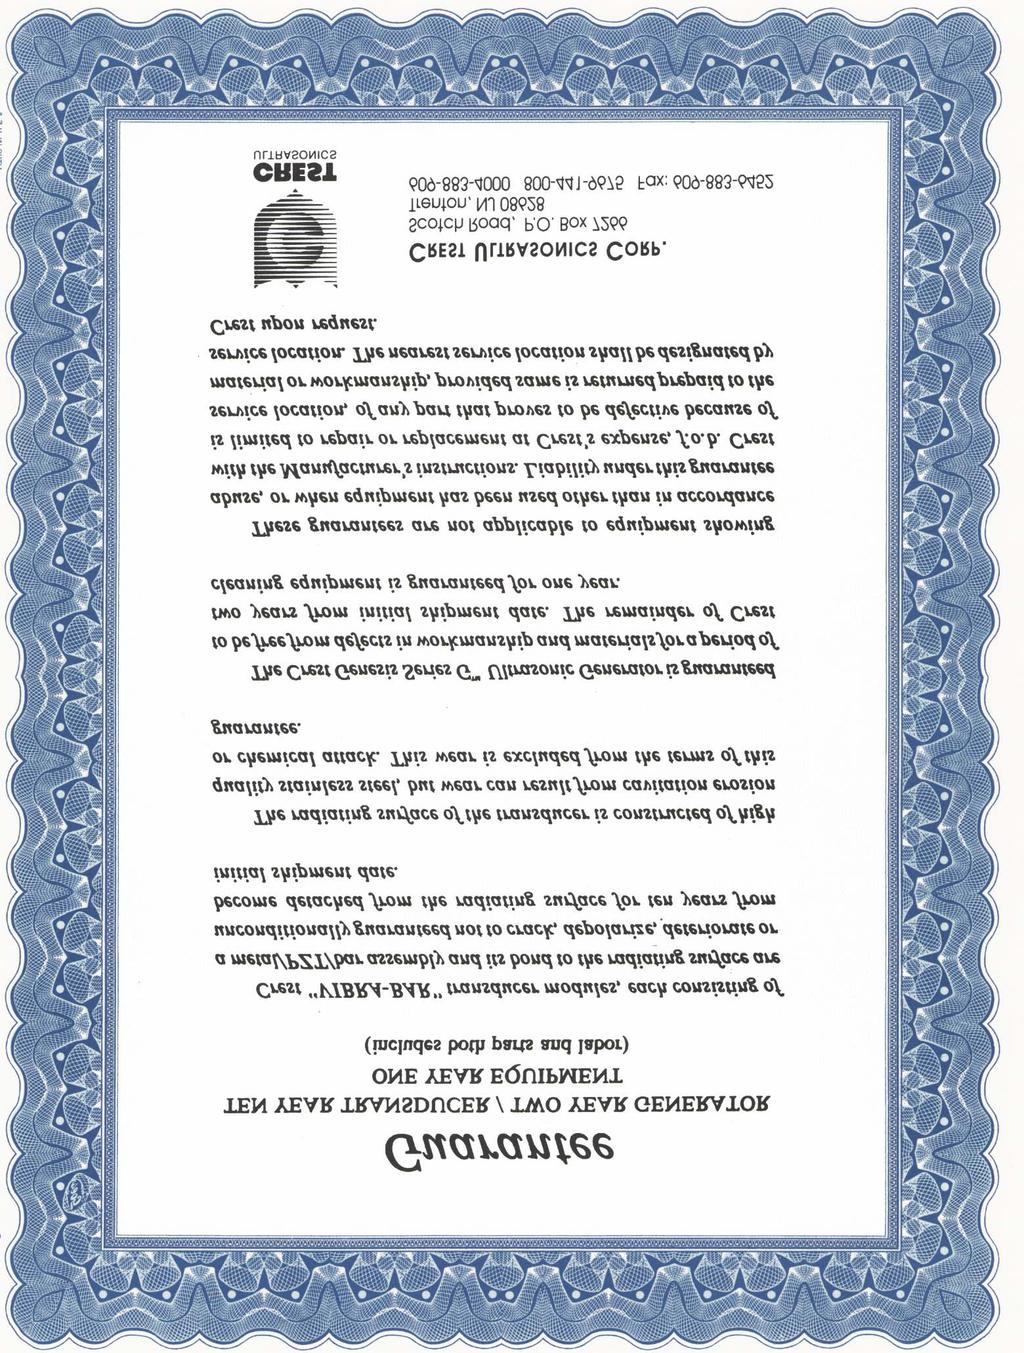
4 TABLE OF CONTENTS 6.b Correcting Problems 35 - No activity in tank; no lamp indication; fan not running 35 - Low activity in tank 36 - Fuse blows 36 - No output from generators 36 - Contacting the Crest Generator Service Department 37 6c. Other Types of Troubleshooting 37 - Transducer Wiring 37 - Drain clog 38 - Defective heating 38 - Low power 38 - Replacing a stack component. 39 REFERENCE Warranty Spare Parts Lists Engineering Drawings - Upper and Lower PC Boards (Generators) - Electrical Schematics for 4HT Heated Tanks - Immersible Transducer Junction Box Assembly - Wiring Conduit and Purging Installation (Typical) for CLASS 1, DIV 1 Applications 4
5 PREFACE: THE SCOPE OF THIS MANUAL This manual provides product descriptions, operating instructions, maintenance recommendations and troubleshooting procedures for the following products: Crest Ultrasonics GENESIS TM generators; Crest Ultrasonics transducerized cleaning tanks; Crest Ultrasonics immersible transducers. Due to our constant efforts to build a better product, changes are made from time to time to our generators. These changes may not be reflected in this instruction manual. Therefore, when ordering replacement parts, please tell us the generator model number, serial number, and voltage, which may be found on a label at the rear of the generator chassis. You should also refer to the circuit board part number (with revision notation) and serial number, which are printed on the circuit board. Serial Numbers: When communicating with Crest about transducerized tanks, please reference the serial numbers of the tank and generator(s) shown on the metal identification plates. Most serial numbers will have the following type of numeric configuration: XXXX-T-YYYY (example). Important Notice About Your Cleaning Equipment If you have purchased Crest ultrasonic cleaning equipment which utilizes cable lengths greater than 20 feet between the generator(s) and transducers, you will need a capacitance compensation package. If such a package is not part of your current order, please contact the Crest Sales Department ( ) or your local Crest representative for a quotation. 5
6 SECTION 1: ULTRASONIC CLEANING 1.a Ultrasonic Energy Ultrasonic energy exists in a liquid as alternative rarefactions and compressions of the liquid. During rarefaction, small vacuum cavities are formed which implode (i.e., collapse) during compression. This rapid and continuing process is called cavitation. Cavitation is responsible for the scrubbing effect that is characteristic of ultrasonic cleaning. Three primary factors affect the ultrasonic scrubbing action: 1) the degree of de-gassing; 2) the ultrasonic frequency; 3) the chemical characteristics of the liquid at specific temperatures; and 4) nature of the contaminant and substrates. 1.b Degassing Degassing is the removal of unwanted dissolved gas from the liquid. As the cavities form, they fill with unwanted air which appears as bubbles. These resist collapse and tend to remain suspended in the liquid, serving as shock absorbers which can reduce cleaning efficiency. The amount of air in the tank liquid can be reduced by switching off or modulating the sound energy to permit adjacent bubbles to coalesce, float to the surface, and escape. The type of modulation is important, for the correct balance between de-gassing and cleaning efficiency must be determined for each application. (For more information about de-gassing modulation, see page 8.) 1.c Frequency Frequency affects cleaning efficiency by influencing the cavitation. Low frequencies such as 25 khz generate large but relatively fewer cavitations that have forceful implosions, resulting in high cleaning power. Higher frequencies generate a great number of small cavitations with good penetrating capability. Selection of the correct frequency is an important consideration in achieving optimum parts cleaning. 1.d Transducers Ultrasonic energy is transmitted to a liquid by means of transducers that convert electrical energy to acoustic energy. These transducers are similar in function to a radio speaker except that they operate at ultrasonic frequencies and transmit acoustic energy to a liquid rather than to air. 6
7 SECTION 1: ULTRASONIC CLEANING Transducers are typically bonded to the underside and/or vertical sides of the cleaning tank. For reliability, transducer modules are distributed over the tank bottom and/or walls(s) rather than having a single transducer in the center. For some applications, transducers may be encased in stainless steel housings for immersion in a liquid. These are known as immersible transducers. Transducers are energized by an electronic generator. The generator transforms the energy from the electrical supply into a suitable form for efficiently energizing the transducers at the desired frequencies. The number of transducers and generators is determined by tank size and process requirements. 1.e Cleaning Chemistry The use of ultrasonic energy increases the action of most chemicals and provides a scrubbing action for removal of particulate matter and other insoluble contaminants. To optimize the cleaning process, the appropriate chemical solution must be used. Crest maintains an Applications Laboratory with a Class 100 clean room to assist you in decisions about cleaning chemistry. Here, new cleaning techniques can be investigated using customers actual parts. This service does not end once equipment has been purchased, but is available both for new applications and for changes that may occur in an existing process. If you have any questions pertaining to cleaning chemistry, you may contact the Crest Applications Laboratory, located at Crest s main facility at Scotch Rd., Mercer County Airport, Trenton, New Jersey, (609)
8 SECTION 2: EQUIPMENT VERSATILITY 2.a Equipment Line General: The Crest Ultrasonics product line includes transducerized tanks, immersible transducers, ultrasonic vapor degreasers, aqueous cleaning consoles, semi-aqueous cleaning consoles, custom automated precision cleaning systems and a wide range of auxiliary equipment related to ultrasonic cleaning. Consoles: Consoles and automated systems are complete systems where the required tanks, plumbing, wiring, and integral accessories are constructed within one or more console (cabineted) units. Generators may be incorporated in the unit or remotely located. A console control enclosure and certain auxiliaries may also be remotely located. Immersible Transducers: Immersible transducers are typically utilized within existing tank installations where application flexibility is required. Vapor Degreasers: The vapor degreaser line is for applications using solvents, to provide continuous distillation combined with cleaning, rinsing, and in some cases drying in a single system. Automation: Crest also has complete facilities for design and fabrication of systems with automated materials handling capability, using a variety of stateof-the art automation control systems. In some systems, console functions are interfaced to the automation control. One-Source Reliability: Crest Ultrasonics facilities provide one source for all phases of industrial ultrasonic cleaning from simple ultrasonic cleaning tanks to the most sophisticated automated systems. All of these products have been designed and developed by Crest engineers and are manufactured exclusively by Crest. 2.b Reliability is Built-in Crest manufactures ultrasonic equipment to fulfill a very broad spectrum of performance requirements dictated by various cleaning applications. Uniform and Thorough Cleaning: The versatile performance of Crest equipment results, in part, from the simultaneous presence of a wide range of ultrasonic frequencies within the cleaning chamber. The higher frequencies, with their greater penetrating capability, initiate the cleaning by loosening soils in difficult-to-access areas, such as tapped holes and undercuts. This allows the heavy duty lower frequencies to complete the cleaning operation quickly and thoroughly. The presence of many frequencies also reduces the probability of 8
9 SECTION 2: EQUIPMENT VERSATILITY damage to sensitive parts, as it avoids the single strong resonance found in conventional ultrasonic tanks. The cooperating effect of many frequencies insures constantly uniform and thorough cleaning. High Efficiency: Crest Ultrasonics has developed and holds the U.S. and international patents on the technology of enhancing transducer stacks with high-tech ceramics. An impressive and growing body of research data indicates that the inclusion of high-tech ceramic material in the stacking of an ultrasonic transducer module greatly increases efficiency, so that there is less heat build-up and more cleaning energy in the tank. Uniform Energy Distribution: Another important Crest advantage is the elimination of undesirable standing wave patterns, which are always present in conventional single frequency ultrasonic cleaners. Because of the coexistence of frequencies with many different wave lengths, Crest units provide extremely uniform energy distribution throughout the entire fluid volume. Hot Spots Eliminated: The elimination of standing waves is further enhanced by a frequency sweep. For example, the sweep circuit changes the ultrasonic 40 khz rated frequency between 38 to 42 khz at an adjustable repetition rate of 30 Hz to 1000 Hz. Hot spots (high intensity areas) will be reduced or completely dispersed. 2.c Two Modes of Degassing Modulation Only Crest designs offer the versatility of two modes of degassing modulation to insure continuous removal of unwanted air from cavitating liquids under various conditions. Air that is normally present in the liquid plus air that is continually introduced as work is placed into the tank may seriously reduce the cleaning action. Effective degassing is essential for efficient cleaning. It is best accomplished by repetitively switching off or modulating the sound energy. The modulation time duration must be chosen to provide a balance between continuous degassing and cleaning power. It is impossible to predict the correct modulation for each cleaning job because of variations in the tank loading conditions, nature of the soil, and characteristics of the liquid. Experience shows that two modes of modulation are required to obtain good cleaning over a wide range of cleaning applications. All Crest generators have two modes of degassing modulation full wave and half wave. Selection is by means of a toggle switch on the rear panel of the generator. (See Figure 2.) 9
10 SECTION 3: PRODUCT DESCRIPTIONS Introduction: The fundamental reliability of the Crest product line is, in part, the result of superior design and construction of the transducer modules and plug-in generator modules. These standard components are used throughout the entire line, thereby eliminating one time, untried designs. Production tooling and facilities have been engineered to insure consistent product quality control. Spreading out from the standard module base are system designs and fabrication that are the result of years of specific field experience in ultrasonic cleaning applications. 3.a Transducer Modules The heart of Crest technology is the design of uniquely constructed transducer modules that are specifically configured for optimal operation at the dominant frequencies of 25 khz, 40 khz, and 68 khz, as well as various high frequency levels. Each module design incorporates Crest s patented high-tech ceramic transducer enhancement which delivers significantly greater efficiency, reliability and durability than non-ceramic designs. Other proprietary features, developed over four decades of continuous research at Crest, make our transducer designs the best in the world for an extremely broad range of applications in industrial, biomedical and specialty fields. 3.b Plug-in Generator Modules Product Design: A generator module consists of a narrow profile cabinet and a plug-in chassis. The cabinet has four rubber feet, a carrying handle, and an eight-pin connector receptacle to which is attached the line cord. At the front of the cabinet are two receptacles to receive the captive fasteners which hold the Plug-In chassis module. Metal brackets at the rear of the cabinet and the rear of the chassis module provide a convenient area for storing the line cord when the chassis is in the cabinet. Access to the eight-pin connector receptacle is gained by removing the four screws holding the angled metal cover at the rear of the cabinet. Power and Grounding Requirements: The power cord from the cabinet has a conventional three-prong plug. The generator must be grounded through a third prong of the power cord or by use of a conventional grounding lug adapter. Generators are available for operation at nominal voltages of 100, 120, 200, 208, 220, 230 or 240; 50/60 Hz; single phase A.C. current. 10
11 SECTION 3: PRODUCT DESCRIPTIONS Potentiometers: The level of output power delivered to the transducers is adjustable by a trim potentiometer mounted on one of the generator circuit boards. This adjustment changes the peak amplitude of the power delivered to the load, but it does not change the duty cycle as a power intensity control would. It is particularly useful when power reduction is necessary to protect fragile items during cleaning. The frequency of the power delivered to the load is also adjustable by a trim potentiometer on one of the generator circuit boards. The factory set frequency of 68 khz, 40 khz, or 25 khz may be changed to eliminate standing waves in the cleaning solution or to minimize resonances in the structure of the cleaning system. These two adjustments are factory calibration procedures which should not be performed without adequate instrumentation and technical assistance from the factory. (For location of potentiometers, see Figure 3.) Generator Classification: As noted above, Crest generators are available in three frequency ranges as follows. Model Prefix 2G 4G 6G Frequency Range khz khz khz The next series of digits in the model number on the rear nameplate of each module indicates the nominal average output of the module: 250 = 250 watts 500 = 500 watts The last digit in each model number correlates to the number of transducer modules energized by the generator module. The schematic drawings for these modules are included in this manual. (See REFERENCE. ) Schematic designations referred to in the following paragraphs are taken from those drawings. NOTE: All generator system are built-up from the two basic Plug-In chassis modules of 250 watts and 500 watts. All cabinets are mechanically connected. Each of the three modules may be independently turned off or on by the switch, S2, on each chassis module front panel. 11
: The adjustable output power intensity control (amplitude) is also located on the front panel.")
12 SECTION 3: PRODUCT DESCRIPTIONS Controls (Standard) ON/OFF: On the front panel is the On/Off switch with integral pilot light. ADJUSTABLE OUTPUT POWER INTENSITY CONTROL (AMPLITUDE): The adjustable output power intensity control (amplitude) is also located on the front panel. This control may be turned fully clockwise for full output power. Amplitude type PIC keeps the generator running non-stop over each half cycle of the line frequency, and the ultrasonic energy is controlled by adjusting the amplitude. The range of adjustment is about 50W to maximum (maximum being the power level to which the generator was factory adjusted). Duty cycle PIC is also available as an option, see below. ADJUSTABLE OUTPUT POWER INTENSITY CONTROL DIGITAL WATTMETER (OPTIONAL FEATURE) ON/OFF SWITCH WITH INTEGRAL PILOT LIGHT Figure 1: Genesis TM ultrasonic generator (front) with adjustable output power intensity control and optional digital wattmeter. 12
13 SECTION 3: PRODUCT DESCRIPTIONS GENERATOR WITH OPTIONAL DE-9 PORT (THREE-CHANNEL/ ONE-CHANNEL) ALLOWS INTERFACE WITH EXTERNAL CONTROLS OR MONITORING DEVICES COAXIAL CABLE CONNECTION DE-GASSING MODULATION SELECTOR TOGGLE SWITCH WITH HI AND LO POSITIONS FUSE CABLE TO ELECTRICAL POWER SOURCE COAXIAL CABLE TO ULTRASONIC TRANSDUCERS Figure 2: Genesis TM ultrasonic generator (rear) with optional DE-9 port for interchangeable 3-channel/1-channel network operation. DE-GASSING MODULATION SELECTOR TOGGLE SWITCH (on rear panel of generator): The Hi position of the modulation toggle switch selects fullwave modulation. The Lo position is half-wave modulation. Halfwave may be required for degassing some solutions. Experience indicates that the two modes of degassing modulation are required to obtain the correct balance between degassing and cleaning, under the broad range of cleaning conditions that can be encountered. Controls (Optional) Duty Cycle PIC (Power Intensity Control) controls the amount of ultrasonic energy delivered into the cleaning solution every half cycle of the input line frequency. At the beginning of each half cycle the generator starts producing ultrasonic energy. The PIC can shut down the generator from about 1 millisecond after the start-up to the completion of the half cycle. The 13
14 SECTION 3: PRODUCT DESCRIPTIONS generator therefore delivers blasts of energy lasting from 1 millisecond to the complete half cycle, the amount being adjustable by the PIC control. One millisecond represents about 50W, and the complete half cycle the maximum ultrasonic energy. Frequency Control: The user may adjust the frequency of the ultrasonic energy about + 1 around the factory-set center frequency of 68 khz, 40 khz or 25 khz. This adjustment lets the user tune out unwanted audible noise present as a sub-harmonic resonance of some sheet metal parts of the ultrasonic tank. The frequency adjustment should be used only in conjunction with input and output wattmeters and frequency meter because some ultrasonic tanks may present an unfavorable operating condition at a frequency other than the factory set 68 khz, 40 khz or 25 khz. This unfavorable operating frequency will show up as a difference between the input power and the output power. If this difference is 100W or more, change the frequency until the difference is at its minimum. Wattmeter: An optional true RMS wattmeter is available which directly measures the ultrasonic energy being fed into the transducers of the tank. This power is digitally displayed. In conjunction with a PIC (Power Intensity Control), it lets the user accurately set the exact energy level, so that cleaning operations can be precisely duplicated. Also, if some transducers get damaged during operation, the wattmeter would indicate reduced output power, alerting the user that the system is not operating properly, which otherwise would be hard to detect. Single Channel Network: This option lets the user remotely control the cleaning process from up to 250 feet away (consult factory for longer lengths). The generator has the true RMS wattmeter built in without the display. Instead a DC voltage is brought out through a DE9 connector at the rear of the generator. This 0-5VDC voltage represents a 0-500W true RMS watts. Also, a remote Duty Cycle Type PIC (optional) or Amplitude PIC (optional) is incorporated to let the user adjust the output power (ultrasonic energy) remotely by a 0-10VDC signal and up to 250 feet away through the same DE9 connector. A computer can be used to provide the 0-10VDC signal for controlling the output power from the generator from about 50W to the maximum. At the same time the output power from the generator can be read on the 0-5VDC line representing 0-500W output. This arrangement enables a cleaning process to be remotely controlled and/or to be controlled by a computer. If manual remote control is preferred, a 1K ohm potentiometer remotely locat- 14
15 SECTION 3: PRODUCT DESCRIPTIONS ed will provide the proper signal to change the generator output power from 50W to maximum. A remote display which can read the 0-5VDC feedback signal will provide the user with 0-500W remote power indication. Three-Channel Network: With this option, both Duty Cycle Type PIC and Amplitude Type PIC can be controlled remotely by a 0-10VDC signal. For example, on the 40 khz generator, Duty Cycle and Amplitude PICs are adjustable from about 50W to maximum by the 0-10VDC input signal. Two feedback signals are provided: one 0-5VDC represents 0-500W output power; and the second represents output frequency as 2.3V to 2.7VDC on a 25 khz system, 3.8VDC to 4.2VDC on a 40 khz system, or 6.7 VDC to 7 VDC on a 68 khz system. All the signal input and output connections are made through one DE9 connector at the rear of the generator. The remote controls can be up to 250 feet (consult factory for longer length) away from the cleaning area and can be controlled manually or by computer. For computer control, the computer is programmed to control all the cleaning processes automatically. In the manual control, three 10K ohm potentiometers in a remote location are connected to the DE9 connector to control all three parameters, Duty Cycle PIC, Amplitude PIC, and Frequency Control. For example, for the 40 khz generator, two 0-5VDC displays are required to monitor the output power at the remote location, 0-5VDC representing a 0-500W output power and 3.8 to 4.2VDC representing the 38 khz to 42 khz frequency. Other Electrical Design Details Logic Board: The 120 volts A.C. nominal line voltage is applied to filters FL1 and FL2. The filters are used to insure that the generator complies with FCC conducted interference specifications over a wide frequency spectrum. Power is then applied to auto transformer T5 (optional) which allows operation from 100, 120, 200, 208, 220, and 240 nominal line voltages, as selected by transformer tap connections. The input voltage is then applied to the lower (logic) board of the generator assembly. The function of the logic board is to generate and control the frequency of the power delivered to the transducers. The logic board also holds the output transformer. (See Figure 3.) Power Board: The upper (power) board of the generator assembly contains the high power output transistors used to drive the output transformer. The power board also contains smaller transistors used as drives for the output transistors as well as the feedback network used to maintain constant output power. Due to the proprietary nature of the Crest generator design (Patent #4, ), 15
16 SECTION 3: PRODUCT DESCRIPTIONS limited service may be performed in the field. If trouble occurs, either the power or logic boards may be replaced. Please refer to the troubleshooting section of this manual for more details. (See Figure 3.) Back Panel: On the module back panel is the generator RF output MHV connector receptacle (J2) and the fuse (F1). The coaxial cable from the transducerized tank or immersible transducer connects to the MHV receptacle (J2) by means of a mating quarter-turn connector. (See Figure 2.) Jumper: Each generator module has an internal jumper that selects which half of the A.C. line power the generator will run on when half-wave operation is selected. Multiple Generator Systems: In all multiple generator systems, an equal number of odd and even jumper generators are installed when possible. On installation, each bank of generators is also equally odd and even jumper when possible. While this does not affect the operation of the cleaning system, it does provide for a better load balance on the power line that could otherwise cause problems for other equipment on that line. Transformer: Each generator supplied for stand-alone non-patient hospital use with a drop-in transducerized tank is fitted with an isolation transformer mounted within the generator module. This transformer enables the generator to meet current leakage requirements for sensitive care areas as established by the Association for the Advancement of Medical Instruments (AAMI) at the date of manufacture. These units are also UL and CSA certified. Generators installed in hospital console units are not equipped with this transformer, as the console itself has an internal isolation transformer to assure system compliance with AAMI standards. Ease of Maintenance: Crest designs have been engineered for reliability plus rapid and simplified field maintenance/repair. Access to the generator chassis is obtained by two captive fasteners which permit the chassis to be removed from the cabinet. Replacement of the upper and lower circuit board subassemblies can be carried out without a soldering iron. Replacement parts may be ordered from Crest Ultrasonics. For other repair procedures, please contact the Generator Service Department at Crest Ultrasonics Corporation to determine if the generator must be returned to the factory or if the difficulty can be remedied on a field repair basis. (See page 35 for address and phone number of the Crest Generator Service Department.) 16
17 SECTION 3: PRODUCT DESCRIPTIONS Radio Frequency Interference (RFI) Suppression: Generator modules Model 4G and Model 4G supplied by Crest are fitted with radio frequency interference (RFI) suppression devices in compliance with Federal Communications Commission Rules and Regulations Sections to 18.84, Subpart C of Part 18. The RFI filter is located in the bottom portion of the generator module under the main chassis. WARNING: It is extremely important that the electrical service to the equipment provides a complete electrical ground. This assures RFI suppression and protection against electrical shock. Sweep Frequency: Sweep frequency is useful because it tends to break up any standing waves in the ultrasonic tank to produce a very uniform cleaning environment. The fundamental 68 khz, 40 khz, or 25 khz are swept + 1 khz around the center frequency. The repetition rate of the sweep is either front panel adjustable from 30 to 1000 cycles per second, or factory-set to any repetition rate between 30 and 1000 cycles per second. 3.c Transducerized Tanks Description Construction: The transducerized tanks in Series NT and HT contain groups of acoustic couplers which are permanently bonded to the tank bottom by means of high temperature bonding cured at 325 F. Access to the transducers is obtained by removing the bottom panel. Each tank is constructed with a double wall. The inner tank is 316L stainless steel to provide chemical corrosion resistance. The outer wall or skirt is constructed of 304 stainless steel with a grained finish. All inner surfaces of the tank are bright annealed to minimize cavitation erosion, and optional coating materials such as titanium nitride may be applied for additional protection. The bottom is sloped in one direction toward the drain to provide ease of emptying. The drain consists of a 300 series stainless steel elbow and nipple with a plastic end cap. A conventional drain valve may be installed on the nipple. A 300 series stainless steel fill port is provided near the top of the tank. This may be plumbed to the inlet water supply or connected for use with an optional filtration system. A 1 mounting flange of 316L stainless steel is built into the tank for flush table-top mounting where required. Coaxial Cables: The energizing RF voltage from the generator is obtained through the built-in flexible coaxial cables. The following table lists the number of acoustic couplers and coaxial cables for each tank model. 17
18 SECTION 3: PRODUCT DESCRIPTIONS TANK MODEL # of ACOUSTIC COAXIAL CABLES* (4HT or 4NT) COUPLERS Gray Black & & , 6, 6 & * The coaxial cable color-coded black is for 500 watts. The gray-coded cable is for 250 watts. No single coaxial cable carries more than 500 watts. Heated Tanks: For the heated tanks, Series HT, refer to Reference which contains the schematic drawing. The heaters of the Model 4HT-710 and Model 4HT-1014 operate from a 120 volt input, while the larger heaters on Models 4HT-1218, 4HT-1622, and 4HT-1826 require 208/240 volt, single phase input. The correct voltage and amperage are indicated on the nameplate of the tank. The tank heater cord is attached to the tank. Pilot light 1-LT and thermostat 1-TH are built into the outer tank skirt. When the heater cord is plugged into the wall and thermostat switch 1-TH is turned On, the pilot light 1-LT will glow, indicating heat is on. When the thermostat is set for a temperature above the liquid temperature in the tank, the strip heaters located on the outside wall of the inner tank near the bottom will be energized. This condition is indicated by the amber pilot light coming on. Once set at the desired temperature, the thermostat will maintain the liquid temperature within a few degrees by periodically cycling the strip heaters On and Off as required. The set point for the thermostat is at 12:00, at the top of the control. Models 4HT-710 and 4HT-1014 use 500 watt strip heaters. Models 4HT-1218, 4HT-1622, 4HT-1524, and 4HT-1826 use 1000 watt strip heaters. Access to the heater network is obtained by removing the side and bottom panels. CAUTION: Do not operate heaters without liquid in the tank. When heaters are on, the liquid should always be greater than 5 in depth in order to cover the strip heaters completely. If the liquid level is lower than 18
19 SECTION 3: PRODUCT DESCRIPTIONS 5, the life of the heaters will be reduced and the tank may be damaged. For unheated tanks, any liquid depth of 1-1/2 or more may be used as long as the parts to be cleaned are fully immersed. CAUTION: Do not operate ultrasonics without liquid in the tank. Transducer modules may withstand being energized without liquid in the tank for a short period of time, but this condition is NOT RECOMMENDED and should be avoided. With no liquid in the tank, the vibrational energy remains in the transducers, causing them to increase in temperature. This build-up of temperature in the transducers may depolarize the transducers, making them inoperative and nullifying the ten-year guarantee. The depolarization will also increase dissipation in the generator, and the generator may fail due to high internal heat. 3.d Tank Accessories Recirculating Filter System: In many cleaning applications it is necessary to filter the cleaning solution continuously while the parts are being ultrasonically cleaned. This requirement occurs when the cleanliness of the parts is critical, or when the ultrasonically-removed contaminants would re-contaminate the parts if left in the bath. Crest s Simultaneous Multi-Frequency permits continuous recirculation and filtration without any reduction in cleaning efficiency. Each filter system consists of a pump, filter housing, pressure gauge, appropriate flow control valve, and associated electrical hardware and plumbing. All of these items are mounted on a convenient frame. The inlet to the pump makes connection with the drain in the tank. The outlet of the filter makes connection with the fill port on the tank. A recirculation system may be purchased after the tank and field-retrofitted to the cleaning process. The pump motor is available for input of 120 volt or 240 volt single phase. Other voltages are available upon request. Two systems are available with the following maximum flow rates: Model Number Maximum Flow Rate Filters PF-5 5 GPM 1 PF GPM 2 The main difference between the systems is the flow rate, as shown in the preceding table. 19
20 SECTION 3: PRODUCT DESCRIPTIONS All filter housings are for the standard 10 length filter cartridge. Each filter housing has a single cover nut for ease in changing the filter element. Each system has a pressure gauge to help determine when the filter element should be replaced. Appropriate flow control is provided for adjusting the rate of recirculation to meet various application requirements. Both systems are available in either stainless steel or brass/copper construction. Replaceable 10 length filter cartridges are available for a wide range of nominal micron ratings. Absolute filter cartridges are also available. Recirculation System Operating Instructions 1. Connect the pump inlet to the drain on the tank. 2. Connect the outlet of the filter housing to the fill port of the tank. 3. Insert a filter cartridge in the filter housing by taking off the housing cover. In replacing the housing cover, be certain that the gasket between the filter housing and the head is properly seated. 4. Turn the flow valve to full open. 5. Plug the motor cord of the pump into the appropriate electrical outlet. 6. Fill the tank with desired solution. Be certain solution is compatible with recirculation plumbing and pump seals. Consult with Crest s application engineers if any doubt exists. 7. Turn on pump and adjust flow rate to minimize turbulence in the tank. When you initially operate the system or after you change a filter, the pump may become air-locked due to entrapped air. Turning the motor switch on and off several times will usually overcome this air-lock. Ultrasonics may be run at the same time. As a general rule the slower the flow rate of the recirculation system, the better the cavitation action from the ultrasonics. As the filter becomes full, the pressure indicated on the pressure gauge will increase. Experience will indicate the gauge reading at which a filter cartridge change should be made. Low Liquid Level Safety: Interconnecting wiring and conduit to be provided by customer, in accordance with specifications on your electrical schematic and all applicable codes. Theory of operation: Sensor will signal an interrupt to the ultrasonics, pump 20
21 SECTION 3: PRODUCT DESCRIPTIONS and/or heat if liquid level drops below the sensor level. To restore ultrasonic, pump, and/or heat function, add liquid to tank to a level above the sensor. Tank Covers and Rinse Tanks: Accessories for the tanks include stainless steel covers and matching rinse tanks without transducers. The covers are desirable for minimizing solution evaporation, lowering noise level, or preventing airborne dirt from falling into the tank. The rinse tanks may be identical to the ultrasonic tanks except transducers are omitted. (Transducers could be factory attached at a later date if it is deemed necessary to have an ultrasonic rinse.) Similar to the cleaning tanks, the rinse tanks are constructed of an inner tank of 316L stainless steel with outer walls of 300 series stainless steel. The bottom is sloped in one direction to the drain for ease of cleaning. The drain consists of a 300 series stainless steel elbow with plastic end cap. A 300 series stainless steel fill port is near the top of the tank. This provides for a convenient connection to inlet water or for an optional filtration system. A 1 mounting flange of 316L stainless steel is built into the tank for flush table-top mounting where required. Thermostatically controlled heaters are available on the rinse tanks to provide a practical means of maintaining the rinse solution at a prescribed temperature. Workbasket and Drain Valves: Stainless steel workbaskets are available for all tanks. All-mesh baskets are usually used for large parts which will not fall through the perforations, while solid bottom baskets are used for very small parts. In many cleaning applications, the parts to be cleaned are held in specially-designed fixtures or boats. Crest s application engineers should be consulted for assistance in these designs. Ball-type drain valves for the tanks are available in brass and stainless steel. However, a standard plumbing valve will fit the nipple supplied with the tank. 21
22 SECTION 3: PRODUCT DESCRIPTIONS WARNING: You should not use flammable or combustible chemicals in a Crest ultrasonic cleaning tank unless it is equipped with safety features for that type of processing. Among the safety features used for such processing are those listed below. You must consult with the Crest Sales Department to determine the proper safety features required for the type of processing chemicals you plan to use. DANGER: When using volatile chemicals for ultrasonic cleaning, you must not allow the temperature of the liquid in the tank to be greater than 50 F below the flashpoint for the chemical. Water Jacket and Condensing Collar: Water jackets are available for cooling the solution, and condensing collars are available for minimizing solvent loss. These accessories are similar except for their location on the tank. The water jacket is located below the solution depth, while the condensing collar is located at the top of the tank. They consist of a welded stainless steel channel on the outside of the tank wall which carries cooling water along the walls of the tank. Since they are welded to the tank, they must be specified at the time of tank purchase. They incorporate a threaded water inlet and outlet and will withstand a maximum water inlet pressure of 10 psi. The water outlet should go to an open drain or reservoir. The water flow rate requirement is approximately 1/4 gpm. The inlet water temperature should be 70 F or less. The location of the cooling jacket should be specified at the time of purchase. Water Jackets and Condensing Collars Operating Instructions Water should be plumbed into the lower of the two threaded ports. An open drain connection or reservoir should be supplied for the other port. DANGER WARNING: If your process is specially designed for the use of flammable or combustible chemicals, you must precisely follow instructions provided by the chemical manufacturer with regard to temperature and other environmental and personal safety controls. Chemical handling instructions should be posted on or near the cleaning machinery. 22
23 SECTION 3: PRODUCT DESCRIPTIONS DANGER WARNING: If your process requires the use of flammable or combustible chemicals, you should have emergency procedures posted near the cleaning equipment so that personnel can react appropriately in the event of a fire. Personnel should be trained in advance to carry out safety procedures and emergency responses. Sealed skirt with nitrogen purge fittings: This feature enables positive low-pressure purging capability to prohibit entry of combustible vapors into the transducer compartment during processing. It also helps prevent the accumulation of a potentially combustible atmosphere by continually replacing ambient gases with a non-combustible atmosphere. The key to successful installation and use of this safety feature is drawing #10D99-823, which is provided with this manual. (See REFERENCE. ) Inlet and outlet connections must be made by the customer, with control logic as stated in this drawing. NOTE: for the use of compressed gases, a pressure regulator and applicable safety alarm(s) must be installed by the customer; or these devices can be supplied by Crest as options. WARNING: You must comply with all local electrical codes and with electrical code NFPA 496. Heat exchanger: This feature is designed to remove heat generated by the ultrasonics and/or other unregulated heat inputs to the tank (e.g., pump). This is achieved by means of a counter-flow multiple-pass type heat exchanger, utilizing water or other cooling liquid. Typically, inlet and outlet connections must be made by the customer. Install a flow control valve on the outlet to regulate flow according to the amount of heat it is necessary to remove. Outlet may be to a closed loop system, to reservoir, to drain, or otherwise as customer desires, consistent with local codes. When water is used as the cooling liquid, it is typically supplied to the cooling jacket at a temperature of approximately 50 F. However, your needs may differ from this and may vary from one process to another. In theory, water should be supplied to the water cooling jacket at a temperature that allows the temperature of the liquid in the tank to remain constant at the desired level. Hinged cover with fusible link: In the case of combustion that generates sufficient heat, a fusible link will melt and the prop rod will fall, thus allowing cover to close automatically. 23
24 SECTION 3: PRODUCT DESCRIPTIONS The closed cover helps to contain a combustion situation and prevents additional oxygen from entering the tank to feed the fire. However, this is not intended to be a means for extinguishing the fire. WARNING: Tank lid falls quickly when fusible link melts. Be cautious not to place hands in path of closing lid, as severe pinch injuries may result, and hands may be forced down to the vicinity of the flames. DANGER WARNING: Fire within a tank is to be considered an emergency situation. Extreme caution must be used in dealing with a combustion situation to prevent human injury or death and to minimize damage to equipment and facility. Follow your facility procedures for handling an emergency of this type. This feature does not require any special installation by customer. To maintain the cover in open position, seat prop rod into fusible link that is mounted to the inside of the tank wall. 3.e Radiating Diaphragm - Minimum Erosion Feature The greatest factor limiting cavitation amplitude within an ultrasonic cleaning tank is the erosion of the radiating diaphragm. Cavitation causes the surface of the radiating diaphragm to be etched. Too much etching can render the diaphragm inoperable. With Crest equipment, a high level of cleaning is obtained, yet only a minimum amount of erosion takes place. Crest uses only 316L stainless steel, which has been bright annealed. This alloy of steel plus the polishing effect of bright annealing increases the resistance of the plate to erosion. Factors That Affect Erosion: Deep scratches in the surface of the plate act as beginning points for erosion. Therefore, Crest does not recommend parts or baskets that could scratch the surface be placed directly on the radiating diaphragm. To further eliminate cavitation erosion, optional titanium nitride coating can be added to the radiating surface. Other factors affecting erosion are the transducer design, frequency of operation, and the type of modulation. The more transducer area bonded to the diaphragm, the lower is the erosion. With the Crest transducer design, there is about three times more area of transducer per PZT active element as compared with other designs. This means that the energy is more uniformly distributed in Crest tanks, thus minimizing erosion. 24
25 SECTION 3: PRODUCT DESCRIPTIONS The final factor affecting erosion, and independent of the equipment, is the characteristic of the cavitating liquid. Water solutions erode much more than solvent systems. Also, the higher the temperature of the liquid, the lower the erosion. Since these factors are out of Crest s control, it is necessary to have the transducer guarantee not cover the radiating diaphragm. 3.f. Immersible Transducers Immersible transducers can be moved from container to container or placed in an existing container. They consist of acoustic couplers bonded in a liquidtight stainless steel housing. The radiating surface is 316L stainless steel bright annealed to minimize cavitation erosion. The acoustic couplers are permanently attached to the radiating surface by means of high temperature bonding. The radiating surface (front face) has four sides with double heliarc welds at the seams. This makes a box-like structure to house the acoustic couplers. The box is made liquid tight by welding on a cover box (bottom face) of 316L stainless steel which has a four-sided reinforced butt joint. There are two basic means of bringing the RF voltage to the acoustic couplers and still maintain liquid tightness. One is by means of a flexible Teflon-lined braided stainless steel cable (Mounting Model No. Suffix FC). The cable is attached to the immersible housing by means of a 300 Series stainless steel nipple. The other end connects with a junction box which has a standard 6 long coaxial cable for connection to the generator module. The standard stainless steel cable is 3 long. Longer lengths are available upon request. Bulkhead Fittings: The other method for acoustic coupler leads is use of bulkhead fittings on the immersible housings. These require a 7/8 diameter hole in the tank or container. The bulkhead fitting is a 3/4 diameter threaded stud which passes through the tank wall and terminates in a junction box on the exterior of the tank. A lock nut secures the box and stud to the tank wall, and washers inside and outside the tank wall prevent leaks. A standard 6 long coaxial cable exits the immersible via the bulkhead fitting for connection to the generator. The bulkhead fitting is welded to either the end of the housing (Mounting Model No. Suffix EB) or to the bottom cover of the housing (Mounting Model No. Suffix BB). For the bottom bulkhead mounting, there is either a single 3/4 diameter stud centered on the bottom, or for longer housings there are two 3/4 diameter studs centered on the bottom 4 from each end (Mounting Model No. Suffix DBB). 25
26 SECTION 3: PRODUCT DESCRIPTIONS The immersibles are designed to house either three or six acoustic couplers to correspond to the two standard generator modules. Many sizes are available as long as multiples of three or six acoustic couplers are maintained. The immersible may float in the cleaning solution. This does not present a problem for the bulkhead type, but means that provision must be made to secure the flexible cable type. This can be done with racks on the bottom or side of the tanks. Angle brackets may be provided on the flexible cable type for mounting in a tank. When using immersibles, it is important to identify the radiating surface (front face) so that the immersible is not placed in the tank incorrectly. For the bottom bulkhead type (BB or DBB), the radiating surface is obviously the opposite face from the fitting, but identification of front face may be difficult for the end bulkhead or flexible cable type (EB or FC). The radiating surface is the face farther away from the sealing weld around the immersible. If mounting flanges are desired on the flexible cable or end bulkhead type, they should be specified at time of purchase so that they can be fabricated at the time the bottom cover is made. CAUTION: When mounting the immersibles on the side of a tank, precautions should be taken to insure the radiating surface is always covered with solution. If it is not, damage can occur to the unit. The position should be such that the radiating front face is directed toward the parts being cleaned. The energy is emitted from the front face, and can be thought of as radiating in a manner similar to light from a flashlight. 26
27 SECTION 4: OPERATING INSTRUCTIONS 4.a Tanks and Generators Preliminary: Review information on generators and tanks in Section 3. Be sure that the surface on which tank and generator are placed is level and secure. The area surrounding the tank and generator should be clear and dry with close access to proper electrical connection. Set-Up and Operation of Tanks 1. Verify that the plastic cap on the drain nipple of the tank is securely tight. Or, if the drain outlet is fitted with a valve, be sure that the valve is closed. 2. Fill the tank with the appropriate liquid to a depth sufficient to cover the parts being cleaned. If tank is heated, liquid depth must be 5 or greater to cover the heaters. Add cleaning solution as required. CAUTION: Generators should be kept dry at all times. Do not allow moisture or chemicals to collect on or near the ultrasonic generators. Explanation: The generator contains delicate electronic components which should be protected from chemicals and moisture. Any splashing of liquid in the vicinity of the generator may draw small droplets of the liquid inside the generator through the fan. The droplets will deposit on the printed circuit boards and may cause a short circuit between adjacent points on the board, making the generator inoperative. 3. Before operating, check generator serial tag for proper power requirement. NOTE: Generators equipped with a step-up or step-down transformer can be operated at different line voltages by selecting the proper transformer tap. Connect the tank coaxial cable 1/4 turn connector to the rear generator panel MHV connector. (Do NOT move the wire soldered to the 120 volt tap. Instead, move the one with the spade connection.) NOTE: If more than 500 watts are on the tank, there will be more than one coaxial cable on the tank. Connect each coaxial cable to the appropriate chassis module. 27
28 SECTION 4: OPERATING INSTRUCTIONS A cable color-coded gray for three acoustic couplers goes to a 250 watt module. Cable color coded black for six acoustic couplers goes to a 500 watt module. The 500 watt module will not work with three Vibra-Bars and vice versa. 4. Plug the generator line cord into the appropriate outlet. 5. Set the modulation toggle switch on the rear of the generator to Hi position for full-wave modulation. 6. Plug the generator power cord into an appropriate wall outlet. WARNING: BE SURE RECEPTACLE PROVIDES PROPER ELECTRICAL GROUND. NOTE: The input voltage should be between volts. If input voltage falls below 100 volts, the activity in the tank may become too low. IMPORTANT: Be certain generator location permits air passage through the cabinet. Rear of generator should be at least 6 from any wall or other obstruction. 7. Activate the front panel on/off switch to begin cavitation in the tank. The red pilot light will glow. 8. If the generator has more than one module, energize all modules by activating each front panel on/off switch. 9. Check to insure the fan is operating for proper cooling. 10. Allow time for degassing of the solution. Degassing of normal water detergent solutions will usually be completed within ten minutes. Do not skip the degassing step. Some cleaning chemicals behave peculiarly in that when they are cold and not degassed, a large burst of energy will appear in the tank immediately after the generator switch is turned On. In general, cleaning may not be as efficient as possible when this occurs. During degassing you may switch to the Lo position for half-wave modulation. (Although the peak power is the same, average power is reduced by one-half.) See Figure 1 for location of switch. 28
29 SECTION 4: OPERATING INSTRUCTIONS 11. For tanks with heaters, set the control thermostat to the desired temperature. (Twelve o clock above the control is the set position.) 12. Plug the heater power cord into the wall. CAUTION: BE CERTAIN THE LIQUID DEPTH IS AT LEAST 5 TO COVER THE STRIP HEATERS. When the temperature of the liquid is below the thermostat setting, the heaters will be energized and the amber pilot light on the tank will indicate the heaters are on. NOTE: Once the thermostat has been set at the desired temperature, this setting need not be changed, for the strip heaters will be automatically cycled on and off to maintain the desired liquid temperature. 13. For generators that have the optional output power intensity control on the generator module, turn the control fully clockwise for full output power. To reduce the output power, turn the control counterclockwise. 14. Place the parts to be cleaned in a basket or fixture. Or, you may suspend a part using tongs. Either way, be certain that all surfaces to be cleaned are fully immersed in the cavitating liquid. Tip parts with blind holes to permit air to escape. (Ultrasonic cleaning will not take place if air is present, for ultrasonic cavitation does not occur in air.) WARNING: Do not put hands in cleaning liquid. If cleaning liquid splashes on skin or eyes, follow procedures recommended by the manufacturer of the cleaning chemical in use. Chemical manufacturer instructions should be near the processing area and accessible to the operator. 15. After cleaning the prescribed time, the parts should be rinsed and dried. 4.b Immersible Transducers and Generators CAUTION: Be certain that the radiating front face is directed toward parts being cleaned and that cleaning solution covers radiating face at all times. Radiating front face can be identified as the surface farthest away from the sealing weld around the immersible. Sides of the radiating front face are about 2 long and fit into the 1/2 sides of the bottom cover. 29
30 SECTION 4: OPERATING INSTRUCTIONS CAUTION: Transducers must be covered by liquid at all times. 1. Fill the tank or container with enough cleaning solution to cover the radiating surface completely. Immersible may be placed at any position within the tank, but the radiating surface should be directed toward parts being cleaned. Since immersibles will tend to float, mechanical fixtures should be provided. It is best not to use any fixture which touches the radiating surface. The smaller units can be held by a clamp or rod on the end fitting where the flexible cable is attached. For longer units, brackets can be provided on the housings if specified at time of purchase. WARNING: Insure that junction box end of the flexible cable does not come in contact with the cleaning solution. It is not liquid tight. 2. Connect the coaxial cable from the junction box to the generator module. 3. Follow steps for degassing and processing parts as described in Section 4.a. 4.c Bulkhead Immersible Models Type EB, BB, and DBB 1. Place the immersible in the tank or container with the 3/4 diameter mounting stud in the appropriate hole or holes in the tank wall. The diameter of these holes should be 7/8. By use of the hardware provided, make the connection liquid-tight. See Drawing 36C in Reference for details. 2. Mount or place the junction box so that liquid from the tank will not spill on the box. If two mounting studs are present such as in Type DBB, one stud may not have any wires for it because it is used only to provide a stable mounting. 3. Fill the tank or container with enough cleaning solution to completely cover the radiating surface. 30
31 SECTION 4: OPERATING INSTRUCTIONS 4. Connect the coaxial cable from the junction box to the generator module. 5. Follow steps for degassing and processing parts as described in Section 4.a. 6. Check and re-tighten lock nuts periodically. 4.d Special Options - Tanks See applicable portions of Section 3 for operating instructions pertaining to the various options available for Crest ultrasonic cleaning tanks. 31
32 SECTION 5: ROUTINE MAINTENANCE The design of your Crest Ultrasonics tank and generator eliminates the need for elaborate routine maintenance procedures. Following are the simple procedures that are recommended. DANGER: Always disconnect the generator from its power source and from the transducers before removing the generator cabinet to service the interior. Failure to do so may result in injury or death due to the presence of high voltages. 1. Cleaning the generator: Periodically you should remove the chassis module from the cabinet and clean off any dust which has accumulated on the components. Use a hand vacuum cleaner or fine brush. Light air pressure will remove dirt from critical areas. (See Figure 3 on following page.) 2. Checking for clogged drain: The drain elbow of the tank may become clogged. It should be cleaned out periodically with a stiff wire. Keep drain area as clean as possible. 3. Cleaning tanks: Tanks should be cleaned with a non-abrasive cloth and a non-abrasive cleanser. Rinse thoroughly. CAUTION: Do not scratch the inside surface of the tank. Scratches can become areas where cavitation erosion occurs. 32

33 SECTION 5: ROUTINE MAINTENANCE DANGER: Always disconnect the generator from its power source and from the transducers before removing the generator cabinet to service the chassis module. Failure to do so may result in injury or death due to the presence of high voltages. WARNING: Do not touch sink and power transistors. They remain warm for some time after the generator is turned off and the power is disconnected. CAPTIVE FASTENER WATTMETER BOARD COOLING FAN LOGIC BOARD (UPPER BOARD) When a TRANSFORMER is required, it is placed here. See page 16. (Transformer not shown in this model.) POWER BOARD (LOWER BOARD) CAPTIVE FASTENER OUTPUT POWER POTENTIOMETER (R10) - see page 11. FREQUENCY POTENTIOMETER (R9) - see page 11. Ḟor front panel controls, see Figure 1. Figure 3: Generator chassis module with case removed. (See important warnings above.) 33
34 SECTION 6: TROUBLESHOOTING It is challenging to determine if an ultrasonic cleaning system is functioning the same on a day-to-day basis, because there is no meter or gauge that can be put into the cavitating liquid to establish a standard. Visually, the cavitating action may appear to change even though the cleaning action has not changed. Visual changes are brought about by many things such as the type of liquid, temperature, liquid level, type of contaminant, parts being cleaned, angle of light reflection, etc. To provide a truer measure of comparison, a standard can be established using regular household aluminum foil. Standard foil rather than freezer thickness foil should be used. Since there are differences in foil manufacturing, try to buy enough foil at one time to keep as a working standard over a long period of time. 6.a Foil Testing To Begin Foil Testing: Cut pieces of foil about 4 square. Hold foil with tongs and immerse it in the center of the tank which is full and has been cavitating for a period of time. Remove foil after a pre-determined amount of time, e.g., one minute. Hold foil with tongs vertically over the tank to allow excess liquid to drip back into the tank. Inspect foil. You will note a certain amount of pocking and in some areas an actual erosion of the foil caused by the scrubbing action of the ultrasonics. Experiment to determine a good amount of time to get a repeatable effect from the ultrasonics which clearly marks the foil but does not completely erode it. When you have determined a useful amount of time for the test in your ultrasonic bath and produced one or more specimens which you wish to save, date and record time data for the foil specimens for future reference. Future tests should be done at time periods and under tank conditions comparable to your benchmark testing. Test Conditions: Repeatable controlled conditions are recommended for ongoing foil testing as a comparative indicator of ultrasonic activity. For example, use water at 120 F with a known amount of wetting agent such as Joy. Establish a standard liquid depth and maintain input voltage to the generator at a known value, such as 120 volts. If all these conditions are controlled, it should be possible to have repeatability of foil erosion versus time for foil immersed in the tank. If you suspect that there may be low activity in the ultrasonic bath, first be certain to check the input voltage to see if it is 120 volts. If the input is below 105 volts, the output power will start dropping off. If this is the case, try switching 34
35 SECTION 6: TROUBLESHOOTING the generator to another line which is not loaded with heaters or other items that lower the input voltage. Do not use solvent (non-water solutions) for the foil erosion test. The eroding effects of ultrasonics are greatly decreased in a solvent and the foil attack may be almost negligible. Also, do not be fooled by the sudden burst of cavitation that occurs in cold solvents when the generator is first turned on. In cold solvents that are not degassed, this sudden burst will die out in about ten seconds, which may lead you to think that the generator is not functioning properly, or that the transducers work initially but then gradually die out. Wait until the liquid temperature has increased; then the cavitation will burst through and remain strong. WARNING: Do not attempt to defeat the electrical safety interlock. High voltages are present which could be harmful. 6. b Correcting Problems DANGER: Always disconnect the generator from its power source and from the transducers before removing the generator cabinet to service the interior. Failure to do so may result in injury or death due to the presence of high voltages. The troubleshooting steps on the following page are recommended prior to contacting the factory. If further service is required, qualified personnel should be used. Refer to drawings and spare parts lists in REFERENCE as required. Problem: No activity in tank. No lamp indication. Fan not running. Possible Causes and Corrections: Plug-in generator chassis connector not mating with cabinet connector. Fuse blown. Reset module chassis in cabinet. Replace fuse. No power at A.C. outlet. Wall circuit may have tripped a circuit breaker or blown a fuse. Reset breaker or replace fuse. 35
36 SECTION 6: TROUBLESHOOTING Problem: Low activity in tank. Possible Causes and Corrections: Bad transducer component. Refer to Replacing a Stack Component troubleshooting section below. Full-Wave/Half-Wave Toggle Switch in half-wave (low) position. Place switch in full-wave (high) position. Cleaning solution (particularly solvents) not up to operating temperature or not completely degassed. Leave generators and heaters on until liquid is up to temperature. Units with optional adjustable power intensity control may have power knob turned too low. Problem: Fuse (F 1 ) blows. Corrective Measures: Turn power knob clockwise. Replace transistors Q1 through Q4, Q11, and Q12. Replace upper board. Replace diodes D 1 through D 4. Replace lower board. DANGER: Always disconnect the generator from its power source and from the transducers before removing the generator cabinet to service the interior. Failure to do so may result in injury or death due to the presence of high voltages. Problem: No output from generators. Corrective Measures: Measure voltage between TP5 and TP6 on lower board: if 0V, replace lower board (replacing the lower board may or may not solve the problem.); if 10V, return generator for service. See next page. 36
37 SECTION 6: TROUBLESHOOTING NOTE: If trouble is suspected in the transducer area, an ohm meter should be used to measure the resistance between the high voltage electrode and the tank ground. This measurement should indicate a high resistance of greater than 5-10 meg ohms. The high voltage electrode is located between the PZT disc and the white insulator. Contacting the Crest Generator Service Department: A user can perform limited field diagnostics on a Genesis generator, and some repairs can be handled in the field after contacting Crest Generator Service for instructions. In most cases, Crest can supply either a new power (upper) or logic (lower) board assembly which may be easily changed by the user. Or, if it is determined that you must return a generator for service at the factory, you will be given a Return Authorization Number. Please be sure to include your return address and other pertinent information with any item sent in for service. Crest Ultrasonics Generator Service Department Scotch Road at Mercer County Airport, P.O. Box 7266 Trenton, New Jersey, USA, Tel , ask for the Generator Service Dept. 6.c Other Types of Troubleshooting Transducer wiring: Short circuits are indicated by a low resistance measurement ( < 5 megohm). A short can result from a wire lead to an electrode coming off and arcing against the tank or other ground source. This will usually be evidenced by burning at the fault point. Also, either electrode may become bent and get too close to the ground or high voltage. If this occurs, bend the electrode back into a horizontal plane. If burning has taken place, the defective part should be replaced. A short can also exist if moisture forms on the outer surface of the piezoelectric disc (PZT). This can cause arcing and cracking of the piezoelectric element, which would then have to be replaced. If the PZT were to crack, it might show up as an open circuit rather than a short. To avoid this occurrence, all stacks are coated with a moisture-resistant varnish. An open circuit condition is indicated by a capacitance measurement that is more than 15% lower than the normal capacitance values listed on the next page. Measurements can be taken with consideration given to the wattage carried by each. (The wattage for each coaxial cable is the same as the output wattage of the GENESIS generator to which it is connected.) 37
38 SECTION 6: TROUBLESHOOTING Following are the normal capacitance readings to be expected for different models: 25 khz: 24,000 pf for 250 watts 48,000 pf for 500 watts 40 khz: 12,000 pf for 250 watts 24,000 pf for 500 watts. 68 khz: 12,000 pf for 250 watts 24,000 pf for 500 watts. Drain clog: The drain elbow may become clogged, preventing proper draining. This can be cleaned out with a stiff wire. Defective heating: If poor heating exists or thermostatic control is faulty, check to see that the thermostat bulb is in tight contact with the side of the tank. Bend the bulb bracket toward the tank to insure tight contact. (For heated tanks, refer to the electrical schematic.) If the water level has fallen below the height of the strip heater, excessive heating may have occurred which could loosen the thermal compound between the strip heaters and tank wall. Replace compound to overcome this problem. This can be accomplished by loosening the nuts which hold heaters against tank. After the heat transfer material has been applied, tighten nuts. The possibility exists that a short could occur using an open circuit in the heating elements or wiring. This can be checked with an ohm meter. The resistance of the heating elements should be only a few ohms. Before concluding the immersible is malfunctioning, read Section 6.a. (re: foil test) to assist in the evaluation of the cavitation. Because of the welded construction of the immersible housing, it is not possible to obtain direct access to the acoustic coupler. Low power (immersibles): Usually cleaning installations with immersibles have more than one immersible; therefore, if one immersible unit is suspected of low power, substitute another generator (which you know is operational) on the same immersible to isolate whether the trouble is with the immersible or with the generator module. In doing this, be certain a cable color coded black is connected to a 500 watt module and a cable color coded gray is connected to a 250 watt module. If the trouble is in the generator, refer to Section 6b. If the immersible is suspected, check the coaxial cables for shorts. An ohm meter can be used to measure the resistance between the center conductor and housing ground. This measurement should read a resistance greater than 5-10 megohms. Moisture across the PZT element can also cause a short cir- 38
39 SECTION 6: TROUBLESHOOTING cuit. Sometimes this can be corrected by baking the immersible in an oven at 200 F for a few hours. Moisture can be the result of unusual condensation or a small pin hole in the welds. The pin hole can be detected by inserting clean air into the housing while it is immersed and observing any bubbles. A pressure no greater than 12 psi of air should be used or it is possible to damage the unit. When the pin hole is located, it can be repaired by applying epoxy or other corrosion resistant adhesive. Another measurement that can be made is the capacitance between the center conductor of the coaxial cable and housing ground. Following are the normal capacitance readings to be expected for different models: 25 khz 24,000 pf for 250 watts 48,000 pf for 500 watts 40 khz 12,000 pf for 250 watts 24,000 pf for 500 watts. 68 khz 12,000 pf for 250 watts 24,000 pf for 500 watts. If the capacitance is much greater or much less than these values, it probably indicates trouble in the electrode area, and the unit should be returned to the factory for service. Replacing a stack component: In some instances it is possible to repair a transducer stack by replacing one or more components. In order to determine whether you have a tank model that is eligible for field stack repair, call the Crest Service Department at , extension 236. Both parts and assembly diagrams are available for stack repairs that are judged to be eligible for field repair. However, if your machine is not eligible for field stack repair, you will be told how to send your tank back to the factory for repairs. CAUTION: Do not attempt replacement of a stack component unless you are authorized to do so by the Crest Service Department. Only Crest components should be used. You must refer to the assembly drawing(s) supplied with the new part(s). Otherwise you may seriously damage your tank. The following guidelines are to be utilized only if the Crest Service Department has determined and informed you that a field stack repair may be attempted on your Crest ultrasonic cleaning tank. To replace a transducer stack component, loosen the center bolt, remove the damaged part, and replace a new component. In replacing the component, be certain it is thoroughly clean on all surfaces, for even a speck of dirt can 39
40 SECTION 6: TROUBLESHOOTING cause problems when the bolt is tightened. In replacing components, use only Crest-approved parts. All parts should be handled with extreme care. All parts are to be cleaned with paint stripper (Methylene Chloride). Be careful NOT to remove any polarity mark on a PZT disc. Wash with isopropyl alcohol after using paint stripper. The clean part should be handled only by someone wearing nylon or plastic gloves. The bolt hole in the bar must be kept clean at all times. New electrodes should be used on re-assembly of a stack. All parts must be perfectly flat. Refer to the assembly drawing supplied with your replacement parts. Polarity of wire must be strictly observed in relation to electrodes. Positive wire is double-insulated. Face solder pad on both electrodes toward bolt head. PZT disc must be placed with polarity mark toward bolt head; beveled edge of backing plate to face bolt head; convex side of compression washers to face bolt head. All components must be aligned to backing plate. Torque bolt to 300 inch pounds. Suggested insulating coatings are: Humi Seal type 1B15H and/or polyurethane varnish AC-41 Class F. Coating is to be done as soon as stack is assembled. Re-solder wires to electrodes using only solder on pad. If temporary repair to the wiring is needed in the field, use a light multistrand wire of gauge. Cover the wire with insulation (plastic tubing positive side only). Also, coat the solder joint between the wire and electrode with RTV caulking. 40
41 REFERENCE 41
42
Instruction Manual. Immersible & Flange Type Transducer. Advanced Ceramics Technology (M) Sdn. Bhd A Crest Group Inc. Company
 Sdn. Bhd A Crest Group Inc. Company") Instruction Manual Immersible & Flange Type Transducer Advanced Ceramics Technology (M) Sdn. Bhd A Crest Group Inc. Company No 1536, Jalan Perusahaan, Kawasan Perusahaan Bukit Tengah, 13600 Perai, Penang,
Instruction Manual Immersible & Flange Type Transducer Advanced Ceramics Technology (M) Sdn. Bhd A Crest Group Inc. Company No 1536, Jalan Perusahaan, Kawasan Perusahaan Bukit Tengah, 13600 Perai, Penang,
INSTALLATION INSTRUCTIONS FOR 6532 SERIES PACKAGE HEAT PUMP
 INSTALLATION INSTRUCTIONS FOR 6532 SERIES PACKAGE HEAT PUMP RV Products A Division of Airxcel, Inc. P.O. Box 4020 Wichita, KS 67204 1976-360 (1-02) PP TABLE OF CONTENTS 1. Warnings......................................................
CAV-METER ULTRASONIC CAVITATION INTENSITY METER
 INSTRUCTION MANUAL FOR CAV-METER ULTRASONIC CAVITATION INTENSITY METER PLEASE READ THIS MANUAL CAREFULLY BEFORE OPERATION 3, Hagavish st. Israel 58817 Tel: 972 3 5595252, Fax: 972 3 5594529 mrc@mrclab.com
Before digging into the 10 things you should know let s start with a brief explanation of the process.
 Ultrasonic cleaners are unsurpassed when it comes to removing contaminants from virtually any hard surface that can be safely immersed in a cleaning solution. The challenge is selecting the correct ultrasonic
Instructions for Model E782 Betman Cleaning System (Cleaner/Rinser/Rinser/Dryer)
") 1 2 Esma Inc. PO Box 734 450 W. Taft Drive South Holland, IL 60473 708-331-1855 800-276-2466 FAX 708-331-8919 Introduction Instructions for Model E782 Betman Cleaning System (Cleaner/Rinser/Rinser/Dryer)
1 2 Esma Inc. PO Box 734 450 W. Taft Drive South Holland, IL 60473 708-331-1855 800-276-2466 FAX 708-331-8919 Introduction Instructions for Model E782 Betman Cleaning System (Cleaner/Rinser/Rinser/Dryer)
OPERATING AND MAINTENANCE MANUAL FOR PLATE HEAT EXCHANGER INDIRECT FIRED WATER HEATER. Electric Heater Company Base Model "BWXP"
 OPERATING AND MAINTENANCE MANUAL FOR PLATE HEAT EXCHANGER INDIRECT FIRED WATER HEATER Electric Heater Company Base Model "BWXP" HUBBELL ELECTRIC HEATER COMPANY P.O. BOX 288 STRATFORD, CT 06615 PHONE: (203)
Skymen Cleaning Equipment Shenzhen Co., Ltd. Ultrasonic Cleaner Instruction Manual
 Skymen Cleaning Equipment Shenzhen Co., Ltd. Ultrasonic Cleaner Instruction Manual Model: JP-360ST and JP-300ST Please read the manual carefully before operation. 1 INDEX 1. Working conditions. 3 2. General..
1 ESMA, Inc. P. O. BOX 734 * SOUTH HOLLAND, IL * (800) * FAX (708)
 * FAX (708)") 1 2 Instructions for Ultrasonic Washer E789 (U.L. Approved) 1. INTRODUCTION The E789 Automatic Ultrasonic Washer automatically performs a cleaning cycle, the major steps of which are: Ultrasonic cleaning
1 2 Instructions for Ultrasonic Washer E789 (U.L. Approved) 1. INTRODUCTION The E789 Automatic Ultrasonic Washer automatically performs a cleaning cycle, the major steps of which are: Ultrasonic cleaning
Model LTN-3R Outdoor Rated Uninterruptible Power System Single Phase
 Model LTN-3R Outdoor Rated Uninterruptible Power System Single Phase General Specification 550 VA/Watts 1300 VA/Watts 1.0 GENERAL This specification defines the electrical and mechanical characteristics
Integrated Process Solutions. Series 48 Heaters. heater jackets sizes 1 1/2'' to 4'' (nw 40 to nw 100)
") Integrated Process Solutions w w w. m k s i n s t. c o m Series 48 s heater jackets sizes 1 1/2'' to 4'' (nw 40 to nw 100) Series 48 heaters have been designed for safety, flexibility, power conservation,
Integrated Process Solutions w w w. m k s i n s t. c o m Series 48 s heater jackets sizes 1 1/2'' to 4'' (nw 40 to nw 100) Series 48 heaters have been designed for safety, flexibility, power conservation,
INSTALLATION, OPERATING & MAINTENANCE INSTRUCTIONS FOR 350 SERIES CIRCULATION HEATERS
 INDEECO Circulation Heaters are designed to provide years of trouble free operation if properly installed and maintained. Please read and follow these instructions for installing and maintaining the heater.
WATLOW IND. WATROD Modular Duct Heater Installation & Maintenance Manual I&M NUMBER: Page: 1 Date:6/11/2008 Rev: 2
 I&M NUMBER: 316-42-15-1 Page: 1 _ Pre Installation Check to make sure that heater received is the same as that ordered. Elements may come in contact with each other during shipment. Minor adjustments to
WATLOW IND. WATROD Circulation Heater Installation & Maintenance Manual I&M NUMBER: Page: 1 Date: 6/11/2008 Rev: 2.00
 I&M NUMBER: 316-42-5-1 Page: 1 Pre Installation Check to make sure that heater received is the same as that ordered. Watlow heaters are built to comply with UL and CSA dielectric requirements, it may be
INSTALLATION INSTRUCTIONS FOR MOUNTING KIT
 RV Products Division INSTALLATION INSTRUCTIONS FOR 8330-5501 MOUNTING KIT 8330-752 CONTROL BOX KIT (12 VDC COOL ONLY) 9330B755 CONTROL BOX KIT (12 VDC HEAT/COOL) 8530-750 CONTROL BOX KIT (24 VAC COOL ONLY)
INSTALLATION INSTRUCTIONS FOR 6636 SERIES PACKAGE AIR CONDITIONER
 INSTALLATION INSTRUCTIONS FOR 6636 SERIES PACKAGE AIR CONDITIONER TABLE OF CONTENTS 1. Warnings...................................................... 3 2. Component Match-Up...........................................
WILKERSON MODELS DE3, DE4 AND DE5 COMPACT HEATLESS AIR DRYERS
 INSTRUCTION MANUAL FOR WILKERSON MODELS DE3, DE4 AND DE5 COMPACT HEATLESS AIR DRYERS DE3 - DE5 OPERATIONS GENERAL This instruction manual covers the installation, operation, maintenance and troubleshooting
INSTALLATION INSTRUCTIONS FOR 8330*5511 MOUNTING KIT
 RV Products Division INSTALLATION INSTRUCTIONS FOR 8330*5511 MOUNTING KIT 8330-752 CONTROL BOX KIT (12 VDC COOL ONLY) 9330A755 CONTROL BOX KIT (12 VDC HEAT/COOL) 8530-750 CONTROL BOX KIT (24 VAC COOL ONLY)
Internet Version for Reference Only INDUCED DRAFT COMMERCIAL WATER HEATERS SUPPLEMENT INSTRUCTIONS TO PART #
 INDUCED DRAFT COMMERCIAL WATER HEATERS SUPPLEMENT INSTRUCTIONS TO PART #238-39387-00 THIS INSTRUCTION SUPPLEMENT IS ONLY INTENDED TO GIVE INSTALLATION INSTRUCTIONS AND INFORMATION RELATED TO THE INDUCED
CNA-Series - Large Industrial Heaters Tankless Water Heating Solutions
 36-144 kw (122,800-491,300 BTUs) Certified Lead-Free Design New & Improved Pressure Drop Advantage Variable Temp Heat Exchanger NEMA 4 enclosure standard Independent Safeties ETL and cetl certified to
FIREYE C9707A ALL FUEL SCANNER
 65-8065 APRIL 11, 2013 FIREYE C9707A ALL FUEL SCANNER The C9707A All Fuel Scanner is used with the FIREYE R9107A Flame Controller to provide continuous monitoring of burner flames in industrial and utility
WATLOW IND. FIREBAR Flange Heater Installation & Maintenance Manual I&M NUMBER: Page: 1 Date: 6/11/2008 Rev: 2.00
 I&M NUMBER: 316-42-2-1 Page: 1 Pre Installation Check to make sure that heater received is the same as that ordered. Elements may come in contact with each other during shipment. Minor adjustments to elements
3500 SERIES CONVECTION STEAM COOKER PARTS AND SERVICE MANUAL
 3500 SERIES CONVECTION STEAM COOKER PARTS AND SERVICE MANUAL EFFECTIVE JULY 30, 2014 Superseding All Previous Parts Lists. The Company reserves the right to make substitution in the event that items specified
RK-02 Multi Point Detector Operator s Manual
 65-2485RK-02 Multi Point Detector Operator s Manual Part Number: 71-0237RK Revision: A Released: 11/26/14 RKI Instruments, Inc. www.rkiinstruments.com WARNING Read and understand this instruction manual
Cavitator Ultrasonic Cleaners
 Cavitator Ultrasonic Cleaners Instruction Manual (for model # 18G) 1333 South Claudina Street Anaheim, CA 92805 Toll Free: (800) 854 9305 Tel: (714) 533 2221 FAX: (714) 635 7539 Web site: www.mettlerelectronics.com
WATLOW IND. WATROD Flange Heater Installation & Maintenance Manual I&M NUMBER: Page: 1 Date:6/11/2008 Rev: 2.00
 I&M NUMBER: 316-42-8-1 Page: 1 _ Pre Installation Check to make sure that heater received is the same as that ordered. Elements may come in contact with each other during shipment. Minor adjustments to
RK Multi Point Detector Operator s Manual
 65-2480RK Multi Point Detector Operator s Manual Part Number: 71-0198RK Revision: C Released: 11/26/14 RKI Instruments, Inc. www.rkiinstruments.com WARNING Read and understand this instruction manual before
C1N Series - Light Industrial Heaters Tankless Water Heating Solutions
 18-25 kw (61,4000-85,300 BTUs) Low flow activation options at 0.25 and 0.50 GPM (1.0 and 1.9 LPM) Certified Lead-Free Design Variable Temp Heat Exchanger Pressure Drop Advantage NEMA 4 enclosure standard
INSTALLATION INSTRUCTIONS FOR SERIES TWO TON HIGH EFFICIENCY PACKAGED HEAT PUMP
 RV Products Division INSTALLATION INSTRUCTIONS FOR 46515 SERIES TWO TON HIGH EFFICIENCY PACKAGED HEAT PUMP TABLE OF CONTENTS 1. Warnings.................................................. 2 2. Component
SNA-SKID Series - Preassembled Safety Shower Heater Skid Tankless Water Heating Solutions
 Pre-assembled skid system Back-to-Back heater models, SNA & SNAR High Flow Demand Safety Shower Applications 216-288 kw (737,000-983,000 BTUs) Temperature overshoot purge system NEMA 4 enclosure standard
Chromalox. Installation, Operation. Circulation Heaters for Oil or Water Heating RENEWAL PARTS IDENTIFICATION PE GENERAL NWH
 Dimensions (Inches) Rotatable Terminal Cover 1" Conduit Opening Outlet 1" FNPT Inlet 1" FNPT 1" FNPT Pipe Plug (or Inlet) Chromalox Installation, Operation and RENEWAL PARTS IDENTIFICATION 6" 4" E1 4 (Supersedes
RK-05 Combustible Gas Transmitter Operator s Manual
 65-2405RK-05 Combustible Gas Transmitter Operator s Manual Part Number: 71-0180RK Revision: 0 Released: 2/16/11 RKI Instruments, Inc. www.rkiinstruments.com WARNING Read and understand this instruction
GIRTON CABINET WASHER MODEL 794A
 DESCRIPTION GIRTON CABINET WASHER MODEL 794A The washer shall be a Girton Model 794A Cabinet Type Pressure Washer constructed of type-304 stainless steel, utilizing a reciprocating header spray system.
BINDER Scientific Product Catalog
 BINDER Scientific Product Catalog 36 Vacuum drying ovens Vacuum drying ovens 37 VD VDL VDL EX-Zone 2 Absolutely reliable drying Drying with no residues, no danger of incrustation, no oxidation all under
Direct Gas-Fired Make-Up Air
 Direct Gas-Fired Make-Up Air Model TSU Heavy Duty, High Airflow Applications Manufacturing and Industrial Facilities Up to 64,000 cfm August 2012 Products Model TSU Direct Gas-Fired Make-Up Air Unit The
Tankless Electric Water Heater Available 3-27 kw in Single Phase Voltages
 Point-of-Use Tankless Tankless Electric Water Heater Available 3-27 kw in Single Phase Voltages Features Heavy Duty Construction Reliability Constructed with high grade materials to ensure long operating
Portable C2N Series - Light Industrial Heaters Tankless Water Heating Solutions
 Portable C2N Series - Light Industrial Heaters Heavy duty industrial cart options simplify moving heater to various locations 36-50 kw (122,800-170,600 BTUs) Variable Temp Heat Exchanger Pressure Drop
CONTENTS CONSIDERATIONS. General Plumbing Component Connection ILLUSTRATION. Control System CONFIGURATION. Voltage Verification CONNECTION
 AIR SERIES SYSTEM INSTALLATION MANUAL CONTENTS CONSIDERATIONS General Plumbing Component Connection 2 2 2 ILLUSTRATION Control System 3 CONFIGURATION Voltage Verification 4 CONNECTION Component Connection
Custom Duct Heaters. Special Applications
 Special Applications Air Conditioning & Air Handling Units For more than 50 years, INDEECO has been supplying special heaters for use in air handling and air conditioning equipment (Figure 50). A wide
ANSUL ANSUL AUTOMAN II-C RELEASING DEVICE
 ANSUL INSTALLATION OPERATION AND MAINTENANCE MANUAL ANSUL AUTOMAN II-C RELEASING DEVICE 001799 This manual is intended for use with the ANSUL AUTOMAN II-C Releasing Device. Those who install, inspect,
CT-7 Series Toxic Gas Transmitter Operator s Manual
 65-2341 CT-7 Series Toxic Gas Transmitter Operator s Manual Part Number: 71-0424 Revision: P1 Released: 6/8/17 RKI Instruments, Inc. www.rkiinstruments.com WARNING Read and understand this instruction
installation and operation manual for Hunter Ceiling Fans
 For Your Records and Warranty Assistance Model Name: Catalog/Model No.: Serial No.: Date Purchased: Where Purchased: For reference also attach your receipt or a copy of your receipt to the manual. installation
MODEL A5-2 SOLVENT & WATER RECOVERY SYSTEMS (EXPLOSION PROOF UNITS)
") MODEL A5-2 SOLVENT & WATER RECOVERY SYSTEMS (EXPLOSION PROOF UNITS) FOR PROPER AND SAFE USE OF THIS CHEMCHAMP EQUIPMENT, PLEASE FOLLOW THIS DOCUMENT AND LOCAL AUTHORITY. KEEP THIS DOCUMENT FOR FUTURE REFERENCE.
MODEL A5-2 SOLVENT & WATER RECOVERY SYSTEMS (EXPLOSION PROOF UNITS) FOR PROPER AND SAFE USE OF THIS CHEMCHAMP EQUIPMENT, PLEASE FOLLOW THIS DOCUMENT AND LOCAL AUTHORITY. KEEP THIS DOCUMENT FOR FUTURE REFERENCE.
A. American National Standards Institute (ANSI): Establishes requirements applicable to certifying direct gas-fired heaters.
: Establishes requirements applicable to certifying direct gas-fired heaters.") SECTION 15622 DIRECT GAS-FIRED BURNER & MANIFOLD SYSTEM PART 1: GENERAL 1.1 Section includes: A. Direct gas-fired heater modules B. Controls C. Equipment schedule 1.2 Related Sections A. Section 01655:
SECTION 15622 DIRECT GAS-FIRED BURNER & MANIFOLD SYSTEM PART 1: GENERAL 1.1 Section includes: A. Direct gas-fired heater modules B. Controls C. Equipment schedule 1.2 Related Sections A. Section 01655:
RK CO 2 Transmitter Operator s Manual
 65-2397RK CO 2 Transmitter Operator s Manual Part Number: 71-0185RK Revision: B Released: 7/18/14 RKI Instruments, Inc. www.rkiinstruments.com WARNING Read and understand this instruction manual before
RK Hydrogen Sulfide Transmitter Operator s Manual
 65-2331RK Hydrogen Sulfide Transmitter Operator s Manual Part Number: 71-0176RK Revision: B Released: 11/26/14 RKI Instruments, Inc. www.rkiinstruments.com WARNING Read and understand this instruction
4201 Lien Rd Madison, WI Owner s Manual Therma-Stor III Heat Recovery System. Installation, Operation & Service Instructions
 4201 Lien Rd Madison, WI 53704 TS-140F Revised 09-10 Owner s Manual Therma-Stor III Heat Recovery System Installation, Operation & Service Instructions Read and Save These Instructions Table Of Contents
RK/ RK Carbon Monoxide Detector Operator s Manual
 65-2496RK/65-2499RK Carbon Monoxide Detector Operator s Manual Part Number: 71-0156RK Revision: 0 Released: 2/16/11 www.rkiinstruments.com WARNING Read and understand this instruction manual before operating
Dual Column Dehydrating Breather Manual
 Dual Column Dehydrating Breather Manual DCB-MANUAL 1.6 Read and understand this manual prior to operating or servicing the products. SPX Transformer Solutions, Inc., Service & Components Division U.S.
Portable C1N Series - Light Industrial Heaters Tankless Water Heating Solutions
 Heavy duty industrial cart options simplify moving heater to various locations 18-25 kw (61,4000-85,300 BTUs) Low flow activation options at 0.25 and 0.50 GPM (1.0 and 1.9 LPM) Certified Lead-Free Design
Custom Duct Heaters. Special Applications
 Special Applications Air Conditioning & Air Handling Units For more than 55 years, INDEECO has been supplying special heaters for use in air handling and air conditioning equipment (Figure 49). A wide
Keltech SNA-Series - Safety Shower Heaters Tankless Water Heating Solutions
 36-144 kw (122,800-491,300 BTUs) Temperature overshoot purge system Certified Lead-Free Design NEMA 4 enclosure standard ASME and NB Certified options available New & Improved Pressure Drop Advantage Dual
PURPLE K POWDER EXTINGUISHERS INSTALLATION, OPERATION, MAINTENANCE AND RECHARGE MANUAL
 PURPLE K POWDER EXTINGUISHERS INSTALLATION, OPERATION, MAINTENANCE AND RECHARGE MANUAL NO. 05602 FOR AMEREX STORED PRESSURE, HAND PORTABLE DRY CHEMICAL FIRE EXTINGUISHERS. ABC (Ammonium Phosphate Base)
WATLOW ELECTRIC MFG CO. FIREBAR Screw Plug Installation & Maintenance Manual I&M NUMBER: Page: 1 Date: 11/25/2013 Rev: 4.
 I&M NUMBER: 316-42-3-1 Page: 1 Pre Installation Check to make sure that heater received is the same as that ordered. Elements may come in contact with each other during shipment. Minor adjustments to elements
Product Application Guide- Industrial Alarms
 Product Application Guide- Industrial Alarms Part Numbering System LSC Series Part Number Structure LSC 648A NP R Series LSC = 30mm Alarm with LED Lights Voltage Range & Type 628A = 6 to 28 Vac/dc 110
CHILLER. Operator s & Installation Manual
 CHILLER MODELS: CH1001-A Operator s & Installation Manual Release Date: August 9, 2002 Publication Number: 620914301 Revision Date: May 6, 2010 Revision: E Visit the IMI Cornelius web site at www.cornelius.com
Circulation Heaters. To order, call or shop online at omega.com SM. CHF Series
 CHF Series Self-contained heating units designed for optimum operating efficiency and performance Providing trouble-free service and application flexibility! All of the heat generated by the elements is
INSTALLATION INSTRUCTIONS FOR 6536 SERIES TWO TON PACKAGED HEAT PUMP
 INSTALLATION INSTRUCTIONS FOR 6536 SERIES TWO TON PACKAGED HEAT PUMP TABLE OF CONTENTS 1. Warnings...2 2. Component Match-Up...2 3. Unit Depiction Figures...3 4. Blower Performance Data...5 5. General
SECTION INTERIOR LIGHTING
 SECTION 26 51 00 INTERIOR LIGHTING PART 1 - GENERAL 1.1 RELATED DOCUMENTS A. Drawings and general provisions of the Contract, including General and Supplementary Conditions and Division 01 Specification
5.0 Installation Instructions
 5.0 Installation Instructions 5.1 Location Within the laboratory, pharmacy, etc., the ideal location of the biological safety cabinet is away from personnel traffic lanes, air vents (in or out), doors
CENTRIFUGAL PUMPS. STATE the purposes of the following centrifugal pump components:
 Pumps DOE-HDBK-1018/1-93 CENTRIFUGAL PUMPS CENTRIFUGAL PUMPS Centrifugal pumps are the most common type of pumps found in DOE facilities. Centrifugal pumps enjoy widespread application partly due to their
MODEL: 1407, , 1408, & INSTALLATION AND INSTRUCTION MANUAL
 ECONOMY VACUUM OVEN MODEL: 1407, 1407-2, 1408, & 1408-2 INSTALLATION AND INSTRUCTION MANUAL Sheldon Manufacturing Inc. P.O. Box 627, Cornelius, Oregon 97113 EMAIL: tech@shellab.com INTERNET: http://www.shellab.com/~shellab
Installation, Operation and Maintenance LOK-FLANGE Multitube Heat Exchangers
 Bulletin 1200/4 (Revised 5/12) Installation, Operation and Maintenance LOK-FLANGE Multitube Heat Exchangers INNOVATORS IN HEAT TRANSFER I. INSTALLATION OF HEAT EXCHANGERS A. HEAT EXCHANGER SETTINGS 1)
G 7804 Laboratory Glassware Washer. Simplified Control, Miele Quality
 G 7804 Laboratory Glassware Washer Simplified Control, Miele Quality 2 Miele Professional: Advancing the Science of Clean G 7804: Advancing the Science of Clean Miele G 7804 Overview The G 7804 features
RK-05 Carbon Monoxide Detector Operator s Manual
 65-2433RK-05 Carbon Monoxide Detector Operator s Manual Part Number: 71-0189RK Revision: 0 Released: 5/17/11 RKI Instruments, Inc. www.rkiinstruments.com WARNING Read and understand this instruction manual
C1N & C2N SERIES Fluid heating for light industrial applications
 Keltech Electric Tankless Water Heaters C1N & CN SERIES Fluid heating for light industrial applications Contents Keltech Electric Tankless Water Heaters C1N & CN Series Overview Standard Features 6 Optional
Instruction Manual - Anti-Siphon Ejector Chlorine & Sulfur Dioxide 500 PPD (10 kg/h) Maximum Capacity
 Maximum Capacity") - Anti-Siphon Ejector Chlorine & Sulfur Dioxide 500 PPD (10 kg/h) Maximum Capacity 100 PPD (2 kg/h) Chlorine or Sulfur Dioxide 250 & 500 PPD (5 & 10 kg/h) Chlorine or Sulfur Dioxide Anti-Siphon Ejector
- Anti-Siphon Ejector Chlorine & Sulfur Dioxide 500 PPD (10 kg/h) Maximum Capacity 100 PPD (2 kg/h) Chlorine or Sulfur Dioxide 250 & 500 PPD (5 & 10 kg/h) Chlorine or Sulfur Dioxide Anti-Siphon Ejector
INSTALLATION, OPERATING & MAINTENANCE INSTRUCTIONS FOR 870 SERIES INDUSTRIAL CONTROL PANELS
 INSTALLATION, OPERATING & MAINTENANCE INSTRUCTIONS FOR 870 SERIES INDUSTRIAL CONTROL PANELS GENERAL INDEECO Industrial Control Panels are designed to provide years of trouble free operation if properly
Circulation Heaters. To order, call or shop online at omega.com SM. CHF Series
 CHF Series Self-contained heating units designed for optimum operating efficiency and performance Providing trouble-free service and application flexibility! All of the heat generated by the is immediately
TECHNICAL DATA. Wet 26a. February 22, 2009
 February 22, 2009 Wet 26a 1. DESCRIPTION The Viking Alarm Check Valve serves as a check valve by trapping pressurized water above the clapper and preventing reverse flow from sprinkler piping. The valve
Circulation Heaters. To order, call or shop online at omega.com SM. CHF Series
 CHF Series Self-contained heating units designed for optimum operating efficiency and performance Providing trouble-free service and application flexibility! All of the heat generated by the elements is
! The Caution Symbol (exclamation point) alerts you to a "CAUTION", a safety or
 alerts you to a CAUTION, a safety or") I&M NUMBER: 316-42-10-1 Page: 1 Pre Installation Check to make sure that heater received is the same as that ordered. Elements may come in contact with each other during shipment. Minor adjustments to
I&M NUMBER: 316-42-10-1 Page: 1 Pre Installation Check to make sure that heater received is the same as that ordered. Elements may come in contact with each other during shipment. Minor adjustments to
QuickStart Guide. Automated Support Removal System. PostProcess Technologies, Inc. REV C
 CENTI QuickStart Guide Automated Support Removal System PostProcess Technologies, Inc. www.postprocess.com REV C Copyright Copyright 2018 by PostProcess Technologies Inc. POSTPROCESS. All rights reserved.
Indirect Gas-Fired Make-Up Air
 Indirect Gas-Fired Make-Up Air Model IG 800 to 7,000 cfm Up to 400,000 Btu/hr Multiple Furnace Control Options Optional Evaporative Cooling May 20041 Product Features Model IG Indirect Gas-Fired Make-Up
OWNER'S SERVICE MANUAL NO INSPECTION, MAINTENANCE AND RECHARGE
 FOAM FIRE EXTINGUISHERS MODEL 254-6 LITER AFFF FOAM WITH SPRAY NOZZLE Model 250 2 ½ GAL.LON AFFF FOAM WITH ASPIRATED NOZZLE MODEL 252 2 ½ GAL.LON FFFP (ALCOHOL RESISTANT) FOAM WITH ASPIRATED NOZZLE OWNER'S
S19361F - Pre-Assembled Freeze-Protected Safety Shower Heater Skid Tankless Water Heating Safety Solutions
 Pre-assembled, freeze-protected safety fixture and SNA heater skid system Bradley Heat Trace S19-300 with SpinTec 54-144 kw (491,300 BTUs) Molded Duragrate and integrated shower pan Temperature overshoot
DF400/DF600. Construction Heaters. Installation and Maintenance Manual
 342 N. Co. Rd. 400 East Valparaiso, IN 46383 219-464-8818 Fax 219-462-7985 www.heatwagon.com Installation and Maintenance Manual Please retain this manual for future reference. DF400/DF600 Construction
Circulation Heaters. To order, call or shop online at omega.com SM. CHF Series
 CHF Series Self-contained heating units designed for optimum operating efficiency and performance Providing trouble-free service and application flexibility! All of the heat generated by the elements is
Service Manual Model 3163
 Service Manual Model 3163 Contents Important Safety Information.......... 1 Specifications.................. 2 General Information.............. 2 Direct Vent Requirements........... 2 Propane System................
Is Your Ultrasonic Cleaning System Living Up to Its Potential?
 Is Your Ultrasonic Cleaning System Living Up to Its Potential? Some guidelines about ultrasonic cleaning equipment and performance. The use of ultrasonic cleaning equipment to clean or degrease parts has
SECTION PANELBOARDS. A. Drawings and general provisions of the Contract, including General and Supplementary Conditions, apply to this Section.
 PART 1 - GENERAL 1.1 RELATED DOCUMENTS A. Drawings and general provisions of the Contract, including General and Supplementary Conditions, apply to this Section. 1.2 SUMMARY A. This Section includes the
INSTALLATION INSTRUCTIONS FOR 9330F4552 FREE DELIVERY PLENUM KITS
 RV Products Division INSTALLATION INSTRUCTIONS FOR 9330F4552 FREE DELIVERY PLENUM KITS 8330-752 CONTROL BOX KIT (12 VDC COOL ONLY) 9330C755 CONTROL BOX KIT (12 VDC HEAT READY) 8530-750 CONTROL BOX KIT
Installation Instructions Wall Ovens
 Installation Instructions Wall Ovens TESTED IN ACCORDANCE WITH THE LATEST EDITION OF UL858 STANDARD FOR HOUSEHOLD ELECTRIC COOKING APPLIANCES. IMPORTANT 1. Before beginning installation, please thoroughly
The Danger signal indicates an immediately hazardous situation which, if not avoided, will result in death or serious injury.
 The Danger signal indicates an immediately hazardous situation which, if not avoided, will result in death or serious injury. The Warning signal alerts you to potential hazards or unsafe practices which,
Discontinued. SN Series - Safety Shower Heaters Tankless Water Heating Solutions. Standard Equipment. Construction. Code Compliance and Certifications
 36-144 kw (122,800-491,300 BTUs) Temperature overshoot purge system Certified Lead-Free Design NEMA 4 enclosure standard ASME and NB Certified options available Pressure Drop Advantage Dual Flow Activation
RK Carbon Monoxide Transmitter Operator s Manual
 65-2335RK Carbon Monoxide Transmitter Operator s Manual Part Number: 71-0177RK Revision: 0 Released: 4/12/11 RKI Instruments, Inc. www.rkiinstruments.com WARNING Read and understand this instruction manual
2364 Leicester Road, P.O. Box 175, Leicester, NY Phone (585) Fax (585)
 Fax (585)") Dry Heat Sterilizers with 60 Minute Sterilization Cycle Times MODEL 3100 MODEL 2100 2364 Leicester Road, P.O. Box 175, Leicester, NY 14481 Phone (585) 382-3223 Fax (585) 382-9481 www.cpac.com December
Dry Heat Sterilizers with 60 Minute Sterilization Cycle Times MODEL 3100 MODEL 2100 2364 Leicester Road, P.O. Box 175, Leicester, NY 14481 Phone (585) 382-3223 Fax (585) 382-9481 www.cpac.com December
Portable CNA-Series - Large Industrial Heaters Tankless Water Heating Solutions
 Portable CNA-Series - Large Industrial Heaters Heavy duty industrial cart options simplify moving heater to various locations 36-72 kw (122,800-245,600 BTUs) Certified Lead-Free Design New & Improved Pressure
BHC. Replacing Air Sparging Agitation Increases Cleaning Efficiency in Immersion/Soak Tank Degreasing BHC WHITE PAPER
 WHITE PAPER Replacing Air Sparging Agitation Increases Cleaning Efficiency in Immersion/Soak Tank Degreasing Progressively tighter cleanliness specifications of high-precision manufactured parts require
Circulation Heaters. To order, call or shop online at omega.com SM. CHF Series
 CHF Series Self-contained heating units designed for optimum operating efficiency and performance Providing trouble-free service and application flexibility! All of the heat generated by the elements is
Page 1 of 18. Part# /5/2013
 Part# 1002655-06 8/5/2013 This manual contains important information concerning the installation and operation of the gun washers listed above. Read manual thoroughly and keep for future reference INSTRUCTIONS
RK/ RK Oxygen Detector Operator s Manual
 65-2494RK/65-2497RK Oxygen Detector Operator s Manual Part Number: 71-0179RK Revision: 0 Released: 2/16/11 www.rkiinstruments.com WARNING Read and understand this instruction manual before operating detector.
Tankless On Demand Electric Water Heater
 ECO FRIENDLY 98% EFFICIENT ENERGY & WATER SAVING Model MTX Tankless On Demand Electric Water Heater Available Up To 54 KW in Single or Three Phase Voltages Marine Approvals American Bureau of Shipping
O W N E R ' S M A N U A L
 O W N E R ' S M A N U A L www.parasound.com 1 Introduction Congratulations on your purchase of the Outsiders Series Loudspeaker system and thank you for choosing Parasound. Your new Outsiders were developed
Operator: Save these instructions for future use!
 50A66-743 Integrated Furnace Control Operator: Save these instructions for future use! FAILURE TO READ AND FOLLOW ALL INSTRUCTIONS CAREFULLY BEFORE INSTALLING OR OPERATING THIS CONTROL COULD CAUSE PERSONAL
DIGITAL CENTRALIZED Section NANOMASKIT
 Page 1 of 8 1 GENERAL 1.1 RELATED SECTIONS 1.2 REFERENCES.1 Section 16010 Electrical General Requirements.2 Section 16120 Wire and Cable.3 Section 16993 Electrical Starting and Testing General Requirements
RELEASE DEVICES RELEASE DEVICE-WPS MODELS A/B INSTALLATION MANUAL U.L. LISTED CANADIAN LISTED CSFM: :100 GENERAL DESCRIPTION:
 RELEASE DEVICES MADE IN THE U.S.A. RELEASE DEVICE-WPS MODELS A/B INSTALLATION MANUAL U.L. LISTED CANADIAN LISTED CSFM: 7300-1418:100 GENERAL DESCRIPTION: S/N: The "WPS" World Power Series, Time Delay Release
Circulation Heaters. To order, call or shop online at omega.com SM. CHF Series
 CHF Series Self-contained heating units designed for optimum operating efficiency and performance Providing trouble-free service and application flexibility! All of the heat generated by the elements is
STEAMPRO. Steam Generator Troubleshooting and Service Guide
 STEAMPRO Steam Generator Troubleshooting and Service Guide TABLE OF CONTENTS Page PREFACE... 1 I. STEAMPRO STEAM GENERATOR SYSTEM...2 II. PLUMBING AND ELECTRICAL...3-4 III. SYSTEM OVERVIEW... 5-10 IV.
DFE T ECHNOLOGY. At Conceptronic, the design and management process for reflow soldering systems is called Dynamic Flow Engineering, or DFE.
 DFE T ECHNOLOGY As components become smaller, component mixes become more diverse, and board densities continue to increase, the processes of packaging, interconnection, and assembly are challenging the
PURest Air Dryer Installation and Maintenance
 PURest Air Dryer Installation and Maintenance L31170 Rev. 4/04 The Haldex PURest is a desiccant type dryer that effectively removes moisture, oil and contaminants from the compressed air system. This reduces