Cuppone Pizzaform User and Installation Manual
|
|
|
- Georgia Welch
- 5 years ago
- Views:
Transcription


1 Cuppone Pizzaform User and Installation Manual Note: Pizza Equipment Professionals has provided this manual as an English only copy of the Cuppone F. LLI SRL Manual provided by the manufacturer. Words and Descriptions may have been altered. If you have questions please reference the Manufacturer s Manual you have received with your purchase S. Ideal Parkway. Manteca, CA U.S.A. info@pizzaequipmentpros.com 1
2 Introduction Initial Instructions Explanation of Symbols Risk Analysis Technical Data (Pizzaform 30, 35) Technical Data (Pizzaform 40, 45, 50) General Specifications Installation Requirements Safety Distances Instructions for the Installer Uploading & Transport Preparations and Checks Positioning Electrical Connections INDEX Power Supply, Activation, Operation Verification Pre-test Control Panel Description Instructions for the User Turning On Setting the Plate Temperature Setting the Plate Contact Time (Dwell Setting) Use Shutting OFF Countdown Function Strike Counting Function Troubleshooting Recommendations Governing Use Maintenance Instructions Maintenance Positioning of Main Controls Wiring Diagram Warranty Conditions Limits Exclusions 2
3 INTRODUCTION The present manual refers to various electronic control PIZZAFORM pizza hot forming machine models. The present manual was originally written in Italian. All other languages are translations. Congratulations on selecting a product that was designed and constructed with advanced technology. We recommend that you read through this manual fully before using this equipment. It contains very important information and instructions regarding installation, use and maintenance. The equipment you have purchased was carefully designed and constructed and has been subjected to strict inspection tests in our laboratories, therefore we can guarantee its absolute safety and functionality. Installation must be done according to the instructions by professionally qualified personnel who are able to take on the responsibility for the installation and guarantee the best conditions for operation and safety. TECHNICAL SUPPORT The manufacturer is able to solve any technical problem concerning use and maintenance. In the remote possibility of poor operation or a repair, only use qualified personnel or contact our authorized service centers. INITIAL INSTRUCTIONS ATTENTION! Failure to comply with what is described in this handbook could jeopardize safety. The manual must be kept carefully in an accessible location, it must also always accompany the product during its life. Before installing and using the equipment, this manual must be read carefully and the instructions it contains must be followed scrupulously. The manufacturer declines all civil and criminal liability for damage to people, property or animals deriving from the failure to observe current safety regulations, failure to respect the contents of this manual and from any printing or transcription errors. It also declares that it reserves the right to make any changes to the product that it considers appropriate without the obligation to provide notice. Before handling, installing, or using the product, verify the suitability of the room where it will be located. Make sure that all safety measures have been taken in order to avoid any accidents. 3


4 EXPLANATION OF SYMBOLS Risk of Crushing Fingers Warning Gear Equipotential Risk of Electric Wheels Shock Risk of Blistering Surface Warning: Before using the equipment carefully read the enclosed booklet. Warning: In case of arrest of the plate, switch off and turn on the machine. Do not force it. 4
5 RISK ANALYSIS The machine was designed in compliance with the Machinery Directive 2006/42/EC and Legislative Decree no. 17 of the 27 January In compliance with these standards an assessment of the possible damage resulting from risks to health and the safety of operators of the machines in question, should a hazed come to light, was carried out. According to the analysis there are outstanding risks associated with the use of the machine which cannot be eliminated without loss of machine functionality and without increased cost. These outstanding risks include: The operators head may get crushed by the plates upon opening. The outstanding risk is signaled by the pictogram on the machine. Risk of breakage and projection of objects during insertion of the blade into the protections during closure. Do not insert any objects into the protection grille when the machine is moving, not even to unblock the plates. In the case where the machine is blocked, switch it off and then on again. Risk of crushing fingers at the plate piston base. The piston base is flared to enable sliding of the fingers and to prevent catching; an outstanding risk of crushing of the fingers where forced into position, remains. Do not attempt to access or intervene at the piston base where the machine is moving. The outstanding risk is signaled by the pictogram on the machine. Risk of burns when touching the plates: during use, the surfaces of plates become hot, we recommend taking extra caution. The outstanding risk is signaled by this pictogram. 5


6 Ensure that you keep a distance of at least 500 mm (20 inches) between the equipment and other equipment of inflammable materials. We advise that you leave an unrestricted space of at least 500 mm to the right side to allow for easy access to the electrical system. Leave the space above the equipment free: do not place anything on it. L: width P: depth H: height Front View Side View These cables can only be used provided that their length does not exceed 2 m between the point where the cable or relative protection enters the equipment and the plug input. Rear View Plain View Packaging Dimensions 6


7 Ensure that you keep a distance of at least 500 mm (20 inches) between the equipment and other equipment of inflammable materials. We advise that you leave an unrestricted space of at least 500 mm to the right side to allow for easy access to the electrical system. Leave the space above the equipment free: do not place anything on it. L: width P: depth H: height Front View Side View These cables can only be used provided that their length does not exceed 2 m between the point where the cable or relative protection enters the equipment and the plug input. Rear View Plain View Packaging Dimensions 7

8 GENERAL SPECIFICATIONS 1 Iron supporting frame with thickness of 20 mm. 2 Stainless steel body 3 Self-braking motor (direct-current brake) with built-in thermal protection. 4 Thick chromed plates with flared perimeter. 5 Electronic control of temperature and plate contact time. 6 EC certified safety devices. 7 Lever to adjust the distance between plates. 8 Protection grille. To access the specifications explicit to your model, consult the technical data table above. 8

9 INSTALLATION REQUIREMENTS Before starting the installation, check the following conditions that are necessary for proper equipment operation and maintenance: 1) Handling: Make sure that the floor is able to support the weight of the equipment. Handle the packaged equipment using a forklift or a pallet truck. 2) Electrical connection: Provide a box for the connection to the mains power supply in the immediate surroundings. 3) Safety distances: It is mandatory that the minimum safety distances between the equipment and the other equipment or inflammable material are respected (see page 20). It is also prohibited to use the equipment in areas at risk of explosion. The indicated distances must be increased in the presence of heat sensitive material. SAFETY DISTANCES It is mandatory that the minimum safety distances between the equipment and the other equipment or inflammable material are respected (see page 20). It is also prohibited to use the equipment in areas at risk of explosion. The indicated distances must be increased in the presence of heat sensitive material. Leave this area unobstructed 9

10 INSTRUCTIONS FOR THE INSTALLER The gas, water, electrical systems and the rooms where the equipment will be installed must comply with the safety, accident prevention and fire prevention standards applicable in the country of use; otherwise the Manufacturer shall not be liable for any direct or indirect damage to people or property. ATTENTION! Always shut off the main electric switch when installing, servicing or repairing the equipment. Before making the electrical connection, make sure that the voltage and frequency stated on the specifications plate corresponds to those of the power supply. A circuit breaker with auto-protection and sufficient capacity must be installed upstream of the equipment; it must have a contact opening distance that permits complete disconnection. (the specifications regarding the opening distance of the contacts and the maximum leakage current must be taken from current regulations). The equipment must be earth bonded. The equipment must also be connected to an equipotential system using the screw located at the back of the equipment, to the lower left, marked with the symbol This equipotential system must comply with current standards. Install the equipment in a well ventilated area, as incorrect air recirculation impedes optimal operation and the wellbeing of the people working near the equipment. Do not obstruct the ventilation system in the area where the equipment is installed. Do not obstruct the ventilation and exhaust holes in this or any other equipment. At the end of installation, dispose of the packaging pursuant to local ecological and environmental regulations. The material used for packaging is compatible with the environment and can be kept safely or burnt in a specific waste combustion system. The plastic components subject to disposal with recycling are marked with this symbol 10


11 UNLOADING AND TRANSPORT PREPARATIONS AND CHECKS Unwrap the equipment and carefully remove the protective film. In the instance where glue residue remains on surfaces, remove then using soapy water; do not use corrosive products. ATTENTION! Check that all equipment parts are in good condition and that there are no defects or breakages; in such an instance, contact the manufacturer who will advise you on the procedure to follow. 11
.")
12 POSITIONING The machine must be positioned on the appropriate support supplied by the company, which must be manufactured to satisfy the characteristics. In the case where it is placed above a different base, ensure that it is level and is able to support the weight (see the technical specifications table on pg.14). Carry out this operation with the support of suitable lifting mechanisms, using the ringbolt provided, which should be screwed to the top of the machine after having removed the protective cap. Ensure that you keep a distance of at least 500 mm (20 inches) between the equipment and other equipment or flammable materials. 12

13 ELECTRICAL CONNECTIONS Only qualified personnel must carry out electrical connection. The technical data plate, located on the back of the equipment, contains all the necessary information for correct connection. The equipment must be connected to a power supply with a H05 RN-F type cable (supplied by the installer). To carry out this operation, remove the right side equipment panel, connect the cable to the terminal board and secure it with the relative cable gland located on the back of the equipment itself. Earth the equipment and connect it to the circuit; the terminal intended for this very purpose can be found on the back of the equipment, and is marked with the internationally-recognized symbol. Connect the cable to the automatic master switch (omnipolar differential magnothermal switch with a contact opening of at least 3 mm), arranged in the immediate vicinity. The manufacturer will not assume any responsibility in the instance where the above described is not respected. 13

14 POWER SUPPLY ACTIVATION OPERATION VERIFICATION Start up the equipment using the instructions provided below. Check the correct operation of all electrical components, whilst explaining how to best use the equipment and how to carry out routine maintenance and cleaning operations to the user. 14

15 PRE-TEST Prior to delivery to the customer, the equipment is tested at the manufacturer s workshops both with regard to functionality as well as to safety. When the unit is turned on for the first time is recommended that the temperature is set at 150 C and left on for at least 1 hour. During this phase, the equipment will produce fumes and unpleasant odors due to the evaporation of the moisture contained in the insulation. These fumes and odors will disappear during the subsequent operating cycles. It is recommended that during the first operating cycle, a thin layer of olive oil is placed on the hot plates using paper and is subsequently cleaned using absorbent paper, to then take a dough ball, flatten it and then reshape it into a ball, repeating this until the dough no longer sticks to the plates. This operation serves to establish a protective layer over the plates which facilitates movement of the pasta during flattening; this must be repeated every time that thorough cleaning of the plates is carried out. ATTENTION: Please refer to the user s manual for startup and programming. 15


16 16
17 INSTRUCTIONS FOR THE USER This equipment was designed exclusively for flattening dough balls to make pizza or similar food products as per the methods indicated in this booklet. Any use other than what is indicated is considered improper, potentially dangerous for people and animals and could cause irreparable damage to the equipment. Improper equipment will void the warranty; furthermore, the manufacturer does not consider itself liable for damage to people, animals or property. FIRE HAZARD Leave the area around the equipment free and clean of combustibles. Do not keep flammable material near this equipment. All of the models described in this handbook have parts that are heated by direct contact, by air convection or fumes and radiation: attention - risk of burns! Do not handle parts without suitable protection. ATTENTION: It is prohibited to place flammable solids or liquids, such as spirits, on the plates during operation. Supervise the equipment when in operation and do not leave food on the plates unsupervised! ATTENTION: Always turn off the main electrical switch when no longer using the equipment, especially during cleaning operations or a prolonged period of inactivity. If you notice any anomaly (ex. damaged power cable, etc...), poor operation or failure, do not use the equipment and contact a service center authorized by the manufacturer. Original spare parts must be used under penalty of cancellation of the warranty. Place the emergency telephone numbers in a visible location. This equipment is not suitable for use by people (including children) with reduced physical, sensorial or mental capacity or those lacking experience and knowledge, unless a person who is responsible for their safety supervises them or provides them with instruction regarding equipment use. Personnel using the equipment must be professionally prepared and periodically trained in its use and in safety and accident prevention regulations. Children must be supervised to make sure they do not play with the equipment or its parts. 17
 will present the top plate temperature and the display (3) the bottom plate temperature.")


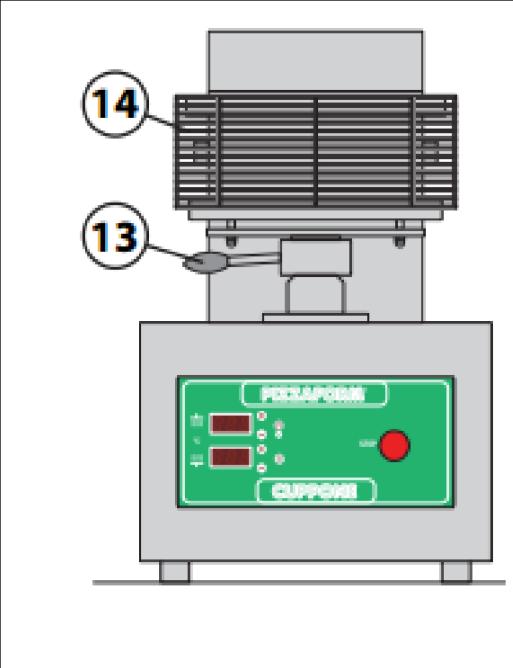
18 TURNING ON Unblock the machine by turning the STOP key (12) clockwise. Switch the machine on by pressing the ON/OFF key (11). After a few sec the display (1) will present the top plate temperature and the display (3) the bottom plate temperature. SETTING THE PLATE TEMPERATURE To set the top plate temperature, press either key (5) or (6); the display (1) will begin to flash; press key (5) or (6) up until the desired temperature has been achieved. To set the bottom plate temperature, press either key (7) or (8); the display (3) will begin to flash; press key (7) or (8) up until the desired temperature has been achieved. N.B. The temperature which has been set at the time the machine is switched off, will be automatically saved and proposed once again when the machine is switched on again. SETTING THE PLATE CONTACT TIME (Dwell Setting) To set the plate contact time, press key (10); the display (1) will begin to flash and the set time will be displayed; press keys (5) and (6) up until the desired time has been achieved. 18
 lowered.")
.")
19 USE Wait until the plates have reached the set temperature; attempt to flatten a few balls by varying the plate distance using the lever (13) up until the desired depth has been achieved. Flattening is achieved by positioning the dough ball at the center of the bottom plate and keeping the protection grille (14) lowered. Once the bottom plate has returned to the original position, the protection grille can be raised and the dough disk can be removed taking care not to burn yourself on the plate surface. Find the setting most suited to the type of dough used; the machine is ready to begin operating. SHUTTING OFF To switch the machine off simply press the ON/OFF key (11). ATTENTION: The protective grille must only be raised when the lower plate has finished the levelling cycle and has returned to the original position; should you wish to lower the bottom plate beforehand to reduce the diameter of the disk plate, raise the grille before the end of the cycle. 19
; to modify the time, use keys (5) and (6) (maximum limit 99.5: 99 hours and 50 minutes).")
20 COUNTDOWN FUNCTION The board is equipped with a countdown function which automatically turns on the equipment. To activate this function, press Timer key (10) with the equipment turned off. The time remaining before the oven is due to turn itself on will appear on display (1); to modify the time, use keys (5) and (6) (maximum limit 99.5: 99 hours and 50 minutes). When making the selection, the TIMER Led (9) flashes. Should you wish to exit the function and cancel the countdown, press key (10) or key (11) to switch the equipment on. Otherwise, the equipment will switch on upon expiry of the set time, according to the time set at the time of switching off the aforementioned. WARNING! In the instance of power failure, the countdown value is saved and will resume upon the return of power: for example, let s consider the following situation, if 4 hours were remaining before the oven was due to turn itself on and the power supply was cut o for 30 minutes, once the power supply has returned, 4 hours will still remain before the oven is due to turn itself on. 20
: thermocouple lower heating element fault. 3. Err on display (1) and rot on display (3) : motor error - cycle not completed in the time set with the tup parameter.")
 unlocked, when pressing key (5) the total number of strikes carried out is displayed for five")
21 TROUBLE SHOOTING In case of a fault and or malfunctions, the following error messages will appear on the board display: 1. Err on display (1): thermocouple upper heating element fault. 2. Err on display (3): thermocouple lower heating element fault. 3. Err on display (1) and rot on display (3) : motor error - cycle not completed in the time set with the tup parameter. NOTE: Err machine turns off. To reset the functions, switch the machine off and then on again. If the problem persists, contact a service center. STRIKE COUNTING FUNCTION With the board in the OFF position and the machine on, or with the STOP key (12) unlocked, when pressing key (5) the total number of strikes carried out is displayed for five seconds. The display (1) presents thousands whilst display (3) the unit of measurement. The contactor is updated after every five strikes. 21
22 Problem Cause Solution The dough sticks to the plates The shape of the Dough Disc is not perfectly circular. The dough disk withdraws after flattening The plate temperature is too Low Check the set temperature on the thermostat and where necessary, raise it to C The ball has not been placed at the centre of the plate. The shape of the ball is not spherical. The plate temperature is too low The dough ball has not adequately risen. The dough ball temperature is too low The dough disk is not the correct The plate depth adjustment is not size correct. The timer adjustment is not correct. Bubbles form on the surface of the pizza during cooking Place the ball at the centre of the bottom plate. Do not alter the spherical shape of the ball when handling. Check the set temperature on the thermostats and where necessary, raise it to C. Allow the dough to rise more by placing it in a hot place Decrease or increase the distance between plates. Decrease or increase the plate contact time. The dough does not rise perfectly. Pierce the dough with a dough docker before topping. RECOMMENDATIONS GOVERNING USE We recommend setting the thermostats to a temperature of C and the timer at a contact time equal to 0.8 seconds (these values may be modified based upon the type of dough used by the operator, the rising level and the temperature). It is recommended that during the first operating cycle, a thin layer of olive oil is placed on the hot plates using paper; this operation serves to create a protective layer over the plates which facilitates movement of the pasta during flattening and this must be repeated every time that thorough cleaning of the plates is carried out. It is also essential to use well risen and not cold dough (remove the dough from the fridge at least two hours before begin work) and place the lightly floured ball, exactly at the center of the bottom plate. ATTENTION When raising the protective grill during resurgence of the bottom plate, movement is blocked and is immediately diverted. In the instance where the bottom plate does not complete the flattening action, owing to the dough which has not risen or owing to a foreign body in between the plates, immediately raise the protection to enable the diversion of the movement. In the case where the plate stops, switch the machine o and then on again. Do not force it. 22
23 MAINTENANCE INSTRUCTIONS The data plate, located on the back of the equipment, provides important technical information: this information is essential when making a request for maintenance or a repair for the equipment: therefore is it recommended not to remove, damage or modify it. ATTENTION: Prior to any routine or extraordinary maintenance operation, disconnect the equipment from the power supply; when performing this operation do not pull on the cable to remove the plug. Wait until the plates cool down. Cleaning the equipment using methods, products or tools that are not specifically indicated in this handbook is considered improper, potentially dangerous and could damage the equipment or jeopardize its operation or duration. CAUTION! Do not use products (even if diluted) that contain chlorine (sodium hypochlorite, hydrochloric or muriatic acid, etc.) to clean the equipment or the floor under the equipment. Do not use metal or abrasive tools to clean the steel (ex. brushes or scourers, such as Scotch Brite). Do not permit dirt, fat, food or other items to form a crust on the equipment. It is recommended to have the equipment checked by an authorized service center at least once a year. MAINTENANCE Clean the equipment every day, removing any food waste without using substances harmful to health. Never use water. Periodically, remove the side and back panels and vacuum any flour remains at the bottom. Clean the exterior parts using a dry cloth without the use of solvents or products that contain abrasive or chlorinated substances. Pay attention not to scratch the plates when cleaning them to remove any dough remains. If the equipment is not used for long periods of time, disconnect the electrical power and use a cloth to apply a protective layer of Vaseline oil on the stainless steel surfaces. ATTENTION: Do not clean the equipment using direct water sprays or pressure jets! All of these measures are important for proper the equipment care and failure to observe them could cause damage that is not covered by the warranty! WARNING: RISK OF FIRE Every 3 months, open the control unit and carefully vacuum any our or dust deposits! 23

24 POSITIONING OF MAIN CONTROLS All electrical components can be found inside the control box to the left of the equipment. You are able to access these components by removing the right side. Disconnect the electrical power supply before carrying out any of the following operations. 24
25 Cable must be purchased at the expense of the client. Available to purchase from Pizza Equipment Professionals WIRING DIAGRAM Protection at the Expense of the Client. 25

26 WARRANTY CONDITIONS Cuppone F.lli s.r.l. guarantees this product for 1 year from its date of purchase for manufacturing and material defects. Cuppone F.lli s.r.l. ensures that all of its products were constructed using the best quality materials and with work techniques that guarantee its complete efficiency. If defective or malfunctioning parts are discovered during normal use, these parts will be replaced free of charge. For products sold abroad, the replacements will be provided free of charge ex our works, with the exception of particular conditions agreed upon during the contract phase with the foreign distributor. The liability of Cuppone F.lli s.r.l. is limited to the supply of the device, which must be installed in a workmanlike manner by qualified personnel following the instructions contained in the booklet provided with the purchased product and in compliance with current laws. Cuppone F.lli s.r.l. shall not be liable in the case of failure to observe the installation, use and maintenance instructions in the same manual provided with each product. Systems that are installed in public areas are subjected to particular regulations. 26
27 LIMITS The warranty shall be acknowledged under the following conditions: 1. the device is installed by a qualified technician or capable person who assesses as suitable all of the technical specifications of the system where the equipment will be connected, which in any case must be compliant with what is required in the booklet provided with all products; 2. the installer confirms to have successfully tested the product after installing it; 3. the equipment is used as described in the instruction manual provided with all products. The warranty shall not apply for damage caused by: 1. atmospheric agents, chemicals, fires, electrical system defects, improper product use, lack of maintenance, changes to or tampering with the product, an ineffective and/or unsuitable use and/or other causes independent of the product. 2. all damage caused by transport (for which the carrier is responsible) therefore it is recommended to carefully check the goods upon receipt, immediately informing the retailer of any damage, reporting the information on the transport document and on the copy that the transporter keeps. EXCLUSIONS The guarantee does not include parts subject to normal wear, such as: Gaskets, ceramic glass, lamps and electric cables. The warranty does not cover product calibration or adjustments based on the type of installation. This warranty is only valid for the purchaser and cannot be transferred. In the case of part replacement, the warranty shall not be extended. No compensation shall be acknowledged for a period of product inefficiency. This is the only valid warranty and no one else is authorized to provide others in the name of or on behalf of Cuppone F.lli s.r.l.. WARRANTY SERVICES If during the warranty period defects appear or breakage is verified, the user must contact his reseller within 2 months of the date in which the defect was discovered with a tax document. In the case of a justified claim, the warranty service includes equipment repair without any charge as foreseen by current law. FORUM For any dispute, the competent court will be the court of Treviso. 27
Index I. INSTALLATION DIAGRAM... WIRING DIAGRAMS...
 Index I. INSTALLATION DIAGRAM... 4 II. III. WIRING DIAGRAMS...... 1. Wiring diagram AC 3-N-400 50/60 Hz... 2. Wiring diagram AC 3-230 50/60 Hz...... 3. Wiring diagram AC 230 50/60 Hz... 4. Series 30 electrical
USERS MANUAL FOR GAS BOILERS
 USERS MANUAL FOR GAS BOILERS PLEASE READ THE MANUAL CAREFULLY: IT CONTAINS IMPORTANT INFORMATION REGARDING SAFETY, INSTALLATION, USE AND MAINTENANCE OF THE APPLIANCE MODELS: NOVADENS 24 NOVADENS 24C NOVADENS
Friul Co. M33 Sheeter User & Installation Manual
 Friul Co. M33 Sheeter User & Installation Manual 1 INTRODUCTION Congratulations on selecting a product that was designed and constructed with advanced technology. We recommend that you read through this
HR 601 C A AUS. ENGLISH Instructions for use Page 2
 HR 61 C A AUS ENGLISH Instructions for use Page 2 1 INSTRUCTION FOR USE IMPORTANT SAFETY INSTRUCTIONS BEFORE USING THE GLASS CERAMIC HOB INSTALLATION ELECTRICAL CONNECTIONS ENERGY SAVING TIPS SAFEGUARDING
CTA15-2 warming drawer. operating and installation instructions
 CTA15-2 warming drawer operating and installation instructions Table of Contents GB-IE 1 PRECAUTIONS FOR USE...4 2 DISPOSAL INSTRUCTIONS - OUR ENVIRONMENT POLICY...5 3 SAFETY PRECAUTIONS...6 4 GET TO KNOW
Instructions for Use Warming Drawer. Bedienungsanweisung Wärmeschublade. Notice d'utilisation Chauffe-vaisselle. Gebruiksaanwijzing Servieswarmer
 Instructions for Use Warming Drawer Bedienungsanweisung Wärmeschublade Notice d'utilisation Chauffe-vaisselle Gebruiksaanwijzing Servieswarmer Table of Contents GB-IE 1 PRECAUTIONS FOR USE...4 2 DISPOSAL
SAFEGUARDING THE ENVIRONMENT IMPORTANT NOTES BEFORE USING THE OVEN OVEN ACCESSORIES CARE AND MAINTENANCE TROUBLESHOOTING GUIDE AFTER SALES SERVICE
 INSTRUCTIONS FOR USE SAFEGUARDING THE ENVIRONMENT IMPORTANT NOTES BEFORE USING THE OVEN OVEN ACCESSORIES CARE AND MAINTENANCE TROUBLESHOOTING GUIDE AFTER SALES SERVICE To make the most of your new oven,
INSTRUCTIONS FOR USE. To make the most of your new oven, read the user's instructions carefully and keep them on hand for consultation in the future.
 INSTRUCTIONS FOR USE INSTALLATION...4 SAFEGUARDING THE ENVIRONMENT... 7 IMPORTANT NOTES... 7 BEFORE USING THE OVEN... 8 OVEN ACCESSORIES... 9 CARE AND MAINTENANCE... 10 TROUBLESHOOTING GUIDE... 12 AFTER
SAFEGUARDING THE ENVIRONMENT IMPORTANT NOTES BEFORE USING THE OVEN OVEN ACCESSORIES CARE AND MAINTENANCE TROUBLESHOOTING GUIDE AFTER SALES SERVICE
 31002018GB.fm Page 11 Tuesday, December 2, 2008 10:29 PM INSTRUCTIONS FOR USE SAFEGUARDING THE ENVIRONMENT IMPORTANT NOTES BEFORE USING THE OVEN OVEN ACCESSORIES CARE AND MAINTENANCE TROUBLESHOOTING GUIDE
Reseller Stamp for Warranty
 FORMING MACHINE PF PF 30 PF 33 PF 36 PF 40 PF 45 Reseller Stamp for Warranty The equipment is constructed and tested in accordance with the safety regulations indicated in the reference European directives.
Warming Drawer LAM9001. User & Installation Guide
 Warming Drawer LAM9001 User & Installation Guide 1 CONTENTS Safety information... 2 Safety instructions... 4 Precautions during use... 5 Appliance Description... 6 Use... 7 Load capacity... 8 Cleaning
IMPORTANT SAFETY INFORMATION
 319252GB.fm Page 11 Wednesday, September 3, 28 4:5 PM IMPORTANT SAFETY INFORMATION This manual contains important information regarding safety, the use and maintenance of your new hob. Read the manual
Warming Drawer LAM9000. User & Installation Guide
 Warming Drawer LAM9000 User & Installation Guide 1 CONTENTS Safety information... 2 Safety instructions... 4 Precautions during use... 5 Appliance Description... 6 Use... 7 Load capacity... 8 Cleaning
Installation and Operating Instructions MODEL: MSE46W
 Installation and Operating Instructions MODEL: MSE46W MSE50W MODEL: Free Standing Electric ElectricOven Oven Free Standing Please read these instructions carefully before attempting to install or use this
OVENS AUS. Installation - Use - Maintenance. Oven models: 60cm Built in Ovens
 OVENS Installation - Use - Maintenance AUS Oven models: 60cm Built in Ovens 539.07.031 539.07.041 GENERAL INFORMATION Please read this booklet thoroughly before you use this appliance. It is important
EED EED EED EED 29800
 EED 14700 EED 14800 EED 14650 EED 29800 Warming Drawer EN User Manual 2 WWW.ELECTROLUX.COM CONTENTS SAFETY INFORMATION... 3 SAFETY INSTRUCTIONS... 5 PRECAUTIONS DURING USE... 6 APPLIANCE DESCRIPTION...
Packaged Air Conditioning Units. Owner s Guide to Operating and Maintaining Your Air Conditioner. This manual should be left with the owner.
 Packaged Air Conditioning Units Owner s Guide to Operating and Maintaining Your Air Conditioner ELECTRICAL SHOCK HAZARD. Failure to follow this warning could result in personal injury, Disconnect power
LISEO Insert. European Standard Certification UNE EN inserts. LISEO s.r.o. Folknářská 1246/21 Děčín 2 Nové Město
 LISEO Insert European Standard Certification UNE EN-13229 inserts LISEO s.r.o. Folknářská 1246/21 Děčín 2 Nové Město 405 02 INTRODUCTION.4 1. GUARANTEE CONDITIONS.4 1.1. SAFETY WARNINGS....4 1.2. GUARANTEE
Verdi 90 & 120 Ceiling Hood Re-Circulating and Ducted Installation & User Instructions
 Verdi 90 & 120 Ceiling Hood Re-Circulating and Ducted Installation & User Instructions Please read these instructions carefully before installing and operating this appliance 1 Contents 1. Introduction
USE AND INSTALLATION HANDBOOK
 Date : 30/10/14 Rev. 02 PR.T : FG006203 USE AND INSTALLATION HANDBOOK (SLA1) ALARM1, ALARM2 ALARM WITH BUFFER BATTERY Via Enrico Fermi, 8-35020 Polverara PD Tel.049/9772407 Fax.049/9772289 www.fourgroup.it
GB User and maintenance manual
 GB User and maintenance manual IMPORTANT SAFETY INSTRUCTIONS These instructions shall also be available on website: docs.whirlpool.eu. YOUR SAFETY AND THAT OF OTHERS IS VERY IMPORTANT This manual and
02/2010. Mod: EFP/44R. Production code: ENTRY 8 RUST
 02/2010 Mod: EFP/44R Production code: ENTRY 8 RUST DECLARATION CE OF CONFORMITY In agreement with the Low Voltage Directive 2006/95 EEC, with the directive 2004/108 EEC (EMC9),with the directive 2006/42
Operating and installation instructions
 Operating and installation instructions Plate warming drawer EGW 3060-10 To avoid the risk of accidents or en-gb damage to the appliance it is essential to read these instructions before it is installed
THERMOFILM CONVECTIVE PANEL HEATER INSTALLATION, OPERATION AND MAINTENANCE MANUAL. Models: CP 2400 CP 2000 CP 1500 CP 1000 TABLE OF CONTENTS
 THERMOFILM CONVECTIVE PANEL HEATER Rev C JUL13 INSTALLATION, OPERATION AND MAINTENANCE MANUAL Models: CP 2400 CP 2000 CP 1500 CP 1000 TABLE OF CONTENTS 1. Important Safety Instructions 2. Specification
Leonardo 90 Wall Hood
 Leonardo 90 Wall Hood Installation & User Instructions Please read these instructions carefully before installing and operating this appliance 1 Contents 1. Introduction 3 2. Health and Safety 3-4 3. Installation
Hamlet 60 & 80 Wall Hood
 Hamlet 60 & 80 Wall Hood Installation & User Instructions Please read these instructions carefully before installing and operating this appliance 1 Contents 1. Introduction 3 2. Health and Safety 3-4 3.
LISEO STOVES. European Standard Certification UNE EN stoves. LISEO s.r.o. Folknářská 1246/21 Děčín 2 Nové Město
 LISEO STOVES European Standard Certification UNE EN-13240 stoves LISEO s.r.o. Folknářská 1246/21 Děčín 2 Nové Město 405 02 INTRODUCTION.3 2 1. GUARANTEE CONDITIONS.3 1.1. SAFETY WARNINGS..3 1.2. GUARANTEE
Instruction Manual. Bottle Cooler. Models HBC-50 (-S) HBC-65 (-S) HBC-80 (-S) HBC-95 (-S) hoshizakiamerica.com. Issued: Revised:
 HBC-65 (-S) HBC-80 (-S) HBC-95 (-S) hoshizakiamerica.com. Issued: Revised:") Instruction Manual Bottle Cooler Models HBC-50 (-S) HBC-65 (-S) HBC-80 (-S) HBC-95 (-S) hoshizakiamerica.com Issued: 06-11-2018 Revised: WARNING Only qualified service technicians should install and service
Instruction Manual Bottle Cooler Models HBC-50 (-S) HBC-65 (-S) HBC-80 (-S) HBC-95 (-S) hoshizakiamerica.com Issued: 06-11-2018 Revised: WARNING Only qualified service technicians should install and service
Installation and Operating Instructions
 Installation and Operating Instructions Models: HO-4-77NF-CER-T For your convenience, we recommend to attach the serial number label HERE. As part of Parmco Appliances commitment to improving and updating
Rigoletto 60,90 & 120 Built-In Cupboard Hood
 Rigoletto 60,90 & 120 Built-In Cupboard Hood Installation & User Instructions Please read these instructions carefully before installing and operating this appliance 1 Contents 1. Introduction 3 2. Health
Installation and user manual
 Installation and user manual Please read carefully and retain for future reference Models EcoHeat: C3, C5, C6, C8, C9, C11, C12 Rev.1_09-07-15 Page 1 Table of Contents 1 IMPORTANT: WARNINGS 1.1 GENERAL
User and maintenance manual
 GB User and maintenance manual IMPORTANT SAFETY INSTRUCTIONS These instructions shall also be available on website: docs.whirlpool.eu. YOUR SAFETY AND THAT OF OTHERS IS HIGHLY IMPORTANT. This manual and
CERAMIC FAN HEATER URBAN
 EN CERAMIC FAN HEATER URBAN OPERATING INSTRUCTIONS Read the instructions carefully before installing and operating the appliance or performing maintenance operations. Observe all the safety instructions;
Read this manual through carefully before installing/using the cleaner, paying special attention to the SAFETY INSTRUCTIONS
 PW1370TD 2 EN Read this manual through carefully before installing/using the cleaner, paying special attention to the SAFETY INSTRUCTIONS 3 E3 E1 C3 A1-A2-A3-A4 B4 B1 B5 B2 C1 B3 D 1 4 1 2 3 4 5 6 7 Ø13
Rigoletto 60,90 & 120 Built-In Cupboard Hood
 Rigoletto 60,90 & 120 Built-In Cupboard Hood Installation & User Instructions Please read these instructions carefully before installing and operating this appliance 1 Contents 1. Introduction 3 2. Health
Instructions. 1 Instructions
 Contents 1 Instructions 22 1.1 General safety instructions 22 1.2 Identification plate 23 1.3 Manufacturer liability 23 1.4 Appliance purpose 23 1.5 Disposal 23 1.6 This user manual 24 1.7 How to read
60cm Built In Induction Cooktop
 20100618 issue 2 啊哈 60cm Built In Induction Cooktop Installation and User manual Content Safety instructions---------------------------------- 1 Product description--------------------------------- 3 Installation---------------------------------------------
USER GUIDE. DRENA 2 - User Manual ELECTRICAL PANEL FOR 2 MOTORS - WASTE WATER -
 USER GUIDE DRENA 2 - User Manual ELECTRICAL PANEL FOR 2 MOTORS - WASTE WATER - II CONTENTS 1. SYMBOLS AND WARNINGS... 5 2. GENERAL INFORMATION... 6 3. WARNINGS... 7 4. GENERAL DESCRIPTION... 8 5. INSTALLATION...
Instructions for use
 Instructions for use These instructions are also available on the website: www.kitchenaid.eu Important instructions for safety 4 Installation 6 Safeguarding the environment 6 Troubleshooting guide 7 After-sales
DRYTEK 1 - User Manual ELECTRICAL PANEL FOR 1 MOTOR WITH POWER FACTOR CONTROL
 DRYTEK 1 - User Manual ELECTRICAL PANEL FOR 1 MOTOR WITH POWER FACTOR CONTROL CONTENTS 1. INTRODUCTION... 5 2. WARNINGS... 6 3. GENERAL DESCRIPTION... 7 4. INSTALLATION... 8 5. CONTROL PANEL... 9 5.1
Installation and Operating Instructions
 Installation and Operating Instructions Models: Verso 4G Hob As part of Parmco Appliances commitment to improving and updating product ranges, we reserve the right to alter, change and update technical
Nabucco Island Hood. Installation & User Instructions. Please read these instructions carefully before installing and operating this appliance
 Nabucco Island Hood Installation & User Instructions Please read these instructions carefully before installing and operating this appliance 1 Contents 1. Introduction 3 2. Health and Safety 3-4 3. Installation
h is ngl E ASSISTANCE CENTRE AUTHORIZED RETAILER
 Softcooker_03 Ed. 09/2015 Roner R FOREWORD - This manual was drawn up to provide the Customer with information concerning the machine and applicable standards, as well as instructions on operation and
HEA-900 EDENPURE INDOOR/OUTDOOR ALL SEASON INFRARED HEATER
 HEA-900 EDENPURE INDOOR/OUTDOOR ALL SEASON INFRARED HEATER USER MANUAL 01mf_Manuel_EdenPure_ChaufHEA-900_12025.indd 1 ALL SEASON INFRARED HEATER 01mf_Manuel_EdenPure_ChaufHEA-900_12025.indd 2 INSTRUCTION
OPERATING INSTRUCTIONS
 EN CERAMIC FAN HEATER OPERATING INSTRUCTIONS Read the instructions carefully before installing and operating the appliance or performing maintenance operations. Observe all the safety instructions; failure
INSTALLATION AND USER INSTRUCTIONS BUILT-IN ELECTRIC DEEP FAT FRYER DF-Z01
 INSTALLATION AND USER INSTRUCTIONS BUILT-IN ELECTRIC DEEP FAT FRYER DF-Z01 Dear Customer, thank you for purchasing one of our products. We are confident that this practical and modern appliance, made with
 www.indesit.com/register GB Contents Safety instructions, 3 Safeguarding the environment, 5 Setting up your oven, 6 Operation instruction, 7 Troubleshooting, 11 Installation instruction, 12 2 SAFETY INSTRUCTIONS
Built-in Conventional Oven
 Built-in Conventional Oven LAM3204 User & Installation Guide using this manual Thank you for choosing LAMONA Built - In Oven. This user Manual contains important information on safety and instructions
Warming Drawer. Instructions and Installation LAM
 Warming Drawer Instructions and Installation www.howdens.com/appliance-registration LAM9002 See back page for product serial number 3 CONTENTS Safety information... 4 Appliance Description... 8 Use...
DUCTED AIR CONDITIONER. Owner s Manual. KD Series KD24. Kaden Owner s Manual 1
 DUCTED AIR CONDITIONER Owner s Manual KD Series KD24 Kaden Owner s Manual 1 Table of Contents 1. Safety Precautions 4 2. Indoor Unit Parts and Major Functions 6 3. Care and Maintenance 8 4. Troubleshooting
Instructions for installation and use English. More documents on: H B /09
 TM Instructions for installation and use English EN More documents on: www.zodiac-poolcare.com H0538700.B - 2015/09 Read this manual carefully before installing, maintaining or repairing this appliance!
METAL CERAMIC FAN HEATER
 EN METAL CERAMIC FAN HEATER OPERATING INSTRUCTIONS Read the instructions carefully before installing and operating the appliance or performing maintenance operations. Observe all the safety instructions;
 www.indesit.com/register GB Contents Safety instructions, 3 Safeguarding the environment, 5 Setting up your oven, 6 Operation instruction, 7 Troubleshooting, 11 Installation instruction, 12 2 SAFETY INSTRUCTIONS
60cm Built-In Ceramic Cooktop
 20130304 issue 8 啊哈 60cm Built-In Ceramic Cooktop Installation and User manual Content Safety instructions-----------------------------------2 Features of your product---------------------------4 Installing
ST1. Mod. USE AND MAINTENANCE MANUAL
 Mod. USE AND MAINTENANCE MANUAL 2 Use and Maintenance Manual ---------------------------------------------------------------------------------------------------------------------------------------------------------------------------------
USE AND INSTRUCTION MANUAL MODD. EKL 823 EKL 864 EKL 864 R
 USE AND INSTRUCTION MANUAL MODD. EKL 823 EKL 864 EKL 864 R EKL 1264 EKL 1264 R(-HT) rev. 0 TECNOEKA S.r.l. Via Marco Polo,, n.11-35010 Borgoricco (Padova) Italy Tel. +39.049.9300344 +39.049.5791479 Fax
IMPORTANT SAFETY INSTRUCTIONS DANGER WARNING
 IMPORTANT SAFETY INSTRUCTIONS These instructions shall also be available on website: www.whirlpool.eu YOUR SAFETY AND THAT OF OTHERS IS VERY IMPORTANT This manual and the appliance itself provide important
COMBY 4000 & 9000 STEAM CLEANER OPERATOR MANUAL
 COMBY 4000 & 9000 STEAM CLEANER OPERATOR MANUAL Clemas & Co. Unit 5 Ashchurch Business Centre, Alexandra Way, Tewkesbury, Gloucestershire, GL20 8NB. Tel: 01684 850777 Fax: 01684 850707 Email: info@clemas.co.uk
Cooker Hood User Manual
 Cooker Hood User Manual HCB93042X EN 01M-8850803200-0116-02 Please read this manual first! Dear Customers! Thank you for preferring a Beko product. We hope that you get the best results from your product
IMPORTANT SAFETY INSTRUCTIONS DANGER: WARNING:
 IMPORTANT SAFETY INSTRUCTIONS YOUR SAFETY AND THAT OF OTHERS IS PARAMOUNT This manual and the appliance itself provide important safety warnings, to be read and observed at all times. This is the attention
User Manual GV25 GV35 GV702. Company information: Original instructions GV12066 (1)
") User Manual Original instructions GV25 GV35 GV702 Company information: www.vipercleaning.eu info-eu@vipercleaning.com GV12066 (1) 2012-04-10 USER MANUAL ENGLISH TABLE OF CONTENTS Introduction... 4 Manual
User Manual Original instructions GV25 GV35 GV702 Company information: www.vipercleaning.eu info-eu@vipercleaning.com GV12066 (1) 2012-04-10 USER MANUAL ENGLISH TABLE OF CONTENTS Introduction... 4 Manual
HG 675 CX 60 HG 675 CN 60 HG 675 CW 60
 HG 675 X 60 HG 675 CX 60 HG 675 CN 60 HG 675 CW 60 1 2 1. : 93/68: 90/396: 2006/95/CE: 2004/108/CE: - 1935/2004:. 2002/95/CE: RoHS 2.,.,,,,...,. (,..)..,,.,. ( ),,, ;,,.,.....,.,,,,,,...,. (..),,.,..,.,,,,
DAIKIN ROOM AIR CONDITIONER. Operation Manual
 DAIKIN ROOM AIR CONDITIONER Operation Manual FDXM25F2V1B FDXM50F2V1B FDXM35F2V1B FDXM60F2V1B CONTENTS READ BEFORE OPERATION Safety precautions... 2 Names of parts... 4 CARE Care and Cleaning... 6 TROUBLE
Cooker Hood LA-72-CAN.
 Cooker Hood LA-72-CAN EN www.luxairhoods.com WARNINGS Safety This equipment can be used by children aged 8 or more, people with physical, mental and sensory disabilities or inexperienced users it they
ELECTRIC HEATER WITH CARBON FIBER HEATING ELEMENTS
 EN ELECTRIC HEATER WITH CARBON FIBER HEATING ELEMENTS OPERATING INSTRUCTIONS Read the instructions carefully before installing and operating the appliance or performing maintenance operations. Observe
Curv-infrared.com. The Smarter Way. To Heat Your Home. Installation & Operating Instructions For Cürv, Flat, Towel Rail and Mirror Infrared Heaters
 Curv-infrared.com The Smarter Way To Heat Your Home Installation & Operating Instructions For Cürv, Flat, Towel Rail and Mirror Infrared Heaters Safety Precautions Important Notice To Purchaser Before
FAN HEATER FH118 User Manual
 FAN HEATER FH118 User Manual PLEASE READ AND SAVE THESE INSTRUCTIONS FOR FUTURE REFERENCE IMPORTANT SAFEGUARDS When using electrical appliances, basic safety precautions should always be followed to reduce
ECH60DC 60CM CERAMIC HOB DIAL CONTROL. Instruction Manual. Please read these instructions carefully before use and retain for future reference
 ECH60DC 60CM CERAMIC HOB DIAL CONTROL Instruction Manual Please read these instructions carefully before use and retain for future reference Safety Warnings Your safety is important to us. Please read
Instruction Leaflet. Heater with Adjustable Thermostat PLEASE READ AND SAVE THESE IMPORTANT INSTRUCTIONS
 TRUSTED FOR OVER 100 YEARS Heater with Adjustable Thermostat * Fan-Forced Heaters may appear with a different grill design NOTE: A Phillips screwdriver is required for assembly. Instruction Leaflet PLEASE
Tornado Operations & Maintenance Manual
 Tornado Industries, LLC 333 Charles Court West Chicago, IL 60185 www.tornadovac.com Tornado Operations & Maintenance Manual MODEL NO. 99414 Form No. L9740AB Tornado Industries, LLC. All rights reserved
MICATHERMIC PANEL HEATER
 EN MICATHERMIC PANEL HEATER OPERATING INSTRUCTIONS Read the instructions carefully before operating the panel or carrying out maintenance operations. Observe all the safety instructions; failure to observe
40KMC KMQ
 40KMC------301 40KMQ------301 OWNER S MANUAL Split system Global cassette indoor unit IR Remote Control Room Controller Zone Manager The unit can be used with infrared Remote Control, with the Carrier
operating & installation instructions SA20XMFR
 operating & installation instructions SA20XMFR Contents 1. INSTRUCTIONS FOR SAFE AND PROPER USE 26 2. INSTALLATION 28 3. DESCRIPTION OF CONTROLS 30 4. USE OF THE OVEN 35 5. AVAILABLE ACCESSORIES 36 6.
THANK YOU FOR PURCHASING THE LV-H133 TOWER HEPA AIR PURIFIER BY LEVOIT! GET STYLE #LevoitLove #LevoitLifestyle
 Model No.: LV-H133 Tower HEPA Air Purifier Questions or Concerns? Please contact us Monday - Friday 9:00 am - 5:00 pm PT at support@levoit.com or (888) 726-8520. THANK YOU FOR PURCHASING THE LV-H133 TOWER
Instruction Manual for Electric Warming Drawer BWD14B
 Instruction Manual for Electric Warming Drawer BWD14B Contents Appliance Description... 6 Main Components... 6 How the warming drawer works... 6 Use... 7 Before using for the first time... 7 Control Panel...
Infrared quartz heater
 Infrared quartz heater User manual English...2 USA Introduction Infrared quartz heater Introduction Congratulations! You have made an excellent choice with the purchase of this quality Easy Home product.
Operator s Manual. 68 Inch Conveyor Pizza Ovens
 Thank you for purchasing this Vollrath equipment. Before operating the equipment, read and familiarize yourself with the following operating and safety instructions. SAVE THESE INSTRUCTIONS FOR FUTURE
INSTALLATION AND OPERATION MANUAL TURBO CONVECTION OVEN TCO85
 INSTALLATION AND OPERATION MANUAL TURBO CONVECTION OVEN TCO85 TCO85 Convection Oven Manual Page 1 Revision: 13 Jan 11 WARNINGS IMPROPER INSTALLATION, USE, SERVICE OR MAINTENANCE CAN CAUSE INJURY OR DEATH.
OPERATION MANUAL. Total Heat Exchanger HRV (Heat Reclaim Ventilation) (Ceiling mounted duct type)
 (Ceiling mounted duct type)") OPERATION MANUAL (Ceiling mounted duct type) VAM50FC VAM500FC VAM650FC VAM800FC VAM000FC VAM500FC VAM000FC 8 7 6 9 5 7 5 0 6 8 6 9 0 5 5 7 7 6 7 A A B B 5 6 5 6 7 VAM50F VAM800F VAM500F VAM500F VAM000F
OPERATION MANUAL (Ceiling mounted duct type) VAM50FC VAM500FC VAM650FC VAM800FC VAM000FC VAM500FC VAM000FC 8 7 6 9 5 7 5 0 6 8 6 9 0 5 5 7 7 6 7 A A B B 5 6 5 6 7 VAM50F VAM800F VAM500F VAM500F VAM000F
OPERATING INSTRUCTIONS
 EN DESK AND STAND FAN OPERATING INSTRUCTIONS Read the instructions carefully before operating the appliance or carrying out maintenance operations. Observe all the safety instructions; failure to observe
87cm. Cooker hood. Stainless steel JLCEILHD87. User guide
 87cm Cooker hood Stainless steel JLCEILHD87 User guide 2 Cooker hood user guide Contents Contents 3 Introduction 4 Safety is important 4 In the box 4 Safety information 5 Important safety information 5
Pellet Boilers. Instructions for Use and Maintenance
 Pellet Boilers Instructions for Use and Maintenance - THE PRESENT MANUAL FORMS AN INTEGRAL PART OF THE BOILER AND MUST BE KEPT FOR FUTURE REFERENCE Bmax Technology - a Division of Elmec Group S.r.l. Localition
MODEL 598A TWO-SPEED PLUS CENTRAL AIR CONDITIONER
 USER S INFORMATION MANUAL MODEL 598A TWO-SPEED PLUS CENTRAL AIR CONDITIONER NOTE TO INSTALLER: This manual must be left with the equipment user. WELCOME TO EFFICIENT HOME COOLING COMFORT Congratulations
SMART EVO 2 - User Manual ELECTRICAL PANEL FOR 2 MOTORS
 SMART EVO 2 - User Manual ELECTRICAL PANEL FOR 2 MOTORS CONTENTS 1. INTRODUCTION... 5 2. WARNINGS... 6 3. GENERAL DESCRIPTION... 7 4. INSTALLATION... 8 5. LUMINOUS INDICATORS AND COMMANDS... 9 6. DIP-SWITCH
Contents. Downloaded from manuals search engine
 Contents 1. INSTRUCTIONS FOR SAFE AND PROPER USE 6. INSTALLATION 8 3. DESCRIPTION OF CONTROLS 30 4. USE OF THE OVEN 35 5. AVAILABLE ACCESSORIES 36 6. COOKING HINTS 37 7. CLEANING AND MAINTENANCE 43 8.
60cm Canopy Extractor
 60cm Canopy Extractor LAM2300 User & Installation Guide Dear Customer, Congratulations on your choice of domestic appliance which has been designed to give you excellent service. The user manual will help
USER MANUAL Convection Oven
 Convection Oven Intertek MODEL: 351FGC100(L/N), 351FGC200(L/N) 01/2018 This user s manual contains information and guidelines collected from years of industry experience. For optimal safety and efficient
OWNER S MANUAL. AIR CONDITIONER (SPLIT TYPE) For general public use Indoor unit RAS-10, 13, 18, 24, 30BKS-HK
 For general public use Indoor unit RAS-10, 13, 18, 24, 30BKS-HK") OWNER S MANUAL ENGLISH AIR CONDITIONER (SPLIT TYPE) For general public use Indoor unit RAS-0,, 8, 24, 0BKS-HK Outdoor unit RAS-0,, 8, 24, 0BAS-HK 065560 065560_EN.indd 9/0/2558 BE 5:07 PRECAUTIONS FOR
OWNER S MANUAL ENGLISH AIR CONDITIONER (SPLIT TYPE) For general public use Indoor unit RAS-0,, 8, 24, 0BKS-HK Outdoor unit RAS-0,, 8, 24, 0BAS-HK 065560 065560_EN.indd 9/0/2558 BE 5:07 PRECAUTIONS FOR
DXAPV3N. Air Purifier. With. Enviro-neutralising Technology DXAPV3N
 DXAPV3N Air Purifier With Enviro-neutralising Technology DXAPV3N WARNING: Please read before use these instructions and keep them for future reference. SAFETY WARNINGS ATTENTION! This unit is regarded
Tornado Operations & Maintenance Manual
 TORNADO INDUSTRIES 7401 W. LAWRENCE AVENUE CHICAGO, IL 60706 (708) 867-5100 FAX (708) 867-6968 www.tornadovac.com Tornado Operations & Maintenance Manual MODEL NO. 99690 BD 22/14, 99720 BD 26/14 L9722
PROF. RANGE COOKER MODEL: EPRC-A6456GE(SS) Owner s Manual Please read this manual carefully before operating your set. Retain it for future reference.
 Owner s Manual Please read this manual carefully before operating your set. Retain it for future reference.") PROF. RANGE COOKER MODEL: EPRC-A6456GE(SS) Owner s Manual Please read this manual carefully before operating your set. Retain it for future reference. Record model number and serial number of the set.
PROF. RANGE COOKER MODEL: EPRC-A6456GE(SS) Owner s Manual Please read this manual carefully before operating your set. Retain it for future reference. Record model number and serial number of the set.
USE & CARE INSTRUCTIONS
 USE & CARE INSTRUCTIONS InvisiClean Aura Air Purifier (Model IC-5018) with Pre-filter, Activated Charcoal, True HEPA, UV-C Light, and Ionizer READ AND SAVE THESE INSTRUCTIONS WARNINGS Failure to comply
10/2017. Mod: WR-FP600-X. Production code: AGBS-600RI /
 10/2017 Mod: WR-FP600-X Production code: AGBS-600RI / 19043130 MANUAL DE INSTRUCCIONES ************** INSTRUCTIONS MANUAL Cod: 12152903 V.01 INSTALLATION, USAGE AND MAINTENANCE MANUAL LANGUAGE INDEX Armarios
MIGHTY PRO 1/4 HP CHILLER
 1 MIGHTY PRO 1/4 HP CHILLER FOR TANKS UP TO 170 GALLONS TOP QUALITY & HIGHLY EFFICIENT INTEGRATED DUAL STAGE THERMOSTAT 2 ASSEMBLY PARTS FRONT TOP VIEW BACK 3 SET UP INSTRUCTIONS 1. Remove chiller and
PANEL HEATERS OPERATING INSTRUCTIONS
 PANEL HEATERS OPERATING INSTRUCTIONS GPH110 GPH210/220 GPH310/320 GPH410/420 WARNINGS AND SAFEGUARDS 1. Use only the voltage specified on the rating plate of the appliance. 2. Keep all objects at least
User Manual. 60 cm Knob control 4 zone ceramic cooktop
 User Manual HHC601 60 cm Knob control 4 zone ceramic cooktop OTE: This User Instruction Manual contains important information, including safety & installation points, which will enable you to get the most
30-pint Dehumidifier User Guide
 30-pint Dehumidifier User Guide IVADH30PW Thank you for purchasing the Ivation 30 Pint Dehumidifier. This User Guide is intended to provide you with guidelines to ensure that operation of this product
Electric Salamander CHM-1200W CHM-2400W CHM-4350W. User s Manual
 Electric Salamander CHM-1200W CHM-2400W CHM-4350W User s Manual 1 Dear Client & User, Thank you for choosing our products. All the information and instructions in this manual take into account standard
Instruction Manual JLHDA cm Cooker hood
 Contents 3 Introduction 3 Safety is important 3 In the box 4 Safety information 4 Important safety information 4 Warnings 5 Cautions 5 Electrical information 6 Remote control 6 Programming the remote control
VITROCERAMIC HOB CH-F2B
 VITROCERAMIC HOB CH-F2B User Instructions C 2 Fig. 1 400 mm 700 mm 655 mm 320 mm 50mm 660 mm 325 mm Fig. 2 52 mm 30 mm 52 mm 40 mm A B A B 3 Fig. 3 40 mm min. 50 mm 20 mm Fig. 4 Fig. 5 NO ~ 2 mm YES Fig.