Caprice. Baignoire à Hauteur Variable avec Lève-personne Variable Height Bath and Integral Transfer System. EN Instruction manual
|
|
|
- Lewis Rice
- 5 years ago
- Views:
Transcription


1 EN Instruction manual Baignoire à Hauteur Variable avec Lève-personne Variable Height Bath and Integral Transfer System Caprice UK UK
2 SUMMARY CONTENTS PAGES DIMENSIONS DESCRIPTION / HAND CONTROL TECHNICAL SPECIFICATIONS OPERATION / SAFETY SAFETY INSTRUCTIONS AND WARNINGS INITIALISATION PROCEDURE OF THE CONTROL BOX SOFTWARE DIRECTIONS FOR USE TRANSFER 8 POSITIONING THE SEATING SYSTEM 8 SEATING SYSTEM AND HOIST INTERFACE 8 RAISING THE SEATING SYSTEM 9 LOWERING THE SEATING SYSTEM 9 AUTOMATIC SEQUENCES FUNCTIONS 9 TEMPERATURE CONTROL 10 DRAIN PLUG OPERATION 11 HYDRO-MASSAGE OPERATION (OPTIONAL) 11 CHROMOTHERAPY (OPTIONAL) 12 HYDRO-AROMATHERAPY (OPTIONAL) 13 AUDIO SPA (OPTIONAL) MAINTENANCE DISINFECTION 15 CLEANING METHOD 15 DISINFECTION METHOD 15 CLEANING PROCEDURE - AIR WHIRLPOOL SYSTEM PERIODIC INSPECTION MAINTENANCE FORM (LOGBOOK) /18
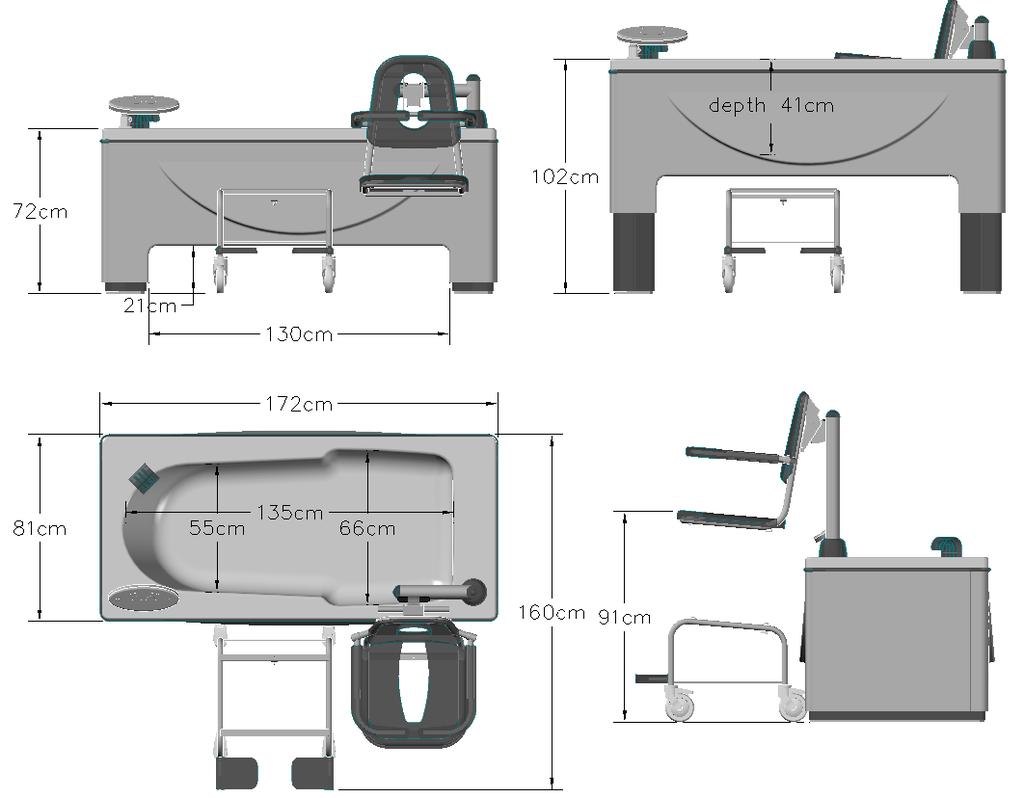
3 DIMENSIONS 2/18


4 DESCRIPTION Filling spout Drain plug control & overflow Rada Sense Control Locking mechanism Flow adjustment Seating chassis Safety armrests Seating system HAND CONTROL Seat height function Seat lowering function Rotation to transfer Rotation to bath Tub height function Tub lowering function Automatic transfer to trolley : Sequence A: 1. Tub fully comes down. 2. Hoist fully rises. 3. Seat fully turns to transfer. Automatic transfer to bath : Sequence B: 1. Hoist fully rises. 2. Tub fully comes down. 3. Seat fully turns to bath. 4. Seat comes down until 3/18
5 TECHNICAL SPECIFICATIONS VERSIONS: REF UK REF UK Bathtub "CAPRICE" access by the left side. Bathtub "CAPRICE" access by the right side. OPTIONS : REF REF REF REF Trolley system Air whirlpool. Chromotherapy. Aromatherapy. BATHTUB: Construction - Reinforced fibreglass tub with polished white gel coat colour finish. Variable height adjustment with dual 24V electric actuators. TMV 3 scheme approved thermostatic anti-scold mixer. 8 functions hand control IP66 rated for hoist and tub. TMV 3 Scheme approved thermostatic anti-scold shower system. INTEGRAL HOIST : Stainless steel chassis. Polyurethane seat and backrest cushions. Stailess steel seating system frame. Bath chair braked castors Ø125mm. Foot rests fixed position flip up type. PERFORMANCE : Max water volume: (overflow limit = 240 litres) Flow: 54 litres/min. Tub lifting range: 300mm Hoist lifting range: 320mm Filling 3 bars: 4 min Safe working load (SWL) 125Kg Working capacity for Hi/Lo tub : unlimited 6 min/hours Working capacity for hoist : unlimited 6 min/hours ELECTRICITY : Electric supply requirements: 230V - 50hz - 180W CONFORMITY: 73/23/CEE (low voltege directive) 89/336/CEE (EMC directive) NF EN (electric standard for bathtub..) NF EN (electric standard for bathtub...) NF EN 1717 (Anti-pollution) NF C (Electric installations ) NB. Please be advised that the image's used in this brochure may not represent the product marketed in your country. e.g. Many products marketed in the UK are WRAS certified. Therefore, there products may be fitted with controls and apparatus such as thermostatic mixers, and shower up-stands which may not be illustrated in this or any other documentation. For specific information please contact Reval customer services. Also, Reval Reserves the right to change or modify its documentation, and product at any time without prior notification, for full details of our standard terms and conditions, please contact Reval Customer Services on ! 4/18
6 OPERATION Variable height adjustment is via dual 24V synchronised actuators. Raise and lower function of the integral hoist is via a single 24V actuator. Rotate function via a single 24V actuator. 8 function hand control pendent controls - seat rotation/ seat rise and lower - variable tub height automatic cycle for transfer and bath Electric Jacks are controlled via an electronic control box installed with unique software Designed specifically for the Caprice appliance. Bath fill via TMV 3 scheme approved thermostatic anti-scold mixer which complies with the requirements of WRAS fluid category 5 backflow prevention. TMV 3 scheme approved thermostatic anti-scold shower system complies with the requirements of WRAS fluid category 5 backflow prevention. Water temperature control and adjustment is via the thermostatically controlled TMV 3 scheme approved deck mixer tap. A compressor drives the variable flow control hydro-massage system (optional). Heated air is blown under pressure into the bath via 12 diffuser nozzles equipped with anti-return valves integrated in to the bottom of the bath tub. The three button control is located on the tub. SAFETY For safety reasons, the seating system will only rotate when the tub is in LOW position and the hoist in HIGH position. To raise the tub is only possible if the seating system is ABOVE TUB LEVEL! Lowering the seat into the bath is only possible if the seat is in the High position and is positioned, in the in bath position which prevents accidental transfer in to the side of the bath! Care givers transferring service users to and from a bathroom in the mobile seating system, should take special care not exert excess force or exceed a slow constant and controlled walking pace. Care should also be taken when crossing room thresholds or very small obstacles which may require the adverse handling of the seating system. The seat and trolley are two separate components which if handled incorrectly or in a careless manor, could become detached which may result in separation causing a serious accident and injury! Take extra care when docking the seating system into the bath prior to transfer. Ensure that the two back posts of the seating system are securely located in to the two black clip locators positioned on the side of the bath tub. This will insure the hoist and seat index pins are correctly located prior to transfer. Remove the trolley from the clip locators at the side of the bath before the tub is height adjusted to provide working space beside the bath! 5/18

7 SAFETY INSTRUCTIONS AND WARNINGS IMPORTANT! DO NOT USE THIS APPLIANCE BEFORE READING AND UNDERSTANDING THIS USER GUIDE. To ensure safe operation, read this manual carefully. Please pay particular attention to sections explaining "Safety Instructions and Warnings", before installing, operating, or servicing this equipment. If in any doubt contact Reval Continuing Care Ltd for more details +44 (0) ) or assistance do not take a chance! Failure to comply with warnings in this manual may result in injury! Keep this manual with the tub and refer to it as required. Contents of this manual are subjected to change without prior notice to users! The CAPRICE bathing system MUST be installed by a contractor or a certified installation technician! NOTE TO INSTALLATION TECHNICIANS The Caprice bath is supplied with four floor fixings (rawl bolts M10-60mm) and a template to be used to mark and drill the holes required on the floor. Please ensure that these fixings which are located at all four corners at the base of the mast are made effectively. Failure to floor fix the bath can seriously damage the mast mechanism and cause serious risk of injury to service user and care worker. FAILURE TO FLOOR FIX THE CAPRICE BATH CAN CAUSE THE BATH SYSTEM TO TOPPLE OVER WHEN BEING USED AND UNDERLOAD. Floor fix at all four positions. DO NOT immerse the hand control in water! DO NOT try to lift the tub! DO NOT work underneath the tub during lowering! DO NOT fill over the maximum water level line! DO NOT operate the air whirlpool pump without water! DO NOT pull on the shower head too forcibly! DO NOT place any object underneath the tub! DO NOT use any electrical appliances near the tub! DO NOT use any electrical appliances (hair dryer or electric razor, etc) while in the tub! DO NOT force controls or taps! ALWAYS perform a daily check before using the bathing system! ALWAYS prepared yourself the environment, and the service, user prior to transferring a user! ALWAYS check the water temperature prior to transferring or showering a user! ALWAYS check the seat and hoist interface is correctly positioned and engaged prior to operation. User ability MUST be professionally assessed prior to using this system to ensure user safety! For health, safety, and hygiene reasons clean the bath after each user cycle! For health, safety, and hygiene reasons disinfect the bath after each user cycle! When disinfecting the bathing system, wear protection e.g. rubber gloves, safety clothing and Eye protection! In case of eye or skin contact, follow the procedures on the disinfectant container or safety manual! ( BFR4.0) A weekly safety check should be performed to ensure all hoses, pipes, connections and securing devices are in safe working order. Keep all tub components clean and dry! DO NOT TAKE A CHANCE! 6/18

 Press on the button to endstop (sound signal) then 2) Press on the button to endstop (sound signal) then 3) Press on the button to endstop (sound")
8 INITIALISATION PROCEDURE OF THE CONTROL BOX SOFTWARE Whenever an actuator is connected/re-connected to the CB an initialisation should be performed. The end stop is used as a reference for the actuator position and all further movement is made referring to this end stop position. Thus it is recommended to calibrate the position measurement system by initialising regularly to prevent position errors to accumulate in the system. All channels initialise in end stop inwards. The initialisation procedure is as follows: 1) Press on the button to endstop (sound signal) then 2) Press on the button to endstop (sound signal) then 3) Press on the button to endstop (sound signal) If these 3 stages are not enough, press simultaneously on the keys(touches) of sequences A and B during 7s up to a sound signal then take back 3 stages of reset described above. If these 3 stages are not enough, press simultaneously on the keys(touches) of second line of buttons until the alarm stopsl then take back 3 stages of reset described above. This procedure should always be done if a channel has position lost. 7/18


9 DIRECTIONS FOR USE WARNING: This symbol is intended to alert the user to hazards or unsafe practices which could result in serious bodily harm. CAUTION: This symbol is intended to alert the user of the presence of important operating and maintenance instructions which could prevent product damage or possible personal injury. NOTE: This symbol offers helpful information concerning certain operating procedures. TRANSFERRING A SERVICE USER POSITIONING THE BATH-CHAIR Before transfer, ensure the user is safely positioned in the seat with the armrests in down position! Care givers transferring service users to and from a bathroom in the mobile seating system, should take special care not exert excess force or exceed a slow constant and controlled walking pace. Care should also be taken when crossing room thresholds or very small obstacles which may require the adverse handling of the seating system. The seat and trolley are two separate components which if handled incorrectly or in a careless manor, could become detached which may result in separation causing a serious accident and injury! Position the bath-chair near the bath. Before positioning the bath-chair ensure the hoist is in the low position! SEAT AND HOIST INTERFACE Please make sure the mast in its lowest position before attempting to dock the seat system into the hoist. Check to ensure the seat is fixed securely and the latch gate is in the down position! With the bath-chair correctly positioned raise the hoist using the hand control take care to ensure the male and female connectors insert/interface correctly! Raise button on the pendent! Take extra care when performing this operation! 8/18
 or to go out the bath to go in the")

10 DIRECTIONS FOR USE RAISING THE BATH SEAT To raise the seating system press the UP button on the hand control until endstop (sound signal) Seat rise button SEAT ROTATION To rotate the seating system press the ROTATE button until endstop (sound signal) or to go out the bath to go in the bath BATH HEIGHT ADJUSTMENT Raise the bath tub to the required height, then lower the seating system into the bath by pressing the SEAT LOWERING button on the hand control AUTOMATIC SEQUENCES FUNCTIONS Automatic transfer to trolley: = then then then Automatic transfer to bath: = then then then 9/18


11 DIRECTIONS FOR USE TEMPERATURE CONTROL To adjust the water temperature, pass your finger in front of the cold water sensitive captor (blue triangle) or in front of the hot water (red triangle) according to the temperature desired. Temperature display Full cold Cold adjustment sensor Shower control Warm adjsutment sensor Bath control Service activation BATH FILLING Factory pre-set with PDA: -Max outlet temperature for bath: 44 C. -Max outlet temperature for shower: 41 C. -Min outlet temperature for bath: 37 C. -Min outlet temperature for shower: 33 C. -Default outlet temperature for bath: 38 C. -Default outlet temperature for shower: 36 C. -Flow times (bath): 7min30s, allow to fill until max water level. -Flow times (shower): 2min Check the water temperature. If necessary, adjust it via the digital mixer. Close the drain plug by turning the button in a clockwise direction. Pass the finger in front of the pictogram of the tap. PATIENT SHOWER The shower head can be operated at any time. Pass the finger in front of the pictogram of the shower head and adjust the flow intensity with the tap in front of the bath. Select the desired temperature by adjusting the temperature valve as described above. The shower head spray can be adjusted from a wide to narrow flow. After each use, turn off the valve. THERMIC DESINFECTION The «rada sense» control box is equipped with a system of thermic disinfection for its pipes, which is controlled by a PDA. Only a recognised technician can do this operation, so please call REVAL CC. 10/18
12 DIRECTIONS FOR USE DRAIN PLUG OPERATION Turn the button lever in a clockwise direction to close the drain plug and anti clockwise to open it OPEN CLOSE HYDRO-MASSAGE (OPTION) A compressor drives variable flow control hydro-massage system (optional). Heated air is blown under pressure with adjustable flow control via 12 diffuser nozzles equipped with anti-return valves integrated in to the bottom of the bath tub. The three button control is located on the tub. blower on / off LED green colour +/- ~ blower variable speed blower massage mode System Safety - Drying cycle & auto switch off : If the hydro-massage function is used at any time. 30 minutes after use the hydro-massage bower automatically re-starts and runs for a period of 4-5 minutes cycling from high to low speed. After 4-5 seconds the system automatically switches its self off! This is the systems unique means drying the internal airways to ensure humidity is dried helping to prevent the build up of harmful bacteria and can reduce the risk of cross contamination! 11/18


13 DIRECTIONS FOR USE CHROMOTHERAPY (OPTION) Chromotherapy is dynamic LED (light emitting diode) therapy which utilises no less than two pairs of 51 coloured LED s positioned under the bathwater level, designed to colour the bathwater and room lighting to provide a uniquely relaxing and atmospheric experience for service users. The LED s automatically alternate in colour and on/off switching. This can also be set to manual adjustment for fine tuning the mood of the bathroom to suit the mood and requirements of the user. There are several lighting sequences that will create the perfect atmospheric sensation. This coupled with Reval's Hydro- Aromatherapy system deliver the ultimate in bathing comfort, relaxation and rehabilitation. The Chromotherapy control button allows the user or care giver total control when using the chromotherapy function. The chrome circular surface mounted button pad with function mode LED which informs the user as to the function status. There are three main function modes: 1. On/Off - press function button once to switch on (led stable) 2. Auto colour change sequence - press button again for two seconds to activate auto colour sequence (LED flashes intermittently) 3. Manual colour sequence press once to switch to manual colour sequence then again when you wish to change colour. After the sequence has run the system will switch to off mode! To reactivate, follow steps /18
14 DIRECTIONS FOR USE AROMATHERAPY (OPTION) Reval give all areas of patient well being and safety careful consideration. Its unique Aromatherapy system combines the benefits of hydro-massage with the relaxing aromatic effects, of infused aroma essence, providing the ultimate bathing and rehabilitation experience. The Aromatherapy system is compressed heated fresh air technology, which infuses aroma therapy oils at temperature into the hydrotherapy air jet which explodes into the bath water delivering controlled therapy with sensual and relaxing aromas assuring a totally unique and wonderful experience. Reval's new Aromatherapy system has an ultra safe auto-clean function which self dries and cleans the internal air ducting pipe work after use automatically. The auto-clean function significantly reduces the risk and development of micro -biological organisms that can develop in humid and wet environments. Reval's unique air ducting system can be dismantled without the need for tools and can be termically cleaned during routine servicing in a matter of minutes.. TO OPERATE: 1. Simply remove the chrome cap, take the wooden spatula, soak in aromatherapy oil and replace it in to the essence well. Replace the chrome cap) finger tight). Do not over tighten! 2. Switch the Aromatherapy system on via the circular control panel. Once up to temperature the heated air infuses with the aroma oil and releases its fragrance into the water via the diffuser jets positioned in the bottom of the bath tub. The aroma is carried inside the bubbles and explodes on contact with the water releasing the sensual aromatic fragrances in to the air. 3. For extended use switch off and re-soak the spatula as described in points 1&2. 4. The hydro Aromatherapy has an alternating intensity function. To activate this potion press the button on the control panel. The intensity will increase and decrease automatically providing needed therapy without sensitivity and discomfort for those with sensitive joints and skin conditions. 5. The intensity can also be set at a fixed pressure for those who enjoy the continuous sensation and work-out. To fix the intensity level simply press the + or button on the control panel until the desired intensity has been found. 6. To switch off press the middle button on the control panel marked 1/0. 7. The Aromatherapy system has a self cleaning function called Auto Clean Once the system has been switched off the status LED on the On/Off button changes from ON to Intermittent flashing. This indicates that the system has gone into stand-by mode and will Automatically switch on again and run for 5 minutes self drying any build up of humidity in the internal hydro plumbing system. After five minutes the system will shut down. 13/18


15 DIRECTIONS FOR USE AUDIO SPA (OPTION) The Audio spa option consists of two loudspeakers, a waterproof amplifier, a MP3 player and a control panel including the commands "One / Off" and "volume" as well as an embeded box with removable panel allowing to receive and to connect the MP3 player. Operation : Take the MP3 player. Set it and add in musics of your choice. Respect the legislation. Connect the MP3 player (headphone plug) to the DIN plug located inside the embeded black box. Read your MP3 player. Push on the button 0/1 located on the control panel. Adjust the volume thanks to the potentiometer. In case the tone would not be sufficient, increase the volume from the MP3 player. To guarantee the longevity of the amplifier, think to switch off it by pressing on the button "On / off". 14/18
16 MAINTENANCE CLEANING & DISINFECTING THE APPLIANCE Cleaning: To wash clean the bath use a soft not abrasive soap and water mix wash the appliance thoroughly ensuring maximum coverage of the tub the controls and the seating system. Rinse the soapy water of the bath and wipe dry any residual water away with a clean soft cloth. Disinfection The appliance is supplied with a hand held spray applicator which should be used to apply REVAL disinfectant BFR 0.4 The applicator hold 600 ml of diluted disinfectant sufficient to thoroughly clean and disinfect the appliance. Reval disinfectant is specifically designed to clean and disinfect your appliance whilst protecting it s the smooth polished gel coat finish. Other products may not be suitable such as any powder based products which if not diluted carefully can mark or scratch the smooth easy to clean gel coat surface. Scratch marks can harbour soap or greasy deposits which can harbour bacteria and increase the risk of cross infection. NB. REVAL disinfectant is specifically designed to provide maximum protection for both the service users and the appliance! Dilution Ratio: The REVAL disinfectant (BFR 4.0) has final dilution of 0,4%.per litre of cold fresh water Health and Safety: When mixing or applying REVAL disinfectant always ware protective rubber gloves, safety clothing, and appropriate eye protection! Method: For 2,4 mltrs of neat Reval disinfectant into the hand held spray applicator. (The exact dilution ration ratio should be 0.4% per litre of fresh cold water) Add 597,6 mltrs of water to the neat Reval disinfectant replace the top and mix well. Spray a suitable amount of solution over the total area of the bath and seating system to ensure total area coverage. Leave the solution on the surface area to activate for a minimum of two minutes. After the two minute period, rinse off the disinfectant with the fresh water shower. Wipe any fresh residual water up with a clean soft cloth. The appliance is them clean safe and ready for the next user. CLEANING THE CONTROL PANEL To clean the rada sense control panel, take the magnetic key located behind the security door in front of the bath and pass it in front of the infra red of the control panel to desactivate it. To reactivate the control panel, do the inverse operation. DISINFECTING THE TUB Spray a suitable cleaner or disinfectant onto the interior tub surface. Let the disinfectant activate for 2 minutes on the bath surface then rince off using the patient. Thoroughly rinse the interior tub surfaces. Dry the interior tub surfaces with a soft cloth. 15/18
17 MAINTENANCE CLEANING THE HYDRO-MASSAGE DIFFUSERS For the efficient functioning of the whirlpool system, the nozzles have to be cleaned on a regular basis(at least once a year). Functioning of a whirlpool s nozzle. Air is lown through the nozzle an dis discharged under the chromed air jet cap. CAPSULE CHROMEE BUSE AIR There is a risk of heating the air jet cap is the nozzles are not regularly cleaned. Layers of soap or deposit can hinder the circulation of the air. To clean the nozzles, please follow the next stages : 1) Switch off the whirlpool option and empty the bath.. 2) Unscrew the air jet cap. 3) Clean the chromed air jet cap, the nozzle and the ball. Then the air jet cap on the nozzle. 4) Switch on the bath and the whirlpool system to check they are working properly. 16/18
18 PERIODIC INSPECTION 1) Periodic inspection of the appliance should be undertaken at the time intervals stated by the manufacturer, OR at least once annually. Service means a full physical and visual examination of all the functions and fixtures and fitting on the appliance in particular the safety systems. 2) Periodic inspection should be performed by a Reval trained and approved engineer who is qualified and well acquainted with the design, use and care of the appliance. The scope of the periodic inspection should be included in the manual supplied with the appliance. 3) All service and repair work out on the appliance should be recorded in the service logbook provided and should be retained by the owner of the appliance for reference. Do not use the product if the service logbook has not been signed after every service or repair. This constitutes that the product has not been signed off as fit for use! The service provider must sign the service logbook to constitute the appliance has been re-commissioned and safe for use! 4) If in any doubt contact Reval Continuing Care Ltd for further help and assistance. Any feedback provided by the Reval or the service provider should be recorded in the service logbook for future reference. 5) It is important to ensure your appliance is serviced in line with the manufacturer s service policy. Failure to meet this requirement will render your product warranty void! 17/18
19 MAINTENACE FORM (LOGBOOK) Date Service or repair undertaken Service providers Comments Parts fitted Clients signature Service providers signature 18/18
20 FRANCE : Reval Z.A. Fief des Prises Usseau Sainte Soulle Tel: (33) Fax: (33) UNITED KINGDOM : Reval Continuing Care Limited Unit 17 Brynmenyn Busines Centre St Theodore's Way - Brynmenyn CF32 9TZ BRIDGEND - WALES Tel: Fax:
EN Instruction manual. ELECTRIC Hi-Lo Bathtub. Transcare UK
 EN Instruction manual ELECTRIC Hi-Lo Bathtub Transcare 7200.00 UK SUMMARY CONTENTS PAGES DIMENSIONS 2 - - - - - - - - - - - - - - - - - - - - - - - - - - - - - - - - - - - - - - - - - - - - - - - - - -
New. Caprice Range 3 YEAR WARRANTY
 New Caprice Range 3 YEAR WARRANTY Discover sensational bathing with the Caprice Range With a compete range of innovative and thoughtfully developed features, Caprice ensures everyone can enjoy bath times.
Instructions for use Multibath
 Instructions for use Multibath Please read these instructions carefully before use GENERAL DESCRIPTION The Multibath is designed to be used in Hospitals, Nursing and Residential homes and domestic properties.
GULFSTREAM PLASTICS LTD.
 GULFSTREAM PLASTICS LTD. Cambridge, Ontario, Canada N1R 6T4 Phone (519) 622-0950 Toll Free 1-877-622-4853 Fax (519) 622-6926 Website: www.gulfstreamplastics.com Manufacturers of Acrylic Baths Whirlpools
Installation and Operation Manual MG-304. Please read this manual carefully before use.
 Installation and Operation Manual MG-304 Please read this manual carefully before use. 1 P a g e Important Safety Instructions: Warning! Use this unit only for its intended purposes or as described in
RELAX. REVITALIZE. RESTORE. LUXURY SPA UNIT Installation Manual. English. For Model Numbers 2848, 2853, 3153 and 3255
 RELAX. REVITALIZE. RESTORE. LUXURY SPA UNIT Installation Manual For Model Numbers 2848, 2853, 3153 and 3255 English RELAX. REVITALIZE. RESTORE. Thank you for choosing a Secure Spa Luxury Spa Unit. Secure
Superior Spa with Aqua-Aire
 Superior Spa with Aqua-Aire Safe Operation & Daily Maintenance Instructions PENNER PATIENT CARE, INC Box 523 / 102 Grant St. Aurora, NE 68818 350750 Rev H 08/28/2014 1-866-PENNERS 1-866-736-6377 1-800-732-0717
EXPOSED BATH SHOWER MIXER INSTRUCTION MANUAL W INST 300. Please note: Tap heads shown is for illustration purposes only.
 EXPOSED BATH SHOWER MIXER INSTRUCTION MANUAL W INST 300 Please note: Tap heads shown is for illustration purposes only. CONTENTS GUARANTEE GENERAL SAFETY INSTRUCTIONS PARTS SUPPLIED HOW TO INSTALL AFTER
Factory Direct Walk-In Tubs WALK-IN TUB. Installation Manual. For Model Numbers VT2848, VT2853, VT3153 and VT3255
 Factory Direct Walk-In Tubs WALK-IN TUB Installation Manual For Model Numbers VT2848, VT2853, VT3153 and VT3255 FACTORY DIRECT WALK-IN TUBS Thank you for choosing an Vitality Tubs Walk-In Tub. Vitality
I N S T R U C T I O N S
 INSTRUCTIONS HIPPO Deluxe Room Steam Vaporiser Congratulations on your purchase of the HIPPO Deluxe Room Steam Vaporiser. Before using this appliance, read the following instructions carefully as they
Triple Gel Coat Walk in Tubs A1A Ultimate Edition
 Triple Gel Coat Walk in Tubs A1A Ultimate Edition http://comfortwalkintubs.com/fiberglass-walk-in-tubs/a1a-ultimate-edition/ Size: 30" W x 54" L x 38" H Quick Fill with 42L faucet A1A Ultimate Edition
Cascade Comfort Bathing Systems with Aqua-Aire Safe Operation & Daily Maintenance Instructions
 Cascade Comfort Bathing Systems with Aqua-Aire Safe Operation & Daily Maintenance Instructions PENNER PATIENT CARE, INC Box 523 / 101 Grant St. Aurora, NE 68818 560750 Revision A 12/11/15 1-866-PENNERS
TR Shower Panel. Operating manual. Hygiene Equipment Designed for People. Serial Number:
 Operating manual Serial Number: Registered at Medical Products Agency, Sweden, as a MD Class 1 product, MDD 93/42EEC. TR reserves the right to make design changes and/or improvements without notice. Always
MODEL 7000 SUCTION UNIT
 MODEL 7000 SUCTION UNIT OPERATOR S MANUAL Caution Federal law restricts this device to sale by or on order of a physician, or any other practitioner licensed by the law of the State in which he practices
Pear Kitchen Sink Tap
 Pear Kitchen Sink Tap Installation Instructions & User Guide Please keep these instructions for future reference and request of replacement parts Contents Thank you for choosing Bristan, the UK s leading
Unity 180 Premium Whirlpool 180/80/62 cm
 Unity 180 Premium Whirlpool 180/80/62 cm Operating and installation instructions Is there a problem with your product or do you have any questions? Please feel free to contact our hotline: 020-8528 1729
Target Monobloc Kitchen Mixer Chrome
 Target Monobloc Kitchen Mixer Chrome Installation Instructions & User Guide Please keep these instructions for future reference and request of replacement parts Contents Thank you for choosing Bristan,
TOEPIA LX ARMREST ASSEMBLY INSTRUCTION
 TOEPIA LX ARMREST ASSEMBLY INSTRUCTION 1) Align the aluminum rail and slide through the base rail 2) Place the aluminum end-plate and secure it with 2 screws 8 TOEPIA Spa Specifications 2 1/2 4 3/4 6 3/4
EZ Way, Inc. BATHING CATALOG. PO Box 89, 710 E. Main Clarinda, IA
 EZ Way, Inc. BATHING CATALOG www.ezlifts.com PO Box 89, 710 E. Main Clarinda, IA 51632 1-800-627-8940 EZ1000 BATTERY-OPERATED SHOWER CHAIR The EZ1000 is designed to offer a safe experience for the patient
Beeline Monobloc Kitchen Mixer Tap
 Beeline Monobloc Kitchen Mixer Tap Installation Instructions & User Guide Please keep these instructions for future reference and request of replacement parts Contents Thank you for choosing Bristan, the
Intatherm Safe Touch Basin Tap IT1008CP
 Intatherm Safe Touch Basin Tap IT1008CP Installation and Maintenance Instructions In this procedure document we have endeavoured to make the information as accurate as possible. We cannot accept any responsibility
Parenzo Range. Basin Mixer, Bath Filler & Bath Shower Mixer. Assembly instructions
 Parenzo Range Basin Mixer, Bath Filler & Bath Shower Mixer Assembly instructions We have designed these products with your enjoyment in mind. To ensure that they work to their full potential, they need
Installation Instructions. Hansgrohe S 15721XXX
 Installation Instructions Hansgrohe S 15721XXX Contents Safety and Important Information 3 Pack Contents 4 Diniensions 4 Technical Data 5 Supply Conditions TMV2 5 Supply Conditions TMV3 5 Installation
SG User Manual
 SG 0004-5 User Manual The spa equipment requires a 44 amp outlet, preferably dedicated to the spa. Carefully read all of the instructions before enjoying the spa. WARNING: Operating the system without
RESIN FREESTANDING TUB
 RESIN FREESTANDING TUB INSTALLATION INSTRUCTIONS AND CARE GUIDE CONTENTS Tub Installation...2 Rough-In...2 Drain Installation...3 Air Tub Installation...4 Electrical Installation...4 Remote Control Installation...5
Diamond Whirlpool/Air pool INSTALLATION & OPERATION INSTRUCTION
 Diamond Whirlpool/Air pool INSTALLATION & OPERATION INSTRUCTION WARNING When using this unit, precautionary steps should be followed to prevent electrical shock or personal injury. 1. Do not permit children
Technical Specifications: Your product has a high quality finish and should be treated with care to preserve the visible surfaces.
 3 Remove concealing plate KIRI Concealed Mixer Valve ABS Undo nuts (9) on both hot and cold inlets and remove filter washer KIRI VA (6) Installation Instructions & Maintenance Guide 5 Rinse filter washers
User manual Whirlpool
 User manual Whirlpool Serial number: Foreword: This manual is general for all whirlpools in the BT-series. The user manual describes safety procedures, operating instructions and general maintenance. Please
WALK IN BATH TUB OWNER S MANUAL
 WALK IN BATH TUB OWNER S MANUAL USWIBOWMAN-V1-10/12/07 1 TABLE OF CONTENTS WALK IN BATH TUB GENERAL INFORMATION INTENDED USE. 3 SAFETY INSTRUCTIONS. 4 CLASSIFICATION & TECHNICAL DETAILS. 4 OPERATING INSTRUCTIONS
YS-B501 SPA Deluxe Overall Functional Capsule
 YS-B501 SPA Deluxe Overall Functional Capsule Functions Description Ozone Sterilize: Full automatic ozone sterilization provides safety guarantee for each user Massage Bed: Back vibration massage can remove
USER MANUAL KINGKRAFT SHOWER CHANGER
 USER MANUAL KINGKRAFT SHOWER CHANGER Model... Serial No... Delivery/installation date... IMPORTANT SAFETY INSTRUCTONS Please read these instructions carefully before first using your Kingkraft product,
Puro Mini Dual Control Shower Mixer PU90010CP
 Puro Mini Dual Control Shower Mixer PU90010CP Installation and Maintenance Instructions In this procedure document we have endeavoured to make the information as accurate as possible. We cannot accept
Airfield Industrial Estate Hixon Staffordshire ST18 0PF
 Deluge Thermostatic Basin Mixer IT1002CP Installation and Maintenance Instructions Intatec Ltd Airfield Industrial Estate Hixon Staffordshire ST18 0PF In this procedure document we have endeavoured to
USER MANUAL KINGKRAFT CONTOUR BATH
 USER MANUAL KINGKRAFT CONTOUR BATH Model... Serial No... Delivery/installation date... IMPORTANT SAFETY INSTRUCTONS Please read these instructions carefully before first using your Kingkraft product, and
AVERO Comfort... The perfect bathing and nursing solution
 AVERO Comfort... The perfect bathing and nursing solution AVERO Comfort... Modern design for your new nursing bathroom ComfortMedic designs and manufactures high quality products for long term care facilities
X62 Tap Range. Please keep these instructions for future reference
 X62 Tap Range This instruction booklet covers: X625205CP, X625215CP, X625255CP, X625265CP, X625122CP, X625126CP, X625135CP Please keep these instructions for future reference 02 For latest prices and delivery
treesse treesse DIRECTIONS FOR USE Pg. 6 FILTER COMPARTMENT CONTROL PANEL Ÿ GENERAL FEATURES
 DIRECTIONS FOR USE Ÿ GENERAL FEATURES FILTER COMPARTMENT CONTROL PANEL Pg. 6 HYDROMASSAGE In the MUSE minipool is installed the GHOST SYSTEM hydromassage system. This device allows you to enjoy the hydromassage
Assembly instructions. Alexandria Pedicare System ALEXANDRIA. Perfect design. Personal service.
 R Assembly instructions Alexandria Pedicare System ALEXANDRIA Perfect design. Personal service. IMPORTANT SAFETY PRECAUTIONS 1. Read and follow all instructions.. Danger: To reduce the risk of injury,
COPPER FREESTANDING TUB
 COPPER FREESTANDING TUB INSTALLATION INSTRUCTIONS AND CARE GUIDE CONTENTS Tub Installation...2 Rough-In...2 Drain Installation...3 Drain without Overflow...3 Waste and Overflow Drain...3 Trimming Drain
CONCEALED THERMOSTATIC SHOWER MIXER VALVE installation & aftercare instruction
 TROUBLE-SHOOTING CONCEALED THERMOSTATIC SHOWER MIXER VALVE installation & aftercare instruction Problem After installation shower only runs HOT or COLD and will not mix. Solution Hot & Cold supplies are
Roman Steam Rooms Information Pack
 Roman Steam Rooms Information Pack Oceanic Saunas,Pountney Street, Wolverhampton, WV2 4HX +44 (0) 1902 871 301 sales@oceanic-saunas.co.uk www. oceanic-saunas.co.uk Overview Oceanic Roman steam rooms are
Schuco byallied MEDICAL ASPIRATOR. USER'S MANUAL A Caution
 S168-544-OO1E REV.A Schuco byallied MEDICAL ASPIRATOR MnrInI -33OA USER'S MANUAL A Caution Federal law restricts this device to sale by or on order of a physician, or any other practitioner licensed by
Installation Instructions & Maintenance Guide 6 Refit Nuts (19) and tighten.
 and tighten.") 3 Remove concealing plate KIRI Concealed Mixer Valve With Undo nuts (9) on both hot and cold inlets and remove filter washer Diverter (2 olts & Bath Fill) ABS (6) KIRI 3VDIVA 5 Rinse filter washers (6)
3 Remove concealing plate KIRI Concealed Mixer Valve With Undo nuts (9) on both hot and cold inlets and remove filter washer Diverter (2 olts & Bath Fill) ABS (6) KIRI 3VDIVA 5 Rinse filter washers (6)
Telo Shower Mixing Valve TL10016CP
 Telo Shower Mixing Valve TL10016CP Installation and Maintenance Instructions In this procedure document we have endeavoured to make the information as accurate as possible. We cannot accept any responsibility
Inta City Shower Mixing Valve CT20010CP
 Inta City Shower Mixing Valve CT20010CP Installation and Maintenance Instructions In this procedure document we have endeavoured to make the information as accurate as possible. We cannot accept any responsibility
Installation Instructions
 Installation Instructions Ecomax Bath/Shower 13354000 Ecomax Shower 13356000 Contents Safety and Important Information 3 Pack Contents 4 Dimensions 4 Technical Data 5 Supply Conditions TMV2 5 Supply Conditions
Cinnamon Kitchen Sink Tap
 Cinnamon Kitchen Sink Tap Installation Instructions & User Guide Please keep these instructions for future reference and request of replacement parts Contents Thank you for choosing Bristan, the UK s leading
Decade Tap Range. Installation Instructions & User Guide. Please keep these instructions for future reference and request of replacement parts
 Decade Tap Range Installation Instructions & User Guide Please keep these instructions for future reference and request of replacement parts Contents Thank you for choosing Bristan, the UK s leading taps
AirBath Hydro-Massage Tubs UL1795 Installation and Operating Instructions
 Tools you might need for proper installation Galvanized Nails or Screws - For Units with a Tiling Flange Four Foot Level Shims Caulking Gun Screw Gun Adhesive Thank you for purchasing the Praxis AirBath
Installation Instructions. Starck
 Installation Instructions Starck 10751000 Contents Safety and Important Information 3 Pack Contents 4 Diniensions 4 Technical Data 5 Supply Conditions TMV2 5 Installation Requirements 6-7 Installation
Mix Boiler & Font Range ( #, #, #, , )
") Mix Boiler & Font Range (1000870#, 1000871#, 1000880#, 1000878, 1000879) Service Manual Marco Beverage Systems Ltd. 63d Heather Road, Sandyford Industrial Estate, Dublin 18, Republic of Ireland Ireland
Mix Boiler & Font Range (1000870#, 1000871#, 1000880#, 1000878, 1000879) Service Manual Marco Beverage Systems Ltd. 63d Heather Road, Sandyford Industrial Estate, Dublin 18, Republic of Ireland Ireland
Inta City Concealed Shower Mixing Valve CT80010CP
 Inta City Concealed Shower Mixing Valve CT80010CP Installation and Maintenance Instructions In this procedure document we have endeavoured to make the information as accurate as possible. We cannot accept
Singulier Spout Tube Basin Mixer Installation and User Guide
 Singulier Spout Tube Basin Mixer Installation and User Guide MODEL NUMBERS 10862W-CP Important! Please quote the above model number(s) when ordering spares IMPORTANT Installer: This manual is the property
I K. V.lla ADVANCED SYSTEM - M0S Edizione 1H10
 Advanced System O M N E G H J J1 F C P W Q D A I K B L R X V.lla ADVANCED SYSTEM - M0S06060 - Edizione 1H10 ENGLISH Vaporella Advanced System Advanced System A) Tank cap B) Main switch C) Board main switch
PRO 2000i LOW LEVEL DEPOSITOR
 DEPOSITORS AND AUTOMATED CAKE PRODUCTION SYSTEMS PRO 2000i LOW LEVEL DEPOSITOR OPERATION AND SPARE PARTS MANUAL Serial No. PR2L- (Please quote this number when ordering spares, and making service calls)
TR 900. Height Adjustable Bathtub. Operating Manual. Hygiene Equipment Designed for People Hygiene Equipment Designed for People.
 Operating Manual Serial Number: Registered at Medical Products Agency, Sweden, as a MD Class 1 product, MDD 93/42EEC. TR reserves the right to make design changes and/or improvements without notice. Always
INSTRUCTIONS AND WARRANTY
 INSTRUCTIONS AND WARRANTY MODEL NO. RHFM-30 RUSSELL HOBBS FOOT MASSAGER Congratulations on purchasing your new Russell Hobbs Foot Massager. Each unit is manufactured to ensure safety and reliability. Before
Finished Excellence. Limited Lifetime Finish Warranty. Armaturen.Accessoires.Interiors.Culture Projects.
 Finished Excellence. Limited Lifetime Finish Warranty Armaturen.Accessoires.Interiors.Culture Projects. Dornbracht fittings and accessories. Exclusive unique designs in technical perfection. The Dornbracht
Avenue (HY) Series Installation & Operation Manual
 Series Installation & Operation Manual") Avenue (HY) Series Installation & Operation Manual Note: You must read all installation & operation instructions prior to assembly and use of this unit. 1 P a g e Table of Contents Warnings. 3 HY Series
Avenue (HY) Series Installation & Operation Manual Note: You must read all installation & operation instructions prior to assembly and use of this unit. 1 P a g e Table of Contents Warnings. 3 HY Series
Thermostatic mixing valves with interchangeable cartridges
 www.caleffi.com R37. Thermostatic mixing valves with interchangeable cartridges Installation, commissioning and servicing instructions 3 Series Function The thermostatic mixing valve is used in systems
INSTALLATION MANUAL GUTHD2. Universal Two Way Digital Thermostatic Valve for Shower Systems
 INSTALLATION MANUAL GUTHD2 Universal Two Way Digital Thermostatic Valve for Shower Systems IMPORTANT: To ensure this product is installed properly, you must read and follow these guidelines. The owner/
Before you begin, carefully read the installation instructions below. Observe all local electrical safety and plumbing codes.
 AIR TUB INSTALLATION Before you begin, carefully read the installation instructions below. Observe all local electrical safety and plumbing codes. Unpack and inspect tub and parts for damage. If any damage
Prism Thermostatic Recessed Shower with Integral 2 Outlet Diverter
 Prism Thermostatic Recessed Shower with Integral 2 Outlet Diverter Installation Instructions & User Guide Please keep these instructions for future reference and request of replacement parts Thank you
Blueberry Kitchen Sink Tap
 Blueberry Kitchen Sink Tap Installation Instructions & User Guide Please keep these instructions for future reference and request of replacement parts Contents Thank you for choosing Bristan, the UK s
BLADE BATH SHOWER MIXER DECK MOUNTED CHR WITH KIT INSTALLATION INSTRUCTIONS P BS-E A/2
 BLADE BATH MIXER DECK MOUNTED CHR WITH KIT 20007014600 INSTRUCTIONS P5-65511339-1-BS-E A/2 20007014600 INTRODUCTION DIMENSIONS Please read these instructions carefully and keep in a safe place for future
Hot Chocolate Dispenser
 Hot Chocolate Dispenser Instruction manual Model: CN219-A AU Telephone Helpline: 1300225960 Safety Tips Position on a flat, stable surface. A service agent/qualified technician should carry out installation
Infra Red Thermostatic Wall Mixer
 Infra Red Thermostatic Wall Mixer HTMWMBCP, HTMWMMCP, HTMWMBRS & HTMWMMRS Installation and Maintenance Instructions In this procedure document we have endeavoured to make the information as accurate as
INSTALLATION INSTRUCTIONS
 BATH SHOWER MIXER WITH KIT UB422DC/L/U/B INSTRUCTIONS INTRODUCTION DIMENSIONS Please read these instructions carefully and keep in a safe place for future reference. General Installation Requirements.
Before using your machine, you must familiarize yourself with all of its components.
 USE AND MAINTENANCE MANUAL FOR THE FOAMTEC 1800 NOTE: As with all electrical equipment, care and attention must be exercised at all times during its use, in addition to ensure that routine and preventative
Kiko Bath Shower Mixing Valve KK90015CP
 Kiko Bath Shower Mixing Valve KK90015CP Installation and Maintenance Instructions In this procedure document we have endeavoured to make the information as accurate as possible. We cannot accept any responsibility
User instructions DHP-AT
 User instructions DHP-AT VUGFC202 If these instructions are not followed during installation and service, Danfoss A/S liability according to the applicable warranty is not binding. Danfoss A/S retains
Enzo and Enzo Deluxe Safe Touch Thermostatic Shower EN10031CP & EN10035CP
 Enzo and Enzo Deluxe Safe Touch Thermostatic Shower EN10031CP & EN10035CP Installation and Maintenance Instructions In this procedure document we have endeavoured to make the information as accurate as
OWNER S MANUAL LG CORDLESS VACUUM CLEANER
 OWNER S MANUAL LG CORDLESS VACUUM CLEANER This information contains important instructions for the safe use and maintenance of the vacuum cleaner. More importantly, please read all of the information on
Plus Bath Shower Mixing Valve CP and PL30020CP
 Plus Bath Shower Mixing Valve 920000CP and PL30020CP Installation and Maintenance Instructions In this procedure document we have endeavoured to make the information as accurate as possible. We cannot
Tempest TP420/180 Electric Pressure Washer
 Please dispose of packaging for the product in a responsible manner. It is suitable for recycling. Help to protect the environment, take the packaging to the local amenity tip and place into the appropriate
AWP 3260 CWH Installation Instructions Hydro-massage Bathtub - UL 1795
 Tools you might need for proper installation galvanized nails or screws large level hammer or screw gun shims adhesive Thank you for purchasing Praxis Bathware. For best results, please read and follow
15,000 BTU Portable Air Conditioner
 Instruction Manual 15,000 BTU Portable Air Conditioner Model: HYAC15 READ AND SAVE THESE INSTRUCTIONS Please read and follow the instructions in this user manual even if you feel you are familiar with
MIX Boiler & Font Range Service Manual
 MIX Boiler & Font Range Service Manual 1000870# 1000871# 1000875# 1000880# 1000887# 1000878 1000879 2300268 www.marcobeveragesystems.com Ireland Tel: +353 (1) 295 2674 UK Tel: +44 (0207) 2744577 Service
BOILING UNIT REDITAP. Installation and User Guide. IMPORTANT: This booklet should be left with the user after installation and demonstration
 in tap Boiling water to in tap sink Drain Valve (as high as possible) REDITAP CONNECTION SUMMARY Amp mains supply cold mains water into in tap optional filter cold water in hot water BOILING UNIT Installation
Capri Tap Range. Installation Instructions & User Guide. Please keep these instructions for future reference and request of replacement parts
 Capri Tap Range Installation Instructions & User Guide Please keep these instructions for future reference and request of replacement parts Thank you for choosing Bristan, the UK s leading taps and showers
Thermostatic Bath Shower Mixer. Without shower kit.
 Thermostatic Bath Shower Mixer. Without shower kit. 555QT Size Pattern No. Pack 1 Qty Pack 2 Qty Code Barcode Price ( ) ex 555QT Code A B C D E F Pegler Yorkshire reserve the right to change specifications
MemoirsStately3HoleBasin Mixer Installation and User Guide
 P3907005 MemoirsStately3HoleBasin Mixer Installation and User Guide 454W 3S 454W 4S 454W-4V MODEL NUMBERS Important :- Please quote the above model number(s) when ordering spares. IMPORTANT! Installer:
SAFETY AND OPERATING MANUAL. Original instructions 2000W WALLPAPER STRIPPER
 24 SAFETY AND OPERATING MANUAL Original instructions This appliance can be used by children aged from 8 years and above and persons with reduced physical, sensory or mental capabilities or lack of experience
Z8 Quick Reference Guide
 Z8 Quick Reference Guide J These short instructions do not replace the Z8 Instructions for Use. Make sure you read and observe the safety information and warnings first in order to avoid hazards. Rinsing
Deluge Shower Mixing Valve 10045CP
 Deluge Shower Mixing Valve 10045CP Installation and Maintenance Instructions In this procedure document we have endeavoured to make the information as accurate as possible. We cannot accept any responsibility
INSTALLATION MANUAL FOR MODELS: TERAZZA, TRACCIO, MILANO, CERRATO
 INSTALLATION MANUAL FOR MODELS: TERAZZA, TRACCIO, MILANO, CERRATO TABLE OF CONTENTS ROOM SPECIFICATIONS ELECTRICAL SPECIFICATIONS PLUMBING SPECIFICATIONS TECHNICAL SPECIFICATIONS INTRODUCTION ASSEMBLY
Penner Stationary Patient Lift Safe Operation & Daily Maintenance Instructions
 Penner Stationary Patient Lift Safe Operation & Daily Maintenance Instructions PENNER PATIENT CARE, INC Box 523 / 102 Grant St. Aurora, NE 68818 350751 Rev B 09/15/2006 1-866-PENNERS 1-866-736-6377 1-800-732-0717
Ropox Bathtub. Keep this manual with the product at all times! User Manual & Mounting Instructions PDF 6128 /
 Ropox Bathtub PDF 6128 / 08.01.2019 User Manual & Mounting Instructions Keep this manual with the product at all times! Contents... 1 Contents... 2 Presale information... 4 General product information...
INSTALLATION AND MAINTENANCE GUIDE TRENDY 1000 T ELECTRONIC LAVATORY FAUCET
 INSTALLATION AND MAINTENANCE GUIDE TRENDY 1000 T ELECTRONIC LAVATORY FAUCET 1 INDEX 1 TECHNICAL DATA 2 TEMPERATURE ALTERNATIVES 3 PACK CONTENTS 4 PRE-INSTALLATION INFO 5-6 FAUCET INSTALLATION 7 ADJUSTING
Dyna-Form Air. Alternating Pressure Relief Overlay System
 Dyna-Form Air Alternating Pressure Relief Overlay System 1 Contents Introduction 3 Cleaning 10 General Warnings 4 Control Unit 10 Unpacking / Setting Up 5 Air Filter 10 Setting Up 6 Mattress Cover 11 Connect
Installation Manual for M-G014 & M-G015
 Installation Manual for M-G014 & M-G015 M-G014 M-G015 1 Contents 1. Electrical specifications 2. Plumbing 3. Installation of Water connections 4. Installation of Drain 5. Operation of Bathtub 6. Troubleshooting
Monza Easyfit Kitchen Sink Mixer
 Monza Easyfit Kitchen Sink Mixer Installation Instructions & User Guide Please keep these instructions for future reference Contents Thank you for choosing Bristan, the UK s leading taps and showers expert.
Utility Master. Steam cleaner. User Guide. Performance is everything. S10 Series. vax.co.uk
 Utility Master Steam cleaner User Guide S10 Series vax.co.uk Performance is everything. Contents Contents 1 Machine Overview 2 General Safety Information 3 Getting Started 4 How To Use 5 Looking After
REDRING POWERSTREAM UNVENTED INSTANTANEOUS WATER HEATER. Installation and User Guide
 : GUARANTEE AND CONTACT DETAILS REDRING POWERSTREAM UNVENTED INSTANTANEOUS WATER HEATER Installation and User Guide APPLIED ENERGY PRODUCTS LIMITED MORLEY WAY, PETERBOROUGH PE2 JJ TEL: +44 (0) 844 372
Ireland. Australia. New Zealand
 UK Ireland Australia New Zealand 2 3 4 5 Intended use Your Black & Decker vacuum cleaner has been designed to vacuum dry substances. This product is intended for household use only. Safety instructions
Rif Cod i220-0
 15 52 50 6 13 53 51 2 9 8 3 20 19 18 5 1 7 14 10 4 17 Rif Cod 1 0010060 2 0060287 3 0060310 4 0080003 5 0080004 6 0080051 7 0080053 8 0080410 9 0080413 10 0080430 11 0080432 12 0080434 13 0080435 14 0080436
shower panel specification manual 2008
 Uniclass L72107 CI/SfB (74.26) X EPIC H123 shower panel specification manual 2008 HORNE ENGINEERING Ltd tel +44 (0)1505 321455 email sales@horne.co.uk web www.horne.co.uk shower panel specification manual
Technical data. Bathroom/shower room installations. Water services (WRAS approved)
") Technical data The Closomat toilet MUST be installed by a competent or qualified person. Explanation of symbols Safety instructions in this manual are identified by symbols. The safety instructions are
Technical data The Closomat toilet MUST be installed by a competent or qualified person. Explanation of symbols Safety instructions in this manual are identified by symbols. The safety instructions are
Installation Instructions / Warranty
 Installation Instructions / Warranty IP C 04210000 04211000 04212000 IP S 04203000 04204000 04205000 IP E 04199000 04200000 04201000 IP Trim Sets Valve trim only IP C 04212000 IP E 04201000 IP S 04205000
Complete Shower Room Installation Guide and Operation Manual. Models 8727 / 8728
 Complete Shower Room Installation Guide and Operation Manual Models 8727 / 8728 IMPORTANT PLEASE READ BEFORE STARTING ASSEMBLY ALL STEAM SHOWERS REQUIRE TWO PEOPLE TO ASSEMBLE THEM IF YOU ARE NOT AT ALL