Right-hand connection. 1. Take the hoses and elbow out of the holders, depending on model. max. 100 cm. min. * cm
|
|
|
- Drusilla Rogers
- 5 years ago
- Views:
Transcription


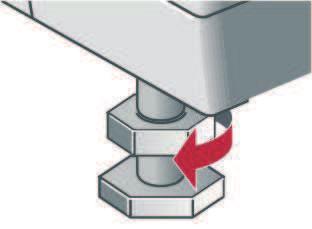
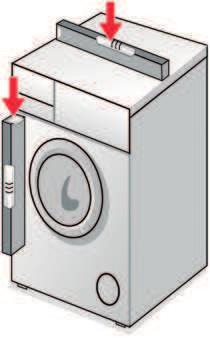
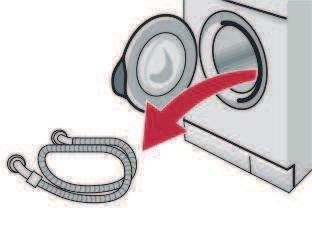
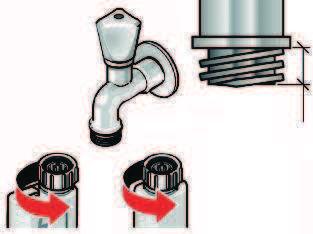
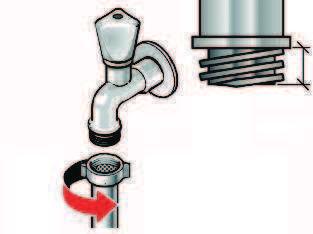
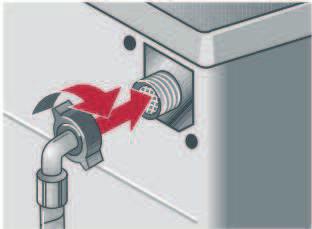
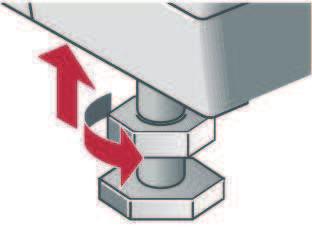
1 Hose and cable lengths depending on model Scope of delivery depending on model AquaäStop AquaäSecure or Left-hand connection ~ 100 cm ~ 145 cm ~ 145 cm ~ 95 cm Moisture inside the drum is due to final testing. Standard ~ 85 cm ~ 135 cm Water connection depending on model Before using the appliance for the first time, make sure that you completely remove transport braces and keep them for subsequent transportation. If you need to transport the appliance at a later date, always re-affix the transport braces to prevent damage to the machine a page 6. Store the screw and sleeve screwed together. Right-hand connection Risk of electric shock. Do not immerse the Aqua-Stop safety device in water (contains an electric valve). To prevent leaks or water damage, observe the instructions in this section. Caution: only operate the washing machine using cold drinking water. Do not connect to the mixer tap of an unpressurised hot-water boiler. Do not use a used inlet hose. Only use the inlet hose supplied or one which was purchased from an authorised specialist dealer. If in doubt, have a technician connect the appliance. 1. Take the hoses and elbow out of the holders, depending on model. max. 100 cm The washing machine is heavy - take care when lifting. Caution: frozen hoses may rip/burst. Do not install the washing machine in areas exposed to frost or outdoors. The washing machine could be damaged. Do not lift the appliance by protruding components (e.g. the washing machine door). In addition to the instructions provided in this document, special regulations from the relevant water and electric utility companies may apply. If in doubt, have a technician connect the appliance. Lay hoses and cables in such a way that there is no risk of tripping. Removing the transport braces min. * cm Safety instructions Water inlet Water inlet hose: Caution: do not bend, squash, modify or cut through (otherwise its strength is no longer guaranteed). Optimum water pressure in the supply network: 100ä1,000 kpa (1ä10 bar) When the tap is on, the water flow is at least 8 l/min. If the water pressure is higher than this, a pressure reducing valve must be installed. Mains cable Available from specialist dealers/the after-sales service: Extension for Aqua-Stop or cold-water inlet hose (approx m). order no. WMZ2380, WZ10130, CZ11350, Z7070X0 Longer inlet hose (approx m) for standard model. Water outlet Water inlet 2. Loosen the bolts... Model: AquaäStop AquaäSecure... until they move freely in the sleeves. Installing the appliance depending on model Covers 3. Completely remove all 4 transportation protection devices and take the main cable out of the holder. Install the appliance before connecting it to the power supply. Elbow Wrench (depending on model) 1. Connect the water inlet hose to the tap. Caution: only tighten the screw connections by hand. 2. Open the water tap carefully, checking the leak tightness of the connection points. Caution: the screw connection is under mains water pressure. Risk of electric shock. for fixing the drainage hose in place max. 90 3/4 min. 10 mm Water outlet hose: Caution: do not bend or pull lengthways. Height difference between the installation surface and the drain: min. 60 cm - max. 100 cm 4. Insert covers. Useful tools Spirit level for installation. Spanner WAF 13 for undoing the transport safety bolts --> page 3 and Spanner WAF 17 for levelling the appliance feet --> page 5. max. 90 Water outlet Also required, depending on the connection: For models with a non-continuous appliance covering plate or a round service flap, the appliance covering plate must not be removed. 3/4 min. 10 mm For models with a continuous appliance covering plate or a square service flap, the appliance covering plate can be replaced by a metal cover. Instead of the appliance covering plate, you must have a metal cover fitted by an expert. 1 hose clamp Ø mm (exclusive dealers) to connect to a siphon a page 4; water connection. Standard Only install the washing machine underneath a continuous worktop that is securely connected to adjacent cabinets. Recess width of 60 cm required. Outlet in a sink Caution: secure the drain hose from slipping out. Caution: the plug must not block drainage from the sink. During pumping, check whether the water is draining away quickly enough. The end of the drain hose must not be immersed in the water pumped out. This risks water being sucked back into the washing machine. Installation surface The machine must be stable so that it does not move around. The installation surface must be firm and level. Soft floors/floor coverings are not suitable. Drainage into a siphon: Caution: the connection point must be secured with a hose clamp, Ø mm (exclusive dealers). Installation on a pedestal The feet of the washing machine must be secured with holding brackets*. * order no. WMZ2200, WX9756, CZ110600, Z7080X0 Installation on a wood joist floor If possible, place the washing machine in a corner. Screw a water-resistant wooden board (min. 30 mm thick) to the floor. The feet of the washing machine must be secured with holding brackets*. * order no. see above


2

3
4
5
6
Moisture inside the drum is due to final testing. Mains cable. Water outlet
 Safety instructions Moisture inside the drum is due to final testing. Scope of delivery depending on model The washing machine is heavy - take care when lifting. Caution: frozen hoses can crack/burst.
1. Take the hoses and elbow out of the holders, depending on model. max. 100 cm. min. * cm
 Safety instructions The washing machine is heavy - take care when lifting. Caution: frozen hoses may rip/burst. Do not install the washing machine in areas exposed to frost or outdoors. The washing machine
Moisture inside the drum is due to final testing.
 Safety instructions Scope of delivery depending on model Moisture inside the drum is due to final testing. Removing the transport braces Water connection depending on model The washing machine is heavy
Moisture inside the drum is due to final testing.
 Safety instructions Scope of delivery depending on model Moisture inside the drum is due to final testing. Removing the transport safety devices Water connection depending on model The washing machine
Removing shipping locks
 y Safety instructions Scope of delivery Moisture in the drum is due to end inspection. Removing shipping locks Water connection l The washing machine is heavy - lift with caution. Frozen hoses can tear/burst.
en-us Use and Care Manual, Installation Instructions Washer WAT28400UC
 en-us Use and Care Manual, Installation Instructions Washer WAT28400UC Under counter (Less Desirable) If front of the appliance is covered ventilation openings must be installed. E & F are minimum area
en Instruction Manual and Installation Instructions Washing machine
 en Instruction Manual and Installation Instructions Washing machine www.siemens-home.com Your new washing machine You have chosen a premium washing machine. Thanks to its innovative technology, this washing
INSTALLATION GUIDE NZ AU C
 DISHWASHER DW60 models INSTALLATION GUIDE NZ AU 591217C 12.17 1 SAFETY AND WARNINGS! WARNING! Electrical shock hazard Before installing the dishwasher, remove the house fuse or open the circuit breaker.
INSTALLATION GUIDE NZ AU
 DISHWASHER DW60U6I & DW60U2I models INSTALLATION GUIDE NZ AU 1 SAFETY AND WARNINGS 100 lb 45 kg! WARNING! Electrical shock hazard Before installing the dishwasher, remove the house fuse or open the circuit
Installation Instructions
 Installation Instructions KFN 9855 ide en - CA Installation, repair and maintenance work should be performed by a Miele authorized service technician in accordance with national and local safety regulations
IMPORTANT INFORMATION. Revised Dishwasher Installation Instructions
 IMPORTANT INFORMATION Revised Dishwasher Installation Instructions To obtain a revised copy of the entire Dishwasher User s Manual, go to www.eurotechappliances.com. SPECIAL EDITION 11-20-02 SAVE THESE
INSTALLATION INSTRUCTIONS
 INSTALLATION INSTRUCTIONS INSTALLATION REQUIREMENTS Tools and Parts Gather required tools and parts before starting installation. Tools needed: Optional tools: Flashlight Options: Bucket Pedestal: You
Installation Instructions
 GE Consumer & Industrial Appliances Installation Instructions Junction Box Cover Within this user bag, you will find a junction box cover and a #10 hex head screw used to attach the junction box cover
Installation Instructions Built-In Dishwasher
 RINSE CHINA CRYSTAL SPEED CYCLE NORMAL WASH COOK WARE SELECTIONS ANTI BACTERIA START RESET ENHANCEMENTS DELAY HOURS ADDED HEAT PRE WASH HEATED DRY TO LOCK CONTROLS PRESS HEATED DRY FOR 3 SECONDS GE Consumer
Rif Cod i220-0
 15 52 50 6 13 53 51 2 9 8 3 20 19 18 5 1 7 14 10 4 17 Rif Cod 1 0010060 2 0060287 3 0060310 4 0080003 5 0080004 6 0080051 7 0080053 8 0080410 9 0080413 10 0080430 11 0080432 12 0080434 13 0080435 14 0080436
Built-In Dishwasher. Installation Instructions. BEFORE YOU BEGIN Read these instructions completely and carefully. IMPORTANT The dishwasher MUST be
 Installation Instructions Built-In Dishwasher If you have questions, call 800.GE.CARES (800.432.2737) or visit our website at: www.ge.com BEFORE YOU BEGIN Read these instructions completely and carefully.
Installation Instructions
 Installation Instructions Built-In Dishwasher If you have questions, call 800-GECARES or visit our website at: www.geappliances.com BEFORE YOU BEGIN Read these instructions completely and carefully. IMPORTANT
Installation instructions Refrigerators and freezers for integrated use, door-on-door
 Installation instructions Refrigerators and freezers for integrated use, door-on-door 010612 7084276-04 IK/ IKB/ IKP/ IG/ IGN... 1/ 3/ 6 General safety information Contents 1 General safety information...
Unpacking and removing shipping bolts. Connecting the drain line Leveling the washer Connecting to the power supply
 11 INSTALLATION Installation Overview Choosing the proper location Unpacking and removing shipping bolts Connecting the water line Connecting the drain line Leveling the washer Connecting to the power
Zip HydroTap MINIBOIL
 89585DE v1.20 06.14 Instant boiling water system Zip HydroTap MINIBOIL Operating and installation instructions Contents 1. Safety Instructions 1. Safety Instructions........................................................................................
Installation Instructions Built-In Dishwasher
 GE Consumer & Industrial Appliances Installation Instructions Built-In Dishwasher If you have questions, call 800.GE.CARES (800.432.2737) or visit our website at: www.ge.com BEFORE YOU BEGIN Read these
Mix Boiler & Font Range ( #, #, #, , )
") Mix Boiler & Font Range (1000870#, 1000871#, 1000880#, 1000878, 1000879) Service Manual Marco Beverage Systems Ltd. 63d Heather Road, Sandyford Industrial Estate, Dublin 18, Republic of Ireland Ireland
Mix Boiler & Font Range (1000870#, 1000871#, 1000880#, 1000878, 1000879) Service Manual Marco Beverage Systems Ltd. 63d Heather Road, Sandyford Industrial Estate, Dublin 18, Republic of Ireland Ireland
Gaggenau en Installation instruction RC 462/472 RF 411/413 RF 461/463 RF 471 RW 414/464
 Gaggenau en Installation instruction RC 462/472 RF 411/413 RF 461/463 RF 471 RW 414/464 2 Table of Content Safety and warning information... 4 Installation possibilities... 5 Stand alone appliance... 5
en Instruction Manual and Installation Instructions WM16Y790AU Washing machine
 en Instruction Manual and Installation Instructions WM16Y790AU Washing machine www.siemens-home.com Your new washing machine You have chosen a premium washing machine made by Siemens. Thanks to its innovative
Care and cleaning. 1. Pull out the condensation container. 2. Pull the filter out of its snap-in lock.
 Environmentally-responsible disposal After-sales service Dispose of packaging in an environmentally-responsible manner. This appliance is labelled in accordance with European Directive 2012/19/EU concerning
BEFORE USING THE WASHING MACHINE
 INSTRUCTIONS FOR USE DEFINITION OF USE BEFORE USING THE WASHING MACHINE FIRST WASH CYCLE PRECAUTIONS AND GENERAL RECOMMENDATIONS DESCRIPTION OF THE WASHING MACHINE CHILD SAFETY DETERGENTS AND ADDITIVES
Installation Instructions
 GE Consumer & Industrial Appliances Installation Instructions Junction Box Cover Within this user bag, you will find a junction box cover and a #10 hex head screw used to attach the junction box cover
DOUBLE DISHDRAWER TM DISHWASHER
 DOUBLE DISHDRAWER TM DISHWASHER DD4DDFT & DD4DVT models INSTALLATION GUIDE US CA 5985 A 08.7 SAFETY AND WARNINGS! WARNING! Electrical Shock Hazard Before installing the dishwasher, remove the house fuse
Dishwasher. Installation manual DW60M9990AP
 Dishwasher manual DW60M9990AP DW9000M_DD68-00197B-00_EN.indd 1 6/1/2017 4:34:14 PM Contents Contents 3 What s included 3 requirements 7 Dimensions and specifications 9 Step-by-step installation 11 2 English
Food Waste Disposer Instruction Manual
 Food Waste Disposer Instruction Manual See insert for specific information about your new disposer NOTE: IMPORTANT: CAUTION: This Food Waste Disposer has been designed to operate on 110-120 Volt, 60 Hz
MIX Boiler & Font Range Service Manual
 MIX Boiler & Font Range Service Manual 1000870# 1000871# 1000875# 1000880# 1000887# 1000878 1000879 2300268 www.marcobeveragesystems.com Ireland Tel: +353 (1) 295 2674 UK Tel: +44 (0207) 2744577 Service
HOT WASHER MODEL NO: KING150
 WARNING: Do not use the hot washer without reading this manual HOT WASHER MODEL NO: KING150 PART NO: 7320175 OPERATION & MAINTENANCE INSTRUCTIONS LS1215 INTRODUCTION Thank you for purchasing this CLARKE
[FLARE CONNECTION TYPE] ATTENTION
![[FLARE CONNECTION TYPE] ATTENTION](/thumbs/88/117511702.jpg "[FLARE CONNECTION TYPE] ATTENTION") SPLIT-TYPE AIR CONDITIONERS Model MXZ-2A20NA [FLARE CONNECTION TYPE] HFC utilized R410A INSTALLATION MANUAL ATTENTION This manual mentions how to install only the outdoor unit, MXZ-2A20NA. As for the way
SPLIT-TYPE AIR CONDITIONERS Model MXZ-2A20NA [FLARE CONNECTION TYPE] HFC utilized R410A INSTALLATION MANUAL ATTENTION This manual mentions how to install only the outdoor unit, MXZ-2A20NA. As for the way
INVERTER SPLIT - TYPE
 INVERTER SPLIT - TYPE ISSUE No 2 DATE 04/09/08 P/No 2020323A2868 CONTENTS SAFETY PRECAUTIONS Warning 2 Operating temperature 2 BEFORE INSTALLATION Tools needed for installation 3 Items required for installing
SINGLE DISHDRAWER TM DISHWASHER
 SINGLE DISHDRAWER TM DISHWASHER DD4SA & DD4SCT models INSTALLATION GUIDE US CA 595B 08.7 SAFETY AND WARNINGS! WARNING! Electrical Shock Hazard Before installing the dishwasher, remove the house fuse or
AquaReef Cube. Inspiring Excellence in Fish Keeping!
 AquaReef 275 Cube Inspiring Excellence in Fish Keeping! www.aquaone.com.au Instruction version: 25/03/2011 Important Safeguards To guard against injury, basic safety precautions should be observed, including
PREMIUM KITCHEN MIXER TAP. PREMIUM KITCHEN MIXER TAP Assembly, operating and safety instructions IAN
 PREMIUM KITCHEN MIXER TAP PREMIUM KITCHEN MIXER TAP Assembly, operating and safety instructions IAN 282471 GB/IE/NI Assembly, operating and safety instructions Page 5 B 15mm HG00476A HG00476B C 5 4 12
DOUBLE DISHDRAWER TM DISHWASHER
 DOUBLE DISHDRAWER TM DISHWASHER DD60DA & DD60DC models INSTALLATION GUIDE NZ AU GB IE 591151C 08.17 WARNING! Electrical shock hazard Before installing the dishwasher, remove the house fuse or open the
INSTALLATION MANUAL. Split-type Air Conditioner (Cooling and Heating) Outdoor Unit UQB09JJWC UQB12JJWC. Indoor Unit AQB09JJWC AQB12JJWC
 Outdoor Unit UQB09JJWC UQB12JJWC. Indoor Unit AQB09JJWC AQB12JJWC") AQB09JJ6WC_IM_E_2585 2006.4.17 4:26 PM Page 17 INSTALLATION MANUAL Indoor Unit AQB09JJWC AQB12JJWC Outdoor Unit UQB09JJWC UQB12JJWC ENGLISH FRANÇAIS ESPAÑOL Split-type Air Conditioner (Cooling and Heating)
AQB09JJ6WC_IM_E_2585 2006.4.17 4:26 PM Page 17 INSTALLATION MANUAL Indoor Unit AQB09JJWC AQB12JJWC Outdoor Unit UQB09JJWC UQB12JJWC ENGLISH FRANÇAIS ESPAÑOL Split-type Air Conditioner (Cooling and Heating)
INDIVIDUAL HEATING. Installation Manual e Skirting Heating Classic. Skirting Heating Delta. HEATING. COOLING. COMFORT.
 www.variotherm.at INDIVIDUAL HEATING Skirting Heating Classic. Skirting Heating Delta. Installation Delta HEATING. COOLING. COMFORT. Classic Installation Manual e22111 Page 2 Table of Contents INDIVIDUAL
SCHWAN INSTALLATION GUIDE
 SCHWAN INSTALLATION GUIDE For Schwan Versatap SC52E Instant Hot Cold Filtered Water FOR SERVICE OR ASSISTANCE CALL MERQUIP ON 0800 636 0 636. Schwan recommends that a qualified tradesperson installs your
Installation Instructions
 Installation Instructions Built-In Dishwasher If you have questions, call 800-944-9400(US),800-245-8352(Canada)or visit our website at: www.frigidaire.com BEFORE YOU BEGIN Read these instructions completely
Drying Cabinet Installation and Operating Manual
 Drying Cabinet Installation and Operating Manual Model:- ECO Dryer 2.0 HP Heat Pump Technology CONTENTS THIS USER MANUAL 3 DATA PLATE DETAILS 3 ADVICE ON SAFE OPERATION 3 DESCRIPTION OF THE CABINET 4 AIR
INSTALLATION INSTRUCTIONS
 INSTALLATION INSTRUCTIONS TM DishDrawer dishwasher DD4D 7 & DD4DT 7 models US CA 59004D 04.3 FOLLOW THE INSTALLATION SEQUENCE RELEVANT TO YOUR MODEL STANDARD HEIGHT DOUBLE MODELS TALL HEIGHT DOUBLE MODELS
Electrical cable Water supply tube Fittings for tube Coupler Teflon tape. Hole saw min. 2½" bit
 Installation Parts and Tools Parts not Provided Electrical cable Water supply tube Fittings for tube Coupler Teflon tape Air gap Wire nuts for 6-gauge wiring Hose clamp ⅞" UL approved strain relief Electrical
Installation GUIDE VDWU524SS VDWU524WSSS FDWU524WS FDWU524 VDWU324SS FDWU324
 Installation GUIDE VDWU524SS VDWU524WSSS FDWU524WS FDWU524 VDWU324SS FDWU324 To prevent accidents, which could cause serious injury or death, as well as machine damage read these instructions before installation
Polti S.p.A. reserves the right to change equipment or accessory specification without prior notice.
 R E N G L I S H KEY 1. Handle 2. Motor 3. Rotating hooks for cable storage 4. Power supply cable 5. Handle locking screw 6. Mains ON/OFF switch 7. Eyelet 8. "Full bag" red indicator light 9. Cover of bag/filter
Floor Standing Bath Shower Mixer. Fitting instructions. Please keep these instructions for future reference and request of replacement parts.
 Floor Standing Bath Shower Mixer Fitting instructions Please keep these instructions for future reference and request of replacement parts. We have taken great care to ensure that this product reaches
INSTALLATION MANUAL. Split-type Air Conditioner (Cooling and Heating) Indoor Unit AQB18J6WC AQB24J2WC. Outdoor Unit UQB18J6WC UQB24J2WC
 Indoor Unit AQB18J6WC AQB24J2WC. Outdoor Unit UQB18J6WC UQB24J2WC") AQB8J6WC_IM_E_25864 2006.4.4 3:29 PM Page 7 INSTALLATION MANUAL Indoor Unit AQB8J6WC AQB24J2WC Outdoor Unit UQB8J6WC UQB24J2WC ENGLISH FRANÇAIS ESPAÑOL Split-type Air Conditioner (Cooling and Heating)
AQB8J6WC_IM_E_25864 2006.4.4 3:29 PM Page 7 INSTALLATION MANUAL Indoor Unit AQB8J6WC AQB24J2WC Outdoor Unit UQB8J6WC UQB24J2WC ENGLISH FRANÇAIS ESPAÑOL Split-type Air Conditioner (Cooling and Heating)
Gaggenau en Installation instruction RY 492
 Gaggenau en Installation instruction RY 492 O Table of Contents Safety and warning information... 4 Installation possibilities... 5 Stand alone appliance... 5 Stand alone appliance with dividing wall...
INSTALLATION INSTRUCTIONS
 INSTALLATION INSTRUCTIONS DishDrawer TM dishwasher DD24SUT7 and DD24SVT7 models US CA 590225B 04.4 SAFETY AND WARNINGS Electrical hazard WARNING! Before installing the dishwasher, remove the house fuse
Care and cleaning. 1. Pull out the condensation container. 2. Pull the filter out of its snap-in lock.
 Environmentally-responsible disposal Care and cleaning Care and cleaning After-sales service Dispose of packaging in an environmentally-responsible manner. This appliance is labelled in accordance with
INSTALLATION INSTRUCTIONS WM75. Washing machine DOMESTIC. Carefully read the instructions for use before using the washing machine.
 INSTALLATION INSTRUCTIONS WM75 Washing machine DOMESTIC Carefully read the instructions for use before using the washing machine. Dear Customer, Read these instructions carefully and completely before
Dishwasher Installation Instructions DW 24XT/DW 24XV
 Dishwasher Installation Instructions DW 24XT/DW 24XV Installation Instructions Dishwasher BEFORE YOU BEGIN Read these instructions completely and carefully. IMPORTANT Observe all governing codes and ordinances.
INSTALLATION INSTRUCTIONS
 INSTALLATION INSTRUCTIONS TM DishDrawer dishwasher DD36SDFTX (Designer) & DD36STI (Integrated) models US CA 59008D 04.3 a SAFETY AND WARNINGS Electrical hazard WARNING! Before installing the dishwasher,
A PROUD HERITAGE OF EXPERIENCE & QUALITY DISHWASHER BR- DWSH01- S
 A PROUD HERITAGE OF EXPERIENCE & QUALITY DISHWASHER BR- DWSH01- S W W W. V I N O T E M P. C O M Installation Instructions Dishwasher BEFORE YOU BEGIN Read these instructions completely and carefully. IMPORTANT
HD Kompakt Service Manual
 HD Kompakt Service Manual English 5.906-583.0 Rev. 00 (08/13) 1 1 Contents 1 Contents.................................................... 2 2 Preface.....................................................
Dishwasher Installation Manual
 Dishwasher Installation Manual DW 51600 SS DW 51600 FBI DWT 51600 SS DWT 51600 FBI DWT 81800 FBI DWT 81800 SS DWT 81800 SSIH DWT 81800 SSWS DWT 52600 WIH DWT 52600 SSIH DWT 52600 BIH DWT 52800 WIH DWT
INSTALLATION INSTRUCTIONS
 INSTALLATION INSTRUCTIONS TM DishDrawer dishwasher DD90SDF(H)TX, DD90SDFTM (Designer) & DD90S(H)TI (Integrated) models NZ AU GB IE 5900D 04.3 FOLLOW THE INSTALLATION SEQUENCE RELEVANT TO YOUR MODEL Designer
Installation guide COMBI E. Before installing read this guide first
 Installation guide COMBI E Before installing read this guide first Introduction The operation of the Quooker COMBI E The Quooker COMBI E supplies boiling water and hot water. The tank is vacuuminsulated
Installation. 324 Series Built-In Dishwashers U L. Viking Range, LLC 111 Front Street Greenwood, Mississippi USA (662)
") Installation Viking Range, LLC Front Street Greenwood, Mississippi 890 USA (66) 455-00 For product information, call -888-845-464 or visit the Viking Website at vikingrange.com U L C U L 4 Series Built-In
Installation Viking Range, LLC Front Street Greenwood, Mississippi 890 USA (66) 455-00 For product information, call -888-845-464 or visit the Viking Website at vikingrange.com U L C U L 4 Series Built-In
Installation and maintenance instructions
 6304 4995 0/004 GB For installer Installation and maintenance instructions Flue gas heat exchanger WT50/60 Please read thoroughly prior to installation and maintenance. Summary About this manual This equipment
LED ILLUMINATED MAGNIFIER
 LED ILLUMINATED MAGNIFIER LED ILLUMINATED MAGNIFIER Operation and Safety Notes IAN 101449 101449_livx_LED-Lupenleuchte_Cover_BS_IE.indd 2 05.08.14 10:48 GB / IE Operation and Safety Notes Page 5 101449_livx_LED-Lupenleuchte_Cover_BS_IE.indd
CENTRAL AIR CONDITIONER SPLIT SYSTEM
 CENTRAL AIR CONDITIONER SPLIT SYSTEM WITH ELECTRONIC CONTROL SERIES: DS INSTALLATION INSTRUCTIONS INDEX GENERAL... 2 UNIT LOCATION CRITERIA... 2 DIMENSIONAL DRAWINGS... 3 INDOOR UNIT INSTALLATION... 5
A PROUD HERITAGE OF EXPERIENCE & QUALITY DISHWASHER BR-DWSH01-S
 A PROUD HERITAGE OF EXPERIENCE & QUALITY DISHWASHER BR-DWSH01-S, 1 6 7 $ / / $ 7, 2 1, 1 6 7 5 8 & 7, 2 1 6 W W W. V I N O T E M P. C O M Installation Instructions Dishwasher BEFORE YOU BEGIN Read these
Zen Boiling Tap Range
 Product Instruction Manual Zen Boiling Tap Range Zen Solo, Zen Spa, Zen Life Tap Range v16.10/3 Version 3.2 Jan 2015 Overview The Zen Boiling Tap Range delivers elegant practical solutions for your domestic
Installation Instructions
 Instructions for Topload Washers Original Instructions Keep These Instructions for Future Reference. CAUTION: Read the instructions before using the machine. (If this machine changes ownership, this manual
OPTIMUM 700 PASTA COOKER ELECTRIC BUILDER S SPECIFICATIONS. Part A: Technical characteristics Part B: Technical instructions for the installer
 OPTIMUM 700 PASTA COOKER ELECTRIC BUILDER S SPECIFICATIONS Part A: Technical characteristics Part B: Technical instructions for the installer WARNING Installation and repairs must be carried out by personnel
Installation Instructions. For the 18 Built-In Dishwasher and Front Color Panels
 Installation Instructions For the 18 Built-In Dishwasher and Front Color Panels Printed in USA 154232102 Before You Begin DO NOT INSTALL DISHWASHER UNTIL YOU HAVE READ ALL INSTRUCTIONS. FOR YOUR SAFETY,
Viking Installation Guide
 Viking Installation Guide Viking Range Corporation 111 Front Street Greenwood, Mississippi 38930 USA (662) 455-1200 For product information, call 1-888-VIKING1 (845-4641) or visit the Viking Web site at
Aquience 1200/1500 R
 Aquience 1200/1500 R Congratulations, you have purchased one of the fi nest quality aquariums available. This product will give you many years of excellent service when installed and maintained correctly.
DOUBLE DISHDRAWER TM DISHWASHER
 DOUBLE DISHDRAWER TM DISHWASHER DD4DI, DD4DTI & DD4DHTI models INSTALLATION GUIDE US CA 5986 A 08.7 !! WARNING! Electrical Shock Hazard Before installing the dishwasher, remove the house fuse or open the
METIS. Installation instructions. Riser rail kit INSTALLERS PLEASE NOTE THESE INSTRUCTIONS ARE TO BE LEFT WITH THE USER.
 METIS Riser rail kit Installation instructions INSTALLERS PLEASE NOTE THESE INSTRUCTIONS ARE TO BE LEFT WITH THE USER 2180531A September 2006 CONTENTS Page General installation notes 1 Main components
MPS-425 e-drum set. assembly instructions
 MPS-425 e-drum set assembly instructions Musikhaus Thomann Thomann GmbH Hans-Thomann-Straße 1 96138 Burgebrach Germany Telephone: +49 (0) 9546 9223-0 E-mail: info@thomann.de Internet: www.thomann.de 20.07.2015,
DISHWASHER. Models DW2432 and DW2432SS. Installation Manual. Write Serial Number (on inner door of unit) here:
 here:") DISHWASHER Models DW2432 and DW2432SS Installation Manual Write Serial Number (on inner door of unit) here: Felix Storch, Inc. Summit Appliance Division 770 Garrison Avenue Bronx, New York 10474 www.summitappliance.com
DISHWASHER Models DW2432 and DW2432SS Installation Manual Write Serial Number (on inner door of unit) here: Felix Storch, Inc. Summit Appliance Division 770 Garrison Avenue Bronx, New York 10474 www.summitappliance.com
RWC Issue: F. Description: ARISTON WALL CANOPY Model Numbers: ARCH90BIX. Model may vary slightly from images pictured. All measurements are in mm.
 RWC Issue: F Description: ARISTON WALL CANOPY Model Numbers: ARCH90BIX Model may vary slightly from images pictured. All measurements are in mm. 1 Overview Pre-installation Thank you for purchasing a quality
Installation guide Nordic mixer taps. Before installing read this guide first
 Installation guide Nordic mixer taps Before installing read this guide first Introduction Installation, maintenance and warranty The Nordic Twintaps are our latest innovation for your kitchen a boiling-water
CIRCO 6 Solar Circulation Unit
 TECHNICAL INFORMATION / INSTALLATION INSTRUCTIONS CIRCO Solar Circulation Unit CIRCO Solar Circulation Unit in combination with the intelligent SUNGO controllers, it is the safe and reliable heart of a
Washing machine PW 6055 AV/LP PW 6065 AV/LP. en - GB. Installation plan
 Installation plan Washing machine PW 6055 AV/LP PW 6065 AV/LP To avoid the risk of accidents or damage to the machine, it is essential to read operating and installation instructions before installation
6L PRESSURE COOKER. Instruction Manual. Model: PLA1424
 6L PRESSURE COOKER Instruction Manual Model: PLA1424 Due to ongoing product improvements, specifications and accessories may change without notice. Actual product may differ slightly to that depicted.
ProStar Ceiling Fan PS52. Installation Instructions Instrucciones de instalación Instructions d installation
 ProStar Ceiling Fan PS52 Installation Instructions Instrucciones de instalación Instructions d installation Read and Save These Safety Precautions. Turn off electricity at main switch before wiring or
Installation and maintenance instructions
 6304 4994 03/2006 GB For installer Installation and maintenance instructions Flue gas heat exchanger WT30/40 Please read thoroughly prior to installation and maintenance. Contents Contents Contents 2 1
PIPE DREAMS 96. Aeroponic Garden IMPORTANT:
 1 WARNING: BEFORE PUTTING WATER PUMP INTO OPERATION FILL UP NUTRIENT TANK TO TOP OF PUMP. THE PUMP MUST NEVER RUN DRY OTHERWISE, WARRANTY WILL BE DECLINED. READ FILLING INSTRUCTIONS BEFORE USE. Welcome
INSTRUCTION- AND MAINTENANCE MANUAL FOR ELECTROMAGNETIC AIR PUMP JDK-60, JDK-80, JDK-100, JDK-120
 INSTRUCTION- AND MAINTENANCE MANUAL FOR ELECTROMAGNETIC AIR PUMP MODEL : JDK-60, JDK-80, JDK-100, JDK-120 - release 29.01.2014 - We thank you for purchasing our air pump. Prior to use, it is kindly requested
Inta City Shower Mixing Valve CT20010CP
 Inta City Shower Mixing Valve CT20010CP Installation and Maintenance Instructions In this procedure document we have endeavoured to make the information as accurate as possible. We cannot accept any responsibility
Atmos EasySolar. Installation Instructions for. In-roof and flat roof installation with flat plate collectors
 Atmos EasySolar Installation Instructions for Atmos EasySolar In-roof and flat roof installation with flat plate collectors Atmos Heating Systems West March Daventry Northants, NN11 4SA Tel: 01327 871990
INSTALLATION INSTRUCTIONS
 INSTALLATION INSTRUCTIONS ActiveSmart Slide-in refrigerator RS90A and RS90AU models NZ AU GB IE EU AE HK SG IN www.fisherpaykel.com 839137 A 02.15 R600a 1 safety and warnings This refrigerator contains
kk21 installation Kk21-WF21 Things you might need for the installation: vessel sink,
 Kk21-WF21 Things you might need for the installation: vessel sink, plumber's putty(home depot), liquid nails(home depot), Bucket silicone caulk(home depot), Putty knife Plumber's putty Pipe wrench Channel-lock
DOUBLE DISHDRAWER TM DISHWASHER
 DOUBLE DISHDRAWER TM DISHWASHER DD4DI, DD4DTI & DD4DHTI models INSTALLATION GUIDE US CA 59386 A 08.7 !! WARNING! Electrical Shock Hazard Before installing the dishwasher, remove the house fuse or open
INSTALLATION INSTRUCTIONS: these are intended for the qualified technician who must carry out the installation, hook-up and testing of the appliance.
 Contents 1. Safety and operating instructions 2 2. Installation and hook-up 14 You are advised to read this manual carefully; it contains all the information you need about the right conditions for the
Installation instructions Combined fridge-freezer for integrated use, door-on-door
 Installation instructions Combined fridge-freezer for integrated use, door-on-door 100713 7085634-00 IC.../ ICB.../ ICU...... LC/ LP General safety information Contents 1 General safety information...
PARTS & ACCESSORIES INSTALLATION AND SAFETY INSTRCUTIONS ITEM NO.:60010BZGTGLD SAFETY PRECAUTION. Canopy. Downrod. Housing. Transmitter CR2032/3V
 L I G H T I N G INSTALLATION AND SAFETY INSTRCUTIONS ITEM NO.:000BZGTGLD SAFETY PRECAUTION PARTS & ACCESSORIES Canopy Downrod Housing WARNING To make sure power is off before attempting installation. WARNING
Evap WTW INSTALLATION INSTRUCTIONS D
 Evap WTW INSTALLATION INSTRUCTIONS (English) WWW.BRINKAIRFORLIFE.NL 614796-D English (EN) Installation instructions Humidifier for central ventilation with heat recovery KEEP WITH THE PRODUCT This product
INSTALLATION INSTRUCTIONS UNDERCOUNTER DISHWASHERS
 INSTALLATION INSTRUCTIONS UNDERCOUNTER DISHWASHERS VIKING 111 Front Street Greenwood, Mississippi 38930 USA (662) 455-1200 IMPORTANT - PLEASE READ AND FOLLOW Before beginning - please read these instructions
FOOD WASTE DISPOSER OWNER S GUIDE
 FOOD WASTE DISPOSER OWNER S GUIDE See insert for specific information about your new disposer NOTE: IMPORTANT: CAUTION: This Food Waste Disposer has been designed to operate on 110~120 Volt, 60 Hz exclusively.
INSTALLATION INSTRUCTIONS
 INSTALLATION INSTRUCTIONS TM DishDrawer dishwasher DD4S 7 & DD4ST 7 models US CA 59004D 04.3 FOLLOW THE INSTALLATION SEQUENCE RELEVANT TO YOUR MODEL STANDARD HEIGHT SINGLE MODELS TALL HEIGHT SINGLE MODELS
Installation Instructions for. DairyFount Series Fountains
 Installation Instructions for DairyFount Series Fountains Congratulations, you have just purchased the finest watering fountain on the market. This unit is built to give you excellent service when properly
Installation instructions
 Installation instructions Refrigerators and freezers for integrated use, door-on-door 200514 7085630-03 IK/ IKB/ IG/ (S)IGN... LC/LP General safety information Contents 1 General safety information...
Issue 4 Oct Panamatic Top loading Maxi & Optima 3 Installation
 Issue 4 Oct 2005 Panamatic Top loading Maxi & Optima 3 Installation Please Do handle the unit with care, to avoid scuffs and scratches during installation. Do not over-tighten plumbing or any other mechanical
Installation guide PRO7-VAQ E. Before installing read this guide first
 Installation guide PRO7-VAQ E Before installing read this guide first Introduction The operation of the Quooker PRO7-VAQ E The Quooker system consists of a small tank under the sink which is connected