General Characteristics.3. S.M.A.R.T System Set-up...5. Start-up Procedures.6. Shut-down Procedures 8. General Maintenance..8
|
|
|
- Joshua Collins
- 5 years ago
- Views:
Transcription

1
2 TABLE OF CONTENTS General Characteristics.3 How the S.M.A.R.T System Works..3 S.M.A.R.T Technical Specifications..3 Erecting the S.M.A.R.T System..4 S.M.A.R.T System Set-up...5 Start-up Procedures.6 Airwash Classifier Settings and Adjustments..7 Shut-down Procedures 8 General Maintenance..8 General Maintenance Schedule..8 Adjusting the Bucket Elevator Belt..9 Transporting the S.M.A.R.T System..10 Troubleshooting..11 Warranty Coverage..12 2
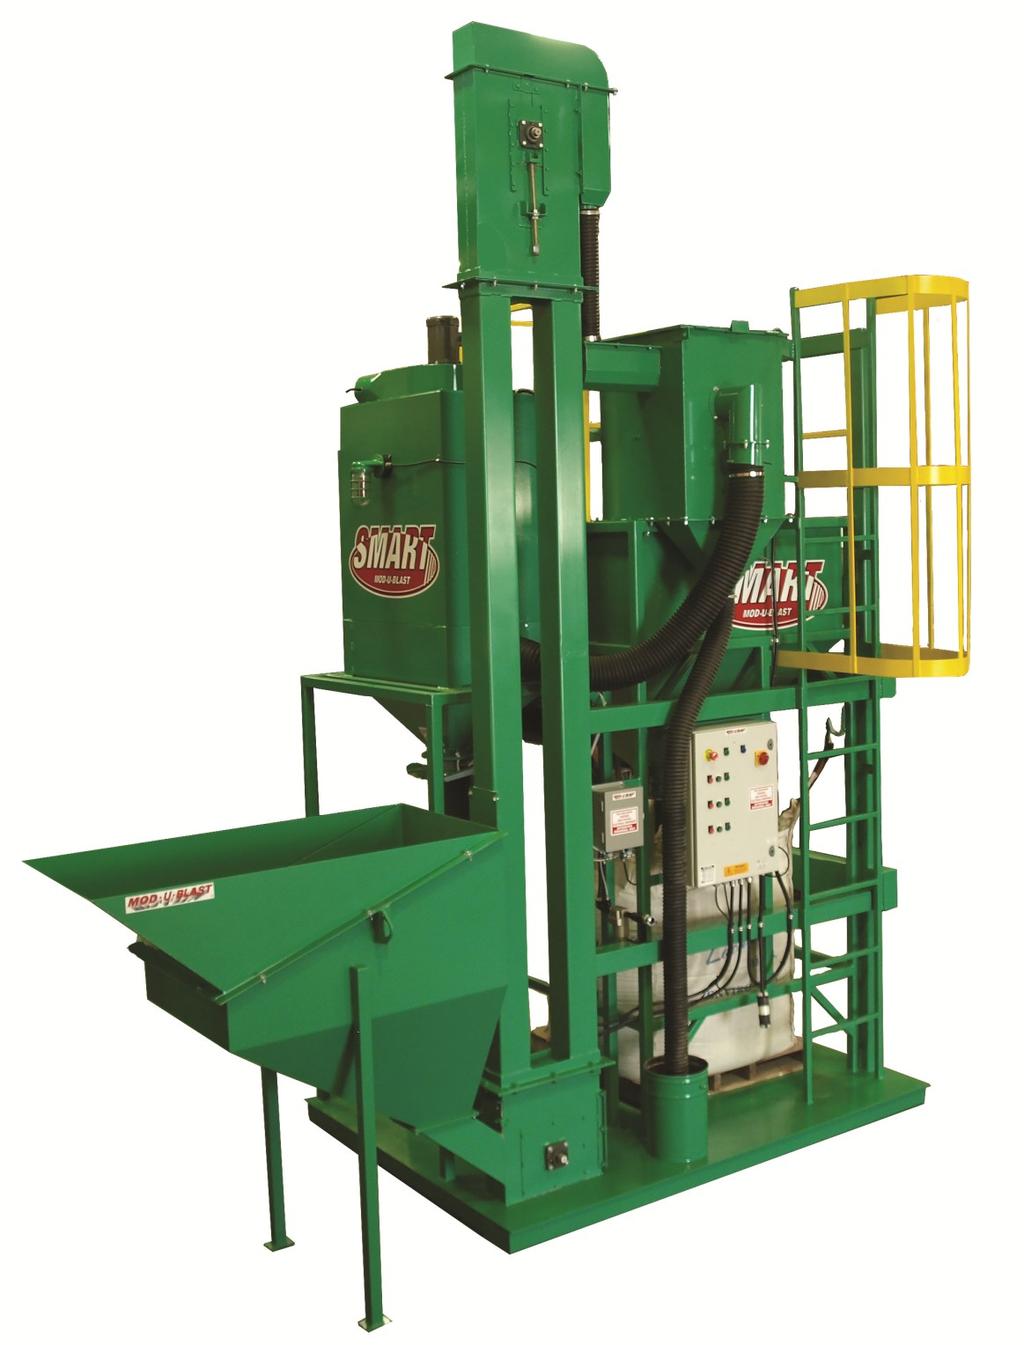
3 General Characteristics: The S.M.A.R.T system has been designed for the cleaning & recycling of different types of media by using a loading hopper, bucket elevator, air wash, dust collector and storage hopper. The efficiency of the S.M.A.R.T depends on the effectiveness of its components, which require a maintenance program. To that effect, this manual includes a description of the different components and a schedule for the minimum maintenance required. ABSOLUTLEY NO MOISTURE CAN BE ALLOWED TO ENTER ANY COMPONENT OF THE S.M.A.R.T. SYSTEM AT ANY TIME How the S.M.A.R.T System Works: With the system running, the used media is dumped into the loading hopper and from there into the bucket elevator which lifts and unloads the media into the air wash classifier. Inside the air wash the used media passes through a screen and builds a curtain to allow air to pass through the used media taking the dust away to the dust collector hopper leaving the good media to fall into the 40 cubic foot hopper and then loaded into a bulk bag to reuse again. S.M.A.R.T Technical Specifications: Control Panel Voltage Large Hopper Capacity Dust Collector Hopper At Capacity Warning Lights Dust Collector Hopper Capacity Loading Hopper Capacity S.M.A.R.T. Unit Weight (without loading hopper) Loading Hopper Weight 230 volt - 3 phase - 60 Hz 40 cubic feet Blue on Panel - Red External on D.C. 9 cubic feet 30 cubic feet 4075 lbs. 350 lbs. S.M.A.R.T. Dimensions Standing 109 L x 93 W x 184 H S.M.A.R.T. Dimensions for Transport 184 L x 93 W x 109 H Recycling Capabilities 6 Tons per Hour Lifting Lug Ratings 6800 lbs ea. (2) Strap Ratings 8800 lbs ea. (2) Anchor Shackles 6.5 Ton Working Load Limit (3) 3
. This will allow you to get the lift forks under the lifting bar.")

4 Erecting The S.M.A.R.T System: Use a forklift, zoom boom or a picker to stand-up the S.M.A.R.T.. Our illustrations will show the use of a forklift which is very similar to using a zoom boom. When using a forklift /zoom boom, block the lifting end once removed from the transport vehicle (fig. 1). This will allow you to get the lift forks under the lifting bar. The lifting bar is near the top of the ladder and has 2 lifting lugs attached with the strap. Fig 1 Insert the forks about 24 under the lifting bar at equal width of the lifting lugs. Attach the enclosed strap to the lifting lugs The second strap will need to be wrapped around the carriage or guard of the forklift / zoom boom and made as tight as possible. Once the straps are hand tight back-up the zoom boom to take the slack out of the straps. There should be approx. about 12 of forks left underneath the lifting bar when straps are tight to assist with lifting the unit. (Fig. 2) Fig 2 Now the Smart system can be lifted upright - make sure that during the lifting process that you drive ahead slowly while lifting the unit and keep the lifting straps tight. Once the unit is upright then the straps can be disconnected Lift the unit by using the forklift pockets onto a level area. 4


 (9/16 wrench required - hardware included) The legs on the hopper may need to")

.")
 Fig 5 Place the bulk bag under the large hopper on a 4 x 4 pallet and")
5 S.M.A.R.T System Set-Up: Remove the loading hopper from the skid by using the attached lifting eyes with one of the straps supplied and place the hopper onto the inlet of the bucket elevator (fig. 3) and bolt them together.(fig. 4) (9/16 wrench required - hardware included) The legs on the hopper may need to be shimmed if not on level ground. Hopper positioning is as shown on the cover page of this manual. Fig 3 Fig 4 Attach your power input cable to the female plug (supplied) (Power requirement is listed on the tag at the right bottom corner of the control panel). Once your power cable is ready then plug it into the male pigtail on the panel (Fig. 5) Fig 5 Place the bulk bag under the large hopper on a 4 x 4 pallet and attach the rubber straps as shown in (Fig. 6). Place the large drum (if supplied) on a small pallet 2 x 3 under the dust collector as shown in (Fig. 7). Position the small pail (if supplied) under the junks discharge tube as shown in (Fig. 8). Fig 6 Fig 7 Fig 8 5
 - open the ball valve from the compressor slowly and check the gauge (adjust pressure to 80 psi). 2.")

 6.")
6 S.M.A.R.T Operating Instructions: ALL COMPONENTS IN THIS SYSTEM MUST BE ON BEFORE INSERTING USED MEDIA INTO THE LOADING HOPPER See the control panel layout in (Fig 9). Startup Procedures: 1. Connect an air supply for the dust collector as shown in (Fig 10) - open the ball valve from the compressor slowly and check the gauge (adjust pressure to 80 psi). 2. The toggle switch on the reverse pulse box (Fig 11) needs to be in the up/on position at all times during use of the system. 3. Turn the main power switch to the on position - The power light will illuminate. 4. To start the S.M.A.R.T. System push the green buttons for each component starting from top to bottom. (the control panel will only allow you go in this order). 5. The system is now ready to recycle the used media. (see the following page for airwash & damper adjustment once the media starts to flow through the system) 6. The dust collector hopper butterfly valve must remain closed during the recycling process but will need to be emptied often for maximum filtration. 7. The Blue light on the panel will illuminate when the Dust Collector hopper is full and should be emptied into a container. (The red external light will also illuminate at the same time as a secondary warning). DO NOT USE THE EMERGENCY STOP BUTTON TO SHUT THE S.M.A.R.T. DOWN UNLESS THERE IS AN ACTUAL EMERGENCY Hopper Full Warning Light Main Power Switch Power On Light Emergency Stop Fig 10 Air Connection For Dust Collector Dust Collector Off - On - Light Air Wash Off - On - Light Bucket Elevator Off - On - Light Fig 11 Reverse Pulse Toggle Switch Fig 9 Panel Technical Specifications 6

7 Air Wash Separator Adjustments: The bucket elevator carries the used media to the air wash separator to be cleaned of dust and big particles and return good media to the storage hopper. Once the media starts flowing through the system the air wash separator curtain needs to be set to insure proper dust removal. Air Wash Setup: Big particles are removed in the rotating screen and the media and dust fall through which produces a uniformed curtain. It is very important that the curtain created be the maximum width of the separator, so the slide gate is adjusted to a 1-1/2 gap (from the factory). Media must be added to the counter weights (Fig. 12) to achieve a full width curtain. (Approx. 1/3 full when cleaning Garnet) NOTE: Loading the counter-weight in excess prevents the abrasive from falling freely. The air goes through the curtain and separates the dust form the good media.(the more even the curtain - the better the dust removal). The 6 suction outlet to the dust collector (damper controlled) should be regulated so that the filters only retain dust and a small quantity of abrasive. (If the damper is open to far good media will start to pour out of the 4 hose for the big particles). Once the air wash separator is set and the proper separation is achieved it will not need any more adjustments unless the S.M.A.R.T System is put into transport mode where the counter weights will be emptied. (Should this happen then the counter weights will need to be adjusted when upright again to create the proper media curtain). How the Airwash Works: Fig 12 Counter Weights Add or Subtract Media to Obtain Full Curtain 7
8 S.M.A.R.T Operating Instructions cont d: See the control panel layout in (Fig. 9 on page 6). Shutdown Procedures: 1. After finishing recycling the used media make sure the loading hopper is empty and let the system run for approx. 2 minutes to clear out the bucket elevator and air wash. 2. To stop the S.M.A.R.T. System push the stop button for each component starting from bottom to the top. (the control panel will only allow you go in this order). 3. Keep the main power and the pulse on for 10 minutes to allow the filters to clean. (Fig 11 on page 6)(The filters clean best when the dust collector fan is off) 4. After the 10 minutes shut the main power off (the pulse switch can remain in the up / on position). 5. Shut the ball valve off at the compressor to stop the air supply and drain the system air tank. 6. The loading hopper should be covered with a tarp to ensure the system does not get moisture inside. (not included) DO NOT USE THE EMERGENCY STOP BUTTON TO SHUT THE S.M.A.R.T. DOWN UNLESS THERE IS AN ACTUAL EMERGENCY General Maintenance: After the first 10 hours of operation, the elevator belt tightness should be checked due to some initial stretching. (When the system is empty there should not be a noise coming from the buckets clanging against the inside of the elevator - if there is, then the belt needs to be adjusted). (see next page for instructions) It is a good rule to tighten the belt after every extra 50 working hours. To avoid damaging the belt do not tighten excessively; a moderate tightness is preferred.(the belt can be checked through the hatch on the front side of the elevator just above the loading hopper. Periodically inspect the belt and the condition of the buckets and the pulleys. General Maintenance Schedule: PREVENTATIVE MAINTENANCE HOURLY PERIODS 50 HRS 100 HRS 200 HRS CHECK TIGHTNESS OF ELEVATOR BELT LUBRICATE ALL BEARINGS CHECK OIL LEVEL IN GEAR BOXES INSPECT ELEVATOR BUCKETS INSPECT UPPER PULLEY OF ELEVATOR INSPECT LOWER PULLEY OF ELEVATOR BEFORE ATTEMPTING ANY MAINTENANCE DISCONNECT THE POWER SUPPLY FIRST. 8
 2. Loosen the adjustment guide bolts on each side of the elevator (do not remove) 3.")
 Do not over tighten the belt 5.")
9 Adjusting the Bucket Elevator Belt: This is the most difficult, time consuming and crucial part of the continued operation of this unit. 1. Disconnect the power supply & lay down the unit as explained on the next page. (Pg. 10) 2. Loosen the adjustment guide bolts on each side of the elevator (do not remove) 3. Loosen off the bottom locking nut on each side of the adjustment bolt 4. While holding the top nut turn the adjustment bolt to move the slider upwards which will tighten the belt.(exactly the same amount of turns must be done on both sides to insure proper belt tracking) Do not over tighten the belt 5. Once the belt has been adjusted then tighten the locking nut on the adjustment bolt and tighten the guide bolts. 6. When everything is tight then return the unit to the upright position. Open the lid on top of the bucket elevator. Connect the power and start the system - while the system is running someone needs to watch the belt tracking at the top of the bucket elevator. The belt needs to run straight on the wheel - if it starts to wander to one side then shut the system down, adjust the side that the belt is tracking to towards the top and check again. When the belt tracks straight for 2 minutes then close the lid. 7. The unit can now be returned to operation. The illustration below only shows adjusting the one side Both sides of the elevator must be done equally for proper belt tracking 3. Hold this nut with a wrench 1. Loosen Adjustment Guide Bolts 2. Loosen this locking nut Slider 4. Turn the bolt to push the slider upwards Transport Position Shown 1. Loosen Adjustment Guide Bolts Should you need advice with these procedures then please call and ask for the service department 9
 4.")

10 Transporting The S.M.A.R.T System: Laydown Procedures: 1. Make sure the 3 hoppers are empty before attempting to lay down the S.M.A.R.T system into the transport mode. 2. Unbolt & remove the loading hopper and remove anything that is loose. 3. Attach the slings as shown in (Fig. 13) 4. Make sure when the slings are tight when pulling back that the forks are under bar at least 12 inches. Slowly reverse your forklift / zoom boom keeping tension on the slings while lowering the forks. 5. Once the unit is almost lowered onto the ground then block the end to remove the forks. 6. Lift the unit onto the transport vehicle using the forklift pockets on the side of the unit and fasten down for shipping. Fig 13 Transport Mode 10

 To correct this follow the steps for the adjusting the bucket elevator belt on page 9.")
11 Troubleshooting The S.M.A.R.T System: The component most likely to have any issues will be the bucket elevator probably due to improper belt tension. Should this happen the belt will slip off the top pulley causing the belt to seize and trip the breaker. (see below) To correct this follow the steps for the adjusting the bucket elevator belt on page 9. (The top of the elevator will have to be removed to reposition the belt back on the pulley) BEFORE ATTEMPTING ANY SERVICE DISCONNECT THE POWER SUPPLY FIRST. For Service Call Breaker Tripped 11
12 12
SUPERIOR PERFORMANCE
 LAB-1 ABR BLAST ROOM & MECHANICAL RECOVERY SYSTEM OPERATION & MAINTENANCE MANUAL BLAST ROOM SUPERIOR PERFORMANCE And Quality In Blast Cleaning Equipment! WARNING READ MANUAL Failure to read, understand
BLAST-IT-ALL BUMPER BLASTER
 LARRY HESS AND ASSOCIATES, INC 185 PIPER LANE / SALISBURY, NC 28147 PHONE: 1-800-535-2612 / FAX: 1-704-638-9311 WWW.BLAST-IT-ALL.COM BLAST-IT-ALL BUMPER BLASTER SUCTION BLAST CABINET NOTE: It is the responsibility
MANUAL COVER. To expedite parts ordering or technical questions, please include your Model and Serial Number listed below in all correspondence.
 MANUAL COVER We at Larry Hess & Associates, Inc. would like to take this opportunity to thank you for your patronage. The machine you have purchased has been manufactured and assembled in the USA with
EAGLE 2000B EAGLE 2000BE EAGLE 2000EBT MUST READ MANUAL PRIOR TO INSTALLING MACHINE
 EAGLE 2000B EAGLE 2000BE EAGLE 2000EBT MUST READ MANUAL PRIOR TO INSTALLING MACHINE Contents 1 Machine Safety Information 3 1.5 Safety Precautions Prior to Operating Machine 6 2 Machine Installation 7
SAVE THESE INSTRUCTIONS
 Built-In Dishwasher Dishwashers Write the model and serial numbers here: Model # Serial # You can find them on the tub wall just inside the door or. the lower part of back. Installation Instructions DDW1802W
MODEL 6430T, 6460 & 6460T POTATO PEELER
 MODEL 6430T, 6460 & 6460T POTATO PEELER MODEL ML-137602 6430T ML-19630 6460 ML-137604 6460T ML-104562 6460C ML-137606 6460CT 701 S. RIDGE AVENUE TROY, OHIO 45374-0001 FORM 37005 (Apr. 2006) Installation,
SUPERIOR PERFORMANCE
 Economy (E) Series Blast Cabinet Owner s Manual SUPERIOR PERFORMANCE And Quality In Blast Cleaning Equipment! WARNING READ MANUAL Failure to read, understand & follow all safety and operation procedures
ENVIRO-PAK. Operation and Maintenance Manual. Manufacturer of
 ENVIRO-PAK H Series Single Chamber Compactor Operation and Maintenance Manual Manufacturer of ENVIRO-PAK SAFESUB WINDCHILLER 800-737-5533 WWW.ENVIRO-PAK.NET SALES@ENVIRO-PAK.NET 4308 West Admiral Doyle
Setup. Important. Texture Spraying (material supplied from unit)
") Setup Setup Important If you are going to stop spraying for more than 5 minutes, turn sprayer off to prevent shortened pump hose life. Do not allow material to dry inside pump, hoses, gun or spray system.
Setup Setup Important If you are going to stop spraying for more than 5 minutes, turn sprayer off to prevent shortened pump hose life. Do not allow material to dry inside pump, hoses, gun or spray system.
SuperKlean Washdown Products
 DURAREEL DR8 & DR8S INSTALLATION AND MAINTENANCE INSTRUCTIONS **DO NOT THROW AWAY AFTER INSTALLATION** **SAVE AND DISPLAY PROMINENTLY WHERE THIS EQUIPMENT IS USED** GENERAL WARNINGS High pressure and hot
Panel Fan Series Operators Manual (Galvanized and Polymer)
") Panel Fan Series Operators Manual (Galvanized and Polymer) Galvanized Panel Fan with Three Wing Blade IMPORTANT: READ AND SAVE THESE INSTRUCTIONS Read all instructions carefully before attempting to assemble,
Panel Fan Series Operators Manual (Galvanized and Polymer) Galvanized Panel Fan with Three Wing Blade IMPORTANT: READ AND SAVE THESE INSTRUCTIONS Read all instructions carefully before attempting to assemble,
INSTALLATION and OPERATION BALL WASHER MODEL NO: BW-022
 Easy Picker Golf Products, Inc. 415 Leonard Blvd. N., Lehigh Acres, FL 33971 PH: 239-368-6600 FAX: 239-369-1579 Service: 800-982-4653 SALES: 800-641-4653 www.easypicker.com salesdept@easypicker.com INSTALLATION
INSTALLATION INSTRUCTIONS
 INSTALLATION INSTRUCTIONS BUILT-IN BOTTOM MOUNT REFRIGERATOR/FREEZER DBRTGK72SS-GRILLE KIT (FOR designer SERIES ONLY) VIKING RANGE CORPORATION 111 Front Street Greenwood, Mississippi (MS) 38930 USA (662)
BLAST-IT-ALL PRESSURE BLAST CABINET
 LARRY HESS AND ASSOCIATES, INC 185 PIPER LANE / SALISBURY, NC 28147 PHONE: 1-800-535-2612 / FAX: 1-704-638-9311 WWW.BLAST-IT-ALL.COM BLAST-IT-ALL PRESSURE BLAST CABINET NOTE: It is the responsibility of
Installation Instructions
 GE Consumer & Industrial Appliances Installation Instructions Junction Box Cover Within this user bag, you will find a junction box cover and a #10 hex head screw used to attach the junction box cover
Panel Fan Series Operators Manual (Galvanized and Polymer)
") Panel Fan Series Operators Manual (Galvanized and Polymer) 52" Belt Drive, Galvanized Panel Fan with Three Wing Blade IMPORTANT: READ AND SAVE THESE INSTRUCTIONS Read all instructions carefully before
Panel Fan Series Operators Manual (Galvanized and Polymer) 52" Belt Drive, Galvanized Panel Fan with Three Wing Blade IMPORTANT: READ AND SAVE THESE INSTRUCTIONS Read all instructions carefully before
CBT LW MAINTENANCE GUIDE
 CBT LW MAINTENANCE GUIDE PICTOGRAMS Each Signifier displayed here is specific to this User Manual. Menu Previous Advance Note Tip Example Powder Feeder Mixing Bowl Weigh Scale CBP Tanks Control Panel PSD
Wheelbarrow Mixer Operations Manual
 Wheelbarrow Mixer Operations Manual Part# MIX3, MIX3-UK EDI# 27275, 27276 104 S. 8th Ave. Marshalltown, IA Phone 800-888-0127 / 641-753-0127 Fax 800-477-6341 / 641-753-6341 www.marshalltown.com 1 of 20
INSTALLATION INSTRUCTIONS
 INSTALLATION INSTRUCTIONS BUILT-IN BOTTOM MOUNT REFRIGERATOR/FREEZER BRTGK72SS-GRILLE KIT (FOR PROFESSIONAL SERIES ONLY) VIKING RANGE CORPORATION 111 Front Street Greenwood, Mississippi (MS) 38930 USA
INSTALLATION AND SERVICE MANUAL FOR THE SERIES 2000 & SERIES 3000 FAN SERIES GEN 2
 INSTALLATION AND SERVICE MANUAL FOR THE SERIES 2000 & SERIES 3000 FAN SERIES GEN 2 (PNEUMATIC CONTROL AND HYDRAULIC CONTROL) PUBLICATION No. 01900 Revision 2 Printed in Canada 1.1 INTRODUCTION Thank you
ACT Cartridge Dust Collector
 IOM-101-1 ACT Cartridge Dust Collector Installation and Operation Manual ACT Dust Collectors CAUTION! Accidents happen, be careful and always follow all local and federal regulations! Fires and explosions
READ AND SAVE THESE INSTRUCTIONS
 READ AND SAVE THESE INSTRUCTIONS CEILING FAN INSTALLATION AND OPERATION INSTRUCTION FAN RATING AC 120V. 60Hz UL LISTED MODEL: AC-552OD WEIGHT OF FAN: 6.82 KGS 1. TOOLS AND MATERIALS REQUIRED Philips screw
Built-In Dishwasher. Installation Instructions. BEFORE YOU BEGIN Read these instructions completely and carefully. IMPORTANT The dishwasher MUST be
 Installation Instructions Built-In Dishwasher If you have questions, call 800.GE.CARES (800.432.2737) or visit our website at: www.ge.com BEFORE YOU BEGIN Read these instructions completely and carefully.
INSTALLATION AND SERVICE MANUAL FOR THE SERIES 2000 & SERIES 3000 FAN SERIES GEN 1
 INSTALLATION AND SERVICE MANUAL FOR THE SERIES 2000 & SERIES 3000 FAN SERIES GEN 1 (PNEUMATIC CONTROL AND HYDRAULIC CONTROL) PUBLICATION No. 01524 Revision 15 Printed in Canada 1.1 INTRODUCTION Thank
FerronTM. Instruction Manual A Kichler Decor ceiling fan
 Includes our new CoolTouch TM 6 Speed DC Control System Looks permanent, but goes wherever you go! U.S. Patent Pending 300160 A Kichler Decor ceiling fan HIGH EFFICIENCY DC MOTOR FerronTM Kichler Lighting
GRIND PRO DUAL OR DISC SANDER. Operator Manual
 GRIND PRO DUAL OR DISC SANDER Operator Manual 2 GRIND PRO DUAL OR DISC ORTHO-SANDER INTRODUCTION The Grind Pro Dual or Disc Sander is a compact, durable machine designed for fast, complete finishing work.
IMPORTANT INFORMATION. Revised Dishwasher Installation Instructions
 IMPORTANT INFORMATION Revised Dishwasher Installation Instructions To obtain a revised copy of the entire Dishwasher User s Manual, go to www.eurotechappliances.com. SPECIAL EDITION 11-20-02 SAVE THESE
OPERATIONS AND MAINTENANCE MANUAL FOR THE 8-TON TURF CART ENVIRONMENTAL CONTROL UNIT (ECU) PART NUMBER
 PART NUMBER") OPERATIONS AND MAINTENANCE MANUAL FOR THE 8-TON TURF CART ENVIRONMENTAL CONTROL UNIT (ECU) PART NUMBER 2001927 Prepared by: 860 Douglas Way PO Box 530 Natural Bridge Station, VA 24579 1 1.0 SCOPE: This
OPERATIONS AND MAINTENANCE MANUAL FOR THE 8-TON TURF CART ENVIRONMENTAL CONTROL UNIT (ECU) PART NUMBER 2001927 Prepared by: 860 Douglas Way PO Box 530 Natural Bridge Station, VA 24579 1 1.0 SCOPE: This
Technical Data. Name: ERIKA Automat fully automatic machine to divide and to round dough pieces of the same size
 AUTOMAT MANUAL 1 Technical Data Name: ERIKA Automat fully automatic machine to divide and to round dough pieces of the same size Type Divisions Dough Portions (in ounces) Plate Nos. 3 30 1.0 3.5 #35 4/40A
and Closed Circuit Blaster
 and Closed Circuit Blaster The Clemco Easy Load Systems are designed to eliminate the awkward, back-breaking and potentially injury-causing practice of lifting and maneuvering heavy bags of abrasive into
Operating Instructions for the BBO-1 and BBO-2 Basket Blasters
 Operating Instructions for the BBO-1 and BBO-2 Basket Blasters 2101 West Cabot Boulevard Langhorne, PA 19047-1893 www.empire-airblast.com Page 2 Model Number: Serial Number: Date of Purchase: Date of Installation:
Page 1 of 18. Part# /5/2013
 Part# 1002655-06 8/5/2013 This manual contains important information concerning the installation and operation of the gun washers listed above. Read manual thoroughly and keep for future reference INSTRUCTIONS
LITTLE BLASTER LARRY HESS AND ASSOCIATES, INC. BLAST-IT-ALL P.O. BOX 1615 SALISBURY, NC WITH DUST COLLECTOR
 LITTLE BLASTER LARRY HESS AND ASSOCIATES, INC. BLAST-IT-ALL P.O. BOX 1615 SALISBURY, NC 28145 WWW.BLAST-IT-ALL.COM LITTLE BLASTER WITH DUST COLLECTOR MANUAL NUMBER: 561 TABLE OF CONTENTS PAGE FIGURE 1
PANEL FAN SERIES OPERATORS MANUAL (Galvanized and Polymer)
") PANEL FAN SERIES OPERATORS MANUAL (Galvanized and Polymer) Galvanized Panel Fan IMPORTANT: READ AND SAVE THESE INSTRUCTIONS Read all instructions carefully before attempting to assemble, install, operate
PANEL FAN SERIES OPERATORS MANUAL (Galvanized and Polymer) Galvanized Panel Fan IMPORTANT: READ AND SAVE THESE INSTRUCTIONS Read all instructions carefully before attempting to assemble, install, operate
OPERATION AND INSTRUCTION MANUAL NORCLEAN POWERED EDDY CURRENT VACUUM RECOVERY SYSTEM WITH WATER TRAP OPTION
 OPERATION AND INSTRUCTION MANUAL NORCLEAN POWERED EDDY CURRENT VACUUM RECOVERY SYSTEM WITH WATER TRAP OPTION THIS SYSTEM IS TO BE USED FOR REMOVING CONTAMINATED DEBRIS FROM EDDY CURRENT PROBES DURING STEAM
ValkyrieTM. Instruction Manual. Includes our new CoolTouch TM 6 Speed DC Control System Looks permanent, but goes wherever you go! U.S.
 ValkyrieTM A Kichler Décor ceiling fan Designed to coordinate with a popular Kichler Lighting collection. Includes our new CoolTouch TM 6 Speed DC Control System Looks permanent, but goes wherever you
THE MONTICELLO CEILING FAN INSTALLATION INSTRUCTIONS
 THE MONTICELLO CEILING FAN INSTALLATION INSTRUCTIONS Please read and save these instructions These instructions are to be used in the installation of the following QUORUM INTERNATIONAL fans... The Monticello
INSTALLATION, OPERATION, AND MAINTENANCE MANUAL
 INSTALLATION, OPERATION, AND MAINTENANCE MANUAL TUBE AXIAL FANS BTA, WTA, HTA, DDA The purpose of this manual is to aid in the proper installation and operation of the fans. These instructions are intended
π H-2268 SANITAIRE UPRIGHT VACUUM SAFETY uline.com
 π H-2268 SANITAIRE UPRIGHT VACUUM 1-800-295-5510 uline.com SAFETY PAGE 1 OF 7 NOTE: When using an electrical appliance, basic precautions should always be followed, including the following: READ ALL INSTRUCTIONS
MIST MAX MODEL MM2400. Important: Installation and Operation Manual
 MIST MAX MODEL MM2400 Installation and Operation Manual TM Important: This manual contains specific cautionary statements relative to worker safety. Read this manual thoroughly and follow as directed.
57" Fiberglass Exhaust Fan with Cone
 OPERATORS MANUAL Fiberglass Exhaust Fan IMPORTANT: READ AND SAVE THESE INSTRUCTIONS Read all instructions carefully before attempting to assemble, install, operate or service the product described. Failure
HHP-300 EXTRACTOR 120V
 CARPET HHP-300 EXTRACTOR 120V 1 2 CORD 1 3 VAC PUMP UPHOLSTERY MODE INFORMATION & OPERATING INSTRUCTIONS DO NOT OPERATE MACHINE UNTIL YOU HAVE READ ALL SECTIONS OF THIS INSTRUCTIONS IMPROPER USE OF THE
INSTALLATION and OPERATION BALL WASHER, HIGH CAPACITY MODEL NO: BW-022AN
 Easy Picker Golf Products, Inc. 415 LEONARD BLVD. N., LEHIGH ACRES, FL 33971 PH: 239-368-6600 FAX: 239-369-1579 Service: 800-982-4653 SALES: 800-641-4653 www.easypicker.com salesdept@easypicker.com INSTALLATION
5.0 cu ft Electric Concrete Mixer
 Save This Manual for Future Reference 5.0 cu ft Electric Concrete Mixer Operator s Manual MODEL NUMBER YM0146 SERIAL NUMBER PURCHASE DATE Both model number and serial number may be found on the main label
THE BARCLAY HUGGER CEILING FAN INSTALLATION INSTRUCTIONS
 THE BARCLAY HUGGER CEILING FAN INSTALLATION INSTRUCTIONS Please read and save these instructions These instructions are to be used in the installation of the following QUORUM INTERNATIONAL fans... The
Clean Water Made Easy. CWS Time Clock Softener Installation & Start Up Guide. Questions?
 Clean Water Made Easy www.cleanwaterstore.com CWS Time Clock Softener Installation & Start Up Guide Thank you for purchasing a Clean Water System! With proper installation and a little routine maintenance
Los Angeles Abrasion Machine HM-70A & HM-70AF
 Operating Manual Los Angeles Abrasion Machine HM-70A & HM-70AF Rev: 07/24/2018 PHONE: 800-444-1508 740-548-7298 P.O. Box 200, Lewis Center, Ohio 43035-0200 E-mail: customerservice@gilsonco.com Website:
OPERATING INSTRUCTIONS
 OPERATING INSTRUCTIONS FOR CARPET PRO UPRIGHT VACUUMS MODELS : CPU-75, CPU-75T, CPU-85, CPU-85T Before operating the vacuum, please read these instructions completely. Index Important Safety Instructions.............................................................2
AIRWASH Abrasive Recycling System
 AIRWASH Abrasive Recycling System Racohi AIRWASH Abrasive Recycling System is designed & manufactured with high quality materials to be the most robust and reliable in the industry. It is an innovative
Installation Instructions
 Installation Instructions Built-In Dishwasher If you have questions, call 800-GECARES or visit our website at: www.geappliances.com BEFORE YOU BEGIN Read these instructions completely and carefully. IMPORTANT
Owner s Manual CPU-1QD CPU-1 CPU-1T CPU-2 CPU-2T HEAVY DUTY UPRIGHT VACUUMS. Save These Instructions
 Owner s Manual HEAVY DUTY UPRIGHT VACUUMS CPU-1QD CPU-1 CPU-1T CPU-2 CPU-2T Save These Instructions Index Important Safety Instructions.... 2 Polarization Instructions....3 Grounding Instructions.....
SUPERIOR PERFORMANCE
 Pressure (P) Series Blast Cabinet Owner s Manual SUPERIOR PERFORMANCE And Quality In Blast Cleaning Equipment! WARNING READ MANUAL Failure to read, understand & follow all safety and operation procedures
Product Information. Brushes. Drum brace cable
 Product Information Mega-Polisher Washing & Polishing Equipment Top cover Sliding door Infeed chute Drum drive belt Drum motor gearbox Brush motor gearbox Brush drive belt Synchronous belt Drum Brushes
THE DAVENPORT CEILING FAN INSTALLATION INSTRUCTIONS
 THE DAVENPORT CEILING FAN INSTALLATION INSTRUCTIONS Please read and save these instructions The Davenport 8 P.O.Box 961008 Fort Worth, TX 76161 (817) 626-5483 FAX (817) 626-5540 IO171-04/08 QUORUM'S UNIQUE
Hatteras BayTM. Patio. Instruction Manual. Includes our new CoolTouch TM Control System Looks permanent, but goes wherever you go! U.S.
 Hatteras BayTM Patio A Kichler Décor ceiling fan Designed to coordinate with a popular Kichler Lighting collection. Includes our new CoolTouch TM Control System Looks permanent, but goes wherever you go!
CF35 # INSTALLATION & OPERATION
 CF35 #80046677 INSTALLATION & OPERATION PICTOGRAMS Each Signifier displayed here is specific to this User Manual. Menu Previous Advance Note Tip Example 35 kg Safety Warnings System Diagram Installation
457LAVBP10QT LAVEX HEPA BACKPACK VACUUM CLEANER
 457LAVBP10QT LAVEX HEPA BACKPACK VACUUM CLEANER IMPORTANT SAFEGUARDS When using an electric appliance, basic precautions should always be followed, including the following: READ ALL INSTRUCTIONS BEFORE
XC-18. NOTE: *Machine shown without Lift-Up Safety Guard. This guard is included with machine. Machine should not be operated without this guard.
 XC-18 NOTE: *Machine shown without Lift-Up Safety Guard. This guard is included with machine. Machine should not be operated without this guard. EXTREMA MACHINERY COMPANY, INC. PO BOX 1450, ALBANY, LOUISIANA
OPERATING INSTRUCTIONS
 CLEANMAX OPERATING INSTRUCTIONS FOR CLEANMAX STANDARD SERIES UPRIGHT VACUUMS MODELS : CMS-1T CMS-1N Before operating the vacuum, please read these instructions completely. Index Important Safety Instructions............................................................
Removal. CAUTION: Do not let tensioner arm snap back to the freearm position, sever damage may occur to the tensioner.
 Removal 3.7L/4.7L ENGINE CAUTION: Do not let tensioner arm snap back to the freearm position, sever damage may occur to the tensioner. 1. Disconnect negative battery cable from battery. 2. Rotate belt
ChicagoTM. Instruction Manual. Includes our new CoolTouch TM Control System Looks permanent, but goes wherever you go! U.S.
 Includes our new CoolTouch TM Control System Looks permanent, but goes wherever you go! U.S. Patent Pending ChicagoTM A Kichler Decor ceiling fan Kichler Lighting 7711 East Pleasant Valley Road P.O. Box
HID312, HID525 and HID540 Meridian Ice Maker-Dispensers Technical Service
 HID312, HID525 and HID540 Meridian Ice Maker-Dispensers Technical Service What you will learn Introduction Installation Operation Maintenance Take It Apart Diagnostics HID Ice Maker-Dispensers HID models
RHGN-H: COMMERCIAL AIR HANDLER WITH VARIABLE FREQUENCY DRIVE (VFD) NOMINAL 10 TONS R-410A REFRIGERANT 2-STAGE AIR-FLOW
 NOMINAL 10 TONS R-410A REFRIGERANT 2-STAGE AIR-FLOW") INSTALLATION INSTRUCTIONS RHGN-H: COMMERCIAL AIR HANDLER WITH VARIABLE FREQUENCY DRIVE (VFD) NOMINAL 10 TONS R-410A REFRIGERANT 2-STAGE AIR-FLOW 92-106595-01-00 TABLE OF CONTENTS Introduction.......................................
INSTALLATION INSTRUCTIONS RHGN-H: COMMERCIAL AIR HANDLER WITH VARIABLE FREQUENCY DRIVE (VFD) NOMINAL 10 TONS R-410A REFRIGERANT 2-STAGE AIR-FLOW 92-106595-01-00 TABLE OF CONTENTS Introduction.......................................
10QT AND 6QT BACKPACK VACUUMS
 ATLAS 1000TV-HA, 1000TV-HAH 600TV-HA 10QT AND 6QT BACKPACK VACUUMS OWNER S/OPERATOR S MANUAL PROUDLY DESIGNED AND MANUFACTURED BY WWW.EDIC-USA.COM UNPACKING YOUR NEW ATLAS: When your package is delivered,
INLET DAMPER WALL FAN UNIT
 FARM PRODUCTS DIVISION MEMBER OF AMCA AMERICAN COOLAIR CORPORATION P.O. BOX 2300 JACKSONVILLE, FLORIDA 32203 PHONE (904) 389-3646 FAX (904) 387-3449 E-MAIL - agfans@coolair.com INLET DAMPER WALL FAN UNIT
Installation Instructions
 Installation Instructions KFN 9855 ide en - CA Installation, repair and maintenance work should be performed by a Miele authorized service technician in accordance with national and local safety regulations
FD 90 / FD 95 Rotary Perforators
 FD 90 / FD 95 Rotary Perforators 11/2018 OPERATOR MANUAL SECOND EDITION TABLE OF CONTENTS SPECIFICATIONS 1 SAFETY PRECAUTIONS 1 DESCRIPTION 2 INSTALLATION AND OPERATION 3 INFEED TABLE ADJUSTMENT 3 OUTFEED
Easy Rooter. Operating Instructions
 Easy Rooter Operating Instructions For 3" through 10" lines (75mm 250mm) Your Easy Rooter is designed to give you years of trouble-free, profitable service. However, no machine is better than its operator.
INSTALLATION AND SERVICE MANUAL FOR THE SERIES 1000-P FAN SERIES (PNEUMATIC CONTROL) SERIES 1000-H FAN SERIES (HYDRAULIC CONTROL) GEN 2
 SERIES 1000-H FAN SERIES (HYDRAULIC CONTROL) GEN 2") INSTALLATION AND SERVICE MANUAL FOR THE SERIES 1000-P FAN SERIES (PNEUMATIC CONTROL) SERIES 1000-H FAN SERIES (HYDRAULIC CONTROL) GEN 2 Publication No. 01906 Revision 0 Printed in Canada 1.1 INTRODUCTION
INSTALLATION AND SERVICE MANUAL FOR THE SERIES 1000-P FAN SERIES (PNEUMATIC CONTROL) SERIES 1000-H FAN SERIES (HYDRAULIC CONTROL) GEN 2 Publication No. 01906 Revision 0 Printed in Canada 1.1 INTRODUCTION
Media Service Instructions 1500 Series BAT Media Plants
 R Media Service Instructions 1500 Series BAT Media Plants J-500 MEDIA SERVICE Read these instructions and perform every step. After servicing 2 or 3 installations, you will only have to refer to these
ROTARY TUMBLER LORTONE INSTRUCTIONS AND PARTS LIST. Model 3-1.5B. Model 45C. Model 33B Cyrus Way Mukilteo, WA (425)
") ROTARY TUMBLER INSTRUCTIONS AND PARTS LIST Model 3-1.5B Model 45C Model 33B LORTONE 12130 Cyrus Way Mukilteo, WA 98275 (425) 493-1600 SETTING UP YOUR MACHINE For 45C Unit Only (33B & 3-1.5B already assembled)
ROTARY TUMBLER INSTRUCTIONS AND PARTS LIST Model 3-1.5B Model 45C Model 33B LORTONE 12130 Cyrus Way Mukilteo, WA 98275 (425) 493-1600 SETTING UP YOUR MACHINE For 45C Unit Only (33B & 3-1.5B already assembled)
Clean Water Made Easy
 Clean Water Made Easy http://www.cleanwaterstore.com Pro-OX 2510 Iron Filter Installation & Start- Up Guide Thank you for purchasing a Clean Water System! With proper installation and a little routine
IMER USA (301) Koine 35 Quick User Guide IMER USA
 Koine 35 Quick User Guide IMER USA") IMER USA (301) 336-3700 Koine 35 Quick User Guide IMER USA 1 Koine 35 Quick User Guide Thank you for choosing IMER USA for your mixing and pumping needs. This is a quick user guide intended to be used
IMER USA (301) 336-3700 Koine 35 Quick User Guide IMER USA 1 Koine 35 Quick User Guide Thank you for choosing IMER USA for your mixing and pumping needs. This is a quick user guide intended to be used
52 Lacey LED. Instruction Manual. 6 Speed DC Wall Control System
 6 Speed DC Wall Control System 52 Lacey LED HIGH EFFICIENCY DC MOTOR Kichler Lighting 7711 East Pleasant Valley Road P.O. Box 318010 Cleveland, Ohio 44131-8010 Customer Service 866.558.5706 8:30 AM to
XPS-ProDry User s Guide Dryer Base
 XPS-ProDry User s Guide XPS-ProDry User s Guide Dryer Base For Use with Inkjet Imaging Systems Manual Part#: M-3120 Revision: August 2005 XPS-ProDry User s Guide Written by Frank Mauri & John Brand Published
Installation, Operation, and Maintenance Manual
 READ AND SAVE THESE INSTRUCTIONS PART # 538 Model BCF Belt Drive Centrifugal Cabinet Fans Installation, Operation, and Maintenance Manual Please read and save these instructions for future reference. Read
User Manual Box Exhaust Fan Series (Belt Drive)
") User Manual Box Exhaust Fan Series (Belt Drive) 36" Box Exhaust Fan with Three Wing Blade Box with Aluminum Shutter 54" Box with Cone 800-779-3267 sales@schaeferfan.com www.schaeferfan.com 2013 Schaefer
User Manual Box Exhaust Fan Series (Belt Drive) 36" Box Exhaust Fan with Three Wing Blade Box with Aluminum Shutter 54" Box with Cone 800-779-3267 sales@schaeferfan.com www.schaeferfan.com 2013 Schaefer
CAR-MON DUST COLLECTORS SERIES 207, 2410, 3015
 INSTALLATION-OPERATION-MAINTENANCE CAR-MON DUST COLLECTORS SERIES 207, 2410, 3015 TEFC 3 phase motor Outlet duct Fan wheel housing Inlet duct connection After filter transition Optional after filter unit
1. SAFETY RULES WARNING WARNING. 8. Avoid placing objects in the path of the blades.
 1 1. SAFETY RULES 1. To reduce the risk of electric shock, insure electricity has been turned off at the circuit breaker or fuse box before beginning. 2. All wiring must be in accordance with the National
Mopit 4 Operator s / Service Manual
 Mopit 4 Operator s / Service Manual FOR PARTS AND SERVICE 1-800-290-2833 To view Mopit 4 instructional videos scan this qr code with your smart phone. You can also find Mopit 4 instructional videos on
Pool Weasel Vacuum Users Guide
 Pool Weasel Vacuum Users Guide Welcome to best way to keep your swimming pool or fountain clean. WE have done everything to insure that the Pool Weasel is the safest pool vacuum system available, You have
Power sweeper 2+2. Operating instructions
 GB Power sweeper 2+2 Operating instructions Congratulations on your new sweeper! Description Dear Customer For your convenience, a description of the machine is provided on the following pages. Technical
TruTrainer. Premium Bicycle Rollers Assembly Instructions. Shaft Anti Rotation on Drive Side Rollers Purchased post 2008
 TruTrainer Premium Bicycle Rollers Assembly Instructions Shaft Anti Rotation on Drive Side Rollers Purchased post 2008 CAUTION: To prevent damage, familiarize yourself with the parts list and assembly
OPERATING INSTRUCTIONS
 CLEANMAX OPERATING INSTRUCTIONS FOR CLEANMAX PRO SERIES UPRIGHT VACUUMS MODELS : CMPS-1T CMPS-1N CMPS-QD CMPS-QDZ Before operating the vacuum, please read these instructions completely. Index Important
Electric Honey Extractor
 Electric Honey Extractor Instruction Manual SKU: BEE-V004E Scan the QR code with your mobile device or follow the link for helpful videos and specifications related to this product. https://vivo-us.com/products/bee-v004e
COBRA -300H EXTRACTOR
 COBRA -300H EXTRACTOR 120V INFORMATION & OPERATING INSTRUCTIONS DO NOT OPERATE MACHINE UNTIL YOU HAVE READ ALL SECTIONS OF THIS INSTRUCTIONS IMPROPER USE OF THE MACHINE WILL VOID THE WARRANTY 1. Always
Orrin. Instruction Manual. Includes our new CoolTouch TM Control System Looks permanent, but goes wherever you go! U.S.
 Includes our new CoolTouch TM Control System Looks permanent, but goes wherever you go! U.S. Patent Pending Orrin A Kichler Select ceiling fan Kichler Lighting 7711 East Pleasant Valley Road P.O. Box 318010
OPERATING INSTRUCTIONS
 CLEANMAX OPERATING INSTRUCTIONS FOR CLEANMAX PRO SERIES UPRIGHT VACUUMS MODELS : CMPS-1T CMPS-1N Before operating the vacuum, please read these instructions completely. Index Important Safety Instructions............................................................
52 CEILING FAN READ AND SAVE THESE INSTRUCTIONS FAN RATING AC 120V.
 Irene 52 CEILING FAN READ AND SAVE THESE INSTRUCTIONS FAN RATING AC 120V. 60Hz TABLE OF CONTENTS Tools and Materials Required... 1 Package Contents... 1 Safety Rules... 2 Mounting Options... 3 Hanging
hp Dust Collector With Vacuum Attachment
 Please dispose of packaging for the product in a responsible manner. It is suitable for recycling. Help to protect the environment, take the packaging to the local amenity tip and place into the appropriate
Fully automatic, pneumatic machine to install eyelets and washers
 Operating Manual Fully automatic, pneumatic machine to install eyelets and washers Warning: Spandex accepts no liability for the incorrect use of the equipment Distributed by Spandex. www.spandex.com Spandex
FitchTM. Instruction Manual. Includes our Basic Function CoolTouch TM Control System Looks permanent, but goes wherever you go!
 Includes our Basic Function CoolTouch TM Control System Looks permanent, but goes wherever you go! FitchTM A Kichler Décor ceiling fan U.S. Patent Pending Kichler Lighting 7711 East Pleasant Valley Road
Description of the vacuum R30D, R30P & R30PET. Owner s Manual
 Description of the vacuum R30D, R30P & R30PET Owner s Manual Contents Getting Started Important Safety Instructions... 2 Polarization Instructions... 3 State of California Proposition 65 Warnings... 3
CapraLite. Owner s Manual. Milking Machines. Built by: Apparatus Mfg., Inc. 13 Commerce St Poughkeepsie, NY 12603
 CapraLite Milking Machines Owner s Manual www.capralite.com Built by: Apparatus Mfg., Inc. 13 Commerce St Poughkeepsie, NY 12603 Page 2 Getting your Machine ready Your machine is almost ready to use. For
KCC Centrifugal Fan Air Cooled Condensers
 PRODUCT DATA & INSTALLATION Bulletin K50-KCC-PDI-10 KCC Centrifugal Fan Air Cooled Condensers Air Cooled Models from 103 Thru 164 Four to ninety Ton 1064435 We are on the Internet www.keepriterefrigeration.com
INSTALLATION AND MAINTENANCE OF THE "THOMPSON-BRITISH" AUTOMATIC PLATEN
 INSTALLATION AND MAINTENANCE OF THE "THOMPSON-BRITISH" AUTOMATIC PLATEN Installation and Maintenance of The "Thompson-British" Auto Platen Lifting Bolt. Motor. Direction of rotation. Oiling. The machine
Installation Instructions
 PAGE 1 Installation Instructions Important information about your new a/c system. Please read the following directions prior to installing this a/c system. PN: CK6772-1CHPU 1967-1972 Chevy PU A/C Kit Contact
As part of the V.I.P. family, you are entitled to the best protection by one of the most comprehensive warranties in the industry.
 CONGRATULATIONS on your purchase of a Viper product, and welcome to the V.I.P. family. We appreciate your business and will do everything in our power to keep you happy with your purchase for many years
7165 Dust Collector Owner s Manual
 7165 Dust Collector Owner s Manual Oliver Machinery M-7165 12/2016 Seattle, WA Copyright 2003-2017 info@olivermachinery.net www.olivermachinery.net CONTENTS IMPORTANT SAFETY RULES----------------------------------------------------------------
1. SAFETY RULES. 8. Avoid placing objects in the path of the blades.
 1 1. SAFETY RULES 1. To reduce the risk of electric shock, insure electricity has been turned off at the circuit breaker or fuse box before beginning. 2. All wiring must be in accordance with the National