G34 AU1B (External Ultrasonic Sensor) Version 3
|
|
|
- Eleanor Pierce
- 5 years ago
- Views:
Transcription
 Version 3")
1 Car Alarm Series 3 B 4 Buttons G34 AU1B (External Ultrasonic Sensor) Version 3 24
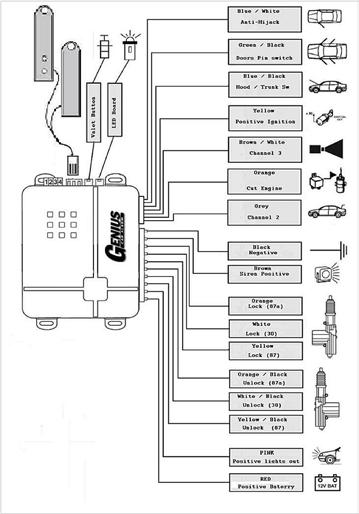
2 CAR ALARM GENIUS Series 3B 4 Buttons G34 AU1B (External Ultrasonic Sensor) Module controlled using Micro-Processor 2 Transmitters - 4 buttons with color Blue LED 4 Learning Transmitters (Codes) Transmission frequency 370 MHz (Anti-Scanner) Panic by transmitter Car Finder by transmitter Transmitter Arm and Disarm Mute Programmable Mute Armed and Disarmed Negative output Channel 2 (Opens electric trunk) Negative output Channel 3 optional modules (Programmable) Opening the electric trunk without deactivating the alarm using the transmitter (channel 2) LED indicator on the board Programmed controls identifier (P.C.I.) (Programmable) 1 Positive output for Light flash with internal relay in the module Universal Central Door Lock Automatic Armed (Programmable) Electric locks on with the Automatic Armed (Programmable) Ignition Lock and unlock (Programmable) Double push button to unlock door Automatic Rearm (accidental disarm) Automatic Rearm with Lock External Ultrasonic Sensor bypass by transmitter Line door pin switches (Positive or Negative) Line hood and trunk pin switches (Negative) Electronic siren of 120 dba Mode Valet (using emergency button or Transmitters ) Wires identified by colors Protection fuses included in the installation harness Transmitter Anti-carjack (Programmable) Door Anti-carjack (Optional) Ignition Anti-carjack (Programmable) Presence Anti-carjack (Additional transmitter) (Programmable) Warning Light when anti-carjack activates Acoustic warning when anti-carjack activates (Programmable) Negative output in armed, for engine cut Second engine cut (Programmable) Negative output timed for windows-up modules (Programmable) Defective zone exclusion Flashing output for the horn (Programmable) Dome Light (Programmable) Function programming through software Manual disarmed by safety PIN code (Programmable) Memory of last status of the system. 25
3 Introduction Thank you for purchasing our security system for your vehicle. Read well the user s manual of the system specifically the functions of the transmitter, the valet switch and the LED indicator on the board. The Transmitter Each transmitter has a different code, the alarm system is programmed by the factory with 2 codes (2 transmitters), and you can program a maximum of 4 codes (4 transmitters). The transmitter has 4 buttons, I, II, III, IV. The system is pre-programmed with a work routine with each button of the transmitter. It works with the following configuration: Button II Button I Button III Button IV Programming and memory of the transmitters and witnessed transmitters The alarm system is designed to memorize up to 4 different transmitters, be careful when programming a transmitter, the alarm system deletes from the memory the previous transmitters, program all transmitters at the same time, since through this deletion function you can delete the memory of any transmitter if it is lost by simply programming the transmitter or transmitters again. The witnessed transmitter should be the last one to be memorized. To enter the memory and be able to program the transmitters, follow these steps: Set the ignition switch in ON 2. Within the first 5 seconds after setting the ignition switch in ON, press and let go the reset button 5 times, the siren will confirm with long sound, you have 10 seconds to enter the transmitters, if you do not enter any transmitter before the 10 seconds or set the ignition switch in OFF, the system will automatically exit the transmitter learning mode and the siren will confirm with 2 sounds and the memory of the transmitters will not be deleted. 3. Press and let go button I on the transmitter to program, the siren will confirm with 1 sound the memorization of the transmitter, as of that moment the old transmitters will be deleted. 4. If you wish to program a second transmitter, repeat step 3 where the siren confirms with 2 sounds the memorization of the second transmitter and with 3 sounds the third and with 4 the programming ends.
4 The system pre-programmed with a routine of work with each button of the Transmitter. It works with the following configuration: Press button 1 once Press button 1, then button 3 within 2 seconds Press button 1, then button 2 within 2 seconds Press button 2 once a. Alarm is armed and the doors a. IGNITION IS are locked OFF b. Stop temporarily the alarm s b. SIREN trigger SOUNDING Arm the alarm cancelling the IGNITION IS OFF Ultrasonic sensor. Arm the alarm cancelling the ultrasonic sensor and the doors IGNITION IS OFF signal input Disarm and unlock doors ARMED Stop temporarily the alarm s trigger. SIREN SOUNDING Press button 4 for 3 seconds Channel 2 (Open Trunk) IGNITION IS OFF Press button 1 for 1 second Car Finder. ARMED Press button 3 for 3 seconds Panic IGNITION IS OFF Press buttons 1 and 2 together for 3 seconds Press button 3, then button 1 within 2 seconds. Press button 3, then button 2 within 2 seconds. Press button 4, then button 3 for 3 seconds. Press buttons 3 and 4 together for 2 seconds. Anti-hijacking Silent Arming Mode Silent Disarming Mode Valet Mode Arm Channel 3 IGNITION IS ON IGNITION IS OFF ARMED IGNITION IS OFF IGNITION IS ON/OFF Alarm system armed. The alarm system can be armed in 2 methods. 1. The first, using button I on the transmitter. It is necessary for the ignition switch to be OFF and for the system not to be on Valet. 2. The second, using the automatic armed, which is obtained when the ignition switch goes from ON to OFF and then open and close a door. The system will automatically arm in 30 seconds after closing the last door, this functions is programmable (see function programming chart). 27
5 Alarm system armed by using the Transmitter. The alarm system will always be armed by using the transmitter, provided that the ignition switch is OFF and the system in not in the Valet mode. To arm the alarm system after leaving the vehicle and closing all the doors, simply press and let go button I on the transmitter once, the lights will flash once, the siren will sound once and the LED indicator on the board will start flashing slowly to confirm that the system in armed. If the electric locks are connected to the alarm system, they will be locked; the current breaker will be activated avoiding the use of the vehicle, after 3 seconds the system goes to expecting-robbery mode Exclusion of defective zones. When the alarm system is armed and if any of the zones is defective, the siren shall sound 3 times and, simultaneously, the lights will flash 3 times, indicating that a zone is defective, when this occurs, the defective zone will be automatically excluded and the vehicle will be protected on the rest of the zones. For example, if the trunk is not closed properly alter arming the alarm system using the transmitter, the siren will sound 3 times and the lights will flash 3 times indicating a door is not properly closed and it will exclude the sensors of that zone. The defective zone will be included again in the protection 3 seconds after correcting the failure, alter properly closing the trunk. Armed and activated alarm system. When the alarm system is armed, the LED indicator on the board blinks slowly, if a door is opened, the siren starts sounding and the lights flashing for 60 seconds, if the door remains open after the 60 seconds, the siren will keep sounding and the lights flashing for 3 minutes, after the 3 minutes, the alarm system excludes the door sensors protecting the vehicle through the rest of the sensors, if the door is closed before the first 60 seconds after the siren start sounding, the same will silent after 60 seconds and the light will stop flashing. If when the alarm system disarms the siren sounds 4 times and the lights flashes 4 times, this indicates the vehicle was victim of a carjack attempt. The LED indicator on the board will continue to blink until the ignition switch is ON. Please check the vehicle. Alarm System Disarm When the alarm system is armed, press and let go button No. II on the transmitter, the siren will sound twice and the lights will flash twice indicating the alarm system disarmed, the current breaker will deactivate, the LED indicator on the board will turn off, if the electric locks are connected, they will open, if button II is pressed again, the system will send the second pulse to open the electric locks Silent Arm First press and let go button III and then press and let go button I on the transmitter to arm the alarm system silently, the alarm system will arm without the sound of the siren. When the alarm is silently armed and a door is open or not properly closed, the siren will sound 3 times as an alert warning. Silent Disarm First press and let go button III and then press and let go button II on the transmitter to disarm the alarm system silently, the system will disarm without the sound of the siren. When silently disarmed and after the vehicle has been victim of a carjack attempt, the siren will sound 3 times as an alert warning. 28 ARMING WITH ZONES CANCELLATION This system allows us to arm the alarm cancelling the shock sensor as the 1 st zone and the shock sensor and doors signal as the 2 nd zone. This is to avoid false alarm when the shock sensor or the doors switch is triggered.
6 1. Press button 1, then press button 3 within two seconds, the ultrasonic sensor is cancelled. 2. Press button 1, then press button 2 within 2 seconds, both the ultrasonic sensor and the door s signal are cancelled. DOORS SIGNAL ARMING DELAY This function allows us to arm the alarm even when the dome lights are on, because the system will not recognize this signal for the programmed time, avoiding notices of open door when the alarm is armed. * See Programming Table- Disarm of the system using the reset button In case you lose the transmitter, damage it or the battery of the same dies, you can disarm the system by pressing the reset button. First, with the security system armed, open the driver s door and the siren will start sounding. Second, turn ON the ignition switch, before the 10 seconds press the reset button the number of times assigned in the security code (1 as set by the factory) the siren will continue to sound for 3 seconds and if the security code is right the system will disarm. PANIC With this function, we can make the system to trigger intentionally to prevent or attract the attention of people, in case of a theft or aggression attempt. a. With the ignition in OFF, - PANIC, BUTTON 3 FOR 3 SECONDS b. The siren and the lights will trigger for 3 seconds. c. Press button 1 or button 2 to stop PANIC, the system will remain armed. d. With the ignition in ON. Activate PANIC. By stopping PANIC, the system will remain armed without the ignition interrupter, but if the ignition key is turned to OFF position, the IGNITION INTERRUPTER will be activated. CAR FINDER With this function we can make the system to send us signals with the siren and lights, which will serve us to locate the vehicle, whenever we are in the transmission range between the remote control and the vehicle. a. When the alarm is armed, - CAR FINDER, BUTTON 1 FOR 1 SECOND b. The siren will chirp 10 times and the parking lights will flash 10 times. c. Press button 1 or button 2 to stop the Car Finder. ANTI-HIJACKING BY IGNITION (Programmable by Jumper) This function is in the memory s software to activate automatically the anti-hijacking mode every time the ignition key is turned form OFF position to ON position. (See Jumpers table) ANTI-HIJACKING BY TRANSMITTER (Programmable) This function is used to immobilize the vehicle in case of emergency, pressing the buttons 1 and 2 simultaneously for 3 seconds and the anti-hijacking mode will activated by transmitter. (See Functions Programming Table) 29
7 ANTI-HIJACKING BY DOORS (Programmable) With the ignition key in ON position, open driver s door and the anti-hijacking mode by door will be activated. You must connect the wire of anti-hijacking by door. (See Functions Programming Table) WITNESSED ANTI-CARJACK (Additional transmitter necessary) This function is used to immobilize the vehicle in case of emergency by simply separating the additional transmitter while the engine of the vehicle is working, 60 seconds after the signal disappears, the lights will flash twice, The LED indicator will start blinking indicating the anti-carjack has been activated, if the acoustic warning is programmed, the siren will sound twice. This function is programmable (see function programming chart). For the witnessed anti-carjack to function, the additional transmitter must be acquired. It must be programmed in the alarm system memory and enable function in the function chart. Turning on the transmitter Optional witnessed transmitter Press the button on the transmitter and hold it, the LED indicator on the transmitter will turn on and off, after 3 seconds the LED on the transmitter will turn on for 2 seconds. Let go the button on the transmitter. The transmitter will send a signal to the receiving module (Central Unit) every 6 seconds. When the internal battery of the transmitter is dead, the LED transmitter will warn you by continuously blinking. You must replace the batteries of the transmitter. Turning off the transmitter Press the button on the transmitter and hold it, the red LED on the transmitter will flash once, after 3 seconds, the LED of the transmitter will flash 5 times. Let go the button of the transmitter. ANTI-HIJACKING SEQUENCE When the system enters in anti-hijacking mode, a. 0 to 15 seconds, nothing happens (See Functions Programming Table, function 9). 16 to 30 seconds, the LED twinkles slowly. 31 to 45 seconds, the LED will flash rapidly, the siren will chirp once every two seconds and the lights will flash once every second. 46 to 70 seconds, the LED will flash rapidly, the siren will chirp once every second and the lights will flash once every second. After 70 seconds, the siren and the lights will trigger, the engine interrupter will be activated. b. When the anti-hijacking is triggered, (the ignition remains in ON position). Even if the ignition key is turned to OFF position, the siren and the lights remain triggered for 3 minutes. c. If the ignition key is turned to ON position again, the siren and the lights will be triggered again. *To exit Anti-hijacking mode: APPLY THE DISARMING EMERGENCY PROCEDURE 30 AUTOMATIC ARMING This function provides us with a greater confidence in our alarm, giving us security and tranquility because of the alarm s complete protection. With this function we can assure that the system will arm automatically in case we forget to do so.
8 * For more security, it is recommended to arm the system with the remote control. a. After turning the ignition key to ON position and closing the doors, 30 seconds later the alarm will be automatically armed. * See Jumper 1 selection for MANUAL / AUTOMATIC Arming * See Programming Table for Automatic Arming Programming with doors lock. AUTOMATIC REARMING When the alarm is disarmed with the remote control, without turning the ignition key to ON position and without opening the doors, 30 seconds later the alarm will be re-armed and the doors will be locked. CHANNEL 2 (TRUNK) a. When the alarm is disarmed: CHANNEL 2, BUTTON 4 FOR 3 SECONDS, the signal is triggered (The trunk will be opened) b. When the alarm is armed: Activating channel 2, first the alarm will be disarmed and then the signal is triggered. (The trunk will be opened) * See Programming Table CHANNEL 3 With this signal we can control a function (connecting an additional- optional module) such as a window module, or the engine ignition. Press buttons 3 and 4 together for two seconds to activate the function. (If the buttons are pressed for more time, the signal is applied; releasing the buttons will stop the signal) * See Programming Table SECOND PULSE TO UNLOCK DOORS If we wish to control the doors lock as AGENCY TYPE, with this function we can do it. Disarming the alarm pressing the Button 2 once, only the driver s door will be unlocked. If we press Button 2 again, within three seconds the others will be unlocked. *See Programming Table HORN OUTPUT Normally, in alarms the sound is produced by a siren (Positive Output), with this new system, we can simultaneously drive the horn s sound (Negative Output), or select one of the two functions. * See programming Table VALET MODE Valet, it is the function that allows us to cancel temporarily our security system, for those situations in which we do not want to use the alarm system, for example in the car washer, while in maintenance services, etc. 1. Valet by Remote Control a. While the alarm is disarmed, press BUTTON 4 once. Within 3 seconds, press BUTTON 3 for 2 seconds. b. The LED will light solid and the siren will chirp 5 times, confirming that the system is in Valet mode. c. If the system is in Valet mode: If we press BUTTON 1, the doors will be locked and the lights will flash once if BUTTON 2 is pressed, the doors will be unlocked and the lights will flash twice. d. To exit Valet mode, apply the previous mentioned procedure. *The LED will turn off. 31
9 2. Valet by Reset Switch. a. When the ignition key is in ON position, keep pressing reset switch until the siren chirp 5 times. b. The LED will light solid confirming that the system is in Valet mode. c. To exit Valet mode, apply the previous mentioned procedure. * The LED will turn off. DOORS LOCK WITH IGNITION The overall alarm system offers us a comfortable and secure operation, and this function is one of them. a. After the engine ignition is on, the doors will be locked 2 seconds later. b. Once the engine is turned off, the doors will be unlocked immediately. DOOR LOCKS CONTROL WITH THE TRANSMITTER WHILE DRIVING While driving, if we press button 1, the doors will be locked; and if we press button 2, the doors will be unlocked. FUNCTIONS SELECTION - JUMPERS Important: All the Jumper s selections have to be determined before installation. JUMPER MODE DEFAULT FABRIC CONFIGURATION MODE VARIANTS J1: AUTOMATIC ARMING / MANUAL ARMING AUTOMATIC ARMING MANUAL ARMING J2: DOOR LOCKS TIME 0.5 SECONDS DOUBLE PULSE J3: DOORS POLARITY (+ O -) DOORS INPUT (-) DOOR S INPUT (+) J4: ANTI-HIJACKING BY IGNITION ACTIVATED (ON) DEACTIVATED (OFF) INSTRUCTIONS * LED S CONDITIONS a. Armed Alarm: The LED will flash slowly (once every second) b. Automatic Arming and Re-arming: The LED will flash rapidly. c. Valet Mode: LED will light solid. * TRIGGER DIAGNOSIS LED Disarming the alarm after it was triggered will make the LED to flash, indicating us the zone that triggered the alarm. Triggered by Ignition The LED will flash once. Triggered by Opened Door The LED will flash 3 times. Triggered by Shock Sensor The LED will flash 4 times. 32 FUNCTIONS PROGRAMMING a. Turn the ignition key to ON position. b. Within 10 seconds, press the valet switch 5 times. c. The siren will chirp 3 times.
10 d. Press the valet switch the number of times of the selected function. * The siren will sound every time the valet switch is pressed. e. Press the button in the remote control of the selected option. * If the button 1 is pressed, the siren will chirp once (1); if the button 2 is pressed, it will chirp twice (2), and three chirps if button 3 is pressed. f. To exit the programming mode, turn the ignition key to OFF position. * The siren will sound a (1) long beep. PROGRAMMING TABLE Times the Valet switch is pressed 1 FUNCTION Press button 1 Press button 2 Lock closure with automatic arm YES NO Press button Door s Signal Activation Delay Anti-hijacking by transmitter WITHOUT DELAY YES Delay of 30 seconds NO Lock Doors with Ignition YES NO Delay of 60 seconds 5 Unlock Doors with Ignition YES NO 6 Second Pulse to OUTPUTS FOR CHANNEL 3 Unlock Doors CHANNEL 3 7 Anti-hijacking Warning *Indicates the beginning of the YES NO sequence 8 ARMED and DISARMED Notices YES NO HORN OUTPUT (-) Reminder to arm the alarm. *Only in Manual Arming YES NO Opened Door Warning YES NO Channel 2 Electric Trunk Dome Light Anti-hijacking by Door Close Door Opend Door 30 second Electric window lifter 13 FABRIC RESET SI 14 Witnessed Anti-carjack (Additional Transmitter) 15 Programmed controls identifier (P.C.I.) OFF ON ON OFF 33
11 * Example to do the Programming: Genius Car Alarm a. Select the functions to be changed. (It is recommended to write down them to avoid mistakes) b. If you are going to work with 2 or 3 functions, follow these steps: c. Function # 2: Press valet switch twice and then select button 1. d. Then, if you wish to program, function #4, press twice again the valet switch (to complete the # 4) then select button 2 of the remote control. e. And then, if you also want to program function # 8, press four times the valet switch (to complete the # 8), select the button 2 of the remote control. IMPORTANT: Going from one function to another, just press the valet switch the number of times necessary to complete the following function. DETAILS OF THE PROGRAMMING FUNCTIONS 1. LOCK CLOSURE WITH AUTOMATIC ARM If we programmed the Automatic Arming function (JUMPER 1), the alarm will arm by itself, so with this function 1 we can choose to unlock or lock the doors. 2. DOORS SIGNAL ARMING DELAY This function allows us to arm the alarm even when the dome lights are on, because the system will not recognize this signal for the programmed time, avoiding notices of open door when the alarm is armed. 3. ANTI-HIJACKING BY TRANSMITTER This function is used to immobilize the vehicle in case of emergency; pressing the buttons 1 and 2 simultaneously for 3 seconds while the engine is running, the siren will chirp once and the parking lights will flash once; after 15 seconds, the LED will start to twinkle indicating the activation of the anti-hijacking mode. This function is programmable (See Functions Programming Table) 4 and 5 DOORS LOCK WITH IGNITION This function provides us comfort and security. When the engine is turned on, the doors will lock TWO seconds later. When the engine is turned off, the doors will unlock immediately. 6. OUTPUTS FOR CHANNEL 3 Select a function from one of these three options: 1. CHANNEL 3- Output to drive an optional function, such as a windows module. 2. SECOND PULSE TO UNLOCK DOORS 3. HORN OUTPUT- * NEGATIVE OUTPUT * 7. ANTI-HIJACKING WARNING: BEGINNING OF THE SEQUENCE When this function is activated, triggering the anti-hijacking will make the siren chirp once. 8. ARMING OR DISARMING WARNINGS When arming the alarm, the siren will chirp once; when disarming the alarm, the siren will chirp three times. Sometimes, the chirps may be annoying, so the system gives us the option to cancel temporarily these warning sounds REMINDER TO ARM THE ALARM When we get off the vehicle and close the last door, 5 seconds later the siren will chirp three times and 10 seconds later other three chirps will be produced, indicating that we have not armed the alarm.
12 * This function will only activate if in MANUAL ARMING MODE * See Programming Table 10. OPENED DOOR WARNING While driving, if one of the doors is opened, the lights will flash for 60 seconds. In case the door keeps open and is closed before the 60 seconds, the lights will turn off. 11. CHANNEL 2 Function s Selection- Trunk s release or dome lights: DOME LIGHTS Negative Output Signal for 20 seconds. When disarming, if the ignition key turns to ON, the dome lights turn off. TRIGGERED, the dome lights are intermittent. 12. ANTI-HIJACKING BY DOOR (Open / Close) With the ignition key in ON position, open or close the driver s door, the siren will sound once and the parking lights will flash once indicating the activation of the anti-hijacking mode. For the anti-hijacking by door to work, you must connect the anti-hijacking by door wire to the push-button (-) in the driver s door. 13. FABRIC DEFAULT RESET This function allows us to correct the errors, if we mistaken during programming. 14. WITNESSED ANTI-CARJACK (ADDITIONAL TRANSMITTER NECESSARY) This function is used to immobilize the vehicle in case of emergency by simply separating the additional transmitter while the engine of the vehicle is working 15. PROGRAMMED CONTROLS IDENTIFIER (P.C.I.) Every time you set the key in ON, the LED will light immediately for 10 seconds, to indicate the number of remote controls that were programmed. 1. Intermittency /pause = 1 control programmed 2. Intermittency /pause = 2 controls programmed 3. Intermittency /pause = 3 controls programmed 4. Intermittency /pause = 4 controls programmed 35
13 36
14 37
15 38
16 Purchase Date: Invoice BENEFICIARY Name: C.I.: Vehicle s Trademark: Color: Model: Vehicle s Plate: STAMP AND SIGNATURE OF THE DISTRIBUTOR THAT INSTALLED THE SYSTEM TECHNICAL REVISION 1 ST Date Observations Stamp: 2 nd Date Observations Stamp: 3 rd Date Observations Stamp 39
17 LIMITED WARRANTY Every GENIUS branded alarm system is guaranteed for ( ) year(s) since the installation date considering the following conditions: 1. This warranty does not cover damage or malfunctions caused by: a. Immersion in water or liquids b. Shocks or fire c. Attempted modification or repair by unskilled hands d. Controls Loss or Degradation 2. The costs of dismantling, assembling or any other will be borne by the claimant. 3. The implementation of this guarantee will have greater flexibility in its dealings, if the user has placed the sticker on the rear window of the vehicle. 4. The technical department of the company reserves the right to determine the validity of the guarantee according to expertise. WARNING: The Anti-hijacking is exclusively a deterrent against possible theft. In no case it can be considered as an insurance against theft. The manufacturer disclaims all liability for damage or abnormal functioning of the alarm, accessories and automotive group, due to improper installation or monitoring of the characteristics listed. Recommendations for Storage Take it with you always 1. Anti-hijacking Disarming With the ignition key in ON position, press the reset button 1 time, wait 3 seconds and the anti-hijacking mode will be disarmed. 2. Manual Disarming Turn the ignition key to ON position, press the reset button 1 time, wait 3 seconds and the alarm s system will be disarmed. 3. Enter and Exit Valet Mode With the ignition key in ON position, press and hold reset button for 5 seconds, the LED will light solid; to exit Valet mode, with the ignition key in ON position, press and release reset button, the LED will turn off. Important: Plastic and store these instructions and take it with you always. Technical Specification (1) Frequency 370 MHz (2) Working Voltage From 9.5V to 16V (3) Standby Current for ARM Mode 13mA (4) Standby Current for DISARM Mode 11mA (5) Maximum Parking Light Output 15A (6) Maximum Negative Output for Trunk, Dome Light, 3 rd Channel Negative 0.5A (7) Maximum Central Door Lock Output Negative 0.5A (8) Combination of Fixed code in Transmitter 1,
640 Series Advanced Remote Vehicle Security System
 640 Series Advanced Remote Vehicle Security System WWW.ULTRASTARTERS.COM FCC/ID Notice This device complies with Part 15 of the FCC rules. Operation is subject to the following conditions: (1) This device
MEGA WAY LCD 4-CHANNEL MOTORCYCLE ALARM SECURITY SYSTEM. Operation Manual MEGATRONIX CALIFORNIA, U.S.A. MEGA 3100 OPERATE 1
 MEGA 3100 2-WAY LCD 4-CHANNEL MOTORCYCLE ALARM SECURITY SYSTEM Operation Manual MEGATRONIX CALIFORNIA, U.S.A. MEGA 3100 OPERATE 1 MEGA 3100 OPERATE 2 A. TRANSMITTER OPERATION: OPERATION: Transmitter Button
For silent arm / disarm use BUTTON 2.
 INSTRUCTION MANUAL FOR Code Hopping Remote Control Car Alarm with Two Stage Impact Sensor, Battery Backup Siren & 2 Point Engine Immobilisation A.C.N 001 621 610 SYDNEY / AUSTRALIA Build Date: TO ARM/DISARM
745i 3 OPERATION MANUAL TABLE OF CONTENTS
 TABLE OF CONTENTS OPERATION MANUAL 745i 3 COPYRIGHT 1999: OMEGA RESEARCH & DEVELOPMENT, INC. About Your New Crime Guard System... 3 Using Your Crime Guard System... 4 Remote Arming By Transmitter... 4-5
Model: M30. Owner s Operation Manual. For correct operation, please read this manual to familiarise yourself with the features.
 Model: M30 Owner s Operation Manual For correct operation, please read this manual to familiarise yourself with the features. Includes wiring diagram We recommend professional installation of this security
CA 120 Owners Manual of 10
 CA 120 Owners Manual 1 of 10 Your System has many features and available options some of which are selected at time of installation. Consult your installing dealer for options that may have been installed
AMX 68 Owner's Manual 12/29/97
 Standard Features Lifetime Warranty We guarantee the operation of the control unit and remote controls for as long as you own your car (see the enclosed warranty card for details). A Pair of AviGlo 3-Button/6-Channel
FOR MORE INFORMATION AND PRODUCTS, VISIT: USER MANUAL TO REMAIN IN VEHICLE
 SMART KEYLESS CODE LEARNING SEQUENTIAL LOCKING ZONE SECURITY FOR MORE INFORMATION AND PRODUCTS, VISIT: /fleetwood03.html Any questions please Email Support@poplocks.com All enquiries please reference Product
ENFORCER OWNER'S MANUAL. SLI 840 / SLI 840C (315 MHz) SLI / SLI 840C-4 ( MHz) Remote Controlled Keyless Entry System with Alarm
 SLI / SLI 840C-4 ( MHz) Remote Controlled Keyless Entry System with Alarm") OWNER'S MANUAL ENFORCER SLI 840 / SLI 840C (315 MHz) SLI 840-4 / SLI 840C-4 (433.92 MHz) Remote Controlled Keyless Entry System with Alarm SECO-LARM U.S.A., INC. 16842 Millikan Avenue, Irvine, California
OWNER'S MANUAL ENFORCER SLI 840 / SLI 840C (315 MHz) SLI 840-4 / SLI 840C-4 (433.92 MHz) Remote Controlled Keyless Entry System with Alarm SECO-LARM U.S.A., INC. 16842 Millikan Avenue, Irvine, California
OWNER S MANUAL. Remote Mobile Security System. Models: PL50 PL60
 Remote Mobile Security System OWNER S MANUAL Models: PL50 PL60 This device complies with part 15 of the FCC rules. Operation is subject to the following two conditions: (1) This device may not cause harmful
838 CAR ALARM SYSTEM USER S MANUAL
 838 CAR ALARM SYSTEM USER S MANUAL INTRODUCTION Congratulations on your wise choice of Steel Mate Car Alarm System! Steelmate Co., Ltd. is a leading supplier to the automotive industry. We use our best
Phoenix 2 Rev. A - Owner's Manual 0399
 Table of Contents Phoenix 2... 2 Lifetime Warranty...2 Remote Controls....2 Electronic Scan Prevention (ESP)... 3 Instant Remote Control Code Deletion... 3 One-Step Remote Control Code Learning... 3 Valet
TO ARM/DISARM ALARM The alarm is activated by pressing BUTTON 1 on the remote control transmitter once. The blinkers will flash once, and the
 INSTRUCTION MANUAL FOR Code Hopping Remote Control Car Alarm with Two Stage Impact Sensor, Battery Backup Siren & 2 Point Engine Immobilisation N517 Build SYDNEY Date: / AUSTRALIA Version 2.0 TO ARM/DISARM
INSTRUCTION MANUAL FOR. Remote Control Car Alarm with Impact Sensor, Mini-Battery Backup Siren & Engine Immobiliser
 INSTRUCTION MANUAL FOR Remote Control Car Alarm with Impact Sensor, Mini-Battery Backup Siren & Engine Immobiliser A.C.N 001 621 610 SYDNEY / AUSTRALIA Build Date: TO ARM/DISARM ALARM The alarm is activated
HPS 846 U S E R M A N U A L
 HPS 846 U S E R M A N U A L N e w g e n e r a t i o n C A N B U S / A n a l o g C a r a l a r m a n d A n t i h i - j a c k s y s t e m, i n t e g r a t e d G S M p a g e r, w i t h o p t i o n a l P A
FOR MORE INFORMATION AND PRODUCTS, VISIT: USER MANUAL TO REMAIN IN VEHICLE
 poplocks.com Pro Controller I CODE LEARNING SEQUENTIAL LOCKING ZONE SECURITY DOOR OPEN WARNING FOR MORE INFORMATION AND PRODUCTS, VISIT: /fleetwood03.html Any questions please Email Support@poplocks.com
2006 directed electronics
 Model 3002 Owner s Guide limited lifetime consumer warranty Directed Electronics ("Directed") promises to the original purchaser to repair or replace with a comparable reconditioned model any Directed
Model 2504A USER MANUAL REMOTE CONTROL ENGINE STARTER. For all gas- and diesel-powered vehicles (FRANÇAIS AU VERSO)
") REMOTE CONTROL ENGINE STARTER USER MANUAL Model 2504A For all gas- and diesel-powered vehicles This model may be equipped with an optional security system.. (FRANÇAIS AU VERSO) CONSULT SAFETY PRECAUTION
REMOTE CONTROL ENGINE STARTER USER MANUAL Model 2504A For all gas- and diesel-powered vehicles This model may be equipped with an optional security system.. (FRANÇAIS AU VERSO) CONSULT SAFETY PRECAUTION
GSM CAR ALARM SYSTEM USER S MANUAL
 Features: GSM CAR ALARM SYSTEM USER S MANUAL 1 Mainframe size: 134MM*120MM*34MM 2 Mainframe: Working Voltage: 12V Static current: (including GSM module) 40mA-60mA Frequency: 300MHZ-350HMZ Cover range and
/ /24 INSTALLATION AND USE MANUAL. Made in Italy AC 2710/UK Rev /12
 INSTALLATION CERTIFICATE The undersigned qualified installer attests to have personally fitted the here described vehicle security system following the manufacturer instructions. By : Sold on : T ype of
Model 3901T / 3902T / 3903T
 Vehicle Security System Model 3901T / 3902T / 3903T Owner s Guide Limited consumer warranty For a period of one calendar year from the date of purchase of this auto-security device, Directed Electronics,
888 TWO WAY CAR ALARM SYSTEM USER S MANUAL
 888 TWO WAY CAR ALARM SYSTEM USER S MANUAL INTRODUCTION Congratulations on your wise choice of Steel mate Car Alarm System! Steelmate Co., Ltd. is a leading supplier to the automotive industry. We use
AVS A4 alarm Owner s manual
 www.avscarsecurity.com AVS A4 alarm Owner s manual Version July 2010 Thank you for choosing an AVS A4 car security system. It has been designed to provide a superior level of security for you and your
NO ONE DARES COME CLOSE O WNER S GUIDE 7756V
 NO ONE DARES COME CLOSE O WNER S GUIDE M O D E L 7756V Congratulations Congratulations on the purchase of your state-of-the-art Directed Digital System. Reading this Owner s Guide prior to using your
Model AM1 Owner s Guide
 Model AM1 Owner s Guide limited lifetime consumer warranty Directed Electronics, Inc. promises to the original purchaser to repair or replace with a comparable reconditioned model any Directed Electronics,
Model 700 ESP Owner's Guide
 Model 700 ESP Owner's Guide Table of Contents Standard Transmitter Configuration............................... 2 What Is Included............................................. 3 Important Information.........................................
Remote Vehicle Control System. Security and Convenience System
 1 Remote Vehicle Control System PC 4300 TM Owner's Manual Security and Convenience System IMPORTANT NOTE: The operation of the PowerCode as described in this manual is applicable to most vehicles. However,
BRIDGE 4100 MANUALE UTENTE USER INSTRUCTIONS MANUEL POUR L UTILISATEUR MANUAL DE USO
 BRIDGE 4100 MANUALE UTENTE USER INSTRUCTIONS MANUEL POUR L UTILISATEUR MANUAL DE USO 1 06DE2142E.pmd 1 Dear customer, Thank you for having purchased this product. It is a technologically advanced anti
AVS S5 Alarm Anniversary Model
 www.avscarsecurity.com AVS S5 Alarm Anniversary Model Owner s manual Thank you for choosing an AVS S-Series car security system. The AVS S5 is engineered to the highest specifications providing you with
C A N B U S C A R A L A R M
 USER MANUAL H P S 8 4 0 P T L ( H ) C A N B U S C A R A L A R M Working ALARM SYSTEM ARMING Push the CLOSING button of the remote-control. The arming will be confirmed by: Blinker s based on the lock features
e-ask electronic Access Security Keyless-entry
 e-ask electronic Access Security Keyless-entry e-fob RF Keyless-entry entry Full Function Consumer Manual FCC ID: TV2EFOB1 (UM19 ~ 22793-01) Table of Contents Introduction... 1 e-fob Operation and Features
RF2352A, HC2351AC (Discontinued), HC2352AC
, HC2352AC") REMOTE OVERVIEW Your idatastart remote start system may include one or both long-range remotes listed below. Please take a moment to familiarize yourself with their general features. REMOTE MODEL Related
REMOTE OVERVIEW Your idatastart remote start system may include one or both long-range remotes listed below. Please take a moment to familiarize yourself with their general features. REMOTE MODEL Related
Power Locking Installation Manual
 Shop Manual V203 Please Copy Necessary Pages, and Store the Original Power Locking System PLRB-Pro Controller Flex Switch & Key Fobs Numeric Keyless Interface Power lock (Compartments) Power Locking Installation
PRO-TEC SYSTEM ONE. Trailer Security Systems Model # PTS-2. Photo includes PTS-2 with optional pager unit
 PRO-TEC SYSTEM ONE Trailer Security Systems Model # PTS-2 Photo includes PTS-2 with optional pager unit Professional Technology to Pro-Tec Your Investment More helpful install information on our website
Remote Vehicle Control System
 1 Remote Vehicle Control System PC 5100 TM Owner's Manual Factory Keyless Upgrade System IMPORTANT NOTE: The operation of the PowerCode as described in this manual is applicable to most vehicles. However,
M60 Series WITH BUILT-IN TURBO TIMER. OWNERS OPERATION MANUAL includes programming and wiring information
 M60 Series M60i M60B, M60S M60G/GNZ 3 STAR 4 STAR 5 STAR WITH BUILT-IN TURBO TIMER OWNERS OPERATION MANUAL includes programming and wiring information All models certified to AS/NZS4601 amendment 1 2003
User s Guide. SUB-MA7240O-0001.OG.Solution doc. Created: 6/05/03. Last Updated: 23/09/03. MA7240AO-0001 Version 1.0
 User s Guide SUB-MA7240O-0001.OG.Solution40-111.doc Created: 6/05/03 Last Updated: 23/09/03 MA7240AO-0001 Version 1.0 2 Table Of Contents User List...6 Quick Reference..7 Features...7 Keypad User's Guide...8
INSTALLATION AND USE MANUAL
 953 INSTALLATION AND USE MANUAL GEMINI Technologies S.p.A. Via Luigi Galvani 12-21020 Bodio Lomnago (VA) - Italia Tel. +39 0332 943211 - Fax +39 0332 948080 www.gemini-alarm.com ISO 9001 Certified Company
MotorCycle Alarm by. Testing during the initial immunity phase Reversed flashing 1 BEEP
 LEGOS1/LEGOS3 OPERATI MANUAL MotorCycle Alarm by SIGNALS STATUS OF CTRAL UNIT LED DIRECTI INDICATORS SIR Passive arming Slow flashing 1 short flash 1 BEEP Arming by remote control Flashing 2 flashes 2
cod.: ISUT211/211BUK-UK FILENAME:ISUT211/211BUK-UK.P65 211UK -211BUK MODULAR ALARM SYSTEMS USER GUIDE CAR ALARM SYSTEMS
 cod.: ISUT211/211BUK-UK FILENAME:ISUT211/211BUK-UK.P65 GB 211UK -211BUK MODULAR ALARM SYSTEMS USER GUIDE CAR ALARM SYSTEMS THE SYSTEM IS MANUFACTURED FROM THE HIGHEST QUALITY COMPONENTS TO ENSURE A LONG
HA-263K HA-263D. OWNER'S MANUAL Installation And Operation 8-ZONE ALARM CONTROL PANEL FOR HOME AND OFFICE PROTECTIONS OPEN THE CABINET FOR SERVICE
 D (OPERATION) INITIATE A DYNAMIC BATTERY TEST The system tests the back-up battery once every 24 hours. The owner can initiate a dynamic battery test at any time with the following codes while the system
Important information. Government Regulations and Safety information. Your Warranty. Replacement remote controls
 Congratulations Congratulations on the purchase of your state-of-the-art security and remote start system. Reading this Owner s Guide prior to using your system will help maximize the use of your system
3121V O WNER S GUIDE & INSTALL GUIDE. The company behind Viper Auto Security Systems is Directed.
 The company behind Viper Auto Security Systems is Directed. Since its inception, Directed has had one purpose, to provide consumers with the finest vehicle security and accessories available. The recipient
hc3 OWNER S MANUAL OMHC3US2016/07E
 hc3 OWNER S MANUAL OMHC3US2016/07E 2 IDATASTART OWNER S GUIDE WELCOME TO IDATASTART Congratulations on the purchase of your idatastart HC3 remote start system. Please take a moment to review the following
Interactive Technologies Inc North 2nd Street North St. Paul, MN Technical Manuals Online! -
 Security System Owner s Manual Interactive Technologies Inc. 2266 North 2nd Street North St. Paul, MN 55109 FCC Notices FCC Part 15 Information to the User Changes or modifications not expressly approved
INSTRUCTION MANUAL PC255O
 INSTRUCTION MANUAL PC255O Canadian Department of Communications Notice NOTICE: The Canadian Department of Communications label identifies certified equipment. This certification means that the equipment
Protégé Eclipse LED Keypad User Manual PRT-KLES
 Protégé Eclipse LED Keypad User Manual PRT-KLES The specifications and descriptions of products and services contained in this manual were correct at the time of printing. Integrated Control Technology
Remote Vehicle Control System. Car Start, Security and Convenience System
 1 Remote Vehicle Control System PC 4400 TM Owner's Manual Car Start, Security and Convenience System IMPORTANT NOTE: The operation of the Power Code as described in this manual is applicable to most vehicles.
USER GUIDE WIRE-FREE HOME PROTECTION SYSTEM AG100+ CONTENTS
 CONTENTS USER GUIDE WIRE-FREE HOME PROTECTION SYSTEM AG00 Section Getting started. General system overview. Introduction to the system. Items included with the system. Introduction to the Smart Panel.5
Intruder alarm panel Terxon MX Operating instructions
 Intruder alarm panel Terxon MX Operating instructions Operating instructions Perfect Security for home and office These operating instructions are an important product accessory. They contain important
Wireless Keypad GKP-S8M
 Wireless Keypad GKP-S8M User manual Contents Congratulations on your purchase of this Honeywell wireless keypad. To make the best out of your equipment we advise you to read this manual carefully. This
Version 1.03 January-2002 USER S MANUAL
 Version 1.03 January-2002 1 USER S MANUAL 2 Version 1.03 January-2002 System Details CUSTOMER:...... PHONE:... FAX:... INSTALLED BY:...... PHONE:... FAX:... MAINTENANCE & SERVICE:...... PHONE:... FAX:...
MODEL APS-15 REMOTE CONTROL AUTO SECURITY SYSTEM DU SYSTÈME DE SÉCURITÉ AUTO À COMMANDE À DISTANCE DE SEGURIDAD DE AUTOMÓVILES A CONTROL REMOTO
 MODEL APS-15 Owner's Manual Manuel D'Instructions Manual Del Sistema Active/Passive OperationFonctionnement Du Actif/PasifOperación Del Activa/Pasiva REMOTE CONTROL AUTO SECURITY SYSTEM DU SYSTÈME DE SÉCURITÉ
INSTRUCTION MANUAL PC255O
 INSTRUCTION MANUAL PC255O Canadian Department of Communications Notice NOTICE: The Canadian Department of Communications label identifies certified equipment. This certification means that the equipment
/24 USER MANUAL
 61-62 63/24 USER MANUAL UK Made in Italy AVS: Rev 0/16 UK 1.0 - PRELIMINARY ADVICE... USER MANUAL 2.0 - OPERATING DESCRIPTION... 2.1 -Complete system arming... 2.2 -System arming with siren sound exclusion...
Model 425 Owner s Guide
 Model 425 Owner s Guide G425A 1999 Directed Electronics, Inc. Limited Lifetime Consumer Warranty Directed Electronics, Inc. ("DEI ") promises to the original purchaser to repair or replace with a comparable
What you get Welcome to the best generation of security with remote start. Your system contains everything you need.
 Congratulations Congratulations on the purchase of your state-of-the-art remote start and security system. Reading this Owner s Guide prior to using your system will help maximize the use of your system
Solution 880 Operators Manual. Issue 1.00
 Solution 880 Operators Manual Issue 1.00 Solution 880 Operators Manual Copyright 1998 by, SYDNEY, AUSTRALIA Document Part Number MA408O Document ISSUE 1.00 Printed 15 June 1998 This documentation is provided
Sentry 4 Zone Alarm Panel User Manual
 TM TM Sentry 4 Zone Alarm Panel User Manual PLEASE NOTE: A 16Vac / 16VA Transformer MUST be used with this product. Contents 1. Introduction. 2. Programming a Remote. 3. Deleting all Remote s. 4. The siren
7590TK15 INSTALLATION AND USE MANUAL
 7590TK15 INSTALLATION AND USE MANUAL Made in Italy AC2594 Rev.02-06/14 UK TABLE OF CONTENTS 1.0 - PRELIMINARY ADVICE 2.0 - FUNCTIONS 3.0 - REMOTE CONTROL OPERATION AND BATTERY REPLACEMENT USER MANUAL 4.0
O WNER S GUIDE M O D E L
 Vista, CA 92081 www.viper.com The company behind Viper Auto Security Systems is Directed Electronics. Since its inception, Directed Electronics has had one purpose, to provide consumers with the finest
Wireless Keypads LKP(E)S8M Series
S8M Series") Wireless Keypads LKP(E)S8M Series User manual Contents Congratulations on your purchase of this Honeywell wireless keypad. To make the best out of your equipment we advise you to read this manual carefully.
Wireless Keypads LKP(E)S8M Series User manual Contents Congratulations on your purchase of this Honeywell wireless keypad. To make the best out of your equipment we advise you to read this manual carefully.
9000P Wireless Alarm Owner s Manual
 9000P Wireless Alarm Owner s Manual Table of Contents Introduction... 3 Intended Use... 3 System Functionality... 3 Arming your Alarm... 3 Arm Home...3 Arm Away...4 Alarm Triggering... 4 Disarming your
User s Information Guide R2A
 Pi HSC505 Home Security Controller User s Information Guide R2A Page 1 of 15 of its development program. 1This document and product are copyrighted and all rights are reserved. Introduction Convention
Master Code Arming Auto-Bypass Option - Home-Away Arming Entry Delay Off Arming
 Master Code The 4 digit Master Code is used for arming and disarming the system, for programming additional access codes, and for changing other features. The Master Code will be supplied to you by your
What you get Welcome to the best generation of security with remote start. Your system contains everything you need.
 Congratulations Congratulations on the purchase of your state-of-the-art remote start and security system. Reading this Owner s Guide prior to using your system will help maximize the use of your system
Using Your. Security System With LED Keypad S5030, S5031, S5032
 Using Your Security System With LED Keypad S5030, S5031, S5032 Contents 1 Overview Your Security System... 1 How Your Security System Works... 2 Your System's Programming... 3 Getting Used to Your System...
Total Connect Box. User manual
 Total Connect Box User manual 1 Congratulations on your purchase of the Honeywell Total Connect Box security system. To make the best out of your system we advise you to read this manual carefully. This
NO ONE DARES COME CLOSE O WNER S GUIDE 7857V
 NO ONE DARES COME CLOSE O WNER S GUIDE M O D E L 7857V Congratulations Congratulations on the purchase of your state-of-the-art Directed Digital System. Reading this Owner s Guide prior to using your
HARDWIRED CONTROL PANELS
 USER GUIDE 9651 HARDWIRED CONTROL PANELS Contents 1. Introduction...3 The Alarm System...3 The Keypad...3 About This Guide...5 2. Everyday Operation...6 How Do I Know if the System is Working?...6 Setting
REMOTE MOBILE SECURITY SYSTEM USER MANUAL
 REMOTE MOBILE SECURITY SYSTEM USER MANUAL This device complies with part 15 of the FCC rules. Operation is subject to the following two conditions: (1) This device may not cause harmful interference; and
Digiplex LED Keypads User s Manual
 KLEDEU03.fm Page -1 Friday, May 4, 2001 11:25 AM Digiplex LED Keypads User s Manual KLEDEU03.fm Page 0 Friday, May 4, 2001 11:25 AM KLEDEU03.fm Page 1 Friday, May 4, 2001 11:25 AM TABLE OF CONTENTS 1.0
Watchguard WGAP864 User Manual
 Watchguard WGAP864 User Manual v1.0 Issued September 2016 1 2 Table of Contents Glossary... 5 1. Introduction to your Watchguard WGAP864... 6 2. Before Operating your Alarm System... 6 3. Understanding
INSTRUCTION MANUAL FOR: WIRELESS SECURITY STARTER KIT MODEL NO: SWSKIT
 INSTRUCTION MANUAL FOR: WIRELESS SECURITY STARTER KIT MODEL NO: SWSKIT B. Operation i. Powering up the Key Fob Remote Control ii. Enrolling the Remote Control onto the Smart Panel iii. Operating the Key
H.P.A. High Performance Alarm INSTALLER S MANUAL Release 02
 H.P.A. High Performance Alarm INSTALLER S MANUAL Release 02 Dear Installer, Congratulations on your choice of a MetaSystem product! We would like to ask you to read the instructions in this manual carefully
3203A. Vehicle Security System OWNER'S GUIDE MODEL.
 Since its inception, Directed has had one purpose, to provide consumers with the finest vehicle security and car stereo products and accessories available. The recipient of nearly 100 patents and Innovations
Intelliguard 770 Owner s Guide
 Intelliguard 770 Owner s Guide limited lifetime consumer warranty Directed Electronics ("Directed") promises to the original purchaser to repair or replace with a comparable reconditioned model any Directed
EVO192 v3.0 Fire and Burglary What s New
 EVO192 v3.0 Fire and Burglary What s New Compatibility: EVO192 v3.0 TM50 v1.31 K641 v2.41 Overview: CP-01 Compliancy Wiring Diagram The following sections/options have been added to the EVO192 panel. They
EasyLoader. End User Manual
 EasyLoader End User Manual Table of Contents Table of Contents... 1 System Configuration... 3 Introduction... 4 SAFETY AND MAINTENANCE INSTRUCTIONS... 4 GLOSSARY... 4 Basic Operations... 8 ARMING YOUR
670T INSURANCE APPROVED CAN BUS ALARM (ORIGINAL REMOTE CONTROL UPGRADE) USER GUIDE
 USER GUIDE") GB 670T INSURANCE APPROVED CAN BUS ALARM (ORIGINAL REMOTE CONTROL UPGRADE) USER GUIDE CAR ALARM SYSTEMS ISUT670T.p65 1 pag. 2 ENGLISH 1 - INDEX 1) Index... 2 2) Introduction... 3 3) 670T System Components...
GB 670T INSURANCE APPROVED CAN BUS ALARM (ORIGINAL REMOTE CONTROL UPGRADE) USER GUIDE CAR ALARM SYSTEMS ISUT670T.p65 1 pag. 2 ENGLISH 1 - INDEX 1) Index... 2 2) Introduction... 3 3) 670T System Components...
O WNER S GUIDE M O D E L
 Vista, CA 92081 www.directed.com The company behind Viper Auto Security Systems is Directed Electronics. Since its inception, Directed Electronics has had one purpose, to provide consumers with the finest
LCD and 16-Zone LED Keypads. User s Manual
 LCD and 16-Zone LED Keypads 1689 1641 16-Zone LED Keypad LCD Keypad User s Manual TABLE OF CONTENTS 1.0 INTRODUCTION...3 2.0 BASIC OPERATION...4 2.1 Keypad Indicator Lights... 4 2.2 Visual Feedback...
NESS 5000 SERIES DIALLER
 NESS 5000 SERIES DIALLER INSTALLATION MANUAL This manual is designed to provide the installation instructions on the NESS SECURITY PRODUCT'S 5000 SERIES Dialler. For complete details on the warranty or
limited lifetime consumer warranty
 3000 Owner s Guide limited lifetime consumer warranty For a period of one calendar year from the date of purchase of this auto-security device, Directed Electronics promises to the ORIGINAL PURCHASER to
AXI LED USER MANUAL (REV. 1.0)
") Security & Home Automation System AXI LED USER MANUAL (REV. 1.0) CONTENTS PREFACE FEATURES LED KEYPAD OUTLOOK 1.0 LIGHT INDICATION 1 2 4 6 CHAPTER 1: ALARM SYSTEM CONTROL 1.0 USING LED KEYPAD 1.0.1 ARMING
Security & Home Automation System AXI LED USER MANUAL (REV. 1.0) CONTENTS PREFACE FEATURES LED KEYPAD OUTLOOK 1.0 LIGHT INDICATION 1 2 4 6 CHAPTER 1: ALARM SYSTEM CONTROL 1.0 USING LED KEYPAD 1.0.1 ARMING
Contents. Glossary Introduction to the IDS Notes Understanding the Keypad Indicators Operation of the Keypad...
 2 Contents Glossary...7 1. Introduction to the IDS805...8 1.1 Notes...8 2. Understanding the Keypad Indicators...8 3. Operation of the Keypad...9 4. System Information...10 4.1 Programmed Functions...10
LED Keypads D720 Series User s Guide
 LED Keypads D720 Series User s Guide D720 D720W D720B Table of Contents Fire Safety 3 The D720/D720W/D720B Keypad 4 Security System Basics 5 Turning the System On and Off 7 Silencing and Reporting Alarms
O WNER S GUIDE M O D E L
 Vista, CA 92081 www.viper.com The company behind Viper Auto Security Systems is Directed Electronics. Since its inception, Directed Electronics has had one purpose, to provide consumers with the finest
TSM/TSSM OVERVIEW 3.1
 TSM/ OVERVIEW 3.1 GENERAL 7844 See Figure 3-1. The turn signal module (TSM) has two major functions: Control turn signals. Serve as bank angle sensor. The optional, factory-installed, security system (turn
RF KIT TYPE: 5-Button LE Remote Controls 9856V, 9856P, 9856X 9656V, 9656P, 9656X. User s Guide
 RF KIT TYPE: 5-Button LE Remote Controls 9856V, 9856P, 9856X 9656V, 9656P, 9656X User s Guide 2016 Directed, Vista, CA G9856 2016-08 FailSafe, Learn Routine, Silent Mode, Valet, and Warn Away are all Trademarks
Paradox Security System Graphic Dept - PRINTED IN CANADA. keypad entries in memory. arming permits movement in pre-selected,
 970213-0001 ESPRIT 727 U LISTED User Manual VERSION 3.3 P R D O X S E C U R I T Y S Y S T E M S Paradox Security System Graphic Dept - PRINTED IN CANADA READY The green LED must be " on", indicating all
SK642 THE TELEPHONE DIALER REQUIRES A LAND TELEPHONE LINE TO MAKE OUTGOING CALLS AND ELECTRICITY.
 SK642 WIRELESS WATER ALARM SYSTEM WITH AUTO DIALER OWNER'S MANUAL AND SET UP INSTRUCTIONS. Thank you for choosing Ideal Security s Wireless Water Alarm with Telephone Dialer. Please read through complete
Security System. User s Guide for the Text Command Center
 User s Guide for the Text Command Center MY ALARM COMPANY IS: CALL BEFORE TEST: THIS SECURITY SYSTEM IS CONNECTED TO TELEPHONE NUMBER: THE SECURITY CONTROL PANEL IS CONNECTED TO THE PHONE JACK LOCATED:
MOTORCYCLE SECURITY 866F ADVANCED MOTORCYCLE SECURITY All Rights Reserved Ver. 2.4, Apr. 11
 TM MOTORCYCLE SECURITY 866F ADVANCED MOTORCYCLE SECURITY 2006-2011 All Rights Reserved Ver. 2.4, Apr. 11 Thank you for purchasing this CYCLONE 866F Motorcycle Security System. The 866F is a state of the
JA-63 Profi User manual
 JA-63 Profi User manual Contents: 1 Limited warranty... 2 2 Indicators... 3 3 Controlling the system... 4 3.1 Arming... 5 3.2 Disarming... 6 3.3 Panic Alarm... 6 3.4 To stop ALARM... 6 3.5 Home arming...
SR-i500 INSTALLATION MANUAL AND USER S GUIDE. FM 2-Way Security System. Setting Clock Time. Setting Alarm Clock. FCC Notice
 Setting Clock Time 1. Enter the programming mode. 2. Press button #4 repeatedly until the icon begins to flash. 3. Press button #1 to select and enter clock setting mode. 4. Press button #1 to scroll through
Thank you for choosing Ideal Security s Home Security System with Telephone Dialer.
 SK618 WIRELESS ALARM SYSTEM WITH AUTO DIALER OWNER'S MANUAL Thank you for choosing Ideal Security s Home Security System with Telephone Dialer. If at any time during your installation you have any questions
WIRELESS ALARM SYSTEM WITH TELEPHONE AUTO DIALER
 BAT.LOW AC WIRELESS ALARM SYSTEM WITH TELEPHONE AUTO DIALER THE SYSTEM THAT CALLS YOU! Our WIRELESS ALARM SYSTEM WITH TELEPHONE AUTO DIALER is designed to allow you to create your own security system.
C:OOc~7wIlA ~rn nclbclcly ELSE IS Wi=' TCl CClClE OWNER'S MANUAL PROFESSIONAL SERIES SX 3000 ELITE SERIES DM 1500
 C:OOc~7wIlA ~rn nclbclcly ELSE IS Wi=' TCl CClClE OWNER'S MANUAL PROFESSIONAL SERIES 1000 1000SX 3000 ELITE SERIES DM 1500 Turn the ignition key off and exit the vehicle. Press the arming button (refer
Profile. For a better understanding of this product, please read this user manual thoroughly before using it.
 Intelligent GSM Auto-Dial Alarm System User s Manual Profile For a better understanding of this product, please read this user manual thoroughly before using it. Contents Function Introduction (3) Alarm