Installation Instructions Vertical Blinds
|
|
|
- Norah Dorsey
- 6 years ago
- Views:
Transcription
1 Installation Instructions Vertical Blinds
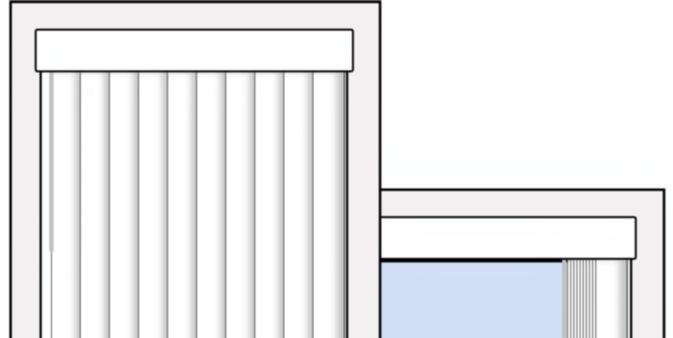
2 Installing Your New Vertical Blinds Thank you for your purchase of a Century Blinds Inc. Vertical Blind. Please take a moment to review the contents of your parts package. Your parts package should contain the following: Standard Parts: 1) Mounting Clips (IM) or Brackets (OM). 2) Two Mounting Bracket Screws per bracket. 3) Valance Clips. (Quantity and type will vary based on type and width of valance ordered.) 4) Center Support Brackets w/screws. (As needed).. Inside Mount Installation: If your blind was ordered with a Standard Valance, you will need to attach the returns before you begin. Attach the corner clip to the end of the valance. Insert the valance return into the opposite end of the corner clip. If your blind was ordered with a Rounded Valance, the returns are pre-attached. No assembly is necessary. Optional Parts (On request): Hold Down Brackets Spacer Blocks or Extension Brackets - Use spacer blocks or extension brackets to project the standard mounting brackets out over any obstructions (such as window moldings or ledges). Bracket Requirements: All blinds require a minimum of two mounting brackets (included). If your vertical blind was ordered for inside mount, mounting clips will be included in your parts package. The clip is mounted directly into ceiling/top frame. The correct number of these clips will be provided for the size of your blind. If your blind was ordered for Outside Mount, the mounting clips will come attached to an L-bracket designed for outside mounting. The bracket is installed with the short end against the wall. (Fig 1b) IM Mounting Clip OM Mounting Bracket Mark your mounting clip locations on the window frame with a pencil. The first two clips should be mounted 2-4 from each end of the headrail. Additional clips are then evenly spaced between, no more than apart. (Fig 2) If your window is 60 or less, only two clips will be necessary. **Please note: the vertical headrail needs to be properly supported in order to function correctly. It is important to use all clips provided, and space them appropriately. Insufficient mounting clips may cause the headrail to sag, and cause the carriers to bind, preventing the blind from drawing correctly. Screw Holes Screw Hole
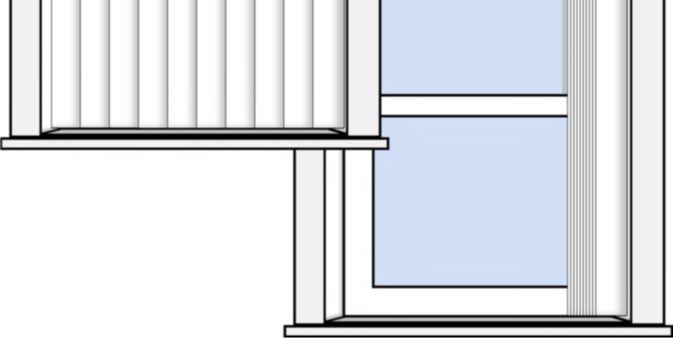
3 Mounting the Clips: Using the screws provided, mount each clips directly into the top frame of the window. Ceiling/Top Frame Outside Mount: For blinds ordered as Outside Mount, the mounting bracket with attached mounting clip is used. Using 2 screws per bracket, mount the bracket to the wall or window frame. Make sure all brackets are level and even. The same number of Outside Mount brackets would be used as for an inside mount. The valance will be installed separately for an Outside Mount. Mounting Clip Window If your blind came with a valance, the mounting clip is installed directly into the valance, through the dust cover. Drill pilot holes into the dust cover of the valance, along the center of the three grooves. Holding the valance against the ceiling/top frame, screw the mounting clip into place. Grooves Installing the Headrail: Insert the front edge of the headrail into the front edge of the mounting clip. Push the back of the headrail up into the mounting clip and snap securely into place. **The headrail is properly snapped into the mounting clip when you hear a loud clicking noise. Click* Valance
4 Attach the Vanes: Determine the angle you want the patterned side of the vanes to face, and how light will enter the room. Attach the Valance (Outside Mount Only): Window/Sunlight Attach the valance clips to the headrail, spaced evenly across the length. Front of Vanes Angle of Light Into Room Window/Sunlight Angle of Light Into Room Front of Vanes The vanes are snapped into the carrier stem so that the punch on the vane locks onto the prongs. Rotate the carriers so that the long prong is facing you. Insert the dust cover of the valance into the slot at the top of the valance clip. Push each vane onto a carrier stem gently, until it snaps into place. Long Prong Push valance back until firmly in place.


5 Caring For Your Vertical Blinds Child Safety: The quality materials used in manufacturing your blind require minimal care to maintain their appearance for several years. Here are some simple tips to keep your window coverings looking their best. Vertical Vanes are easily cared for with regular dusting. A soft vacuum cleaner with a soft brush attachment, will remove deeper dirt and dust. When cleaned regularly, surface dust is easily removed. In the event a spot or stain occurs on your vanes, the vinyl vanes can be easily wiped clean with a damp rag. Fabric vanes are durable enough for most cleaning. However, it is recommended you spot test a small hidden area of the shade before proceeding. Gently blot stains with a soft clean cloth lightly dampened with water. Do not use harsh chemicals or cleaning agents, as this may cause permanent discoloration of the fabric. Century Blinds Inc manufactures its products in accordance with ANSI/ WCMA recommendations for Child Safety. To help prevent children from becoming tangled in lift cords all vertical blinds made with cord and chain operation come with a Safety Tensioner for the cord. This device comes already attached to the cord or chain and keeps the continuous loop safely anchored to the window frame or wall. In addition, the tilt chains are split at the bottom, with no chain loop to create additional hazards. The Safety Tensioner can be installed to the bottom sill of the window frame, to the side of the window frame, or outside the window frame. The plastic foot at the bottom of the tensioner can be rotated by pulling it all the way down in the tensioner and twisting, allowing the tensioner to be installed at any angle. Detailed mounting instructions are included in the parts package for your shades.
Installation Instructions Horizontal Blinds
 Installation Instructions Horizontal Blinds Installing Your New Horizontal Blinds Thank you for your purchase of a Century Blinds Inc. Horizontal Wood or Fauxwood blind. Please take a moment to review
Installation Operation Care. Vertical Blind Collection Paramount, PermAlign, and PermaTrak Headrail Systems
 Installation Operation Care Vertical Blind Collection Paramount, PermAlign, and PermaTrak Headrail Systems CONTENTS Getting Started: Product View... 1 Tools and Fasteners Needed... 2 Installation: Installation
Soft Sheer Vertical. Installation and Care Guide
 Soft Sheer Vertical Installation and Care Guide Soft Sheer Vertical Blinds represent a design breakthrough in style, efficiency and function. The unique fabric structure and hardware system are designed
Before you begin the installation process, gather the following tools and keep them handy:
 Vertical Blind Installation Instructions ucontact@udoblinds.com 1-855-205-8442 Congratulations on purchasing vertical blinds from Follow these instructions to properly install your blinds. Tools You Need
Once you ve located these components, set them aside so they ll be handy as you begin the installation process. Screw Holes
 Wood Blinds Installation Instructions with Magnet Valance Email: customerservice@blindster.com Call us: (888) 256-8672 Mon - Fri 8am - 7pm (CT) How to Install Your Wood Blinds Before you get started installing
Installation Instructions
 Wood Blinds Installation Instructions Heartland Woods Heartland Woods w/ Continuum *Click on any page to return to the Table of Contents* Heartland Woods Wood Blinds Mounting Inside or Outside Window Frame
INSTALLATION INSTRUCTIONS. Vertical Blinds
 1 INSTALLATION INSTRUCTIONS Vertical Blinds Vinyl & Fabric Thank you for your purchase. This blind has been custom built for you from the highest quality materials. To avoid errors and save valuable time,
Vertical Blinds. Step by Step Installation Instructions
 Vertical Blinds Step by Step Installation Instructions Everything You Need A Smooth Set-Up We want you to love your new window coverings and that includes having a smooth installation experience. We recommend
2" and 2 1/2" Wood Horizontal Blinds 2", 2 1/4" and 2 1/2" Faux Wood Horizontal Blinds. Installation & Operating Instructions
 2" and 2 1/2" Wood Horizontal Blinds 2", 2 1/4" and 2 1/2" Faux Wood Horizontal Blinds Installation & Operating Instructions TC07-08.2011 TABLE OF CONTENTS Product View...3 GETTING STARTED...4 Tools Required:...4
Installation Instructions
 Aluminum Blinds Installation Instructions Echelon, Traditions & Integra Aluminum Blinds 2 Metro Aluminum Blinds *Click on any page to return to the Table of Contents* Echelon, Traditions & Integra Aluminum
Aluminum Horizontal Blinds BOX BRACKET INSTALLATION
 Aluminum Horizontal Blinds BOX BRACKET INSTALLATION MOUNT THE INSTALLATION BRACKETS Mounting Options The installation brackets may be inside mounted, outside mounted or ceiling mounted. In all cases, level
GETTING STARTED OPTIONAL HARDWARE A
 ROLLER SHADES Continuous Cord Loop and Link System without Cassette Double Roller GETTING STARTED OPTIONAL HARDWARE A few simple tools are required: Hold Down Brackets Spacer Block Spacers Steel Tape Measure
Installation and Care Instructions
 Installation and Care Instructions THANK YOU for purchasing a Hunter Douglas product. Your new blind has been custom built for you from the highest quality materials. Once in your window, it will provide
Installation and Care Instructions
 Installation and Care Instructions 2" Horizontal Aluminum Blinds MagnaView Tilt Feature CONTENTS Getting Started................................................ 1 Mount the Installation s....................................
Installation and Care Instructions
 Installation and Care Instructions 2" Horizontal Aluminum Blinds MagnaView Tilt Feature Thank you for your purchase. Your new blinds have been custom built for you from the highest quality materials. Properly
Installation and Care Instructions. Wood Blinds and Alternative Wood Blinds. LiteRise Touch System. Getting Started
 Installation and Care Instructions Wood Blinds and THANK YOU for purchasing a Hunter Douglas product. Your new blind has been custom built for you from the highest quality materials. Once in your window,
Installation Operation Care
 Installation Operation Care Roman Shades EasyRise and UltraGlide Lifting Systems CONTENTS Getting Started: Product View... 1 Tools and Fasteners Needed... 2 Mounting Types and Window Terminology... 2 Installation:
MINI BLINDS Classic GETTING STARTED STANDARD HARDWARE. A few simple tools are required: OPTIONAL HARDWARE
 MINI BLINDS Classic GETTING STARTED STANDARD HARDWARE A few simple tools are required: Steel Tape Measure Pencil Level End Brackets (Open Position LH & RH) Top Brackets Power Drill and Drill Bits Flathead
INSTALLATION INSTRUCTIONS. WOOD BLINDS 1-3/8, 2 and 2-3/8 SLAT SIZES. FAUX WOOD BLINDS 2 and 2-1/2 SLAT SIZES
 INSTALLATION INSTRUCTIONS WOOD BLINDS 1-3/8, 2 and 2-3/8 SLAT SIZES FAUX WOOD BLINDS 2 and 2-1/2 SLAT SIZES STANDARD CORDLESS LIFT Thank you for your purchase. This blind has been custom built for you
Installation Operation Care
 Installation Operation Care Skyline Gliding Window Panels CONTENTS Getting Started: Mounting Types And Window Terminology... 1 Unpack The Box... 1 Installation Components Required... 2 Optional Components...
PRODUCT INFORMATION MANUAL SECTION: 3 VERI SHADES VERI SHADES
 VERI SHADES Where innovation meets style and functionality. A contemporary take on a classic window covering, Veri Shades combines the versatility of a vertical blind with the elegant appeal of a soft
STEP BY STEP INSTALLATION INSTRUCTIONS. Vertical Honeycomb Shades
 STEP BY STEP INSTALLATION INSTRUCTIONS Vertical Honeycomb Shades Everything You Need A Smooth Set-Up We want you to love your new window coverings and that includes having a smooth installation experience.
INSTALLATION INSTRUCTIONS. Aluminum Blinds - Standard - - Lift & Lock -
 1 INSTALLATION INSTRUCTIONS Aluminum Blinds - Standard - - Lift & Lock - 1 Deluxe 1 Traditional 1 Value & 1 Basic 2 Macro Thank you for your purchase. This blind has been custom built for you from the
FAUX WOOD BLINDS 2 & 2-1/2 SLAT SIZES
 INSTALLATION INSTRUCTIONS FAUX WOOD BLINDS 2 & 2-1/2 SLAT SIZES STANDARD RECTANGULAR Thank you for your purchase. This blind has been custom built for you from the highest quality materials. To avoid errors
Operating Instructions. Care & Cleaning Guidelines
 Operating Instructions Care & Cleaning Guidelines congratulations! Thank you for selecting Enlightened Style window coverings for your home. With your purchase of Enlightened Style window coverings, you
CONGRATULATIONS, YOU VE MADE A GREAT CHOICE!
 WELCOME GUIDE CONGRATULATIONS, YOU VE MADE A GREAT CHOICE! And thank you for making that choice Alta. We take our customer s experience very personally. After all, we are part of your most personal space.
Installation Instructions for Vertical Blind
 Installation Instructions for Vertical Blind In order to have an accurate installation it is necessary to follow these simple steps. 1. Tools needed Marker or pencil, measuring tape, screwdriver and screws
Installation Operation Care
 Installation Operation Care Duette and Applause Honeycomb Shades Vertiglide System CONTENTS Getting Started: Product View... 1 Tools and Fasteners Needed... 2 Installation: Installation Overview... 3 Outside
INSTALLATION INSTRUCTIONS TOOLS YOU WILL NEED GETTING STARTED
 INSTALLATION INSTRUCTIONS HONEYCOMB SHADES STANDARD RECTANGULAR Thank you for your purchase. This shade has been custom built for you from the highest quality materials. To avoid errors and save valuable
HONEYCOMB AND PLEATED SHADES
 HONEYCOMB AND PLEATED SHADES GETTING STARTED BRACkET INFORMATION A few simple tools are required: The brackets you received with your product are REQUIRED for proper installation. Brackets should be installed
Installation Operation Care
 Installation Operation Care Duette and Applause Honeycomb Shades Vertiglide System CONTENTS Getting Started: Product View... 1 Tools and Fasteners Needed... 2 Installation: Installation Overview... 3 Outside
Installation Operation Care
 Installation Operation Care 2" Horizontal Aluminum Blinds MagnaView Tilt Feature 5102014000F 4/14 CONTENTS Getting Started: Product View Reveal with MagnaView... 1 Product View Natural Elements with MagnaView...
Installation Operation Care
 Installation Operation Care EasyRise UltraGlide LiteRise Vignette Modern Roman Shades Traditional Style EasyRise, LiteRise, and UltraGlide Operating Systems CONTENTS Getting Started: Product View Traditional
Installation Operation Care
 Installation Operation Care Duette and Applause Honeycomb Shades Vertiglide Side Stack Design CONTENTS Getting Started: Product View... 1 Tools and Fasteners Needed... 2 Installation: Installation Overview...
SHEER MAGIC Installation Instructions
 SHEER MAGIC Installation Instructions The Vertical Blind that Looks Like A Sheer Drapery! Congratulations on the purchase of your new window covering! Sheer Magic blinds are an attractive choice for your
HONEYCOMB SHADES CORDLESS LIFT SYSTEM CONTINUOUS CORD LOOP SYSTEM REMOTELIFT 2.0 SYSTEM
 INSTALLATION INSTRUCTIONS HONEYCOMB SHADES CORDLESS LIFT SYSTEM CONTINUOUS CORD LOOP SYSTEM REMOTELIFT 2.0 SYSTEM Thank you for your purchase. This shade has been custom built for you from the highest
INSTALLATION INSTRUCTIONS. WOOD BLINDS 1-3/8, 2 and 2-3/8 SLAT SIZES. COMPOSITE FAUX WOOD BLINDS 2 and 2-1/2 SLAT SIZES
 INSTALLATION INSTRUCTIONS WOOD BLINDS 1-3/8, 2 and 2-3/8 SLAT SIZES COMPOSITE FAUX WOOD BLINDS 2 and 2-1/2 SLAT SIZES POLYMER FAUX WOOD BLINDS 2 and 2-1/2 SLAT SIZES STANDARD CORDLESS LIFT Thank you for
Graber Lake Forest Faux Wood and Premium Faux Wood Blind
 2 3 5 6 8 7 1 2" (5.1cm) Blind shown 1. Blind (cord tilt shown) 2. Mounting Brackets 3. Center support bracket (if required). Mounting screws (2 per bracket) 5. Projection brackets (optional, one per mounting
Installation Operation Care
 Installation Operation Care Provenance Woven Wood Shades Standard Cordlock and Clutch Operated Shades CONTENTS Getting Started: Product View... 1 Tools and Fasteners Needed... 2 Mounting Types and Window
Installation Operation Care
 Installation Operation Care Horizontal Blinds Standard Hardware System LiteRise Operating System UltraGlide Operating System CONTENTS Getting Started: Product View...1 Tools and Fasteners Needed...2 Unpack
Installation Operation Care
 Installation Operation Care Provenance Woven Wood Shades Standard Cordlock And Clutch Operated Shades CONTENTS Getting Started: Installation Components Needed... 1 Tools And Fasteners Needed... 2 Mounting
Operating your blind is easy. Just follow these instructions.
 Vertical Blinds: Operating your blind Operating your blind is easy. Just follow these instructions. To control the angle of the louvres, pull gently on the side chain. To open and close the blind, pull
CONTENTS BEFORE YOU BEGIN
 Owner s Guide Wood Blinds Alternative Wood Blinds 2" Aluminum Horizontal Blinds Intelligence Interface Motor Clip Receiver Eye Battery Holder Battery Cover Remote PowerTilt Motorized Tilt System CONTENTS
Fine Fabric Shade. Thank you for purchasing our Fine Fabric Shade.
 Fine Fabric Shade Installation Safety Care & Cleaning Warranty Thank you for purchasing our Fine Fabric Shade. With proper installation, operation, and care your new shades will provide years of beauty
Horizontal Blinds Installation Instructions
 Horizontal Blinds Installation Instructions Mounting Options Inside mount: Blind is mounted inside the window frame, either to the top of the frame or to the sides. Outside mount: Blind is mounted either
Installation Operation Care
 Installation Operation Care Horizontal Blinds Standard Cordlock, Operable Specialty Shapes, LiteRise, SimpleLift, and UltraGlide Operating Systems CONTENTS GETTING STARTED Product View Standard Cordlock
Luxaflex Metal Venetian Blinds Guarantee, Installation, Safety & Care Instructions
 Luxaflex Metal Venetian Blinds Guarantee, Installation, Safety & Care Instructions ! WARNING Young children can be strangled by loops in pull cords, chains, tapes and inner cords that operate the product.
Wood. Blind owner's handbook
 Wood owner's handbook 2 WARNING Cords and bead chains can loop around a child s neck and strangle. Always keep cords and bead chains out of children s reach. Move furniture away from cords and bead chains.
INSTALLATION INSTRUCTIONS Lift & Lock for Horizontal Blinds
 INSTALLATION INSTRUCTIONS Lift & Lock for Horizontal Blinds 6/2016 Installating Your New Horizontal Blinds Please take a moment to review the contents of your package. Your package should contain the following:
HONEYCOMB AND PLEATED SHADES
 HONEYCOMB AND PLEATED SHADES GETTING STARTED BRACKET INFORMATION A few simple tools are required: The brackets you received with your product are required for proper installation. Brackets should be installed
STEP BY STEP INSTALLATION INSTRUCTIONS. Natural Woven Shades. Standard Top Down/Bottom Up Slim Headrail Operable Lining
 STEP BY STEP INSTALLATION INSTRUCTIONS Natural Woven Shades Standard Top Down/Bottom Up Slim Headrail Operable Lining Table of Contents Everything You Need A Smooth Set-Up We want you to love your new
STEP BY STEP INSTALLATION INSTRUCTIONS. Wood Blinds. Standard Control
 STEP BY STEP INSTALLATION INSTRUCTIONS Wood Blinds Standard Control Everything You Need Table of Contents Step 1 - Getting Started...3 Overview - Standard Control Wood Blinds...4 Step 2 - Mounting the
STEP BY STEP INSTALLATION INSTRUCTIONS. Durawood Blinds. Easy Lift Cordless
 STEP BY STEP INSTALLATION INSTRUCTIONS Durawood Blinds Easy Lift Cordless Table of Contents Everything You Need A Smooth Set-Up We want you to love your new blinds and that includes having a smooth installation
Install. Operate. Care.
 Install. Operate. Care. Standard Hardware System LiteRise Cordless System Wood Blinds Alternative Wood Blinds 2" Aluminum Blinds Thank you for your purchase. By selecting a horizontal blind for your window,
Install. Operate. Care.
 Install. Operate. Care. Standard HeadMaster System LiteRise Cordless System Wood Blinds Alternative Wood Blinds 2" Aluminum Blinds Thank you for your purchase. By selecting a horizontal blind for your
Privacy Aluminum Shade
 Privacy Aluminum Shade Installation Instructions Email: customerservice@blindster.com Call us: (888) 256-8672 Mon - Fri 8am - 7pm (CT) Congratulations on purchasing an Aluminum Privacy Blind from Blindster.
STEP BY STEP INSTALLATION INSTRUCTIONS. Durawood Blinds. Standard Lift
 STEP BY STEP INSTALLATION INSTRUCTIONS Durawood Blinds Standard Lift Everything You Need A Smooth Set-Up We want you to love your new blinds and that includes having a smooth installation experience. If
Timber Venetians Manual
 Timber Venetians Manual Measuring & Limitations Timber Venetians Measuring Architrave & Reveal Face & Reveal Corners Bays Options & Limitations Maximum Width Minimum Width Fixed Control Minimum Width Tilt
STEP BY STEP INSTALLATION INSTRUCTIONS. Wood Blinds. Cordless Control
 STEP BY STEP INSTALLATION INSTRUCTIONS Wood Blinds Cordless Control Everything You Need Table of Contents Step 1 - Getting Started....3 Overview - Standard Control Wood Blinds....4 Step 2 - Mounting the
Cordless CellularFabric Shade. owner's handbook
 Cordless CellularFabric Shade owner's handbook 2 WARNING Young children can STRANGLE in cord and bead chain loops. They can also wrap cords around their necks and STRANGLE. Always keep cords and bead chains
ALUMINIUM VENITIAN BLINDS
 ALUMINIUM VENITIAN BLINS Options & Limitations Venetians - Micro, Slimline & 50mm Classic 16mm MICRO 25mm SLIMLINE/ MAGNAVIEW 25mm TWI-NIGHTER 50mm CLASSIC MAXIMUM WITH 3100mm 3700mm 3700mm 4000mm MINIMUM
MPM Add a Touch of Style to Every Window
 MPM-5441 Add a Touch of Style to Every Window Cordless Blinds Cordless Mini Blinds Cordless mini blinds provide security, privacy, and safety with no exposed cords. Totally free from hazardous loops,
Venetian Blinds PRODUCT INFORMATION CHILD SAFE PRODUCT SURVEY GUIDE FITTING GUIDE CARE INSTRUCTIONS
 Venetian Blinds.. CHILD SAFE PRODUCT PRODUCT INFORMATION SURVEY GUIDE FITTING GUIDE CARE INSTRUCTIONS Survey/Measuring Guide Recess Fitting: Measure width at 3 points across top, middle & bottom. Record
STEAM MOP INSTRUCTION MANUAL CATALOG NUMBER BDH1725SM PLEASE READ BEFORE RETURNING THIS PRODUCT FOR ANY REASON. SAVE THIS MANUAL FOR FUTURE REFERENCE.
 STEAM MOP INSTRUCTION MANUAL CATALOG NUMBER BDH1725SM Thank you for choosing BLACK+DECKER! PLEASE READ BEFORE RETURNING THIS PRODUCT FOR ANY REASON. SAVE THIS MANUAL FOR FUTURE REFERENCE. SAFETY GUIDELINES
Duette Shades. luxaflex.com.au
 Duette Shades The information and advice included in this brochure has been prepared with care. However, we are unable to accept responsibility for the results of or any damage caused during operation.
STEAM MOP INSTRUCTION MANUAL CATALOG NUMBER BDH1765SM PLEASE READ BEFORE RETURNING THIS PRODUCT FOR ANY REASON. SAVE THIS MANUAL FOR FUTURE REFERENCE.
 STEAM MOP INSTRUCTION MANUAL CATALOG NUMBER BDH1765SM Thank you for choosing BLACK+DECKER! PLEASE READ BEFORE RETURNING THIS PRODUCT FOR ANY REASON. SAVE THIS MANUAL FOR FUTURE REFERENCE. SAFETY GUIDELINES
FSMH1621 English 5 12
 www.blackanddecker.com FSMH1621 English 5 12 A B C D E 2 F G H I J K 3 L M 4 (Original instructions) ENGLISH FSMH1621 STEAM MOP Technical data Steam Mop FSMH1621 Voltage V ac 220-240 Power W 1600 Tank
Measuring for BLINDS AND SHADES & DRAPERY, PANELS, VALANCES AND CORNICES
 Measuring for BLINDS AND SHADES & DRAPERY, PANELS, VALANCES AND CORNICES OVERVIEW AND MOUNTING OPTIONS Our measuring guide will take you through the steps you need to measure your windows. Just a few simple
Odysee Insulating Blinds
 AVAILABLE IN 800 COLORS IN LIGHT FILTERING AND ROOM DARKENING Odysee Insulating Blinds 2008 Manufacturers Price List and Reference Guide FEATURING Standard and Continuous Cord Loop Hardware Options Blind
Installation Instructions Fascia for Dual Roller FlexShade by Draper
 Installation Instructions Fascia for Dual Roller FlexShade by Draper Caution 1 Inspect all boxes to make sure you have received the proper shades and parts. Controls may be shipped separately, or in same
General information BB0113
 General information BB0113 BB0113 General information 3 Cost guide This cost guide contains all the prices of our roller shade and butterfly blinds collection books. It will help you quote your customers
Convertible Cleaner. Owners Manual
 Hoover, Model U4001 Convertible Cleaner Owners Manual HOW TO ASSEMBLE YOUR NEW HOOVER CLEANER ASSEMBLE HANDLE PIECES Remove cardboard from end of handle pieces. Slide the two handle pieces together. Check
READ AND SAVE THESE INSTRUCTIONS
 145x210mm FW40-6HR Black 365 20150613 Easy living OWNER S MANUAL 16" Wall Fan MODEL: RM/288 Version 1.0 2015 READ AND SAVE THESE INSTRUCTIONS Attention: Pictures in the IM are for reference only. CAUTION
SWFcontract COMMERCIAL WINDOW TREATMENTS CATALOG. Call or
 SWFcontract COMMERCIAL WINDOW TREATMENTS CATALOG Call 800-327-9798 or email architectsolutions@ TABLE OF CONTENTS SWFcontract AND SPRINGS WINDOW FASHIONS Company Overview... 3 SOLAR SHADES SWFcontract
Ambiance Sheers with Room Darkening. Suggested Retail Pricing
 Ambiance Suggested Retail Pricing Effective April 2015 Table of Contents Overview How to Place an Order 3 How to Measure 4 Critical Dimensions 5-6 Light Control Index 6 Finish Index 7 Cleaning Guide 7
decor 150 Vertical Blind decor systems
 Vertical Blind decor systems Vertical Blind The decor 150 vertical blind is designed specifically for use in demanding contract environments. A highly versatile method of shading, the decor 150 is suitable
A Guide to Measuring Shaped Venetian Blinds (and getting it right) Rule No. 1: If in any doubt after reading this talk to us.
 Rule No. 1: If in any doubt after reading this talk to us.") TM A Guide to Measuring Shaped Venetian Blinds (and getting it right) Rule No. 1: If in any doubt after reading this talk to us. Introduction We manufacture these shaped venetians in 25mm aluminium slat
TM A Guide to Measuring Shaped Venetian Blinds (and getting it right) Rule No. 1: If in any doubt after reading this talk to us. Introduction We manufacture these shaped venetians in 25mm aluminium slat
UNIT MODEL/ POWER SUPPLY VOLTAGE VARIATION AMBIENT AIR ON CONDENSER
 Room Air Conditioner Installation and Operation Manual UNIT MODEL/ POWER SUPPLY VOLTAGE VARIATION AMBIENT AIR ON CONDENSER (VOLTS) MIN. MAX. MIN. F ( C) MAX. F ( C) WAC060K7A 127-1-60 114.3 139.7 70(20.1)
INSTALLATION USE & CARE MANUAL ALL WEATHER SL-SERIES QUARTZ TUBE ELECTRIC INFRARED RADIANT HEATER
 INSTALLATION USE & CARE MANUAL ALL WEATHER SL-SERIES QUARTZ TUBE ELECTRIC INFRARED RADIANT HEATER TABLE OF CONTENTS IMPORTANT INFORMATION Warnings 2 Installation Instructions 3 Wiring Instructions 3 Outdoor
Roman Quilt Insulated Shade Instructions
 Ver. 12_1 Copywrite Rominsulated Shades, LLC (2012) - diyinsulatedshades.com Congratulations, you have purchased the most complete roman shade kit on the market today. Included in your kit you will find:
FSMH1621-XE Australia New Zealand
 www.blackanddecker.com.au FSMH1621-XE Australia New Zealand A B C D E 2 F G H I J K 3 L M 4 (Original instructions) ENGLISH Intended use Your Black & Decker steam mop has been designed for sanitising and
PARTS LIST. 1 x POST. 1 x BOOM. 1 x ELBOW. 1 x CANOPY CLIP BRACKET. 1 x CRANK HANDLE. 1 x BASE SLEEVE. 1 x RUBBER COVER. 6 x WASHERS LOCKING PIN
 COMPONENTS PARTS LIST x POST (SEE OVERLEAF FOR ASSEMBLY DIAGRAM.) x BOOM x ELBOW 0 x CANOPY CLIP BRACKET x CRANK HANDLE x BASE SLEEVE SPIGOT (INSIDE BASE SLEEVE) x RUBBER COVER LOCKING PIN x WASHERS 7
WINDOW/WALL-TYPE ROOM AIR CONDITIONER
 Before using your air conditioner, please read this manual carefully and keep it for future reference. WINDOW/WALL-TYPE ROOM AIR CONDITIONER Prior to installation this air-conditioning unit must be submitted
CARE & MAINTENANCE. Keep your windows looking and working great
 CARE & MAINTENANCE Keep your windows looking and working great Care and Cleaning of vinyl windows (SINGLE HUNG, DOUBLE HUNG, CASEMENT AND SLIDING WINDOWS) CARE OF SCREENS Because our screens are made of
OFF. 20 min. 60 min. 30 min. 60 min OFF. 100 min Start. 200 min 150 min
 Cool Warm HDY-M60 HDY-M60 HDY-M40 20 min 30 min 200 min 150 min 100 min Start Please read this manual carefully before operating your dryer. Retain this for future reference. Record the model and serial
2 Aluminum & PVC Horizontal Blinds 1, 2 & 2 ½ Basswood Horizontal Blinds 1, 2 & 2 ½ Fauxwood Horizontal Blinds
 2 Aluminum & PVC Horizontal Blinds 1, 2 & 2 ½ Basswood Horizontal Blinds 1, 2 & 2 ½ Fauxwood Horizontal Blinds April 2016 Save a life: "Install Cord Cleats!" Horizontal Blind Measuring & Ordering Instructions
oem OEM 1" Between the Glass Metal Blind Series P2100 Included:
 OEM 1" Between the Glass Metal Blind Series P2100 Included: Specifications ^Overview Diagram oem S H D E S INC 700 First Avenue, Ford City, PA 16226 Phone. 724-763-3600 Fax: 724-763-3601 www.oemshades.com
STEP BY STEP INSTALLATION INSTRUCTIONS. Natural Woven Shades. Waterfall Valance
 STEP BY STEP INSTALLATION INSTRUCTIONS Natural Woven Shades Waterfall Valance Everything You Need Table of Contents Step 1 - Getting Started.... 3 Overview - Natural Woven Waterfall Valance..............
Duette and Applause Honeycomb Shades
 Replacement Guide SUS NIÑOS/A V OS ENFANT YOUR CHILDR CHI PCN 5102116000 Printed Printed in in China China Replacement Guide Replacement Guide Replacement Guide PROTEJ Honeycomb Shades PROTÉG For Standard
Normandy Wood Blinds. February Program Reference Guide
 Normandy Wood Blinds Normandy Wood Blinds February 2018 Program Reference Guide Normandy Wood Blinds Revision Log Date March 24, 2017 Changes Pg. 11: Added note to Cut-out: Please note: cut-out will be
Aluminum PREMIER COLLECTION CUSTOM MADE BLINDS
 2 017 P R O D U C T R E F E R E N C E & W H O L E S A L E P R I C E G U I D E Prices subject to change without notice. Aluminum PREMIER COLLECTION CUSTOM MADE BLINDS B E ST FOR KID S C E R TIFIE D LIFT
Read through the instructions carefully before using the appliance for the first time. Safeguard them for future reference.
 Table of Contents Important Safeguards... 2 Additional Caution for Blower... 2 Parts... 3 Installing Charger Base... 4 Charging the Battery... 4 Important Note for Charging... 5 Indication Lights... 5
WIRE GUIDE BLIND OUTDOOR DELUXE ROLLER. 5YR Warranty ASSEMBLY GUIDE
 WIRE GUIDE BLIND OUTDOOR DELUXE ROLLER 5YR Warranty 5 YEAR FABRIC WARRANTY AGAINST UV DEGRADATION ASSEMBLY GUIDE 2 You will need: Pelmet cap Pelmet Pelmet cap Idle end plug Aluminium tube Clutch plug Clutch
INSTALLATION GLYDEA MOTORIZED TRACK PRODUCT OVERVIEW. 1. Glydea Motor 2. Motorized Drapery Track. 3. Wall Brackets 4. One Touch Ceiling Bracket
 PRODUCT OVERVIEW 1. Glydea Motor 2. Motorized Drapery Track 2 3. Wall Brackets 4. One Touch Ceiling Bracket 7 6 6 7 5. Return Hooks 6. Master Carrier/Carrier Arms 1 7. Carriers 8. Swivel/Ceiling Bracket
CHOOSING WINDOW COVERINGS THE BASICS
 CHOOSING WINDOW COVERINGS THE BASICS TYPES OF WINDOW COVERINGS HORIZONTAL Wood blinds Faux wood blinds Aluminum mini blinds Textured Horizontals VERTICAL PVC ( poly vinyl chloride) Fabric free hanging
OPERATING INSTRUCTIONS
 OPERATING INSTRUCTIONS FOR CARPET PRO UPRIGHT VACUUMS MODELS : CPU-75, CPU-75T, CPU-85, CPU-85T Before operating the vacuum, please read these instructions completely. Index Important Safety Instructions.............................................................2
Normandy Wood Blinds
 Normandy Wood Blinds Normandy Wood Blinds Program Reference Guide February 2018 Normandy Wood Blinds Revision Log Date March 24, 2017 Changes Pg. 11: Added note to Cut-out: Please note: cut-out will be
Warnings 2. Installation Instructions 3. Wiring Instructions 3. Mounting Instructions 4-5. Replacement Element Installation 5. Replacement Parts 5-6
 TABLE OF CONTENTS Warnings 2 Installation Instructions 3 Wiring Instructions 3 Mounting Instructions 4-5 Replacement Element Installation 5 Replacement Parts 5-6 Heater Coverage Areas 6 General Notes 6
Luxaflex Silhouette. TAKE CARE not to get the headrail wet!
 Luxaflex Silhouette Luxaflex Silhouette shades look vulnerable but in fact they are very durable. Regular dusting with a feather duster is usually sufficient to keep the shade clean and attractive for
EcoBrite Smooth Light LED Light Fixtures
 Installation Guide EcoBrite Smooth Light LED Light Fixtures BEFORE YOU BEGIN INSTALLATION Read these instructions carefully. Failure to follow these instructions will invalidate the warranty on this product