Installation Instructions Horizontal Blinds
|
|
|
- Bartholomew Arnold
- 6 years ago
- Views:
Transcription

1 Installation Instructions Horizontal Blinds
 Left and Right Box-style ing Brackets. 2) Two ing Bracket Screws per bracket. 3) Valance Clips.")
 indicates which screw holes would be used for each option.")
: Hold Down Brackets Spacer Blocks or Extension Brackets - Use spacer blocks or extension brackets to project the standard mounting brackets out over any obstructions")

2 Installing Your New Horizontal Blinds Thank you for your purchase of a Century Blinds Inc. Horizontal Wood or Fauxwood blind. Please take a moment to review the contents of your parts package. Your parts package should contain the following: Standard Parts: 1) Left and Right Box-style ing Brackets. 2) Two ing Bracket Screws per bracket. 3) Valance Clips. (Quantity and type will vary based on type and width of valance ordered.) 4) Center Support Brackets w/screws. (As needed).. ing the Brackets: The box-style mounting brackets are designed to work in all possible mounting applications. Figure 1 (previous page) indicates which screw holes would be used for each option. brackets as shown below, either Inside, (Fig 2a) or Outside (Fig 2b). Always use all brackets supplied. Fig. 2a Fig. 2b Optional Parts (On request): Hold Down Brackets Spacer Blocks or Extension Brackets - Use spacer blocks or extension brackets to project the standard mounting brackets out over any obstructions (such as window moldings or ledges). Bracket Requirements: All blinds require a minimum of two mounting brackets (included). Center Support Brackets are provided based on the width of the blind, as needed. All 2 on 1 blinds receive 1 support bracket. All 3 on 1 blinds receive 2 support brackets. Wood blinds: Over 69 1 support bracket Over 95 2 support brackets Softwood Blinds: Over 60 1 support bracket Over 95 2 support brackets center support brackets (if needed), near the center of the window.(fig 3) Be sure to mount the support bracket (s) in positions that will not interfere with the operating mechanisms of the blind. Fig. 3 Screw Holes Always use at least two screws per bracket, to ensure a strong, secure mount. Fig. 1 Inside Ceiling Outside Installing the Blind: Position the headrail in the box-style brackets as shown. (And in support bracket if used). Swing the covers down and snap them closed. (Fig 4) Fig. 4
3 Routeless/Privacy Blinds: Due to the unique cording method of routeless blinds, the slats may shift out of the ladder braid during shipping, installation, and aggressive use. To ensure proper operation of the routeless/privacy blind, it is important to check the slats are properly seated onto the ladder braid. The ladder braid should be securely seated into the notches on the edge of each slat. The following diagrams show a slat properly engaged to the ladder braid (Fig 5a), and one that has become un-seated (Fig 5b). To fix the slat, move the slat or the ladder braid until the ladder is reseated into the notch. Fig. 5a Hold-Down Brackets: Hold-down brackets may be used to prevent the blinds from swaying when mounted on doors or exposed to the wind. Attach the hold-down bracket to the lower corner of the window jam or sill with the screws provided. Fig 6a) The hold-down pin comes pre -attached to the end of the bottom rail. After the bracket is installed, insert this pin into the bracket. (Fig 6b) Fig. 6a Fig. 6b Tilt Wand Attachment: (where applicable) Attach want to tip over the end of the tilter hook. Slide the clear cover down to hold wand in place. (Fig 7) Fig. 7 Fig. 5b Final Adjustments: Alignment: After installing the blind, tilt the slats open, then raise and lower the blind several times. This motion will allow the cords and slats to properly align themselves. For best performance, blinds should only be raised or lowered when the slats are in the horizontal position.

. Hidden valance clips (Fig 8): attach plastic clip to headrail before installing blind.")


: After blind is installed, mount valance to front surface of headrail using the")
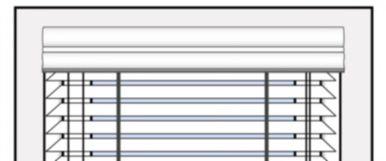
4 Installing the Valance: The type of valance clip included in your package will vary depending on the type of valances you have ordered. You will either receive a hidden valance clip, Drop-In metal valance clip or inset magnet (for flush mounts only). Hidden valance clips (Fig 8): attach plastic clip to headrail before installing blind. After the blind is installed, attach the valance to the clips. Operating the Blind: To raise the blind, tilt the slats open, then grab the lift cord, and pull straight down. (Fig 10) Pull the cord to the outside of the window frame to lock the blind in the raised position. To lower it, pull the tilt cord to the inside of the window to release the cord lock, and gently lower the blind down to the window sill. (Fig 11) Fig. 10 Drop-In Clips (Fig 9: These valance clips come attached to the blind already by the factory. Simply hook the clips to the headrail of the blind after the blind is installed. Inset Magnets (Not shown): After blind is installed, mount valance to front surface of headrail using the magnets attached to the valance. Make sure the magnets are able to make a flat connection to the headrail surface. Lift Cord Fig. 8 2) Snap Valance onto Clip. 1) Attach Hidden Clip to Headrail. Tilt Cords Fig. 11 Valance clip comes attached. Fig. 9 Hook onto headrail. To Release To Lock


5 Care and Cleaning: Dust the blinds regularly, using a soft clean cloth, a dusting mitt, a vacuum cleaner with a soft brush attachment, or a dusting brush designed for use with blinds. When cleaned regularly, surface dust is easily removed. Cleaning is best done when the blinds are lowered. Tilt the slats forward to clean the upper surface, tilt backward to clean the lower surface. Child Safety - Horizontal Blinds Young children can STRANGLE in cord loops and in the loop above the cord stop. They can also wrap cords around their necks and STRANGLE. In addition, inner cords can pull out to form a loop, which can STRANGLE a young child. Stains and heavier dirt can be cleaned off with a dampened cloth, using water or a mild cleaning solution. Never use harsh cleansers or chemical cleaners, as this may cause permanent damage and discoloration to the slats or ladder cords. Always keep cords out of children s reach. Move cribs, playpens, and other furniture away from the windows, so a child cannot reach the operating cords. Do not tie cords together. Make sure cords do not twist together to create a loop. Child Safety: Century Blinds Inc. manufactures its products in accordance with ANSI/WCMA recommendations for Child Safety. To help prevent children from becoming tangled in lift cords, all blinds or shades made with standard lift operation come with a Safety Breakaway on each shade lift cord, which separates into two pieces when pressure is applied between the cords. If your Breakaway is pulled apart, simply snap the two halves back together. For increased safety, also included in your installation package are Cord Cleats, used to anchor the lift cord to the wall when the blind or shade is raised. the Cord Cleats to the side of the window frame, at a height where they will be out of reach for children. When the blind or shade is raised, wrap the lift cord around the Cord Cleats to anchor it safely. Safety Breakaway Cord Cleats The Window Covering Safety Council (WCSC) and the U.S. Consumer Product Safety Commission (CPSC) are urging parents and caregivers to check their window coverings for exposed or dangling cords that can pose a strangulation hazard to infants and young children, and to retrofit or replace them with today s safer products. WCSC and CPSC recommend that only cordless window coverings or those with inaccessible cords be used in homes with young children.
Once you ve located these components, set them aside so they ll be handy as you begin the installation process. Screw Holes
 Wood Blinds Installation Instructions with Magnet Valance Email: customerservice@blindster.com Call us: (888) 256-8672 Mon - Fri 8am - 7pm (CT) How to Install Your Wood Blinds Before you get started installing
INSTALLATION INSTRUCTIONS Lift & Lock for Horizontal Blinds
 INSTALLATION INSTRUCTIONS Lift & Lock for Horizontal Blinds 6/2016 Installating Your New Horizontal Blinds Please take a moment to review the contents of your package. Your package should contain the following:
INSTALLATION INSTRUCTIONS. WOOD BLINDS 1-3/8, 2 and 2-3/8 SLAT SIZES. FAUX WOOD BLINDS 2 and 2-1/2 SLAT SIZES
 INSTALLATION INSTRUCTIONS WOOD BLINDS 1-3/8, 2 and 2-3/8 SLAT SIZES FAUX WOOD BLINDS 2 and 2-1/2 SLAT SIZES STANDARD CORDLESS LIFT Thank you for your purchase. This blind has been custom built for you
Aluminum Horizontal Blinds BOX BRACKET INSTALLATION
 Aluminum Horizontal Blinds BOX BRACKET INSTALLATION MOUNT THE INSTALLATION BRACKETS Mounting Options The installation brackets may be inside mounted, outside mounted or ceiling mounted. In all cases, level
Installation Instructions Vertical Blinds
 Installation Instructions Vertical Blinds Installing Your New Vertical Blinds Thank you for your purchase of a Century Blinds Inc. Vertical Blind. Please take a moment to review the contents of your parts
Installation Instructions
 Aluminum Blinds Installation Instructions Echelon, Traditions & Integra Aluminum Blinds 2 Metro Aluminum Blinds *Click on any page to return to the Table of Contents* Echelon, Traditions & Integra Aluminum
INSTALLATION INSTRUCTIONS. Aluminum Blinds - Standard - - Lift & Lock -
 1 INSTALLATION INSTRUCTIONS Aluminum Blinds - Standard - - Lift & Lock - 1 Deluxe 1 Traditional 1 Value & 1 Basic 2 Macro Thank you for your purchase. This blind has been custom built for you from the
Installation and Care Instructions
 Installation and Care Instructions 2" Horizontal Aluminum Blinds MagnaView Tilt Feature CONTENTS Getting Started................................................ 1 Mount the Installation s....................................
Installation and Care Instructions
 Installation and Care Instructions 2" Horizontal Aluminum Blinds MagnaView Tilt Feature Thank you for your purchase. Your new blinds have been custom built for you from the highest quality materials. Properly
2" and 2 1/2" Wood Horizontal Blinds 2", 2 1/4" and 2 1/2" Faux Wood Horizontal Blinds. Installation & Operating Instructions
 2" and 2 1/2" Wood Horizontal Blinds 2", 2 1/4" and 2 1/2" Faux Wood Horizontal Blinds Installation & Operating Instructions TC07-08.2011 TABLE OF CONTENTS Product View...3 GETTING STARTED...4 Tools Required:...4
MINI BLINDS Classic GETTING STARTED STANDARD HARDWARE. A few simple tools are required: OPTIONAL HARDWARE
 MINI BLINDS Classic GETTING STARTED STANDARD HARDWARE A few simple tools are required: Steel Tape Measure Pencil Level End Brackets (Open Position LH & RH) Top Brackets Power Drill and Drill Bits Flathead
Installation and Care Instructions
 Installation and Care Instructions THANK YOU for purchasing a Hunter Douglas product. Your new blind has been custom built for you from the highest quality materials. Once in your window, it will provide
Installation Operation Care
 Installation Operation Care Horizontal Blinds Standard Hardware System LiteRise Operating System UltraGlide Operating System CONTENTS Getting Started: Product View...1 Tools and Fasteners Needed...2 Unpack
Installation Operation Care
 Installation Operation Care 2" Horizontal Aluminum Blinds MagnaView Tilt Feature 5102014000F 4/14 CONTENTS Getting Started: Product View Reveal with MagnaView... 1 Product View Natural Elements with MagnaView...
Installation Operation Care
 Installation Operation Care Horizontal Blinds Standard Cordlock, Operable Specialty Shapes, LiteRise, SimpleLift, and UltraGlide Operating Systems CONTENTS GETTING STARTED Product View Standard Cordlock
Install. Operate. Care.
 Install. Operate. Care. Standard Hardware System LiteRise Cordless System Wood Blinds Alternative Wood Blinds 2" Aluminum Blinds Thank you for your purchase. By selecting a horizontal blind for your window,
Install. Operate. Care.
 Install. Operate. Care. Standard HeadMaster System LiteRise Cordless System Wood Blinds Alternative Wood Blinds 2" Aluminum Blinds Thank you for your purchase. By selecting a horizontal blind for your
Installation and Care Instructions. Wood Blinds and Alternative Wood Blinds. LiteRise Touch System. Getting Started
 Installation and Care Instructions Wood Blinds and THANK YOU for purchasing a Hunter Douglas product. Your new blind has been custom built for you from the highest quality materials. Once in your window,
Fine Fabric Shade. Thank you for purchasing our Fine Fabric Shade.
 Fine Fabric Shade Installation Safety Care & Cleaning Warranty Thank you for purchasing our Fine Fabric Shade. With proper installation, operation, and care your new shades will provide years of beauty
Wood. Blind owner's handbook
 Wood owner's handbook 2 WARNING Cords and bead chains can loop around a child s neck and strangle. Always keep cords and bead chains out of children s reach. Move furniture away from cords and bead chains.
STEP BY STEP INSTALLATION INSTRUCTIONS. Durawood Blinds. Standard Lift
 STEP BY STEP INSTALLATION INSTRUCTIONS Durawood Blinds Standard Lift Everything You Need A Smooth Set-Up We want you to love your new blinds and that includes having a smooth installation experience. If
Graber Lake Forest Faux Wood and Premium Faux Wood Blind
 2 3 5 6 8 7 1 2" (5.1cm) Blind shown 1. Blind (cord tilt shown) 2. Mounting Brackets 3. Center support bracket (if required). Mounting screws (2 per bracket) 5. Projection brackets (optional, one per mounting
FAUX WOOD BLINDS 2 & 2-1/2 SLAT SIZES
 INSTALLATION INSTRUCTIONS FAUX WOOD BLINDS 2 & 2-1/2 SLAT SIZES STANDARD RECTANGULAR Thank you for your purchase. This blind has been custom built for you from the highest quality materials. To avoid errors
INSTALLATION INSTRUCTIONS. WOOD BLINDS 1-3/8, 2 and 2-3/8 SLAT SIZES. COMPOSITE FAUX WOOD BLINDS 2 and 2-1/2 SLAT SIZES
 INSTALLATION INSTRUCTIONS WOOD BLINDS 1-3/8, 2 and 2-3/8 SLAT SIZES COMPOSITE FAUX WOOD BLINDS 2 and 2-1/2 SLAT SIZES POLYMER FAUX WOOD BLINDS 2 and 2-1/2 SLAT SIZES STANDARD CORDLESS LIFT Thank you for
Installation Operation Care
 Installation Operation Care Provenance Woven Wood Shades Standard Cordlock And Clutch Operated Shades CONTENTS Getting Started: Installation Components Needed... 1 Tools And Fasteners Needed... 2 Mounting
Installation Operation Care
 Installation Operation Care Provenance Woven Wood Shades Standard Cordlock and Clutch Operated Shades CONTENTS Getting Started: Product View... 1 Tools and Fasteners Needed... 2 Mounting Types and Window
INSTALLATION INSTRUCTIONS. Vertical Blinds
 1 INSTALLATION INSTRUCTIONS Vertical Blinds Vinyl & Fabric Thank you for your purchase. This blind has been custom built for you from the highest quality materials. To avoid errors and save valuable time,
Installation Instructions
 Wood Blinds Installation Instructions Heartland Woods Heartland Woods w/ Continuum *Click on any page to return to the Table of Contents* Heartland Woods Wood Blinds Mounting Inside or Outside Window Frame
Privacy Aluminum Shade
 Privacy Aluminum Shade Installation Instructions Email: customerservice@blindster.com Call us: (888) 256-8672 Mon - Fri 8am - 7pm (CT) Congratulations on purchasing an Aluminum Privacy Blind from Blindster.
STEP BY STEP INSTALLATION INSTRUCTIONS. Durawood Blinds. Easy Lift Cordless
 STEP BY STEP INSTALLATION INSTRUCTIONS Durawood Blinds Easy Lift Cordless Table of Contents Everything You Need A Smooth Set-Up We want you to love your new blinds and that includes having a smooth installation
HONEYCOMB AND PLEATED SHADES
 HONEYCOMB AND PLEATED SHADES GETTING STARTED BRACkET INFORMATION A few simple tools are required: The brackets you received with your product are REQUIRED for proper installation. Brackets should be installed
GETTING STARTED OPTIONAL HARDWARE A
 ROLLER SHADES Continuous Cord Loop and Link System without Cassette Double Roller GETTING STARTED OPTIONAL HARDWARE A few simple tools are required: Hold Down Brackets Spacer Block Spacers Steel Tape Measure
Luxaflex Metal Venetian Blinds Guarantee, Installation, Safety & Care Instructions
 Luxaflex Metal Venetian Blinds Guarantee, Installation, Safety & Care Instructions ! WARNING Young children can be strangled by loops in pull cords, chains, tapes and inner cords that operate the product.
Child Safety Guide SAFETY FIRST. STYLE SECOND TO NONE.
 Child Safety Guide SAFETY FIRST. STYLE SECOND TO NONE. SAFETY FIRST. STYLE SECOND TO NONE. Consumers have not yet replaced or retrofitted millions of older treatments. New parents and pet owners are sometimes
STEP BY STEP INSTALLATION INSTRUCTIONS. Wood Blinds. Cordless Control
 STEP BY STEP INSTALLATION INSTRUCTIONS Wood Blinds Cordless Control Everything You Need Table of Contents Step 1 - Getting Started....3 Overview - Standard Control Wood Blinds....4 Step 2 - Mounting the
STEP BY STEP INSTALLATION INSTRUCTIONS. Wood Blinds. Standard Control
 STEP BY STEP INSTALLATION INSTRUCTIONS Wood Blinds Standard Control Everything You Need Table of Contents Step 1 - Getting Started...3 Overview - Standard Control Wood Blinds...4 Step 2 - Mounting the
CONTENTS BEFORE YOU BEGIN
 Owner s Guide Wood Blinds Alternative Wood Blinds 2" Aluminum Horizontal Blinds Intelligence Interface Motor Clip Receiver Eye Battery Holder Battery Cover Remote PowerTilt Motorized Tilt System CONTENTS
HONEYCOMB SHADES CORDLESS LIFT SYSTEM CONTINUOUS CORD LOOP SYSTEM REMOTELIFT 2.0 SYSTEM
 INSTALLATION INSTRUCTIONS HONEYCOMB SHADES CORDLESS LIFT SYSTEM CONTINUOUS CORD LOOP SYSTEM REMOTELIFT 2.0 SYSTEM Thank you for your purchase. This shade has been custom built for you from the highest
HONEYCOMB AND PLEATED SHADES
 HONEYCOMB AND PLEATED SHADES GETTING STARTED BRACKET INFORMATION A few simple tools are required: The brackets you received with your product are required for proper installation. Brackets should be installed
Installation Operation Care. Vertical Blind Collection Paramount, PermAlign, and PermaTrak Headrail Systems
 Installation Operation Care Vertical Blind Collection Paramount, PermAlign, and PermaTrak Headrail Systems CONTENTS Getting Started: Product View... 1 Tools and Fasteners Needed... 2 Installation: Installation
INSTALLATION INSTRUCTIONS TOOLS YOU WILL NEED GETTING STARTED
 INSTALLATION INSTRUCTIONS HONEYCOMB SHADES STANDARD RECTANGULAR Thank you for your purchase. This shade has been custom built for you from the highest quality materials. To avoid errors and save valuable
Installation Operation Care
 Installation Operation Care Roman Shades EasyRise and UltraGlide Lifting Systems CONTENTS Getting Started: Product View... 1 Tools and Fasteners Needed... 2 Mounting Types and Window Terminology... 2 Installation:
Custom Window Treatments. Safety Guide
 Custom Window Treatments Safety Guide Safety First. Style Second to None. The window covering industry has redesigned its corded products and developed cord-safety standards to respond to child safety
ALUMINIUM VENITIAN BLINDS
 ALUMINIUM VENITIAN BLINS Options & Limitations Venetians - Micro, Slimline & 50mm Classic 16mm MICRO 25mm SLIMLINE/ MAGNAVIEW 25mm TWI-NIGHTER 50mm CLASSIC MAXIMUM WITH 3100mm 3700mm 3700mm 4000mm MINIMUM
Custom Window Treatments. Child Safety Guide SAFETY FIRST. STYLE SECOND TO NONE.
 Custom Window Treatments Child Safety Guide SAFETY FIRST. STYLE SECOND TO NONE. Safety First. Style Second to None. Consumers have not yet replaced or retrofitted millions of older treatments, and new
Before you begin the installation process, gather the following tools and keep them handy:
 Vertical Blind Installation Instructions ucontact@udoblinds.com 1-855-205-8442 Congratulations on purchasing vertical blinds from Follow these instructions to properly install your blinds. Tools You Need
Cordless CellularFabric Shade. owner's handbook
 Cordless CellularFabric Shade owner's handbook 2 WARNING Young children can STRANGLE in cord and bead chain loops. They can also wrap cords around their necks and STRANGLE. Always keep cords and bead chains
STEP BY STEP INSTALLATION INSTRUCTIONS. Natural Woven Shades. Standard Top Down/Bottom Up Slim Headrail Operable Lining
 STEP BY STEP INSTALLATION INSTRUCTIONS Natural Woven Shades Standard Top Down/Bottom Up Slim Headrail Operable Lining Table of Contents Everything You Need A Smooth Set-Up We want you to love your new
Timber Venetians Manual
 Timber Venetians Manual Measuring & Limitations Timber Venetians Measuring Architrave & Reveal Face & Reveal Corners Bays Options & Limitations Maximum Width Minimum Width Fixed Control Minimum Width Tilt
Installation Operation Care
 Installation Operation Care EasyRise UltraGlide LiteRise Vignette Modern Roman Shades Traditional Style EasyRise, LiteRise, and UltraGlide Operating Systems CONTENTS Getting Started: Product View Traditional
Operating Instructions. Care & Cleaning Guidelines
 Operating Instructions Care & Cleaning Guidelines congratulations! Thank you for selecting Enlightened Style window coverings for your home. With your purchase of Enlightened Style window coverings, you
PRODUCT INFORMATION MANUAL SECTION: 3 VERI SHADES VERI SHADES
 VERI SHADES Where innovation meets style and functionality. A contemporary take on a classic window covering, Veri Shades combines the versatility of a vertical blind with the elegant appeal of a soft
Installation Operation Care
 Installation Operation Care Skyline Gliding Window Panels CONTENTS Getting Started: Mounting Types And Window Terminology... 1 Unpack The Box... 1 Installation Components Required... 2 Optional Components...
Installation Instructions for Vertical Blind
 Installation Instructions for Vertical Blind In order to have an accurate installation it is necessary to follow these simple steps. 1. Tools needed Marker or pencil, measuring tape, screwdriver and screws
REDBOURNE ROAD, REDBOURNE, GAINSBOROUGH, LINCOLNSHIRE, DN21 4TG Tel: Fax:
 Ltd REDBOURNE ROAD, REDBOURNE, GAINSBOROUGH, LINCOLNSHIRE, DN21 4TG Tel: 01652 648814 Fax: 01652 648104 www.merrick-day.com Child Safety Requirements for Internal Blinds BS EN 13120, BS EN16433 and BS
Soft Sheer Vertical. Installation and Care Guide
 Soft Sheer Vertical Installation and Care Guide Soft Sheer Vertical Blinds represent a design breakthrough in style, efficiency and function. The unique fabric structure and hardware system are designed
SHEER MAGIC Installation Instructions
 SHEER MAGIC Installation Instructions The Vertical Blind that Looks Like A Sheer Drapery! Congratulations on the purchase of your new window covering! Sheer Magic blinds are an attractive choice for your
CONGRATULATIONS, YOU VE MADE A GREAT CHOICE!
 WELCOME GUIDE CONGRATULATIONS, YOU VE MADE A GREAT CHOICE! And thank you for making that choice Alta. We take our customer s experience very personally. After all, we are part of your most personal space.
Duette and Applause Honeycomb Shades
 Replacement Guide SUS NIÑOS/A V OS ENFANT YOUR CHILDR CHI PCN 5102116000 Printed Printed in in China China Replacement Guide Replacement Guide Replacement Guide PROTEJ Honeycomb Shades PROTÉG For Standard
MPM Add a Touch of Style to Every Window
 MPM-5441 Add a Touch of Style to Every Window Cordless Blinds Cordless Mini Blinds Cordless mini blinds provide security, privacy, and safety with no exposed cords. Totally free from hazardous loops,
Specification Blinds. Disclaimer JASNO reserves the right to change the contents of this document without notice.
 Specification Blinds Disclaimer JASNO reserves the right to change the contents of this document without notice. Warning EN 2011/477/01 Young children have been strangled by loops in pull-cords, chains
Operating your blind is easy. Just follow these instructions.
 Vertical Blinds: Operating your blind Operating your blind is easy. Just follow these instructions. To control the angle of the louvres, pull gently on the side chain. To open and close the blind, pull
Horizontal Blinds Installation Instructions
 Horizontal Blinds Installation Instructions Mounting Options Inside mount: Blind is mounted inside the window frame, either to the top of the frame or to the sides. Outside mount: Blind is mounted either
HARMONY COLLECTION By Legacy Window Coverings
 HARMONY COLLECTION By Legacy Window Coverings Welcome Home Program www.harmonyjcp.com Table of Contents TABLE OF CONTENTS GENERAL PRODUCT INFORMATION Features and Benefits...3 Cellular Terminology...4
Installation Instructions Fascia for Dual Roller FlexShade by Draper
 Installation Instructions Fascia for Dual Roller FlexShade by Draper Caution 1 Inspect all boxes to make sure you have received the proper shades and parts. Controls may be shipped separately, or in same
Venetian Blinds PRODUCT INFORMATION CHILD SAFE PRODUCT SURVEY GUIDE FITTING GUIDE CARE INSTRUCTIONS
 Venetian Blinds.. CHILD SAFE PRODUCT PRODUCT INFORMATION SURVEY GUIDE FITTING GUIDE CARE INSTRUCTIONS Survey/Measuring Guide Recess Fitting: Measure width at 3 points across top, middle & bottom. Record
2 Aluminum & PVC Horizontal Blinds 1, 2 & 2 ½ Basswood Horizontal Blinds 1, 2 & 2 ½ Fauxwood Horizontal Blinds
 2 Aluminum & PVC Horizontal Blinds 1, 2 & 2 ½ Basswood Horizontal Blinds 1, 2 & 2 ½ Fauxwood Horizontal Blinds April 2016 Save a life: "Install Cord Cleats!" Horizontal Blind Measuring & Ordering Instructions
Vertical Blinds. Step by Step Installation Instructions
 Vertical Blinds Step by Step Installation Instructions Everything You Need A Smooth Set-Up We want you to love your new window coverings and that includes having a smooth installation experience. We recommend
Installation Operation Care
 Installation Operation Care Duette and Applause Honeycomb Shades Vertiglide Side Stack Design CONTENTS Getting Started: Product View... 1 Tools and Fasteners Needed... 2 Installation: Installation Overview...
Aluminum PREMIER COLLECTION CUSTOM MADE BLINDS
 2 017 P R O D U C T R E F E R E N C E & W H O L E S A L E P R I C E G U I D E Prices subject to change without notice. Aluminum PREMIER COLLECTION CUSTOM MADE BLINDS B E ST FOR KID S C E R TIFIE D LIFT
CHILD SAFETY AT THE WINDOW
 CHILD SAFETY AT THE WINDOW DESIGNED WITH SAFETY IN MIND Children are innately curious about the world around them. So, even basic household items like window fashions can turn into potential hazards for
Legal requirements for internal window blinds. Surveyor and installer guide for made-to-measure blinds
 Legal requirements for internal window blinds Surveyor and installer guide for made-to-measure blinds Make it Safe says Mum of three, Rachael Maynard My daughter, Megan, became entangled in a window blind
Silent Gliss. Venetian Blind Systems
 Venetian Blind Systems Application Chart Dimensions Features / Options Fitting Options Fitting Surfaces Operation Side Guide available Slat widths (mm) Twin Operation Mono operation Radio Control Perforated
STEP BY STEP INSTALLATION INSTRUCTIONS. Vertical Honeycomb Shades
 STEP BY STEP INSTALLATION INSTRUCTIONS Vertical Honeycomb Shades Everything You Need A Smooth Set-Up We want you to love your new window coverings and that includes having a smooth installation experience.
Installation and operating instructions for Luxaflex Venetian Blinds
 for 16/25 mm Luxaflex Lightline Ondulette www.luxaflex.com GB General information Please read the following installation and operating instructionscarefully. We are unable to accept responsibility for
oem OEM 1" Between the Glass Metal Blind Series P2100 Included:
 OEM 1" Between the Glass Metal Blind Series P2100 Included: Specifications ^Overview Diagram oem S H D E S INC 700 First Avenue, Ford City, PA 16226 Phone. 724-763-3600 Fax: 724-763-3601 www.oemshades.com
PVC BLINDS PVC READY-MADE STANDARD FEATURES
 READY-MADE PVC BLINDS STANDARD FEATURES Available with: 1.0" (25mm), and 2.0" (50mm) slats. Wand tilters, with zinc stems, for durability and strength. Cord locks with solid brass rollers in a clear polycarbonate
Duette Shades. luxaflex.com.au
 Duette Shades The information and advice included in this brochure has been prepared with care. However, we are unable to accept responsibility for the results of or any damage caused during operation.
Specification Blinds. Disclaimer JASNO reserves the right to change the contents of this document without notice.
 Specification Blinds Disclaimer JASNO reserves the right to change the contents of this document without notice. Warning EN 2011/477/01 Young children have been strangled by loops in pull-cords, chains
Installation Operation Care
 Installation Operation Care Duette and Applause Honeycomb Shades Vertiglide System CONTENTS Getting Started: Product View... 1 Tools and Fasteners Needed... 2 Installation: Installation Overview... 3 Outside
Roman Quilt Insulated Shade Instructions
 Ver. 12_1 Copywrite Rominsulated Shades, LLC (2012) - diyinsulatedshades.com Congratulations, you have purchased the most complete roman shade kit on the market today. Included in your kit you will find:
Estates and Facilities Alert
 Estates and Facilities Alert Action Ref: EFA/2010/007 Issued: 8 July 2010 Device Window blinds with looped cords or chains. All types. Problem Action Looped cords and chains on window blinds can present
A Guide to Measuring Shaped Venetian Blinds (and getting it right) Rule No. 1: If in any doubt after reading this talk to us.
 Rule No. 1: If in any doubt after reading this talk to us.") TM A Guide to Measuring Shaped Venetian Blinds (and getting it right) Rule No. 1: If in any doubt after reading this talk to us. Introduction We manufacture these shaped venetians in 25mm aluminium slat
TM A Guide to Measuring Shaped Venetian Blinds (and getting it right) Rule No. 1: If in any doubt after reading this talk to us. Introduction We manufacture these shaped venetians in 25mm aluminium slat
Installation Operation Care
 Installation Operation Care Duette and Applause Honeycomb Shades Vertiglide System CONTENTS Getting Started: Product View... 1 Tools and Fasteners Needed... 2 Installation: Installation Overview... 3 Outside
CHOOSING WINDOW COVERINGS THE BASICS
 CHOOSING WINDOW COVERINGS THE BASICS TYPES OF WINDOW COVERINGS HORIZONTAL Wood blinds Faux wood blinds Aluminum mini blinds Textured Horizontals VERTICAL PVC ( poly vinyl chloride) Fabric free hanging
faux wood blinds COLLECTION
 faux wood blinds COLLECTION RETAIL PRICE LIST & PRODUCT INFO GUIDE Effective July 7, 2008...finding solutions for families, especially busy moms. A WHOLE FAMILY OF WINDOW SOLUTIONS TABLE OF CONTENTS Product
Normandy Wood Blinds. February Program Reference Guide
 Normandy Wood Blinds Normandy Wood Blinds February 2018 Program Reference Guide Normandy Wood Blinds Revision Log Date March 24, 2017 Changes Pg. 11: Added note to Cut-out: Please note: cut-out will be
New legal requirements for internal window blinds. Surveyor and installer guide for made-to-measure blinds
 New legal requirements for internal window blinds Surveyor and installer guide for made-to-measure blinds Make it Safe says Mum of three, Rachael Maynard It s the Law! Which products? All internal blinds
Normandy Wood Blinds
 Normandy Wood Blinds Normandy Wood Blinds Program Reference Guide February 2018 Normandy Wood Blinds Revision Log Date March 24, 2017 Changes Pg. 11: Added note to Cut-out: Please note: cut-out will be
Measuring for BLINDS AND SHADES & DRAPERY, PANELS, VALANCES AND CORNICES
 Measuring for BLINDS AND SHADES & DRAPERY, PANELS, VALANCES AND CORNICES OVERVIEW AND MOUNTING OPTIONS Our measuring guide will take you through the steps you need to measure your windows. Just a few simple
CLASSIC ROMAN SHADES COST AND PRODUCT REFERENCE GUIDE CLASSIC ROMAN SHADES UNITED STATES FEBRUARY 2018
 r CLASSIC ROMAN SHADES COST AND PRODUCT REFERENCE GUIDE CLASSIC ROMAN SHADES UNITED STATES FEBRUARY 2018 Table of Contents Features Summary...3 Features and Benefits...3 Oeko-Tex Standard 100 Certified
Step 1: Identify the parts of your shade (parts shown are not to scale)
") Motor Operated Solar Shade with Valance Installation and Care Instructions Read carefully and retain for future use. Installation video is available online. Tools required: Philips head screwdriver (not
Motor Operated Solar Shade with Valance Installation and Care Instructions Read carefully and retain for future use. Installation video is available online. Tools required: Philips head screwdriver (not
March, Normandy Wood Blinds. Program Reference Guide
 March, 2015 Normandy Wood Blinds Program Reference Guide Table of Contents Features & Benefits 1 Terminology 2 3 Standard Features & Options 4 General Specifications 5 6 Color Coordination Chart 7 Cloth
Child Safety At The Window
 Child Safety At The Window Enhancing Your Home s Windows Vignette Tiered Modern Roman Shades with LiteRise cordless operation As Well As Your Home s Safety As babies grow, so does their curiosity with
installation and operation manual for Hunter Ceiling Fans
 For Your Records and Warranty Assistance Model Name: Catalog/Model No.: Serial No.: Date Purchased: Where Purchased: For reference also attach your receipt or a copy of your receipt to the manual. installation
ANSI/WCMA A Page 1 of 58
 ANSI A100.1-2018 Revision of ANSI/WCMA A100.1-2014 STANDARD FOR SAFETY OF WINDOW COVERING PRODUCTS SPONSOR WINDOW COVERING MANUFACTURERS ASSOCIATION, INC. American National Standards Institute Approved
PURE WOOD BLINDS TECHNICAL SPECIFICATIONS
 PURE WOOD BLINDS TECHNICAL SPECIFICATIONS STYLISH, MADE-TO-MEASURE SOLUTIONS 2015 Version 1.2 PURE WOOD BLIND SPECIFICATION SPEC2-2015 Section 1 Features and benefits 1 Section 2 Components and accessories
AUTOMATION KIT. User s Manual. mysmartblinds.com/installation
 TM AUTOMATION KIT User s Manual mysmartblinds.com/installation QUICK START 1. Download the MySmart- Blinds app to your smart device from the App Store or Google Play. 2. Visit mysmartblinds.com/ installation
Made to Measure Window Furnishings
 Made to Measure Window Furnishings Innovative Solutions to Add Value for your Customer Sales Product Training Module 10.6 Design Shades Revision F 14 th October 2015 Sales Product Training Contents for
Made to Measure Window Furnishings
 Made to Measure Window Furnishings Innovative Solutions to Add Value for your Customer Sales Product Training Module 10.4 Panel Glide Revision C Sales Product Training Contents for Module 10.4 Panel Glide