INSTALLATION INSTRUCTIONS: VERTICAL WALL BED HARDWARE KIT WITH FRAME
|
|
|
- Kellie Norris
- 6 years ago
- Views:
Transcription


 55991 (Double")
")


1 INSTALLATION INSTRUCTIONS: VERTICAL WALL BED HARDWARE KIT WITH FRAME MODEL CODES: (Single vertical wall bed) (Double vertical wall bed) (Queen vertical wall bed) *Our more compact model for shipping. Rockler Woodworking and Hardware 4365 Willow Drive, Medina, MN
2 HARDWARE A Left and right of the frame B Upper and lower half frame supports C Middle frame supports D Long center frame support x1 x1 x1 E Upper and lower frame supports F Flat bars G Pistons (non locking) H Mattress Supports x1 I Mounting plates (left and right) J Saddle locking plates K Brackets to attach wall bed to wall L Door brackets x6 x12 x12 M Legs (left and right) N Tube (for attaching legs) x1 x1 x1 O Slats P Slat caps Q Double slat caps
3 R Wrench x1 x1 x1 S1 Allen Key #4 x1 x1 x1 S2 Allen Key #5 x1 x1 x1 T Threaded inserts x16 x16 x16 U M8 x 16mm Screws x16 x16 x16 V #10 x 55mm Screws (Step 12) W #8 x 15mm Screws (Steps 11-12) x32 x52 x52 X #10 x 15mm Screws Y #10 x 30mm Screws Z M5 x 15mm Screws AA M6 x 30mm Bolts BB M8x 50mm Bolts x34 x34 x34 CC Washers x8 x8 x8 DD Nylon Washers (for pivoting legs) EE M5 Nuts (for saddle locks) FF M8 Locking nuts GG Temporary stoppers 3


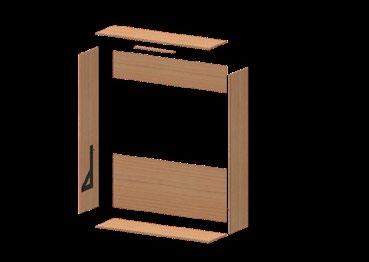
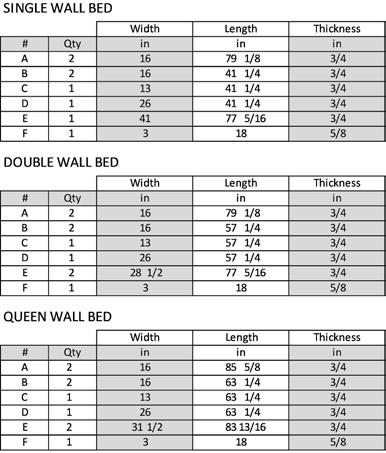

4 Overall Cabinet Dimensions Cabinet Parts Dimension Guide F B C B C A A= Exterior B-C-D-E = Inset D B A A D B A Single Double Queen E E E E E 4 * Suggested dimensions
5 DRILLING GUIDE The holes should be 3/8 in diameter and 1/2 deep for threaded inserts. Back " " " " " " " " Front " " " Bottom All measurements are for 3/4 thick board. *See full sized template in product box. 5


6 1 INSTALLING THE MOUNTING BRACKETS Front Right side I U T x16 x16 S2 Front Wood Left side I Bottom U + T 2 ASSEMBLING THE CABINET 6 * See guide on page 4 for suggested cabinet dimensions.


7 3 SECURING TO THE WALL X= Y= CC= K= x8 * Needs to be secured into at least two wood or metal studs. Y X *Nylon wall anchors are NOT recommended * Professional installation recommended. 4 ASSEMBLING THE FRAME S 4.1 Attach B and C to A for both the right and left sides of the frame. A B FF= x12 BB= A= B= C= x12 C *Ensure that all of the tabs are pointing towards each other. These tabs should be flat on the ground. B 7


8 4.2 Attach E and F to D. F E FF= BB= D= x1 D The tabs on E must face the inside of the frame. E= F= All tabs should be facing the floor. E F 4.3 Insert E into the assemblies from step 4.1. FF= BB= x6 x6 8


.")
9 4.4 Bolt F to the two frame halves from step 4.1. FF= BB= x12 x12 5 INSTALLING THE SLATS P x36 O Q O x36 O P Q x18 Place P on one end of each slat. Attach two slats together with Q. Insert P and Q into their designated holes along the frame. Insert all of the slats except for 4 for the single and double, and 6 for the queen (please see next page to see which slats to skip). *If necessary, use a rubber mallet to secure the slats into the frame. 9


10 Example below works for both single and double. Please do not insert slats in row 11 for the queen Start from this side. Pivot point For each bed size, do not insert slats in row #8, or the slats in the last row. For the queen size, please do not insert slats in row #11 as well. #8 Pivot point Last 6 ATTACHING THE PISTONS TO THE FRAME FF= G= FF Secure the longer metal ends of the pistons to the frame. This end 10


11 7 INSTALLING THE FRAME ONTO THE MOUNTING BRACKETS Place the bearing into the saddle on the mounting bracket. Secure the bearing in place with: Z J EE 11


12 8 INSTALLING THE PISTONS TO THE CABINET Tilt the frame inside past the edge of the cabinet to install the pistons on the mounting brackets. FF 9 INSTALLING THE STOPPER Stopper Install the temporary stoppers GG onto the top corners of the bed cabinet. GG Install the permanent stopper on the inside top of the cabinet where it will allow for the door to close flush to the front of the cabinet. 12


13 M 10 INSTALLING THE LEGS FF DD 10.1 Secure the legs to the bed frame. Do not overtighten. AA M N 10.2 Install tube to both legs. AA AA S1 11 INSTALLING THE DOOR BRACKETS 6 6 The door brackets must point downward. Install the door brackets in alignment with the support bars on the bed frame. Top 10 3/8 10 3/8 * Install the handle on the other side of the door during this step. Decorative handle not included. Handle should be mounted at a height to comfortably allow the user to pull the bed down (approximately 1/3 of the way down from the top of the door). 27 5/ /4 Measurements (right) are for the placement of this hole on the backside of the doors. 27 5/ /4 W x12 x 24 L x 6 x12 Bottom 13


14 12 INSTALLING THE DOORS 12.1 Hook the door brackets onto the frame and push down until they are firmly in place. Center the doors on the frame. W V For this step x Attach the doors to the frame while putting weight on the frame to keep the bed open. We recommend to have someone else sit on the frame during this step. W x 20 x 28 * The bed will not stay open on its own without the weight of a mattress. V x 26 x 26 14


15 13 INSTALLING THE REMAINING SLATS P O Q x6 x6 x3 O Q O P Insert P and Q into their designated holes along the frame. Insert all of the remaining slats. 14 INSTALLING THE MATTRESS SUPPORTS Insert the mattress supports into the designated holes on the bed frame. H H x 1 x 2 15


16 USING THE WALL BED The wall bed is assembled and shown in lowered position.. Pivot the leg towards the inside of the unit. Make sure that the leg is fully retracted. Pull up gently to close. The leg serves as a mattress retaining system. The pistons insure that the door closes properly and remains closed. * The bed will not stay open on its own without the weight of a mattress. Bed Size Mattress Size *Mattress not included Thickness Load Rating Dynamic Static Single 39 x kg (300 lbs) Double 54 x kg (340 lbs) 454 kg (1000 lbs) Queen 60 x kg (400 lbs) 16 RCKLR100KD-R2
VERTICAL WALL BED INSTRUCTIONS - FULL & QUEEN
 VERTICAL WALL BED INSTRUCTIONS - FULL & QUEEN Hardware F Q A Flat Bars B Pistons (non locking) Full: 90kg, Queen: 110kg C Mattress Supports D Mounting Plates (left and right) E Saddle locking plates F
2 ADULTS REQUIRED FOR ASSEMBLING
 2 ADULTS REQUIRED FOR ASSEMBLING If you have any questions regarding assembly or if you are missing parts, do not return this item to Retailer Store Please call our customer service number and have your
Installation Instructions
 Installation Instructions Outdoor Installation Kit Models AD250 & AW250 Part No. 24097 Qualifications for installation of the kit: You must be able to read and understand all instructions provided with
Flat-Screen TV Ceiling Mount - For 32in to 70in LCD, LED or Plasma TVs
 Flat-Screen TV Ceiling Mount - For 32in to 70in LCD, LED or Plasma TVs Product ID: FLATPNLCEIL Save space and mount your flat-screen television in the ideal viewing location, by suspending it from the
High Ceiling TV Mount - 8.2' to 9.8' Long Pole - For 32" to 75" TVs - Full Motion
 High Ceiling TV Mount - 8.2' to 9.8' Long Pole - For 32" to 75" TVs - Full Motion Product ID: FPCEILPTBLP Now, you can suspend your flat-screen television in an area with a high ceiling, for optimal viewing.
MNEFDD54 & MNBCDD54 GALVANIZED WALL FANS Installation, Operation, and Maintenance Instructions
 FARM PRODUCTS DIVISION MEMBER OF AMCA AMERICAN COOLAIR CORPORATION P.O. BOX 2300 JACKSONVILLE, FLORIDA 32203 PHONE (904) 389-3646 FAX (904) 387-3449 E-MAIL - fans@coolair.com MNEFDD54 & MNBCDD54 GALVANIZED
Integrated Refrigeration
 INSTALLATION GUIDE Integrated Refrigeration Contents Integrated Refrigeration....................... 3 Model Specifications.......................... 4 Site Preparation.............................. 6
Installation Instructions
 Dear customer! Thank you for choosing this quality product from ASKO. We hope it will meet your expectations and fulfil your needs for many years to come. Scandinavian design combines clean lines, everyday
Installation and Care Instructions
 Installation and Care Instructions 2" Horizontal Aluminum Blinds MagnaView Tilt Feature CONTENTS Getting Started................................................ 1 Mount the Installation s....................................
STONE TROUGH CONSOLE SINK
 STONE TROUGH CONSOLE SINK INSTRUCTIONS CONTENTS Console Installation Sink Support 2 2 Backsplash 2 Undermount Sink Semi-Recessed Sink 3 4 Vessel Sink 5 Drain Installation 6 1 CONSOLE SINK Read entire Console
Flat-Screen TV Ceiling Mount - Short Pole - Full Motion
 Flat-Screen TV Ceiling Mount - Short Pole - Full Motion Product ID: FPCEILPTBSP Save space and create the ultimate viewing environment for your flat-screen television, by suspending it from the ceiling.
Installation and Care Instructions
 Installation and Care Instructions 2" Horizontal Aluminum Blinds MagnaView Tilt Feature Thank you for your purchase. Your new blinds have been custom built for you from the highest quality materials. Properly
harborbreezeoutlet.com
 Harbor Breeze is a registered trademark of LF, LLC. All Rights Reserved. ATTACH YOUR RECEIPT HERE Serial Number Purchase Date ITEM #0373684 BUILDER S SERIES CEILING FAN MODEL #40016 Español p. 18 Questions,
Wall Bed Assembly Instructions
 Wall Bed Assembly Instructions Pardo European Adjustable Fold Away Bed Systems For Casework The SM Series Bed Mechanisms Vertical Descending Horizontal Descending Concealed Hardware Exposed Hardware End
Wall Bed Assembly Instructions
 Wall Bed Assembly Instructions Pardo European Adjustable Fold Away Bed Systems For Casework The SM Series Bed Mechanisms Vertical Descending Horizontal Descending Concealed Hardware Exposed Hardware End
Graber Lake Forest Faux Wood and Premium Faux Wood Blind
 2 3 5 6 8 7 1 2" (5.1cm) Blind shown 1. Blind (cord tilt shown) 2. Mounting Brackets 3. Center support bracket (if required). Mounting screws (2 per bracket) 5. Projection brackets (optional, one per mounting
INSTALLATION INSTRUCTIONS
 INSTALLATION INSTRUCTIONS BUILT-IN BOTTOM MOUNT REFRIGERATOR/FREEZER Retain for Future Reference VIKING RANGE CORPORATION 111 Front Street Greenwood, Mississippi 38930 USA (662) 455-1200 IMPORTANT - PLEASE
Product Name: Villa Park 3pc Bistro Set - Golden Wheat
 Please refer to part numbers when reordering For questions or comments about product: Email: sears@sunjoygroup.com or Call toll-free: 1-866-578-6569 Made in / Hecho en CHINA Distributed by Sears, Roebuck
CEILING FAN OWNER'S MANUAL
 CEILING FAN OWNER'S MANUAL READ AND SAVE THESE INSTRUCTIONS MODELS: 52-ECM-5RV-13 52-ECM-5RV- 52-ECM-5RV-SN FAN RATING AC 120V. 60Hz CUL LISTED MODEL : AC-552 1. TOOLS AND MATERIALS REQUIRED Philips screwdriver
Aluminum Horizontal Blinds BOX BRACKET INSTALLATION
 Aluminum Horizontal Blinds BOX BRACKET INSTALLATION MOUNT THE INSTALLATION BRACKETS Mounting Options The installation brackets may be inside mounted, outside mounted or ceiling mounted. In all cases, level
Installation and Care Instructions
 Installation and Care Instructions THANK YOU for purchasing a Hunter Douglas product. Your new blind has been custom built for you from the highest quality materials. Once in your window, it will provide
PRO 48 INSTALLATION INSTRUCTIONS
 PRO 48 INSTALLATION INSTRUCTIONS CONTENTS PRO 48 Installation Recommendations 3 PRO 48 Overall Dimensions 4 PRO 48 Installation Specifications 5 PRO 48 Installation Instructions 6 PRO 48 Installation Checklist
Step 1: Identify the parts of your shade (parts shown are not to scale)
") Motor Operated Solar Shade with Valance Installation and Care Instructions Read carefully and retain for future use. Installation video is available online. Tools required: Philips head screwdriver (not
Motor Operated Solar Shade with Valance Installation and Care Instructions Read carefully and retain for future use. Installation video is available online. Tools required: Philips head screwdriver (not
Installation Instructions
 Aluminum Blinds Installation Instructions Echelon, Traditions & Integra Aluminum Blinds 2 Metro Aluminum Blinds *Click on any page to return to the Table of Contents* Echelon, Traditions & Integra Aluminum
Installation Instructions
 Installation Instructions For Fully Integrated NoFrost Combined Refrigerator-Freezers HCB 1560/1561 7084 429-00 Important Please read and follow these instructions These instructions contain Danger, Warning
CEILING FAN OWNER'S MANUAL
 CEILING FAN OWNER'S MANUAL READ AND SAVE THESE INSTRUCTIONS MODEL: 52-854-5RV-234 52-854-5RV-CH 52-854-5RV- FAN RATING AC 120V. 60Hz CUL LISTED MODEL : AG-962MC 1. TOOLS AND MATERIALS REQUIRED Philips
High-Density Industrial
 Installation Instructions 1 High-Density Industrial Drawers in Shelving BORROUGHS CORPORATION 3002 N. BURDICK STREET * KALAMAZOO, MI 49004-3483 800-748-0227 * FAX: 269-342-4161 Industrial Drawer Installation
Installation Instructions
 Installation Instructions Over the Range Microwave Oven PVM88 Questions? Call -800-56-44 or Visit our Website at: GEAppliances.ca BEFORE YOU BEGIN Read these instructions completely and carefully. IMPORTANT
Please read the following installation instructions first after purchasing this product or transporting it to another location.
 9 Installation Overview Please read the following installation instructions first after purchasing this product or transporting it to another location. 1 Unpacking your refrigerator 2 Choosing the proper
Installation Instructions
 Installation Instructions Above the Cooktop Microwave Oven JVM60 and JVM65 Questions? Call -800-56- or Visit our Website at: GEAppliances.ca BEFORE YOU BEGIN Read these instructions completely and carefully.
HENNESSY / HARTLAND / CORBETT. 24 inch STAINLESS STEEL LAUNDRY CABINET MODEL # AXCLDYSS-24 1/23
 HENNESSY / HARTLAND / CORBETT 24 inch STAINLESS STEEL LAUNDRY CABINET MODEL # AXCLDYSS-24 1/23 FOR REPLACEMENT PARTS OR HELP WITH ASSEMBLY PLEASE CONTACT US AT: simpli-home.com/customer-support PLEASE
Installation Guide. Install your new sink with step-by-step instructions.
 Installation Guide Install your new sink with step-by-step instructions. Installation Guide Bath Sinks Drop-In Undermount Dual Flex Vessel Drains Bathtubs Freestanding Overflow and Waste Kit Rough-In Kit
INSTALLATION INSTRUCTIONS
 INSTALLATION INSTRUCTIONS BUILT-IN BOTTOM MOUNT REFRIGERATOR/FREEZER DBRTGK72SS-GRILLE KIT (FOR designer SERIES ONLY) VIKING RANGE CORPORATION 111 Front Street Greenwood, Mississippi (MS) 38930 USA (662)
Oahu Showerspa Model #1035 Owner's Manual
 O A H U Oahu Showerspa Model #1035 Owner's Manual Oahu ShowerSpa Model #1034 Please Read The Following Instructions COMPLETELY Before Beginning! Our goal is to ensure your installation goes smoothly and
Installation Instructions
 Installation Instructions For Fully Integrated NoFrost Combined Refrigerator-Freezers HC 2062 HCB 2062 HC/HCB 20 7082 373-00 Important PLEASE READ AND FOLLOW THESE INSTRUCTIONS These instructions contain
CBT 50LA-1 & CBT 100LA-1
 CBT 50LA-1 & CBT 100LA-1 Bracket Installation Guide Rev B For Swivel (Pan) / Tilt Wall Bracket Included: SPEAKER BRACKET SWIVEL-TILT WALL BRACKET M6-34L M6-15L SS Flat washers M6 nuts SS Lock washers switch
Installation. Built-in Full Height Wine Cellar VCWB301
 Installation Built-in Full Height Wine Cellar VCWB301 Table of Contents Warnings & Important Information _ 3 Dimensions _ 5 Specifications _ 6 Cutout Dimensions 7 Cabinet Information _ 8 Cabinet Information
Closomat Lima Vita installation & user guide
 Closomat Lima Vita installation & user guide design manufacture supply install service recycle Technical data The Closomat toilet MUST be installed by a competent or qualified person. Explanation of symbols
Installation Instructions
 Instructions For Fully Integrated NoFrost Combined Refrigerator-Freezers HC 1540/1541 7084 433-00 Important Please read and follow these instructions These instructions contain Danger, Warning and Caution
MAYFIELD CEILING FAN LISTED E ITEM # MODEL #BTH44ABZC5C BTH44BNK5C Español p. 20 ATTACH YOUR RECEIPT HERE.
 Harbor Breeze is a registered trademark of LF, LLC. All Rights Reserved. ITEM #0331094 0331096 MAYFIELD CEILING FAN MODEL #BTH44ABZC5C BTH44BNK5C Español p. 20 ATTACH YOUR RECEIPT HERE Serial Number Purchase
INSTALLATION INSTRUCTIONS
 INSTALLATION INSTRUCTIONS BUILT-IN BOTTOM MOUNT REFRIGERATOR/FREEZER BRTGK72SS-GRILLE KIT (FOR PROFESSIONAL SERIES ONLY) VIKING RANGE CORPORATION 111 Front Street Greenwood, Mississippi (MS) 38930 USA
Lavatory Faucet INSTALLATION INSTRUCTIONS P24490-CR, P24490-LV, P24491-CR, P24491-LV, P24492-CR, P24492-LV, P24700, P24705, P24706, P24736, P24800
 P24490-CR, P24490-LV, P24491-CR, P24491-LV, P24492-CR, P24492-LV, P24700, P24705, P24706, P24736, P24800 2018 1 of 7 KALLISTA THANK YOU FOR CHOOSING KALLISTA We appreciate your commitment to KALLISTA quality
Instructions CH Chrome SS Stainless Steel Certifications. Single Handle, Pull-Down, Kitchen Faucet. Tools Required.
 Instructions *Image may vary slightly from actual product Tools Required Adjustable Wrench Groove Joint Pliers Pipe Wrench Phillips Screwdriver Pipe Tape or pipe thread compound Safety Tips If you solder
Important Instructions
 Important Instructions Subject: Installing Elevated Base Pedestal on Frontload Washers and Dryers Use With: PDR08W, PDR08B, PDR08U, PDR08G, PDR08D, PDC06B, PDC08B, PDC0B, PDCB Elevated Base Pedestals This
Viking Installation Guide
 Viking Installation Guide Viking Range, LLC 111 Front Street Greenwood, Mississippi 38930 USA (662) 455-1200 For product information, call 1-888-(845-4641) or visit the Viking Web site at vikingrange.com
S - SERIES IN-WALL SERIES INSTALLATION MANUAL
 S - SERIES IN-WALL SERIES INSTALLATION MANUAL VERSION 2.2 [Skriv tekst] S-15 AND S210... 4 IN-WALL SERIES, S-15IW AND S-16IW... 13 S-15IW AND S-16IW WITH GRILLS... 38 IN-CEILING S-16IW... 64 2 INTRODUCTION
Factory-direct TV Lift Cabinets. Installing your TV on the Residential Lift
 TV LiftCabinet.com Factory-direct TV Lift Cabinets Installing your TV on the Residential Lift Thank you for choosing TVLiftCabinet.com. This lift is designed to support TV s with a maximum weight of 80
Carbon Rack Enclosure
 USER S MANUAL Carbon Rack Enclosure CRxU Series SAVE THESE INSTRUCTIONS Please read this manual and follow the instructions for installation and use. Copyright 07 Cyber Power Systems, Inc. All rights reserved.
INSTALLATION INSTRUCTIONS. Aluminum Blinds - Standard - - Lift & Lock -
 1 INSTALLATION INSTRUCTIONS Aluminum Blinds - Standard - - Lift & Lock - 1 Deluxe 1 Traditional 1 Value & 1 Basic 2 Macro Thank you for your purchase. This blind has been custom built for you from the
PX Dual Sliding Doors, Installation Guide
 s, 01 102.25 Bumper location inside header Header & Valance Legs (C-Channels, Width 3 ) Door Handles Bumper location inside header Floor Brackets 54" Installation Instructions: Step #1 Attach legs to valance
EW25 EW30 EW35 USER & INSTALLATION MANUAL. Model. Model. Model
 ON-WALL SPEAKERS Model EW25 Model EW30 Model EW35 USER & INSTALLATION MANUAL Introduction Congratulations on your purchase of an EMP Tek EW25, 30 or 35 on-wall Speaker! Your speaker is the result of many
CEILING FAN OWNER S MANUAL
 Style that revolves around you. CEILING FAN OWNER S MANUAL Total fan weight *53 lbs. WEXFORD 11/05 WARNING: Read and follow these instructions carefully and be mindful of all warnings shown throughout.
PAVIA INSTALLATION GUIDE
 FSP800 PAVIA INSTALLATION GUIDE Parts List Please unpack and inspect all packages and components carefully, make sure they are complete. Examine for shipping damage. If some parts are damaged or missing,
INSTALLATION INSTRUCTIONS
 INSTALLATION INSTRUCTIONS BUILT-IN FULL HEIGHT WINE CELLAR Retain for Future Reference VIKING RANGE CORPORATION 111 Front Street Greenwood, Mississippi 38930 USA (662) 455-1200 IMPORTANT - PLEASE READ
Installation Instructions
 Installation Instructions Over the Range Microwave Oven BEFORE YOU BEGIN (Read these instructions completely and carefully.) IMPORTANT IMPORTANT Save these instructions for local inspector s use. Observe
Models , Equinox, and Sirens Clutch Replacement Service Manual
 Models 2001-130, Equinox, and 508-128 Sirens Clutch Replacement Service Manual 25500297 Rev. A0 1115 Printed in U.S.A. Copyright 2015 Federal Signal Corporation Contents Safety Messages... 3 General Description...
52 Lacey LED. Instruction Manual. 6 Speed DC Wall Control System
 6 Speed DC Wall Control System 52 Lacey LED HIGH EFFICIENCY DC MOTOR Kichler Lighting 7711 East Pleasant Valley Road P.O. Box 318010 Cleveland, Ohio 44131-8010 Customer Service 866.558.5706 8:30 AM to
Instructions. 110-KVD-CYSCH-AD-Z Chrome 110-KVD-CYSSS-AD-Z Stainless Steel Certifications. Single Handle, Pull-Down, Kitchen Faucet
 Instructions *Image may vary slightly from actual product Tools Required Adjustable Wrench Groove Joint Pliers Pipe Wrench Phillips Screwdriver Pipe Tape or pipe thread compound Safety Tips If you solder
Pole Mounting System Installation & Certification Manual
 Pole Mounting System Installation & Certification Manual IronRidge Pole Mount Installation Guide... 2 IronRidge Certification Letter... 17 IronRidge Wet Stamped Drawing... 18 IronRidge Foundation Addendum...
Undercounter Refrigeration
 INSTALLATION GUIDE Undercounter Refrigeration Contents Undercounter Refrigeration..................... 3 Undercounter Specifications.................... 4 Site Preparation..............................
Installation. Leveling
 Your refrigerator was packed carefully for shipment. Remove and discard shelf packaging and tape. Do not remove the serial plate. Location Do not install refrigerator near oven, radiator or other heat
Wood. Blind owner's handbook
 Wood owner's handbook 2 WARNING Cords and bead chains can loop around a child s neck and strangle. Always keep cords and bead chains out of children s reach. Move furniture away from cords and bead chains.
Parts for Avery Dennison ST9000 TM Plastic Staple Attacher Old Style
 Attacher Old Style A DT0002-001 Assembly, frame 1 16010 B DT0007-001 Needle guard 1 C DT0029-001 Button screw M4 x 8mm 4 D 028040-242 Lock washer M4 4 E 026040-136 Washer M4 4 F DT0008-001 Assembly, reactor
HE120, HE160 Humidifier Installation Kit
 HE120, HE160 Humidifier Installation Kit INSTALLATION INSTRUCTIONS WELCOME To the comfortable world of humidified air. When you use your Honeywell humidifier, you notice that your skin is not as dry, and
C-IV 60 CEILING FAN READ AND SAVE THESE INSTRUCTIONS. FAN RATING AC 120V. 60Hz
 C-IV 60 CEILING FAN READ AND SAVE THESE INSTRUCTIONS FAN RATING AC 120V. 60Hz Please do not use any electric or battery powered tools in the assembly and installation of this or any Matthews Fan Company
Technical data. Bathroom/shower room installations. Water services (WRAS approved)
") Technical data The Closomat toilet MUST be installed by a competent or qualified person. Explanation of symbols Safety instructions in this manual are identified by symbols. The safety instructions are
Technical data The Closomat toilet MUST be installed by a competent or qualified person. Explanation of symbols Safety instructions in this manual are identified by symbols. The safety instructions are
Ebb & Flow System
 113501 Ebb & Flow System Actual system may differ from what is shown. System requires a timer to control the main pump and to set watering cycles. Additional purchase required. 2016 FarmTek All Rights
BRONZE HSC PATIO HEATER. Call center for missing parts IMPORTANT DO NOT RETURN MODEL NO.: PG195H
 BRONZE HSC PATIO HEATER MODEL NO.: PG195H DANGER: If you smell gas: 1. Shut off gas to the appliance. 2. Extinguish any open flame. 3. If odor continues, keep away from the appliance and immediately call
Basin Set INSTALLATION INSTRUCTIONS
 P24130-CR, P24130-LV, P24131-CR, P24131-LV, P24400-CR, P24400-LV, P24401-CR, P24401-LV, P24402-CR, P24402-LV, P24500-LV, P24500-TT 1 of 5 INSTALLATION INSTRUCTIONS Thank You For Choosing Kallista We appreciate
Instructions. Certifications CH Chrome SS Stainless Steel. Single Handle, Industrial Style, Pull-Down Kitchen Faucet.
 Instructions *Image may vary slightly from actual product Tools Required Adjustable Wrench Groove Joint Pliers Pipe Wrench Phillips Screwdriver Pipe Tape or pipe thread compound Safety Tips If you solder
Installation and Care Instructions. Wood Blinds and Alternative Wood Blinds. LiteRise Touch System. Getting Started
 Installation and Care Instructions Wood Blinds and THANK YOU for purchasing a Hunter Douglas product. Your new blind has been custom built for you from the highest quality materials. Once in your window,
Installation Instructions
 Installation Instructions For Fully Integrated NoFrost Combined Refrigerator-Freezers HC 2060/2061 7082 485-00 Important PLEASE READ AND FOLLOW THESE INSTRUCTIONS These instructions contain Warning and
Installation Instructions
 Installation Instructions Built-In Dishwasher If you have questions, call 800-GECARES or visit our website at: www.geappliances.com BEFORE YOU BEGIN Read these instructions completely and carefully. IMPORTANT
Handshower, Hose & Handshower Accessories
 P24443, P24445, P24446, P24452, P24453, P24456 1 of 6 INSTALLATION INSTRUCTIONS Thank You For Choosing KALLISTA We appreciate your commitment to KALLISTA quality products. Please take a moment to review
MAG Rowing Machine. Art No. GK713. Owner s Manual
 MAG Rowing Machine Art No. GK713 Owner s Manual Safety Instructions To ensure the best safety of the exerciser, regularly check it on damages and worn parts. If you pass on this exerciser to another person
1. SAFETY RULES. 8. Avoid placing objects in the path of the blades.
 1 1. SAFETY RULES 1. To reduce the risk of electric shock, insure electricity has been turned off at the circuit breaker or fuse box before beginning. 2. All wiring must be in accordance with the National
CEILING FAN OWNER'S MANUAL
 Style that revolves around you. CEILING FAN OWNER'S MANUAL CIARA 12/14 WARNING: Read and follow these instructions carefully and be mindful of all warnings shown throughout. GENERAL INSTALLATION & OPERATION
TILGHMAN CEILING FAN ITEM # MODEL #WCK44NWZ5L1. español p. 21 ATTACH YOUR RECEIPT HERE. Serial Number. Purchase Date
 ITEM #0889808 TILGHMAN CEILING FAN MOEL #WCK44NWZ5L1 español p. 21 ATTACH YOUR RECEIPT HERE 4009218 APPROVE FOR USE IN AMP LOCATIONS Serial Number Purchase ate Questions, problems, missing parts? Before
OWNER S MANUAL. Replacement Canopy for Grandview Gazebo. Product code: D71 M12209 UPC code: Vendor Item: C-I-138-2NGZ
 OWNER S MANUAL Replacement Canopy for Grandview Gazebo Product code: D71 M12209 UPC code: 769455 761194 Vendor Item: C-I-138-2NGZ Date of purchase: / / 1 PARTS Read through all the instructions before
MOJAVE. Mojave ShowerSpa Model #1016 Owner's Manual
 MOJAVE Mojave ShowerSpa Model #1016 Owner's Manual Mojave ShowerSpa Model #1016 Please Read The Following Instructions COMPLETELY Before Beginning! Our goal is to ensure your installation goes smoothly
Revision 2. October Owner s Manual. Serial Number Here. Date of Purchase
 Revision 2 October 2013 Owner s Manual Serial Number Here Date of Purchase www.batcafitness.com 1207 New Hope Road, Raleigh, NC - 919.255.1233 Omega 2 Owner s Manual - www.batcafitness.com Instructions
Revision 3. April Owner s Manual. Serial Number Here. Date of Purchase
 Revision 3 April 2012 Owner s Manual Serial Number Here Date of Purchase www.batcafitness.com 1207 New Hope Road, Raleigh, NC - 919.255.1233 Omega 4 Owner s Manual - www.batcafitness.com Instructions Congratulations
Installation Instructions
 Installation Instructions For Fully Integrated NoFrost Combined Refrigerator-Freezers HC 2060/2061 HCB 2060/2061 7084 349-00 Important Please Read and Follow these Instructions These instructions contain
Bed Frames Roll Slats Trundles
 Bed Frames Roll Slats Trundles Twin/Full Bolt-On Bed Frame B100-21 Sturdy metal bed frame supports a twin or full mattress and foundation/box spring. Designed to bolt onto the headboard. Mattress and foundation/box
Speaker Wall Mount (MSP-DCCSPM)
") INSTALLATION INSTRUCTIONS Speaker Wall Mount () The speaker wall mount is a convenient mounting solution for speakers that are compatible with flat panel displays. The speaker wall bracket is equipped
INSTALLATION INSTRUCTIONS Speaker Wall Mount () The speaker wall mount is a convenient mounting solution for speakers that are compatible with flat panel displays. The speaker wall bracket is equipped
Bed Frames Roll Slats Trundles
 Bed Frames Roll Slats Trundles Twin/Full Bed Frame B100-11 Sturdy metal bed frame supports a twin or full mattress and foundation/box spring. Designed to bolt onto the headboard. Mattress and foundation/box
USSC LLC 4 ONE LLC FIELD MODIFICATION INSTRUCTIONS
 and Retrofit of G2E Quick Release Cushion Upholstery 1 OF 32 A 1.0 PURPOSE: To replace both Back and Cushion Upholstery on the G2E seats. 2.0 Tools Required: 2.1 1/2 Socket and Wrench 2.2 5/8 Socket 2.3
INSTALLATION INSTRUCTIONS
 INSTALLATION INSTRUCTIONS MODEL: BISTRO THERMO SHOWER KIT (RH-5344) 1 Restoration Hardware Thermo Shower Kit Specification Diagram 2 All Threaded Connections are 3/4 NPT Dimensions are in Inches and Approximation
BAYOU CREEK CEILING FAN
 ITEM #0649729 BAYOU CREEK CEILING FAN Harbor Breeze is a registered trademark of LF, LLC. All Rights Reserved. MODEL #E-CAF56OSB5CRC Español p. 23 ATTACH YOUR RECEIPT HERE Serial Number Purchase Date 4009654
Ultimate Flip Lever Astragal Cut Down Instructions
 Ultimate Flip Lever Astragal Cut Down Instructions 8817 West Market Street Colfax, NC 27235 800.334.2006 www.enduraproducts.com Tools Required: Pencil/Marker Tape Measure Chop Saw Flathead Screwdriver
ASSEMBLY and INSTALLATION INSTRUCTIONS. Pipe wrench Ratchet 3/8 socket 9/16 socket 11/16 socket 3/16 Allen key 3/32 Allen key 9/64 Allen key
 ASSEMBLY and INSTALLATION INSTRUCTIONS Gas Conversion Kit Tube Heaters View these instructions online at www.lbwhite.com Kit Contents: DESCRIPTION QTY. Instructions 1 Burner orifi ce 1 Manifold pipe 1
5CO52XX Series Fan UL Model No. : 5CO52. Owner s Guide and Installation Manual. Attach sales receipt to this card and retain as your proof of purchase
 Owner s Guide and Installation Manual 5CO52XX Series Fan UL Model No. : 5CO52 Attach sales receipt to this card and retain as your proof of purchase DATE OF PURCHASE: RETAILER NAME: MODEL NUMBER: RETAILER
5YK60XXX Series Fan. Owner s Guide and Installation Manual. CUL Model NO. : 5YK60XXX
 Owner s Guide and Installation Manual 5YK60XXX Series Fan CUL Model NO. : 5YK60XXX Attach sales receipt to this card and retain as your proof of purchase DATE OF PURCHASE: MODEL NUMBER: RETAILER NAME:
DAGNY LK. Ceiling Mounted Rotational Fan READ AND SAVE THESE INSTRUCTIONS. FAN RATING AC 110V~60Hz
 DAGNY LK Ceiling Mounted Rotational Fan READ AND SAVE THESE INSTRUCTIONS FAN RATING AC 110V~60Hz Please do not use any electric or battery powered tools in the assembly and installation of this or any
Single-Control Lavatory Faucet
 P22740 P23201 P24407 1 of 5 Thank You For Choosing KALLISTA We appreciate your commitment to KALLISTA quality products. Please take a moment to review this manual before you install your KALLISTA product.
DUAL FUNCTION MAGNETIC ROWING MACHINE
 DUAL FUNCTION MAGNETIC ROWING MACHINE SF-RW5622 USER MANUAL IMPORTANT! Please retain owner s manual for maintenance and adjustment instructions. Your satisfaction is very important to us, PLEASE DO NOT
Installation Instructions
 Installation Instructions For Fully Integrated NoFrost Combined Refrigerator-Freezers HCB 1560/1561 HC 1550 7084 327-00 Important Please Read and Follow these Instructions These instructions contain Danger,
52 SAN LUCAS CEILING FAN
 52 SAN LUCAS CEILING FAN Owner s Manual Models #20551 If a problem cannot be remedied or you are experiencing difficulty in installation, please contact the Service Department: 1-877-459-3267, 9 a.m.-
Installation Instructions
 Installation Instructions For Fully Integrated NoFrost Combined Refrigerator-Freezers HC 2062 HCB 2062 HC/HCB 2062 7084 445-00 Important Please read and follow these instructions These instructions contain
3SA60 3SA60+LED. Vogue & Vogue Plus. Net weight. This instruction contains 11 pages:
 Vogue & Vogue Plus 3SA60 3SA60+LED This instruction contains 11 pages: Page 1: Foreword Page 2~3: Unpack and inspect parts contained Page 4~5: Notes before installation and Hanging system installation