Installation instructions
|
|
|
- MargaretMargaret Benson
- 5 years ago
- Views:
Transcription


1 Installation instructions Absorption Refrigerator for Recreation Vehicles RM 530 RM 5330 RM 5380 MBA /20 N AUS / NZ Type C40 /
2 Table of Contents 0.0 Unpacking and transport General Introduction Guide to these operating instructions Copyright protection Explanation of symbols used in this manual Warranty Limitation of liability Declaration of conformity Safety instructions Application according to regulations User's responsibility Working upon and checking the refrigerator Operating the refrigerator with gas Description of model Model identification Refrigerator rating plate Technical data Installation instructions Installation Side installation Side installation with floor-roof ventilation Rear installation Draught-proof installation Ventilation and air extraction of the refrigerator Installing the ventilation system Exhaust gas duct and installing the fume flue Installation recess Installation in the recess Recess dimensions Securing the refrigerator Inserting of the decor panel Gas installation Electrical installation Mains connection Battery connection Terminal strip Wiring diagrams Dometic GmbH In der Steinwiese 6 D Siegen Dometic GmbH Subject to change without notice 2


!")
3 WARNING! DO NOT USE A FLAME TO CHECK FOR GAS LEAKS WARNING! Most LP gas appliances used in recreational vehicles are vented to the outside of the vehicle. When parked close to a gasoline pump, it is possible that the gasoline fumes could enter this type of appliance and ignite from the burner flame, CAUSING A FIRE OR AN EXPLOSION. FOR YOUR SAFETY, it is recommended that all LP gas appliances which are vented to the outside should be shut off when refueling. The refrigerator must be shut off during refueling. 0.0 Unpacking and transport Lifting / carrying the refrigerator CAUTION! Never use for lifting or carrying other parts of the refrigerator (i.e. cooling unit, gas pipe, frontpanel)! The refrigerator will be damaged! NOT OK NOT OK OK 3
4 General.0 General. Introduction On installation of the appliance, the technical and administrative regulations of the country in which the vehicle will first be used must be adhered to. Otherwise the refrigerator must be installed as described in these instructions..2 Guide to these installation instructions Before you start installing the refrigerator, please read the installation instructions carefully. These instructions provide you with the necessary guidance for the proper installation of your refrigerator. Observe in particular the safety instructions. Observation of the instructions and handling recommendations is important for dealing with the refrigerator safely and for protecting you from injury and the refrigerator from damage. You must understand what you have read before you carry out a task. Keep these instructions in a safe place so they may be referred to at any time..4 Explanation of symbols used in this manual Warning notices Warning notices are identified by symbols. A supplementary text gives you an explanation of the degree of danger. Observe these warning notices rigorously. You will thus protect yourself and other people from injury, and the appliance from damage. DANGER! DANGER indicates an imminent hazardous situation which, if not avoided, could result in death or serious injury. WARNING! WARNING indicates a potentially hazardous situation which, if not avoided, could result in death or serious injury CAUTION!.3 Copyright protection CAUTION indicates a potentially hazardous situation which, if not avoided, may result in minor or moderate injury. The information, texts and illustrations in these instructions are copyright protected and are subject to industrial property rights. No part of these instructions may be reproduced, copied or utilised in any other way without written authorisation by Dometic GmbH, Siegen. CAUTION! CAUTION (used without the safety alert symbol) indicates a potentially hazardous situation which, if not avoided, may result in damage to the appliance. 4
5 General Information INFORMATION gives you supplementary and useful guidance when dealing with your refrigerator. Environmental Tips ENVIRONMENTAL TIPS gives you useful guidance for saving energy and disposal of the appliance..5 Warranty Warranty arrangements are in accordance with the normal conditions applicable for the country concerned. For warranty or other maintenance, please contact our customer services department. Any damage due to improper use is not covered by the warranty. The warranty does not cover any modifications to the appliance or the use of non-original Dometic parts. The warranty does not apply if the installation and operating instructions are not adhered to and no liability shall be entertained..6 Limitation of liability All information and guidance in these operating instructions were prepared after taking into consideration the applicable standards and regulations as well as the current state of the art. Dometic reserves the right to make changes at any time which are deemed to be in the interest of improving the product and safety. Dometic will assume no liability for damage in the case of : non-observation of the operating instructions application not in accordance with the regulations or provisions use of non-original spare parts modifications and interferences to the appliance effect of environmental influences, such as - temperature fluctuations - humidity.7 Environmental notices Refrigerators manufactured by Dometic GmbH are free of CFC/HCFC and HFC. Ammonia (a natural compound of hydrogen and nitrogen) is used in the cooling unit as a coolant. Non-ozone-hazardous cyclopentane is used as a propellant for manufacturing PU foam insulation. Deviations from these installation instructions without prior notification of Dometic result in Dometic's warranty obligations becoming void! Disposal In order to ensure that the recyclable packaging materials are re-used, they should be sent to the customary local collection system. 5
6 Safety instructions 2.0 Safety instructions 2. Application according to regulations This refrigerator is designed for installation in recreation vehicles such as caravans or motorhomes. The appliance has been typeapproval tested for this application in accordance with the EC Gas Directive. The refrigerator is to be used solely for storing foodstuffs. CAUTION! The refrigerator must not be exposed to rain. DANGER! Never use an unshielded flame to check gas bearing parts and pipes for leakage! There is a danger of fire or explosion. WARNING! Never open the absorber cooling unit! It is under high pressure. There is a danger of injury! 2.2 User's responsibility Anyone operating the refrigerator must be familiar with the safe handling and understand the advice in the operating instructions (part no ). 2.3 Working upon and checking the refrigerator 2.4 Operating the refrigerator with gas It is imperative that the operating pressure corresponds to the data specified on the rating plate of the appliance. Compare the operating pressure of the rating plate with the data specified on the pressure reducing valve of the liquid gas cylinder. WARNING! Work on gas equipment, exhaust system and electrical facilities must be carried out by authorised personnel only. Substantial damage to property and/or injury to persons can arise through unprofessional procedures. 6

7 Description of model 3.0 Description of model 3. Model identification Example : RM Refrigerator rating plate The rating plate is to be found on the inside of the refrigerator. It contains all important details of the refrigerator. You can read off from this the model identification, the product number and the serial number. You will need these details whenever you contact the customer service centre or when ordering spare parts. with battery igniter* 2 3 Model variant Model range 4 5 Refrigerator Mobile / Mobile Absorption Refrigerator * = manual ignition with battery igniter Example Fig Model number Product number Serial number Electrical rating details Gas pressure 7
 freezer")


8 Description of model 3.3 Technical data RM 530 RM 5330 RM 5380 H T B Fig. 2 Fig. 3 Fig. 4 Model Dimensions Gross capacity Rating details Consumption * Net Ignition H x W x D (mm) freezer mains/battery electricity/gas weight Piezo Automat Depth incl. door compartment over 24hrs RM x486x lit. 5 lit. 25 W / 20 W ca.2,5 KWh / 270 g 20 kg RM x486x lit. 5 lit. 25 W / 20 W ca.2,5 KWh / 270 g 22 kg RM x486x lit. 5 lit. 25 W / 20 W ca.2,5 KWh / 270 g 24 kg Subject to technical changes. *Average consumption measured at an average ambient temperature of 25 C in pursuance of ISO Standard. 8
9 Installation 4.0 Installation instructions 4. Installation WARNING! The appliance may be installed by authorised personnel only! The unit and the exhaust duct system must be in principle installed so that it is accessible for maintenance work, can be easily installed and dismantled and removed from the vehicle without great effort. Installation and connection of the appliance must comply with the latest technical regulations, as follows: The electrical installation must comply with national and local regulations. Electrical wiring regulations The gas installation must comply with national and local regulations. 4.. Side installation If the appliance is installed on the same side of the vehicle as the entrance door, it is desirable that the door does not cover the refrigerator's vents. (Fig. 5, Clearance door/ventilation grille at least 25 mm). Otherwise ventilation could be impaired which causes a loss in cooling performance. Awnings are often placed at the door side of a caravan. This complicates evacuation of combustion gases and heat through the ventilation grilles (loss in cooling performance)! (Fig.5) The air vent grilles are blocked. There must be a distance between the door and the air vents of at least 25 mm! If the door/grille distance is between 25 mm and 45 mm, we recommend installing a Dometic ventilation kit to achieve an optimal cooling performance in high ambient temperatures. AS 560- Gas Installations NZ Gas Appliance Safety The appliance must be installed in such a way that it is shielded from excessive heat radiation. Excessive heat impairs performance and raises the energy consumption of the refrigerator! Fig. 5 (Fig. 6) The air vent grilles offer an unobstructed dissipation of heat and exhaust gas even when the door is opened. Deviations from these installation instructions without prior notification of Dometic result in Dometic GmbH's warranty obligations becoming void! Air vent grille notblocked! OK! Fig. 6 9
 (Fig. 8). The maximum cooling performance of the aggregate is actually not available. CAUTION! The maximum cooling performance is not available!")
 at the side wall of the recreation vehicle.")
10 Installation 4..2 Rear installation Rear installation often causes an unfavourable installation arrangement, as ideal ventilation cannot always be assured (e.g. the lower ventilation grille is covered by the bumper or the rear lights of the vehicle!) (Fig. 8). The maximum cooling performance of the aggregate is actually not available. CAUTION! The maximum cooling performance is not available! Do not apply this installation method, as it does not provide proper ventilation! Please refer to the description in section Draught-proof installation Air vent grille blocked! Air vent grille not blocked! OK! Fig. 8 Fig. 9 Another unfavourable method of rear installation is to install the air intake and exhaust grilles (Fig. 0) at the side wall of the recreation vehicle. The air-heat recirculation is very restricted which means that heat exchangers (condenser, absorber) cannot be adequately cooled. The optional method of an additional air vent grille installed in the floor also exhibits an insufficient air flow duct. Refrigerators in motorhomes, caravans or other vehicles must be installed in a draughtproof manner. This means that the combustion air for the burner is not taken from the living space and that exhaust fumes are prevented from entering the living space. Adequate sealing between the back of the refrigerator and the vehicle interior has to be provided. Dometic strongly recommends carrying this out using a flexible seal (in order to simplify later removal and installation of the unit for maintenance purposes. WARNING! By no means use durable sealing compounds, fitting foam or similar material to realise draught-proof installation of the refrigerator! Do NOT use any easily inflammable materials for sealing (in particular silicon sealing compound or similar). Risk of fire! The device manufacturer's product liability and warranty shall lapse if such materials are used. Proposal Fig. 0 The lip seals () are installed at the bottom and on each side in the installation recess (Fig. - 3). A heat deflector plate (2) is installed in the 0
11 Installation installation recess above the refrigerator. Affix the this plate to the caravan wall, do NOT attach to the refrigerator! Attach the deflector plate so that the heated air escapes through the top ventilation grill into the open air and no heat build-up can be produced. Proposal 2 Fasten the sealing lips to a stop bar on the rear side (), e.g. by gluing. 2 Fig. 2 Fig. 4/5 2 The cavity in-between the outer vehicle wall and refrigerator is completely isolated from the vehicle interior. Intrusion of exhaust fumes into the living space is prevented. Fumes will escape through the upper ventilation grille to the outside. Fig. Fig. 3 The refrigerator is later pushed into the installation recess from the front. Ensure that the seals abut the case evenly. This installation option facilitates the removal and installation of the appliance for servicing. Deviations require the consent of the manufacturer!


.")
 to escape directly into the open air.")
. Fig. 6 Position ventilation grilles / RM 530, 5330 RM 530 RM 5330 2 2 2 Ventilation grille LS 00 or LS 200 Ventilation grille LS 200 Fig. 7 Fig.")
12 Installation 4.2 Ventilation and air extraction of the refrigerator Principle of ventilation A correct installation of the refrigerator is essential for its correct operation, as due to physical reasons heat builds up at the back of the appliance which must be allowed to escape into the open air. In the event of high ambient temperatures, full performance of the cooling unit can only be achieved by means of adequate ventilation and extraction. Ventilation is provided for the unit by means of two apertures in the caravan wall. Fresh air enters at the bottom, extracts the heat and exits through the upper vent grille (chimney effect). The upper ventilation grille should be positioned as high as possible above the condenser (,2, Fig.7). Install the lower ventilation grille at floor level of the recess, allowing unburnt gas (heavier than air) to escape directly into the open air. The gas burner must be located above the edge (, Fig. 5). Fig. 6 Position ventilation grilles / RM 530, 5330 RM 530 RM Ventilation grille LS 00 or LS 200 Ventilation grille LS 200 Fig. 7 Fig. 5 An optional ventilation aperture can be introduced introduced by the manufacturer of the vehicle into the recess floor in order to avoid the accumulation of unburnt gas on the floor. Position ventilation grilles / RM 5380 With this arrangement of the ventilation grilles, a ventilation aperture (3) must be introduced by the manufacturer of the vehicle into the recess floor in order to avoid the accumulation of unburnt gas on the floor. 2 3 RM 5380 Fig. 8 2


. Fig. 26 Lower ventilation grille Fig. 20 4.3.")
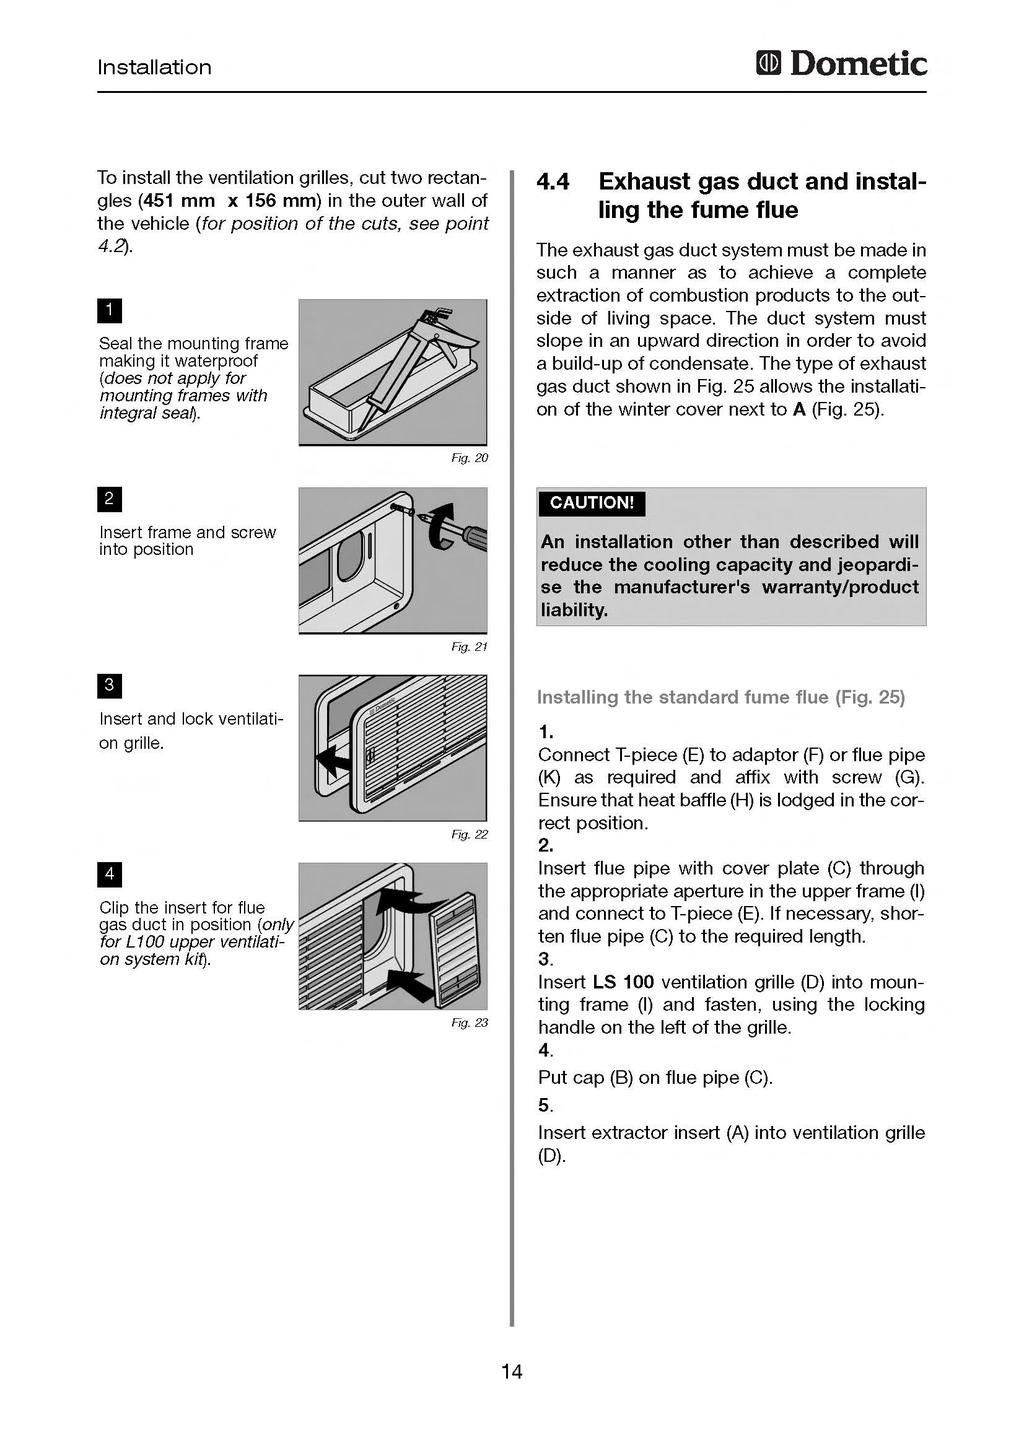
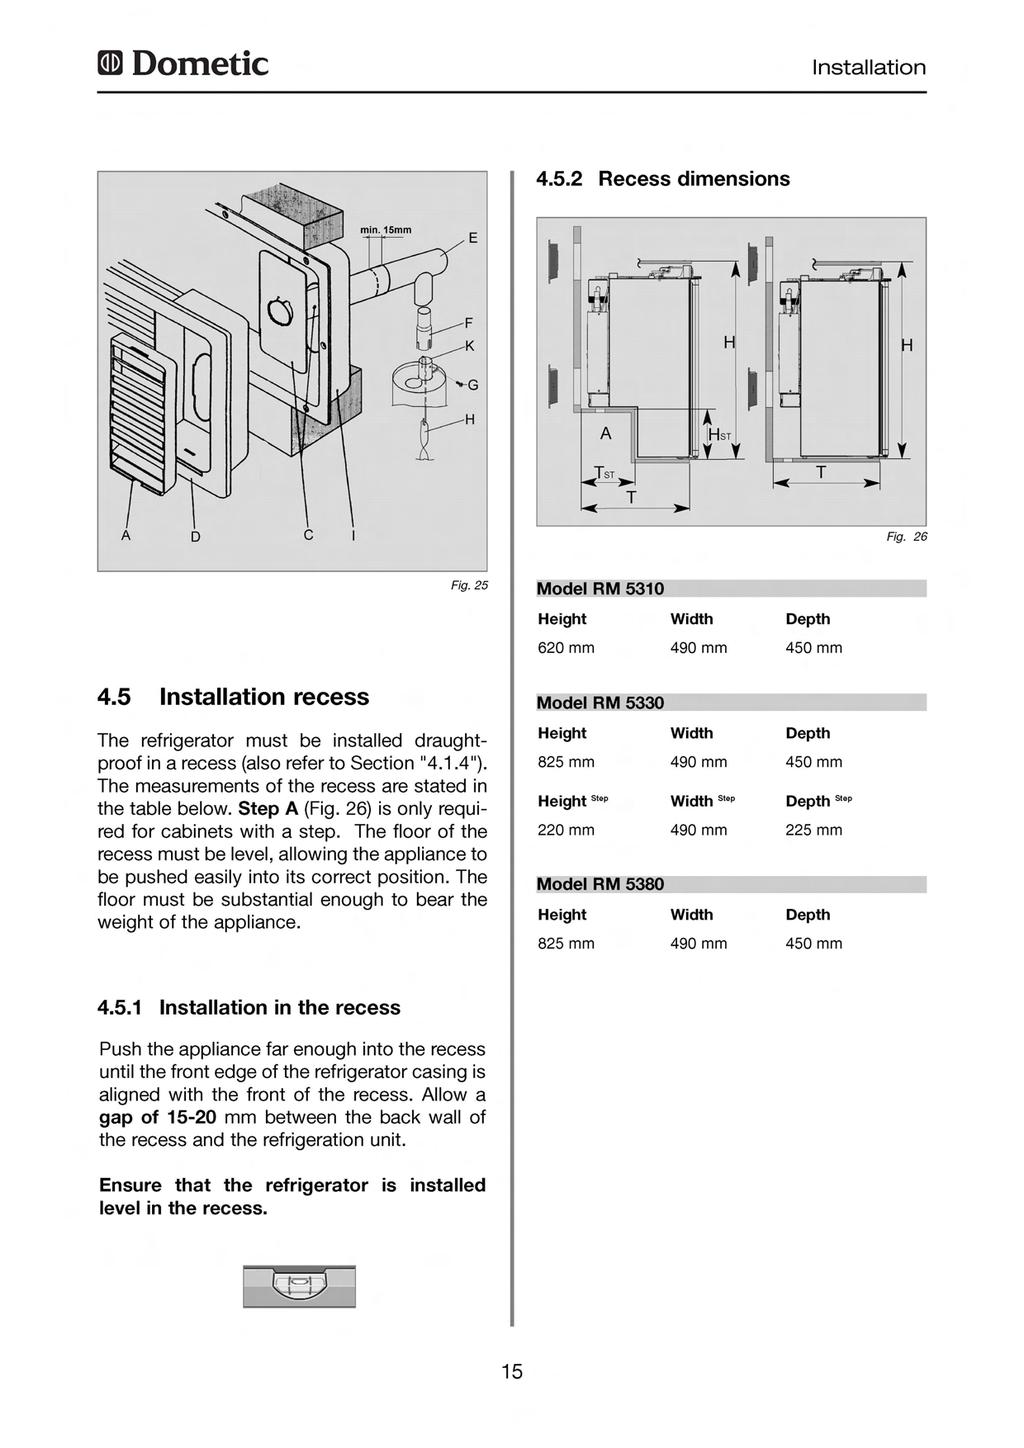
13 Installation 4.3 Installing the ventilation system 4.3. Ventilation systems Dometic recommends the A 625 ventilation and flue gas extraction system which has been tested and approved for this purpose. These ventilation grills provide the required open cross-section of at least 250 cm². LS 00 2 Insert frame and screw into position 3 Insert and lock ventilation grille. Fig. 24 Fig. 25 Top ventilation grille with flue LS 200 Fig. 9 4 Clip the insert for flue gas duct in position (only for L00 upper ventilation system kit). Fig. 26 Lower ventilation grille Fig Installing LS 00/LS 200 To install the ventilation grilles LS 200, cut two rectangles (45mm x 56mm) in the outer wall of the vehicle (for position of the cuts, ssee Fig. 6). LS 00 Seal the mounting frame making it waterproof (does not apply for mounting frames with integral seal). Fig. 23 3
14
15


16 Installation 4.6 Securing the refrigerator 4.7 Inserting the decor panel In the sidewalls of the refrigerator, there are four plastic sleeves for securing the refrigerator. The sidewalls or strips attached for securing the refrigerator must be prepared to hold the screws firmly in place even when under increased load (while the vehicle is moving). Fastening screws and caps are supplied with the refrigerator. Remove the door. 2 Fig. 29 Fig Fig. 3 Fig. 32 Fig. 27 Loosen three screws of the lower trim moulding and remove trim moulding. Fit new panel and slide it upwards as far as possible. Fit the trim moulding back in place. Fit the door on the hinge pin. CAUTION! Always insert screws through the sleeves provided as otherwise components laid in foam, such as cables etc., could be damaged. After the refrigerator is put in its final place, secure the screws into the wall of the recess. The screws must penetrate the casing of the refrigerator. Decor panel dimensions : Model RM 530 Height Width Thickness 532 +/- mm 453 +/- mm max. 3,8 mm Model RM 5330 Height Width Thickness 740 mm 453,5 mm max. 3,8 mm Model RM 5380 Height Width Thickness 740 mm 453,5 mm max. 3,8 mm Fig. 28 6


 (no natural gas, town gas).")
17 Installation 4.8 Gas installation WARNING! correct method of operation. In case the appliance fails to operate correctly after all checks have been carried out, refer to the authorised service provider in your area. The gas connection shall be carried out by specialised personnel* only. * Specialised personnel are accredited experts who are able, by virtue of their training and knowledge, to vouch for the correct installation and implementation of the leakage test. Gas connection Observe the regulations stated in section 2.. This refrigerator is provided for installation within liquid gas equipment and must be run exclusively on liquid gas (propane, butane) (no natural gas, town gas). An AGA Approved LP Regulator must be fitted to the gas supply. The pressure regulator must concur with the operating pressure specified on the rating plate of the appliance. The operating pressure corresponds to the standard pressure of the country of specification. Only one connection pressure is permissible for any one vehicle! A plate showing the permanent, clearly legible notice must be displayed in full view at the point where the gas cylinder is installed. The gas connection to the appliance must be installed securely and free of stress using pipe connectors and must be securely connected to the vehicle (a hose connection is not permissible). The gas connection to the appliance is /8"BSP Female (s. figure 33). The refrigerator must be equipped with a shut-off valve allowing to cut the supply line. Such a shut-off device must be readily accessible to the user. Before Leaving - Check all connections for gas leaks with soap and water. DO NOT use a naked flame for detecting leaks. Ignite the burner to ensure correct operation of gas valve, burner and ignition. When satisfied with the appliance, please instruct the user on the SW SW 4 Testing point Connection to gas supply Pipe to gas burner Gas pressure Refer to data label. Fig. 33 The refrigerator must be equipped with a gas cock in the supply line to allow the supply to be disconnected. Such a cut-out device must be readily accessible to the user. When using LPG gas (tank), please consider that the burner needs cleaning at shorter intervals due to the gas combustion method (2-3 times per year recommended)
18 Installation 4.9 Electrical installation WARNING! The electrical installation shall be carried out by qualified personnel only. * Specialised personnel are accredited experts who are able, by virtue of their training and knowledge, to vouch for the correct installation. The electrical installation must be in accordance with the national regulations of the respective countries. The connection cables must be routed in a way to prevent contact with hot components of the unit/burner or with sharp edges. Changes to the internal electrical installation or the connection of other electrical components (e.g. external fan) to the internal wiring of the appliance will render the e/ CE admittance as well as any claims from warranty and product liability void! 4.9. Mains connection The power should be supplied by a properly grounded socket outlet or a grounded non-detachable connection. Where a socket outlet with mains supply is used, the outlet must be freely accessi ble. Should the connection cable be dama ged, have it replaced by Dometic Customer Services or by qualified per sonnel to avoid hazards. We recommend leading the power supply via a board-side fuse protection Battery connection The machine's 2V connection cable is connected (observing correct polarity) to a terminal strip. The wiring for the heating element (refer to A, B wiring diagram connections; connection cable white/red) must be direct and by the shortest possible route to the battery or electric generator. Cable cross sections and cable lengths : Motorcaravan & Caravan (inside) 4 mm ² < 6 m 6 mm ² > 6 m Caravan (outside) min 2,5 mm ² (EN648-) 2,5mm² Fig. 34 Provide a 6 A fuse to protect on-board 2 V circuit. In order to ensure that the 2V power supply is shut off when stopping the engine (otherwise the battery would discharge within a few hours), perform the power supply to the heating element (cf. page 20, connection A/B in wiring diagram) in a way to have the 2V supply only live while the vehicle ignition is switched on. The connection C/D (interior light, cable black / violet) must be permanently provided by a 2V DC power supply to be protected by a 2A fuse. CAUTION! If the appliance is installed in a caravan the respective leads for the 2V+ and 2Vconnections A/B and C/D must not be connected to each other on the caravanside (EN 648-). 8


19 Installation Terminal block Connections : mains connections Fig. 35 A B 2V- connection appliance without interior lighting Fig. 36 A B C D 2V- connection appliance with interior lighting Fig. 37 A = Ground heating element DC B = Positive connection, h.e. DC C = Ground interior lighting D = Positive connection, interior lighting 9
20 Installation Wiring diagrams Wiring diagram RM 5xx0 without interior lighting Fig. 38 Connections A = ground heating element 2VDC B = plus heating element 2VDC 20
21 Installation Wiring diagram RM 5xx0 with interior light Fig. 39 Connections A = ground heating element 2VDC B = plus heating element 2VDC C = ground interior light 2VDC D = plus interior light 2VDC 2
22 22
23 23
24 24
Installation instructions
 instructions Absorption Refrigerator for Recreation Vehicles RM 530 RM 5330 RM 5380 MBA 0/0 N - AUS / NZ Type C40 / 0 8 690-99 Table of Contents 0.0 Unpacking and transport.................................
Installation Instructions
 Instructions Absorption Refrigerator for Recreation Vehicles RMD 8501 RMD 8505 RMD 8551 RMD 8555 T.B. MBA 02/2009 Type C40 / 110 822 6114-00 N 1 English Dometic GmbH In der Steinwiese 16 D-57074 Siegen
Operating instructions
 Operating instructions Absorption refrigerator for recreation vehicles RM 530 RM 5330 RM 5380 Record for future reference: Model number... MBA /20 Product number... Serial number... N AUS / NZ Type C40
Operating Instructions
 Operating Instructions Absorption Refrigerator for Recreation Vehicles RM 8400 RM 8401 RM 8405 RM 8500 RM 8501 RM 8505 RM 8550 RM 8551 RM 8555 RMS 8400 RMS 8401 RMS 8405 RMS 8460 RMS 8461 RMS 8465 RMS
Operating Instructions
 Operating Instructions Absorption Refrigerator for Recreation Vehicles RM 8400 RM 840 RM 8405 RM 8500 RM 850 RM 8505 RM 8550 RM 855 RM 8555 RMS 8400 RMS 840 RMS 8405 RMS 8460 RMS 846 RMS 8465 RMS 8500
B Saneo. Saneo. Saneo BS Saneo CS Saneo BW Saneo CW. C Saneo BLP Saneo CLP. Dometic Dometic. Dometic Dometic. Dometic Dometic.
 Installation Instructions Cassette toilet for recreational vehicles Saneo B Saneo C Saneo BLP Saneo CLP Saneo BS Saneo CS Saneo BW Saneo CW N 0 R - 04737 EN MBA 03/05 English Saneo B Saneo C For your safety
Operating Instructions
 Operating Instructions Cassette toilet for recreational vehicles CTS 40 Cassette toilet Record for future reference: Model number... MBA /0 Product number... Serial number... N - AUS / NZ 4 605-35 GROUP
Operating instructions
 Operating instructions ABSORPTION-REFRIGERATORS for RECREATIONAL VEHICLES RM 6290 (L) RM 6291 (L) RM 6401 (L) RM 7270 (L) RM 7290 (L) RM 7360 (L) RM 7370 (L) RM 7400 (L) RM 7540 (L) RM 7550 (L) EN OPERATING
Operating Instructions
 Operating Instructions ABSORPTION - REFRIGERATOR for CARAVAN and MOTORHOME RM 7271 L RM 7275 L RM 7291 L RM 7295 L RM 7361 L RM 7365 L RM 7371 L RM 7401 L RM 7405 L RM 7541 L RM 7545 L RM 7551 L RM 7555
Operating Instructions
 Operating Instructions Absorption Refrigerator for Recreation Vehicles RMD 850 RMD 8505 RMD 855 RMD 8555 Absorption refrigerator Record for future reference: Model number... MBA 05/0 Product number...
CT4110, CTS4110. Cassette toilet for recreational vehicles Installation manual...2
 FR ES PT Cassette toilet for recreational vehicles Installation manual...............2 Toilettes à cassette pour véhicules de loisirs Notice de montage..............20 Inodoros de cassette para vehículos
1.0 INTRODUCTION 3 TABLE OF CONTENTS 2.0 FOR YOUR SAFETY Warnings and Safety Advice Coolants WARRANTY AND 3 CUSTOMER SERVICE 4.0 INS
 MANUAL minibar RH 436D RH 447D RH 430LD RH 440LD RH 441LD RH 455LD RH 456LD RH 460LD RH 461LD RH 456LDE English Type H20 / 60 821 2693-81 T.D. 07/02 1.0 INTRODUCTION 3 TABLE OF CONTENTS 2.0 FOR YOUR SAFETY
Instruction for use. HiPro 3000 HiPro 4000 HiPro 6000 HiPro Vision. minibar. English. & installation instructions
 Instruction for use & installation instructions minibar HiPro 3000 HiPro 4000 HiPro 6000 HiPro Vision Dometic absorption refrigerators for hotels & offices English MBA 10/2011 Record for future reference:
DOMETIC PTY. LTD. Camping Boxes-Refrigerator. Models: RC 1600 EGP Type: JCB - 1. Operating Instructions AUS
 DOMETIC PTY. LTD. Camping Boxes-Refrigerator Models: RC 1600 EGP Type: JCB - 1 Operating Instructions AUS 207.5911.15 Please read these operating instructions carefully before putting the refrigeration
Trumatic E. Trumatic E 2400 (Australia) Operating instructions Page 4 Installation instructions Page 7. To be kept in the vehicle!
 Operating instructions Page 4 Installation instructions Page 7. To be kept in the vehicle!") Trumatic E 7 7 2 9 9 4 Trumatic E 2400 (Australia) Operating instructions Page 4 Installation instructions Page 7 To be kept in the vehicle! Trumatic E 2400 (Australia) Table of contents Installation example...
Trumatic E 7 7 2 9 9 4 Trumatic E 2400 (Australia) Operating instructions Page 4 Installation instructions Page 7 To be kept in the vehicle! Trumatic E 2400 (Australia) Table of contents Installation example...
installation & operating instructions
 installation & operating instructions RGE 410 RA/RM-2D 822706106 MO-M 0740 INTRODUCTION We are pleased that you have chosen this refrigerator and hope you will derive much satisfaction from using it.
Installation Requirements for Models:
 900 & 9100 Series Refrigerators Installation Requirements for Models: 9162 9163 9182 9183 962 963 982 983 WARNING Improper installation, adjustment, alteration, service, or maintenance can cause injury
Combi Box 3 Way Fridge & Freezer
 ELECTROLUX LEISURE PTY. LTD. Combi Box 3 Way Fridge & Freezer RC 1180 207.5098.01 Operating Instructions Please read these operating instructions carefully before putting the refrigeration unit into operation.
Freightliner Refrigerator Troubleshooting Guide For (TJ18F) (TJ22F) (TJ18FP3)
 (TJ22F) (TJ18FP3)") www.dometic.com Freightliner Refrigerator Troubleshooting Guide For Before initiating troubleshooting, the following equipment is recommended: Multimeter, 20 gauge (min) wires to use as jumpers, and 12Vdc
www.dometic.com Freightliner Refrigerator Troubleshooting Guide For Before initiating troubleshooting, the following equipment is recommended: Multimeter, 20 gauge (min) wires to use as jumpers, and 12Vdc
Operating instructions
 Operating instructions For the operator Operating instructions ecotec plus Gas-fired wall-hung high-efficiency boiler GB, IE Publisher/manufacturer Vaillant GmbH Berghauser Str. 40 D-42859 Remscheid Telefon
Operating instructions
 Operating instructions For the operator Operating instructions HOME SYSTEM GB, IE Publisher/manufacturer Vaillant GmbH Berghauser Str. 40 D-42859 Remscheid Tel. +49 21 91 18 0 Fax +49 21 91 18 28 10 info@vaillant.de
Operating instructions
 The energy you need Operating instructions Betacom 3 24c -A (H-GB) 30c -A (H-GB) GB, IE Contents Contents 1 Safety... 3 1.1 Action-related warnings... 3 1.2 Intended use... 3 1.3 General safety information...
Owner s Information Manual
 48ES---A and 48VL---A Comfort and Performance 13 and 14 SEER Single Packaged Air Conditioner and Gas Furnace System With Puron (R---410A) Refrigerant Single and Three Phase 2---5 Nominal Tons (Sizes 24---60)
ULTRA LOW TEMPERATURE FREEZER. User Manual
 ULTRA LOW TEMPERATURE FREEZER User Manual Note:Kaltis reserves the right to modify any parts of this manual without prior notice. 1. No part of this manual may be reproduced in any form, or translated
Operating instructions
 Operating instructions Capriz 2 24c 28c GB, IE Contents Contents 1 Safety... 3 1.1 Action-related warnings... 3 1.2 Intended use... 3 1.3 General safety information... 4 2 Notes on the documentation...
Packaged Gas/Electric Units. Owner s Guide to Operating and Maintaining Your Gas/Electric Unit
 Packaged Gas/Electric Units Owner s Guide to Operating and Maintaining Your Gas/Electric Unit ELECTRICAL SHOCK HAZARD. FIRE OR EXPLOSION HAZARD Disconnect power at fuse box or service panel before performing
Service Manual For model N260 - a 2.4 cu. ft., 2-way refrigerator. For model N a 2.4 cu. ft., 3-way refrigerator.
 Service Manual For model N260 - a 2.4 cu. ft., 2-way refrigerator. For model N260.3 - a 2.4 cu. ft., 3-way refrigerator. NORCOLD, Inc. P.O. Box 4248 Sidney, OH 45365-4248 Part No. 619260A (4-98) Table
General safety precautions English
 English 1 1 1.1 About the documentation The original documentation is written in English. All other languages are translations. The precautions described in this document cover very important topics, follow
Operating and Installation Instructions for CRAMER COE Gas Cooker
 Operating and Installation Instructions for CRAMER COE Gas Cooker Models: COE-C COE-CG COE-CGO COE-FULL COE-C-DUFU COE-CG-DUFU COE-CGO-DUFU COE-FULL-DUFU Cooker (4 gas burners) Cooker + grill (4 gas burners)
INSTALLATION GUIDE NZ AU D
 GAS COOKTOP CG905DW models INSTALLATION GUIDE NZ AU 590684D 08.17 1 SAFETY AND WARNINGS! WARNING! Electrical Shock Hazard Before carrying out any work on the electrical section of the appliance, it must
Fig. 1 - Unit PGD4, PGS4, WPG4
 OWNER S MANUAL 14 SEER Single -Package Air Conditioner and Gas Furnace System with R -410A Refrigerant Single Phase 2 to 5 Nominal Tons Three Phase 3 to 5 Nominal Tons PGD4andPGS4SeriesE,WPG4SeriesB Fig.
General safety precautions English
 English 1 1 1.1 About the documentation The original documentation is written in English. All other languages are translations. The precautions described in this document cover very important topics, follow
INSTALLATION INSTRUCTIONS
 INSTALLATION INSTRUCTIONS Gas Cooktop CG905DW models NZ AU www.fisherpaykel.com 590684B 11.14 1 Safety and warnings! WARNING! Electrical Shock Hazard Before carrying out any work on the electrical section
DES/TB 07/97 Typ C 40/ 110
 MANUAL CARAVAN RM 4212 RM 4213 Deutsch Seite 1 English page 7 Français page 14 Italiano pagina 20 Español pagina 26 Svenska sida 32 Dansk side 38 Norsk side 44 Nederlands pag. 50 Suomi sivu 56 821 2649-01
Installation Manual. For Australian refrigerator models: N304M.3 (93 liter 3-way operation with LP gas, 240 volts AC, or 12 volts DC )
") Installation Manual For Australian refrigerator models: N304M.3 (93 liter 3-way operation with LP gas, 240 volts AC, or 12 volts DC ) N404M.3 (128 liter 3-way operation with LP gas, 240 volts AC, or 12
Installation Manual For Australian refrigerator models: N304M.3 (93 liter 3-way operation with LP gas, 240 volts AC, or 12 volts DC ) N404M.3 (128 liter 3-way operation with LP gas, 240 volts AC, or 12
Operating instructions
 Operating instructions Gas-fired condensing boiler Logano plus GB312 For the user Please read carefully before use 7 747 009 296-01/2007 EN Contents 1 For your safety..............................................
UPRIGHT REFRIGERATORS FOR RV AND MARINE APPLICATIONS INSPIRED BY COMFORT.
 UPRIGHT REFRIGERATORS FOR RV AND MARINE APPLICATIONS INSPIRED BY COMFORT www.dometic.co.nz 2 FEATURES OF DOMETIC 3 WAY REFRIGERATORS ABSORPTION REFRIGERATION FOR 12 VOLTS, 240 VOLTS AND GAS Famous 3 way
General safety precautions English
 English A min (m 2 ) 550 530 540 510 520 490 500 470 480 450 460 430 440 410 420 390 400 370 380 350 360 330 340 310 320 290 300 270 280 250 260 230 240 210 220 190 200 170 180 150 160 130 140 110 120
General safety precautions English
 English A min (m 2 ) 550 530 540 510 520 490 500 470 480 450 460 430 440 410 420 390 400 370 380 350 360 330 340 310 320 290 300 270 280 250 260 230 240 210 220 190 200 170 180 150 160 130 140 110 120
Truma VarioHeat eco AU. Installation instructions Page 2
 Truma VarioHeat eco AU Installation instructions Page 1 3 4 Installation example Fig. 1 9 7 8 6 5 1 Room temperature sensor Control panel Truma CP plus VarioHeat 3 Electric window switch (optional) 4 Exhaust
ecotec pro Operating instructions Operating instructions For the operator GB, IE Gas-fired wall-hung high-efficiency boiler
 Operating instructions For the operator Operating instructions ecotec pro Gas-fired wall-hung high-efficiency boiler GB, IE Publisher/manufacturer Vaillant GmbH Berghauser Str. 40 D-42859 Remscheid Tel.
User's Infomation Manual
 User's Infomation Manual 574A GAS HEATING/ELECTRIC COOLING Cancels: OM01-69 OM10-28 02-07 NOTE: Read the entire instruction manual before starting the installation. SAFETY CONSIDERATIONS Note to Installer:
Owner s Information Manual
 50EZ---A and 50VT ---A Comfort and Performance 13 and 14 SEER Single Packaged Heat Pump System With PuronR (R ---410A) Refrigerant Single and Three Phase 2---5 Nominal Tons (Sizes 24---60) Owner s Information
Owner's Guide to Operating and Maintaining Your Gas/Electric Unit
 Packaged Gas Heat/Electric Cooling Units Owner's Guide to Operating and Maintaining Your Gas/Electric Unit ELECTRICAL SHOCK. FIRE OR EXPLOSION Failure to follow this warning could result in personal injury,
Area Heater AH100 Series
 Area Heater AH100 Series FEATURES: The ideal solution for extending the season for outdoor entertaining Creates a stylish and attractive ambience Casts an approximate 3 to 5 metre circle of radiant sun-like
Installation and maintenance instructions
 6304 4994 03/2006 GB For installer Installation and maintenance instructions Flue gas heat exchanger WT30/40 Please read thoroughly prior to installation and maintenance. Contents Contents Contents 2 1
Packaged Heat Pumps. Owner s Guide to Operating and Maintaining Your Heat Pump
 Packaged Heat Pumps Owner s Guide to Operating and Maintaining Your Heat Pump NOTE TO EQUIPMENT OWNER: For your convenience, please record the model and serial numbers of your new equipment in the spaces
I n s t r u c t i o n m a n u a l f o r b u i l t - i n h o o d. Model code: BORA600
 I n s t r u c t i o n m a n u a l f o r b u i l t - i n h o o d Model code: BORA600 Contact Caple on 0844 8003830 or for spare parts www.4caple.co.uk 1 Y O U R A P P L I A N C E Thank you for buying your
WMHP Series R410a Heat Pump INSTALLATION INSTRUCTIONS
 WMHP Series R410a Heat Pump INSTALLATION INSTRUCTIONS **WARNING TO INSTALLER, SERVICE PERSONNEL AND OWNER** Altering the product or replacing parts with non authorized factory parts voids all warranty
Model No: Little Devil II (inc ss)
") GAS HEATER Model No: Little Devil II (inc ss) PART NO: 6926020, 6926025 (SS) OPERATION & MAINTENANCE INSTRUCTIONS LS1213 INTRODUCTION Thank you for purchasing this CLARKE Gas Heater. Before attempting
GAS HEATER Model No: Little Devil II (inc ss) PART NO: 6926020, 6926025 (SS) OPERATION & MAINTENANCE INSTRUCTIONS LS1213 INTRODUCTION Thank you for purchasing this CLARKE Gas Heater. Before attempting
INSTALLATION INSTRUCTIONS
 INSTALLATION INSTRUCTIONS Gas-on-glass cooktop CG302D, CG451D, CG603D, CG604D, CG752D, CG903D & CG905D models GB IE IN 590657A 02.14 1 SAFETY AND WARNINGS 3 WARNING! Electrical shock hazard Before carrying
JUMBO INDIRECT FIRED DIESEL HEATER OPERATING INSTRUCTIONS
 JUMBO INDIRECT FIRED DIESEL HEATER OPERATING INSTRUCTIONS Before using the heater, read and understand all instructions and follow them carefully. The manufacturer is not responsible for damages to goods
AES III RM2355 RM2455 RM Contact a qualified person. RM4605 RM4805 FOR YOUR SAFETY FOR YOUR SAFETY
 RA/RM-D RA/RM-2D AES III FOR YOUR SAFETY If you smell gas:. Open windows and door. 2. Don t touch electrical switches.. Extinguish any open flame. 4. Turn off the gas supply at the source. 5. Contact a
Automatic Dryers. Installation. Keep These Instructions for Future Reference. (If this machine changes ownership, this manual must accompany machine.
 Automatic Dryers Installation D715I Keep These Instructions for Future Reference. (If this machine changes ownership, this manual must accompany machine.) Part No. R4 June 2007 IMPORTANT: The electrical
Operating Instructions. Accessory Units Melitta Cafina XT Series. Melitta Professional Coffee Solutions
 Operating Instructions Accessory Units Melitta Cafina XT Series Melitta Professional Coffee Solutions Contents General... 4. Manufacturer information... 4.2 About these instructions... 4.3 Explanation
3gb53231b.fm5 Page 12 Friday, April 11, :21 PM
 3gb53231b.fm5 Page 12 Friday, April 11, 2003 12:21 PM INSTRUCTIONS FOR USE BEFORE USING THE COOKTOP SUGGESTIONS FOR ENVIRONMENT PROTECTION PRECAUTIONS AND GENERAL ADVICE ENERGY SAVING TIPS CARE AND MAINTENANCE
Gas Instantaneous Water Heater
 6 720 607 823 GB (06.06) SM Installation and Operating Instructions Gas Instantaneous Water Heater WR10..B... WR11..B... With electronic ignition and triple safety system consisting of ionisation detector,
BR342 Ducted Installation Instructions Australian Version Electronic Wall Control
 Australian Version Electronic Wall Control 1 Introduction The BR342 reverse cycle rooftop air-conditioner is designed for installation onto Recreational Vehicles (RV s) at the time of manufacture or as
User manual. - A brand of EuroCave Group -
 OXYVD7WCOUS OXY2TVD6COUS User manual - A brand of EuroCave Group - Welcome You have just purchased an ARTEVINO product thank you for your custom. We take particular care in manufacturing our products in
GAS-ON-GLASS COOKTOP
 GAS-ON-GLASS COOKTOP CG301D, CG302D, CG451D, CG603D, CG604D, CG752D, CG903D & CG905D models INSTALLATION GUIDE GB IE IN PH 590657D 08.17 1 SAFETY AND WARNINGS! WARNING! Electrical shock hazard Disconnect
T UNI 7000 F. Operating instructions For the user (2006/05) AU/GB
 AU/GB") 6 720 648 662-00.1T UNI 7000 F Operating instructions For the user AU/G 2 Contents Contents Contents 2 1 Safety information and explanation of symbols 3 1.1 For your safety 3 1.2 Explanation of symbols
6 720 648 662-00.1T UNI 7000 F Operating instructions For the user AU/G 2 Contents Contents Contents 2 1 Safety information and explanation of symbols 3 1.1 For your safety 3 1.2 Explanation of symbols
Glass Chimney Hood. Installation & User Instructions Please keep for future reference
 Glass Chimney Hood Installation & User Instructions Please keep for future reference 4897549 4897556 Important Please read these instructions fully before installing or using These instructions contain
USER S INFORMATION MANUAL
 USER S INFORMATION MANUAL UPFLOW, DOWNFLOW, UPFLOW/HORIZONTAL & HORIZONTAL ONLY INDUCED DRAFT GAS FURNACES Recognize this symbol as an indication of Important Safety Information If the information in this
Bosch 80% AFUE Gas Furnace BGS80 Model
 Bosch 80% AFUE Gas Furnace BGS80 Model 4-Way Multipoise Category I Fan-Assisted Furnace User's Information Manual 3124627 2 Bosch 80% AFUE Gas Furnace User's Information Manual Data subject to change 06.2018
EHA Hoffmann International GmbH
 EHA Hoffmann International GmbH Operating Instructions EHA - Embossing Press 50-75 Professional Machine number: Model year: The side shelfs are optional and are not included in the Standard scope of delivery.
SCHMIDT Flow Sensor SS Ex - Supplementary instructions for use in explosive atmospheres ATEX
 SCHMIDT Flow Sensor SS 20.600 Ex - Supplementary instructions for use in explosive atmospheres ATEX SCHMIDT Flow Sensor SS 20.600 Ex ATEX version Table of Contents 1 Important information... 3 2 Storage
HOW TO USE YOUR 2000 RANGE L.P.G. COOKER OR HOB UNIT
 HOW TO USE YOUR 2000 RANGE L.P.G. COOKER OR HOB UNIT CAUTION These instructions must be read and understood before proceeding with the installation and to avoid any possibility of accident it is essential
Use and Care Manual. For Beverage Cooler RU
 Use and Care Manual For Beverage Cooler RU 500 7081 619-01 Congratulations on your purchase. Choosing this appliance means you want all the benefits of state-of-the-art refrigeration technology, guaranteeing
FOR YOUR SAFETY FOR OUTDOOR USE ONLY PROPANE GAS. Model No. AH2069ODS, AH2063ODS
 Model No. AH2069ODS, AH2063ODS The ideal solution for extending the season of outdoor entertaining Creates a stylish and attractive ambience Direct ignition Includes a safety tip-over switch that halts
G-7s. Instruction Manual. G-Series Cooler COUNTERTOP COOLER. Part No.11IPA
 G-Series Cooler COUNTERTOP COOLER Part No.11IPA-061000 Instruction Manual FOR YOUR FUTURE REFERENCE This easy-to-use manual will guide you in getting the best use of your cooler. Remember to record the
Instructions for use. Gas hobs for installation in worktops GKS GWS GKS GKS
 Instructions for use Gas hobs for installation in worktops GKS 3920.0 GWS 3911.0 GKS 6940.0 GKS 9951.0 For use in: Hong Kong Issue: 2014-01-14 Version: 1.3_EN Identity no.: 073587_HK Welcome 2 Welcome
INSTALLATION OPERATING, AND SERVICE INSTRUCTIONS FOR SUBURBAN DIRECT VENT SEALED COMBUSTION GAS HEATER MODEL GT-10D
 INSTALLATION OPERATING, AND SERVICE INSTRUCTIONS FOR SUBURBAN DIRECT VENT SEALED COMBUSTION GAS HEATER MODEL GT-10D FOR YOUR SAFETY FOR YOUR SAFETY IF YOU SMELL GAS: DO NOT STORE OR USE GASOLINE 1. OPEN
Combi 2 E / 4 E CP plus (Australia) Operating instructions Page 2. To be kept in the vehicle!
 Operating instructions Page 2. To be kept in the vehicle!") Combi 2 E / 4 E CP plus (Australia) Operating instructions Page 2 To be kept in the vehicle! Combi 2 E / 4 E CP plus (Australia) 4 5 1 2 6 10 13 15 16 12 8 10 14 6 1 Control panel (digital) 2 Room temperature
Combi 2 E / 4 E CP plus (Australia) Operating instructions Page 2 To be kept in the vehicle! Combi 2 E / 4 E CP plus (Australia) 4 5 1 2 6 10 13 15 16 12 8 10 14 6 1 Control panel (digital) 2 Room temperature
Sip Vacuum Cleaner 1400/35 Wet & Dry
 Please dispose of packaging for the product in a responsible manner. It is suitable for recycling. Help to protect the environment, take the packaging to the local amenity tip and place into the appropriate
USER S INFORMATION MANUAL
 USER S INFORMATION MANUAL UPFLOW/HORIZONTAL & DOWNFLOW TWO STAGE INDUCED DRAFT GAS FURNACES Recognize this symbol as an indication of Important Safety Information If the information in this manual is not
Fig. 1 - Unit PHD4 and WPH4
 OWNER S MANUAL 14 SEER Single -Package Heat Pump System with R -410A Refrigerant Single Phase and Three Phase 2 to 5 Nominal Tons PHD4 Series F and WPH4 Series B Fig. 1 - Unit PHD4 and WPH4 A09034 NOTE
INSTALLATION GUIDE NZ AU E
 GAS COOKTOP CG604DX & CG905DX models INSTALLATION GUIDE NZ AU 590447E 08.17 1 SAFETY AND WARNINGS Electrical shock hazard WARNING! Before carrying out any work on the electrical section of the appliance,
VH60SS 60CM VISOR HOOD STAINLESS STEEL
 VH60SS 60CM VISOR HOOD STAINLESS STEEL INSTRUCTION MANUAL Thank you for purchasing our product. We hope you enjoy using the many features and benefits it provides. Before using this product please study
installation manual DM3862 RM2554 DM2663 RM2551 Refrigerator for LP-gas & electric operation DM2852 ! AVERTISSEMENT ! WARNING FOR YOUR SAFETY
 RM25 RM254 RM245 RM2454 RM255 RM2554 DM2652 DM2662 DM266 DM2852 DM2862 DM862 NDM062 NDR292 installation manual Refrigerator for LP-gas & electric operation FOR YOUR SAFETY If you smell gas:. Open windows.
RV REFRIGERATOR LP-GAS & ELECTRIC
 LITERATURE NUMBER MPD 4003333 RV REFRIGERATOR LP-GAS & ELECTRIC HE-0601, HE-0801 PROTECTED BY US PATENTS PENDING avoid possible injury or death SAFETY ALERT SYMBOLS Safety Symbols alerting you to potential
Truma VarioHeat eco AU. Installation instructions Page 2
 Truma VarioHeat eco AU Installation instructions Page 1 3 4 Installation example Fig. 1 9 7 8 6 5 1 Room temperature sensor Control panel Truma CP plus VarioHeat 3 Electric window switch (optional) 4 Exhaust
User s Information Manual
 48N2,N3,N4,N5,N6,N7,N8,N9 75-150 Ton Gas Heating/Electric Cooling Units with ComfortLink Controls User s Information Manual NOTE TO INSTALLER: This manual should be left with the equipment owner. : If
OXYVD8WCOUS OXYVG8WCOUS OXY2TVD6COUS. User manual. - A brand of EuroCave Group -
 OXYVD8WCOUS OXYVG8WCOUS OXYTVD6COUS User manual - A brand of EuroCave Group - Welcome Contents You have just purchased an ARTEVINO product thank you for your custom. We take particular care in manufacturing
Installation instructions Combined fridge-freezer for integrated use, door-on-door
 Installation instructions Combined fridge-freezer for integrated use, door-on-door 100713 7085634-00 IC.../ ICB.../ ICU...... LC/ LP General safety information Contents 1 General safety information...
INSTALLATION & OPERATING INSTRUCTIONS
 RA/R-D RA/R-2D INSTALLATION & OPERATING INSTRUCTIONS AES III FOR YOUR SAFETY If you smell gas:. Open windows and door. 2. Don t touch electrical switches.. Extinguish any open flame. 4. Immediately call
Installation and Operating instructions for. C9900-U battery pack. Version: 2.0 Date:
 Installation and Operating instructions for C9900-U330-0010 battery pack Version: 2.0 Date: 2017-03-23 Table of contents Table of contents 1 Foreword 3 1.1 Notes on the Documentation 3 1.1.1 Liability
Outdoor Tabletop Heater TTH20 Series
 Outdoor Tabletop Heater TTH20 Series FEATURES: The ideal solution for extending the outdoor entertaining season Creates a stylish and attractive ambience Casts an approximate 1 to 1.5 metre circle of radiant
USER MANUAL Gas Step Up Hot Plate
 USER MANUAL Gas Step Up Hot Plate MODELS: CK HPSU, CK HPSU, CK HPSU 0 / 07 IMPORTANT FOR FUTURE REFERENCE Please complete this information and retain this manual for the life of the equipment. For Warranty
Service Manual Model 3163
 Service Manual Model 3163 Contents Important Safety Information.......... 1 Specifications.................. 2 General Information.............. 2 Direct Vent Requirements........... 2 Propane System................
Proline GAS HOB Model TCG40IX Instruction Book
 Proline GAS HOB Model TCG40IX Instruction Book GB Operating and Installation Instructions Index Technical data and specifications...... 3 Installation...................... 3-6 Ventilation........................
USER S INFORMATION MANUAL
 USER S INFORMATION MANUAL UPFLOW & DOWNFLOW/HORIZONTAL CONDENSING GAS FURNACES SAFETY Recognize this symbol as an indication of Important Safety Information If not installed, operated and maintained in
GCG-10. Instruction Manual. G-Series Cooler. Manual is for the following models: GCG-10-N33EB G-10-N33EB UPRIGHT COOLER
 G-Series Cooler GCG-10 UPRIGHT COOLER Manual is for the following models: GCG-10-N33EB G-10-N33EB Instruction Manual Manual is for the following models: GCG-10-N33EB G-10-N33EB Instruction Manual GCG-10
Packaged Gas/Electric
 Packaged Gas/Electric Units Owner's Guide to Operating and Maintaining Your Gas/Electric Unit ELECTRICAL SHOCK HAZARD. FIRE OR EXPLOSION HAZARD Failure to follow this warning can result in Disconnect power
USER MANUAL REFRIGERATOR
 USER MANUAL REFRIGERATOR UND1094W Please read the following instruction carefully before using your refrigerator. -Do not put hot food inside the refrigerator. -Wrap all food items with a plastic protection
G-10s. Instruction Manual. G-Series Cooler UPRIGHT COOLER. Part No.11IPA
 G-Series Cooler UPRIGHT COOLER Part No.11IPA-062800 Instruction Manual FOR YOUR FUTURE REFERENCE Thank you for using our product. This manual will guide you in getting the best use of your cooler. Remember
2245 Wyecroft Road #5, Oakville, Ontario Canada L6L 5L7 Ph: Toll Free: Fax:
 2245 Wyecroft Road #5, Oakville, Ontario Canada L6L 5L7 Ph: 905-827-6157 Toll Free: 1-877-427-2266 Fax: 905-827-2027 Instructions for Installation, Operation & Service Manufacturer: Zero Appliances, Chloorkop
Installation Instructions T 9822 Gas Dryer. en - US, CA. To prevent accidents
 Installation Instructions T 9822 Gas Dryer To prevent accidents en - US, CA and appliance damage read these instructions before installation or use. M.-Nr. 07 431 110 2 WARNING For your safety the information
2245 Wyecroft Road #5, Oakville, Ontario Canada L6L 5L7 Ph: Toll Free: Fax:
 2245 Wyecroft Road #5, Oakville, Ontario Canada L6L 5L7 Ph: 905-827-6157 Toll Free: 1-877-427-2266 Fax: 905-827-2027 Instructions for Installation, Operation & Service Manufacturer: Zero Appliances, Chloorkop
User s Information Manual
 62DA,DB,DC,DD07-38 Vertical or Horizontal Dedicated 100% Outdoor Air Unit with Optional Gas Heat User s Information Manual NOTE TO INSTALLER This manual should be left with the equipment owner. : If the
Instruction Manual M6627 / Version 7.4. Slide Drying Bench MH6616 MH6616X1
 Instruction Manual M6627 / Version 7.4 Slide Drying Bench MH6616 MH6616X1 Please take your time to read this Instruction Manual in order to understand the safe and correct use of your new Electrothermal