GREEN LOO DRY COMPOSTING TOILET Owners Installation Operation Manual. for the. GT 120 Family and GT 330
|
|
|
- Bryce Armstrong
- 5 years ago
- Views:
Transcription

1 GREEN LOO DRY COMPOSTING TOILET Owners Installation Operation Manual for the GT 120 Family and GT 330
2 2 INSTALLATION PLANNING It's all in the planning! For proper operation of the toilet you should consider a number of issues during the building design stages to enable the natural composting processes the best chance to give trouble-free operation. The design of the site and building needs to allow for: The location of the toilet pedestal in the building and any structures that may be required to have the composting container below floor level. Space for the composting container and a firm, dry and sheltered base for it to sit. Adequate access to service and maintain the toilet. Good ventilation to provide oxygen and evaporate liquids Electrical supply (240VAC or 12VDC) to the fan location The GT 120 and GT 330 is supplied as a kit containing most of the components required and can be installed using basic building tools and materials available at plumbing suppliers or hardware shops Installation of the GTs involves: 1. Positioning the Pedestal and composting container to ensure a vertical drop from the pedestal to the waste bins 2. Preparing a flat, level and firm base for the composting container to sit 3. Installing the ventilation pipe-work, including fan and vent cowl 4. Connecting the Pedestal, waste chute and composting container 5. Preparing the excess liquids dispersal trench 6. Final checks before use. Space Required There is no ideal set of measurements which will suit all applications but you do need to provide enough space to locate and install the composting container, enough space to fit and maintain the air vent piping and fan and enough space to access and exchange the containers, so allow space to maneuver the bins. Toilet Pedestal and composting container The composting container must be located directly below the toilet pedestal. The height of the pedestal above the compost container may vary according to the building design. The waste chute supplied allows for mm from underneath the floor of the toilet room to the top of the composting container. Additional Waste Chutes may be added to
3 3 increase this if desired. We suggest using black HDPE pipe that is larger in diameter than the waste outlet of the toilet pedestal but smaller than the diameter of the waste chute of the composting container (250mm and 280mm are standard). Don't plan to install a light directly over the pedestal/waste chute as this will attract flying insects. Don t use your toilet fan. It s suction works against the suction of the fan of the GT. Structural Issues The GT System is installed sub-floor. It may be installed under a concrete slab or bearer and joist floor, in a full or partial cellar as desired in the building design. Consider the spacing of joists or concrete slab penetrations to allow for the waste chute. Consult a relevant Engineer to ensure support spacing and floor spans are adequate for the size and position of the GT. Most GTs are installed in a location largely protected from the elements and can sit freely on the base. If your installation is likely to experience extremes, you may need to consider anchoring the composting container to the ground to prevent it moving in the event of weather events. The GT is not designed to be immersed in water so should not be installed where severe flooding may occur without flood protection. Vent System The GT airflow requirement is provided by 100mm pipe and incorporates a continuous running fan (supplied). Consider how the fan will be powered (240VAC or 12VDC) and ensure the fan housing is accessible for maintenance. Ensure correct airflow of the fan away from the toilet. Remember that warm air from the composting chamber (the composting process generates its own warmth) naturally rises, and that sharp bends restrict airflow designing the vent piping correctly will improve natural operation. Warm air holding moisture entering a cold vent can result in condensation. Consider insulating the outlet vent piping, or providing a condensate trap as per drawing on page 5. Excess Liquid As a result of the capillary double base of the GT System, % of the liquid waste is used up in the composting process, as well as being evaporated through the vent system. An absorption trench is required to deal with any excess liquid. The length of the trench is 2 m for the GT 120 (4 person permanent use) and 4 m for the GT 330 (8 person permanent use). The trench is to be 400mm wide, 400mm deep. However, dimensions must not be less than required by Regulation 50 of the Health (Treatment of Sewage and Disposal of Effluent and Liquid Waste) Regulations 1974 or AS/NZS See diagram for a GT 120 installation below. The excess liquids drain from the composting, fallow container can be connected into this drain or needs to be disposed of in the same way.
.")

4 4 1. INSTALLATION The first thing to do is to decide where in the toilet room you want to place the pedestal. Mark a centre position for the waste chute using the pedestal as a guide. The floor joists will need to be clear of the waste chute and provision should be made to secure the waste chute to the underside of the floor or similar (see photo below). Once you have found the right spot in the toilet room, drill a small hole through the centre point and through the floor. Go to where the GT is to be located. Attach a plumb bob through the centre point hole and consider the position and ensure there is enough room to fix the vent piping and fan and there is adequate access to exchange the bins. By maximising the length of the waste chute you will give yourself extra room as well as minimising the visual impact when you happen to look down the Pedestal. Check you have clearance in the joists for the waste chute to pass through the floor. Don't cut out the waste chute hole in the floor until you are sure you have everything lined up in case you need to adjust the position. Now cut the waste chute hole in the floor. If you wish to line the hole, we suggest using standard 250mm or 280 mm black HDPE pipe. This can also be used as extra length for the chute (see below). The most common way to install and service the GT System is to push the container from the back of the toilet room to its position under the seat. To locate the waste shaft, there are rails in the package to be installed to both sides of the toilet base chute hole (see picture below). These rails ensure that the shaft holds firmly in its place during use.

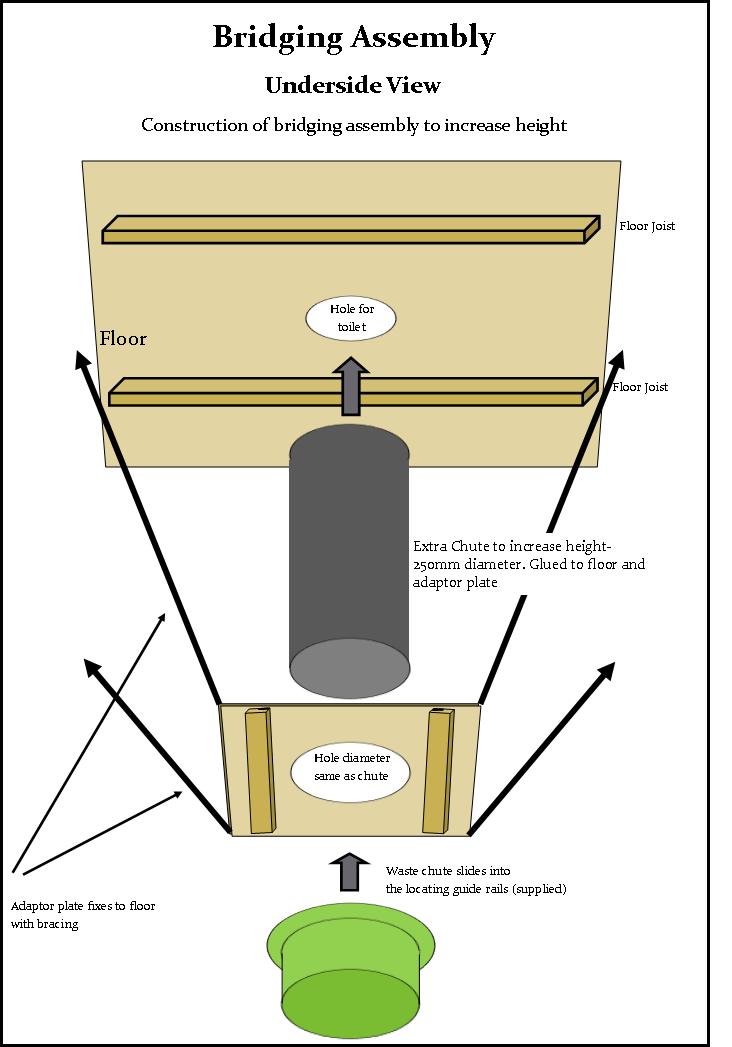
5 If floor joists make this option difficult, a bridging assembly can be constructed as per below: 5

6 If a greater distance needs to be spanned, an extra waste chute can be ordered. Installation suggestion below: 6
7 7
8 8

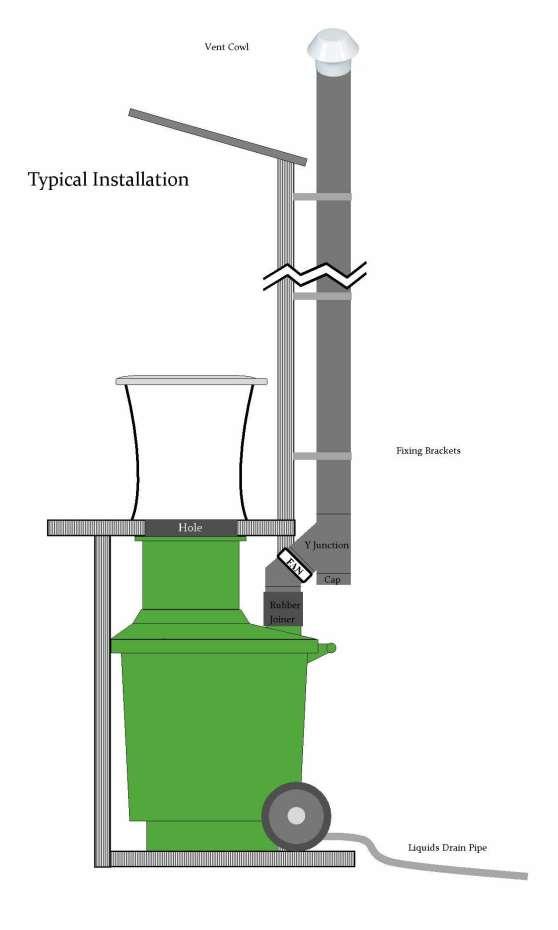
9 9 The height of the waste chute can be adjusted by sliding up or down. If the chute is too long, the excess part can be cut off with a saw. Vent Pipe Installation The ventilation pipe should rise perpendicularly with as few curves and elbows as possible, the vent cowl placed on top. Don t use pipe cement the push fittings should be tight enough for this purpose, and this allows you to dismantle and service the vent system as required. The following is an example as to a standard vent installation there are many permutations possible and if in doubt, contact us for discussion and guidance: 1. Attach the rubber joiner to the vent outlet of your GT container in situ. Cut off a short piece of vent pipe and insert half into the rubber joiner, half out. Attach the 45 degree bend, pointing backwards. Cut a hole in the wall, allowing the vent pipe assembly to traverse the wall. 2. Install the fan by cutting off 2 short pieces of the vent pipe and inserting the fan as a joiner. Plug the fan into the power supply and ensure the airflow is away from the composting container, upwards towards the exhaust end. 3. Attach the Y joiner as per the picture. Cut off a short piece of vent pipe and insert into the Y joiner at the bottom. Finish with attaching the cap. This is your moisture trap, which should be emptied every few weeks by undoing the cap, letting the water drain out and re-attaching the cap. 4. Attach the remaining vent pipes with joiner and attach to the house wall using the pipe fasteners. Add additional vent pipes, joiners and pipe fasteners (from your local plumbing store) as required. Cap with the vent cowl. Fasten the screws on the rubber joiner. Congratulations, you are done! 2. BEFORE USE The composting power of the GT System is based on the capillary double base which works similar to under watering flower pots. A large part of the liquid waste is absorbed back to the composting mass through capillary action, thus boosting the composting process. Before putting the system into use, fill the upper bottom and legs with a 5-10 cm layer of peat. This layer enables the capillary feature to work. Also, after every emptying, remember to add a new layer of peat before use.
10 10 3. USE OF THE GT SYSTEM The GT System can be used almost like any normal water toilet. Toilet paper can be thrown into the toilet, as it composts together with the waste. However, any items containing plastic, e.g. sanitary towels should be placed into a separate bin. A handful of covering material (peat, 1 cup) should be added after each bowel movement. The composting process can be enhanced even further by leveling and mixing the compost occasionally. Our compost accelerator (biodegrader) may also be added. 4. SERVICE a) Check the fan 1) monthly to ensure it is working or 2) if you notice unusual odour. b) The average length of time until a container is ¾ full (recommended exchange level) is around 6 months at 4 / 8 people full time use for the GT 120 / GT 330. c) Both the active and fallow container need to be secured to prevent tampering by young children. This can be achieved by keeping the containers in a locked area or by securing and locking a strap around the composting container that can not be undone by young children. d) It is not vital that the fallow container is kept in the sun, however composting is accelerated by warmth. Therefore choosing a warm spot is helpful, as long as provision a) above is observed. e) Excess liquid drainage from the external composting container can be connected into the existing drain or alternatively needs to be disposed of in another excess liquids dispersal trench during the 6 months composting period. To exchange or empty the GT System, protective clothing, face mask, glasses and gloves must be worn at all times. Disconnect the rubber connector the joins the ventilation pipe to the lid of the composting container. Then pull the container out, exchange the lid onto the second, spare container and move the second container in place. Set aside the first container and seal with the supplied lid. Childproof both containers as per point 4a above. The waste will finish composting in this container (3-6 months on average). For exchange of containers and the emptying of composted container (including wheeling the full container up or down slopes) 2 persons may be required. You can expect weights of 50kg and 140kg respectively for the GT 120 and 330. When emptying a container, wheel to the prepared disposal site. Gently lay the container on its side and start emptying the container with a spade or shovel. Always observe safe work methods. Clean the container by hosing if required. 5. USE OF COMPOST a. Bury the contents of the container into a prepared area. Burial depth is a minimum of 300mm in soil that is not intended for human food cultivation for six (6) months, and b. Burial should be a minimum of 30 metres from any water source and 6 metres from any subsoil or open drainage system, or c. Disposed of as directed by the Local Government. 6. CLIMATIC CONDITIONS Composting will occur satisfactorily between 5 and 50 degrees Celsius. There is a cold climate model of the GT System available for areas where temperature falls below 5 degrees for long periods of time. The Cold climate model is equipped with a self adjusting heating cable which enables composting throughout the year.
11 11 Dear Friend, Thank you very much for choosing our GT Bio Sanitation Systems. We hope that you enjoy many years of fruitful, waterless and trouble-free use. Please don t hesitate to contact us with any questions, suggestions, we are here to help. Feedback is always welcome and is an invaluable part of providing an excellent product and service! Finally, thank you for being an integral part of the environmental solution. The Earth will thank you too! The Team at Green Loo Green Loo PO Box 2678 Burleigh BC, QLD 4220 info@greenloo.org
GREEN LOO DRY COMPOSTING TOILET MANUAL. for the. GT 120 Family and GT 330
 GREEN LOO DRY COMPOSTING TOILET MANUAL for the GT 120 Family and GT 330 INSTALLATION PLANNING It's all in the planning! For proper operation of the toilet you should consider a number of issues during
User Manual for MullToa 10 and 25
 User Manual for MullToa 10 and 25 User Manual for MullToa 10 and 25 Congratulations on your purchase of MullToa toilet Your bio-toilet is patented and manufactured in Sweden and the brand is MullToa.
Rota-Loo Operations Manual
 Rota-Loo Operations Manual Phone: (03) 5135 3900 Fax: (03) 5135 3955 enquiry@rotaloo.com admin@kielindustries.com.au www.rotaloo.com AS/NZS 1546.2:2008 is the Standard that sets out the requirements for
Installation Instructions. For the 18 Built-In Dishwasher and Front Color Panels
 Installation Instructions For the 18 Built-In Dishwasher and Front Color Panels Printed in USA 154232102 Before You Begin DO NOT INSTALL DISHWASHER UNTIL YOU HAVE READ ALL INSTRUCTIONS. FOR YOUR SAFETY,
Feels like home. Unlimited Capacity Odour free Easy handling Waterless. Comfort wherever you are. Environmentally friendly
 Unlimited Capacity Odour free Easy handling Waterless Environmentally friendly Feels like home Comfort wherever you are Separett VILLA 5-year guarantee www.separett.com 5-year guarantee Child Seat Included
Comfort Odour free Easy handling. Waterless. Environmentally friendly. Feels like home. Comfort wherever you are.
 Comfort Odour free Easy handling Waterless Environmentally friendly Feels like home Comfort wherever you are Separett VILLA 5-year guarantee www.separett.com Separett a complete toilet system for vacation
Installation Manual PS-200 & PS-201
 Installation Manual PS-200 & PS-201 Table of Contents Pre-Uncrating Checklist... 1 Verifying System Requirements... 2 Verifying System Direction... 2 Verifying the Electrical Requirements... 2 Removal
PROPER WALL MOUNTING OF THE SUITMATE
 The SUITMATE Swimsuit Water Extractor has been designed and manufactured with safety as our primary consideration. Therefore, it is important that the unit be installed correctly. It is also important
Installation Manual PS-225 & PS-275
 Installation Manual PS-225 & PS-275 Table of Contents Pre-Uncrating Checklist... 1 Verifying System Requirements... 2 Verifying System Direction... 2 Verifying the Electrical Requirements... 2 Removal
ECOJET GREASE LEVEL SENSOR
 ACO Passavant Installation guide ECOJET GREASE LEVEL SENSOR AUTHOR Kate Jennings DATE COMPLETED 8 August 2016 DATE COMPLETED V13 ACO Polycrete, 134-140 Old Bathurst Road, Emu Plains, NSW 2750 Tel: +61
Installation Instructions
 Installation Instructions For the 18" Built-In Dishwasher Sears, Roebuck and Co. Sears Canada, Inc. Hoffman Estates, IL 60179 U.S.A. Toronto, Ontario, Canada M5B 2B8 154435201 Before You Begin DO NOT INSTALL
SUPPLEMENTARY INSTRUCTIONS
 www.burcam.com 2190 Dagenais Blvd.West TEL: 514.337.4415 LAVAL (QUEBEC) FAX: 514.337.4029 CANADA H7L 5X9 info@burcam.com SUPPLEMENTARY INSTRUCTIONS MODEL 450475 Dear consumer, We thank and congratulate
COMBUSTION AIR SYSTEM
 COMBUSTION AIR SYSTEM MODEL: CAS-4JR This product is designed for use with any natural gas or LP burning furnace, water heater, or boiler with a 24 VAC control system. It may be used with a residential
EFX 600. aquamanta. Instruction Manual. 4year guarantee. the experts in aquatic technology. >600 Litres
 EFX 600 aquamanta TM the experts in aquatic technology >600 Litres Coldwater Tropical Marine 4year guarantee Instruction Manual Important Safeguards This appliance is not intended for use by persons (including
MANUAL BIOLET. Model Separera 30 and 30 NE. What you have to know about the installation and the use of your Biolet. Websites :
 MANUAL BIOLET Model Separera 30 and 30 NE What you have to know about the installation and the use of your Biolet Websites : English : www.composttoilet.eu Dutch : www.composttoilet.be French : www.toilletteacompost.be
The FAWSsit USER CARE GUIDE
 The FAWSsit Fold Away Wheelchair Shower US Patent Number 7,231,673 B1 USER CARE GUIDE Recliner R3000 A Note to You Thank you for buying this product. To ensure you enjoy years of trouble-free operation,
EVAPOCYCLE OWNERS MANUAL
 EVAPOCYCLE OWNERS MANUAL Introduction. The Aim of this manual to provide information to the property owner or occupant of the land on which an Evapocycle System has been constructed to insure that the
INSTALLATION MANUAL. Split-type Air Conditioner (Cooling and Heating) Outdoor Unit UQB09JJWC UQB12JJWC. Indoor Unit AQB09JJWC AQB12JJWC
 Outdoor Unit UQB09JJWC UQB12JJWC. Indoor Unit AQB09JJWC AQB12JJWC") AQB09JJ6WC_IM_E_2585 2006.4.17 4:26 PM Page 17 INSTALLATION MANUAL Indoor Unit AQB09JJWC AQB12JJWC Outdoor Unit UQB09JJWC UQB12JJWC ENGLISH FRANÇAIS ESPAÑOL Split-type Air Conditioner (Cooling and Heating)
AQB09JJ6WC_IM_E_2585 2006.4.17 4:26 PM Page 17 INSTALLATION MANUAL Indoor Unit AQB09JJWC AQB12JJWC Outdoor Unit UQB09JJWC UQB12JJWC ENGLISH FRANÇAIS ESPAÑOL Split-type Air Conditioner (Cooling and Heating)
RWC Issue: F. Description: ARISTON WALL CANOPY Model Numbers: ARCH90BIX. Model may vary slightly from images pictured. All measurements are in mm.
 RWC Issue: F Description: ARISTON WALL CANOPY Model Numbers: ARCH90BIX Model may vary slightly from images pictured. All measurements are in mm. 1 Overview Pre-installation Thank you for purchasing a quality
Congratulations with your purchase of our high quality, corrosion-free hot water cylinder (HWC).
.") Congratulations with your purchase of our high quality, corrosion-free hot water cylinder (HWC). Please follow the installation instructions carefully, AND check the final installation according to the
Congratulations with your purchase of our high quality, corrosion-free hot water cylinder (HWC). Please follow the installation instructions carefully, AND check the final installation according to the
Installer manual GreenMaster-HP
 Installer manual GreenMaster-HP Transport and installation Ventilation unit IHB EN 1747-2 8017172 2 GreenMaster-HP Transport and installation Introduction Here you can read about how best to handle the
INDUSTRIAL VACUUM CLEANER WITH AUTO START/STOP
 INSTRUCTIONS FOR INDUSTRIAL VACUUM CLEANER WITH AUTO START/STOP MODEL NO: PC200SDAUTO.V3 Thank you for purchasing a Sealey product. Manufactured to a high standard, this product will, if used according
BioMaster 250/350/600 BioMaster Thermo 250/350/600
 Downloaded from www.watergardeningdirect.com BioMaster 250/350/600 BioMaster Thermo 250/350/600 A BMR0003 B BMR0004 2 BioMaster 250/350/600, BioMaster Thermo 250/350/600 C D BMR0021 BMR0022 3 Downloaded
PLANTS. Interactive Science Book. Created by Cristina Schubert
 PLANTS Interactive Science Book Created by Cristina Schubert JOURNAL What do you think plants need to grow and live? 1 What Plants Need Plants are living things that must have certain things or basic needs
Heater for BRP Commander. Caution: Before using this product, read this manual and follow all safety instructions. Owner s Manual
 Owner s Manual Model: Can Am Commander Heater for BRP Commander Caution: Before using this product, read this manual and follow all safety instructions. Safety Instructions Kit Contents Tool Requirement
CLIM9000CE PORTABLE AIR CONDITIONER USER MANUAL
 CLIM9000CE PORTABLE AIR CONDITIONER USER MANUAL Please read this user manual before using this innovative Air Conditioner and keep it safe for future reference. SAFETY INSTRUCTIONS Important! Carefully
Direct Vent Training & Installation Instructions for Venting 40/50 gallon models Telescoping Vent Kit (standard)
") Choosing Location of the water heater This water heater is of the direct vent design. It takes all of its fresh air for combustion from outside the building which it is installed. It also vents the combustion
Choosing Location of the water heater This water heater is of the direct vent design. It takes all of its fresh air for combustion from outside the building which it is installed. It also vents the combustion
NFT. Instructions & Grow Guide
 NFT Instructions & Grow Guide WWW.NUTSYSTEMS.CO.UK 01695 554 080 01226 320 850 0121 289 3450 Raising seeds and cuttings RAISING TRANSPLANTS FROM SEED Ensure your growing environment is good enough for
INSTALLATION INSTRUCTIONS UNDERCOUNTER DISHWASHERS
 INSTALLATION INSTRUCTIONS UNDERCOUNTER DISHWASHERS VIKING 111 Front Street Greenwood, Mississippi 38930 USA (662) 455-1200 IMPORTANT - PLEASE READ AND FOLLOW Before beginning - please read these instructions
IMPORTANT INFORMATION. Revised Dishwasher Installation Instructions
 IMPORTANT INFORMATION Revised Dishwasher Installation Instructions To obtain a revised copy of the entire Dishwasher User s Manual, go to www.eurotechappliances.com. SPECIAL EDITION 11-20-02 SAVE THESE
DOMESTIC & COMMERCIAL PLUMBING SYSTEMS FURTHER INFOMATION
 DOMESTIC & COMMERCIAL PLUMBING SYSTEMS FURTHER INFOMATION Hot and Cold water distribution pipework Sizing of pipework For everyday plumbing in an average sized building a rule of thumb can be used when
Easy installation in both new construction and retrofit RN80L RN110L READ AND SAVE THESE INSTRUCTIONS INSTALLATION GUIDE
 READ AND SAVE THESE INSTRUCTIONS RN80L RN0L ULTRA Pro TM Ventilation Fan / Light / Night Light with ULTRAQuick TM Installation Technology INSTALLATION GUIDE Easy installation in both new construction and
Portable Air Conditioner USER MANUAL
 AC12 AC12HP Portable Air Conditioner USER MANUAL Thank you for choosing this innovative Amcor air conditioner. We suggest that you keep this manual in a safe place for future reference. It describes the
User Manual for Separera 30
 User Manual for Separera 30 User Manual for Separera 30 Congratulations on your purchase of a Separera 30. Before installing your new Separera 30, we recommend that you read through this instruction in
Work-Shed Vac 1100 Watt
 Work-Shed Vac 1100 Watt Operation Manual 3 Year Replacement Warranty WVG-951 To view the full range visit: www.ozito.com.au 0209 SPECIFICATIONS MODEL NO. WVG-951 Motor: Input: Max. vacuum: Hose length:
Owner s Manual FS-10/FreshSpa
 Owner s Manual FS-10/FreshSpa Table of Contents Product Features................ Page 2 Parts List....................... Page 3 Configuration................... Page 4 Installation.....................
Easy installation in both new construction and retrofit. READ AND SAVE THESE INSTRUCTIONS Installer: leave this guide with homeowner.
 TM Models ZQ80-GPE ZQ0-GPE Multi-Speed Ventilation Fan INSTALLATION GUIDE READ AND SAVE THESE INSTRUCTIONS Installer: leave this guide with homeowner. Easy installation in both new construction and retrofit
Easy installation. EZ80N EZ Fit Ventilation Fan INSTALLATION GUIDE READ AND SAVE THESE INSTRUCTIONS. Table of Contents
 READ AND SAVE THESE INSTRUCTIONS EZ80N EZ Fit Ventilation Fan INSTALLATION GUIDE Easy installation Table of Contents Warnings and Cautions Operation Cleaning and Maintenance Troubleshooting Typical Installation
Multiplexing Installation Instructions
 KOLD-DRAFT CLASSIC GB430/440/450 GB630/640/650 GB1220/1240/1250 Multiplexing Installation Instructions KOLD-DRAFT Ice Machine Products 1525 East Lake Road, Erie, PA 16511-1088 814/453-6761 FAX 814/455-6336
Unlimited Capacity. Odor free. Easy handling. Waterless. Environmentally friendly. Feels like home. Comfort wherever you are.
 Unlimited Capacity Odor free Easy handling Waterless Environmentally friendly Feels like home Comfort wherever you are Separett VILLA 5-year guarantee www.separett.com Separett A complete toilet system
DC Heat Recovery Unit MVHR Wholehouse heat recovery unit
 DC Heat Recovery Unit MVHR Wholehouse heat recovery unit Stock Ref. N DC Heat Recovery Unit MVHR 443423 Installation, Maintenance & Users Instructions PLEASE READ INSTRUCTIONS IN CONJUNCTION WITH ILLUSTRATIONS.
Zip Econoboil. On wall boiling water. Installation instructions & user manual. Model number: ,
 Zip Econoboil On wall boiling water. Model number: 305542, 303542 1 Table of contents Intended Use... 2 Warnings and precautions... 3 Before installation... 5 Technical specification... 6 Installation
Media Service Instructions 1500 Series BAT Media Plants
 R Media Service Instructions 1500 Series BAT Media Plants J-500 MEDIA SERVICE Read these instructions and perform every step. After servicing 2 or 3 installations, you will only have to refer to these
Installation Instructions
 Installation Instructions KFN 9855 ide en - CA Installation, repair and maintenance work should be performed by a Miele authorized service technician in accordance with national and local safety regulations
Compact Cyclonic Bagless Upright Vacuum Cleaner
 Compact Cyclonic Bagless Upright Vacuum Cleaner Model Number: RHUV20MR05 For Customer Services & Spare Parts please call 0345 209 7461 Opening times: Monday - Friday 8am 8pm & Saturday 9am 1pm Or visit
DOUBLE DISHDRAWER TM DISHWASHER
 DOUBLE DISHDRAWER TM DISHWASHER DD60DA & DD60DC models INSTALLATION GUIDE NZ AU GB IE 591151C 08.17 WARNING! Electrical shock hazard Before installing the dishwasher, remove the house fuse or open the
22 Water Fall Instructions
 1 of 12 22 Water Fall Instructions 2 of 12 Parts Hood - 1 Tray - 1 Water Distribution Unit with Baffling Pad - 1 Pebble Shelf - 1 Pebbles in bag - 1 Pump - 1 1 Grabber Screw - 15 2.5 Grabber Screw - 5
SILENT 12 PORTABLE AIR CONDITIONER USER MANUAL
 SILENT 12 PORTABLE AIR CONDITIONER USER MANUAL Thank you for choosing ElectriQ Please read this user manual before using this innovative Air Conditioner and keep it safe for future reference. Visit our
Tornado Operations & Maintenance Manual
 Tornado Industries, LLC 333 Charles Court West Chicago, IL 60185 www.tornadovac.com Tornado Operations & Maintenance Manual MODEL NO. 99414 Form No. L9740AB Tornado Industries, LLC. All rights reserved
Dishwasher Installation Instructions DW 24XT/DW 24XV
 Dishwasher Installation Instructions DW 24XT/DW 24XV Installation Instructions Dishwasher BEFORE YOU BEGIN Read these instructions completely and carefully. IMPORTANT Observe all governing codes and ordinances.
Installation and handlinginstructions for Mullis biological toilets.
 Installation and handlinginstructions for Mullis biological toilets. Please read the instruction before starting the installation and follow the handlinginstructions. The systems best functional temperature
User Guide Compact-7 series
 User Guide Compact-7 series Boiler-CH Calorifier Combi Introductory remarks Congratulations on the purchase of your Kabola Compact 7. Kabola has been a manufacturer of oil-fired heating systems since 1947.
Flue Installation Manual
 Flue Installation Manual Rinnai FFSS (Stainless Steel) flue systems Rinnai FFSS (Stainless Steel) coaxial flue system, suitable for use with the following Rinnai internal continuous flow water heater models:
INSTALLATION MANUAL. Split-type Air Conditioner (Cooling and Heating) Indoor Unit AQB18J6WC AQB24J2WC. Outdoor Unit UQB18J6WC UQB24J2WC
 Indoor Unit AQB18J6WC AQB24J2WC. Outdoor Unit UQB18J6WC UQB24J2WC") AQB8J6WC_IM_E_25864 2006.4.4 3:29 PM Page 7 INSTALLATION MANUAL Indoor Unit AQB8J6WC AQB24J2WC Outdoor Unit UQB8J6WC UQB24J2WC ENGLISH FRANÇAIS ESPAÑOL Split-type Air Conditioner (Cooling and Heating)
AQB8J6WC_IM_E_25864 2006.4.4 3:29 PM Page 7 INSTALLATION MANUAL Indoor Unit AQB8J6WC AQB24J2WC Outdoor Unit UQB8J6WC UQB24J2WC ENGLISH FRANÇAIS ESPAÑOL Split-type Air Conditioner (Cooling and Heating)
2. It should be capable of supplying requisite amount of water for fire fighting. 3. It should be cheap with the least capital construction cost
 2 Requirements of Good Distribution System 1. It should be capable of supplying water at all the intended places within the city with the reasonably sufficient pressure head. 2. It should be capable of
HFG 12 and 24 Hydrogen Generators Installation Instructions
 HFG 12 and 24 Hydrogen Generators Installation Instructions Model 12 Model 24 PLEASE READ THESE INSTRUCTIONS FROM BEGINNING TO END BEFORE STARTING YOUR INSTALLATION. If you are still having problems after
It s only Natural EXCELET MANUAL. Ver Phone: or Web: ABN
 It s only Natural EXCELET MANUAL Ver. 1711 Phone: 07 3889 6144 or 1300 138 182 Email: info@ecoflo.com.au Web: www.ecoflo.com.au ABN 33 606 583 895 Please call your local distributor for support if required.
Redneck Air Conditioner
 Redneck Air Conditioner I have been somewhat successful in gleaning information from multiple sources and have put together a portable 12 volt and ice powered air conditioner. In an effort to give back,
MAXI PUMP INSTRUCTION MANUAL NE6151B /NE6171B READ THIS MANUAL CAREFULLY BEFORE USING YOUR MAXI PUMP
 MAXI PUMP INSTRUCTION MANUAL NE6151B /NE6171B READ THIS MANUAL CAREFULLY BEFORE USING YOUR MAXI PUMP 8104 MAXI-PUMP PARTS BREAKDOWN Re f # 1 2 3 4 5 6 7a 7b 8 9 10 11 12 13 14 15 16 2 Part # NEP2134 NEP2135
Window Kit Installation Instructions
 Window Kit Installation Instructions Preparations for installing the window kit You must vent your portable air conditioner when running it in cooling mode or heat mode (certain models). Your unit includes
Comfort. Odour free Easy handling. Waterless. Environmentally friendly. Feels like home. Comfort wherever you are.
 Comfort Odour free Easy handling Waterless Environmentally friendly Separett FLAME 3-year guarantee Feels like home Comfort wherever you are Separett VILLA 5-year guarantee www.separett.com Separett a
USER MANUAL SILENT16 PORTABLE AIR CONDITIONER
 USER MANUAL SILENT16 PORTABLE AIR CONDITIONER Thank you for choosing electriq Please read this user manual before using this innovative Air Conditioner and keep it safe for future reference. Visit our
How Seeds Become Plants - Worksheet
 Name: TEACHER S COPY How Seeds Become Plants - Worksheet Think about what part of a plant contains seeds. Where on the plant would you find an apple or tomato seed? In the fruit Are coconuts seeds? How
Instruction Manual for Electric Marine Toilets LT-0E and LT-1E
 Instruction Manual for Electric Marine Toilets LT-0E and LT-1E www.nuovarade.com Nuova Rade Electric toilets LT-0E and LT-1E,can be supplied as either 12V or 24V and have been designed to make your life
How to become Composting Champions
 Why should we compost? The pupils will find the whole experience very fascinating. Some may shriek yuck at the beginning, but as they get used to the routine they will want to do it all the time. To become
INSTALLATION INSTRUCTIONS
 INSTALLATION INSTRUCTIONS INSTALLATION REQUIREMENTS Tools and Parts Gather required tools and parts before starting installation. Tools needed: Optional tools: Flashlight Options: Bucket Pedestal: You
TOOLS REQUIRED: Crimping tool A/C Recovery Unit Wrench set up to 1 ¼ 4 Hole saw
 INSTALL INSTRUCTIONS PT-A-401 HVAC UNIT for 2003-2018 CHEVROLET/GMC VAN (For 2007 ALL WHITE Prisoner Transport Inserts ONLY) Not Recommended for diesel engine application because of lack of space needed
MODEL MC-UL592 MC-UL594 POWER SOURCE. 230V - 240V ~ 50 Hz MAX INPUT 1400 W 1500 W NOMINAL INPUT DIMENSIONS (W x L x H)
") Order Number: PMMA091040CE Vacuum Cleaner MC-UL592/MC-UL594 SPECIFICATION MODEL MC-UL592 MC-UL594 POWER SOURCE 230V - 240V ~ 50 Hz MAX INPUT 1400 W 1500 W NOMINAL INPUT DIMENSIONS (W x L x H) 1200-1300
Order Number: PMMA091040CE Vacuum Cleaner MC-UL592/MC-UL594 SPECIFICATION MODEL MC-UL592 MC-UL594 POWER SOURCE 230V - 240V ~ 50 Hz MAX INPUT 1400 W 1500 W NOMINAL INPUT DIMENSIONS (W x L x H) 1200-1300
Piccolo Cyclonic Vacuum Cleaner
 Piccolo Cyclonic Vacuum Cleaner For Household Use Only Model No.: YL-60-120 Item No.: 900235 220-240Va.c. 50Hz 1400W Max Rev 1 Note: The specifications and/or components of this appliance are subject to
C C C-600 INSTRUCTION MANUAL ICE CUBES MACHINE. (including: exploded views, part list & diagrams) CUISIMAT
 CUISIMAT") C-250 - C-400 - C-600 INSTRUCTION MANUAL ICE CUBES MACHINE (including: exploded views, part list & diagrams) Art.no.: *706.025 / *706.040 / *706.060 1 CONTENTS PRECAUTIONS... 2 INSTALLATION... 3-4 OPERATION...
C-250 - C-400 - C-600 INSTRUCTION MANUAL ICE CUBES MACHINE (including: exploded views, part list & diagrams) Art.no.: *706.025 / *706.040 / *706.060 1 CONTENTS PRECAUTIONS... 2 INSTALLATION... 3-4 OPERATION...
PORTABLE AIR CONDITIONER (LOCAL)
") EN PORTABLE AIR CONDITIONER (LOCAL) OPERATING INSTRUCTIONS Read the instructions carefully before operating the appliance or carrying out maintenance work. Observe all the safety instructions; failure
EN PORTABLE AIR CONDITIONER (LOCAL) OPERATING INSTRUCTIONS Read the instructions carefully before operating the appliance or carrying out maintenance work. Observe all the safety instructions; failure
The 3 Common Landscape Challenges. & How to Transform them into Features
 The 3 Common Landscape Challenges & How to Transform them into Features Think That Your Landscape is Doomed Because of its Limited Size, Slope, or Drainage Issue? There are many common issues that homeowners
HOTLINE:
 You are about to install a product that is designed to outlast the life-cycle of the building. Once installed the unit will operate continuously for 5 years and beyond without a major service. Please therefore
EVAC Commercial Marine Equipment TOILET TECHNICAL DATA EVAC 90, SQUATTING TOILET. To main vacuum line, connection Ø50.
 Date: 25 Jan 2005 Doc. 1:114E TECHNICAL DATA 5979301 EVAC 90, SQUATTING To main vacuum line, connection Ø50 Service door 600 Push button Fresh water supply connection 1/2" MPT BSP 700 700 Flushing mechanism
173 Index of Materials
 73 Index of Materials IBC Tank 9 Polystyrene Sheet 2 200 Litter Blue Barrels 0 Plumbers Tape (Teflon) 3 Fish Tank Shading Cable Ties 4 Plastic Net 2 Waterproof Eclectic Box 5 Concrete Blocks 3 0 mm Wide
Top Control Dishwasher
 INSTALLATION GUIDE Top Control Dishwasher NS-DWH2BS8/NS-DWH2SS8/NS-DWR2BS8/NS-DWR2WH8/NS-DWR2SS8 Before using your new product, please read these instructions to prevent any damage. Contents Introduction......................................................................................................
Installation. Please keep this manual for future reference.
 Installation Tecma Bathroom Anywhere Owner s and Installation Manual Please keep this manual for future reference. Read ALL these instructions before installing the Tecma Bathroom Anywhere unit. Warning
BMW E36 Thermostat Removal And Coolant Flush
 BMW E36 Thermostat Removal And Coolant Flush Disclaimer: The cooling system is critical to the proper operation of your car. Failure to properly install all of the components of the cooling system could
Picture 1 The Bios Urn next to its HUMAN packaging. BIOS URN FACT PACK
 FACT PACK BIOS URN FACT PACK Picture 1 The Bios Urn next to its HUMAN packaging. 1 2 Picture 2 The Bios Urn PET packaging. The only difference between the Human and Pet urns is the decoration on thebox,
INSTALLATION & COMMISSIONING INSTRUCTIONS Model: 990 CH
 INSTALLATION & COMMISSIONING INSTRUCTIONS Model: 990 CH TABLE OF CONTENTS General Safety Information Page 2 Chimney and Flue Information Page 3 Installing the Appliance Page 4 Flue Draught Page 5 Chimney
TILE ROOF DUCTING KIT. instruction manual VDKRT 12 MONTH WARRANTY
 TILE ROOF DUCTING KIT instruction manual VDKRT 12 MONTH WARRANTY Contents Guide to the Ducting Kit 2 Caring for the Environment 3 Safety Information and Warnings 4-5 Items in the Box 6 Installation Instructions
GT842 INSTALLATION MANUAL. ATTENTION INSTALLERS: These instruc ons must be le with the customer
 INSTALLATION MANUAL GT842 www.insigniarange.co.uk 30 Day Technical Support: 01908 226545 (NOTE: This service is only available to customers from the day of delivery, please have your supplier s details
2 SPEED PUMP INSTRUCTION MANUAL READ THIS MANUAL CAREFULLY BEFORE USING YOUR 2 SPEED PUMP
 2 SPEED PUMP INSTRUCTION MANUAL READ THIS MANUAL CAREFULLY BEFORE USING YOUR 2 SPEED PUMP 8308 PUMP PARTS BREAKDOWN Ref # Part # Manf. # Descrip on 1 NEP2134 AC 81361 PUMP LID 2 NEP2135 AC 81396 PUMP LID
LV100 Standard LV100PC Pull Cord LV100T Timer LV100H Humidistat LV100HP Humidistat and Pull Cord LV100PIR
 Installation and operating instructions LV100 Standard LV100PC Pull Cord LV100T Timer LV100H Humidistat LV100HP Humidistat and Pull Cord Safety extra low voltage toilet/bathroom 100mm fan range Integral
Installation Electric Dryers Instructions 01
 Installation Electric Dryers Instructions 01 Questions? Call 800.GE.CARES (800.432.2737) or visit our Web site at: GEAppliances.com This is the safety alert symbol. This symbol alerts you to potential
MiniVap Humidifier Models LMV2 & LMV4
 Ä MiniVap Humidifier Models LMV2 & LMV4 Please read these Instructions BEFORE Installation and Start-up Failure to observe manufacturer s recommendations may invalidate warranty Vapac Humidity Control
Portable Air Conditioner and Heater With Heat Pump Technology Operating Instructions. Model No.: PH3-12R-03 Reference No.: KY2-34
 Portable Air Conditioner and Heater With Heat Pump Technology Operating Instructions 3046364 Model No.: PH3-12R-03 Reference No.: KY2-34 Thank you for choosing a Soleus Air Portable Air Conditioner. This
For our present, For their future. Version 11.04
 For our present, For their future. SFH-S1 Series Solar Water Heater Assembly Manual Content http://www.sunflower-solar.com/ 1. FEATURES...3 2. SOLAR WATER HEATER SIZE AND WEIGHT...4 3. HOW TO TRANSPORT
WC2 & WC3 Installation & Maintenance Instructions
 WC2 & WC3 Installation & Maintenance Instructions Please leave this instruction booklet with the home owner as it contains important guarantee, maintenance and safety information WC3 shown WC2 WC3 IMPORTANT
INSTALLATION AND USER S MANUAL COOKER HOOD RS-600/A-S
 INSTALLATION AND USER S MANUAL COOKER HOOD RS-600/A-S RS-600 (CHS60SS)-GB-05.indd 1 6/8/2010 9:30:59 AM TABLE OF CONTENTS 1. Introduction 2 2. Safety precaution 2 3. Intended use 3 4. Parts supplied 3
1. Take the hoses and elbow out of the holders, depending on model. max. 100 cm. min. * cm
 Safety instructions The washing machine is heavy - take care when lifting. Caution: frozen hoses may rip/burst. Do not install the washing machine in areas exposed to frost or outdoors. The washing machine
Portable Air Conditioner with Evaporative Technology PE6-10R-03 Operating Instructions. Model No. PE6-10R Soleus Air International
 Portable Air Conditioner with Evaporative Technology PE6-10R-03 Operating Instructions 3046364 Model No. PE6-10R-03 2011Soleus Air International Thank you for choosing a Soleus Air Portable Air Conditioner.
BLADE BATH SHOWER MIXER DECK MOUNTED CHR WITH KIT INSTALLATION INSTRUCTIONS P BS-E A/2
 BLADE BATH MIXER DECK MOUNTED CHR WITH KIT 20007014600 INSTRUCTIONS P5-65511339-1-BS-E A/2 20007014600 INTRODUCTION DIMENSIONS Please read these instructions carefully and keep in a safe place for future
INDEX. Granita Machine. Operation a nd Instruction Manual
 INDEX Index 2 Unpacking 3 Positioning the machine 3 Familiarizing yourself with the Controls 4 Cleaning and Sanitizing instructions 5 Part ONE. Disassembly and Cleaning of Dispenser 5 Part TWO. Re-assemble
SPA DE USO PRIVADO SPA FOR PRIVATE USE SPA POUR UN USAGE PRIVÉ SPA FÜR PRIVATE NUTZUNG SPA PER USO PRIVATO SPA PARA USO PRIVADO SPA VOOR PRIVE-GEBRUIK
 SPA DE USO PRIVADO SPA FOR PRIVATE USE SPA POUR UN USAGE PRIVÉ SPA FÜR PRIVATE NUTZUNG SPA PER USO PRIVATO SPA PARA USO PRIVADO SPA VOOR PRIVE-GEBRUIK MANUAL DE INSTALACIÓN INSTALLATION MANUAL MANUEL D
DOUBLE DISHDRAWER TM DISHWASHER
 DOUBLE DISHDRAWER TM DISHWASHER DD4DDFT & DD4DVT models INSTALLATION GUIDE US CA 5985 A 08.7 SAFETY AND WARNINGS! WARNING! Electrical Shock Hazard Before installing the dishwasher, remove the house fuse
Installation Instructions
 Installation Instructions Built-In Dishwasher If you have questions, call 800-944-9400(US),800-245-8352(Canada)or visit our website at: www.frigidaire.com BEFORE YOU BEGIN Read these instructions completely
USER MANUAL. Portable Air Conditioner and Heater With Heat Pump Technology PAC18. Please read this manual carefully prior to operating the product.
 USER MANUAL Portable Air Conditioner and Heater With Heat Pump Technology PAC12 PAC15 PAC18 Please read this manual carefully prior to operating the product. TABLE OF CONTENTS INTRODUCTION... 3 IMPORTANT
SUBCOURSE EDITION EN US ARMY ENGINEER SCHOOL PLUMBING FIXTURES (PLUMBING IV)
") SUBCOURSE EDITION EN5113 5 US ARMY ENGINEER SCHOOL PLUMBING FIXTURES (PLUMBING IV) US ARMY PLUMBER MOS 51K SKILL LEVELS 1 AND 2 COURSE PLUMBING FIXTURES (PLUMBING IV) SUBCOURSE NO. EN5113 US Army Engineer
SUBCOURSE EDITION EN5113 5 US ARMY ENGINEER SCHOOL PLUMBING FIXTURES (PLUMBING IV) US ARMY PLUMBER MOS 51K SKILL LEVELS 1 AND 2 COURSE PLUMBING FIXTURES (PLUMBING IV) SUBCOURSE NO. EN5113 US Army Engineer
Autofill counter top water boiler
 Autofill counter top water boiler Please read and keep these instructions For Burco counter top water boilers 76500 (SKU 444448531) and 76502 (SKU 444448533) Getting the best from your water boiler Remove