INSTRUCTIONS AND SPARE PARTS
|
|
|
- Eustacia Gaines
- 5 years ago
- Views:
Transcription


1 COM1000i DEPOSITOR INSTRUCTIONS AND SPARE PARTS Manual Part # COMi-Ins-UK 12/08/2010 Translation from the Original Instructions
2 Table of Contents Table of Contents 2 Safety Instructions and Warnings 5 Introduction 6 Contacting Unifiller 6 Machine Description 7 Serial Number location 8 Controls 9 Main control enclosure 9 Turntable Buttons 9 Swing Nozzle Components 10 Turntable Position 11 Safety 12 Air Requirements 12 Electrical Power Requirements 13 Assembly and Operation 14 Depositing Accessories Set Up 14 Hopper Safety Plug 14 Priming/Preparing to Deposit 15 Deposit Speed Control 15 Deposit Volume Adjustment 16 Purge Button 16 Setting up the Nozzles for Top and Side Icing 17 Nozzle Gap Adjustment 18 Set up of Middle fill nozzle. 19 Enrobing Trouble Shooting 20 Turntable Delay 20 Turntable speed 21 Tips for achieving the best results with the COM1000i 22 Turntable Factory Settings 22 Overlap: 22 Over rotate: 22 Working with the machine as a Depositor 23 2
3 Disassembly For Cleaning / Sanitizing 24 General 24 Swing nozzle O ring removal 26 Cleaning 28 Sanitizing 28 Maintenance 29 O Ring Care 30 Daily 30 Weekly 30 3 Months 30 O Ring and Gasket Part numbers 30 Spare parts 31 Product Cylinder Sizes 31 Parts Identification 32 UNI Block 32 Pneumatic Components 1 33 Pneumatic Components 2 33 Front Pneumatic Components 34 Underside 34 Volume Adjustment 35 Lower Frame 36 Upper Frame 37 Height Adjustment 37 Table Parts 1 38 Table Parts 2 38 Rear Turntable 39 Electrical Parts - Turntable 39 Servo Motor Repair Kits 40 Turntable 40 Depositing with Hot Product 40 Pneumatic schematic 41 Electrical Schematic 42 High Voltage 42 Low Voltage (24 volt) 43 3
4 Control Box 44 Trouble Shooting 46 Mechanical 46 Electrical 49 CE Mark 51 Sound Level Measurement 52 4
5 Safety Instructions and Warnings These safety instructions must be read prior to operating, sanitizing or servicing the equipment. All machines have a risk of personal injury wherever moving parts are involved in their operation. UNIFILLER has taken all possible precautions to reduce and wherever possible eliminate the dangers associated with moving parts. Having all operators of this equipment read and abide by the instructions in this manual will further reduce the risk of personal injury. Turn air off and remove supply line from machine before attempting to clean, dismantle, or service the machine. Keep fingers and hands away from all mechanical moving parts including the hopper inlet and deposit nozzle outlet. Do not try to service the Air regulator / Water filter with the air supply line connected. For servicing or technical support please contact UNIFILLER directly or one of its authorized suppliers or dealers. Do not run product or water, with temperatures exceeding 140 deg F (60 Deg C), through the machine. For Product Temperatures that exceed 140 deg F (60 Deg C) up to 180 deg F (82 Deg C), please use HOT changeover parts on the machine. Operating Air pressure should not be adjusted to exceed 80 P.S.I. (5.5 Bar) on the Air regulator / Water filter pressure gauge. Always wash out the machine after use, dismantle and lubricate all the seals (As per cleaning instructions in this manual). Follow the enclosed instructions carefully before operating the machine for the first time, or maintenance. Before use ensure that the locks on the wheels are engaged. Unifiller Systems recommends the use of personal protection equipment approved by the safety regulators in the country of use. IMPORTANT: All stainless steel parts are coated with a protective coating at the factory and therefore any stainless steel parts that may come into contact with product must first be washed in hot water and detergent. 5
6 Introduction Thank you for purchasing Unifiller Equipment. We are sure you will get years of trouble free use and excellent productivity from your new investment. Please take a few minutes to read this manual and familiarize yourself with the layout of the controls, and the set up and operating procedure. If you have any questions regarding the setting up, or operation of your equipment please contact us. Contacting Unifiller Manufacturer Unifiller Systems Incorporated, 7621 Macdonald Road Delta, B.C. V4G 1N3 Telephone Main: Toll Free: Fax : parts@unifiller.com OR Contact your local authorized Unifiller dealer. Please see our website for dealer contact Please remember to supply your company name, telephone number, and a contact name when ordering parts. EU Contact Barclay Phelps, Atlantic House, High Road Wood Green London N22 8HH 6

7 Machine Description The COM1000i is a computer controlled Depositor designed to apply product to the top and sides of round Cakes. The COM1000i Servo turntable speed is automatically adjusted by a computer, compensating for changes in icing consistency. This eliminates the requirement for operator adjustment during production. It may also be used as a stand alone depositor. Intended uses Batter for cakes, muffins, etc Fruit fillings Icings, frostings and toppings Jams and jellies Creams, custards and mousse Anything that can be squeezed through a pastry bag Non intended uses Dry goods Large chunks Liquids Stiff non settling products # Description 1 14 Gallon / 52 Lt Hopper. 2 Control box. 3 Deposit speed control. 4 Accessory connection. 5 Volume adjustment. 6 Height adjustment. 7 Hopper safety. 8 Air regulator / filter, Air supply slide valve. 9 Product cylinder 10 Table lock (not shown). 11 Locking wheels. 12 TSI nozzle side gap adjustment handle. 13 Deposit button. 14 Turntable enclosure. 15 Adjustable turntable. 16 Turntable spin (not shown). 17 TSI nozzle 18 Swing valve. 19 Uni block. 20 Uni valve air cylinder 7

8 Serial Number location Quote this number when ordering spare parts It is located as shown, stamped into the side of the base 8


9 Controls Main control enclosure # Description 1 Power Indicator light 2 Turntable Direction: Sets rotation direction of the turntable during spin only functions. 3 Turntable Speed: Sets rotational speed of the turntable during spin only function. 4 Turntable Delay: Delays turntable rotation start in relation to the deposit start. 5 Main Power Switch: Turns the main power to the machine On or Off. Turntable Buttons # Description 1 Spin only 2 Deposit 9

10 Swing Nozzle Components # Description 1 Swing speed air flow control 2 Swing valve air cylinder 3 Air Cylinder Clevis 4 Swing nozzle housing 5 Nozzle retaining screw 6 TSI Nozzle Note: The swing valve is factory set for slow retraction. 10


11 Turntable Position The turntable must be in either of the following two positions for safe transport and operation: Stored away and locked in position at the rear of the depositor, or moved fully out and locked in the operational position. Table lock in the down locked position. 11


 to the quick connector (1) which is located on the bracket next to the main frame upright.")
12 Safety Never leave or use the machine with the table swung out at the side, this may cause the balance of the machine to be unstable. Air Requirements Important: It is recommended that the compressed air supplied to the depositor be run through an air dryer before connecting to machine. Please contact UNIFILLER for details. Use a airline with a minimum inside diameter of 3/8 (10mm) Connect your supply air hose that comes from your compressor (not supplied) to the quick connector (1) which is located on the bracket next to the main frame upright. Set the air pressure gauge on the machine to 80 P.S.I. (5.5 Bar) by pulling up the knob (2), adjusting the air pressure, and then pushing the knob down to lock it. The air supply is controlled by the Red slide valve (1). 12
13 Electrical Power Requirements North America 115 volt single phase 60Hz AC. Europe 220 volt single phase 50Hz AC. The operating voltage is factory set, and is not field adjustable. Please contact Customer care if any change to the operating voltage is required. 13


14 Assembly and Operation Depositing Accessories Set Up The nozzle, Uni valve, hopper safety signal, and the foot pedal airlines are connected to the ports located on the front of the base When using the optional hand held nozzle, the four airlines are connected to the foot pedal port and accessories port. # Description 1 Deposit speed 2 Uni valve connection 3 Purge button 4 Hopper safety 5 Foot pedal or external signal connection 6 Nozzle / accessory connection Hopper Safety Plug The machine will not operate until the plug (1) is connected to the quick disconnect on the front of the base. 14
15 Priming/Preparing to Deposit Before filling the hopper, ensure the machine is assembled correctly with seals in place, and that the correct depositing outlet attachment is fitted, and all clamps are tightened. Remove the foot pedal from its hanger and position it on the floor in a comfortable operating position. After sanitizing (See sanitizing section), Fill the hopper. Connect the depositing attachment and foot pedal to the machine using the appropriate clamps and quick disconnects. Connect the air supply. Depress foot pedal, deposit button or hand held nozzle trigger until product flows from outlet. Deposit Speed Control The deposit speed controls the speed at which the product is placed into the target area. Turn clockwise = decrease deposit speed Turn counter clockwise = increase deposit speed Important: If a deposit speed adjustment is made after the volume has been set, the volume may change slightly, so be sure to re-adjust the deposit volume if required. The deposit 0-100% speed Dial is a calibrated one turn adjustment to obtain the desired speed of delivery of the product mix to the target area 15

 is located on the front base plate.")
16 Deposit Volume Adjustment Press the foot pedal once and 1 measured amount will be deposited. For continuous deposits press and hold. Run the machine 2 or 3 cycles, check the weight of the last deposit. Turn air off, adjust size of deposit by turning the hand wheel at the rear of the machine. Turn air on Make 2 or 3 deposits into a container and check the weight, adjust the volume again if required. If deposit is below 12% on the side scale, change the product cylinder to the next size smaller. Purge Button A Purge button (1) is located on the front base plate. This allows the depositor to be cycled manually without the need of a foot pedal or an external signal. This can be used to prime the depositor, or cycle it during cleaning. This button can also be used if on the rare occasion the depositor becomes stuck mid cycle. Press the button once and the machine will cycle and reset. 16

17 Setting up the Nozzles for Top and Side Icing A well-balanced and properly positioned TSI icing nozzle will give you an equal, level amount of icing in all areas when icing the cake. At UNIFILLER, we balance the icing nozzles with butter cream icing prior to shipping them. In most cases, further balancing is not required. This area of the nozzle has been depressed at the Unifiller factory. This restriction forces the product to flow evenly to the tips of the nozzle. Position your TSI nozzle as shown above for recommended set up. A side and top gap of typically 3/16 to ¼ (5-6.5mm) is recommended. 17


 to be parallel with the turntable. 5.")
. 6.")
18 Nozzle Gap Adjustment This applies to TSI and middle fill nozzles 1. Turn air off and remove supply line from machine. 2. Place the cake on the turntable ensuring it is centered. Correct alignment of middle fill nozzle, same applies to Top and Side nozzle. 3. Swing the nozzle down, (nozzle should line up with the center of the cake). 4. Level the nozzle (loosen clamp and rotate) to be parallel with the turntable. 5. Adjust the distance of the nozzle from the top and the side of the cake. (This gap should equal the required thickness of icing). 6. Adjust side gap using the hand wheel on the right-hand side of the turntable cover. 7. Adjust top gap using the height adjustment hand wheel. 18

19 8. Swing nozzle back to rest position (Up). 9. Reconnect supply line and turn Air on. NOTE: Amount of icing thickness is determined by deposit volume Set up of Middle fill nozzle. Turn air off and remove supply line from machine. Fit middle-icing nozzle to machine. The plastic slider allows for different diameter of cakes to be middle filled. 1. Turn air off and remove supply line from machine. 2. Place cake cardboard and 1 st cake layer onto turntable. 3. Swing the nozzle down and check that it is correctly centered. 4. Adjust both height and sideways position. 5. Reconnect supply line and turn Air on. 19

20 Enrobing Trouble Shooting Wrong! Holes in the icing shown on the side of the cake are caused by the following issues: Cake is not centered on turntable. Icing is not smooth. Top and Side icing nozzle is not close enough to the side of the cake. Icing will not adhere to the cake. Deposit volume is set too low. Deposit speed is too slow.. Holes Remedy: Icing must be smooth and bubble free. Increase deposit volume. or Increase deposit speed. Turntable Delay This function controls how long the cake waits before the turntable starts to rotate. This should be adjusted to delay the spinning of the turntable until the icing adheres in a straight line to the top and side of the cake. When the delay is set correctly, the icing forms a straight edge start (top and side), if it starts to rotate too early, a ragged or S edge is formed at the start. Default value for the turntable Delay is 2.5 on the dial. CORRECT The delay is set correctly; the icing adheres to the cake and then rotates INCORRECT Delay is too short, the table started to rotate too early. This will produce a Ragged edge start. Increase the delay setting. 20
21 Turntable speed The deposit speed dictates the turntable speed; faster deposit speed will result in a faster turntable speed. In most cases adjust deposit speed so that the icing is applied in about 1 second (resulting in RPM) 21
22 Tips for achieving the best results with the COM1000i EVEN CAKES Consistent cake height will result in less touch up and higher production rates with more quality product throughput. If layers do not bake to consistent heights, a slabbing system is recommended. Contact UNIFILLER for details. ACCURATE MIDDLE FILLS Portion control for mid fill operations ensures consistent mid fill thickness. This will have an overall positive affect on cake production by improving final cake height consistency. Use your COM1000i for mid fill operations. Use multiple machines alongside a conveyor for best production rates. Contact UNIFILLER for details. MIDDLE FILL APPLICATION It is recommended that the mid fill icing extend slightly over the edge (providing it is the same icing on the top and side ice). This will compensate for slight differences between the cake layers and allows for optimum top and side icing application. ICING QUALITY Icing must be of a smooth consistency, this is the most important factor in achieving a quality result. ICING THICKNESS The ideal thickness range for best results is 3/16 ¼ on top and on the sides. This will reduce touch-up. Turntable Factory Settings Deposit Delay 2.5 Overlap* 60 DEG Over Rotate* 60 DEG *Overlap and Over Rotate functions have been factory set to suit most applications, Overlap: Sets how much more the turntable will rotate while depositing to a maximum of 453 degrees. This is usually used to close the end and start gap, as well as deposit more than one layer of product for apportion of the cycle. Note: Increasing Overlap will also increase the spin speed (so that the turntable does its rotations by the time the depositor finishes dispensing). Over rotate: Sets how much more the turntable will rotate after depositing has completed to a maximum of 90 degrees over the depositing rotation. This is usually used to clean up the finish and prevent tailing. Note: Over rotate will not affect the spin speed. Please contact Unifiller if a change to these settings is required. 22


23 Working with the machine as a Depositor Various attachment options are available and are operated by a foot pedal, or a hand held nozzle. These are attached by the clamp on the front of the Uni block. Contact Customer care for more details. If you experience splashing of the product when depositing, slow down the deposit speed as described previously. If the product is depositing too slowly, increase the deposit speed. Keep the hopper more than ½ full to avoid air pockets and inconsistent deposits / portions. 23

24 Disassembly For Cleaning / Sanitizing General Sanitizing requires that the food contact parts be disassembled. Note: Always lay parts on a flat tray, never in a pail or bucket. Remove plug from electrical source Turn air off and remove supply line from machine. Scrape down the inside of the hopper. Reconnect supply line and turn air on. Keep depositing until nothing more comes out of the outlet nozzle. Turn air off and remove supply line from machine Pour warm water (maximum 140 deg, F 60 deg C) into the hopper and wipe the inside of the hopper clean. Reconnect supply line and turn air on. Reduce deposit speed. Cycle the rest of the water out of the machine. Repeat the above procedure. Turn air off and remove supply line from machine. Remove depositing nozzle. Disconnect attachment airlines from machine. Connect the red and black quick connects together. This will stop water from entering the air cylinders during cleaning. DO NOT SUBMERGE THE AIR CYLINDERS IN WATER. 24


25 Remove hopper and place top downwards on a sanitary flat surface. Remove the UNI-block valve, by removing the clamp and pulling the assembly out. Slide Air cylinder out of slot. Pull the red safety pin out from the side. Remove the UNI-block Remove the product cylinder by sliding forward. 25


26 Remove the product piston. NOTE: Use O-Ring tool to remove all O-Rings Tip. Place the O rings and clamp gaskets on one of the clamps, this will keep them from getting misplaced. Swing nozzle O ring removal Remove thumb screw Pull nozzle out 26


27 Remove Air cylinder. Pull valve out from body. Remove the two O- rings Use the O-ring pick tool in prying grooves to avoid damage. 27


28 Cleaning Mix 1 to 4 ounces (30-120ml) of Zep F.S. PROCESS CLEANER (green) per gallon (4ltr) of water. Immerse the parts in the solution. Clean all food residues with a cloth or a non-metallic scrubbing pad/brush. Rinse thoroughly with potable water. For the hopper, spray the same solution onto the hopper surface. Clean and sanitize the parts shown, and any attachment parts. # Description 1 Clamp 2 Product cylinder 3 Product piston O ring 4 Product piston 5 Safety pin 6 Hopper gasket 7 Product cylinder O ring 8 Uni block 9 Uni valve O rings 10 Uni valve Sanitizing Mix 1 ¼ oz s (120ml) of Zep F.S. SUPERMARKET SANITIZER (red) per gallon (4ltr) of water. Immerse all parts that were previously in the cleaner in the new solution for 1-2 minutes. Rinse thoroughly with potable water. The rest of the machine can be wiped down or washed with a mild detergent. Re Assembly Inspect all O rings and seals for damage or wear; replace if required. Re-lubricate all O rings, and openings they will be inserted into, with food quality grease (as supplied with your machine). Do not lubricate black gaskets. Re-assemble in the reverse order, taking care to center the stainless steel pin of the air cylinder with the cutout in the UNI valve assembly, Re-connect all the airlines 28
 Disconnect the air line from the machine before opening the cover.")

29 Maintenance Turn air off, and remove supply line from machine before any maintenance is performed. IMPORTANT SAFETY NOTES: Move the Red Slide valve to the down position. (1) Disconnect the air line from the machine before opening the cover. Any maintenance to the pneumatics system will require the top cover to be opened. Maintenance personnel will require a Phillips screwdriver to open the cover. If top cover is opened beware of pinch points The screw (1) shown in Red is factory set, and must not be touched. The top cover is locked in place with one screw (2) as shown in the picture. 29

30 O Ring Care The most important components of the machine are the O rings. These must be inspected and maintained daily. All O rings should be a high quality Viton seal as supplied by Unifiller, or your authorized Unifiller dealer. Signs of wear include: Flatness, Abrasions, Cracks, and Cuts Daily After parts have been cleaned, lubricate all O rings, seals and moving parts with food grade grease. Weekly With the air disconnected. Check the air filter/regulator bowl and if necessary clean the bowl and empty any accumulated water. 3 Months With the air disconnected. Check the condition of the White filter in the Air regulator / Water filter, and replace if contaminated. O Ring and Gasket Part numbers Description Part Number Quantity Required Hopper Gasket /2 Clamp Gasket Uni Valve O ring V Product Cylinder O Ring V per Cylinder 1 (25.4 mm) Product Piston O Ring V per Piston 1 ½ (38.1 mm) Product Piston O Ring V per Piston 2 ½ (63.5 mm) Product Piston O Ring V per Piston 3 (76.2 mm)product Piston O Ring V per Piston The following parts are available from Unifiller or one of its authorized representatives. Part Number Description Item O ring lubricant. 4 oz tube Lubri-film plus O-ring pick tool. 30

31 Spare parts Product Cylinder Sizes To obtain the most accurate deposit volume, 4 different sizes of product cylinder and product piston are available. See chart following. To maintain portion accuracy, it is recommended that the % volume setting for the product piston be set between 12 to 80% of the scale, this will ensure optimum machine performance. Size Piston and Cylinder Volume (oz) Volume (ml) Kits Part Numbers 1 (25.4 mm) oz ml 1.5 (38.1 mm) oz ml 2.5 (63.5 mm) oz ml 3 (76.2 mm) oz ml 31

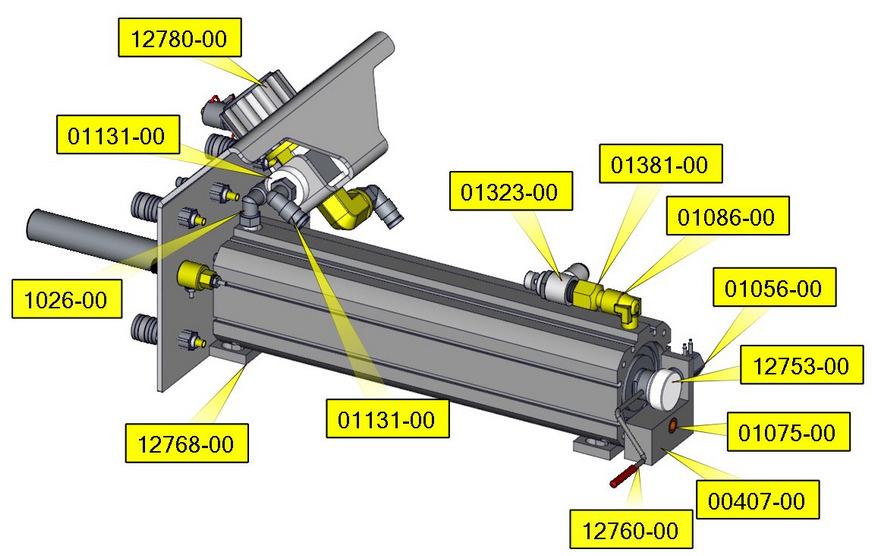
32 Parts Identification It is highly recommended to carry a complete spare set of O rings and seals, as these are vital to the accuracy of the machine. UNI Block 32

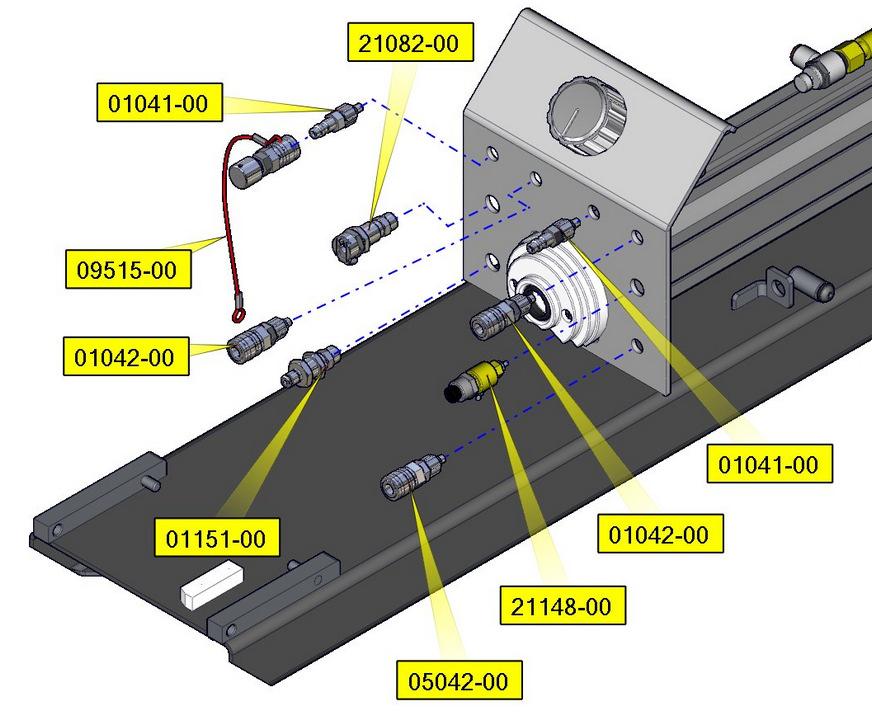
33 Pneumatic Components 1 Pneumatic Components 2 33

34 Front Pneumatic Components Underside 34
35 Volume Adjustment 35

36 Lower Frame 36

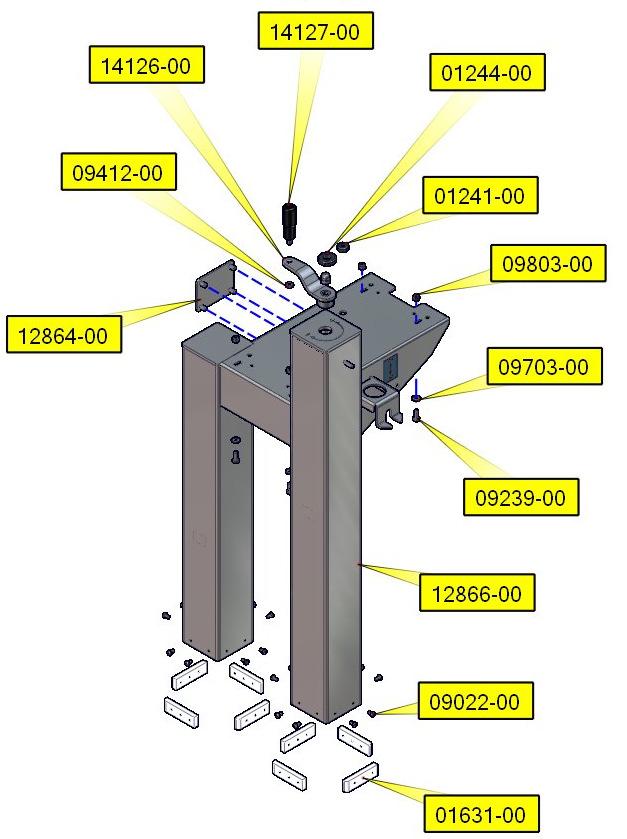
37 Upper Frame Height Adjustment 37


38 Table Parts 1 Table Parts 2 38


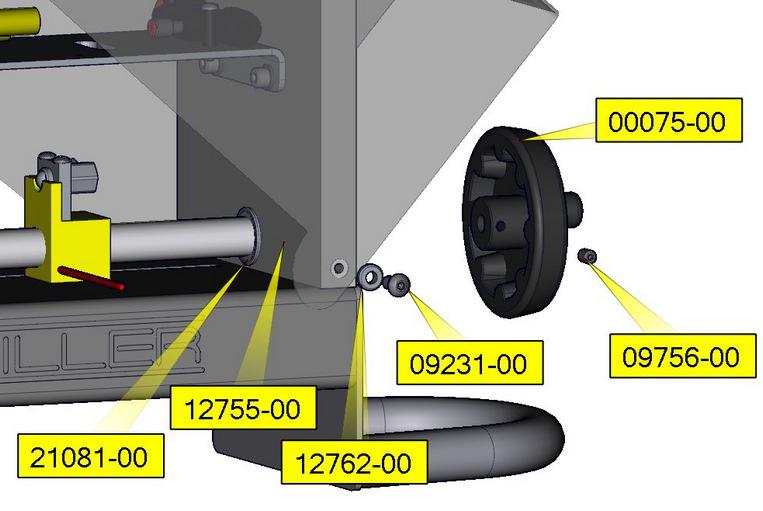
39 Rear Turntable Electrical Parts - Turntable 39
40 Servo Motor Repair Kits Pt# Description Servo motor and 5 meter cable.(stand alone depositor) Servo motor and 10 meter cable.(cake line use) Turntable # Small Large Depositing with Hot Product The depositor is supplied with standard product piston and Uni valve, used for products up to 60 C/140 F. For products above 60 C/140 F and up to 82 C /180 F, a hot product piston and Uni valve should be used. Contact Unifiller customer service for details. Hot UNI valve part number: For hot product piston part numbers see section spare parts- Product Cylinder Sizes. The HOT versions of both parts are identified by the word HOT stamped into the end of each one. 40
41 Pneumatic schematic 41
42 Electrical Schematic High Voltage 120V NORTH AMERICAN PART # V EUROPEAN PART # V AUSTRALIA PART #
43 Low Voltage (24 volt) 43
44 Control Box 44
45 45


46 Trouble Shooting IMPORTANT SAFETY NOTE: The machine will not operate until the red handled block pin is fully inserted, and the hopper safety is properly connected. Mechanical Problem Cause Remedy Low air pressure. Machine will not cycle. Check air supply for correct operation. Also check pressure regulator setting 80 psi / 5.5 bar. Pilot valves have loosened from their mount bracket or are damaged. Incomplete piston stroke caused by solid object in product cylinder. Volume adjustment set too low. Deposit speed set too low. Kinked air lines. Product being deposited is too hot. Red Uni block pin is not inserted. Hopper safety not inserted fully inserted. Top cover open. Check pilot valves, ensure that they are secure. Replace if necessary. With Air off remove product cylinder and check for obstruction. Increase volume setting. Adjust deposit speed. Check air lines to make sure they are not kinked. Ensure product temperature does not exceed 140 deg F (60 deg C) unless HOT valves are in place. Insert pin fully. Insert fully. Ensure top cover is screwed tight. 46
47 Problem Cause Remedy Machine cycles but will not deposit. Air quick connects are not secure. Uni valve is inserted incorrectly. Check that all air connections are securely attached. Remove clamp and align Uni valve with pin. Machine does not finish cycle Machine stops in forward position. Check front pilot valve. Obstruction in product cylinder. Inconsistent deposits. When starting to run continuously, the first deposits may be a little heavier than the rest, more so for aerated product. Deposit return speed too fast. Product piston O-ring worn or missing. Hopper is loose or beveled seal is missing. Air leakage past product piston or Uni valve. Deposit volume too large at minimum setting Deposit speed set too high. Fluctuating air supply pressure. Water build up in air lines and valves. Product leakage. Product. quality Piston not installed on air cylinder correctly. Turn air off and remove supply line from machine before opening the cover. Adjust piston return speed control to slow down back stroke. See page 50 Replace the O-ring. Check that the beveled seal is in place and is not damaged. Retighten hopper nut. Replace O-ring. Install smaller product cylinder. Reduce deposit speed. Check setting of air regulator/water filter. Drain air compressor regularly to remove build up of water. Check for correct valves (Hot or Cold). Supply smooth product mix. 47

48 Problem Cause Remedy Product Clamps are not tight. Check that all clamps are tight. leakage. Product piston or Uni valve O-rings are worn or damaged. Replace O-rings. Product splashes. Machine Blockage Deposit speed set too fast. Product stuck at neck of Hopper. Decrease deposit speed. Disconnect air, and remove Hopper safety pin. Remove Hopper and clear obstruction. Do not use any object to clear obstruction that can damage components. Piston return speed control. This is a factory setting and should not normally need to be adjusted. (See trouble shooting section under inconsistent deposits). 48
49 Electrical Problem Cause Solution No power No power to machine. (Green power light is not lit) on the control panel. Make sure the machine is plugged in and turned on. Make sure the plug has power. Have a technician open the electrical enclosure and check fuses. They will be lit if they need to be replaced. Turntable does not spin a full 360 degrees. Turntable does not spin when Spin only button is pressed. Motor speed is too fast. Feedback sensor problem. Motor is mechanically binding. Servo motor has failed No Power to the servo motor. Machine is stuck in a cycle. Motor is mechanically binding. Spin only button problem. Servo Motor has failed. Check to make sure the motor spins fine when the Spin only button is pressed: If it spins ok, decrease the speed of the depositor so that the motor can keep up. If it does not spin well with the Spin only button, proceed to the motor problem steps below. Have a technician check the feedback sensor to make sure it stays on for the full depositor stroke. If it does not, replace the feedback sensor. Have a technician check if the motor and gear box spin freely. Call Unifiller to talk to a technician and have the motor replaced. Use the no power troubleshooting above and check to make sure the motor has power. Check to make sure the lights are lit on the side of the servo motor. Power off the machine and back on again and make sure depositor can cycle in less than 10 seconds. Have a technician check if the motor and gear box spin freely. Have a technician check the wiring and integrity of the Spin only button. Call Unifiller to talk to a technician and have the motor replaced. 49
50 Problem Cause Solution Turntable does No feedback air. not spin when the depositor is triggered. Feedback sensor problem. No power to the servo motor. Motor is mechanically binding. Servo motor has failed. Check to make sure the depositor cycles and that the feedback air (red and black air lines from table) are connected to the depositor base and working. Check to make sure the motor spins fine when the Spin only button is pressed: If it spins OK, continue on to the next step below. If it does not spin well with the Spin only button, skip the next step and proceed to check the motor in the steps below. Have a technician check the feedback sensor to make sure it stays on for the full depositor stroke. If it does not, replace the feedback sensor. Use the no power troubleshooting above and check to make sure motor has power. Check to make sure lights are lit on the side of the servo motor. Have a technician check if the motor and gear box spin freely. Call Unifiller to talk to a technician and have the motor replaced. 50

51 CE Mark 51
52 Sound Level Measurement All sound level readings taken at 1m from the front of the machine and 1.6m from the floor level. All readings are A weighted emission sound pressure level. Machine Sound level db Compact Depositor 79.4 Uni1000i 75.2 Pro 1000i 75.2 Pro Spot 87.5 XL2 81 COM Servo 75.2 Deco Mate 78.0 Hopper Topper 72.0 Hopper Topper Max 83.5 Multi 87 52
PRO 2000i LOW LEVEL DEPOSITOR
 DEPOSITORS AND AUTOMATED CAKE PRODUCTION SYSTEMS PRO 2000i LOW LEVEL DEPOSITOR OPERATION AND SPARE PARTS MANUAL Serial No. PR2L- (Please quote this number when ordering spares, and making service calls)
Operation and Safety Manual. Model LNKB15. Planetary Mixer. Medium Duty; Gear-driven; Manual operation
 Medium Duty; Gear-driven; Manual operation Model LNKB15 Planetary Mixer DO NOT ATTEMPT TO OPERATE THIS MACHINE UNTIL YOU HAVE READ AND UNDERSTOOD THIS OPERATION AND SAFETY MANUAL. SAFETY ISSUES 1. NEVER
ICED CAPPUCCINO MACHINE Taylor MODEL: 390
 4.8.6.3 ICED CAPPUCCINO MACHINE Taylor MODEL: 390 LOCATION: Front of House WHEN CLEANED: Daily, Weekly, Monthly, Seasonal TOOLS/SUPPLIES REQUIRED: Salmon Cloth 2 or 3-Compartment Sink Sink Detergent Sanitizer
PrimePour TM Operation Manual
 COT2000 SERIES PrimePour TM Operation Manual READ BEFORE USE. 840247001 7/14 For more Good Thinking visit www.commercial.hamiltonbeach.com 840247001_v18.indd 1 IMPORTANT SAFETY INSTRUCTIONS WARNING When
INDEX. Granita Machine. Operation a nd Instruction Manual
 INDEX Index 2 Unpacking 3 Positioning the machine 3 Familiarizing yourself with the Controls 4 Cleaning and Sanitizing instructions 5 Part ONE. Disassembly and Cleaning of Dispenser 5 Part TWO. Re-assemble
Installation & Operating Guide
 HOT WATER DISPENSER Installation & Operating Guide Read all instructions thoroughly. Keep this guide for future reference. Proof of purchase is required for Warranty. Staple receipt or proof of purchase
BLAST-IT-ALL BUMPER BLASTER
 LARRY HESS AND ASSOCIATES, INC 185 PIPER LANE / SALISBURY, NC 28147 PHONE: 1-800-535-2612 / FAX: 1-704-638-9311 WWW.BLAST-IT-ALL.COM BLAST-IT-ALL BUMPER BLASTER SUCTION BLAST CABINET NOTE: It is the responsibility
HEDMAN DI-50. Endorser Instructions. Hedman DI-50 Operators Guide
 HEDMAN DI-50 Endorser Instructions Hedman DI-50 Operators Guide 25-0132-20 TABLE OF CONTENTS 1. INTRODUCTION...1 1.1 DI-50 Description...1 1.2 Items Included...1 1.3 Safety Terms...2 1.4 Safety Precautions...3
Sanitise Syrup Lines & Valves. Taylor PH61 Cleaning every 14 days
 Taylor PH61 Cleaning every 14 days Drain the Syrup Lines Remove each syrup feed tube from syrup bottle and let excess syrup drain from the feed tube back into the syrup bottle. When flow of syrup from
OWNER S MANUAL CAVN SERIES SELF CONTAINED RETRACTABLE NOZZLE VACUUM SEALER WITH GAS PURGE
 OWNER S MANUAL CAVN SERIES SELF CONTAINED RETRACTABLE NOZZLE VACUUM SEALER WITH GAS PURGE WHAT S IN THE PACKAGE? This Operation Manual. (1) Vacuum Sealer. (1) E-(unit size) Heating Element, inside the
CBT LW MAINTENANCE GUIDE
 CBT LW MAINTENANCE GUIDE PICTOGRAMS Each Signifier displayed here is specific to this User Manual. Menu Previous Advance Note Tip Example Powder Feeder Mixing Bowl Weigh Scale CBP Tanks Control Panel PSD
Pet. Easy Guide. VAX Ltd., Kingswood Road, Hampton Lovett, Droitwich, Worcestershire, WR9 OQH, UK - website:
 V-027P Rapide Pet User Guide 10/7/07 10:05 Page 14 EEC STATEMENT OF COMPLIANCE Manufacturer/EEC importer: VAX Limited, hereby on our own responsibility declare that the products V-027/V-027PT/V-027P/CCW-701
SERVICE/INSTALLATION MANUAL ICE ONLY DISPENSERS MODELS-IOD150, IOD200 AND IOD250
 SERVICE/INSTALLATION MANUAL ICE ONLY DISPENSERS MODELS-IOD150, IOD200 AND IOD250 Ice-O-Matic 11100 East 45th Ave Denver, Colorado 80239 Part Number 9081305-01 Date 10/08 Introduction IOD150,IOD200,IOD250
OWNER S MANUAL AVN SERIES RETRACTABLE NOZZLE VACUUM SEALER WITH GAS PURGE
 OWNER S MANUAL AVN SERIES RETRACTABLE NOZZLE VACUUM SEALER WITH GAS PURGE WHAT S IN THE PACKAGE? This Operation Manual. (1) Vacuum Sealer. (1) E-(unit size) Heating Element, inside the manual sheet protector.
Setup. Important. Texture Spraying (material supplied from unit)
") Setup Setup Important If you are going to stop spraying for more than 5 minutes, turn sprayer off to prevent shortened pump hose life. Do not allow material to dry inside pump, hoses, gun or spray system.
Setup Setup Important If you are going to stop spraying for more than 5 minutes, turn sprayer off to prevent shortened pump hose life. Do not allow material to dry inside pump, hoses, gun or spray system.
Operation and Safety Manual. Model B15/B20 CVFM. Planetary Mixers
 Operation and Safety Manual Model B15/B20 CVFM Planetary Mixers SAFETY ISSUES 1. NEVER touch this machine without training and authorisation from your supervisor. 2. Machine MUST BE on solid, level support.
FD Heavy Duty Feeder for FD 280 Tabbing System
 FD 280-10 Heavy Duty Feeder for FD 280 Tabbing System Operator Manual 8/2011 First Edition TABLE OF CONTENTS 1. INTRODUCTION... 1 1.1 Feeder Description... 1 1.2 Items Included... 1 1.3 Operating Manual
User information. Cleaning/descaling and sanitizing
 User information How the dispenser works Follett s 110 series automatic-load ice and water dispensers are equipped with Follett s 425 lb (193 kg)/day ice machine. In the continuous icemaking process, water
Explorer CleaningPartsDirect.com Carpet Extractor. Operator and Parts Manual. Home Find... Go To.. Model No.: Can.
 Explorer 1500 Carpet Extractor Model No.: 608808 609231 Can. Operator and Parts Manual CleaningPartsDirect.com 662-393-3045 NOBLES 12875 RANSOM STREET HOLLAND MI 49424 U.S.A. CUSTOMER SERVICE: 1-800-365-6625
Machine MANUAL. Spaceman USA, LLC. Sales and Product Information Sunday Saturday 8 AM 5 PM Mountain. 226 Commerce Street Suite B Broomfield, CO 80020
 Machine MANUAL MODEL SM-6650 FROZEN BEVERAGE - COUNTERTOP - ONE FLAVOR Customer Service Spaceman USA, LLC Sales and Product Information Sunday Saturday 8 AM 5 PM Mountain 226 Commerce Street Suite B Broomfield,
Installation Instructions
 GE Consumer & Industrial Appliances Installation Instructions Junction Box Cover Within this user bag, you will find a junction box cover and a #10 hex head screw used to attach the junction box cover
GETZ MANUFACTURING PART NO.: MODEL: SV1 100 PR VACUFILL SYSTEM (Revised 6/7/05)
") GETZ MANUFACTURING PART NO.: 58616 MODEL: SV1 100 PR VACUFILL SYSTEM (Revised 6/7/05) GETZ SV1-100-PR VACU-FILL SYSTEM TABLE OF CONTENTS PAGE # 1... GETZ SV1-100-PR VACU-FILL SYSTEM 2... PARTS LIST 3...
GETZ MANUFACTURING PART NO.: 58616 MODEL: SV1 100 PR VACUFILL SYSTEM (Revised 6/7/05) GETZ SV1-100-PR VACU-FILL SYSTEM TABLE OF CONTENTS PAGE # 1... GETZ SV1-100-PR VACU-FILL SYSTEM 2... PARTS LIST 3...
MANUAL VERSION SERIAL # X-1 MINI PRO OWNER S MANUAL ASSEMBLY & OPERATOR INSTRUCTIONS 1.0
 SERIAL # MANUAL VERSION 1.0 Introduction WARNING: To limit risk of potential injury and material damage, all users must read these instructions in their entirety and follow them strictly. Check our YouTube
SaniServ. Operator s Guide. Model 601 Shake Machine With AccuFreeze. Reliability from the team that Serves the Best
 SaniServ Reliability from the team that Serves the Best Model 601 Shake Machine With AccuFreeze Operator s Guide Owner/Operator Information Distributor Name: Address: Phone: Date of Installation: Model
Built-In Dishwasher. Installation Instructions. BEFORE YOU BEGIN Read these instructions completely and carefully. IMPORTANT The dishwasher MUST be
 Installation Instructions Built-In Dishwasher If you have questions, call 800.GE.CARES (800.432.2737) or visit our website at: www.ge.com BEFORE YOU BEGIN Read these instructions completely and carefully.
Model LF-310 Air Operated
 Microflush Half Gallon Toilets Model LF-310 Air Operated Installation/Service Manual P/N 24156 452 East Hill Road Fax: 707.459.6617 Willits, CA 95490 USA E-mail: info@microphor.com Phone: 707.459.5563
CADDY 5 UL OPERATOR S MANUAL
 CADDY 5 UL CADDY ENGLISH 10 UL OPERATOR S MANUAL CADDY 1 TECHNICAL CHARACTERISTICS Read electrical ratings written on the data plate under the individual units. The serial number of the unit is preceded
PS-2/ES Automated pack & tag machine with IndES fastening system
 English Manual PS-2/ES Automated pack & tag machine with IndES fastening system Contents 1. Introduction 2. Important Safety Instructions 3. PS-2/ES 4. Unpacking the machine 5. Setting up the machine 6
Installation Manual UNIVERSAL C-750 PRE-MIX DISPENSER
 IMI CORNELIUS INC One Cornelius Place Anoka, MN 55303-6234 Telephone (800) 238-3600 Facsimile (612) 422-3246 Installation Manual UNIVERSAL C-750 PRE-MIX DISPENSER Part No. 185211000 January 25, 1984 Revised:
RTP9 ROTARY TABLET PRESS USER MANUAL
 RTP9 ROTARY TABLET PRESS USER MANUAL LFA Tablet Presses is a trading name of LFA Machines Oxford LTD All of the content in this document is covered by copyright CONTENTS Page 1. Introduction Page 1. Technical
Technical Data. Name: ERIKA Automat fully automatic machine to divide and to round dough pieces of the same size
 AUTOMAT MANUAL 1 Technical Data Name: ERIKA Automat fully automatic machine to divide and to round dough pieces of the same size Type Divisions Dough Portions (in ounces) Plate Nos. 3 30 1.0 3.5 #35 4/40A
OPERATING MANUAL MANUAL WATER BASE GUN CLEANERS UM120W UNI-RAM CORPORATION ONTARIO CANADA PATENTS
 OPERATING MANUAL MANUAL WATER BASE GUN CLEANERS UM120W PATENTS USA 4,788,836 CANADA USA 5,213,117 ENGLAND EUROPE 0300248 ITALY SWEDEN 0300248 GERMANY FRANCE 8110528.0 JAPAN UNI-RAM CORPORATION ONTARIO
PR-L2466W- PA. Operating Instructions. High Performance Refrigerator PR-L2466W-PA
 Operating Instructions High Performance Refrigerator PR-L2466W- PA PR-L2466W-PA Please read these instructions carefully before using this product, and save this manual for future use. See page 11 for
ICE ONLY DISPENSERS MODELS-IOD150, IOD200 AND IOD250 INSTALLATION/SERVICE MANUAL
 ICE ONLY DISPENSERS MODELS-IOD150, IOD200 AND IOD250 INSTALLATION/SERVICE MANUAL Ice-O-Matic 111000 East 45th Ave Denver, Colorado 80239 Part Number 9081305-01 Rev. C Revision Date: September 19, 2011
SUPERIOR PERFORMANCE
 Economy (E) Series Blast Cabinet Owner s Manual SUPERIOR PERFORMANCE And Quality In Blast Cleaning Equipment! WARNING READ MANUAL Failure to read, understand & follow all safety and operation procedures
MANUAL COVER. To expedite parts ordering or technical questions, please include your Model and Serial Number listed below in all correspondence.
 MANUAL COVER We at Larry Hess & Associates, Inc. would like to take this opportunity to thank you for your patronage. The machine you have purchased has been manufactured and assembled in the USA with
GETZ EQUIPMENT INNOVATORS PART NO.: 9G58619 MODEL: SV1 150 PR VACUFILL SYSTEM (Revised 2/25/14)
") GETZ EQUIPMENT INNOVATORS PART NO.: 9G58619 MODEL: SV1 150 PR VACUFILL SYSTEM (Revised 2/25/14) !!WARNING!! SEVERE DAMAGE AND/OR INJURY MAY RESULT DO NOT DISCHARGE ANY EXTINGUISHER CYLINDER EXCEEDING 195
GETZ EQUIPMENT INNOVATORS PART NO.: 9G58619 MODEL: SV1 150 PR VACUFILL SYSTEM (Revised 2/25/14) !!WARNING!! SEVERE DAMAGE AND/OR INJURY MAY RESULT DO NOT DISCHARGE ANY EXTINGUISHER CYLINDER EXCEEDING 195
We can help you streamline your production operations by providing solutions for achieving higher output, greater weight accuracy and better product
 30 Transfer Pump & Cake Depositing Machine We can help you streamline your production operations by providing solutions for achieving higher output, greater weight accuracy and better product integrity
OWNER S MANUAL CAVS SERIES SELF CONTAINED RETRACTABLE NOZZLE VACUUM SEALER
 OWNER S MANUAL CAVS SERIES SELF CONTAINED RETRACTABLE NOZZLE VACUUM SEALER WHAT S IN THE PACKAGE? This Operation Manual. (1) Vacuum Sealer. (1) E-(unit size) Heating Element, inside the manual sheet protector.
Installation & Operating Guide
 5-036 HOT WATER TANK Installation & Operating Guide Read all instructions thoroughly. Keep this guide for future reference. Proof of purchase is required for Warranty. Staple receipt or proof of purchase
CERT 7795 Fully certified to AS2658:2008. Part No. COMP825 OWNERS MANUAL
 CERT 7795 Fully certified to AS2658:2008 Part No. COMP825 OWNERS MANUAL INTRODUCTION IT IS IMPORTANT THAT YOU READ THESE INSTRUCTIONS CAREFULLY AND UNDERSTAND THE OPERATION & SAFETY FEATURES OF THIS APPLIANCE.
AHPO-6/18 GOLD PROOFER OVEN
 AHPO-6/18 GOLD PROOFER OVEN For information or technical assistance, call: TOLL FREE 1(800) 735-DUKE (3853) or 1(314) 231-1130 PN 156081R 1 of 25 TABLE OF CONTENTS MANUFACTURER S INTRODUCTION...3 INSTALLATION...4
ICE/BEVERAGE DISPENSER
 ICE/BEVERAGE DISPENSER MODEL: ENDURO-175 8 VALVE OPERATOR S MANUAL Release Date: March 1, 2004 Publication Number: 620917901OPR Revision Date: August 3, 2010 Revision: C Visit the IMI Cornelius web site
BLAST-IT-ALL PRESSURE BLAST CABINET
 LARRY HESS AND ASSOCIATES, INC 185 PIPER LANE / SALISBURY, NC 28147 PHONE: 1-800-535-2612 / FAX: 1-704-638-9311 WWW.BLAST-IT-ALL.COM BLAST-IT-ALL PRESSURE BLAST CABINET NOTE: It is the responsibility of
Table Of Contents. Introduction... Page 1. Specifications... Page 2. Diagrams... Page 3. Uncrating... Page 4. Ice Machine...
 Introduction HD356 This manual includes the information needed to uncrate, install, clean, maintain and service this ice dispenser. The HD356 has been designed to work with Scotsman s CME256, CME506 or
Model K 3000 G Part No
 K3000G Manual 11/30/01 4:56 PM Page 1 Model K 3000 G Part No. 1.133-110.0 High Pressure Washer Operator Manual Overview..................................1 Precautions...............................1-2
CAUTION UM120W (RIGHT TANK) FOR WATER BORNE PAINTS ONLY UM120W (RIGHT TANK) SECTION IS NOT DESIGNED FOR USE WITH SOLVENT BASED PAINT
 FOR WATER BORNE PAINTS ONLY UM120W (RIGHT TANK) SECTION IS NOT DESIGNED FOR USE WITH SOLVENT BASED PAINT") OPERATING MANUAL SOLVENT AND WATER BASE SPRAY GUN CLEANER UG5000W and UG5500W CAUTION UM120W (RIGHT TANK) FOR WATER BORNE PAINTS ONLY UM120W (RIGHT TANK) SECTION IS NOT DESIGNED FOR USE WITH SOLVENT BASED
OPERATING MANUAL SOLVENT AND WATER BASE SPRAY GUN CLEANER UG5000W and UG5500W CAUTION UM120W (RIGHT TANK) FOR WATER BORNE PAINTS ONLY UM120W (RIGHT TANK) SECTION IS NOT DESIGNED FOR USE WITH SOLVENT BASED
HW-17 Record Cleaning Machine Setup and Instruction Manual
 HW-17 Record Cleaning Machine Setup and Instruction Manual VPI Industries, Inc., 77 Cliffwood Ave. #3B, Cliffwood, NJ 07721 Phone: 732-583-6895, Email: Sales@vpiindustries.com http://www.vpiindustries.com
Food Waste Disposer Instruction Manual
 Food Waste Disposer Instruction Manual See insert for specific information about your new disposer NOTE: IMPORTANT: CAUTION: This Food Waste Disposer has been designed to operate on 110-120 Volt, 60 Hz
PUREPOWER SERIES CENTRAL VACUUM POWER UNITS PP500, PP600 & PP650
 USER GUIDE PUREPOWER SERIES CENTRAL VACUUM POWER UNITS PP500, PP600 & PP650 AB0039 FOR RESIDENTIAL USE ONLY!! MODELS SFDB-DQ, SFDB-DR AND SFDB-DS 30042509E IMPORTANT SAFETY INSTRUCTIONS SAVE THESE INSTRUCTIONS
STAINLESS STEEL JUICER - BLENDER COMBO. 600 Watt / 2 Speed & Pulse INSTRUCTION MANUAL
 STAINLESS STEEL JUICER - BLENDER COMBO 600 Watt / 2 Speed & Pulse Customer Service: 1-800-423-4248 Printed in China Stainless Steel Juicer-Blender Combo ITEM NO.8290 SI The Sharper Image name and logo
TECHNOGEL AMERICA Cream Whipping Machine
 OPERATING INSTRUCTIONS FOR TECHNOGEL AMERICA Cream Whipping Machine Thank you for putting your trust in us and we congratulate you on your purchase of a Technogel America Cream Whipping Machine. You have
installation and operation manual for Hunter Ceiling Fans
 For Your Records and Warranty Assistance Model Name: Catalog/Model No.: Serial No.: Date Purchased: Where Purchased: For reference also attach your receipt or a copy of your receipt to the manual. installation
OPERATOR'S MANUAL. IMPORTANT: READ OPERATOR'S MANUAL CAREFULLY Please fill out & return your warranty card! DP80405
 CARBON SPOT 30 EXTRACTOR OPERATOR'S MANUAL IMPORTANT: READ OPERATOR'S MANUAL CAREFULLY Please fill out & return your warranty card! DP80405 Diamond Products www.diamondproductsus.com Printed in the U.S.A.
Hard floor cleaner. Vax careline V-120. Vax model number:
 Vax V-120 User Guide.qxd 9/10/07 12:43 Page 1 Vax careline 0870 6061248 Hard floor cleaner Vax model number: V-120 instruction manual Please read carefully before using this cleaner. lways fully extend
EAGLE 2000B EAGLE 2000BE EAGLE 2000EBT MUST READ MANUAL PRIOR TO INSTALLING MACHINE
 EAGLE 2000B EAGLE 2000BE EAGLE 2000EBT MUST READ MANUAL PRIOR TO INSTALLING MACHINE Contents 1 Machine Safety Information 3 1.5 Safety Precautions Prior to Operating Machine 6 2 Machine Installation 7
01694-REVC_081315_ENGLISH
 01694-REVC_081315_ENGLISH MODEL: CSP EZ-CREAM TM 3/8 OUNCE, CHICK-FIL-A 120V Series 14I 94152 SAFETY GUIDELINES WHEN USING THIS UNIT: C Warning- E Electrical shock could occur: This unit must be earthed
Model K 4400 G Part No High Pressure Washer
 Model K 4400 G Part No. 1.133-208.0 High Pressure Washer Table of Contents Overview..................................1 Precautions...............................1-2 Assembly Instructions.........................3
Installation Instructions
 Installation Instructions Built-In Dishwasher If you have questions, call 800-GECARES or visit our website at: www.geappliances.com BEFORE YOU BEGIN Read these instructions completely and carefully. IMPORTANT
LBX-2000 POWER STRAPPING MACHINE
 LBX-2000 POWER STRAPPING MACHINE Copyright 2008, Signode 439998 9/2008 (EN) CONGRATULATIONS Thank you for purchasing your LBX-2000 Walk-Up Strapping Machine. The LBX- 2000 Strapping Machine was designed
2 BURNER LP GAS STOVE OPERATING INSTRUCTIONS
 BURNER LP GAS STOVE OPERATING INSTRUCTIONS Part No. 5090 IMPORTANT Read these instructions for use carefully. Familiarise yourself with the appliance before connecting it to it s gas container. Keep these
UNDERCOUNTER REFRIGERATORS AND FREEZERS Installation, Operation and Maintenance Instructions
 UNDERCOUNTER REFRIGERATORS AND FREEZERS Installation, Operation and Maintenance Instructions Please read this manual completely prior to installing and operating this equipment. This manual describes how
Notices. Safety Notices. 2 Restek Corporation
 Notices Safety Notices Restek Corporation 207-07-005 Rev. Date: 7/16 Printed in USA Restek Corporation Bellefonte, PA USA A CAUTION notice warns of a hazard. It calls attention to an operating procedure,
Installation and Setup
 NFORMATION NO: 007 Self Fill Lavazza Colibri with changegiver Congratulations on choosing to drink great coffee using the unique Lavazza pod vending system. The machine is easy to use. Follow the simple
OPERATOR S MANUAL ICE/BEVERAGE DISPENSER. Model: Enduro Valve
 OPERATOR S MANUAL ICE/BEVERAGE DISPENSER Model: Enduro-175 8 Valve Release Date: March 1, 2004 Publication Number: 620917901OPR Revision Date: January 14, 2015 Revision: E Visit the Cornelius web site
OPERATING MANUAL UG2000D SERIES SPRAY GUN CLEANERS UG2000D, UG2000DM UNI-RAM CORPORATION ONTARIO CANADA UG2000DM UG2000D REVISION
 OPERATING MANUAL UG2000D SERIES SPRAY GUN CLEANERS UG2000D, UG2000DM UG2000D UG2000DM UNI-RAM CORPORATION ONTARIO CANADA REVISION 2015-08 INTRODUCTION Uni-ram holds many patents on designs used in its
MANUAL OWNER S. Operating and Servicing Instructions IMPORTANT: READ CAREFULLY BEFORE ASSEMBLY AND USE.
 OWNER S MANUAL Operating and Servicing Instructions www.hoover.com.hk HW-FM-HKA IMPORTANT: READ CAREFULLY BEFORE ASSEMBLY AND USE. THIS PRODUCT IS INTENDED FOR HOUSEHOLD USE ONLY. IF USED COMMERCIALLY
USER MANUAL UN-200V / UN-200VH
 USER MANUAL UN-200V / UN-200VH CONTACT US PHONE/FAX Toll Free: 800.465.1004 Phone: 801.486.1004 Fax: 801.486.1007 ADDRESS LACO Technologies, Inc. 3085 West Directors Row Salt Lake City, UT 84104 WEB www.lacotech.com
EYS SEPARATOR EYS 01 G. USER MANUAL for EYS SCREW-PRESS SEPARATOR MODEL EYS 01 G. User Manual for EYS 01G Screw-Press Separator
 USER MANUAL for EYS SCREW-PRESS SEPARATOR MODEL EYS 01 G User Manual for EYS 01G Screw-Press Separator Table of Contents Page 1. Introduction 2 2. General Safety Instructions 3 3. Installation 5 4. Start-up
IMER USA (301) Koine 35 Quick User Guide IMER USA
 Koine 35 Quick User Guide IMER USA") IMER USA (301) 336-3700 Koine 35 Quick User Guide IMER USA 1 Koine 35 Quick User Guide Thank you for choosing IMER USA for your mixing and pumping needs. This is a quick user guide intended to be used
IMER USA (301) 336-3700 Koine 35 Quick User Guide IMER USA 1 Koine 35 Quick User Guide Thank you for choosing IMER USA for your mixing and pumping needs. This is a quick user guide intended to be used
Technical Details. Important Safety Instructions READ ALL INSTRUCTIONS BEFORE USING THIS MACHINE
 SEBO ET-1 Owner's Manual Technical Details Brush motor - 175 watts, 1.6 amps Width: 12 in Weight: 5.4 lbs Brush roller: replaceable Brush drive: toothed belt with electronic overload protection Important
Installation Guide BUILT-IN SXS REFRIGERATOR UPSXB2627**
 Installation Guide BUILT-IN SXS REFRIGERATOR UPSXB2627** www.thesignaturekitchen.com 2 Contents 1. Precaution before installation... 3 2. Product and Cutout dimension... 4 3. Precaution when moving the
FAILURE TO ADHERE TO THESE WARNINGS CAN RESULT IN FIRE, SERIOUS INJURY, ELECTRICAL SHOCK AND/OR DEATH. Technical Service
 INSTRUCTION MANUAL Eat well, drink well and live well with Omega www.omegajuicers.com BL400 SERIES BLENDER English PLEASE READ THESE INSTRUCTIONS CAREFULLY BEFORE USE BL400MAN 122011 A OMGMAN 082009Rev
3/4 HP Model Trimmer Operating Instructions
 3/4 HP Model Trimmer Operating Instructions Whip Mix Corporation 361 Farmington Ave. P.O. Box 17183 Louisville, KY 40217-0183 USA 502-637-1451 800-626-5651 Fax 502-634-4512 www.whipmix.com Technical Specifications
AUTOMATIC GRANULAR ICE FLAKER
 AUTOMATIC GRANULAR ICE FLAKER INSTRUCTIONS AND WARNINGS 24480 rev. 01 It is strictly forbidden to reproduce this instruction manual or any part thereof. Dear Customer, Congratulations on choosing a
MERCHANT POPCORN MACHINE SERVICE MANUAL
 3243 North California Avenue, Chicago, IL 60618 MERCHANT POPCORN MACHINE SERVICE MANUAL 120 Volt, Single Phase, 60 Hz 230 Volt, Single Phase, 50 Hz READ and UNDERSTAND this servicing, and safety instructions
Model K 5800 G Part No
 K5800G Manual 11/30/01 5:02 PM Page 1 Model K 5800 G Part No. 1.194-103.0 High Pressure Washer Operator Manual Overview..................................1 Precautions...............................1-2
Installation and Operation Manual For Hunter Ceiling Fans
 Installation and Operation Manual For Hunter Ceiling Fans 1 2 CONGRATULATIONS! Your new Hunter ceiling fan is an addition to your home or office that will provide comfort and performance for many years.
Models: GW/R-T GW/R-2-T GW/R-3-T
 Part# GW/R-T-OM 1/12/04 TN Models: GW/R-T GW/R-2-T GW/R-3-T This manual contains important information concerning the installation and operation of the gun washers listed above. Read manual thoroughly
INSTALLATION & OPERATION MANUAL
 216300-000 rev2 INSTALLATION & OPERATION MANUAL OIL CIRCULATING HEATING SYSTEM FOR HAZARDOUS LOCATIONS MODEL OSE OSX (this page intentionally left blank) IDENTIFYING YOUR SYSTEM IOM216300-000 The HOTSTART
OWNER S MANUAL VERSION 4.4 SERIAL # X-1 SINGLE LAYER PRESS. With EG-260 Variable Speed Grinder
 OWNER S MANUAL VERSION 4.4 CONFORMS TO UL STD 763, NSF/ANSI STD 8 CERTIFIED TO CSA STD C22.2 #195 CONFORMS TO CE, IEC TESTED X-1 SINGLE LAYER PRESS With EG-260 Variable Speed Grinder SERIAL # 2 20 INTRODUCTION
INSTALLATION & SERVICE MANUAL QUANTUM SERIES
 INSTALLATION & SERVICE MANUAL QUANTUM SERIES IMI CORNELIUS INC. One Cornelius Place Anoka, MN 55303 Tel: 1-888-248-5568 / 630-539-5050 Fax: 1-800-344-3801 / 630-539-6960 Part Number- 7208011206 Revision-
STRUCTURE ILLUSTRATION...3 IMPORTANT SAFETY INSTRUCTIONS 4 INSTALLATION INSTRUCTION..4 OPERATING YOUR REFRIGERATOR...5-6
 TABLE OF CONTENTS STRUCTURE ILLUSTRATION....3 IMPORTANT SAFETY INSTRUCTIONS 4 INSTALLATION INSTRUCTION..4 OPERATING YOUR REFRIGERATOR...5-6 FREEZER COMPARTMENT OPERATION 6 CARE & MAINTENANCE..7 CHANGING
Service Manual Q MODEL DISPENSER Q160/290/300
 Q MODEL DISPENSER Q160/290/300 Service Manual Thank you for selecting a Manitowoc Dispenser, the dependability leader in ice making equipment and related products. With proper care and maintenance, your
MIX Boiler & Font Range Service Manual
 MIX Boiler & Font Range Service Manual 1000870# 1000871# 1000875# 1000880# 1000887# 1000878 1000879 2300268 www.marcobeveragesystems.com Ireland Tel: +353 (1) 295 2674 UK Tel: +44 (0207) 2744577 Service
OPERATING MANUAL SOLVENT SPRAY GUN CLEANERS UG5000E, UG5000DVM AND UG5500E UNI-RAM CORPORATION ONTARIO CANADA PATENTS
 OPERATING MANUAL SOLVENT SPRAY GUN CLEANERS UG5000E, UG5000DVM AND UG5500E PATENTS USA 4,788,836 CANADA USA 5,213,117 ENGLAND EUROPE 0300248 ITALY SWEDEN 0300248 GERMANY FRANCE 8110528.0 JAPAN UNI-RAM
Page 1 of 18. Part# /5/2013
 Part# 1002655-06 8/5/2013 This manual contains important information concerning the installation and operation of the gun washers listed above. Read manual thoroughly and keep for future reference INSTRUCTIONS
Symphony Plus 25 and 50 Series Ice and Water Dispensers 25FB425A/W, 50FB425A/W
 Symphony Plus 25 and 50 Series Ice and Water Dispensers 25FB425A/W, 50FB425A/W Installation Guide Please visit https://www.follettice.com/technicaldocuments for the Operation and Service manual for your
HERSHEY S Classic Syrup Dispenser
 HERSHEY S Classic Syrup Dispenser COMPLETE UNIT 87952 MODEL: SPPH PUMP ONLY 88548 MODEL: BP-1 Used with Hershey s 64 oz pouches with 16mm fitments. Thank You...for purchasing this dispenser. The reliable,
User s Manual: WERI Mini Applicator
 User s Manual: User s Manual Page 1 of 15 Table of Content 1 Document revision history... 2 2 Important warnings... 3 3 Symbols... 4 4 Identification... 5 5 Technical data... 5 6 Installation (trained
Arctic EVAPORATIVE COOLER USER MANUAL
 Arctic EVAPORATIVE COOLER USER MANUAL Thank you for choosing ElectriQ Please read this user manual before using this innovative Air Cooler and keep it safe for future reference. Visit our page www.electriq.co.uk
Product Manual. Scotsman. Models: 10150, and 10250
 Product Manual Scotsman Models: 10150, 10200 and 10250 IN TRO DUC TION This service manual is intended as a reference for the installer, user, and service agent of this Scotsman ice dispenser. It includes
Model K 280 M Part No
 Model K 280 M Part No. 1.189-205.0 High Pressure Washer Operator Manual Overview...................................1 Precautions................................1-3 Assembly Instructions.........................3
HX-30/40 and HX-30/40 S Glass and Dishwashers
 HX-30/40 and HX-30/40 S Glass and Dishwashers INSTALLATION OPERATION VERSION 18/01/00 2 Installation and Operation Instructions for Model HX-30/40 and HX-30/40 S (with built-in softener) Content Page 1
rev3 INSTALLATION & OPERATION MANUAL OIL CIRCULATING HEATING SYSTEM MODEL OSM
 216279-000 rev3 INSTALLATION & OPERATION MANUAL OIL CIRCULATING HEATING SYSTEM MODEL OSM IDENTIFYING YOUR SYSTEM IOM216279-000 The HOTSTART heating system is designed to heat fluids for use in marine
REFRIGERATED PREP TABLES Installation, Operation and Maintenance Instructions
 REFRIGERATED PREP TABLES Installation, Operation and Maintenance Instructions Please read this manual completely prior to installing and operating this equipment. This manual describes how to install,
Owner s Guide and Installation Manual
 For Your Records and Warranty Assistance For reference, also attach your receipt or a copy of your receipt to the manual. Model Name Type 2A Models Owner s Guide and Installation Manual Model No. Date
Dual Power Pro. vax.com.au vax.co.nz POWERFUL PERFORMANCE FOR TOTAL HOME CLEANING LET S GET STARTED. CARPET CLEANER VX65
 Dual Power Pro CARPET CLEANER POWERFUL PERFORMANCE FOR TOTAL HOME CLEANING LET S GET STARTED. VX65 vax.com.au vax.co.nz Let s talk safety Basic safety precautions Do s This machine is intended for household
High Pressure Washer Operator Manual. Specifications Model HD 2700 DH/DB
 Model HD 2700 DB Part No. 1.194-116 Model HD 2700 DH Part No. 1.194-117 Model HD 3000 DH Part No. 1.187-115 Model HD 3500 DH Part No. 1.810-997 Model HD 3500 DB Part No. 1.810-998 High Pressure Washer
SAFETY PRECAUTIONS. 2) Before operating machine: - Make sure all safety devices are in place and operate properly.
 Before operating machine: - Make sure all safety devices are in place and operate properly.") TABLE OF CONTENTS Machine Components Safety Precautions Machine Set Up Machine Operation Machine Maintenance & Storage Troubleshooting Technical Specifications Parts Lists Wiring Diagram 1 2 3 3-4 5 6
TABLE OF CONTENTS Machine Components Safety Precautions Machine Set Up Machine Operation Machine Maintenance & Storage Troubleshooting Technical Specifications Parts Lists Wiring Diagram 1 2 3 3-4 5 6