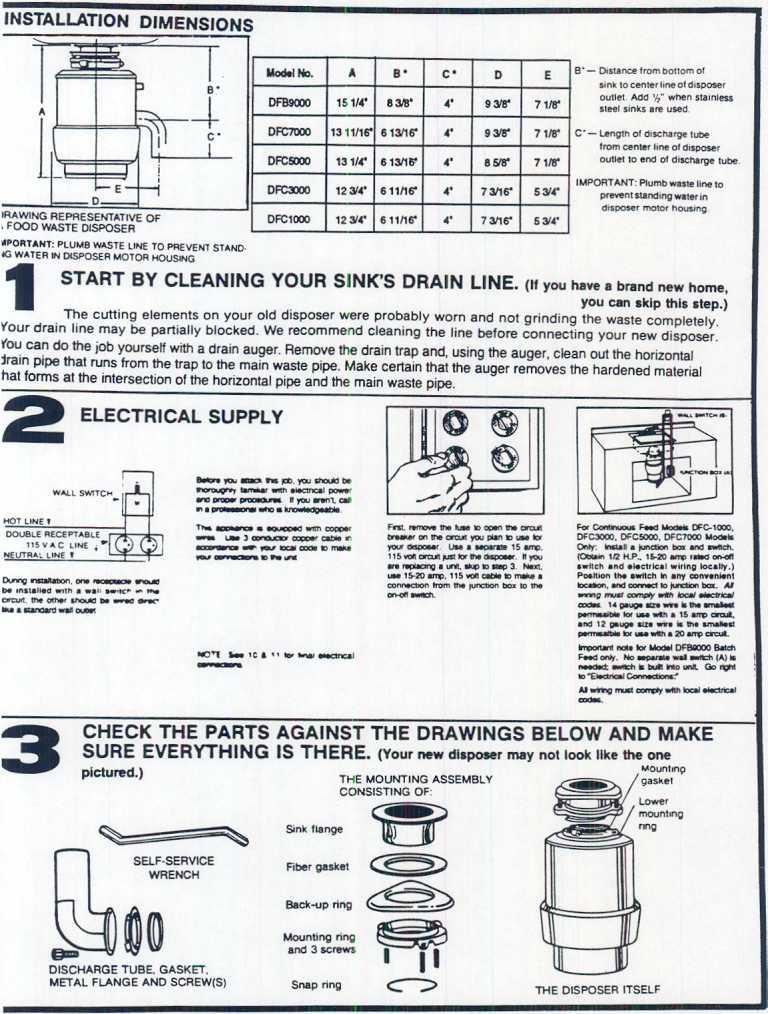
Tools and materials you will need: Scre1wdriver, pipe wrench, hammer, plumber's putty (1/4 lb.), wire nuts (2 -size 54)
|
|
|
- Emmeline Barker
- 6 years ago
- Views:
Transcription
, wire nuts (2 -size 54) Tools and materials you may need: Plur,nber's drain auger or rod, on-off electrical")
, hack saw, worm gear clamp, copper wire (12 or 14 gauge), dishwasher drain connector kit")


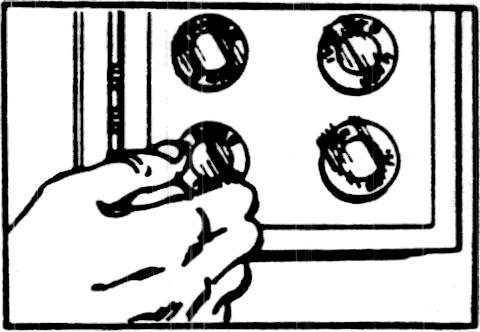
1 Tools and materials you will need: Scre1wdriver, pipe wrench, hammer, plumber's putty (1/4 lb.), wire nuts (2 -size 54) Tools and materials you may need: Plur,nber's drain auger or rod, on-off electrical switch (1/2 H.P., amps), hack saw, worm gear clamp, copper wire (12 or 14 gauge), dishwasher drain connector kit CONTINUOUS FEED MODELS- DFC1000, DFC3000, DFCSOOO, DFC7000 Remove the stopper from the disposer sink sleeve and turn on the cold water full flow. (Water should remain on during complete disposer operation.) Failure to turn on a full flow of water before turning on the disposer can cause drain blockages. MFlip" the wall switch to the on position to start disposer. Feed food waste into the disposer while it is running. To avoid drain pipe blockage, allow water to flow sufficient time after grinding is completed to be sure all waste is flushed away. Ground waste and water mixture flows at the rate of 2 seconds per foot in a horizontal drain line. A mlinimum of 15 seconds is recommencjed. NOTE: After all the food waste has been fed 111to the disposer, place the stopper IlrI the sink sleeve In the drain/grind position (see Illustrations) to minimize the possible ejection of material while grinding. DO NOT INSERT HAND INTO DISPOSER. SA TCH FEED MODEL DFB9000. If your new disposer is a -Batch-Feed" model. the on-off switch is built in and operated by the stopper. Remove the stopper trom the sink sleeve and push the food "'aste into the disposer chamber. C:AUTlON: DO NOT PACK THE CHAMIBER WITH WASTE. Place the stopper back into the sink sleeve in the seal position, turn on the cold water full flow. Failure to turn on a full flow of water before turning on the disposer can c-.ause drain blockages. Lift up the stopper handle slightly and turn it to the right or left until the disposer starts. To avoid drain pipe blockage allow water to flow sufficient time after grinding is completed to be sure all waste is flushed away. Ground waste and water mixture flows at the rate of 2 seconds per foot in a horizontal drain line. A minimum of 15 seconds is recommended. ---~ 1-Piece Stopper. ~1.' (~~~!B ' 2-Plece Stopper ;c-- Stoppers are in drain/grind position. Pan No (5/93\
2
3


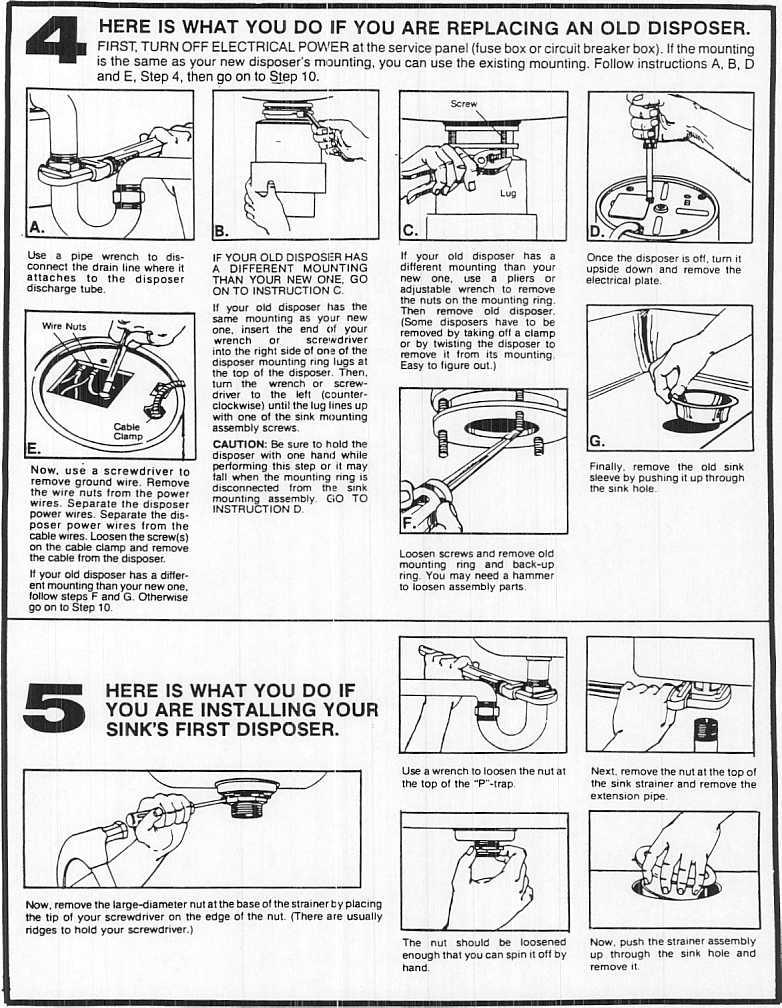
4 ~ IF YOU ARE REPLACING ~~N OLD DISPOSER, CLEAN THE OLD SEALANT FROM THE RIM OF THE SINK HOLE. Use your screwdriver or a putty knife to scrape away all traces of the old putty or caulking from the edge of the sink drain hole. Make sure you get this as clean as possible so that you'll have a good, watertight,seal for your new disposer sink sleeve.
5


 First.")


6 !~..\ PREPARING THE DISHWASHER DRAIN CONNECTION. (If you have a dishwasher.) If you do NOT plan to connect a dishwasher drain to the disposer, go on to step 13. \*'V ~ ru:ll~~ : - Lay the disposer on its side and insert the tip of your screwdriver into the dishwaser drain hole opening at an angle. ci~ -~ ~:~~,~~~~.-r-q,~::; ~ J Rap the end of the screwdriver with a hammer until the molded plug pops out. Make sure you take the loose plug out of your disposer. WE'RE ALMOST THERE. C:ONNECT THE DISPOSER TO ITS MOUNTING ASSEMBLY.? ""'/ Lift the disposer and position it so that the disposer's three mounting ears are lined up ui1der the ends of the sink mounting assembly screws. I\...r j, Then. while holding the disposer in place. turn the lower mounting ring with the ears to the right until _II three ears are engaged in the mounting assembly. The disposer will now hang by itself. You will lock this ring later. after the plumbing corlnections are made. NOW, ATTACH THE DISPOSER DISCHARGE TUBE TO YOUR SIN~S DRAIN "RAP. ~\) First. check inside the disposer ~rlnding chamber to remove Iny foreign material that might tave dropped in. Rotate the disposer arollnd and attach the discharge tube to the disposer. First. insert the rubber washer in the discharge opening Then. put the metal flange over the dls(:harge tube and screw the tube into place using the bolt(s) provided. Install the discharge tube gasket onto the discharge tube. Gasket must be installed as shown to assure a leak-proof installation.
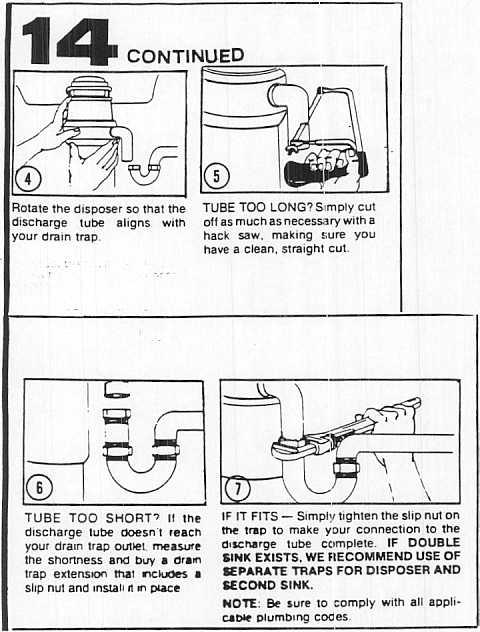
7


8 MAKE THE DISHWASHER DRAIN CONNECTION. Make an connections to comply with local plumbing codes. An approved dishwasher connector kit, Part No is available from your authorized Maytag dealer. NOW, LOCK DISPOSER IN PLACE. Place the end of your wrench or a screwdriver into the left side of one of the disposer mounting lugs...at the top of the disposer. Then, turn the screwdriver or wrench to the right until the disposer is firmly secured in position, engaging the locking notch. CHECK FOR LEAKS. Run water slowly through the unit. Then. place the stopper in seal position and fill the sink with water. Finally. rem,ove the stopper and permit the ~'ater to flow. Check for leaks and correct. if necessary. We sure hope there is nothing to correct.
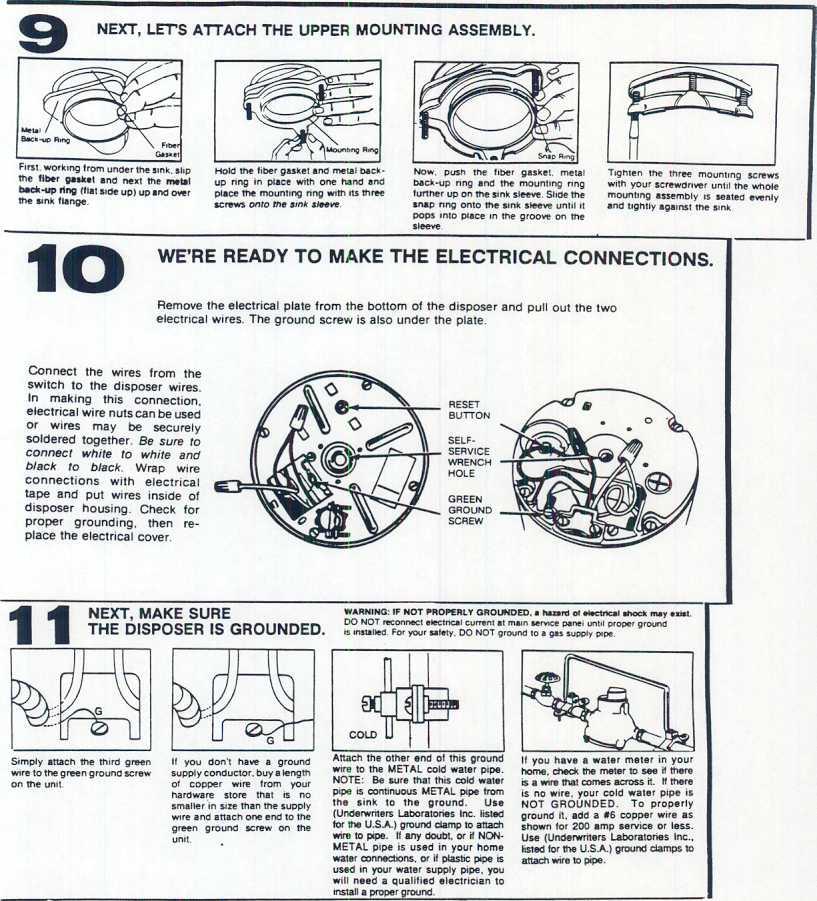
9
10 :>:>:>::. ~
FOOD WASTE DISPOSER INSTALLATION AND USE MANUAL
 FOOD WASTE DISPOSER INSTALLATION AND USE MANUAL English only (Australia and New Zealand) 1a 1 1b 1 1c 11 3 1 17 3 13 4 1 7 14 1 0 1 7174 Rev C www.insinkerator.com 01 InSinkErator, a business unit of Emerson
FOOD WASTE DISPOSER OWNER S GUIDE
 FOOD WASTE DISPOSER OWNER S GUIDE See insert for specific information about your new disposer NOTE: IMPORTANT: CAUTION: This Food Waste Disposer has been designed to operate on 110-120 Volt, 60 Hz exclusively.
Read All Instructions Thoroughly Before Installing or Using the Disposer.
 SINK PRO NANOGRIND 3 BOLT PRO MOUNT OPERATING & INSTALLATION INSTRUCTION MANUAL BEFORE YOU BEGIN: NOTE: Your XO Food Waste Disposer has been designed exclusively for residential use, for operation on 120V
Food Waste Disposer Instruction Manual
 Food Waste Disposer Instruction Manual See insert for specific information about your new disposer NOTE: IMPORTANT: CAUTION: This Food Waste Disposer has been designed to operate on 110-120 Volt, 60 Hz
Dimensions: 39 1/2" w x 22" D x 35.5 H. kk25 installation. Things you might need for the installation: vessel sink,
 Things you might need for the installation: vessel sink, plumber's putty(home depot), liquid nails(home depot), Bucket silicone caulk(home depot), Putty knife Plumber's putty Pipe wrench Channel-lock pliers
INSTALLATION INSTRUCTIONS
 INSTALLATION INSTRUCTIONS Percy Single Control Lavatory and Vessel Faucet Loop Handle Lavatory - Model D00 Pixie Handle Lavatory - Model D000 Loop Handle Vessel - Model D0 Pixie Handle Vessel - Model D00
Food Waste Disposer Instruction Manual
 Food Waste Disposer Instruction Manual NOTE: IMPORTANT: CAUTION: This Food Waste Disposer has been designed to operate on 220-240V~, 50/60 Hz exclusively. Using any other voltage or Hz adversely affects
kk21 installation Kk21-WF21 Things you might need for the installation: vessel sink,
 Kk21-WF21 Things you might need for the installation: vessel sink, plumber's putty(home depot), liquid nails(home depot), Bucket silicone caulk(home depot), Putty knife Plumber's putty Pipe wrench Channel-lock
DISPOSERS GUIDE FOR EASY, TROUBLE-FREE INSTALLATION, CARE AND USE. HOW THIS GUIDE WILL HELP YOU. SCREWDRIVER ONw'IOF I_LECaTmR_ CrALng)_ DRAIN AUGER
_ DRAIN AUGER") FOOD WASTE DISPOSERS GUIDE FOR EASY, TROUBLE-FREE INSTALLATION, CARE AND USE. HOW THIS GUIDE WILL HELP YOU. This guide describes everything you need to know to install your new food waste disposer, including
FOOD WASTE DISPOSERS GUIDE FOR EASY, TROUBLE-FREE INSTALLATION, CARE AND USE. HOW THIS GUIDE WILL HELP YOU. This guide describes everything you need to know to install your new food waste disposer, including
FOO WASTE DISPOSERS. 'LT-- _t _,-f",_p - 1 <=_-'"-Je... fl/r,l. _-N. O s j/k OR 0 U
 FOO WASTE DISPOSERS J Installation, TOOLS AND MATERIALS YOU WILL NEED: Slotted Screwdriver, Adjustable Pliers, Plumber's Putty, Electrical Tape TOOLS, MATERIALS, AND ACCESSORIES YOU MAY NEED: Phillips
INSTALLATION INSTRUCTIONS
 INSTALLATION INSTRUCTIONS 67000 6700 MODEL: SPRITZ 67000 (RH-600) 6700 (RH-600X) REV.C Restoration Hardware Faucet Product Size Specification Diagram Recommended Deck Hole Size -/8 Diameter Dimensions
RYLE WIDESPREAD FAUCET INSTALLATION
 SKU(s): 934429, 934421 RYLE WIDESPREAD FAUCET INSTALLATION BEFORE YOU BEGIN We recommend consulting a professional if you are unfamiliar with installing plumbing fixtures. Signature Hardware accepts no
Minor Home Repairs. November 4, County of Henrico Department of Community Revitalization
 Minor Home Repairs 1 November 4, 2017 County of Henrico Department of Community Revitalization Educate homeowners on basic technical skills that will help the homeowner understand daily operations of different
Single-Control Bathroom Sink Faucet
 P24407 1 of 5 THANK YOU FOR CHOOSING KALLISTA We appreciate your commitment to KALLISTA quality products. Please take a moment to review this manual before you install your KALLISTA product. If you encounter
AUBEREE CENTERSET FAUCET INSTALLATION
 SKU(s): 917558 BEFORE YOU BEGIN We recommend consulting a professional if you are unfamiliar with installing plumbing fixtures. Signature Hardware accepts no liability for any damage to the faucet, plumbing,
INSTALLATION/USE INSTRUCTIONS FOOD WASTE DISPOSER
 INSTALLATION/USE INSTRUCTIONS FOOD WASTE DISPOSER VIKING RANGE CORPORATION 111 Front Street Greenwood, Mississippi 38930 USA (662) 455-1200 TOOLS AND MATERIALS YOU WILL NEED: Slotted Screwdriver, Adjustable
Lavatory Faucet INSTALLATION INSTRUCTIONS P24490-CR, P24490-LV, P24491-CR, P24491-LV, P24492-CR, P24492-LV, P24700, P24705, P24706, P24736, P24800
 P24490-CR, P24490-LV, P24491-CR, P24491-LV, P24492-CR, P24492-LV, P24700, P24705, P24706, P24736, P24800 2018 1 of 7 KALLISTA THANK YOU FOR CHOOSING KALLISTA We appreciate your commitment to KALLISTA quality
INSTALLATION INSTRUCTIONS
 INSTALLATION INSTRUCTIONS 5000 700069 50055 MODEL: Dillon 5000 (RH-600) 50055 (RH-600X) 700069 (TRRH-600) REV D Restoration Hardware Faucet Product Size Specification Diagram Recommended Deck Hole Size
Food Waste Disposer Instruction Manual
 Food Waste Disposer Instruction Manual See insert for specific information about your new disposer NOTE: IMPORTANT: CAUTION: This Food Waste Disposer has been designed to operate at 220/240V~, 50/60 Hz
MENZA CENTERSET FAUCET INSTALLATION
 SKU(s): 929372 BEFORE YOU BEGIN We recommend consulting a professional if you are unfamiliar with installing plumbing fixtures. Signature Hardware accepts no liability for any damage to the faucet, plumbing,
Single-Control Lavatory Faucet
 P22740 P23201 P24407 1 of 5 Thank You For Choosing KALLISTA We appreciate your commitment to KALLISTA quality products. Please take a moment to review this manual before you install your KALLISTA product.
Sign Planogram: Plumbing Repair Bay Name: Plumbing Repair 4.1. Toilet Repair. 72" from floor to bottom of AV. Replacing a Fill Valve
 70054 Toilet Repair 700539 70054 Bay Name: Plumbing Repair 4.1 1 of 1 1 Toilet Repair 72" from floor to bottom of AV 2 3 4 5 6 7 2 Installing a Toilet Ensure that Install a new Place the toilet Tighten
FOOD WASTE DISPOSER OWNER S GUIDE
 FOOD WASTE DISPOSER OWNER S GUIDE See insert for specific information about your new disposer NOTE: IMPORTANT: CAUTION: This Food Waste Disposer has been designed to operate on 110~120 Volt, 60 Hz exclusively.
DELEVINGNE WIDESPREAD FAUCET INSTALLATION
 SKU(s): 927254 BEFORE YOU BEGIN We recommend consulting a professional if you are unfamiliar with installing plumbing fixtures. Signature Hardware accepts no liability for any damage to the faucet, plumbing,
TARVER SINGLE HOLE FAUCET INSTALLATION
 SKU(s): 931525, 934571 BEFORE YOU BEGIN We recommend consulting a professional if you are unfamiliar with installing plumbing fixtures. Signature Hardware accepts no liability for any damage to the faucet,
Things you might need for the installation: vessel sink, plumber's putty(home depot), liquid nails(home depot), Bucket silicone caulk(home depot),
, liquid nails(home depot), Bucket silicone caulk(home depot),") Things you might need for the installation: vessel sink, plumber's putty(home depot), liquid nails(home depot), Bucket silicone caulk(home depot), Putty knife Plumber's putty Pipe wrench Channel-lock pliers
Things you might need for the installation: vessel sink, plumber's putty(home depot), liquid nails(home depot), Bucket silicone caulk(home depot), Putty knife Plumber's putty Pipe wrench Channel-lock pliers
Threaded Faucet Installation
 Threaded Faucet Installation !"#$%&'"()'*&+(%',%--%.'*/(0'1--%23.4 M$-"3773"'#$&P'3,93Q )*+'$,-!"#$%&!'$(.CCD&EFGF&!'7'5#$% J#=*K= @347(&8%"B%%$ J#=*K=&3$L&!'$( A""35;&!'$(&B'";.CCD&EFGF&!'7'5#$%../01&2345%"&6#7%.H/I1&6#7%.1
INSTALLATION GUIDELINES
 IMPORTANT: To ensure this product is installed properly, you must read and follow these guidelines. The owner/user of this product must keep this information for future reference. This product must be
Glass Vessel Sink Installation
 Glass Vessel Sink Installation Required Supplies & Tools A. One of these two type of Faucets Threaded Faucet Nut & Bolt Faucet B. Under Counter Supply/Drain Lines & Shutoff Valves Water Supply Lines +
MAKAI WIDESPREAD FAUCET INSTALLATION
 SKU(s): 933814 BEFORE YOU BEGIN We recommend consulting a professional if you are unfamiliar with installing plumbing fixtures. Signature Hardware accepts no liability for any damage to the faucet, plumbing,
INSTALLATION INSTRUCTIONS
 INSTALLATION INSTRUCTIONS 3580079 3580006 MODEL: LUGARNO 3580006 (RH-5900) 3580079 (RH-5900L) REV C Restoration Hardware Faucet Product Size Specification Diagram Recommended Deck Hole Size -3/8 Diameter
Things you might need for the installation: vessel sink, plumber's putty(home depot), liquid nails(home depot), Bucket silicone caulk(home depot),
, liquid nails(home depot), Bucket silicone caulk(home depot),") Things you might need for the installation: vessel sink, plumber's putty(home depot), liquid nails(home depot), Bucket silicone caulk(home depot), Putty knife Plumber's putty Pipe wrench Channel-lock pliers
Things you might need for the installation: vessel sink, plumber's putty(home depot), liquid nails(home depot), Bucket silicone caulk(home depot), Putty knife Plumber's putty Pipe wrench Channel-lock pliers
WATTS WALL-MOUNT WIDESPREAD BATHROOM FAUCET INSTALLATION
 SKU(s): 940842 WATTS WALL-MOUNT WIDESPREAD BEFORE YOU BEGIN We recommend consulting a professional if you are unfamiliar with installing plumbing fixtures. Signature Hardware accepts no liability for any
LUDGATE SINGLE HOLE FAUCET INSTALLATION
 SKU(s): 931522 BEFORE YOU BEGIN We recommend consulting a professional if you are unfamiliar with installing plumbing fixtures. Signature Hardware accepts no liability for any damage to the faucet, plumbing,sink,
Installation Manual.
 Installation Manual The Evolution series by InSinkErator is a new standard in sound and grind performance. Featuring exclusive patented SoundSeal and MultiGrind technologies, no food waste disposer grinds
Food Waste Disposer Owner s Manual
 H. WARRANTY TERMS FOR ECOSINK FOOD WASTE DISPOSER Warranty Period: 1 Year Homelektro Ltd. warrants that, with appropriate installation and use, the EcoSink food waste disposer shall be free from defects
Basin Set INSTALLATION INSTRUCTIONS
 P24130-CR, P24130-LV, P24131-CR, P24131-LV, P24400-CR, P24400-LV, P24401-CR, P24401-LV, P24402-CR, P24402-LV, P24500-LV, P24500-TT 1 of 5 INSTALLATION INSTRUCTIONS Thank You For Choosing Kallista We appreciate
How To: PREPARATION REPLACE A KITCHEN SINK
 Skill Level: INTERMEDIATE Give these projects a try if you're a confident DIYer with a good working knowledge of a variety of tools. They can take a day or more to complete. If you can build a birdhouse
Patterson/AMT Inline Circulator Pump Refer to pump manual for General Operating and Safety Instructions.
 Please read and save this Repair Parts Manual. Read this manual and the General Operating Instructions carefully before attempting to assemble, install, operate or maintain the product described. Protect
Tips from the Drain Cleaning Pro s
 Tips from the Drain Cleaning Pro s Here are easy-to-follow instructions on how to unstop clogged drains, toilets and sewers. Read these instructions carefully before undertaking these jobs. If any part
LETA SINGLE HOLE FAUCET INSTALLATION
 SKU(s): 910802 LETA SINGLE HOLE FAUCET INSTALLATION BEFORE YOU BEGIN We recommend consulting a professional if you are unfamiliar with installing plumbing fixtures. Signature Hardware accepts no liability
Food Waste Disposer Instruction Manual
 Food Waste Disposer Instruction Manual NOTE: IMPORTANT: CAUTION: This Food Waste Disposer has been designed to operate on 110-120 Volt, 60 Hz exclusively. Using any other voltage or Hz adversely affects
568X, 587X, 588X Series
 Please read and save this Repair Parts Manual. Read this manual and the General Operating Instructions carefully before attempting to assemble, install, operate or maintain the product described. Protect
Kallista Bath Flip Drain
 P21586 Page 1 of 7 THANK YOU FOR CHOOSING KALLISTA We appreciate your commitment to Kallista quality products. Please take a moment to review this manual before you install your Kallista product. If you
WASTE DISPOSER OWNER S GUIDE
 WASTE DISPOSER OWNER S GUIDE NOTE: IMPORTANT: CAUTION: This Food Waste Disposer has been designed to operate on 110-120 Volt, 60 Hz exclusively. Using any other voltage or Hz adversely affects performance.
IB 835. Installation Manual. Integrated Bidet Toilet TABLE OF CONTENTS
 IB 835 Installation Manual Integrated Bidet Toilet Cautions before installation Water supply should have a minimum water pressure of 10 psi For smooth drainage, water pressure must stay at its required
SuperKlean Washdown Products
 February 2012 DURAMIX 8000 INSTALLATION AND MAINTENANCE INSTRUCTIONS **DO NOT THROW AWAY AFTER INSTALLATION** **SAVE AND DISPLAY PROMINENTLY WHERE THIS EQUIPMENT IS USED** WARNING HIGH PRESSURE AND HOT
WIDESPREAD KEEP THIS INSTRUCTION BOOKLET FOR FUTURE REFERENCE
 WIDESPREAD KEEP THIS INSTRUCTION BOOKLET FOR FUTURE REFERENCE Parts Breakdown 1 2 13 3 10 4 5 11 8 6 14 9 12 7 # PART DESCRIPTION PART # 1 Complete Spout Assembly * PS - 2 00-U** 2 Complete Handle Assembly
BUILT-IN DISHWASHER INSTALLATION INSTRUCTIONS
 BUILT-IN DISHWASHER INSTALLATION INSTRUCTIONS PLEASE READ COMPLETE INSTRUCTIONS BEFORE YOU BEGIN LEAVE INSTALLATION INSTRUCTIONS AND USER'S GUIDE WITH OWNER ALL ELECTRIC WIRING AND PLUMBING MUST BE DONE
KITCHEN FAUCET COS-KF222C
 KITCHEN FAUCET COS-KF222C USER S MANUAL & INSTALLATION GUIDE Thank You Thank you for your purchase. We know that you have many brands and products to choose from and we are honored to know that you have
EDGEMERE DUAL CONTROL WIDESPREAD LAVATORY FAUCET INSTALLATION INSTRUCTIONS
 EDGEMERE DUAL CONTROL WIDESPREAD LAVATORY FAUCET INSTALLATION INSTRUCTIONS 0.0 Thank you for selecting American Standard... the benchmark of fine quality for over 00 years. To ensure that your installation
BROEG SINGLE HOLE FAUCET INSTALLATION
 SKU(s): 931283 BEFORE YOU BEGIN We recommend consulting a professional if you are unfamiliar with installing plumbing fixtures. Signature Hardware accepts no liability for any damage to the faucet, plumbing,sink,
Aplos Single Handle Basin Bathroom Faucet
 INSTALLATION MANUAL Aplos Single Handle Basin Bathroom Faucet KEF-15301 www.kraususa.com I toll free: 1.800.775.0703 I 2014-2015 Kraus USA Inc. I REV. August 16, 2016 Thank you for your purchase We would
Caution: Dual-Flex rim
 INSTALLATION Caution: All installation types need to allow room for faucet installation. Ensure adequate clearance behind the basin for your faucet and backsplash, as well as the full range of motion for
Patterson/AMT Inline Circulator Pump Refer to pump manual for General Operating and Safety Instructions.
 Please read and save this Repair Parts Manual. Read this manual and the General Operating Instructions carefully before attempting to assemble, install, operate or maintain the product described. Protect
SUBCOURSE EDITION EN US ARMY ENGINEER SCHOOL PLUMBING FIXTURES (PLUMBING IV)
") SUBCOURSE EDITION EN5113 5 US ARMY ENGINEER SCHOOL PLUMBING FIXTURES (PLUMBING IV) US ARMY PLUMBER MOS 51K SKILL LEVELS 1 AND 2 COURSE PLUMBING FIXTURES (PLUMBING IV) SUBCOURSE NO. EN5113 US Army Engineer
SUBCOURSE EDITION EN5113 5 US ARMY ENGINEER SCHOOL PLUMBING FIXTURES (PLUMBING IV) US ARMY PLUMBER MOS 51K SKILL LEVELS 1 AND 2 COURSE PLUMBING FIXTURES (PLUMBING IV) SUBCOURSE NO. EN5113 US Army Engineer
PAGOSA SINGLE HOLE FAUCET INSTALLATION
 SKU(s): 927330, 927331 BEFORE YOU BEGIN We recommend consulting a professional if you are unfamiliar with installing plumbing fixtures. Signature Hardware accepts no liability for any damage to the faucet,
EDISON DUAL HANDLE VESSEL SINK FAUCET
 SKU(s): 929281 BEFORE YOU BEGIN We recommend consulting a professional if you are unfamiliar with installing plumbing fixtures. Signature Hardware accepts no liability for any damage to the faucet, plumbing,
Patterson/AMT Inline Circulator Pump Refer to pump manual for General Operating and Safety Instructions.
 Please read and save this Repair Parts Manual. Read this manual and the General Operating Instructions carefully before attempting to assemble, install, operate or maintain the product described. Protect
Manual / Handbuch Spare parts list / Ersatzteilliste
 Manual / Handbuch Spare parts list / Ersatzteilliste Equipment Imp.-Exp. GmbH Zitterpappelweg 9 D - 22391 Hamburg Tel.: + 49 40 60009468-0 Fax: + 49 40 536 75 01 E - M a i l : i n f o @ w e s c o - n a
Installation Guide. Install your new sink with step-by-step instructions.
 Installation Guide Install your new sink with step-by-step instructions. Installation Guide Bath Sinks Drop-In Undermount Dual Flex Vessel Drains Bathtubs Freestanding Overflow and Waste Kit Rough-In Kit
CAOL VESSEL SINK FAUCET INSTALLATION
 SKU(s): 926652 CAOL VESSEL SINK FAUCET INSTALLATION BEFORE YOU BEGIN We recommend consulting a professional if you are unfamiliar with installing plumbing fixtures. Signature Hardware accepts no liability
MODEL 6430T, 6460 & 6460T POTATO PEELER
 MODEL 6430T, 6460 & 6460T POTATO PEELER MODEL ML-137602 6430T ML-19630 6460 ML-137604 6460T ML-104562 6460C ML-137606 6460CT 701 S. RIDGE AVENUE TROY, OHIO 45374-0001 FORM 37005 (Apr. 2006) Installation,
Installing the Turbo Floor Model System
 Installing the Turbo Floor Model System Location 1. Locate as close as possible to water supply source. 2. Locate as close as possible to a three-prong grounding receptacle. 3. Locate the System on a smooth
WINE AND BAR SERIES. Sink Installation Kit. For assistance, call ; for UK ; at
 WINE AND BAR SERIES Sink Installation Kit For assistance, call 1.877.306.8930; for UK 0800.031.4069; e-mail at info@newageproducts.com Unpacking Begin by placing the package on a protected flat surface.
I NS T RUC T ION MODEL 4346 MIXER-GRINDER MODEL
 I NS T RUC MODEL 4346 MIXER-GRINDER T ION S MODEL 4346 ML-104658 R.H. Standard Hopper (Without Side Feed Opening) ML-104659 L.H. Standard Hopper (Without Side Feed Opening) ML-104662 R.H. Optional Hopper
Instructions. Certifications Brass w/built-in Stop Valve. Pressure Balance Shower Valve. Tools Required. Important Points.
 Instructions Tools Required Adjustable Wrench Groove Joint Pliers Pipe Wrench Phillips Screwdriver Pipe Tape or Pipe Thread Compound Safety Tips If you solder the joints during installation, the seats,
KD-27A SERIES DISHWASHERS
 KD-27A SERIES DISHWASHERS INSTALLATION INSTRUCTIONS FORM 4171083 (153138) 3-86 THIS PAGE INTENTIONALLY LEFT BLANK BEFORE STARTING: Please read these installation instructions COMPLETELY AND CAREFULLY.
#8 STAINLESS STEEL ELECTRIC MEAT GRINDER OWNER S MANUAL
 #8 STAINLESS STEEL ELECTRIC MEAT GRINDER OWNER S MANUAL ITEM# 337989 Thank you very much for choosing a Kitchener product! For future reference, please complete the owner s record below: Model: Purchase
Installation Instructions. For the 18 Built-In Dishwasher and Front Color Panels
 Installation Instructions For the 18 Built-In Dishwasher and Front Color Panels Printed in USA 154232102 Before You Begin DO NOT INSTALL DISHWASHER UNTIL YOU HAVE READ ALL INSTRUCTIONS. FOR YOUR SAFETY,
569, 570, 571, 572 Series
 Please read and save this Repair Parts Manual. Read this manual and the General Operating Instructions carefully before attempting to assemble, install, operate or maintain the product described. Protect
IMPORTANT INFORMATION. Revised Dishwasher Installation Instructions
 IMPORTANT INFORMATION Revised Dishwasher Installation Instructions To obtain a revised copy of the entire Dishwasher User s Manual, go to www.eurotechappliances.com. SPECIAL EDITION 11-20-02 SAVE THESE
569, 570, 571, 572 Series
 Please read and save this Repair Parts Manual. Read this manual and the General Operating Instructions carefully before attempting to assemble, install, operate or maintain the product described. Protect
Installation Instructions
 Installation Instructions KFN 9855 ide en - CA Installation, repair and maintenance work should be performed by a Miele authorized service technician in accordance with national and local safety regulations
ONE PIECE TOILET LT3. Model: MPN: B0940 INSTALLATION INSTRUCTIONS. Version: 1.0
 Model: MPN: B0940 INSTALLATION INSTRUCTIONS Version: 1.0 READ ALL INSTRUCTIONS BEFORE UNPACKING THE PRODUCT INSTRUCTIONS THAT, IF IGNORED COULD RESULT IN DEATH OR SERIOUS INJURY CAUSED BY INCORRECT HANDLING
HIGH TORQUE GARBAGE DISPOSER
 /2 HP HIGH TORQUE GARBAGE DISPOSER This product may require approval of the relevant regulators and/or the sewerage system operator. Waste disposal must be installed according to AS/NZS 3500.2 requirements.
Pulldown Kitchen Faucet
 P25200 1 of 7 Thank You For Choosing Kallista We appreciate your commitment to Kallista quality products. Please take a moment to review this manual before you install your Kallista product. If you encounter
Installation Instructions
 Installation Instructions Electric Drop-In Range JDS28, JDP39 Questions? Call 800.GE.CARES (800.432.2737) or Visit our Website at: ge.com BEFORE YOU BEGIN Read these instructions carefully and completely.
INSTALLATION INSTRUCTIONS
 INSTALLATION INSTRUCTIONS Fitzgerald 1.28 gpf / 4.8 Lpf 2-Piece Toilet Elongated with Seat - Model# D2205CA101 Round Front with Seat - Model# D2205DA101 Thank you for selecting. To ensure this product
CBT Bowl & wrap replacement
 CBT bowl & wrap replacement 2 CBT BOWL & WRAP REPLACEMENT Revision History rev. level 01_03.14.2012 rev. level 02_03.19.2012 rev. level 03_03.23.2012 rev. level 04_05.30.2013 NOTE: due to the fact that
Fix It. Do all of these:
 Preparation for: Home Repairs Automotive Maintenance Traffic Safety Fix It Do all of these: 1 Den Meeting + homework to complete Takeaways Home repair knowledge and skills A Scout is Helpful 1. Put a Fix
Instructions CH Chrome SS Stainless Steel Certifications. Single Handle, Pull-Down, Kitchen Faucet. Tools Required.
 Instructions *Image may vary slightly from actual product Tools Required Adjustable Wrench Groove Joint Pliers Pipe Wrench Phillips Screwdriver Pipe Tape or pipe thread compound Safety Tips If you solder
installation and operation manual for Hunter Ceiling Fans
 For Your Records and Warranty Assistance Model Name: Catalog/Model No.: Serial No.: Date Purchased: Where Purchased: For reference also attach your receipt or a copy of your receipt to the manual. installation
3/4.8 AERODYNE 3/4.8L CLASS FIVE+
 3/4.8 AERODYNE 3/4.8L CLASS FIVE+ INSTALLATION INSTRUCTIONS VITREOUS CHINA SKIRTED TRAPWAY ONE-PIECE TOILET S-TRAP 305mm K-3869T/K-3869T-S S-TRAP 400mm K-4165T/K-4165T-S Please read these instructions
Owner s Guide and Installation Manual
 For Your Records and Warranty Assistance For reference, also attach your receipt or a copy of your receipt to the manual. Model Name Type 8 Models Owner s Guide and Installation Manual Model No. Catalog
Installation Instructions
 Installation Instructions Outdoor Installation Kit Models AD250 & AW250 Part No. 24097 Qualifications for installation of the kit: You must be able to read and understand all instructions provided with
Welcome! Today s topic: Small Home Repairs. November 14, 2015
 Welcome! Today s topic: Small Home Repairs November 14, 2015 Small Home Repairs Course Presented by Monique Johnson Environmental Green Solutions, LLC Objective Educate homeowners on basic technical skills
Single Lever Pull-Out Kitchen Faucet
 INSTALLATION MANUAL Single Lever Pull-Out Kitchen Faucet KPF-1612 www.kraususa.com I toll free: 1.800.775.0703 I 2014-2015 Kraus USA Inc. I REV. August 16, 2016 Thank you for your purchase We would like
REPRODUCTION NON-MIXING SINK FAUCET
 SKU(s): 905707 BEFORE YOU BEGIN TOOLS AND MATERIALS: We recommend consulting a professional if you are unfamiliar with installing plumbing fixtures. Signature Hardware accepts no liability for any damage
MODEL 4246 MIXER-GRINDER
 MODEL 4246 MIXER-GRINDER 4246S STANDARD (5 HP/1 HP) ML-134220 4246HD HEAVY DUTY (7.5 HP/1 HP) ML-134221 701 S. RIDGE AVENUE TROY, OHIO 45374-0001 937 332-3000 www.hobartcorp.com FORM 34850 (Dec. 2002)
REVE ORDERING INFORMATION NOTES T01-A INSTALLATION INSTRUCTIONS 现代型分体座便器 CONTEMPORARY TWO-PIECE TOILET K-17178T-S/K-17178T-SP
 REVE INSTALLATION INSTRUCTIONS 现代型分体座便器 CONTEMPORARY TWO-PIECE TOILET K-17178T-S/K-17178T-SP Please read these instructions carefully to familiarize yourself with the required tools, materials, and installation
Karess ORDERING INFORMATION NOTES T01-A INSTALLATION INSTRUCTIONS
 Karess INSTALLATION INSTRUCTIONS VITREOUS CHINA TWO-PIECE TOILET S-TRAP 305mm K-5331T-S S-TRAP 400mm K-5471T-S Please read these instructions carefully to familiarize yourself with the required tools,
Electrical cable Water supply tube Fittings for tube Coupler Teflon tape. Hole saw min. 2½" bit
 Installation Parts and Tools Parts not Provided Electrical cable Water supply tube Fittings for tube Coupler Teflon tape Air gap Wire nuts for 6-gauge wiring Hose clamp ⅞" UL approved strain relief Electrical
Solinder Single Lever Basin Faucet
 INSTALLATION MANUAL Solinder Single Lever Basin Faucet KEF-15601 www.kraususa.com I toll free: 1.800.775.0703 I 2013-2014 Kraus USA Inc. Thank you for purchasing Kraus We would like to take this opportunity
INSTALLATION INSTRUCTIONS
 INSTALLATION INSTRUCTIONS St. George / Wyatt / Seagram One-Piece Toilets St. George 1.28 gpf / 4.8 Lpf - Model# D22000C101 Wyatt 1.28 gpf / 4.8 Lpf - Model# D22005C101 Seagram 1.28 gpf / 4.8 Lpf - Model#
HIGH TORQUE GARBAGE DISPOSER
 3/4 HP HIGH TORQUE GARBAGE DISPOSER NOTE: This product may require approval of the relevant regulators and/or the sewerage system operator. Waste disposal must be installed according to AS/NZS 3500.2 requirements.
FOR PRODUCT/WARRANTY REGISTRATION Go to Click on SUPPORT at the top of homepage Click on PRODUCT REGISTRATION
 Salvajor Commercial Disposers For All Models: 75, 00, 50, 200, 300, 500, 750 Models 75-200 Models 300-750 2 Typical Installations & Installation of Cone Bowl or Sink Collar 3 Attaching Disposer to Cone
Central Brass C O M P A N Y. A Division of Pioneer Industries, Inc. Installation Guide
 Central Brass C O M P A N Y A Division of Pioneer Industries, Inc. Installation Guide Slow-Close Two Handle Widespread Lavatory Faucet: 3127-AN1 3127-AVN1 3127-DAN1 3127-DAVN1 This product meets the following
Instructions. 110-KVD-CYSCH-AD-Z Chrome 110-KVD-CYSSS-AD-Z Stainless Steel Certifications. Single Handle, Pull-Down, Kitchen Faucet
 Instructions *Image may vary slightly from actual product Tools Required Adjustable Wrench Groove Joint Pliers Pipe Wrench Phillips Screwdriver Pipe Tape or pipe thread compound Safety Tips If you solder
Silverware Pre-washing System INSTALLATION
 Silverware Pre-washing System INSTALLATION 1 WARNING! Be sure to follow all applicable national and local electrical codes when installing the electrical supply for this system. All field connections must